Excera Technology EP5800VHF Digital Portable Radio User Manual 1
Shenzhen Excera Technology Co., Ltd. Digital Portable Radio 1
User manual

Digital Portable Radio
Digital Portable Radio
Quick Reference Guide
Quick Reference Guide
1
This manual helps you quickly get basic operations of our
digital portable radio.
Before using this product, please read this manual carefully.
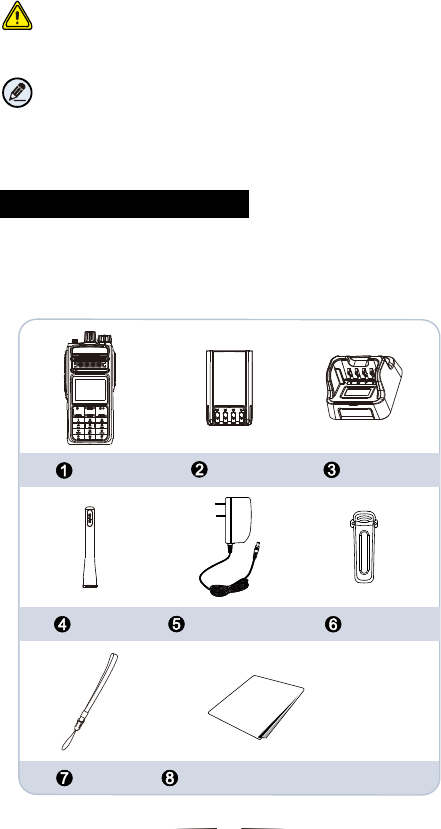
Package Contents
Alert Icon
Caution:
Indicates situations that could cause human injury or
damage to your products.
Note:
Indicates tips that can help you make better use of
your products.
Please unpack carefully and check if all items listed
below are received. If any item is missing or damaged,
please contact your dealer.
Quick Reference
Guide
Radio Battery
Charger
Antenna
Power Adapter Belt Clip
Strap Quick Reference Guide
6
8
9
10
15
7
1
2
3
4
5
11
12
13
14
16
17
18
19
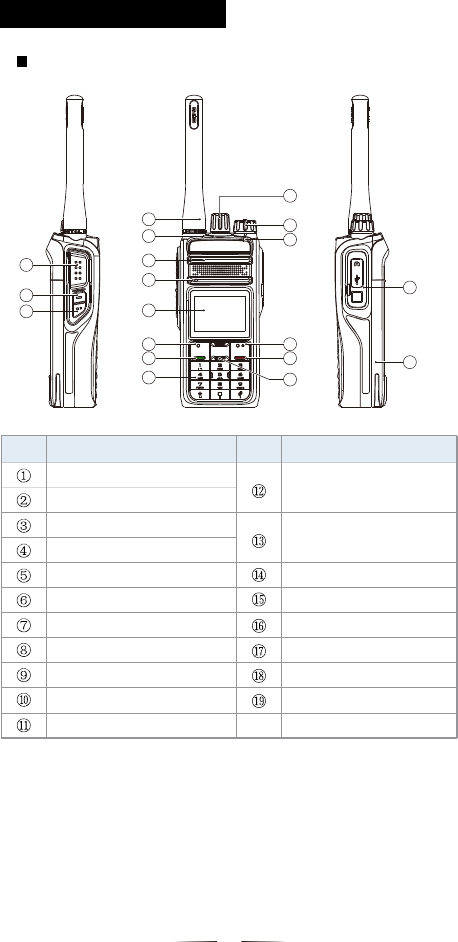
FK1/Answer/Call Key
No. Part Name
PTT Key
Side Key 1 (SK1)
Side Key 2 (SK2)
Antenna
Speaker
Microphone
LCD Display
Menu/OK Key
No. Part Name
Getting Started
Radio Controls
LED Indicator
Channel/
Group Selector Knob
Radio On-Off/
Volume Control Knob
Battery
FK2/End/Home Key
Up/Down Key
Accessory Jack
Numeric Keypad
2
Setting Key/Back Key
Emergency Top Key (TK)
3
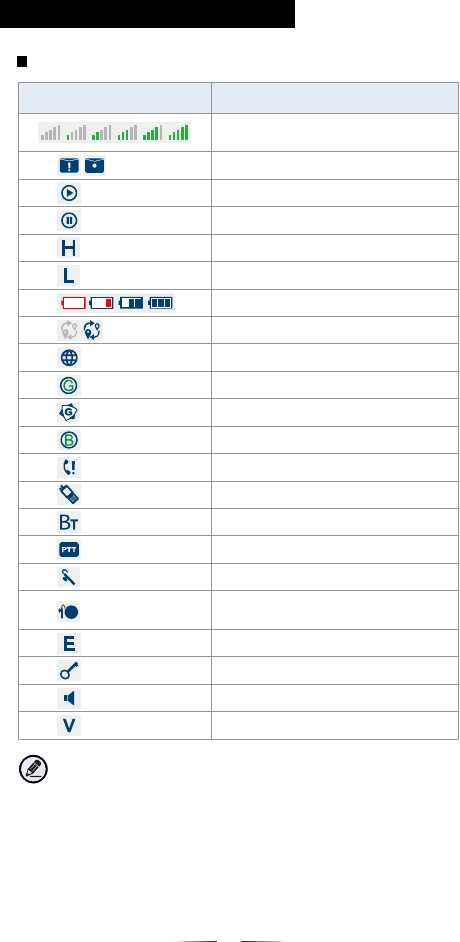
Radio Status Indication
Battery Power
Received Signal Strength
Indicator (RSSI)
New Message /Full Inbox
High Power
Low Power
Roam
Man Down
Scanning
Scan Paused (Conventional)
Missed Call
GPS Located
Bluetooth Disabled
Wireless PTT
Bluetooth Earpiece
Wireless PTT and
Bluetooth Earpiece
Emergency Alarm
LCD Icon
GPS Enabled
GLONASS Located
BDS Located
PTT
Icon Meaning
VOX
Encrypt
Squelch
Note: The LCD icons of different radio models are
different. Due to the technological development, the icons
are subject to change without notice in advance.

LED Indicator
LED Indicator Radio Status
LED flashes green slowly.
LED flashes green rapidly.
LED glows green.
LED flashes red slowly.
LED flashes red rapidly.
LED glows red.
LED flashes orange slowly.
LED flashes orange rapidly.
None
Upgrading or powering on
Receiving
Low battery
None
Transmitting
Scanning
None
4
Locking / Unlocking Keypad
Turning the Radio On/Off
Basic Operations
● Via Key Combination
Locking/Unlocking Keypad by pressing OK key and key.
● Via Programmable Button
Set Keypad Lock key via programmable button. Press the
shortcut key to lock and unlock keypad.
● Via Menu Operation
Procedure:
1. In the home screen, go to “Settings -> Radio Settings ->
Keypad Lock” to select the desired remaining time when
the keypad will be locked.
2. If you select a desired time, the keypad will be locked
automatically if no operation is made within the preset
time period.
Rotate the Radio On-Off/Volume Control knob clockwise or
counterclockwise until a click is heard to turn the radio on/off.
When the keypad is not in use, you can lock the keypad to
prevent accidental keypad operation.
You can use any of the following methods to lock or unlock the
keypad.

5
Adjusting Power Level
Adjusting the Volume
With this option, you may adjust power levels quickly. We
recommend you to adopt low power for battery saving. However,
if you cannot communicate with radios located at a distant place
with low power, please select high power.
You may press the programmed Adjust Power Level key to
adjust power levels.
Selecting a Zone
A zone is a group of channels exhibiting the same property. The
radio supports 32 zones and each zone contains 128 channels
at most.
You can select a zone through any of the following methods.
● Selecting a Zone through Menu
Procedure:
1. In the home screen, press the Menu key to enter the main
menu.
2. Go to “Settings -> Zone”.
3. Use the Up/Down key to go to a desired zone.
4. Press OK key to select the zone.
Selecting a Zone via Programmable Button●
You may quickly toggle to your desired zone by pressing the
programmed Zone Up or Zone Down key.
Selecting a Channel
After turning the radio on, rotate the Channel Selector knob to
select a needed channel. You can also switch to the designated
channel by pressing the Preset Channel key.
If the Channel Notify function is active, you will hear the
corresponding channel number when switching to any channel.
After turning the radio on, rotate the Radio On-Off/Volume
Control knob clockwise to increase the call volume, or
counterclockwise to decrease it.

A group call refers to a call from an individual radio to a group of
radios.
You can make a group call through any of the following methods.
Group Call
6
Switching the Channel Mode
This radio can operate in either digital or analog conventional
mode.
Each channel can be programmed as either analog or digital
channel via the CPS. If the current zone includes a mixture of
analog and digital channels, you may quickly switch between
digital and analog through the Channel Selector knob.
Private Call
Call
A private call is a call from an individual radio to another
individual radio.
You can make a private call through any of the following methods.
To ensure that your speech is clear, keep the microphone 2.5cm
to 5cm from your mouth.
● Making a Call through Contact or Call Log
Procedure:
1. In the home screen, press the Menu key to enter the main
menu.
2. Go to “Contact -> Private Call”, or go to “Call Log” and
access the Missed/Incoming/Outgoing Call list.
3. Use the Up/Down key to select a private call contact you
want to call.
4. Press the PTT key to make the private call.
● Making a Call via Manual Dial
Procedure:
1. In the home screen, press the Menu key to enter the main
menu.
2. Go to “Contact -> Manual Dial”.
3. Input a private call number using the numeric keypad.
4. Press the PTT key to make the call.

An all call is a call from an individual radio to every radio on the
channel.
All Call
Note: The All Call ID is fixed.
You can make an all call through Contact Menu.
Procedure:
1. In the home screen, press the key to enter the main menu.Menu
2. Go to “Contact -> Group Call”, or go to “Call Log” and access
the Missed/Incoming/Outgoing Call list.
3. Use the to select the all call contact. Up/Down Key
4. Press to make the call.the PTT key
Emergency Call
Emergency call is used to summon help in emergency situations.
To enable this feature on a channel, you should associate this
channel with an emergency system using the CPS.
7
● Making a Call through Contact Menu
Procedure:
1. In the home screen, press the key to enter the main Menu
menu.
2. Go to “Contact -> Group Call”, or go to “Call Log” and
access the Missed/Incoming/Outgoing Call list.
3. Use the to select a group call contact you Up/Down Key
want to call.
4. Press to make the call. the PTT key
● Making a Call via Manual Dial
Procedure:
1. In the home screen, press the key to enter the main Menu
menu.
2. Go to “Contact -> Manual Dial”.
3. Press the key to switch to the group call dial screen.
4. Input a group call number using the numeric keypad.
5. Press to make the call. the PTT key

8
To transmit a call on an analog channel, press the PTT key and
speak into the microphone.
To receive a call on an analog channel, release the PTT key.
Transmitting or Receiving a Call on Analog Channel
The purpose of Transmit Time-Out is to prevent any user from
occupying a channel for an extended period. If the preset time
expires, the radio will automatically terminate the transmission
and sound alert tones that will disappear when the PTT key is
released.
You may set the time via the CPS.
Transmit Time-Out

Major Technical Specification
RF Specification
Support Frequency Range:
136MHz~174MHz
Permitted frequency range:
*1
136MHz~174MHz
Rated Output Power:
High Power: 5W
Low Power: 1W
Modulation Type:
Analog:
FM
Digital :
4FSK
Supported Digital Protocol: *2
DMR
Channel Separation:
Analog:
12.5kHz
Digital :
6.25kHz
12.5kHz
Emission Designator: *3
Analog:
11K0F3E
Digital:
7K60FXW, 7K60FXD
Support data rate:
9.6kbps
Antenna Type:
External
Bluetooth
Version:
Supported BT4.0+BLE
Modulation:
GFSK
Operation frequency:
2402MHz~2480MHz
Channel number:
40
Channel separation:
2MHz
Antenna type:
Integral
Antenna gain:
0 dBi
Bluetooth
Version:
Supported BT4.0+EDR
Modulation:
GFSK, π/4DQPSK, 8DPSK
Operation frequency:
2402MHz~2480MHz
Channel number:
79
Channel separation:
1MHz
Antenna type:
Integral
Antenna gain:
0 dBi
FCC Statement
This device complies with Part 15 of the FCC Rules. Operation is subject to the following two conditions:
(1) This device may not cause harmful interference, and
(2) This device must accept any interference received, including interference that may cause undesired operation.
NOTE 1: This equipment has been tested and found to comply with the limits for a Class B digital device, pursuant to
part 15 of the FCC Rules. These limits are designed to provide reasonable protection against harmful interference in a
residential installation. This equipment generates, uses and can radiate radio frequency energy and, if not installed
and used in accordance with the instructions, installed and used in accordance with the instructions, may cause
harmful interference to radio communications. However, there is no guarantee that interference will not occur in a
particular installation. If this equipment does cause harmful interference to radio or television reception, which can be
determined by turning the equipment off and on, the user is encouraged to try to correct the interference by one or
more of the following measures:
- Reorient or relocate the receiving antenna.
- Increase the separation between the equipment and receiver.
-Connect the equipment into an outlet on a circuit different from that to which the receiver is connected.
-Consult the dealer or an experienced radio/TV technician for help.
NOTE 2: Any changes or modifications to this unit not expressly approved by the party responsible for compliance
could void the user's authority to operate the equipment.
Warning!
This portable radio generates RF electromagnetic energy during transmit mode. This radio is designed for and
classified as “Occupational Use Only,” meaning it must be used only during the course of employment by individuals
aware of the hazards and the ways to minimize such hazards. This radio is NOT intended for use by the “General
Population” in an uncontrolled environment.
Output power listed is rated conducted. This device must be restricted to work-related operations only in an
Occupational/Controlled RF exposure environment and must operate with a duty factor not exceeding 50%. This
transmitter may operate with the antenna(s) documented in this filing in Push-to-Talk and body-worn configurations.
RF exposure compliance is limited to the specific belt-clip and accessory configurations as documented in this filing
and the separation distance between user and the device or its antenna shall be at least 2.5 cm. All qualified
end-users of this device must have the knowledge to control their exposure conditions and/or duration to comply with
occupational/controlled Exposure limit and requirements. The highest reported SAR values for Face-held and body-
worn are 1.93W/Kg and 1.69W/Kg.
This device contains Bluetooth, BLE and Two Way Radio transmitters.