Exmark Commercial 21 Users Manual
!! Exmark-5 Exmark Lawn Mower Manuals - Lawn Mower Manuals – The Best Lawn Mower Manuals Collection
COMMERCIAL 21 to the manual 9cd34505-5959-43a6-9f65-ed1ad2819bc5
2015-02-04
: Exmark Exmark-Commercial-21-Users-Manual-366878 exmark-commercial-21-users-manual-366878 exmark pdf
Open the PDF directly: View PDF ![]() .
.
Page Count: 40

COMMERCIAL21
ForSerialNos.
312,000,000&Higher
PartNo.4500-927Rev.A
WARNING
CALIFORNIA
Proposition65Warning
Theengineexhaustfromthisproduct
containschemicalsknowntotheStateof
Californiatocausecancer,birthdefects,
orotherreproductiveharm.
Important:Theengineinthisproductisnot
equippedwithasparkarrestermufer.Itisa
violationofCaliforniaPublicResourceCode
(CPRC)Section4442touseoroperatethis
engineonanyforest-covered,brush-covered,
orgrass-coveredlandasdenedinCPRC4126.
Otherstatesorfederalareasmayhavesimilar
laws.
Toacquireasparkarresterforyourunit,seeyour
EngineServiceDealer.
Thissparkignitionsystemcomplieswiththe
CanadianstandardICES-002.Cesystèmed’allumage
parètincelledevèhiculeestconformeàlanorme
NMB-002duCanada.
TheenclosedEngineOwner’sManualis
suppliedforinformationregardingTheU.S.
EnvironmentalProtectionAgency(EPA)and
theCaliforniaEmissionControlRegulationof
emissionsystems,maintenanceandwarranty.
KeepthisengineOwner’sManualwithyourunit.
ShouldthisengineOwner’sManualbecome
damagedorillegible,replaceimmediately.
Replacementsmaybeorderedthroughthe
enginemanufacturer.
Exmarkreservestherighttomakechangesor
addimprovementstoitsproductsatanytime
withoutincurringanyobligationtomakesuch
changestoproductsmanufacturedpreviously.
Exmark,oritsdistributorsanddealers,accept
noresponsibilityforvariationswhichmaybe
evidentintheactualspecicationsofitsproducts
andthestatementsanddescriptionscontained
inthispublication.
©2011ExmarkMfg.Co.,Inc.
IndustrialParkBox808
Beatrice,NE683102
Contactusatwww.Exmark.com.
PrintedintheUSA
AllRightsReserved
Introduction
CONGRATULATIONSonthepurchaseofyour
ExmarkMower.Thisproducthasbeencarefully
designedandmanufacturedtogiveyouamaximum
amountofdependabilityandyearsoftrouble-free
operation.
Thismanualcontainsoperating,maintenance,
adjustment,andsafetyinstructionsforyourExmark
mower.
BEFOREOPERATINGYOURMOWER,
CAREFULLYREADTHISMANUALINITS
ENTIRETY.
Byfollowingtheoperating,maintenance,andsafety
instructions,youwillprolongthelifeofyourmower,
maintainitsmaximumefciency,andpromotesafe
operation.
Ifadditionalinformationisneeded,orshould
yourequiretrainedmechanicservice,contactyour
authorizedExmarkequipmentdealerordistributor.
Exmarkpartsmanualsareavailableonlineat
http://www.exmark.com
AllExmarkequipmentdealersanddistributorsare
keptinformedofthelatestmethodsofservicing
andareequippedtoprovidepromptandefcient
serviceintheeldorattheirservicestations.They
carryamplestockofservicepartsorcansecurethem
promptlyforyoufromthefactory.
AllExmarkpartsarethoroughlytestedandinspected
beforeleavingthefactory,however,attentionis
requiredonyourpartifyouaretoobtainthefullest
measureofsatisfactionandperformance.
Wheneveryouneedservice,genuineExmarkparts,
oradditionalinformation,contactanAuthorized
ServiceDealerorExmarkCustomerServiceandhave
themodelandserialnumbersofyourproductready.
Figure1identiesthelocationofthemodelandserial
numbersontheproduct.Writethenumbersinthe
spaceprovided.
Figure1
1.Modelandserialnumberlocation
ModelNo.
SerialNo.
3

Contents
Introduction...........................................................3
Safety.....................................................................5
SafetyAlertSymbol.........................................5
SafeOperatingPractices..................................5
SafetyandInstructionalDecals.......................9
Specications........................................................11
ModelNumbers.............................................11
Systems..........................................................11
Dimensions....................................................11
ProductOverview.................................................12
Operation..............................................................13
Controls.........................................................13
Pre-Start.........................................................14
OperatingInstructions...................................15
Maintenance..........................................................21
RecommendedMaintenanceSchedule(s)............21
PeriodicMaintenance........................................22
CheckEngineOilLevel..................................22
CheckingtheBladeBrakeClutch(Blade
BrakeClutchOnly).....................................22
ChecktheMowerBlade..................................22
CheckforLooseHardware.............................24
ChecktheBladeBrakeClutchBail
Operation(BladeBrakeClutchUnits
Only)..........................................................24
ServiceAirFilter(KawasakiUnits)..................25
ServiceAirFilter(ECXHNBBC21and
ECXHN21Units)......................................25
ChangeEngineOil.........................................26
ChangeOilFilter(ECXKA21and
ECXKABBC21)........................................27
CheckConditionOfBelt(Self-Propelled
UnitsOnly)................................................27
CheckSparkPlugs..........................................27
EmptyingtheFuelTankandCleaningthe
FuelFilter...................................................28
Adjustments......................................................28
AdjustingtheSelf-PropelDrive
(Self-PropelledUnitsOnly).........................28
AdjustingtheBladeBrakeCable(Blade
BrakeClutchUnitsOnly)............................29
Cleaning............................................................30
CleanGrassBuild-UpUnderDeck.................30
CleaningtheDischargeTunneland
Plug............................................................30
CleaningUndertheBeltCover
(Self-PropelledUnitsOnly).........................30
CleaningtheBladeBrakeClutchShield
(BladeBrakeClutchUnitsOnly).................31
CleaningUndertheCoverPlate(Non-Blade
BrakeClutchUnitsOnly)............................31
WasteDisposal...............................................32
Storage..................................................................33
PreparingtheFuelSystem...............................33
PreparingtheEngine......................................33
GeneralStorageInformation..........................33
RemovingtheLawnMowerfrom
Storage.......................................................33
Troubleshooting....................................................34
4
Safety
Safety
SafetyAlertSymbol
ThislawnmowermeetsorexceedstheConsumer
ProductSafetyCommission(CPSC)bladesafety
requirementsforwalk-behindrotarymowersand
theB71.4specicationsoftheAmericanNational
StandardsInstituteineffectatthetimeofproduction.
Exmarkdesignedandtestedthislawnmowertooffer
reasonablysafeservice;however,failuretocomply
withthefollowinginstructionsmayresultinpersonal
injury.
ThisSafetyAlertSymbol(Figure2)isusedbothin
thismanualandonthemachinetoidentifyimportant
safetymessageswhichmustbefollowedtoavoid
accidents.
Thissymbolmeans:ATTENTION!BECOME
ALERT!YOURSAFETYISINVOLVED!
Figure2
SafetyAlertSymbol
Thesafetyalertsymbolappearsaboveinformation
whichalertsyoutounsafeactionsorsituations
andwillbefollowedbythewordDANGER,
WARNING,orCAUTION.
DANGER:Whitelettering/Redbackground.
Indicatesanimminentlyhazardoussituationwhich,if
notavoided,Willresultindeathorseriousinjury.
WARNING:Blacklettering/Orangebackground.
Indicatesapotentiallyhazardoussituationwhich,if
notavoided,Couldresultindeathorseriousinjury.
CAUTION:Blacklettering/Yellowbackground.
Indicatesapotentiallyhazardoussituationwhich,if
notavoided,Mayresultinminorormoderateinjury.
Thismanualusestwootherwordstohighlight
information.Importantcallsattentiontospecial
mechanicalinformationandNoteemphasizes
generalinformationworthyofspecialattention.
SafeOperatingPractices
Training
•ReadtheOperator’sManualandothertraining
material.Iftheoperator(s)ormechanic(s)can
notreadEnglishitistheowner’sresponsibilityto
explainthismaterialtothem.
•Becomefamiliarwiththesafeoperationofthe
equipment,operatorcontrols,andsafetysigns.
•Alloperatorsandmechanicsshouldbetrained.
Theownerisresponsiblefortrainingtheusers.
•Neverletchildrenoruntrainedpeopleoperate
orservicetheequipment.Localregulationsmay
restricttheageoftheoperator.
•Onlyadultsandmatureteenagersshouldoperate
amower,andevenmatureteenagersshouldhave
adultsupervision.Besureateenager:
1.hasreadandunderstandstheOperator's
Manualandrecognizestherisksinvolved;
2.issufcientlymaturetousecaution;and
3.isofsufcientsizeandweighttooperate
thecontrolscomfortablyandtomanagethe
mowerwithouttakingrisks.
•Theowner/usercanpreventandisresponsible
foraccidentsorinjuriesoccurringtohimselfor
herself,otherpeopleorproperty.
Preparation
•Evaluatetheterraintodeterminewhataccessories
andattachmentsareneededtoproperlyand
safelyperformthejob.Onlyuseaccessoriesand
attachmentsapprovedbyExmark.
•Wearappropriateclothingincludingsafetyglasses,
substantialfootwear,longtrousers,andhearing
protection.DoNotoperatewhenbarefootor
whenwearingopensandals.Longhair,loose
clothingorjewelrymaygettangledinmoving
parts.
CAUTION
Thismachineproducessoundlevelsinexcess
of85dBAattheoperator’searandcancause
hearinglossthroughextendedperiodsof
exposure.
Wearhearingprotectionwhenoperatingthis
machine.
5

Safety
•Inspecttheareawheretheequipmentistobe
usedandremoveallrocks,toys,sticks,wires,
bones,andotherforeignobjectswhichcanbe
thrownbythemachineandmaycausepersonal
injurytotheoperatororbystanders.
DANGER
Incertainconditionsgasolineisextremely
ammableandvaporsareexplosive.
Areorexplosionfromgasolinecanburn
you,others,andcausepropertydamage.
•Fillthefueltankoutdoorsonlevelground,
inanopenarea,whentheengineiscold.
Wipeupanygasolinethatspills.
•Neverrellthefueltankordrainthe
machineindoorsorinsideanenclosed
trailer.
•DoNotllthefueltankcompletely
full.Addgasolinetothefueltankuntil
thelevelis1/4to1/2inch(6–13mm)
belowthebottomofthellerneck.This
emptyspaceinthetankallowsgasoline
toexpand.
•Neversmokewhenhandlinggasoline,and
stayawayfromanopenameorwhere
gasolinefumesmaybeignitedbyspark.
•Storegasolineinanapprovedcontainer
andkeepitoutofthereachofchildren.
•Addfuelbeforestartingtheengine.Never
removethecapofthefueltankoradd
fuelwhenengineisrunningorwhenthe
engineishot.
•Iffuelisspilled,DoNotattempttostart
theengine.Moveawayfromtheareaof
thespillandavoidcreatinganysourceof
ignitionuntilfuelvaporshavedissipated.
•DoNotoperatewithoutentireexhaust
systeminplaceandinproperworking
condition.
DANGER
Incertainconditionsduringfueling,static
electricitycanbereleasedcausingaspark
whichcanignitegasolinevapors.Areor
explosionfromgasolinecanburnyouand
othersandcausepropertydamage.
•Alwaysplacegasolinecontainersonthe
groundawayfromyourvehiclebefore
lling.
•DoNotllgasolinecontainersinsidea
vehicleoronatruckortrailerbedbecause
interiorcarpetsorplastictruckbedliners
mayinsulatethecontainerandslowthe
lossofanystaticcharge.
•Whenpractical,removegas-powered
equipmentfromthetruckortrailerand
refueltheequipmentwithitswheelson
theground.
•Ifthisisnotpossible,thenrefuelsuch
equipmentonatruckortrailerfroma
portablecontainer,ratherthanfroma
gasolinedispensernozzle.
•Ifagasolinedispensernozzlemustbe
used,keepthenozzleincontactwiththe
rimofthefueltankorcontaineropening
atalltimesuntilfuelingiscomplete.
WARNING
Gasolineisharmfulorfatalifswallowed.
Long-termexposuretovaporshascaused
cancerinlaboratoryanimals.Failuretouse
cautionmaycauseseriousinjuryorillness.
•Avoidprolongedbreathingofvapors.
•Keepfaceawayfromnozzleandgas
tank/containeropening.
•Keepawayfromeyesandskin.
•Neversiphonbymouth.
•Checkthattheoperator'spresencecontrols,
safetyswitches,andshieldsareattachedand
functioningproperly.DoNotoperateunlessthey
arefunctioningproperly.
6

Safety
Operation
WARNING
Operatingengineparts,especiallythemufer,
becomeextremelyhot.Severeburnscanoccur
oncontactanddebris,suchasleaves,grass,
brush,etc.cancatchre.
•Allowengineparts,especiallythemufer,to
coolbeforetouching.
•Removeaccumulateddebrisfrommuferand
enginearea.
•Installandmaintaininworkingordera
sparkarresterbeforeusingequipment
onforest-covered,grass-covered,or
brush-coveredunimprovedland.
WARNING
Engineexhaustcontainscarbonmonoxide,
whichisanodorlessdeadlypoisonthatcankill
you.
DoNotrunengineindoorsorinasmallconned
areawheredangerouscarbonmonoxidefumes
cancollect.
•Operateonlyindaylightorgoodarticiallight,
keepingawayfromholesandhiddenhazards.
•Starttheenginecarefullyaccordingtoinstructions
withfeetwellawayfromtheblade.
•Neverraisedeckwithbladerunning.
•Neveroperatethemowerwithdamagedguards,
shields,orcovers.Alwayshavesafetyshields,
guards,switchesandotherdevicesinplaceandin
properworkingcondition.
•Nevermowwiththedischargedoorraised,
removedoralteredunlessthereisagrass
collectionsystemormulchkitinplaceand
workingproperly.
•Grasscatchercomponentsaresubjecttowear,
damageanddeterioration,whichcouldexpose
movingpartsorallowobjectstobethrown.
Frequentlycheckthecomponentsandreplace
themwiththemanufacturer’srecommendedparts
whennecessary.
•DoNotchangetheenginegovernorsettingor
overspeedtheengine.
•Neverattempttomakewheelheightadjustments
whiletheengineisrunning.
•Parkthemachineonlevelground.Stopengine,
waitforallmovingpartstostop,andremovethe
sparkplugwire(s).
–Beforechecking,cleaningorworkingonthe
mower.
–Afterstrikingaforeignobjectorabnormal
vibrationoccurs(inspectthemowerfor
damageandmakerepairsbeforerestarting
andoperatingthemower).
–Beforeclearingblockages.
–Wheneveryouleavethemower.
•Stopengine,waitforallmovingpartstostop:
–Beforerefueling.
–Beforedumpingthegrasscatcher.
–Beforemakingheightadjustments.
WARNING
Hands,feet,hair,clothing,oraccessoriescan
becomeentangledinrotatingparts.Contact
withtherotatingpartscancausetraumatic
amputationorseverelacerations.
•DoNotoperatethemachinewithout
guards,shields,andsafetydevicesinplace
andworkingproperly.
•Keephands,feet,hair,jewelry,orclothing
awayfromrotatingparts.
•Keepclearofthedischargeopeningatalltimes.
•Thismowerwasdesignedforoneoperator
only.Keepallothersawayfrommowerduring
operation.
•DONOToperatethemowerwhenpeople,
especiallychildren,orpetsareinthearea.
•Bealert,slowdownandusecautionwhen
makingturns.Lookbehindandtothesidebefore
changingdirections.
•Stoptheblades,slowdown,andusecaution
whencrossingsurfacesotherthangrassandwhen
transportingthemowertoandfromtheareato
bemowed.
•Beawareofthemowerdischargepathanddirect
dischargeawayfromothers.
•DoNotoperatethemowerundertheinuence
ofalcoholordrugs.
7

Safety
•Useextremecarewhenloadingorunloadingthe
machineintoatrailerortruck.
•Usecarewhenapproachingblindcorners,shrubs,
trees,orotherobjectsthatmayobscurevision.
SlopeOperation
UseExtremecautionwhenmowingand/orturning
onslopesaslossoftractionand/ortip-overcould
occur.Theoperatorisresponsibleforsafeoperation
onslopes.
DANGER
Operatingonwetgrassorsteepslopescan
causeslidingandlossofcontrol.Lossofcontrol
and/orlossofoperator'sfootingcouldresultina
fallwithanarmorleggettingunderthemower
orenginedeckwhichmayresultinseriousinjury,
deathordrowning.
•Mowacrossslopes,neverupanddown.
•DoNotmowslopeswhengrassiswet.
•DoNotmowneardrop-offsornearwater.
•DoNotmowexcessivelysteepslopes.
•Reducespeedanduseextremecautionon
slopes.
•Avoidsuddenturnsorrapidspeedchanges.
•Whenfeasible,avoidoperatingtheequipmentin
wetgrass.
•Progressivelygreatercareisneededastheslope
increases.
•Removeormarkobstaclessuchasrocks,tree
limbs,etc.fromthemowingarea.Tallgrasscan
hideobstacles.
•Watchforditches,holes,rocks,dipsandrisesthat
changetheoperatingangle,asroughterraincould
overturnthemachine.
•Useextremecarewithgrasscatchersor
attachments.Thesecanchangethestabilityofthe
machineandcauselossofcontrol.
MaintenanceandStorage
•Stoptheengineandremovethesparkplug
wire(s).Waitforallmovementtostopbefore
adjusting,cleaningorrepairing.
•Keepengineandengineareafreefrom
accumulationofgrass,leaves,excessivegrease
oroil,andotherdebriswhichcanaccumulate
intheseareas.Thesematerialscanbecome
combustibleandmayresultinare.
•LetenginecoolbeforestoringandDoNotstore
nearameoranyenclosedareawhereopenpilot
lightsorheatappliancesarepresent.
•Shutofffuelwhilestoringortransporting.Do
Notstorefuelnearamesordrainindoors.
•Parkmachineonlevelground.Neverallow
untrainedpersonneltoservicemachine.
•Removesparkplugwirebeforemakingany
repairs.
•Usecarewhencheckingblades.Wraptheblade(s)
orweargloves,andusecautionwhenservicing
them.Onlyreplacedamagedblades.Never
straightenorweldthem.
•Keephandsandfeetawayfrommovingparts.
Ifpossible,DoNotmakeadjustmentswiththe
enginerunning.
•Keepallguards,shieldsandallsafetydevicesin
placeandinsafeworkingcondition.
•Checkallboltsfrequentlytomaintainproper
tightness.
•Frequentlycheckforwornordeteriorating
componentsthatcouldcreateahazard.
WARNING
Removingstandardoriginalequipmentparts
andaccessoriesmayalterthewarranty,traction,
andsafetyofthemachine.Failuretouseoriginal
Exmarkpartscouldcauseseriousinjuryor
death.Makingunauthorizedchangestothe
engine,fuelorventingsystem,mayviolateEPA
andCARBregulations.
Replaceallpartsincluding,butnotlimitedto,
tires,belts,blades,andfuelsystemcomponents
withoriginalExmarkparts.
8
Safety
SafetyandInstructionalDecals
•Keepallsafetysignslegible.Removeallgrease,
dirtanddebrisfromsafetysignsandinstructional
labels.
•Replaceallworn,damaged,ormissingsafety
signs.
•Whenreplacementcomponentsareinstalled,be
surethatcurrentsafetysignsareafxedtothe
replacedcomponents.
•Ifanattachmentoraccessoryhasbeeninstalled,
makesurecurrentsafetysignsarevisible.
•Newsafetysignsmaybeobtainedfrom
yourauthorizedExmarkequipmentdealeror
distributororfromExmarkMfg.Co.Inc.
•Safetysignsmaybeafxedbypeelingoffthe
backingtoexposetheadhesivesurface.Apply
onlytoaclean,drysurface.Smoothtoremove
anyairbubbles.
•Familiarizeyourselfwiththefollowingsafetysigns
andinstructionlabels.Theyarecriticaltothesafe
operationofyourExmarkcommercialmower.
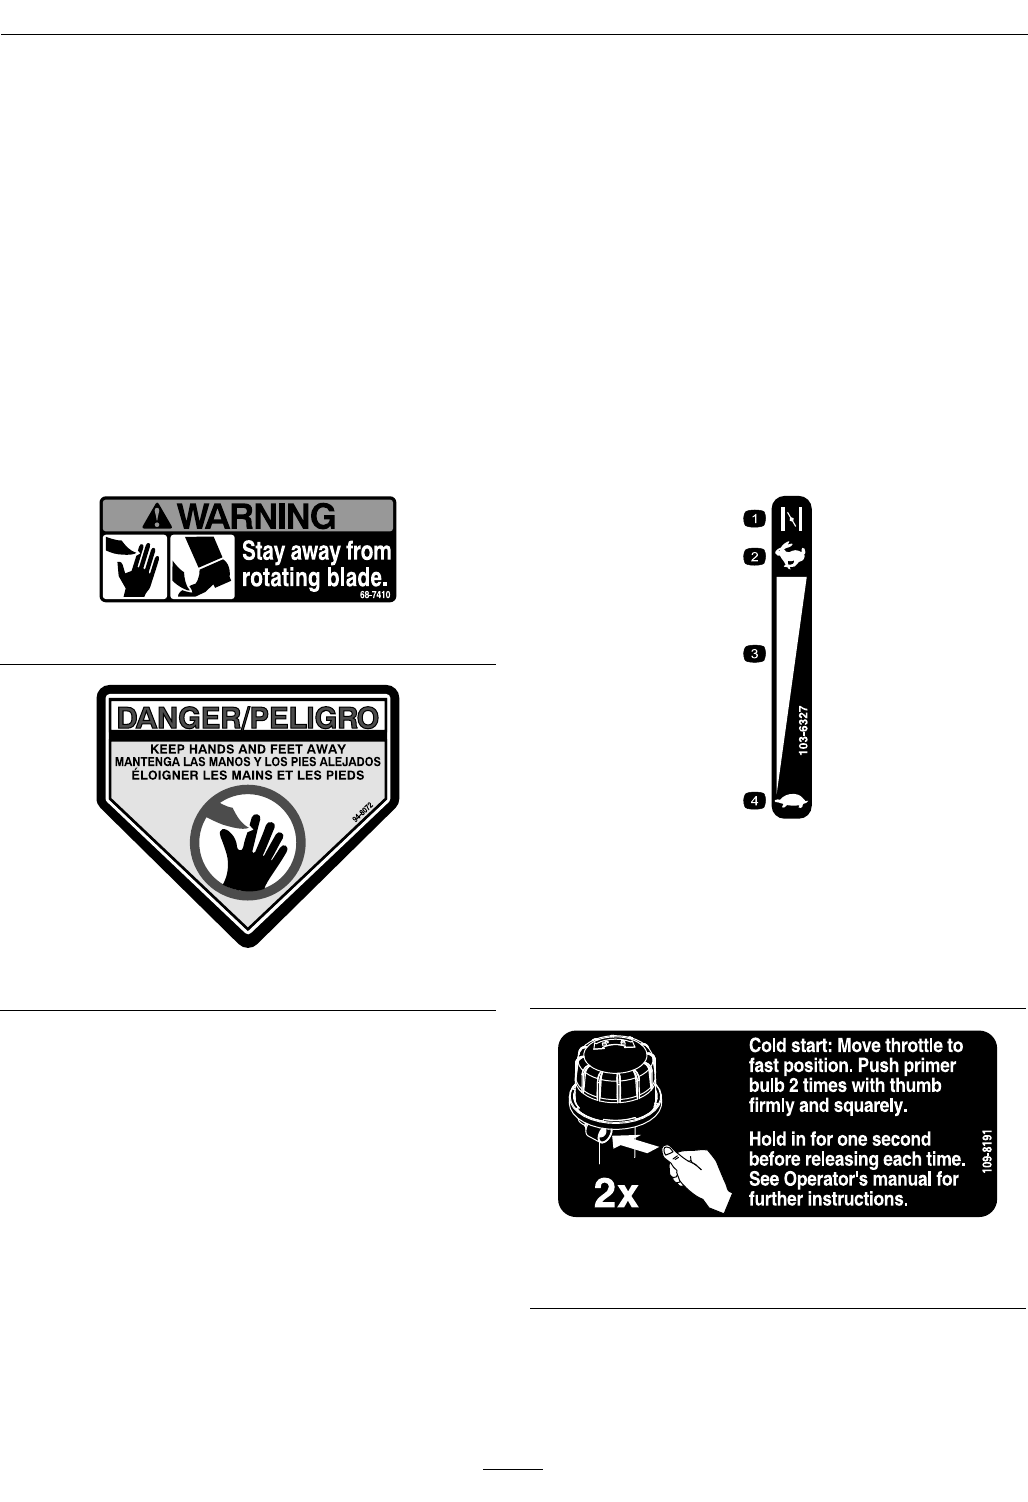
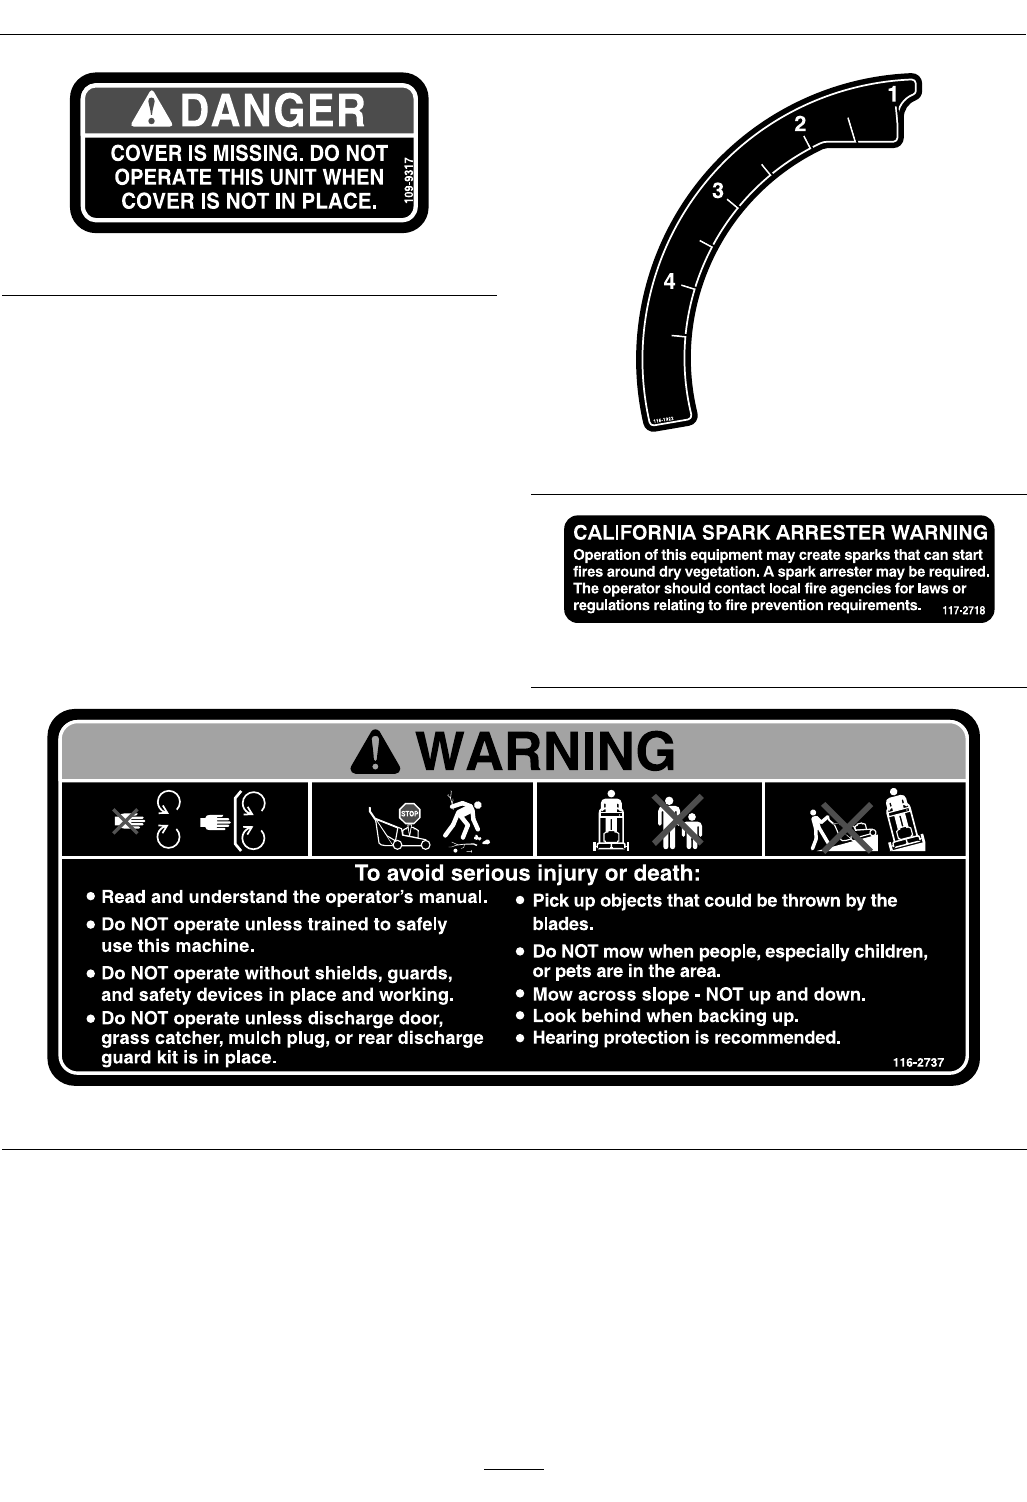
68-7410
94-8072
103-6327
ECXHN21
1.Choke–on
2.Throttle–fast
3.Continuousvariablesetting
4.Throttle–slow
109-8191
ECXKABBC21,ECXKA21
9
Safety
109-9317
116-1922
117–2718
116-2737
10

Specications
Specications
ModelNumbers
SerialNos:312,000,000andHigher
ECSKAP21;ECSKA21;ECXKA21;ECXHN21;ECXKABBC21;ECXHNBBC21
Systems
Engine
•EngineSpecications:SeeyourEngineOwner’s
Manual
•EngineOilType:Exmark4–CyclePremium
EngineOil
•RPM:3300RPM(NoLoad)
FuelSystem
•Capacity:
ECSKA21andECSKAP21Units:
2.0qt(1.9L)
Allotherunits:4.0qt(3.8L)
•FuelRecommendations:
–Forbestresults,useonlyclean,fresh,unleaded
gasolinewithanoctaneratingof87orhigher
((R+M)/2ratingmethod).
–Oxygenatedfuelwithupto10%ethanolor
15%MTBEbyvolumeisacceptable.
–DoNotuseethanolblendsofgasoline(such
asE15orE85)withmorethan10%ethanol
byvolume.Performanceproblemsand/or
enginedamagemayresultwhichmaynotbe
coveredunderwarranty.
–DoNotusegasolinecontainingmethanol.
–DoNotstorefueleitherinthefueltankor
fuelcontainersoverthewinterunlessafuel
stabilizerisused.
–DoNotaddoiltogasoline.
•FuelFilter:Non-replaceable,intank
•FuelShut-OffValve:
ECSKA21andECSKAP21UnitsDoNothavea
shut-offvalve.
Allotherunitshaveashut-offvalve.
SafetyInterlockSystem
ForunitswithoutaBladeBrakeClutch:Operator
musthavethebladecontrolbaildepressedtostart
theengine.Releasingthebladecontrolbailwillcause
theenginetostop.
Transmission(SelfPropelledUnits)
Variable
SpeedRange:0–4.2mph(6.8km/hr)
CuttingDeck
•CuttingWidth:21inches(53.3cm)
•BladeBrake:Whenthebladeengagementcontrol
ismovedtothedisengagedpositionafriction
brakepadstopstherotationoftheblades.
•BladeSize:(1ea.):20.88inches(53.0cm)
•Deck:21inchesrigid.Deckdesignallowsfor
bagging,mulchingorreardischarge.
•CuttingHeightAdjustment:
Adjustsfrom1inch(2.5cm)to41/2inches(11.4
cm)in1/2inch(1.3cm)increments.
•MulchingKit:StandardonECXKA21;
ECXHN21;ECXKABBC21,and
ECXHNBBC21Units
Dimensions
CurbWeight:
98-122lb(44-55kg)Weightsmayvaryslightly
dependingonengineoption.
OverallWidth:
22inches(55.9cm)
11
ProductOverview
OverallLengthandHeightat
21/2inchCuttingHeight:
HandleSettingLengthHeight
High61.00inches
(154.9cm)
39.00inches(99.1
cm)
Medium63.00inches
(160.0cm)
37.50inches(95.3
cm)
Low64.50inches
(163.8cm)
35.00inches(88.9
cm)
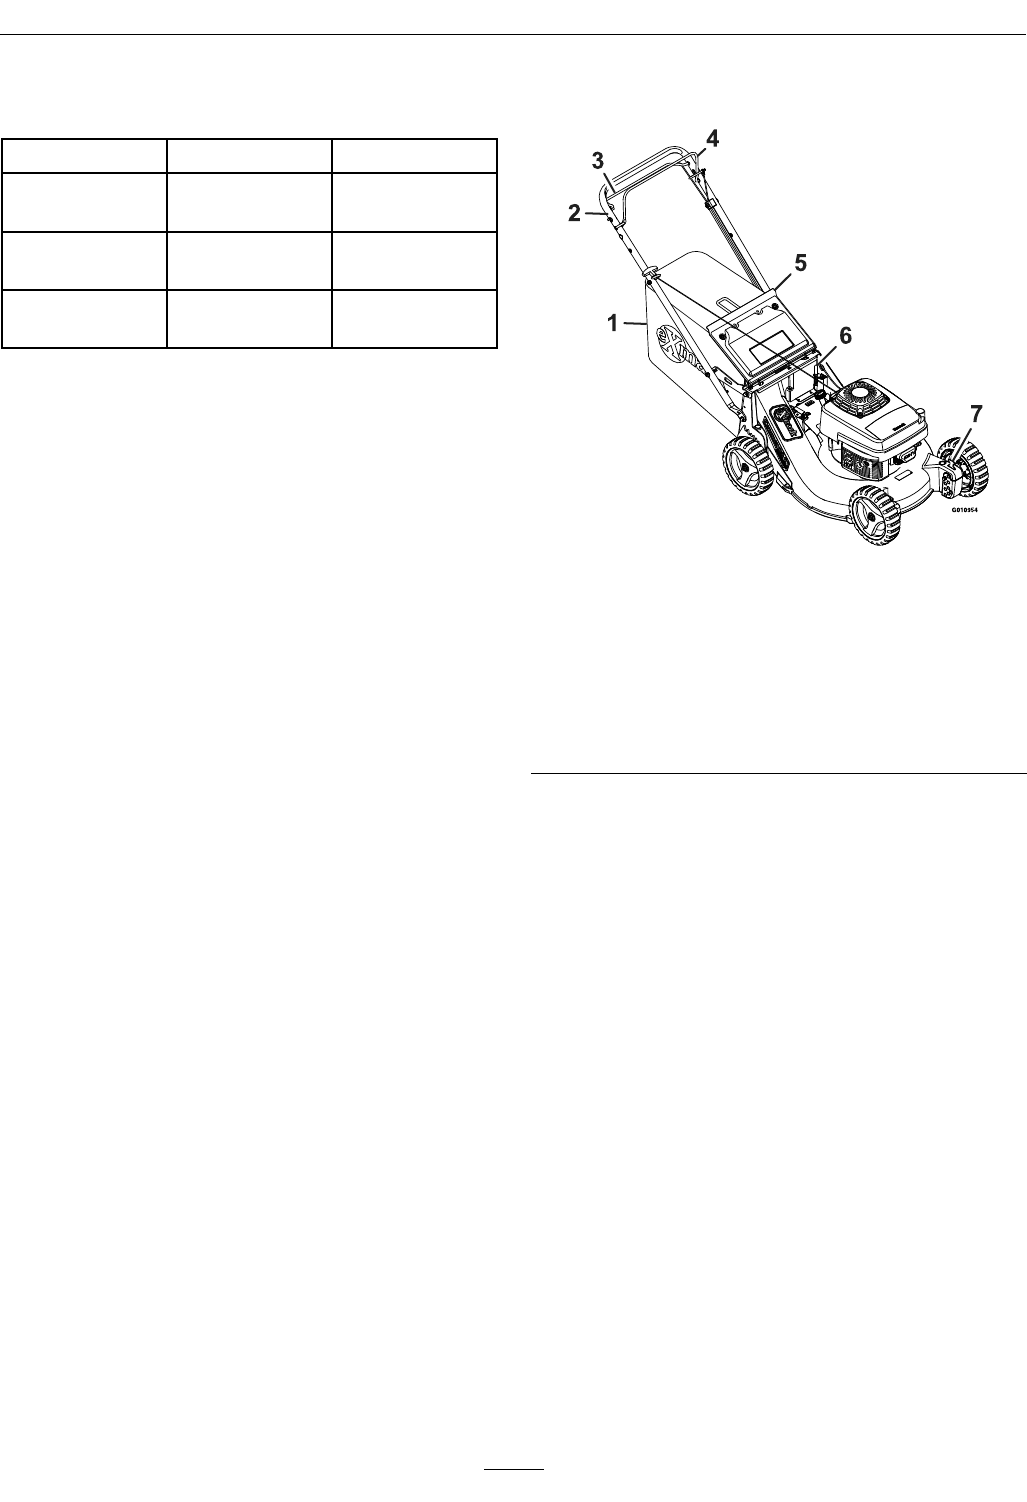
ProductOverview
Figure3
1.Grassbag5.Dischargedoor
2.Handle6.Rearwheelheight
adjustment
3.DriveBail
(Self-PropelledUnits
Only)
7.Frontwheelheight
adjuster
4.BladeControlBail
12
Operation
Operation
Note:Determinetheleftandrightsidesofthe
machinefromthenormaloperatingposition.
Controls
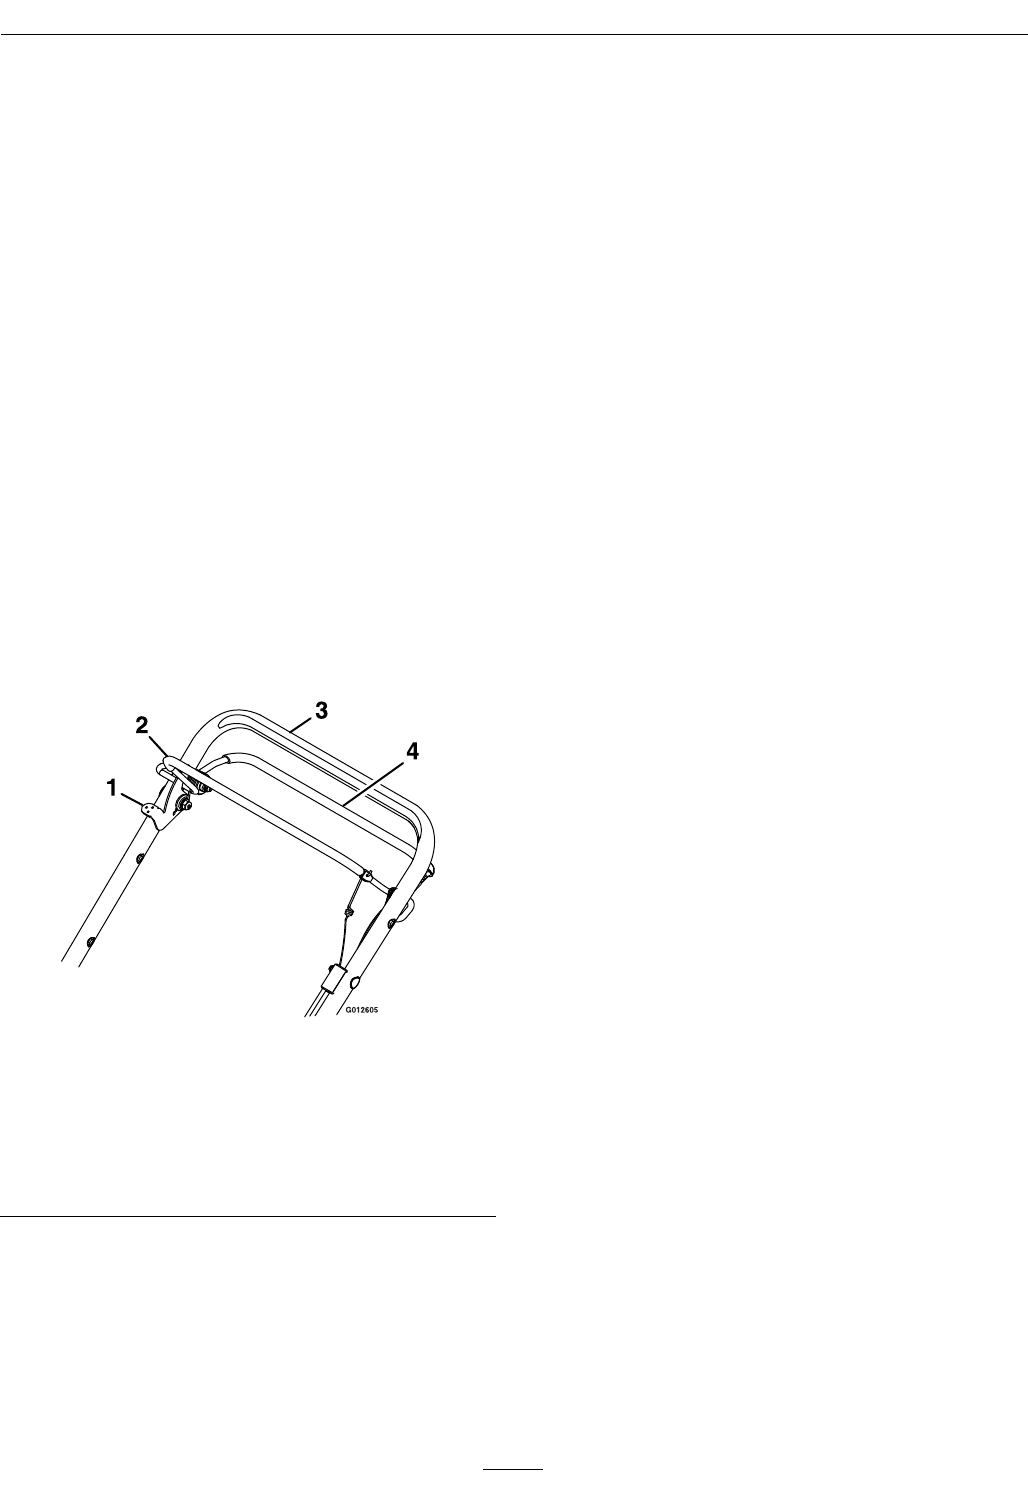
BladeControlBail
LocatedontheupperhandleasshowninFigure4.
Whenthebladecontrolbailisdepressed,thesystem
sensesthattheoperatorisinthenormaloperator's
position.
•ForUnitswithaBladeBrakeClutch:When
thebladecontrolbailisreleased,thesystem
sensesthattheoperatorhasmovedfromthe
normaloperatingpositionandwillstoptheblade.
•ForUnitswithoutaBladeBrakeClutch:
Whenthebladecontrolbailisreleased,thesystem
sensesthattheoperatorhasmovedfromthe
normaloperatingpositionandwillkilltheengine.
Figure4
BladeBrakeUnitShown
1.Bladecontrollocklever(BladeBrakeUnitsOnly)
2.Bladecontrolbail
3.Handle
4.Drivebail(Self-PropelledUnitsOnly)
Self-PropelDriveBail(Self-Propelled
UnitsOnly)
LocatedontheupperhandleasshowninFigure4.
Whentheself-propeldrivebailissqueezed,the
unitwillmoveforwardbasedonhowfarthebail
isdepressedtowardthehandle.Whenthisbailis
releasedtheunitwillstopmoving.
Throttle-ChokeLever(ECXHN21)
Locatedontheleftsideofthehandlebar.
Theleverisusedtocontrolenginespeed.Moving
thethrottletothefullforward(Choke)positionwill
placetheleverinthechokeposition.Thechokeaids
instartingacoldengine.Movingthethrottlecontrol
forwardwillincreaseenginespeedandmovingitto
therearwilldecreaseenginespeed.
ChokeControl(ECXHNBBC21)
Locatedonthefrontleftsideoftheengineasshown
inFigure9.
Thechokeaidsinstartingacoldengine.Pulling
outwardwillplacethecontrolinthechokeposition.
Pushingthecontrolinwardshutsoffthechoke.
BladeControlLockLever(Blade
BrakeClutchUnitsOnly)
Thebladecontrollockleverislocatedontheright
sideofthehandlenexttotheBladeControlBailas
showninFigure4.
Movingthebladecontrollockleverintothefull
forwardpositionreleasesthebladecontrolbail.
Squeezingthebladecontrolbailagainstthehandle
engagestheblade.Releasingthebladecontrolbail
automaticallydisengagestheblade.Thebladecontrol
lockleverwillresettolockthebladecontrolbail.
EngineStopSwitch
Locatedontheleftsideoftheengineinfrontofthe
fueltankasshowninFigure5.Theenginestopswitch
isusedonECXHNBBC21andECXKABBC21(see
Figure9andFigure10).
Presstheswitchto“STOP”tokilltheengine.Press
“|”beforestartingtheengine.
13
Operation
Figure5
Clearplasticcoverremovedforclarity
1.Enginestopswitch
2.Press“STOP”tokillengine
3.Press“I”beforestartingengine
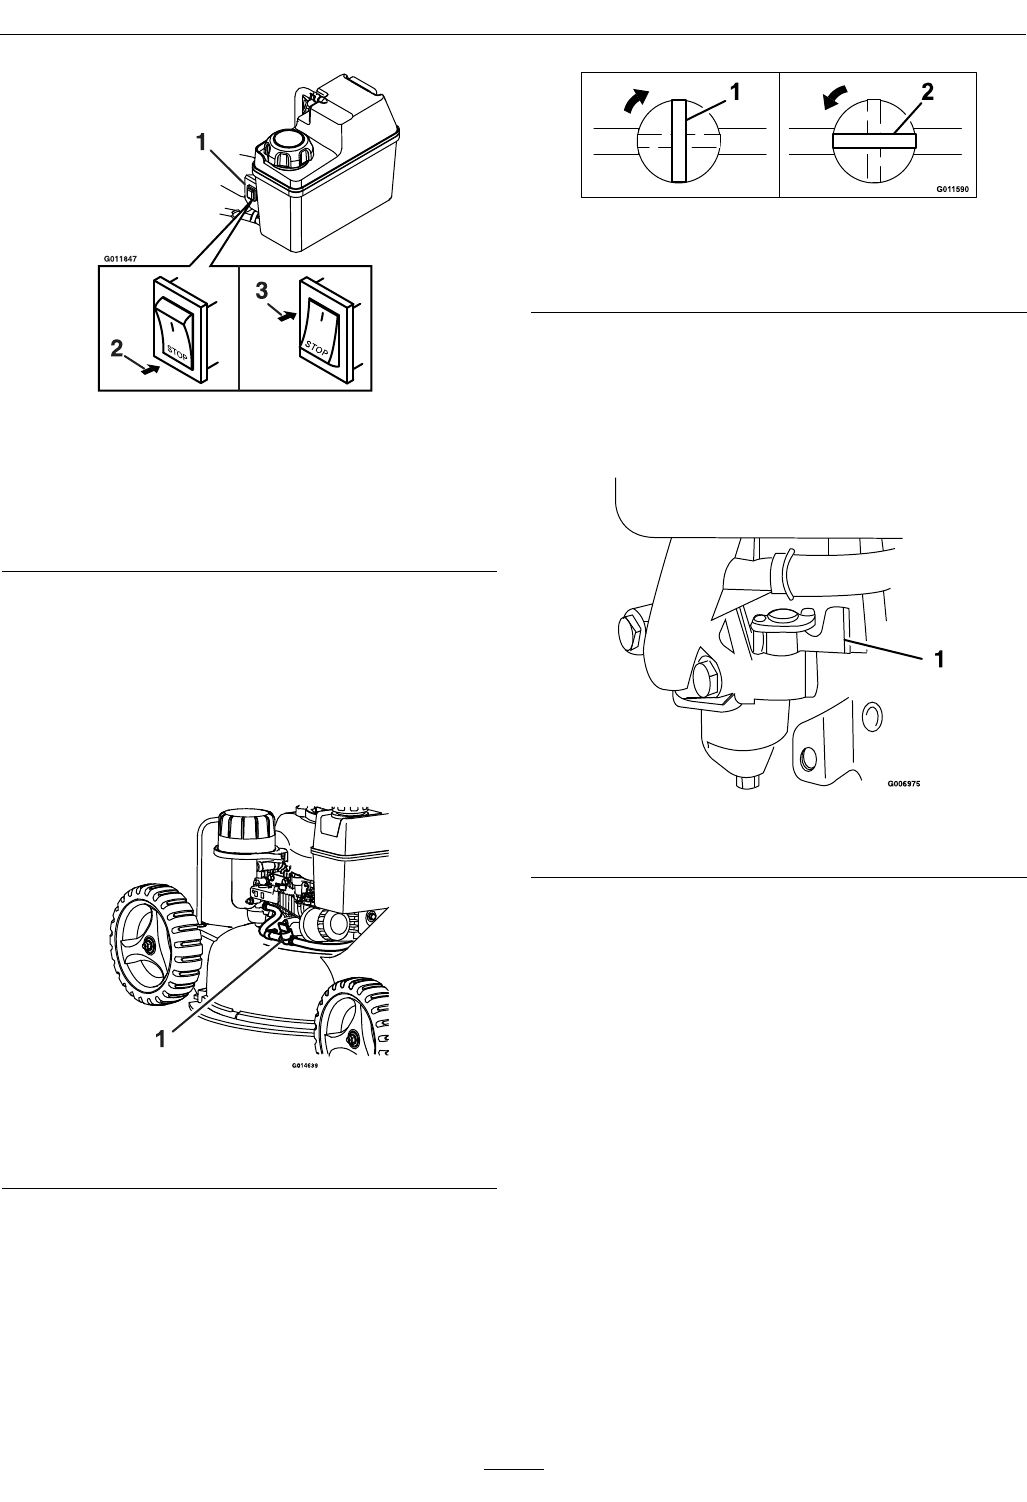
FuelShut-OffValve
Thefuelshutoffvalveislocatedbetweenthe
carburetorandthefueltank.Thefuelshutoffvalve
shutsofftheowoffuelwhenthemachinewill
notbeusedforafewdays,whenparkinginsidea
building,andduringtransporttoandfromthejob.
Figure6
KawasakiUnit
1.Fuelvalve
OnECXKA21andECXKABBC21units,rotatethe
valve1/4turnclockwisetoshutofffuel.Rotatethe
valve1/4turncounterclockwisetoturnonfuel.
Figure7
1.Rotateclockwisetoclose
2.Rotatecounterclockwisetoopen
OnECXHN21andECXHNBBC21units,thefuel
shutoffvalveislocatedontheengineasshownin
Figure8.Rotate1/4turnclockwisetoshutofffuel.
Rotatethevalve1/4turncounterclockwisetoturn
onfuel.
Figure8
1.Fuelvalve
Pre-Start
Fillfueltanks.SeeFuelRecommendationsin
theSpecicationssectionforadditionalgasoline
information.
DoNotaddoiltogasoline.
DoNotoverllfueltank.Fillthefueltanktothe
bottomofthellerneck.Theemptyspaceinthe
tankallowsgasolinetoexpand.Overllingmayresult
infuelleakageordamagetotheengineoremission
system.
Makesureyouunderstandthecontrols,their
locations,theirfunctions,andtheirsafety
requirements.
RefertotheMaintenancesectionandperformallthe
necessaryinspectionandmaintenancesteps.
14
Operation
OperatingInstructions
HandleAdjustment
Theheightofthehandlecanbeadjustedfor
comfortableoperation.Standbehindthehandleto
determinetheheight.Toadjustthehandleheight,
positionthehardwareintooneofthethreeholesin
thehandlebracket.
OpentheFuelShut-OffValve
Rotatethevalve1/4turncounterclockwisetoturn
thefuelon(ifequipped).
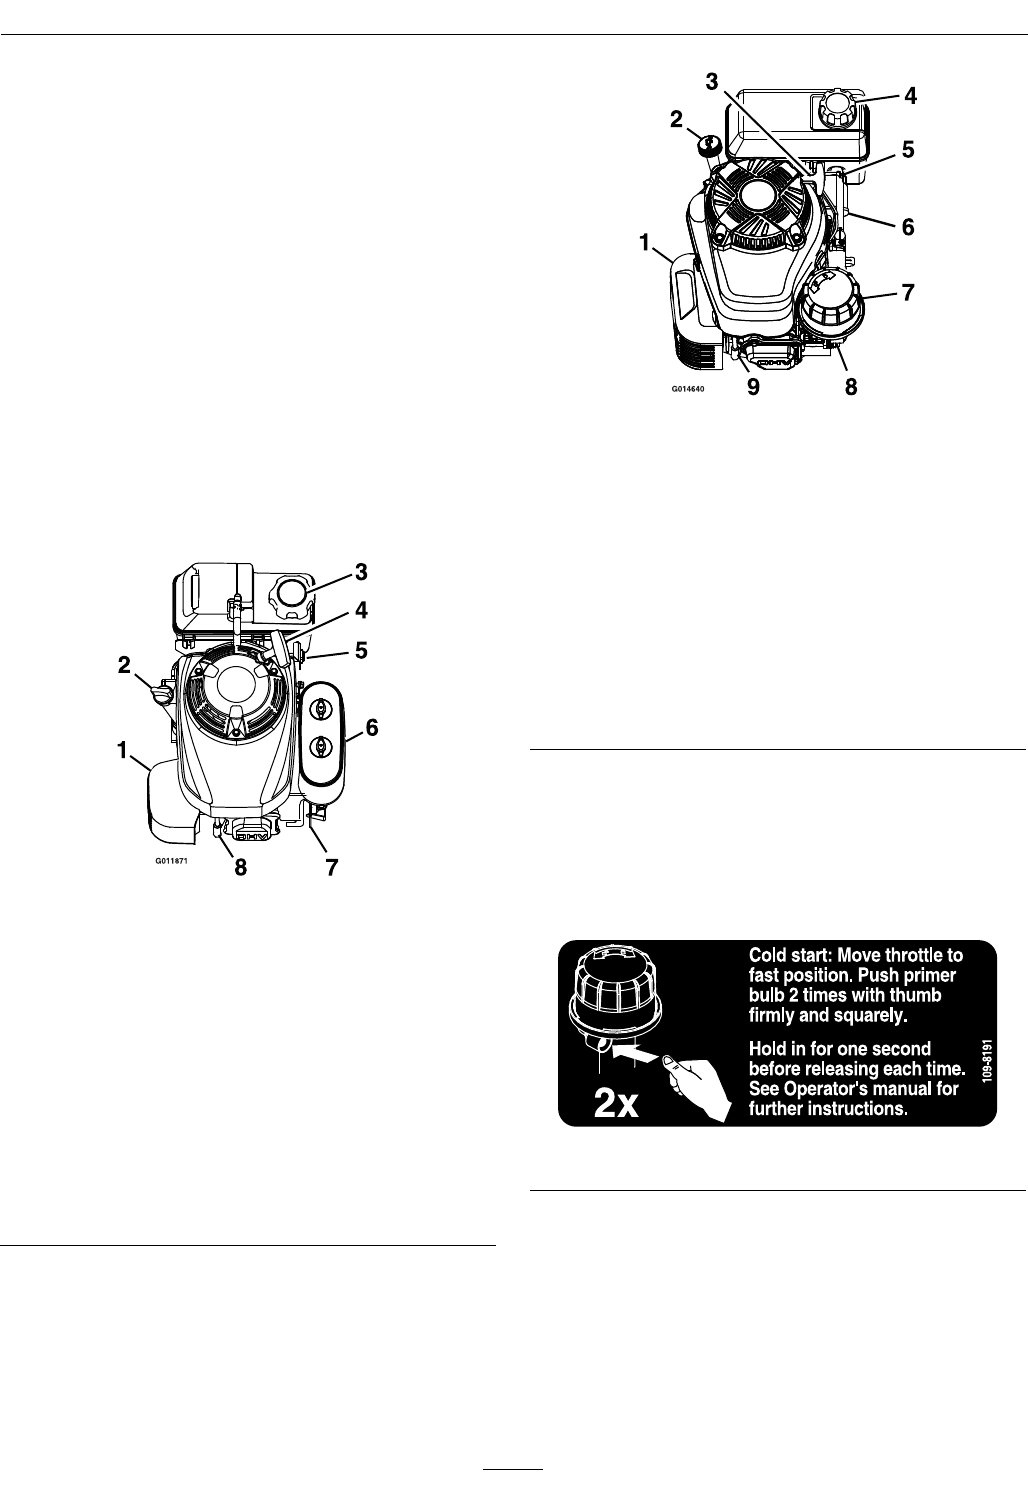
StartingtheEngine
1.Connectthewiretothesparkplug.
Figure9
Hondaunit
1.Mufer
2.Oilll/dipstick
3.Fueltankcap
4.Recoilstarterhandle(locatedonhandlebarforzone
startunits)
5.Enginestopswitch(ifequipped)
6.Airlter
7.Choke(BBConly)
Throttle/Choke(locatedonhandlebarforzone
startunits)
8.Sparkplug
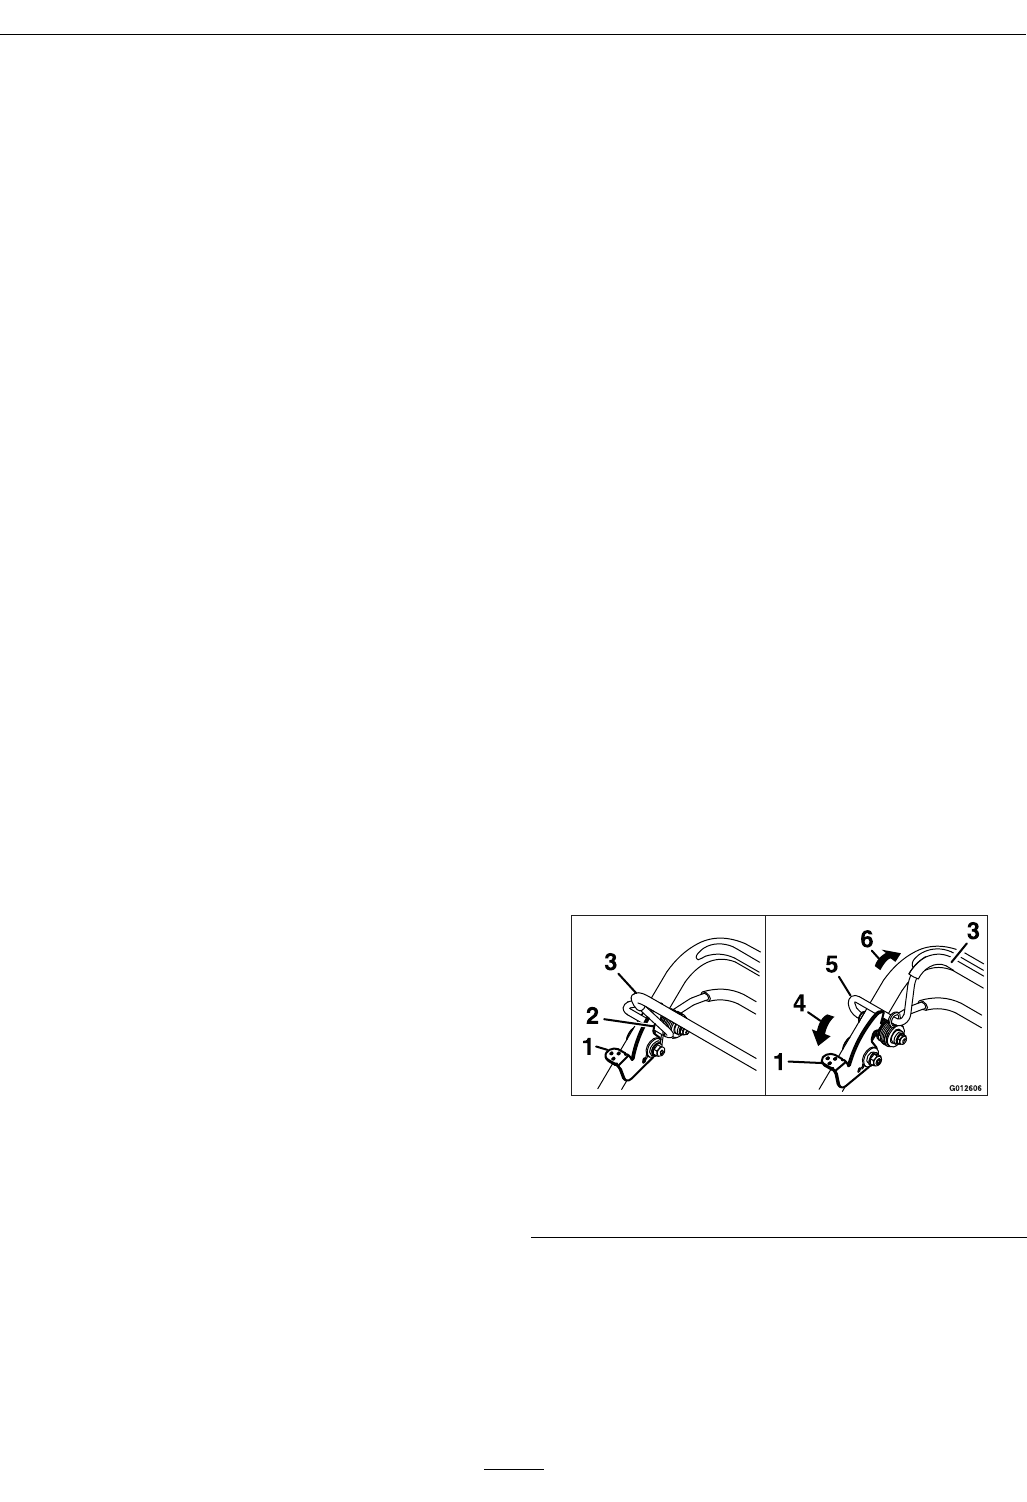
Figure10
Kawasakiunitswithlargefueltankshown
1.Mufer
2.Oilll/dipstick
3.Recoilstarterhandle(locatedonhandlebarforzone
startunits)
4.Fueltankcap(fueltankvaries)
5.Enginestopswitch(ifequipped)
6.Oillter(ifequipped)
7.Aircleaner
8.Primerbulb
9.Sparkplug
2.Openthefuelvalve.
3.ForECXKABBC21Units:Turntheenginestop
switchto“|”(seeFigure5).
4.ForKawasakiUnits:Presstheprimerbulbtwo
times(seeFigure11).
Figure11
ForECXHNBBC21Units:Turntheengine
stopswitchto“|”andpulloutwardonthechoke
control.
ForECXHN21Units:Movethechoke/throttle
controlforwardtothechokeposition.
Note:DoNotusethechokewhentheengine
iswarmedup.
15
Operation
5.ForunitswithoutaBladeBrakeClutch:Hold
thebladecontrolbailtothehandle.
6.Pullthestarterhandlelightlyuntilyoufeel
resistance,thenpullitsharply.Allowtheropeto
returnslowly.
7.ForECXHNBBC21Units:Graduallypushin
thechokecontrolastheenginewarmsup.
8.ForECXHN21Units:Whentheenginestarts,
movethechoke/throttlecontrolbacktothefast
position.
StoppingtheEngine
1.Bringtheunittoafullstop.
•ForunitswithoutaBladeBrakeClutch:
Releasethebladecontrolbail.Boththe
engineandthebladeshouldstopwithinthree
seconds.
•ForunitswithaBladeBrakeClutch:Press
theswitchto“STOP”tokilltheengine(see
Figure5).
Note:Ifthebladedoesnotstopwithin3seconds
afterreleasingthebladecontrolbail,contactan
AuthorizedServiceDealer.
2.Closethefuelshut-offvalve,ifequipped,when
themachinewillnotbeinuseforafewdays,
whentransporting,orwhentheunitisparked
insideabuilding.
OperatingtheSelf-PropelDrive
(Self-PropelledUnitsOnly)
Thelawnmowerisvariablespeed,themoreyou
squeezethedrivebailthefasterthemachinetravels.
1.Starttheengine.
2.Squeezethedrivebailagainstthehandle(see
Figure4).
Note:Youcanvarythegroundspeedby
increasingordecreasingthedistancebetween
thegroundspeedcontrolbailandthehandle.
Lowerthecontrolbailtodecreasetheground
speedwhenyouaremakingaturnorifthelawn
mowerismovingtoofastforyou.Ifyoulower
thecontrolbailtoofarthelawnmowerstops
self-propelling.Squeezethegroundspeedcontrol
bailclosertothehandletoincreasetheground
speed.Whenyouholdthegroundspeedcontrol
bailtightagainstthehandle,thelawnmower
self-propelsatthemaximumgroundspeed.
Releasethedrivebailtostopmovingwhenyou
usethelawnmowerfortrimmingorwhenever
youleavethelawnmower.
3.Todisengagetheself-propeldrive,releasethe
drivebail.
Note:Themowercomeswithfreewheeling
clutcheswhichmakeiteasiertopullthemower
rearward.Todisengagetheclutches,youmay
needtopushthemowerforwardoneinch(2.5
cm)ormoreafteryoureleasetheself-propeldrive
bail.
OperatingtheBladeControlBail
(UnitsWithoutBladeBrakeClutch)
1.Squeezethebladecontrolbailagainstthehandle.
2.Starttheengine.
3.Whenthebladecontrolbailissqueezedagainst
thehandle,thebladeshouldengage.
4.Releasethebladecontrolbail.Boththeengine
andthebladeshouldstop.
OperatingtheBladeControlLever
(BladeBrakeClutchUnitsOnly)
1.Starttheengine.
2.Pushandholdthebladecontrollockleverforward
toreleasethebladecontrolbail(Figure12).
Figure12
1.Bladecontrollocklever4.Pushforward
2.Lockedposition5.Unlockedposition
3.Bladecontrolbail6.Squeezeagainsthandle
3.Squeezethebladecontrolbailagainstthehandle
andreleasethebladecontrollocklever;theblade
shouldengage.
4.Releasethebladecontrolbailtodisengagethe
blade.Thebladecontrollockleverwillresetto
lockthebladecontrolbail.
16
Operation
UsingtheMulchPlug
Occasionallyyoumaywishtousethemulchplugto
mulchthegrassandleafclippingsbackintothelawn.
•InstallingtheMulchPlug:
1.Stoptheengineandwaitforallmovingparts
tostop.
2.Removethegrassbagifitisonthemower.
3.Raisethedischargedoorandinsertthemulch
plugintothedischargeopening.Thelipon
theplugwillsnapintothemowerhousing.
Figure13
1.Mulchplug3.Lip
2.Dischargedoor4.Mowerhousing
4.Lowerthedischargedoor.
•RemovingtheMulchPlug:
Note:Whengrassisthickandlush,clippings
maycollectonandaroundthedischargetunnel
plug.Thismaymakeitdifculttoremovethe
plug.Cleantheplugthoroughlyaftereachuse.
1.Toremovethemulchplug,raisethedischarge
doorandpullthemulchplugoutofthe
dischargetunnel.
2.Lowerthedischargedoor.
CheckingtheBladeBrakeClutch
(BladeBrakeClutchUnitsOnly)
ChecktheBladeBrakeClutch(BBC)systembefore
eachusetoensurethatitisoperatingproperly.
NormalTest:
1.Stoptheengineandwaitforallmovingpartsto
stop.
2.Movethelawnmowerontoapavedsurfacein
anon-windyarea.
3.Setallfourwheelstothe21/2inches(6.4cm)
cuttingheight(seeFigure15andFigure16)
4.Takeahalfsheetofnewspaperandcrumple
itintoballsmallenoughtogounderthedeck
(about3inchesor7.6cmindiameter)asshown
inFigure14.
Figure14
1.Crumplednewspaper2.5inches(12.7cm)
5.Placetheballofnewspaper5inches(12.7cm)in
frontofthelawnmower.
6.Starttheengine.
7.Pushthebladecontrollockleverforwardto
releasethebladecontrolbail(Figure4).
8.Squeezethebladecontrolbailagainstthehandle.
bladeshouldengage.
9.Releasethebladecontrolbail.Youshouldheara
“bang.”Thebladeshouldstopinthreeseconds.
Thebladecontrollocklevershouldresettolock
thebladecontrolbail.
10.Immediatelypushthelawnmoweroverthe
newspaperball.
11.Stoptheengineandwaitforallmovingpartsto
stop.
12.Walkaroundthelawnmowertocheckforthe
newspaperball.Iftheballdidnotgounderthe
deck,repeatsteps6through11.
13.Pullthelawnmowerawayfromthenewspaper.
Ifthenewspaperballunravelsorisshredded,
17
Operation
thebladehasnotproperlystopped,resulting
inanunsafeoperatingcondition.Contactan
AuthorizedServiceDealer.
DANGER
Ifthebladebrakeclutchsystemisinoperative,
thebladewillcontinuetorotatewhenyou
releasethebladecontrolbail.Contactwith
thebladecouldoccur,causingseriousinjury.
•ChecktheBBCoperationbeforeeachuse.
•NeverusetheBBC-equippedlawnmower
withaninoperativesafetysystem.
•TakeyourlawnmowertoanAuthorized
ServiceDealerforrepairifthesafety
systemfailstooperateproperly.
TestUsingtheGrassBag
1.Installtheemptygrassbagonthedischarge
tunnel.
2.Starttheengine.
3.ForunitswithaBladeBrakeClutch:Pushthe
bladecontrollockleverforwardtoreleasethe
bladecontrolbail(Figure4).
4.Squeezethebladecontrolbailagainstthehandle.
5.Thebagshouldbegintoinate,indicatingthat
thebladeisengagedandrotating.
6.Releasethebladecontrolbail.Ifthebagdoesnot
immediatelydeate,itindicatesthatthebladeis
stillrotating.Thebladebrakeclutchmechanism
maybedeteriorating,and,ifignoredcouldresult
inanunsafeoperatingcondition.Havethelawn
mowerinspectedandservicedbyanAuthorized
ServiceDealer.
AdjustingtheCuttingHeight
Therearwheelsareadjustedtogetherwithaheight
adjustmentrodlocatedonthemowerhousingby
theleftrearwheel.Thefrontwheelsareadjusted
separatelybyremovingthefrontwheelshaft
assemblies,adjustingtheheight,andthenreplacing
theshaftassemblies.Thecuttingheightcanbe
adjustedfrom1inch(25mm)to41/2inches(114
mm)in1/2inch(12.7mm)increments.
WARNING
Adjustingthecuttingheightleverscouldbring
yourhandsintocontactwithamovingblade.A
movingbladecancauseseriousinjury.
•Stoptheengineandwaitforallmovementto
stopbeforeadjustingthecuttingheight.
•DoNotputyourngersunderthehousing
whenadjustingthecuttingheight.
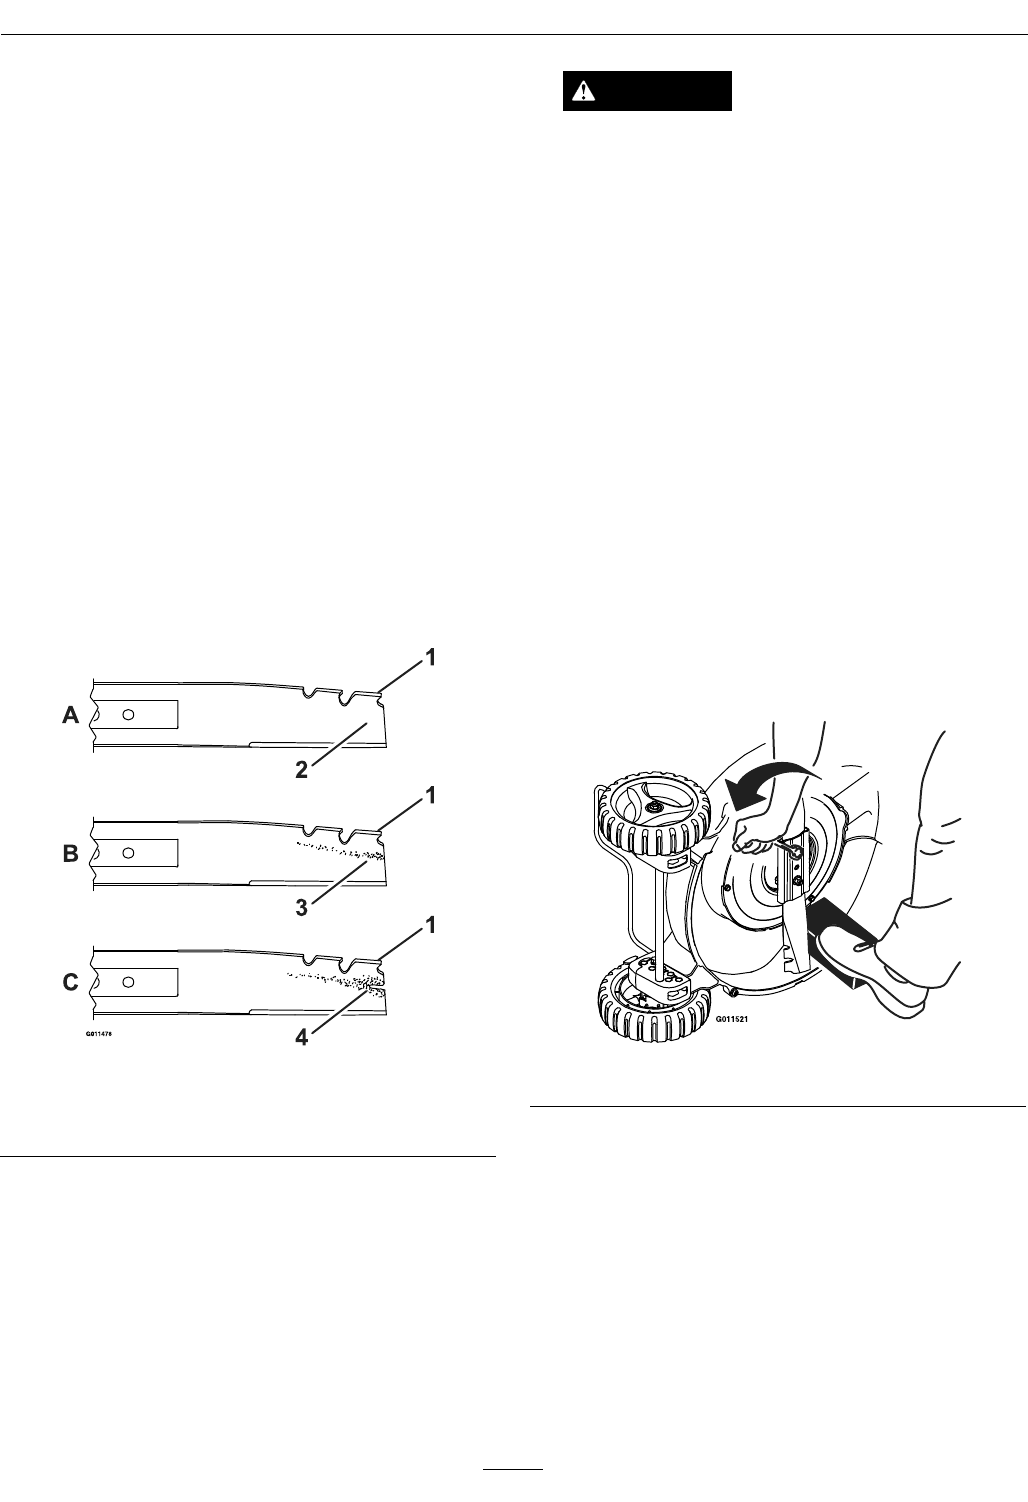
•RearWheelAdjustment:
1.Pullthewheelheightadjustmentrodupward
toreleasethepinfromthenotchinthe
adjustmentbracket(Figure15).
Figure15
1.Pullupward4.Pin
2.Wheelheightadjustment
rod
5.Rotatetodesiredsetting
3.Adjustmentbracket6.Indicator
2.Applydownwardpressureorliftthehousing
torotatetheheightadjustmentbracket.Use
theindicatortodeterminethedesiredsetting.
3.Releasethewheelheightadjustmentrodtoset
thepinsecurelyinthedesirednotch.
•FrontWheelAdjustment
1.Pullupontheheightadjusterandpullthe
frontwheelshaftassemblyoutwardasshown
inFigure16.
18
Operation
Figure16
1.Frontwheelshaft
assembly
4.Frontquadrantblockcut
heights
2.Pullup5.Pulloutward
3.Heightadjuster6.Shaftgroove
2.Insertthefrontwheelshaftassemblyintothe
desiredcutheightsettinginthefrontquadrant
block.Lowertheheightadjusterintothe
grooveonthefrontwheelshaft.Pulland
pushthewheelshaftassemblytomakesureit
haslockedintoplace.
UsingtheGrassBag
•InstallingtheGrassBag
1.Stoptheengineandwaitforallmovingparts
tostop.
2.Openthereardoor.
3.Graspthehandleonthebagandsettherear
ofthebagframeontothehandlebracket
notch(Figure17).
Figure17
1.Bag4.Handlebracketnotch
2.Handle5.Reardoor
3.Bagframe6.Lower
4.Oncethebagisseated,lowerthereardoor
ontothebag.
•MowingwiththeGrassBag
WARNING
Aworngrassbagcouldallowsmallstones
andothersimilardebristobethrowninthe
operator’sorbystander’sdirection.Thrown
objectscanresultseriouspersonalinjuryor
deathtotheoperatororbystanders.
Checkthegrassbagfrequently.Ifitis
damaged,installanewExmarkreplacement
bag.
Cutthegrassuntilthebagisfull.
Note:DoNotoverllthebag.
•RemovingtheGrassBag
1.Stoptheengineandwaitforallmovingparts
tostop.
2.Raisethereardischargedoorandgraspthe
handleonthebag.
3.Liftthebagoffofthelawnmowerandlower
thereardischargedoor.
4.Graduallytipthebagforwardtoemptythe
clippings.
5.Toinstallthebag,refertothesectionon
InstallingtheGrassBag.
19

Operation
DANGER
Ifthedischargedoordoesnotclose
completely,thelawnmowercouldthrow
objects.Thrownobjectscanresultin
seriouspersonalinjuryordeathtothe
operatororbystanders.
•Neveropenthedoortothedischarge
openingwhentheengineisrunning.
•Ifyoucannotclosethedoorbecause
thegrassclippingsclogthedischarge
area,stoptheengineandgentlymove
thedischargedoorhandlebackand
forthuntilyoucanclosethedoor
completely.Ifyoustillcannotclosethe
door,removetheobstructionwitha
stick,notyourhand.
OperatingTips
•ReviewtheSafetysectionandreadthismanual
carefullybeforeoperatingthelawnmower.
•Settheenginespeedtothefastestpositionfor
thebestcuttingresults.
•Maintainasharpbladethroughoutthecutting
season.Periodicallyledownnicksontheblade.
Replacethebladewhennecessarywithanoriginal
Exmarkreplacementblade.
•Cleantheairlterfrequently.Mulchingstirsup
moreclippingsanddustwhichclogstheairlter
andreducesengineperformance.
CuttingGrass
•Grassgrowsatdifferentratesatdifferenttimes
oftheyear.Inthesummerheat,itisbesttocut
grassatthe21/2inch(64mm),3inch(76mm),
or31/2inch(90mm)cuttingheightsettings.Cut
onlyaboutathirdofthegrassbladeatatime.Do
Notcutbelowthe21/2inch(64mm)setting
unlessthegrassissparseoritislatefallwhen
grassgrowthbeginstoslowdown.
•Whencuttinggrassover6inches(15cm)tall,
rstmowatthehighestcuttingheightsettingand
walkslower;thenmowagainatalowersettingfor
thebestlawnappearance.Ifthegrassistoolong
andthegrassclumpontopofthelawn,thelawn
mowermayplugandcausetheenginetostall.
•Alternatethemowingdirection.Thishelps
dispersetheclippingsoverthelawnforeven
fertilization.
•Ifthenishedlawnappearanceisunsatisfactory,
tryoneormoreofthefollowing:
–Sharpentheblade.
–Walkataslowerpacewhilemowing.
–Cutthegrassmorefrequently.
–Overlapcuttingswathsinsteadofcuttinga
fullswathwitheachpass.
–Setthedesiredcuttingheightonthefront
wheels.Settherearwheelsonetotwonotches
higher.Forexample,setthefrontwheelsat2
1/2inches(64mm)andtherearwheelsat3
inches(76mm).
CuttingLeaves
•Aftercuttingthelawn,ensurethathalfofthe
lawnshowsthroughthecutleafcover.Youmay
needtomakemorethanonepassovertheleaves.
•Forlightleafcoverage,setallthewheelsatthe
samecuttingheightsetting.
•Iftherearemorethan5inches(12.7cm)ofleaves
onthelawn,setthefrontcuttingheightoneor
twonotcheshigherthantherearcuttingheight.
Thismakesiteasiertofeedtheleavesunderthe
lawnmowerdeck.
•Slowdownyourmowingspeedifthelawnmower
doesnotcuttheleavesnelyenough.
•Ifyoumowoveroakleaves,youcanaddlimeto
thegrassinthespringtoreducetheacidityofthe
oakleaves.
20

Maintenance
Maintenance
Note:Determinetheleftandrightsidesofthemachinefromthenormaloperatingposition.
WARNING
Ifyouleavethewireonthesparkplug,someone
couldaccidentallystarttheengine.Accidental
startingoftheenginecouldseriouslyinjureyou
orotherbystanders.
Disconnectthewirefromthesparkplugbefore
youdoanymaintenance.Setthewireasideso
thatitdoesnotaccidentallycontactthespark
plug.
WARNING
Theenginecanbecomeveryhot.Touchingahot
enginecancausesevereburns.
Allowtheenginetocoolcompletelybefore
serviceormakingrepairsaroundtheenginearea.
WARNING
Tippingthelawnmowermaycausethefuel
toleakfromthecarburetororthefueltank.
Gasolineisextremelyammable,highly
explosive,andundercertainconditions,can
causepersonalinjuryorpropertydamage.
Avoidfuelspillsbyrunningtheenginedryorby
removingthegasolinewithahandpump;never
siphon.
RecommendedMaintenanceSchedule(s)
MaintenanceService
IntervalMaintenanceProcedure
Aftertherst5hours•Changetheengineoil.
Beforeeachuseordaily
•Checktheengineoillevel.
•Checkthestoppingtimeofthebladebrake.Theblademuststopwithin3secondsof
releasingthebail;ifitdoesnot,contactanAuthorizedServiceDealerforrepair.
•Checkthemowerbladeandtheenginemountingfasteners.
•Checkforloosehardware.
•ChecktheBladeBrakeClutchBailoperation(BladeBrakeClutchUnitsOnly)
•Cleanthegrassbuild-upfromunderthedeck.
•Cleanthedischargetunnelandplug.
Every25hours•Cleanthefoampre-cleaner(KawasakiUnits).
•Cleanthecover,base,foamandpaperelements(ECXHNBBC21andECXHN21Units).
Every40hours•Checktheconditionofthebelt(s).
Every50hours
•Changetheengineoil.(Mayneedmoreoftenundersevereconditions.)
•Checkforleaksinthefuelsystemsand/ordeterioratingfuelhose.
•Cleanunderthebeltcover(self-propelledunitsonly).
•Cleanthebladebrakeclutchshield.
•Cleanunderthecoverplate(Non-BBCUnits).
Every100hours
•Changetheoillter(ECXKA21andECXKABBC21Units).
•Checkthesparkplugs.
•Cleanthefuellterelement.
Every250hours•Replacetheairlterelements(ECXHNBBC21andECXHN21Units).(Mayneedmore
ofteniftheyaredamagedorexcessivelydirty.)
21
Maintenance
MaintenanceService
IntervalMaintenanceProcedure
Every300hours•Replacethepaperairlter(KawasakiUnits).(Mayneedmoreoftenindustyconditions.
SeetheEnginemanualforadditionalinformation.)
Yearlyorbeforestorage•Emptythefueltankbeforerepairsasdirectedorbeforestorage.
PeriodicMaintenance
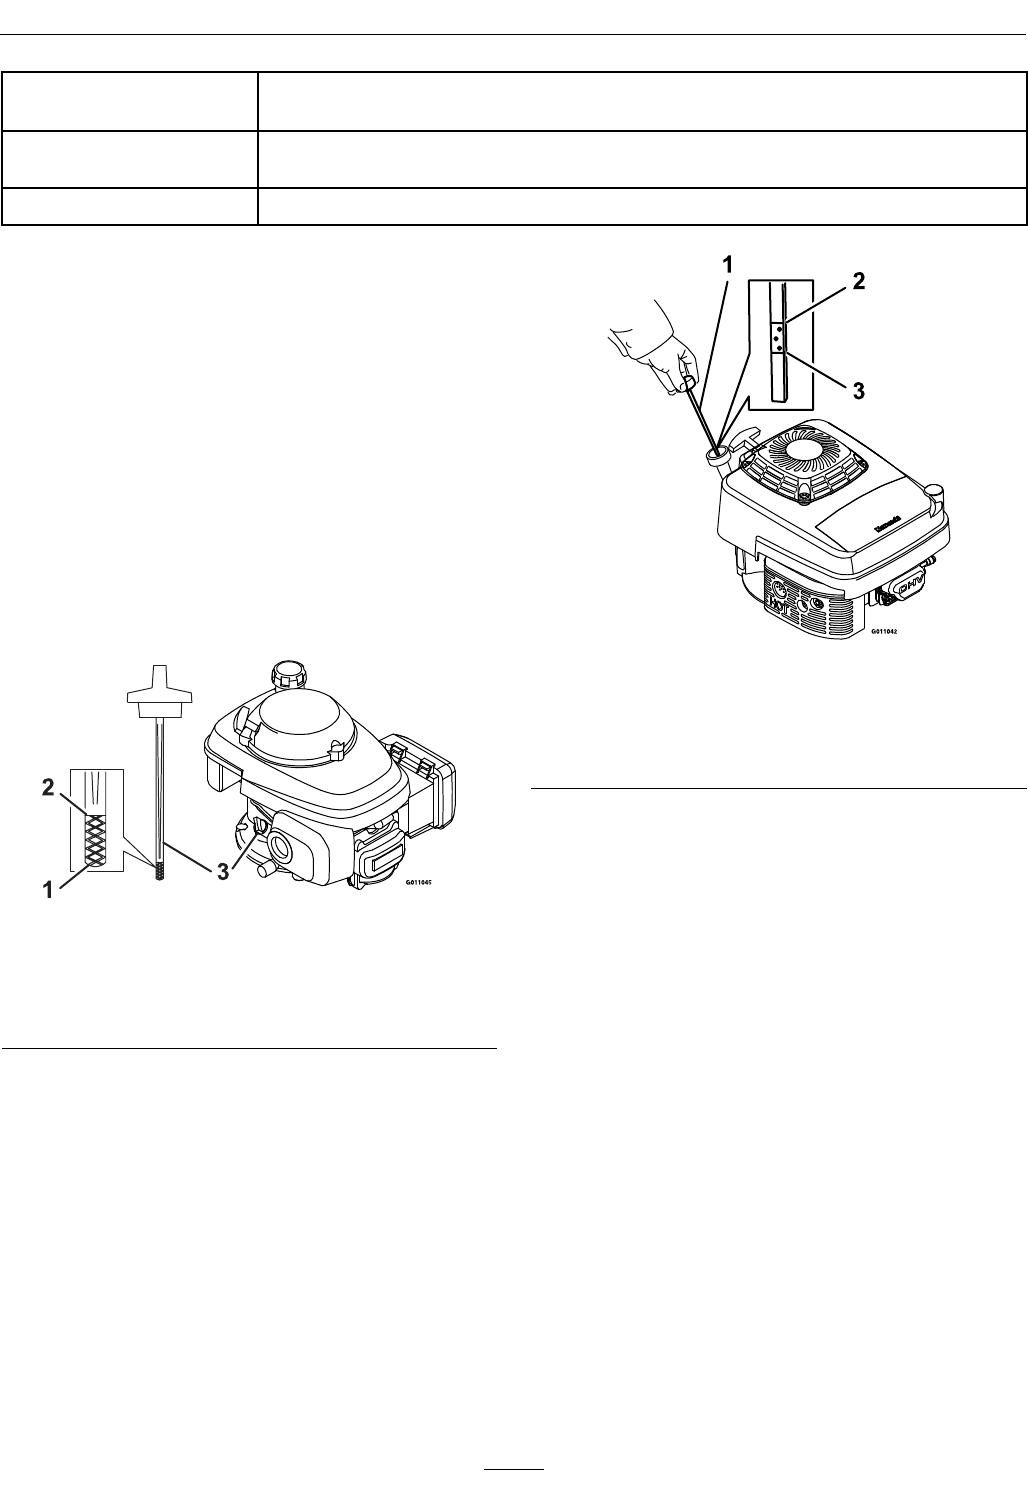
CheckEngineOilLevel
ServiceInterval:Beforeeachuseordaily
1.Stopengineandwaitforallmovingpartstostop.
Makesureunitisonalevelsurface.
2.Checkwithenginecold.
3.Cleanareaarounddipstick.Removedipstickand
wipeoiloff.Reinsertthedipstickandpushitall
thewaydownintothetube.DoNotscrewinto
place.Removethedipstickandreadtheoillevel.
Figure18
HondaEngine
1.Lowerlimitmark3.Dipstick
2.Upperlimitmark
Figure19
KawasakiEngine
1.Dipstick3.Add
2.Full
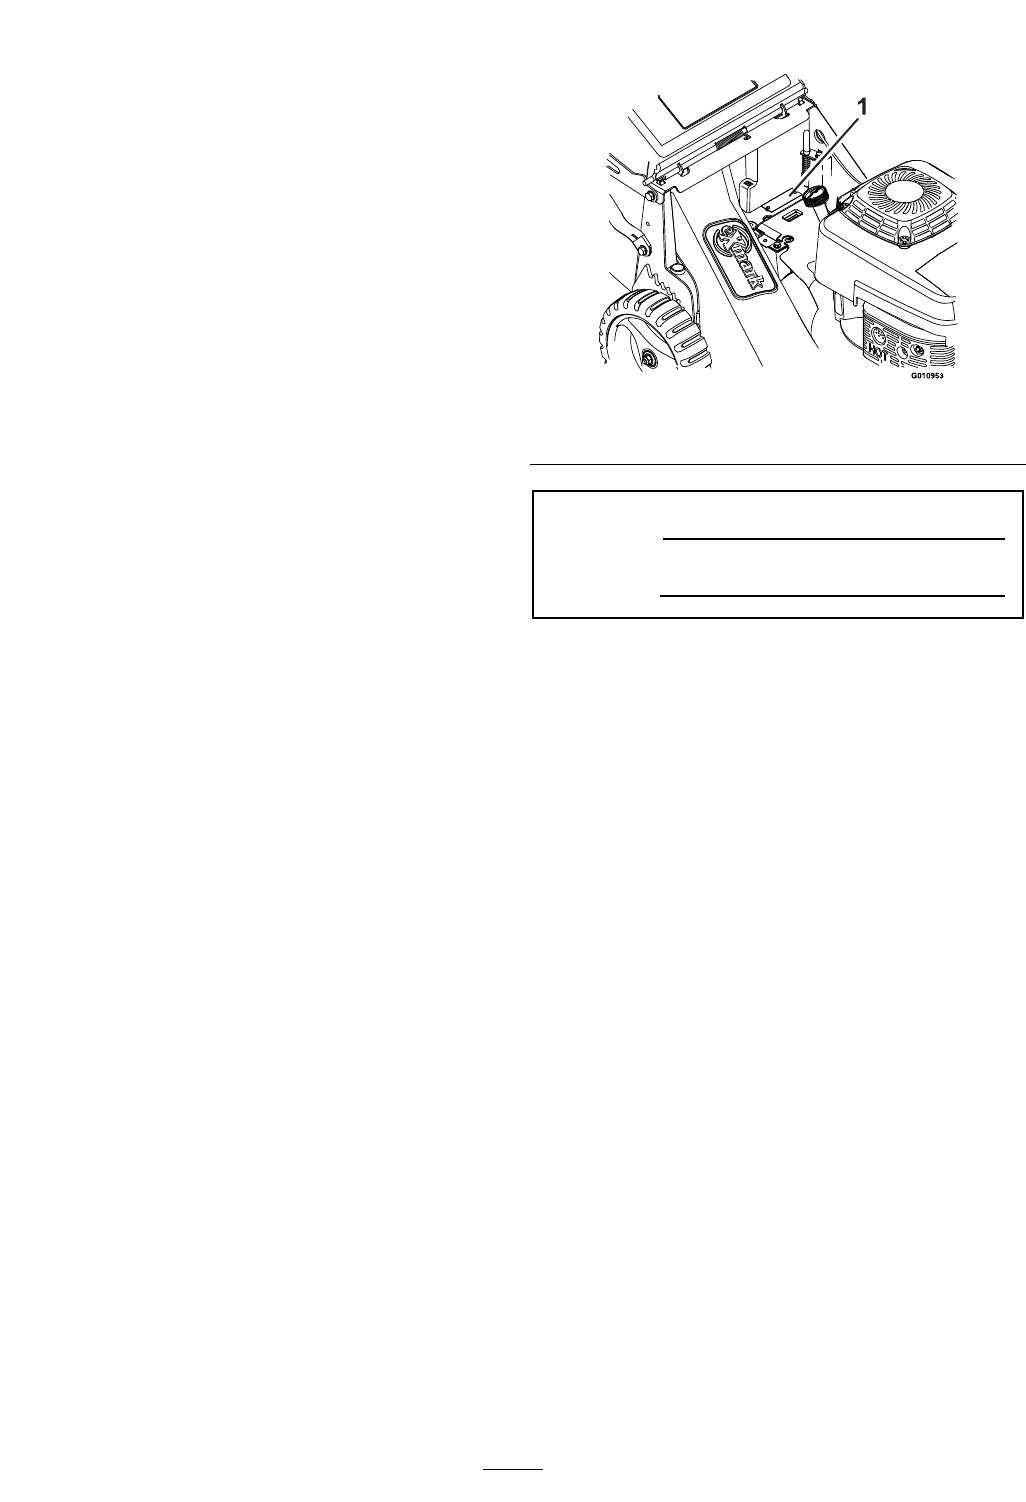
4.Iftheoillevelislow,wipeofftheareaaroundthe
oilllcap,removecapandlltothe“FULL”
markonthedipstick.Exmark4-CyclePremium
EngineOilisrecommended;refertotheEngine
Owner'smanualforanacceptablealternative.Do
Notoverll.
Important:DoNotoperatetheenginewiththe
oillevelbelowthe“LOW”(or“ADD”)markon
thedipstick,oroverthe“FULL”mark.
CheckingtheBladeBrake
Clutch(BladeBrakeClutch
Only)
ServiceInterval:Beforeeachuseordaily
RefertoCheckingtheBladeBrakeClutchinthe
OperatingInstructionssection.
ChecktheMowerBlade
ServiceInterval:Beforeeachuseordaily
22
Maintenance
Alwaysmowwithasharpblade.Asharpbladecuts
cleanlyandwithouttearingorshreddingthegrass
blade.
1.Stoptheengineandwaitforallmovingpartsto
stop.
2.Disconnectthewirefromthesparkplug
(Figure9andFigure10).
3.Drainthegasolinefromthefueltank.Referto
EmptyingtheFuelTankandCleaningthe
FuelFiltersection.
4.Tipthelawnmowerontoitsrightside.
5.Inspectthebladeforsharpnessandwear,
especiallywheretheatandthecurvedparts
meet(seeFigure20).Becausesandandabrasive
materialcanwearawaythemetalthatconnects
theatandcurvedpartsoftheblade,check
thebladebeforeusingthelawnmower.Ifyou
noticeaslotorwear(Figure20BandFigure20C),
replacetheblade.
Figure20
1.Sail3.Wear
2.Flat4.Slot
Note:Forthebestperformance,installanew
bladebeforethecuttingseasonbegins.During
theyear,ledownanysmallnickstomaintainthe
cuttingedge.
DANGER
Awornordamagedbladecanbreak.A
pieceofthebladecouldbethrownintothe
operator’sorbystander’sarea,resultingin
seriouspersonalinjuryordeath.
•Inspectthebladeperiodicallyforwearor
damage.
•Replaceawornordamagedblade.
Ifitisnecessarytoremovethebladefor
replacementorsharpening,completethe
followingsteps:
A.Toremovetheblade,useablockofwoodto
holdthebladesteady(seeFigure21).Make
suretograsptheendofthebladeusingarag
orathicklypaddedglove.
•ForBladeBrakeClutchUnits:Remove
thebladenuts,bladesupport,andblade.
•ForUnitswithoutaBladeBrake
Clutch:Removethebladebolt,blade
support,andblade.
Figure21
B.ForSharpening:Filethetopsideofthe
bladetomaintainitsoriginalcuttingangle
(Figure22AandB)andinnercuttingedge
radius(Figure22A).Thebladewillremain
balancedifyouremovethesameamountof
materialfrombothcuttingedges.
23
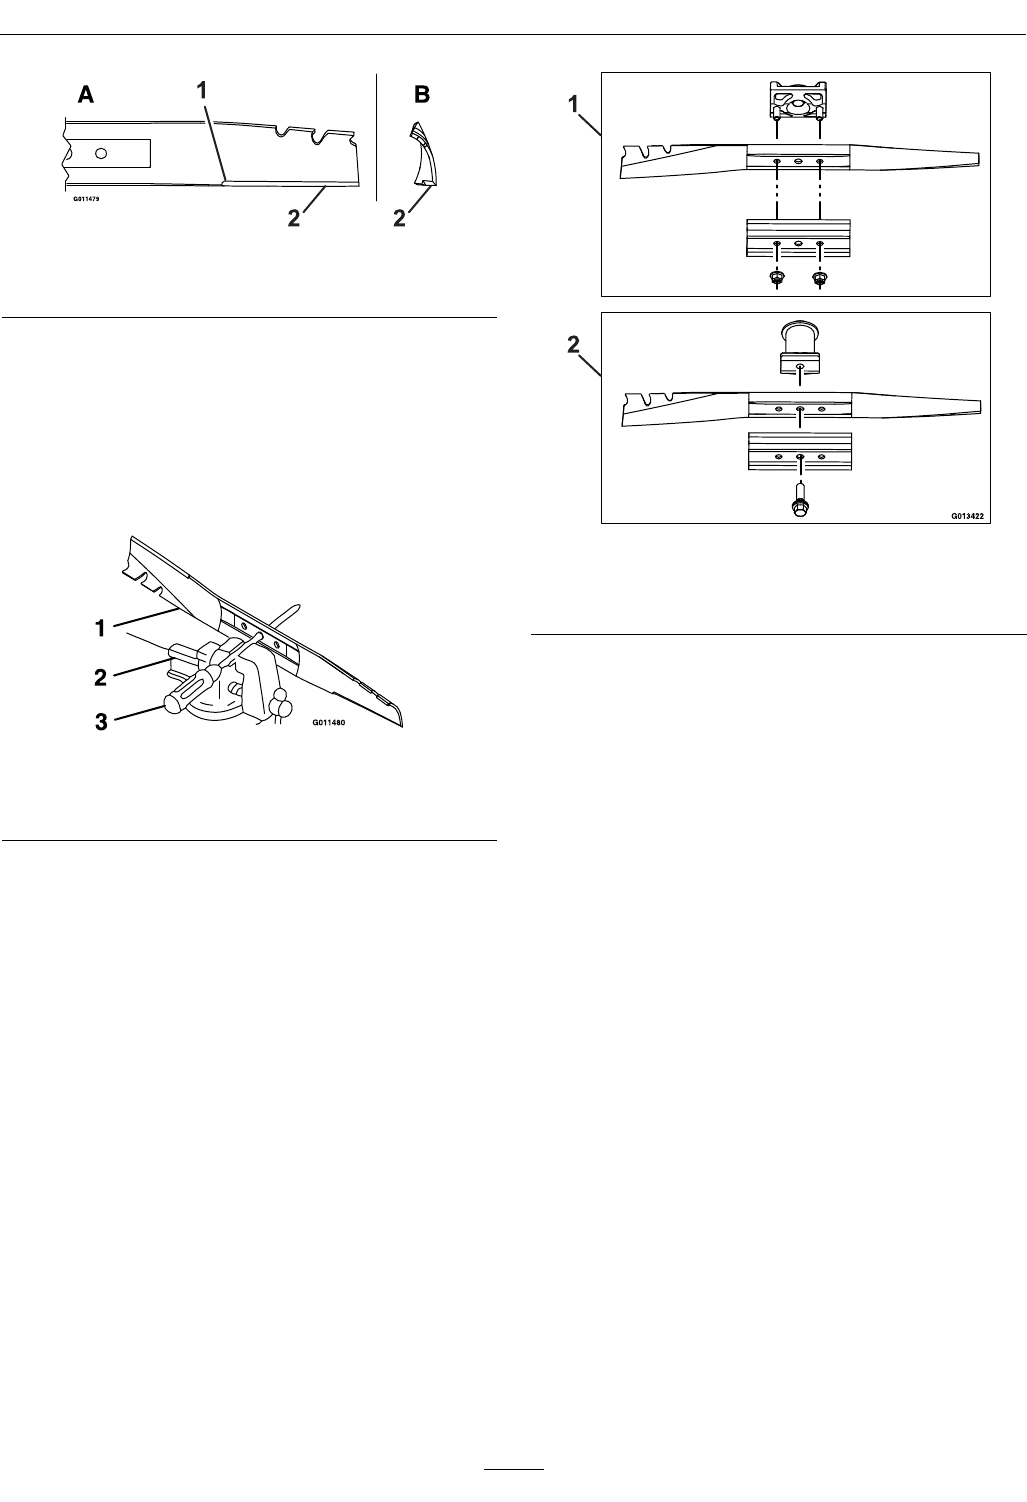
Maintenance
Figure22
1.Innercuttingedgeradius2.Cuttingangle
C.Checkthebalanceofthebladebyplacing
thecenterholeofthebladeoveranailor
screwdrivershankclampedhorizontallyina
vise(Figure23).Ifeitherendoftheblade
rotatesdownward,lethatend(notthe
cuttingedge).Thebladeisproperlybalanced
whenneitherenddrops.
Figure23
1.Blade3.Screwdriver
2.Vise
D.ForInstallation:Makesuretograsptheendof
thebladeusingaragorathicklypaddedglove.
ForBladeBrakeClutchUnits:Installasharp,
balancedExmarkblade,bladesupport,and
thebladenuts.Thesailoftheblademust
pointtowardthetopofthelawnmower
housingforproperinstallation.Torquethe
bladenutsto23-27ft-lb(31-37Nm).
ForUnitswithoutaBladeBrakeClutch:
Installasharp,balancedExmarkblade,blade
support,andbladebolt.Thesailoftheblade
mustpointtowardthetopofthelawnmower
housingforproperinstallation.Torquethe
bladeboltto35-45ft-lb(47-61Nm).
Figure24
1.BladeBrakeClutchUnits
2.UnitswithoutaBladeBrakeClutch
6.Returnthelawnmowertoitsuprightposition.
7.Connectthewiretothesparkplug.
CheckforLooseHardware
ServiceInterval:Beforeeachuseordaily
1.Stopengine,waitforallmovingpartstostop.
2.Visuallyinspectmachineforanyloosehardware
oranyotherpossibleproblem.Tightenhardware
orcorrecttheproblembeforeoperating.
ChecktheBladeBrake
ClutchBailOperation(Blade
BrakeClutchUnitsOnly)
ServiceInterval:Beforeeachuseordaily
ChecktheBladeBrakeClutch(BBC)bailoperation
foranyoperationproblemsordeteriorating
components,suchasthespring.Replacecomponents
orcorrectanyproblemsbeforeoperating.Referto
OperatingtheBladeControlLeverinOperation.
24
Maintenance
ServiceAirFilter
(KawasakiUnits)
ServiceInterval:Every25hours—Clean
thefoampre-cleaner
(KawasakiUnits).
Every300hours—
Replacethepaperair
lter(KawasakiUnits).
(Mayneedmoreoftenin
dustyconditions.See
theEnginemanualfor
additionalinformation.)
Note:DoNotoperatetheenginewithouttheair
lterassembly;extremeenginedamagewilloccur.
1.Stopengine,waitforallmovingpartstostop.
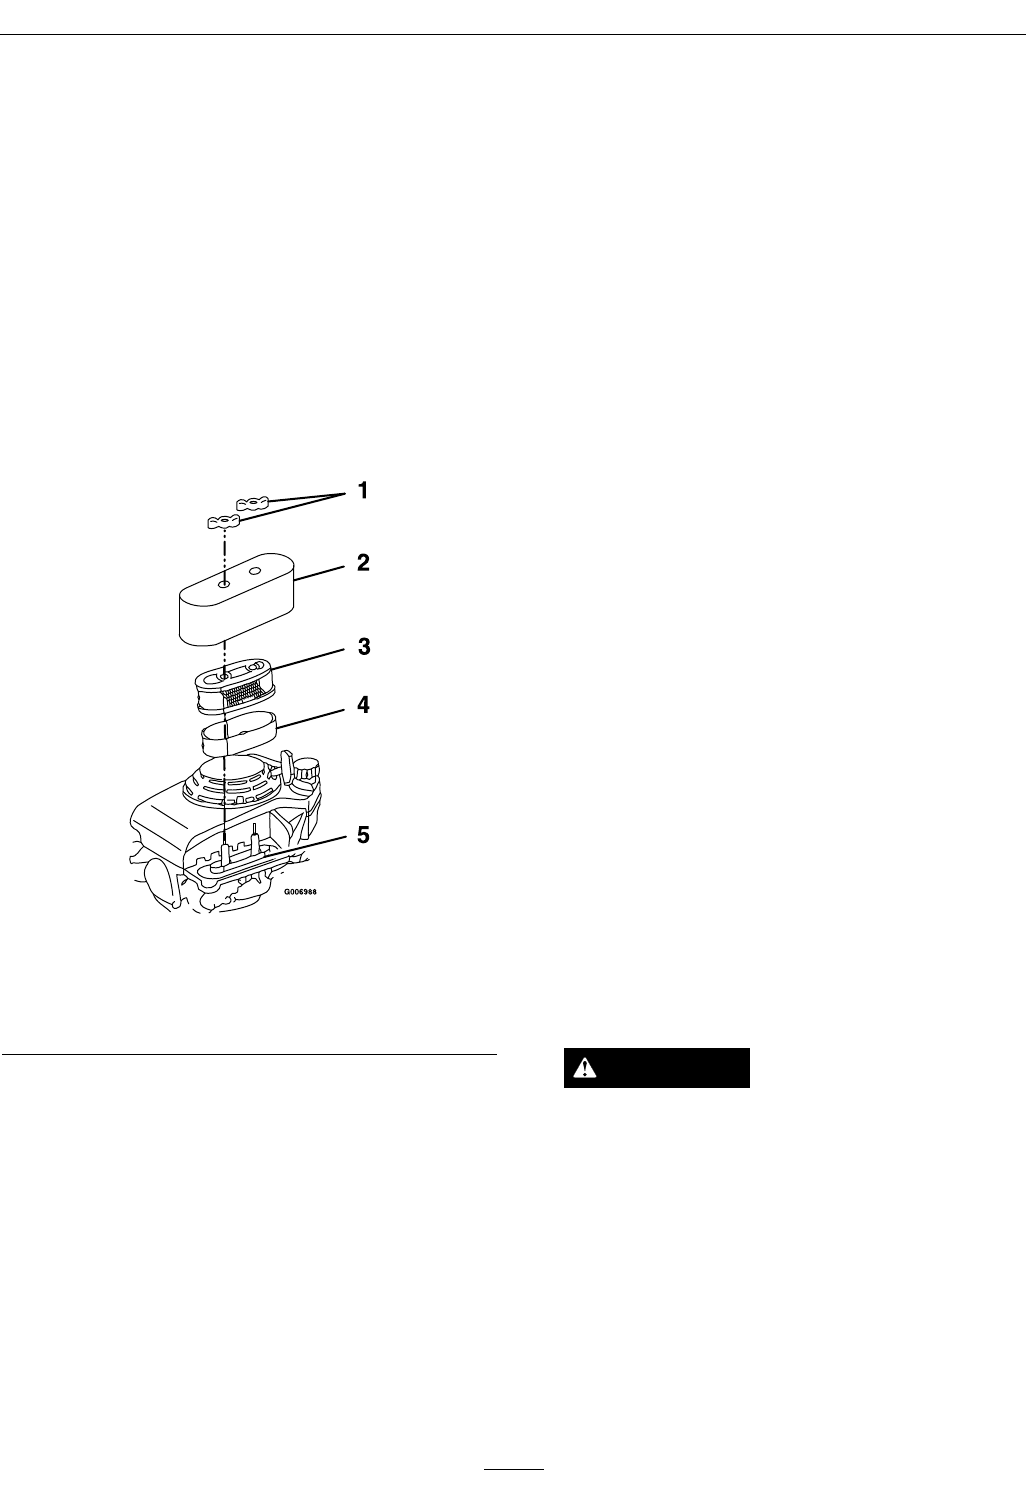
2.Disconnectthewirefromthesparkplug
(Figure10).
3.Removethecoverandcleanitthoroughly.
Figure25
ECXKA21andECXKABBC21Units
1.Cover3.Paperairlter
2.Foamelement4.Airlterbase
Figure26
ECSKA21andECSKCP21Units
1.Cover3.Foamelement
2.Paperairlter
4.Removethepaperairlteranddiscarditas
required.
Note:DoNottrytocleanapaperairlter.
5.Removethefoamelementandwashitwithamild
detergentandwater,thenblotitdry.
6.Saturatetheelementwithcleanengineoil,then
squeezeit(DoNottwist)toremovetheexcessoil.
7.Installthefoamelement.
8.Installthenewpaperairlter.
9.Installthecover.
ServiceAirFilter
(ECXHNBBC21and
ECXHN21Units)
ServiceInterval:Every25hours—Clean
thecover,base,foam
andpaperelements
(ECXHNBBC21and
ECXHN21Units).
Every250hours—Replace
theairlterelements
25
Maintenance
(ECXHNBBC21and
ECXHN21Units).(May
needmoreofteniftheyare
damagedorexcessively
dirty.)
Note:DoNotoperatetheenginewithouttheair
cleanerassembly;extremeenginedamagewilloccur.
1.Stoptheengineandwaitforallmovingpartsto
stop.
2.Disconnectthewirefromthesparkplug
(Figure9).
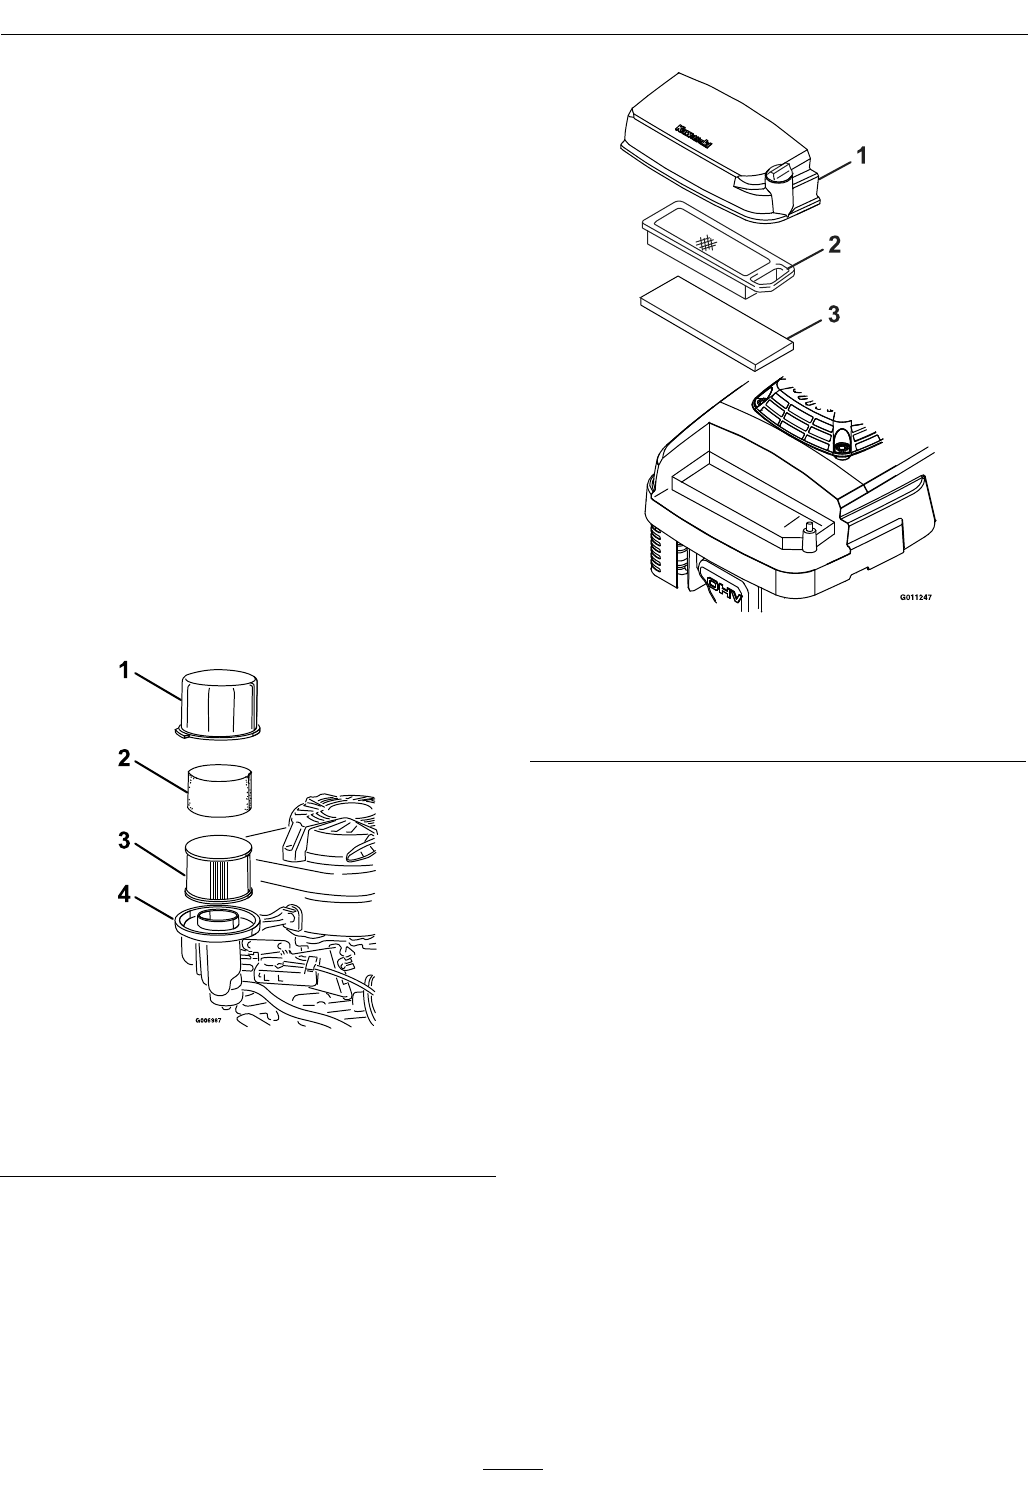
3.Removethetwowingnutsthatsecurethecover
(Figure27).
Figure27
1.Wingnuts4.Foamelement
2.Cover5.Base
3.Paperelement
4.Removethecover.
Note:Becarefultopreventdirtanddebrisfrom
fallingintothebase.
5.Removethefoamandpaperelementsfromthe
base.
6.Removethefoamelementfromthepaper
element.
7.Inspectthefoamandpaperelements,andreplace
themiftheyaredamagedorexcessivelydirty.
8.Tapthepaperelementonahardsurfaceseveral
timesorusecompressedairnotexceeding30
psi(207kPa)throughthelterfromthewire
screensidetoremoveanyexcessdirt.Ifthepaper
elementisexcessivelydirty,replaceit.
Note:Nevertrytobrushdirtoffthepaper
element;brushingforcesthedirtintothebers.
9.Cleanthefoamelementinwarm,soapywateror
inanonammablesolvent.
10.Rinseanddrythefoamelementthoroughly.
11.Dipthefoamelementincleanengineoil,then
squeezeouttheexcessoil.
Note:Excessoilinthefoamelementrestricts
theairowthroughtheelementandmayreach
thepaperlterandclogit.
12.Wipedirtfromthebaseandthecoverwitha
moistrag.
Note:Becarefultopreventdirtanddebrisfrom
enteringtheairductleadingtothecarburetor.
13.Installtheaircleanerelementsandensurethat
theyareproperlypositioned.
14.Securelyinstallthecoverwiththetwowingnuts.
ChangeEngineOil
ServiceInterval:Aftertherst5hours
Every50hours(Mayneed
moreoftenundersevere
conditions.)
1.Runtheenginetowarmtheengineoil.
Note:Warmoilowsbetterandcarriesmore
contaminates.
WARNING
Oilmaybehotafterenginehasbeenrun.
Contactwithhotoilcancauseseverepersonal
injury.
Avoidcontactingthehotengineoilwhenyou
drainit.
2.Stopengine,waitforallmovingpartstostop.
3.Disconnectthewirefromthesparkplug.
4.Drainthegasolinefromthefueltank.Referto
EmptyingtheFuelTankandCleaningthe
FuelFiltersection.
26

Maintenance
5.Placeasuitabledrainpanunderthedipstick/oil
drain.
6.Cleanaroundthedipstick.
7.Removethedipstickbyrotatingthecap
counterclockwiseandpullingitout.
8.Raisetheleftsideofthelawnmowertodrainthe
oilfromthedipsticklltubeintothedrainpan.
9.Afterdrainingtheoil,returnthelawnmowerto
theoperatingposition.
10.Fillthecrankcasewithfreshoiltotheupperlimit
markonthedipstick.Useoilrecommendedin
theCheckEngineOilLevelsection.DoNot
overll
11.Insertthedipstickintothellerneckandrotate
thecapclockwiseuntilitistight.
12.Wipeupanyspilledoil.
13.Connectthewiretothesparkplug.
14.Recycletheusedoilaccordingtolocalcodes.
ChangeOilFilter
(ECXKA21and
ECXKABBC21)
ServiceInterval:Every100hours
1.Runtheenginetowarmtheoil.
2.Stoptheengineandwaitforallmovingpartsto
stop.
3.Disconnectthewirefromthesparkplug.
4.Draintheengineoil.
5.Placearagundertheoilltertocatchanyoilthat
mayleakoutasyouremovethelter.
6.Removetheoillter.
7.Useyourngertocoatthegasketonthenew
lterwithcleanExmark4–CyclePremiumEngine
oil(seeFigure28).
Figure28
1.Gasket
8.Installthenewlterandhandtightenit2/3turn
only.
9.FillthecrankcaseasstatedinCheckEngineOil
Levelsection.Exmark4–CyclePremiumEngine
oilisrecommended.RefertotheEngineOwner's
Manualforanacceptablealternative.
10.Connectthewiretothesparkplug.
11.Runtheengineforabout3minutes.
12.Stoptheengine,waitforallmovingpartstostop,
andcheckforoilleakagearoundthelter.
13.Addoiltocompensatefortheoilintheoillter.
14.Recycletheusedoillteraccordingtolocalcodes.
CheckConditionOfBelt
(Self-PropelledUnitsOnly)
ServiceInterval:Every40hours
1.Stopengine,waitforallmovingpartstostop.
2.Removethebeltcovertothelawnmowerhousing.
3.Checkthebeltforcracks,frayededges,burn
marksoranyotherdamage.
4.Replacethedamagedbelt.
CheckSparkPlugs
ServiceInterval:Every100hours
1.Stoptheengineandwaitforallmovingpartsto
stop.
2.Disconnectthewirefromthesparkplug
(Figure9andFigure10).
3.Cleanaroundthesparkplug.
4.Removethesparkplugfromthecylinderhead.
27
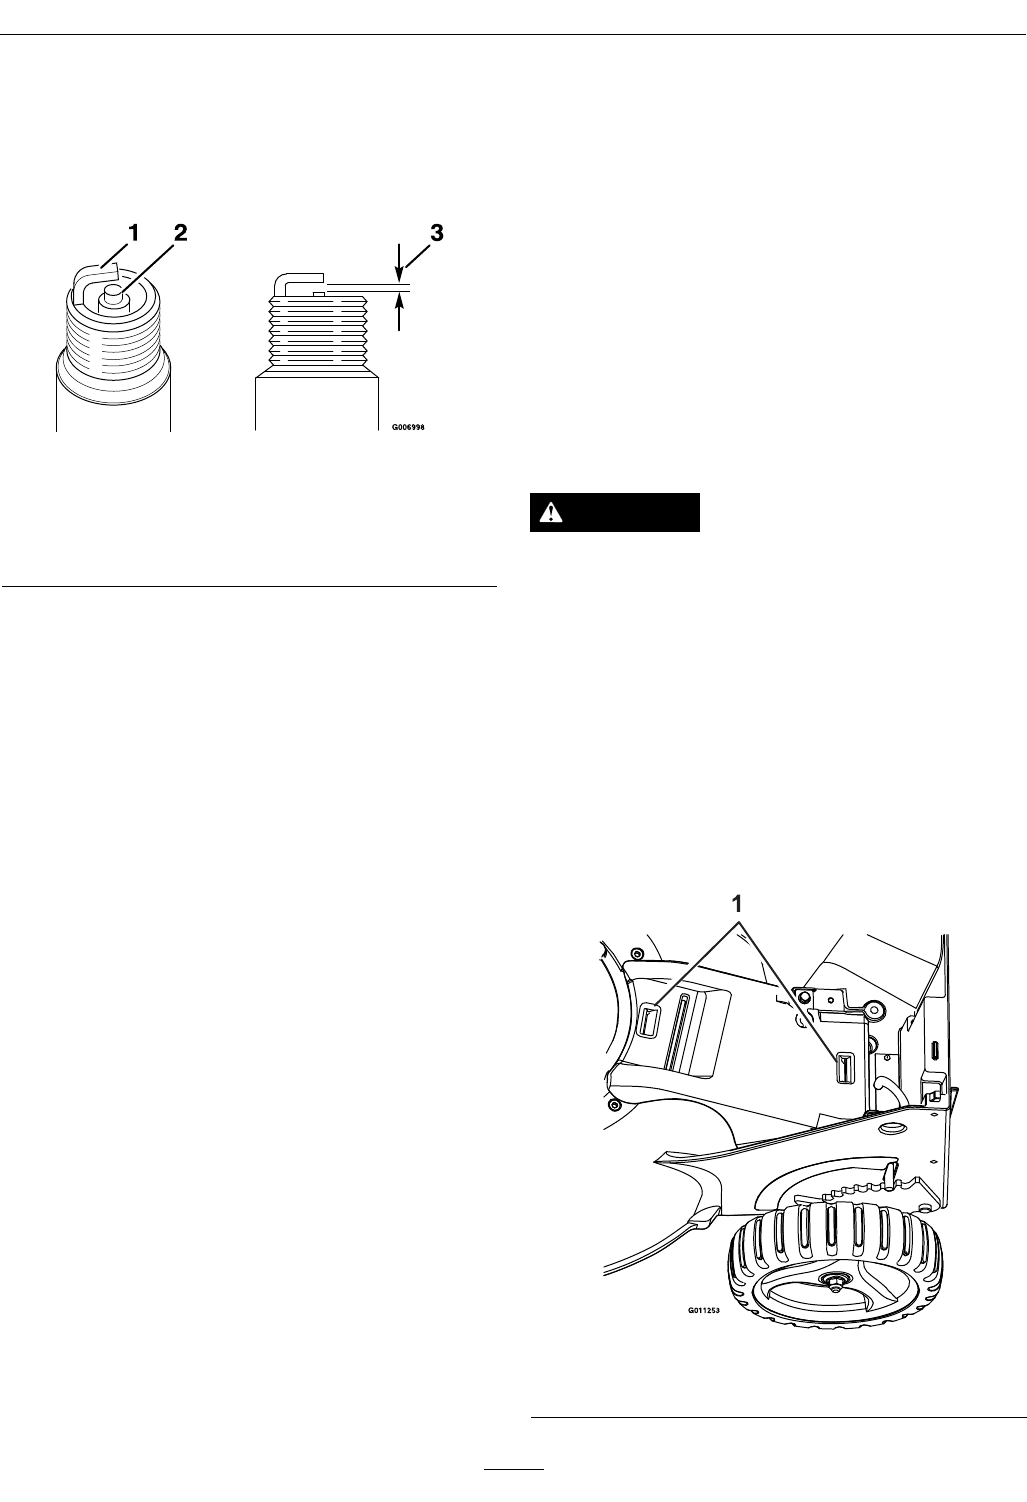
Maintenance
Note:Replaceacracked,fouled,ordirtyspark
plug.DoNotcleantheelectrodesbecausegrit
enteringthecylindercandamagetheengine.
5.Setthegapontheplugto0.030inch(0.76mm)
(Figure29).
Figure29
1.Sideelectrode3.Airgap—0.030inch
(0.76mm)
2.Centerelectrode
insulator
6.Installthesparkplugandthegasketseal.
7.Torquetheplugto17ft-lb(23N-m).
8.Connectthewiretothesparkplug.
EmptyingtheFuelTankand
CleaningtheFuelFilter
ServiceInterval:Every100hours
Thefuellter(screen)elementislocatedinsidethe
fueltank(ifapplicable).
1.Stoptheengineandwaitforittocooldown.
Note:Draingasolineforacoldengineonly.
2.Disconnectthewirefromthesparkplug
(Figure10).
3.Closethefuelvalve.
4.Disconnectthefuellinebylooseningthetube
clampatthecarburetor.
5.Openthefuelvalvebyturningthelevertothe
openposition.
6.Drainthegasolinecompletelyfromthetankand
fuellineintoanapprovedfuelcontainer.
7.Removethefueltankfromthemower.
8.Closethefuelvalve.
9.Pourasmallamountoffuelinthefueltank,move
thefuelaroundinthetank,andpouritoutinto
anapprovedfuelcontainer.
10.Installthefueltankandfuelline.
Adjustments
Note:Waitforallmovingpartstostopandremove
sparkplugwirebeforeservicing,cleaning,ormaking
anyadjustmentstotheunit.
AdjustingtheSelf-Propel
Drive
(Self-PropelledUnitsOnly)
Ifthelawnmowerdoesnotself-propelorhasa
tendencytocreepforwardwhenthecontrolbail
isreleased,adjustthedrivecablenutsasshownin
Figure31.
DANGER
Checkingtheoperationofthemowerwiththe
beltcoverremovedwillallowdebristobethrown
intheoperator'sorbystander'sdirectionandcan
resultinseriouspersonalinjuryordeath.
DoNotoperatetheunitwhencoverisnotin
place.
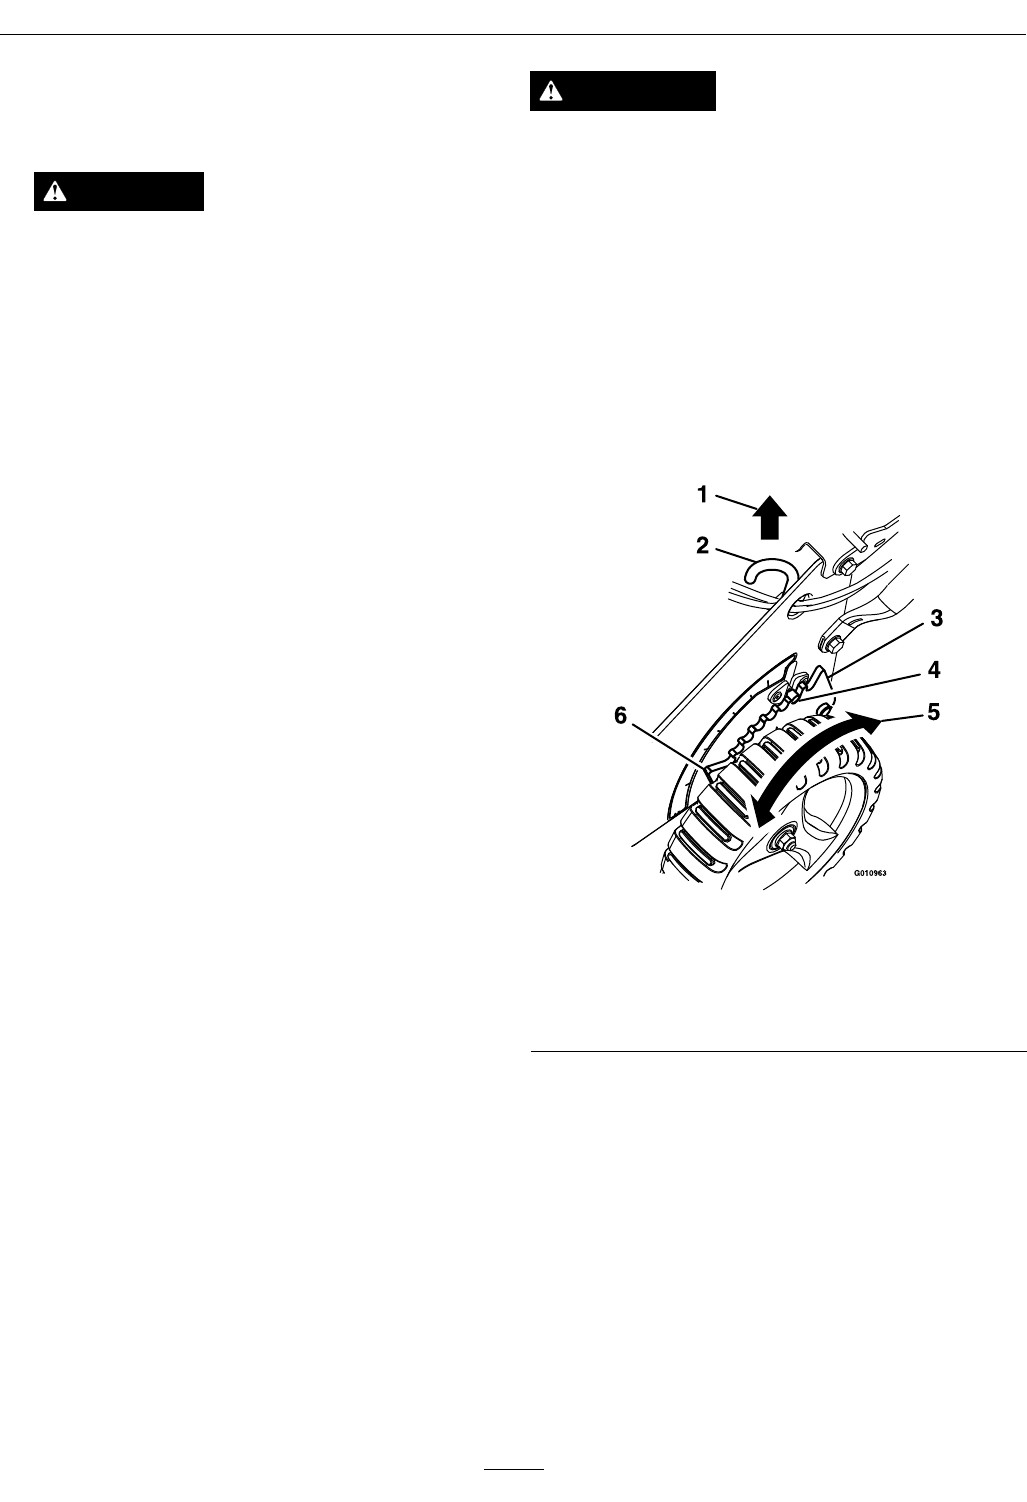
1.Stoptheengineandwaitforallmovingpartsto
stop.
2.Removethebeltcoverbypullingupwardonthe
backofthecovertounsnapthefrontandback
covertabs.Removeanydebrisunderthecover.
Figure30
1.Beltcovertabs
28
Maintenance
3.Ifthelawnmowerdoesnotselfpropelwithbail
engaged,tightenthebeltbyturningthedrive
cablenutsclockwise.Tomaximizebeltlife,Do
Notovertightenthebelt.
Ifthelawnmowercreepsforwardwithoutthe
bailengaged,loosenthebeltbyturningthedrive
cablenutscounterclockwise.
Figure31
1.Adjustmentofdrivecablenuts
4.Reinstallthebeltcoverbypushingdownonthe
rearrstandthensnappingthefrontontothe
mowerhousing.
5.Checktheoperationfordesireddrivecontrol.
6.Repeatsteps2through5asnecessaryforfurther
adjustment.
Note:Adjustmenttoobtaindesiredground
speedatfullbailtravelmaybemadeinorderto
accommodateslowerspeeds.
AdjustingtheBlade
BrakeCable
(BladeBrakeClutchUnits
Only)
Adjustwheneveranewbladebrakecableassemblyis
installedorifthebladecontrollockleverdoesnot
operateproperly.
1.Stoptheengineandwaitforallmovingpartsto
stop.
2.Disconnectthewirefromthesparkplug.
3.Removethebeltcoverbypullingupwardonthe
backofthecovertounsnapthefrontandback
covertabs(seeFigure30).Removeanydebris
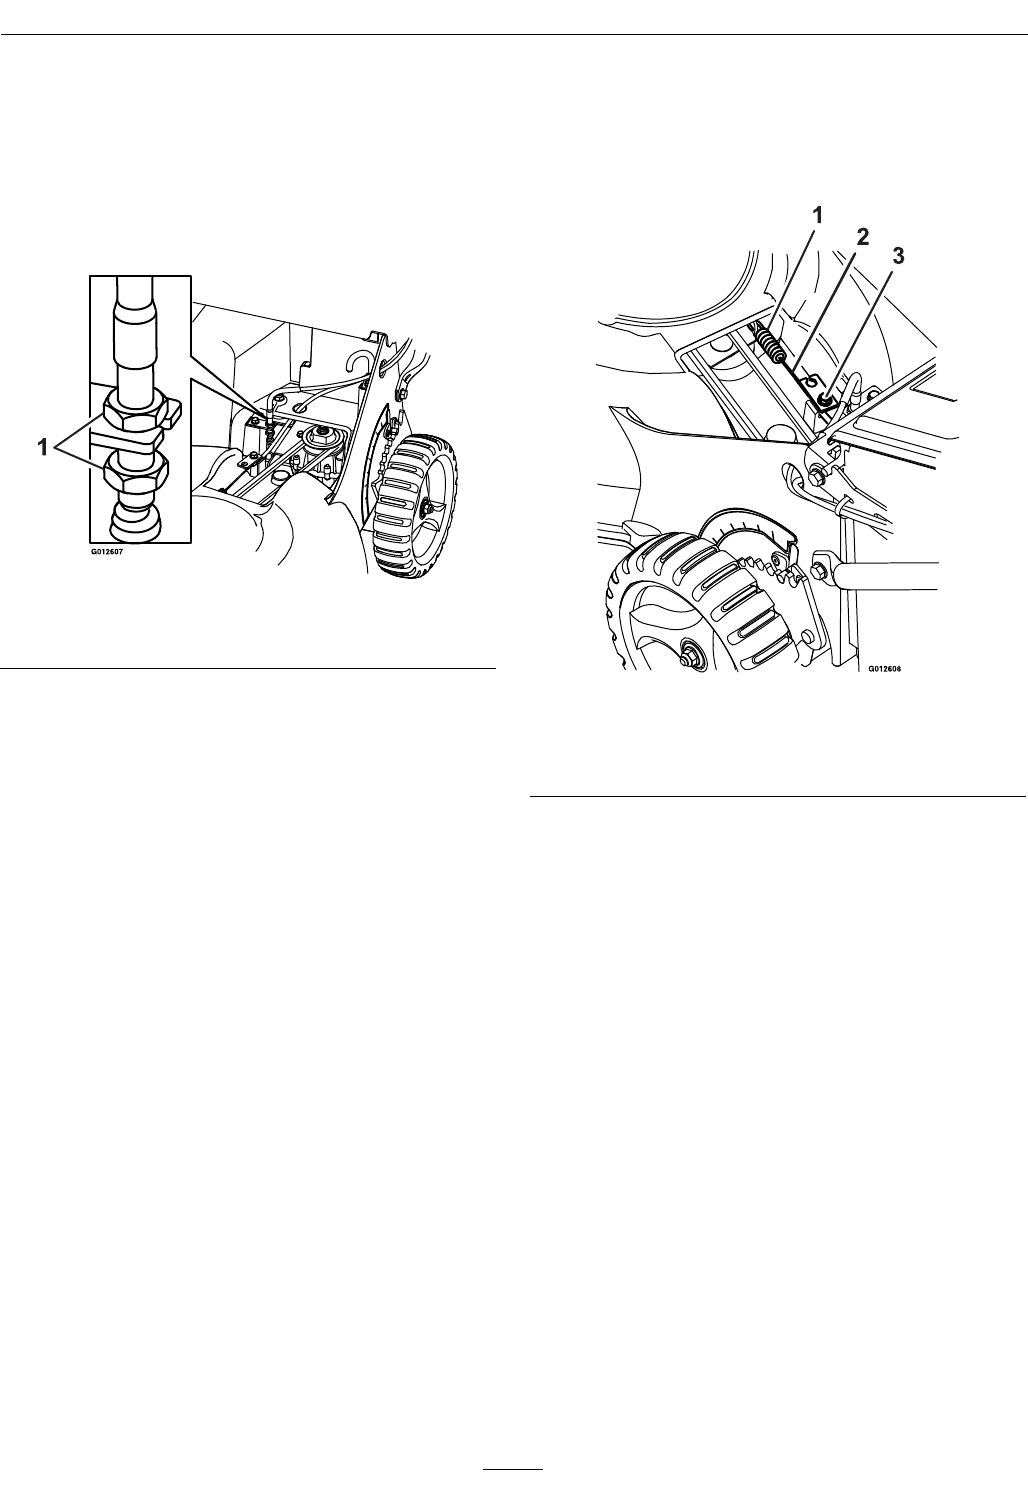
underthecover.
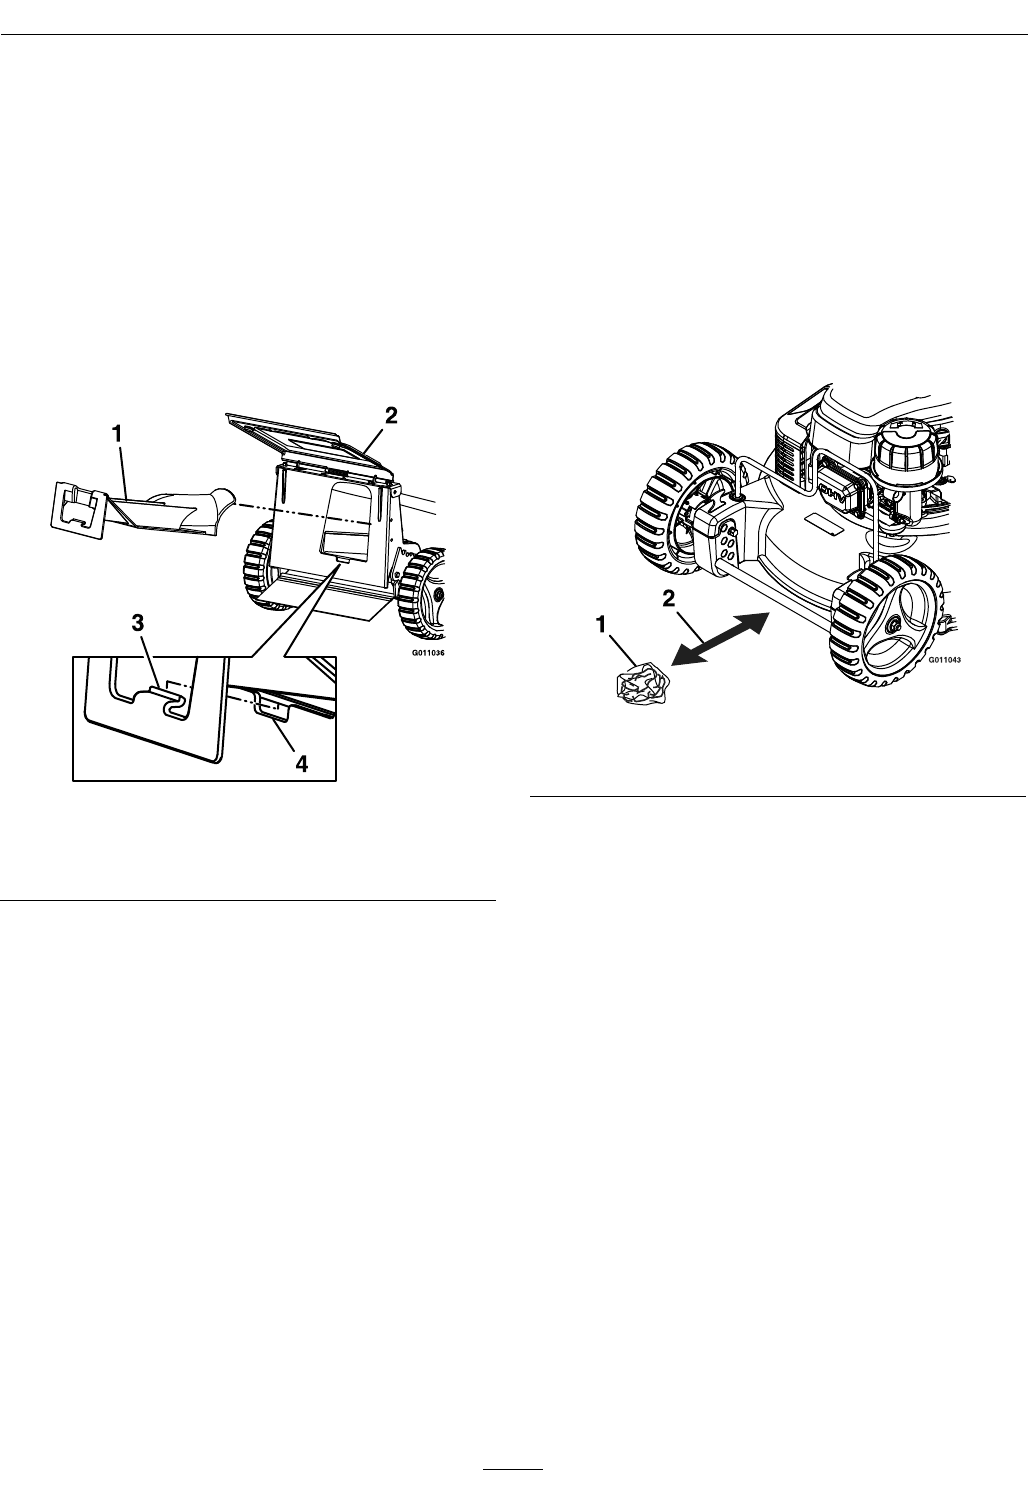
4.Loosenthecableclampscrewuntilthecable
conduitslides(seeFigure32).
Figure32
1.Spring3.Cableclampscrew
2.Cableconduit
5.Pullthecableuntilthereisapproximately1/8
inchinslack.DoNotputtensiononthespring.
6.Tightenthescrewtolocktheadjustmentinplace.
7.Reinstallthebeltcoverbypushingdownonthe
rearrstandthensnappingthefrontontothe
mowerhousing.
8.Connectthewiretothesparkplug.
9.Checktheoperationofthebladecontrollock
lever(seeFigure12).Thelevermustresetitself
tolockoutthebladecontrolbail.Ifitdoesnot,
repeatsteps4through8.
10.Performthe“CheckingtheBladeBrakeClutch
(BladeBrakeClutchUnitsOnly)”procedurein
Operation.
29
Maintenance
Cleaning
CleanGrassBuild-UpUnder
Deck
ServiceInterval:Beforeeachuseordaily
1.Stopengine,waitforallmovingpartstostop,and
removesparkplugwire.
2.Toensurethebestperformance,keepthe
undersideofthelawnmowerhousingclean.
CAUTION
Themowermaydislodgematerialfromunder
themowerhousing.
•Weareyeprotection.
•Stayintheoperatingposition(behindthe
handle).
•DoNotallowbystandersinthearea.
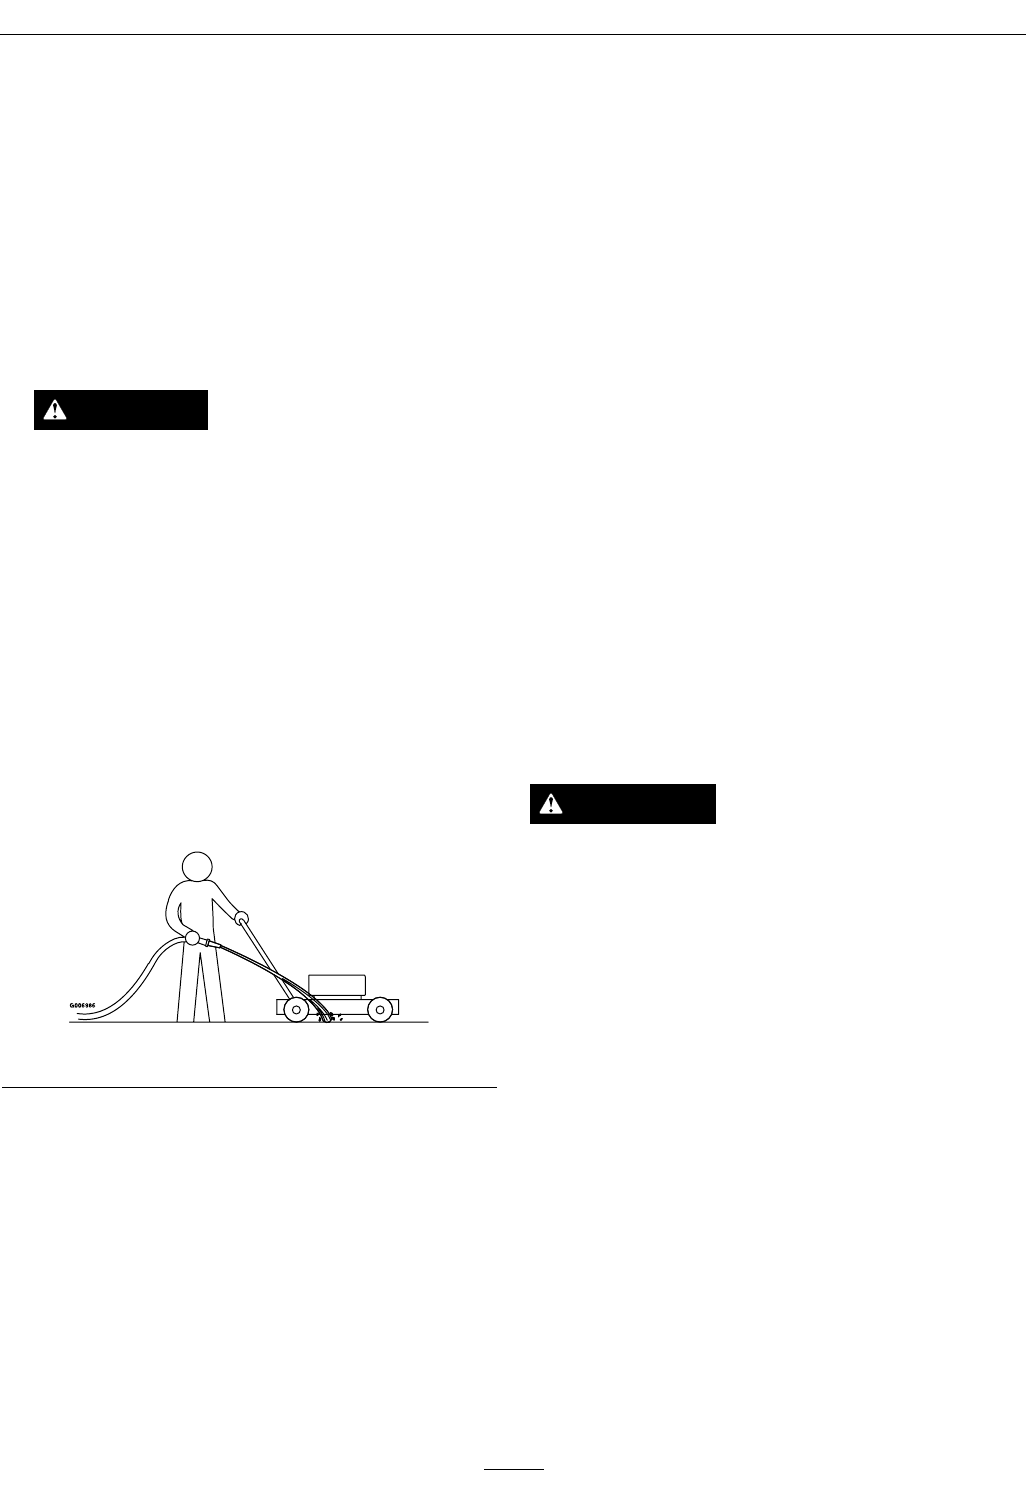
WashingMethod
1.Positionthelawnmoweronaatconcreteor
asphaltsurfacenearagardenhose.
2.Starttheengine.
3.Holdtherunninggardenhoseathandleleveland
directthewatertoowonthegroundjustin
frontoftherightreartire(Figure33).
Figure33
4.Engagetheblade.
Note:Thebladewilldrawinwaterandwashout
clippings.Letthewaterrununtilyounolonger
seeclippingsbeingwashedoutfromunderthe
housing.
5.Disengagetheblade,stoptheengineandwaitfor
allmovingpartstostop.
6.Turnoffthewater.
7.Startthelawnmower,engagetheblade,andlet
thelawnmowerrunforafewminutestodryout
itscomponents.
ScrapingMethod
Ifwashingdoesnotremovealldebrisfromunderthe
lawnmower,scrapeitclean.
1.Disconnectthewirefromthesparkplug.
2.Drainthefuelfromthefueltank.Referto
EmptyingtheFuelTankandCleaningthe
FuelFiltersection.
3.Tipthelawnmowerontoitsrightside.
4.Removethedirtandgrassclippingswitha
hardwoodscraper.Avoidburrsandsharpedges.
5.Turnthelawnmowerupright.
6.Fillthefueltank.
7.Connectthewiretothesparkplug.
CleaningtheDischarge
TunnelandPlug
ServiceInterval:Beforeeachuseordaily
Alwaysbesurethatthedischargetunneldoorcloses
securelywhenyoureleasethehandle.Ifthedebris
preventsthedischargedoorfromclosingsecurely,
cleantheinsideofthedischargetunnelandthedoor
thoroughly.
WARNING
Grassclippingsandotherobjectscanbethrown
fromanopendischargetunnel.Thrownobjects
cancauseseriousinjuryorkilltheoperatoror
bystanders.
Neverstartoroperatethelawnmowerunlessone
ofthefollowingistrue:
•Thedischargetunnelplugislockedsecurely
inthedischargetunnel.
•Thegrassbagislockedinplace.
•Theoptionalreardischargechuteislocked
inplace.
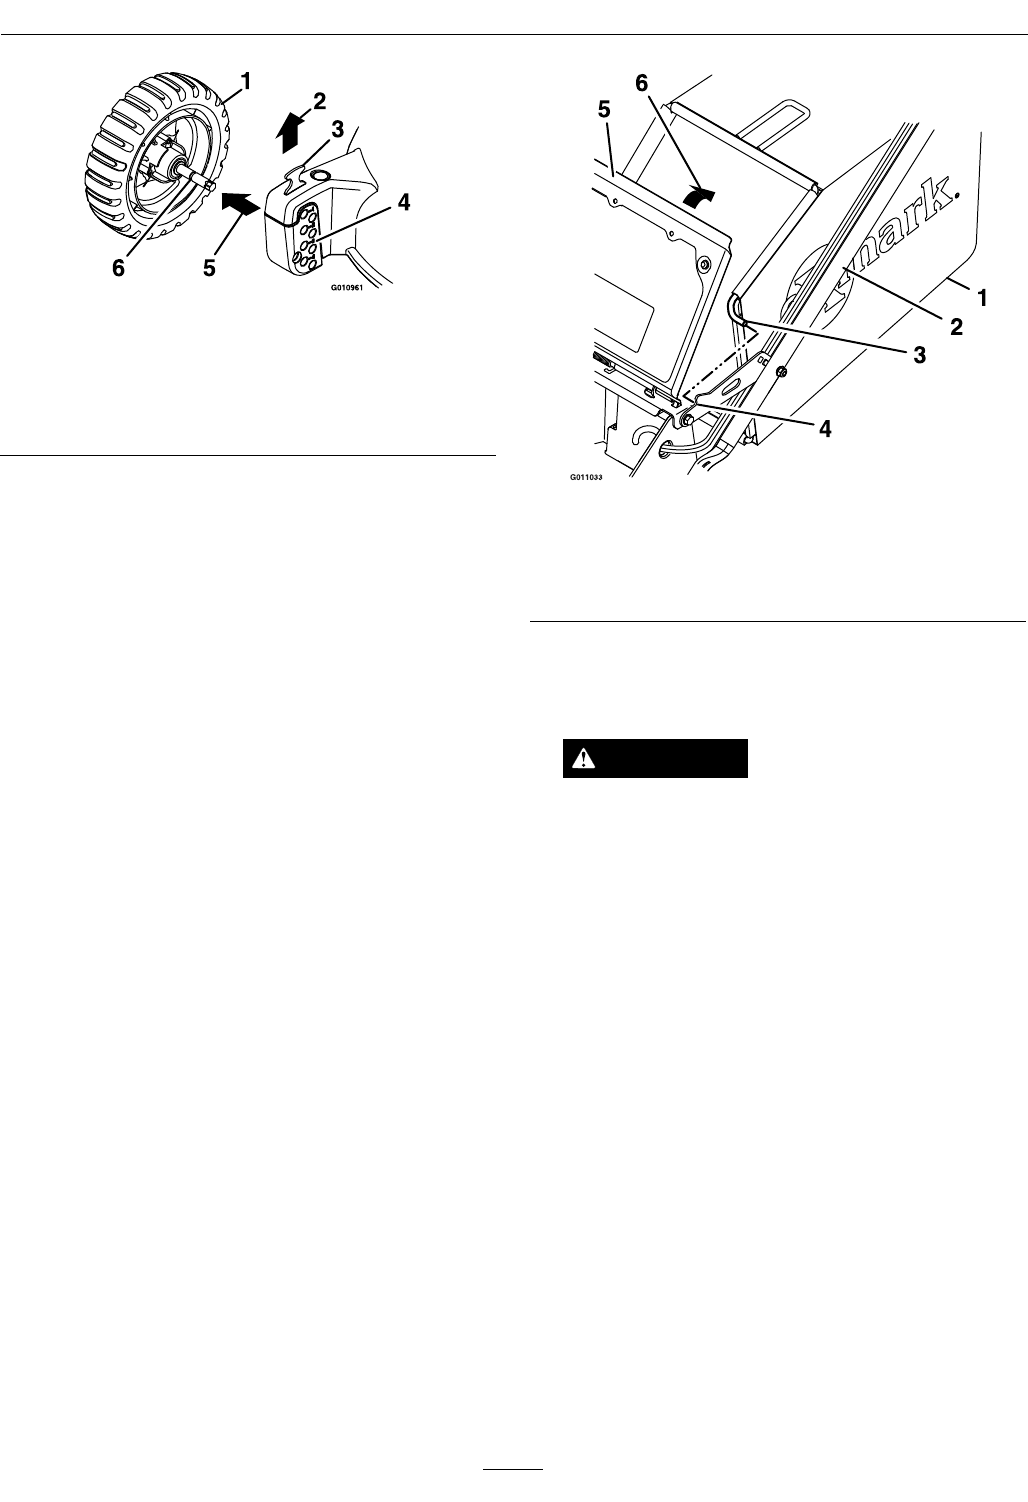
•Thedischargetunneldoorisclosed.
CleaningUndertheBelt
Cover(Self-PropelledUnits
Only)
ServiceInterval:Every50hours
1.Stoptheengineandwaitforallmovingpartsto
stop.
30
Maintenance
2.Disconnectthewirefromthesparkplug(see
Figure9andFigure10).
3.Pullupwardonthebackofthecovertounsnap
thefrontandbackcovertabs(seeFigure30).
4.Liftoffthecoverandbrushoutallthedebris
aroundthebeltarea.
5.Installthebeltcoverbypushingdownontherear
rstandthensnappingthefrontontothemower
housing.
6.Connectthewiretothesparkplug.
CleaningtheBlade
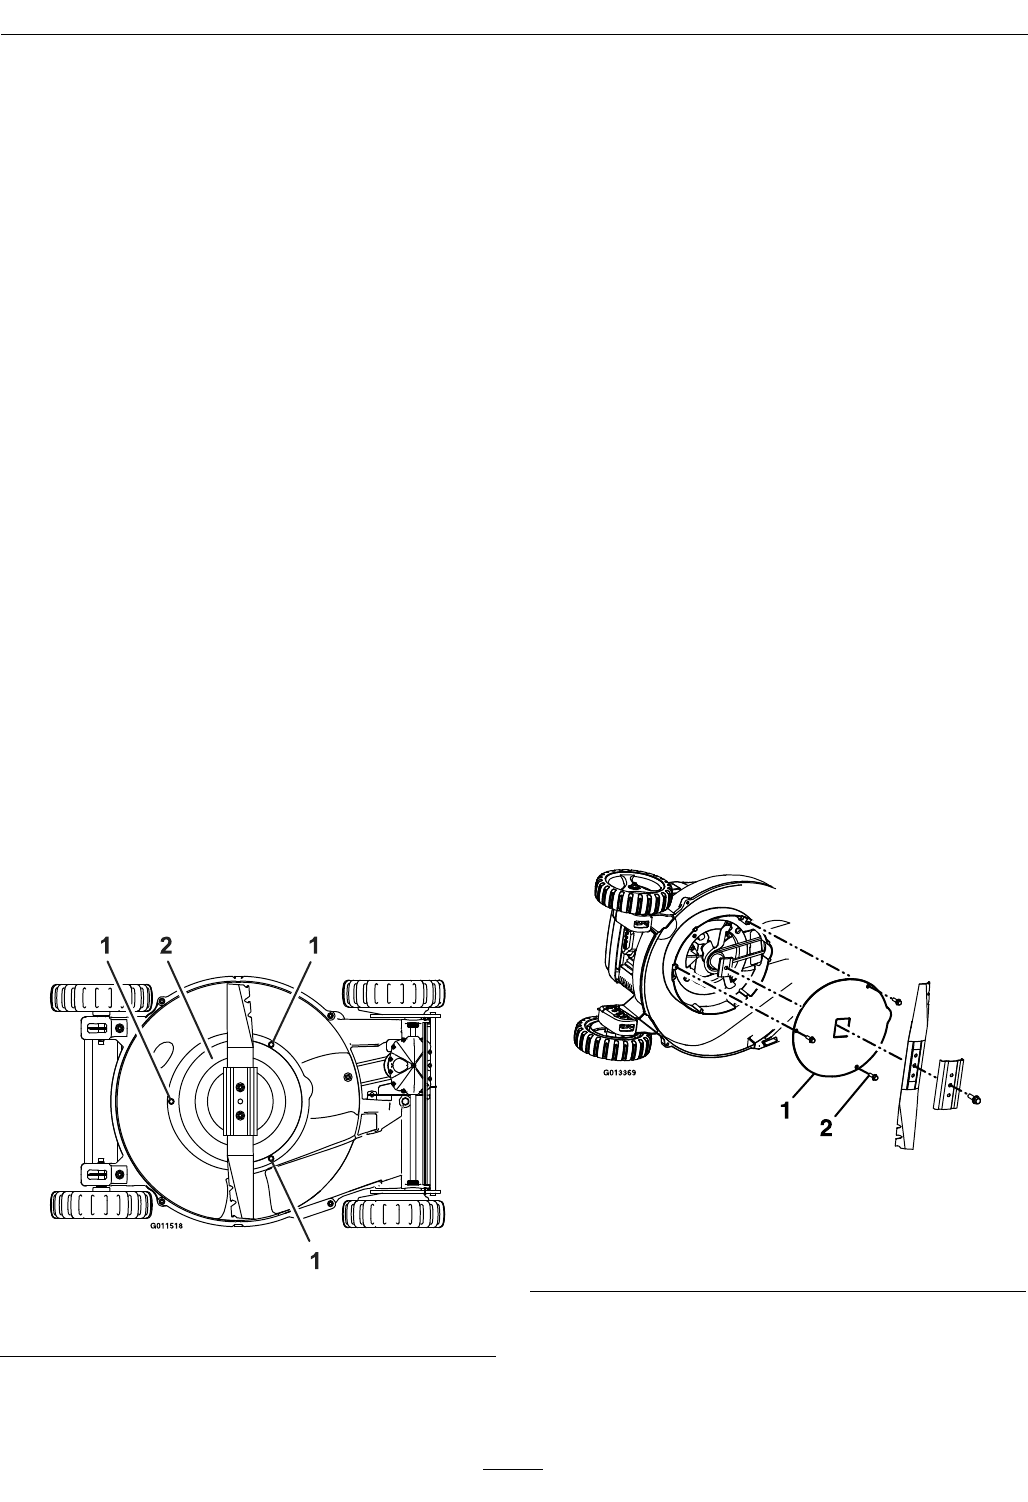
BrakeClutchShield
(BladeBrakeClutchUnits
Only)
ServiceInterval:Every50hours
1.Stoptheengineandwaitforallmovingpartsto
stop.
2.Disconnectthewirefromthesparkplug(see
Figure9andFigure10).
3.Drainthegasolinefromthefueltank.Referto
EmptyingtheFuelTankandCleaningthe
FuelFiltersection.
4.Tipthelawnmowerontoitsrightside(airlter
up).
5.Removethebladenutsandtheblade(see
Figure24).
Figure34
1.Screws2.BBCShield
6.RemovethethreescrewsholdingtheBBCshield
ontotheunit(seeFigure34).
7.RemovetheBBCshieldandbrushorblowall
thedebrisfromundertheshieldandaroundthe
BBCsystem.
8.InstalltheBBCshield.Tightenthescrewsto
securetheBBCshieldtothedeck.
9.Installthebladeandthetwobladenuts.
10.Turnthelawnmowerupright.
11.Connectthewiretothesparkplug.
CleaningUndertheCover
Plate(Non-BladeBrake
ClutchUnitsOnly)
ServiceInterval:Every50hours
1.Stoptheengineandwaitforallmovingpartsto
stop.
2.Disconnectthewirefromthesparkplug(see
Figure9andFigure10).
3.Drainthegasolinefromthefueltank.Referto
EmptyingtheFuelTankandCleaningthe
FuelFiltersection.
4.Tipthelawnmowerontoitsrightside(airlter
up).
5.Removethebladebolt,bladesupport,andthe
blade(seeFigure24).
Figure35
1.Bladebolt4.Coverplate
2.Bladesupport5.Screw
3.Blade
6.Removethethreescrewsholdingthecoverplate
ontotheunit(seeFigure35).
7.Removethecoverplateandbrushorblowallthe
debrisfromundertheplate.
31

Maintenance
8.Reinstallthecoverplateandtorquethescrewsto
35-45ft-lb(47-61N-m).
9.Installtheblade,bladesupport,andtheblade
bolt.
10.Turnthelawnmowerupright.
11.Connectthewiretothesparkplug.
WasteDisposal
MotorOilDisposal
Engineoilandhydraulicoilarebothpollutantsto
theenvironment.Disposeofusedoilatacertied
recyclingcenteroraccordingtoyourstateandlocal
regulations.
32

Storage
Storage
PreparingtheFuelSystem
Topreparethelawnmowerforoffseasonstorage,
performtherecommendedmaintenanceprocedures.
Storethelawnmowerinacool,clean,dryplace.
Coverthelawnmowertokeepitcleanandprotected.
WARNING
Gasolinecanvaporizeifyoustoreitoverlong
periodsoftime.Gasolinevaporscanexplodeif
theycomeintocontactwithanopename.
•DoNotstoregasolineoverlongperiodsof
time.
•DoNotstorethelawnmowerwithgasolinein
thefueltankorthecarburetorinanenclosure
withanopename.(Forexample,afurnace
orawaterheaterpilotlight.)
•Allowtheenginetocoolbeforestoringitin
anyenclosure.
Emptythefueltankwhenmowingthelasttime
beforestoringthelawnmower.
1.Runthelawnmoweruntiltheenginestopsfrom
runningoutoffuel.
2.Primetheengineandstartitagain.
3.Allowtheenginetorununtilitstops.Whenyou
cannolongerstarttheengineitissufcientlydry.
PreparingtheEngine
1.Whiletheengineisstillwarm,changetheoilfrom
thecrankcase.RefertoChangeEngineOil
sectioninMaintenance.
2.Removethesparkplug.
3.Usinganoilcan,addaboutonetablespoonofoil
tothecrankcasethroughthesparkplughole.
4.Slowlyrotatetheengineseveraltimes,usingthe
starterrope,todistributetheoil.
5.InstallthesparkplugbutDoNotconnectthe
wiretothesparkplug.
GeneralStorageInformation
1.Cleanthelawnmowerhousing.Referto
CleaningtheUndersideoftheLawnMower
HousingsectioninCleaning.
2.Cleananydirtandchafffromthecylinder,
cylinderheadns,andblowerhousing.
3.Removegrassclippings,dirt,andgrimefromthe
externalpartsoftheengine,theshrouding,and
thetopofthelawnmowerhousing.
4.CleantheBBCshield.RefertoCleaningthe
BladeBrakeClutchShieldsectioninCleaning.
5.Checktheconditionoftheblade.Refer
toMaintainingtheBladesectioninthe
Maintenance.
6.Servicetheairlter.RefertoServicingtheAir
FilterinMaintenance.
7.Tightenallnuts,bolts,andscrews.
8.Touchupallrustedorchippedpaintsurfaceswith
paintavailablefromanAuthorizedServiceDealer.
RemovingtheLawnMower
fromStorage
1.Checkandtightenallfasteners.
2.Removethesparkplugandspintheenginerapidly
bypullingthestarterropetoblowexcessoilfrom
thecylinder.
3.Cleanthesparkplugorreplaceitifitiscracked,
broken,oriftheelectrodesareworn.
4.Installthesparkplugandtorqueitto17ft-lb(23
N-m).
5.Performanyneededmaintenanceprocedures.
6.Fillthefuelinthefueltankwithfreshgasoline.
7.Checktheengineoillevel.
8.Connectthewiretothesparkplug.
33

Troubleshooting
Troubleshooting
Important:Itisessentialthatalloperatorsafetymechanismsbeconnectedandinproperoperating
conditionpriortomoweruse.
Whenaproblemoccurs,DoNotoverlookthesimplecauses.Forexample:startingproblemscouldbe
causedbyanemptyfueltank.
Thefollowingtablelistssomeofthecommoncausesoftrouble.Ifaproblemcontinues,contactanAuthorized
ServiceDealer.
ProblemPossibleCauseCorrectiveAction
1.Fueltankisempty.1.Fillthefueltank.
2.Fuelshutoffvalveisclosed.2.Openthefuelshutoffvalve.
3.Thethrottleleverisnotinthecorrect
position.
3.MovethethrottlelevertotheChoke
position.
4.Dirt,water,orstalefuelisinthefuel
system.
4.ContactanAuthorizedServiceDealer.
5.Faultysparkplug.5.Clean,adjustorreplacesparkplug.
Enginewillnotstart,startshard,orfailsto
keeprunning.
6.Sparkplugwireisnotconnected.6.Checkthesparkplugwireconnection.
1.Aircleanerisdirty.1.Cleanorreplacetheaircleanerelement.
2.Oillevelinthecrankcaseislow .2.Addoiltothecrankcase.
3.Ventholeinthefuelcapisplugged.3.Cleanorreplacethefuelcap.
4.Dirtinfuellter.4.Replacethefuellter.
5.Dirt,water,orstalefuelisinthefuel
system.
5.ContactanAuthorizedServiceDealer.
Enginelosespower.
6.Theundersideofthelawnmowerdeck
containsclippingsanddebris.
6.Cleantheundersideofthelawnmower
deck.
1.Thewireisnotconnectedtothespark
plug.
1.Connectthewiretothesparkplug.
2.Faultysparkplug.2.Clean,adjustorreplacesparkplug.
3.ThethrottleleverisnotintheFast
position.
3.MovethethrottlelevertotheFast
position.
Enginerunsrough.
4.Theairlterelementisdirtyandis
restrictingtheairow.
4.Cleantheairlterpre-cleanerand/or
replacethepaperairlter.
1.Thebladeisbentorisoutofbalance.1.Balancetheblade.Ifthebladeisbent,
replaceit.
2.Theblademountingboltisloose.2.Tightentheblademountingbolt.
3.Theundersideofthelawnmowerdeck
containsclippingsanddebris.
3.Cleantheundersideofthelawnmower
deck.
Lawnmowerorenginevibratesexcessively.
4.Theenginemountingboltsareloose.4.Tightentheenginemountingbolts.
1.Allfourwheelsarenotatthesameheight.1.Placeallfourwheelsatthesameheight.
2.Thebladeisdull.2.Sharpenandbalancetheblade.
3.Mowinginthesamepatternrepeatedly.3.Changethemowingpattern.
Unevencuttingpattern.
4.Theundersideofthelawnmowerdeck
containsclippingsanddebris.
4.Cleantheundersideofthelawnmower
deck.
1.ThethrottleleverisnotintheFast
position.
1.MovethethrottlelevertotheFast
position.
2.Cuttingtoomuchgrassinonepass2.Raisethecuttingheight.Ifnecessary,cut
asecondtimeatlowercuttingheight.
3.Mowingtoofast.3.Slowdown.
4.Thegrassiswet.4.Allowthegrasstodrybeforemowing.
Dischargechuteplugs.
5.Theundersideofthelawnmowerdeck
containsclippingsanddebris.
5.Cleantheundersideofthelawnmower
deck.
34

Troubleshooting
ProblemPossibleCauseCorrectiveAction
1.Theself-propeldrivecableisoutof
adjustmentorisdamaged.
1.Adjusttheself-propeldrivecable.Replace
thecableifnecessary.
Lawnmowerdoesnotself-propel.
(Self-PropelUnitsOnly)
2.Thereisdebrisunderthebeltcover.2.Cleanthedebrisfromunderthebelt
cover.
Difculttopulllawnmowerrearward
(Self-PropelledUnitsOnly).
1.Transmissionislocked.1.Pushmowerforwardtodisengagethe
transmissionandthenpullrearward.
35

Conditions and Products Covered
Exmark Mfg. Co. Inc. and its affiliate, Exmark Warranty
Company, pursuant to an agreement between them, jointly
warrant on the terms and conditions herein, that we will repair,
replace or adjust any part on these products and found by us
(in the exercise of our reasonable discretion) to be defective in
factory materials or workmanship for a period of one year.
This warranty applies to Exmark commercial equipment sold
in the U.S. or Canada. This warranty may only be assigned or
transferred to a second (or third) owner by an authorized
Exmark dealer. The warranty period commences upon the date
of the original retail purchase.
Warranty Exceptions Warranty Period
• Bags, Belts and Tires 90 days
• Battery 1 Year Prorated
• Engine *
* The Engine warranty is covered by the engine manufacturer.
Please refer to the engine manufacturer’s warranty statement
that is included in the literature packet.
This warranty only includes the cost of parts and labor.
Items and Conditions Not Covered
This warranty does not cover the following:
• Pickup and delivery charges to and from any authorized
Exmark Service Dealer.
• Any damage or deterioration due to normal use, wear and
tear, or exposure including standard service items such as
blades, brushes, cutting teeth, tines, bushings, bearings,
chains, or sprockets.
• Cost of regular maintenance service or parts, such as filters,
fuel, lubricants, tune-up parts, and adjustments.
• Any product or part which has been altered or misused or
required replacement or repair due to normal wear,
accidents, or lack of proper maintenance.
• Any repairs necessary due to use of parts, accessories or
supplies, including gasoline, oil or lubricants, incompatible
with the equipment or other than as recommended in
the operator's manual or other operational instructions
provided by Exmark.
There are no other express warranties except for engine and
special emission system coverage.
All warranty work must be performed by an authorized
Exmark Service Dealer using Exmark approved replacement
parts.
Instructions for Obtaining Warranty Service
The product must be registered with original proof of purchase
by an Exmark Service Dealer before obtaining any warranty
service.
Contact any Exmark Service Dealer to arrange service at their
dealership. To locate a dealer convenient to you, access our
website at www.exmark.com. U.S. or Canada customers may
also call 402-223-6375.
If for any reason you are dissatisfied with the Service Dealer’s
analysis or with the assistance provided, contact us at:
Exmark Customer Service Department
The Exmark Warranty Company
2101 Ashland Avenue
Beatrice, NE 68310
402-223-6375 or
service@exmark.com
Owner’s Responsibilities
If your product requires warranty service it must be returned
to an authorized Exmark service dealer within the warranty
period. This warranty extends only to equipment operated
under normal conditions. You must read the operator’s
manual. You must also properly service and maintain your
Exmark product as described in the operator’s manual. Such
routine maintenance, whether performed by a dealer or by
you, is at your expense.
General Conditions
The sole liability of Exmark and Exmark Warranty Company
with respect to this warranty shall be repair or replacement of
defective components as set forth herein. Neither Exmark
nor Exmark Warranty Company shall be liable for any
incidental or consequential loss or damage.
Such damages include but are not limited to:
• Expenses related to gasoline, oil or lubricants.
• Travel time, overtime, after hours time or other
extraordinary repair charges or charges relating to repairs or
replacements outside of normal business hours at the place
of business of the authorized Exmark Service Dealer.
• Rental of like or similar replacement equipment during the
period of any warranty, repair or replacement work.
• Any telephone or telegram charges or travel charges.
• Loss or damage to person or property other than that
covered by the terms of this warranty.
• Any claims for lost revenue, lost profit or additional cost as
a result of a claim of breach of warranty.
• Attorney's fees.
No Claim of breach of warranty shall be cause for cancellation
or rescission of the contract of sale of any Exmark mower.
All implied warranties of merchantability (that the
product is fit for ordinary use) and fitness for use (that the
product is fit for a particular purpose) are limited to the
duration of the express warranty.
Some states do not allow exclusions of incidental or
consequential damages, or limitations on how long an
implied warranty lasts, so the above exclusions and
limitations may not apply to you.
This warranty gives you specific legal rights, and you may
also have other rights which vary from state to state.
Exmark Commercial Equipment
1 Year Limited Warranty
G4500-426_D
36

Notes:
37

ServiceRecord
Date:DescriptionofWorkDone:ServiceDoneBy:
38

39

MID-MOUNT RIDING ACCESSORIES AND OPTIONS
SEE EXMARK’S COMPLETE LINE OF ACCESSORIES AND OPTIONS
WALK-BEHIND ACCESSORIES AND OPTIONS
GRASS CATCHER
MICRO-MULCH SYSTEM
TURF STRIPER
STANDON
CUSTOM RIDE SEAT SUSPENSION SYSTEM
FULL SUSPENSION SEAT
DECK LIFT ASSIST KIT
HITCH KIT
LIGHT KIT
12V POWER PORT
MICRO-MULCH SYSTEM
OPERATOR CONTROLLED DISCHARGE
ROLL OVER PROTECTION SYSTEM (ROPS)
SUN SHADE
TRASH CONTAINER
TURF STRIPER
ULTRA VAC COLLECTION SYSTEM
ULTRA VAC QUICK DISPOSAL SYSTEM
OUT-FRONT RIDING ACCESSORIES AND OPTIONS
CUSTOM RIDE SEAT SUSPENSION SYSTEM
DUAL-TAIL WHEEL
FLOOR PAN EXTENDER
HITCH KIT
LIGHT KIT
MICRO-MULCH SYSTEM
ROLL OVER PROTECTION SYSTEM (ROPS)
SNOW BLADE
SNOWBLOWER
SUN SHADE
TRASH CONTAINER
ULTRA VAC COLLECTION SYSTEM
ULTRA VAC QUICK DISPOSAL SYSTEM
WEATHER CAB
PlaceModelNo.andSerialNo.
LabelHere(IncludedintheLiterature
Pack)orFillinBelow
DatePurchased
EngineModelNo.andSpec.No.
ModelNo.EngineSerialNo.(E/No)
SerialNo.
©2011ExmarkMfg.Co.,Inc.
IndustrialParkBox808
Beatrice,NE68310
AllRightsReserved
PartNo.4500-927Rev.A
(402)223-6300
Fax(402)223-5489
PrintedintheUSA
www.exmark.com
