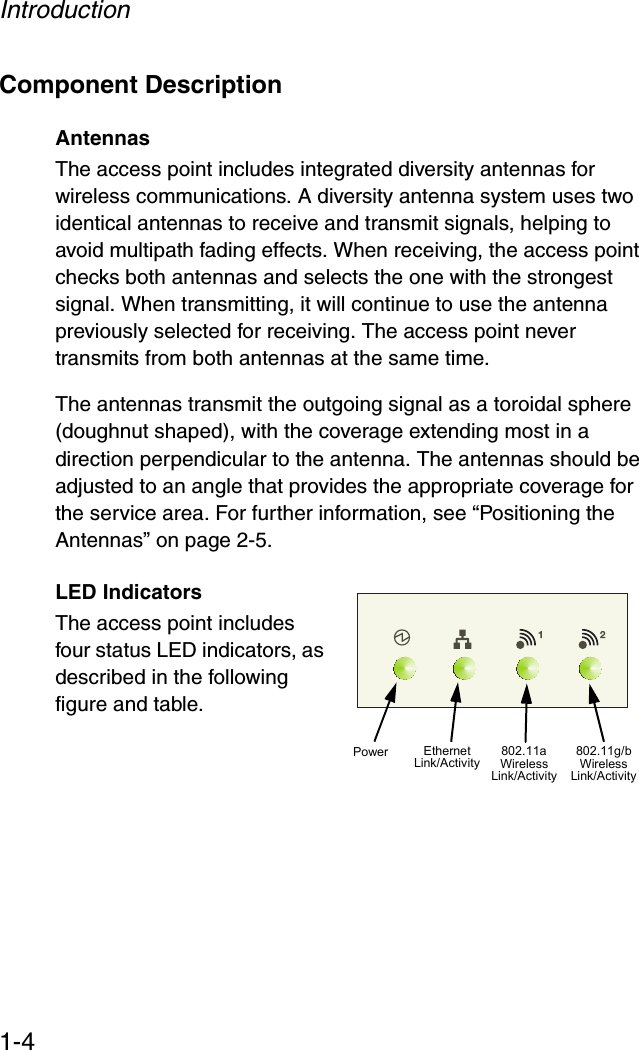
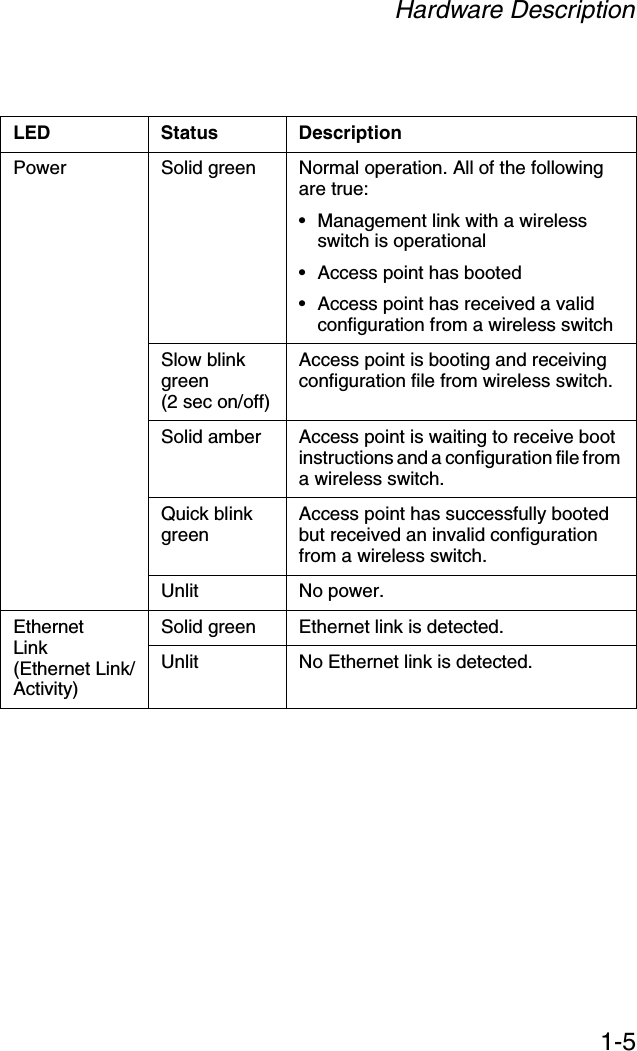
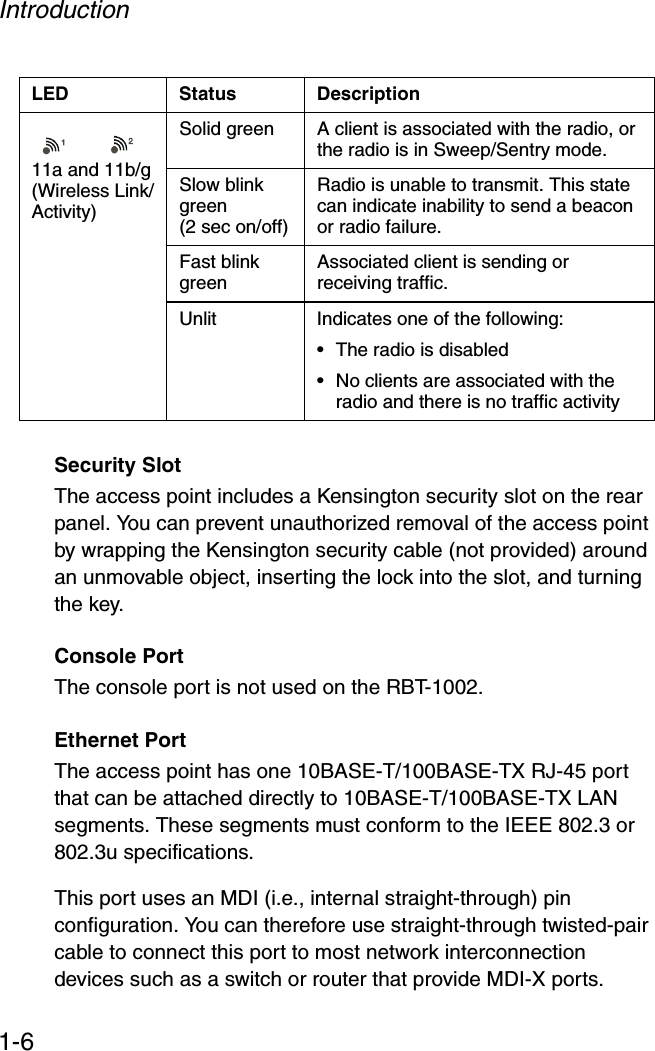
Extreme Networks RBT1002 WLAN 11a+b/g Access Point User Manual WA6102X 60

Extreme Networks, Inc. WLAN 11a+b/g Access Point WA6102X 60

Users Manual

P/N 9034169-01RoamAboutRBT-10022.4 GHz / 5 GHz Wireless Access PointInstallation Guide
iNoticeENTERASYS NETWORKS reserves the right to make changes in specifications and other information contained in this document and its web site without prior notice. The reader should in all cases consult ENTERASYS NETWORKS to determine whether any such changes have been made.The hardware, firmware, or software described in this document is subject to change without notice.IN NO EVENT SHALL ENTERASYS NETWORKS BE LIABLE FOR ANY INCIDENTAL, INDIRECT, SPECIAL, OR CONSEQUENTIAL DAMAGES WHATSOEVER (INCLUDING BUT NOT LIMITED TO LOST PROFITS) ARISING OUT OF OR RELATED TO THIS DOCUMENT, WEB SITE, OR THE INFORMATION CONTAINED IN THEM, EVEN IF ENTERASYS NETWORKS HAS BEEN ADVISED OF, KNEW OF, OR SHOULD HAVE KNOWN OF, THE POSSIBILITY OF SUCH DAMAGES.Enterasys Networks, Inc.50 Minuteman RoadAndover, MA 01810© 2005 Enterasys Networks, Inc. All rights reserved.Printed in TaiwanRelease Date: September 2005ENTERASYS NETWORKS, ENTERASYS ROAMABOUT, LANVIEW, ROAMABOUT, NETSIGHT, WEBVIEW, and any logos associated therewith, are trademarks or registered trademarks of Enterasys Networks, Inc. in the United States and other countries.All other product names mentioned in this manual may be trademarks or registered trademarks of their respective companies.Documentation URL: http://www.enterasys.com/support/manualsELECTRICAL HAZARD: Only qualified personnel should perform installation procedures.
NoticeiiEnterasys Networks, Inc.Firmware License AgreementBEFORE OPENING OR UTILIZING THE ENCLOSED PRODUCT,CAREFULLY READ THIS LICENSE AGREEMENT.This document is an agreement (“Agreement”) between the end user (“You”) and Enterasys Networks, Inc. on behalf of itself and its Affiliates (as hereinafter defined) (“Enterasys”) that sets forth Your rights and obligations with respect to the Enterasys software program/firmware installed on the Enterasys product (including any accompanying documentation, hardware or media) (“Program”) in the package and prevails over any additional, conflicting or inconsistent terms and conditions appearing on any purchase order or other document submitted by You. “Affiliate” means any person, partnership, corporation, limited liability company, or other form of enterprise that directly or indirectly through one or more intermediaries, controls, or is controlled by, or is under common control with the party specified. This Agreement constitutes the entire understanding between the parties, and supersedes all prior discussions, representations, understandings or agreements, whether oral or in writing, between the parties with respect to the subject matter of this Agreement. The Program may be contained in firmware, chips or other media.BY INSTALLING OR OTHERWISE USING THE PROGRAM, YOU REPRESENT THAT YOU ARE AUTHORIZED TO ACCEPT THESE TERMS ON BEHALF OF THE END USER (IF THE END USER IS AN ENTITY ON WHOSE BEHALF YOU ARE AUTHORIZED TO ACT, “YOU” AND “YOUR” SHALL BE DEEMED TO REFER TO SUCH ENTITY) AND THAT YOU AGREE THAT YOU ARE BOUND BY THE TERMS OF THIS AGREEMENT, WHICH INCLUDES, AMONG OTHER PROVISIONS, THE LICENSE, THE DISCLAIMER OF WARRANTY AND THE LIMITATION OF LIABILITY. IF YOU DO NOT AGREE TO THE TERMS OF THIS AGREEMENT OR ARE NOT AUTHORIZED TO ENTER INTO THIS AGREEMENT, ENTERASYS IS UNWILLING TO LICENSE THE PROGRAM TO YOU AND YOU AGREE TO RETURN THE UNOPENED PRODUCT TO ENTERASYS OR YOUR DEALER, IF ANY, WITHIN TEN (10) DAYS FOLLOWING THE DATE OF RECEIPT FOR A FULL REFUND.IF YOU HAVE ANY QUESTIONS ABOUT THIS AGREEMENT, CONTACT ENTERASYS NETWORKS, LEGAL DEPARTMENT AT (978) 684-1000. You and Enterasys agree as follows:1. LICENSE. You have the non-exclusive and non-transferable right to use only the one (1) copy of the Program provided in this package subject to the terms and conditions of this Agreement.2. RESTRICTIONS. Except as otherwise authorized in writing by Enterasys, You may not, nor may You permit any third party to:(i) Reverse engineer, decompile, disassemble or modify the Program, in whole or in part, including for reasons of error correction or interoperability, except to the extent expressly permitted by applicable law and to the extent the parties shall not be permitted by that applicable law, such rights are expressly excluded. Information necessary to achieve interoperability or correct errors is available from Enterasys upon request and upon payment of Enterasys’ applicable fee.
Noticeiii(ii) Incorporate the Program, in whole or in part, in any other product or create derivative works based on the Program, in whole or in part.(iii) Publish, disclose, copy, reproduce or transmit the Program, in whole or in part.(iv) Assign, sell, license, sublicense, rent, lease, encumber by way of security interest, pledge or otherwise transfer the Program, in whole or in part.(v) Remove any copyright, trademark, proprietary rights, disclaimer or warning notice included on or embedded in any part of the Program.3. APPLICABLE LAW. This Agreement shall be interpreted and governed under the laws and in the state and federal courts of the Commonwealth of Massachusetts without regard to its conflicts of laws provisions. You accept the personal jurisdiction and venue of the Commonwealth of Massachusetts courts. None of the 1980 United Nations Convention on Contracts for the International Sale of Goods, the United Nations Convention on the Limitation Period in the International Sale of Goods, and the Uniform Computer Information Transactions Act shall apply to this Agreement. 4. EXPORT RESTRICTIONS. You understand that Enterasys and its Affiliates are subject to regulation by agencies of the U.S. Government, including the U.S. Department of Commerce, which prohibit export or diversion of certain technical products to certain countries, unless a license to export the Program is obtained from the U.S. Government or an exception from obtaining such license may be relied upon by the exporting party.If the Program is exported from the United States pursuant to the License Exception CIV under the U.S. Export Administration Regulations, You agree that You are a civil end user of the Program and agree that You will use the Program for civil end uses only and not for military purposes. If the Program is exported from the United States pursuant to the License Exception TSR under the U.S. Export Administration Regulations, in addition to the restriction on transfer set forth in Sections 1 or 2 of this Agreement, You agree not to (i) reexport or release the Program, the source code for the Program or technology to a national of a country in Country Groups D:1 or E:2 (Albania, Armenia, Azerbaijan, Belarus, Bulgaria, Cambodia, Cuba, Estonia, Georgia, Iraq, Kazakhstan, Kyrgyzstan, Laos, Latvia, Libya, Lithuania, Moldova, North Korea, the People’s Republic of China, Romania, Russia, Rwanda, Tajikistan, Turkmenistan, Ukraine, Uzbekistan, Vietnam, or such other countries as may be designated by the United States Government), (ii) export to Country Groups D:1 or E:2 (as defined herein) the direct product of the Program or the technology, if such foreign produced direct product is subject to national security controls as identified on the U.S. Commerce Control List, or (iii) if the direct product of the technology is a complete plant or any major component of a plant, export to Country Groups D:1 or E:2 the direct product of the plant or a major component thereof, if such foreign produced direct product is subject to national security controls as identified on the U.S. Commerce Control List or is subject to State Department controls under the U.S. Munitions List.5. UNITED STATES GOVERNMENT RESTRICTED RIGHTS. The enclosed Program (i) was developed solely at private expense; (ii) contains “restricted computer software” submitted with restricted rights in accordance with section 52.227-19 (a) through (d) of the Commercial Computer Software-Restricted Rights Clause and its successors, and (iii) in all respects is proprietary data belonging to Enterasys and/or its suppliers. For Department of Defense units, the Program is considered commercial computer software in accordance with DFARS section 227.7202-3 and its successors, and use, duplication, or disclosure by the Government is subject to restrictions set forth herein.
Noticeiv6. DISCLAIMER OF WARRANTY. EXCEPT FOR THOSE WARRANTIES EXPRESSLY PROVIDED TO YOU IN WRITING BY ENTERASYS, ENTERASYS DISCLAIMS ALL WARRANTIES, EITHER EXPRESS OR IMPLIED, INCLUDING BUT NOT LIMITED TO IMPLIED WARRANTIES OF MERCHANTABILITY, SATISFACTORY QUALITY, FITNESS FOR A PARTICULAR PURPOSE, TITLE AND NON- INFRINGEMENT WITH RESPECT TO THE PROGRAM. IF IMPLIED WARRANTIES MAY NOT BE DISCLAIMED BY APPLICABLE LAW, THEN ANY IMPLIED WARRANTIES ARE LIMITED IN DURATION TO THIRTY (30) DAYS AFTER DELIVERY OF THE PROGRAM TO YOU. 7. LIMITATION OF LIABILITY. IN NO EVENT SHALL ENTERASYS OR ITS SUPPLIERS BE LIABLE FOR ANY DAMAGES WHATSOEVER (INCLUDING, WITHOUT LIMITATION, DAMAGES FOR LOSS OF BUSINESS, PROFITS, BUSINESS INTERRUPTION, LOSS OF BUSINESS INFORMATION, SPECIAL, INCIDENTAL, CONSEQUENTIAL, OR RELIANCE DAMAGES, OR OTHER LOSS) ARISING OUT OF THE USE OR INABILITY TO USE THE PROGRAM, EVEN IF ENTERASYS HAS BEEN ADVISED OF THE POSSIBILITY OF SUCH DAMAGES. THIS FOREGOING LIMITATION SHALL APPLY REGARDLESS OF THE CAUSE OF ACTION UNDER WHICH DAMAGES ARE SOUGHT.THE CUMULATIVE LIABILITY OF ENTERASYS TO YOU FOR ALL CLAIMS RELATING TO THE PROGRAM, IN CONTRACT, TORT OR OTHERWISE, SHALL NOT EXCEED THE TOTAL AMOUNT OF FEES PAID TO ENTERASYS BY YOU FOR THE RIGHTS GRANTED HEREIN. 8. AUDIT RIGHTS. You hereby acknowledge that the intellectual property rights associated with the Program are of critical value to Enterasys and, accordingly, You hereby agree to maintain complete books, records and accounts showing (i) license fees due and paid, and (ii) the use, copying and deployment of the Program. You also grant to Enterasys and its authorized representatives, upon reasonable notice, the right to audit and examine during Your normal business hours, Your books, records, accounts and hardware devices upon which the Program may be deployed to verify compliance with this Agreement, including the verification of the license fees due and paid Enterasys and the use, copying and deployment of the Program. Enterasys’ right of examination shall be exercised reasonably, in good faith and in a manner calculated to not unreasonably interfere with Your business. In the event such audit discovers non-compliance with this Agreement, including copies of the Program made, used or deployed in breach of this Agreement, You shall promptly pay to Enterasys the appropriate license fees. Enterasys reserves the right, to be exercised in its sole discretion and without prior notice, to terminate this license, effective immediately, for failure to comply with this Agreement. Upon any such termination, You shall immediately cease all use of the Program and shall return to Enterasys the Program and all copies of the Program.9. OWNERSHIP. This is a license agreement and not an agreement for sale. You acknowledge and agree that the Program constitutes trade secrets and/or copyrighted material of Enterasys and/or its suppliers. You agree to implement reasonable security measures to protect such trade secrets and copyrighted material. All right, title and interest in and to the Program shall remain with Enterasys and/or its suppliers. All rights not specifically granted to You shall be reserved to Enterasys.
Noticev10. ENFORCEMENT. You acknowledge and agree that any breach of Sections 2, 4, or 9 of this Agreement by You may cause Enterasys irreparable damage for which recovery of money damages would be inadequate, and that Enterasys may be entitled to seek timely injunctive relief to protect Enterasys’ rights under this Agreement in addition to any and all remedies available at law. 11. ASSIGNMENT. You may not assign, transfer or sublicense this Agreement or any of Your rights or obligations under this Agreement, except that You may assign this Agreement to any person or entity which acquires substantially all of Your stock or assets. Enterasys may assign this Agreement in its sole discretion. This Agreement shall be binding upon and inure to the benefit of the parties, their legal representatives, permitted transferees, successors and assigns as permitted by this Agreement. Any attempted assignment, transfer or sublicense in violation of the terms of this Agreement shall be void and a breach of this Agreement.12. WAIVER. A waiver by Enterasys of a breach of any of the terms and conditions of this Agreement must be in writing and will not be construed as a waiver of any subsequent breach of such term or condition. Enterasys’ failure to enforce a term upon Your breach of such term shall not be construed as a waiver of Your breach or prevent enforcement on any other occasion.13. SEVERABILITY. In the event any provision of this Agreement is found to be invalid, illegal or unenforceable, the validity, legality and enforceability of any of the remaining provisions shall not in any way be affected or impaired thereby, and that provision shall be reformed, construed and enforced to the maximum extent permissible. Any such invalidity, illegality or unenforceability in any jurisdiction shall not invalidate or render illegal or unenforceable such provision in any other jurisdiction.14. TERMINATION. Enterasys may terminate this Agreement immediately upon Your breach of any of the terms and conditions of this Agreement. Upon any such termination, You shall immediately cease all use of the Program and shall return to Enterasys the Program and all copies of the Program.
Noticevi
viiCOMPLIANCESFederal Communication Commission Interference StatementThis equipment has been tested and found to comply with the limits for a Class B digital device, pursuant to Part 15 of the FCC Rules. These limits are designed to provide reasonable protection against harmful interference in a residential installation. This equipment generates, uses and can radiate radio frequency energy and, if not installed and used in accordance with the instructions, may cause harmful interference to radio communications. However, there is no guarantee that interference will not occur in a particular installation. If this equipment does cause harmful interference to radio or television reception, which can be determined by turning the equipment off and on, the user is encouraged to try to correct the interference by one of the following measures:• Reorient or relocate the receiving antenna• Increase the separation between the equipment and receiver• Connect the equipment into an outlet on a circuit different from that to which the receiver is connected• Consult the dealer or an experienced radio/TV technician for helpFCC Caution: Any changes or modifications not expressly approved by the party responsible for compliance could void the user's authority to operate this equipment. This device complies with Part 15 of the FCC Rules. Operation is subject to the following two conditions: (1) This device may not cause harmful interference, and (2) this device must accept any interference received, including interference that may cause undesired operation.IMPORTANT NOTE:FCC Radiation Exposure StatementThis equipment complies with FCC radiation exposure limits set forth for an uncontrolled environment. This equipment should be installed and operated with a minimum distance of 20 centimeters (8 inches) between the radiator and your body. This transmitter must not be co-located or operating in conjunction with any other antenna or transmitter.Wireless 5 GHz Band Statements:As the Access Point can operate in the 5150-5250 MHz frequency band it is limited by the FCC, Industry Canada and some other countries to indoor use only so as to reduce the potential for harmful interference to co-channel Mobile Satellite systems.
COMPLIANCESviiiHigh power radars are allocated as primary users (meaning they have priority) of the 5250-5350 MHz and 5725-5850 MHz bands. These radars could cause interference and /or damage to the access point when used in Canada.The term “IC:” before the radio certification number only signifies that Industry Canada technical specifications were met.Operating FrequenciesThe user must use the configuration utility provided with this product to ensure the channels of operation are in conformance with the spectrum usage rules for country in which it is being operated.Industry Canada - Class BThis digital apparatus does not exceed the Class B limits for radio noise emissions from digital apparatus as set out in the interference-causing equipment standard entitled “Digital Apparatus,” ICES-003 of Industry Canada. Cet appareil numérique respecte les limites de bruits radioélectriques applicables aux appareils numériques de Classe B prescrites dans la norme sur le matérial brouilleur: “Appareils Numériques,” NMB-003 édictée par l’Industrie.
ixTABLE OF CONTENTS1 Introduction  . . . . . . . . . . . . . . . . . . . . . . . . . . . . .  1-1Package Checklist   . . . . . . . . . . . . . . . . . . . . . . . . . . . . . . . . . 1-2Hardware Description  . . . . . . . . . . . . . . . . . . . . . . . . . . . . . . . 1-3Component Description  . . . . . . . . . . . . . . . . . . . . . . . . . . 1-4Features and Benefits   . . . . . . . . . . . . . . . . . . . . . . . . . . . . . . 1-8System Defaults  . . . . . . . . . . . . . . . . . . . . . . . . . . . . . . . . . . . 1-82 Hardware Installation  . . . . . . . . . . . . . . . . . . . . .  2-13 Configuration   . . . . . . . . . . . . . . . . . . . . . . . . . . .  3-1A Troubleshooting  . . . . . . . . . . . . . . . . . . . . . . . . . A-1B Cables and Pinouts . . . . . . . . . . . . . . . . . . . . . . . B-1Twisted-Pair Cable Assignments  . . . . . . . . . . . . . . . . . . . . . . B-110/100BASE-TX Pin Assignments . . . . . . . . . . . . . . . . . . B-2Straight-Through Wiring . . . . . . . . . . . . . . . . . . . . . . . . . . B-3Crossover Wiring  . . . . . . . . . . . . . . . . . . . . . . . . . . . . . . . B-3C Specifications  . . . . . . . . . . . . . . . . . . . . . . . . . . . C-1General Specifications  . . . . . . . . . . . . . . . . . . . . . . . . . . . . . . C-1Sensitivity . . . . . . . . . . . . . . . . . . . . . . . . . . . . . . . . . . . . . C-4Transmit Power  . . . . . . . . . . . . . . . . . . . . . . . . . . . . . . . . C-5Index
TABLE OF CONTENTSx
1-1Chapter 1IntroductionThe RoamAbout RBT-1002 Wireless Access Point is an IEEE 802.11a/g access point that provides transparent, wireless high-speed data communications between a wired LAN and fixed, portable or mobile devices equipped with an 802.11a, 802.11b or 802.11g wireless adapter. This solution offers fast, reliable wireless connectivity with considerable cost savings over wired LANs (which include long-term maintenance overhead for cabling). Using 802.11a and 802.11g technology, this access point can easily replace a 10 Mbps Ethernet connection or seamlessly integrate into a 10/100 Mbps Ethernet LAN.Radio Characteristics – The IEEE 802.11a/g standard uses a radio modulation technique known as Orthogonal Frequency Division Multiplexing (OFDM), and a shared collision domain (CSMA/CA). It operates at the 5 GHz Unlicensed National Information Infrastructure (UNII) band for connections to 802.11a clients, and at 2.4 GHz for connections to 802.11g clients.IEEE 802.11g includes backward compatibility with the IEEE 802.11b standard. IEEE 802.11b also operates at 2.4 GHz, but uses Direct Sequence Spread Spectrum (DSSS) and Complementary Code Keying (CCK) modulation technology to achieve a communication rate of up to 11 Mbps. The access point supports a 54 Mbps half-duplex connection to Ethernet networks for each active channel.
Introduction1-2Package ChecklistThe RoamAbout RBT-1002 Wireless Access Point package includes:•One RoamAbout 1002 Wireless Access Point •One AC power adapter and power cord•Four rubber feet •Four wall-mounting screws•Bezel•This Installation GuideOptional Wireless Access Point Equipment:•Wall-mounting bracketInform your dealer if there are any incorrect, missing or damaged parts. If possible, retain the carton, including the original packing materials. Use them again to repack the product in case there is a need to return it.
Hardware Description1-3Hardware DescriptionTop PanelRear PanelAntennasLED IndicatorsSecurity Slot 5 VDC Power SocketRJ-45 Port,PoE ConnectorReset Button Console PortBracket Fastening Screw
Introduction1-4Component DescriptionAntennasThe access point includes integrated diversity antennas for wireless communications. A diversity antenna system uses two identical antennas to receive and transmit signals, helping to avoid multipath fading effects. When receiving, the access point checks both antennas and selects the one with the strongest signal. When transmitting, it will continue to use the antenna previously selected for receiving. The access point never transmits from both antennas at the same time.The antennas transmit the outgoing signal as a toroidal sphere (doughnut shaped), with the coverage extending most in a direction perpendicular to the antenna. The antennas should be adjusted to an angle that provides the appropriate coverage for the service area. For further information, see “Positioning the Antennas” on page 2-5.LED IndicatorsThe access point includes four status LED indicators, as described in the following figure and table.Power 802.11a WirelessLink/ActivityEthernetLink/Activity802.11g/b WirelessLink/Activity
Hardware Description1-5LED Status DescriptionPower Solid green Normal operation. All of the following are true:• Management link with a wireless switch is operational• Access point has booted• Access point has received a valid configuration from a wireless switchSlow blink green(2 sec on/off)Access point is booting and receiving configuration file from wireless switch.Solid amber Access point is waiting to receive boot instructions and a configuration file from a wireless switch.Quick blink green Access point has successfully booted but received an invalid configuration from a wireless switch.Unlit No power.Ethernet Link(Ethernet Link/Activity)Solid green Ethernet link is detected.Unlit No Ethernet link is detected.
Introduction1-6Security SlotThe access point includes a Kensington security slot on the rear panel. You can prevent unauthorized removal of the access point by wrapping the Kensington security cable (not provided) around an unmovable object, inserting the lock into the slot, and turning the key.Console PortThe console port is not used on the RBT-1002.Ethernet PortThe access point has one 10BASE-T/100BASE-TX RJ-45 port that can be attached directly to 10BASE-T/100BASE-TX LAN segments. These segments must conform to the IEEE 802.3 or 802.3u specifications. This port uses an MDI (i.e., internal straight-through) pin configuration. You can therefore use straight-through twisted-pair cable to connect this port to most network interconnection devices such as a switch or router that provide MDI-X ports. 11a and 11b/g(Wireless Link/Activity)Solid green A client is associated with the radio, or the radio is in Sweep/Sentry mode.Slow blink green(2 sec on/off)Radio is unable to transmit. This state can indicate inability to send a beacon or radio failure.Fast blink green Associated client is sending or receiving traffic.Unlit Indicates one of the following:• The radio is disabled• No clients are associated with the radio and there is no traffic activityLED Status Description
Hardware Description1-7However, when connecting the access point to a workstation or other device that does not have MDI-X ports, you must use crossover twisted-pair cable.The access point appears as an Ethernet node and performs a bridging function by moving packets from the wired LAN to remote workstations on the wireless infrastructure.Note: The RJ-45 port also supports Power over Ethernet (PoE) based on the IEEE 802.3af standard. Refer to the description for the “Power Connector” for information on supplying power to the access point’s network port from a network device, such as a switch, that provides Power over Ethernet (PoE).Reset ButtonThe reset button has no affect on the RBT-1002.Power ConnectorThe access point does not have a power switch. It is powered on when connected to the AC power adapter, and the power adapter is connected to a power source. The access point automatically adjusts to any voltage between 100-240 volts at 50 or 60 Hz. No voltage range settings are required.The access point may also receive Power over Ethernet (PoE) from a switch or other network device that supplies power over the network cable based on the IEEE 802.3af standard. Note that if the access point is connected to a PoE source device and also connected to a local power source through the AC power adapter, PoE will be disabled.
Introduction1-8Features and Benefits•Local network connection via 10/100 Mbps Ethernet ports or 54 Mbps wireless interface (supporting up to 127 mobile users)•IEEE 802.11a, 802.11b and 802.11g compliant •Interoperable with multiple vendors based on the IEEE 802.11f protocol•Advanced security through 64/128-bit Wired Equivalent Protection (WEP) encryption, IEEE 802.1x authentication via a central RADIUS server, Wi-Fi Protected Access (WPA), and MAC address filtering features to protect your sensitive data and authenticate only authorized users to your network•Provides seamless roaming within the IEEE 802.11a, 802.11b and 802.11g WLAN environment•Scans all available channels and selects the best channel for each client based on the signal-to-noise ratioSystem DefaultsThere are no system defaults on the RBT-1002 because a new image is loaded on the access point with every power cycle.
2-1Chapter 2Hardware Installation1. Select a Site – Choose a proper place for the access point. In general, the best location is at the center of your wireless coverage area, within line of sight of all wireless devices. Try to place the access point in a position that can best cover its Basic Service Set. For optimum performance, consider these points:• Mount the access point as high as possible above any obstructions in the coverage area.• Avoid mounting next to or near building support columns or other obstructions that may cause reduced signal or null zones in parts of the coverage area.• Mount away from any signal absorbing or reflecting structures (such as those containing metal)Note:   The supplied bezel should not be used when mounting on a plenum ceiling.2. Mount the Access Point – The access point can be mounted on any horizontal surface or a wall.Mounting on a horizontal surface – To keep the access point from sliding on the surface, attach the four rubber feet provided in the accessory kit to the marked circles on the bottom of the access point.
Hardware Installation2-2Mounting on a wall – The access point should be mounted only to a wall or wood surface that is at least 1/2-inch plywood or its equivalent. To mount the access point on a wall, always use its wall-mounting bracket. a. Using the mounting bracket, mark the position of the four screw holes on the wall. For concrete or brick walls, you will need to drill holes and insert wall plugs for the screws.b. Position the mounting bracket over the wall screw holes, then insert the included screws and tighten them down to secure the bracket firmly to the wall.c. Attach the access point to the mounting bracket. Line up the two mounting points on the bracket with the two mounting slots on the bottom of the access point (see the following figure). Place the mounting points of the bracket into the mounting slots of the bracket, slide it into position so that the bracket fastening screw on the access point
Hardware Installation2-3lines up with the tab on the bracket. Then screw down the fastening screw to secure the access point to the bracket.MountingPointsMountingSlotsBracketFasteningScrewAlign this tab with the Fastening Screw
Hardware Installation2-43. Lock the Access Point in Place – To prevent unauthorized removal of the access point, you can use a Kensington Slim MicroSaver security cable (not included) to attach the access point to a fixed object.4. Connect the Ethernet Cable – The access point can be wired to a 10/100 Mbps Ethernet network through a device such as a hub or a switch. Connect your network to the RJ-45 port on the back panel with category 3, 4, or 5 UTP Ethernet cable. When the access point and the connected device are powered on, the Ethernet Link LED should light indicating a valid network connection.Note: The RJ-45 port on the access point uses an MDI pin configuration, so you must use straight-through cable for network connections to hubs or switches that only have MDI-X ports, and crossover cable for network connections to PCs, servers or other end nodes that only have MDI ports. However, if the device to which you are connecting supports auto-MDI/MDI-X operation, you can use either straight-through or crossover cable.5. Connect the Power Cord – Connect the power adapter to the access point, and the power cord to an AC power outlet. Otherwise, the access point can derive its operating power directly from the RJ-45 port when connected to a device that provides IEEE 802.3af compliant Power over Ethernet (PoE). Note: If the access point is connected to both a PoE source device and an AC power source, PoE will be disabled.Warning: Use ONLY the power adapter supplied with this access point. Otherwise, the product may be damaged.
Hardware Installation2-56. Observe the Self Test – When you power on the access point, verify that the Power indicator stops blinking and remains on green, and that the other indicators start functioning as described under “LED Indicators” on page 1-4. If the Power LED does not stop blinking or turns on yellow, the self test has not completed correctly. Refer to the RoamAbout Mobility System Software Configuration Guide for troubleshooting information.7. Position the Antennas – Each antenna emits a radiation pattern that is a toroidal sphere (doughnut shaped), with the coverage extending most in the direction perpendicular to the antenna. Therefore, the antennas should be oriented so that the radio coverage pattern fills the intended horizontal space. Also, the diversity antennas should both be positioned along the same axes, providing the same coverage area. For example, if the access point is mounted on a horizontal surface, both antennas should be positioned pointing vertically up to provide optimum coverage.If you choose to use the supplied bezel, position the bezel directly over the access point so that the LED holes line up with the LEDs on the unit and snap the bezel into place, as shown in the following diagram:
Hardware Installation2-6To remove the bezel, grasp both sides and gently pry away from the fastening slots located on each antenna side. Pull the bezel clear of the access point.BezelFastening Slot
3-1Chapter 3ConfigurationAll configuration of the RBT-1002 is done from the RoamAbout wireless switch and the RoamAbout Switch Manager interface.Refer to the RoamAbout Switch Manager User Guide and the RoamAbout Mobility System Software Configuration Guide for configuration information.
Configuration3-2
A-1Appendix ATroubleshootingFor troubleshooting information, refer to the RoamAbout Mobility System Software Configuration Guide.
TroubleshootingA-2
B-1Appendix BCables and PinoutsTwisted-Pair Cable Assignments For 10/100BASE-TX connections, a twisted-pair cable must have two pairs of wires. Each wire pair is identified by two different colors. For example, one wire might be green and the other, green with white stripes. Also, an RJ-45 connector must be attached to both ends of the cable. Caution: DO NOT plug a phone jack connector into the RJ-45 port. Use only twisted-pair cables with RJ-45 connectors that conform with FCC standards.Caution: Each wire pair must be attached to the RJ-45 connectors in a specific orientation. (See “Straight-Through Wiring” on page B-3 and “Crossover Wiring” on page B-3 for an explanation.)The following figure illustrates how the pins on the RJ-45 connector are numbered. Be sure to hold the connectors in the same orientation when attaching the wires to the pins.1881
Cables and PinoutsB-210/100BASE-TX Pin AssignmentsUse unshielded twisted-pair (UTP) or shielded twisted-pair (STP) cable for RJ-45 connections: 100-ohm Category 3 or better cable for 10 Mbps connections, or 100-ohm Category 5 or better cable for 100 Mbps connections. Also be sure that the length of any twisted-pair connection does not exceed 100 meters (328 feet).The RJ-45 port on the access point is wired with MDI pinouts. This means that you must use crossover cables for connections to PCs or servers, and straight-through cable for connections to switches or hubs. However, when connecting to devices that support automatic MDI/MDI-X pinout configuration, you can use either straight-through or crossover cable.10/100BASE-TX MDI Port PinoutsPin MDI Signal Name1 Transmit Data plus (TD+)2 Transmit Data minus (TD-)3 Receive Data plus (RD+)4 GND (Positive Vport)5 GND (Positive Vport)6 Receive Data minus (RD-)7 -48V feeding power (Negative- Vport)8 -48V feeding power (Negative- Vport)Note: The “+” and “-” signs represent the polarity of the wires that make up each wire pair.
Twisted-Pair Cable AssignmentsB-3Straight-Through WiringBecause the 10/100 Mbps port on the access point uses an MDI pin configuration, you must use “straight-through” cable for network connections to hubs or switches that only have MDI-X ports. However, if the device to which you are connecting supports auto-MDIX operation, you can use either “straight-through” or “crossover” cable.Crossover WiringBecause the 10/100 Mbps port on the access point uses an MDI pin configuration, you must use “crossover” cable for network connections to PCs, servers or other end nodes that only have MDI ports. However, if the device to which you are connecting supports auto-MDIX operation, you can use either “straight-through” or “crossover” cable.White/Orange StripeOrangeWhite/Green StripeGreen1234567812345678EIA/TIA 568B RJ-45 Wiring Standard10/100BASE-TX Straight-through CableEnd A End BBlueWhite/Blue StripeBrownWhite/Brown StripeWhite/Orange StripeOrangeWhite/Green Stripe1234567812345678EIA/TIA 568B RJ-45 Wiring Standard10/100BASE-TX Crossover CableEnd A End BGreenBlueWhite/Blue StripeBrownWhite/Brown Stripe
Cables and PinoutsB-4
C-1Appendix CSpecificationsGeneral SpecificationsMaximum Channels802.11a:US & Canada: 12802.11b/g:FCC/IC: 1-11Maximum Clients127 total clients for the APOperating RangeRefer to the RoamAbout Switch Manager User GuideData Rate802.11a: 6, 9, 12, 18, 24, 36, 48, 54 Mbps per channel802.11g: 6, 9, 11, 12, 18, 24, 36, 48, 54 Mbps per channel802.11b: 1, 2, 5.5, 11 Mbps per channelModulation Type802.11a: BPSK, QPSK, 16-QAM, 64-QAM802.11g: CCK, BPSK, QPSK, OFDM802.11b: CCK, BPSK, QPSKNetwork ConfigurationInfrastructure
SpecificationsC-2Operating Frequency802.11a:5.150 ~ 5.250 GHz (lower band) US/Canada5.250 ~ 5.350 GHz (middle band) US/Canada5.725 ~ 5.850 GHz (upper band) US/Canada802.11b:2.4 ~ 2.4835 GHz (US, Canada)AC Power AdaptersInput: 100-240 AC, 50-60 HzOutput: 5 VDC, 3 A or 2 AMaximum Power: 13.2 WUnit Power SupplyDC Input: 5 VDC, 2 A PoE input: 48 VDC, 0.2 A maximumPower consumption: 9.6 W maximumNote: Power can also be provided to the access point through the Ethernet port based on IEEE 802.3af Power over Ethernet (PoE) specifications. When both PoE is provided and the adapter is plugged in, PoE will be turned off.Physical Size20.9 x 12.5 x 2.6 cm (8.23 x 4.92 x 1.02 in)Weight0.65 kg (1.43 lbs)LED IndicatorsPower, Ethernet Link/Activity, Wireless Link/ActivityNetwork ManagementVia RoamAbout wireless switches, RoamAbout Switch ManagerTemperatureOperating: 0 to 40 °C (32 to 104 °F)Storage: 0 to 70 °C (32 to 158 °F)
General SpecificationsC-3Humidity15% to 95% (non-condensing)CompliancesFCC Class B (US)ICES-003 (Canada)Radio Signal CertificationFCC Part 15.247 (2.4 GHz)FCC part 15 15.407(b)RSS-210 (Canada)SafetyCSA/NTRL (CSA 22.2 No. 950 & UL 60950)EN60950 (TÜV/GS), IEC60950 (CB)StandardsIEEE 802.3 10BASE-T, IEEE 802.3u 100BASE-TX, IEEE 802.11a, b, g
SpecificationsC-4SensitivityIEEE 802.11a Sensitivity (GHz - dBm)Modulation/Rates 5.150-5.250 5.250-5.350 5.725-5.850BPSK (6 Mbps) -88 -88 -88BPSK (9 Mbps) -87 -87 -87QPSK (12 Mbps) -86 -86 -86QPSK (18 Mbps) -84 -84 -8416 QAM (24 Mbps) -81 -81 -8116 QAM (36 Mbps) -77 -77 -7864 QAM (48 Mbps) -73 -73 -7364QAM(54 Mbps) -69 -70 -67IEEE 802.11gData Rate Sensitivity (dBm) 6 Mbps -889 Mbps -8712 Mbps -8617 Mbps -8524 Mbps -8136 Mbps -7748 Mbps -7254 Mbps -70IEEE 802.11bData Rate Sensitivity (dBm) 1 Mbps -932 Mbps -905.5 Mbps -9011 Mbps -87
General SpecificationsC-5Transmit Power(EIRP) IEEE 802.11a Maximum Output Power (GHz - dBm)Data Rate 5.15-5.250 5.25-5.350 5.725-5.8506 Mbps 17 17 199 Mbps 17 17 1912 Mbps 17 17 198 Mbps 17 17 1924 Mbps 17 17 1936 Mbps 17 17 1948 Mbps 17 17 1954 Mbps 12 17 18IEEE 802.11g Maximum Output Power (GHz - dBm)Data Rate                           2.412            2.417~2.462 6 Mbps                                     20          20 9 Mbps                                     20          20 12 Mbps                                   20          20 18 Mbps                                   20          20 24 Mbps                                   20          20 36 Mbps                                   20          19 48 Mbps                                   17          16 54 Mbps                                   15          14 IEEE 802.11b Maximum Output Power (GHz - dBm)Data Rate           2.412             2.417~2.462 1 Mbps          16         16 2 Mbps          16         16 5.5 Mbps                                16         16 11 Mbps                                 16         16
SpecificationsC-6
Index-1Aantenna description 1-4antennas, positioning 2-5Bbezel 1-2attaching and removing the bezel 2-5Ccableassignments B-1crossover B-3straight-through B-3channels, maximum C-1clients, maximum C-1console port 1-6crossover cable B-3CSMA/CA 1-1Ddata rate, options C-1EEthernetcable 2-4port 1-6Ffeatures and benefits 1-8IIEEE 802.11a 1-1installationhardware 2-1mounting 2-1LLED indicators 1-4lock, Kensington 2-2MMDI, RJ-45 pin configuration 1-6mounting bracket 2-3mounting the access point 2-1OOFDM 1-1operating frequency C-2Optional Equipment 1-2Ppackage checklist 1-2PoE 1-7specifications C-2power connection 2-4power connector 1-7Power over Ethernet See  PoEpower supply, specifications C-2Rradio characteristics 1-1reset button 1-7Index
IndexIndex-2Ssecurity slot 1-6self test 2-5site selection 2-1specifications C-1straight-through cable B-3system defaults 1-8Ttroubleshooting A-1
Model Number: RBT-1002Pub. Number: 150200025200E, E092005-R01

Navigation menu