user_manual
PWR CCM NET SRV
Quick Installation Guideline
Wi-Fi PlugII
PWR CCM NET SRV
PWR CCM NET SRV
PWR CCM NET SRV
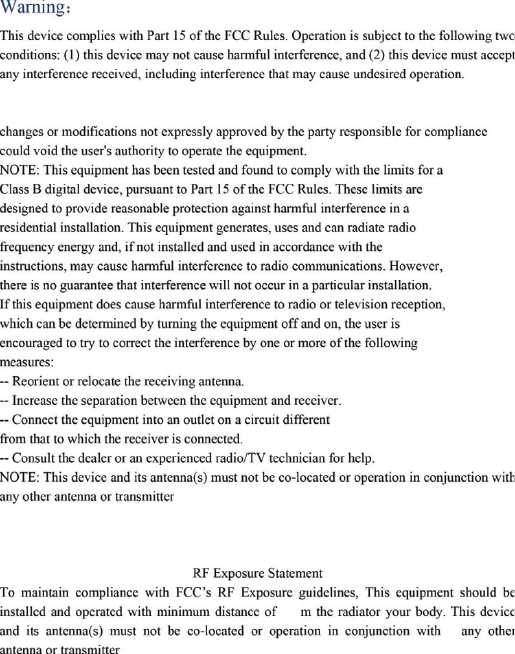
①Open the APP, tap the Wi-Fi Config
button to enter this page.
②Tap the Connect Wi-Fi Datalogger
button on the Connected page
(Android phone has no need of this
step) .
③Select the same number of Wi-Fi
PlugII PN to connect.
(Initial Password: 12345678)
①After the connection completes, tap the
Network Setting button.
② According to the prompts, type in the
information to finish the network setting.
③Reconnect the Wi-Fi or Cellular Data
which can surf the Internet instead of the
Wi-Fi connected by step 2.2.
①Scan the QR Code on the right
side and download the APP.
2.1
Download APP
WLAN
CHOOSE A NETWORK...
W201 5
2018 LA
WLAN
Eybo nd 2.4g
Eybo nd201 5
W001 62500 20 617
Wifi 111
Wifi -test
PASSWOR D
12345678
Disconnect
Please choose a Wi-Fi a nd c on ne ct .
Connected
Connect
Wi-Fi Datalogger
Netw ork Dia gnose
Netw ork Set ting
SmartClient
Kee p passw ord
Plea se enter use r name
Plea se en ter pas sword
Login
Wi-Fi Config
Register
DEMO >
Network Settings
Rout er Name :
Pass word:
Please c on ne ct t o th e wi re le ss router
Setting
Conf irm pas sword :
Register
User N ame
Pass word
Conf irm Pas swo rd
E-mail
Phon e Numbe r
PN
Register
Datal ogger PN
①Open the APP, tap the Register button
to enter this page.
② According to the prompts, type in the
information to create an account.
①Login the account and click
the list button on the bottom
of the home page.
②Tap the “+” button on the top-
right corner of the list page
③According to the prompts, type
in the information to finish
creating plant.
3.3
Add Multiple Dataloggers
①Tap the new plant you just created,
and enter its home page.
②Click the Device button on the
bottom of the home page.
③Tap the “+” button at the top-right
corner to add the datalogger.
④Scan the datalogger PN on the
Wi-Fi PlugII, or input it manually.
Note: One account can create multiple plants and one plant can add multiple dataloggers. If you only have one
datalogger, you could ignore this step.
新建电站
SmartClient
Kee p passw ord
Plea se enter use r name
Plea se enter pas sword
Login
Wi-Fi Config
Register
Demo >
Create Plants
Plea se e nt er p la nt’s n am e
Plant Nam e*
Finish
Plant des cri ption
Plant pic tur e
Plea se i np ut t he d escription th e pl an t
Plant pic tur e
3.2
Create Plant
3.1
Create Account
Installation
1.
W0016250020617
Please c ho os e a Wi -F i an d co nn ec t.
Connected
Netw ork Dia gnose
Netw ork Set ting
Connect
Wi-Fi Datalogger
Plant Name
Cur re nt p owe r: 5 5.6 kW
Daily gene ratio n: 141. 6kWh
Dai ly inco me: ¥15 8. 2
Total g enera tion: 3 64.3k Wh
OVE RVIE W LI ST MAP M E
Inpu t the Dat al ogger P N
Datalogger PN
Add Datalog ger
Add Datalogger
Device
Device 1
Cur rent po wer: 125k W
Dai ly gene ratio n: 125 kWh
PN:12 34 56 78 9
Inf o Ma p Dat a Ala rm
Devi ces
2.3
Network Setting
2.2
Connect Wi-Fi Datalogger
Android
iOS
Wireless Router Connection
2.
Create Account And Plant
3.
❶
❷
❸
❹
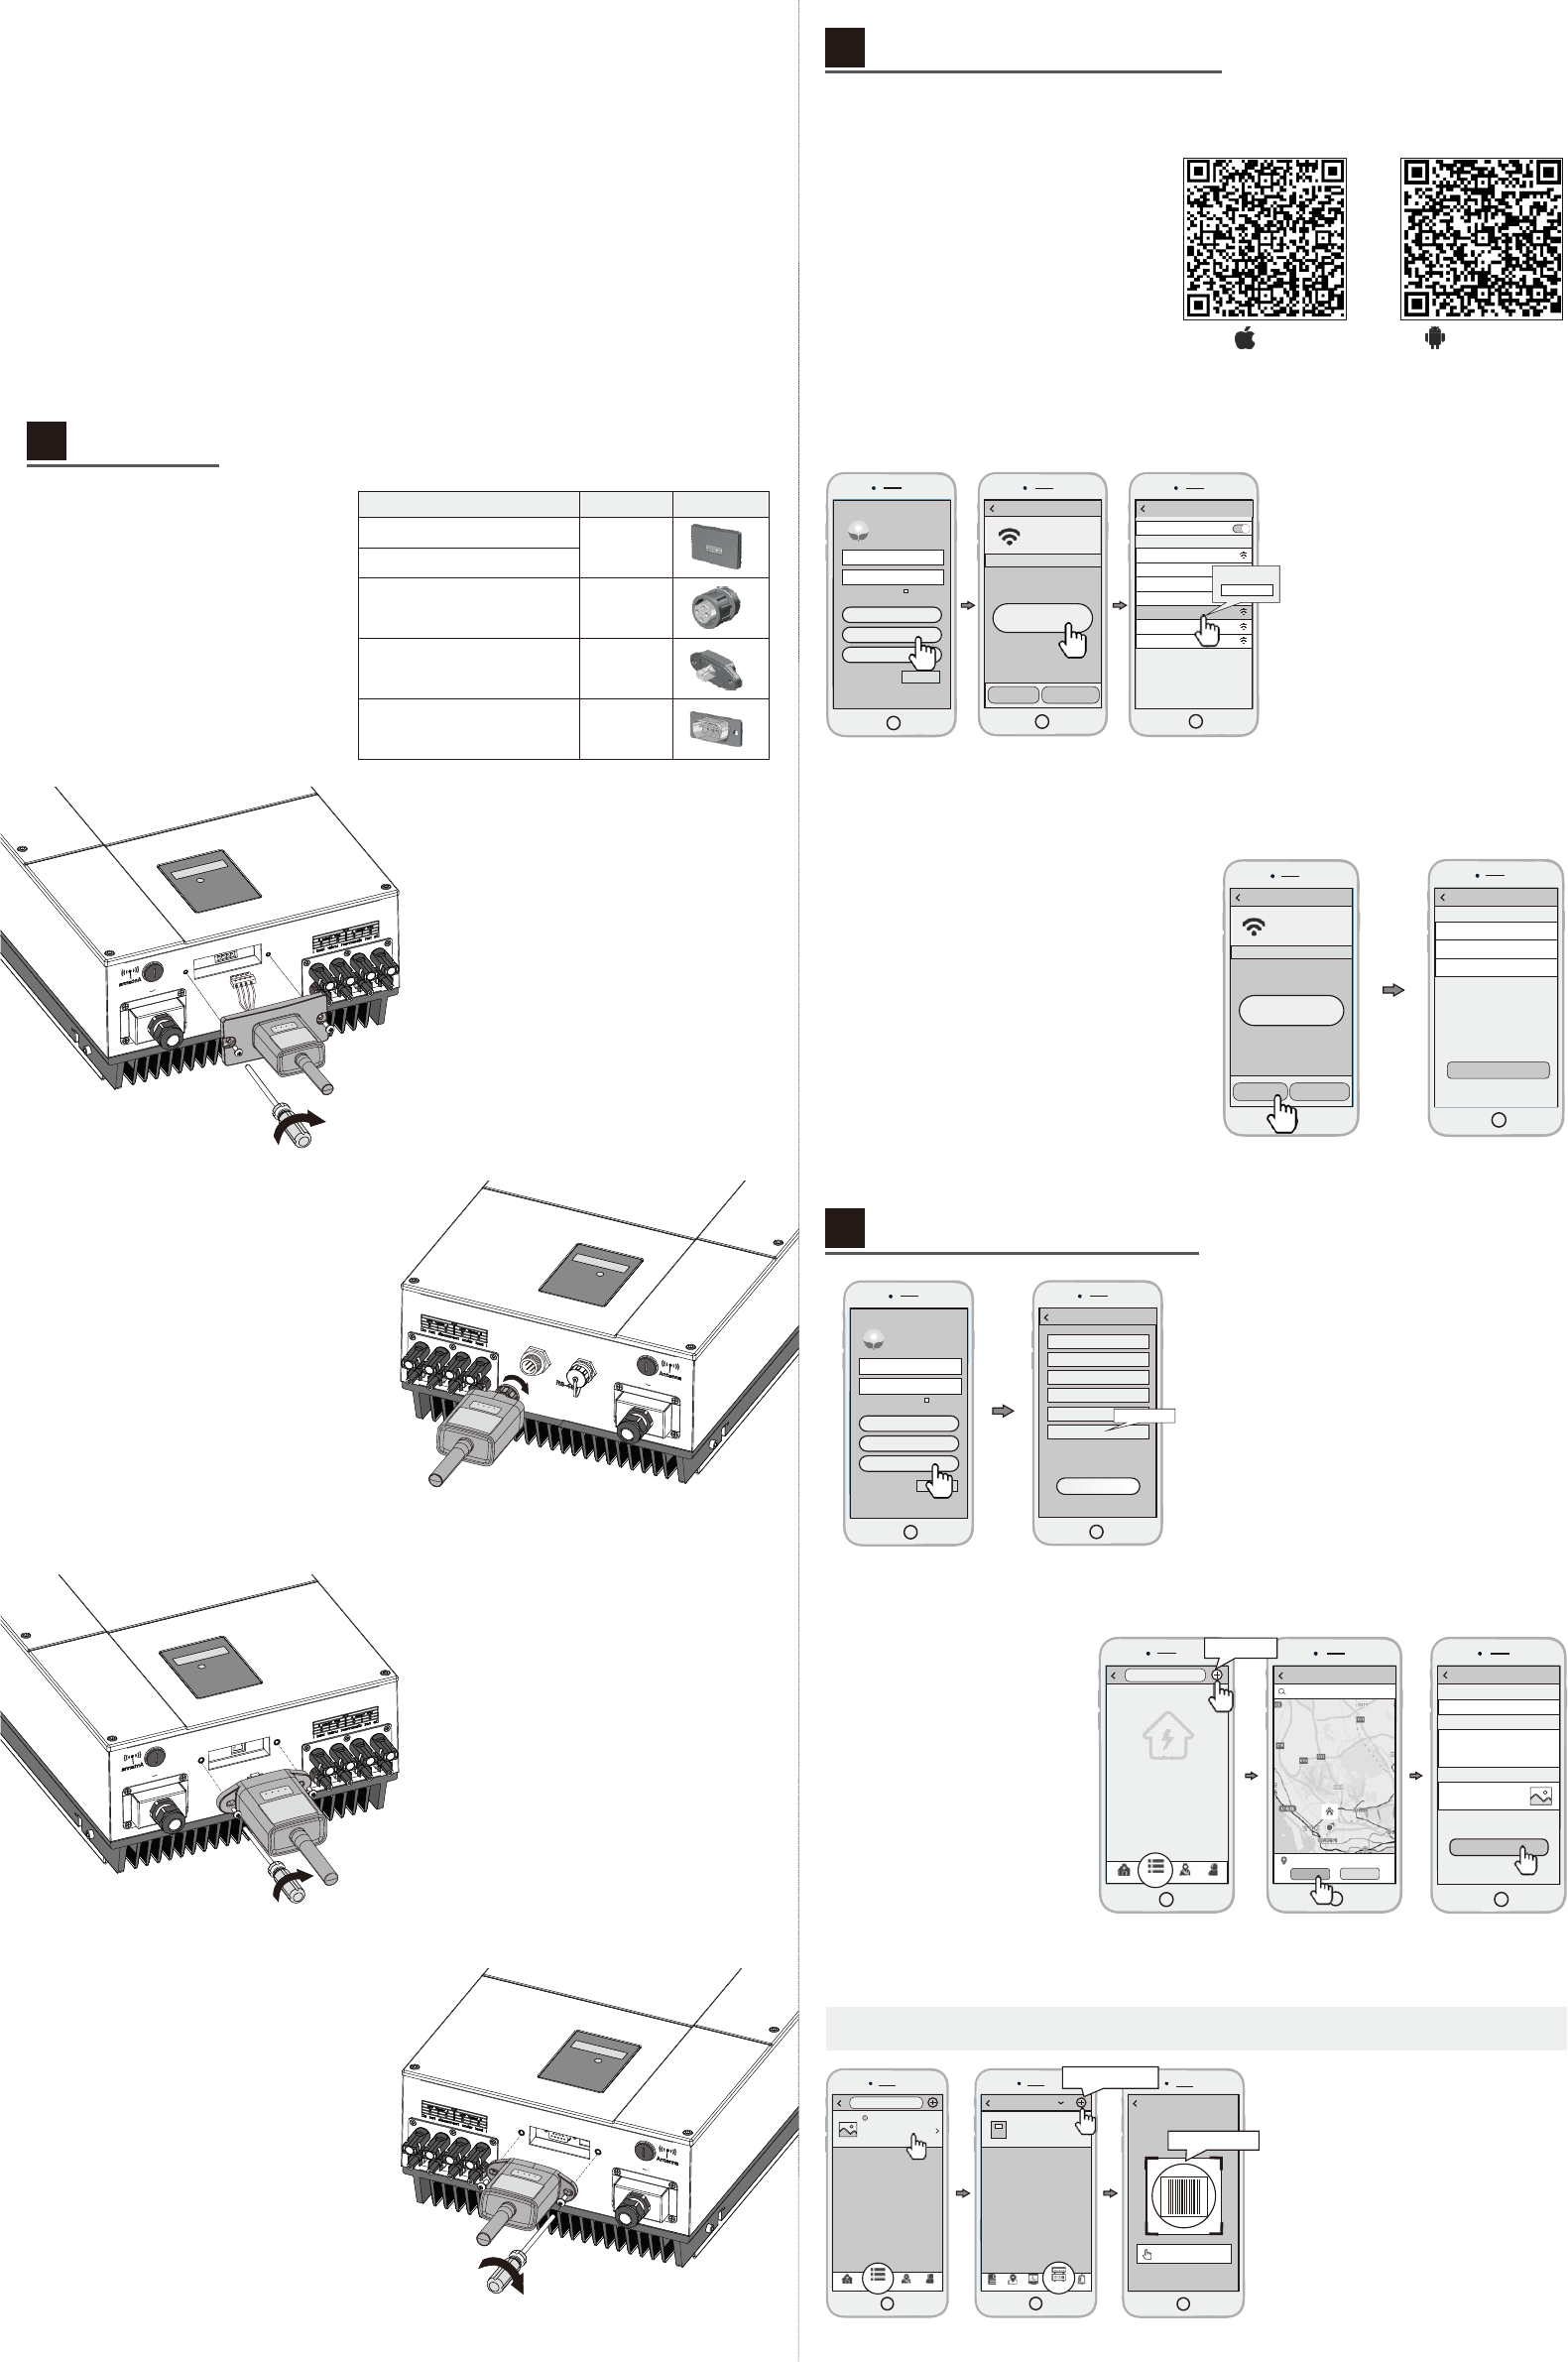
①Find the corresponding
interface code on the right table,
according to the model of the
datalogger.
②Based on the corresponding icon,
finish the installation according to
the interface code.
③Confirm the status of the LED light
(After step2.3, when 4 LED light
keep on, showing the normal
working status). Wi-Fi PlugII - 03/05/06/08/12/13
Datalogger Model Interface Code Interface Icon
Wi-Fi PlugII - 07
Wi-Fi PlugII - 02/10
Wi-Fi PlugII - 01/11(Method 1)
Wi-Fi PlugII - 04(Method 2)
❶
Method 1 :
①Connect the 4PIN power cable of the Wi-Fi
PlugII to the inverter.
②Fasten the Wi-Fi PlugII to the inverter with
the screw.
Method 2 :
①Connect the 2 PIN green interface of the
Wi-Fi PlugII to the RS-485 terminal of
the inverter.
②Connect the 5PIN power cable of the Wi-Fi
PlugII to the inverter.
③Fasten the Wi-Fi PlugII to the inverter
with the screw.
①Align the 4-hole aviation plug of the
Wi-Fi PlugII with the inverter and
plug it in.
②Tighten the nut of the Wi-Fi PlugII to
the inverter.
❷
①Align the RJ-45 crystal head of the Wi-Fi
PlugII with the inverter and insert it in tightly.
②Fasten the Wi-Fi PlugII to the inverter with
the screw.
❸
①Align the serial port of the Wi-Fi PlugII
with the inverter and plug it in tightly.
②Fasten the Wi-Fi PlugII to the inverter
with the screw.
❹
Locat ion of the plant
Loca tion:Ba oan,She nzhen
Plea se enter th e lo catio n of t he plant
Conf irm Cance l
新建电站
Create Plant
You don't have
a plant yet.
OVE RV IEW LIST MAP M E
Test Model:Wi-Fi Plug II-14
20C