FEDDERS Air Conditioner Room (42) Manual L0811079
User Manual: FEDDERS FEDDERS Air Conditioner Room (42) Manual FEDDERS Air Conditioner Room (42) Owner's Manual, FEDDERS Air Conditioner Room (42) installation guides
Open the PDF directly: View PDF ![]() .
.
Page Count: 11
Including Service and Warranty
lncluidos mantenimiento y la garantJa
Avec service et garantie
iill I| IIII _ I
Room Air Conditioners for Double-Hung Windows
Acondicionadores de aire ambientai para ventanas dobles
Ciimatiseur d'air individue! pour fen_tres _ guillotine 5,000- 10,000 BTUt5
ENGLISH
IIIIII L,., • _,:, ESPA/ OL
Electrical Requirements ...... 1.
Warning
Notice
Important Grounding Requirements
Installation ........................... 1
Window Requirements
ToolsNeeded
Attach Filler Panels
Installation in W_ndow Opening 22 7/8 °to 39" Wide
Ir_allation in Window Opening 20 I/4" to 22 7/8" VvTde
Operation ............................. 5
Conuol Functions
Cooling Operation
Heating Operation (Heating ModelsOnly]
Air Circulation Without Cdolingor Heating
ExhaustOperation WithoutCooling orHeating
Decorative Front Removal
Requistos para
la el_ctricos ....................... 10
Aviso
Aviso
Requis'tosimporrantespara la conexi6na tierra
Instalaci6n ......................... 10
Requisitosde la ventana
Hen'amientasnecesarias
Instatelospanelesde Ilenado
ImlalacJ6nep _ ancho de 22 7/8 a39 pulgadas
Inslalaci6nen unaventanade 20 1/4a 22 7/8 pulgadas
de ancho
Funcionamiento ................. 14
Fundo_ de/as co_es
Operac_ de _6_._o
F_ de/a ca/e{acci6n
O_x/e/mcon cddaccidn m/ameme]
OirectingAirflow (UnitWithFixedLouvers) ....... .Gmu!ad_deaim.si_ en{damiemonicalefacci6n
DirectingAirtTow(UnitWithAdjustableLou_ ....... Ventilaci6ndet_sin enfriamie_nicaleiacd_
Cleaning Air Filter
Service ................................. 8
Insufficient Cooling
Insufficient Heating (HeatingModels Only)
Unit Failsto Start
Serviceor Partsare Required
Warranty. .............................. 8
Major Appliance Consumer Action Panel
Retitodelapane delameradecorativa
C_no conmdard tlujodeaim (Unidadcontejiil_ 6jad
Direcci6ndela cboJtacidndelaim
(UnklaJconrejilladireariz ajuszableJ
Limpien dd aluo deaire
Servicio .............................. 18
Enfdamie_oimuf_den_
Calentamientoimul_ciente
(IHo_.lescon calefaccidnsolamenteJ
Sila unidadnose enciende
Necesidadde sen_io opiezas
Garantia ............................. 18
Major ApplianceConsumerA_ Panel
FRANC AIS
Exigences 61ectrique ......... 2
Avertissement
Avis
ImportanteSexigences deraise_la terre
Montage ............................. 2
Carac_ristiquesdesfen_tres
Outils nP._ssaires
Fixationdespanneauxderempllssage
Montage dansla fen_treouverturede 22 7/8
39 po de largeur
Montagedonsdes OuvertumSde [en_tmvariant
entre20 I/4 et22 7/8 po de largeur
Fonctionnement ................. 2
Fonctionsde commande
Refmidissement
Ghauffage(ModP.leschauf[antsseulement)
Circulationd'air sansreJmidissementou chauffage
Sortied'airsansm_froi_'ssementou chauffage
Retraitdu panneaud_coratifavant
Circulationd'air didg_e(Dispositif_Iouvresfixes)
Orientation de I'air (Mode/eavecddflec_eursrdglabic
Netloyagedu filtre_air
Service ............................... 2
Refmidissementinsuffisam
C_auffageinsuffisant(ModUleschauffants seulemem)
L'appareilne semet pasenmarche
R_parationsou pi_cess'avgrentn_.essaires
Garantie ............................. 2
Major ApplianceConsumerAction Panel
Electrical Shock Hazard
1. Plug unit only into _rounded electrical ourdet.
_- Oo no! use an extension cord or piu_ adal:_o¢ wilh
Ih_l uniL
DO not operate unit with {Pont removed.
F_h,_,ttofollowd_eaim.,+_rec2udoescouldresultme_cul
_rcor persa_ iniury.
d_eair conditionerhasaserial plate, rating a_115volts
up_o_ inctud!._.7..S_mpsthe.u_tma_ ona_u_
Or ¢in:uil IxeaKer wlm ome1' a_lces.,/1_, me
ampw_da_6e_ices_ Uza,_searan:mrb_.akercmamexcee_
_e j1,_ aft/le_ae_"d_it be_Jt_.
If the air co_i|ioner has aserial plate rating of 115; voks
a_l _,remerthan7.5ampsit mustha,,eksovmfuseorch'.
cu_t_jker0andnooth_ deviceorunitshouldbeope_ted
that fuse or €_rcut_ breaker.
The location of the serial plate ;hat applies to this model
cam be found on the back page o_ this rna_aL
Notice
13o nol op_'a,le this air conditioner .withoul proper dme
amu_.I_+_. Referto serialpl_ farpmpm"
pow_ wpp_y _qumm_n_.
_++CO,m_,+ENoe+oCJRCUn"WInE
q_ mmOk,,,_Ore.k,,+0Pm_om_J
_O_r-GrO _ $/ZE WIRE
15 AMP 114 MINIMUM
20 AMP #T Z MINIMUM
30 AMP t10 MINIMUM
I_SV _30V ,?JOY 230V
15.4 I SA 20A _OA
Product Damage:
DO no( cut, aker o¢ Rmov_ any ol the ¢q:mnded polv_,,_rene
(while _inside this a_ conditmne_. ' "
For YourSafety:.
liquids mthe wc_rm_ al tins o_ ar_, o_h_ appliance. 11_
f_ can €_w..alea t_ haz.a_ _explosion.
Window Requirements
22 718" to 39" Wide
Air conditioner is factor/prepared for installation
in s_dard double hung windows (air conditioner
cannot be installed in other typesof windows
without modification, consult with a qualif'_!
installation se_iceman). The following installation
instructionsapply to window openings22 7/8" to
39" in width. Removal of both filler panelsper-
mits installationin windows with a minimum
opening width of 20 1/4".
Out_om Do not bloc_air circulationto outside
louversof cabineL
Tools Needed
I
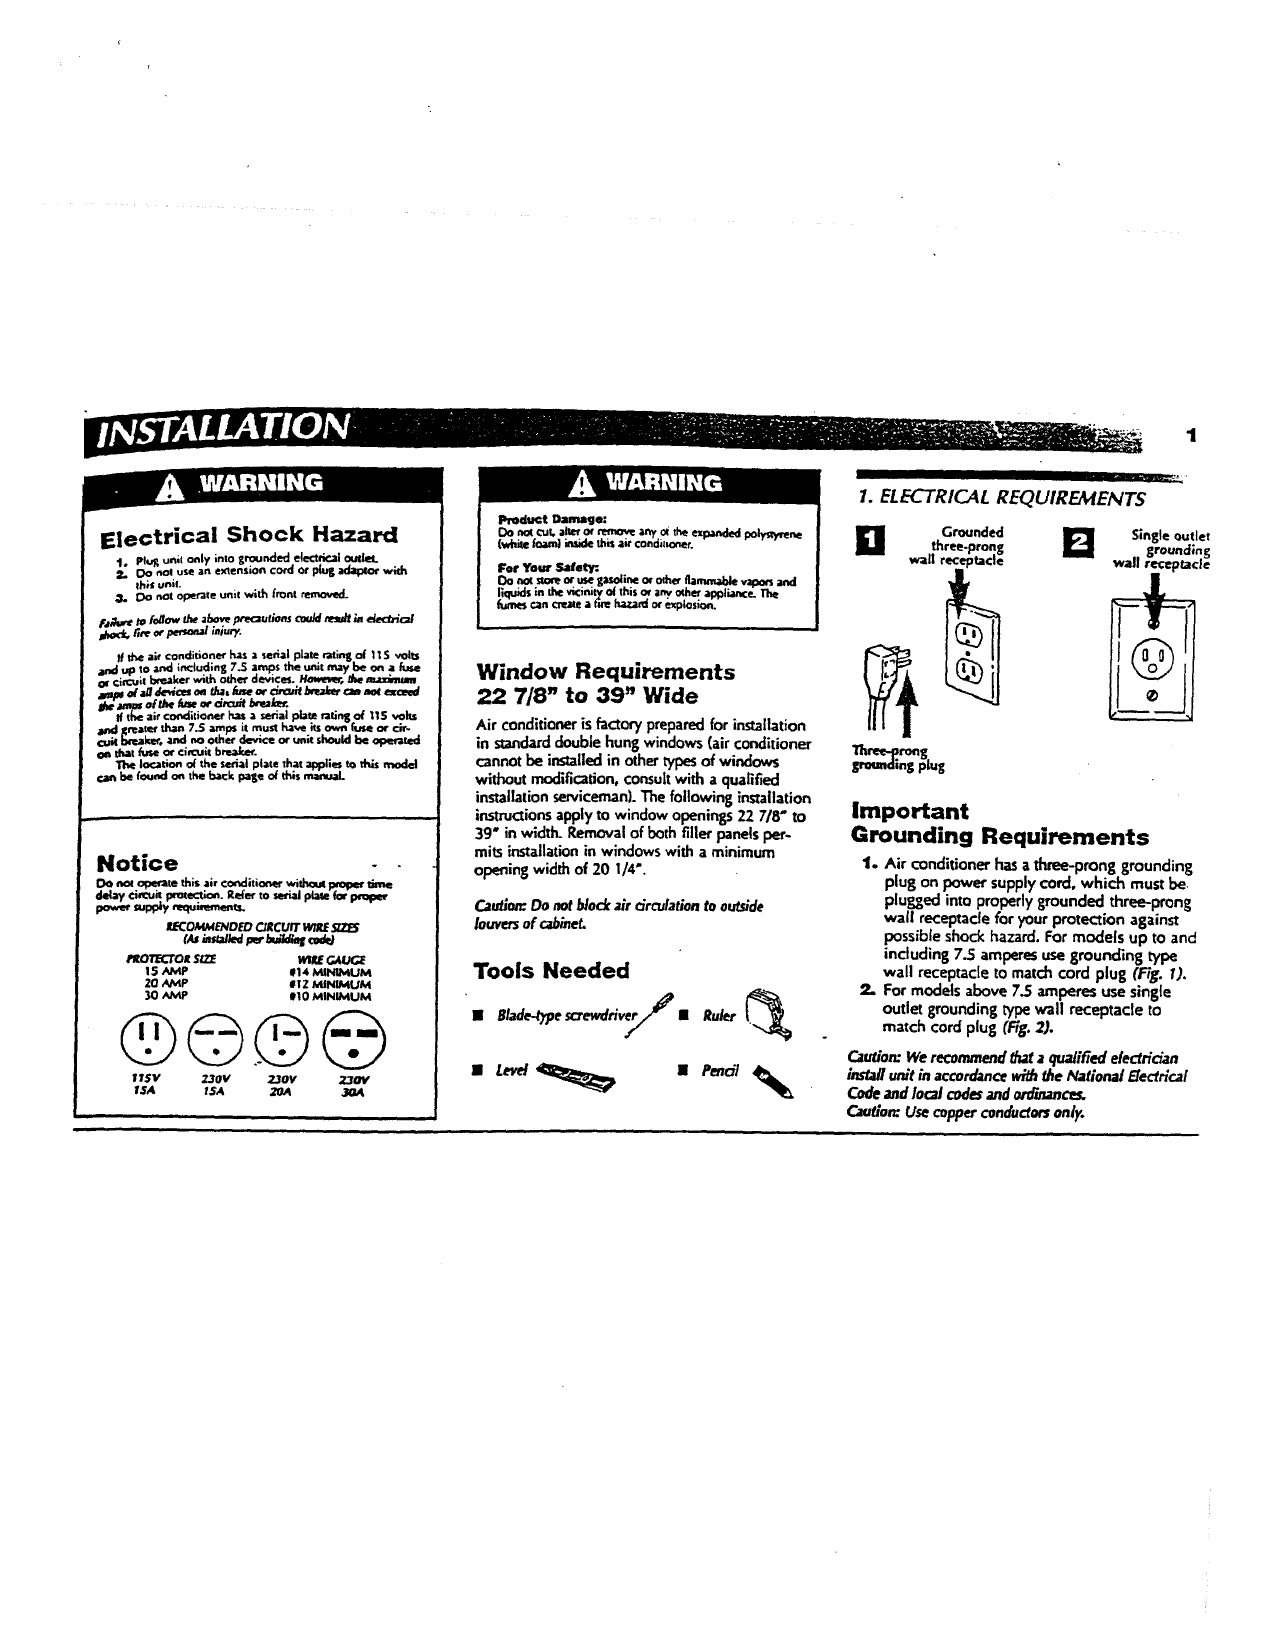
1. ELECTRICAL REQUIREMENTS
D Grounded
three-prong D Singleoutlet
grounding
wall receptacle wall receptacle
ro_g
_ing plug
Important
Grounding Requirements
1. Air conditioner hasa three-prong grounding
plug on power supply cord, which must be
plugged into properly grounded three-prong
wall receptacle for your protection against
possible shock hazard. For models up to and
including 7.5 amperes use grounding type
wall receptacle to match cord plug (Fig. 1).
2, For models above 7.5 amperes use single
outlet grounding type wall receptacle to
match cord plug (Fig. 2).
Caution: We recommend_t aqualified electrician
instaUunit in accordancewi_ _e National Electrical
Codeand local codesand _ce_
Caution:Use copper conductors only.

r
2. FILLER PANEL INSTALLATION
El
Filler panel,
Bottom bar
Attach Filler Panels
On some models_
1. Attach filler panels to the existing holes in
cabinet using the six (6) #8 x 5/8" long
screws supplied (Fig. 3].
II
3. WINDOW INSTALLATION
installation in Window
Opening 22 7/8" to 39" Wide
1. Open and mark center line of window.
2. Securethe an_le bracket on the centerof'
the window silt with two (2) 1" long screws
[Fig. n].
3. To overcomestorm window inteHerence,
securelyattach 2" wide wood strips to the
window stool and sill, with eith_ nails or
screws.Stripsshould be as long as window
opening and flush with back sideof stool.
Thickness of stripsshouldbe controlled by
amount of interference(Fi8. 4).
n\
• Centerline
Interior wall
Air conditioner
wood strips
bracke
Stormwindo_
fram
Caution:Do not drill ahole in bottompan. Unit is designedto operatewith appmxlmately I/2" of water in bottom pan
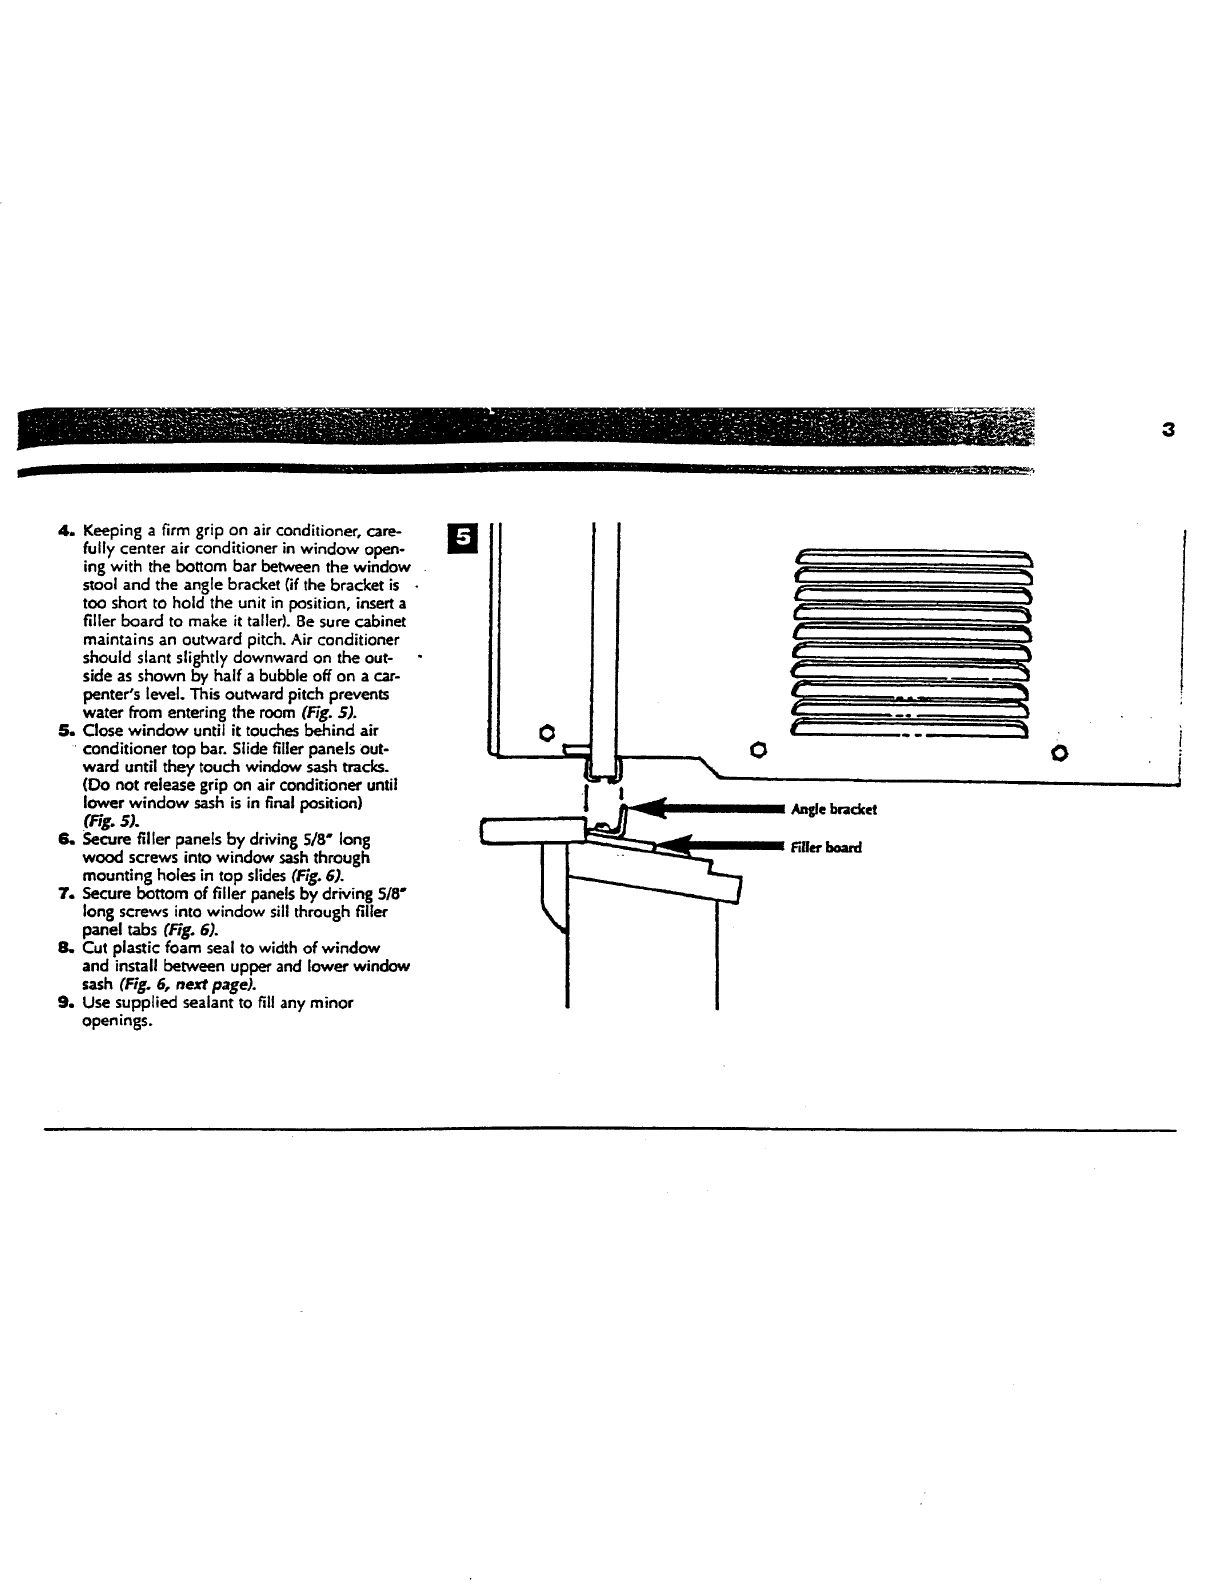
4. Keeping a firm grip on air conditioner, care-
fully center air conditioner in window open-
ing with the bottom bar between the window
stool and the angle bracket {if the bracket is
too short to hold the unit in position, insert a
filler board to make it taller). Be sure cabinet
maintains an outward pitch. Air conditioner
should slant slightly downward on the out-
side as shown by half a bubble off on a car-
penter's level. This outward pitch prevents
water from entering the room (Fig. $).
5. Close window until it touches behind air
conditioner top bar. Slide filler panels out-
ward until they touch window sash tracks.
(Do not release grip on air conditioner until
lower window sash is in final position)
t'Fig-s).
6. Secure filler panels by driving 5/8" long
wood screws into window sashthrough
mounting holes in top slides (Fig. 6).
7. Secure bottom of filler panels by driving 5/8°
long screws into window sill through filler
panel tabs (Fig. 6).
8. Cut plastic foam seal to width of window
and install between upper and lower window
sash (Fig. 6, rJe_ page).
9. Use supplied sealant to fill any minor
openings.
3
i
3. WINDOW INSTALLATION
Plaslic foamseal Upper window sash
Lower window sash
S/S" wood samv
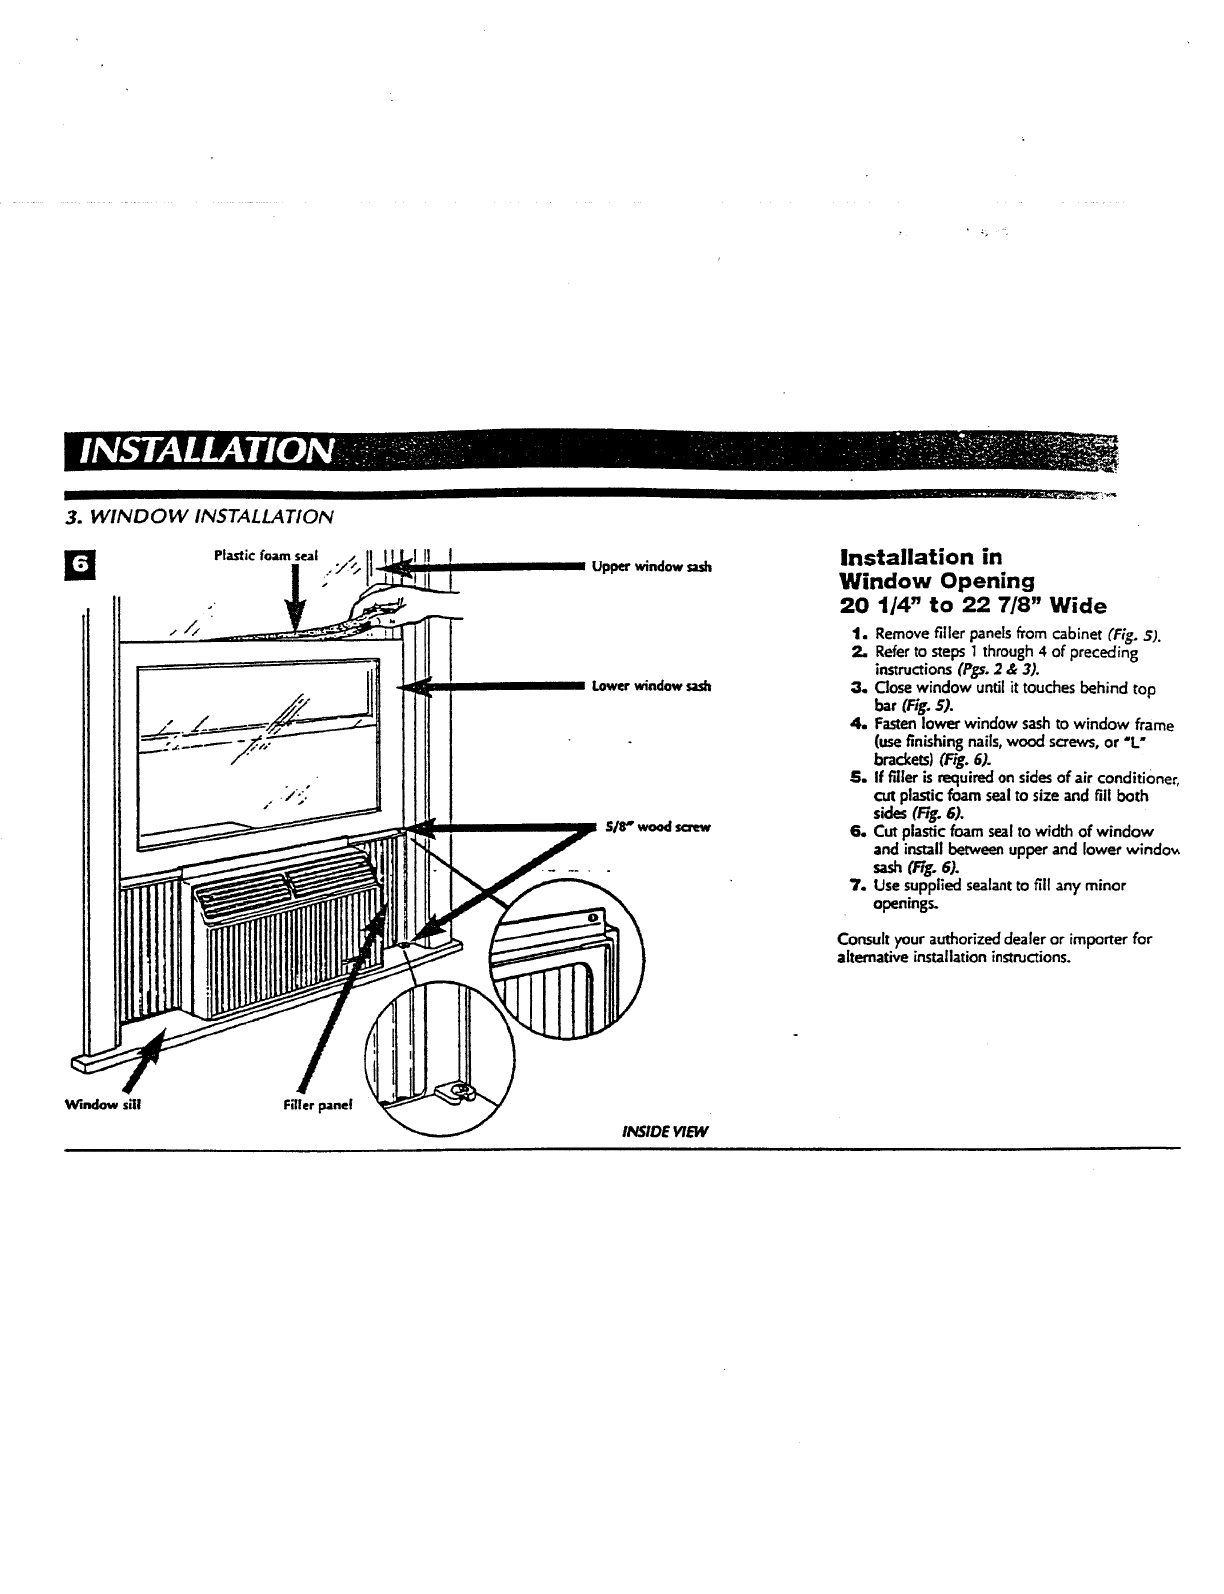
Installation in
Window Opening
20 1/4" to 22 718" Wide
1. Remove filler panelsfrom cabinet (Fig. $).
2. Referto steps I through 4 of preceding
instructions (Pgs.2 &3).
3. Close window until it touches behind top
bar (Fig. 5).
4. Famen lower window sashto window frame
(use finishing nails, wood screws, or "L"
bracEets)(i-78. 6).
5. If filler is required on sidesof air conditioner,
cut plastic foam seal to size and fill both
sides(Fig. 6).
6. Cut plastic foam seal to width of window
and install between upper and lower windo_
7. Use supplied sealant to fill any minor
openings.
Consult your authorized dealer or importer for
aitemabve installation instructions.
Wlndm_ snl Filler pane!
INSIDE WEW
5
I
4. CONTROL PANEL
IIIIIIIIIII
m
m ml
87 6
i i,,,,,Ni
i m
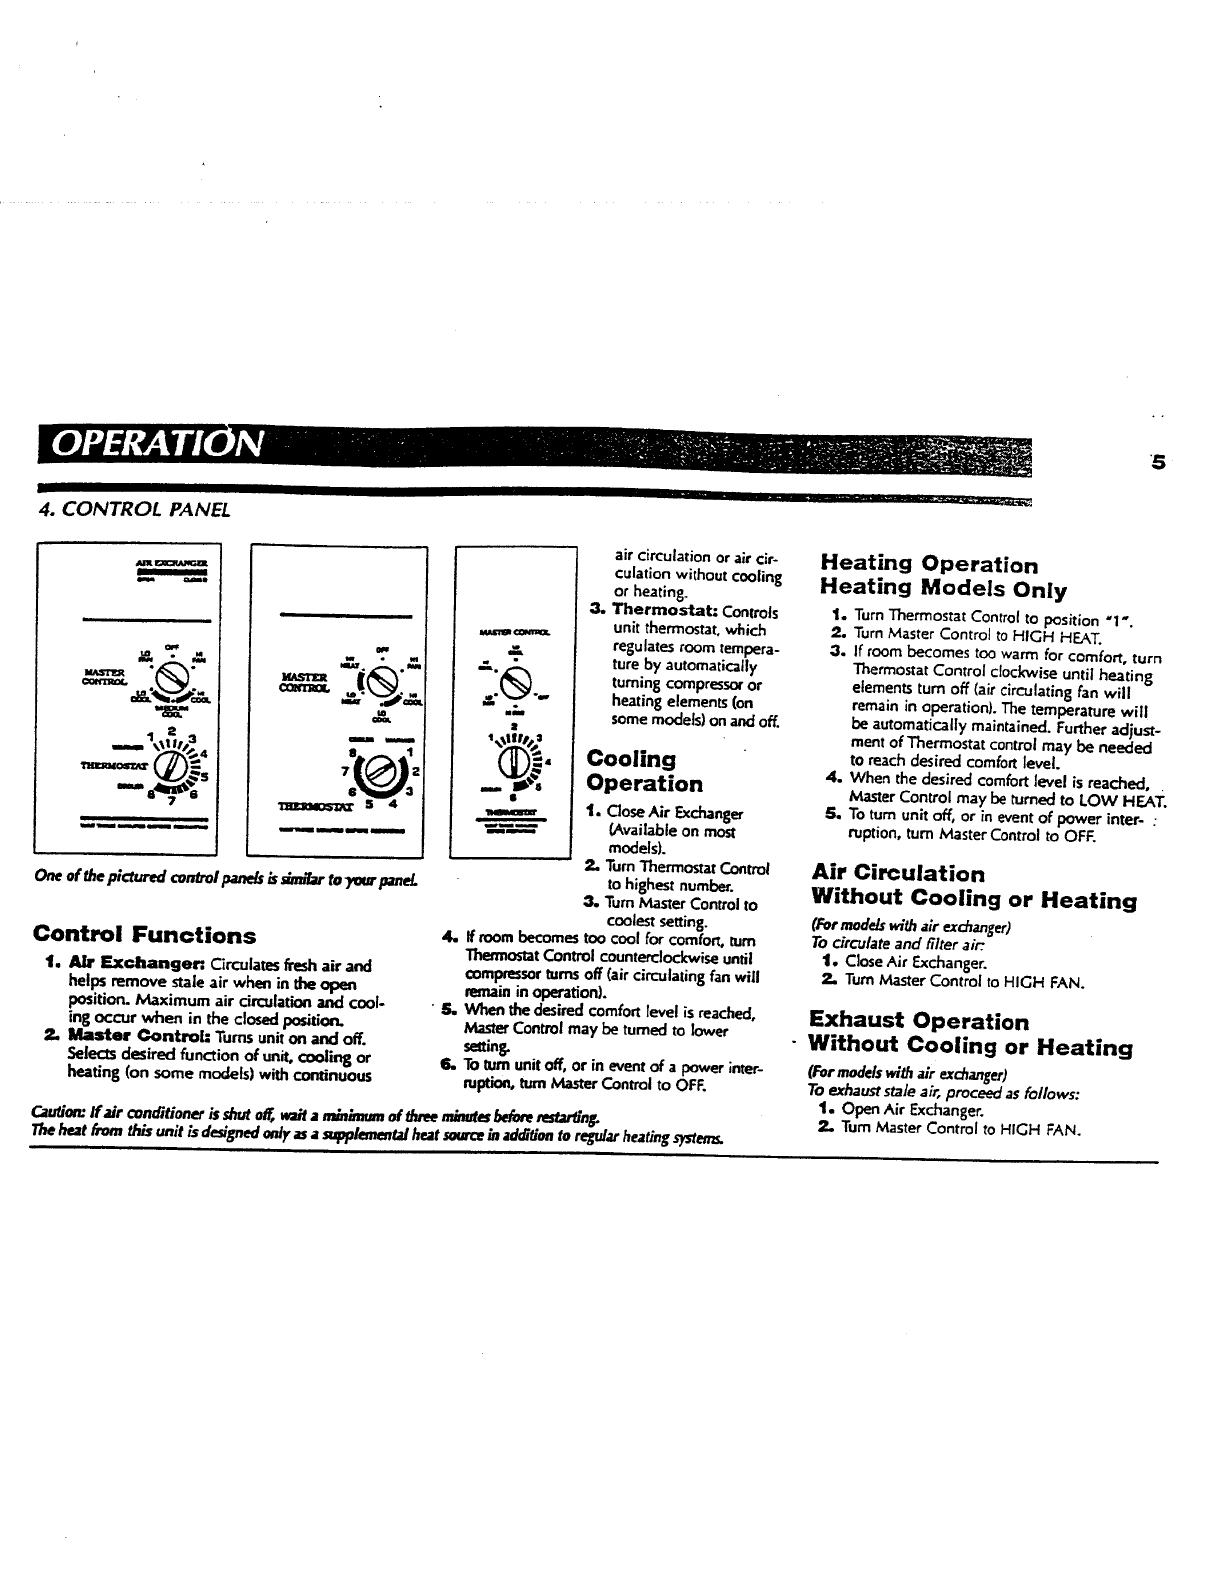
One of ff_epicl_a'ed ,comb'olpane/sis s_,_br {o 7ma"pan_
Control Functions
1. Air Exchanger: Circulates fresh air and
help remove stale air when in the open
position. Maximum air circulation and cool-
ing occur when in the closed posidoa.
2, Master Control: Turns unit on and oIT.
Selects desired function of unit, coolin 8 or
heating (on some models) with continuous
mill
=,
air circulation or air cir-
culation without cooling
or heating.
2, Thermostat: Controls
unit thermostat, which
regulates room tempera-
ture by automatically
turning compressor or
heating elements (on
some models) on and off.
Cooling
Operation
t. Close Air Exchanger
(Available on most
models).
2. Turn Thermostat Control
to highest number.
2. Turn Master Control to
coolest setting.
4. If room becomes too cool for comfort, turn
"rhemm_t Control counterclockwise until
compressorturns off (air circulating fan will
remain in operation).
•5. When the desired comfort level is reached,
Master Control may be tumed to lower
se_ingr
6. To turn unit off, or in event of a power inter-
mption, turn Master Control to OFE
CautlorcIf air conditioner is shut o_ v.mifa rninine_mof threeminuteshe.re restartln_
Theheat from this unit is designed onlFas a supplementalheat sourcein ad_tion to re_dar heatings_'term.
Heating Operation
Heating Models Only
t. Turn Thermostat Control to position "I ".
2. Turn Master Control to HIGH HEAT.
3. If"room I>e¢omes too warm for comfort, turn
Thermostat Control clockwise until heating
elements turn off (air circulating tan will
remain in operation). The temperature will
be automatically maintained. Further adjust-
ment of Thermostat control may be needed
to reach desired comfort level.
4. When the desired comfort level is reached,
Master Control may be turned to LOW HEAT.
S, To turn unit off, or in event of power inter- :
ruption, turn Master Control to OFF.
Air Circulation
Without Cooling or Heating
(Formode/swi_ air exchanger)
To circulate and ._Iter air:.
1. C|oseAir Exchanger.
2. Turn Master Control to HIGH FAN.
Exhaust Operation
- Without Cooling or Heating
(For modelswith air exchanger)
To exhaust stale air, proceed as follows:
1. Open Air Exchanger.
2. Turn Master Control to HIGH FAN.
5. FRONT PANEL
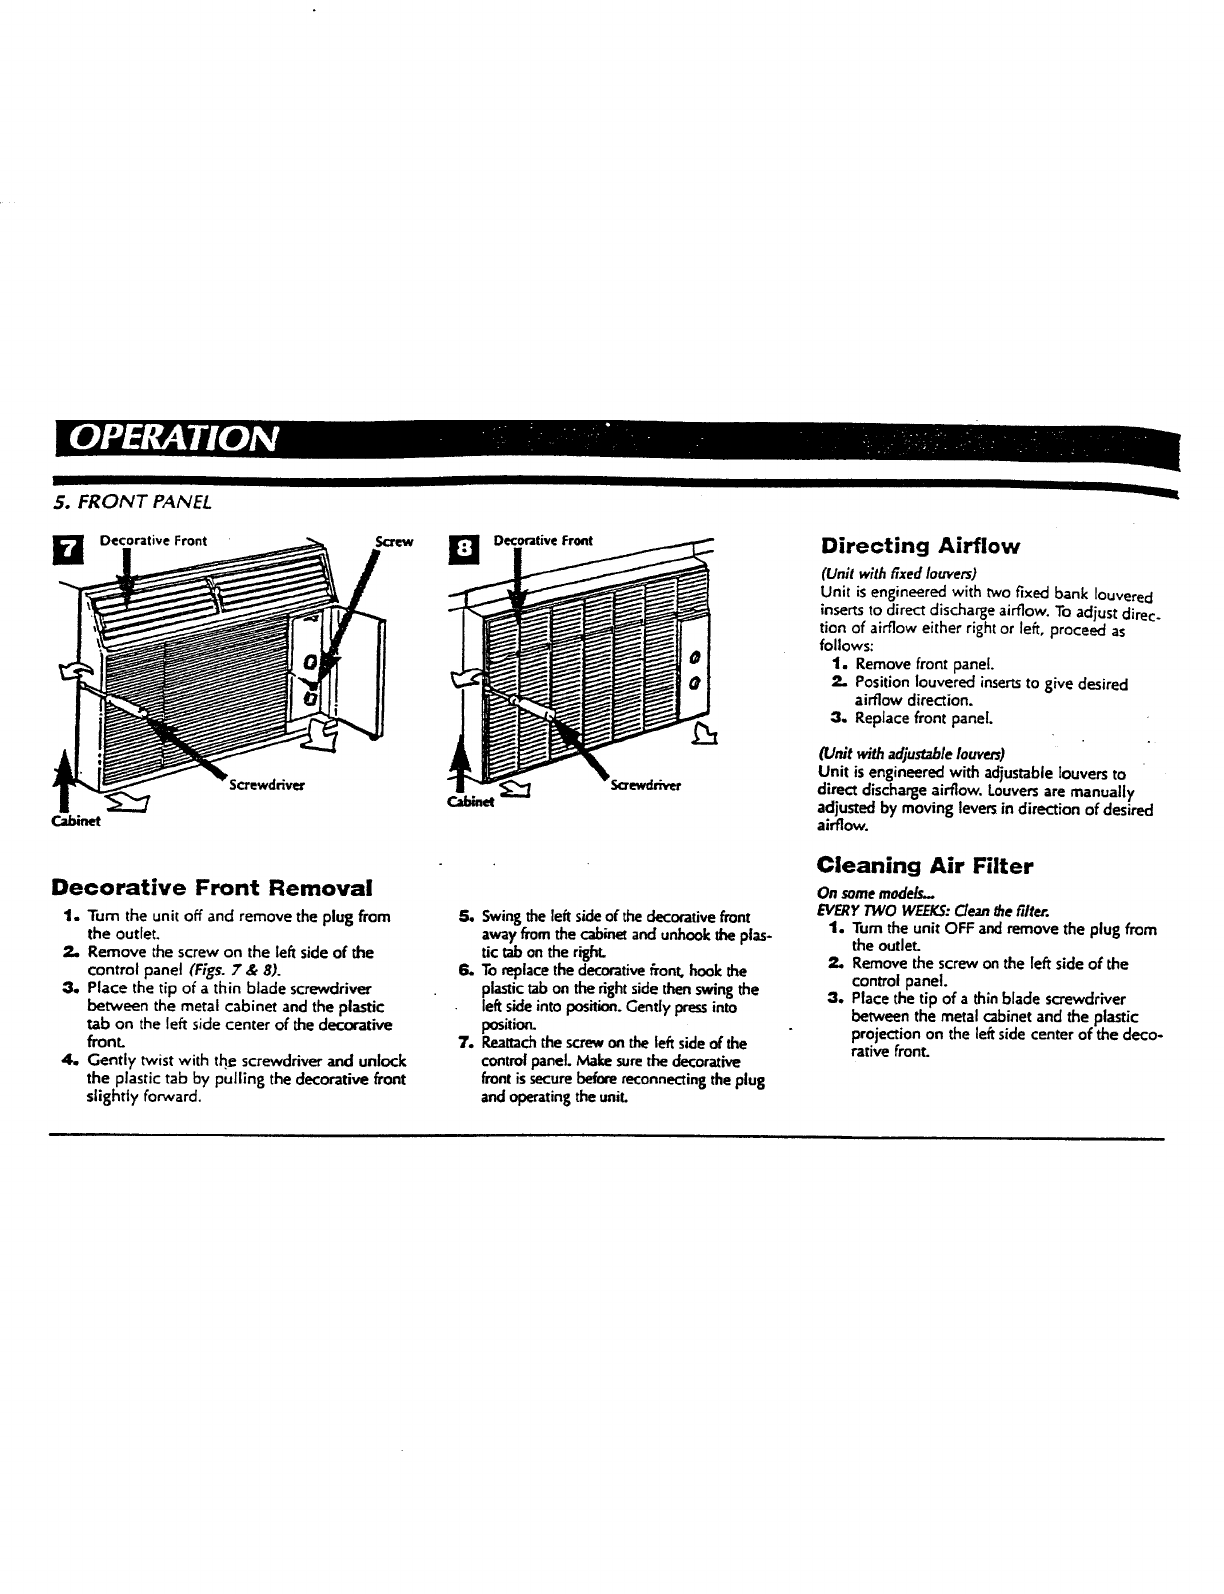
fl Decorative Front
Cab;net
Decorative Front Removal
1. Turn the unit off and remove the plug from
the outlet.
2. Remove the screw on the left side of the
control panel (Figs. 7 &8).
3. Place the tip of athin blade screwdriver
between the metal cabinet and the plastic
tab on the [eft side center of the decorative
fronL
4. Gently twist with tl_ screwdriver and unlock
the plastic tab by pulling the decorative front
slightly forward.
Cabinet Screwdriver
5. Swing the left sideof the decorative front
away from the cabinet and unhook the plas-
tic tab on the right.
6. To replacethe decorativeFront,hook the
plastictab on the right sidethen swing the
left sideinto position.Gendy pressinto
position.
7. P_attach the screw on the left sideof the
control panel. Make surethe decorative
front is securebefore reconnectingthe plug
and operatingthe uniL
Directing Airflow
(Unit with fixed louvers)
Unit is engineered with two fixed bank louvered
insertsto direct discharge airflow. To adjust direc.
tion of airflow either right or left, proceed as
follows:
1o Remove front panel.
Position louvered insertsto give desired
airflow direction.
3. Replace front panel.
(Unit with adjustable lauvers)
Unit is engineered with adjustable louvers to
direct discharge airflow. Louversare manually
adjusted by moving leversin direction of desired
airflow.
Cleaning Air Filter
On some models..
EVERYTWO WEEK5:Clean the filter.
1. "rum the unit OFF and remove the plug from
the outleL
2. Remove the screw on the left side of the
control panel.
3. Place the tip of a thin blade screwdriver
between the metal cabinet and the plastic
projection on the leftside center of the deco-
rative front.
- --T ----
T
4. Gently twist with the screwdriver and unlock
the plastic projection by pulling the decora-
tive front slightly forward.
5. Swing the left side of the decorative front
away from the cabinet and unhook the
plastic projection on the right.
6. Remove air filter from tabs.
"7, Carefully wash air filter with a mild deter-
gent and warm water. Rinsewith clear water,
squeeze dry and replace.
8, To replace the decorative front, hook the
plastic projection on the right side then
swing the left side into position. Gently press
into position.
9. Reattach the screw on the left side of the
control panel. Hake sure the decorative from
is secure before reconnecting the plug and
operating the unit.
On other models vaithsllde-outfiite._...
EVERYTWO WEEKS:CTeanthe filter.
t. Turn Master Control to OFF.
_- Remove the air filter by grasping the top
comers and pulling it up and out of the unit.
3. Wash in hot soapy water, rinse and shake
dry.
4, Replace the filter, with the front of the filter
toward you.
5. To dry the filter thoroughly, run your unit for
aflew minutes. Remember, only a clean filter
works properly and delivers top efficiency at
every setting.
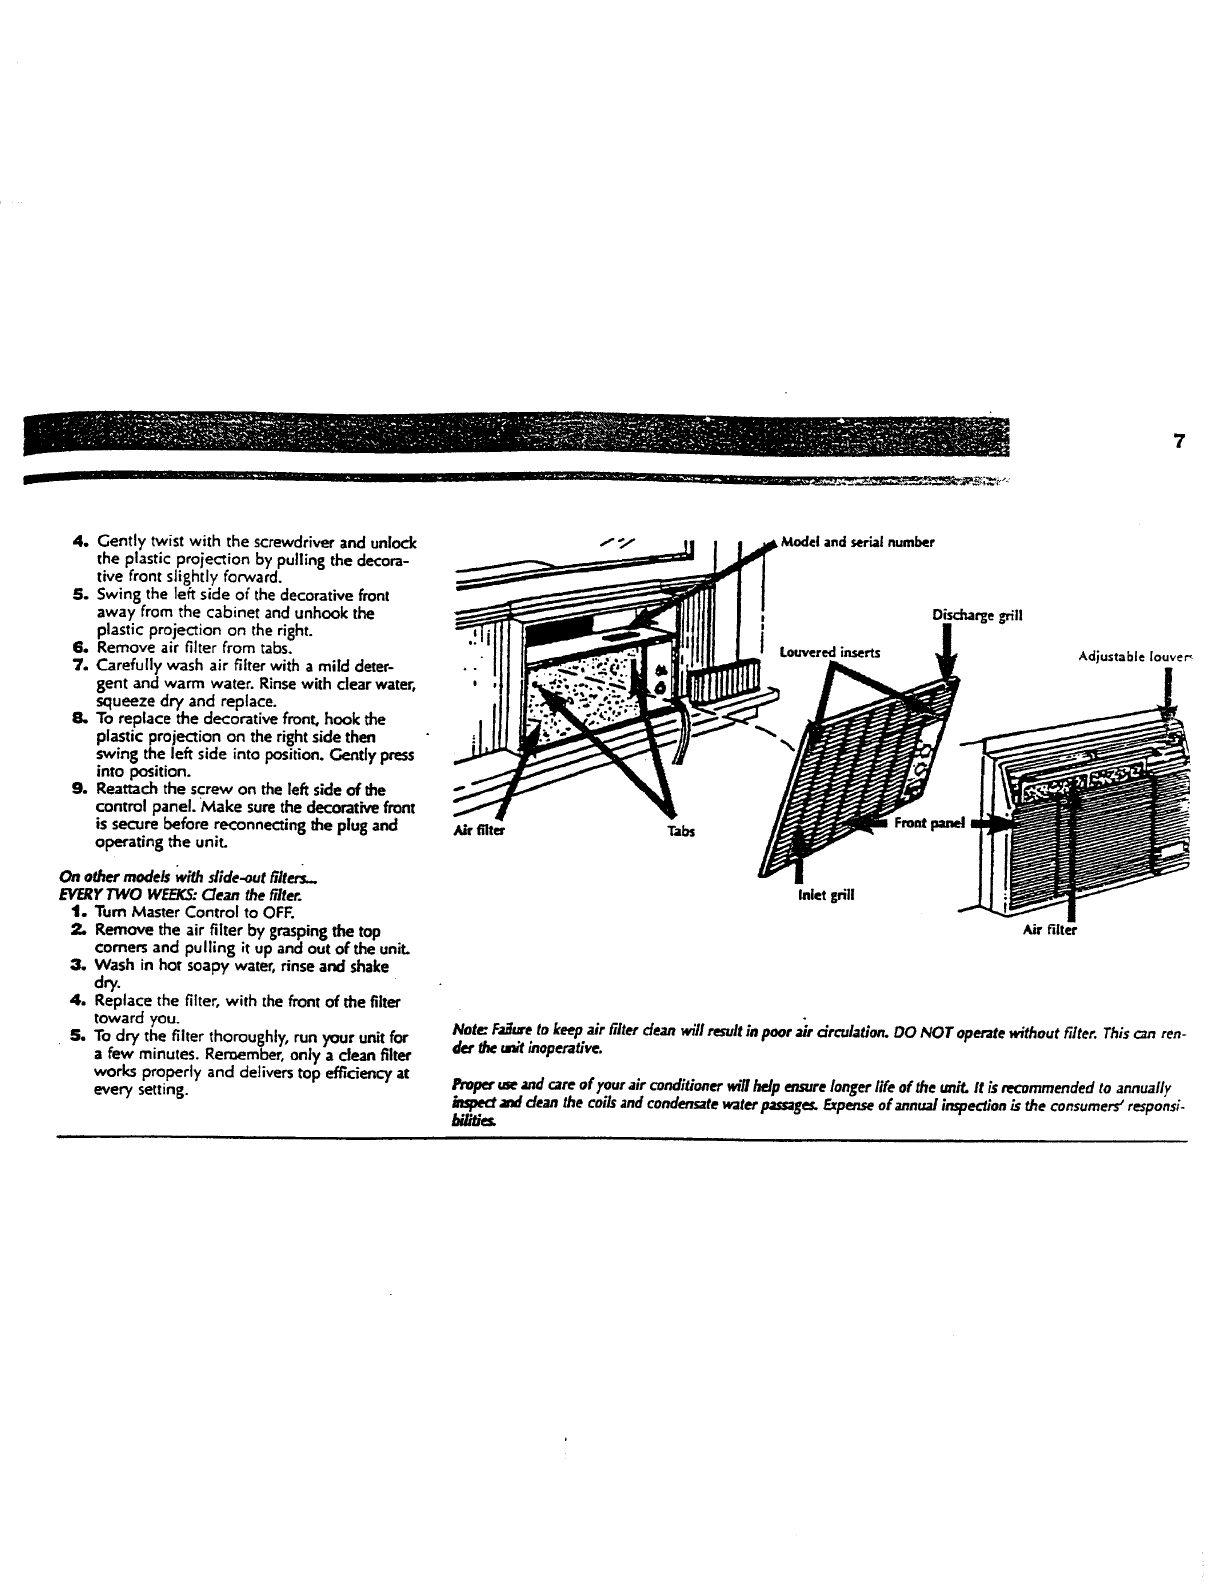
_Model andserialnumber
Disc_rge grill
'" /ouvered inserts 1
i!
Air filter Tabs
Inlet grill
Adjustable [ouve_
Air filter
Note:FazTuretokeepairfilter cleanwillresultinpoorJr circulation.DONOToperatewithoutfilter.Thisc_nren-
dertheunitinoperative.
J_'opermeand careof your air conditionerwig help ensurelonger life of the unit. It is mcummondedto annually
Jl_zectand cleanthe coilsandcondensatewaterpassages.Expe_,zseof annual inspection is the consumers_responsi-
bgitles.
Service Instructions
To save time and expense, checkthe following before
calling an authorized service company.
Insufficient Cooling
III Turn Maste_ Control to OFF.
II Shut all windows and doors in room.
1 Remove any obstructions from inside
and outside cabinet louvers.
1Close Air Exchanger (available on most
units).
1 Inspect filter and clean if dirty.
III Turn Thermostat and Master Controls to
coolest settings.
Under certain conditions the cooling coils directly
behind the filter, may ice up and block the airflow.
This is a common occurrence in air conditioners
caused when the outside temperature drops below
70=F (21°C3 white the humidity remains high. If
this happens, simply turn the unit off and allow
the ice to melt, then resume normal operation.
Insufficient Heating-
Heating Models Only
i Turn Master Control to OFF.
I Shut all windows and doors in room.
i Remove any obstructions from inside and
outside cabinet louvers.
1 Turn Thermostat and Master Controls to
wan'nest settings.
Unit Fails to Start
• Turn Master Control to OFF.
• Replug line cord plug into outlet to be sure
electrical contact is being made. (If firm con-
tact is notbeing made, outlet may have to be
replaced).
•TurnMaster Control to HIGH FAN. If air cir-
culating fan does not operate, check house
circuit breaker(or fuses).
For Models Installed in
North America. If Service
or Parts are Required
First,make the recommended checks, if it appears
that serviceor parts are still required, see your
room air conditionerwarranty "How to Obtain
Warranty Serviceor Parts'.
For Models Installed
Outside North America
For room air conditioners purchasedfor useout-
side North America, the manufacturer does not
e_tend any warranty either expressedo_"implied.
Consult your local dealer for any warranty terms
extended by the importer in your coumry.
Room Air
Conditioner Warranty
OA_thin _e 48 contiguous United 5_ates, state of Hawaii,
the Di_tdct of Columbia, Puerto Rico and Canada)
Full (One Year)Partsand LaborWarranty
During the firstyear after the date of original put.
chase, FeddersNorth America will, through its
authorized servicers and free of charge to the
owner or any subsequentuser, cepair or replace
any parts which are defective in material or work-
manship due to normal use. Ready access to the
air conditioner is the responsibility of the owner.
United (Rye Year)SealedSystemWarranty/
(Two Year)FanMotor PartsWarranty
In addition to the full (one year) parts and labor
warranty described above, FeddersNorth America
will, through its authorized servicers or parts dis-
tributors, exchange sealed systempans (consisting
of compressor, evaporator, condenser, and inter-
conheding tubing) during the second year througt-
fifth year, and the fan motor during the second
year, both from the original date of purchase, pro-
viding the parts are defective in material or work-
manship. Transportation, handling, or labor costs
to diagnose, repair or replace such defective parts
are not covered by this limited parts warranty and
are the owner's responsibility.
Note_ tn the eventof anyrequiRd pare replacementwithin the
pedad of this wananP/,FeddersNorth America replacement
_alt be usedand will be wan'antedorgy for the period
remainingon the originalwarrant.
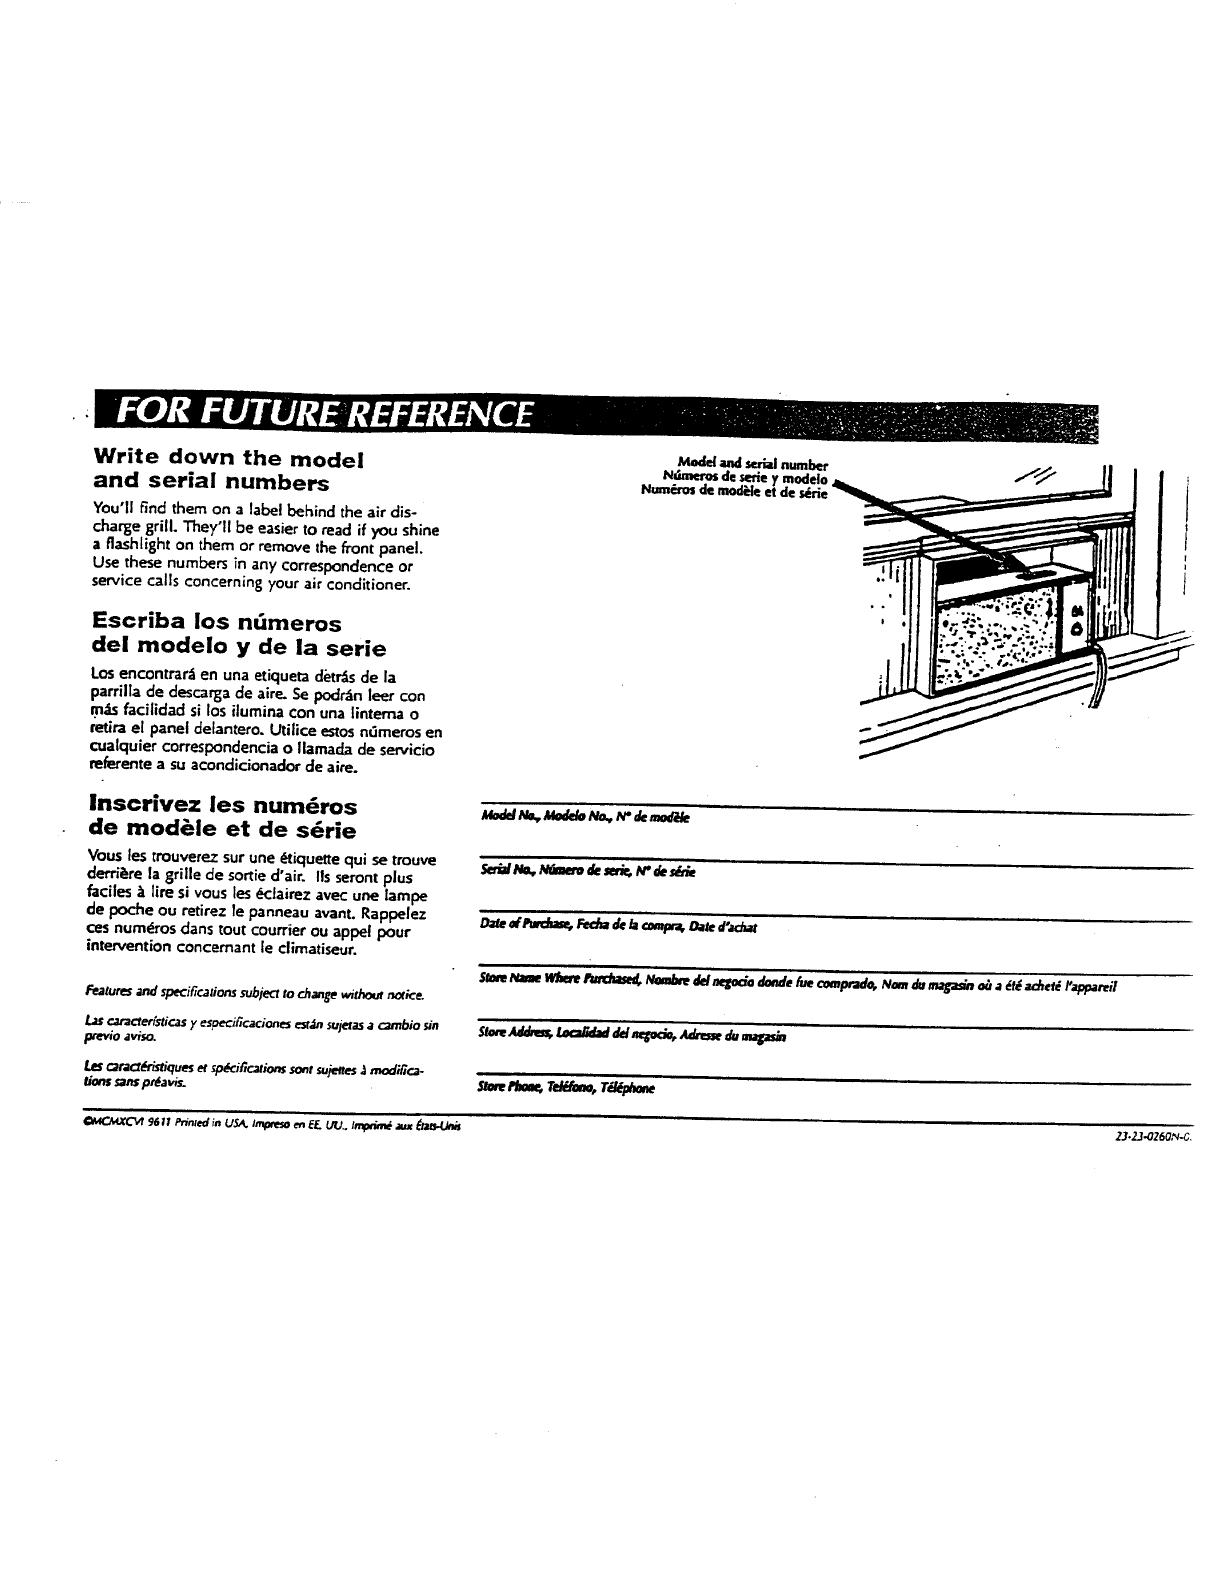
Write down the model
and serial numbers
You'll End them on alabel behind the air dis-
charge grill. They'll be easier to mad if you shine
a flashlight on them or remove the front panel.
Use these numbers in any correspondence or
service calls concerning your air conditioner.
Escriba los nOmeros
dei modelo y de la serie
Los encontrar_ en una etiqueta detr_s de la
parrilla de descarga de aire. Se podr;_nleer con
.m;B faci[idad si _os i[umina con una |intema o
retira el panel delantero. UUlice e_os nQmeros en
cualquier correspondencia o Ilamada de servicio
referente a su acondicionador de aire.
Inscrivez les num6ros
de mod&le et de s_rie
Vous les trouverez sur une _iquette qui se trouve
detrii_re la grille de sortie d'air. IIs seront plus
faciles _ life si vous les 6ciairez avec une lampe
de poche ou retirez le panneau avant. Rappelez
ces num6ros dans tout courtier ou appel pour
intervention concernant le climatiseur.
Featuresand specificationssubject to change without nodce.
Las¢JtacteristiCas yespe_ific._ciones est,tn sujetasac_mbio sin
previo aviso.
C_taCl6_stiqueset sp_i_calions sont suites J moditlca-
s_ns pt_avis.
9611 Prinled in USA. Impcesoen EE. UIU.. Imptlm___t_.Unis
M_iei andse_l number
Ndmerosdeserle
Num_'osdemodile
23.23.4260N-_,
