FLYTECH TECHNOLOGY PBG8D41 Mobile POS User Manual
FLYTECH TECHNOLOGY CO., LTD Mobile POS
Users Manual

iRUGGY
G8 Mobile Tablet
UserManual
Version1.0
March2017

G8UserManual 2
ConfidentialandProprietaryInformation
Copyright
Copyright2017
AllRightsReserved
ManualVersion1.0
Theinformationcontainedinthisdocumentissubjecttochangewithoutnotice.
Wemakenowarrantyofanykindwithregardtothismaterial,including,butnotlimitedto,theimplied
warrantiesofmerchantabilityandfitnessforaparticularpurpose.Weshallnotbeliableforerrors
containedhereinorforincidentalorconsequentialdamagesinconnectionwiththefurnishing,
performance,oruseofthismaterial.
Thisdocumentcontainsproprietaryinformationthatisprotectedbycopyright.Allrightsarereserved.
Nopartofthisdocumentmaybephotocopied,reproducedortranslatedtoanotherlanguagewithout
thepriorwrittenconsentofthemanufacturer.
Trademark
Thematerialinthismanualissubjecttochangewithoutnotice.Bluetoothisaregisteredtrademarkof
BluetoothSIG.Microsoft®,andWindows®areeitherregisteredtrademarksortrademarksofMicrosoft
Corporation.
Allotherproductorservicenamesarethepropertyoftheirrespectiveowners.
Safety
RegulatoryInformation
Caution:OnlyuseapprovedandULListedaccessories,batterypacksandbatterychargers.DoNOT
attempttochargedamp/wetmobilecomputersorbatteries.Allcomponentsmustbedrybefore
connectingtoanexternalpowersource.
PowerSupply
Useonlytheapprovedpowersupplyshippedwiththeunit.Useofalternativepowersupplywill
invalidateanyapprovalgiventothisdeviceandmaybedangerous.
WarningforUseofWirelessDevices
Pleaseobserveallwarningnoticeswithregardtotheusageofwirelessdevices.
PotentiallyHazardousAtmospheres
Youareremindedoftheneedtoobserverestrictionsontheuseofradiodevicesinfueldepots,
chemicalplantsetc.andareaswheretheaircontainschemicalsorparticles(suchasgrain,dust,ormetal
powders)andanyotherareawhereyouwouldnormallybeadvisedtoturnoffyourvehicleengine.
SafetyinAircraft
Switchoffyourwirelessdevicewheneveryouareinstructedtodosobyairportorairlinestaff.

G8UserManual 3
ConfidentialandProprietaryInformation
Pacemakers
Pacemakermanufacturersrecommendedthataminimumof15cm(6inches)bemaintainedbetweena
handheldwirelessdeviceandapacemakertoavoidpotentialinterferencewiththepacemaker.These
recommendationsareconsistentwithindependentresearchandrecommendationsbyWireless
TechnologyResearch.
PersonswithPacemakers
PersonswithPacemakersshouldALWAYSkeepthedevicemorethan15cm(6inches)fromtheir
pacemakerwhenturnedONandhencetheyshouldnotcarrythedeviceinabreastpocket.Theyshould
usetheearfurthestfromthepacemakertominimizethepotentialforinterference.Ifyouhaveany
reasontosuspectthatinterferenceistakingplace,turnOFFyourdevice.
HearingAids
Thewirelessdevicemayinterferewithsomehearingaids.Intheeventofinterferenceyoumaywantto
consultyourhearingaidsuppliertodiscusssolutions.
OtherMedicalDevices
Pleaseconsultyourphysicianorthemanufacturerofthemedicaldevice,todetermineiftheoperation
ofyourwirelessproductmayinterferewiththemedicaldevice.
FCC/EU RF Exposure Guidelines
FCCStatement
ThisequipmenthasbeentestedandfoundtocomplywiththelimitsforaClassBdigitaldevice,
pursuanttopart15oftheFCCRules.Theselimitsaredesignedtoprovidereasonableprotectionagainst
harmfulinterferenceinaresidentialinstallation.Thisequipmentgenerates,usesandcanradiateradio
frequencyenergyand,ifnotinstalledandusedinaccordancewiththeinstructions,maycauseharmful
interferencetoradiocommunications.However,thereisnoguaranteethatinterferencewillnotoccur
inaparticularinstallation.Ifthisequipmentdoescauseharmfulinterferencetoradioortelevision
reception,whichcanbedeterminedbyturningtheequipmentoffandon,theuserisencouragedtotry
tocorrecttheinterferencebyoneormoreofthefollowingmeasures:
‐ Reorientorrelocatethereceivingantenna.
‐ Increasetheseparationbetweentheequipmentandreceiver.
‐ Connecttheequipmentintoanoutletonacircuitdifferentfromthattowhichthe
receiverisconnected.
‐ Consultthedealeroranexperiencedradio/TVtechnicianforhelp.
ThisdevicecomplieswithFCCSARexposurelimitssetforthforanuncontrolledenvironment.This
devicecomplieswithPart15oftheFCCRules.Operationissubjecttothefollowingtwoconditions:(1)
thisdevicemaynotcauseharmfulinterference,and(2)thisdevicemustacceptanyinterference
received,includinginterferencethatmaycauseundesiredoperation.
G8UserManual 4
ConfidentialandProprietaryInformation
Caution!
Anychangesormodificationsnotexpresslyapprovedbythepartyresponsibleforcompliancecouldvoid
theuser'sauthoritytooperatetheequipment.
CE Marking and European Economic Area
Theuseof2.4GHzRLAN's,forusethroughtheEEA,havethefollowingrestrictions:
Maximumradiatedtransmitpowerof100mWEIRPinthefrequencyrange
2.400‐2.4835GHz
InFrance,outsideusageisrestrictedto2.4‐2.454GHz.
Italyrequiresauserlicenseforoutsideusage.
Bluetooth®WirelessTechnologyforusethroughtheEEAhasthefollowingrestrictions:
‐ Maximumradiatedtransmitpowerof100mWEIRPinthefrequencyrange
2.400‐2.4835GHz.
‐ InFrance,outsideusageisrestrictedto10mWEIRP.
‐ Italyrequiresauserlicenseforoutsideusage.
Battery Information
Ourrechargeablebatterypacksaredesignedandconstructedtothehigheststandardswithinthe
industry.However,therearelimitationstohowlongabatterycanoperateorbestoredbeforeneeding
replacement.Manyfactorsaffecttheactuallifecycleofabatterypack,suchasheat,cold,harsh
environmentalconditionsandseveredrops.Whenbatteriesarestoredoversix(6)months,some
irreversibledeteriorationinoverallbatteryqualitymayoccur.Storebatteriesdischargedinadry,cool
place,removedfromtheequipmenttopreventlossofcapacity,rustingofmetallicpartsandelectrolyte
leakage.Whenstoringbatteriesforoneyearorlonger,theyshouldbechargedanddischargedatleast
onceayear.Ifanelectrolyteleakageisobserved,avoidanycontactwithaffectedareaandproperly
disposeofthebattery.Batteriesmustbechargedwithinthe0°to+35°C(32°to95°F)ambient
temperaturerange.Replacethebatterywhenasignificantlossofruntimeisdetected.
BatteryCaution
Thereisariskofexplosionifthebatteryisreplacedbyanincorrecttype.Disposeofusedbattery
accordingtothelocaldisposalinstructions.
WasteElectricalandElectronicEquipment(WEEE)
ForEUCustomers:Allproductsattheendoftheirlifemustbereturnedtotheresellerforrecycling.
Revision Table

G8UserManual 5
ConfidentialandProprietaryInformation
VersionDateChanges
1.0March2017Initialrelease

Table of Contents
1Unpackingtheunit................................................................................................................................8
1.1Standarditems..............................................................................................................................8
1.2Accessories....................................................................................................................................8
2HardwareOverview............................................................................................................................10
2.1Features......................................................................................................................................10
2.2SystemOverview.........................................................................................................................11
2.3Specifications..............................................................................................................................12
3ProductLabelling................................................................................................................................13
4BasicOperation...................................................................................................................................14
4.1PowerOn/OffButton..................................................................................................................14
4.1.1TurningontheUnit.............................................................................................................14
4.1.2TurningofftheUnit.............................................................................................................14
4.1.3TurningofftheDisplayBacklight........................................................................................14
4.2in4Touch™TouchModeControlButton....................................................................................14
4.3AdjustingScreenBrightness........................................................................................................15
4.4AdjustingSystemVolume...........................................................................................................15
4.5ProgrammableFunctionKey.......................................................................................................15
4.6ChargingtheBattery...................................................................................................................15
4.6.1ChargingviaCabletoACAdapter.......................................................................................15
4.6.2BatteryLevelIndicatoronTablet........................................................................................16
4.7ReplacingtheBattery..................................................................................................................16
4.7.1RemovingtheBattery.........................................................................................................16
4.7.2InstallingtheBattery...........................................................................................................17
5InstallationandSetup.........................................................................................................................17
5.1SystemSoftware.........................................................................................................................17
5.2AttachingtheHandStrap............................................................................................................18
5.3Installinga3GormicroSDCard..................................................................................................18
5.4InstallingADD‐f(x)™Modules.....................................................................................................20
5.5AttachinganmPOSIntegrationBracket.....................................................................................21
6UsingtheG8POSDockingStation......................................................................................................22
6.1ConnectingtoPower...................................................................................................................22

G8UserManual 7
ConfidentialandProprietaryInformation
6.2ConnectingtoNetworkandPeripherals.....................................................................................22
6.3PlacingtheTabletintheDock....................................................................................................23
6.4InstallingtheCustomerDisplay..................................................................................................24
6.5Installingathird‐partypaymentdevice......................................................................................25
7UsingtheG8VESAChargingDock......................................................................................................26
8UsingtheG8VehicleMount...............................................................................................................27
9SoftwareConfiguration.......................................................................................................................28
AppendixA:SupportedBarCodeSymbologies.........................................................................................29
G8UserManual 8
ConfidentialandProprietaryInformation
1 Unpacking the unit
Thefollowingitemsmaybeshippedwitheachunit.
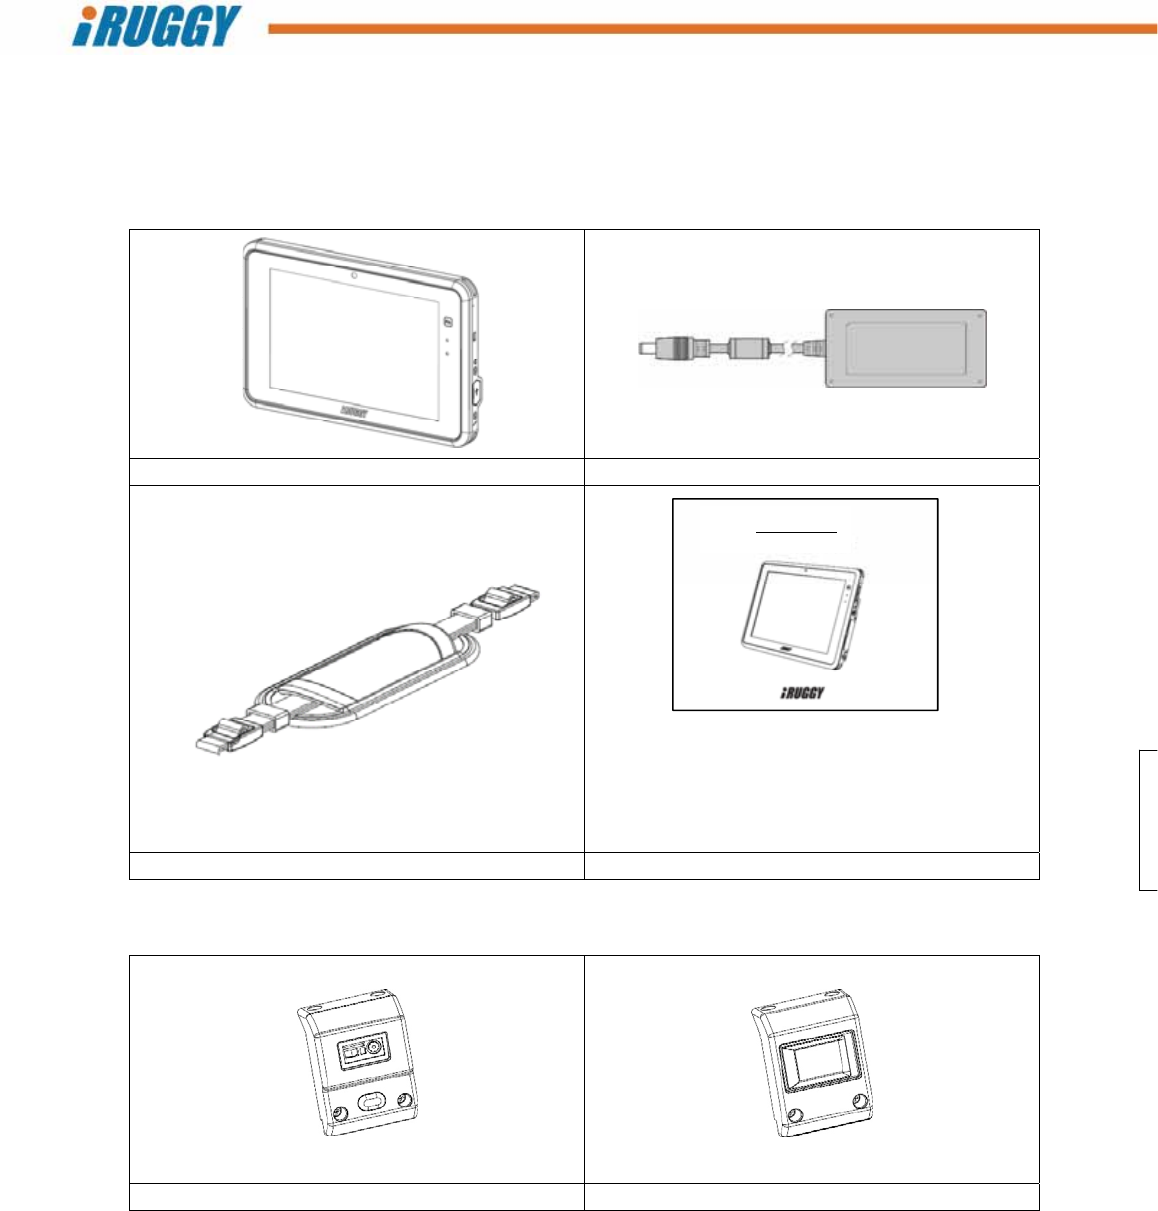
1.1 Standarditems
TabletACAdapter
StandardHandStrapQuickStartGuide
1.2 Accessories
1D/2DScannerADD‐f(x)ModuleFingerprintReaderADD‐f(x)Module
iRUGGYG8
QuickStartGuide
G8UserManual 9
ConfidentialandProprietaryInformation
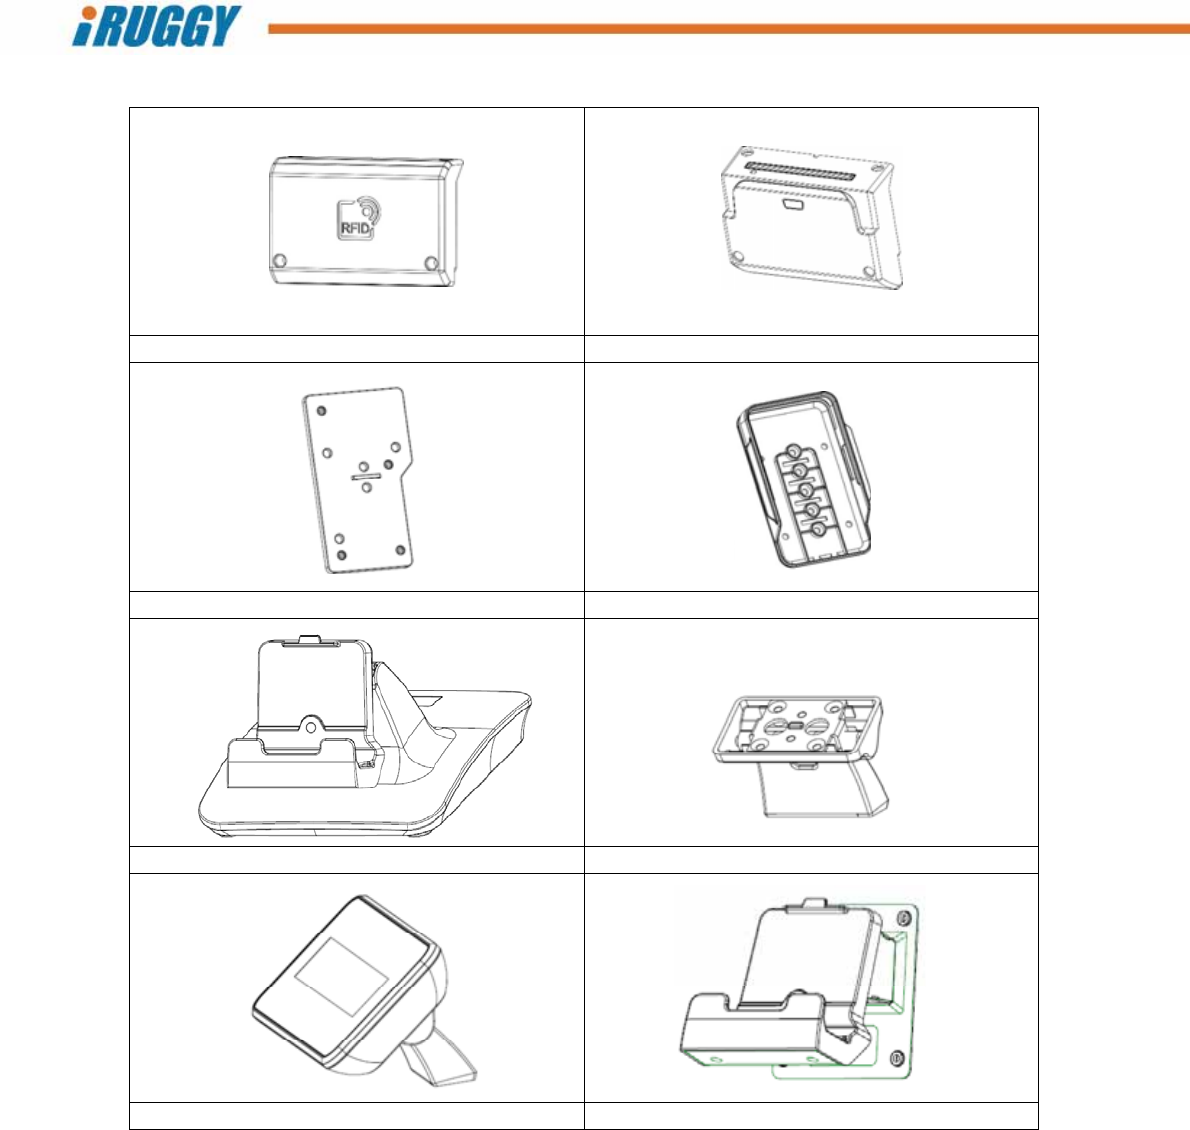
HFRFIDADD‐f(x)ModuleSmartCardReader/MSRADD‐f(x)Module
mPOSIntegrationBracketMountingPlateIngenicoiCMPmPOSIntegrationBracket
POSDockingStationPOSDockmPOSBracketMount
POSDockCustomerDisplay VESAChargingDock
G8UserManual 10
ConfidentialandProprietaryInformation
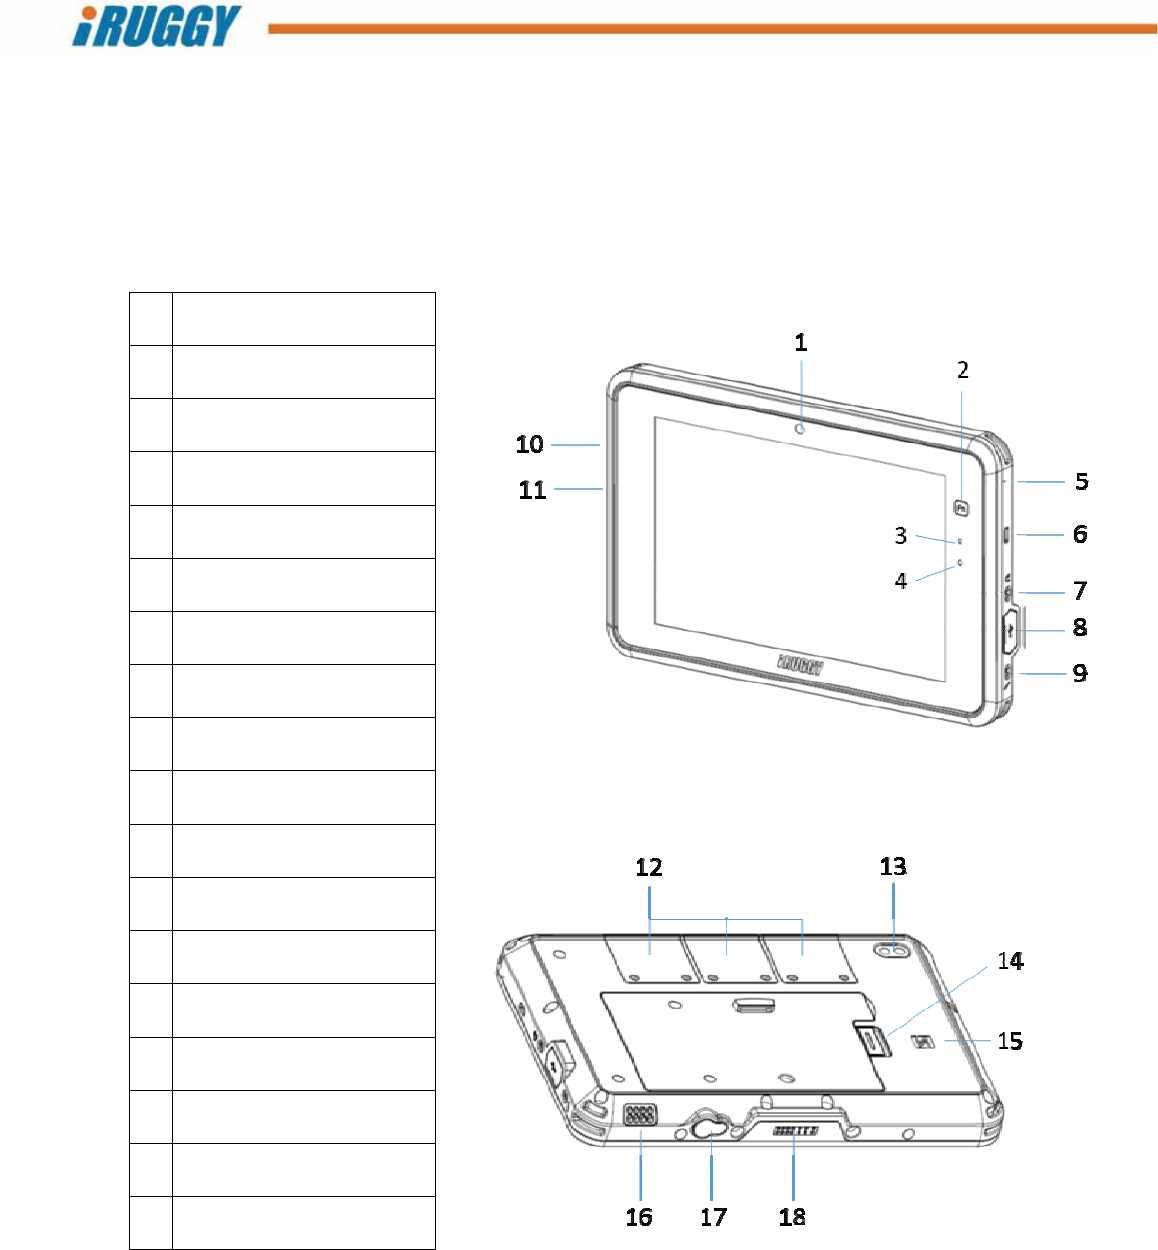
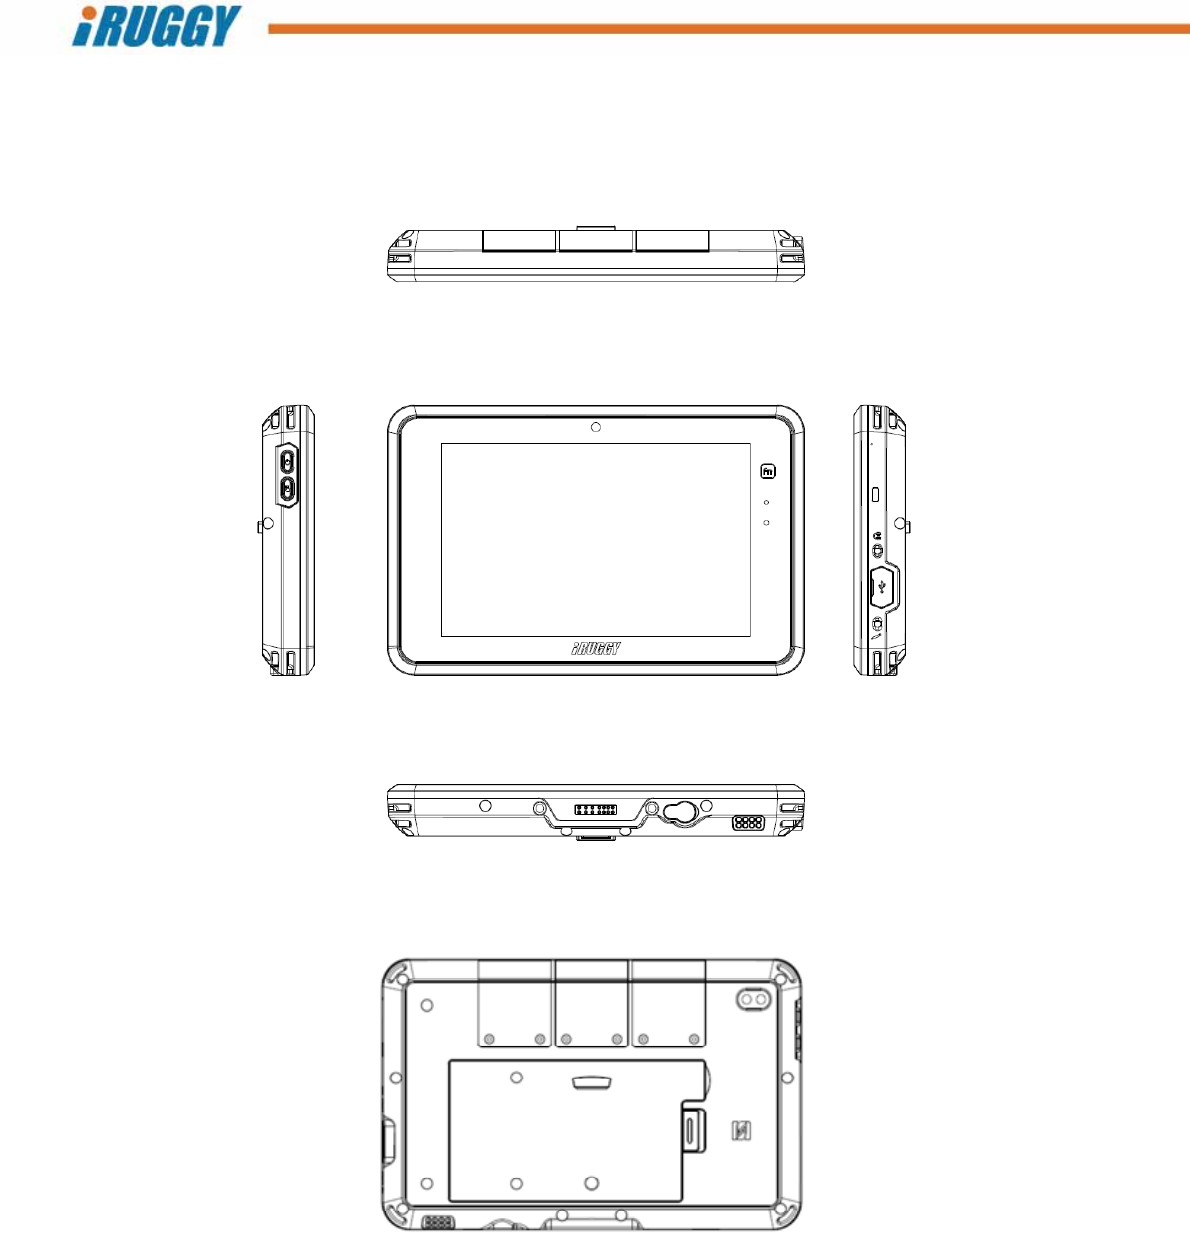
2 Hardware Overview
2.1 Features
12MPwebcam
2Programmablecapacitive
functionkey
3Batterystatusindicator
4Ambientlightsensor
5Microphone
6Kensingtonlockslot
7Audiojack
8Accesscoverfor
microUSB(OTG)slot
9Stylusport
10PowerOn/Offbutton
11in4Touch™touchmode
controlbutton
12ADD‐f(x)modulebays(3)
135MPcamerawith
LEDillumination
14Batteryreleaselatch
15Locationofinternal
NFCreader
16Speaker
17DC‐in
18Dockingconnector
Front View
Back View
G8UserManual 11
ConfidentialandProprietaryInformation
2.2 SystemOverview
G8UserManual 12
ConfidentialandProprietaryInformation
2.3 Specifications
TouchDisplay
8.0”(800x1280resolution)projectedcapacitivemulti‐touchdisplay
User‐selectabletouchmodeforHand,Glove,StylusorRain
Programmablecapacitivefunctionkeyonfront‐bezel
ProcessorIntel®Quad‐CoreCPU2.56GHz
OperatingsystemsWindows®10IoTEnterpriseforSmallTablets
Android™7.0
Memory/Storage¹4GBmemory/64GBstorage(AndroidModel:32GBstorage)
microSDXCsocketforexpansion
Camera8MPautofocusrearcamerawithLEDflash
2MPfront‐facingcamera
ExpansionI/OportsMicroUSB2.0(supportsOTG)
AdditionalperipheralI/OavailablethroughoptionalPOSDockingStation
Audio
1Wspeaker
Audiojack
Microphone
Communications
WLAN802.11ac
Bluetooth4.0+LE(class2)
NFCcontactlesscardreader
LTEdata²anddedicatedGPS(factoryoption)
PowerSupply
3.7V8000mAhbattery,hotswappable*withupto8hourspercharge³
DC‐in,withexternalACadapter(Output5VDV,4A,Input100‐240VAC,50/60Hz)for
charging
Environmental
IP65ratedprotectionfromliquidanddustingress
DesignedtoMIL‐STD‐810G1.2Mdropspecification
Operatingtemperature:‐10°C~50°C(14°F~122°F);
max.35°C(95°F)whenchargingbattery
Storagetemperature:‐20°C~70°C(‐4°F~158°F)
Humidity:90%RHnon‐condensing
Dimensions(WxHxD)234x151.8x26mm(9.2”x5.9”x1.0”)
Weight(withBattery)⁴850g(1.87lbs)
ADD‐f(x)modules⁵
1D/2Dopticalbarcodescanner
Fingerprintreaders
LF,HF,UHFRFIDreaders
Smartcardreader(EMVLevel1and2certified)and3trackencryptedMSR
RearmountingbracketformPOSdevices
LANandCOMI/Omodule
Optionalaccessories⁵
POSdockingstation(1xLAN,3xUSB2.0,1xCOM,1xCD
VESAchargingmount
Vehiclechargingmount
2mmprecisiontipstylus
11GB=1billionbytes;actualformattedcapacitywillbeless
2Subjecttoserviceprovider’sbroadbandsubscriptionandcoveragearea;additionalchargesmayapply
3StandardconfigurationtestedusingPCMark®8batterylifebenchmark.Resultsmaybeusedforproductcomparisonandmayvaryunderdifferentsituations
Includinghardwareconfiguration,software,operatingconditions,powermanagementsettingsandotherfactors.Batterylifewilldecreasewithtimeanduse
4Weightshownrepresentsbaseconfigurationwithbattery,excludinganyoptionalaccessories
5Accessoriesmayvarydependingonyourconfiguration.Accessoriesaresoldseparately
*HotswappablefeatureisonlyavailablewithLTEdatacommunicationanddedicatedGPSoption.
G8UserManual 13
ConfidentialandProprietaryInformation
3 Product Labelling
Safetycertificationandothercompliancelabelsmaybefoundontheinsideofthebatterycompartment,
alongwithproductserialnumberandWindowslicensesticker.SeesectiononRemovingtheBatteryfor
instructionsonremovingthebatterymoduletoviewthisinformation.
Alltabletsarelabelledwithauniqueserialnumber.Thisnumberisimportantintrackingunitsthrough
productionandshipmentandmayberequiredforservicingtheproductunderthewarranty.
Productcertification
labels
G8UserManual 14
ConfidentialandProprietaryInformation
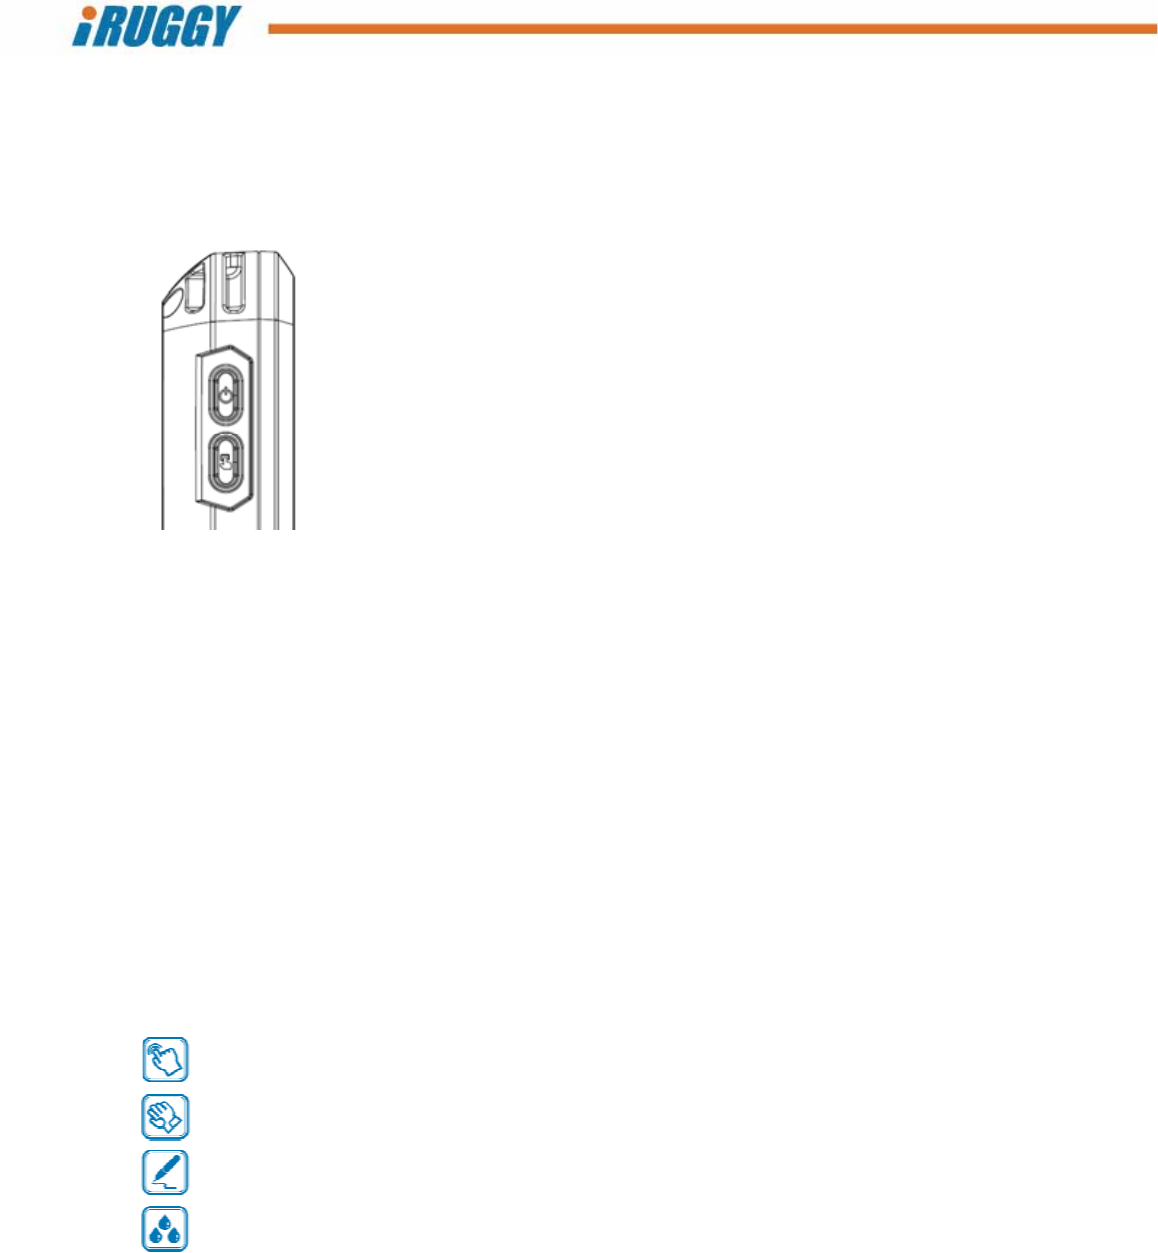
4 Basic Operation
4.1 PowerOn/OffButton
Power On/Off button
in4Touch™ touch mode control button
4.1.1 TurningontheUnit
Pressandholdthepowerbutton2secondsontoturnonthesystem.Youwillfeelavibrationthe
momentthesystempowerson.NOTE:Thetabletmustbedocked,pluggedintoACorbatterycharged
beforeturningontheunitforthefirsttime.
4.1.2 TurningofftheUnit
Theunitshouldbeshutdownnormallyviatheoperatingsystem.Themanuallypowerofftheunit,press
andholdthepowerbutton5seconds.
4.1.3 TurningofftheDisplayBacklight
Systemsettingscanbeusedtoturnoffthebacklightautomaticallyforpowersavingswhenthesystemis
idle.Whentheunitispoweredon,pressingthepowerbuttonmomentarilywillturnoffandonthe
backlightunlessthesesettingsarechanged.
4.2 in4Touch™TouchModeControlButton
Pressandholdthein4Touchbuttontocyclethroughgraphiciconsdisplayedonscreenrepresenting
eachof4supportedtouchoperationmodes.Oncethegraphiciconishighlighted,releasethebuttonto
activatethetouchmoderepresentedbythaticon.
Hand Supportsnormaltouchoperationusingabarefinger.
Glove Enablestouchoperationwhentheuseriswearinggloves.
Stylus Restrictsinputtostylus,ignoringfingerorpalmcontact.MustbeusedwiththeG8
stylusconnectedtothestylusportonthetablet.
RainSupportstouchoperationusingbarefingerwhilereducinginterferencefromrandom
dropsofliquidonthescreen.
G8UserManual 15
ConfidentialandProprietaryInformation
4.3 AdjustingScreenBrightness
Windowsdisplaysettingsallowscreenbrightnesstobesetmanuallyoradjustedautomaticallyfor
powersavingsorforcomfortunderdifferentlightingconditions.Thereare4manualsettings:100%,
75%,50%and25%.Factorydefaultsettingforthedisplayisfixedat100%brightness.
Anambientlightsensorlocatedonthefrontofthedisplaymaybeusedtosenseandreducethe
brightnesslevelforcomfortinlowlightenvironments.Thisfeatureisdisabledatthefactorybutcanbe
enabledthroughsystemsoftwaresettings.
4.4 AdjustingSystemVolume
Volumelevelsontheintegratedspeakeranddevicesconnectedthroughtheaudiojackmustbeset
manuallythroughWindowsorAndroidsystemsoftwaresettings.
4.5 ProgrammableFunctionKey
Thecapacitivebuttononthetoprightofthetabletdisplayisactivatedbytouch.ForWindowsand
Androidmodels,thisbuttonispre‐programmedinthefactoryasWindowsorHomekey,butthebutton
maybere‐programmedbytheusertoopenapplicationsoraccessspecificfunctions.Forinformationon
re‐programmingthiskey,contactyouriRuggySystemsauthorizeddistributororreseller.
4.6 ChargingtheBattery
TheG8MobileTabletisequippedwithaninterchangeable8000mAHbatterymodulesupportingupto8
hoursperchargedependingonusage.
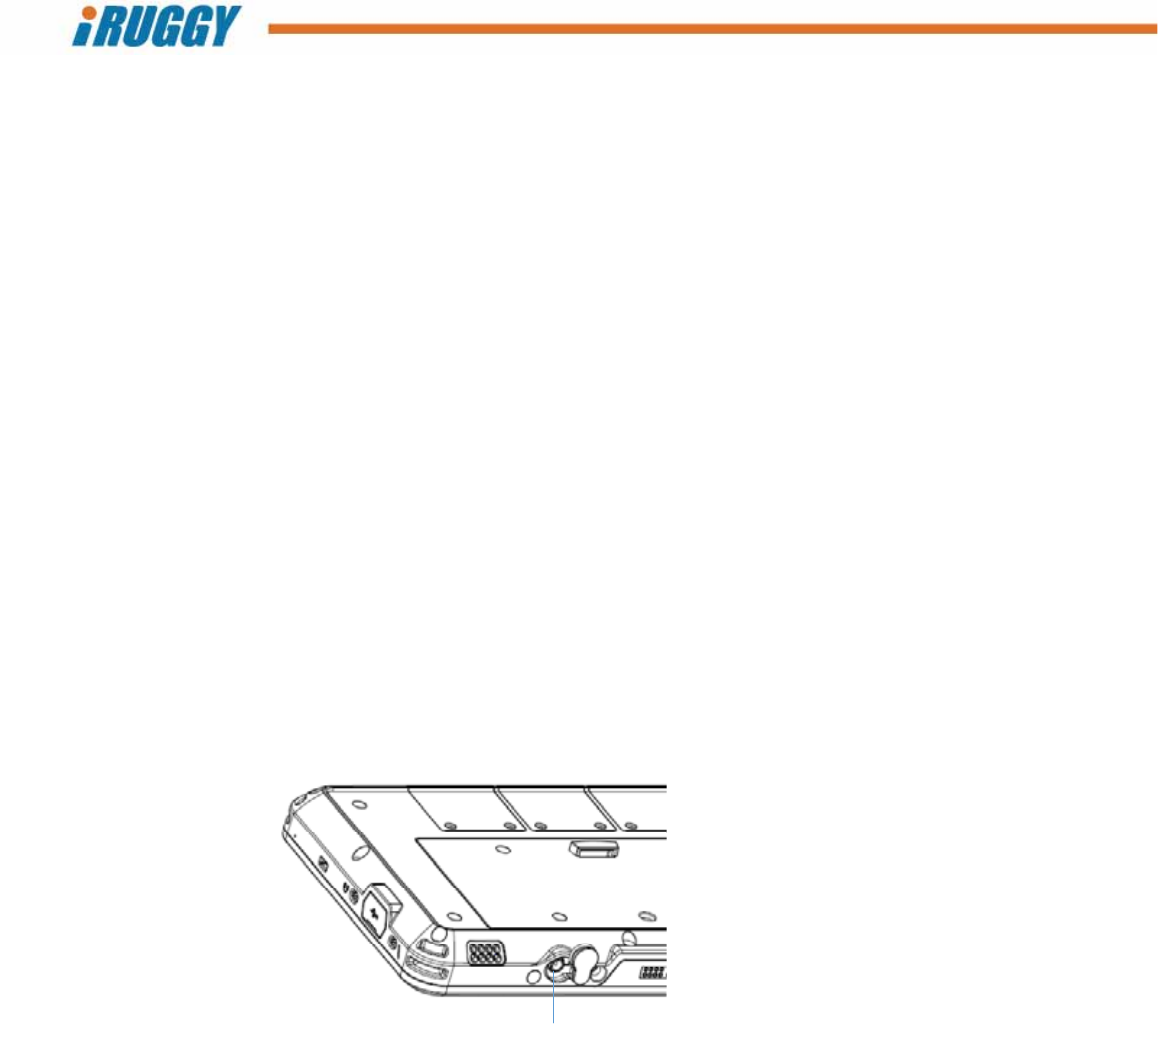
4.6.1 ChargingviaCabletoACAdapter
ThebatterymaybechargedbyconnectingthesuppliedACpoweradaptordirectlytotheDC‐in
connectorlocatedonthebottomofthetablet.Pushtheprotectiverubbersealasideandplugthecable
directlyintotheconnector.ThenplugtheadaptordirectlyintotheACoutlet.
DC‐in
G8UserManual 16
ConfidentialandProprietaryInformation
4.6.2 BatteryLevelIndicatoronTablet
AbatterylevelindicatorLEDonthefrontofthetabletsignalschargestatus:
GREEN Batterychargelevelis90%orhigher(Tabletispluggedinorplacedindock)
ORANGEBatteryischarging(Tabletispluggedinorplacedindock)
RED/Flashing Batterylevelbelow15%
RED Batterylevelbelow10%
4.7 ReplacingtheBattery
4.7.1 RemovingtheBattery
Unlessthetabletisequippedwithabridgebatterysuppliedon3Gmodels,alwayspowerdownthe
systemfirst.UnplugtheACcableifconnecteddirectlytotheDC‐inportonthetablet.Placethetablet
facedownonaflatsurface.Next,slidethelatchdownasshowntounlockandreleasethebatter
modulesoitcanbeliftedoutoftheunit.
Ifthesystemisequippedwiththebridgebattery,thesystemwillautomaticallyenterConnectStandby
Modeandscreenbacklightwillturnoff.ThefrontbatterylevelindicatorLEDwillflashandsystemwill
beepevery3secondsforthefirst3minutes.After3minutes,theLEDwillflashandbeepwillsound
everyhalfsecond.Systemwillautomaticallyshutdownat4minutes.
Themainbatterymodulemayberemovedbyreleasingthelatchandliftinguptheaccesscoveras
shownabove.
1.Slidelatchrighttounlock
2.Liftuphere

G8UserManual 17
ConfidentialandProprietaryInformation
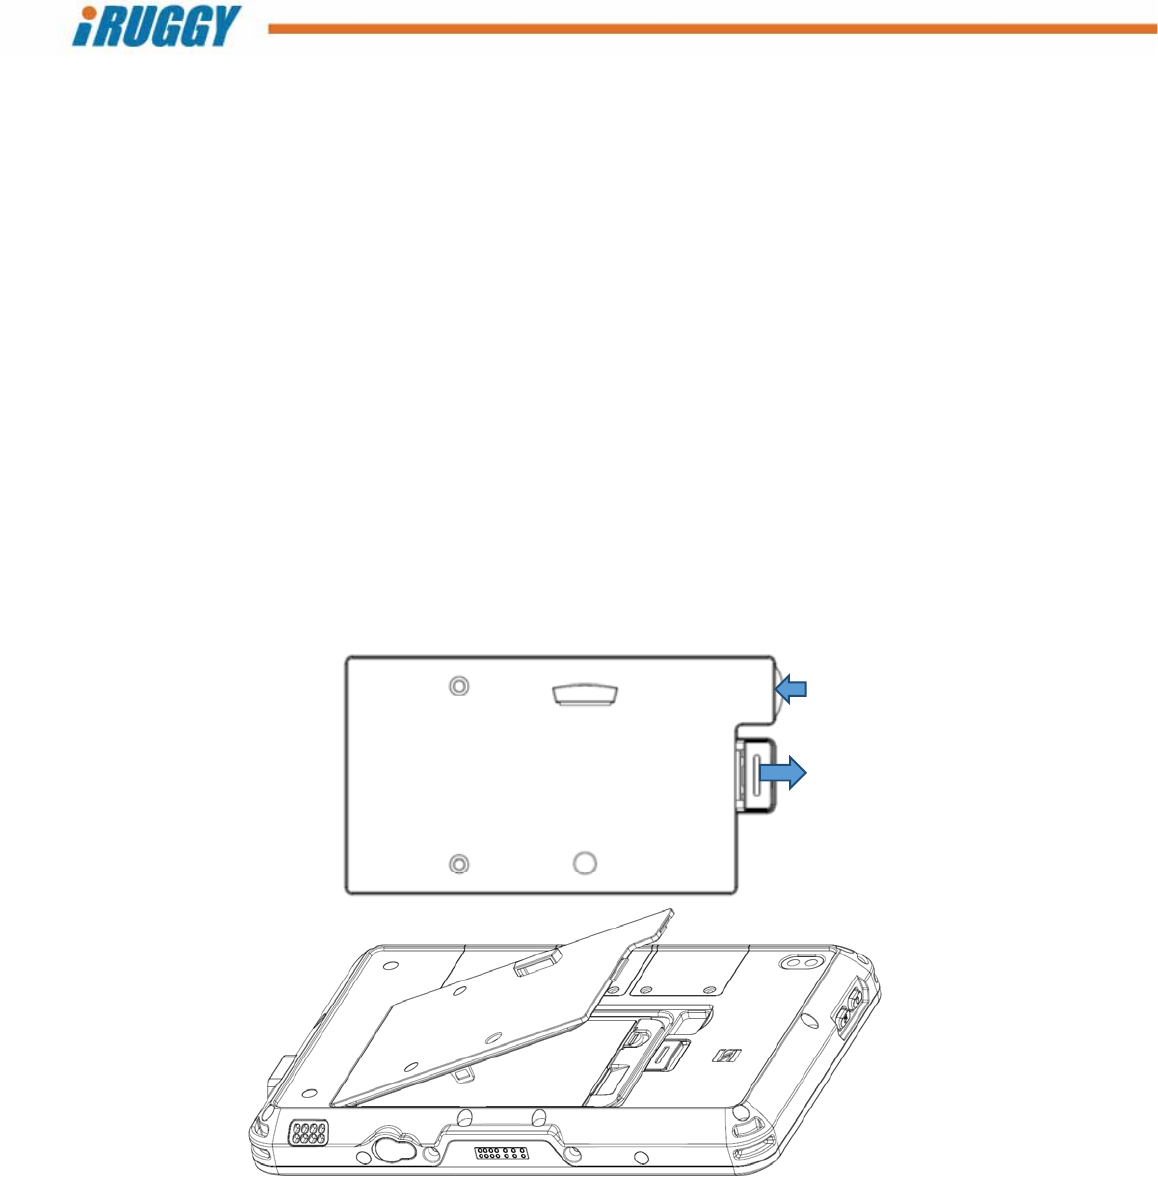
Nextslidethelatchholdingthemainbatterymoduleinplaceandliftoutthebatteryatanangleas
shownabove.
4.7.2 InstallingtheBattery
Anglethebatterymodulesothattheleftsidewithexposedconnectorpinsisinsertedfirstintothe
batterycompartment.Thepressintoplaceandslidethelatchupwardtolockthebatterymoduleinto
position.
5 Installation and Setup
5.1 SystemSoftware
Systemisfactory‐installedwiththesupportedWindowsorAndroidoperatingsystemandrequired
driversforalldeviceoptions,whetherornotdeviceisinstalledontheunitwhenshipped.Noadditional
softwareordevicedriversmustbeinstalledtobeginusingthesystem.
OninitialbootupofasystemloadedwithWindows,theWindowsactivationscreenwillshowand
prompttheuserthroughtheactivationprocess.
SeesectiononSoftwareConfigurationformoreinformationondriverssuppliedwiththesystem.
Slidelatchrighttounlock
G8UserManual 18
ConfidentialandProprietaryInformation
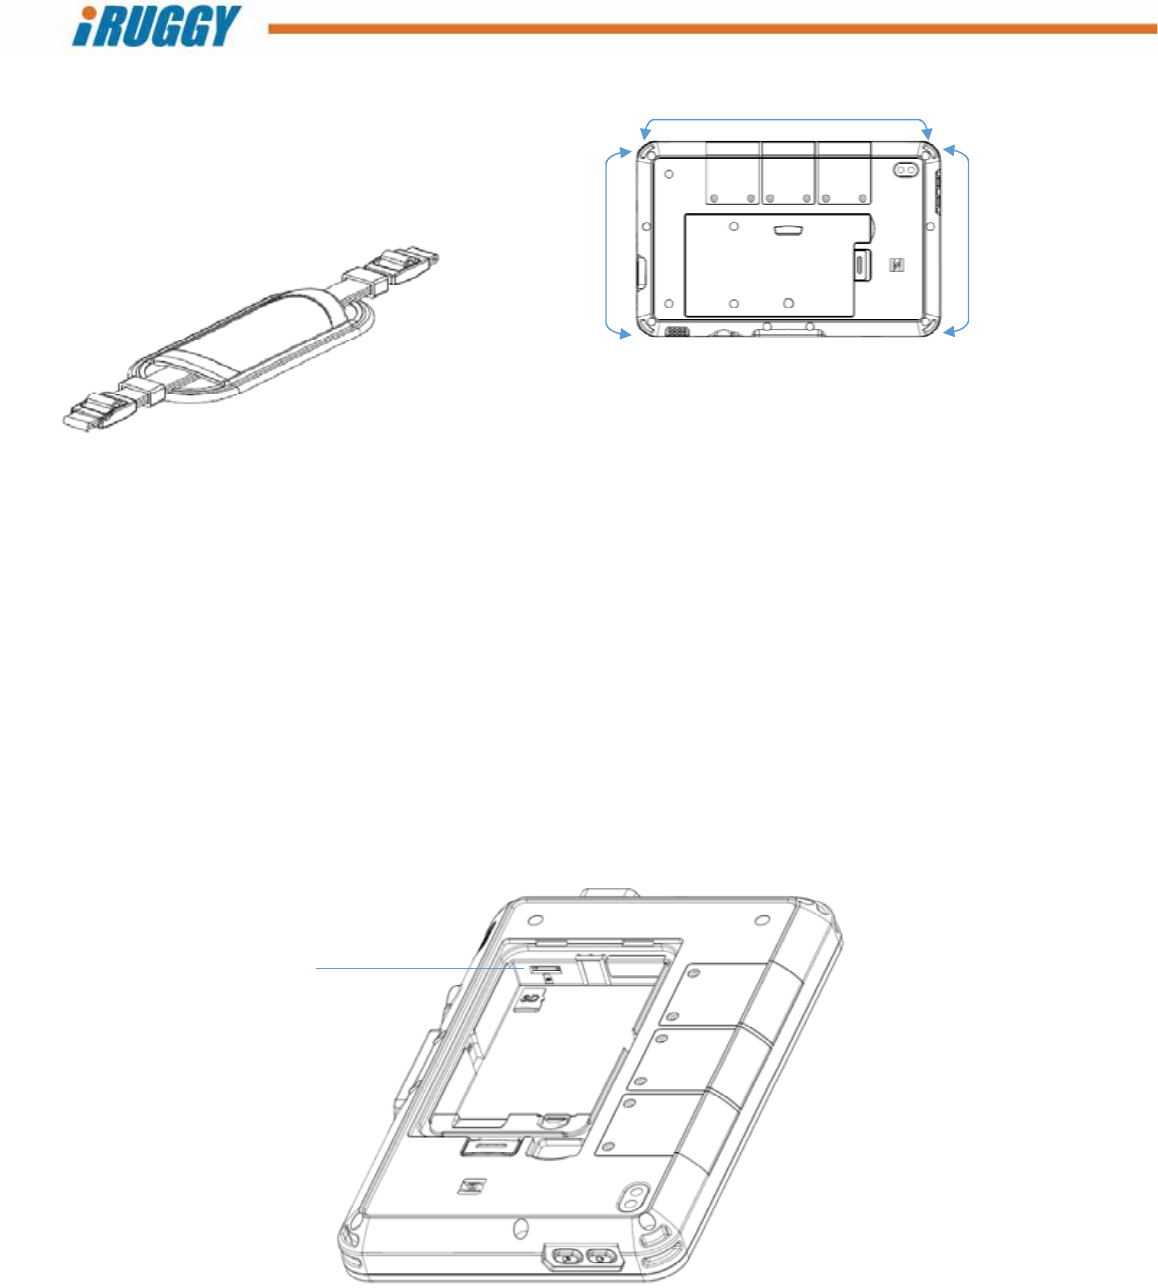
5.2 AttachingtheHandStrap
Useofthestandardhandstrapshippedwiththetabletisoptional.Dependingonthesituation,theuser
mayattachthehandstrapbetweenanchorpointsacrossthetoporeithersideofthetablet.Toattach
thestraptothetablet,threadbothendsofthestrapintoananchorpoint,foldbackandtighteninthe
plasticbuckle.Anyexcesscanbetuckedintothesleevehandleatthecenterofthestrap.
5.3 Installinga3GormicroSDCard
Theusermayinstallauser‐suppliedSDXCorcompatiblemicroSDcardontheunittoloadorsavefiles,
orexpandworkingdatastoragecapacity.Onselecttabletmodelswithsupportfor3Gdata
communication,aseparateslotisavailableforinstallingauser‐supplied3GMicroSIMcard.
Slotsislocatedinsidethemainbatterycompartment.Toinstalleithertypeofcard,firstpowerdown
thesystem.Removethemainbatteryandlocatethecorrectslotasshownbelow.
microSDcardslot
G8UserManual 19
ConfidentialandProprietaryInformation
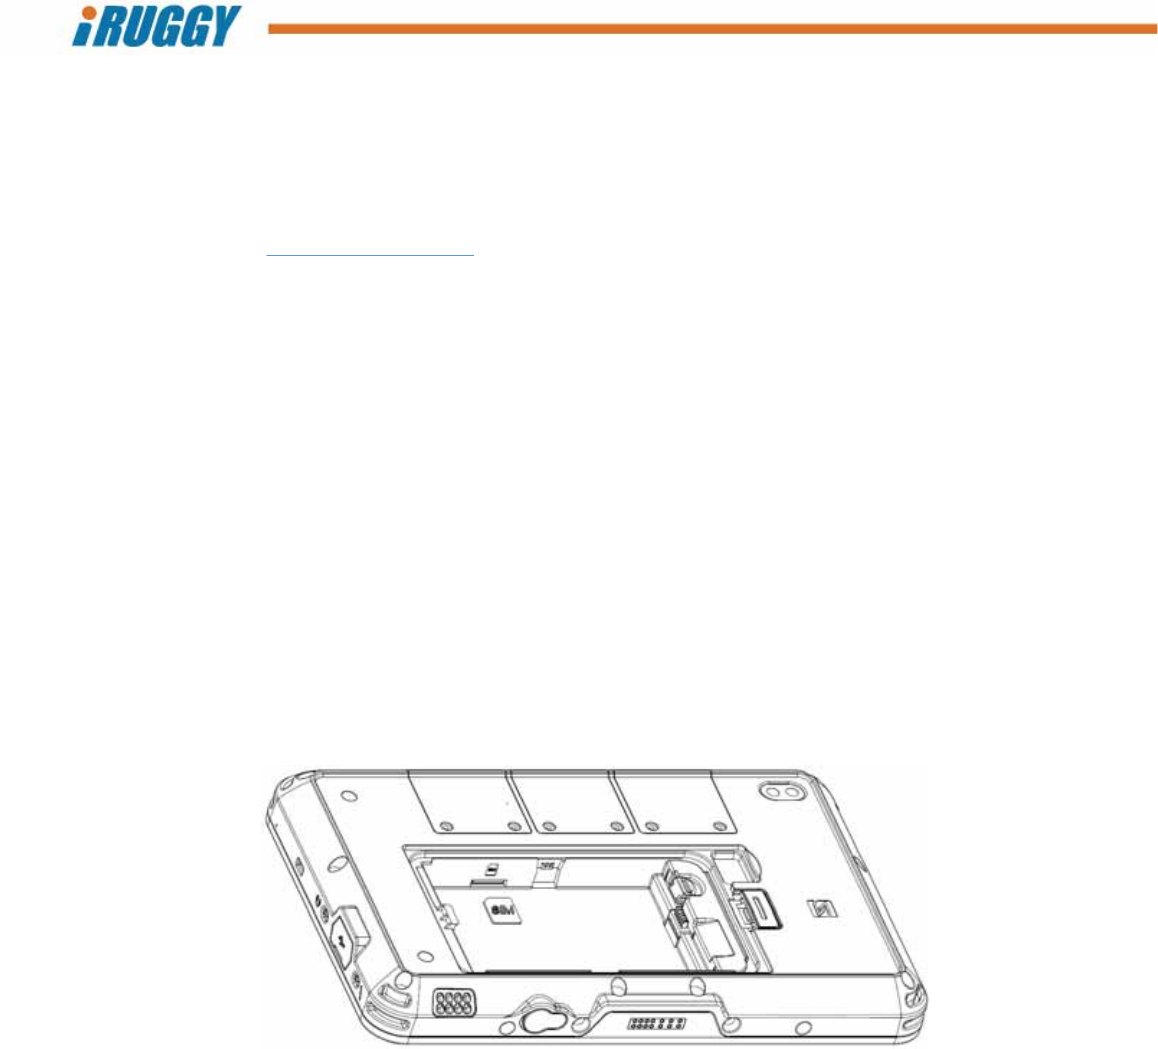
Orienteithercardsothatthegoldcontactedgefacesdowntowardsthefrontofthetablet.Slidethe
cardinuntilitclicksinplace.Toremovethecard,presstheouteredgetoclickandreleasethecard.
3GSIMslot
G8UserManual 20
ConfidentialandProprietaryInformation
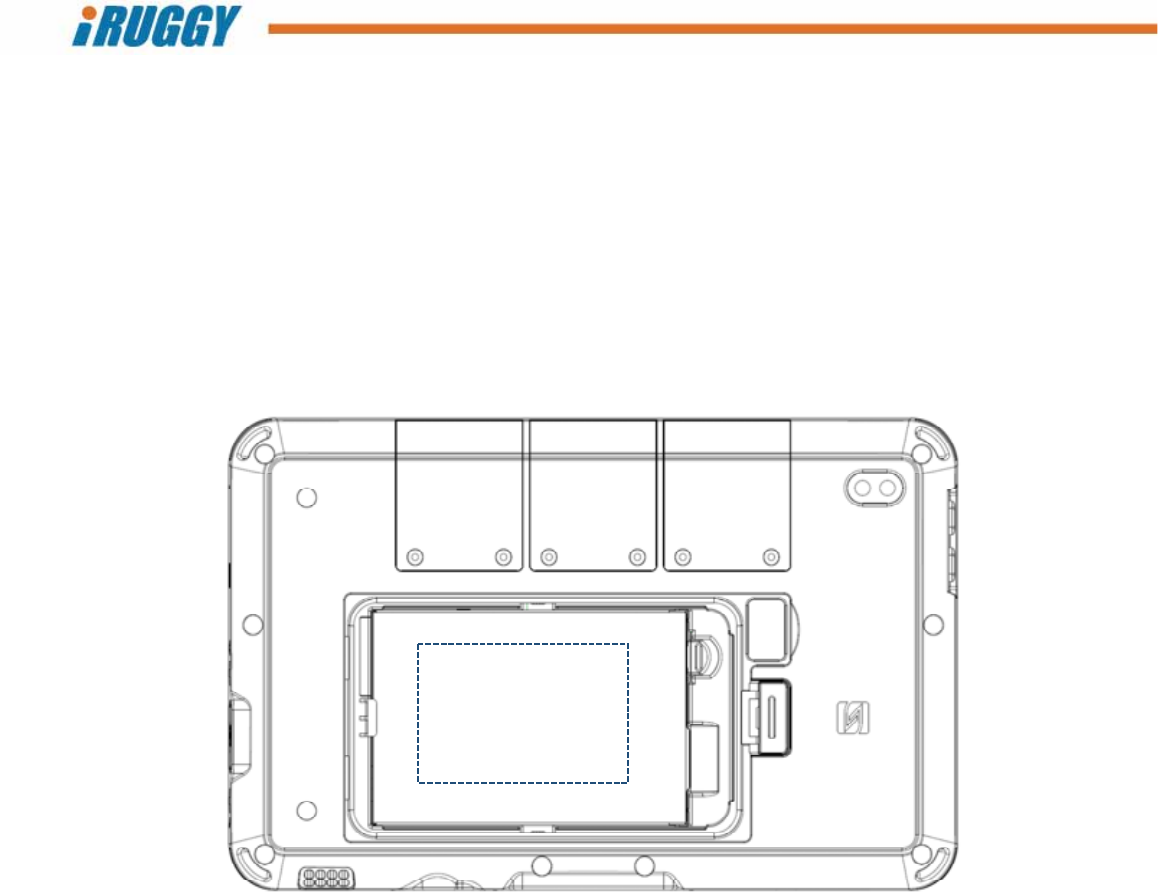
5.4 InstallingADD‐f(x)™Modules
OptionalADD‐f(x)modulesareavailabletoexpandtabletfunctionality.Toinstallanymodule,first
powerdownthesystem.Locatethethreeuniversalexpansionbaysonthetop,backsideofthetablet.
Dependingonthenumberandsizeofthemodulesselected,oneorallthreebaysmaybeusedtoinstall
1,2orupto3ADD‐f(x)modules.
Removethetwoscrewsandliftofftheplasticcovercoveringeachbay.Thiscovermaybesavedor
discarded.Slidethemoduleinplaceandfasteninplacewiththefourscrewsprovided.
G8UserManual 21
ConfidentialandProprietaryInformation
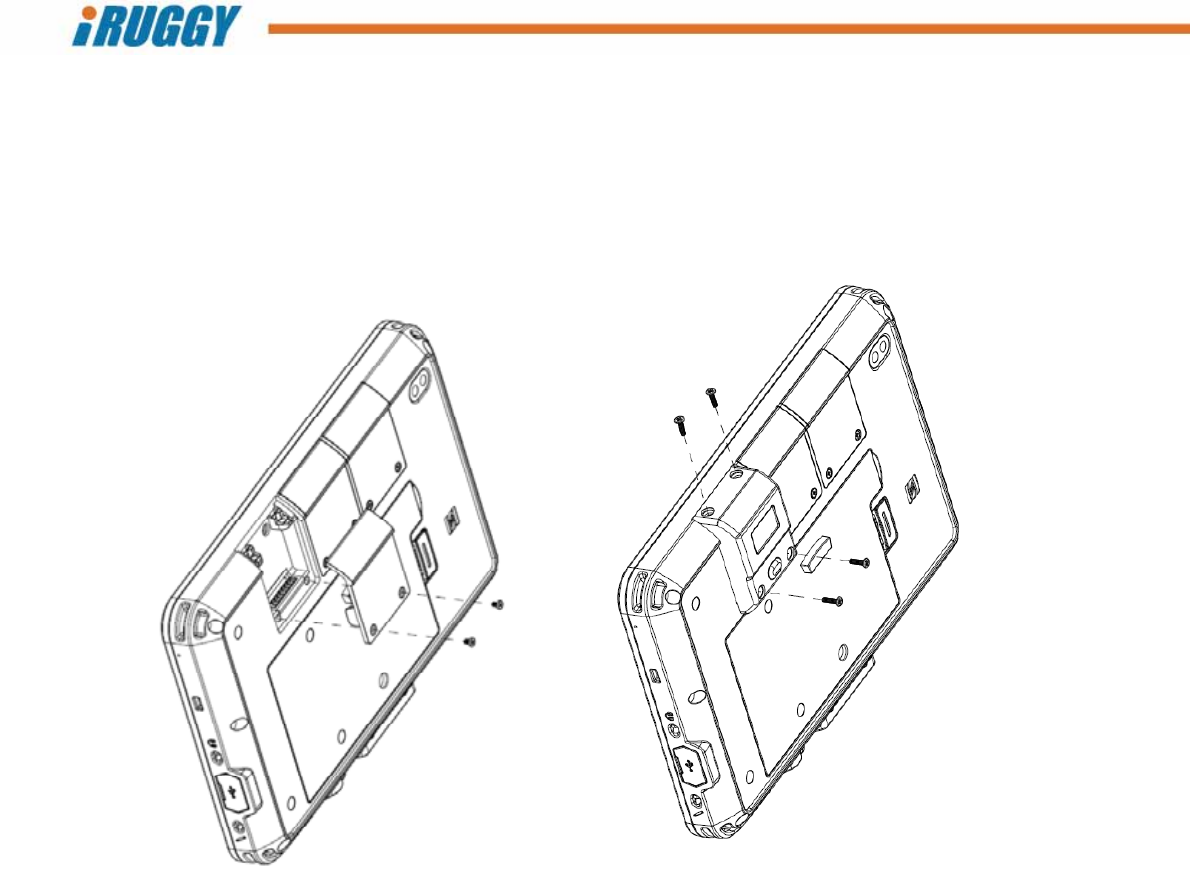
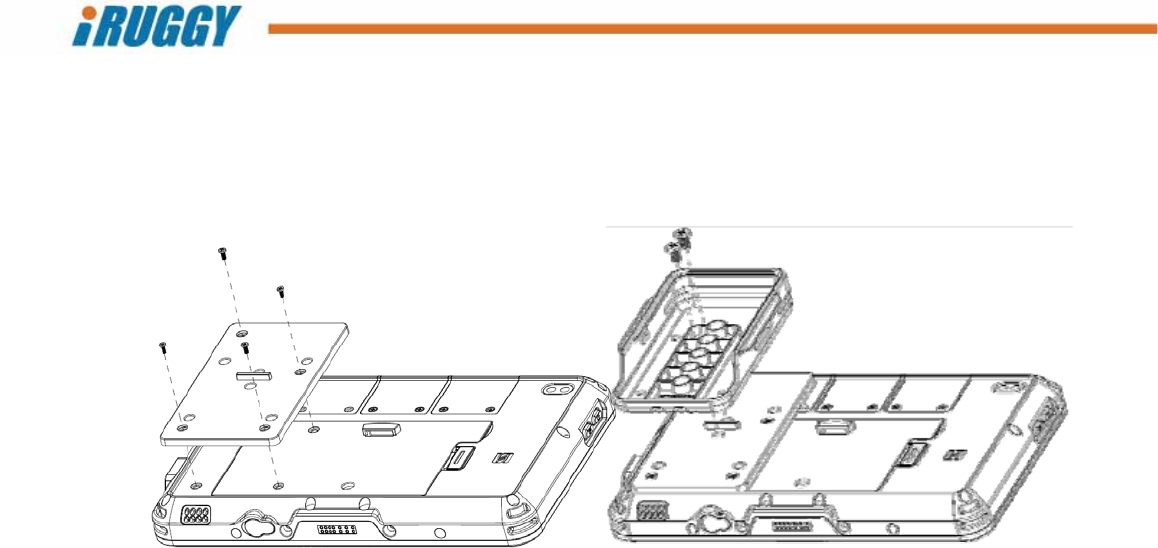
5.5 AttachinganmPOSIntegrationBracket
Custombracketsareavailableforon‐tabletintegrationofthird‐partymobilepoint‐of‐sale(mPOS)
paymentdevices,suchastheIngenicoiCMPmobilepaymentdevice.
Toattachthebracket,placethetabletfacedown.Positionthemetaluniversalmountingplateoverthe
batterymoduleasshownandattachwiththefourscrewsprovided(youmayneedtofirstremoveand
discardcosmeticrubbercoversplacedoverthescrewholes).
Useanothersetoftwoscrewsprovidedtoattachthedevice‐specificbrackettothemountingplate.
ThemPOSdevicemayslideintothebracketfromthetoporbottom,dependingondesign.Charging
portwillremainaccessibletoallowconnectionofachargingcable(suppliedbythevendor)without
removingthedevicefromthetablet.
G8UserManual 22
ConfidentialandProprietaryInformation
6 Using the G8 POS Docking Station
AnoptionalcountertopmountisavailabletoallowtheG8tablettobeoperatedatdifferentangles
whiledockedforcharging,LANcommunicationandconnectionwithperipherals.Thedockingstation
alsosupportsoptionalmountingofacustomerdisplayorthird‐partypaymentterminal.
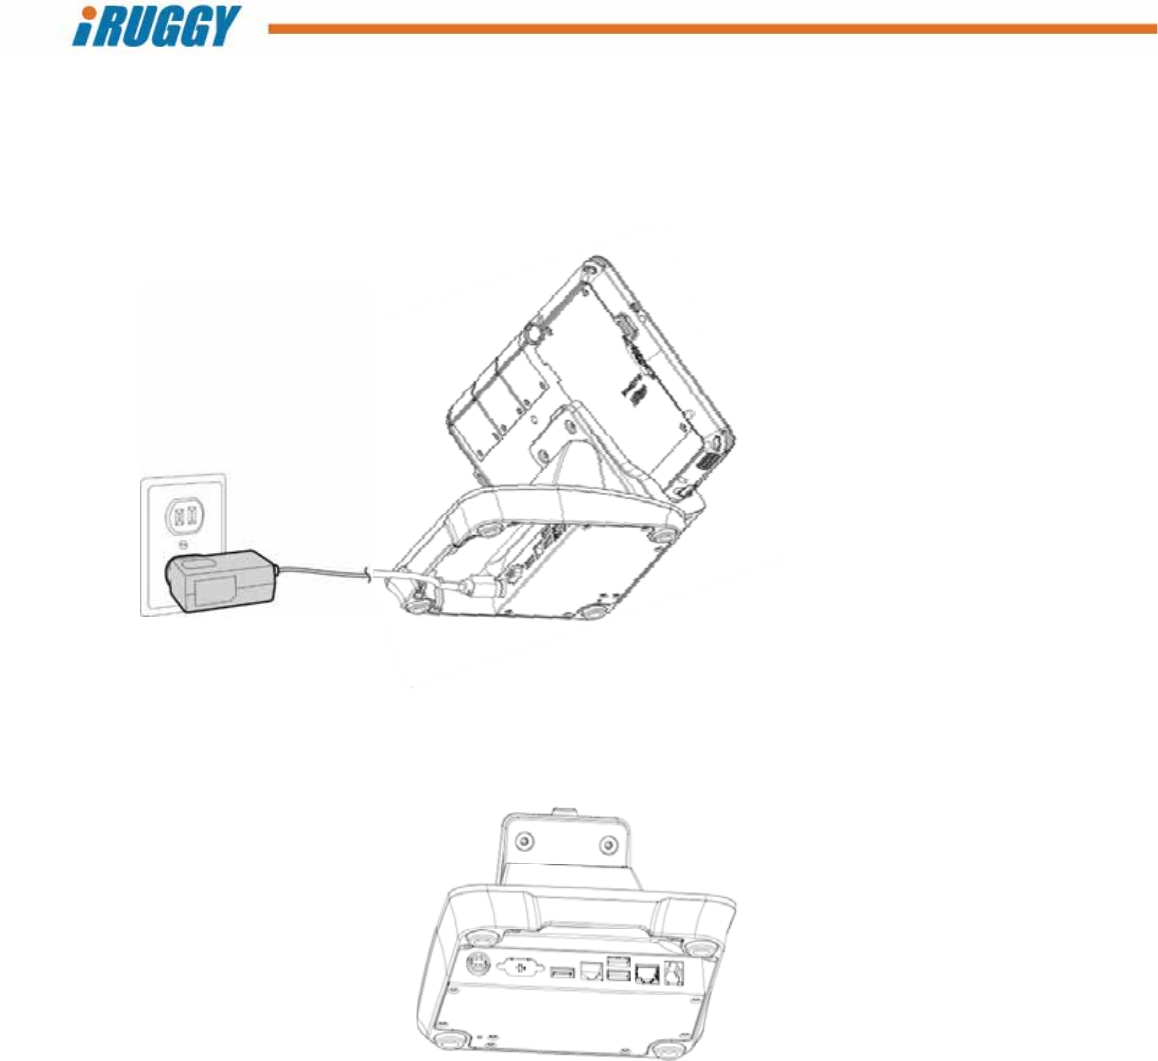
6.1 ConnectingtoPower
Beforethedockingstationcanbeusedtochargethetabletorconnecttoperipherals,thedockmustbe
connectedtoACpowerviathe19V/65WACadaptorshippedwiththePOSDock.LocatetheDC‐in
connectoronthedockandpluginthepowercablefromtheACadaptor.
6.2 ConnectingtoNetworkandPeripherals
Disconnectthepowercablefromthedockingstation.Plugnetworkorperipheralcablesintoavailable
portslocatedinthebase:
RJ4510/100EthernetLAN
Cashdrawerport,12Vor24Vselectablethroughjumpersettings(default24V)
OneRJ48RS‐232port,0V,5Vor12Vselectablethroughjumpersettings(default0V)
Three5VUSB2.0ports
G8UserManual 23
ConfidentialandProprietaryInformation
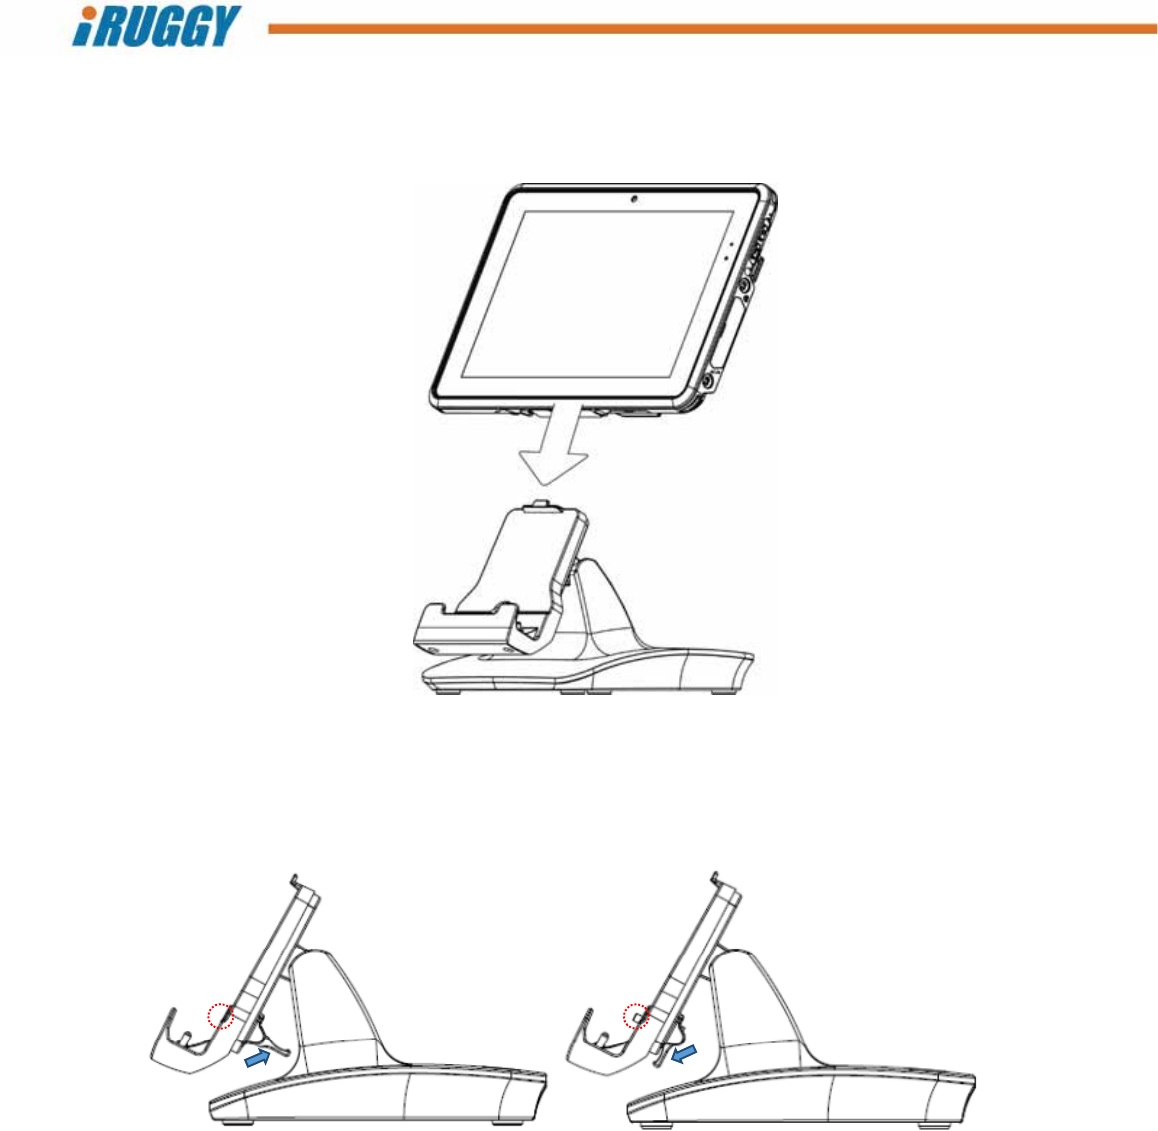
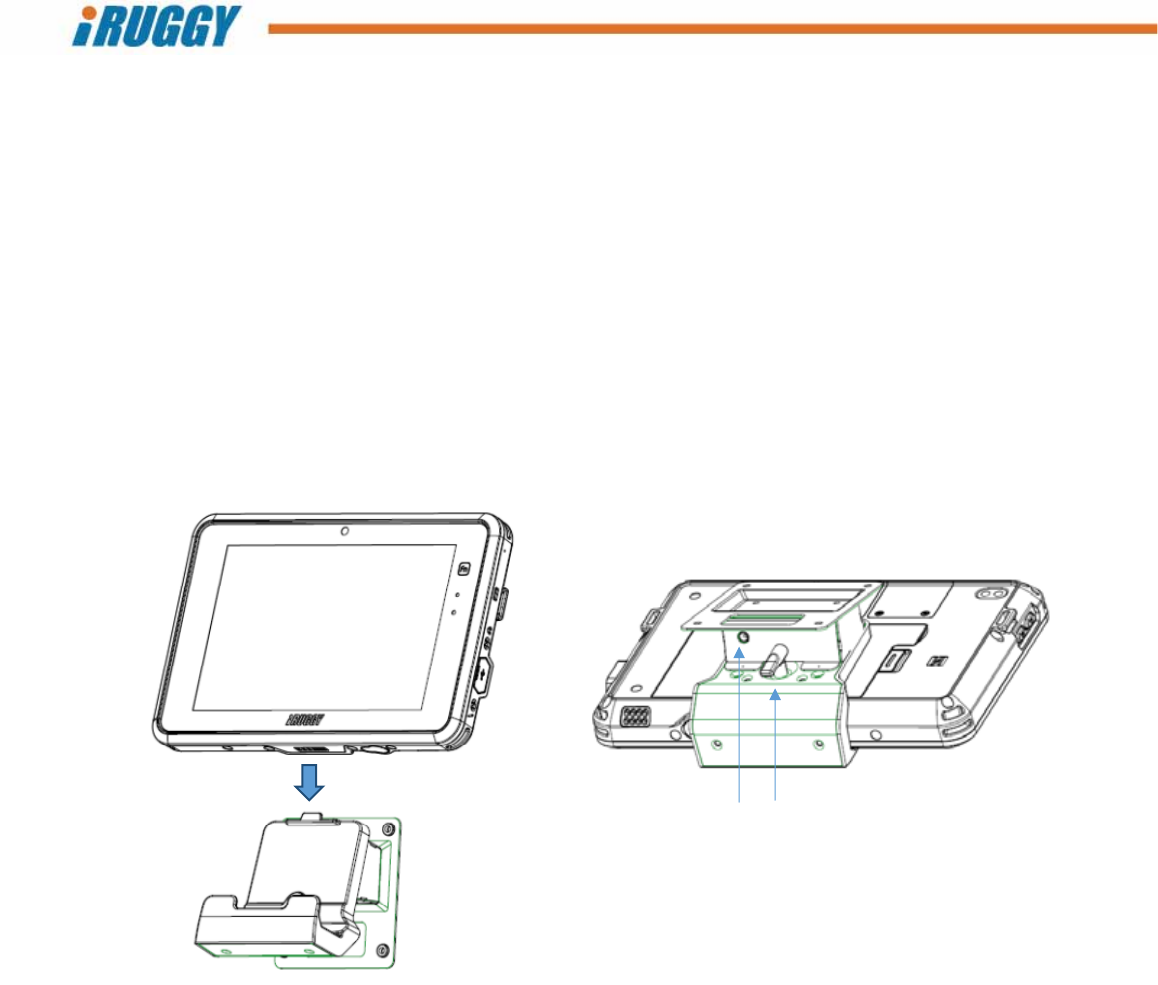
6.3 PlacingtheTabletintheDock
Thetabletmaybeplacedonthedockpoweredonoroff.Whenpositioningthetabletonthedock,take
caretolocatetheextensiononthebackcenterofthetabletandmakesurethisslidesoverthetabon
themount.
Thereisalatchingmechanismtosecurethetabletinthedock,accessedonthebackofthemount.
Beforeplacingthetabletinthedock,checktomakesurethelatchisintheopenposition.
Whenremovingthetabletfromthedock,youmayencountersomeresistanceasthereisastrong
magnetwhichhelpsservertokeeptheelectricalcontactpointstightlyalignedduringoperation.
Open
position Locked
position

G8UserManual 24
ConfidentialandProprietaryInformation
6.4 InstallingtheCustomerDisplay
Anoptional2linex20graphicLCDcustomerdisplaymaybemountedonthebackofthedockingstation.
ContactyouriRuggySystemsorauthorizedsalesrepresentativeforacopyoftheseparateuserguide
andOPOSdriverforthecustomerdisplayoption.
Toinstallthecustomerdisplay,removethesinglescrewsecuringacoverovertherearmountareaand
discard.
Threadthecustomerdisplaycablethroughtheopeningandfastenthedisplaymountintoplacewiththe
fourscrewsprovided.ConnectthehostendofthecabletoanyoftheavailableUSBports.
G8UserManual 25
ConfidentialandProprietaryInformation
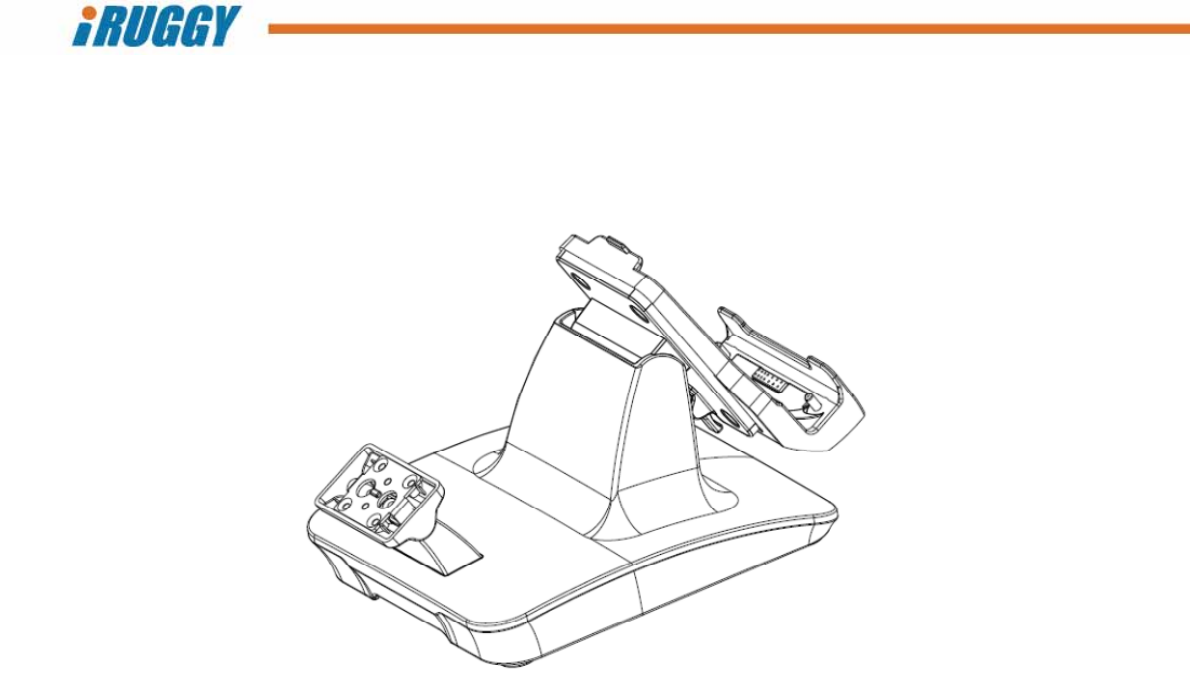
6.5 Installingathird‐partypaymentdevice
Anoptionalmountingpostisavailabletoattachathird‐partypaymentdeviceonthebackofthedocking
station.Thepostiscompatiblewithdevice‐specificmPOSbracketssuppliedbyiRuggySystems.
Toinstallthedevicemount,removethescrewanddiscardtheblankingcoverovertherearmount
access.AttachtheposttothebasewiththefourscrewsprovidedbeforeattachingtheiRuggySystems
mPOSbracket.
G8UserManual 26
ConfidentialandProprietaryInformation
7 Using the G8 VESA Charging Dock
Anoptionalfixedpositionmountisavailabletooperatethetabletwhilecharging.Thismountfeaturesa
75x75mmVESAholepatternforattachingthemounttoanyVESAcompatiblewallorpostbracket.
TheACadaptershippedwiththetabletmaythenbepluggeddirectlyintotheDC‐inconnectoronthe
chargingdock.
Thetabletmaybeplacedonthedockpoweredonoroff.Whenpositioningthetabletonthedock,take
caretolocatetheextensiononthebackcenterofthetabletandmakesurethisslidesoverthetabon
themount.
TheVESAChargingDockincludesalatchingmechanismtoholdthetabletsecurelyinposition,similarto
thePOSDockingStation.SeeillustrationinSection6.3fordetailsonengaginganddisengagingthelatch.
DC‐inLatch

G8UserManual 27
ConfidentialandProprietaryInformation
8 Using the G8 Vehicle Mount
Anoptionalvehiclemountisavailabletosecurethetabletontoavehiclespecificbracket.Thismount
featuresa75x75mmVESAholepattern.Acigarettelighteradaptershippedwiththevehiclemountis
pluggedintothemountandstandardcigarettelighteroutlettokeepthetabletcharged.Thevehicle
mountalsofeaturesa5VPCUSBporttoconnectUSBperipherals.
Thetabletmaybeplacedonthedockpoweredonoroff.Whenpositioningthetabletonthedock,take
caretolocatetheextensiononthebackcenterofthetabletandmakesurethisslidesoverthetabon
themount.
Wheninthemount,thetabletmaybeoperatednormally.BothfrontandrearcamerasandsideI/O
remainaccessibletotheuser.
Toplacethetabletinthemount,firstraisethetoparmofthemount.Angletheunitfromthebottom
asshown.Slidethearmdownandsecure.
DC‐inUSB

G8UserManual 28
ConfidentialandProprietaryInformation
9 Software Configuration
AllWindowsorAndroidsoftwareanddevicedriversrequiredtooperatethetabletwithanystandardor
optionalfeaturesoraccessoriesarepre‐installedatthefactory.Thereisnoneedtodownloadand
installadditionaldriversoftware,evenforADD‐f(x)accessoriesshippedseparately.
ContactyouriRuggySystemsauthorizeddistributororresellerfortechnicalinformationrequiredfor
softwareintegrationorspecificdeviceconfiguration.
1D/2DScannerADD‐f(x)module:SeeAppendixAforsupportedbarcodesymbologies
HFRFIDADD‐f(x)module:Followingtagsmaybereadatmaximumrange25‐30mm:
Mifare_UltraLight
Mifare_One(S50)
Mifare_One(S70)
Mifare_Pro(X)
Mifare_DESFire
IntegratedNFCreadertagssupported:
NXPMifareUltralight
NXPDESFire
SonyFeliCa
BroadcomTopaz

G8UserManual 29
ConfidentialandProprietaryInformation
Appendix A: Supported Bar Code Symbologies
Belowbarcodestypesaresupportedbytheoptional1D/2DscannerADD‐f(x)module:
AztecCode
Codabar
CodablockF
Code11
Code32(PARAF)
Code128
Code2of5
Code39
Code93
DataMatrix
EAN/JAN‐13
EAN/JAN8
EAN‐UCCCompositeCodes
EAN‐UCCEmulation
IATACode2of5
Interleaved2of5
Matrix2of5
MaxiCode
MicroPDF417
MSI,PDF417
QRCode
GS1DataBar
TCIFLinkedCode39
UPC‐A
UPCE
RSSExpanded
RSSLimited
RSS‐14
ChineseSensible(HanXin)code
CodablockA
UPC‐A/EAN‐13withExtendedCouponCode
CouponGS1
GS1codebar