FORMOSA21 CYRFTX03 Aim Presenter RC240 User Manual RC240 Manual 1 3 fom Randy
FORMOSA21 Inc. Aim Presenter RC240 RC240 Manual 1 3 fom Randy
user manual

RC240 3D Mouse Presenter V1.3
1
Motion Sensor Presenter
RF240/611

RC240 3D Mouse Presenter V1.3
2
This device complies with Part 15 of the FCC Rules.
Operation is subject to the following two conditions:
(1) This device may not cause harmful interference and
(2) This device must accept any interference received,
including interference that may cause undesired
operation.
This equipment has been tested and found to comply with the limits for a class B digital device, pursuant to part 15
of the FCC rules. These limits are designed to provide to provide reasonable protection against harmful interference
in a residential installation. This equipment generates, uses and can radiate radio frequency energy and, if not
installed and used in accordance with the installation. , May cause harmful interference to radio communication.
However, there is no guarantee that interference
Will not occur in a particular installation. if this equipment does cause harmful interference to radio or television
reception, which can be determined by turning the equipment off and on, the user is encouraged to try to correct the
interference by one or more of the following measures:
-Reorient or relocate the receiving antenna
-Increase the separation between the equipment and receiver
-Connect the equipment into an outlet on a circuit different from that to which the receiver is connected
-Consult the dealer or an experienced radio / TV technician for help
You are cautioned that changes or modifications not expressly approved by the party responsible for compliance
FCC Radiation Exposure Statement:
This equipment complies with FCC RF radiation exposure limits set forth for an uncontrolled environment.

RC240 3D Mouse Presenter V1.3
3
Table of Contents
PACKAGE CONTENTS.................................................................................4
SYSTEM REQUIREMENTS.............................................................................4
RECHARGING THE PRESENTER .....................................................................4
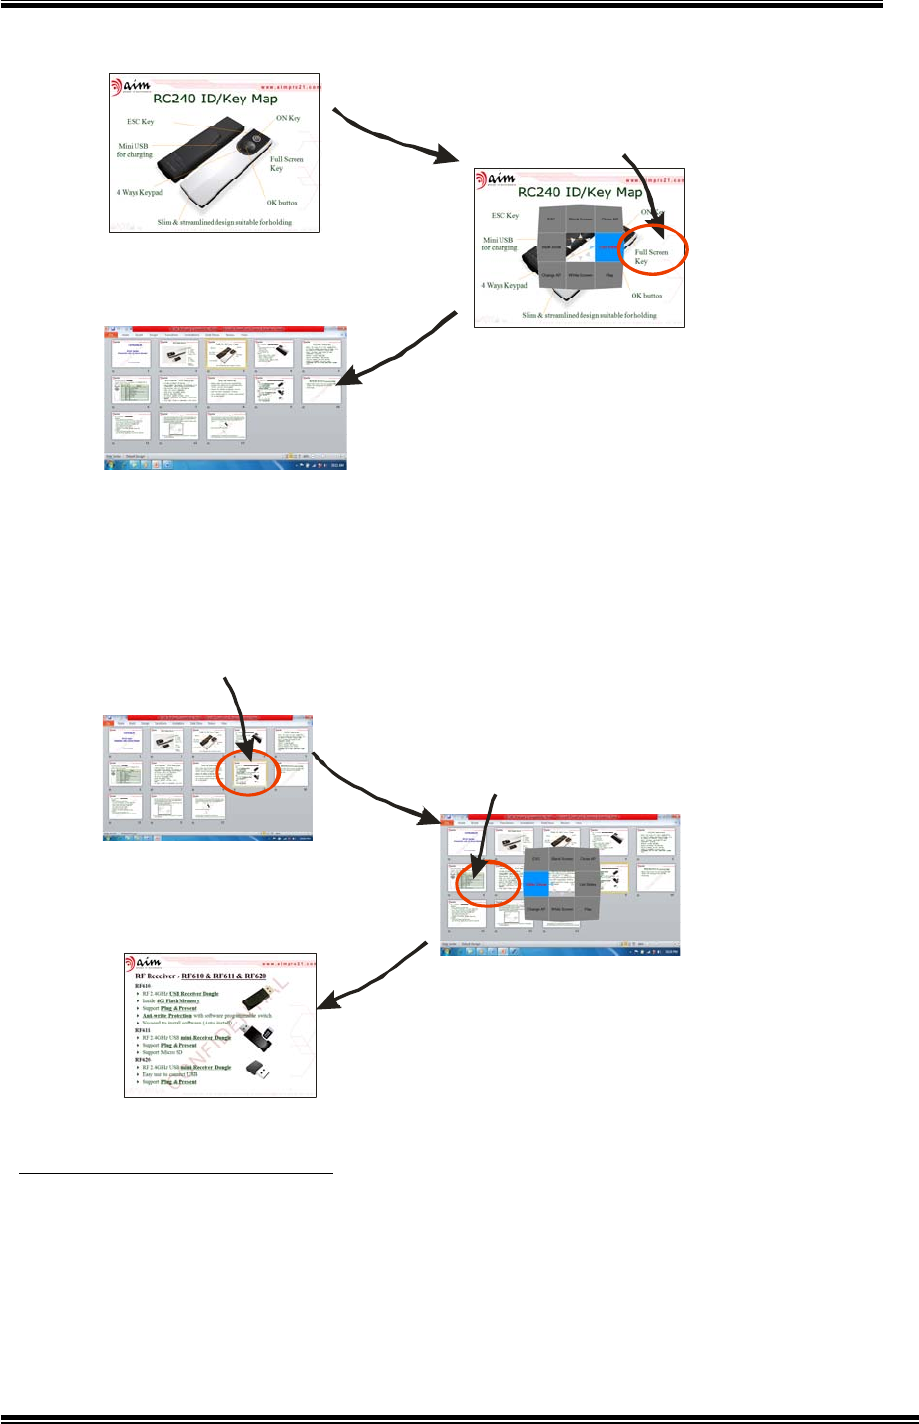
KEY DEFINITIONS ......................................................................................5
USE PRESENTER WITHOUT RUNNING
AIMMASTER™ PRO
SOFTWARE ......................5
INSTALL
AIMMASTER™ PRO
.........................................................................5
START USING PRESENTER...........................................................................6
POWER ON THE PRESENTER ..........................................................................6
POWER OFF THE PRESENTER .........................................................................6
USE MICRO SD CARD .................................................................................6
BASIC MODE ...........................................................................................6
Language .................................................................................. 6
Exit .......................................................................................... 6
Basic Mode Key Definitions ............................................................. 7
Virtual Laser Pointer ...................................................................... 7
Enable/Disable 3D Mouse ............................................................... 7
Open/Close Slide Show.................................................................. 8
Page Up/Down and Scrolling ........................................................... 8
Group Vibrating............................................................................ 8
Change 3D Mouse Speed ............................................................... 8
Volume Adjust ............................................................................. 9
STANDARD MODE ......................................................................................9
Standard Mode Key Definitions ......................................................... 9
Place Check Mark........................................................................10
Draw Line Mark ...........................................................................10
Undo or Remove all Marks. ............................................................11
Timer Setting .............................................................................11
Show Timer ............................................................................... 11
Plug & Present............................................................................12
Change Laser Icon....................................................................... 12
Group Vibrating...........................................................................13
Anti Shaking ..............................................................................13
LINK PRESENTER WITH RECEIVER .................................................................... 13
ADVANCE MODE ..................................................................................... 14
Change Hotkey Map ..................................................................... 14
Use the Motion keys .....................................................................16
CHECK RELEASE NUMBERS.......................................................................... 18
FEATURES ............................................................................................ 19
PRODUCT SPECIFICATIONS ....................................................................... 20
Q & A .................................................................................................. 21
RC240 3D Mouse Presenter V1.3
4
Package Contents
Presenter
Receiver
aimMaster™ Pro
Software CD
(for Microsoft® Windows®
7/Vista/XP), Quick Instruction Guide, and User's Manual
(stored in the Receiver flash memory)
USB Recharge Cable
Leather Bag
Quick Instruction Guide Sheet
System Requirements
Microsoft® Windows® 7/Vista/XP
1GB RAM recommended
CD-ROM drive or DVD-ROM Drive
USB Port
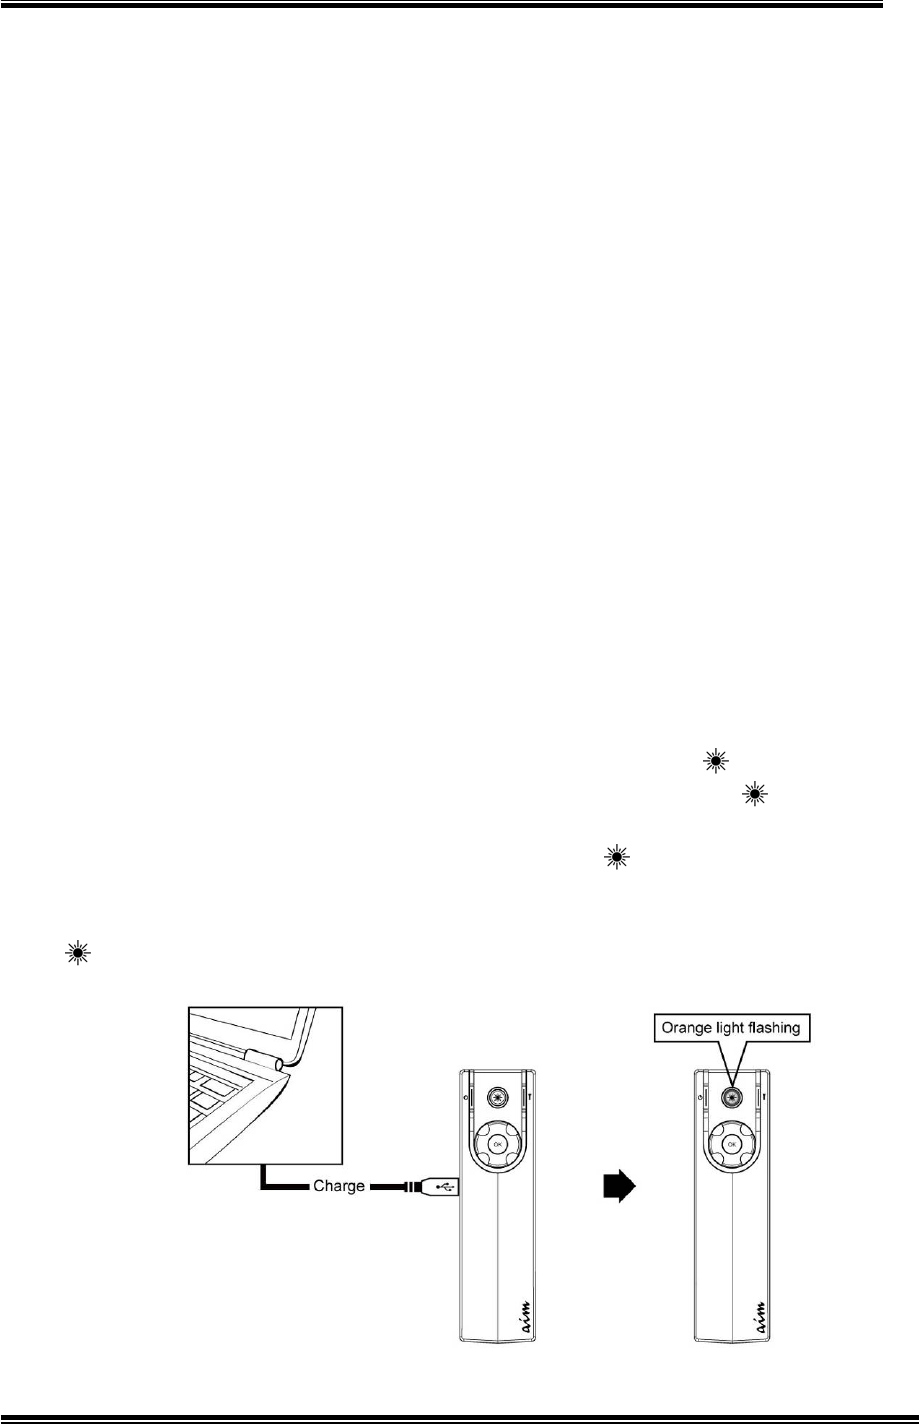
Recharging the Presenter
Fully charge the Presenter by connecting the miniUSB connector of
the USB cable to the Presenter miniUSB Port. Connect the Presenter
with the computer by the USB cable. The orange light of the
LASER key is flashing. Wait for about 2.5 hours until the light of
LASER key changes to blue; the Presenter is fully charged and ready
for use. Click any key will flash the blue light on the LASER key.
The battery can last more than 20 hours for continuous usage. When
the battery capacity is low, click any key will flash the orange light on
the LASER key.

RC240 3D Mouse Presenter V1.3
5
Key Definitions
Use Presenter without running
aimMaster™ Pro
software
Before installing the powerful Presenter Auxiliary Tools –
aimMaster™
Pro
, you can use the functions include 3D Air Mouse, Page Up/Down,
Group Vibration alarm, Volume Adjust, etc. However, the Virtual Laser
Pointer can’t work.
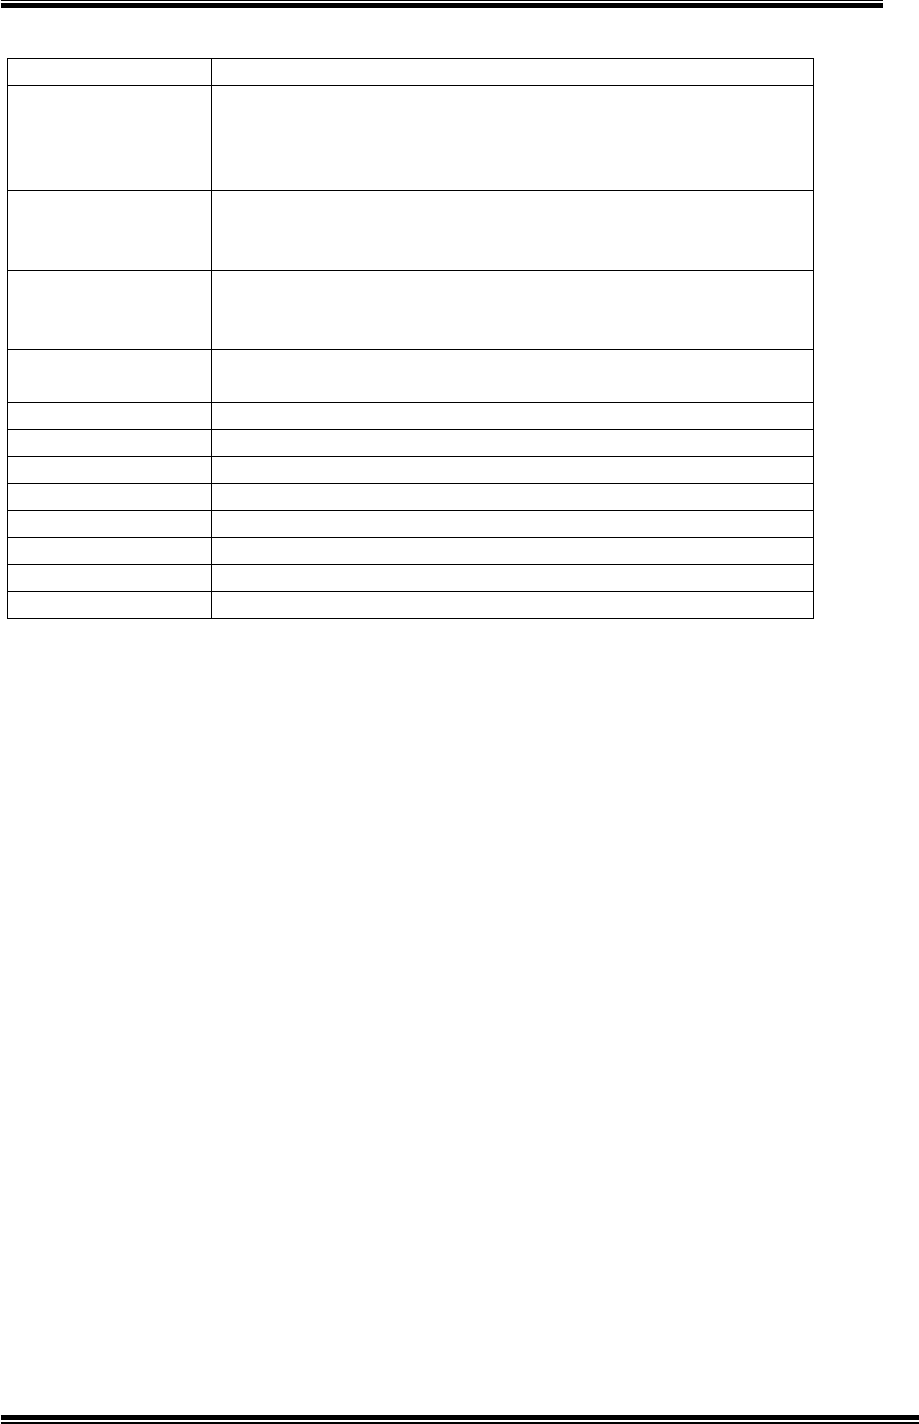
Install
aimMaster™ Pro
Insert the CD to your computer. The following windows will pop up.
Follow the instructions to install
aimMaster™ Pro
.
Double Click the shortcut icon of
aimMaster™ Pro
shown on your desktop to activate
aimMaster™ Pro
.
The message window will pop up three seconds to
remind you that the
aimMaster™ Pro
is activated.
You will see the
aimMaster™ Pro
icon on the
System Tray.
RC240 3D Mouse Presenter V1.3
6
Start Using Presenter
The default mode entered is Basic mode that comes with the basic
functions. There are two more operation modes could be used:
Standard Mode: allows you to use Check/Line Marks and other
functions.
Advanced mode: allows you to use motions keys for more
commends.
Power ON the Presenter
Click the POWER key once to turn on the Presenter. The purple
light on the LASER key flashes once to confirm the ON status.
Power OFF the Presenter
Press and hold the POWER key for 3 seconds until the purple light
on the LASER key is lit. Release the POWER key. The purple
light on the LASER key flashes several times to confirm the OFF
status. If the Presenter is not working for 30 minutes, the Presenter will
be turned off automatically to save the battery power.
Use micro SD Card
Insert a micro SD card into the slot of the Receiver of RC132/611. You
may store the files into this memory.
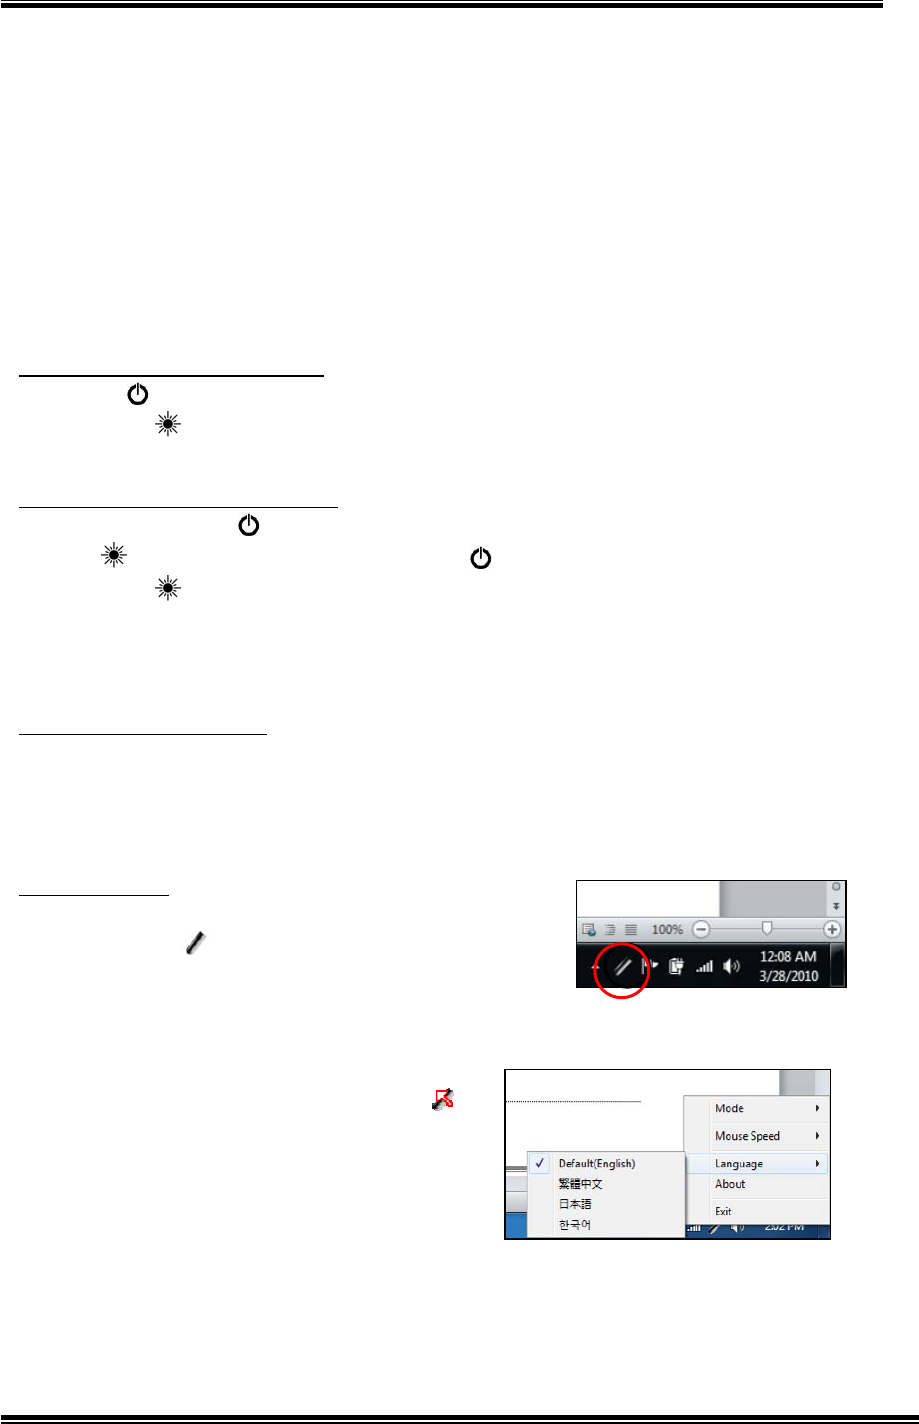
Basic Mode
Please don’t forget to execute
aimMaster™ Pro
(then the icon is shown on the System Tray),
otherwise the Virtual Laser Pointer isn’t
operable.
Language
Right click the
aimMaster™ Pro
icon ,
and click “Language” tab from pop-up
menu. You will see a dialogue window.
Select the language you prefer.
Exit
aimMaster™ Pro
does not use many system resources. You may quit
this background application to release the memory when you don’t
need it. Right click the icon and click “Exit” from pop-up menu to
close
aimMaster™ Pro
.
RC240 3D Mouse Presenter V1.3
7
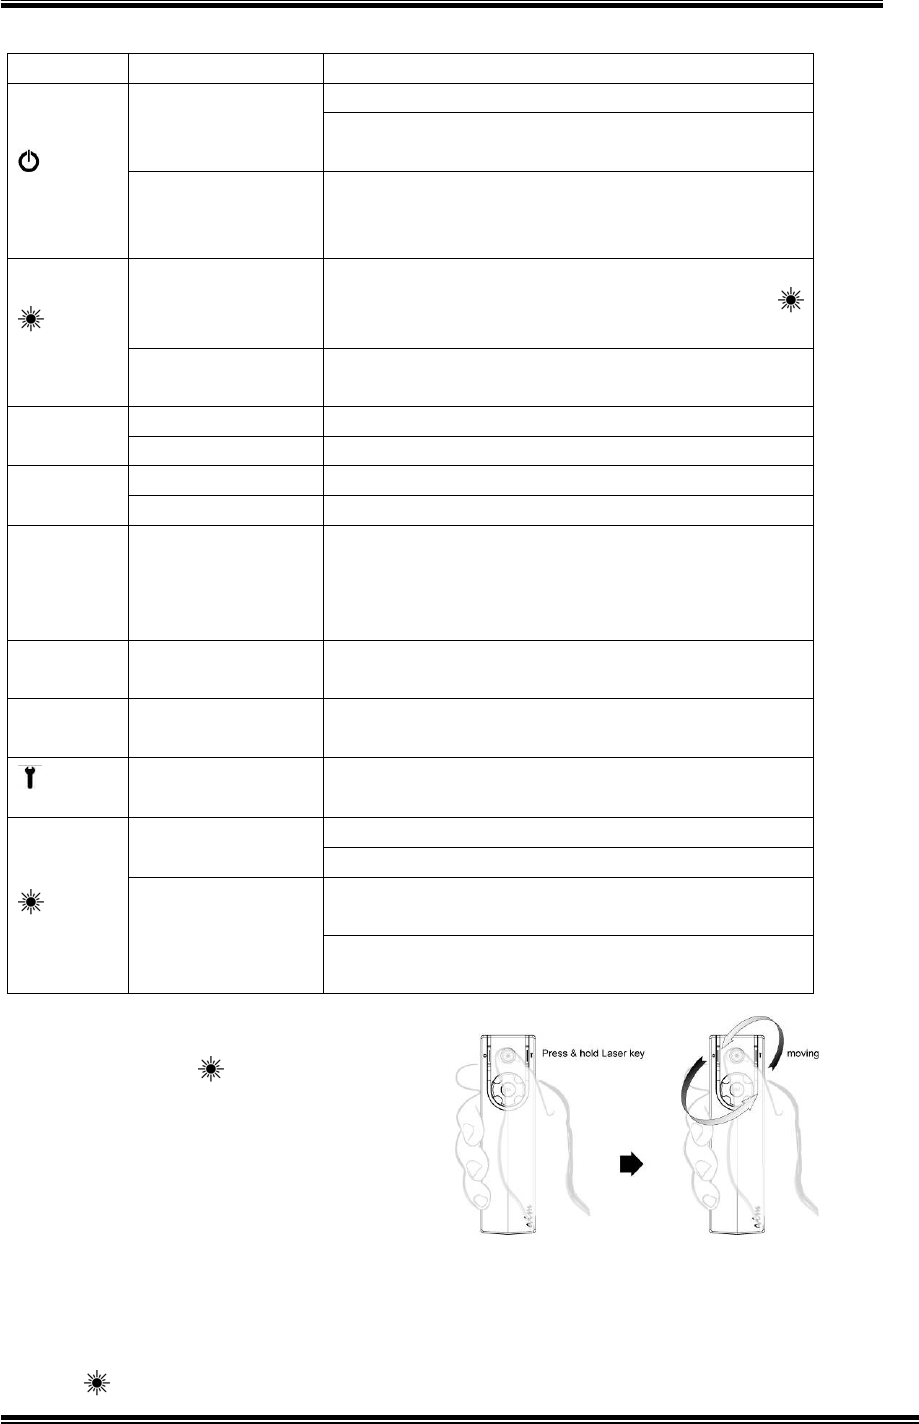
Basic Mode Key Definitions
Key Action Function
If Presenter is Off, this click turns power to On.
Click If Presenter is On, this click forces Slide Show
(shift F5) or Close Slide Show (ESC)
POWER Press & hold
until Purple LED
is On
Turns Presenter to Off.
Click
Enables or Disables 3D Mouse.
If 3D Mouse is enabled, the blue light of
LASER key is flashing.
LASER
Press & Hold Show the Virtual Laser Pointer Icon, (Laser
Pointer icon is changeable, refer to P10)
Click Page up
UP Press & Hold Scroll up
Click Page down
DOWN Press & Hold Scroll down
OK Press & Hold
Turn Presenter clockwise to increase the
system Volume, and turn Presenter
counter-clockwise to reduce the system
volume
LEFT Click Mouse Left key, only when 3D Mouse is
enabled
RIGHT Click Mouse Right key, only when 3D Mouse is
enabled
FEATURE
No function
Flashes Amber: Presenter is Charging
Charging Off: Presenter is fully charged
Flashes Blue: when battery is between 100%
~ 40% of full capacity.
LED on
LASER
key Click any key Flashes Amber: when battery is under 40% of
full capacity.
Virtual Laser Pointer
Press and hold LASER key to
activate the emulated Laser
Pointer. Move Presenter will move
the Laser pointer on the screen.
Please refer to the User’s Manual
to select your own virtual laser
pointer icon.
Enable/Disable 3D Mouse
Click LASER key once to enable the 3D Mouse. The blue light on
RC240 3D Mouse Presenter V1.3
8
the LASER key is flashing. The RIGHT and LEFT key is Mouse
Right and Left button respectively.
Click LASER key once again to disable the 3D Mouse. The blue
light on the LASER key is turned off. The RIGHT and LEFT keys
are NOT Mouse Right and Left now.
When 3D Mouse is not moving for 30 seconds, the Presenter turns off
the 3D Mouse automatically to save the battery
power.
Open/Close Slide Show
Clicking POWER key once will open PowerPoint
file to Slide Show or close the Slide Show.
Page Up/Down and Scrolling
Clicking the UP key will initiate a page up operation
while clicking DOWN will initiate a page down.
Press and hold UP or DOWN key, it will execute the scrolling up or
scrolling down feature respectively.
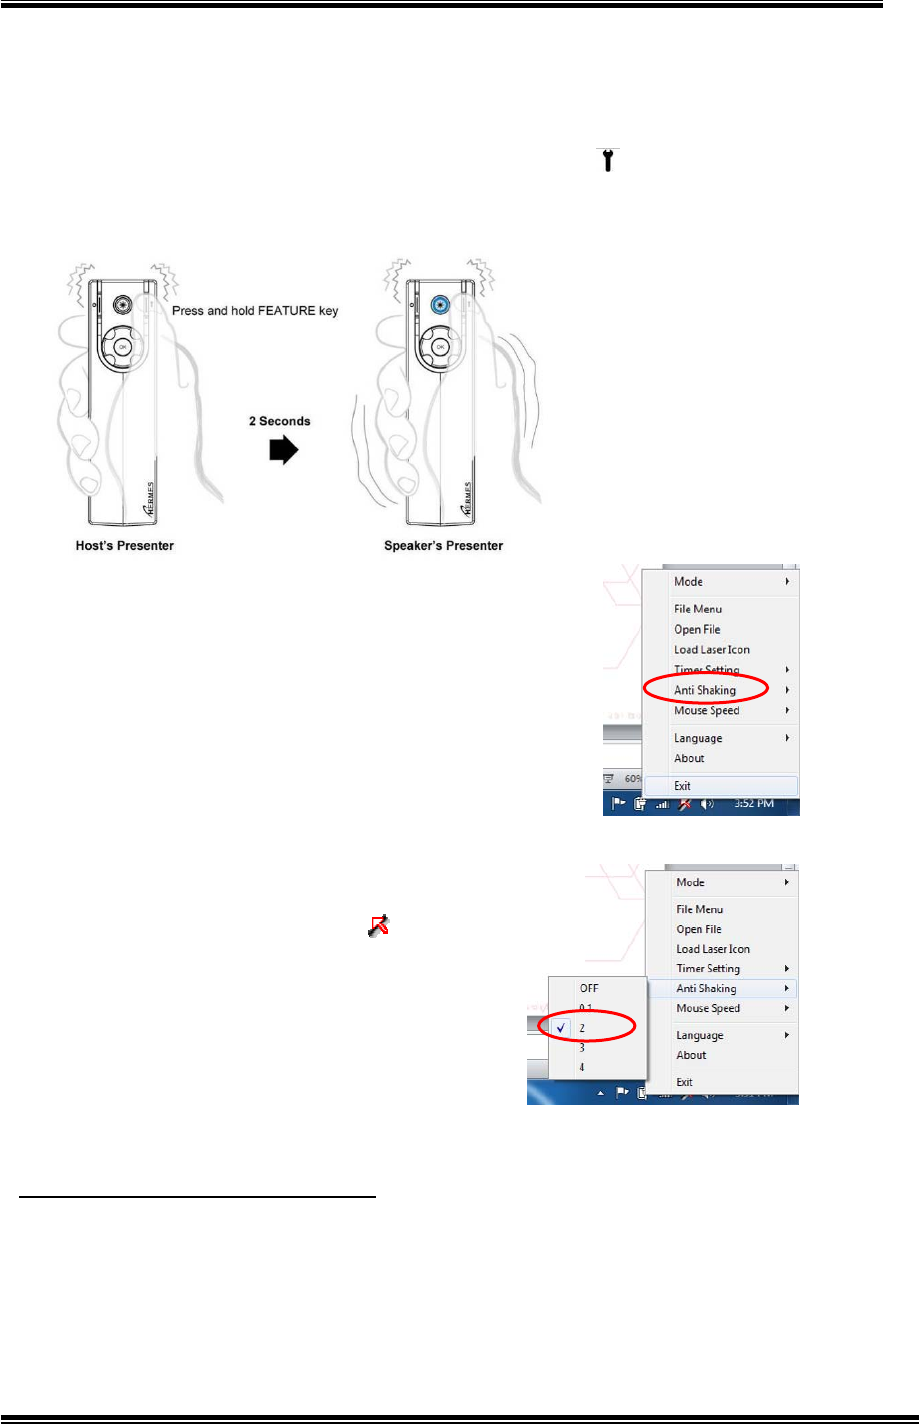
Group Vibrating
If the meeting host wants to
pass some predefined
message (e.g., time end) to
the orator, he may use
another set of Presenter to
send signal to the orator.
The host just presses and
holds the FEATURE key
for more than 2 seconds
until it starts to vibrate, the
Presenter on the orator’s hand will also vibrate for 5 seconds. (Note:
the 2nd Presenter should be linked with Receiver in advance. Refer to
P13 for the linking information.)
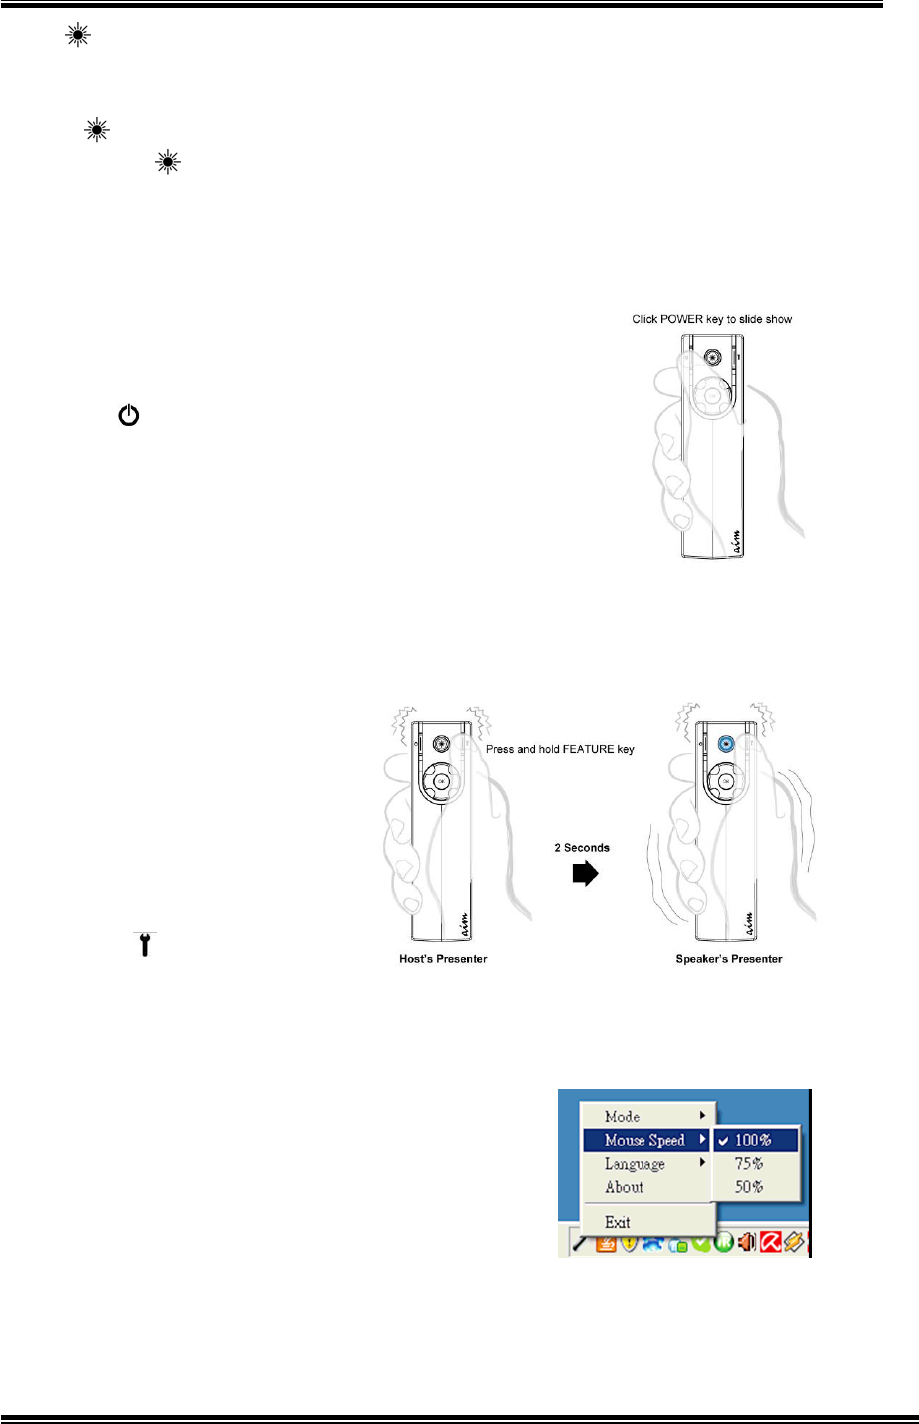
Change 3D Mouse Speed
Right click the
aimMaster
TM
Pro
icon on the
System Tray. Select the Mouse Speed tab.
Then choose one of the 3 speeds.
RC240 3D Mouse Presenter V1.3
9
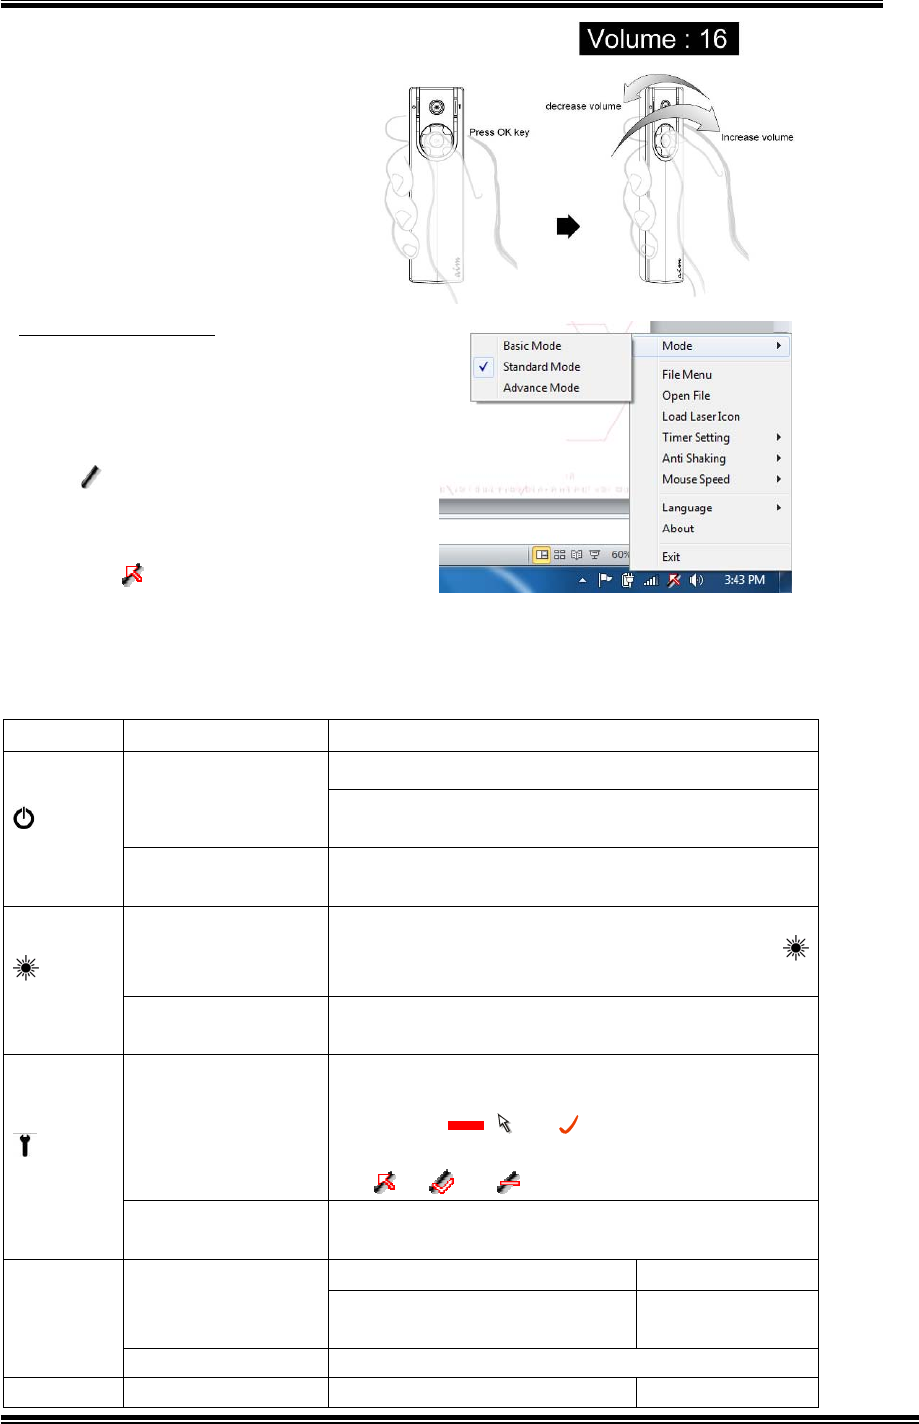
Volume Adjust
Press and hold OK key,
rotating Presenter clockwise
will enlarge the volume.
Rotating counter-clockwise
will decrease the volume. The
volume meter will be shown on
the right up corner of the
screen.
Standard Mode
Standard Mode has all the
functions in Basic Mode plus many
other useful features.
Right click the
aimMaster™ Pro
icon and select Mode from the
pop-up menu. Choose “Standard
Mode”. The icon in System Tray
becomes .
Standard Mode Key Definitions
Refer to the following key definitions for the functions you may use.
Key Action Function
If Presenter is Off, this click turns power to On
Click If Presenter is On, this click forces Slide Show
(shift F5) or Close Slide Show (ESC)
POWER Press & hold until
Purple LED is On
Turns Presenter to Off.
Click
Enables or Disables 3D Mouse.
If 3D Mouse is enabled, the blue light of
LASER key is flashing.
LASER
Press & Hold Show the Virtual Laser Pointer, (Laser Pointer
icon is changeable, refer to P10)
Click
Each click will cycle from Mouse Cursor
Check Mark Line Mark. The cursor
changes from respectively.
The icon on the System tray will be changed
as .
FEATURE
Press & Hold for 2
seconds
All Presenters vibrate for 5 seconds (the host
can inform time-end to the orator).
In Mouse Cursor operation Page up
Click In Check Mark or Line Mark
operation
Undo previous
mark
UP
Press & Hold Scroll up
DOWN Click In Mouse Cursor operation Page down
RC240 3D Mouse Presenter V1.3
10
In Check Mark or Line Mark
operation
Clear all marks
Press & Hold Scroll down
Click
In Check Mark operation, a Check Mark is
placed.
In Line Mark operation, a red line is
drawn, the longer time you press, the longer
red line extends to the right.
OK
Press & Hold Turn Presenter clockwise to increase the
system Volume, and turn Presenter
counter-clockwise to reduce the system
volume
Mouse Left key, only when 3D Mouse is
enabled.
LEFT Click When 3D Mouse is disabled, the Timer will be
shown on the right corner of the screen.
RIGHT Click Mouse Right key, only when 3D Mouse is
enabled.
Flashes Amber: Presenter is charging
Charging Off: Presenter is Fully charged
Flashes Blue: when battery is between
100%~40% of full capacity.
LED on
LASER
key Click any key Flashes Amber: when battery is under 40% of
full capacity.
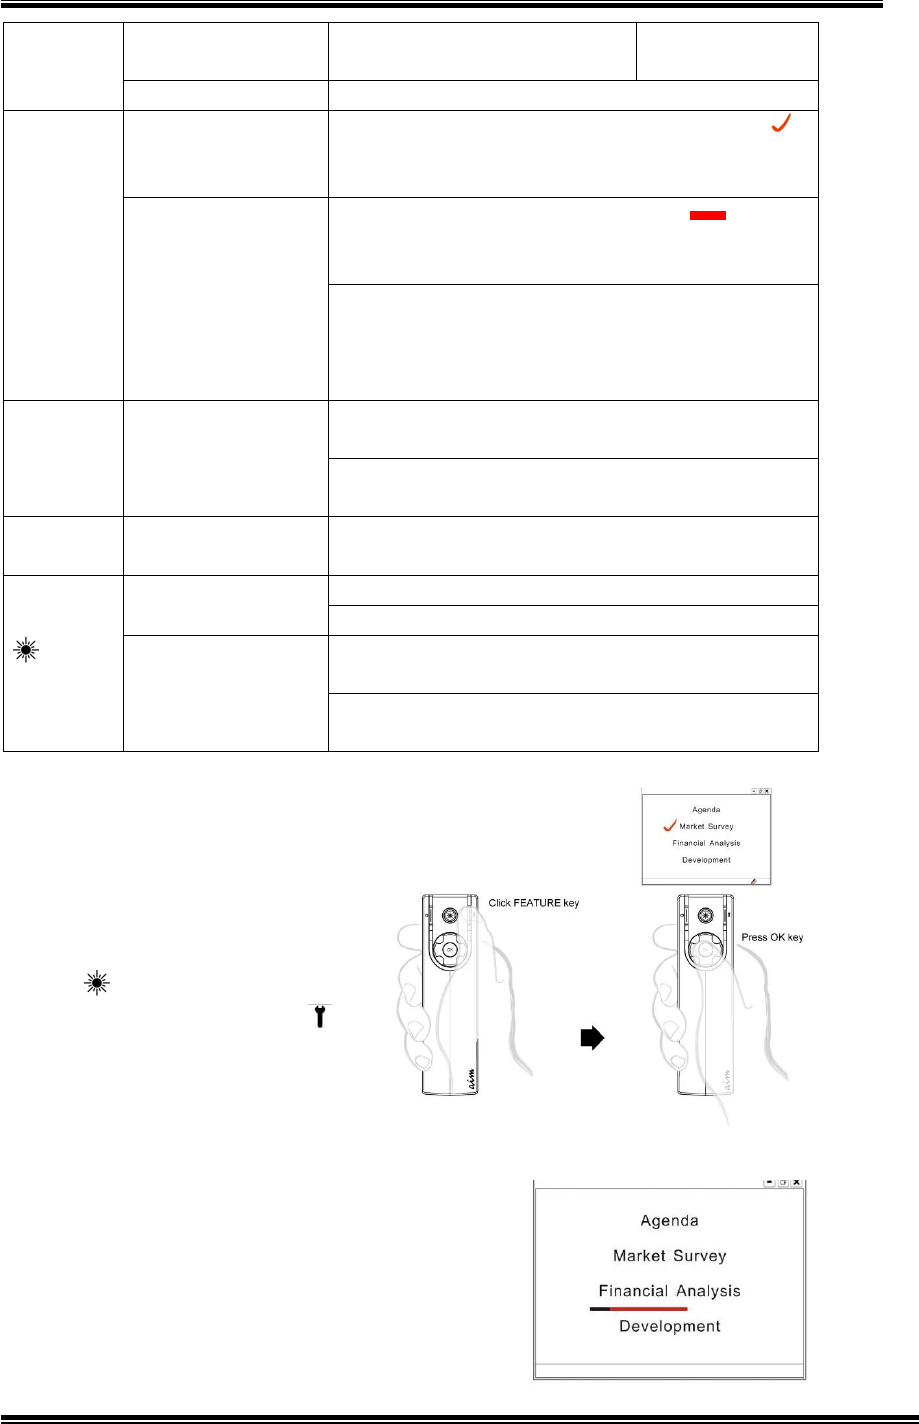
Place Check Mark
You can place red Check
Marks and draw Line Marks on
the screen to emphasis the
important parts.
Click LASER key once to
activate 3D Mouse. Click
FEATURE key once to enable
the Check Mark. Move
Presenter to control the
position of the Check Symbol
cursor. Each click of OK key will place a
Check Mark on the screen.
Draw Line Mark
Click FEATUER key again to enable the Line
Mark. Press and hold OK key to draw the
red line. The longer time you press, the
longer red line extends to the right.
RC240 3D Mouse Presenter V1.3
11
Undo or Remove all Marks.
Press UP key to undo the previous mark or DOWN key to clear all the
marks.
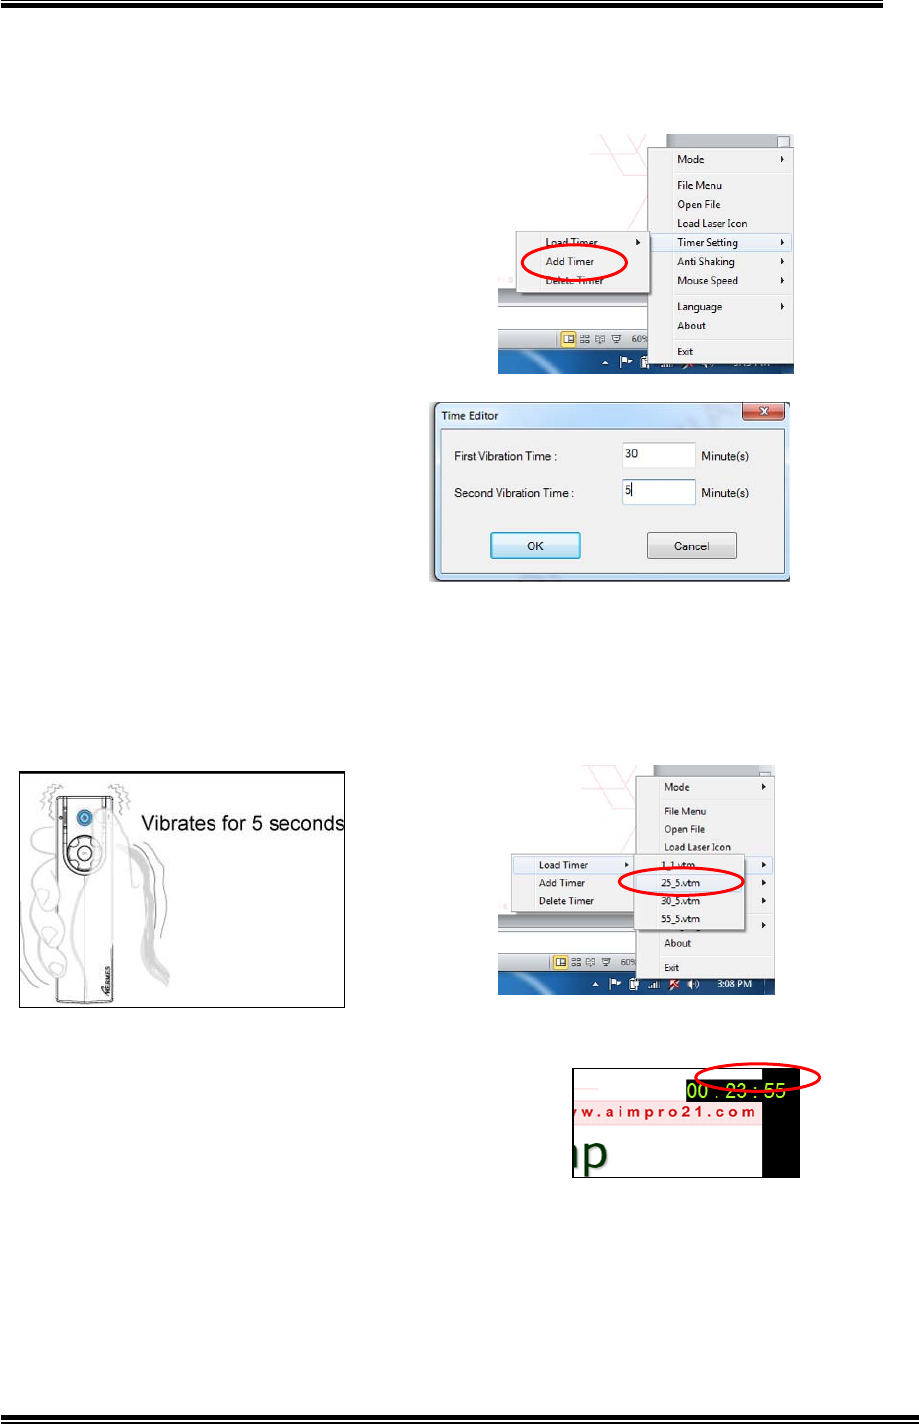
Timer Setting
Right click the
aimMaster
TM
Pro
icon on
the System Tray. Select “Timer Setting”
tab. You may define your own timer by
choosing Add Timer tab. A Timer Window
allows you to enter 2 time periods.
If you have 35 minutes in your
seminar and you want to get
warned 5 minutes before the end,
please enter 30 and 5 to the first
and second fields respectively.
Press OK button and key in the file
name 30_5.vtm for this timer.
To start the timer, you should select Load Timer tab, choose one of
the Timer files. The Timer is counting down until it reaches zero. Then
Presenter vibrates for 5 seconds. When the second Timer counts
down to 0, it vibrates 5 seconds again.
Show Timer
Disable the 3D Mouse. Click LEFT button. The
Timer will be shown on the right-up corner of
the screen for 3 seconds.
RC240 3D Mouse Presenter V1.3
12
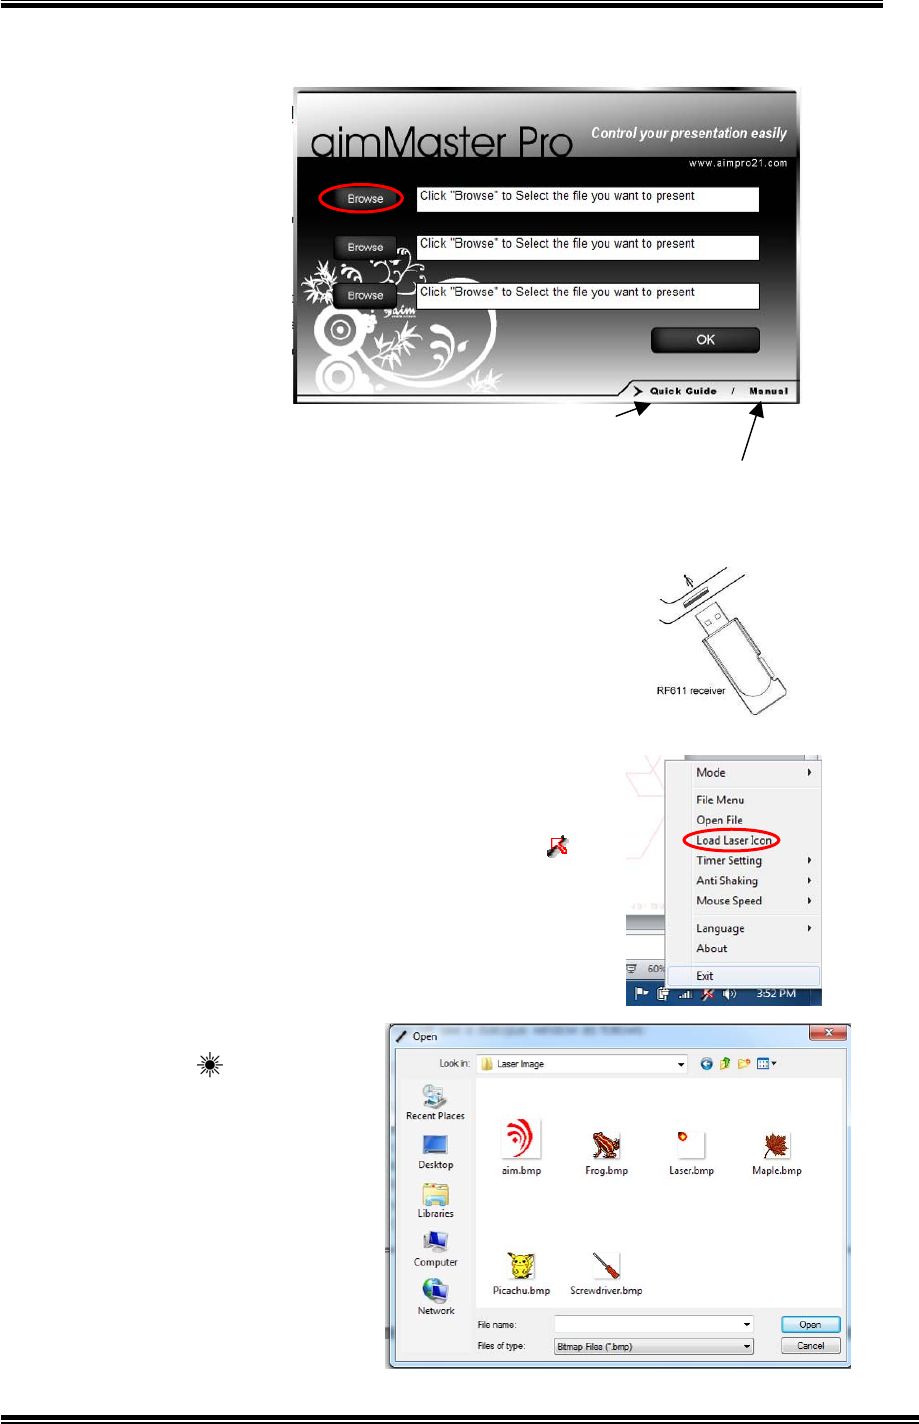
Plug & Present
A. Open Editor
Double click the
aimMaster
TM
Pro
icon on the
System Tray to
pop up the Open
Editor Window.
Click the Browse
button to enter up
to 3 paths of the
files to be
presented. You
may click the
Quick Guide tab or
Manual tab to read Quick Guide or User’s Manual.
B. Plug & Present
Plug the Receiver into the USB port of your
computer. The computer will automatically open
the files corresponding with the paths entered in
the Open Editor Window.
You may start the presentation then.
Change Laser Icon
In Standard Mode, you can change the Virtual Laser
icon by right clicking the
aimMaster™ Pro
icon
on the System Tray. Select “Load Laser Icon” tab
from the pop-up menu.
You will see a dialogue window as follows.
Choose one for your Laser Symbol, and press OK to
finalize this setting.
Press and hold LASER key
to test the selected icon.
You can also create your own
Laser icon by any graphic
bitmap editor, e.g.,
mspaint.exe. System can
accept the format as 128 x
128 and 256 colors in bitmap
file.
Click to read Quick Guide
Click to read User’s Manual
RC240 3D Mouse Presenter V1.3
13
Group Vibrating
You can use another Presenter to inform the orator “time is end” of a
presentation. We call this feature as “Group Vibrating” and you need
to have two (or more) Presenters linked with the Receiver at the same
time. Turn ON both Presenters. Press and hold the FEATURE key
of one Presenter for more than 2 seconds, all the Presenters are
vibrating.
Anti Shaking
When you use Presenter 3D Mouse to click (either
single clicking or double clicking) small objects
(e.g., Minimize, Restore Down, or Close, the
small objects on the up-right corner), the hand
shake will cause the movement and it might be
difficult to make a successful clicking. The
Presenter provides an Anti Shaking feature to
reduce the effect of your hand movement during the clicking.
To enable the Anti Shaking function, right
click the
aimMaster™ Pro
icon . Select
the “Anti Shaking” tab, you will find 5
choices in the pull down menu. Where
OFF means turn off the Anti Shaking. In the
beginning, you may try to use “2” to see if it
helps.
Link Presenter with Receiver
The Presenter and the Receiver are linked before the shipment.
However, once you change the Receiver, or you add one more
Presenter, you should go through the following steps to link the
Presenter with the Receiver.
1. Insert Receiver to USB port of computer system.
RC240 3D Mouse Presenter V1.3
14
2. Press and hold both OK and FEATURE keys of Presenter for
around three seconds, until LASER key light flashes purple
light.
3. Release both keys and click any key. The Blue LED of Receiver
blinks.
The Presenter and Receiver are linked successful and ready for use.
Click any key to see if this Receiver is linked correctly. The blue light
on the Receiver will flash when you click the Receiver key.
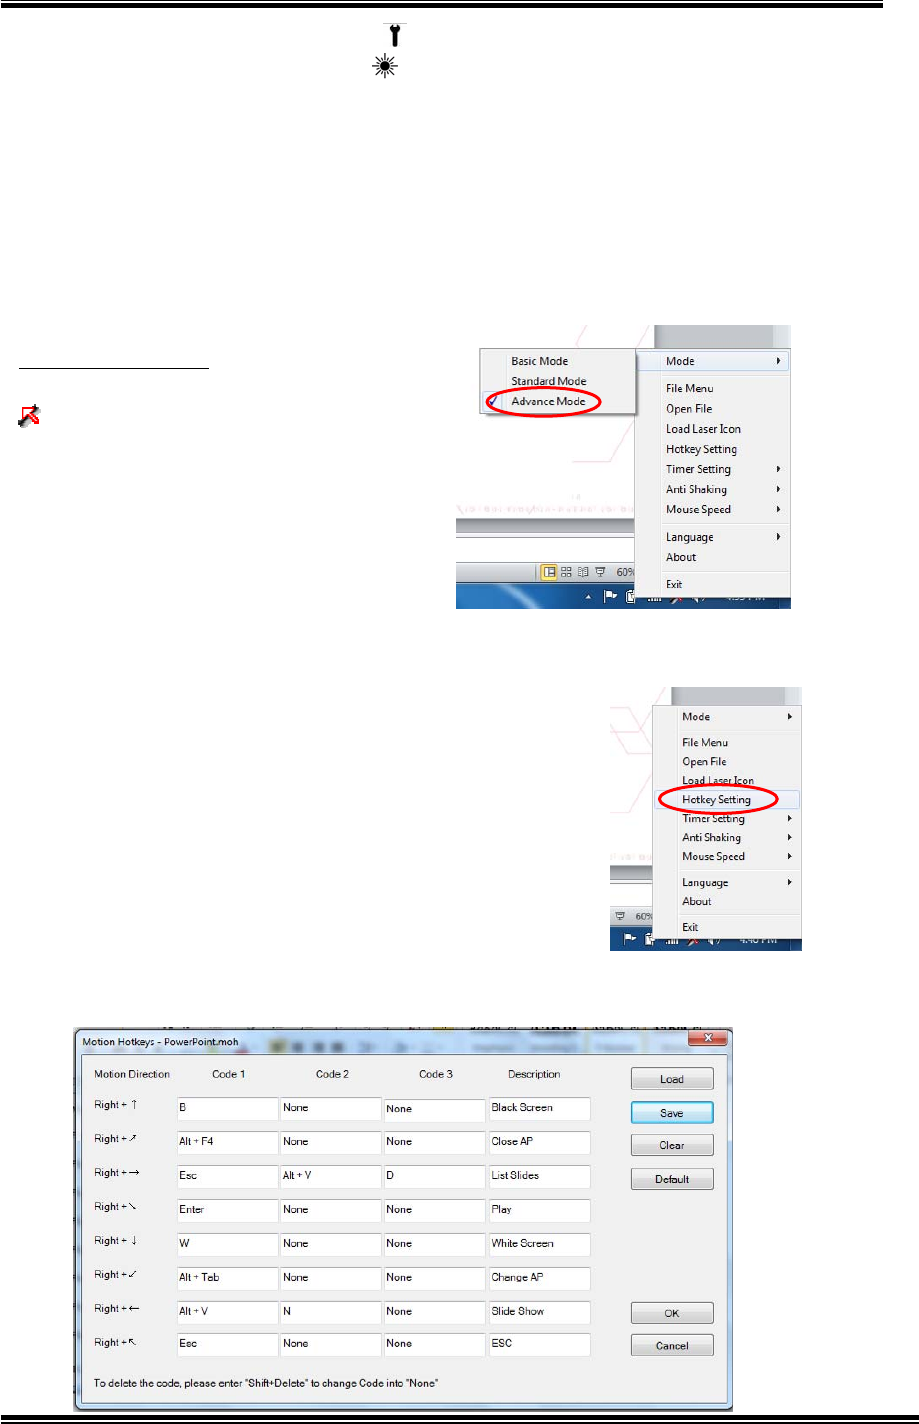
Advance Mode
Right click the
aimMaster™ Pro
icon
on the System Tray and click
“Mode” tab from the pop-up menu.
Choose the “Advance Mode” tab.
Advance Mode has all the functions
in Standard Mode plus eight more
user defined motion keys. You can
enter up to 8 commands to your computer -- up to 3 key codes could
be pre-defined for each Motion Key. And then use the one of the
motion actions to send out the assigned key
codes to your application.
Change Hotkey Map
Right click the
aimMaster™ Pro
icon from System
Tray and select “Hotkey Setting” tab from pop-up
menu. You will see a dialogue window as shown
below:
RC240 3D Mouse Presenter V1.3
15
There are 8 rows for 8-directional motion commands. You may enter
up to 3 key codes for each command on the first to the third column
as specified Code 1, Code 2 and Code 3 respectively. Use mouse to
left-click on the field you want to enter the hotkey code. Type from
your keyboard for up to 3 fields, one code for one field. The single key
(like B, D, etc.) or the combinational key (like Alt-F4, Alt-V, etc.)
could be entered in each field. Also enter the description of each
motion key at the fourth column. This description will be show on the
OSD (On Screen Display) when you activate the Motion Hotkey.
Hotkeys for PowerPoint
Before defining your own Hotkey codes, you should be aware of the
principal of the Hotkey.
When PowerPoint is in the Slide Show mode, key in letter “B” from the
keyboard will turn the screen to black. If you are using the Hotkey
Setting as shown on the dialog of Page 14, a letter “B” is in Code 1
field of the first row, “Right + ↑”. When you use the ↑Motion key
(described in the following section),
aimMaster™ Pro
will send out a
keyboard code, “B” to PowerPoint for you. Then PowerPoint changes
the whole screen into black accordingly.
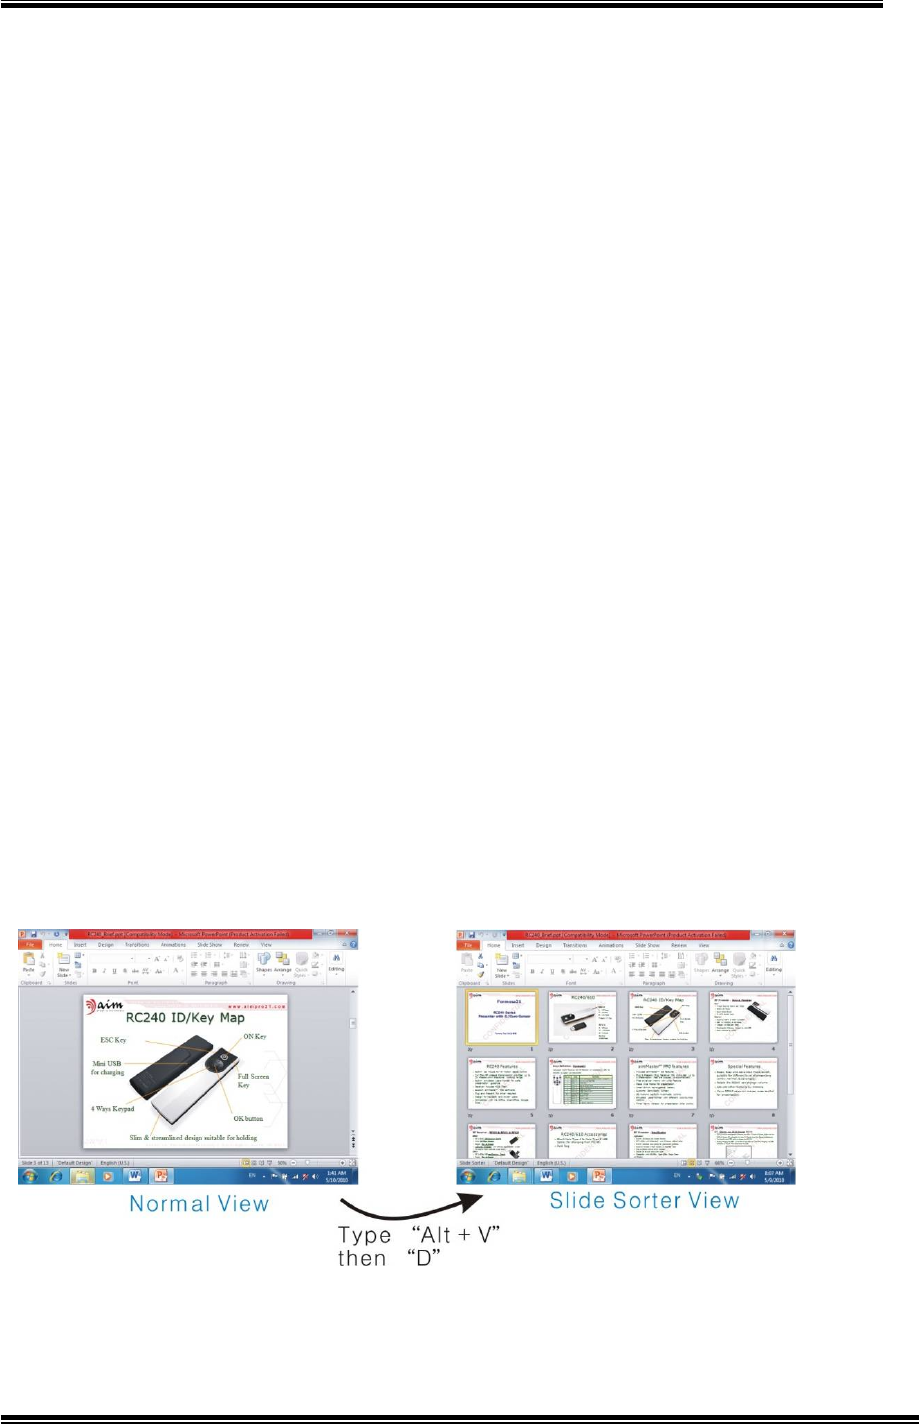
When PowerPoint is in the Normal View mode (not in the Slide Show
mode), if you enter the composite key, pressing the ALT key with the
letter “V”, you select the “View” command. When you then enter the
letter “D”, you choose the “Slide Sorter” tab. PowerPoint enters the
Slide Sorter view.
If you are using the Hotkey Setting as shown on the dialog of Page 14,
the 3rd row, the “Right + ” motion key, will send out “ESC”, “Alt+V”
and “D” keys for you. PowerPoint will change from the “Slide Show
Mode” through “Normal View Mode”, and then to the “Slide Sorter

RC240 3D Mouse Presenter V1.3
16
View” accordingly.
Please check PowerPoint or other applications for the hotkey codes.
You may define your own hotkey code map and save it for your later
use.
When you enter all the codes on the dialog, click the “Save” button
and enter the filename to be saved. You may retrieve a Hotkey
Setting by clicking “Load” button and select one Hotkey Setting file
from the list.
You may modify the Hotkey codes by clicking the “Load” button to
select one of the Motion Key Map files.
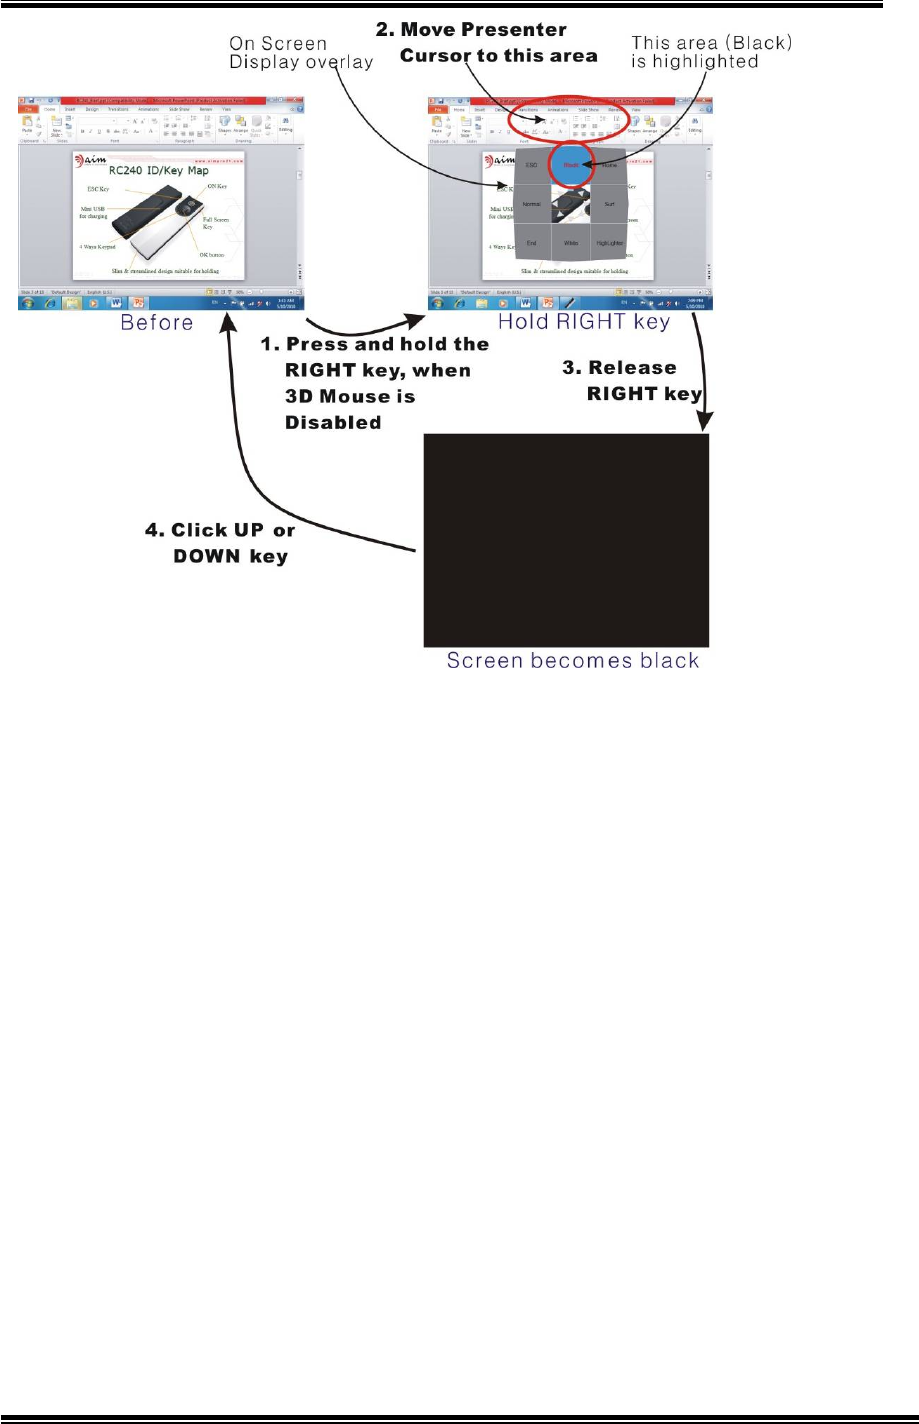
Use the Motion keys
Before using the Motion keys, the 3D Mouse should be disabled (the
light of LASER key is turned OFF).
If you are using the Hotkey Setting as shown on the dialog of Page 14,
pressing & holding the RIGHT key, an OSD (On Screen Display) is
shown on the screen. You will see 8 blocks with the command letters
that were entered in the description column of the Hotkey Setting
dialog. Hold the Presenter RIGHT key and move the cursor towards
the direction of the command you want to execute. When the cursor is
moving out the OSD area, the selected command block is highlighted.
Release the RIGHT key. The Hotkey codes are sent out and the
application will respond with these codes.
Example 1:
Disable 3D Mouse. Press and hold the RIGHT key. When you move the
cursor (still hold the RIGHT key) to up position, the “Black” block will
be highlighted. Release the RIGHT key, the screen will go black
immediately.
Click UP or DOWN key to call back the screen from black.
RC240 3D Mouse Presenter V1.3
17
Note:
MS Windows might send out different key code
when the input method for some language is enabled.
For example, although you type from keyboard a letter
“B” into Word, and you could see the letter “B” shown on
the screen. However, even when you use the keyboard to
enter this “B” in a PowerPoint Slide Show screen, it can
not change to black screen. In case it happens, please
disable the input method for your own language before
operating the Motion keys.
Example 2:
During the presentation, if you want to search one slide from many
pages, in the Slide Show mode, press and hold the RIGHT key to
open the OSD and move the cursor towards right of the screen to
highlight the “List Slide” block (if you are using the Hotkey Setting as
shown on the dialog of Page 13). Release the RIGHT key.
aimMaster™ Pro
sends out “ESC”, “ALT-V” and “D” keys to
PowerPoint. The Slide Show mode is then changed into the Slide
Sorter View.
RC240 3D Mouse Presenter V1.3
18
From the Slide Sorter View, you may enable the 3D Mouse, select one of the Slides
that you want to show to the audiences, and then disable the 3D Mouse. To show
this page for the Slide Show, press and hold the RIGHT key to open the OSD. Move
the cursor to the left side to highlight the “Slide Show” block then release the RIGHT
key. The selected slide will be shown on the Slide Show.
Check Release Numbers
Right click the
aimMaster™ Pro
icon on the System Tray, select
“About” tab. A window is popped up and you will see the following
version numbers:
1.
aimMaster™ Pro
Release Number.
2. Receiver Firmware Release Number.
3. Presenter Firmware Release Number.
The aim website is also shown on this “About” window.
2. Move Cursor
to this area
Slide Sorter View
Slide S Viewhow
The OSD over the Slid
e
1. Disable 3D Mouse
Press and hold the
RIGHT key
.
.
3. Release
RIGHT key
Slide S Viewhow
Slide Sorter View
The OSD over the Slide Sorter
2. Disable 3D Mouse
Press and hold the
RIGHT key
.
.
4. Release
RIGHT key
3. Move Cursor
to this area
1. Select this Slid
e

RC240 3D Mouse Presenter V1.3
19
FEATURES
Built-in wireless 3D Mouse eases the cursor control.
Page Up/Page Down, Scroll Up/Scroll Down.
Hotkey for Slide Show or Close Slide Show.
2.4 GHz RF provides up to 20 meters omni-directional working
range.
Built-in Virtual Laser Pointer for danger-free guidance and
suitable for big presentations that use multiple projectors.
USB Receiver supports microSD Card Reader (RC240/611 only).
Supports powerful
aimMaster™ Pro
Software that offers Basic,
Standard, and Advance modes. Suitable for different level of
applications.
Designed for travelers and professionals.
Compatible with MS Office, OpenOffice, Google Docs.
aimMaster™ Pro
Features
Virtual Laser Pointer with changeable Laser Icon.
Plug & Present: Plug the Receiver into USB port and up to 3 files
are opened automatically.
Place Check Marks and draw Line Marks with Undo/Clear All
Marks.
Support Group Vibrating and Timer Alarm Vibrating ease timing
control.
Flexible Motion Keys for user to define personal Hot key
Commands
Support 8 User definable Motion Keys for Personalized Control.
Anti Shaking eases the small object clicking.
RC240 3D Mouse Presenter V1.3
20
Product Specifications
Category Description
Function Presenter – Page Control, Virtual Laser Pointer, 3D Mouse,
Motion Keys, Group Vibrating, Timer Vibrating, Check/Line
Mark, Plug & Present.
Receiver – microSD Reader (RC240/611 only)
Package Presenter, Receiver, USB Cable, Portable Bag, Quick Guide,
Installation CD (includes
aimMaster™ Pro
Software, Quick
Guide, User Manual).
Size Presenter: L125 x, W35 x H16.7mm (4.86”x1.52”x0.6”)
Receiver of RC132/611: L69x W19.9x
H5.5mm(2.1”x0.8”x0.27”)
Weight Presenter: 65g(2.3oz)
Receiver of RC132/611: 7.5g(0.3oz)
PC Interface USB1.1
Protocol RF 2.4GHz
Operation Distance 20 meters
Charging Time Over 3.5 hours
Usage Time Below 22 hours
DC Power Li-Poly 900mAh, charged by USB port
OS Windows 7/Vista/XP
Certification FCC, CE

RC240 3D Mouse Presenter V1.3
21
Q & A
1. Language:
Q: Does software,
aimMaster™ Pro
, support the language of my
country?
A: Please move the cursor to the
aimMaster™ Pro
icon on the
System Tray. Right Click this icon, and select the “Language”
Tab. You will find a list of the languages. Pick up the one you
need. The user interface will be changed to this language.
2.
aimMaster™ Pro
is not installed:
Q: If I don’t install the software,
aimMaster™ Pro
, can I use
RC240?
A: Yes, you can use a lot of functions: Mouse (includes Left and
Right keys), Page Up, Page Down, Scroll Up, Scroll Down,
Volume Up and Volume Down (the small volume window on the
right up corner is not shown). However, the Virtual Laser Pointer
is not working. You can use Mouse cursor as the Virtual Laser
Pointer.
3. Group Vibration
Q: I use another RC240. I press and hold the FEATURE key for 3
seconds trying to let the original Presenter vibrating. But it does
not work.
A. First, you should link the second Presenter with the original
Receiver. Please place the second Presenter close to the
Receiver then press and hold both the FEATURE and OK keys
of the second Presenter for more than 3 seconds until the
purple light on the LASER key is flashing. Press any key to
confirm if it is linked.
Also, both Presenters should be turned on.
4. Slide Show:
Q: Sometimes when I click the POWER key to enter the slide show,
the computer is not responsive.
A. The window of your PowerPoint file is not an active window.
Perhaps you just did some actions on the
aimMaster™ Pro
icon
on the System Tray of your computer. In this case, the window

RC240 3D Mouse Presenter V1.3
22
of your PowerPoint file is inactive. You should make this
window active by moving mouse cursor to this window and
make a left click. Then, clicking the POWER key will open the
Slide Show successfully.
Q. When I click POWER key to open the Slide Show of a
PowerPoint file, it always open the first page and could not start
from any middle page.
A. Your PowerPoint should be the old release, PowerPoint 2000
that does not support open Slide Show from middle page – it
always starts from the first page.
5. Advance Mode & Motion Keys
Q. Why I should use Advance Mode?
A. When you are becoming familiar with RC240 and would like to
have more function keys on this Presenter. You have the
flexibility to define up to 8 of your own software keys under
Advance Mode.
Q: When I use the Motion Key for PowerPoint, the computer does
not response.
A. The Motion Keys emulate the inputs from the keyboard. Try to
type in the hotkey from your keyboard. If it is working, then your
Motion key should be also working (of course, you should set
the correct key codes on the Hotkey Setting window in
advance).
There are several possible reasons if the Motion keys are not
functional.
(1) Your current window is inactive. Activate 3D Mouse by
clicking the LASER key. Move cursor to the window you are
trying to work and make a LEFT click to enable the
application window.
(2) If you had activated the input mode of your own language,
you should turn off it. E.g., in Traditional Chinese Windows,
if you turn on the Chinese Input Mode, even you type from
your keyboard directly, the hotkey does not work. In this
case, you should key in “Ctrl-Space” to turn off the Chinese
Input Mode. Then the Motion keys should work.

RC240 3D Mouse Presenter V1.3
23
(3) When you press and hold the RIGHT key to start the Motion
key, the 3D Mouse of the Presenter should be inactive;
otherwise, it is just a mouse right key and can not activate
the Hotkey OSD.
6. Low Battery
Q. When the blue light of the LASER key becomes orange, how
many more hours can I use the Presenter?
A. You should be able to use the Presenter for several more hours.
When you turn on the 3D Mouse or Virtual Laser Pointer function,
it consumes more battery power and the usage hours will be
reduced.
7. Plug & Present
Q. I set the paths of the Files on the File Path Editing window.
When I plug in the Receiver to the computer, the files are not
popped up automatically.
A. Windows did not detect the Receiver, please unplug the
Receiver and plug it in again.
Please also check if the file path is correct. The file might be
moved to other directory.
8. Virtual Laser Pointer
Q. The Laser Icon can not be shown correctly in Word or Excel.
A.
aimMaster™ Pro
replaces the cursor icon when the LASER
button is pressed and held. Depends on the position of the
cursor, different applications may have special treatments on
the cursor icon. Word or Excel, or other applications change
the Virtual Laser Icon when the cursor goes to some locations.
However, the Virtual Laser Pointer icon works well under
PowerPoint Slide Show.
Q. How do I change my own Virtual Laser Pointer Icon?
A. You may use the graphics editor (e.g., Paint in Windows) to
edit your own Laser Pointer Icon. The size of this icon should
have the format as 128 x 128 and 256 colors in bitmap file.
9. Quick Guide & User’s Manual

RC240 3D Mouse Presenter V1.3
24
Q. I lost my Quick Instruction Guide, where can I get a new one?
A. Double click the
aimMaster™ Pro
icon on the System Tray to
pop up the File Input Window. You will see two tabs on the
right-down corner. Click “Quick Guide” or “Manual” to open the
Quick Instruction Guide or User’s Manual.
10. Anti Shaking and Mouse Speed
Q. How can I choose the best setting of the Anti Shaking and
Mouse Speed?
A. When you use slower 3D Mouse Speed, you are easier to click
small object. And you may assign less Anti Shaking or turn it off.
Generally speaking, select “1” or “2” of the Anti Shaking will get
the good result when you are using 3D Mouse.
Q. If I choose the higher Anti Shaking what is the disadvantage?
A. When you use higher Anti Shaking, if you are using real mouse
without inserting the Receiver, it does not affect the mouse
functions. However, if you plug the Receiver into the USB port,
you can not click too soon when you move the cursor to a small
object.
11. Update
aimMaster™ Pro
Q. How can I update my
aimMaster™ Pro
software?
A. Please find your
aimMaster™ Pro
version number by right
clicking the
aimMaster™ Pro
icon. Choose the “About” tab to
find the version number. Go to aim website by the URL:
www.aimpro21.com. Find from the Support button and see if
there is a newer version of
aimMaster™ Pro
. If there is a newer
version, you may download it and install it to your computer.