FORYOU MULTIMEDIA ELECTRONICS NS-PR200 Pico Projector with Premium Audio User Manual
FORYOU MULTIMEDIA ELECTRONICS CO., LTD Pico Projector with Premium Audio Users Manual
Contents
- 1. Users Manual
- 2. User Manual
Users Manual
V1 ENGLISH 17-0460
IMPORTANT SAFETY INSTRUCTIONS
• Do not drop the projector.
• Do not store or use the projector in an extremely hot area, such as a parked car.
• Do not disassemble or modify the projector.
• Do not block the vents on the side or top of the projector.
• Do not expose the projector to extreme vibrations. It may damage internal
components.
TROUBLESHOOTING
My device does not recognize the projector.
• If using an Android device, make sure that it is HDMI-compatible. Check with your
device’s manufacturer for more information.
• If using an Apple device, make sure that you have connected a digital AV adapter
(with HDMI output).
• Try another video mode. The maximum input resolution is 1080p.
• Disconnect and reconnect the HDMI cable from the source device.
The image blinks or changes color.
• Reset your projector or connected device.
• The screen may blink if your phone receives a text message or call while it is
connected.
Projector does not display image/video.
• If using a computer, make sure that your display option uses the projector.
• Make sure that your cable connections are correct and secure.
• Make sure that your projector and connected device are fully charged.
• Some apps may not support image projection.
• Check the documentation that came with your device to determine whether it can
display content through HDMI.
Projector does not play sound or is too quiet.
• Turn up the volume on your source device.
• Raise the volume level on your projector.
My device will not connect via Bluetooth
• Make sure that your projector and Bluetooth device are in pairing mode.
• Shorten the distance between your projector and your Bluetooth device.
device.
• Make sure that your projector is not paired to another Bluetooth device.
• Make sure that your Bluetooth device is not connected to any other device.
• Make sure that you have selected NS-PR200 on your Bluetooth device.
• Make sure that the nothing is connected to the headphone jack.
SPECIFICATIONS
AC ADAPTER INFORMATION:
Input: AC 100-240V, 50/60Hz, 1.5A
Output: DC 12V, 3.0A
Maximum Ambient Temperature: 40°C, Class II
UL Approved
File No. E303985
LEGAL NOTICES
FCC Statement
This device complies with part 15 of the FCC Rules. Operation is subject to the
FCC Statement
This device complies with Part 15 of the FCC Rules. Operation is subject to the
following two conditions: (1) this device may not cause harmful interference, and
(2) this device must accept any interference received, including interference that
may cause undesired operation.
Warning
party responsible for compliance could void the user’s authority to operate the
equipment.
“This equipment has been tested and found to comply with the limits for a Class B
digital device, pursuant to Part 15 of the FCC Rules. These limits are designed to
provide reasonable protection against harmful interference in a residential
installation. This equipment generates, uses, and can radiate radio frequency
energy and, if not installed and used in accordance with the instructions, may
cause harmful interference to radio communications. However, there is no
guarantee that interference will not occur in a particular installation. If this
equipment does cause harmful interference to radio or television reception,
encouraged to try to correct the interference by one or more of the following
measures:
• Reorient or relocate the receiving antenna.
• Increase the separation between the equipment and receiver.
the receiver is connected.
• Consult the dealer or an experienced radio/TV technician for help.
RSS-Gen & RSS-247 statement:
This device complies with Industry Canada licence-exempt RSS standard(s).
Operation is subject to the following two conditions: (1) this device may not
cause interference, and (2) this device must accept any interference, including
interference that may cause undesired operation of the device.
Le présent appareil est conforme aux CNR d'Industrie Canada applicables aux
appareils radio exempts de licence. L'exploitation est autorisée aux deux
conditions suivantes : (1) l'appareil ne doit pas produire de brouillage, et (2)
l'utilisateur de l'appareil doit accepter tout brouillage radioélectrique subi, même
si le brouillage est susceptible d'en compromettre le fonctionnement.
RSS-102 Statement:
This equipment complies with Industry Canada radiation exposure limits set forth
for an uncontrolled environment.
Cet équipement est conforme à l'exposition aux rayonnements Industry Canada
limites établies pour un environnement non contrôlé.
Display
LED life
Brightness
Focus
Resolution
Picture ratio
Maximum screen size (diagonal)
Maximum input resolution
Dimensions
Weight
Operating temperature
Humidity
Charging time
Operating time
5W Peak
DLP DMD
20,000 hours (maximum)
100 ANSI lumens (maximum)
Manual focusing dial
WVGA (854 × 480)
16:9
100 in. (254 cm)
Up to 1080p
5.59 × 5.59 × 2.48 in. (14.2 × 14.2 × 6.3 cm)
1.56 lbs. (708 g)
32~104°F (0~40°C)
0~80%
120 minutes (average)
Visit www.insigniaproducts.com for details.
CONTACT INSIGNIA:
For customer service, call 877-467-4289 (U.S. and Canada)
or 01-800-926-3000 (Mexico)
www.insigniaproducts.com
Distributed by Best Buy Purchasing, LLC
©2017 Best Buy. All rights reserved.
Made in China
NS-PR200_17-0460_QSG_V1_EN.ai 2 9/11/2017 8:20:39 AM
The unit must be used with the
original accessories.
贴纸位置,大小46*20mm
Left
Right
CHARGING YOUR PROJECTOR
Note: Use only the included AC power adapter.
Plug the AC power adapter into a power outlet, then plug the 12V DC output end
into the projector. The charging indicator lights red while charging, and it turns
To check your battery level, refer to the table below:
Notes:
it is too hot or too cold.
PACKAGE CONTENTS
• Pico projector
• Mini/Micro HDMI adapter
• HDMI cable
• AC power adapter
• Soft carrying pouch
• Quick Setup Guide
COMPATIBILITY
Works with HDMI-compatible Android devices and devices with micro, mini, or
standard HDMI outputs (up to 1080p). An Apple digital AV adapter is needed for
Apple iOS devices (sold separately).
FEATURES
• 100 lumen output with long-life LEDs
• Projects images up to 100 in. (254 cm) (16:9 aspect ratio)
• Accepts up to 1080p video signals for maximum compatibility
• Internal battery with 120 minutes of run time (normal brightness at 50% volume
level—will vary depending on use)
speakers
• Can be used as an audio-only Bluetooth speaker
• 3.5 mm stereo audio output for use with headphones or external audio devices
Top
Front
Before using your new product, please read these instructions to prevent any damage.
Flat size (W×H): 480 × 240 cm
Final folded size: 120 × 120 cm
QUICK SETUP GUIDE
Pico Projector
NS-PR200
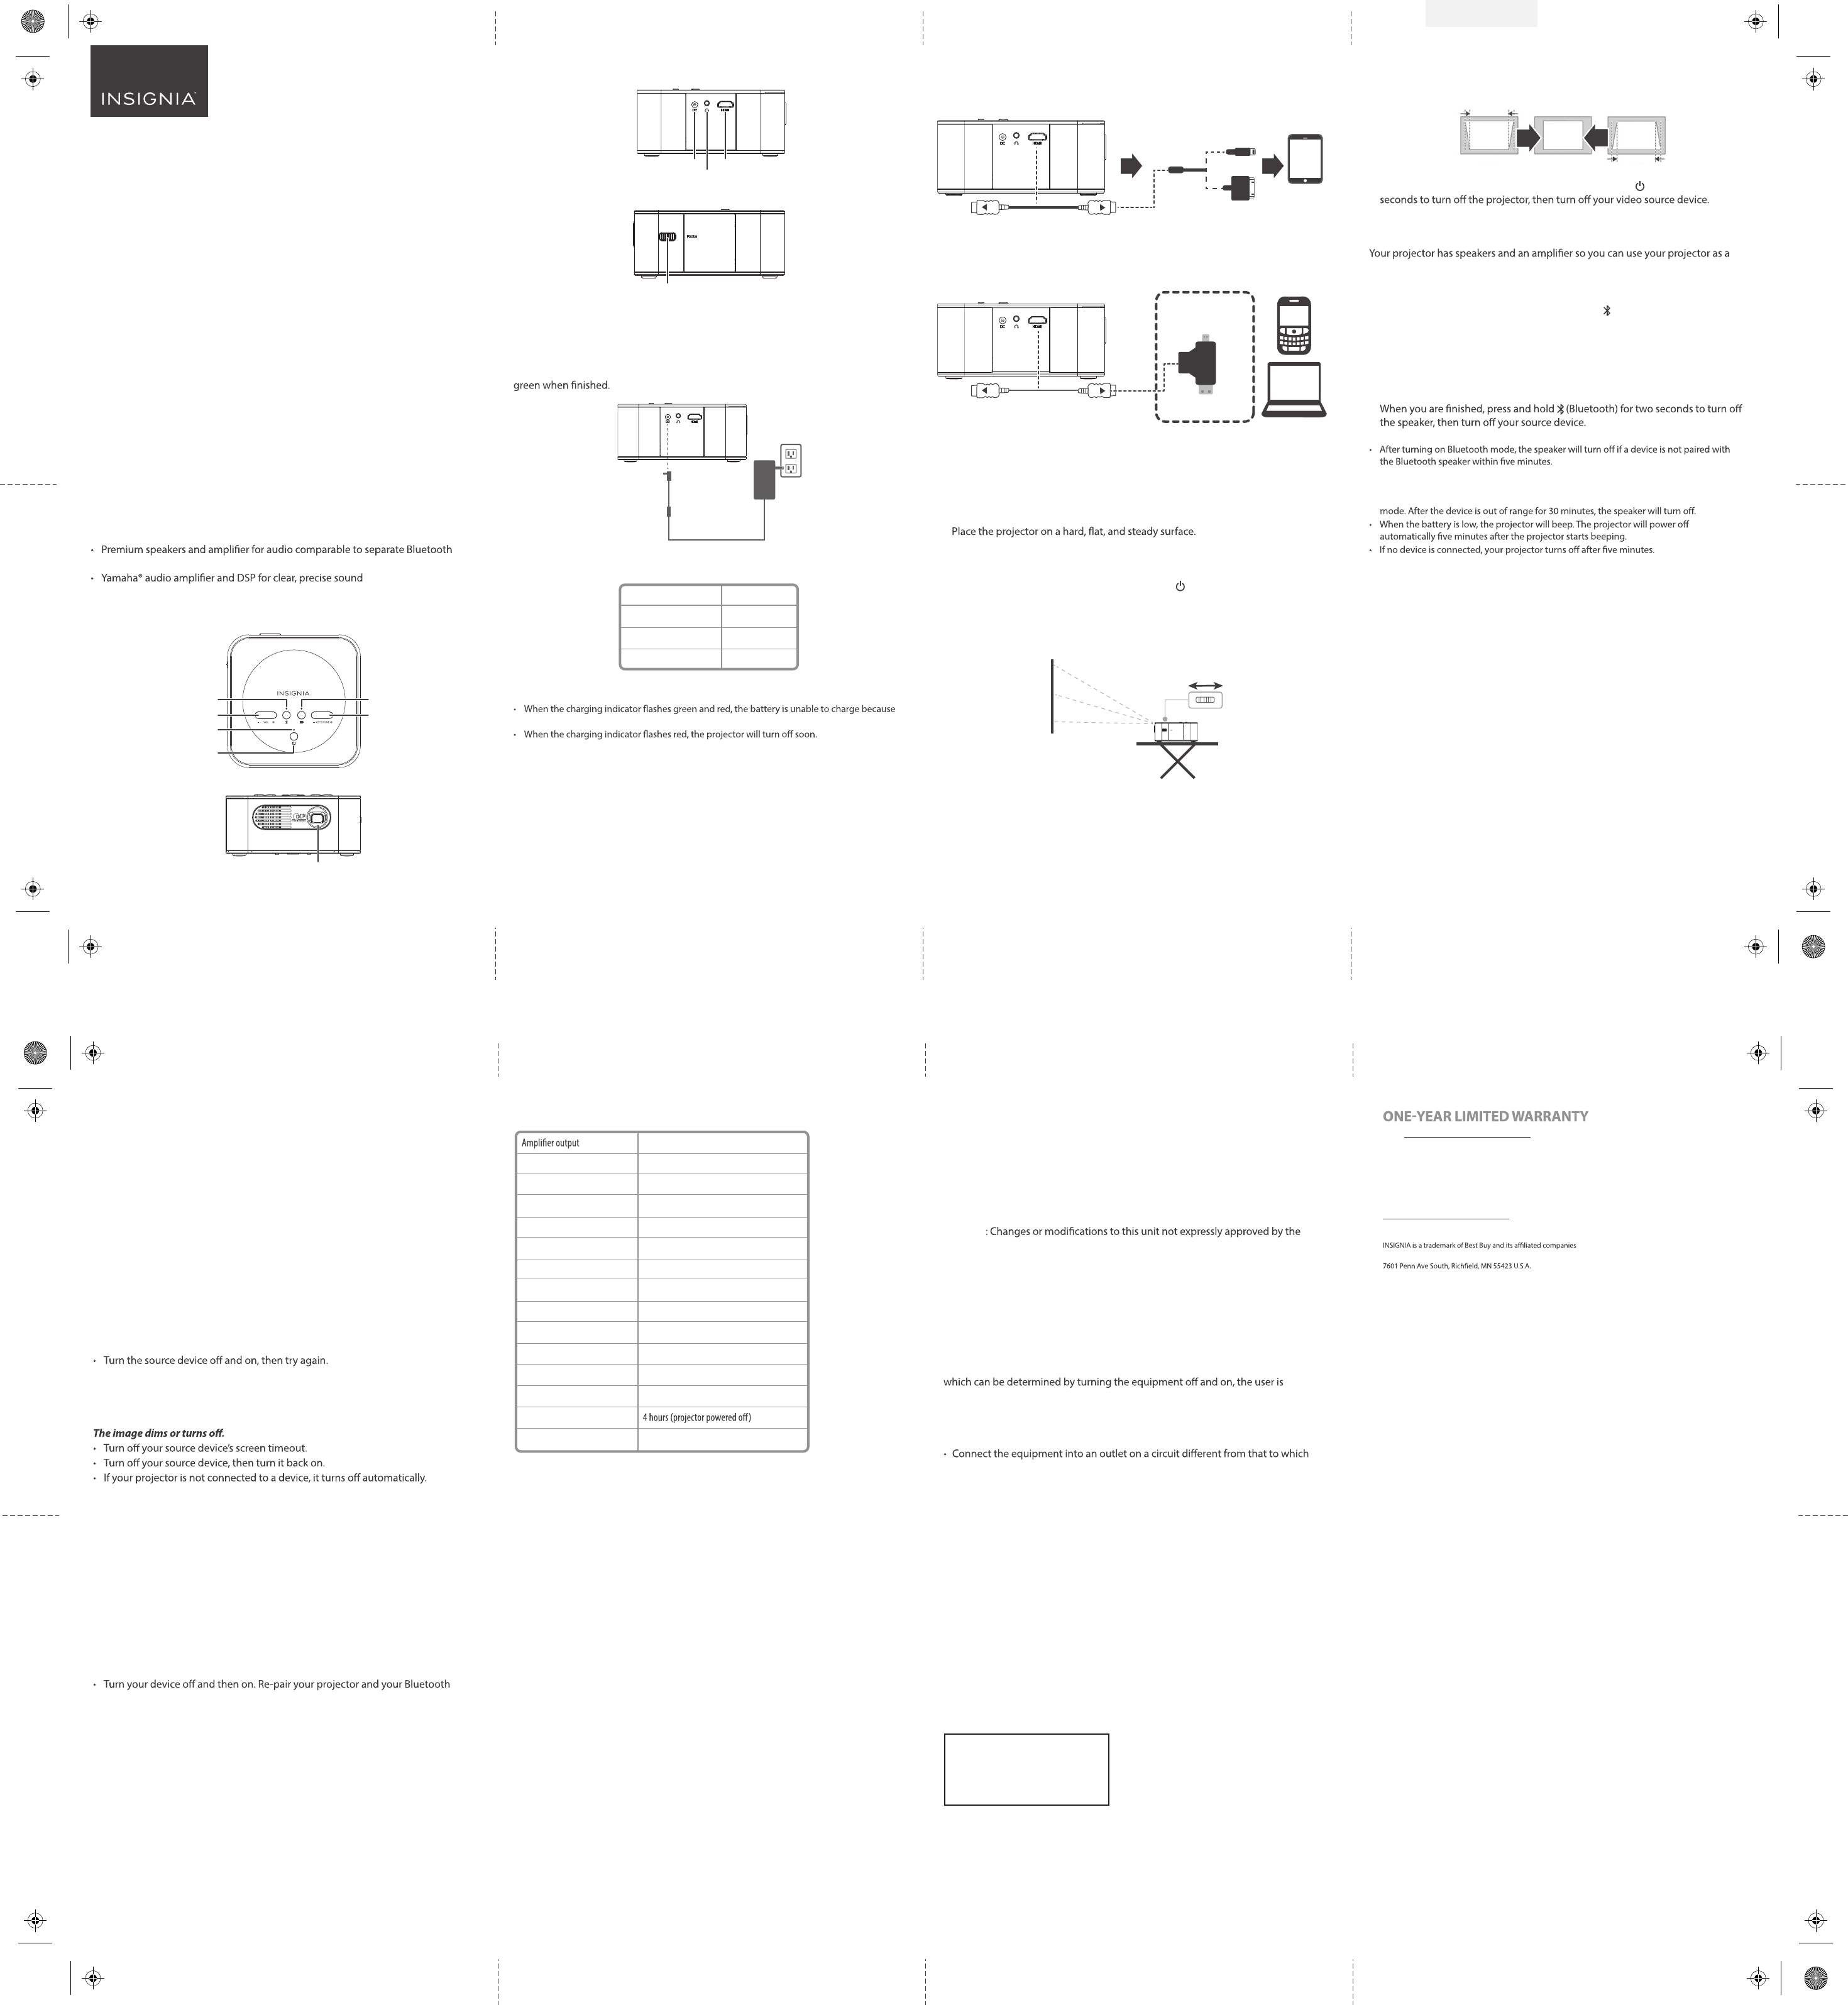
CONNECTING YOUR PROJECTOR
Apple® iOS Devices
HDMI
USING YOUR PROJECTOR
Tip: For the best picture, use the projector in a dark room or with a small picture
in a brighter room.
1 Connect your video source device to your projector. See “CONNECTING YOUR
PROJECTOR” above for instructions.
2
Notes:
• Make sure that the projector has enough ventilation. Do not cover the projector.
• Keep the projector stable. Do not walk around with the projector while in use.
3 Turn on your source device, then press and hold (power) for two seconds to
turn on the projector. After turning on your projector, it displays “NO SIGNAL,”
then mirrors your device’s screen.
4 Aim the lens at a screen or blank wall, then turn the FOCUS dial to bring the
projection into focus.
5 Use your video source device to control playback.
6 Press Vol+ or Vol- to adjust the projector’s volume level. Make sure that your
video source device’s volume is set to at least 50%.
Note: You can also play audio through your video source device’s speakers.
Volume
Power
Keystone
Bluetooth Projector
Lens
Charging port
Headphone
jack
HDMI port
Focus dial
Lightning® digital AV adapter
(not included)
HDMI cable
OR
30-pin digital AV adapter
(not included)
FOCUS
HDMI cable
Mini/Micro HDMI adapter
OPTIONAL
Connect if your device has a
mini or micro HDMI port.
7 Press Keystone+ or Keystone – to correct the distortion during a tilted
projection.
8 When you are done using the projector, press and hold (power) for two
USING YOUR BLUETOOTH SPEAKER
Bluetooth speaker.
For best sound performance, keep your Bluetooth device no farther than
33 ft. (10 m) from your projector.
1 Turn on your source device, then press and hold (Bluetooth) for two seconds
to turn on Bluetooth pairing mode. The Bluetooth indicator blinks.
2 Turn on your device’s Bluetooth, then pair your device with “NS-PR200.” When
pairing is completed, the Bluetooth indicator stays on and the projector beeps
twice.
3 Begin playing audio on your Bluetooth device. It should play through the
speakers on your projector.
4
Notes:
• If you move your device out of range, it will remain paired to the Bluetooth speaker for
10 minutes, but the speaker will not make any sound until the device is back within
range. After the device is out of range for 10 minutes, the speaker will reenter pairing
USING THE HEADPHONE JACK
1 Connect headphones or another sound source with a 3.5 mm audio cable (not
included) into the headphone jack on the left side of your projector.
2 Press Vol+ and Vol- to adjust the volume.
3 Control playback using the controls on the source device.
CHARGING INDICATOR
Green
Yellow
Red
BATTERY STATUS
80-100%
31-79%
0-30%
Charging indicator
NS-PR200_17-0460_QSG_V1_EN.ai 1 9/11/2017 8:20:35 AM