FORYOU MULTIMEDIA ELECTRONICS V8V7V6 pico projector User Manual 201208173 V8
FORYOU MULTIMEDIA ELECTRONICS CO., LTD pico projector 201208173 V8
User Manual

Contents
1 Product introduction
2 Specifications
3 Package content
4 Smart Pico projector appearance and parts name
5 Using and connection
5.1 Use
5.2 Use AV cable
5.3 Connect USB
5.4 Connect earphone/speaker box
6 Specification about buttons
7 Desktop and status bar
7.1 Wallpaper
7.2 Status
8 Multimedia function
8.1 Local media
8.2 Explorer
9 Network application
9.1 WiFi
9.2 Web browse
10 Install/uninstall/run application
10.1 Install app
10.2 Uninstall app
10.3 Run app
11 USB OTG
12 E-mail
13 Setting
14 Smart Pico projector battery charge
15 Trouble shooting
HDMI cable
1
2
3
3
4
4
5
6
6
7
8
8
8
8
8
9
9
9
9
10
10
10
10
10
11
11
11
12
1 Product introduction
- 1 -
Smart Pico projector is based on Android operating system. It is capable of installation
and use of application .With the built-in Wi-Fi module, it supports to surfing the web, play
on line and download software. Users can use office software such as WORD, EXCEL,
PPT, PDF to read or to edit.
It is easy for carrying. Users can watch wonderful screen in anytime and anywhere.
It supports USB Flash Driver, connect to those external devices, it can play audio,
video (HD video), pictures, text files which stored in devices, the biggest capacity
is 1080P HD Video.
Connect to Laptop, DV, DC, PS2/Xbox/Wii), smart mobilephone, DVD Player,
Digital Set Top Box and so on. At the same time, it supports HDMI Port. Big screen
mate for family entertainment and Presentation tool for business meeting.
Smart Pico projector is very smart and convenient, Maximum endurance, unique
industry design, due to those factors, it can work in many places.
HOME
MENU

2 Specification
Brightness 50 Lumens (Normal Model); 20 Lumens (Save Model)
WSVGA(1024X600)
Projection Size
0.4M,12inches; 1.6M, 40inches; 3.2M, 80inches
Light Sources RGB LED, the life is over 30,000Hours
Project Distance 0.4-3.2M
Memory card capacity 32GB USB storage device/8G Built-in Flash/ Portable Hard Drive
16:9 (4:3)
Aspect Ratio
Uniformity ≥80%
NTSC >100% NTSC
Contrast Ratio 300:1
Project Technology LCoS
12-80inches (It can be adjusted according to the light and project distance).
Power consumption 20W (Normal Model); 10W (Save Model)
Power Supply
AC 100-240V~ 50Hz/60Hz
AV; HDMI; USB 2.0; Mini USB OTG2.0; Φ3.5mm earphone interface;
Input Interface
Speaker 2Wx1;4Ω
DC 9V 3A; li-ion battery 1450, mAh 7.4V
Dimension 125.5x73x35mm
AC Adaptor, USB adapter, OTG cable, Pouch, User Manual
Standard Accessories
Weight
230g(Includes the built-in battery)
o o
Operating Temperature: 0 C~40 C;
Operating relative humidity: 35%~85% (without condensation)
Requirement Environment
Video : MPEG1/MPEG2/MPEG4/AVS/VC-1/RMVB/H.263/H.264(4.2)/VP8
Support media data
formats
Picture: JPG/JPEG/BMP/PNG
Audio:MP3/WMA/WAV/M4A/AC3
Native Resolution
Support HD 720p, 1080p
Office: WORD/EXCEL/PPT/PDF(Need to install office software by user)
- 2 -
USB mouse and keyboard
4 Pico projector appearance and parts name
3 Package content
OTG CABLE
AC Adaptor USB adapter User Manual
Thermal Via
1
Left/Right Key
5
Power Key
3
Up/Down Key
4
Focus
2
6
Earphone
7Mini USB port
8Battery full charge
indicator (Green)
9
HDMI port
18
DC IN port
16 AC IN port
17
Battery charge
indicator (Red)
10
11 Source switch key
12 Enter Key
13
USB Port
15
Menu function key
14
Return key
4
5
2
11
3
8
9
14
16
7
1
18
17
13
6
15
10
4
5
Notice
Focus button:when the image is not clear, use this key and adjust image effect, make image
clearer.
12
DCUSB HDM I
MINI USB
AV
- 3 -
Pouch
Home key
5 Using and connection
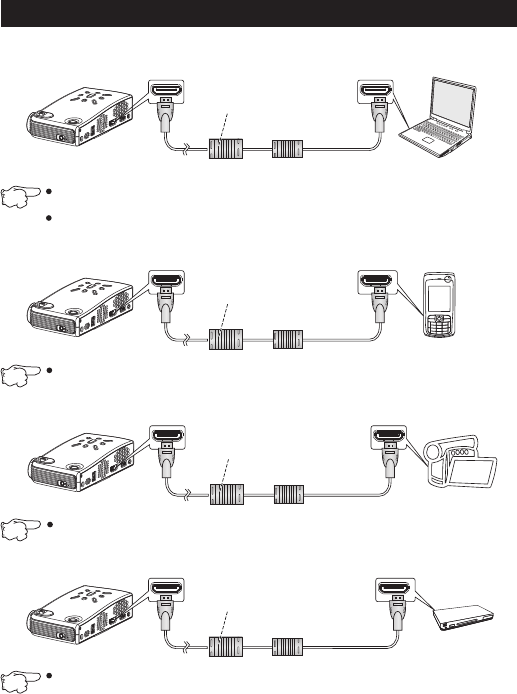
5.1 Use HDMI cable
Connect PC, please press Source switch key and choose HDMI, and then press Enter key into
HDMI mode.
Support VIDEO 480P 720P 1080P;Support native resolution computer output HDMI 640x480
720x480, 1280x600,1280x768,1360x768,some native resolution may display incompletely
for HDMI Overscan.
User own: HDMI cable
Notice
DC USB
HDMI
VGA AV
- 4 -
DC USB
HDMI
VGA AV
Connect mobilephone HDMI, please press Source switch key and choose HDMI, and then press
Enter key into HDMI mode.
User own: HDMI cable
mobilephone
HDMI port
Laptop
DC USB
HDMI
VGA AV
When play DV, please press Source switch key and choose HDMI, and then press Enter key into
HDMI mode.
User own: HDMI cable
Digital video camera
DC USB
HDMI
VGA AV
When play DVD player, please press Source switch key and choose HDMI, and then press Enter
key into HDMI mode.
User own: HDMI cable
DVD player
Notice
Notice
Notice
DC USB
HDMI
VGA AV
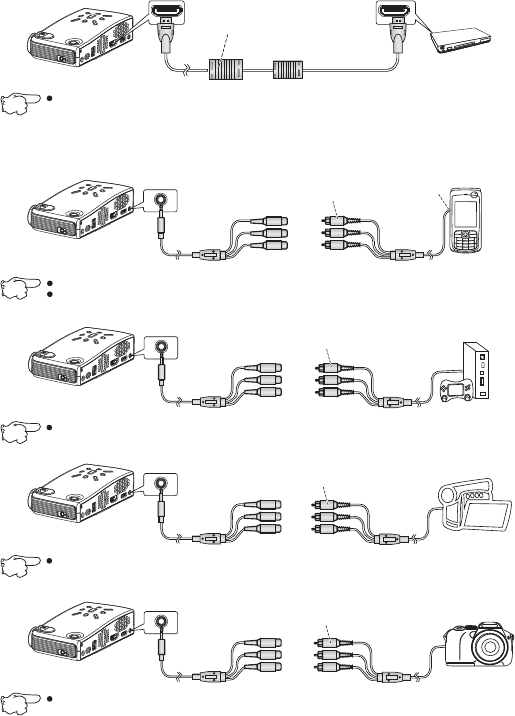
Play Game console
Yellow
White
Red
Play game console
with this cable
- 5 -
DC USB
HDMI
VGA AV
5.2 Use AV cable
Mobilephone
Yellow
White
Red
Mobilephone
specified
AV cable
Connect
AV out/TV
out port
This way just fit for those mobilephones which own AV out or TV out port and can connect AV cable.
When play AV out, please press Source switch key and enter into AV mode.
DC USB
HDMI
VGA AV
When Connect Set Top Box, please press Source switch key and choose HDMI, and then press
Enter key into HDMI mode.
User own: HDMI cable
Set Top Box
When play AV out, please press Source switch key and enter into AV mode.
DC USB
HDMI
VGA AV
Digital Video Camera
Yellow
White
Red
DV specified
AV cable
When play DV, please press Source switch key and choose AV, and then press Enter key into AV
mode.
DC USB
HDMI
VGA AV
Digital Video
Camera
Yellow
White
Red
Digital Camera
special AV cable
When play DC, please press Source switch key and choose AV, and then press Enter key into AV
mode.
Notice
Notice
Notice
Notice
Notice
DC USB
HDMI
VGA AV
Yellow
White
Red
When play DVD Player, please press Source switch key and choose AV, and then press Enter key
into AV mode.
DVD Player
- 6 -
DC USB
HDMI
VGA AV
Yellow
White
Red
When play Set Top Box, please press Source switch key and choose AV, and then press Enter
key into AV mode.
Set Top Box
5.4 Connect earphone/speaker box
User match that,
not included in standard
accessories
DC USB
HDMI
OTG AV
5.3 Use USB cable
USB Flash Driver
DC USB
HDMI
VGA AV
DC USB
HDMI
MINI USB
AV
MINI USB
speaker box
DC USB
HDMI
MINI USB
AV
USB keyboard USB mouse
When connect mouse、keyboard and external USB storage device,choose "host pattern” in
“setting”->“USB”
Yellow(V)
White(L)
Red(L)
Yellow(V)
White(L)
Red(L)
Notice
Notice
Notice
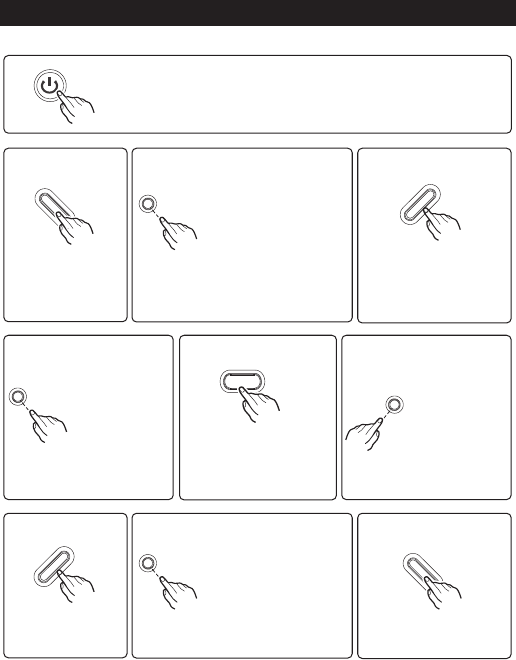
6 Specification about buttons
Power On/Off key
Connect AVcable
se
Use H
◆
◆
◆
→AVmode
U android OS
→android mode
DMI cable
→HDMI mode
Home key
◆ Retun to desktop
◆ Long press 2 seconds and operate On/Off function.
- 7 -
Up key Source switch key
When enter menu,each
time you press the cursor
will move upward
Under
◆
◆
;
Android mode,long
press and volume increase;
short press when play
HDMI,AV.
Enter key
◆ Sure the selected item,
when play video, images;
function menu come out
and them make operation.
◆ When enter menu,
each time you press
the cursor will move
leftward;
Left key Right key
Exit the current state and
back to the previous page.
◆
Menu key
◆ Go into menu function
Down key Return key
◆ When enter menu,each
time you press the cursor
will move downward
◆ Under
;
Android mode, long
press and volume decrease;
short press when play HDMI,
AV.
◆ When enter menu,
each time you press
the cursor will move
rightward;
◆
each time
you press the cursor
will move rightward.
When browsing the
website,
◆ When browsing the
website, each time
you press the cursor
will move rightward.
- 8 -
7 Desktop and status bar
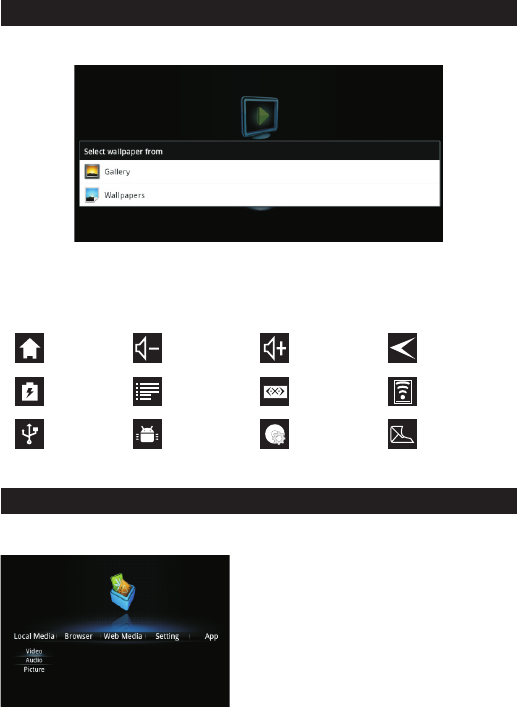
7 1. Wallpaper
7.2 Status Bar
◆ Long press the left key of mouse in desktop status or click the “menu key” to set wallpaper
◆ Click “wallpaper”, set wallpaper from system, click “picture”, set wallpaper from storage device.
;
Desktop icon Volume down icon Volume up icon Return icon
Battery status icon Function menu icon Wired network icon Wireless network icon
Connect USB icon APK installer icon USB storage device
icon
Newletters icon
@
8 Multimedia function
available to choose;
◆
◆ Choose any one of format, system will list all relevant
files stored in the built-in flash drive and USBstorage
device, you can play any one.
Click “local media ”, video, audio, picture are
8.1 Local media
- 9 -
9.2 Browsing webpage
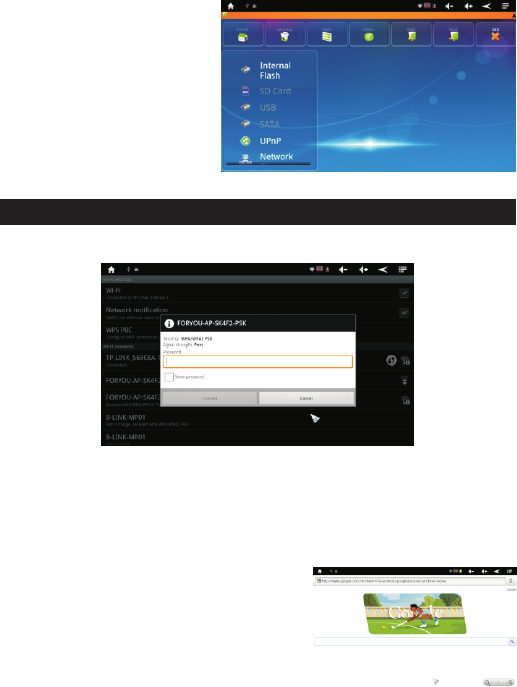
8.2 Explorer
operate all kinds of storage device.
Click one storage device to visit all files
stored in the storage device.
◆
◆
◆ Click the selected file to play, open; long
press the selected file to copy, delete,
move, paste, rename.
Click“app”->“explorer”, enter to
9 Network application
9.1 Connect WiFi
◆
◆
◆
◆
Click“setting”->“wireless&networks”, click “Wi-Fi” to open wireless network;
Click “Wi-Fi setting”->“network notification” to list all searched wireless router;
Click the wireless router, connect network according to guidance, if it is encrypted, input password;
Through the icon above to check connection status and signal strength.
◆
◆
◆
◆
Click“brower”,input website in the address bar to browse;
It is convenient that you can click the webpage to drag it.;
When drag the webpage,a toolbar pops up below, click the
icon to zoom in or zoom out the webpage;
When edit or send e-mail through the browser, choose
plain txt to edit the main body.
10 Install, uninstall, run application
- 10 -
10.1 Install application
◆
◆
◆
Click“app”->“APKinstaller”,click “install”, browse contents and file, find APK need to install and enter
application program interface, click “install ”, it will install automatically;
Click “app”->“explorer”, browse contents and file,find the APK need to install and enter application
program interface, click “install ”, it will install automatically;
Users can install online in “play store” or download online by the built-in browser.
If install application that was not download from “play store“,please set "setting"->
"applications"->unknown sources ok.
Notice
10.2
◆
◆
Click “app”-> “APK installer”,click “manage”, find the application need to uninstall, click uninstall, the
app will be removed.
Click “setting”-> “applications”, click “manage application”, find the app need to be uninstalled, click
uninstall, the app will be removed.
10.3 Run application
◆
◆
Installation completed, prompt “open” or “done”, click “open” will run the app;
Click “app”,find app needed, and click to run it.
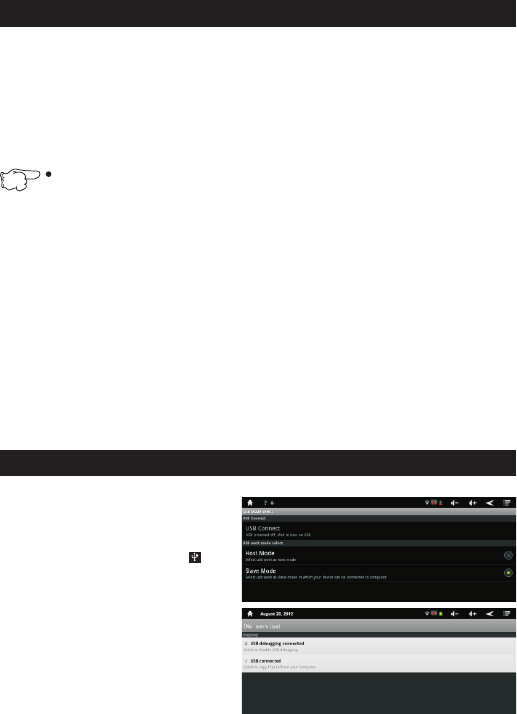
11 OTG
◆
◆
◆
◆
◆
Use USB cable, connect Mini USB,
Click “setting”-“USB”-“USB mode”-“
When it is connected, status bar show ,click
to pull down the status, and copy file to the
computer or copy file to the storage device.
Go into it and click “open the USB storage
device”.
When the computer detect “ROCKCHIPS”, you
can operate built-in flash.
and the
other end to the computer USB port.
slave
mode”.
Uninstall application
- 11 -
12 E-mail
◆
◆
◆
Click “app”-> “e-mail”, set e-mail account, modify the port number “587” to “25”,account setting is done.
After set up account, click “app”->“e-mail”, go into inbox, click , then can write e-mail and set account.
E-mail received, click to enter, then can reply, forward, open enclosure.
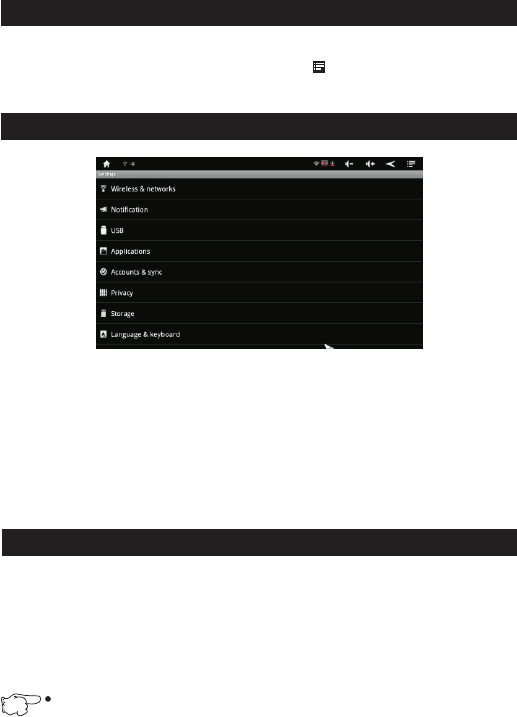
13 System settings
◆
◆
Click “setting”, go into system setup;
“Setting” includes:
● Wireless and networks
● USB
● Applications
● Accounts and sync
● Factory data reset
● Language and keyboard
● Date and time
● Check memory and flash capacity
● Check the kernel version and model number
14 Projector battery charge
Battery was built in, so can't unload that. Please use AC adapter to charge.
Pico Projector built in high capacity lithium battery. When the battery power is too low, please connect to
adaptor for charging. At the same time, it still can watch projection. It is about 4hours for charge full battery.
It can charge about 500times. After 500times, battery effect will down. The maximum endurance time is more
than 60minutes.
Pico Projector is able to expand customized external battery, and it is available to supply power for the host if
it connects to the host. When the battery power is too low, please connect the external battery DC in port to
adaptor for charging, and the LED indicating charging status. Other performance is same to the built-in
battery.
Notice

- 12 -
15 Trouble shooting
Pico projector
can't be turned on
Symptoms Reasons Solution
Images are
not clear
NO images
The whole
machine not work
No power
Low battery
The lens is not focused correctly
The screen is not aligned properly
Operate USB Flash Drive/smart
mobilephone micro-SD card, the
methods of operation are not correct
The input signal device is not connected
with the projector correctly
The input signal isn't selected
correctly.
The system crashes
Ensure the AC power adapter is properly connected
Charge for battery
Adjust Pico projector position(0.4-3.2M,it is suitable)
Please read specification the 7th,8th point,
and find the right connect way.
Please read specification the multimedia function part
and find the right connect way.
Check the connect interface again.
By pico projector or remote control source
button, and then choose the right signal input
source.
With a pen or other sharp objects touch
the bottom of the reset hold to restart.
Cannot get online Wi-Fi is not connected/no signal/weak
signal
Set Wi-Fi according to user manual/move to anywhere
has strong signal
Cannot open the
office files or
videos
Need install support application by user
User can download apps from Android market
127075004652