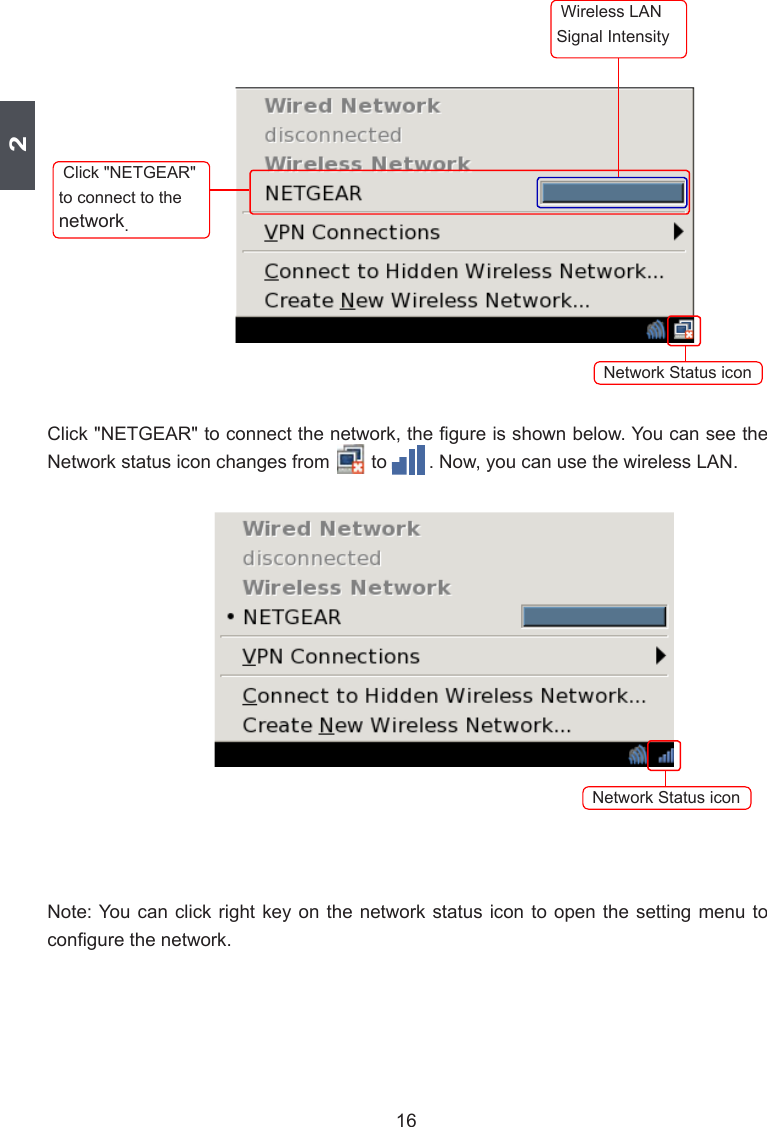
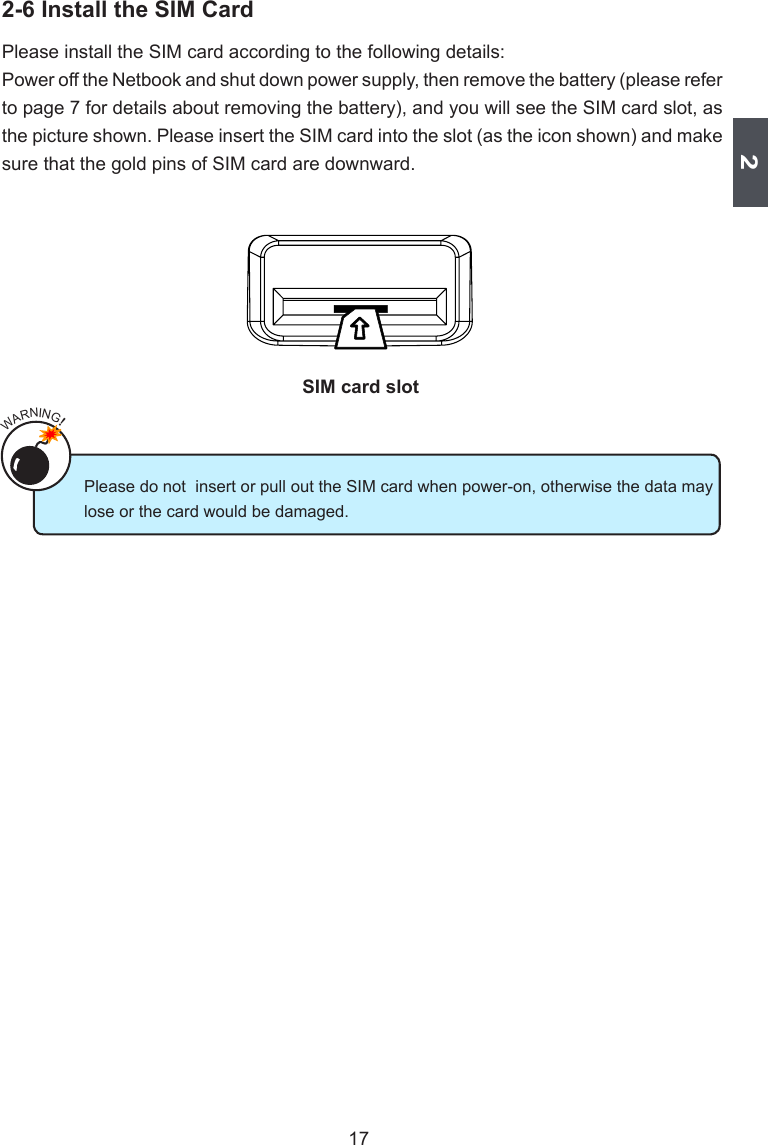
FOXCONN NOTEBOOKNS Notebook User Manual

FOXCONN INTERNATIONAL INC Notebook

user manual

 Netbook User’s Manual   NS20,NS24
Trademark:All trademarks are the property of their respective owners.Version:User’s Manual V1.0 for Netbook.P/N: 3A2220Y00-000-GSymbol description:Caution : refers to important information that can help you to use Netbook   better, and tells you how to avoid problems. Warning : indicating a potential risk of hardware damage or physical injury       may exist.                  WEEE: The use of this symbol indicates that this product may not be treated as household waste. By ensuring this product is disposed of correctly, you will help prevent potential negative consequences for the environment and human health, which could other-wise be caused by inappropriate waste handling of this product. For more detailed household waste disposal service or the shop where you purchased this product.CAUTION!© All rights reserved.All trade names are registered trademarks of respective manufacturers listed.WARNING!
The following safety precautions will increase the life of the netbook. Please follow all precautions and instructions. Except as described in the manual,  casing has been damaged. gas leak.   discomfort or injury from heat exposure. items that may scratch or enter the netbook. between 0oC(32oF) and 40oC(104oF).  、rains、moisture or strong magnetic  will reduce air circulation such as a carrying bag. disposal of electronic products. -ened with a solution of nonabrasive detergent and a few drops of warm water and remove any extra moisture with a dry cloth.CAUTION!    Please carefully read the following information about battery :              batteries according to the instructions. possible special disposal instructions.CAUTION!
TABLE OF CONTENTSChapter 1 Introduction to Your Netbook  External Appearance ................................................................................2  Setting Up Your Computer........................................................................6  Using the Touchpad ................................................................................10Chapter 2 Using Your Netbook  Overview ................................................................................................12  Special Function Keys ............................................................................14  Using Web CameraUsing Web Camera ................................................................................15  ....................................................................15  Using Wireless LAN ...............................................................................15  Install the SIM CardInstall the SIM Card  ...............................................................................17Chapter 3 Install Windows XP in Netbook  Install a new Windows XP system ..........................................................19  Install drivers in new Windows XP .........................................................21    Appendix  ......................................................................22
The Netbook is a compact and easy to use portable computer. It is equipped with an intuitive graphical interface and full wireless connectivity so you can use the Netbook and access the Internet at any time and in any place. This chapter includes the following information:  
121-1 External AppearanceThe Netbook is a compact and easy to use portable computer. It is equipped with an intuitive graphical interface and full wireless connectivity so you can use the Netbook and access the Internet at any time and in any place. Provided below is an introduction to each product function.1. Top ViewYour Netbook keyboard may vary depending on the country/region of purchase. CAUTION!123456897
132. Rear ViewNo.  Purpose 1 2 Netbook's screen3 Power Button Button for turning the computer's power on/off4 Keyboard Input device used for controlling the Netbook's various functions5 Touchpad Works the same way as a mouse and is used for controlling the computer cursor6 Works the same way as the right mouse button7 Touchpad Lock Button Press the button to lock or unlock the touchpad8 Left Touchpad Button Works the same way as the left mouse button9 Computer Status Light From left to right: Battery iconNum Lock iconCaps Lock iconWireless LAN on/off iconNo. Purpose 1 Battery 1
143. Bottom ViewWhen the computer is running or charging, heat is produced inside the Netbook and transferred to the back of the chassis by the heat dissipation system for cooling. The transformer may also produce a lot of heat during normal use as well. The Netbook and its transformer should therefore not be placed in the lap or on any other body part for prolonged periods during use. Also avoid placing the Netbook on a soft surface (e.g. sofa) as it might block the heat vents and interfere with cooling. CAUTION!No.  Purpose 1 Battery Lock Slide inwards to lock the battery in place. Slide outwards to unlock battery. 2 Battery supply3 Battery Latch Push outwards to release battery for removal4 to exchange device5 Memory Cover The cover is to protect the memory from damage.23415
154. Left View1 2 3 4 5No.  Purpose 1 Connects to an external display2 Power Port Connects to the external power supply transformer3 Vent Netbook's cooling vent4 USB Port Connects to USB 2.0 device5 5. Right ViewNo.  Purpose 1 Headphone Connects to external headphone2 Microphone Connects to external microphone3 USB Port Connects to USB 2.0 device4 USB Port Connects to USB 2.0 device   5 Anti-Theft Lock Slot Connects to anti-theft lock6 Network Port 61 2 3 4 5
161-2 Setting Up Your Computer1. Installing/Removing the BatteryPlease install the battery before using the Netbook and connect the external power supply transformer. The Netbook can be powered by the battery  or the external transformer. the battery instead. Installing the BatteryStep 1: Turn the Netbook over and have the back of the battery facing upwards as well. Now push  the end of the battery with the metal contacts into the Netbook's battery slot evenly and slowly along the battery rails. Step 2: Push the end of the Netbook battery with the metal contacts completely into the battery slot. When there is a "click", this means the battery latch has engaged and the battery is now secured to the Netbook. Step 3: Push the Battery Lock inwards lightly to lock the battery in place. 1
1723123    data on the hard disk. CAUTION!Removing the BatteryStep 2: Turn the Netbook over and unlock the battery by pushing the Battery Lock outwards. the other hand to pull the battery out.
182. Connecting the Power SupplyStep 1: Insert the round end of the power supply transformer into the charging port on the left side of the Netbook. Step 2: Insert the other end of the power supply transformer into a power socket.The power connector for the power socket may vary depending on the local national standards. The appropriate connector will be bundled with your Netbook. Please always use the adapter when connecting the power supply. The connector shown here may not match the type included in the box and is provided for reference purposes only.  CAUTION!3. StartupStep 1: Open the screen of your Netbook.
19Step 2: Turn on the machine by pressing the Power Button.Power Button4. Emergency ShutdownWhen the Netbook cannot be shut down through normal means, please press and hold the Power Button until the Netbook powers off.
1101-3 Using the Touchpad1.  Introduction to the Touchpadand  generates  a  voltage  that  is  used  to  control  the  cursor's  movements  and  issue commands. to control the movement of the cursor on screen. Below the touchpad is two buttons. The left button is like the left mouse button and is used for selecting options or launching programs on screen. The right button works the same way as the right mouse button.2.  Single Tap/ Single Click to move the cursor to the window or button to select. Now tap the touchpad with your You can also press the left touchpad button for the same effect. 3.  Double Tap/ Double Clickthe action. This action is equivalent to pressing the left mouse button twice. You can also press the left touchpad button twice for the same effect. 4. DragNow hold down the left touchpad button with one hand and move the cursor to the desired perform the drag operation with one hand. TouchpadLeft Button Lock
This chapter introduces the following information for you:OverviewSpecial Function KeysUsing Web CameraUsing Wireless LANInstall the SIM Card
2122-1 Overview desktop.  With  its  dynamic  user  interface,  simple  desktop  style,  wealth  of  application software, clear system management and complete hardware support. FoxMC can easily             entertainment center, gaming console, educational instrument and mobile devices. Main Page  After turning on the Netbook, when you log in Netbook's pre-loaded FoxMC system, the home screen will appear:  Favorites                by this icon.Help  Click "?" to open the online help page. Please refer to the content of the page about detailed description of the system.Shutdown  Open the menu to choose the action to the system. When you click icon in theWhen you click        icon in the home screen, the shutdown menu will appear as below:Show the current system      date and timeShutdownThe nine modules provide various applications to meet the needs of your work, life and entertainment.FavoritesHelp
213  In the FoxMC system, you can click left key to enter the menu, and click right key or press “ESC“ key to exit the menu.  FoxMC  includes the  following modules:  Videos, Music,  Pictures,  Firefox, Ebooks, Applications, Weather, FileManager, Settings. Each module is explained simply below. (Note: For detailed description, please refer to the online help page. )Videos It allows you to manage your videos through it. It supports most of the formats of videos, such as .rmvb, .mov, .rm, .mp4 etc.Music  With this module, you can manage music according to your favorite. Pictures  It allows you to browse pictures through the menu. Firefox  Firefox is a web browser, click it to connect to internet and browse webs.Ebooks  With it, you can read ebook. It supports the following format: .zip, .fb2, .tcr, .pdb, .epub, .mobi etc.Applications  It includes the following parts: internet, work, play, setting, my favorite. It basically covers most applications used in your daily life.Weather  It  allows  you  to  select  the  location  which you want to display the weather. It canwhich  you  want to display the weather. It can  to  display  the weather.  It  can FileManager Settings              favorite, such as adjust the parameters for videos, music and pictures, change the skin of appearance, set the features of hardware and so on.features of hardware and so on.hardware and so on.Hibernate icon Suspend icon Show system information iconShutdown icon Open favorites iconEject/load drive icon
214Panel   The panel auto hides in the default status. When the mouse moves to the bottom of the home screen, the panel will appear as below.2-2  Special Function KeysFunction Keys Fn + F1 In sleep modeleep modeFn + F2 Switches to the external displayFn + F3 Audio on or offFn + F4 Fn + F5 Increase audio volumeFn + F6 Fn + F7 Increase the display brightnessFn + F8 Camera on or offFn + F9 Wireless LAN on or offFn + F10 3G on or offFn + F11 Bluetooth on or offFn + Insert "Number Lock" on or off "Scroll Lock" on or off(up arrow) Page up Page down Home (move the cursor to the beginning of the line) End (move the cursor to the end of the line)Network Status iconPower iconSCIM Input Method iconVolume icon
2152-3 Using web cameraClick "Applications"->"Play"->"Cheese" to open the web camera, you can take photo and record through the camera. 2-4 MMC/SD/MS Dummy Card2-5 Using Wireless LANYou can use wireless LAN with the Netbook. This part mainly introduces wireless LAN and its connection.I: Introduce wireless LAN1. Wireless LAN:Wireless networks use radio waves as information transmission medium to consist of wireless LAN (WLAN), the main difference lies in the wireless networks using wireless technology instead of string. 2. Wireless card and Access wireless network:Wireless card is a wireless terminal device which uses the wireless connection with the coverage of the wireless LAN. You can access wireless network, if there is a wireless router or the coverage of wireless AP around (Please refer to the wireless router's manual about  its connections and settings);Attach a device to the Netbook and enclose a card as mobile phone card inside when you go telecommunication business hall to handle wireless. After that you can surf the Net wirelessly. II: Connecting wireless LANPress "Fn + F9" to turn on the wireless LAN of the Netbook, the system will automatically search the available wireless network around. Then click icon to open the Network      icon to open the Network menu, the picture is shown as below:(Note: If password is required, enter the password of wireless LAN to realize wireless connection.)
216Network status icon changes from        to        . Now, you can use the wireless LAN. Note: You  can click right  key on  the network  status icon to  open the  setting menu  to to connect to the network.Wireless LANSignal IntensityNetwork Status iconNetwork Status icon
2172-6 Install the SIM CardPlease install the SIM card according to the following details:Power off the Netbook and shut down power supply, then remove the battery (please refer to page 7 for details about removing the battery), and you will see the SIM card slot, as the picture shown. Please insert the SIM card into the slot (as the icon shown) and make sure that the gold pins of SIM card are downward.Please do not  insert or pull out the SIM card when power-on, otherwise the data may lose or the card would be damaged.WANING!SIM card slot
This chapter introduces how to install Windows XP system for you, including following information:Install a new Windows XP systemInstall drivers in new Windows XP
319Install Windows XP in NetbookBy default, the Netbook has been installed FoxMC system for you. But if you do not like the operation system interface, you can install Windows XP by yourself. What kinds of hardware and software you need here :Before we continue :  cord to AC power.3-1 Install a new Windows XP system                     below:  Boot Settings                sequence from the  Quick Boot  [Enabled]    available devices . Quiet Boot  [Enabled]          A device enclosed in                 disabled in the     corresponding type          menu.   ]         ←→  Select Screen                  +-  Change Field           F1  General Help          F10  Save and Exit          ESC  Exitv02.61  (C)Copyright 1985-2006, American Megatrends, Inc.    Main   Advanced   Security   Boot   ExitBootBIOS SETUP UTILITY
3203. Press <Enter> to continue the installation and press <F8> to agree the Licensingress <F8> to agree the Licensing Agreement. Windows will display the partition of your system. First of all, you had    In this example, we 4. Press <Enter> to install Windows XP. The process will ask you to format hard disk, Windows XP Professional Setup Welcome to Setup.               Windows XP Professional Setup The following list shows the existing partitions andunpartitioned space on this computer.                     Unpartitioned space     8  MB       <There is no disk in this drive.>       <There is no disk in this drive.>C:Partition1      [NTFS]  49999 MB < 48568 MB free>
3213-2 Install drivers in new Windows XP1. After installing Windows XP, you have to install necessary drivers before using the seconds, the main menu will be displayed on your Netbook screen.               drivers left, or you can click each individual driver to install it manually.3. After all the drivers are installed, you need to restart your Netbook, then you can use it.
22AppendixRecovery of Linux systemI From DVD to recover system1 2 Select the way of InstallationInstall and make recovery partition", the system will be installed and a recovery partition will be made. Or select "Install system only", the system will be installed without recovery partition, so recover system from hard disk is impossible.3 Click "Next", the warning box is shown as below: Whatever you select "Install and make recovery partition" or "Install system only","Install and make recovery partition" or "Install system only",, the whole disk will both be formatted; So if you do not want to format the disk, please     .WANING!
23Appendix4  Installing system5  
24AppendixII From hard disk to recover system1  When you log in, according to the screen suggestion, press any key to enter Grub 2  Select "FoxMC  recovery" item and then press "Enter", the warning box is shown below:3 as shown below:
25Appendixis as shown below:below:
Federal Communications Commission Statement  This device complies with FCC Rules Part 15. Operation is subject to the following two conditions: •  This device may not cause harmful interference, and • This device must accept any interference received, including interference that may cause undesired operation. •  This equipment has been tested and found to comply with the limits for a class B digital device, pursuant to Part 15 of the Federal Communications Commission (FCC) rules. These limits are designed to provide reasonable protection against harmful interference in a residential installation. This equipment generates, uses, and can radiate radio frequency energy and, if not installed and used in accordance with the instructions, may cause harmful interference to radio communications. However, there is no guarantee that interference will not occur in a particular installation. If this equipment does cause harmful interference to radio or television reception, which can be determined by turning the equipment off and on, the user is encouraged to try to correct the interference by one or more of the following measures:  •  Reorient or relocate the receiving antenna. •  Increase the separation between the equipment and receiver. •  Connect the equipment into an outlet on a circuit different from that to which the receiver is connected. • Consult the dealer or an experienced radio/TV technician for help.  The use of a shielded-type power cord is required in order to meet FCC emission limits and to prevent interference to the nearby radio and television reception. It is essential that only the supplied power cord be used. Use only shielded cables to connect I/O devices to this equipment. You are cautioned that changes or modifications not expressly approved by the party responsible for compliance could void your authority to operate the equipment.  Note:  Any changes or modifications not expressly approved by the party responsible for compliance could void the user’s authority to operate this equipment. “The manufacture declares that this device is limited to Channels 1 through 11 in the 2.4GHz frequency by specified firmware controlled in the USA.”  RF exposure warning    This equipment complies with FCC radiation exposure limits set forth for an uncontrolled environment. The equipment must not be co-located or operating in conjunction with any other antenna or transmitter. The measured SAR levels evaluated are in compliance with the FCC RF exposure guidelines.   Max. SAR Measurement (1g) :0.00838W/kg

Navigation menu