FOXCONN QBOX270WBG QBOX-N270 User Manual QBOX N270 BT
FOXCONN INTERNATIONAL INC QBOX-N270 QBOX N270 BT
FOXCONN >
Contents
- 1. BT User manual Version 01
- 2. User manual Version 01
BT User manual Version 01

QBOX
User’s Manual

Trademark:
All trademarks are the property of their respective owners.
Version:
User’s Manual V1.0 for QBOX.
P/N: 3A221HM00-000-G
Symbol description:
Caution : refers to important information that can help you to use QBOX better,
and tells you how to avoid problems.
WEEE:
The use of this symbol indicates that this product may not be treated as household
waste. By ensuring this product is disposed of correctly, you will help prevent potential
negative consequences for the environment and human health, which could other-
wise be caused by inappropriate waste handling of this product. For more detailed
LQIRUPDWLRQDERXWUHF\FOLQJRIWKLVSURGXFWSOHDVHFRQWDFW\RXUORFDOFLW\RI¿FH\RXU
household waste disposal service or the shop where you purchased this product.
CAUTION
!
© All rights reserved.
All trade names are registered trademarks of respective manufacturers listed.
$OOLPDJHVDUHIRUUHIHUHQFHRQO\SOHDVHUHIHUWRWKHSK\VLFDOSURGXFWIRUVSHFL¿FIHDWXUHV

TABLE OF CONTENTS
Chapter 1 Introducing the QBOX
Top View...................................................................................................2
Left View...................................................................................................2
Right View ................................................................................................3
Bottom View .............................................................................................3
Chapter 2 Placing and connecting the QBOX
Placement of QBOX
On the Desk .........................................................................................5
Under the Display Base........................................................................5
On the Backside of Display ..................................................................6
Connection of QBOX
Connect the Monitor.............................................................................7
Connect the USB Devices....................................................................7
Connect the Network Cable .................................................................7
Connect the Power Cable ....................................................................8
Chapter 3 Using the QBOX
First Boot................................................................................................10
Desktop ..................................................................................................12
Chinese Input Method ............................................................................12
Computer................................................................................................13
My Documents .......................................................................................13
Recycling Bin..........................................................................................13
Chapter 4 Applications
Internet
Web Browsing ....................................................................................15
Files Transfer......................................................................................15
Instant Messaging ..............................................................................15
2I¿FH$SSOLFDWLRQV
)2;2I¿FH%DVH .................................................................................16
)2;2I¿FH&DOF ..................................................................................16
)2;2I¿FH'UDZ ................................................................................ 17
)2;2I¿FH,PSUHVV............................................................................ 17
)2;2I¿FH0DWK..................................................................................17
)2;2I¿FH:ULWHU ...............................................................................18
FreeMind ............................................................................................18
Education and Learning
StarDict...............................................................................................19
Mtpaint................................................................................................19
Multimedia Applications
gThumb Picture Manager...................................................................20
CD Recording.....................................................................................20
Rhythmbox Music Player....................................................................21
Video Player.......................................................................................21
Other Applications
Smart Helper ......................................................................................22
Package Updater................................................................................22
Basic Parameter Settings...................................................................22
Appendix - Install Windows XP in QBOX ....................................... 23

Before using this product, please read the safety precaution below carefully,
and follow them strictly, this will increase the product’s life, and avoid some
danger.
Ŷ ZKHQWKH4%2;LVZRUNLQJSOHDVHPDNHVXUHWKHYHQWVDUHH[SHGLWHVRDV
to facilitate heat dissipation.
Ŷ 7KHWUDQVIRUPHUPD\DOVRSURGXFHDORWRIKHDWGXULQJQRUPDOXVHDVZHOO
please keep it away from your body to prevent discomfort or injury from heat
exposure.
Ŷ 3OHDVHXVHWKHSRZHUDGDSWHUWKDWFRPHVZLWKWKHSURGXFW¶VSDFNDJH
Ŷ %HIRUHXVLQJLWSOHDVHPDNHVXUHDOOWKHSHULSKHUDOLVFRQQHFWHGYDOLGO\
Ŷ 7KLVSURGXFWVKRXOGRQO\EHXVHGLQHQYLURQPHQWVZLWKDPELHQWWHPSHUD-
tures between 5ƕC and 40ƕC.
Ŷ 7RUHGXFHWKHULVNRI¿UHXVHRQO\1R$:*RUODUJHU8//LVWHGRU&6$
&HUWL¿HG7HOHFRPPXQLFDWLRQ/LQH&RUG
Ŷ $OZD\VVKXWGRZQWKHFRPSXWHUEHIRUHLQVWDOOLQJRUXQLQVWDOOLQJWKHSHULSK-
eral that do not support hot plug.
Ŷ 'RQRWH[SRVHWRRUXVHQHDUOLTXLGVRUPRLVWXUH
Ŷ 'RQRWXVHWKHPRGHPGXULQJWKHWKXQGHU
Ŷ 'RQRWXVHWKHPRGHPGXULQJWKHJDVOHDN
Ŷ ,I\RX¿QGWKHSRZHUFRUGLVWDWW\SOHDVHVKXWGRZQWKHSRZHUDWRQFHDQG
connect with your vendor soon.
Ŷ $OZD\VGLVFRQQHFWDOOWHOHSKRQHOLQHVIURPWKHZDOORXWOHWEHIRUHVHUYLFLQJRU
disassembling this equipment.
CAUTION
!
Safety Precaution:

The QBOX is a compact and easy to use desktop. It is equipped
with an intuitive graphical interface and full wireless connectivity so
you can use the QBOX and access the Internet at any time.
This chapter includes the following information:
Ŷ7RS9LHZ
Ŷ /HIW9LHZ
Ŷ 5LJKW9LHZ
Ŷ %RWWRP9LHZ
1
2
The QBOX is a compact and easy to use desktop. It is equipped with an intuitive graphical interface
and full wireless connectivity so you can use the QBOX and access the Internet at any time. Provided
below is an introduction to each part function.
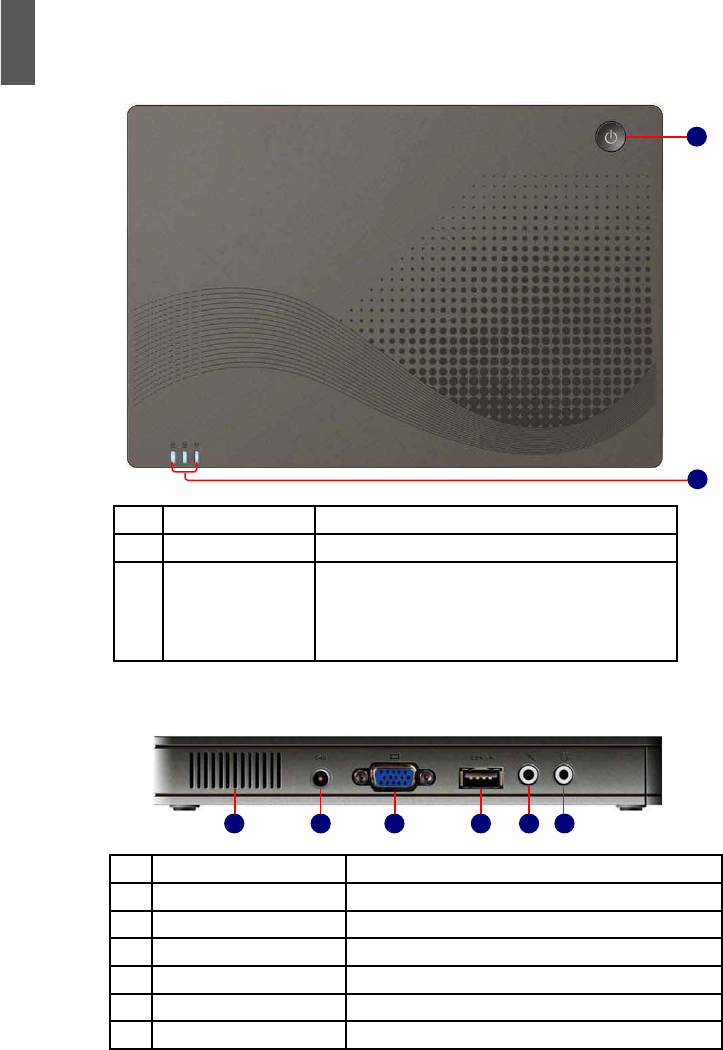
1-1 Top View
1-2 Left View
1
2
No. Purpose Description
1 Power Button Turning the QBOX's power on/off
2 Computer Status
Indicator LED
From left to right:
Num Lock Indicator
Caps Lock Indicator
Wireless Network Indicator
2
1 3 4 5 6
No. Purpose Description
1 Vent QBOX's cooling vent
2 Power Port Connects to the power supply transformer
3 Display Port Connects to display
4 USB Port Connects to USB 2.0 device
5 Microphone Connects to microphone
6 Headphone Connects to headphone or sound box
1
3
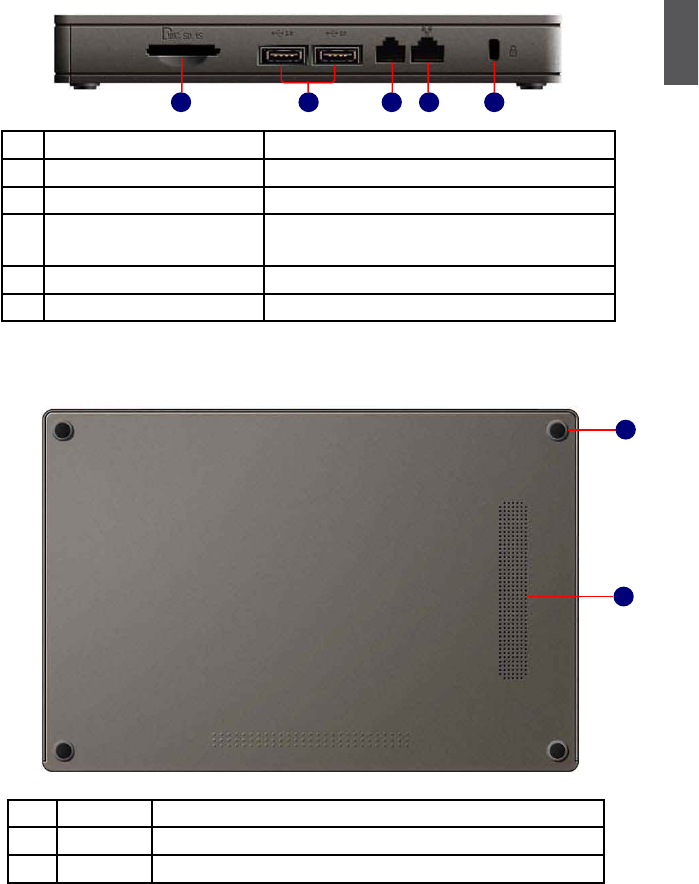
1-3 Right View
1-4 Bottom View
No. Purpose Description
1 Base tray Prop and protect QBOX when it is placed on the desk
2 Vent QBOX's cooling vent
1
2
2
1 4 53
No. Purpose Description
1 Multi-Function Card Reader Supports MMC/SD/MS memory card
2 USB Port Connects to USB 2.0 device
3 Modem Port Connects to telephone line. Used for dial-up
Internet access via modem
4 Network Port Standard RJ-45 network port
5 Anti-Theft Lock Slot Connects to anti-theft lock

In this chapter, the placement and the connection of some neces-
sary peripheral will be introduced.
This chapter includes the following information:
Ŷ3ODFHPHQWRI4%2;
Ŷ &RQQHFWLRQRI4%2;
2
5
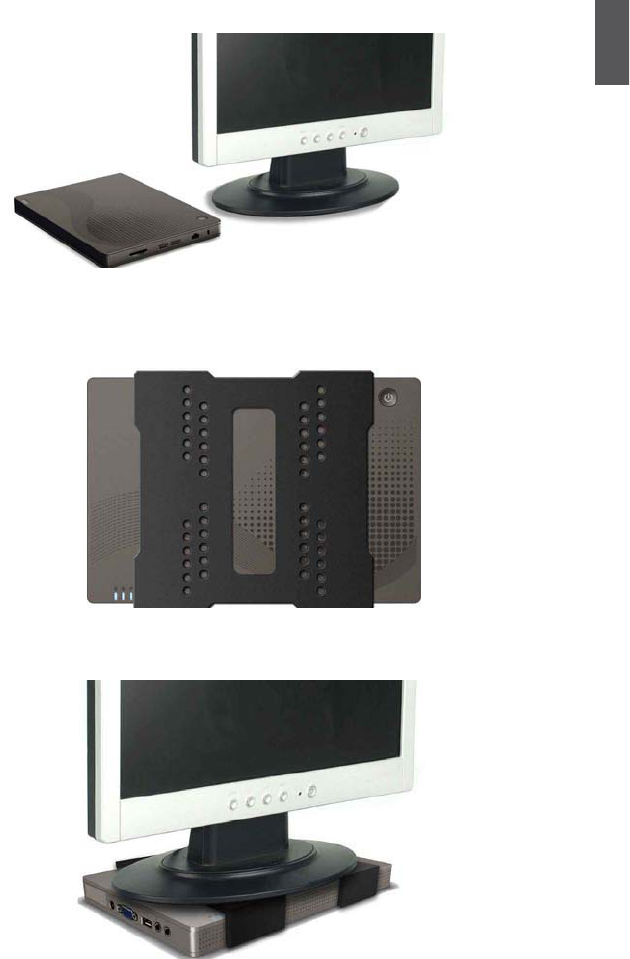
2-1 Placement of QBOX
1. On the Desk
If there is enough space of your desk, you can simply put your QBOX on the tabletop as shown
below, the top side is upturned.
2. Under the display
If you want to save the space of your desk, this way can be used.
1. As shown below, put the QBOX into the bracket.
2. Keep the top side upturned, place the QBOX with bracket under the Liquid Crystal Display.
2
6
2. Keep the power button at the bottom, then put the QBOX into the bracket carefully.
To install the bracket, your display must accord with VESA75/VESA100 standard.
CAUTION
!
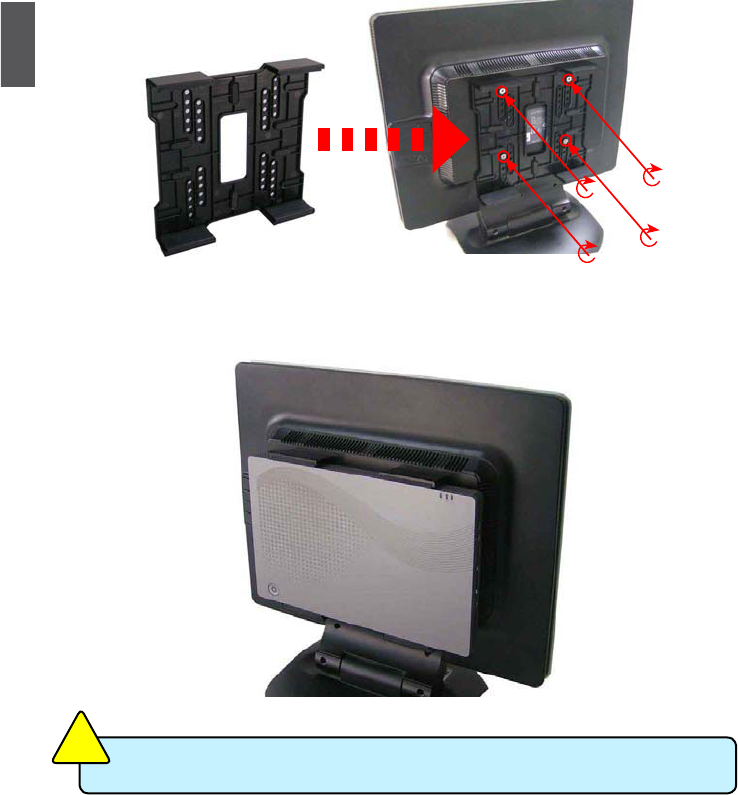
3. On the Backside of Display
This is a perfect way for good looking and space-saving.
1. Use four screws to fasten the bracket onto the display backside.
2
7
2-2 Connection of QBOX
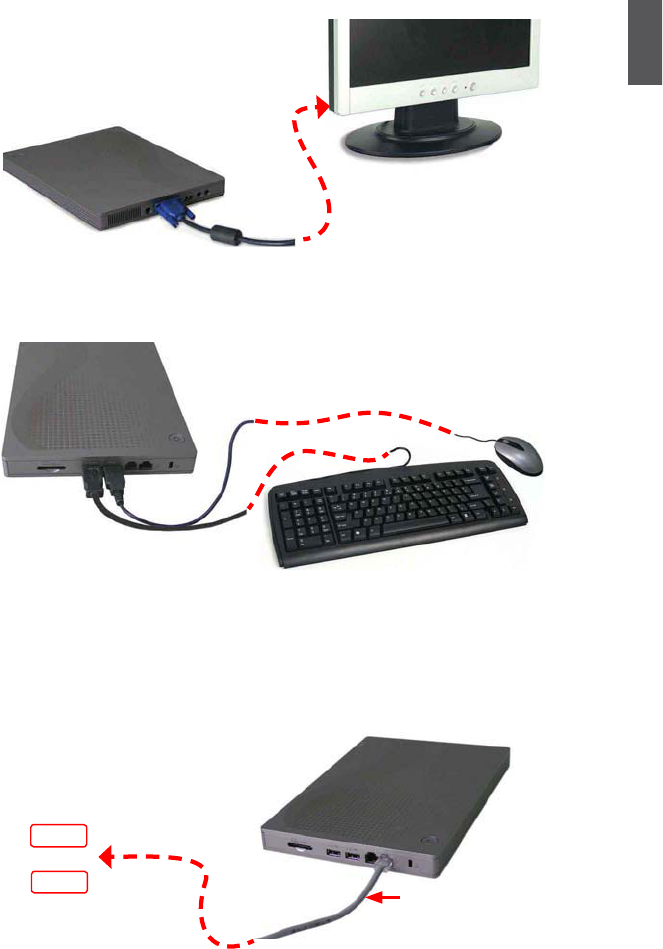
1. Connect the Monitor
Connect the VGA cable, with VGA connectors on each end, to the VGA port on the QBOX, and
the other end to a monitor.
2. Connect the USB Devices
Connect USB devices to the USB port on the QBOX, for example, Mouse and Keyboard.
3. Connect the Network Cable
If you want to obtain network access by using the built-in Ethernet controller, there are two ways
for choosing.
1. Use the RJ-45 LAN port. Connect the RJ-45 cable, with RJ-45 connectors at each end, to the
RJ-45 port on the QBOX and the other end to the hub or switch.
or
Hub
Switch
RJ-45 Cable

2
8
2. Use the RJ-11 port. Connect the RJ-11 cable, with RJ-11 connectors at each end, to the RJ-11
port on the QBOX and the other end to the modem.
4. Connect the Power Cable
&RQQHFWWKHDGDSWRUDQGSRZHUFDEOHWKDWFRPHZLWKWKHSDFNDJH¿UVWWKHQFRQQHFWWKHSOXJ
DQGWKHQFRQQHFWWKHDGDSWHUWRWKHSRZHUSRUWRQWKH4%2;1RZ\RXFDQSUHVVWKH
power button to start.
Ԩၗ
Ќᆶ
1
2
3
RJ-11 Cable
Modem

:KHQ\RXDUHXVLQJWKH4%2;IRUWKH¿UVWWLPHXSRQVWDUWXS
the computer will automatically launch "First Boot". This chapter
will guide you through the setup and registration process, and
introduces the QBOX Windows desktop to you.
This chapter includes the following information :
ŶFirst Boot
ŶDesktop
ŶChinese Input Method
ŶComputer
ŶMy Documents
ŶRecycling Bin
3
10
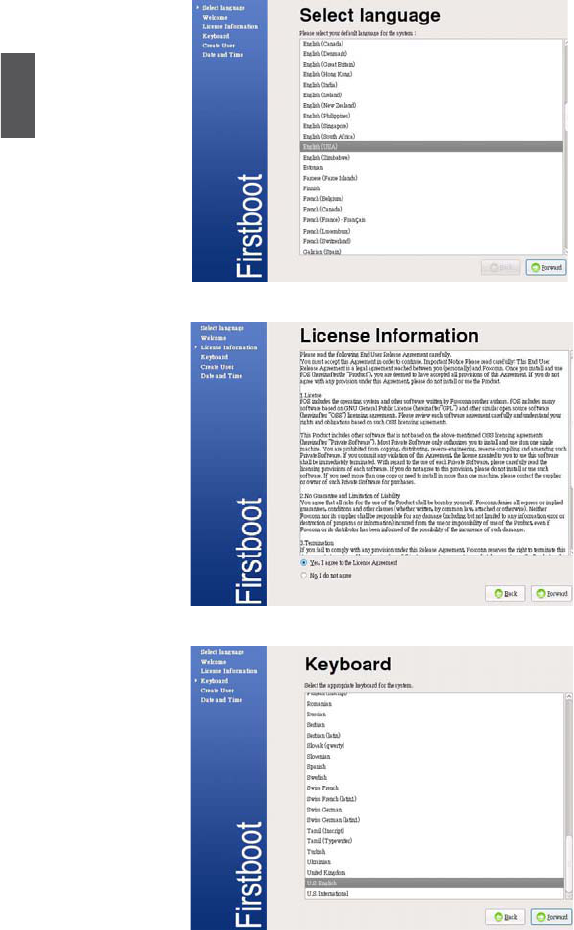
3-1 First Boot
:KHQ\RXDUHXVLQJWKH4%2;IRUWKH¿UVWWLPHXSRQVWDUWXSWKHFRPSXWHUZLOODXWRPDWLFDOO\ODXQFK
"First Boot". This will guide you through the setup and registration process. Please follow the steps
below to complete the initial setup process.
1. Set the appropriate Language then click on “Forward” to continue.
2. Scan the [Welcome] and press “Forward” to the [License Information], select “Yes” to continue.
3. Set up the keyboard then click on “Forward” to continue
3
11
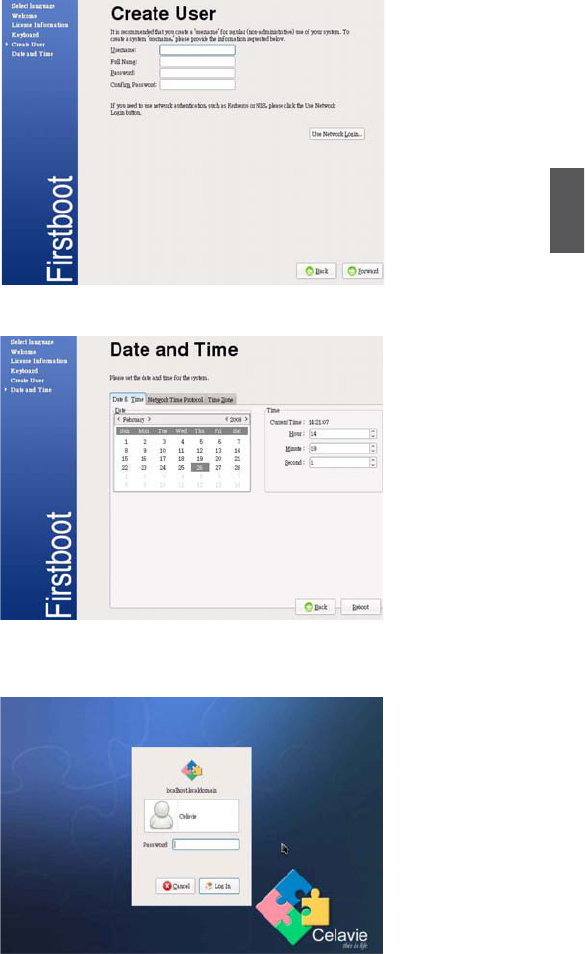
4. Create a user account then click on “Forward” when done.
5. Set the Date and Time then click on “Reboot” to complete setup and reboot the system.
6. The system will go to the login screen as below, select the user and input the password to
login.
3
12
3-3 Chinese Input Method
When the user needs to input Chinese to a document, e-mail or search engine, they must switch to
the Chinese input method. By default the system always uses the English input method. To switch
the Chinese input method, select the desired application then "repeatedly" press <Ctrl> + <Shift>
together to switch through different input methods. The current input method will be shown in the
lower right of the screen. When the input method shown below appears, the corresponding input
method is available for use.
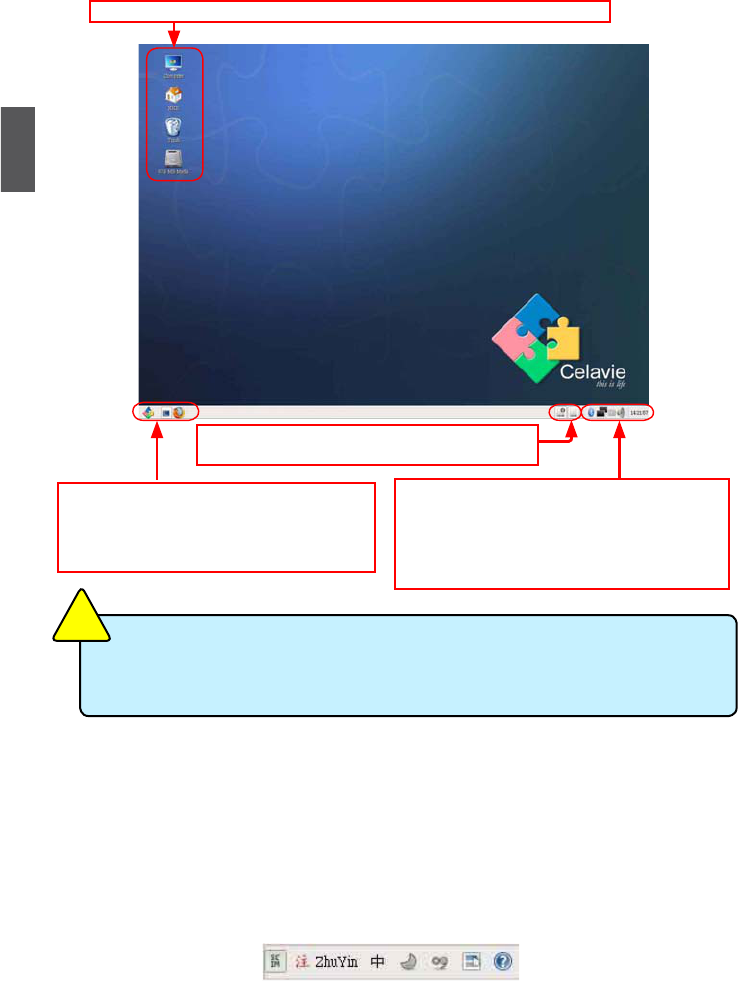
3-2 Desktop
After turning on the QBOX, when you log into QBOX's pre-loaded Celavie system, the following
screen will appear:
Puzzle Icon: Start Button, Open program menu
Screen Icon: Display the desktop/recover the
minimized windows
Earth Icon: Open Firefox browser
Bluetooth Icon: Shows bluetooth status
Network Icon: Shows network connection status
Keyboard Icon: Shows/switches the input method
Speaker Icon: Adjusts volume
Clock Icon: Shows/adjusts the system time
Hard disk Icon: Shows the hard disk connection
USB disk Icon: Shows the USB disk connection
Desktop Shortcuts – double-click to open the corresponding applications
If a CD driver or USB disk is connected in the system, there will be an icon on the
desktop and the system tray, for example, the 57.5 MB Media on the desktop is the
USB disk icon.
CAUTION
!
3
13
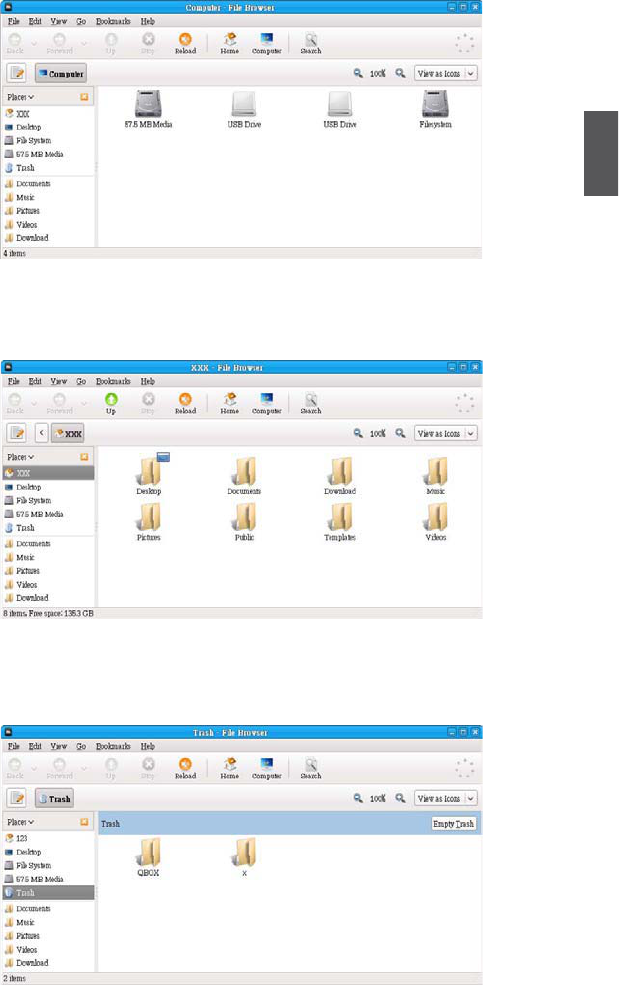
3-4 Computer
&OLFNRQWKH&RPSXWHUVKRUWFXWRQWKHGHVNWRSZLOOEULQJDOLVWRIDOOGHYLFHVRQWKH4%2;LQFOXGLQJ
+''86%GULYHU<RXFDQDFFHVVWKHVHGHYLFHVGLUHFWO\E\FOLFNLQJWKHPRQ
3-5 My Documents
The documents is by default used for storing the user's personal documents, videos or music. Dou-
ble-click the "XXX" shortcut on the desktop brings up the screen shown below.
3-6 Recycling Bin
'HOHWHG¿OHVDUHWHPSRUDULO\VWRUHGLQWKH5HF\FOLQJ%LQ,I\RXDFFLGHQWDOO\GHOHWHWKHZURQJ¿OH
\RXFDQUHVWRUHWKH¿OHIURPWKHVFUHHQVKRZQEHORZ

There are many useful applications are pre-loaded in the sys-
tem, this chapter describes some kinds of them to you.
This chapter includes the following information:
Ŷ,QWHUQHW
Ŷ2I¿FH$SSOLFDWLRQV
Ŷ(GXFDWLRQDQG/HDUQLQJ
Ŷ0XOWLPHGLD$SSOLFDWLRQV
Ŷ2WKHU$SSOLFDWLRQV
4
15
4-1 Internet
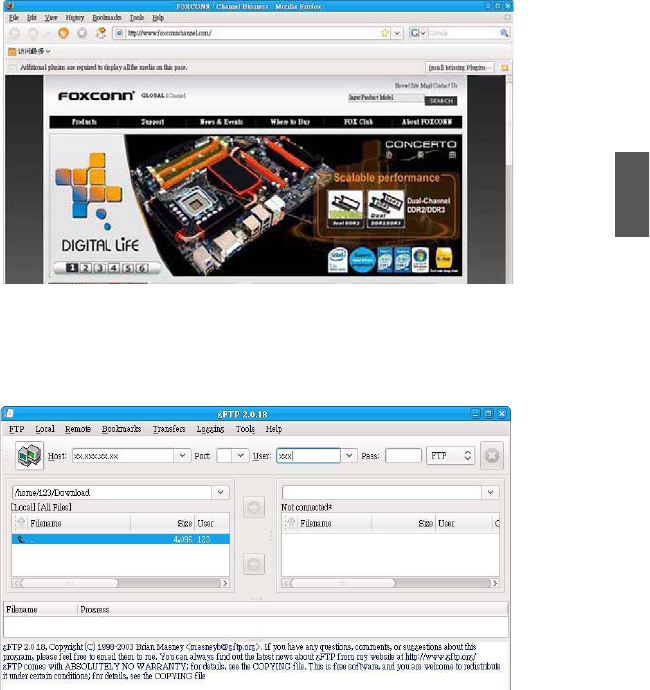
1. Web Browsing
Please click on the “Earth” icon in the desktop toolbar or “Start” -> “Internet” -> “Firefox Web Browser”
to open the web browser as shown below.
2. Files Transfer
Please click on “Start” -> “Internet” -> "gFTP" from the desktop toolbar to open the gFTP client as
VKRZQEHORZ³J)73´LVXVHGIRU¿OHVWUDQVIHU\RXFDQXSORDGRUGRZQORDG¿OHVWKURXJKPXOWLSOH
)LOH7UDQVIHU3URWRFRO)73)736+773HWFE\XVLQJLW
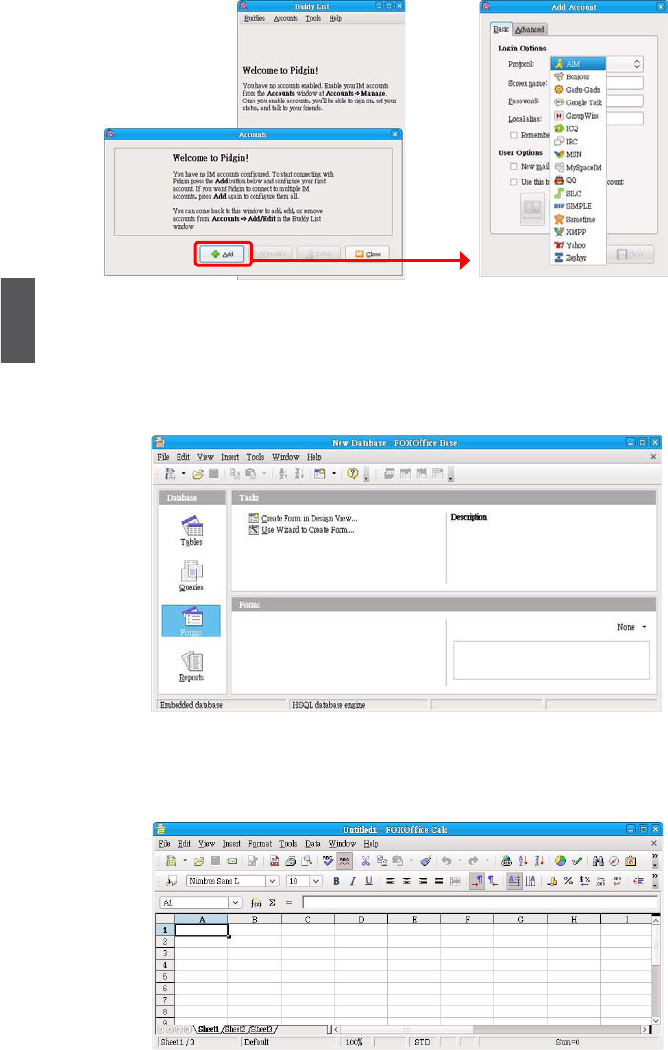
3. Instant Messaging
Please click on “Start” -> “Internet” -> "Internet Messenger" from the desktop toolbar to open the
online instant messaging client as shown.
3OHDVHFOLFNRQWKH³$GG´EXWWRQWRDGGDQ\W\SHRILQVWDQWPHVVDJLQJDFFRXQWHJ<DKRR0HV-
VHQJHU44061HWFDVOLVWHG
4
16
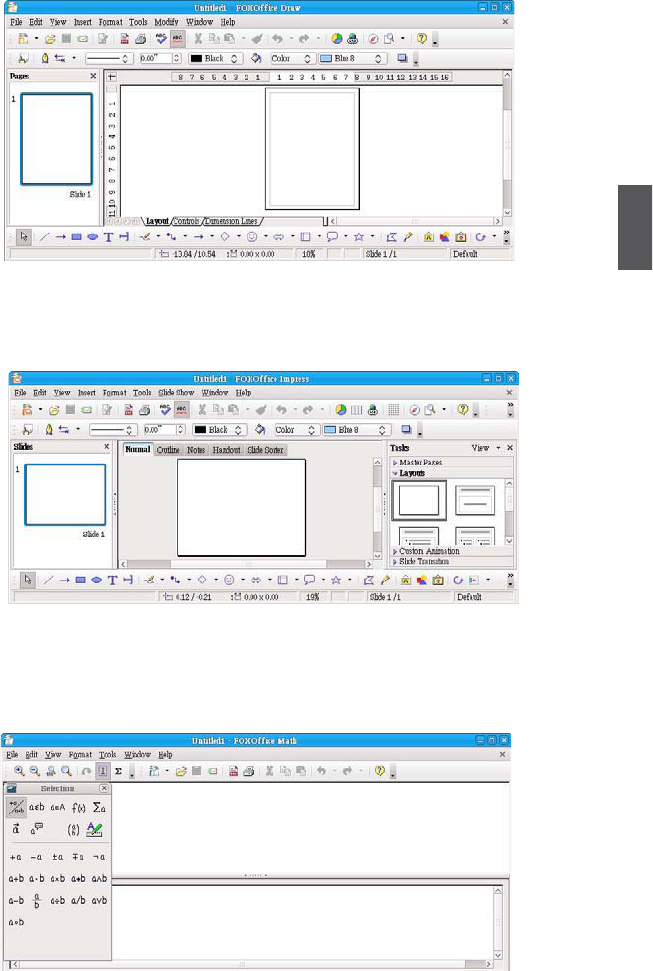
2I¿FH$SSOLFDWLRQV
)2;2I¿FH%DVH
)R[2I¿FH%DVHLVWKHRI¿FH DSSOLFDWLRQ XVHG IRUPDQDJLQJGDWDEDVHV3OHDVHFOLFN RQ 6WDUW!
³2I¿FH´!)2;2I¿FH%DVHIURPWKHGHVNWRSWRROEDUWRUXQWKHDSSOLFDWLRQ7KHSURJUDPLVDV
shown below.
)2;2I¿FH&DOF
)R[2I¿FH&DOFLVWKHRI¿FHDSSOLFDWLRQXVHGIRUVSUHDGVKHHWFDOFXODWLRQV3OHDVHFOLFNRQ³6WDUW´
!³2I¿FH´!)2;2I¿FH&DOFIURPWKHGHVNWRSWRROEDUWRUXQWKHDSSOLFDWLRQ7KHSURJUDPLVDV
shown below.
4
17
)2;2I¿FH'UDZ
)R[2I¿FH'UDZLVWKHRI¿FHDSSOLFDWLRQXVHGIRUFUHDWLQJJUDSKLFV3OHDVHFOLFNRQ6WDUW!³2I-
¿FH´!)2;2I¿FH'UDZIURPWKHGHVNWRSWRROEDUWRUXQWKHDSSOLFDWLRQ7KHSURJUDPLVDVVKRZQ
below.
)2;2I¿FH,PSUHVV
)R[2I¿FH,PSUHVVLVWKHRI¿FHDSSOLFDWLRQXVHGIRUFUHDWLQJSUHVHQWDWLRQV3OHDVHFOLFNRQ³6WDUW´
!³2I¿FH´!)2;2I¿FH,PSUHVVIURPWKHGHVNWRSWRROEDUWRUXQWKHDSSOLFDWLRQ7KHSURJUDPLV
as shown below.
)2;2I¿FH0DWK
)R[2I¿FH0DWKLVWKHRI¿FHDSSOLFDWLRQXVHGIRUGUDZLQJPDWKHPDWLFDOIRUPXODH3OHDVHFOLFNRQ
³6WDUW´!³2I¿FH´!)2;2I¿FH0DWKIURPWKHGHVNWRSWRROEDUWRUXQWKHDSSOLFDWLRQ7KHSURJUDP
is as shown below.
4
18
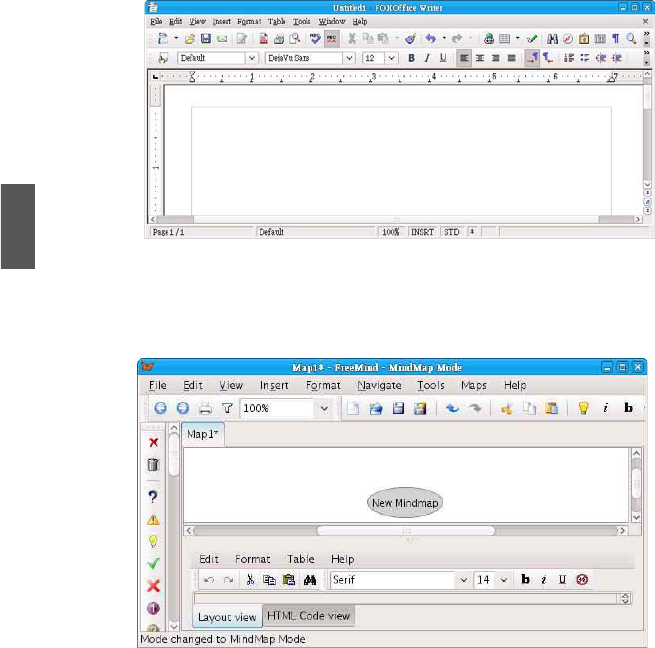
)2;2I¿FH:ULWHU
)R[2I¿FH:ULWHULVWKHRI¿FHDSSOLFDWLRQXVHGIRUZRUGSURFHVVLQJ3OHDVHFOLFNRQ³6WDUW´!³2I¿FH´
!)2;2I¿FH:ULWHUIURPWKHGHVNWRSWRROEDUWRUXQWKHDSSOLFDWLRQ7KHSURJUDPLVDVVKRZQ
below.
7. FreeMind
"FreeMind" is a visualization software that uses a tree diagram to record notes. The tree structure
DOORZVWKHXVHUWRTXLFNO\LQVHUWDUHFRUGRIDQ\HYHQWDWDQ\QRGH3OHDVHFOLFNRQ³6WDUW´!³2I¿FH´
-> “FreeMind” to run this application. The program is as shown below.
4
19
4-3 Education and Learning
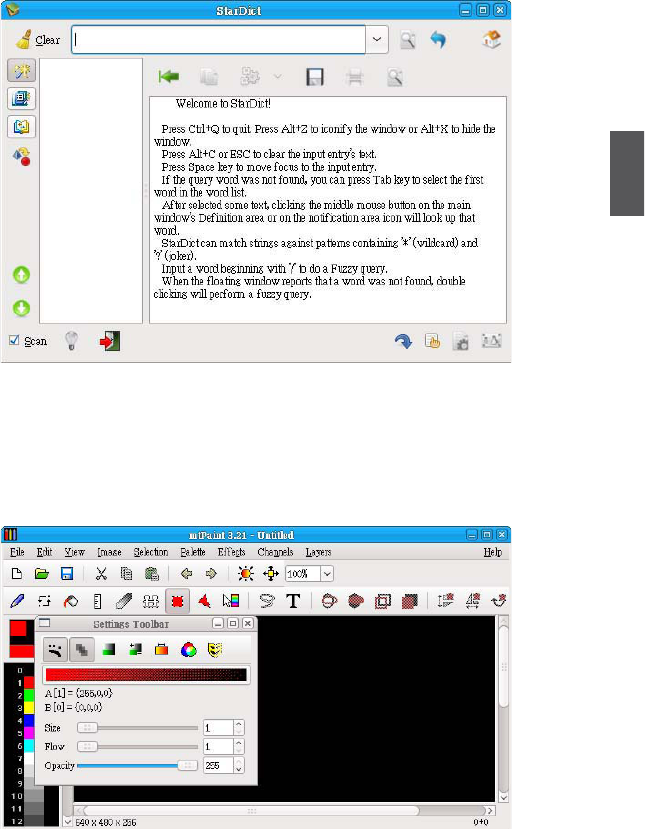
1. StarDict
"StarDict" is a translation program. Please click on “Start” -> “Accessories” -> "StarDict" from the
desktop toolbar to run this application. The program is as shown below.
2. Mtpaint
"Mtpaint" is graphics painting software similar to Windows Paint and is used for drawing or editing
simple graphics. Please click on “Start” -> "Graphics" -> "Mtpaint" from the desktop toolbar to run
this application. The program is as shown below.
4
20
4-4 Multimedia Applicatios
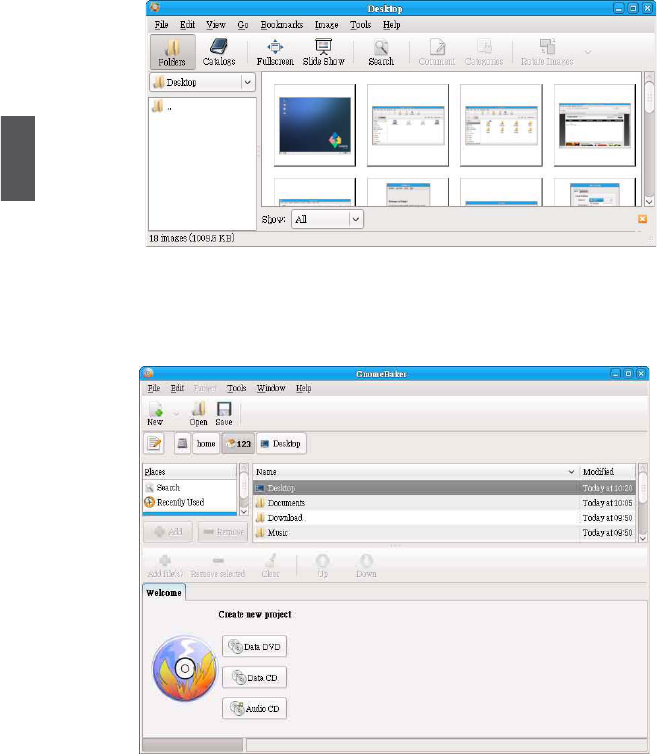
1. gThumb Picture Manager
"gThumb Picture Manager" is a picture management tool with several functions. To use, please
click on “Start” -> "Graphics" -> "gThumb Image Viewer" from the desktop toolbar. The program
is as shown below.
2. CD Recording
Celavie has full support for CD recorders. To use, please click on “Start” -> "Sound& Video" ->
"Gnome Baker CD/DVD Writer" from the desktop toolbar. The program is as shown below.
4
21
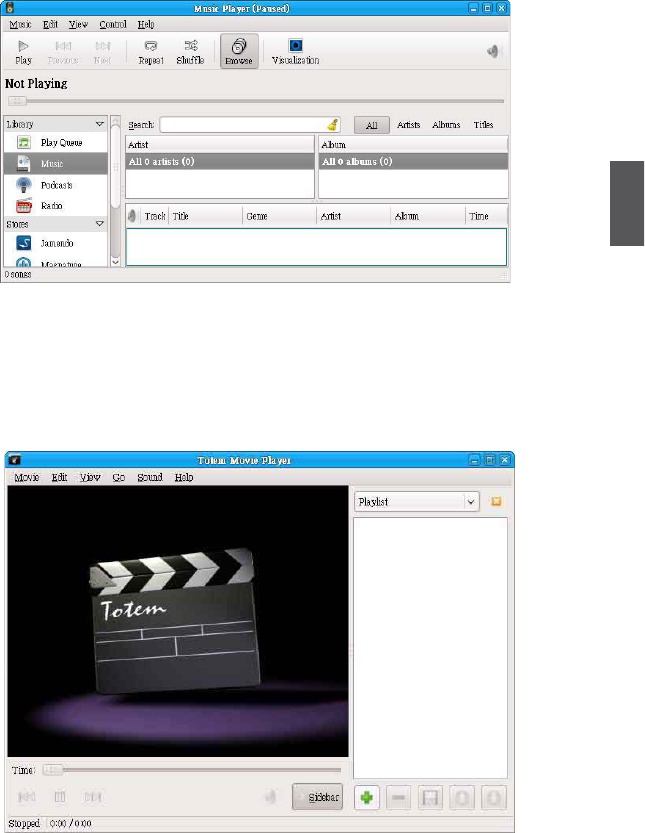
3. Rhythmbox Music Player
"Rythmbox" is a music management program that allows music to be organized into play lists and
can also stream radio broadcasts. To use, please click on “Start” -> "Sound& Video" -> “Rhythmbox
Music Player” from the desktop toolbar. The program is as shown below.
4. Video Player
,WLVTXLWHVLPSOHWRXVH4%2;IRUSOD\LQJYLGHRV6LPSO\ORDGWKHGLVFRU¿OHLQWRWKH4%2;WKHQ
double left click to play. To use, please click on “Start” -> "Sound& Video" -> "Movie Player" from
the desktop toolbar. The program is as shown below.
4
22
4-5 Other Applications
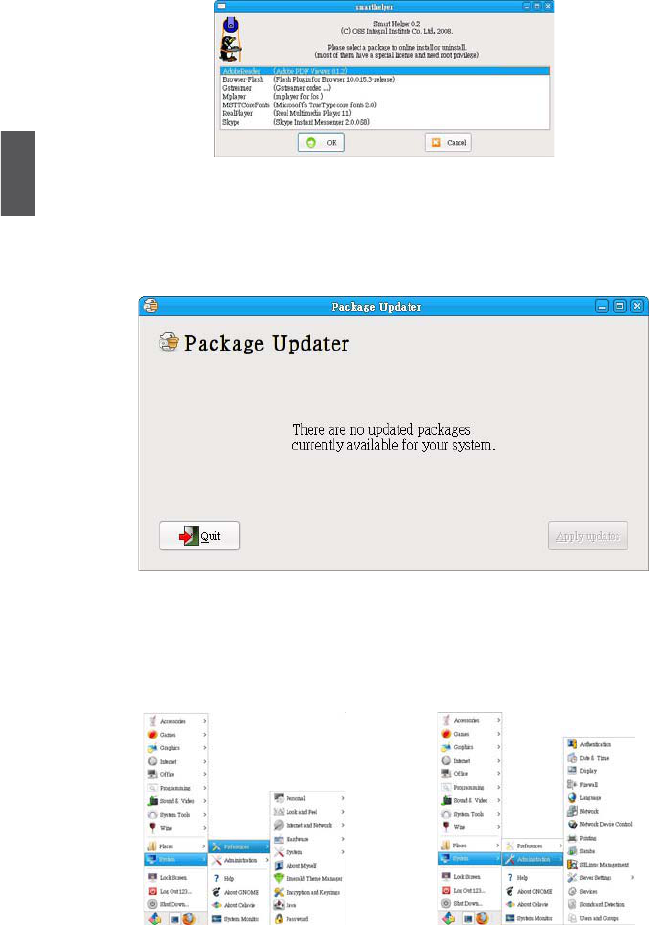
1. Smarthelper
"Smarthelper" helps the user install commercial applications and third-party add-ons on the QBOX.
To use, please click on “Start” -> “System Tools” -> "Smarthelper" from the desktop toolbar. The
program is as shown below.
2. Package Updater
"Package Updater" is used for updating all software currently installed on the QBOX. If a newer
version is available, it will be automatically downloaded and installed by Package Updater. To use,
please click “Start” -> “System Tools” -> "Software Updater" from the desktop toolbar. The program
is as shown below.
3. Basic Parameter Settings
Some basic parameter can be adjusted from the “Preferences” and “Administration” menu, for ex-
ample, the personal information, preferences, mouse and keyboard parameter, volume, date and
time, network connecting, language etc., click “Start”-> “System”, then select the items you want to
FRQ¿JXUHIURPWKH³SUHIHUHQFHV´RU³$GPLQLVWUDWLRQ´PHQX
23
Appendix
Install Windows XP in QBOX
By default, the QBOX has been installed Celavie Operating System for you. But if you
do not like the operation system interface, you can install Windows XP by yourself.
What kinds of hardware and software you need here :
1. USB CD-ROM drive.
2. QBOX driver CD.
3. Windows XP Install CD.
Before we continue :
Ŷ 6KXWGRZQ\RXUFRPSXWHU
Ŷ &RQQHFWWKH86%&'520GULYHWRDQ86%SRUWRI4%2;DQGFRQQHFWWKH
power cord to AC power.
Install a New Windows XP
1. Press <DEL> to enter BIOS Setup during POST.
2. Set the “1st Boot Device” to “USB CD-ROM” in "Boot", save changes and exit BIOS.
3. Insert the Windows XP Install CD into the USB CD-ROM drive.
Boot Settings 6SHFL¿HVWKHERRW
sequence from the
Quick Boot [Enabled] available devices.
Quiet Boot [Disabled]
A device enclosed in
Onboard LAN Boot ROM [Disabled] parenthesis has been
disabled in the
Boot Device Priority corresponding type
1st Boot Device [USB:Optiarc DVD RW] menu.
2nd Boot Device [HDD:PM-FUJITSU MHZ]
3rd Boot Device [USB:Generic- SD/MM]
4th Boot Device [Network]
ĸĺ Select Screen
1st Removable Drive [USB:Generic- SD/MM] ĹĻ 6HOHFW,WHP
2nd Removable Drive [USB:Generic- MS/MS] +- Change Field
F1 General Help
1st Hard Disk Drive [HDD:PM-FUJITSU MHZ] F7 Discard Changes
1st CD/DVD Drive [USB: Optiarc DVD RW] F10 Save and Exit
ESC Exit
Y&&RS\ULJKW$PHULFDQ0HJDWUHQGV,QF
Main Advanced Security Boot Exit
Boot
BIOS SETUP UTILITY

24
Appendix
4. The computer will reboot, and it will start installing Windows XP Operating System.
5. Press <ENTER> to continue the installation.
6. Press <F8> to agree the Licensing Agreement and continue.
7. Windows will display the partition of your system. Firstly, you had better to press [D]
to delete the partition, then you can press [C] to create partitions as many as you
wish, assign them C:, D: or E: logical drive names.
8. In this example, we will create a 50GB partition C: and leave the remaining space as
a partition D:. Press <Enter> to install Windows. The Windows XP install processes
ZLOODVN\RXWRIRUPDW\RXUKDUGGLVNWKHQFRS\¿OHVHWF)ROORZWKHLQVWDOODWLRQ
steps until the whole process is completed.
Windows XP Professional Setup
Welcome to Setup.
7KLVSRUWLRQRIWKH6HWXSSURJUDPSUHSDUHV0LFURVRIW5
:LQGRZV5;3WRUXQRQ\RXUFRPSXWHU
Ɣ7RVHWXS:LQGRZV;3QRZSUHVV(17(5
Ɣ7RUHSDLUD:LQGRZV;3LQVWDOODWLRQXVLQJ
Recovery Console, press R.
Ɣ7RTXLW6HWXSZLWKRXWLQVWDOOLQJ:LQGRZV;3SUHVV)
ENTER=Continue R=Repair F3=Quit
Windows XP Professional Setup
The following list shows the existing partitions and
unpartitioned space on this computer.
Use the UP ad DOWN ARROW keys to select an item in the list.
Ɣ7RVHWXS:LQGRZV;3RQWKHVHOHFWHGLWHPSUHVV(17(5
Ɣ7RFUHDWHDSDUWLWLRQLQWKHXQSDUWLWLRQHGVSDFHSUHVV&
Ɣ7RGHOHWHWKHVHOHFWHGSDUWLWLRQVSUHVV'
114471 MB Disk 0 at id 0 on bus 0 on atapi [MBR]
Unknown Disk
<There is no disk in this drive.>
Unknown Disk
<There is no disk in this drive.>
ENTER=Install C=Create Partition F3=Quit
Unpartitioned space 114471 MB

25
Appendix
Install drivers in new Windows XP
1. When Windows XP is completely installed, you have to install necessary drivers before
using the QBOX. Take out the Windows XP Install CD from the USB CD-ROM drive,
and insert the QBOX driver CD.
2. Waiting for a few seconds, the main menu will be displayed on your QBOX screen.
3. Use these options to install all the drivers for your system. You must click "Intel Chipset
'ULYHUWRLQVWDOOLW¿UVW$IWHUWKDW\RXFDQFOLFN2QH&OLFN6HWXSWRLQVWDOODOOWKHRWKHU
drivers left, or you can click on each individual driver to install it manually.
4. After all the drivers are installed, you need to restart your QBOX, then you can use
it.
Windows XP Professional Setup
The following list shows the existing partitions and
unpartitioned space on this computer.
Use the UP ad DOWN ARROW keys to select an item in the list.
Ɣ7RVHWXS:LQGRZV;3RQWKHVHOHFWHGLWHPSUHVV(17(5
Ɣ7RFUHDWHDSDUWLWLRQLQWKHXQSDUWLWLRQHGVSDFHSUHVV&
Ɣ7RGHOHWHWKHVHOHFWHGSDUWLWLRQVSUHVV'
114471 MB Disk 0 at id 0 on bus 0 on atapi [MBR]
D: Partition2 [Unknown] 64464 MB < 64463 MB free>
Unpartitioned space 8 MB
Unknown Disk
<There is no disk in this drive.>
Unknown Disk
<There is no disk in this drive.>
ENTER=Install C=Create Partition F3=Quit
C:Partition1 [NTFS] 49999 MB < 48568 MB free>

Statement:
This device complies with part 15 of the FCC Rules. Operation is subject to the following two
FRQGLWLRQV7KLVGHYLFHPD\QRWFDXVHKDUPIXOLQWHUIHUHQFHDQGWKLVGHYLFHPXVW
accept any interference received, including interference that may cause undesiredoperation.
Warning:
FEDERAL COMMUNICATIONS COMMISSION INTERFERENCE STATEMENT
This equipment has been tested and found to comply with the limits for a Class B digital
device, pursuant to part 15 of the FCC Rules. These limits are designed to provide reasonable
protection against harmful interference in a residential installation. This equipment generates,
uses and can radiate radio frequency energy and, if not installed and used in accordance with
the instructions, may cause harmful interference to radio communications. However, there is
no guarantee that interference will not occur in a particular installation. If this equipment does
cause harmful interference to radio or television reception, which can be determined by turning
the equipment off and on, the user is encouraged to try to correct the interference by one or
more of the following measures:
ƒ5HRULHQWRUUHORFDWHWKHUHFHLYLQJDQWHQQD
ƒ,QFUHDVHWKHVHSDUDWLRQEHWZHHQWKHHTXLSPHQWDQGUHFHLYHU
ƒ&RQQHFWWKHHTXLSPHQWLQWRDQRXWOHWRQDFLUFXLWGLIIHUHQWIURPWKDWWRZKLFKWKHUHFHLYHU
is connected.
ƒ&RQVXOWWKHGHDOHURUDQH[SHULHQFHGUDGLR79WHFKQLFLDQIRUKHOS
Caution:
$Q\FKDQJHVRUPRGL¿FDWLRQVQRWH[SUHVVO\DSSURYHGE\WKHJUDQWHHRIWKLVGHYLFHFRXOG
void the user’s authority to operate the equipment.
RF exposure warning:
This equipment must be installed and operated in accordance with provided instructions and
must not be co-located or operating in conjunction with any other antenna or transmitter.
End-users and installers must be provide with antenna installation instructions and transmitter
operating conditions for satisfying RF exposure compliance.
This equipment must be installed and operated in accordance with provided instructions and
the antenna(s) used for this transmitter must be installed to provide a separation distance of
at least 20 conform all persons and must not be co-located or operating in conjunction with
any other antenna or transmitter. End-users and installers must be provide with antenna
installation instructions and transmitter operating conditions for satisfying RF exposure
compliance.