Contents
- 1. User manual1
- 2. user manual2
- 3. user manual1
user manual2
1
7
2
3
1
2
3
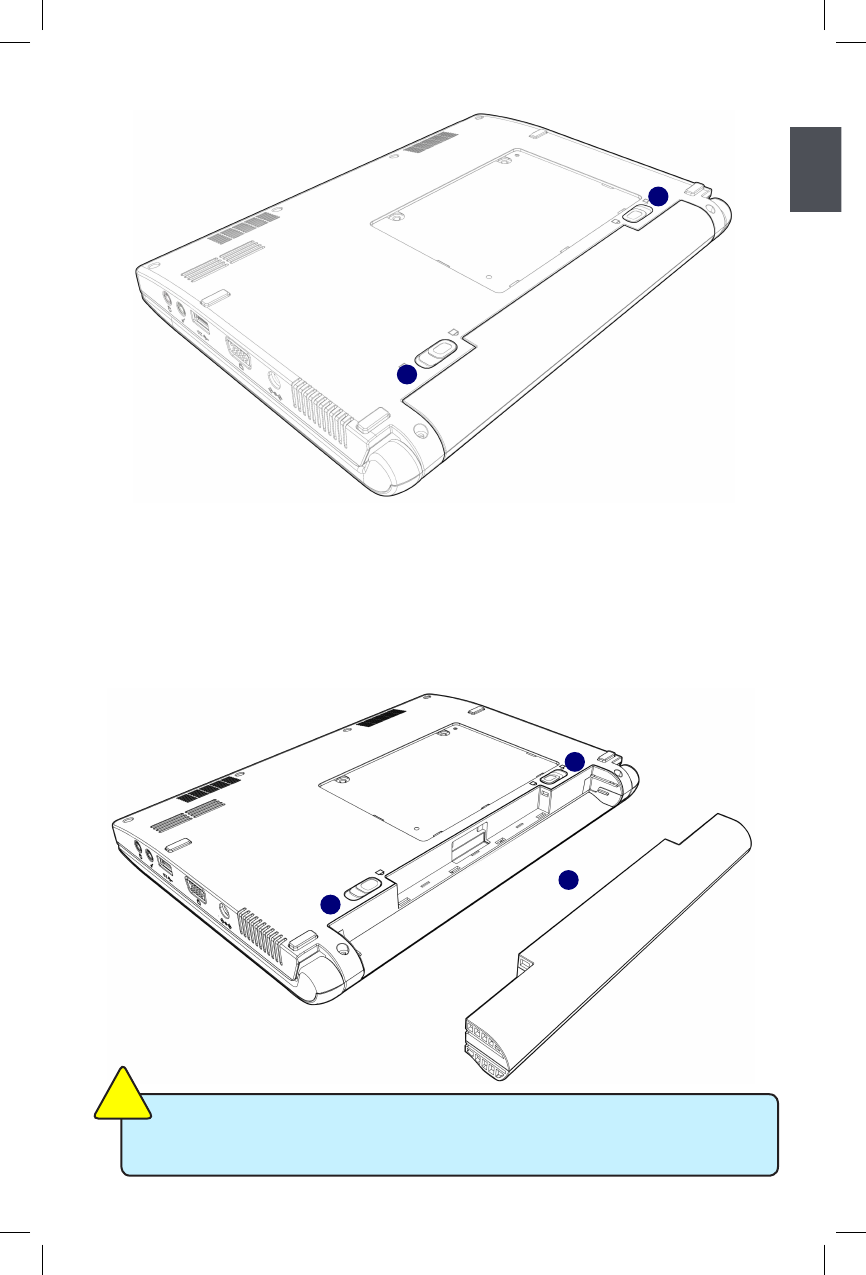
Do not remove the battery while the Netbook is still running. This may damage the
data on the hard disk.
CAUTION
!
Removing the Battery
Step 1: Shut down the Netbook. Disconnect all cables and devices.
Step 2: Turn the Netbook over and unlock the battery by pushing the Battery Lock
outwards.
Step 3: Push the Battery Latch outwards and hold it in place with your nger. Now use
the other hand to pull the battery out.
1
8
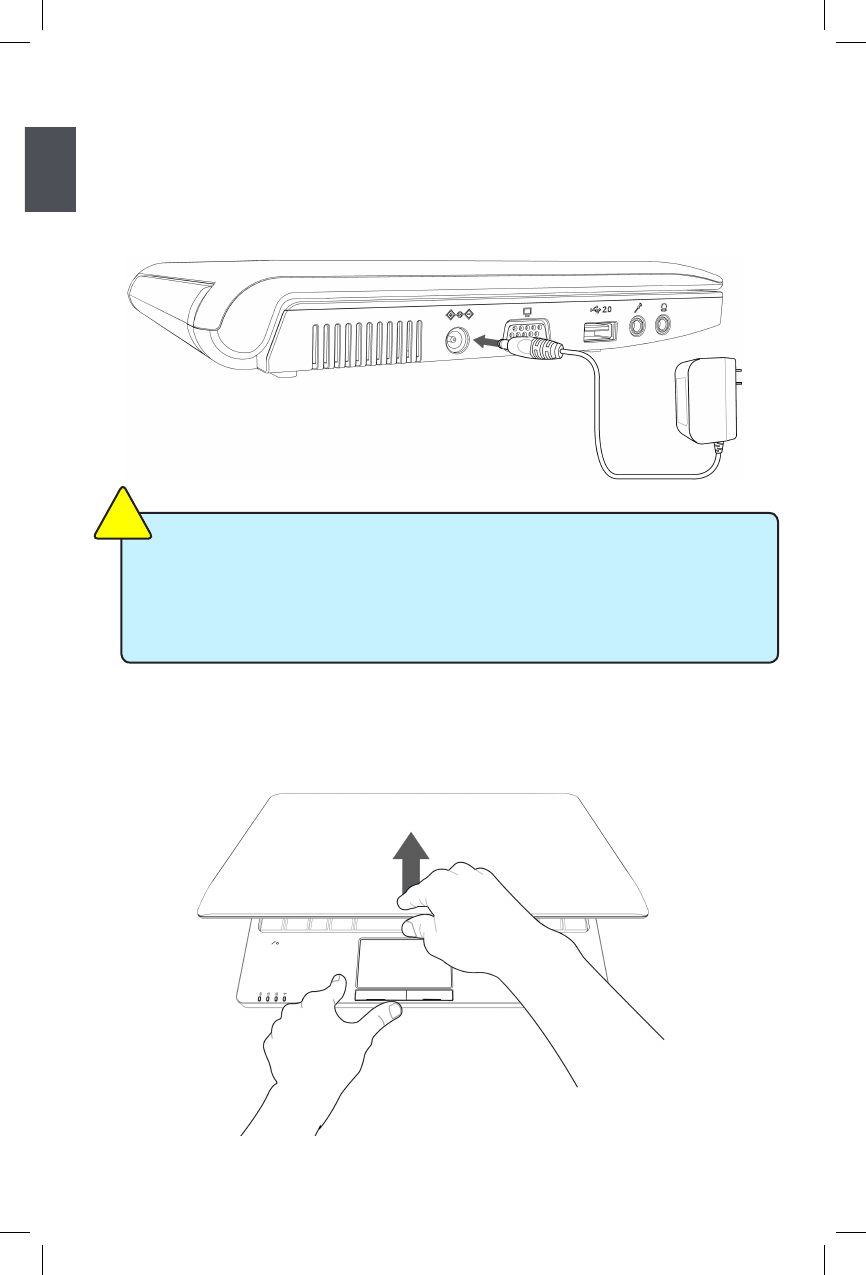
2. Connecting the Power Supply
Step 1: Insert the round end of the power supply transformer into the charging port on
the left side of the Netbook.
Step 2: Insert the other end of the power supply transformer into a power socket.
The power connector for the power socket may vary depending on the local national
standards. The appropriate connector will be bundled with your Netbook. Please
always use the adapter when connecting the power supply. The connector shown
here may not match the type included in the box and is provided for reference
purposes only.
CAUTION
!
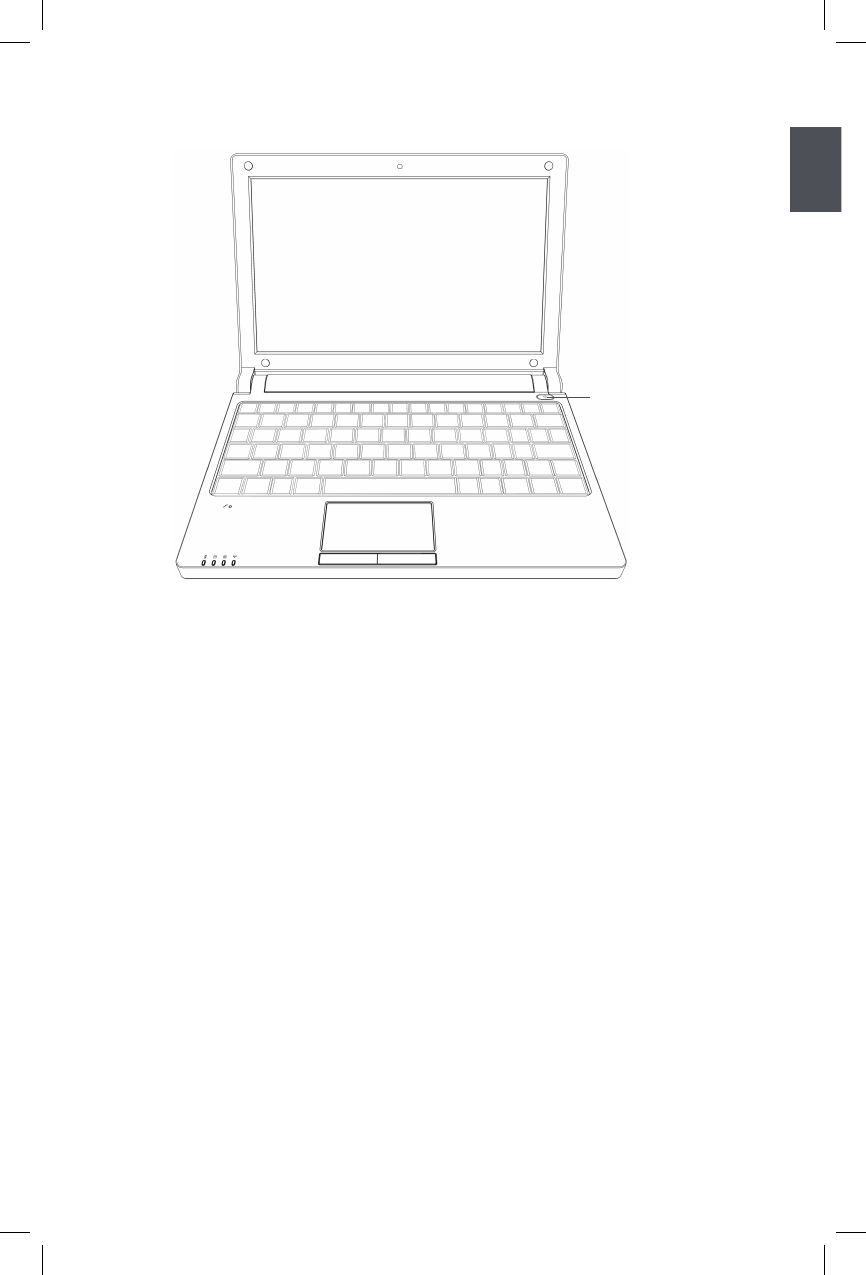
3. Startup
Step 1: Open the screen of your Netbook.
1
9
Step 2: Turn on the machine by pressing the Power Button.
Power Button
4. Emergency Shutdown
When the Netbook cannot be shut down through normal means, please press and hold
the Power Button until the Netbook powers off.
1
10
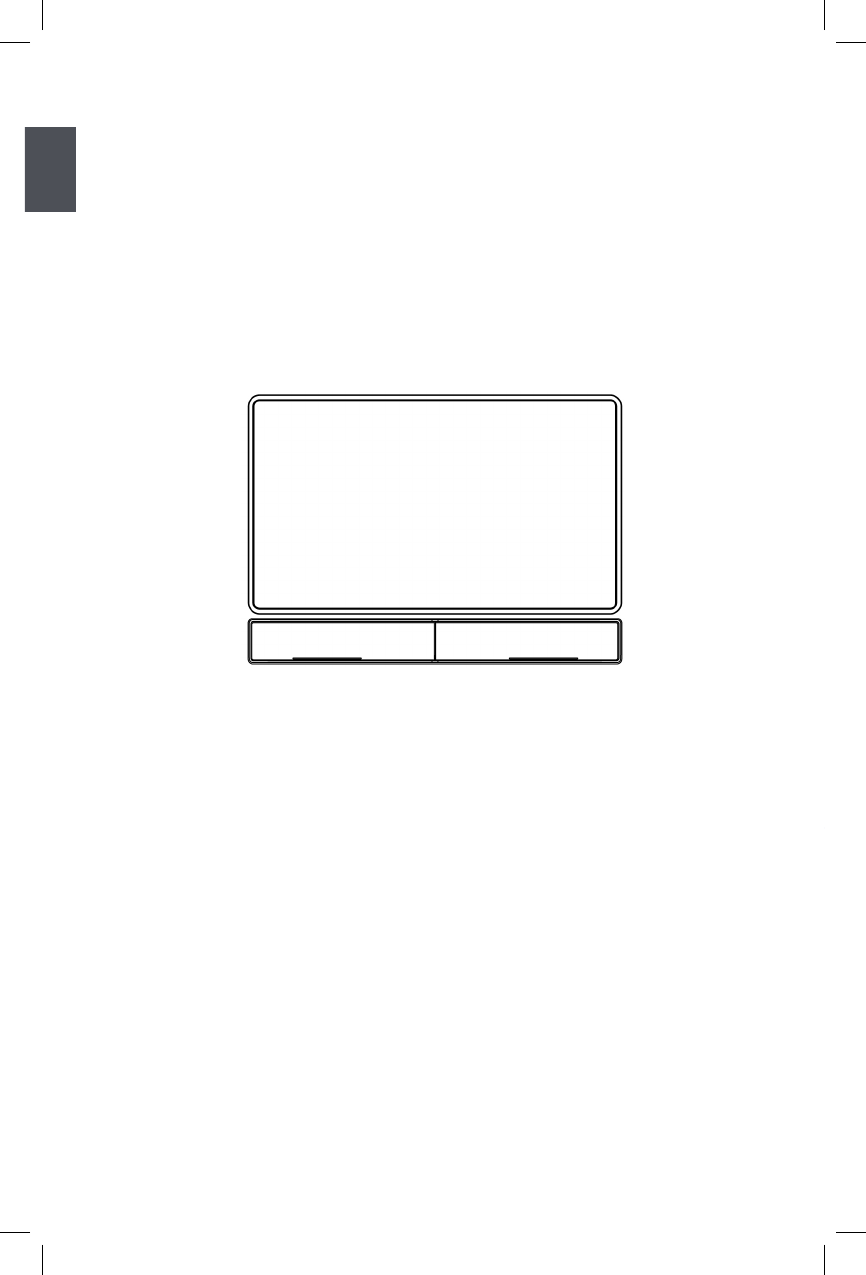
1-3 Using the Touchpad
1. Introduction to the Touchpad
The touchpad is like a computer mouse. It senses the pressure from the user's nger
and generates a voltage that is used to control the cursor's movements and issue
commands.
The touchpad senses nger movements. Simply move one nger across the touchpad
to control the movement of the cursor on screen. Below the touchpad is two buttons.
The left button is like the left mouse button and is used for selecting options or launching
programs on screen. The right button works the same way as the right mouse button.
2. Single Tap/ Single Click
To select a window function or press a button icon, move your nger across the touchpad
to move the cursor to the window or button to select. Now tap the touchpad with your
nger to perform the action. This action is equivalent to pressing the left mouse button.
You can also press the left touchpad button for the same effect.
3. Double Tap/ Double Click
To open a le or document, move your nger across the touchpad to move the cursor to
the le you wish to open. Now quickly tap the touchpad twice with your nger to perform
the action. This action is equivalent to pressing the left mouse button twice. You can also
press the left touchpad button twice for the same effect.
4. Drag
Move your nger across the touchpad to move the cursor to the object you wish to drag.
Now hold down the left touchpad button with one hand and move the cursor to the desired
location. Release the button and complete the drag operation. You can also double tap
the object you wish to drag and keep the nger on the touchpad after the second tap to
perform the drag operation with one hand.
Touchpad
Left Button Right Button

This chapter introduces the following information for you:
■ Overview
■ Using Web Camera
■ Special Function Keys
■ MMC/SD/MS Dummy Card
■ Using WWAN
■ Using Wireless LAN
2
12
2-1 Overview
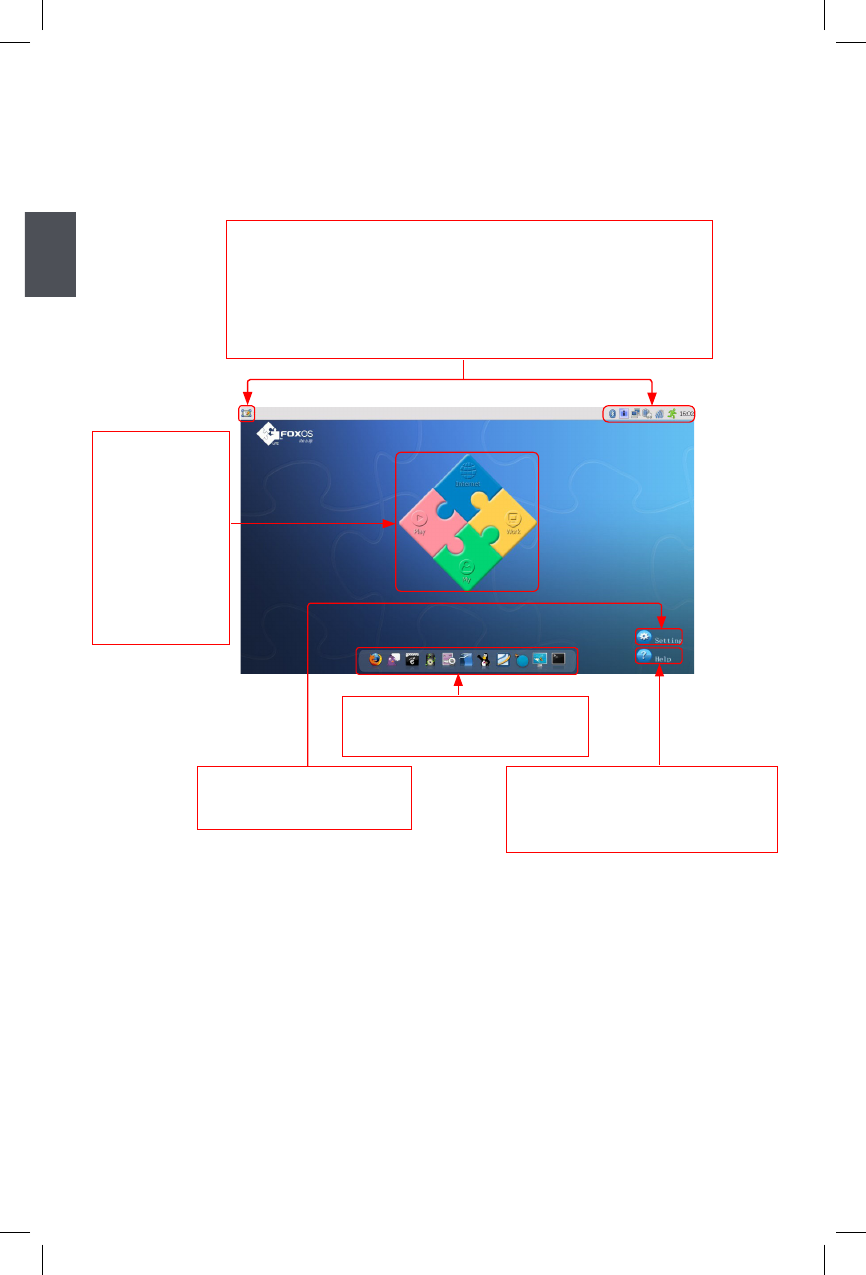
After turning on the Netbook, when you log in Netbook's pre-loaded FoxOS system, the
following screen will appear:
2-2 Using web camera
Click "Play"->"Webcam" to open the web camera, you can take photo and record through
the camera. About detailed information please refer to help page.
Click "Setting" to open the
page to optimize the system.
Click "Help" to open the page, please
refer to the content of the page about
detailed description of the system.
From left to right is in turn:
a. Show Desktop icon b. Bluetooth icon(optional)
c. iBus Input Method icon d. Network Connection status icon
e. Power icon f. Volume icon
g. Exit icon h. Time icon
The four parts
provide various
applications to
meet the needs of
your work, life and
entertainment,
detailed refer to
help page.
You can click these icons to go to
the corresponding utilities.
2
13
2-3 Special Function Keys
The following denes some special function keys on the netbook.
Function Keys Description
Fn + F1 WWAN on or off
Fn + F2 Wireless LAN on or off
Fn + F3 Touchpad on or off
Fn + F4 Switches to the external display
Fn + F5 Audio on or off
Fn + F9 To terminate some applications
Fn + F10 Toggles the "Print Screen" key to initiate screen capture
utility to capture, save or print the contents of desktop
Fn + F11 F12 / Enters into the dialog box of "Save As" in Windows
Ofce applications
Fn + Page Up Presses to move the cursor to the beginning of the line
Fn + Page Down Presses to move the cursor to the end of the line
Fn + Ins "Number Lock" on or off
Fn + Del "Scroll Lock" on or off
Fn + Esc In S3 mode
Fn + (up arrow) Increases the display brightness
Fn + (down arrow) Decreases the display brightness
Fn + (left arrow) Decreases the system volume
Fn + (right arrow) Increases the system volume
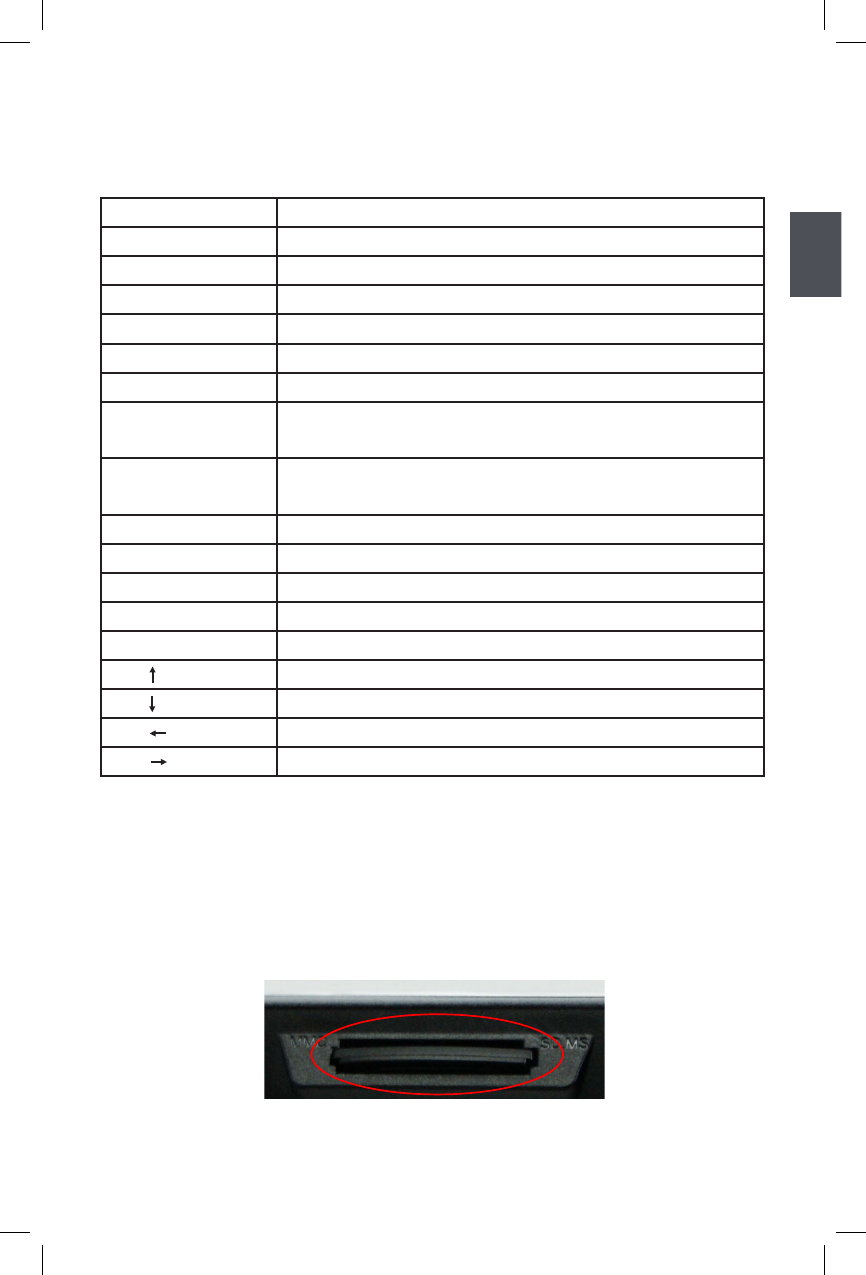
2-4 MMC/SD/MS Dummy Card
There is a dummy card in our Netbook, the gure is as shown below. The main function
of the card is to prevent dust into the computer. When you use the MMC/SD/MS card slot,
press down the dummy card with your nger and take the popping card out.
2
14
2-5 Using WWAN (optional)
Let me take EM770 module as an example to simply introduce how to connect WWAN in
Windows XP, the steps are as below. Please refer to the le "utps_content_concept_00001.
html" for details about the WWAN, its path is as below:
In system path -> Program Files -> Mobile Partner -> usermanual -> en-us -> usermanual
->utps_content_concept_00001.html
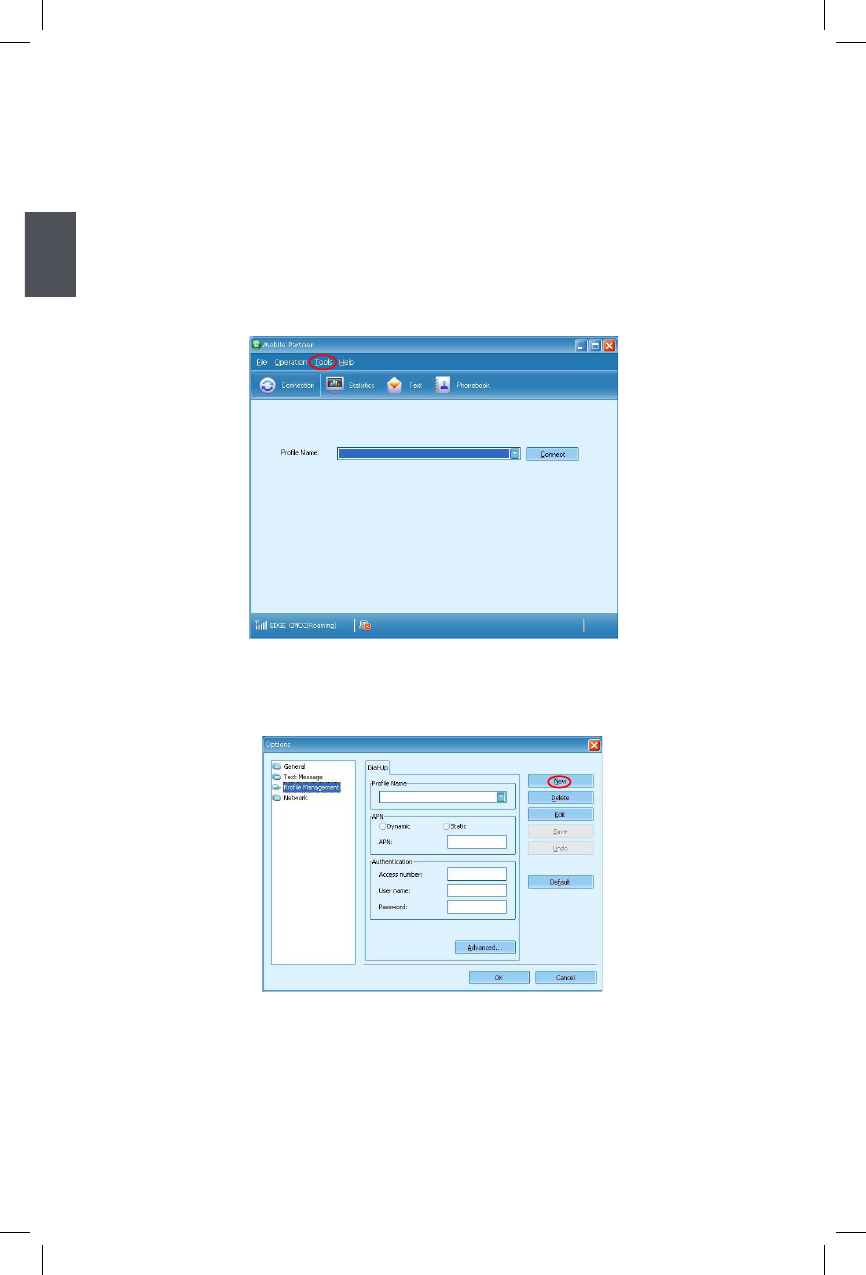
1. Double click "Mobile Partner" on desktop to open the gure as shown below:
2. Click "Tools" - > "Options", and select "Prole Management" in popping window, the
gure is shown as below:
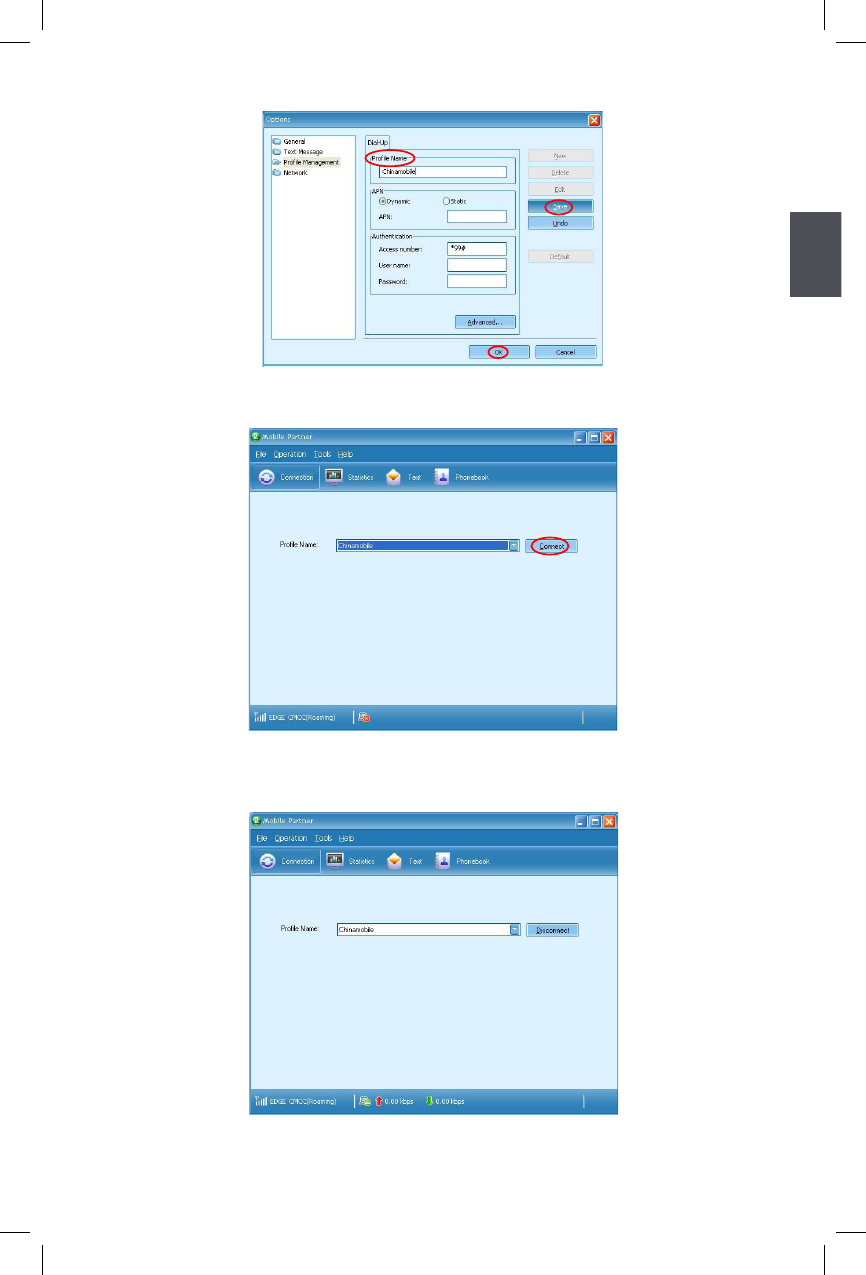
3. Click "New" and input the name in "Prole Name" column, like Chinamobile, then click
"Save" and "Ok".
2
15
4. Click "Connect" to start the connection.
5. You can access the internet when the gure is shown as below.

2
16
Remark - How to install the SIM card
Please install the SIM card according to the following details:
Power off the Netbook and shut down power supply, then remove the battery (please
refer to page 7 for details about removing the battery), and you will see the SIM card slot,
as the picture shown. Please insert the SIM card into the slot (as the arrow shown) and
make sure that the gold pins of SIM card are downward.
2-6 Using Wireless LAN
You can use wireless LAN with the Netbook. This part mainly introduces wireless LAN
and its connection.
I: Introduce wireless LAN
1. Wireless LAN:
Wireless networks use radio waves as information transmission medium to consist of
wireless LAN (WLAN), the main difference lies in the wireless networks using wireless
technology instead of string.
2. Wireless card and Access wireless network:
Wireless card is a wireless terminal device which uses the wireless connection with the
coverage of the wireless LAN. You can access wireless network, if there is a wireless
router or the coverage of wireless AP around (Please refer to the wireless router's
manual about its connections and settings);Attach a device to the Netbook and
enclose a card as mobile phone card inside when you go telecommunication business
hall to handle wireless. After that you can surf the Net wirelessly.
II: Connecting wireless LAN
Press "Fn + F2" to turn on the wireless LAN of the Netbook, the system will automatically
search the available wireless network around and connect it. Or click icon to manually
choose the Internet connection.
If password is required, enter the password of wireless LAN to realize wireless
connection.
Please do not insert or pull out the SIM card when power-on, otherwise the data may
lose or the card would be damaged.
W
A
R
N
I
N
G
!
SIM card slot

This chapter introduces how to install Windows XP system
for you, including following information:
■ Install a new Windows XP system
■ Install drivers in new Windows XP
3
18
Install Windows XP in Netbook
By default, the Netbook has been installed FoxOS system for you. But if you do not
like the operation system interface, you can install Windows XP by yourself.
What kinds of hardware and software you need here :
1. An USB DVD drive.
2. A Netbook driver CD.
3. Windows XP Install CD.
Before we continue :
■ Shut down your computer.
■ Connect the USB DVD drive to an USB port of Netbook and connect the power
cord to AC power.
3-1 Install a new Windows XP system
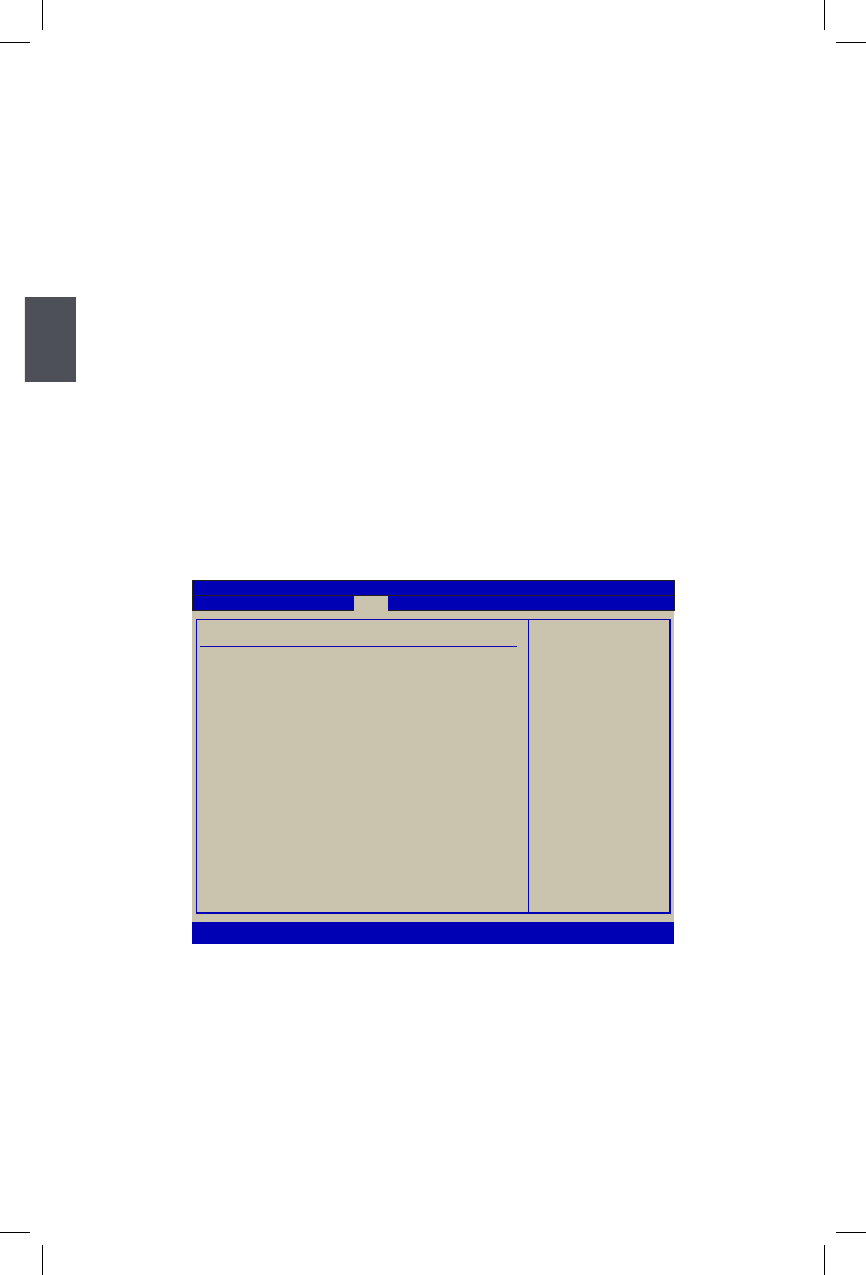
1. Press <Del> to enter BIOS setup during POST, set the "1st Boot Device" to "CD/
DVD" in "Boot" menu, save changes and exit BIOS. The gure is as shown below:
2. Insert the Windows XP Install CD into the USB DVD drive. The computer will reboot,
and it will start installing Windows XP Operating System. The gure is as shown
below:
Boot Settings Species the boot
sequence from the
Quick Boot [Enabled] available devices .
Quiet Boot [Disabled]
A device enclosed in
Onboard LAN Boot ROM [Disabled] parenthesis has been
disabled in the
Boot Device Priority corresponding type
1st Boot Device [CD/DVD] menu.
2nd Boot Device [USB:Generic- SD/MM]
3rd Boot Device [CD/DVD]
4th Boot Device [Network]
←→ Select Screen
1st Hard Disk Drive [HDD:PM-FUJITSU MHZ] ↑↓ Select Item
+- Change Field
1st Removable Drive [USB:Generic- SD/MM] F1 General Help
2nd Removable Drive [USB:Generic- MS/MS] F7 Discard Changes
F10 Save and Exit
ESC Exit
v02.61 (C)Copyright 1985-2006, American Megatrends, Inc.
Main Advanced Security Boot Exit
Boot
BIOS SETUP UTILITY

3
19
3. Press <Enter> to continue the installation and press <F8> to agree the Licensing
Agreement. Windows will display the partition of your system. First of all, you had
better press [D] to delete the partition, then you can press [C] to create partitions as
many as you can, assign them C:, D: or E: logical drive name. In this example, we
will create a 50GB partition C: and leave the remaining space as a partition D:. The
gure is as shown below:
4. Press <Enter> to install Windows XP. The process will ask you to format hard disk,
copy les...etc, follow the installation steps until the system is installed completely.
Windows XP Professional Setup
Welcome to Setup.
This portion of the Setup program prepares Microsoft(R)
Windows(R) XP to run on your computer.
● To set up Windows XP now, press ENTER.
● To repair a Windows XP installation using
Recovery Console, press R.
● To quit Setup without installing Windows XP, press F3.
ENTER=Continue R=Repair F3=Quit
Windows XP Professional Setup
The following list shows the existing partitions and
unpartitioned space on this computer.
Use the UP ad DOWN ARROW keys to select an item in the list.
● To set up Windows XP on the selected item, press ENTER.
● To create a partition in the unpartitioned space, press C.
● To delete the selected partitions, press D.
114471 MB Disk 0 at id 0 on bus 0 on atapi [MBR]
D: Partition2 [Unknown] 64464 MB < 64463 MB free>
Unpartitioned space 8 MB
Unknown Disk
<There is no disk in this drive.>
Unknown Disk
<There is no disk in this drive.>
ENTER=Install D=Delete Partition F3=Quit
C:Partition1 [NTFS] 49999 MB < 48568 MB free>
3
20
3-2 Install drivers in new Windows XP
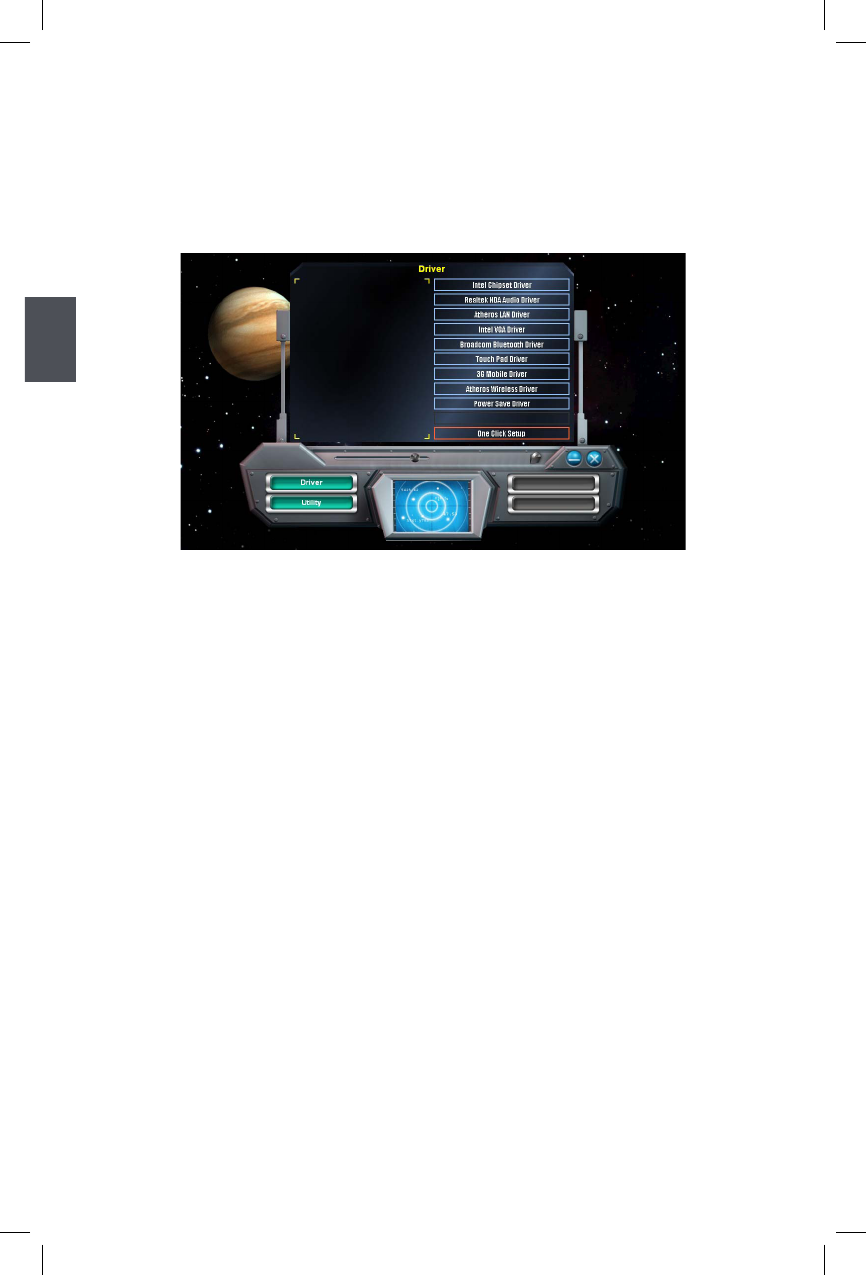
1. After installing Windows XP, you have to install necessary drivers before using the
Netbook. Insert the Netbook driver CD to the USB DVD drive, waiting for a few
seconds, the main menu will be displayed on your Netbook screen.
2. Clicking these options to install all the drivers for your system. You must rstly click
"Intel Chipset Driver" to install and then click "One Click Setup" to install the other
drivers left, or you can click each individual driver to install it manually.
3. After all the drivers are installed, you need to restart your Netbook, then you can use
it.

21
Appendix
Recovery of Linux system
I From DVD to recover system
1 Boot from DVD
Power on the computer, insert the system Installation DVD into the DVD drive, press
"ESC" to select booting system from the DVD drive.
2 Select the way of Installation
When the gure as below shows, select "Install and make recovery partition",
the system will be installed and a recovery partition will be made. Or select "Install
system only", the system will be installed without recovery partition, so recover
system from hard disk is impossible.
3 Click "Next", the warning box is shown as below:
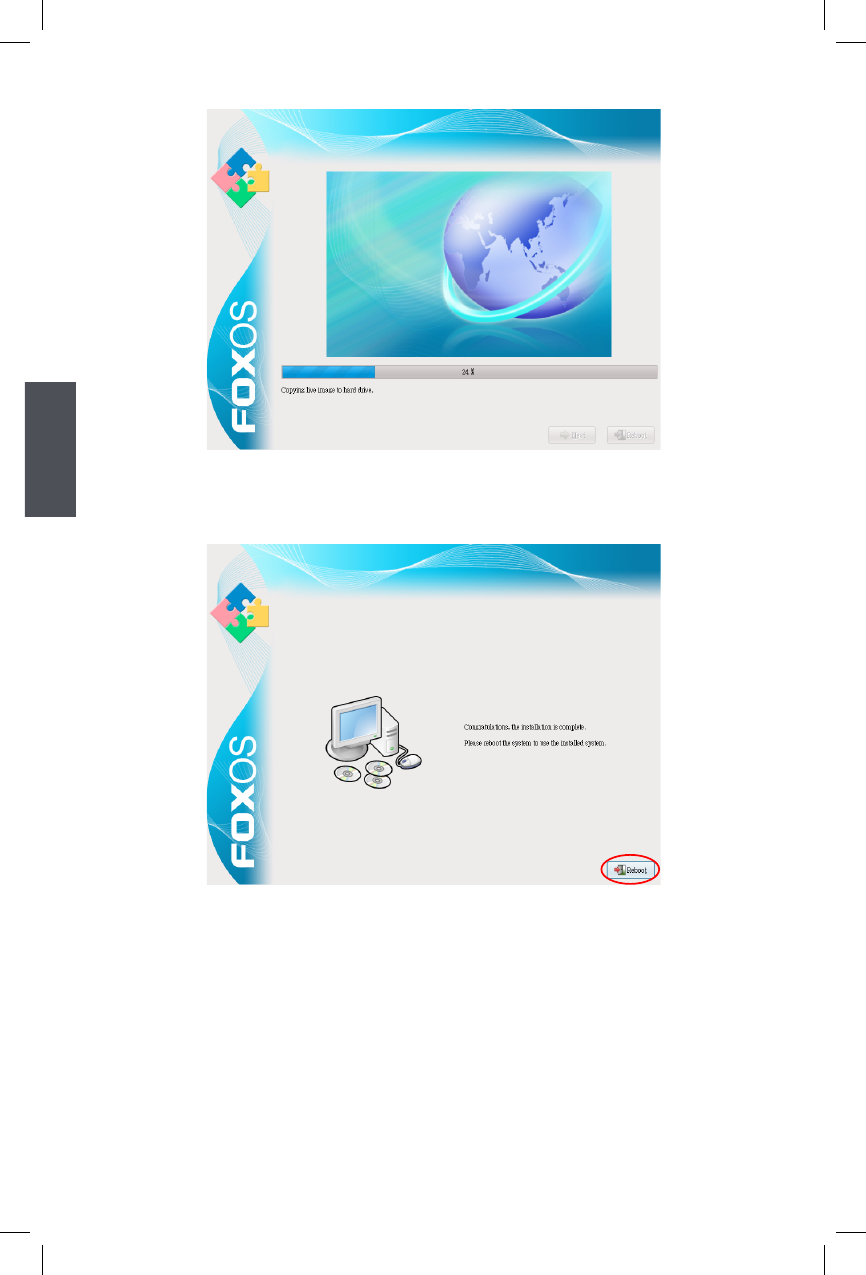
4 Installing system
Click "Next" to format hard disk and install system. The gure is shown as below:
22
Appendix
5 After installing, click "Reboot" to restart the system.

23
Appendix
II From hard disk to recover system
1 When you log in, according to the screen suggestion, press any key to enter Grub
interface, the gure is as shown below:
2 Select "FoxOS recovery" item and then press "Enter", the warning box is shown
below:
3 Select "Next", system warns the root partition(hd0, 0) will be formatted. The gure is
as shown below:

24
Appendix
4 Click "Next" to format partition(hd0,0) and recover system from hard disk. The gure
is as shown below:
5 When the process is completed, please reboot the system.The gure is as shown
below:
Federal Communications Commission Statement
This device complies with FCC Rules Part 15. Operation is subject to the following two
conditions:
• This device may not cause harmful interference, and
• This device must accept any interference received, including interference that may
cause undesired operation.
•
This equipment has been tested and found to comply with the limits for a class B digital
device, pursuant to Part 15 of the Federal Communications Commission (FCC) rules.
These limits are designed to provide reasonable protection against harmful interference in
a residential installation. This equipment generates, uses, and can radiate radio frequency
energy and, if not installed and used in accordance with the instructions, may cause
harmful interference to radio communications. However, there is no guarantee that
interference will not occur in a particular installation. If this equipment does cause harmful
interference to radio or television reception, which can be determined by turning the
equipment off and on, the user is encouraged to try to correct the interference by one or
more of the following measures:
• Reorient or relocate the receiving antenna.
• Increase the separation between the equipment and receiver.
• Connect the equipment into an outlet on a circuit different from that to which the receiver
is connected.
• Consult the dealer or an experienced radio/TV technician for help.
The use of a shielded-type power cord is required in order to meet FCC emission limits and
to prevent interference to the nearby radio and television reception. It is essential that only
the supplied power cord be used. Use only shielded cables to connect I/O devices to this
equipment. You are cautioned that changes or modifications not expressly approved by the
party responsible for compliance could void your authority to operate the equipment.
Note:
Any changes or modifications not expressly approved by the party responsible for
compliance could void the user’s authority to operate this equipment. “The manufacture
declares that this device is limited to Channels 1 through 11 in the 2.4GHz frequency by
specified firmware controlled in the USA.”
RF exposure warning
This equipment complies with FCC radiation exposure limits set forth for an uncontrolled
environment. The equipment must not be co-located or operating in conjunction with any
other antenna or transmitter. The measured SAR levels evaluated are in compliance with
the FCC RF exposure guidelines.
Notebook SZ901P Max. SAR Measurement (1g) 0.00155W/kg