FRIEDRICH Air Conditioner Room (42) Manual L0404286
User Manual: FRIEDRICH FRIEDRICH Air Conditioner Room (42) Manual FRIEDRICH Air Conditioner Room (42) Owner's Manual, FRIEDRICH Air Conditioner Room (42) installation guides
Open the PDF directly: View PDF ![]() .
.
Page Count: 10
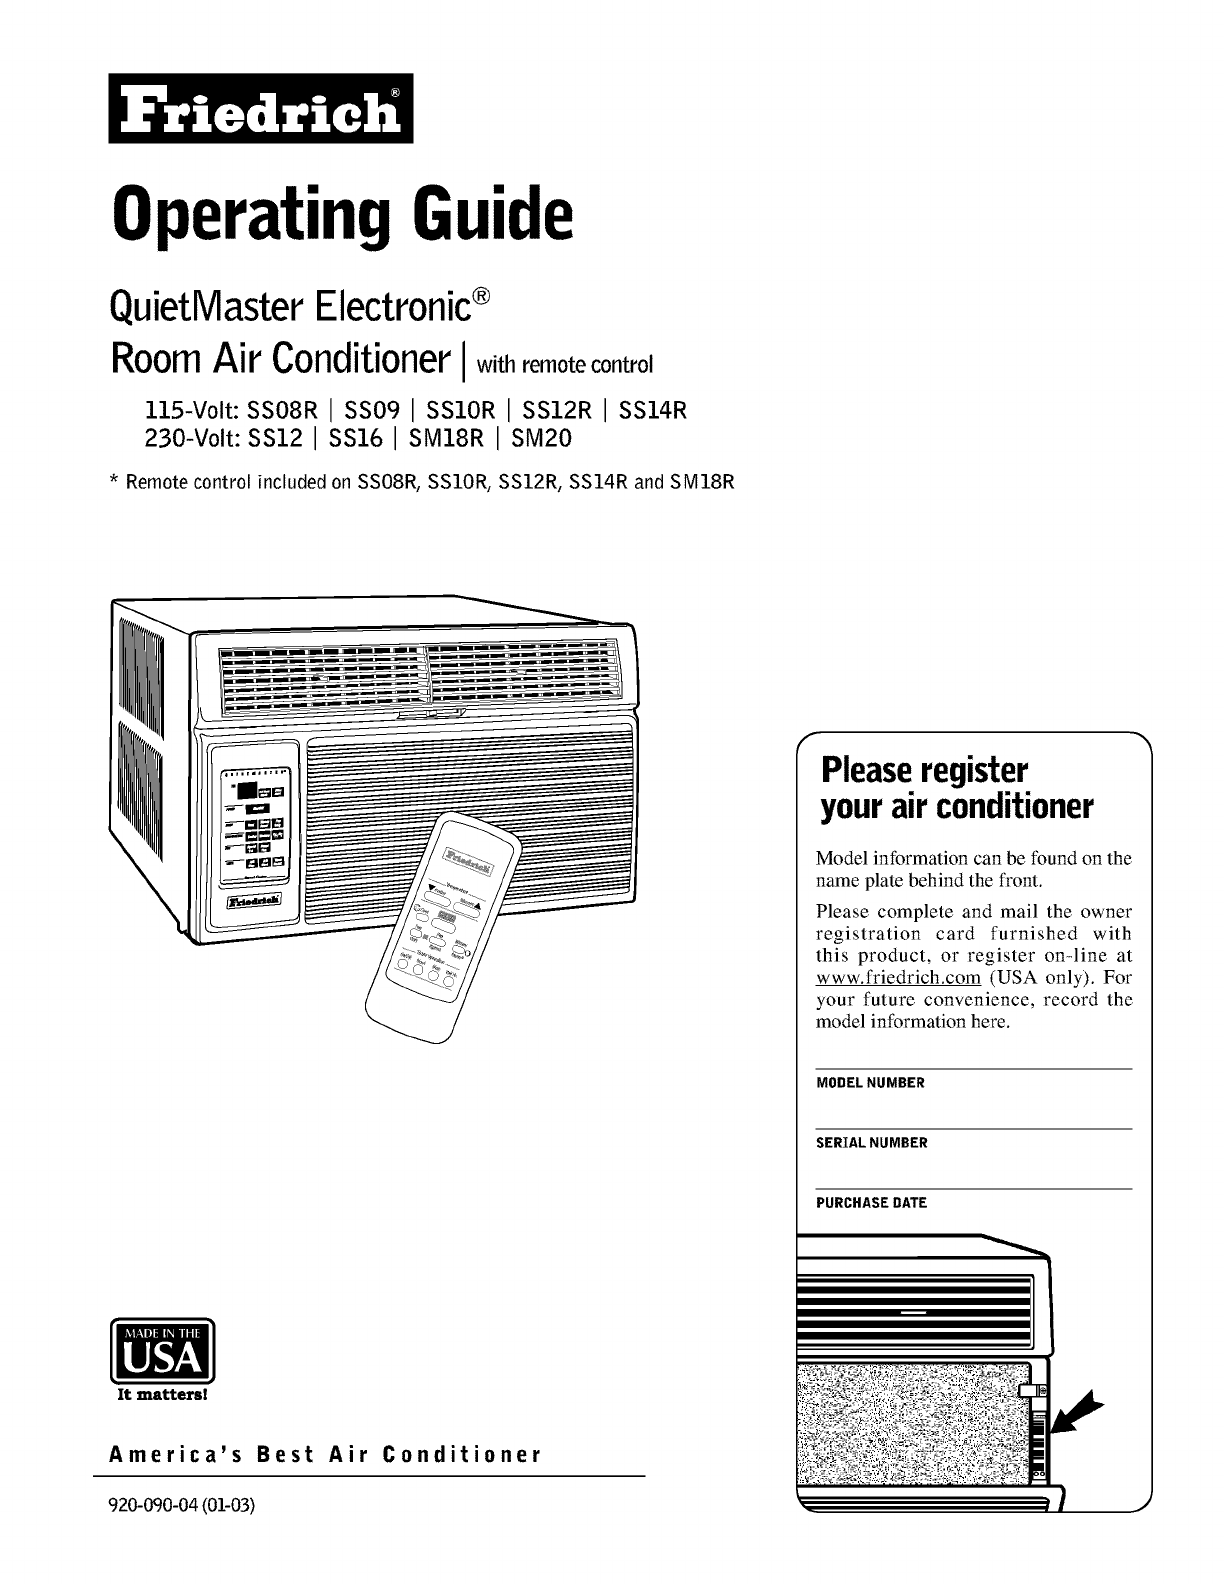
OperatingGuide
QuietMaster Electronic®
RoomAir ConditionerI_ithremote control
115-Volt: SSO8R ISS09 ISSlOR ISS12R ISS14R
230-Volt: SS121 SS161 SM18R ISM20
* Remote control included on SSO8R, SSlOR, SS12R, SS14R and SM18R
It mattersl
America's Best Air Conditioner
920-090-04 (01-03)
Pleaseregister
yourair conditioner
Model information can be found on the
name plate behind the front.
Please complete and mail the owner
registration card furnished with
this product, or register on-line at
www.friedrich.com (USA only). For
your future convenience, record the
model information here.
MODEL NUMBER
SERIAL NUMBER
PURCHASE DATE
Congratulations!
You have purchased the very latest in room air conditioner technology. Your new Friedrich high efficiency room air conditioner
will give you many years of dependable service. Many extra features have been built into your Friedrich air conditioner to assure
quiet operation, the best circulation of cool, dry air, functional controls, and the most economical operation.
Tableof Contents Page
Before Operating Your Unit ............................................................................................................................................................ 3
To Start Unit .................................................................................................................................................................................... 4
To Set Mode of Operation ............................................................................................................................................................... 4
MoneySaver ®Feature ...................................................................................................................................................................... 4
To Adjust Temperature ................................................................................................................................................................... 5
To Adjust Fan Speed ........................................................................................................................................................................ 5
To Activate Smart Fan ..................................................................................................................................................................... 5
To Set Hour Clock ............................................................................................................................................................................ 5
To Set The Timer ............................................................................................................................................................................. 5
Automatic Component Protection ................................................................................................................................................... 5
How to Use the Remote Control ..................................................................................................................................................... 6
Removing/Cleaning the Filter ......................................................................................................................................................... 7
Fresh Air & Exhaust Control .......................................................................................................................................................... 7
Troubleshooting Tips ....................................................................................................................................................................... 8
Warranty ........................................................................................................................................................................................... 9
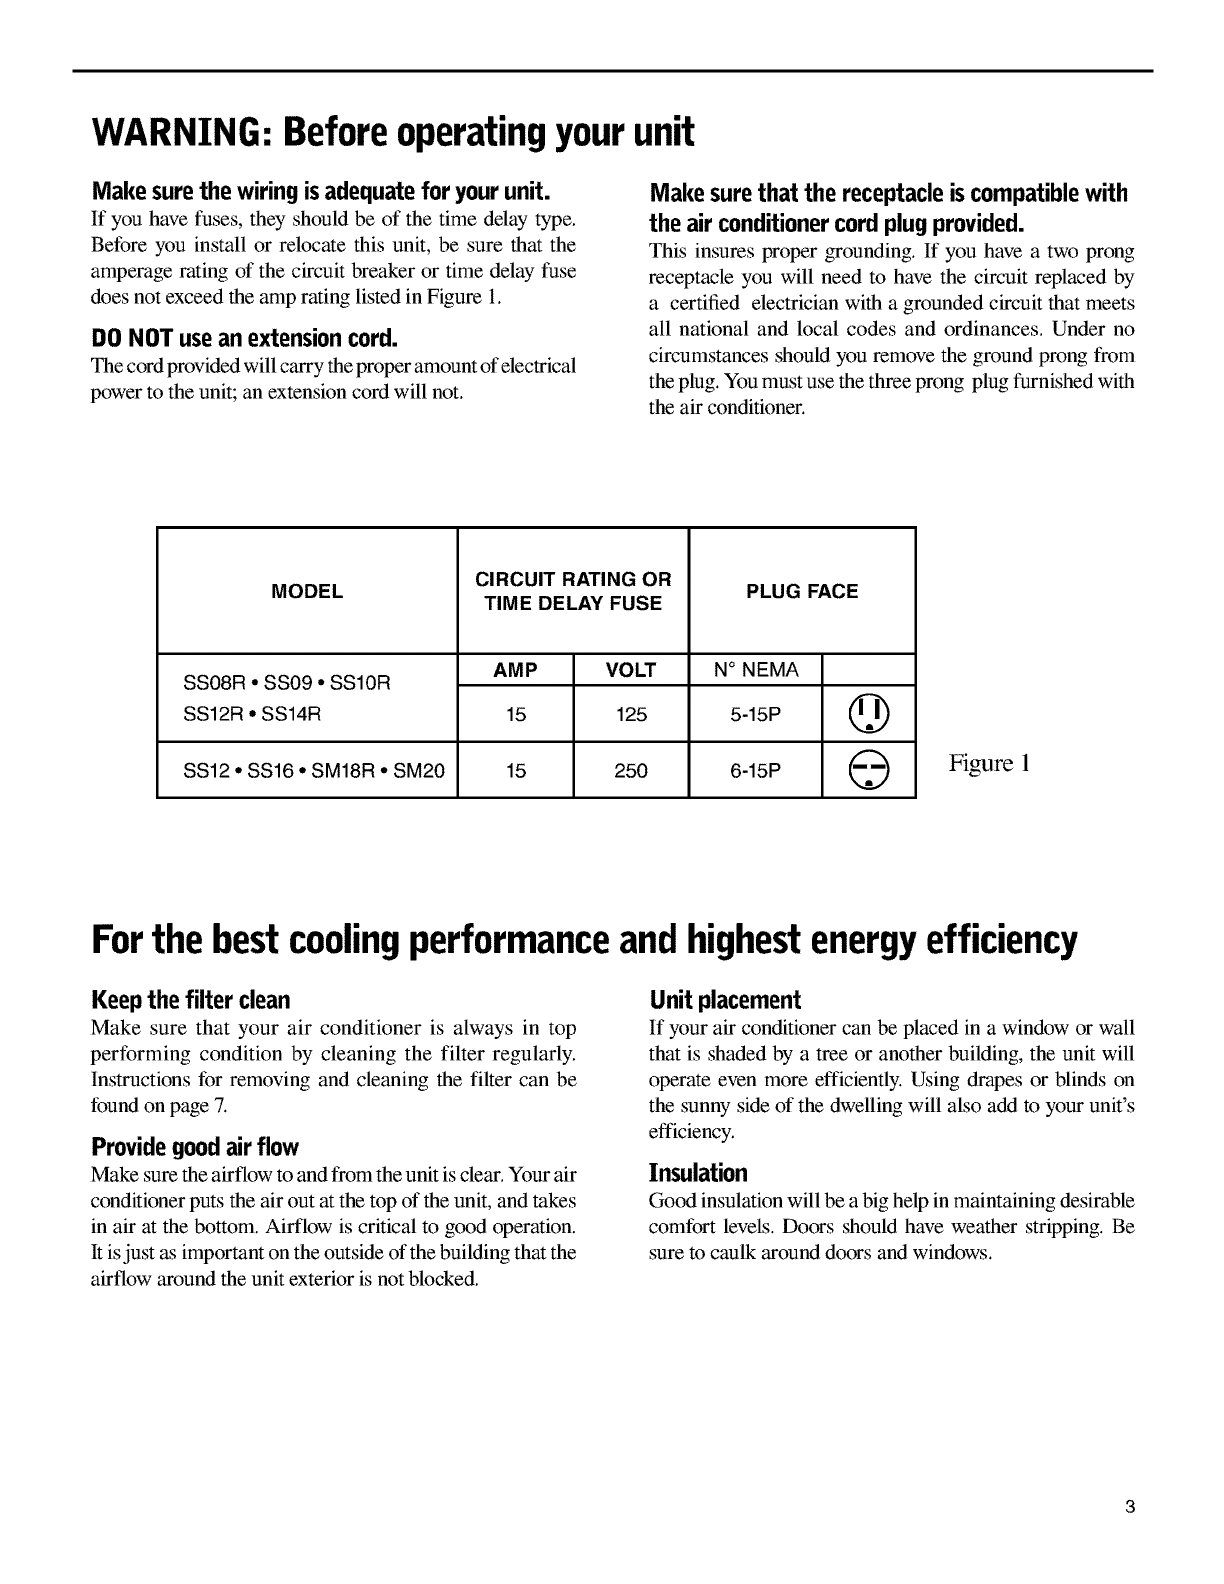
WARNING: Beforeoperatingyourunit
Make surethe wiringisadequatefor yourunit.
If you have fuses, they should be of the time delay type.
Before you install or relocate this unit, be sure that the
amperage rating of the circuit breaker or time delay fuse
does not exceed the amp rating listed in Figure 1.
DONOT usean extension cord.
The cord provided will carry the proper amount of electrical
power to the unit; an extension cord will not.
Makesurethat the receptacleis compatiblewith
the air conditionercordplugprovided.
This insures proper _ounding. If you have a two prong
receptacle you will need to have the circuit replaced by
a certified electrician with a grounded circuit that meets
all national and local codes and ordinances. Under no
circumstances should you remove the ground prong from
the plug. You must use the three prong plug furnished with
the air conditioner.
MODEL
SS08R •SS09 • SS10R
SS12R • SS14R
SS12 •SS16 • SM18R • SM20
CIRCUIT RATING OR
TIME DELAY FUSE PLUG FACE
AMP VOLT
15 125
15 250
N° NEMA
5-15P
6-15P
@
@Figure 1
Forthe bestcoolingperformanceandhighestenergyefficiency
Keepthe filter clean
Make sure that your air conditioner is always in top
performing condition by cleaning the filter regularly.
Instructions for removing and cleaning the filter can be
found on page 7.
Providegoodairflow
Make sure the airflow to and from the unit is clear. Your air
conditioner puts the air out at the top of the unit, and takes
in air at the bottom. Airflow is critical to good operation.
It is just as important on the outside of the building that the
airflow around the unit exterior is not blocked.
Unit placement
If your air conditioner can be placed in a window or wall
that is shaded by a tree or another building, the unit will
operate even more efficiently. Using drapes or blinds on
the sunny side of the dwelling will also add to your unit's
efficiency.
Insulation
Good insulation will be a big help in maintaining desirable
comfort levels. Doors should have weather stripping. Be
sure to caulk around doors and windows.
3
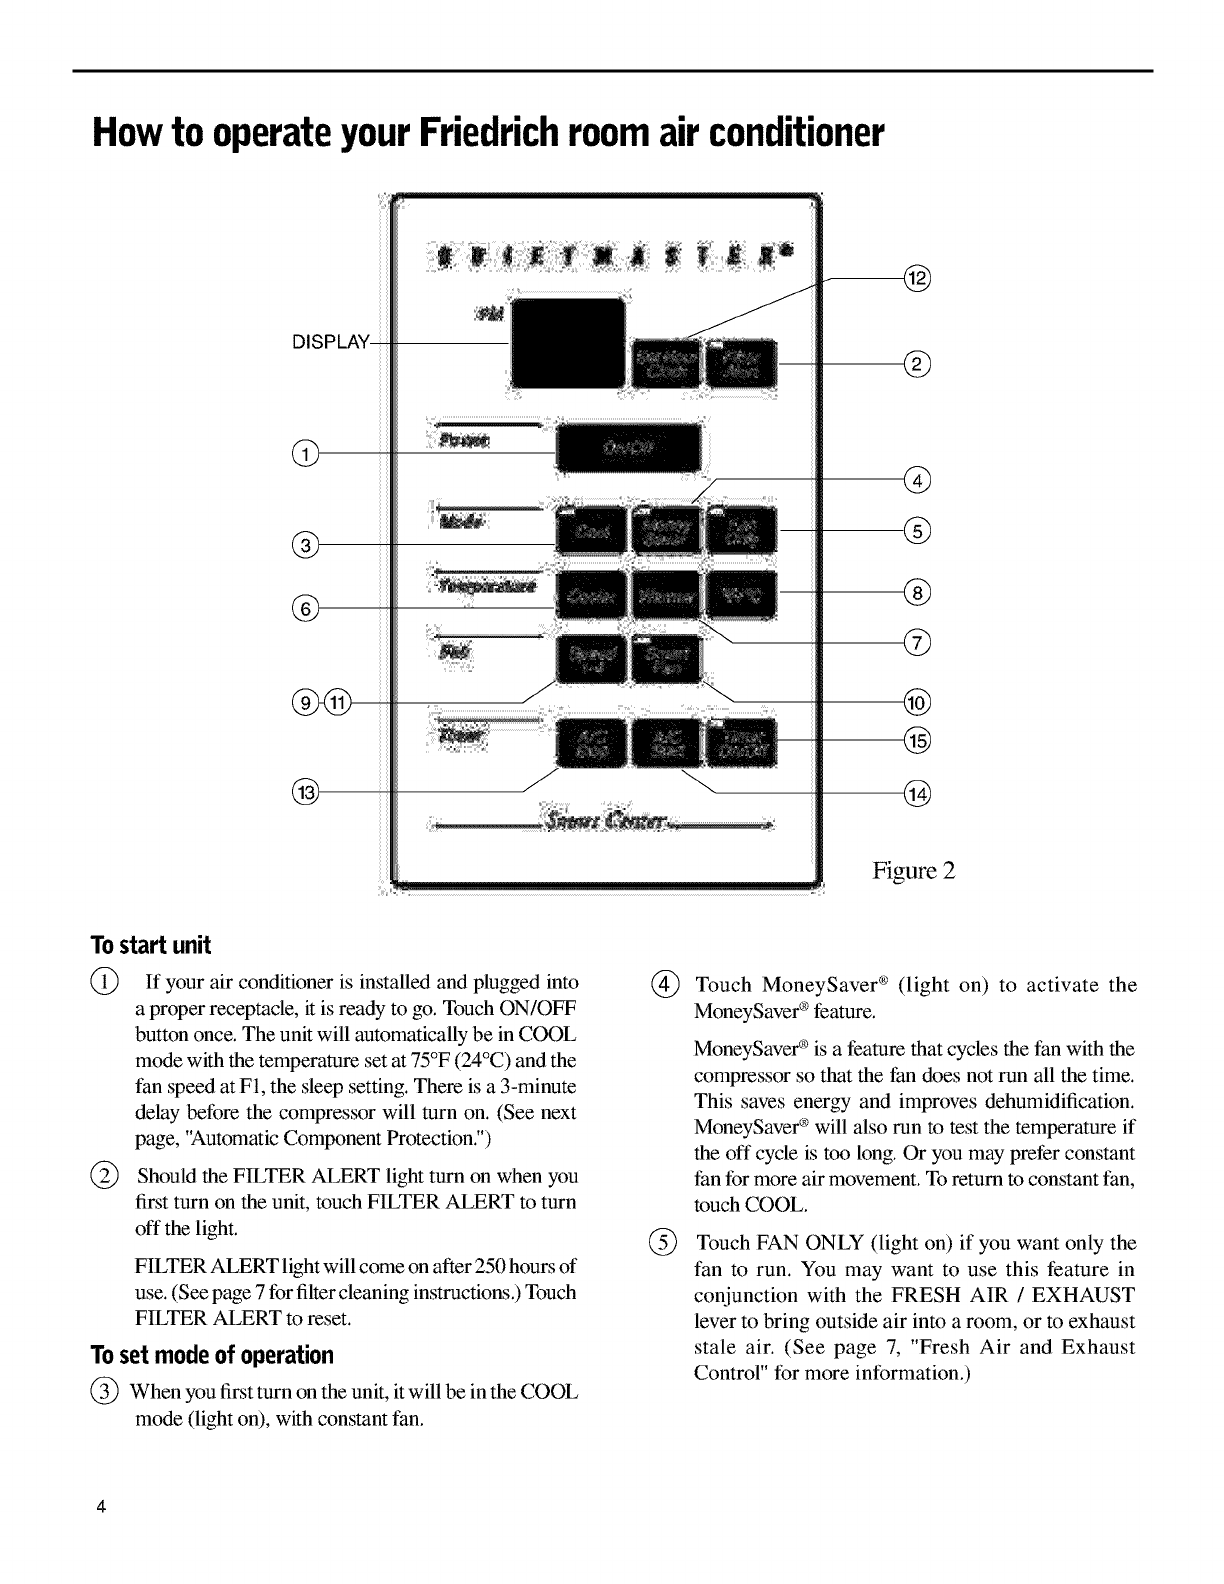
Howto operateyourFriedrichroomair conditioner
m@
®
®
®
®
@
@
@
Figure 2
Tostart unit
G
@
If your air conditioner is installed and plugged into
a proper receptacle, it is ready to go. Touch ON/OFF
button once. The unit will automatically be in COOL
mode with the temperature set at 75°F (24°C) and the
fan speed at F1, the sleep setting. There is a 3-minute
delay before the compressor will turn on. (See next
page, 'Automatic Component Protection.")
Should the FILTER ALERT light turn on when you
first turn on the unit, touch FILTER ALERT to turn
off the light.
FILTER ALERT light will come on after 250 hours of
use. (See page 7 for filter cleaning instructions.) Touch
FILTER ALERT to reset.
Toset modeof operation
@ When you first turn on the unit, it will be in the COOL
mode (light on), with constant fan.
@ Touch MoneySaver ® (light on) to activate the
MoneySaver ®feature.
G
MoneySaver ®is a feature that cycles the fan with the
compressor so that the fan does not run all the time.
This saves energy and improves dehumidification.
MoneySaver ®will also run to test the temperature if
the off cycle is too long. Or you may prefer constant
fan for more air movement. To return to constant fan,
touch COOL.
Touch FAN ONLY (light on) if you want only the
fan to run. You may want to use this feature in
conjunction with the FRESH AIR /EXHAUST
lever to bring outside air into a room, or to exhaust
stale air. (See page 7, "Fresh Air and Exhaust
Control" for more information.)

Howto operateyourFriedrichroomair conditioner
Toadjusttemperature
[60°F (16°C) to 90°F (32°C)]
@ COOLER- Touch COOLER to see setting, touch again
to change.
©
®
WARMER - Touch WARMER to see setting, touch
again to change.
Touch °F/°C to show desired temperature in Fahrenheit
or Celsius.
Toadjustfan speed
@Touch SPEED 1-4 to see current setting. Touch again
to change speed. F1 is the lowest setting (SLEEP
SETTING), F2 is low speed (LOW), F3 is medium
speed (MED), F4 is high speed (HIGH).
Toactivate smartfan
@ Touch SMART FAN (light on). Smart Fan will adjust
the fan speed automatically to maintain the desired
comfort level. For example, if the outside doors in your
home are open for an extended period of time, or more
people enter a room, Smart Fan may adjust to a higher
fan speed to compensate for the increased heat load.
This keeps you from having to adjust the fan speed on
your own. Smart Fan cannot be activated in the FAN
ONLY mode.
Todeactivatesmart fan
@ Touch SPEED 1-4, and select your desired fan speed.
Toset hourclock
(_ Press SET HOUR CLOCK once to see the current
clock setting. Continue pressing the button until
the hour closest to the actual time appears in the
display. MAKE SURE YOU SET A.M. AND RM.
PROPERLY. A light will appear in the upper left
corner of the display when the hour is p.m.
Minutes will NOT show on display.
Toset the timer
NOTE: SET HOUR CLOCK before attempting to set
timer functions.
You can set the A/C START and AJC STOP timer a
minimum of one hour apart and a maximum of twenty-
three hours apart.
@TIMER STOP - Press the AJC STOP button and hold
until the hour you want the unit to shut off appears in
the display (A.M. or RM.). The stop time for cooling
will then be set.
Figure 3
Smart Center °Elect_vnic Control System
@START TIME- Press AJC START to view the current
start time for cooling. Continue pressing until the hour
you want the unit to start appears in the display (A.M.
or RM.). The start time for cooling will then be set.
@ Press the TIMER ON/OFF button once to activate
(light on) the timer function. Touch TIMER ON /OFF
again (light off) to cancel the timer function if you so
desire. Once the on and off times have been selected,
they will remain in memory, and cycle daily until
changed.
NOTE: If unit is unplugged or power is interrupted, the
SET HOUR CLOCK button must be reset or the TIMER
ON/OFF functions will not work.
Automaticcomponentprotection
Your unit is equipped with Automatic Component
Protection.
To protect the compressor of the unit, there is a three minute
time delay if you turn the unit off or if power is interrupted.
The fan will not be affected.
Also, if you switch from COOL mode to FAN ONLY, and
switch back to COOL mode, there is a three minute delay
before the compressor comes back on.
5
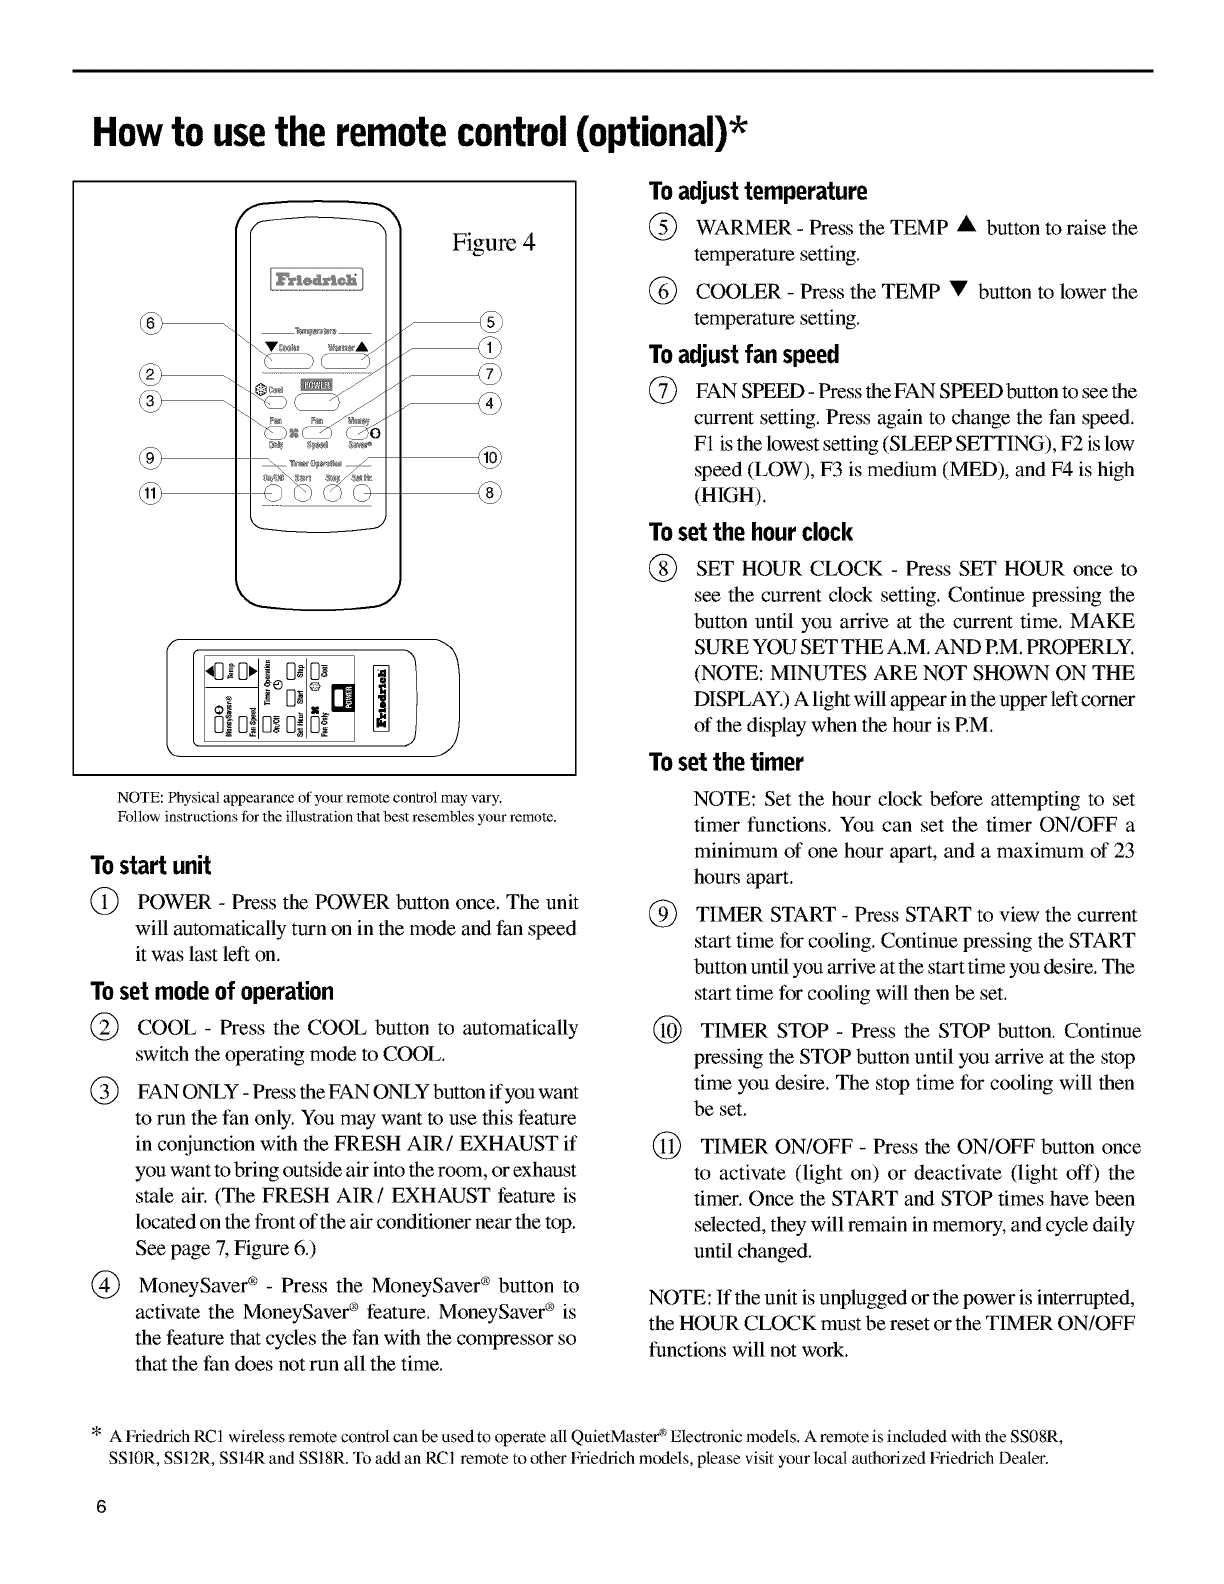
Howto usethe remotecontrol(optional)*
@
F_um4
@
J
_i 8al8_
L818_IE]_q 8_
NOTE: Physical appearance of your remote control may vary.
Follow instructions tbr the illustration that best resembles your remote.
Tostart unit
@ POWER - Press the POWER button once. The unit
will automatically turn on in the mode and fan speed
it was last left on.
Toset modeof operation
@ COOL - Press the COOL button to automatically
switch the operating mode to COOL.
@ FAN ONLY- Press the FAN ONLY button if you want
to run the fan only. You may want to use this feature
in conjunction with the FRESH AIR/EXHAUST if
you want to bring outside air into the room, or exhaust
stale air. (The FRESH AIR/EXHAUST feature is
located on the front of the air conditioner near the top.
See page 7, Figure 6.)
@ MoneySaver ® - Press the MoneySaver ®button to
activate the MoneySaver ® feature. MoneySaver ® is
the feature that cycles the fan with the compressor so
that the fan does not run all the time.
Toadjusttemperature
@ WARMER - Press the TEMP • button to raise the
temperature setting.
@ COOLER - Press the TEMP • button to lower the
temperature setting.
To adjust fan speed
(_) FAN SPEED- Press the FAN SPEED button to see the
current setting. Press again to change the fan speed.
F1 is the lowest setting (SLEEP SETTING), F2 is low
speed (LOW), F3 is medium (MED), and F4 is high
(HIGH).
Toset the hourclock
@ SET HOUR CLOCK - Press SET HOUR once to
see the current clock setting. Continue pressing the
button until you arrive at the current time. MAKE
SURE YOU SET THE A.M. AND RM. PROPERLY.
(NOTE: MINUTES ARE NOT SHOWN ON THE
DISPLAY.) A light will appear in the upper left comer
of the display when the hour is RM.
Toset thetimer
®
®
@
NOTE: Set the hour clock before attempting to set
timer functions. You can set the timer ON/OFF a
minimum of one hour apart, and a maximum of 23
hours apart.
TIMER START - Press START to view the current
start time for cooling. Continue pressing the START
button until you arrive at the start time you desire. The
start time for cooling will then be set.
TIMER STOP - Press the STOP button. Continue
pressing the STOP button until you arrive at the stop
time you desire. The stop time for cooling will then
be set.
TIMER ON/OFF - Press the ON/OFF button once
to activate (light on) or deactivate (light off) the
timer. Once the START and STOP times have been
selected, they will remain in memory, and cycle daily
until changed.
NOTE: If the unit is unplugged or the power is interrupted,
the HOUR CLOCK must be reset or the TIMER ON/OFF
functions will not work.
* A Friech%h RCI wireless remote control can be used to operate all QuietMaster _Electronic models. A remote is included with the SS08R,
SSIOR, SSI 2R, SSI4R and SSI 8R. _lbadd an RCI remote to other Friedfich models, please visit your local authorized Friech%h Dealer.
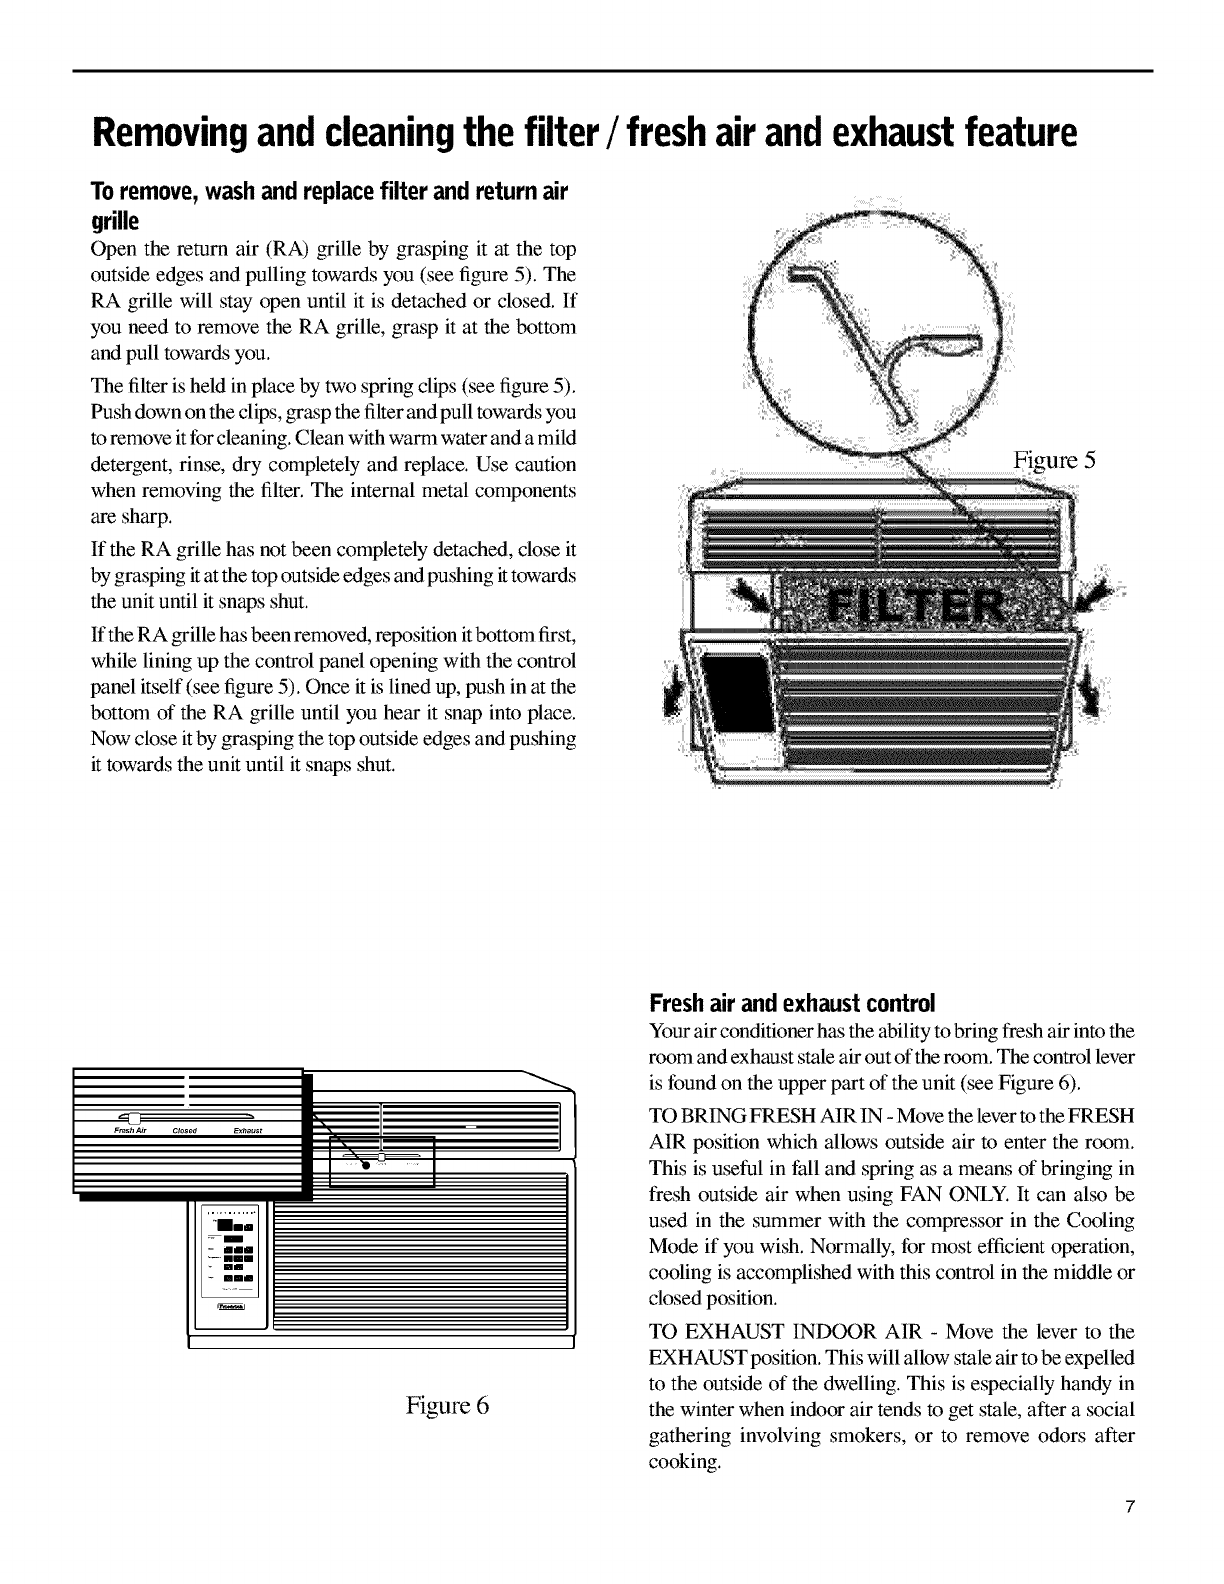
Removingandcleaningthe filter/freshair andexhaustfeature
To remove, wash and replace filter and return air
grille
Open the return air (RA) _ille by grasping it at the top
outside edges and pulling towards you (see figure 5). The
RA grille will stay open until it is detached or closed. If
you need to remove the RA grille, grasp it at the bottom
and pull towards you.
The filter is held in place by two spring clips (see figure 5).
Push down on the clips, _asp the filter and pull towards you
to remove it for cleaning. Clean with warm water and a mild
detergent, rinse, dry completely and replace. Use caution
when removing the filter. The internal metal components
are sharp.
If the RA grille has not been completely detached, close it
by grasping itat the top outside edges and pushing it towards
the unit until it snaps shut.
If the RA _ille has been removed, reposition it bottom first,
while lining up the control panel opening with the control
panel itself (see figure 5). Once it is lined up, push in at the
bottom of the RA _ille until you hear it snap into place.
Now close it by grasping the top outside edges and pushing
it towards the unit until it snaps shut.
))
FreshAir CYosed
_mmln
_--" nmm
- nun
- unmm
Figure 6
Freshair andexhaustcontrol
Your air conditioner has the ability to bring fresh air into the
room and exhaust stale air out of the room. The control lever
is found on the upper part of the unit (see Figure 6).
TO BRING FRESH AIR IN - Move the lever to the FRESH
AIR position which allows outside air to enter the room.
This is useful in fall and spring as a means of bringing in
fresh outside air when using FAN ONLY. It can also be
used in the summer with the compressor in the Cooling
Mode if you wish. Normally, for most efficient operation,
cooling is accomplished with this control in the middle or
closed position.
TO EXHAUST INDOOR AIR - Move the lever to the
EXHAUST position. This will allow stale air to be expelled
to the outside of the dwelling. This is especially handy in
the winter when indoor air tends to get stale, after a social
gathering involving smokers, or to remove odors after
cooking.
7
Troubleshootingtips
Powerfailure
If you have a power failure, the unit's auto-restart feature
will resume operation in the selected mode prior to the
power failure
Won't cool?
If your air conditioner operates, but won't cool; check to see
if the controls are properly set. Check the filter and clean
thoroughly if needed.
Won't run?
Make sure the power cord is plugged in all the way. Check
for a bad fuse or a tripped breaker. This guide shows the
proper fuse size on page 3. Lastly, you can reset the circuit
board by pressing the "MONEYSAVER" button and the
"FILTER ALERT" button at the same time. The LED
(small red light) for the Filter Alert will begin blinking.
Once this occurs, turn the unit off by pressing the On/Off
button once and then unplug the unit. Finally, plug the unit
back in and turn it on by pressing the On/Off button once.
All settings revert back to the factory default settings.
This is a warm weather appliance
Your air conditioner is designed to cool in warm weather
when the outside temperature is above 60°F (16°C), so it
won't cool a room if it is already cool outside. If you want
to cool a room in the winter, touch FAN ONLY and set the
FRESH AIR/EXHAUST control to FRESH AIR. This will
bring in a supply of outside air.
Condensationis normal
Air conditioners actually pump heat and humidity from your
room to the outside air. Humidity becomes water, and your
air conditioner will use most of the water to keep the outside
coil cool. If there is excessive humidity, there may be excess
water that will drip outside. This is normal operation.
Frosting
This usually occurs because of insufficient airflow across
the coils, a dirty filter, cool damp weather, or all of these.
Set unit to Fan Only and the frost will disappear. Setting the
thermostat a little warmer will probably prevent the frosting
from recurring.
Noises
All air conditioners make some noise. We build them to
operate as quietly as possible. An air conditioner mounted
in a wall is quieter than one mounted in a window.
Cleaning your air conditioner
The decorative front and the cabinet can be cleaned with
warm water and a mild liquid detergent. The indoor coil can
be vacuumed with a dusting attachment if it appears to be
dirty. The outdoor coil can be gently sprayed with a hose
if you can get to it. If not, you might call your dealer for a
more thorough cleaning when needed.
FRIEDRICH AIR CONDITIONING CO,
Post Office Box ]540 • San Antonio, Texas 78295-] 540
[2]0) 357-4400 • FAX [2]0) 357-4480
ROOM AIR CONDITIONERS
LIMITED WARRANTY
FIRST YEAR
ANY PART: If any part supplied by FRIEDRICH fails because of a defect in workmanship or material within twelve months from date of
original purchase, FRIEDRICH will repair the product at no charge, provided room air conditioner is reasonably accessible for service.
Any additional labor cost for removing inaccessible units and/or charges for mileage related to travel by a Service Agency that exceeds
25 miles one way will be the responsibility of the owner. This remedy is expressly agreed to be the exclusive remedy within twelve
months from the date of the original purchase.
SECOND THROUGH FIFTH YEAR
SEALED REFRIGERANT SYSTEM: If the sealed refrigeration system (defined for this purpose as the compressor, condenser coil,
evaporator coil, reversing valve, check valve, capillary, filter drier, and all interconnecting tubing) supplied by FRIEDRICH in your Room
Air Conditioner fails because of a defect in workmanship or material within sixty months from date of purchase, FRIEDRICH will pay a
labor allowance and parts necessary to repair the Sealed Refrigeration System; PROVIDED FRIEDRICH will not pay the cost of diagnosis
of the problem, removal, freight charges and transportation of the air conditioner to and from the Service Agency, and the reinstallation
charges associated with repair of the Sealed Refrigeration System. All such cost will be the sole responsibility of the owner. This remedy
is expressly agreed to be the exclusive remedy within sixty months from the date of the original purchase.
APPLICABILITY AND LIMITATIONS: This warranty is applicable only to units retained within the Fifty States of the U.S.A., District of
Columbia, and Canada. This warranty is not applicable to:
1.
2.
3.
Air filters or fuses.
Products on which the model and serial numbers have been removed.
Products which have defects or damage which results from improper installation, wiring, electrical current characteristics, or
maintenance; or caused by accident, misuse or abuse, fire, flood, alterations and/or misapplication of the product and/or units
installed in a corrosive atmosphere, default or delay in performance caused by war, government restrictions or restraints, strikes,
material shortages beyond the control of FRIEDRICH, or acts of God.
OBTAINING WARRANTY PERFORMANCE: Service will be provided bythe FRIEDRICH Authorized Deater or Service Organization
in your area. They are listed in the Yellow Pages. Ifassistance is required in obtaining warranty performance, write to: Room Air Conditioner
Service Manager, Friedrich Air Conditioning Co., P.O. Box 1540, San Antonio, TX 78295-1540.
LIMITATIONS: THIS WARRANTY IS GIVEN IN LIEU OF ALL OTHER WARRANTIES. Anything in the warranty notwithstanding,
ANY IMPLIED WARRANTIES OF FITNESS FOR PARTICULAR PURPOSE AND/OR MERCHANTABILITY SHALL BE LIMITED TO
THE DURATION OF THIS EXPRESS WARRANTY. MANUFACTURER EXPRESSLY DISCLAIMS AND EXCLUDES ANY LIABILITY
FOR CONSEQUENTIAL OR INCIDENTAL DAMAGE FOR BREACH OF ANY EXPRESSED OR IMPLIED WARRANTY.
NOTE: Some states do not allow limitations on how long an implied warranty lasts, or do not allow the limitation or exclusiondconsequential
or incidental damages, so the foregoing exclusions and limitations may not apply to you.
OTHER: This warranty gives you specific legal rights, and you may also have other rights which vary from state to state.
PROOF OF PURCHASE: Owner must provide proof of purchase in order to receive any warranty related services.
All service calls for explaining the operation of this product will be the sole responsibility of the consumer.
All warranty service must be provided by an Authorized FRIEDRICH Service Agency, unless authorized by FRIEDRICH prior to
repairs being made.
In case of questions regarding the provisions of this warranty, the English version will govern.
Revised 08/01

FRIEDRICH AIR CONDITIONING CO.
Post Office Box 1540 • San Antonio, Texas 78295-1540
4200 N. Pan Am Expressway • San Antonio, Texas 78218-5212
(210) 357-4400 • FAX (210) 357-4480
www.friedrich.com
Printed in the U.S.A. 920-090-04(01-03)
