FRIGIDAIRE Top Mount Refrigerator Manual L0504380
User Manual: FRIGIDAIRE FRIGIDAIRE Top Mount Refrigerator Manual FRIGIDAIRE Top Mount Refrigerator Owner's Manual, FRIGIDAIRE Top Mount Refrigerator installation guides
Open the PDF directly: View PDF ![]() .
.
Page Count: 8

Full terms of the warranties covering your Frigidaire Refrigerator-Freezer
are detailed on the back page of this booklet.
Please read them.
The model and serial numbers of your refrigerator-freezer
are found inside the fresh food compartment in the upper
left hand corner. Record and retain these numbers.
Model number FPC._-,_O(=:,7"-,_
Serial number
Frigidaire
Custom Imperial
FPCI-206T-8
Use and Care Guide
for your new Frigidaire
Refrigerator-Freezer
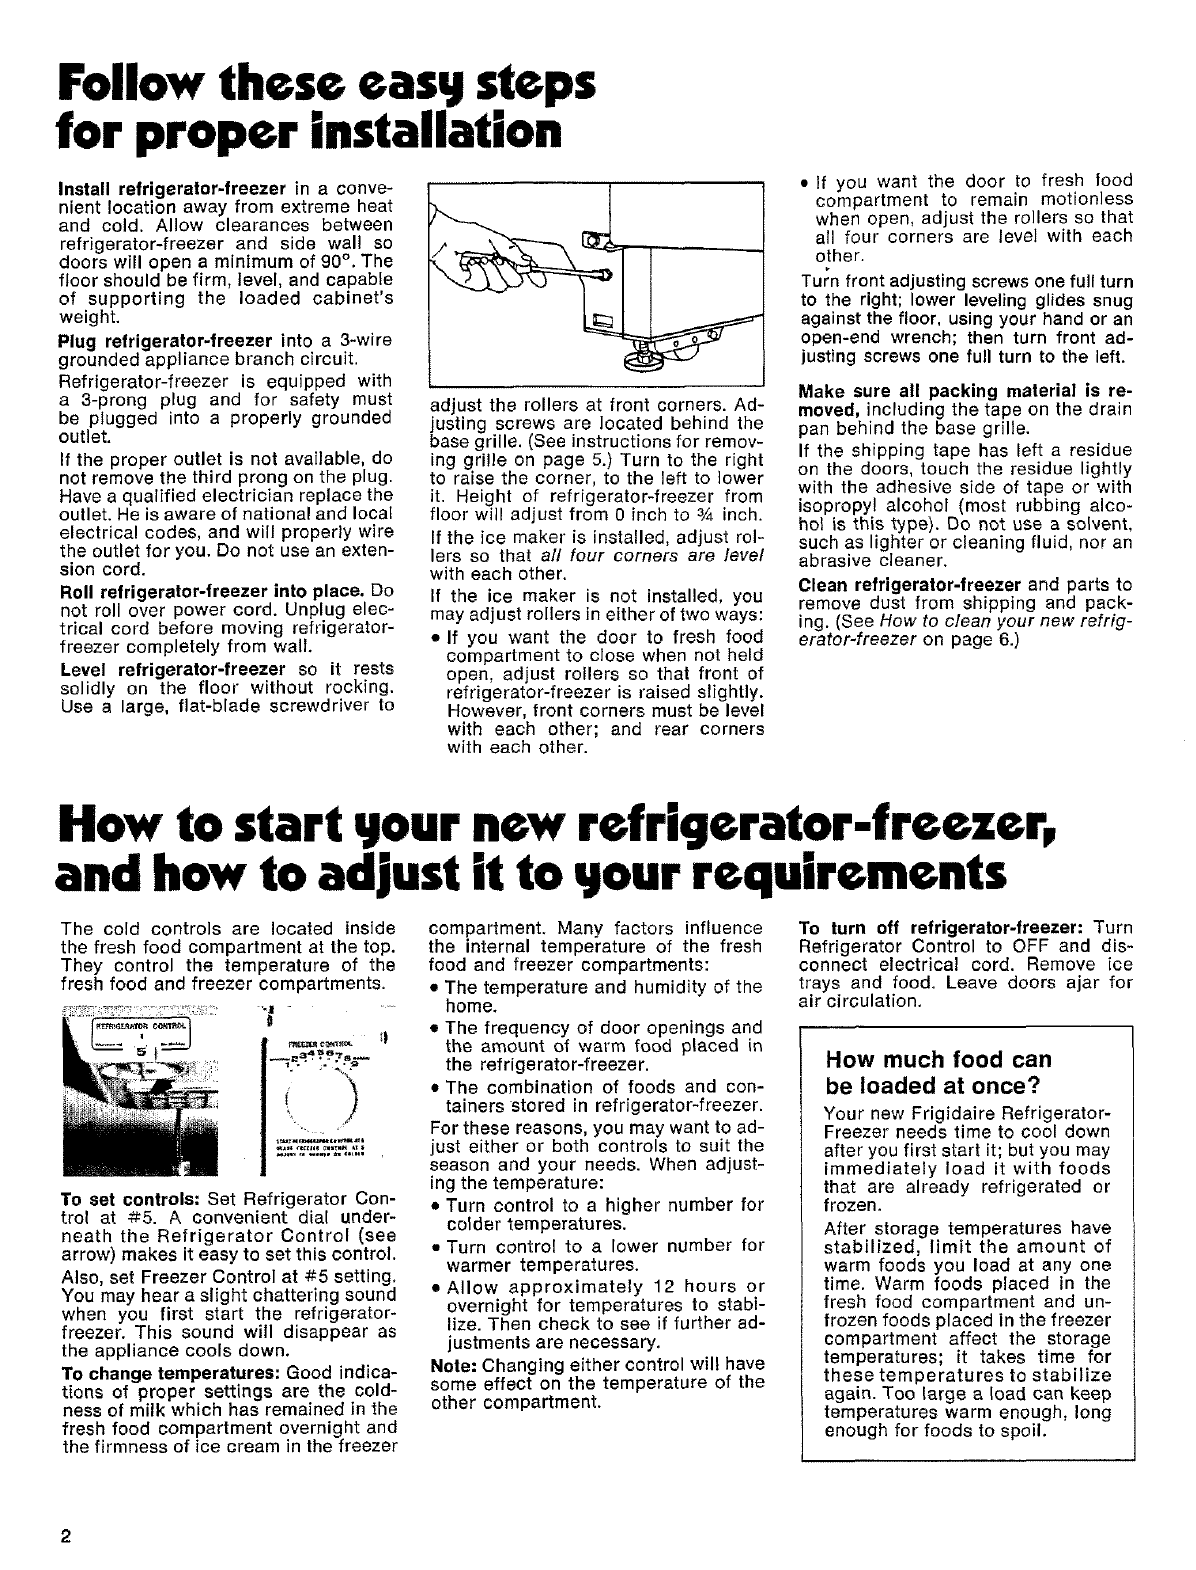
Follow these easq steps
for proper installation
Install refrigerator-freezer in aconve-
nient location away from extreme heat
and cold. Allow clearances between
refrigerator-freezer and side wall so
doors will open a minimum of 90% The
floor should be firm, level, and capable
of supporting the loaded cabinet's
weight,
Plug refrigerator-freezer into a3-wire
grounded appliance branch circuit.
Refrigerator-freezer is equipped with
a 3-prong plug and for safety must
be plugged into a properly grounded
outlet.
If the proper outlet is not available, do
not remove the third prong on the plug.
Have a qualified electrician replace the
outlet. He is aware of national and local
electrical codes, and will properly wire
the outlet for you. Do not use an exten-
sion cord.
Roll refrigerator-freezer into place. Do
not roll over power cord. Unplug elec-
trical cord before moving refrigerator-
freezer completely from wall.
Level refrigerator-freezer so it rests
solidly on the floor without rocking.
Use a large, flat-blade screwdriver to
adjust the rollers at front corners. Ad-
justing screws are located behind the
base grille. (See instructions for remov-
ing grille on page 5.) Turn to the right
to raise the corner, to the left to lower
it. Height of refrigerator-freezer from
floor will adjust from 0 inch to _ inch.
If the ice maker is installed, adjust rol-
lers so that aft four corners are level
with each other.
If the ice maker is not installed, you
may adjust rollers in either of two ways:
• If you want the door to fresh food
compartment to close when not held
open, adjust rollers so that front of
refrigerator-freezer is raised slightly.
However, front corners must be level
with each other; and rear corners
with each other.
• If you want the door to fresh food
compartment to remain motionless
when open, adjust the rollers so that
all four corners are level with each
other.
Turn front adjusting screws one full turn
to the right; lower leveling glides snug
against the floor, using your hand or an
open-end wrench; then turn front ad-
justing screws one full turn to the left.
Make sure all packing material is re-
moved, including the tape on the drain
pan behind the base grille.
If the shipping tape has left a residue
on the doors, touch the residue lightly
with the adhesive side of tape or with
isopropy! alcohol (most rubbing alco-
hol is this type). Do not use a solvent,
such as lighter or cleaning fluid, nor an
abrasive cleaner.
Clean refrigerator-freezer and parts to
remove dust from shipping and pack-
ing. (See How to clean your new refrig-
erator-freezer on page 6.)
How to start ¥our new refrigerator-freezer,
and how to adjust it to qour requirement
The cold controls are located inside
the fresh food compartment at the top.
They control the temperature of the
fresh food and freezer compartments.
To set controls: Set Refrigerator Con-
trol at #5. A convenient dial under-
neath the Refrigerator Control (see
arrow) makes it easy to set this control.
Also, set Freezer Control at #5 setting.
You may hear a slight chattering sound
when you first start the refrigerator-
freezer. This sound will disappear as
the appliance cools down.
To change temperatures: Good indica-
tions of proper settings are the cold-
ness of milk which has remained in the
fresh food compartment overnight and
the firmness of ice cream in the freezer
compartment. Many factors influence
the internal temperature of the fresh
food and freezer compartments:
• The temperature and humidity of the
home.
• The frequency of door openings and
the amount of warm food placed in
the refrigerator-freezer.
• The combination of foods and con-
tainers •stored in refrigerator-freezer.
For these reasons, you may want to ad-
just either or both controls to suit the
season and your needs. When adjust-
ing the temperature:
• Turn control to a higher number for
colder temperatures.
• Turn control to a lower number for
warmer temperatures.
• Allow approximately 12 hours or
overnight for temperatures to stabi-
lize. Then check to see if further ad-
justments are necessary.
Note: Changing either control will have
some effect on the temperature of the
other compartment.
To turn off refrigerator-freezer: Turn
Refrigerator Control to OFF and dis-
connect electrical cord. Remove ice
trays and food. Leave doors ajar for
air circulation.
How much food can
be loaded at once?
Your" new Frigidaire Refrigerator-
Freezer needs time to cool down
after you first start it; but you may
immediately load it with foods
that are already refrigerated or
frozen.
After storage temperatures have
stabilized, limit the amount of
warm foods you load at any one
time. Warm foods placed in the
fresh food compartment and un-
frozen foods placed in the freezer
compartment affect the storage
temperatures; it takes time for
these temperatures to stabilize
again. Too large a load can keep
temperatures warm enough, long
enough for foods to spoil.
Facts about
its operation
Frost-Proof, Your refrigerator-freezer
is completely Frost-Proof. You never
have to defrost either compartment.
Occasionally you may see or hear the
defrost system at work. A red glow be-
low the freezer compartment or slight
hissing sounds of frost melting are nor-
mal indications that you will never have
to defrost your refrigerator-freezer.
When the defrost system is operating
(less than half an hour), the compressor
does not run. At all other times, the com-
pressor cycles on and off as needed to
satisfy the setting of the Refrigerator
Control,
Flowing Cold. Frigidaire Flowing Cold
circulation gently blows cold air
through the food compartments; pro-
vides lower, more uniform tempera-
tures; provides faster return of proper
temperatures after door openings.
You may hear your new refrigerator-
freezer run more often than your old
one did. The new one probably is larger
and colder and has more special fea-
tures than your old one.
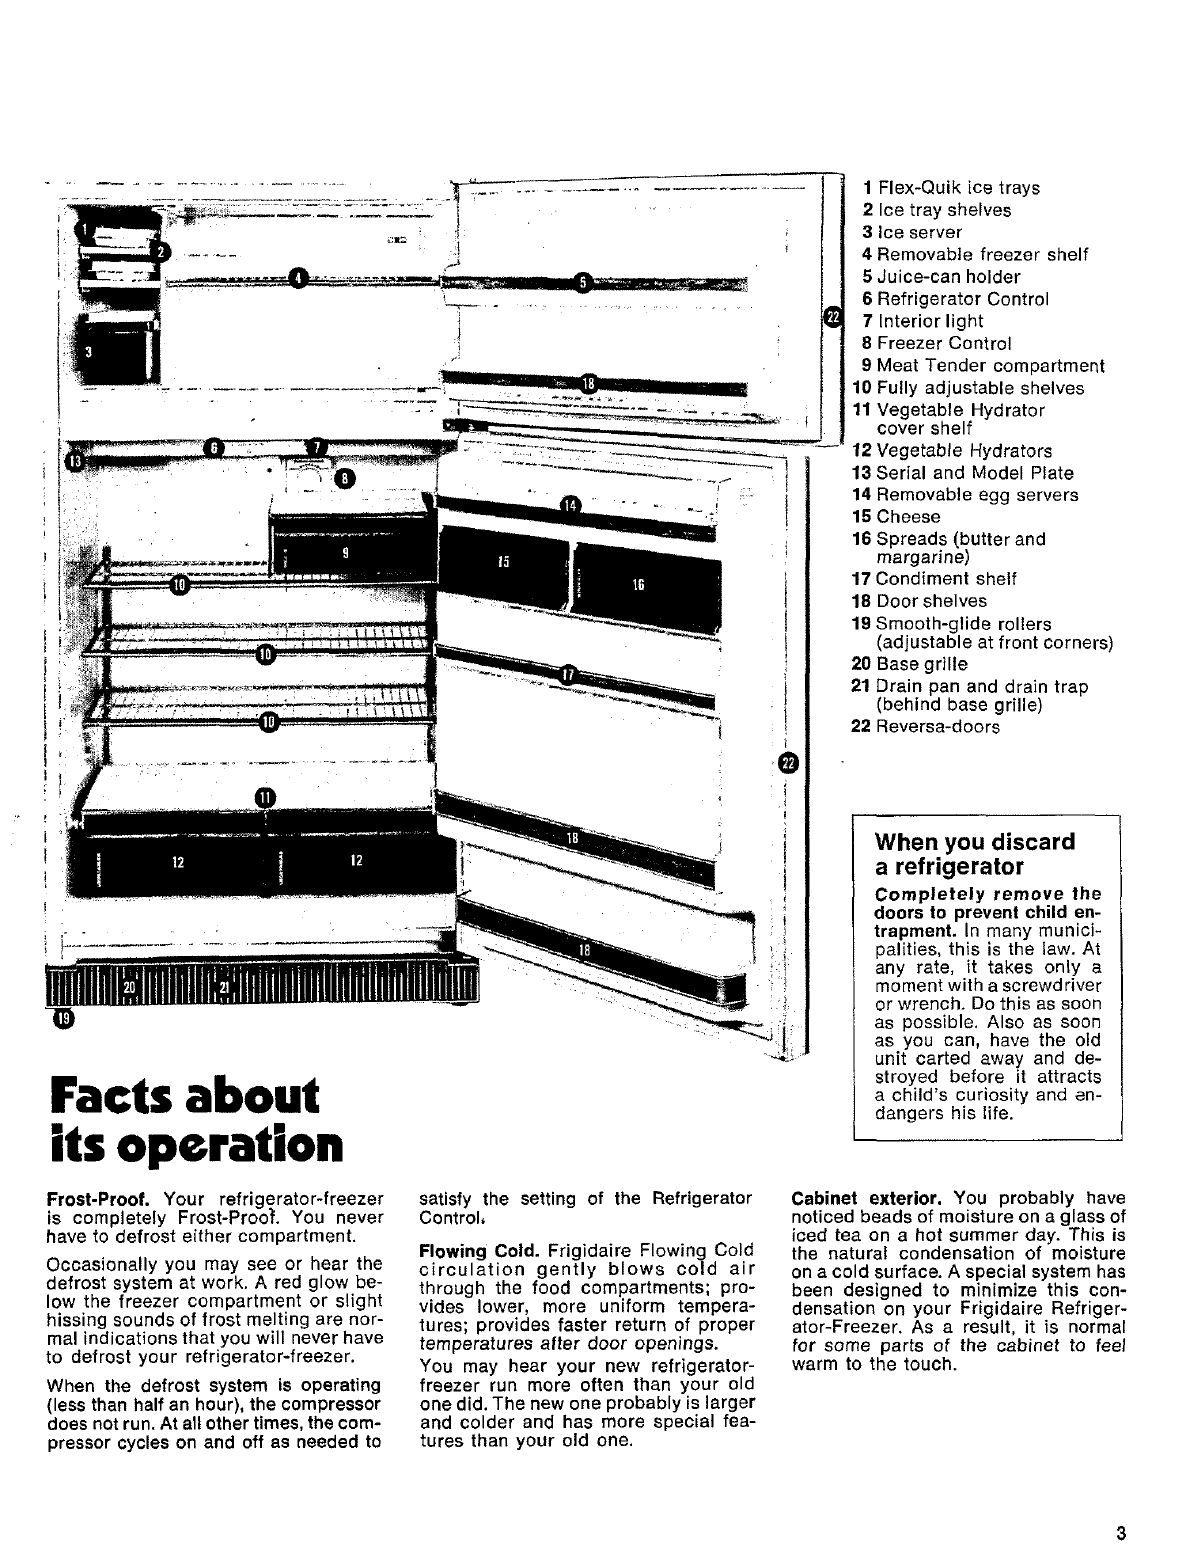
1Flex-Quik ice trays
2Ice tray shelves
3 Ice server
4 Removable freezer shelf
5Juice-can holder
6 Refrigerator Control
7Interior light
8 Freezer Control
9 Meat Tender compartment
10 Fully adjustable shelves
11 Vegetable Hydrator
cover shelf
12 Vegetable Hydrators
13 Serial and Model Plate
14 Removable egg servers
15 Cheese
16 Spreads (butter and
margarine)
17 Condiment shelf
18 Door shelves
19 Smooth-glide rollers
(adjustable at front corners)
20 Base grille
21 Drain pan and drain trap
(behind base grille)
22 Reversa-doors
When you discard
a refrigerator
Completely remove the
doors to prevent child en-
trapment. In many munici-
palities, this is the law. At
any rate, it takes only a
moment with a screwdriver
or wrench. De this as soon
as possible. Also as soon
as you can, have the old
unit carted away and de-
stroyed before it attracts
a child's curiosity and en-
dangers his life.
Cabinet exterior. You probably have
noticed beads of moisture on a glass of
iced tea on a hot summer day. This is
the natural condensation of moisture
on a cold surface. A special system has
been designed to minimize this con-
densation on your Frigidaire Refriger-
ator-Freezer. As a result, it is normal
for some parts of the cabinet to feel
warm to the touch.
Getting to know your new refrigerator-freezer
Here are some of the features of your
Frigidaire Refrigerator-Freezer. Take a
moment to know how each can give
you all the convenience it is designed
to provide. Numbers match those in the
illustration on page 3. For helpful in-
formation, read the Foodkeeping.Tips
booklet that is inside this refrigerator-
freezer.
Flex-Quik ice trays O
and ice server O
Fill trays 3/4 full to allow for expansion
of water during freezing. Do not ever-
fill! Place in freezer compartment on
ice tray shelves and on top of the
server, for best use of freezer com-
partment space.
To release ice cubes, place tray upside
down on top of ice sewer. Grasp rim of
sewer and ice tray at diagonally oppo-
site corners, as shown. Push down on
corners; cubes easily drop into server.
Meat Tender compartment O
The cold air directed to the Meat
Tender provides lower temperatures for
best keeping-quality of meats. This ex-
tends the storage time of most meats;
however, it does vary with the type of
meat, its quality, and original condition.
Such coldness makes it possible to
store top quality, freshly cut meats for
up to seven days; specialty meats,
ground meats, and poultry up to three
to five days. A surface freeze of ice
crystals may appear on the meat. This
is normal because of cold temperatures.
See Foodkeeping Tips for helpful in-
formation. Do not store fruits and veg-
etables in Meat Tender.
To receive special cooling, the Meat
Tender must be placed toward the
right, and top shelf must be in the top
position.
For more flexible use of the top shelf,
you can move the position of the Meat
Tender cover shelf.
Extreme left position. Right legs on shelf bars 7and 8.
4
Extreme right position. Right legs on shel! bars
fand 2.
Vegetable Hydrators O
Store fruits and vegetables in the Veg-
etable Hydrators. See Foodkeeping
Tips for helpful information.
Leafy vegetables contain a high per-
centage of water and require high-
humidity storage to retain their fresh,
crisp appearance. Rinse and drain
them before storing; this will add a
little extra moisture to help keep them
crisp.
Some moisture may collect in the
Hydrators because of the high moisture
content of the vegetables. When neces-
sary, simply sponge the Hydrators dry.
The moisture balance is best when
each drawer is %full of vegetables, or
more; vchen storing less, ybu may pre-
fer to place some items in plastic bags.
Egg servers _)
Be sure rear edge of server fits under
ledge on door and is securely held.
Store eggs large end up.
Drain pan _)
Moisture collected during automatic
defrosting evaporates from a drain pan
located behind the base grille on left
side. Finding moisture in the pan is
normal, especially on humid days.
Wash pan when you clean refrigerator-
freezer and always after spillovers.
Drain trapO
Located above the drain pan and under
the left Hydrator, the white drain trap
permits defrost water and spillovers to
drain into the pan below it. Clean it oc-
casionally, and always after spillovers.
Condenser
The condenser, an important part of
the sealed refrigeration system, is lo-
cated beneath the fresh food compart-
ment at the rear of the product. Clean
it periodically. (See How to clean your
new refrigerator-freezer on page 6.)
Energq-wise tips
Try not to place your refrigerator-
freezer near a range or hot air register.
Transfer warm foods to a cool con-
tainer before placing them in the refrig-
erator-freezer.
Return fresh and frozen foods to the
refrigerator-freezer as soon as pos-
sible. Measure and remove the quantity
needed for cooking or for the table,
and refrigerate the remainder at once.
Use cold controls efficiently by select-
ing the settings that provide about 36°F
in the fresh food compartment and 0°F
in the freezer.
Fill the refrigerator-freezer with food,
but be careful not to overfill.
Make sure that food packages do not
block air vents in the freezer or fresh
food compartment.
Open the doors only when necessary,
and only for as long as necessary.
Before you go on an extended vaca-
tion, turn off the refrigerator-freezer as
directed on page 7.
Clean the condenser surfaces of the
refrigerator-freezer; dirt restricts air
flow and acts to insulate the condenser,
forcing the refrigerator-freezer to work
harder and longer to maintain proper
temperatures.
A¢©essories
These accessories can make your new
Frigidaire Refrigerator-Freezer even
more convenient. They are available
through your Frigidaire Dealer at extra
charge.
"Add-On" Automatic Ice Maker, Model
IMK-8
Refrigerator Deodorizer -- #9956841
Appliance Care Kit--#6598972
Water supply line and fittings for "Add-On"
Automatic Ice Maker---_6597562
Party Ice Kit with3 mini-cube trays and
server u #614636
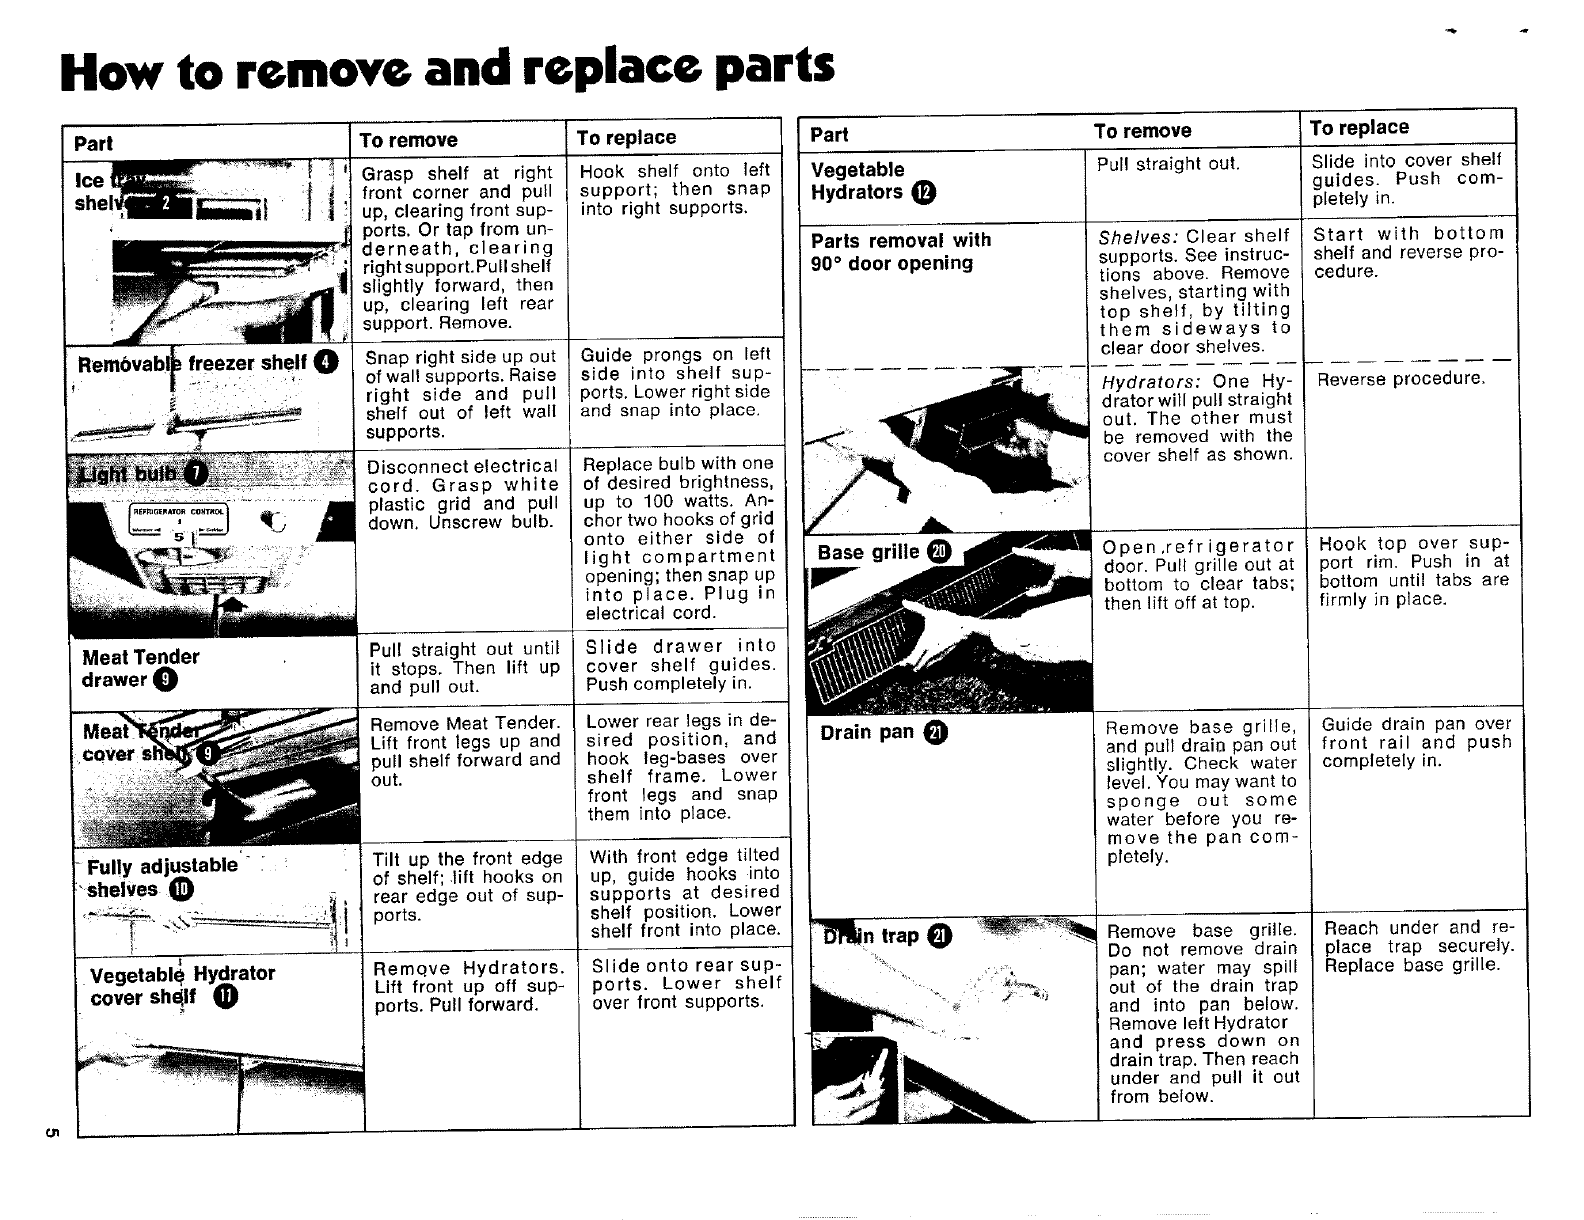
How to remove and replace parts
Part To remove
Meat Tender
drawer 0
Vegetabl_ HydArator
cover she_/f U)
Grasp shelf at right
front corner and pull
up, clearing front sup-
ports. Or tap from un-
derneath, clearing
right support. Pull shelf
slightly forward, then
up, clearing left rear
support. Remove.
Snap right side up out
of wall supports. Raise
right side and pull
shelf out of left wall
supports.
Disconnect electrical
cord. Grasp white
plastic grid and pull
down. Unscrew bulb.
Pull straight out until
it stops. Then lift up
and pull out.
Remove Meat Tender•
Lift front legs up and
pull shelf forward and
out.
Tilt up the front edge
of shelf; ,lift hooks on
rear edge out of sup-
ports.
Remqve Hydrators.
Lift front up off sup-
ports. Pull forward.
To replace
Hook shelf onto left
support; then snap
into right supports.
Guide prongs on left
side into shelf sup-
ports. Lower right side
and snap into place•
Replace bulb with one
of desired brightness,
up to 100 watts. An-
chor two hooks of grid
onto either side of
light compartment
opening; then snap up
into place. Plug in
electrical cord.
Slide drawer into
cover shelf guides.
Push completely in.
Lower rear legs in de-
sired position, and
hook leg-bases over
shelf frame. Lower
front legs and snap
them into place.
With front edge tilted
up, guide hooks into
supports at desired
shelf position. Lower
shelf front into place.
Slide onto rear sup-
ports. Lower shelf
over front supports.
Part
Vegetable
Hydrators _)
Parts removal with
90° door opening
Drain pan _)
_n trap _)
To remove To replace
Pull straight out.
Shelves: Clear shelf
supports. See instruc-
tions above. Remove
shelves, starting with
top she_f, by tilting
them sideways to
clear door shelves.
Hydrators: One Hy-
drator will pull straight
out. The other must
be removed with the
cover shelf as shown.
Open,refr igerator
door. Pull grille out at
bottom to clear tabs;
then lift off at top.
Remove base grille,
and pull draia pan out
slightly. Check water
level. You may want to
sponge out some
water before you re-
move the pan com-
pletely.
Remove base grille.
Do not remove drain
pan; water may spill
out of the drain trap
and into pan below•
Remove left Hydrator
and press down on
drain trap. Then reach
under and pull it out
from below.
Slide into cover shelf
guides. Push com-
pletely in.
Start with bottom
shelf and reverse pro-
cedure.
Reverse procedure.
Hook top over sup-
port rim. Push in at
bottom until tabs are
firmly in place.
Guide drain pan over
front rail and push
completely in.
Reach under and re-
place trap securely.
Replace base grille.

How to clean
your new refrigerator-freezer
Your Frigidaire Refrigerator-Freezer is
Frost-Proof; you will never have to de-
frost the freezer or fresh food compart-
ment. However, you will still want to
remove food spills and freshen and
deodorize it.
Cleaners: The Frigidaire cleaners noted
on this page are available from your
Frigidaire Dealer or Frigidaire Autho-
rized Service Agency at extra charge.
Never use harsh, abrasive cleansers,
heavy-duty cleaners, or solvents on any
surface.
Turn Refrigerator Control to OFF. Re-
move frozen foods and wrap in news-
papers; remove fresh foods. See the
chart on page 5 for instructions on how
to remove shelves and other parts. The
chart on this page tells you how to
clean them.
The finishing touch: Replace all parts,
and return Refrigerator Control to de-
sired setting.
Part Cleaning instructions
Cabinet exterior Wipe with damp, sudsy cloth; rinse and dry. For stub-
born stains and for periodic waxing, use Frigidaire
Surface Renew.
Magnetic door Wash with warm sudsy water; rinseoand dry. Or use
seals Frigidaire Seal Renew.
Fresh food and Sponge with baking soda solution (3 tbsp. per quart of
freezer warm water); rinse and dry.
compartments
Ice trays Place on top rack of dishwasher. Or wash in warm sudsy
water; rinse and dry.
Ice server Wash in warm sudsy water; rinse and dry. Do not wash
Meat Tender in dishwasher.
Hydrators
All shelves
Egg servers
Butter dish
Drain opening Flush with warm water. Be sure drain pan is in place
and channel and that water does not overflow.
(across bottom of
fresh food
compartment)
Drain trap Rinse under warm running water.
Base grille Wash in warm sudsy water; rinse and dry.
Drain pan
Clean periodically for efficient operation. Roll out the
refrigerator-freezer; disconnect the electric cord; and
remove the fibreboard cover panel from the back of the
cabinet. The condenser (see the warranty illustration) is at
the lower left. Use abrush and vacuum cleaner attach-
ment to clean dust and lint from the condenser and sur-
rounding area. Replace rear cover panel; connect the
electric cord; and roll the refrigerator-freezer back into
place. (Do not roll over power cord.)
Reversa-doors:
How to change hinging
Refrigerator-freezer doors that open
out and block your path are a big in-
convenience. If your new kitchen poses
this problem, move the hinges and han-
dles to opposite side of the doors so
the doors open in the more convenient
direction. You can do it yourself (since
the doors are heavy, two people can
move the doors more easily) or call
your Frigidaire Authorized Service
Agency (at extra charge).
Tools needed: One _;_-inch open-end or
box-end wrench. One No. 2size Phil-
lips screwdriver.
Reversa-door steps: The diagram on
this page shows the positions of hinges,
handles, and other hardware as it is to
be reinstalled when door is hinged on
the left-hand side. Holes for relocating
hinges are covered by eight decorator
screws.
Before starting, empty freezer and fresh
food compartment door shelves. Wrap
frozen foods in several folds of news-
paper and store in cool place.
Be careful not to lose any of the parts
removed. They wil/ all be needed dur-
ing reassembly.
1. Open the door to fresh food com-
partment and remove base grille
(see instructions on page 5).
2. Remove the eight decorator screws
(A) from side opposite hinges to
expose new hinge mounting holes.
3. Remove small plastic plugs (B) from
top and bottom of freezer compart-
ment door and top of door to fresh
food compartment. Also, transfer
small plug (C) to opposite side.
(Removal is made easier using the
edge of spatula.)
4. Close both doors. The magnetic
door seals will help support the
doors while you remove hinges.
5. Remove top hinge (D) and nylon
bearing (E); lift off free,zer compart-
ment door.
6. Remove center hinge (F), gasket
(G), and two nylon bearings (H);
lift off door to fresh food compart-
ment.
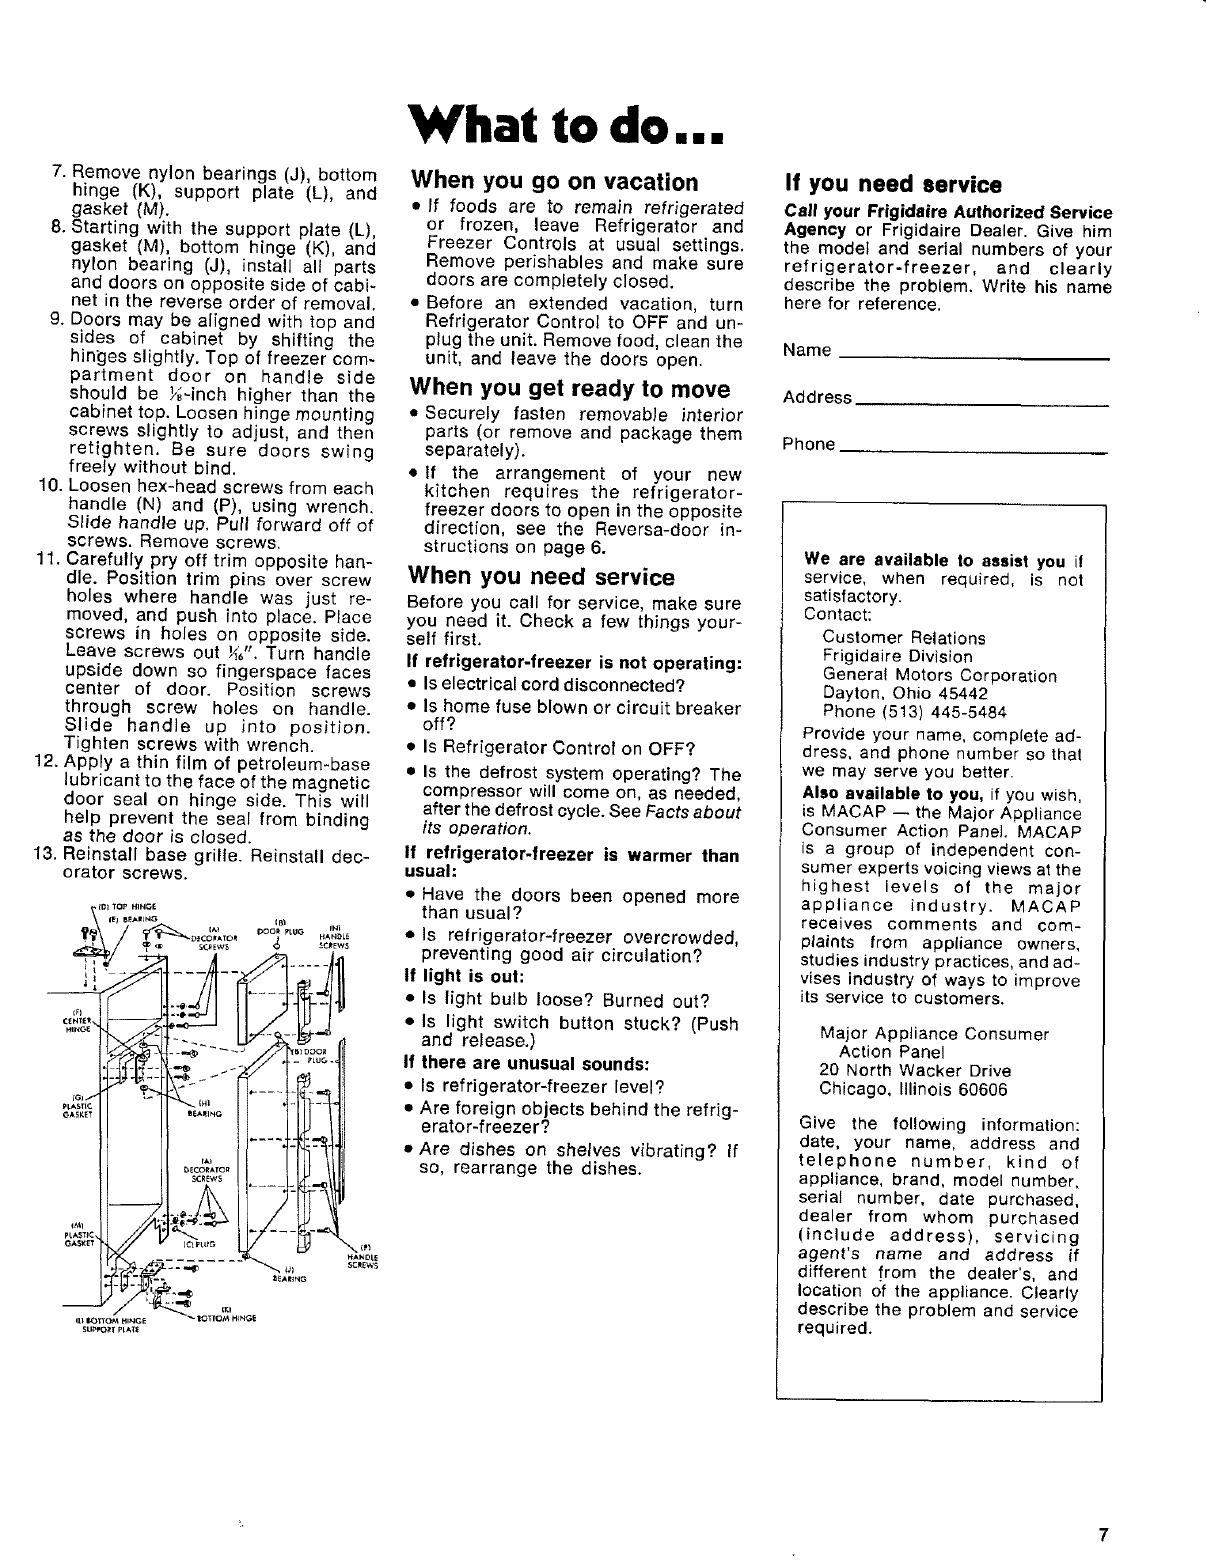
7.Removenylonbearings(J),bottom
hinge(K),supportplate(L), and
gasket (M).
8. Starting with the support plate (L),
gasket (M), bottom hinge (K), and
nylon bearing (J), install all parts
and doors on opposite side of cabi-
net in the reverse order of removal.
9. Doors may be aligned with top and
sides of cabinet by shifting the
hinges slightly. Top of freezer com-
partment door on handle side
should be Y_-inch higher than the
cabinet top. Loosen hinge mounting
screws slightly to adjust, and then
retighten. Be sure doors swing
freely without bind.
10. Loosen hex-head screws from each
handle iN) and (P), using wrench,
S_ide handle up, Pul_ forward off of
screws. Remove screws.
11. Carefully pry off trim opposite han-
dle. Position trim pins over screw
holes where handle was just re-
moved, and push into place. Place
screws in holes on opposite side.
Leave screws out _J'. Turn handle
upside down so fingerspace faces
center of door. Position screws
through screw holes on handle.
Slide handle up into position.
Tighten screws with wrench.
12. Apply a thin film of petroleum-base
lubricant to the face of the magnetic
door seal on hinge side. This will
help prevent the seal from binding
as the door is closed.
13. Reinstall base grille. Reinstall dec-
orator screws.
What to do...
When you go on vacation
*If foods are to remain refrigerated
or frozen, leave Refrigerator and
Freezer Controls at usual settings.
Remove perishables and make sure
doors are completely closed.
•Before an extended vacation, turn
Refrigerator Control to OFF and un-
plug the unit. Remove food, clean the
unit, and leave the doors open.
When you get ready to move
•Securely fasten removabJe interior
parts (or remove and package them
separately).
• If the arrangement of your new
kitchen requires the refrigerator-
freezer doors to open in the opposite
direction, see the Reversa-door in-
structions on page 6.
When you need service
Before you call for service, make sure
you need it. Check a few things your-
self first.
If refrigerator-freezer is not operating:
• Is electrical cord disconnected?
• Is home fuse blown or circuit breaker
off?
•Is Refrigerator Control on OFF?
*Is the defrost system operating? The
compressor will come on, as needed,
after the defrost cycle. See Facts about
its operation.
If refrigerator-freezer is warmer than
usual:
•Have the doors been opened more
than usual?
•Is refrigerator-freezer overcrowded,
preventing good air circulation?
If light is out:
•Is light bulb loose? Burned out?
• Is light switch button stuck? (Push
and release.)
I1 there are unusual sounds:
• Is refrigerator-freezer level?
• Are foreign objects behind the refrig-
erator-freezer?
•Are dishes on shelves vibrating? If
so, rearrange the dishes.
If you need service
Call your Frigidaire Authorized Service
Agency or Frigidaire Dealer. Give him
the model and serial numbers of your
refrigerator-freezer, and clearly
describe the problem. Write his name
here for reference.
Name
Address
Phone
We are available to assist you it
service, when required, is net
satisfactory.
Contact:
Customer Relations
Frigidaire Division
General Motors Corporation
Dayton, Ohio 45442
Phone (513) 445-5484
Provide your name, complete ad-
dress, and phone number so that
we may serve you better.
Also available to you, if you wish,
is MACAP -- the Major Appliance
Consumer Action Panel. MACAP
is a group of independent con-
sumer experts voicing views at the
highest levels of the major
appliance industry. MACAP
receives comments and com-
plaints from appliance owners,
studies industry practices, and ad-
vises industry of ways to improve
its service to customers.
Major Appliance Consumer
Action Panel
20 North Wacker Drive
Chicago, Illinois 60606
Give the following information:
date, your name, address and
telephone number, kind of
appliance, brand, model number,
serial number, date purchased,
dealer from whom purchased
(include address), servicing
agent's name and address if
different from the dealer's, and
location of the appliance. Clearly
describe the problem and service
required.
_7
Your Frigidaire
Refrigerator-Freezer is protected
by these warranties
FULL ONE-YEAR WARRANTY
Frigidaire (Frigidaire Division, General Motors Corporation)* warrants that Frigidaire will repair, without
charge, any defect or malfunction occurring in this Refrigerator during the first year after date of delivery
to the original consumer.
FULL FOUR-YEAR REFRIGERATING SYSTEM AND CABINET LINER WARRANTY
During the second through fifth years, Frigidaire* will repair, without charge, any defect or malfunction oc-
curring in the cabinet liner or Refrigerating System. The Refrigerating System consists of the compressor
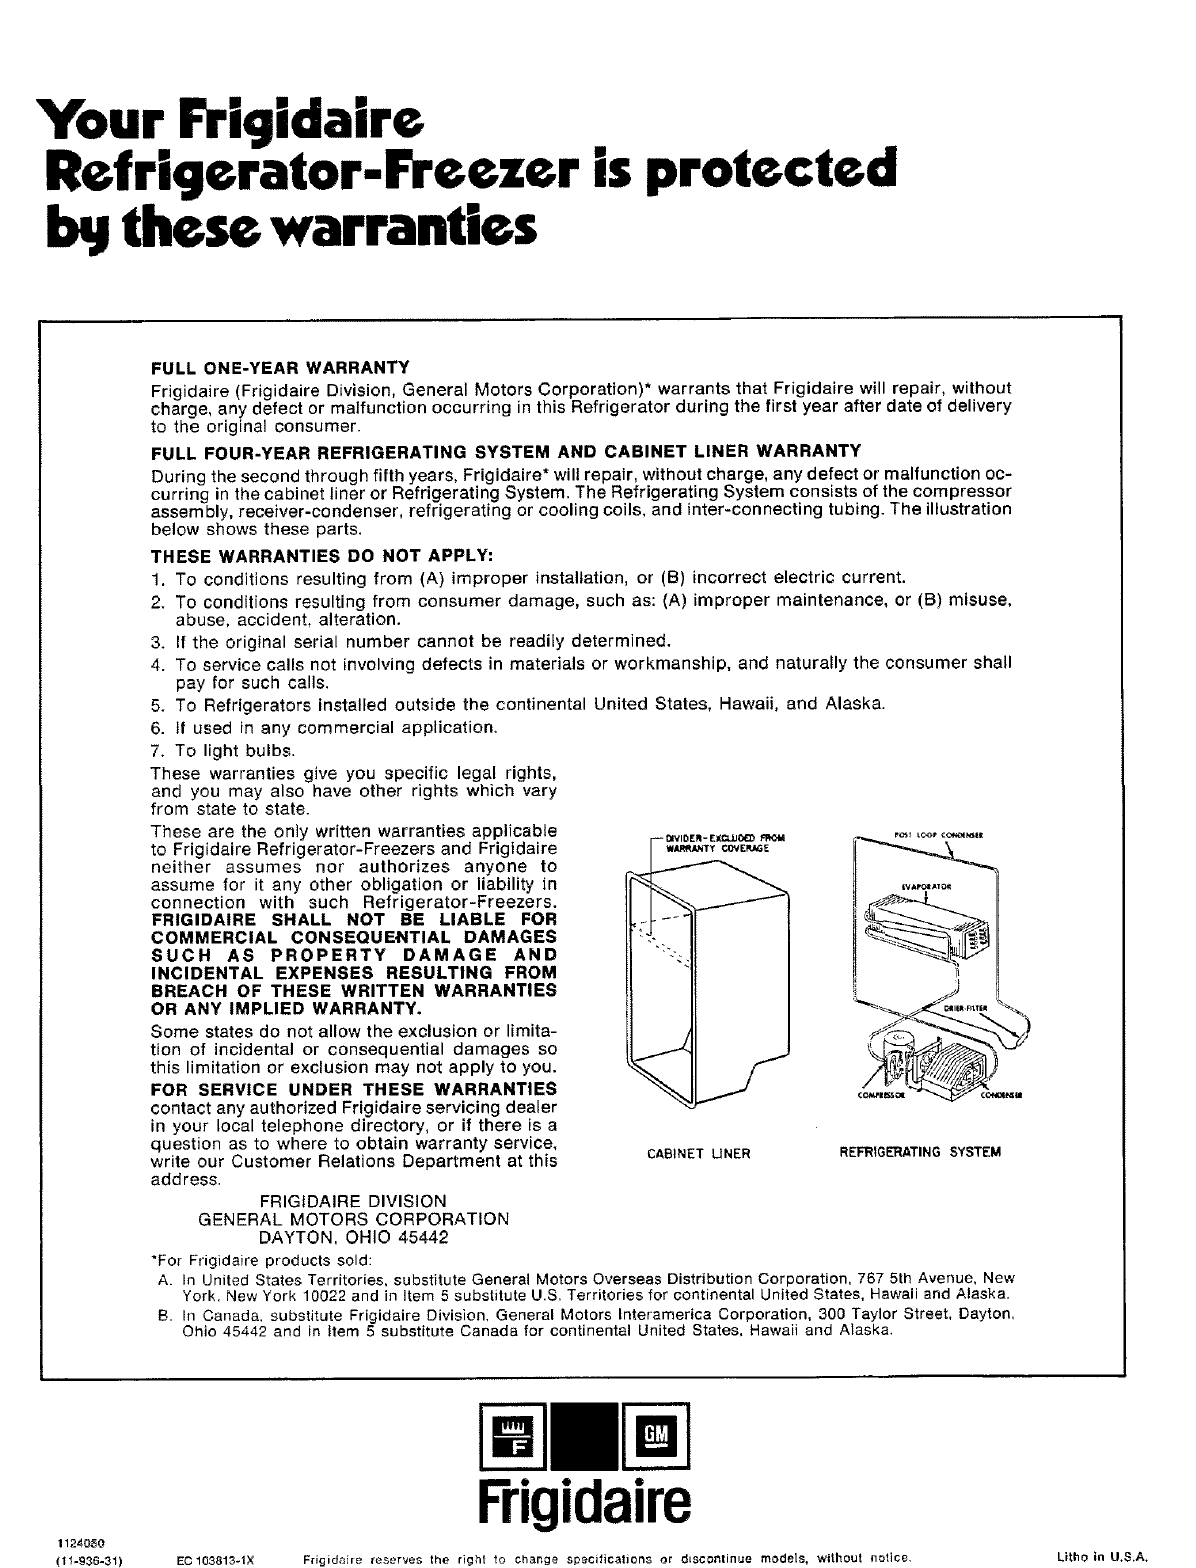
assembly, receiver-condenser, refrigerating or cooling coils, and inter-connecting tubing. The illustration
below shows these parts.
THESE WARRANTIES DO NOT APPLY:
1. To conditions resulting from (A) improper installation, or (B) incorrect electric current.
2. To conditions resulting from consumer damage, such as: (A) improper maintenance, or (B) misuse,
abuse, accident, alteration.
3. If the original serial number cannot be readily determined.
4. To service calls not involving defects in materials or workmanship, and naturally the consumer shall
pay for such calls.
5. To Refrigerators installed outside the continental United States, Hawaii, and Alaska.
6. tf used in any commercial application.
7. To light bulbs.
These warranties give you specific legal rights,
and you may also have other rights which vary
from state to state.
These are the only written warranties applicable
to Frigidaire Refrigerator-Freezers and Frigidaire
neither assumes nor authorizes anyone to
assume for it any other obligation or liability in
connection with such Refrigerator-Freezers.
FRIGIDAIRE SHALL NOT BE LIABLE FOR
COMMERCIAL CONSEQUENTIAL DAMAGES
SUCH AS PROPERTY DAMAGE AND
INCIDENTAL EXPENSES RESULTING FROM
BREACH OF THESE WRITTEN WARRANTIES
OR ANY IMPLIED WARRANTY.
Some states do not allow the exclusion or limita-
tion of incidental or consequential damages so
this limitation or exclusion may not apply to you.
FOR SERVICE UNDER THESE WARRANTIES
contact any authorized Frigidaire servicing dealer
in your local telephone directory, or if there is a
question as to where to obtain warranty service,
write our Customer Relations Department at this
address.
FRIGIDAIRE DIVISION
GENERAL MOTORS CORPORATION
DAYTON, OHIO 45442
*For Frigidaire products sold:
CABINET UNER REFRIGERATING SYSTEM
A. In United States Territories, substitute General Motors Overseas Distribution Corporation, 767 5th Avenue, New
York, New York 10022 and in Item 5 substitute U.S. Territories for continental United States, Hawaii and Alaska.
B. In Canada, substitute Frigidaire Division, General Motors Interamerica Corporation, 300 Taylor Street, Dayton,
Ohio 45442 and in Item 5 substitute Canada for continental United States, Hawaii and Alaska.
1124050
(1%93S-31) EC 103813-1X
Frigidaire
Frigid_Jire reserves the righ[ to change specifications or discontinue models, without [lotlce, Lithe in U,S.A.
