FUHONGXING TECHNOLOGY NB001 Wireless Notebook Computer User Manual
SHENZHEN FUHONGXING TECHNOLOGY CO.,LTD. Wireless Notebook Computer
UserManual.wiki
>
FUHONGXING TECHNOLOGY
>
NB001 User Manual
User Manual
Navigation menu
Upload a User Manual
Namespaces
Wiki Guide
HTML
PDF
Info
Views
User Manual
Discussion / Help
Navigation

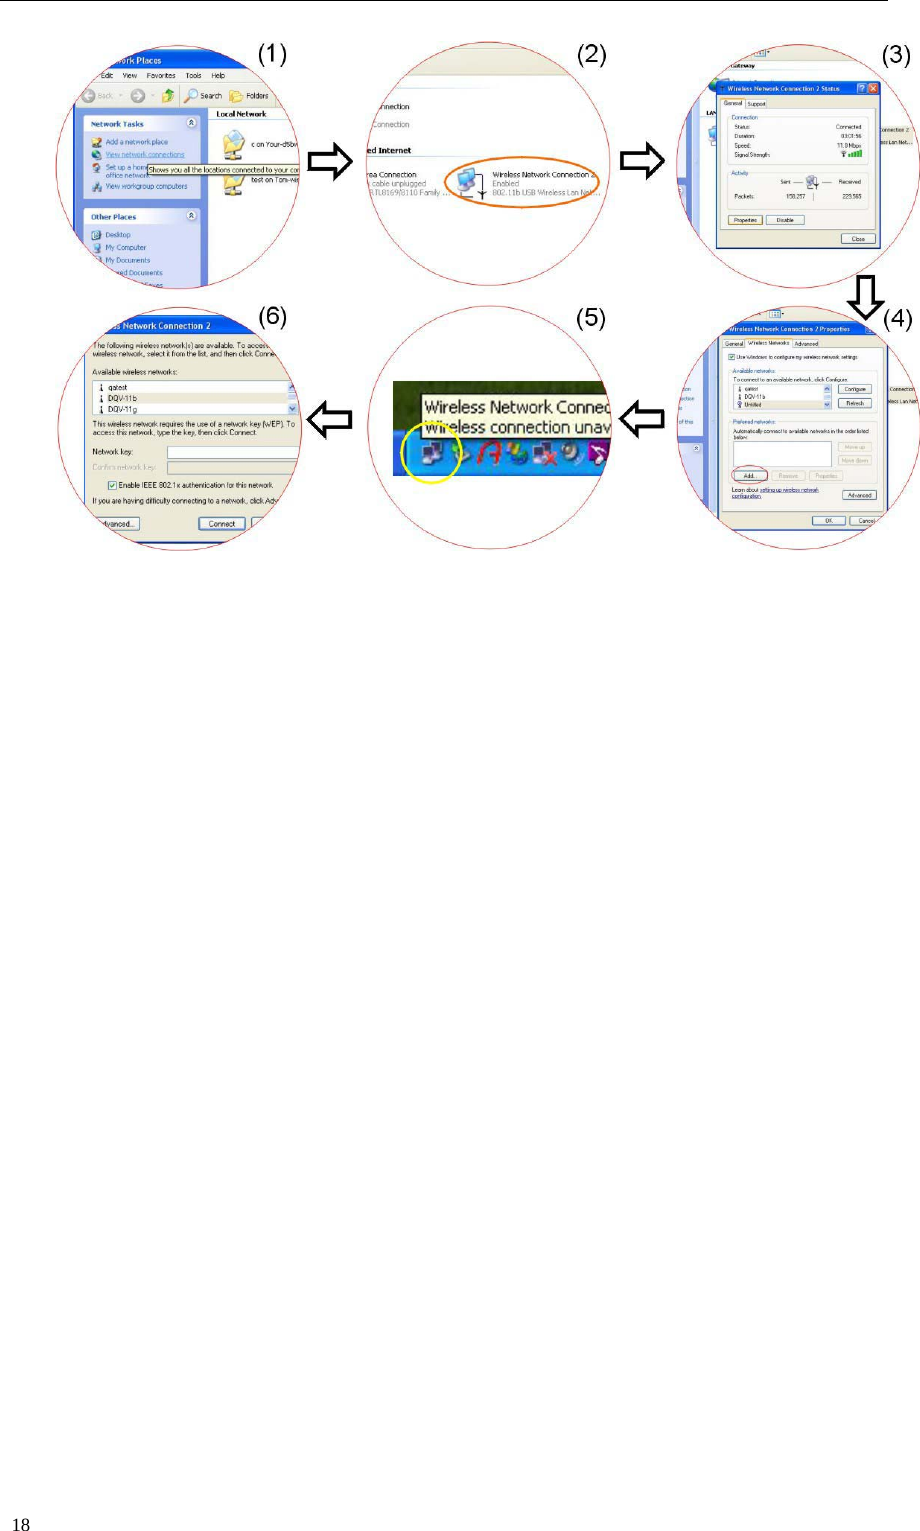
![13Your computer includes a 2.5-inch IDE hard disk drive . The Notebook’s Hot Key Controls KEYS FUNCTIONS [Fn] + [Esc] System to enter hibernation. [Fn] + [F1] Open/closure of the wireless LAN. [Fn] + [F2] Open/closure of the Bluetooth. [Fn] + [F3] This key combination turns on/off the volume.. [Fn] + [F4] Enable/Disable the Mouse. [Fn] + [F5] This key combination toggles the display between the LCD, CRT, simultaneous LCD/CRT. [Fn] + [F6] Decreases the brightness level. [Fn] + [F7] Increases the brightness level. [Fn] + [F8] Decreases the speaker volume. [Fn] + [F9] Increases the speaker volume. [Fn] + [F10] Open/closure of the LCD. The TouchPad The touchpad is a rectangular electronic panel located just below your keyboard. You can use the static-sensitive panel of the touchpad and slit it to move the cursor. You can use the buttons below the touchpad as left and right mouse buttons TouchPad Precautions The TouchPad is a pressure sensitive device. Please take note of the following precautions. ●Make sure the TouchPad does not come into contact with dirt, liquids or grease. ●Do not touch the TouchPad if your fingers are dirty. ●Do not rest heavy objects on the TouchPad or the TouchPad buttons. LCD Care LCD screens are delicate devices that need careful handling. Please pay attention to the following precautions: ●When you are not using the computer, keep the LCD screen closed to protect it from dust. ●If you need to clean your LCD screen, use a soft tissue to gently wipe the LCD surface. ●Do not put your fingers or sharp objects directly on the surface and never spray cleaner directly onto the display. ●Do not press on, or store any objects on the cover when it is closed. Doing so may cause the LCD to break.](https://usermanual.wiki/FUHONGXING-TECHNOLOGY/NB001/User-Guide-1112338-Page-14.png)
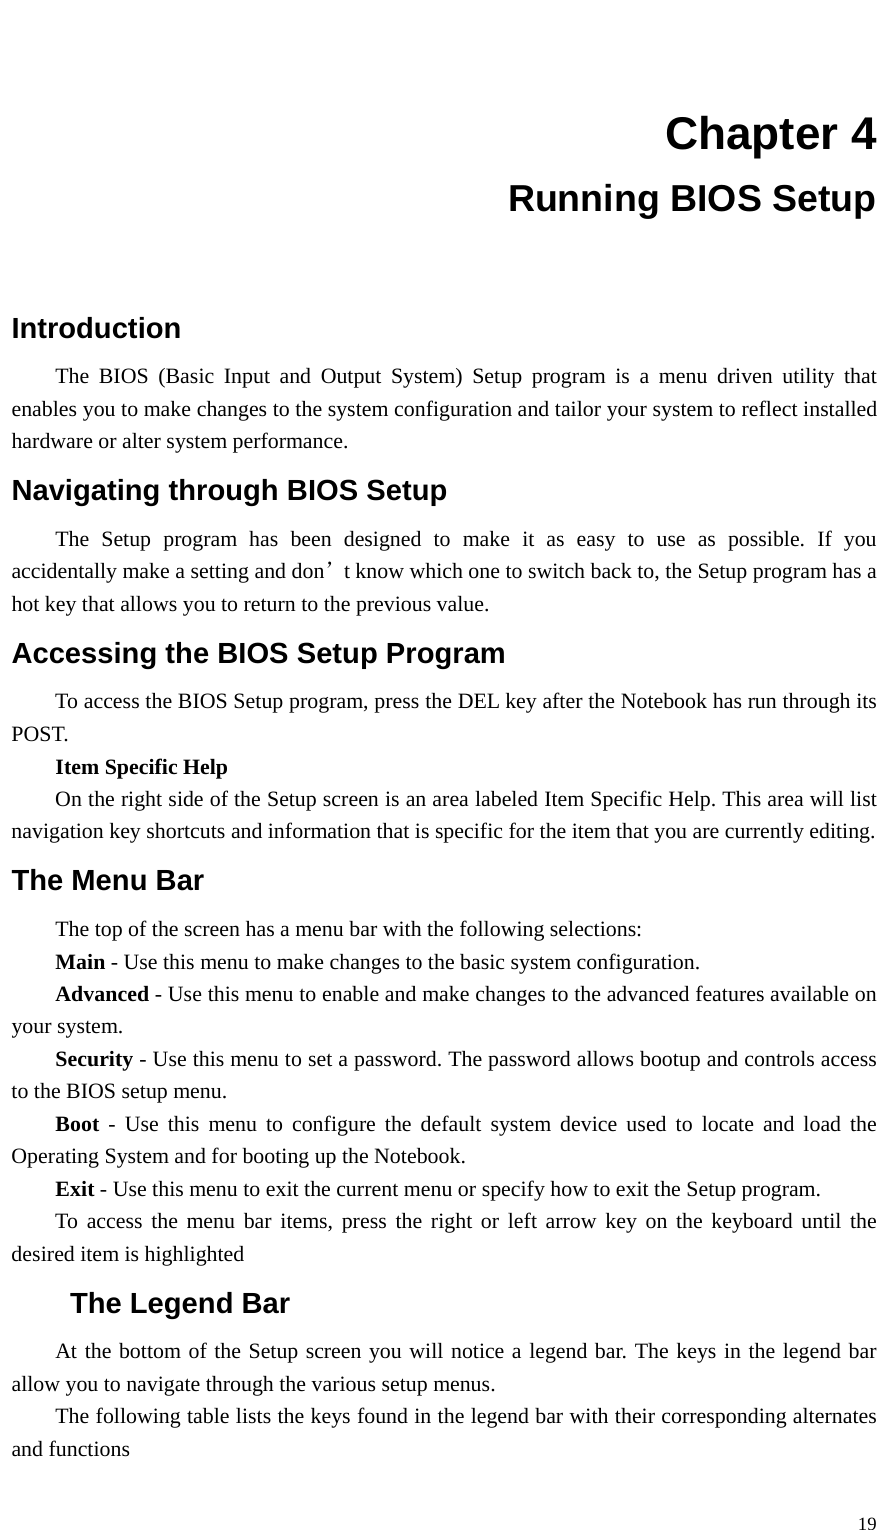
![20 Legend Key Alternate Key Function F1 Displays the General Help window. It can be enabled from anywhere in the BIOS. Esc Jumps to the Exit menu or returns to the Main menu from a submenu. ← Selects the menu item to the left. → Selects the menu item to the right. ↑ or ↓ Keypad arrow keys Moves the cursor up and down between fields. Tab Enter Moves the cursor to the next position available in the field. Minus key (-) Scrolls backward through the values for the highlighted field. Plus key (+) Scrolls forward through the values for the highlighted field. Home PgUp Moves the cursor to the field at the top of the window. End PgDn Moves the cursor to the field at the bottom of the window. F9 Sets the parameters for the current menu to their default values. F10 Save andExit. Enter Will select a sub menu or show a range of options for a field. Launching Submenus Note that a right pointer symbol .. appears to the left of certain fields. This pointer indicates that a submenu can be launched from this field. A submenu contains additional options for a field parameter. To call up a submenu, simply move the cursor to highlight the field and press the [Enter] key. Use the [Esc] key to return to the Main menu. General Help In addition to the Item Specific Help window, the BIOS Setup program also provides a General Help screen can be called up from any menu by simply pressing [F1]. Use the [PgUp] and [PgDn] keys or the up and down arrow keys (仾伀) to scroll through the entire help document. Press the Home key to display the first page, press End to go to the last page. To exit the help window, press the [Enter] or the [Esc] key. Save Changes and Exit the Setup Program Refer to the Exit menu section of this chapter for detailed information on saving changes and](https://usermanual.wiki/FUHONGXING-TECHNOLOGY/NB001/User-Guide-1112338-Page-21.png)