FUZHOU ESUN ELECTRONIC EN2053 Wireless Meat Thermometer User Manual Users manual
FUZHOU ESUN ELECTRONIC CO.,LTD Wireless Meat Thermometer Users manual
Users manual
- 1 -
Remote Wireless BBQ & Meat Thermometer with 4 Probes
Introduction
Thank you for purchasing the professional Remote Wireless BBQ & Meat Thermometer, a programmable radio frequency food thermometer. You will
now be able to remotely monitor 4 things at the same time.
The main technical parameters
Wireless transmission distance:≤100 meters.
4 probes temperature display and can monitors 4 things at the same time.
Synchronize/Pair Transmitter and Receiver.
Waterproof Probes.
High heat probe wires rated to 716°F (380°C).
Temperature range: -4℉to 572℉(-20℃to 300℃).
Probe temp displayed to 1/10 Degrees.
Programmable alert with preset temperature for specific foods.
Back light Auto off after 10 seconds without any operation.
Settings are retained even when unit is turned off.
- 2 -
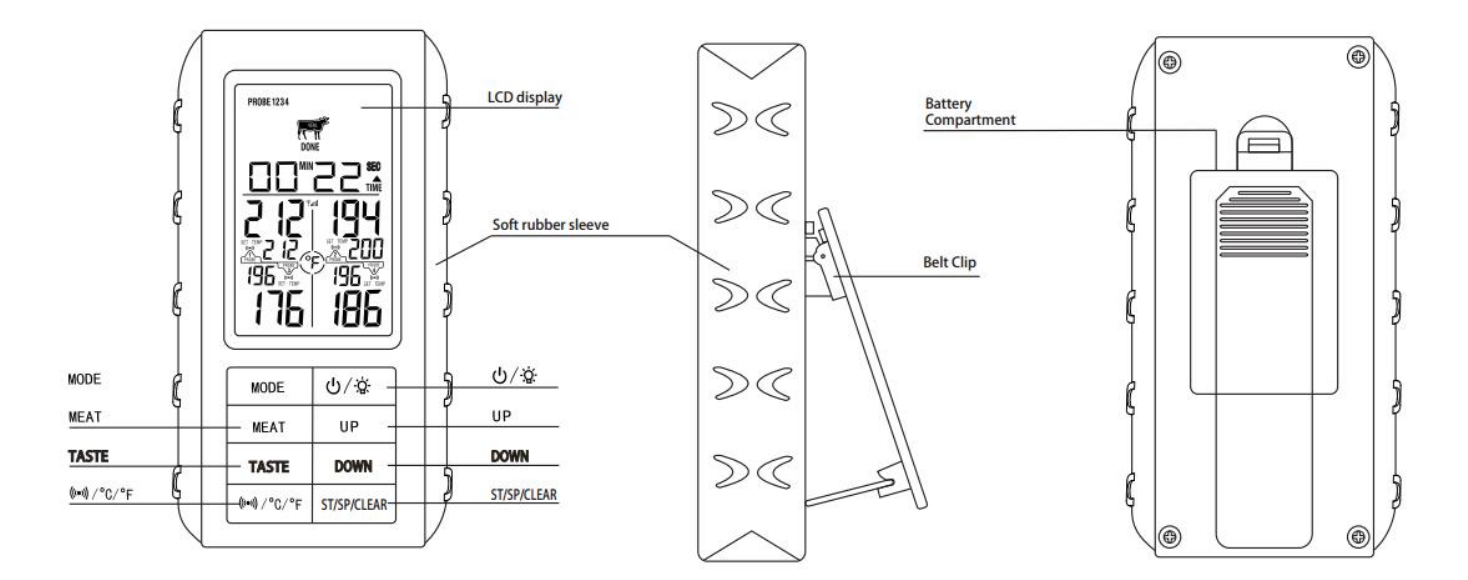
Receiver Features
LCD ( Liquid Crystal Display) – Displays all icons, temperature and time.
4 probes temperature display ( Probe 1, Probe 2, Probe 3, Probe 4).
TEMP SET – Programmable alert with preset temperature for specific foods.
℉or ℃– To select temperature readings in Celsius or Fahrenheit.
99-minute,59-second countdown timer and count up timer.

- 3 -
Battery compartment – Holds 2 AAA batteries.
Belt clip/Stand – Belt clip allows you to be mobile. Clip the receiver unit to belt. Swings out and allow you to stand the receiver on tabletop as
well.
Buttons
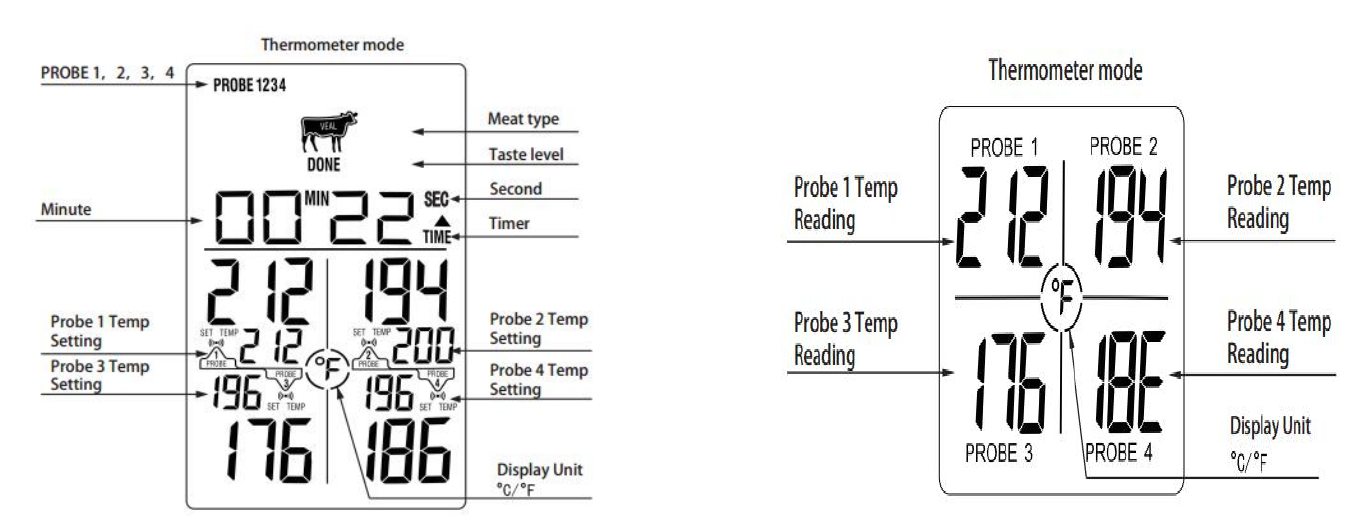
1. MODE – In thermometer mode, press once to select Thermometer Probe 1, Thermometer Probe 2, Thermometer Probe 3 or Thermometer Probe 4.
Press and hold for 3 seconds to enter target temperature manual setting mode.
In setup mode, press once to confirm the current setting.
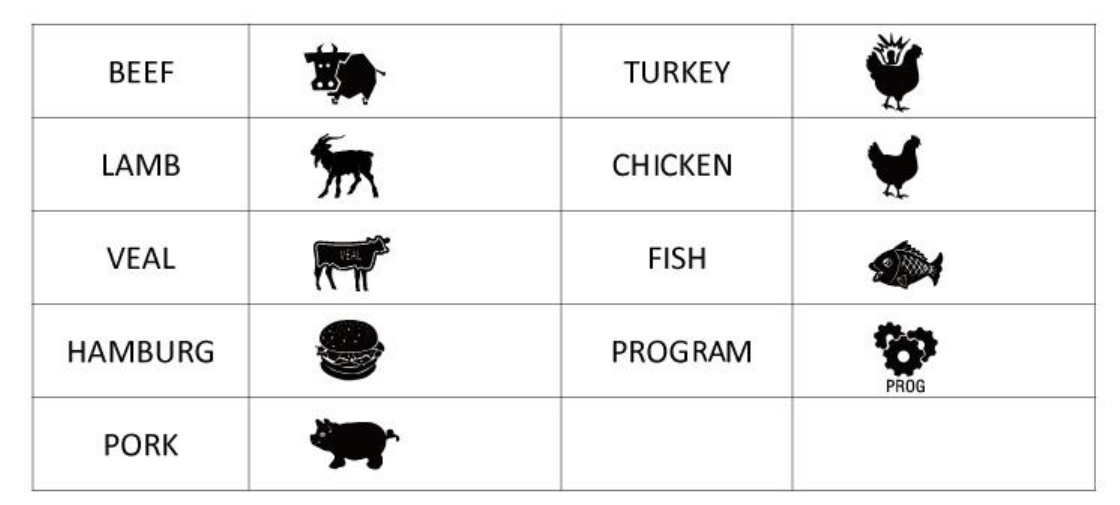
2. MEAT – In thermometer mode, press to select the meat type: PROGM ( program- User Self- Defined), BEEF, LAMB, VEAL, HAMBURG, PORK,
TURKEY, CHICKEN and FISH.
3. TASTE – In thermometer mode, press to select the meat taste level: WELL, MEDIUM WELL, MEDIUM, MEDIUM RARE and RARE.
4. /℃/℉- In thermometer mode, press once to turn on or off the alert after setup of target temperature ( symbol on display lights up), Press
and hold for 2 seconds to select temperature readings in Celsius or Fahrenheit.
5. /LIGHT – Press once to turn on the receiver and backlight, Press and hold for 3 seconds to turn off the receiver.
6. UP – In thermometer mode (Manual setting mode), press once to increase the temperature value. Press and hold for 2 seconds, the temperature
value will increase at a faster pace. In timer mode, press once to increase Minute setting. Press and hold for 2 seconds, the minutes will increase at
a faster pace.
7. DOWN – In thermometer mode (Manual setting mode), press once to decrease the temperature value. Press and hold for 2 seconds, the temperature
- 4 -
value will decrease at a faster pace. In timer mode, press once to increase Second setting. Press and hold for 2 seconds, the seconds will increase
at a faster pace.
8. ST/SP/CLEAR– In timer mode, when the timer setting is set, press once to start the timer. When the timer is running, press once to pause the timer.
Press and hold for 3 seconds to clear timer setting.
LCD Screen
(Receiver) (Transmitter)
- 5 -
MEAT
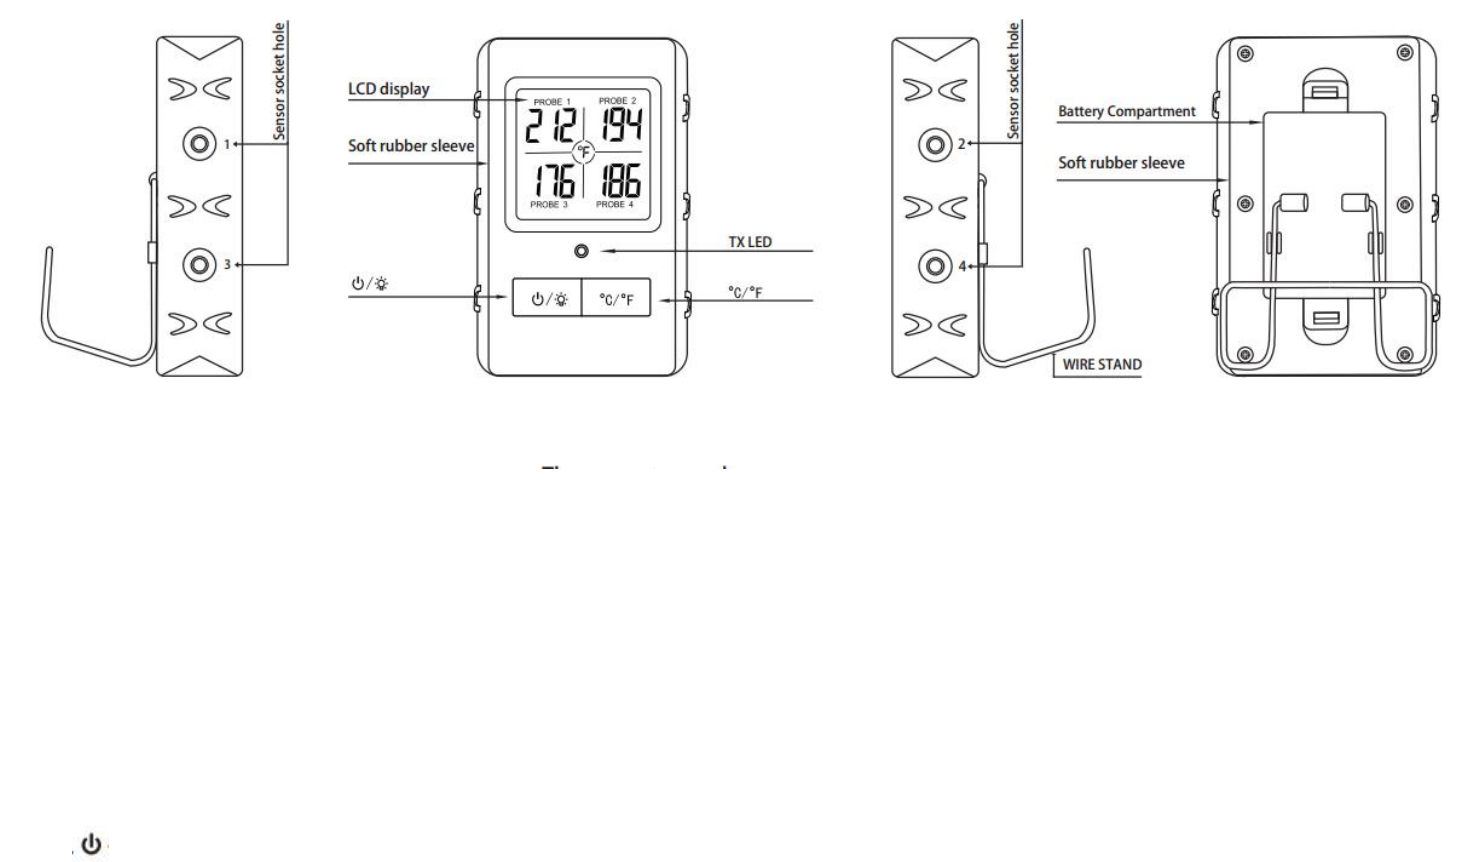
Transmitter Features
- 6 -
LCD ( Liquid Crystal Display) – Displays temperatures of probe 1, probe 2, probe 3 and probe 4.
Wire Stand – Allows you to stand the transmitter on tabletop or it can be reversed and used as a hanger.
Battery Compartment – holds 2 AAA batteries.
Sensor socket hole – Plug- in for stainless steel probe 1, probe 2, probe 3 and probe 4.
Buttons
1. /LIGHT – Press once to turn on the transmitter and the backlight. Press and hold for 3 seconds to turn off the transmitter.
2. ℃/℉– Press once to select the transmitter temperature display in Celsius or Fahrenheit.

- 7 -
Installing batteries
Open the battery compartment of the receiver and insert two “AAA” batteries with correct polarity. Open the battery compartment of the transmitter
and insert two “AAA” batteries with correct polarity.
Turn On/Off Unit
Press /LIGHT button on the transmitter to turn on/off the transmitter;
Press /LIGHT button on the receiver to turn on/off the receiver.
Measure meat temperature to USDA doneness temperature range
1. You can use 4 probes ( Probe 1, 2, 3, 4) to measure and monitor temperatures of 4 pieces of meat or four sections of the same large piece of meat at
the same time.
2. Press MODE to select Thermometer Mode, Probe 1, 2, 3, or 4, represented by a small icon ( PROBE: 1, PROBE: 2, PROBE: 3 or PROBE: 4) on the
upper display.
3. Press MEAT to select meat type: PROGM ( program- User Self- Defined), BEEF, LAMB, VEAL, HAMBURGER, PORK, TURKEY, CHICKEN
and FISH.

- 8 -
4. Press TASTE to select the level of doneness for the meat type selected: WELL, MEDIUM WELL, MEDIUM, MEDIUM RARE and RARE.
Note: The temperature displayed TEMP SET will show the preset temperature according to USDA doneness levels.
Example: Beef will be WELL at 170℉.
5. After setting, press /℃/℉to turn on the alert ( symbol on display lights up)
6. Once the temperature of meat ( Probe 1, Probe 2, Probe 3 or Probe 4) reaches the preset doneness level, the receiver will beep and the LCD
backlight will be turned to red. Press any button to stop the beep.
Measure meat temperature set to your specific taste (Manual setting mode)
1. Press MODE to select Thermometer Mode, Probe 1, Probe2, Probe 3 or Probe 4.
2. Press and hold for 2 seconds to enter manually setting mode ( the value is blinking), Press UP or DOWN to raise or lower the set temperature. As
you press UP or DOWN the display changes to PROGM ( program). Pressing MEAT will return you to the preset USDA ranges.
3. After setting, press /℃/℉to turn on the alert ( symbol on display lights up)
4. Once the temperature of meat reaches the preset doneness level, the receiver will beep and the LCD backlight will be turned to red. Press any
button to stop the beep.
Using the Timer
Count up
- 9 -
1. The timer 00 MIN : 00 SEC with a small icon TIME will be shown in the upper part of the display. If the timer setting is not 00:00, press and hold
ST/SP/CLEAR to clear the setting to 00:00.
2. Press the ST/SP/CLEAR button to start count up. The TIME▲ will blink indicating count up timer is running. The maximum count up that can be
reached is 99 minutes and 59 seconds.
3. To stop the count up process, press the ST/SP/CLEAR button, The TIME▲ becomes solid.
4. Press and hold ST/SP/CLEAR to clear the setting back to 00:00
Count down
1. The timer 00 MIN: 00 SEC with a small icon TIME will be shown in the upper part of the display.
2. Press UP to adjust minute setting, Press and hold UP to increase setting value at a faster pace.
3. Press DOWN to adjust second setting, Press and hold DOWN to increase setting value at a faster pace.
4. Press and hold ST/SP/CLEAR to clear the setting back to 00:00.
5. After setting, press ST/SP/CLEAR to start the timer, TIME▼ will blinking indicating the countdown timer is running.
6. To pause the countdown process, press the ST/SP/CLEAR button. The TIME▼ becomes solid. Press the ST/SP/CLEAR button to continue the
timer.
7. When countdown timer reaches 00:00, an alarm will sound and backlight will be on for 30 seconds.
Helpful Hints
- 10 -
1. If the receiver or the transmitter display LLL or HHH instead of the probe temperature, wait for probe to reach room temperature. If LLL or HHH
is still displayed or you get a false temperature, squeeze the probe jacks harder into the transmitter and twist them back and forth so they make
good contact. If the problem still persists, it is likely the internal probe wire has shorted out either through moisture or heat damage.
2. Do not immerse the probe in water while cleaning.
3. Do not allow the probe or probe wire to come into contact with flames.
4. If the temperature displayed seems to read too high or the temperature seems to increase too quickly, check to make sure the probe tip is not poking
through the food. Reposition the probe tip in the center of the thickest part of food. Avoid touching bone or heavy fat areas.
Cautions:
Always wear a heat resistant glove to touch the stainless steel probe sensors or wires during or just after cooking. Do not touch with bare hands.
Keep the stainless steel probe sensors and wires away from children.
Clean the stainless steel probes and dry thoroughly after each and every use.
Do not use the unit in the rain. It is NOT rain proof.
Do not expose the plugs of the stainless steel probes or the plug in holes of the transmitter to water or any liquid. This will result in a bad
connections and faulty readings.
Do not expose the receiver or transmitter to direct heat.
Do not use stainless steel probes in a microwave oven.
Not Intended for use by persons aged 12 and under.
- 11 -
Cleaning
1. Always wear a heat resistant glove to touch the stainless steel probe sensors or wires during or just after cooking. Do not touch with bare hands.
2. Keep the stainless steel probe sensors and wires away from children.
3. Wash the metal probe tips with hot soapy water and dry thoroughly. Do not immerse the probe in water while cleaning.
4. Wipe the transmitter and receiver with damp cloth. Do not immerse either in water.
FCC Statement
This equipment has been tested and found to comply with the limits for a Class B
digital device, pursuant to part 15 of the FCC rules. These limits are designed to
provide reasonable protection against harmful interference in a residential installation.
This equipment generates, uses and can radiate radio frequency energy and, if not
installed and used in accordance with the instructions, may cause harmful interference
to radio communications. However, there is no guarantee that interference will not
occur in a particular installation. If this equipment does cause harmful interference to
radio or television reception, which can be determined by turning the equipment off
and on, the user is encouraged to try to correct the interference by one or more of the
following measures:
-Reorient or relocate the receiving antenna.
-Increase the separation between the equipment and receiver.
-Connect the equipment into an outlet on a circuit different from that to which the
receiver is connected.
-Consult the dealer or an experienced radio/TV technician for help.
To assure continued compliance, any changes or modifications not expressly
approved by the party.
Responsible for compliance could void the user’s authority to operate this
equipment. (Example- use only shielded interface cables when connecting to
computer or peripheral devices).
This equipment complies with Part 15 of the FCC Rules. Operation is subject to
the following two conditions:
(1) This device may not cause harmful interference, and
(2) This device must accept any interference received, including interference that
may cause undesired operation.
RF warning statement:
The device has been evaluated to meet general RF exposure requirement.
The device can be used in portable exposure condition without restriction.