Famidoc Technology FDBB-V2B Baby Monitor, Baby Unit User Manual
Famidoc Technology Co., Ltd. Baby Monitor, Baby Unit Users Manual
Users Manual
Model: FDBB-V2
BABY MONITOR
300m
Be sure to read this instruction manual before
operation and keep properly.

Contents
1. Illustration .........................................................................................................................1
2. Scope of Application ............................................................................................. 3
3. Intend use........................................................................................................................ 3
4. Basic parts and accessories .............................................................................. 3
5. Product features ........................................................................................................ 3
6. Cautions .............................................................................................................................4
7. Icons shown on LCD .............................................................................................. 5
8. How to use the baby monitor ....................................................................... 6
9. Specications .............................................................................................................10
10. Troubleshooting ...................................................................................................11
11. Laws and regulation ..........................................................................................12
12. Cleaning and storage for the device .....................................................12
13. Product and battery disposal instructions .......................................12
14. Declaration of Conformance ......................................................................13
15. WARRANTY ................................................................................................................13

1
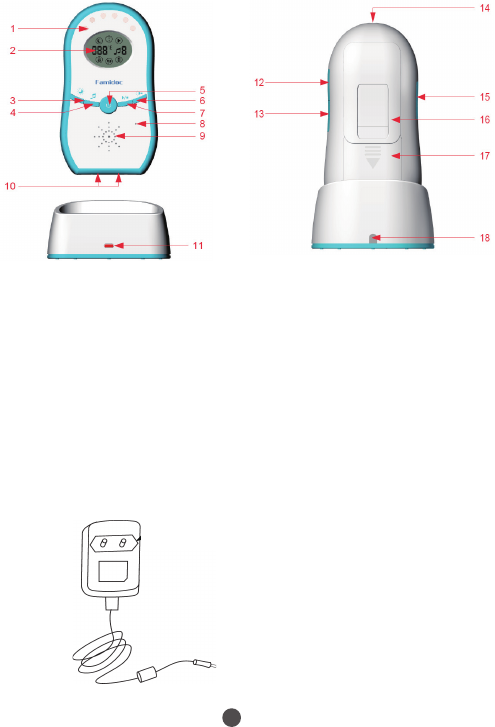
1.Illustration
A. Baby Unit
front back
battery compartment
1. temperature sensor
2. antenna
3. night light
4. on/off/lock button
5. LCD
6. speaker
7. microphone
8. night light on/off button
9. next
10. music play/stop button
11. volume up
12. volume down
13. DC adapter jack
14. battery compartment
15. Celsius/Fahrenheit switch
16. sound sensitivity switch
15 16
2
B. Parent Unit
1. connecting and sound level indicators
2. LCD
3. night light on/o button
4. next
5. on/o button
6. ashlight on/o button
7. music play/stop button
8. microphone
9. speaker
10. charger port
11. power indicator
12. volume up
13. volume down
14. ashlight
15. talk button
16. clip
17. battery compartment
18. DC adapter jack
C. AC adapter
电源适配器
小插头

3
2. Scope of Application
Family, hospital, safety protection etc.
3. Intended use
The unit is using for wireless monitor the sound and ambient temperature of baby side.
4. Basic parts and accessories
Baby unit, parent unit, charger, AC adapter, 3x AA normal alkaline batteries, 3x AAA re-
chargeable NiMH batteries.
5. Product features
5.1 Multiplicate power supply
normal alkaline battery, rechargeable NiMH battery, AC adapter .
5.2 Wireless low power consumption, automatic frequency hopping
Wireless transmitting power, automatic control, automatic frequency hopping to
avoid interference with the work under power saving mode.
5.3 Long-distance wireless voice control
The parent unit can monitor the baby unit in 300m without obstacles.
5.4 Wireless two-way intercom
Parents cam hear the voice from baby side through wireless transmission.
5.5 Baby unit can detect the ambient temperature
The LCD of baby unit can display the ambient temperature, and wireless transmit the
temperature information to parent unit.
5.6 Night light of baby unit
The night light can be used to light the night.
5.7 Eight baby songs
Play songs timed or long time, you can also cycle selections.
5.8 Celsius and Fahrenheit switch
Toggle the Celsius and Fahrenheit switch inside the battery compartment, both units
will change the temperature automatically.
5.9 Adjustable sound sensitivity
Toggle the sound sensitivity switch inside battery compartment can adjust the sound
level of baby unit.

4
5.10 backlight
You can operate the unit easily and see the LCD clearly both day and night.
5.11 Flashlight of parent unit
At night, parents can shine the flashlight at any time.
5.12 Base re-charger of parent unit
Parent unit re-charges when place on base unit.
5.13 lock baby unit
In order to prevent misuse button, baby unit with lock funtion.
5.14 Alarm for wireless disconnection
If the distance too far or the baby unit is off, the parent unit will alarm.
5.15 Alarm for low power
Either baby unit or parent unit is low power, the LCD will show the icon, and parent
unit will alarm.
6. Cautions
1 Before using this product, please read this manual carefully, and keep for future
reference.
2 The baby monitor is only as an auxiliary, not substitute for adult supervision
3 When baby unit and parent unit close together, do not adjust the volume of the parent
unit too high.
4 When the signal confirmation icon is flashing or alarm, please make sure the parent
unit and baby unit are switch on, then close to these two units till connection.
5 Do not put the product into the metal box when using it, so as not to shield the
product wireless signal.
6 When you bath, shower and pool time, please do not use this product, hence the
product will cause an electric shock to sink to the water
7 This product can only operate in line with the instructions of the power supply adapter,
if your home is not this type of power supply, consult your dealer or local power
company.
8 Do not make the product is exposed to extreme temperatures.
9 Please do not put candles, cigarettes, etc. on the product.
10 Do not place the product on an unstable cart or table, the product may fall causing
serious damage.
11 Ensure that the baby unit and the power cord out of reach of the baby (at least 1
meter).
12 If you will not use the product for a long time, please remove the batteries.
5
13 There is a risk of explosion if the batteries are replaced by an incorrect type. Dispose of
used batteries according to the instructions.
14 The re-chargeable battery icon in the battery compartment means that only re-
chargeable batteries can be used.
15 Use only the mains power adapter supplied. Using an incorrect adapter may
permanently damage your Baby Monitor.
16 If you place the Parent and Baby units too close together you will hear a high pitched
noise, this is normal. The units are designed to be located at a distance from one
another.
17 Do not press the Talk button when the Baby unit and Parent unit are positioned in the
same room. Highpitch noise will be generated if the Talk button is pressed when Baby
unit and Parent unit are close to each other or within 3 metres distance.
18 Put down / mute the Parent unit before you go into the nursery in order to prevent
any high-pitched whistle / feedback.
19 The temperature sensor used in this Baby Monitor is intended as a guide, to provide
parents with an indication of the room temperature in which the unit has been
placed. It is is not intended to be as accurate as some medical devices.
20 If you set the sensitivity level too low, only louder sounds in the baby’s room will be
picked up and communicated back to you via the Parent unit. The Unit will not pick
up quieter background noises.
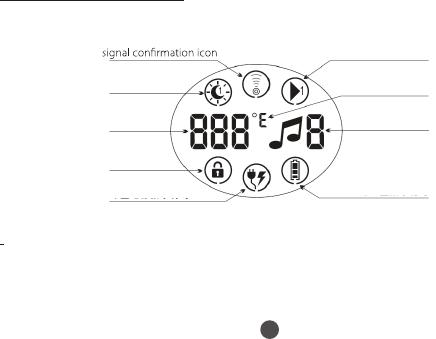
7. Icons shown on LCD
night light icon
temperature display
lock display icon
mains power icon
music play icon
Celsius and Fahrenheit icon
track number of song
battery power icon
6
8. How to use the baby monitor
8.1 Power supply
A Baby unit
Use battery: open the battery cover, put 3xAA normal alkaline batteries correctly, then
close the battery cover.
Mains power: First plug the AC adapter into the 220V AC outlet, make sure power sup-
ply, then plug the DC output plug into the DC adapter jack of the baby unit, the unit will
switch on.
B Parent unit
Use battery: First pull out the clip, then open the battery cover, put 3xAAA normal alka-
line batteries or rechargeable NiMH batteries correctly, then close the battery cover, and
t the clip.
Mains power: First plug the AC adapter into the 220V AC outlet, make sure power sup-
ply, then plug the DC output plug into the DC adapter jack of the base. If the parent unit
is charging, the indicator will light, and vice versa.
8.2 Power on
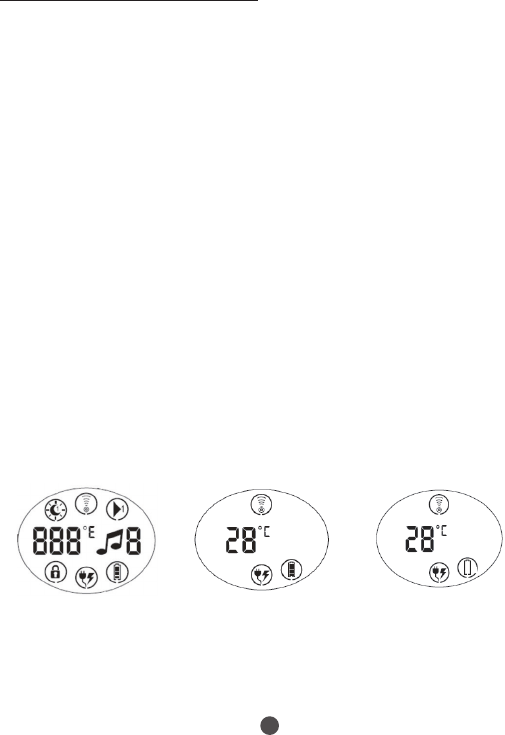
Baby unit: Press on/o button 1 second, LCD will show all icons(picture 1.1). Then LCD will
only show the ambient temperature, signal conrmation icon, mains power icon and bat-
tery power icon(picture 1.2). If the batteries inside the unit, LCD will show the battery pow-
er icon and current power level. If no battery, the battery power icon will empty(picture
1.3). If mains power leads to the unit, LCD will show mains power icon. If the baby unit is
connecting with parent unit, the signal conrmation icon will be shown stable, otherwise
this icon will ash with the frequency of 1 second.
Picture 1.1 Picture 1.2 Picture 1.3
Parent unit: Press on/o button 1 second, LCD will show all icons(picture 1.4). Then LCD
will only show the ambient temperature, signal conrmation icon, mains power icon and
battery power icon. If no mains power, LCD will only show the battey power icon. If the
mains power leads to the unit, LCD will show the mains power icon, and the battery is
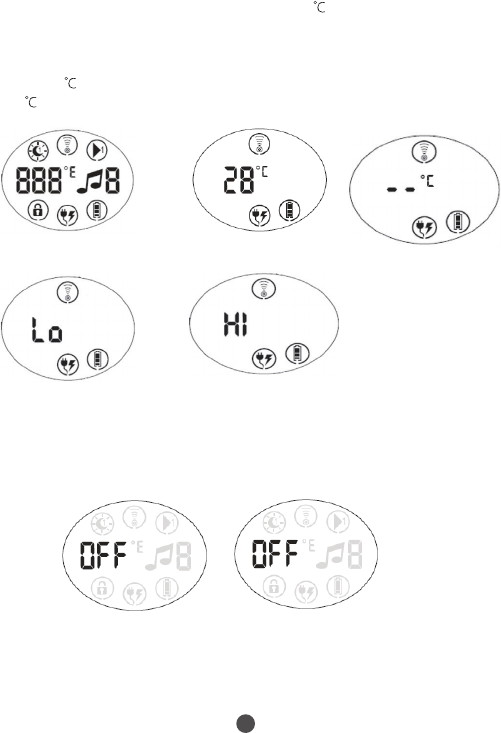
7
charging. If the batteries are charging complete, the battery power icon will full, and vice
versa. If the parent unit is connecting with baby unit, -- will be shown(picture1.6), and
the signal conrmation icon will ash with the frequency of 1 second. When the unit is
connecting with baby unit, LCD will show the actual ambient temperature of baby unit,
the signal confirmation icon will stable(picture1.5). When the ambient temperature is
lower than 10 , LCD will show Lo(picture1.7). When the ambient temperature is higher
than 38 , LCD will show HI(picture1.8).
(picture1.4) (picture1.5) (picture1.6)
(picture1.7) (picture1.8)
8.3 Power o
Baby unit: Press the on/o button 1 second, the backlight will o, LCD will show OFF,
then power o(picture1.9).
(picture1.9) (picture2.0)
Parent unit: Press on/o button 1 second, the backlight will o, LCD will show OFF, then
power o(picture2.0)

8
Baby unit
Night light: Press the night light button 1 second, the night light icon will show 1(pic-
ture2.1) and the night light will ash 1 hour, then o.
(picture2.1) (picture2.2)
Press the night light button 3-5 seconds, the night light will ash long time, the night
light icon will not show 1(picture2.2).
Music
Press the music play/stop button 3-5 second, the songs will be played 10 minutes, then
stop(picture2.3)
(picture2.3) (picture2.4)
Press the music play/stop button 3 seconds, the songs will be played continuous,
and the music play icon will not show 1.Press this button again, the music will be
stopped(picture2.4)
Select a song: Press the next button to select the next song. If the song is the last one, it
will back to the rst song. Meanwhile, both units will changing the song.
Celsius and Fahrenheit switch
Toggle the Celsius and Fahrenheit switch to C, LCD will show (picture 2.5). Toggle the
Celsius and Fahrenheit switch to F, LCD will show (picture 2.6).
Switch C/F, LCD will show the temperature in or accordingly.
(picture 2.5) (picture 2.6) (picture 2.7)

9
lock button
Press the lock button 3-5 seconds, other buttons will not work. Press this button 3-5 sec-
onds again to cancel the lock function.
Baby unit
When the unit is lock, except the on/o button, other buttons will not work.
Parent unit
When the baby unit is lock, even if the parent unit does not cancel the lock function, it
can still control the music and night light of baby unit.
When the parent unit is charging, and the batteries are not full, the battery power icon
will scroll up and down. When the charging complete, the battery power icon will full.
sound sensitivity switch
Toggle the adjustable sound sensitivity switch to L, the sound level is low. Toggle the
adjustable sound sensitivity switch to H, the sound level is high. LCD will not show any
icon, you should listen to the sound and see the indicator after connected both units.
8.4 After connection both units
• Press the music play/stop button, night light button and C/F switch of baby unit, the
LCD of both units will simultaneous display
• Press the music play/stop button and night light button of parent unit, the LCD of
both units will simultaneous display.
• Press the next button of baby unit, the song will switch to the next, the music of
both units will simultaneous change.
• Press the next button of parent unit, the song will switch to the next, the music of
both units will simultaneous change.
• Press the volume button of baby unit, the volume of song will be adjusted accord-
ingly, the volume of both unit will simultaneous change.
• Press the volume button of parent unit, it can only control the volume of parent
unit, the baby unit will not be changed.
• Toggle the C/F switch, both units will show the ambient temperature at the same
time.
• Temperature will update every 5 seconds
• Toggle the sound sensitivity switch, the volume and LED volume indicator will
change.
• When the baby unit is low power, the empty battery power icon of baby unit will
ash with the frequency of 1 second. Meanwhile, the parent unit will show the same

10
icon with the same frequency, and alarm …be.be…be.be… 5 times. If you did not
replace the battery, the same alarm will appear after 5 minutes. If still low power, the
unit will alarm every 5 minutes. 5 times later, both units will o.
• Press and hold the left talk button of parent unit, release the button after talk
• Press the volume up/down button of parent unit to adjust the volume
• When the parent unit is low power, the baby unit does not reect any. The empty
battery power icon will ash with the frequency of 1 second, and alarm…be.be…
be.be…5 times. If you did not replace the battery, the same alarm will appear after
5 minutes. If still low power, the unit will alarm every 5 minutes. 5 times later,the par-
ent unit will o.
• When the parent unit is beyond the eective distance range, the signal conrma-
tion icon will ash with the frequency of 1 second and alarm with sound be.be…
be...be…for 5 times and repeat after 5minutes,if not receive any signal,it will repeat
sounding in every 5 minutes,then parent unit power o.
• When no signal , the unit will alarm …be…be…be
• When low power, the unit will alarm…be.be…be.be…
• Use battery for power supply, when the battery power is too low,it will display blank
battery symbol after switch on and the backlight disappear after 3 seconds,,when
the power very low,can’t switch on.
9. Specications
Baby unit
Model FDBB-V2 (Baby unit)
Power supply 9V DC/350mA adapter or 3x1.5V AA batteries
Standby current ≤120mAh
Module used Frequency range 2410-2473MHz
Module used Channels 64 Channels
Barrier-free transmission distance 300m (clear)
Low Power Indication Battery icon flashes lower than 3.6V(3.6V±2%)
Operation Condition 10-38°C(50-100.4°F) ≤80%RH
Storage Condition -25-55°C(-13-131°F) ≤95%RH
ambient temperature 10~38°C
Size 109.5(L)X108(W)X67.7(D)mm
Weight 135g±5%

12
Communication
distance is not
enough
The product was put at the
side of metal form or in metal
capsule
Put the product in place with
no metal form
Product fall down or fall on the
ground
place the product in right
position
Charge lamp of
parent unit does
not light
Battery is fully charged Normal
Chargeable battery is not
existed in parent unit
Replace into the chargeable
battery
parent unit is not put on the
recharge Stand Normal
Parent unit alarm
Wireless signal is interrupted
Adjust the communicated
distance and position of
parent unit
Low power in baby unit or
parent unit
Replace the battery or use
external power Supply
Hi or Lo symbol is
display on the LCD
The ambient temperature of
baby unit is too high or too
low
Use under the normal envi-
ronment
11. Laws and regulations
The Baby monitor FDBB-V2 has compliance with the regulations and standards as follows:
Regulations Testing standards Remarks
CE & RTTE EN300 440-1
EN300 440-2
LVD EN60950-1
EMC EN301 489-1
EN301 489-3
FCC FCCPart15C
For baby unit:
FCC ID: PONFDBB-V2B
For parent unit:
FCC ID: PONFDBB-V2M
12. Cleaning and storage for the device
Before cleaning, please cut off the power of this product, please do not use liquid or
gas cleaners. Clean the device by wiping gently with a damp cloth moistened with mild
soap and water. Never immerse the device in water or other liquids. Wipe lead wires with

13
a damp cloth as above if they become soiled. To properly store the device for an extended
period of time, remove the battery from the unit. Put the unit and accessories in the
carrying case and store in a cool, dry location.
13. Product and battery disposal instructions
Dispose of the device in accordance with the regulations applicable at the place
of operation.
Dispose of at public collection point in the EU countries – 2002/96/EC WEEE
Directive.
If you have any queries, please refer to the local authorities responsible for waste
disposal.
To protect the environment, dispose of empty battery at your retail store or at
appropriate collection sites according to national or local regulations.
14. Declaration of Conformance
Hereby, Famidoc declares that this Baby Monitor is in compliance with the essential
requirements and other relevant provisions of Directive 1999/5/EC. The Declaration of
Conformance for the Baby Monitor is available by calling the Baby Monitor Helpline on
(+86)0769-89272488
15. WARRANTY
Please contact your dealer or the device centre in case of a claim under the warranty. If
you have to send in the unit, enclose a copy of your receipt with clear statement of defect
description.
The warranty terms as below:
1. The warranty period for device is one year from date of delivery. In case of a warranty
claim, the date of delivery has to be proven by means of the sales receipt or invoice.
2. Repairs under warranty do not extend the warranty period.
3. The following cases are excluded under the warranty
. Power cord or plug is damaged or worn
. Products subjected to rain or water
. Not operate correctly according to the instructions
4. Liability for direct or indirect consequential losses caused by the unit is excluded even if
the damage to the unit is accepted as a warranty claim.

14
FCC Statement
This equipment has been tested and found to comply with the limits for a Class B
digital device, pursuant to part 15 of FCC Rules. These limits are designed to provide
reasonable protection against harmful interference in a residential installation. This
equipment generates and can radiate radio frequency energy and, if not installed and
used in accordance with the instructions, may cause harmful interference to radio
communications. However, there is no guarantee that interference will not occur in a
particular installation. If this equipment does cause harmful interference to radio or
television reception, which can be determined by turning the equipment off and on,
the user is encouraged to try to correct
The interference by one or more of the following measures:
• Reorient or relocate the receiving antenna.
• Increase the separation between the equipment and receiver.
• Connect the equipment into an outlet on a circuit different from that to which the
• receiver is connected.
• Consult the dealer or an experienced radio/TV technician for help
This device complies with Part 15 of FCC Rules.
Operation is subject to the following two conditions:
1. This device may not cause harmful interference, and
2. This device must accept any interference received, including interference that
may cause undesired operation.
Note:“Changes or modifications to this unit not expressly approved by the party
responsible for compliance could void the user’s authority to operate the
equipment.”

15

16

17
Manufacturer
Famidoc Technology Co., Ltd.
Add: No.212 Yilong Road, Hexi Industrial Zone, Jinxia, Changan Town,
Dongguan, Guangdong Province, China
Tel: +86-769-89272488
Fax: +86-769-89272498
Website: www.famidoc.com