Faurecia Clarion Electronics FX503 Car Multimedia Source Unit User Manual NX603 FX503 OM NAM US
Clarion Co Ltd Car Multimedia Source Unit NX603 FX503 OM NAM US
UserManual.wiki
>
Faurecia Clarion Electronics
>
FX503 User Manual
>
Users Manual
Contents
1.
Users Manual add
2.
Users Manual
Users Manual
Navigation menu
Upload a User Manual
Namespaces
Wiki Guide
HTML
PDF
Info
Views
User Manual
Discussion / Help
Navigation

![22 NX603/FX503EnglishsAudio sometimes is not output in the iPod mode when Bluetooth Audio is playing or hands free calls are being made while the iPod touch or iPhone is still connected via Bluetooth. Perform operations from the iPod touch or iPhone main unit, and switch the settings (audio output) from Bluetooth (CAR-BT) to the Dock connector. Also, remove the iPod from the unit and reconnect it. For details, refer to the User’s Manual for the connected device.sAudio is sometimes not output from the USB-connected iPod touch or iPhone if the audio device is connected via Bluetooth. In this case, switch the Bluetooth connection mode to other than [Playing music], and reconnect iPod touch or iPhone. p P.40MEMOsWhen iPod operation is stopped, operations sometimes become possible by selecting a tune or video from the category list.sIf an error message is displayed, remove the iPod from the unit and reconnect it.sIf the iPod becomes inoperable, reset the iPod main unit and reconnect it.Reset methods (examples) - iPod:Simultaneously hold down the “Center” and “Menu” buttons until the Apple logo is displayed. - iPod touch:Simultaneously hold down the “Sleep/Cancel sleep” and “home” buttons until the Apple logo is displayed.For details on how to reset the iPod, check in the User’s Manual for the iPod. ✽If operation is not remedied by resetting and reconnecting the iPod, reset the iPod, check operation of the iPod in an unconnected state and then try connecting it again.Listening to iPod/viewing iPod videoConnectible iPodsThe unit supports the following devices: 5th generation iPod, iPod classic®, iPod nano®, iPod touch®, iPhone 3G, iPhone 3GS, iPhone 4, iPhone 4S.For more details, see the table below. The iPod is not supplied with the unit. Use your own iPod. To play ipod, CCA-750 (sold separately) is required.When an iPod is used on the unit, the iPod firmware must be the most recent.Connectible iPod RemarksiPod (5th generation) Video can be played.iPod classic (80GB, 120GB, 160GB)Video can be played.iPod nano(1st generation, 2nd generation)iPod nano (3rd generation,4th generation, 5th generation)Video can be played.iPod nano (6th generation)iPod touch (1st generation✽)Video can be played.iPod touch (2nd generation, 3rd generation, 4th generation)Video can be played.iPhone 3G/iPhone 3GS/iPhone 4/iPhone 4SVideo can be played. ✽ Video can be played from firmware 2.0 onwards. In firmware versions older than 2.0, use only in the music mode.AttentionsBe sure to remove the iPod after the vehicle’s engine key is turned to the "OFF" position. The iPod’s power supply might run down if it is not turned off while still connected to the unit.NoticesiPad/iPad2 are not supported.sNot all iPod operations are guaranteed.sSome iPods sometimes do not operate depending on their firmware version even if they are in the list of connectible models.sWhen connecting an iPod to the unit, do not use iPod headphones or other accessories.sSome functions are restricted depending on the iPod model and firmware version.For information about connectible models, refer to the following web site:http://www.clarion.com/us/en/support/compatibility/ipod/index.htmlsThe iPod might not operate correctly when the iPod’s track repeat function is set.sThe iPod might not operate correctly when the iPod’s shuffle function is set. In this case, cancel the shuffle function before using the iPod.sThe iPod sometimes is not recognized when only video files are saved to it. This problem is resolved when even one music file is saved.sWhen there are lots of tunes to play, the titles or list sometimes cannot be displayed depending on the iPod model.](https://usermanual.wiki/Faurecia-Clarion-Electronics/FX503.Users-Manual/User-Guide-1993308-Page-24.png)
![24 NX603/FX503EnglishSetting iPod (video only)Adjusting the image quality of iPod video1 MENU USB / iPod 2 Video 3 4 Setup at [Display Adjustment] 5 or of item to adjust Adjust the image quality while viewing the video image on screen.6 Back This sets the newly adjusted image setting. Image quality adjustments can be set for both the day and night screens.Switching the iPod connection methodSelect the iPod connection method from “USB” or “USB + VTR”. (Default: USB)MEMOsWhen the connection method has been changed, disconnect the iPod and then reconnect it.1 MENU USB / iPod 2 Video 3 4 Change at [Connection Method] 5Select the connection method.USB:iPod supports only the music mode. Cannot switch to the iPod video mode.USB + VTR:The VTR jack is used for iPod video and audio input.When “USB + VTR” is set, the video jack of CCA-750 (sold separately) must be connected to the VTR cable.3Touch the Trick Play key select the desired item.Trick Play key(Shuffle play (audio only)) :Cancels shuffle play. :Plays the entire album at random.Tracks in the album are played in order. :All tracks in the album currently being played are played at random.(Repeat play) :Only the track currently being played is repeated. :All tracks in the entire album are repeated.Play begins with the selected operation.4Touch the Trick Play key.The screen returns to the previous screen.Playing under specified conditionsYou can search for tracks that match specific conditions and play these.NoticesWhen the playlist is arranged in a multi-layer hierarchy, unclear items might be displayed depending on the depth of the hierarchy.1 MENU USB / iPod 2 Audio or Video 34Select the desired item.MEMOsSelectable items (examples)(Audio)Tracks/Playlists/Artists/Albums/Others (Genres/Composers/Audiobooks/Podcasts)(Video)Video Playlist/Others (TV programs/Rentals, etc.)Similar operations are repeated until the track list is displayed.5Select the track.The selected track starts playing.Touching returns the screen to the screen in step 3.](https://usermanual.wiki/Faurecia-Clarion-Electronics/FX503.Users-Manual/User-Guide-1993308-Page-26.png)
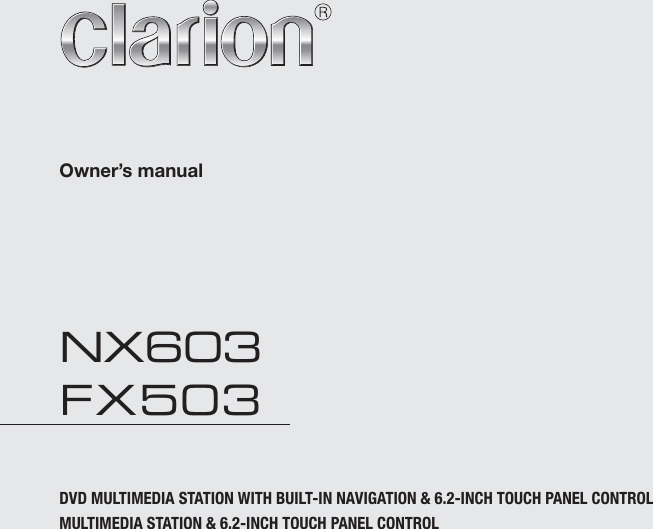
![26 NX603/FX503EnglishViewing connected external devices (AUX)Audio and video from external devices connected to the AUX terminal can be played on the unit by switching the audio mode to AUX1 or AUX2. WARNINGs If the driver wants to view TV or video, he or she should always stop at a safe place before doing so.Preparations ●The following cables are required for connecting external devices to the unit.(When using AUX1)sCCA-772 (3.5 mm AV mini plug-RCA[L/R/V] cable) or 3.5 mm stereo mini plug cable(When using AUX2)sVTR cableAttentionsDo not leave connected external devices inside the vehicle. The inside of the vehicle gets hot under the blazing sun, for example, and might cause them to malfunction.NoticesFor safety’s sake, view TV or video images only when the vehicle has stopped. While you are driving, you can enjoy only audio.Connecting external devices<Connection example> When using AUX1✽ The illustrations for the main unit are of the NX603.Commercially available portable device(Example: For audio)3.5 mm AV mini plug cable (sold separately)<Connection example> When using AUX2✽ The illustrations for the main unit are of the NX603.Commercially available portable deviceVTR cableVideo jackAudio jackVIDEO INAUDIO IN1 MENU BT Audio 23 Browse 4Select the desired item.Available items differ according to the type of Bluetooth Audio device.Similar operations are repeated until the track list is displayed.5Select the track.Play begins from the selected track.Touching returns the screen to the screen in step 2.Repeat/shuffle playNoticesFor this function, only Bluetooth Audio that is compatible with AVRCP Ver1.3 or later can be used. With some types of Bluetooth Audio device, shuffle play sometimes is not possible.1 MENU BT Audio 2Touch the Trick Play key Select the desired item.Trick Play key :Only the track currently being played is repeated. :All tracks in the group currently being played are repeated. :All tracks in the Bluetooth Audio device are repeated. :All song shuffle or group shuffle is canceled. :All tracks in the group currently being played are played at random. :All tracks in the Bluetooth Audio disc are played at random.3Touch the Trick Play key.The screen returns to the previous screen.](https://usermanual.wiki/Faurecia-Clarion-Electronics/FX503.Users-Manual/User-Guide-1993308-Page-28.png)
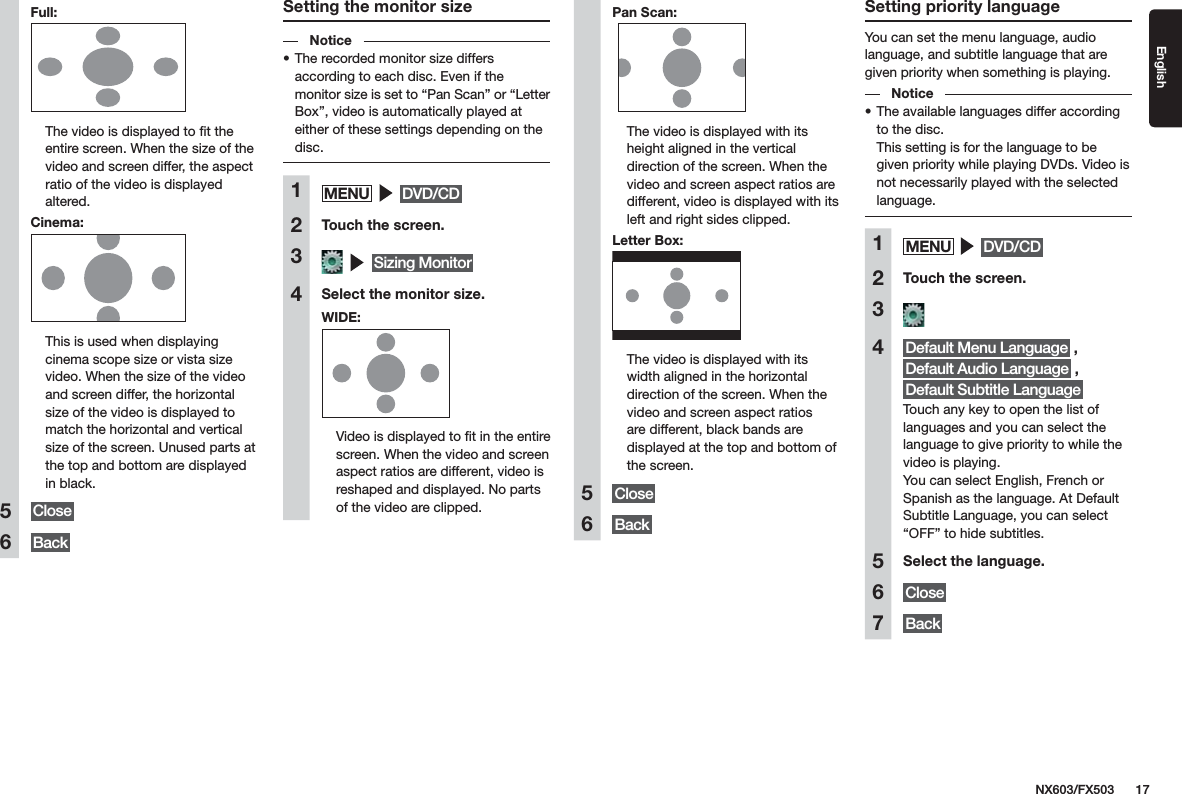
![NX603/FX503 27EnglishMEMOsAlso refer to the User’s Manual for the connected external device.sExternal input connector jack - A 3.5 mm dia. stereo mini plug can be connected. Thoroughly read the User’s Manual for the audio cable (without resistor) and the device to be connected. - Use the battery, etc. provided with the device as the power supply for that device. Using an external device while it is being charged by the accessory socket on the vehicle sometimes causes noise.sThe screen momentarily turns black when switching between the audio and video modes. However, this is not a malfunction.Listening to video from external devices1 MENU AUX1 or AUX2 2Touch the screen Audio 3Operate the external device.Audio is played.Watching video from external devices1 MENU AUX1 or AUX2 2 Video 3Operate the external device.Video and audio are played.MEMOsWhile linked to a smartphone, the smartphone application screen is displayed though it cannot be operated on by touch operations. When using Smartphone linking, see “Using Smart Access.” p P.33Setting external device listeningCompensating for volume differencesCompensate for volume difference that occurs depending on the type of connected external device.1 MENU 2 AUX1 or AUX2 3Touch the screen 4 Audio Level 5Select the audio level.6 Close 7 Back The level is adjusted to the adjusted volume.Switching the screen sizeNoticesWhen the screen size is switched, the image sometimes appears different from the original video image.1 MENU 2 AUX1 or AUX2 3Touch the screen 4 Display Mode 5Select the screen display size.Normal:Video is displayed in the center of the screen with its aspect ratio held intact. When the size of the video and screen differ, excess parts of the screen are displayed in black.Full:The video is displayed to fit the entire screen. When the size of the video and screen differ, the aspect ratio of the video is displayed altered.Cinema:This is used when displaying cinema scope size or vista size video on a regular TV. When the size of the video and screen differ, the horizontal size of the video is displayed to match the horizontal and vertical size of the screen. Unused parts at the top and bottom are displayed in black.6 Close 7 Back The screen is displayed at the selected size.Adjusting image quality1 MENU 2 AUX1 or AUX2 3Touch the screen 4 Setup at [Display Adjustment] 5 or of item to adjust Adjust the image quality while viewing the video image on screen.6 Back This sets the newly adjusted image setting. Image quality adjustments can be set for both the day and night screens.](https://usermanual.wiki/Faurecia-Clarion-Electronics/FX503.Users-Manual/User-Guide-1993308-Page-29.png)
![NX603/FX503 29English4Select the station.From Track:The station is made using the name of the track currently being played.The station will play tunes associated with the tune currently being played.From Artist:The station is made using the name of the artist of the tune currently being played.The station will play tunes associated with the artist of the tune currently being played.Deleting stations1 MENU Pandora Radio 23 Delete Station 4Select the station you want to delete OK Registering Bluetooth-compatible devicesBluetooth-compatible devices such as cellphones can be registered so that incoming and outgoing telephone calls and audio can be played from the unit.If you use a Bluetooth-compatible cellphone, you can use hands free functions using Bluetooth without connecting a cable.For more information about connectible cellphones, visit Clarion’s web site.http://www.clarion.com/us/en/support/compatibility/bluetooth/index.htmllPreparations ●To use Bluetooth, the Bluetooth functions of the unit must be turned on. p P.40When using a Bluetooth-compatible device, the device must be registered (paired) with the unit. p P.29NoticesWhile you are driving, selectable items are limited.What is “Bluetooth”?Bluetooth is a short-range wireless communications technology for portable information devices advocated by the Bluetooth SIG trade association. Communications between Bluetooth-compatible devices is performed using radio waves in the 2.4 GHz band.Cellphones and audio devices that support Bluetooth can be connected for use on the unit.1 MENU 2 Set at [BT Devices Connection] 3 ON at [Connect with Bluetooth] 4Select the Bluetooth connection mode.Hands free:Select this when using the cellphone only as a hands free phone.(Hands free phone+)Smartphone linking:Select this when using the cellphone as a hands free phone and for Smartphone linking.(Hands free phone+)Playing music:Select this when using the cellphone as a hands free phone and for Bluetooth Audio.Smartphone linking:Select this when using the cellphone for Smartphone linking.Playing music:Select this when using the cellphone only for Bluetooth Audio.5 OK 6Select “CAR-BT” (default) from the cellphone, and enter the PIN “1234” (default).The cellphone searches for the unit to complete pairing. When MENU Phone is next touched, the screen changes to the telephone number entry screen.To use each of the Bluetooth functions, you will need a cellphone that supports the following profiles:Hands free callingHFP (Hands-Free Profile)Phonebook forwardingOPP (Object Push Profile)Phonebook forwarding and telephone call log, etc. synchronizationPBAP (Phone Book Access Profile)AudioA2DP (Advanced Audio Distribution Profile), AVRCP (Audio/Video Remote Control Profile)Even if devices support Bluetooth profiles, phenomena sometimes occur where devices cannot connect to each other or display and operation are different because of their characteristics or specifications.Registering cellphones (pairing)When using a Bluetooth-compatible cellphone for the first time, the cellphone must be registered (paired) with the unit.NoticesPairing cannot be executed while you are driving.sAlso, pairing sometimes cannot be executed if the Bluetooth function is not enabled on the cellphone, too. For details, refer to the User’s Manual for the cellphone.sDuring hands free operations (making outgoing calls, taking incoming calls, telephone calls), connection (telephone calls, communications) with other Bluetooth-compatible devices and pairing are not possible. Also, during hands free operation, audio sound is not output.](https://usermanual.wiki/Faurecia-Clarion-Electronics/FX503.Users-Manual/User-Guide-1993308-Page-31.png)
![30 NX603/FX503EnglishMEMOsWhen a cellphone currently in use is switched, the device information including the incoming/outgoing calls log also is switched to the information of the other cellphone that you switched to.sWhen a cellphone is restarted, some cellphones sometimes are not automatically switched to. If the cellphone is not automatically switched to, select the cellphone that you want to connect to by this operation.Deleting registered cellphonesYou can delete the information of paired Bluetooth-compatible devices.1 MENU 2 Set at [BT Devices Connection] 3 for the device you want to delete4 OK MEMOsBluetooth Audio devices other than cellphones also can be deleted.sWhen the registration information of a cellphone is deleted, the incoming/outgoing calls log and phonebook information of the corresponding cellphone also are deleted.sWhen the unit is turned off while cellphone registration information is being deleted, the information sometimes cannot be deleted. If this happens, turn the unit on and try deleting the information again.Using cellphonesAttentionsDo not leave cellphones inside the vehicle. The inside of the vehicle gets hot under the blazing sun, for example, and might cause them to malfunction.Screen during a telephone callThe following screen is displayed during a telephone call:Screen during a telephone call :This displays the option screen. :This mutes the phone outgoing volume. :This switches to telephone calls on the cellphone unit.Private call operation is sometimes not switched to depending on the cellphone you are using. :This ends the telephone call. :When the number entry screen is displayed, enter the numbers for the password, etc. during the telephone call.MEMOsEntry of the PIN is not required on some cellphone models. Also, on some models, the PIN entered on the unit is the same as the PIN on the cellphone or the confirmation screen is displayed. When registering a device, follow the on-screen instructions.sAfter pairing is completed, the operation of checking the connection is sometimes required on the cellphone.sFor details on operations to perform on the cellphone, refer to the User’s Manual for the cellphone.sWith some connected cellphones, numerical values for the cellphone’s reception sensitivity and remaining battery power displayed on the unit sometimes do not match actual cellphone values.sUp to five Bluetooth-compatible devices can be paired. To pair a sixth device, an already registered Bluetooth-compatible device must be deleted. p P.30sFor details on how to register Bluetooth-compatible devices to cellphones, refer to the User’s Manual for the cellphone.sThe name of the device and the PIN can be changed.sConnections sometimes are not made automatically if the cellphone is not set as “Waiting for connection” or the cellphone is not in a standby state. For details, refer to the User’s Manual for the cellphone.sReconnection is automatically retried if the connection is broken, such as if the Bluetooth-compatible cellphone is too far away.sProblems on some cellphones sometimes cause communication errors or prevent operations from being performed or displayed properly. If this happens, switch the Bluetooth functions off then back on again. (Default: OFF)sWhen switching the Bluetooth functions on the cellphone off then back on again, do the same for the Bluetooth functions on the unit.sWhen Bluetooth functions are turned off, Bluetooth functions on the unit cannot be operated. Also, connection to and operations of the unit from Bluetooth-compatible cellphones are no longer possible.Switching the connected cellphoneWhen two or more Bluetooth-compatible devices are registered to the unit, the device to be connected can be switched.NoticesThough up to five Bluetooth-compatible devices can be paired, only one can be connected to at any one time.1 MENU 2 Set at [BT Devices Connection] 3 Select for the device to be switched 4Select the Bluetooth connection mode OK The screen switches to the telephone call screen.](https://usermanual.wiki/Faurecia-Clarion-Electronics/FX503.Users-Manual/User-Guide-1993308-Page-32.png)
![40 NX603/FX503EnglishMaking Bluetooth settings1 MENU 2Set the Bluetooth connection using the keys.BT Devices Connection:This toggles the Bluetooth function on/off, and registers, switches and deletes Bluetooth-compatible devices. p P.29In-Car-Device setting:Renames the device already set to the unit and changes the PIN. p P.40Renaming devices and changing the PINNoticesDevice addresses cannot be changed.1 MENU 2 Set at [In-Car-Device setting] 3 Name or PIN 4Enter the new name (default: CAR-BT) or PIN (default: 1234).5 Set Setting sound qualityMake sound quality related settings.1 MENU 2Set sound quality using the keys.Balance/Fader:This adjusts the volume balance of the speakers at the front, back, left, and right. (Default: 0) p P.40Loudness:This enhances treble and bass to suit the volume. (Default: OFF)Graphic Equalizer:This is for selecting the desired sound quality from the preset sound quality effects memory. (Default: Flat) p P.40Create and save a sound quality effects memory. p P.40Sound Restorer:Interpolating the treble region of compressed audio brings the sound quality closer to the original sound before it was compressed. (Default: OFF)Volume Smoother:This detects differences in volume level based on the source being played and differences in level in each scene in a film, and automatically adjusts the volume level. (Default: OFF) p P.41Virtual Bass:Adding a bass component in the bass region enhances bass to enable a richer bass sound. (Default: OFF)Vocal Image Control:Adjusting vocal volume balance moves the vocal image to the front, back, left, and right. (Default: 0) p P.40Sub Woofer Control:This adjusts the output level of a connected sub woofer speaker. (Default: 0)High Pass Filter:This sets the cutoff frequency of the high pass filter for the front and rear speakers. (Default: Through)Low Pass Filter:This sets the cutoff frequency of the low pass filter for the sub woofer. (Default: 120Hz)Adjusting speaker volume balance and vocal volume balanceBalance/Fader adjusts the overall volume balance. Vocal Image Control adjusts vocal which is oriented in the center of the stereo sound source and the volume balance of components such as main musical instruments. Use these settings to adjust the left/right balance and depth of vocals to suit the speaker configuration and number of passengers.1 MENU 2 Balance/Fader or Vocal Image Control 3Touch and set , , , and Reset to Factory Setting:This returns the currently set adjustment settings (volume balance or Vocal Image Control) to their factory settings.Selecting and setting sound quality effects memoryYou can select and set your preferred sound quality1 MENU 2 Graphic Equalizer 3Select the sound quality.Bass.B:Enhances bass.High.B:Enhances treble.Acoustic:Enhances the mid level (human voice).Impact:Enhances the low and high regions.Smooth:Creates a soft, gentle feel.Flat:Turns the sound source and equalizer off.Setting preferred sound quality effects1 MENU 2 Graphic Equalizer 3 User 1 , User 2 , or User 3 4 Adjust](https://usermanual.wiki/Faurecia-Clarion-Electronics/FX503.Users-Manual/User-Guide-1993308-Page-42.png)
![50 NX603/FX503EnglishWarranty and customer support ■WarrantyThis product is provided with a Warranty. Be sure to check the information and keep the form in a safe place. ■Warranty periodCheck the warranty period written on the Warranty. ■Repair after end of warranty periodIf performance can be maintained by repairing this product, we shall repair it for a charge in accordance with the customer’s wishes.SpecificationsNavigation (GPS) unit (NX603 only)Reception frequency: 1575.42 MHzC/A codeSensitivity: -130 dBm or lessNumber of channels: Parallel 13LCD monitorScreen size: 6.2"Display method: Transmission type TN liquid crystal panelDrive method: TFT (thin-film transistor)Active matrixDrive methodNumber of pixels: 1,152,000[800 (H) x 480 (V) x 3 (RGB)]CD player (NX603 only)Frequency characteristics:20 Hz to 20 kHzSignal-to-noise ratio: 80 dBTotal distortion factor: 0.05% (1 kHz)DVD player (NX603 only)Frequency characteristics:20 Hz to 20 kHzSignal-to-noise ratio: 80 dBTotal distortion factor: 0.05% (1 kHz)FM tunerReception frequency: 76.0 MHz to 90.0 MHzPractical sensitivity: 8 dBμVAM tunerReception frequency: 522 kHz to 1,629 kHzPractical sensitivity: 30 dBμVAudio unitRated output: 18 W x 4 (10%, 4 :)Max. momentary output: 47 W x 4Compatible impedance: 4 :Country codeName of country Country codeEntry numberBermuda BM 6677Canada CA 6765United States US 8583Daily care and handlingDaily care and handling of main unitPay attention to the following points when performing daily care on the main unit. ●When performing daily care on the main unit, wipe lightly with a soft, dry cloth.If dirt is stubborn, wipe lightly with a soft cloth moistened with a small amount of neutral detergent diluted with water, and then finish by wiping with a dry cloth. If liquid gets into the cracks of the device, this may cause a malfunction. ✽When performing daily care on the main unit, never use benzene or paint thinner, car cleaner, polish spray, or similar fluids. Doing so might cause fire. Also, leaving rubber or plastic products in contact with the cabinet for long periods of time may cause stains. ●Occasionally wipe off any dust that adheres to the LCD display with a soft, dry cloth.](https://usermanual.wiki/Faurecia-Clarion-Electronics/FX503.Users-Manual/User-Guide-1993308-Page-52.png)