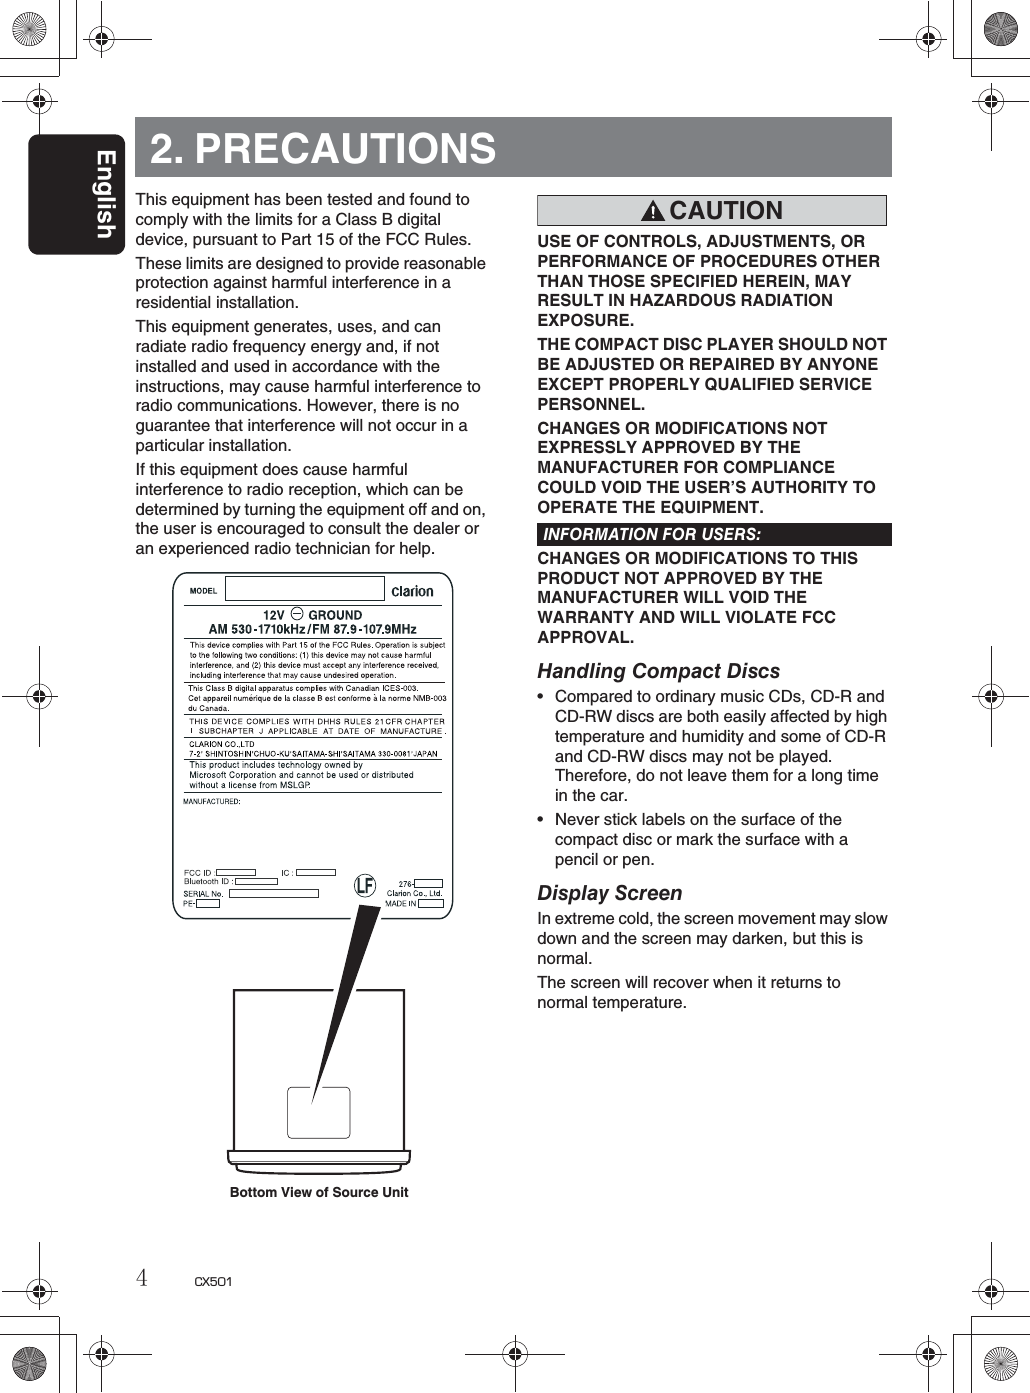
Faurecia Clarion Electronics PE3402BA CAR RADIO WITH CD PLAYER User Manual PE3402BB CX501
Clarion Co., Ltd. CAR RADIO WITH CD PLAYER PE3402BB CX501
UserManual.wiki
>
Faurecia Clarion Electronics
>
PE3402BA User Manual
Users Manual
Navigation menu
Upload a User Manual
Namespaces
Wiki Guide
HTML
PDF
Info
Views
User Manual
Discussion / Help
Navigation
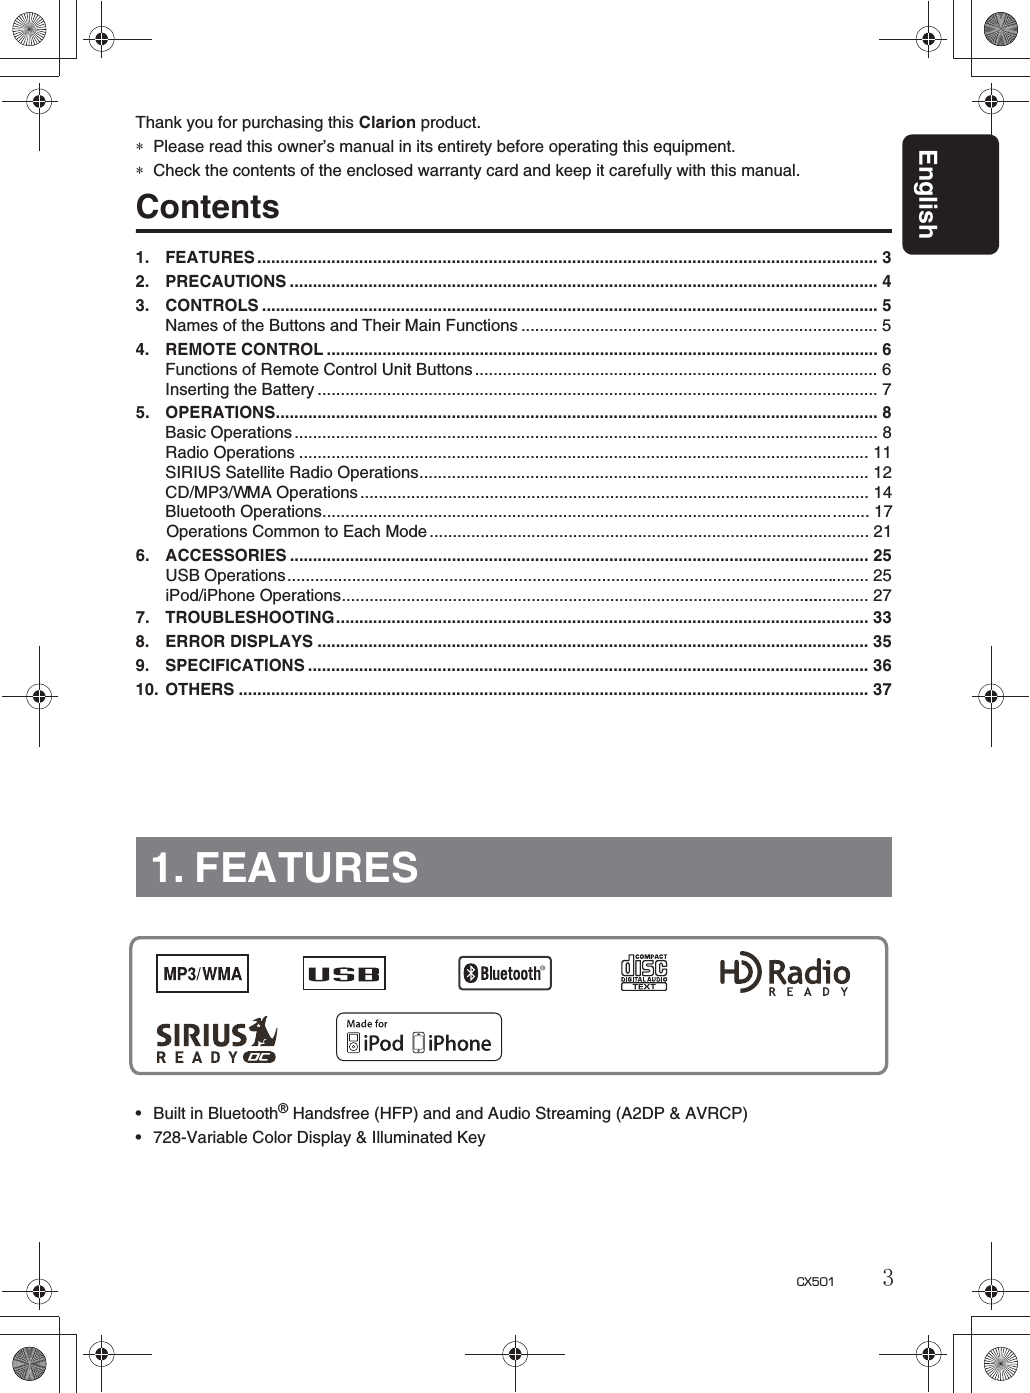
![[SOURCE][x][CD SLOT][DIRECT][MICROPHONE][SCN][RPT][RDM][][SOUND] [DISP] [ISR ] [USB][AUX][BAND][DIRECT][F-DN][F-UP][ ][ROTARY][v]RECEIVER][IR[RESET ][ ] buttonrPerform preset scan while in radio mode.rPlay or pause a track while in CD/MP3/WMA/USB/iPod mode.rReceive and dial a call.[IR RECEIVER] buttonrReceiver for remote control unit.(Operating range: 30° in all directions)[RDM] buttonrPerform random play while in the CD/MP3/WMA/USB/iPod mode.[RPT] buttonrPerform repeat play while in CD/MP3/WMA/USB/iPod mode.[SCN] buttonrPerform scan play while in CD/MP3/WMA/USB mode.[DIRECT] buttonsrStore radio stations in memory or recall itdirectly while in radio mode.[CD SLOT]rInsert CDs here.[MICROPHONE]rBuilt-in microphone for Bluetooth telephone.[Q] (EJECT) buttonrPress to eject disc.[DISP] buttonrSwitch display mode.[AUX], [USB] input jackrInput jack for connecting external device.[BAND] buttonrChange bands, or select seek tuning or manual uning while in the radio mode.[ISR] buttonr[F-UP], [F-DN] buttonsrSelect folders while in MP3/WMA/USB mode.[ROTARY] knobrRotate to adjust the volume.rRotate to select the desired item.rPress to ensure the selected item.[x], [v] buttonsrCommence fast-forward or fast-reversemode.[SOUND] buttonrPress to switch to the sound adjust mode.rEnding a call.[SOURCE] buttonrTurn the power on or off.rRecall ISR radio station in memory.rPress and hold the button (2 sec.) to storecurrent station into ISR memory (radio mode only).LCD Display ScreenEnglish5CX5013. CONTROLSNames of the Buttons and Their Main Functions](https://usermanual.wiki/Faurecia-Clarion-Electronics/PE3402BA/User-Guide-1361271-Page-5.png)
![English6CX5014. REMOTE CONTROLFunctions of Remote Control Unit Buttons∗Some buttons on the remote control unit have different functions from the corresponding buttons on the mainunit.Shared modes[SRC] buttonrPress the button to turn on the power.Press and hold the button (1 sec.) to turn off the power.rUse to alternate operation mode among the various modes.[w], [z]buttonsrIncreases and decreases volume.[MUTE] buttonrTurns mute function on and off.[ISR] buttonrRecalls ISR radio station stored in memory.rPress and hold the button (2 sec.) to store current station in ISR memory (radio modeonly).[DISP] buttonrPress to select the desired display.Radio/Satellite Radio modes[BND] buttonrSwitches reception band.[x], [v] buttonsrMoves preset channels up and down.[SCN] buttonrPress to perform preset scan.rPress and hold the button (2 sec.) to performauto store.rIn the Satellite Radio mode, press once to perform category scan; hold depressed(1 sec.) to perform preset scan.CD/MP3/WMA and USB modes[BND] buttonrPress to play the first track.[x], [v] buttonsrPress to select tracks.rPress and hold the button (1 sec.) to performfast-forward/fast-reverse (Except DRM file).[ ] buttonrSwitches between playback and pause.[SCN] buttonrPress to perform scan play.rWhen in MP3/WMA and USB modes, press and hold the button(1 sec.) to perform folder scan play.[RPT] buttonrPress to perform repeat play.rWhen in MP3/WMA and USB modes, pressand hold the button(1 sec.) to perform folderrepeat play.[RDM] buttonrPress to perform random play.rWhen in MP3/WMA and USB modes, pressand hold the button(1 sec.) to perform folder random play.[SRC][BND][MUTE][ISR][SCN][DISP][RDM][RPT]Signal transmitter](https://usermanual.wiki/Faurecia-Clarion-Electronics/PE3402BA/User-Guide-1361271-Page-6.png)
![English7CX501Inserting the Battery1Turn over the remote control unit and slide the cover in the direction indicated by thearrow in the illustration.2Insert the battery (CR2025) into the insertionguides, with the printed side (+) facing upwards.3Press the battery in the direction indicated bythe arrow so that it slides into the compartment.4Replace the cover and slide in until it clicksinto place.Notes:Misuse may result in rupture of the battery,producing leakage of fluid and resulting inpersonal injury or damage to surroundingmaterials. Always follow these safety precautions:rUse only the designated battery.rWhen replacing the battery, insert properly, with+/– polarities oriented correctly.rDo not subject battery to heat, or dispose of infire or water. Do not attempt to disassemble thebattery.rDispose of used batteries properly.CR2025Insertion guideFunctions of Remote Control Unit ButtonsiPod mode[x], [v] buttonsrPress to move the tracks up and down. rPress and hold the button (1 sec.) to performfast-forward/fast-reverse.[ ] buttonrSwitches between playback and pause.[RPT] buttonrPress to perform repeat play.[RDM] buttonrPress to perform random play.rPress and hold the button (1 sec.) to performall random play.](https://usermanual.wiki/Faurecia-Clarion-Electronics/PE3402BA/User-Guide-1361271-Page-7.png)
![English8CX5015. OPERATIONSNote:rBe sure to read this chapter referring to the front diagrams of chapter “3. CONTROLS”onpage5.Basic OperationsCAUTIONBe sure to lower the volume beforeswitching off the unit power or the ignitionkey. The unit remembers its last volumesetting.Turning on/off the powerNote:1. Press the [SOURCE] button to turn on the 2. Press and hold the [SOURCE] button (1 sec.) for to turn off the power.power.Selecting a mode1. Press the [SOURCE] button to change theoperation mode.Radio (SIRIUS Satellite radio) BLUETOOTH AUX Radio...∗iPod/iPhone connect to this unit via USBcable.Adjusting the volume1. Turning the [ROTARY] knob clockwise increases the volume; turning it counterclockwise decreases the volume.∗Thevolumelevel isfrom0(minimum)to33(maximum).Switching the displayPress the [DISP] button to select the desireddisplay.Sound AdjustmentYou can adjust a sound effect or tone quality to your preference.Setting the BEAT EQThis unit is provided with 4 types of sound tone effects stored in memory.Select the one you prefer.∗The factory default setting is “OFF”.2-1. Select “BEAT EQ”.3-1. Each time you turn the [ROTARY] knobthe tone effect changes in the followingorder:“CUSTOM” “EXCITE” “IMPACT”“B-BOOST” “OFF”CUSTOM : user customEXCITE : bass and treble emphasizedmid emphasizedIMPACT : bass and treble emphasizedB-BOOST : bass emphasizedOFF : no sound effectTo change sound setting1. Press the [SOUND] button to switch to thesound adjustment selection display.∗The factory default sound setting is“BEAT EQ”.2. Then press the [x] or [v] button to select the sound adjustment mode.Each time you press the [x] or [v]button, the sound adjustment modechanges as following order:“BEAT EQ” “M-B EX” “BALANCE”“FADER” “LPF” “S-W VOL” “HPF”∗In the case of display blinking “ENT”, youcan press the [ROTARY]knob to adjust thesetting value.3. Turn the [ ] knob to adjust the selected sound mode.4. After completing settings, press the [SOUND] button to return to the previous mode.ROTARYCD/MP3/WMA USB/iPod/iPhone](https://usermanual.wiki/Faurecia-Clarion-Electronics/PE3402BA/User-Guide-1361271-Page-8.png)
![Basic OperationsEnglish9CX501When “CUSTOM” is set:3-1. Press the [ROTARY] knob.3-2. Press the [x]or[v] button to select the“BASS”/“MID”/“TREBLE” mode to adjust.3-3. If you want to set the flat, press the[ROTARY] knob to return to the “CUSTOM”mode, then press and hold the[ROTARY]knob(1 sec.), bass/mid/treble characteristicsbecome flat.When “EXCITE/IMPACT/B-BOOST” is set:3-2. Press the [ROTARY] knob. 3-3. Turn the [ROTARY] knob to adjust thesetting in the range of –3 to +3.∗The factory default setting is “0”.3-4. Press the [ROTARY] knob to return to the previous mode.Adjusting the BASS/MID/TREBLEThis adjustment can be performed only when the BEAT EQ is set to “CUSTOM”.Note:rWhile connected with the external aplifers,please do not set the “BASS”/“MID”/“TREBLE”in the maximum level. Otherwise the speakersmaybedamaged.3-2. Press the [ROTARY] knob.3-3. Press the [x]or[v] button to select asfollowing order.“BASS<G>”“BASS<F>” “BASS<Q>”“MID<G>”“MID<F>” “MID<Q>”“TREBLE<G>” “TREBLE<F>”“TREBLE<Q>”∗The factory default setting is “BASS<G>”.3-4. Turn the [ROTARY] knob to select the setting.BASS<G>:The factory default setting is “0”.(Adjustment range: +7 to –7)BASS<F>:The factory default setting is “50”.(Adjustment range: 50/100/200)BASS<Q>:The factory default setting is “1”.(Adjustment range: 0.7/1/1.4/2)MID<G> : The factory default setting is “0”.(Adjustment range: +7 to –7)MID<F> :The factory default setting is “500”.(Adjustment range: 500/1K/2K)MID<Q> :The factory default setting is“1”.(Adjustment range: 0.7/1/1.4/2)TREBLE<F>:The factory default setting is“10K”.(Adjustment range: 5K/10K/15K)TREBLE<Q>:The factory default setting is“1”.(Adjustment range: 0.7/1/1.4/2)3-5. Press the [ROTARY] knob to return to theprevious mode.Setting the MAGNA BASS EXTENDThe MAGNA BASS EXTEND does not adjustthe low frequencies like the normal soundadjustment function, but emphasizes the deepbass frequencies to provide you with a dynamicsound.∗The factory default setting is “OFF” (off).2-1. Select “M-B EX”.3-1. Turn the [ROTARY] knob to select “ON”or“OFF”.Adjusting the balance2-1. Select “BALANCE”.3-1. Turn the [ROTARY] knob to adjust the balance of the right and left speakers.∗The factory default setting is “CENTER”(center). (Adjustment range: RIGHT12 toLEFT12 (right 12 to left 12))Adjusting the fader2-1. Select “FADER”.3-1. Turn the [ROTARY] knob to adjust the balance of the rear and front speakers.∗The factory default setting is “CENTER”(center). (Adjustment range: FRONT12 toREAR12 (front 12 to rear 12))Setting the subwooferYou can set the low pass filter of subwoofer.This adjustment can be performed only whenthe “REAR/S-W” is set to “S-WOOFER”.2-1. Select “LPF”.3-1. Turn the [ROTARY] knob to select asfollowing order.“THROUGH” “60” “90” “120”∗The factory default setting is “THROUGH”.TREBLE<G>:The factory default setting is“0”.(Adjustment range: +7 to –7)](https://usermanual.wiki/Faurecia-Clarion-Electronics/PE3402BA/User-Guide-1361271-Page-9.png)
![Basic OperationsEnglish10 CX5012-1. Select “S-W VOL”.3-1. Turn the [ROTARY] knob to increasesor decreases the subwoofer volume.∗The factory default setting is “0”.(Adjustment range: +6 to –6)Adjusting the HPF2-1. Select “HPF”.3-1. Turn the [ROTARY] knob to select as following order.“THROUGH” “60” “90” “120”∗The factory default setting is “THROUGH”.Adjusting the subwoofer outputvolumeYou can adjust the volume output from the unit’ssubwoofer output terminal.This adjustment can be performed only whenthe “REAR/S-W” is set to “S-WOOFER”](https://usermanual.wiki/Faurecia-Clarion-Electronics/PE3402BA/User-Guide-1361271-Page-10.png)
![English11CX501Radio OperationsListening to the radio1. Press the [SOURCE] button and select theradio mode.2. Press the [BAND] button and select the radio band. Each time the button is pressed,the radio reception band changes in the following order:FM1 FM2 FM3 AM FM1...Tuning2 types of tuning mode available, manual tuning and preset tuning.Manual tuningThere are 2 ways available: Quick tuning andstep tuning.Quick tuningPress and hold the [x]or[v] button (1 sec.)to tune in a station.Step tuningPress the [x]or[v] button to manually tunein a station.Recalling a preset stationA total of 24 preset positions (6-FM1, 6-FM2,6-FM3, 6-AM) exists to store individual radio stations in memory. Press the corresponding[DIRECT] button to recall the stored radiofrequency automatically.Manual memory1. Select the desired station with seek tuning ormanual tuning.2. Press and hold one of the [DIRECT] buttons (2 sec.) to store the current station into preset memory.Auto storeAuto store is a function for storing up to 6stations that are automatically tuned in sequentially. If 6 receivable stations cannot be received, a previously stored station remains unoverwritten at the memory position.1. Press the [BAND] button and select the desired band (FM or AM ).Preset scanPreset scan receives the stations stored in preset memory in order. This function is useful when searching for a desired station in memory.1. Press the [ ] button.2. When a desired station is tuned in, press the[ ] button again to continue receiving that station.Note:rBe careful not to press and hold the [ ] button(2 sec.), otherwise the auto store function isengaged and the unit starts storing stations.Instant station recall (ISR)Instant station recall is a special radio preset that instantly accesses a favorite radio station ata touch of a button. The ISR function evenoperates with the unit in other modes.ISR memory1. Select the station that you wish to store inISR memory.2. Press and hold the [ISR] button (2 sec.).Recalling a station with ISRIn any mode, press the [ISR] button to turn on the radio function and tune the selected radio station. “ISR” appears in the display. Press the [ISR] button again to return to the previousmode.2. Press and hold the [ ] button (2 sec.) . Thestations with good reception are stored automatically to the preset channels.∗If auto store is performed in the FM bands, thestations are stored in FM3 even if FM1 or FM2was chosen for storing stations.](https://usermanual.wiki/Faurecia-Clarion-Electronics/PE3402BA/User-Guide-1361271-Page-11.png)
![English12 CX501SIRIUS Satellite Radio OperationsThis function is available when this unit is connected to the SC-C1 tuner (need sold seperately) with the Sirius SSP cable.Selecting a Satellite Radio mode1. Press the [SOURCE] button. The system changes to the specified Satellite Radio mode.Selecting a band1. Press the [BAND] button to select a band.This changes the reception band as follows:SR1 SR2 SR3...Information displayed during receptionThe following information is displayed when thesatellite radio cannot be received normally.rWhen the tuner is not be connected: “NOTUNER”.∗In this time, please turn off the power andconnect the tuner to this unit.rWhen the antenna is not be received: “NOANTENNA”.rWhen no signal is received: “ACQUIRING”.rWhen the contract of the channel is beingupdated: “SUB UPDT”.rWhen the channel map is being updated:“UPDATING”.rA channel without a broadcast has beenselected: “INVALID CH”rA channel not covered by your contract:“CALL 888” “539-SIRI” (alternated)Confirming your SIRIUS ID1. Switch to channel 0.∗For details, see the following operationdescriptions.2. The SIRIUS ID appears in the diaplay.Displaying channel labels1. Press the [DISP] button to select the desiredchannel label.Channel Category Title (Artist)Composer Channel...Channel input directlyThis function allows you to input the channel No.directly.1. Press and hold the [DISP] button.2. Press the [x] or [v] button to select“DIRECT”.3. Press the [ROTARY] knob.4. Press the [x] or [v] button to move the cursor.5. Turn the [ROTARY] knob to select anumber.6. Press and hold the [ROTARY] knob.Notes:rIf no operation is performed whithin 10 seconds,it will return to the previous mode.rIf you select the Parental Locked channel, it willremind you to enter the password (For details,see the chaperter “Parental Lock function”(page 19)).Channel selection1. Channels are selected with the [x]or[v] button.∗For details, see the following operationdescriptions.Notes:rThe audio output is muted and other buttonoperations are not accepted during channelselection.rThe Parental Locked, unsubscribed and invalidchannels will be skiped and can not be tuned.Recalling a preset stationA total of 18 satellite radio stations can bestored.6-SR1, 6-SR2 and 6-SR3This allows you to store your favorite satellite radio stations in memory for later recall.1. Press the [BAND] button to select thedesired band.2. Turn the [ROTARY] knob or [ DIRECT]button to select the desired preset station.Preset memory1. Press the [BAND] button to select thedesired band.2. Select the desired channel.3. Press and hold the [DIRECT] button (2 sec.)to store the current channel into preset memory.](https://usermanual.wiki/Faurecia-Clarion-Electronics/PE3402BA/User-Guide-1361271-Page-12.png)
![SIRIUS Satellite Radio OperationsEnglish13CX501Receiving stations selected bycategorySatellite Radio allows you to select broadcastchannel category (contents).1. Press and hold the [BAND] button (1 sec.)to select the category selection mode.∗It press and hold once again, return to thechannel selection mode.2. Turn the [ROTARY] knob to change the category item.3. Press the [x] or [v] button to tune in a station.∗If press and hold the [x]or[v] button, itwill quick tune a channel a channel in thecurrent category.∗If turn the [ROTARY] knob , it will tune thefirst channel in the next or last category.Notes:rWhen the category selection mode is entered,the category of the last received channel isdisplayed first.rIf no operation is perfomed within 10 seconds,the category selection mode is canceled, andresumes to the channel mode.Presetting a categoryA category can be preset by registering specificcategories in [DIRECT] buttons 1 to 6. Then thedesired category can be recalled by pressingthe corresponding [DIRECT] button.1. Press and hold the [BAND] button (1 sec.)to enter the category mode.2. Turn the [ROTARY] knob to select acategory.3. Press and hold one of the [DIRECT] buttonsfor 2 seconds or longer to store the currentcategory into preset memory.Notes:rWhen the name of a channel stored in memory ischanged by a broadcasting channel, the displaymay show a channel name that differs from thestored name.rA channel stored in memory may bediscontinued at the option of the broadcastingchannel.rIf no operation is performed for more than 1second, category seek tuning can automaticallytune in a receivable broadcast channel category.Scan functionThere are two scan modes: the category scan mode and the preset scan mode.During scanning channels are displayed in abbreviated form, the display mode cannot beswitched.Preset scan (PRESET SCN)A preset scan scans the channels (up to 18channels) stored in the preset memory aboutevery 10 seconds.∗This function is available in the channel selectionmode.Press the [ ]button. And start the preset scanning.Category scan (CAT SCN)In a category scan, broadcast channels in thesame category as the current channel areselected about every 10 seconds.∗This function is available in the category selectionmode.Note:rCategory scanning is not available when nocategory is defined for the current channel.Parental Lock functionThis fuction allows you to set a listeninglimitation level.This setting is possible only when a password isentered.Setting the Password∗The factory default setting is “0000”.1. Press and hold the [DISP] button.2. Press the [x] or [v] button to select“PARENTAL PASSWORD”.3. Press the [ROTARY] knob. 4. Input the old password.4-1. Press the [x]or[v]buttontomovethe cursor.4-2. Turn the [ROTARY] knob to select anumber.4-3. Press and hold the [ROTARY] knob.5. Input a new password.Repeat step 4-1 to 4-3.6. Input the new password again.Repeat step 4-1 to 4-3.Press the [ ]button. And start the categoryscanning.](https://usermanual.wiki/Faurecia-Clarion-Electronics/PE3402BA/User-Guide-1361271-Page-13.png)
![SIRIUS Satellite Radio OperationsEnglish14 CX501Note:rIf you forget the password, you can do thefollowing operations:∗Input the old and new password with “4356”,and it will return to the factory default setting“0000”.∗Input the old password with “4356”, and thenoperate step 5-6.Locking Channel1. Select a desired channel.2. Press and hold the [DISP] button.3. Press the [x] or [v] button to select“LOCK CH”.4. Press the [ROTARY] knob.5. Input the right password.5-1. Press the [x]or[v] button to movethe cursor.5-2. Turn the [ROTARY] knob to select anumber.6. Press and hold the [ROTARY] knob.Unlocking the Channel1. Select the locked channel through inputingchannel No. directly.2. Press and hold the [DISP] button.3. Press the [x] or [v] button to select“UNLOCKCH”.4. Press the [ROTARY] knob.5. Input the right password.5-1. Press the [x]or[v] button to movethe cursor.5-2. Turn the [ROTARY] knob to select anumber.6. Press and hold the [ROTARY] knob.Unlocking All Channel1. Press and hold the [DISP] button.2. Press the [x] or [v] button to select“UNLOCK ALL CH”.3. Press the [ROTARY] knob.4. Input the right password.4-1. Press the [x]or[v] button to movethe cursor.4-2. Turn the [ROTARY] knob to select anumber.5. Press and hold the [ROTARY] knob.Unskip all channel functionThis function allows you to unskip the skiped channel.1. Press and hold the [DISP] button.2. Press the [x] or [v] button to select“UNSKIP ALL CH”.3. Press and hold the [ROTARY] knob.](https://usermanual.wiki/Faurecia-Clarion-Electronics/PE3402BA/User-Guide-1361271-Page-14.png)
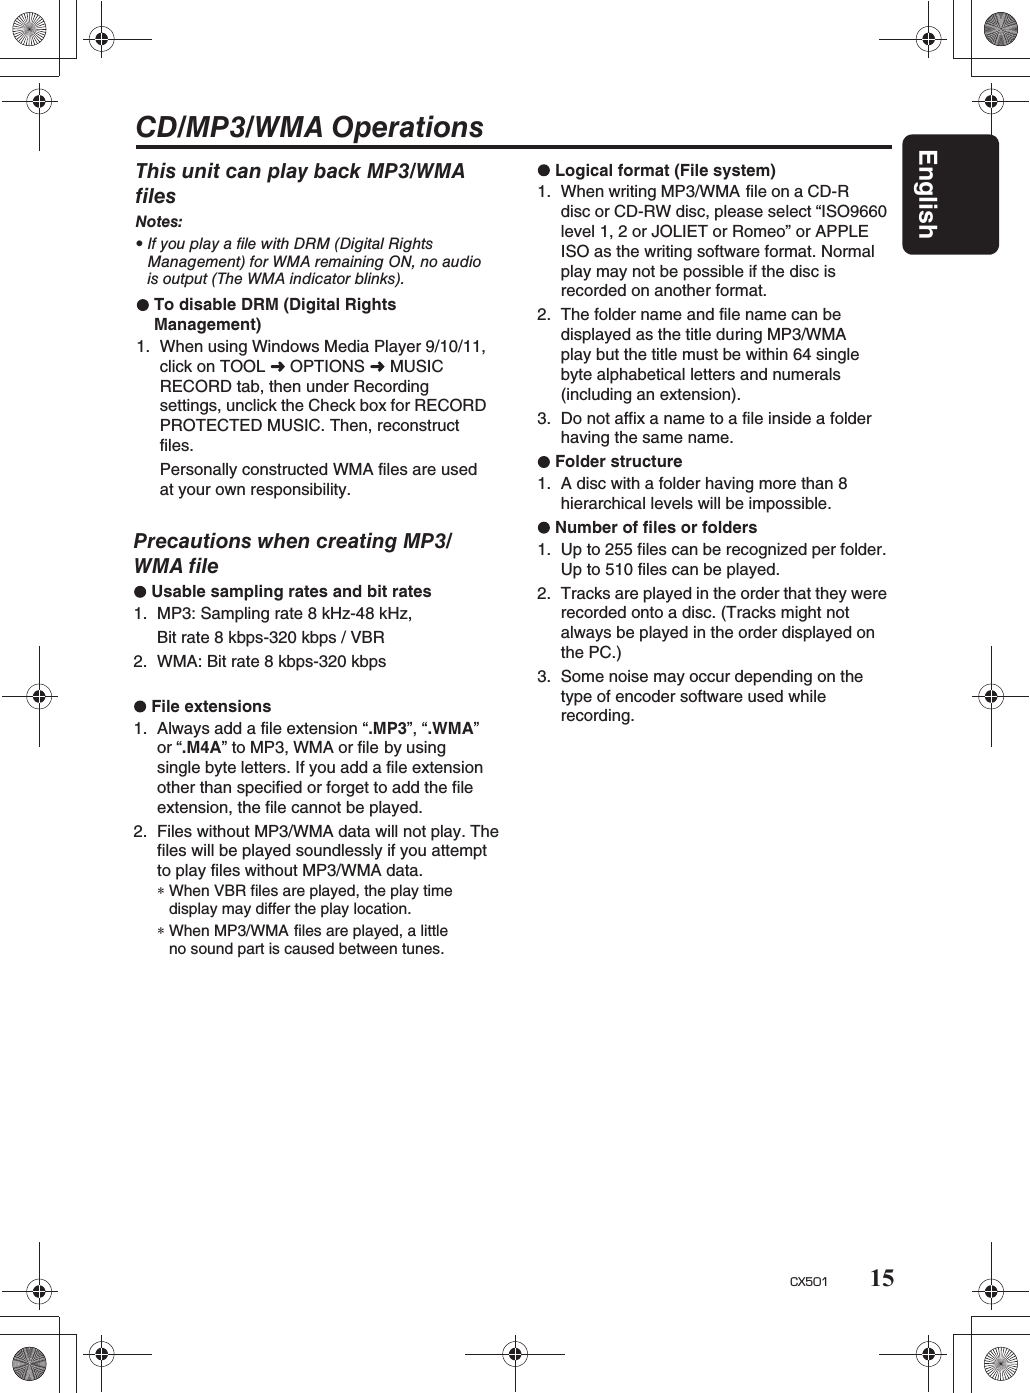
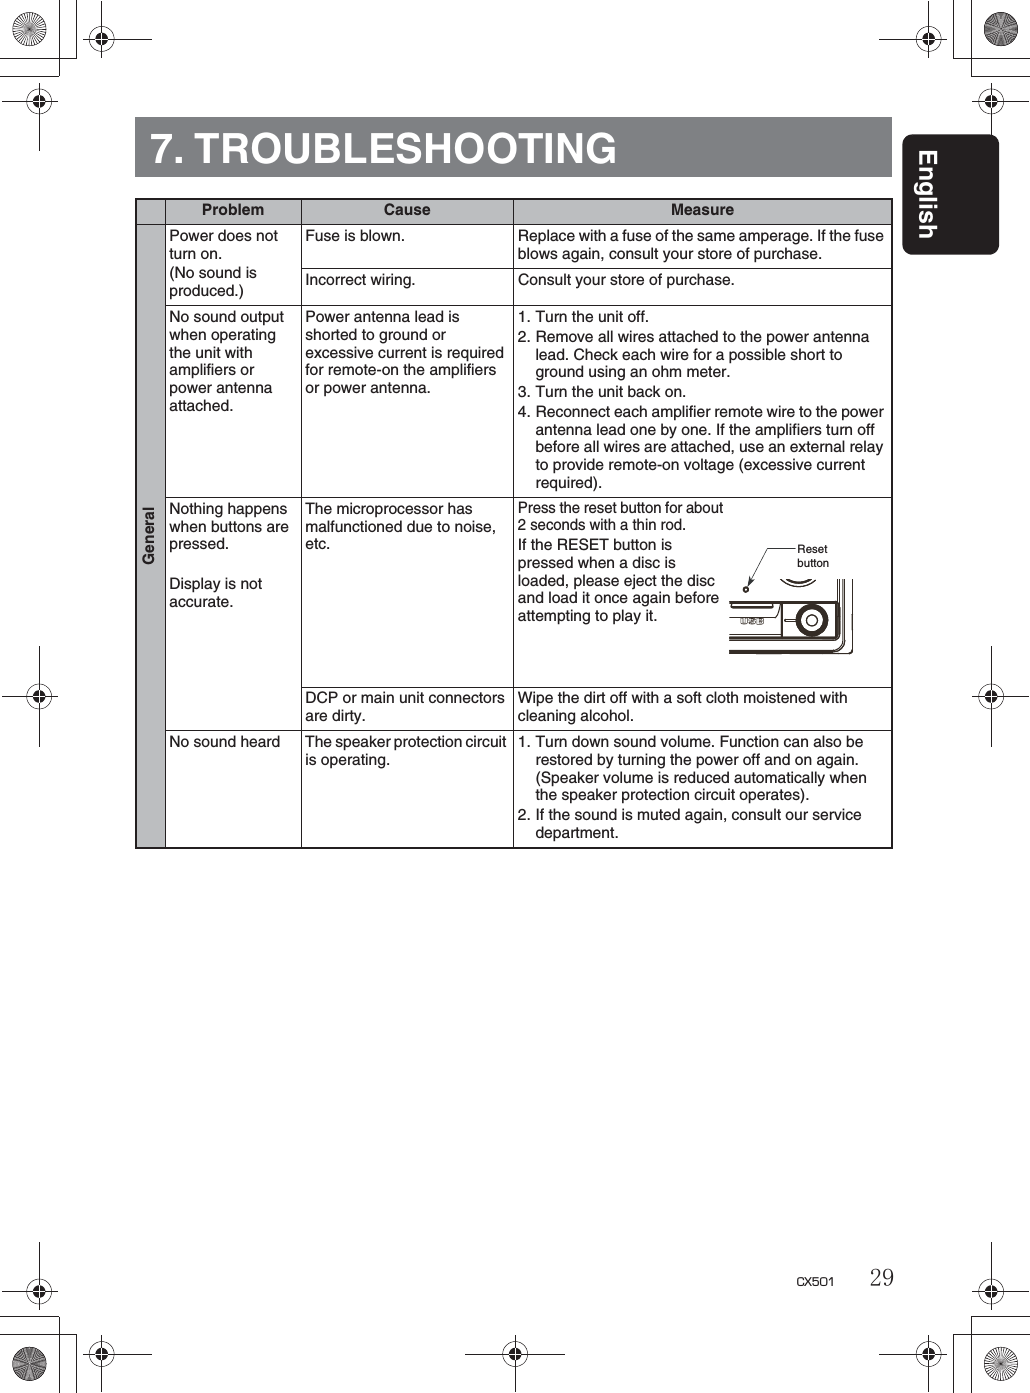
![CD/MP3/WMA OperationsEnglish16 CX501Displaying CD titlesThis unit can display title data for CD-text/MP3/WMA disc and user titles input with this unit. 1. Each time you press the [DISP] button to change the title display.CD-TEXT discUser Track Disc/Artist ...MP3/WMA discTrack Folder Title/Album Artist ...Notes:rIf the CD playing is not a CD-text CD or no usertitle has been input, “NO TITLE”appearsinthedisplay.rIf MP3/WMA disc is not input TAG, “NOTITLE” appears in the display.rFor MP3, supports ID3 Tags V2.3/2.2/1.1/1.0.rTag displays give priority to V2.3/2.2.rIn the case of album Tags for WMA, theinformation written into the extension header isdisplayed.rOnly ASCII characters can be displayed in Tags.Backup Eject functionJust pressing the [QQ] button, ejects the disc even if the power to the unit was not turned on.1. Press the [ ] button. Remove the disc after it is ejected.Notes:rIfyouforceaCDintobeforeautoreloading,thiscandamagetheCD.rIf a CD (12 cm) is left in the ejected position for15 seconds, the CD is automatically reloaded(Auto reload).Listening to a disc already loaded inthe unitPress the [SOURCE] button to select the CD/MP3/WMA mode.When the unit enters the CD/MP3/WMAmode, play starts automatically.If there is no disc loaded, the indication “NODISC” appears in the title display.Loading a CD1. Insert a CD into the center of the CD SLOTwith the labeled side facing up. The CD playsautomatically after loading.Pausing play1. Press the [ ] button to pause play.“PAUSE” appears in the display.2. To resume CD play, press the [ ] buttonagain.Disc-In-Play functionAs long as the ignition key is turned to the ON orACC position, this function allows you to turn thepower to the unit and start playing the disc automatically when the disc is inserted even ifthe power is not turned on. CAUTIONrDo not try to put your hand or fingers inthe disc insertion slot. Also never insertforeign objects into the slot.rDo not insert discs where adhesive comesout from cellophane tape or a rental CD label, or discs with marks where cellophane tape or rental CD labels wereremoved. It may be impossible to extractthese discs from the unit and they maycause the unit to break down.Notes:rNever insert foreign objects into the CD SLOT.rIf the CD is not inserted easily, there may beanother CD in the mechanism or the unit mayrequire service.rDiscs not bearing the or mark andCD-ROMs cannot be played by this unit.rSome CDs recorded in CD-R/CD-RW mode maynot be usable.](https://usermanual.wiki/Faurecia-Clarion-Electronics/PE3402BA/User-Guide-1361271-Page-16.png)
![CD/MP3/WMA OperationsEnglish17CX501Folder SelectThis function allows you to select a folder containing MP3/WMA files and start playing from the first track in the folder.1. Press the [F-DN] button to move the nextfolder.Press the [F-UP] ] button to move theprevious folder.2. To select a track, press the [x] or [v]button.Other various play functionsScan playThis function allows you to locate and play thefirst 10 seconds of all the tracks recorded on a disc.1. Press the [SCN] button to perform scan play.Folder scan playThis function allows you to locate and play thefirst 10 seconds of the first track of all the folderson an MP3/WMA disc.1. Press and hold the [SCN] button (1 sec.) for folder scan play.Folder random playThis function allows you to play all the tracks of all the folders recorded on an MP3/WMAdisc in a random order.1. Press and hold the [RDM] button (1 sec.) for folder random play.To cancel play1. Press the operating button previously selected.∗The various play mode is canceled and thevarious play off mode appears in the displayfor 2 seconds.Selecting a trackTrack-up1. Press the [v] button to move ahead to the beginning of the next track.2. Each time you press the [v] button, thetrack advances ahead to the beginning of thenext track.Track-down1. Press the [x] button to move back to thebeginning of the current track.2. Press the [x] button twice to move back tothe beginning of the previous track.Fast-forward/Fast-reverseFast-forward1. Press and hold the [v] button (1 sec.).Fast-reverse1. Press and hold the [x] button (1 sec.).∗For MP3/WMA discs, it takes some timeuntil the start of searching and betweentracks. In addition, the playing time may haveamarginoferror.Repeat playThis function allows you to play the current trackrepeatedly.1. Press the [RPT] button to perform repeatplay.Folder repeat playThis function allows you to play a track currentlybeing played in the MP3/WMA folder repeatedly.1. Press and hold the [RPT] button (1 sec.) for folder repeat play.Random playThis function allows you to play all tracks recorded on a disc in a random order.1. Press the [RDM] button to perform random play.](https://usermanual.wiki/Faurecia-Clarion-Electronics/PE3402BA/User-Guide-1361271-Page-17.png)
![English18 CX501The Bluetooth allows you to utilize your car’s built-in audio system for wireless mobile phoneor music handsfree communication.Some Bluetooth mobile phones have the audiofeatures, and some portable audio players support Bluetooth feature. This system can play audio data stored in a Bluetooth audio device.The car stereo with Bluetooth will be able to retrieve phonebook contacts, received call, dialed call, missed call, incoming calls,outgoing call, redial call and listen to music.Notes:rThis system will not operate or may operateimproperly with some Bluetooth audio players.rFor detailed information on the playableBluetooth audio players, see our home page:www.clarion.comrWhen a audio device is paired, the followingoperations are the same as for CD mode:∗Pause∗Track selection∗Fast-forward∗Fast-reverserThe titles and the play time can not appear in thedisplay.See “CD/MP3/WMA Operations” (page 15-17 ) for details.Basic OperationsSelect Bluetooth1. Press the [SOURCE] button to switch the Bluetooth OperationsMaking a callThere are 4 ways to make outgoing call.Direct Number CallOutgoing call can be made by entering telephone numbers directly via the car stereo.Telephone number uses 0, 1, 2, 3, 4, 5, 6, 7, 8,9, *, #, and +.1. Press the [BAND] button to select “DIALNUMBER”.2. Press the [ROTARY] knob.3. Turn the [ROTARY] knob to select thenumbers.4. Press the [x] or [v] button to input or delete the number.5. Press and hold the [ ] button (1 sec.) to call the mobile phone No.∗Press the [SOUND] button to end the call.Call from PhonebookUser can search the contact name in the phonebook and make call.Alternatively, user can call from mobile phone.1. Press the [BAND] button to select “PHONEBOOK”.2. Press the [v] button to enter the contact name mode (In this case, turn the [ROTARY]knob to select the desired contact name).3. When the contact name is displayed, press the [v]or[x] button to select the contactname’s phone number.4. Press the [ ] button to call the mobile phone No.∗Press the [SOUND] button to end the call.Answering a call1. You can answer an incoming call by pressingany button.∗Press the [SOUND] button to reject anincoming call.Received/Dialled/Missed Call HistoryYou can search any Received/Dialled/MissedCall History.1. Press the [BAND] button to selectHISTORY“”.2. Press the [v] button to enter the contact name mode (In this case, turn the [ROTARY]knob to select the desired contact name).3. When the contact name is displayed, press the [x]or[v] button to select the contactname’s phone number.source.2. You can press and hold the [SOUND] buttonto disconnect the currently connected device.Switch the displayPress the [DISP] button to select the display in the following order:“BT TEL”“BT AUDIO”∗The connected device name will appear in thedisplay.](https://usermanual.wiki/Faurecia-Clarion-Electronics/PE3402BA/User-Guide-1361271-Page-18.png)
![Bluetooth OperationsEnglish19CX501Redial a callYou can call a redial phone No.1. Press the [BAND] button to select “REDIAL”.2. Press and hold the [ROTARY] knob (1 sec.)to call the redial phone No.∗Press the [SOUND] button to end the call.PAIRINGThis option is used to perform Bluetooth pairingwith the mobile phone and audio.Up to a maximum of 5 mobile phones and a audio device can be paired.2-1. Select “PAIRING”.3-1. Press the [ROTARY] knob.3-2. Turn the [ROTARY] knob to select “TELPHONE” or “AUDIO”. then press theFor a no paired device after reset or at thesame time when you select“TELEPHONE”,please turn the[ROTARY] turn to selectthe phone book type.(For details, see the chaperter “PHONEBOOK TYPE” (page 20))3-3. After select the “TELEPHONE”, turn the[ROTARY] knob to select “ MEMORY 1”to “MEMORY 5”, then press and hold the [ROTARY] knob (1 sec.) to memory.4-1. Turn the [ROTARY] button to select “SEARCH”or “WAIT”.5-1. Press and hold the [ROTARY] knobTo change Bluetooth adjustmentsetting1. Press and hold the [DISP] button (1 sec.) to switch to the Bluetooth adjustmentselection display.2. Press the [x] or [v] button to selectthe “item name”.“PAIRING” “SELECT” “DELETE”“DISCONNECT”“ADD PHONE BOOK” “DEL NO. PHONE BOOK”“HISTORY DELETE ALL” “PHONEBOOK TYPE” “MIC GAIN” “RINGVOL”“TONE SEL” “NOISE”“AUTO ANS” “AUTO CON” “PASSKEY” “ADDRESS” “BT NAME”“BT FW”3. Turn the [ROTARY] button to select the “desired setting value”.∗In the case of display blinking “ENT”, youcan press the [ROTARY] knob to adjustthe setting value.∗After completing settings, press the [DISP]button to return to the previous mode.[ROTARY] knob.∗When the “SEARCHING” appears in thedisplay, you can press the [ROTARY] knobto stop search, then the list search appear.“SEARCH” mode: User can search theBluetooth mobile phone or audio device.“WAIT” mode: User can search this uint viathe mobile phone or audio device.6-1. After the search, turn the [ROTARY]knob to select the desired Bluetoothmobile phone.7-1. Press and hold the [ROTARY] knob(1 sec.) to pair.SELECTThis is a setting for user to select one of thepaired mobile phones or audio.2-1. Select “SELECT”.3-1. Press the [ROTARY] knob, then the pairedmobile phones appears in the display.4-1. Turn the [ROTARY ] knob to choose oneof the 5 mobile phones.5-1. Press and hold the [ROTARY] knob(1 sec.) to connect.Connected device will be able to use all thefunctionalities provided.DELETEThis is a setting for user to delete one of thepaired device from the list.2-1. Select “DELETE”.3-1. Press the [ROTARY] knob, then the pairedmobile phones appears in the display.4-1. Turn the [ROTARY] knob to choose oneof the 5 mobile phones and a audio device.5-1. Press and hold the [ROTARY] knob todelete the paired device.Notes:rDeleted paired device will not automaticallyrearrange in the paired device list.rAfter deleting the device, the phone book andthe call history records will be deleted too.4. Press the [ ] button to call the mobile phone No.(1 sec.).](https://usermanual.wiki/Faurecia-Clarion-Electronics/PE3402BA/User-Guide-1361271-Page-19.png)
![Bluetooth OperationsEnglish20 CX501DISCONNECTThis option is used to disconnect the currentlyconnected device.2-1. Select “DISCONNECT”.3-1. Press and hold the [ROTARY] knob(1 sec.) to disconnect.∗Press and hold the [SOUND]button(2 sec.) to disconnect.ADD PHONE BOOKThis option is used to add one of the phone No.2-1. Select “ADD PHONE BOOK”.3-1. Press the [ROTARY] knob (1 sec.), thenthe“RECEIVING” appears in the display.∗At the same time the phone No. from thepaired phone book list is sent out, then thereis a prompt on the mobile phone if it issuccessful.∗Some mobile phones cannot transfer thephone book to this unit because of the lessword and the language type. In this time,please edit your phone book in otherlanguage, and transfer it once again.DEL NO. PHONE BOOKThis option is used to delete one of or all phone No. of the added phone book.2-1. Select “DEL NO. PHONE BOOK”.3-1. Press the [ROTARY] knob.4-1. Turn the [ROTARY] knob to select “1 DEL” or “ALL DEL”.5-1. When you select “1DEL”, press the[ROTARY] knob, then turn the [ROTARY]knob to select one of the desired phone No.6-1. Press the [ROTARY] knob, then the“DELETE?” appears in the display.7-1. Press the [ROTARY] knob (1 sec.) to delete.detele all of the call records successfully.the“DELETING” appears in the display,Note:rIf you want to transfer or handl this unit, pleaseperform “DELETE”, “ADD PHONE BOOK”and“DEL NO. PHONE BOOK”functiontodeleteallof your personal information.HISTORY DELETE ALLThis option is used to delete all of the call records.2-1. Select “HISTORY DELETE ALL”.3-1. Press the [ROTARY] knob, then the“CONFIRM?” appears in the display.4-1. Press the [ROTARY] knob (1 sec.) , thenPHONE BOOK TYPEThe unit provide 3 types of phone book whichare stored in memory.2-1. Select “PHONE BOOK TYPE”.3-1. Press the [ROTARY] knob.3-2. Turn the [ROTARY] knob to select“1”,“2”or“3”, then press the [ROTARY]knob to store in memory.Notes:rIf you change the phone book type, all of thepaired mobile phones’s book data will bedeleted.rThe piece number of the phone book’s recordcan be stored in the different memory of thephone book type are as follow:MIC GAINMIC gain can be set by each paired mobilephone device. Each registered device has unique MIC gain setting.2-1. Select “MIC GAIN”.3-1. Turn the [ROTARY] knob to change theMIC gain setting.∗The factory default setting is “3”.(Adjustment range:1 to 5)RING VOLThis option is used to change the ringing volumeby each paired mobile phone device.2-1. Select “RING VOL”.3-1. Turn the [ROTARY] knob to change the ringing volume.∗The factory default setting is “5”.(Adjustment range:1 to 10)TONE SELThe system can ring if the mobile phone cannotring when the Bluetooth connection has beenestablished.2-1. Press “TONE SEL”.3-1. Turn the [ROTARY] button to select“INTERNAL”or “AUTO”∗The unit setting is “AUTO”.“INTERNAL”: Adjust tone in the carbluetooth system. PHONETYPEMEMORY1MEMORY2MEMORY3MEMORY4MEMORY51250piece250piece0piece0piece0piece2200piece100piece100piece50piece50piece3100piece100piece100piece100piece100piece](https://usermanual.wiki/Faurecia-Clarion-Electronics/PE3402BA/User-Guide-1361271-Page-20.png)
![Bluetooth OperationsEnglish21CX501“AUTO”: Automatic adjustment is enabled in the paired mobile phone.NOISEThis option is used to set noise volume in the car bluetooth system.2-1. Press “NOISE”.3-1. Turn the [ROTARY] knob to select“LOW” or “HIGH”.∗The factory default setting is “LOW”.AUTO ANSThis is a setting to determine whether any incoming call will be automatically or manually answered.∗The factory default setting is “OFF”.2-1. Select “AUTO ANS”.3-1. Turn the [ROTARY] knob to select “ON”or “OFF”.ON: Any incoming call is automaticallyanswered in 5 seconds.OFF: User needs to manually answer the call.AUTO CONNECTThis function allows the Bluetooth to be connected automatically with previously connected device. Connection can beestablished at any source mode.∗The factory default setting is “OFF”.2-1. Select “AUTO CON”.3-1. Turn the [ROTARY] knob to select “ON”or “OFF”.ON: Automatic connection is enabled.OFF: Automatic connection is disabled.PASS KEYThis PASS KEY is used during pairing mode. Amaximum of 10 digits can be changed through the car stereo.∗The factory default PASS KEY is “1234”.2-1. Select “PASS KEY”.3-1. Press the [ROTARY] knob.4-1. Press the [x] or [v] button to remove the cursor.5-1. Turn the [ROTARY] knob to select thedesired digits.6-1. Press and hold the [ROTARY] knob (2 sec.) to store in memory.∗If press the [BAND] button, the pass keyreturns to the factory default setting.ADDRESSThis will hold the unique Bluetooth address. Theaddress is 12 figures.2-1. Select “ADDRESS”.The Bluetooth address 6 figures appears inthe display.3-1. Turn the [ROTARY] button to display.Bluetooth NameThis will display the name of the Bluetooth.2-1. Select “BT NAME”.The Bluetooth name appears in the display.Bluetooth Firmware versionThis will display the firmware version of theBluetooth.2-1. Select “BT FW”.The Bluetooth firmware version appears in the display.](https://usermanual.wiki/Faurecia-Clarion-Electronics/PE3402BA/User-Guide-1361271-Page-21.png)
![English22 CX501Operations Common to Each ModeTo change adjustment setting1. Press and hold the [DISP] button (1 sec.) to switch to the adjustment selectiondisplay.2. Press the [x] or [v] button to selectthe “item name”.“CONTRAST” “COLOR” “CODE”“SCRN SVR” “SCROLL”“DIMMER”“BLINKLED” “CLOCK” “REAR/S-W” “RESET ”3. Turn the [ROTARY] knob to select the“desired setting value”.∗In the case of display blinking “ENT”, youcan press the [ROTARY]knob to adjust thesetting value.∗After completing settings, press the [DISP]button to return to the previous mode.Setting the contrastYou can adjust the display contrast to match theangle of installation of the unit.∗The factory default setting is “10”.(Adjustment level: 1 to 16)2-1. Select “CONTRAST”.3-1. Turn the [ROTARY] knob to adjust thecontrast.Setting the clock2-1. Select “CLOCK”.3-1. Press the [ROTARY] knob. 3-2. Press the [x]or[v] button to select thehour or the minute.3-3. Turn the [ROTARY] knob to set thecorrect time.∗The clock is displayed in 12-hour format.3-4. Press the [ROTARY] knob to store the timeinto memory.Note:rYou cannot set the clock when it is displayedwith only the ignition on. If you drain or removethe car’s battery or take out this unit, the clock isreset. While setting the clock, if another button oroperation is selected, the clock set mode iscanceled.rSetting COLOR SCAN modeAs selecting “COLOR SCAN”, the colorautomatically changes.∗The factory default setting is “COLOR SCAN”.∗After 3 seconds the color changes to the other.rSetting USER modeThe factory default setting is “RED 8” (red),“GREEN 8” (green), “BLUE 8” (blue).As selecting “USER COLOR 1, 2, 3”, press the [ROTARY] knob to enter the setting.1. Press the [x] or [v] to select “RED”,“GREEN”or “BLUE”.2. Turn the [ROTARY] knob to select from 0to 8.3. Press and hold the [ROTARY] knob for 2seconds or longer to store the color in memoryand cancel the setting mode.Setting the anti-theft function (CATS)“CATS” is the acronym of “Clarion Anti-TheftSystem”. When you set a PIN code (called as “Personal Code”), a theft is prevented by disabling the operation of the unit at the theft.rSetting your Personal Code2-1. Select “CODE”.3-1. Press the [ROTARY] knob.The set personal code screen appears.4-1. Press the [DIRECT] buttons [1]-[6] to enter your desired 4-digit Personal Code.5-1. Press and hold the [ROTARY] knob (2 sec.) The entered Personal Code will beset, and it will return to the previous screen.Note:rWrite down your Personal Code in case youforget it.rErasing the Personal Code2-1. Select “CODE”.3-1. Press the [ROTARY] knob.The ERASE PERSONAL CODE screenappears.4-1. Enter the Personal Code currently.5-1. Press and hold the [ROTARY] knob(2 sec.) or longer.Enter a Personal Code mode is cancelled.Setting the button illumination2-1. Select “COLOR”.3-1. Turn the [ROTARY] knob to select the color type.](https://usermanual.wiki/Faurecia-Clarion-Electronics/PE3402BA/User-Guide-1361271-Page-22.png)
![Operations Common to Each ModeEnglish23CX501Setting the method for title scrollSet how to scroll in CD-TEXT, MP3/WMA title. ∗The factory default setting is “ON”.2-1. Select “SCROLL”.3-1. Turn the [ROTARY] knob to select “ON”or “OFF”.Turning the screen saver function onor offThis unit is provided with the screen saverfunction which allows you to show various kindsof patterns and characters in the operationstatus indication area of the display in a randomorder. You can turn on or off this function. If thebutton operation is performed with the screen saver function on, the operation display corresponding to the button operation is shownfor about 30 seconds and the display returns to the screen saver display.∗The factory default setting is “ON”.2-1. Select “SCRN SVR”.3-1. Turn the [ROTARY] knob to select the setting.Each time you turn the [ROTARY] knob, the setting changes in the following order:“ON”“OFF”To scroll just 1 time.∗When you want to see the title again, in thetitle mode, press and hold the [DISP] button(3 sec.) to scroll the title.Setting the dimmer controlYou can set the dimmer control “ON” or “OFF”.∗The factory default setting is “ON”.2-1. Select “DIMMER”.3-1. Turn the [ROTARY] knob to select “ON”or “OFF”.Anti-theft indicatorThe red Anti-theft indicator is a function forprevent theft. When the ACC or POWER is off, this indicator blinks.∗The factory default setting is “OFF”.2-1. Select “BLINKLED”.3-1. Turn the [ROTARY] knob to select “ON”Selecting Rear or SubwooferThe factory default setting is “REAR”.2-1. Select “REAR/S-W”.3-1. Turn the [ROTARY] knob to select “REAR” or “S-WOOFER”.Performing a resetThis function allows you to perform a system check from the adjust mode when required.2-1. Select “RESET ”.3-1. Press and hold the [ROTARY] knob (1 sec.). “RESET” appears in the display, then the unit returns to the previousoperation mode.rON:To scroll automatically.rOFF:AUX functionThis system has an external input jack on the front panel so you can listen to sounds and music from external devices connected to thisunit.unit.Selecting AUX IN sensitivityMake the following settings to select the sensitivity when sounds from external devicesconnected to this unit are difficult to hear evenafter adjusting the volume.∗The factory default setting is “MID”.1. Press and hold the [DISP] button (1 sec.).2. Select “AUX SENS”.3. Turn the [ROTARY] knob to select “HIGH”, “MID”or“LOW”.Note:rWhen AUX mode is selected, AUX IN sensitivitycan be set.rWhen the ENTER PERSONALCODE screen appearsThe ENTER PERSONAL CODE screen will be displayed when turning the ACC power on after performing the following operations:rThe car battery was replaced.rThe backup power was cut off.rThe [RESET] button was pressed.Note:rIf you have lost your Personal Code, pleasecontact Clarion customer service.1. Enter your Personal Code currently set.2. When the correct Personal Code is entered,the unit will restart from the initial startup screen.Notes:rWhen you enter a wrong Personal Code, themessage “LOCK - - - -” is displayed and thePersonal Code entry is prohibited for a while.This prohibited time is changed according to thenumber of times of wrong code entry as follows:r1 to 6 times: 15 secondsr7 times or more: 15 minutes](https://usermanual.wiki/Faurecia-Clarion-Electronics/PE3402BA/User-Guide-1361271-Page-23.png)

![USB OperationsConnecting a USB memorydevice1. Connect the USB memory device to theUSB cable.Playback will begin from the first filerecorded on the device. ∗If the device is not recognized, press the[SOURCE] button to switch the source to thedevice.∗Always insert the device fully into theconnector. Incomplete connections maycause the device not to be recognized.∗Depending on the number of tracks recorded,some amount of time may be required until alltracks are read into the unit.∗The order in which tracks are recorded maydiffer depending on the device connected (theactual playback order may not be the same asthat indicated on your computer’s display).To listen to tracks on a connectedUSB memory device1. Press the [SOURCE] button to switch thesource. When USB memory device isselected, playback (except DRM files) willbegin from the location at which playbackwas previously stopped. ∗When a USB memory device isconnected the USB mode will bedisplayed.∗When a USB memory device isdisconnected and then reconnected, playbackwill begin from the beginning of the USBmemory device.To stop play1. Press the [SOURCE] button and switch thefunction to a source other than the USBmemory.CAUTIONDo not remove the USB memory devicewhen the USB mode is selected, since itmay result in loss or damage to data on the USB memory device.Always backup and save important data onyour computer.2. Remove the USB memory device from the USB cable.English25CX501](https://usermanual.wiki/Faurecia-Clarion-Electronics/PE3402BA/User-Guide-1361271-Page-25.png)
![iPod OperationsNotes:rSee the iPod Owner’s Manual for detailsregarding operation conditions.rThe unit will not operate, or may operateimproperly with unsupported versions.rFor a list of compatible Apple iPod unit with thethis model, please contact your Clarion dealer orwww.clarion.com.r“Made for iPod” means that an electronicaccessory has been designed to connectspecifically to iPod and has been certified by thedeveloper to meet Apple performancestandards.Apple is not responsible for the operation of thisdevice or its compliance with safety andregulatory standards.iPod and iTunes are trademarks of Apple Inc.,registered in the U.S. and other countries.Connecting an iPodWhen an iPod is connected to the USB slot, “Shuffle” set on the iPod will become as follows:r“Shuffle (Albums)” play Random playr“Shuffle (Songs)” play All random playThe iPod has two modes, the “Play mode” andthe “iPod menu mode” for selecting tracks. Switch between these modes by pressing the [BAND] button for 1 second or longer. Note:rTo connect iPod, please use the USB cableattached in iPod.Select iPod mode1. Press the [SOURCE] button.Playback will begin from the last file that wasplayed on the iPod.Notes:rThe following operations in Play mode operatethesameasinCDmode:∗Track selection: [x],[v]∗Fast-forward/fast-backward: [x],[v]∗Pause: [ ]See “CD/MP3/WMA Operations” (page 15-17) for details.rAfter a Podcast file has completed playback, thepause display, or the track-end position Play-Setting iPod simple modeUse this function if you wish to operate throughyour iPod connected to this unit via the USB cable.∗The factory default setting is “OFF”.1. Press and hold the [DISP] button (1 sec.).2. Press [x]or[v] to select “S-CTRL”.3. Press the [ROTARY] knob.4. Turn the [ROTARY] knob to select “ON”or “OFF”.rON:Operations can be made through your iPod.rOFF:Operations cannot be made through youriPod.5. Press and hold the [ROTARY] knob (1 sec.) to store the setting and return to the previous mode.Notes:rWhen performing iPod operations using simplecontrol mode, make the operations slowly. Ifrepetitive operations are performed too quickly,unforseen errors may occur.rWhen performing iPod operations using simplecontrol mode, please do not operate the iPodand the unit at the same time, otherwise theremay be unexpeted event happened.rSome iPod models do not support this function.Consult your nearest Clarion dealer or website toconfirm which models do not support thisfunction.Other various play functions(in Play mode)Notes:rThese functions are not supported when in theiPod menu mode.rTheRandomfunctionsetontheiPodremainsthesame after attachment/detachment of the iPod.rThe Repeat function on the iPod will be changedwhen you connect/disconnect the iPod to theunit.Repeat playPlay back one track repeatedly.1. Press the [RPT] button.Random playPlay all albums within a selected category, in random order. (Corresponds to “Shuffle(Albums)” command on iPod.)1. Press the [RDM] button.Time display will appear. At that time, select amusic file once again.iPods can be connected by using the connector able supplied with the iPod, but in this case,cYou can enjoy its audio sound only. To enjoydisplaying movies stored in the iPod with videouand connector cable (CCA-723/CCA-748)nit, it is required to useseparately sold.the special monitorEnglish26 CX501](https://usermanual.wiki/Faurecia-Clarion-Electronics/PE3402BA/User-Guide-1361271-Page-26.png)
![English27CX501iPod OperationsAll random playPlay all tracks within a selected category, in random order. (Corresponds to “Shuffle (Songs)” command on iPod.)1. Press and hold the [RDM] button (1 sec.).To cancel play1. Press the same play button once again.Notes:rWhen the repeat play mode is canceled, afterplay all tracks within a selected category,playback will begin from the first track in theselected category.rWhen playing the last track within a selectedcategory in Random mode, if ACC is switched offthen on again, playback will begin from adifferent track.rThough the default setting of an iPod is “AllRepeat”, the indication on the mode status is notdisplayed.rWhen performing operations using simple controlmode, do not set the repeat off on the iPod.Selecting category from the iPodmenu1. Press and hold the [BAND] button to selectthe iPod menu mode.The iPod menu categories will be displayed.Notes:rRepeat and Random mode operations are notsupported when in the iPod menu mode.rIn iPod menu mode, if you press the [x]/[v]button fast, playback may not be performed.2. Turn the [ROTARY] knob to switch betweencategories.The iPod menu categories alternate in the following order: “PLAYLISTS”“ARTISTS”“ALBUMS” “SONGS” “GENRES”“COMPOSERS”...Note:The iPod menu mode can be canceled byperforming one of the following operations:rPress the [BAND] button.rWhen the category select screen is displayed,press the [v]button.3. Press the [v] button to select the category.4. When the track name display is showing,press the [v] button. Playback will begin from the first track in the selected category, and the iPod menu modewill be canceled.the category.In this case, use the [ ] and [ ]buttons to switch between subfolders, thenv]use the [ button to select the desiredsubfolder.∗When the track name display is showing,pressing the [x]buttonwillreturntothecurrently playing folder name display.5. Turn the [ROTARY] knob to select a track within a category.iPod menu alphabet searchThis function searches the subfolders fordesired alphabetical letters.1. Press the [BND] button to select the iPod menu mode.2. Turn the [ROTARY] knob to switch between categories.3. Press the [v] button.∗Subfolders may be displayed, depending onthe category.In this case, you can use the[]or[]button to switch between subfolders and use the[v] button to enter the next subfolder layer.4. Press and hold the [DISP] button (1 sec.).5. Turn the [ROTARY] knob to select the desired letter to search.6. Press the [DISP] button to perform search.rDuring search, press the [DISP]button tocancel search.Selecting category using presetmemory1. Press and hold the [BAND] button (1 sec.) to select the iPod menu mode.The category can be set as follows in the[DIRECT] (1-6) buttons.[1] : PLAYLISTS[2] : ARTISTS[3] : ALBUMS[4] : SONGS[5] : GENRES[6] : COMPOSERS2. Press the desired [DIRECT] (1-6) button to select the category.∗Subfolders may be displayed, depending onthe category.3. When the track name display is showing,press the [v] button.F-UP F-DNF-UP F-DNIn this case, use the [ ] and [ ]buttons to switch between subfolders, thenv]use the [ button to select the desiredsubfolder.F-UP F-DN∗Subfolders may be displayed, depending on](https://usermanual.wiki/Faurecia-Clarion-Electronics/PE3402BA/User-Guide-1361271-Page-27.png)
![iPod OperationsPlayback will begin from the first track in the selected category, and the iPod menu modewill be canceled.∗Use the [ ] knob to select a trackwithin a category.iPod menu list backIn the iPod menu operation mode:∗If press the [BAND] button, it will return to theprevious subfolder list mode.∗If press and hold the [BAND] button (1 sec.), it will return to the category list mode.About title displayThis unit supports the display of titleinformation transmitted from a connected iPod.rCharacter code information is UTF-8;displayable characters include Englishalphanumerics, some symbols, and someumlaut characters.rUnsupported characters will be replacedby asterisks (*).ROTARY2. Press [x]or[v] to select “iPod Menu OperationYou can specify the tracks to play by narrowingthe following categories:1. Press and hold the [BAND] button.sIf press the [BAND] button, it will return tothe previous menu.2. Turn the [ROTARY ] knob to select “Music”or “Video”.3. Press the [ROTARY] knob.4. Turn the [ROTARY ] knob to select a category.In the Music mode[Playlists]:The list of all the Playlists stored in the iPod isdisplayed.[Artists]:You can narrow the Albums to be listed byspecifying the Artist name.[Albums]:The list of all the Albums stored in the iPod isdisplayed.[Songs]:The list of all the Tracks stored in the iPod isdisplayed.Setting iPod Output FormatThe iPod output format can be changed.*The factory default setting is “Digital”.1. Press and hold the [DISP] button.iPodOutput Format”.3. Press the [ROTARY] knob to change the setting: “Digital” or “Analog”.sDigital: The iPod will be played normaly.sAnalog: When the iPod is connected withthe iPod cable (incuded in the iPod), it will be played soundlessly.Note:rAfter the setting, please disconnect and thenconnect the iPod again to make the settingbecome effective.rSomeiPodvideomodelsdonotsupportthisfunction. Consult your nearest Clarion dealer orwebsite to confirm which models do not supportthis function.[Composers]:You can narrow the Albums to be listed byspecifying the Composer name.In the Video modesDisplayed items may be changed dependingon the firmware version of the iPod.[Video Playlists]:The list of all the Video Playlists stored in the iPodis displayed.[Movies]:The list of all the Movies stored in the iPod isdisplayed.[Music Videos]:You can narrow the Albums to be listed byspecifying the Artist name.[TV Shows]:You can narrow the Seasons to be listed byspecifying the Program title.[Video Podcasts]:You can narrow the Tracks to be listed byspecifying the Video Podcast name.[Rentals]:The list of all the rental Movies stored in the iPodis displayed.[Genres]:You can narrow the Artists to be listed byspecifying the Genre name.English28 CX501](https://usermanual.wiki/Faurecia-Clarion-Electronics/PE3402BA/User-Guide-1361271-Page-28.png)
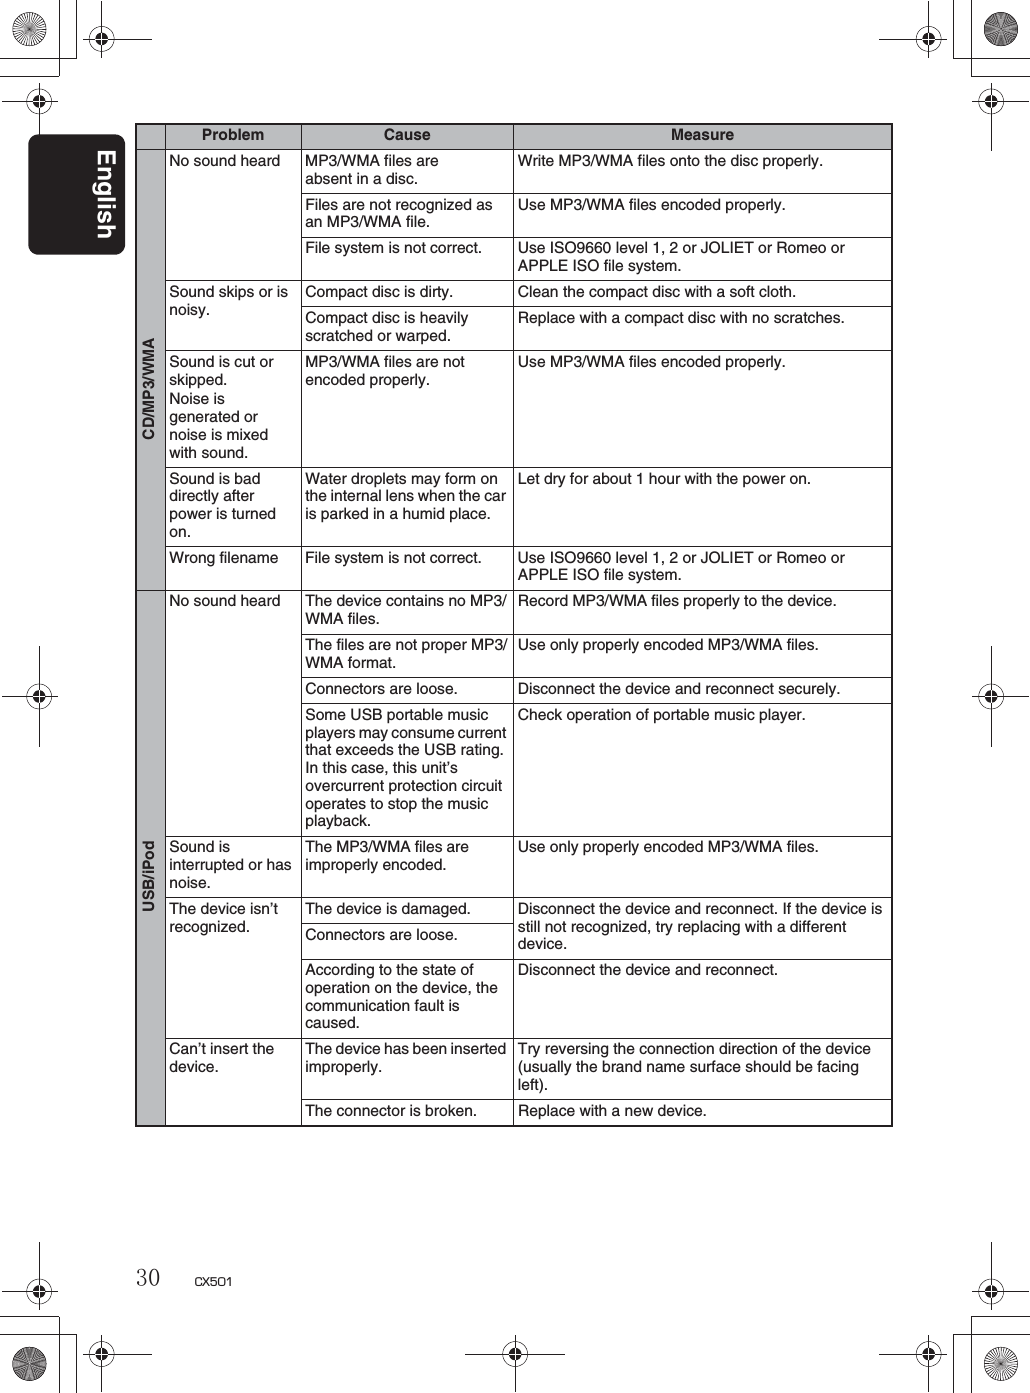
![English32 CX5019. SPECIFICATIONSFM TunerFrequency Range: 87.9 MHz to 107.9 MHzUsable Sensitivity: 11 dBµV50dB Quieting Sensitivity: 17 dBµVAlternate Channel Selectivity: 60 dBStereo Separation (1 kHz): 30 dBFrequency Response (±3 dB): 30 Hz to 15 kHzAM TunerFrequency Range: 530 kHz to 1710 kHzUsable Sensitivity: 28 dBµVCD PlayerSystem: Compact disc digital audio systemUsable Discs: Compact discFrequency Response (±1 dB): 20 Hz to 20 kHzDynamic Range (1 kHz): 80 dB Harmonic Distortion: 0.03%BluetoothGeneralAccessoriesPower Supply Voltage: 14.4 V DC (10.8 to 15.6 V allowable), negativegroundCurrent Consumption: Less than 15 ASpeaker Impedance: 4 Ω(4 Ω to 8 Ω allowable)Auto Antenna Rated Current: 500 mA or lessWeight / Source unit: 3.50 lb. (1.59 kg)Weight / Remote control unit:1.41 oz. (40 g) (including battery)Dimensions / Source unit:7" (Width) 4" (Height) 6-1/8" (Depth)[178 (W) 100 (H) 155 (D) mm]Dimensions / Remote controlWarranty cardInstallationOwner’s manual Remote controlBatteryExtension lead ScrewMachine screw unit:1-3/4" (Width) 4-5/16" (Height) 7/16"(Depth)[44 (W) 113 (H) 11 (D) mm]Note:rSpecifications and design are subject to change without notice for further improvement.Power Output :22 W RMS x 4 Channels at 4 and 1 % THD+NSignal to Noise Ratio:90 dBA (reference: 1 W into 4 )AudioMaximum Power Output: 200 W (50 W 4 ch)Bass Control Action (100 Hz): +14 dB, –14 dBTreble Control Action (10 kHz): +14 dB, –14 dBLine Output Level (CD 1 kHz): 2 V11111188Specification: Bluetooth Ver. 2.0 + EDRProfile:HFP (Hands-Free Profile)HSP (Headset Profile)OPP (Object Push Profile) Phone BookA2DP (Advanced Audio Distribution Profile)AVRCP (Audio/Video Remote Control Profile)PBAP (Phone Book Access Profile)AT CommandSend/Receive Sensitivity: Class 2](https://usermanual.wiki/Faurecia-Clarion-Electronics/PE3402BA/User-Guide-1361271-Page-32.png)