Faurecia Clarion Electronics PF3636 Car Audio User Manual Short Term Confidential
Clarion Co Ltd Car Audio Short Term Confidential
(Short-Term Confidential) User Manual
User Manual
This device is installed in vehicle. Since it is not sold to general end users directly, there is
no user manual of this device.
The following statements must be described on the user manual of the host vehicle of this
device;
[for FCC]
FCC CAUTION
Changes or modifications not expressly approved by the party responsible for
compliance could void the user’s authority to operate the equipment.
This equipment complies with FCC radiation exposure limits set forth for an
uncontrolled environment and meets the FCC radio frequency (RF) Exposure
Guidelines. This equipment has very low levels of RF energy that it deemed to
comply without maximum permissive exposure evaluation (MPE). But it is desirable
that it should be installed and operated keeping the radiator at least 20cm or more
away from person’s body.
[for IC]
This device complies with Industry Canada licence-exempt RSS standard(s).
Operation is subject to the following two conditions: (1) this device may not cause
interference, and (2) this device must accept any interference, including interference
that may cause undesired operation of the device.
Le présent appareil est conforme aux CNR d'Industrie Canada applicables aux
appareils radio exempts de licence. L'exploitation est autorisée aux deux conditions
suivantes : (1) l'appareil ne doit pas produire de brouillage, et (2) l'utilisateur de
l'appareil doit accepter tout brouillage radioélectrique subi, même si le brouillage
est susceptible d'en compromettre le fonctionnement.
This equipment complies with IC radiation exposure limits set forth for an
uncontrolled environment and meets RSS-102 of the IC radio frequency (RF)
Exposure rules. This equipment has very low levels of RF energy that it deemed to
comply without maximum permissive exposure evaluation (MPE). But it is desirable
that it should be installed and operated keeping the radiator at least 20cm or more
away from person's body.
Cet équipement est conforme aux limites d’exposition aux rayonnements énoncées
pour un environnement non contrôlé et respecte les règles d’exposition aux
fréquences radioélectriques (RF) CNR-102 de l’IC. Cet équipement émet une énergie
RF très faible qui est considérée conforme sans évaluation de l’exposition maximale
autorisée. Cependant, il est souhaitable qu'il devrait être installé et utilisé en gardant
une distance de 20 cm ou plus entre le dispositif rayonnant et le corps.
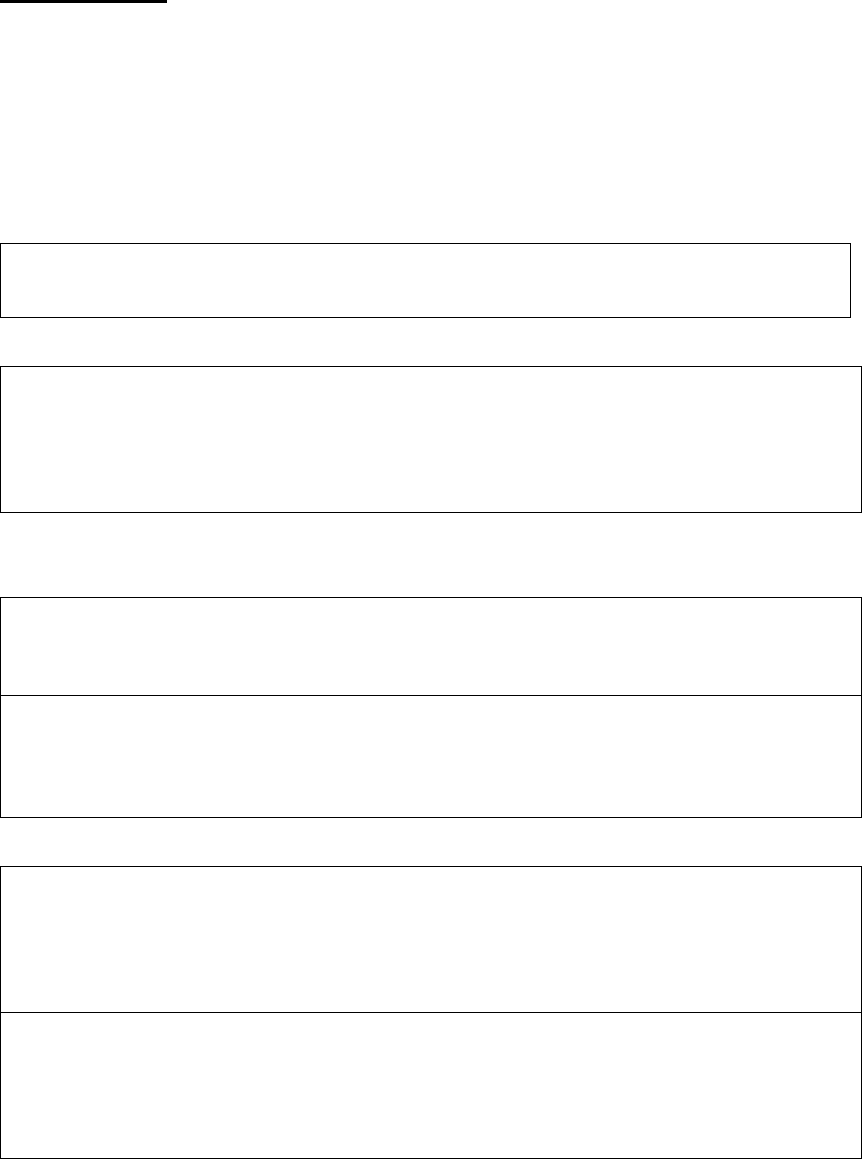
Audio set
1Eject Button
2Power/Volume Button
3Home Button
4Tune/Audio Button
5Seek/Track Up Button
6Seek/Track Down Button
7PHONE Button
Power and audio controls
1Eject Button 2Power/Volume Button 3Home Button
Press the “
▲
” button to eject a
Push the dial for ON or OFF.
Press the button to indicate main menu.
disc loaded in the audio set.
Turn the dial to control volume.
4Tune/Audio Button 5Seek/Track Up Button
Turn “Tune” dial clockwise to increase the tuning frequency and
Press the button and hold 2s, the radio will automatically
turn the “Tune” dial counterclockwise to decrease it.
search for a receivable station and stop at the first one it finds.
Press switch to select desired tone and balance control modes.
Press the button to select the next folder.
Press the button to select the previous.
6Seek/Track Down Button 7PHONE Button
Press the button and hold 2s, the radio will automatically
Press the button to pair with your cell phone.
search for a receivable station and stop at the first one it finds.
Press the button to select the previous.
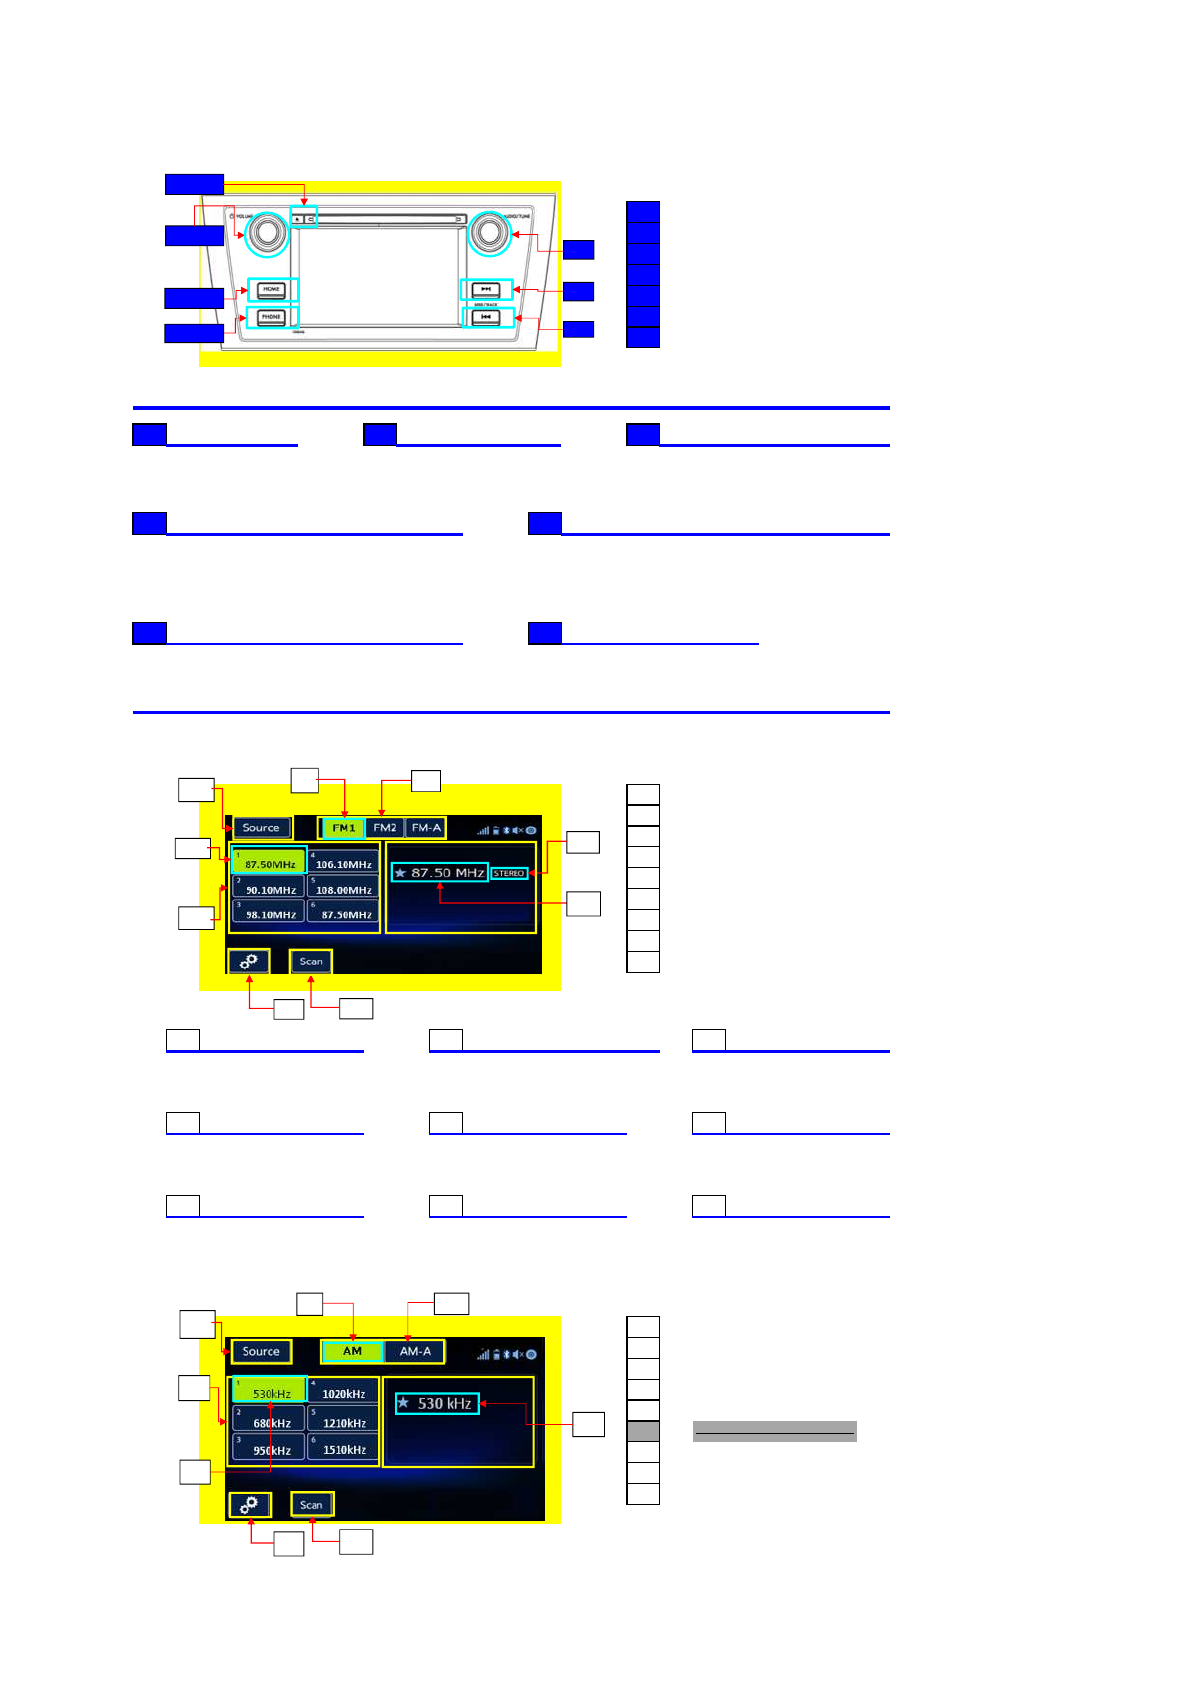
FM MODE
1Preset Channel List
2Preset Channel Key
3Band Display Area
4Frequency Display Area
5Band Select Key
6STEREO Display Area
7Setting Key
8SCAN Key
9Source Select Key
1Preset Channel List 2Preset Channel Key 3Band Display Area
You can preset the channel in You can select the channel when In the area,you can select
the Preset Channel List.
you press the key.
the band that you want.
4Frequency Display Area 5Band Select Key 6STEREO Display Area
The CurrentFrequency that You can select the band when The area is used to judge
you are receving
you press the key.
whether the stereo or not.
7Setting Key 8SCAN Key 9Source Select Key
Press the key to enter the Press the key,the radio Press the key to enter the
audio setting. starts to scan the channel. Multimedia Select Interface.
AM MODE
1Preset Channel List
2Preset Channel Key
3Band Display Area
4Frequency Display Area
5Band Select Key
6STEREO Display Area
7Setting Key
8SCAN Key
9Source Select Key
2
3
7
1
4
5
6
1
2
3
7
5
6
8
4
9
2
3
5
4
1
78
9
1Preset Channel List 2Preset Channel Key 3Band Display Area
You can preset the channel in You can select the channel when In the area,you can select
the Preset Channel List.
you press the key.
the band that you want.
4Frequency Display Area 5Band Select Key
The CurrentFrequency that You can select the band when
you are receving
you press the key.
7Setting Key 8SCAN Key 9Source Select Key
Press the key to enter the Press the key,the radio Press the key to enter the
audio setting. starts to scan the channel. Multimedia Select Interface.
RDS/Radio
1Preset Channel List
[ FM ] 2 Preset Channel Key
3Receiving Status Display Area
4Band Display Area
5Frequency Display Area
6Band Select Key
7STEREO Display Area
8Setting Key
9TA Icon Display Area
10 NEWS Icon Display Area
11 Radio Text Display Area
12 SCAN Key
13 Source Select Key
1Preset Channel List 2Preset Channel Key 3Receiving Station Display Area
You can preset the channel in
You can select the channel when
In the area,you can the current
the Preset Channel List.
you press the key.
status about the radio receiving.
4Band Display Area 5Frequency Display Area 6Band Select Key
In the area,you can select The CurrentFrequency that You can select the band when
the band that you want.
you are receving
you press the key.
7STEREO Display Area 8Setting Key 9TA Icon Display Area
The area is used to judge Press the key to enter the In the area,you can see the
whether the stereo or not. audio setting. "TA" mark.
10 NEWS Icon Display Area 11 Radio Text Display Area 12 SCAN Key
In the area,you can see the In the area,you can see the Press the key,the radio
"NEWS" mark. radio text information. starts to scan the channel.
13 Source Select Key
Press the key to enter the
Multimedia Select Interface.
[ AM ] 1 Preset Channel List
2Preset Channel Key
3Receiving Station Display Area
4Band Display Area
5Frequency Display Area
6Band Select Key
7STEREO Display Area
8Setting Key
9TA Icon Display Area
10 NEWS Icon Display Area
11 Radio Text Display Area
12 SCAN Key
13 Source Select Key
1Preset Channel List 2Preset Channel Key 3Receiving Station Display Area
You can preset the channel in
You can select the channel when
In the area,you can the current
the Preset Channel List.
you press the key.
status about the radio receiving.
4Band Display Area 5Frequency Display Area 6Band Select Key
In the area,you can select The CurrentFrequency that You can select the band when
1
2
4
8
6
5
7
12
11
3
13 9 10
13 4
63
5
8 12
1
2

the band that you want.
you are receving
you press the key.
8Setting Key 12 SCAN Key 13 Source Select Key
Press the key to enter the Press the key,the radio Press the key to enter the
audio setting. starts to scan the channel. Multimedia Select Interface.
SXM 1Source Select Key
2Setting Key
3Information Key
4Receiving Station Display Area
5Scan Key
6Seek Mode Key
7List Key
8Channel Logo Display Area
1Source Select Key 2Setting Key 3Information Key
Press the key to enter the Press the key to enter the Press the key,you can get more
Multimedia Select Interface. audio setting. information.
4Receiving Station Display Area 5Scan Key 6Seek Mode Key
In the area,you can the current Press the key,the radio Press the key,you can get others'
status about the radio receiving. starts to scan the channel. Channels.
7List Key 8Channel Logo Display Area
Press the key to enter the list. The channel logo display in the
area.
RBDS_HD-Radio
[ FM ] 1 Preset Channel List
2Preset Channel Key
3Band Display Area
4PS Name or Frequency Display Area
5Band Key
6Radio Text Display Area
7STEREO Display Area
8Setting Key
9SCAN Key
10 Tag Key
11 Frequency Display Area
12 Source select Key
13 Bookmark Key
14 List Key
[ AM ] 15 HD Indicator
16 Live Indicator
17 Receiving MultiCast Display Area
18 MultiCast Select Key
19 Short Name Display Area
20 Artist Experience Display Area
21 Song Name Display Area
22 Artist Name DisplayArea
1
2
3
4
7
6
5
8
絵フローでは{Preset Channel Key}に周
波数を表示する仕様。各表示項目の配
置含め、確認要。
(ScreenFlow_NAM(SGPF_BF4)_Audio_130
15
1
2
3
8
5
4
9
7
11
12
2
3
5
6
4
1
14
11
1
8
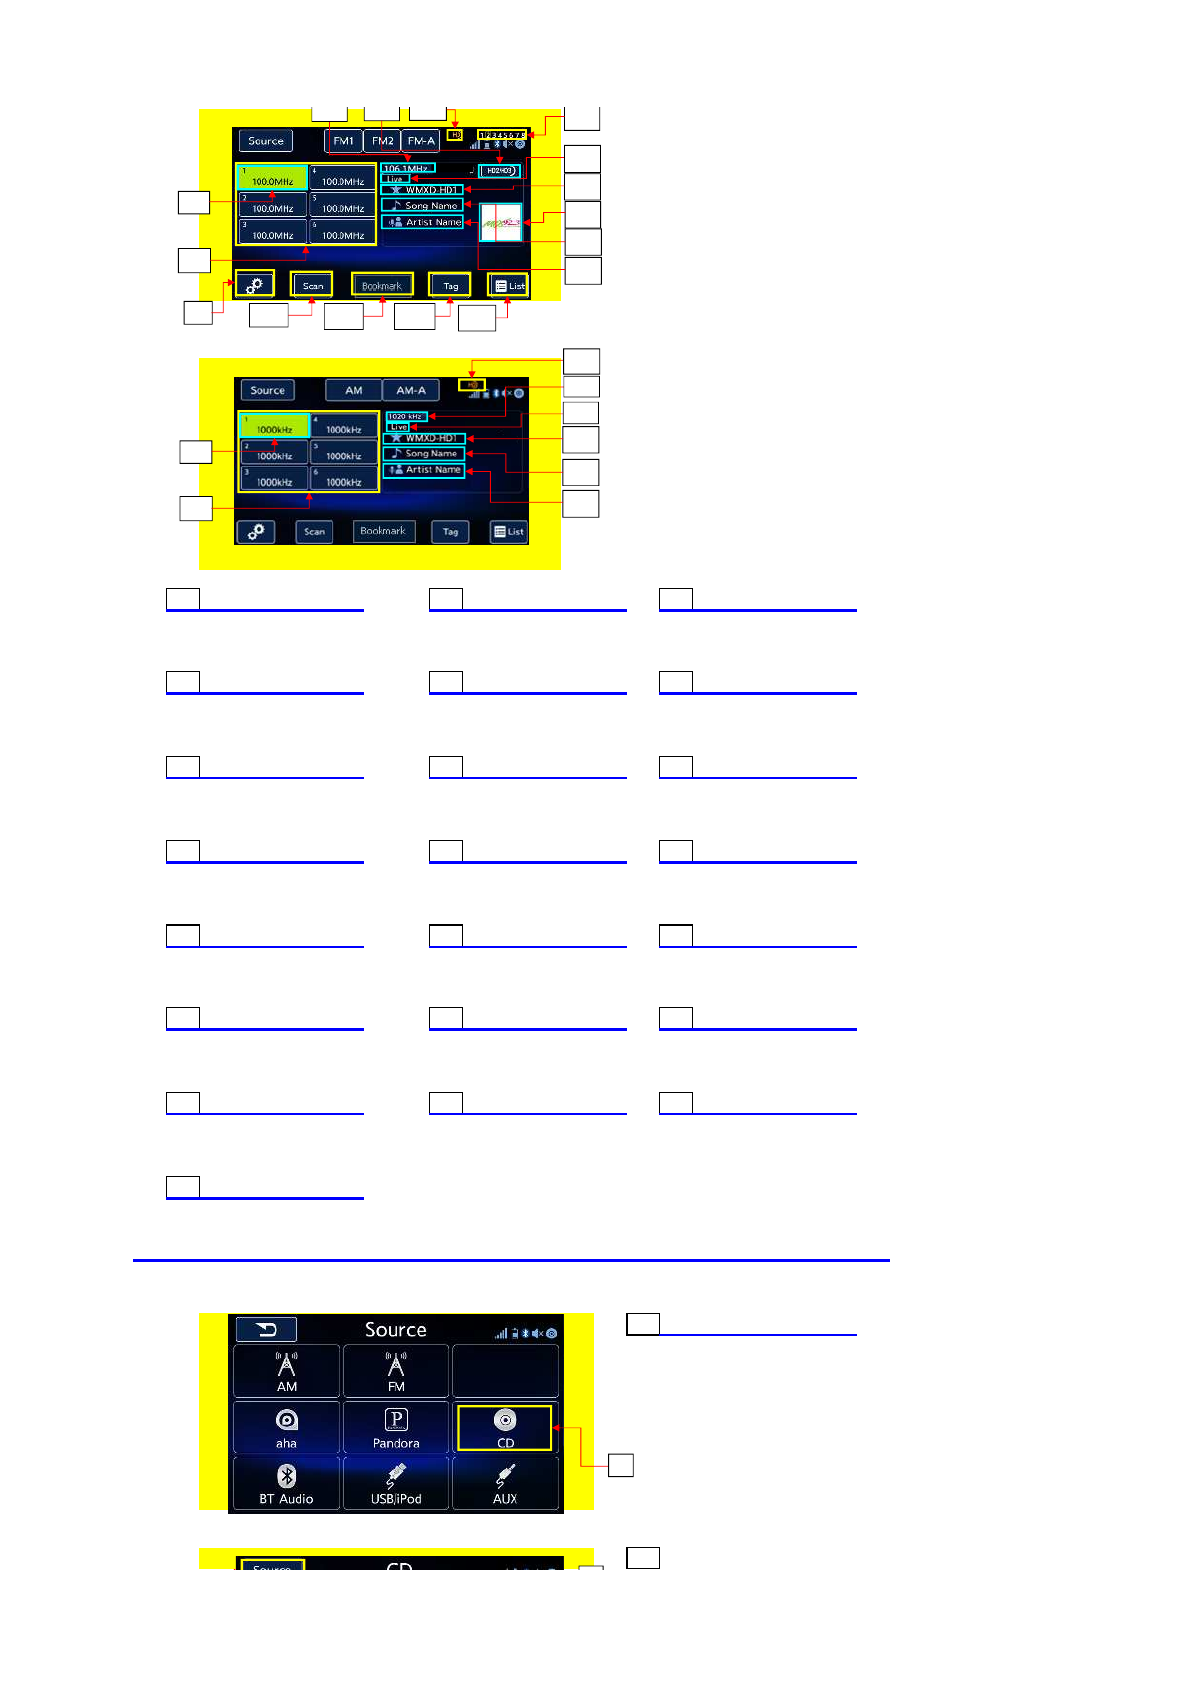
[ FM HD ]
[ AM HD ]
1Preset Channel List 2Preset Channel Key 4Band Display Area
You can preset the channel in
You can select the channel when
In the area,you can select
the Preset Channel List.
you press the key.
the band that you want.
4PS Name or Frequency Display Area 5Band Key 6Radio Text Display Area
In the area,you can see the that You can select the band when In the area,you can see the
CurrentFrequency that you
you press the key.
radio text information.
are receving.
7STEREO Display Area 8Setting Key 9SCAN Key
The area is used to judge Press the key to enter the Press the key,the radio
whether the stereo or not. audio setting. starts to scan the channel.
10 Tag Key 11 Frequency Display Area 12 Source Select Key
Press the key to enter the Tag. The CurrentFrequency that Press the key to enter the
you are receving Multimedia Select Interface.
13 Bookmark Key 14 List Key 15 HD Indicator
Press the key to enter Press the key to enter the list. The indicator show that is
the bookmark
HD radio.
16 Live Indicator 17 Receiving MultiCast Display Area 18 MultiCast Select Key
The indicator show the current In the area,you can the current Press the key to select MultiCast.
status is "LIVE". status about the radio receiving.
19 Short Name Display Area 20 Artist Experience Display Area 21 Song Name Display Area
In the area,you can see the short In the area,you can see the The area shows the song name.
name about current radio. experience information
ahout the artist.
22 Artist Name DisplayArea
The area shows the artist name.
CD
1
CD Key
Press the key to enter CD mode.
1
Source Select Key
219
10 14
15
1
2
1
89
17
11
1
8
13
16
21
20
22
19
21
22
16
15
11
1
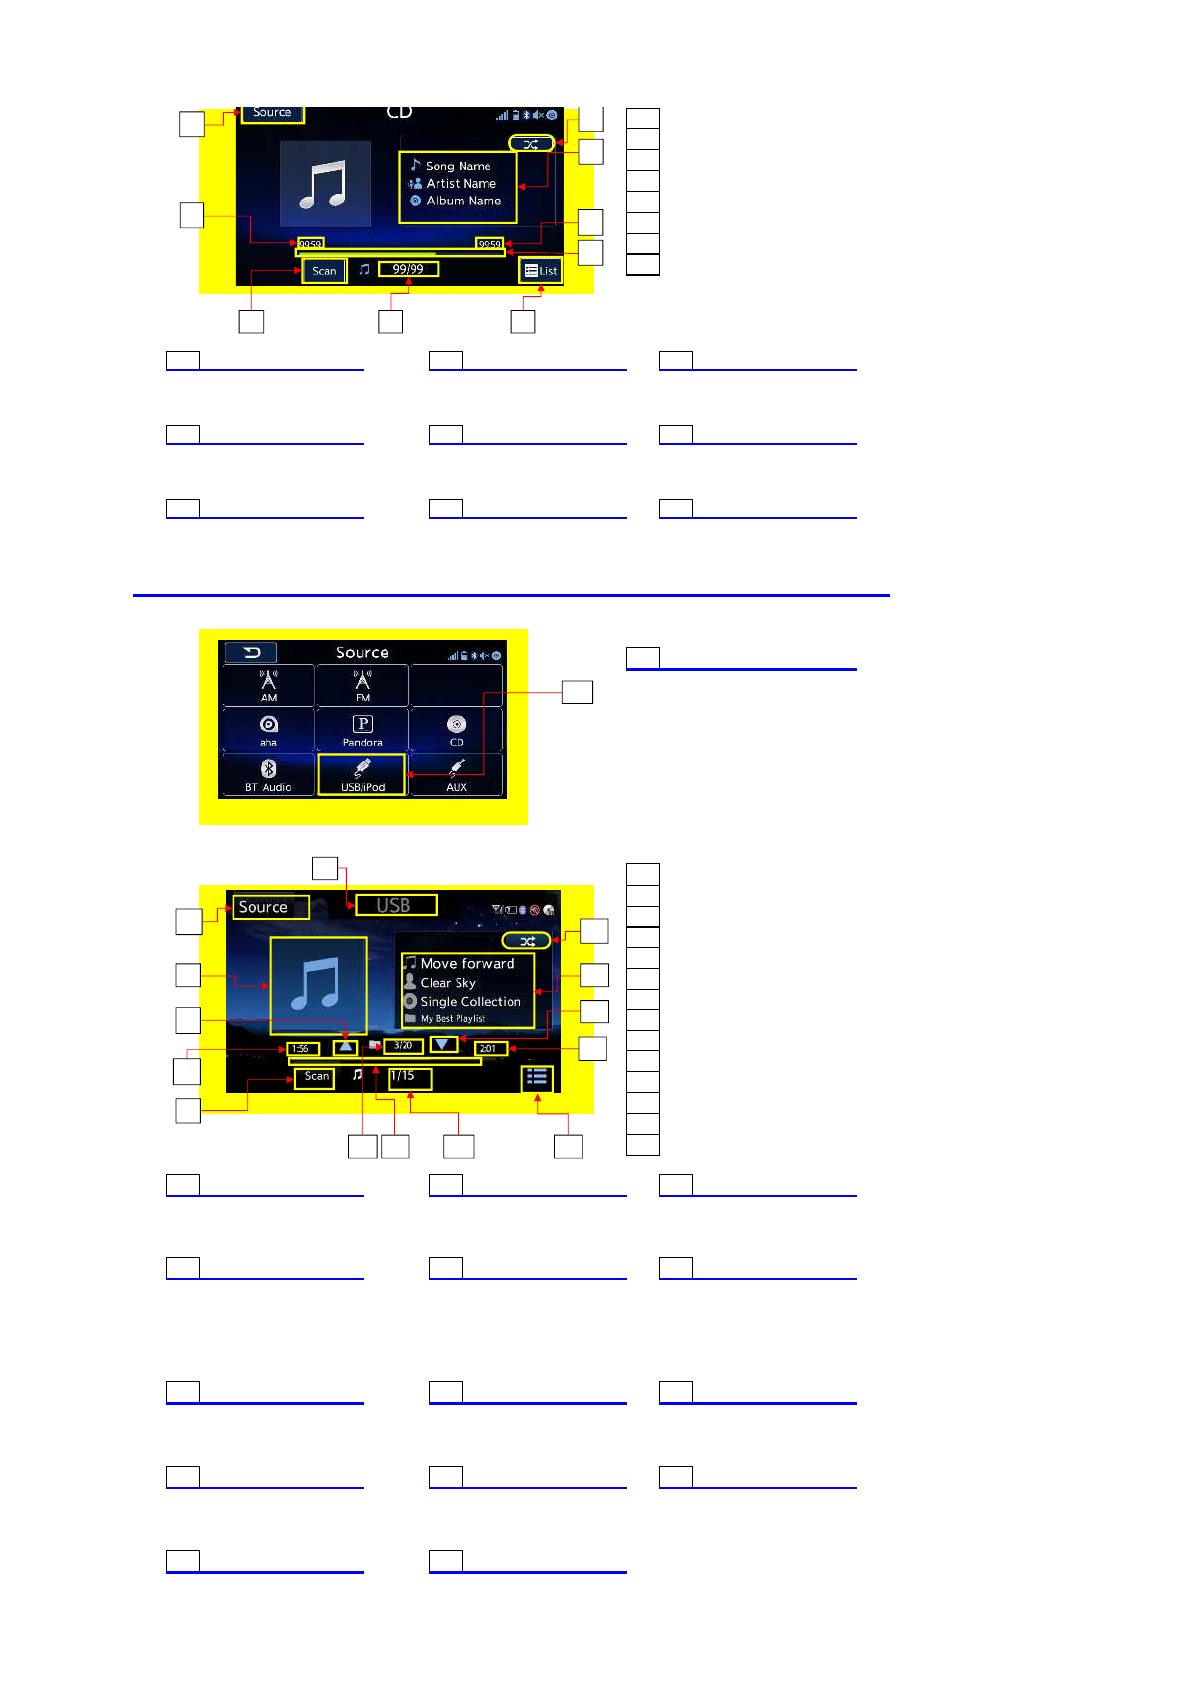
2Audio Information Display
3
Trick Play Key
4
Playing Time Display
5
Track Number
6
Time Of Track
7
Progress Bar
8
List Key
9
SCAN Key
1
Source Select Key
2
Audio Information Display
3
Trick Play Key
Press the key to enter the
In the area,audio information is
Press the key to select the trick.
Multimedia Select Interface.
showed.
4
Playing Time Display
5
Track Number
6
Time Of Track
It shows the currentplay time.
It shows the playing song's order
It shows the track's play time.
and the total songs' number.
7
Progress Bar
8
List Key
9
SCAN Key
It shows the progress of track.
Press the key to enter the list.
Press the key,Scan mode lets you
listen to the first 10seconds of
each track/file.To cancel it,
press the button again.
USB
1
USB/iPod Key
Press the key to enter USB mode.
1USB(Source Name)
2
Source Select Key
3
Quasi Album artwork
4
Scan Key
5
Track Number
6
List Key
7Audio Information Display
8
Trick play Key
9CurrentPlayTime Display Area
10
Folder up Key
11
Folder Number
12
Folder down Key
13
Time Of Track
14
Progress bar
1
USB
(
Source Name
)2Source Select Key 3Quasi Album artwork
It shows the current mode. Press the key to enter the It is the quasi album art work.
Multimedia Select Interface.
4SCAN Key 5Track Number 6List Key
Press the key,Scan mode lets you
It shows the playing song's order Press the key to enter the list.
listen to the first 10seconds of and the total songs' number.
each track/file.To cancel it,
press the key again.
7Audio Information Display 8Trick Play Key 9
CurrentPlayTime Display Area
In the area,audio information is Press the key to select the trick. It shows the currentplay time.
showed.
10 Folder up Key 11 Folder Number 12 Folder down Key
Press the key to select the previous. It shows the total folder number. Press the key to next folder.
13 Time Of Track 14
Progress Bar
12
3
4
5
6
7
89
1
1
9
12
6
8
10
11
13
14
4
7
5
3
2
It shows the track's play time. It shows the progress of track.
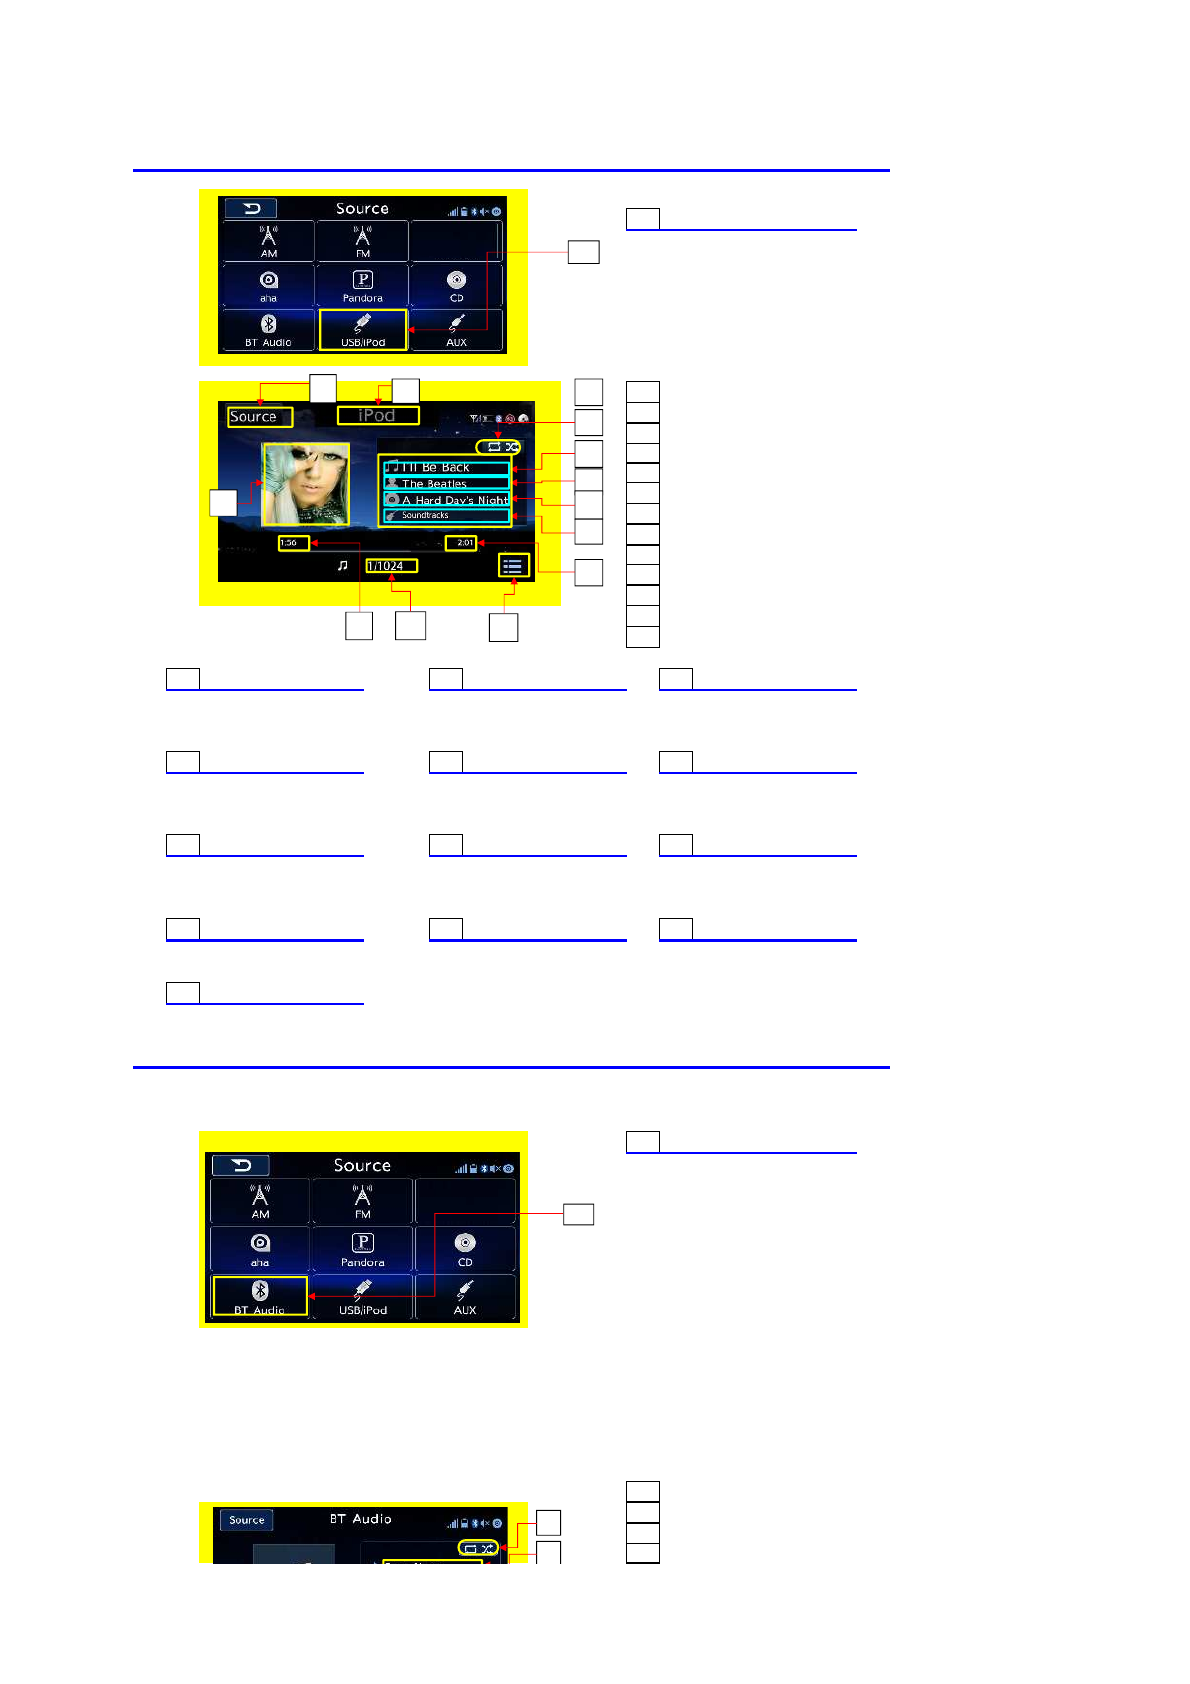
Ipod
1
USB/iPod Key
Press the key to enter Ipod mode.
1
Source Name
2
Source Key
3
Album artwork
4CurrentPlayTime Display Area
5TotalPlayTime Display Area
6
Audio Information Area
7
Trick play key
8
List key
9TrackNumber Display Area
10
Title Display Area
11
ArtistName Display Area
12
Album Display Area
13
GenreName Display Area
1Source Name 2Source Select Key 3Album artwork
It shows the current mode. Press the key to enter the It is the quasi album art work.
Multimedia Select Interface.
4CurrentPlayTime Display Area 5
TotalPlayTime Display Area
6Audio Information Display
It shows the currentplay time. It shows the track's play time. In the area,audio information is
showed.
7Trick Play Key 8List Key 9TrackNumber Display Area
Press the key to select the trick. Press the key to enter the list. It shows the total folder number.
10 Title Display Area 11 ArtistName Display Area 12 Album Display Area
It shows the song's title. The area shows the artist name.
It shows the album about the song.
13 GenreName Display Area
It shows the GenreName about
the song.
BT
1
BT Audio Key
Press the key to enter BT mode.
1
Song Name Display
2
Artist Name Display
3
Album Name Display
4CurrentPlayTime Display Area
1
6
7
48
5
1
3
9
10
11
12
13
2
1
1
6
5
Track's Order Number
6
Trick play key
7
Play/Pause key
8
List key
9
Bluetooth Setting Key
10 Track down key
11 Track up key
1Song Name Display 2Artist Name Display 3Album Name Display
It shows the song's name. It shows the artist's name. It shows the album's name.
4CurrentPlayTime Display Area 5Track Number 6Trick play key
It shows the currentplay time.
It shows the playing song's order.
Press the key to select the trick.
7
Play/Pause key
8List Key 9Bluetooth Setting Key
Press the key first to play,then Press the key to enter the list. Press the key to enter bluetooth
press again to pause it. setting.
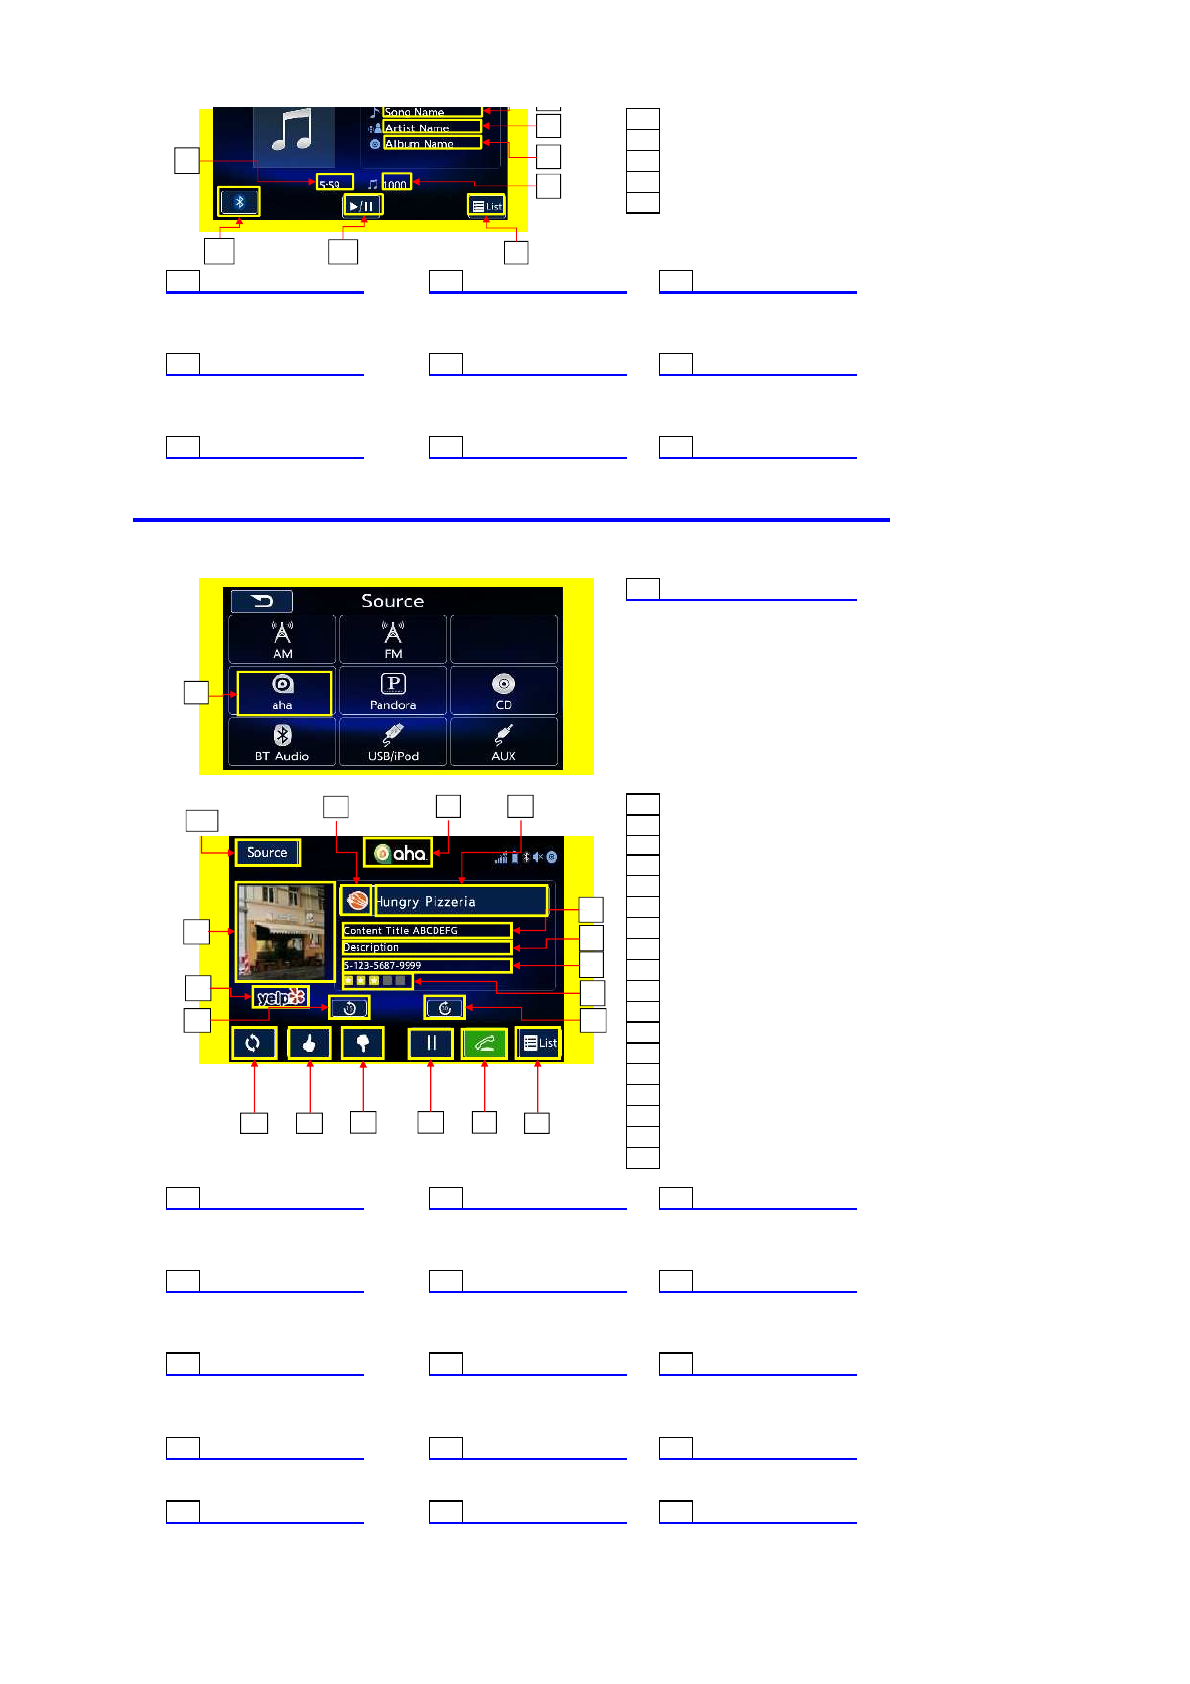
Aha
1
Aha Radio Key
Press the key to enter aha mode.
1
Aha Logo
2
Station Icon
3Station Name/Station List Key
4
Content Image
5
Content Description Line 1
6
Content Description Line 2
7
Content Description Line 3
8
Content Partner Logo
9
Content Ratings Image
10
Skip Back Key
11
Skip Forward Key
12
Like Key
13
Dislike Key
14
Play/Pause Key
15
Call Key
16
Content List Key
17
Refresh Key
18
Source Select Key
1Aha Logo 2Station Icon 3
Station Name/Station List Key
It shows the Aha Logo. It shows the Station Icon. It shows the Station Name.
4Content Image 5Content Description Line 1 6
Content Description Line 2
It shows Content Image. It shows the content title. It shows the content description.
7
Content Description Line 3
8
Content Partner Logo
9Content Ratings Image
It shows the content information.
Press the key to enter the list. It shows Content Ratings Image.
10 Skip Back Key 11 Skip Forward Key 12 Like Key
Press the key to skip back. Press the key to skip forward.
Press the key to show you like it.
13 Dislike Key 14
Play/Pause key
15 Call Key
Press the key to show you dislike it. Press the key first to play,then Press the key to call telephone.
press again to pause it.
2
3
4
7
5
8
9
1
4
3
5
6
7
12 13 16
9
1
2
14
17 15
18
8
10 11
16 Content List Key 17
Refresh Key
18 Source Select Key
Press the key to enter the content list. Press the key to refresh. Press the key to enter the
Multimedia Select Interface.
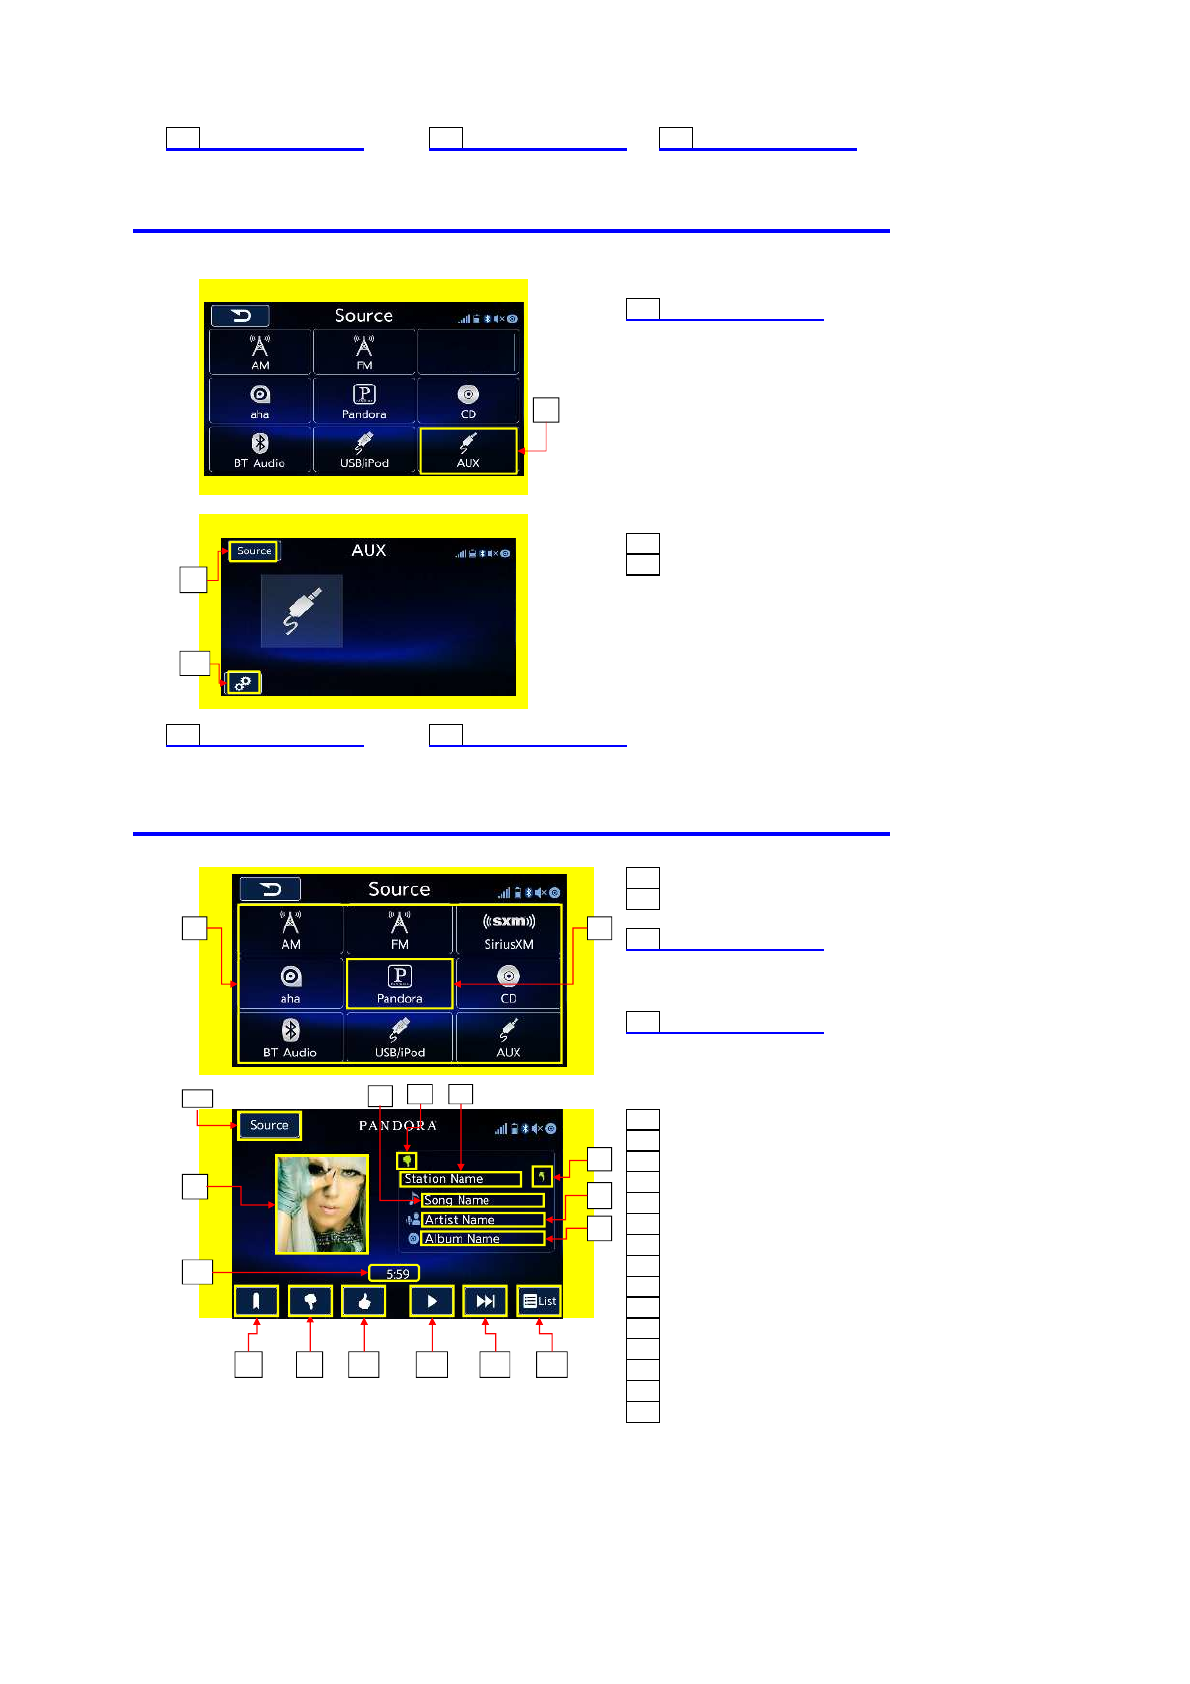
AUX
1
AUX
Key
Press the key to enter AUX mode.
1
SOURCE Key
2
Setting Key
1SOURCE Key 2Setting Key
Press the key to enter the Press the key to enter the
Multimedia Select Interface. audio setting.
Pandora
1
Source List
2
Pandora Key
1Source Key
It shows the Multimedia
Select Interface.
2Pandora Key
Press the key to enter Pandora mode.
1
Album Artwork
2
Station Name
3
Shared Station Icon
4
Track Name
5
Artist Name
6
Album Name
7
Thumbs Up/Down Icon
8
Bookmark Key
9
Thumbs Down Key
10
Thumbs Up Key
11
Play/Pause Key
12
Skip Key
13
List Key
14
PlayTime
15
Source Select Key
1
2
1
1 2
1
2
3
4
5
6
14
8 9 10 11 12 13
7
15