Faurecia Clarion Electronics PJ4605 CAR AUDIO User Manual 19 TRUCKS AUDIO 180425 FCC ENG PJ4605 indd
Clarion Co., Ltd. CAR AUDIO 19 TRUCKS AUDIO 180425 FCC ENG PJ4605 indd
Users Manual

1
English
Model No.
PJ-4605

2
English
Contents
1. FEATURES ������������������������������� 3
Expanding Systems ���������������������������� 3
2. PRECAUTIONS ������������������������������ 4
Operational Panel ����������������������������� 6
4. OPERATIONS ������������������������������ 9
Basic Operations ����������������������������� 9
Sound Setup �������������������������������11
System Setup ������������������������������13
Radio Operations �����������������������������15
CD/MP3/WMA Operations �������������������������16
USB Operations �����������������������������18
Bluetooth Operations ���������������������������19
AUX Operations ������������������������������21
5. TROUBLESHOOTING ��������������������������� 22
6. ERROR DISPLAYS ����������������������������25
7. SPECIFICATIONS ����������������������������26
Thank you for purchasing this Clarion product.
• Please read this owner’s manual in its entirety before operating this equipment.
• After reading this manual, be sure to keep it in a handy place (e.g., glove
compartment).
• Check the contents of the enclosed warranty card and keep it carefully with this
manual.
3
English
1. FEATURES
• BuiltinBluetooth®handsfree(HFP)andaudiostreaming(A2DP&AVRCP)
• SoundQualityCorrectionbyIntelligentTune
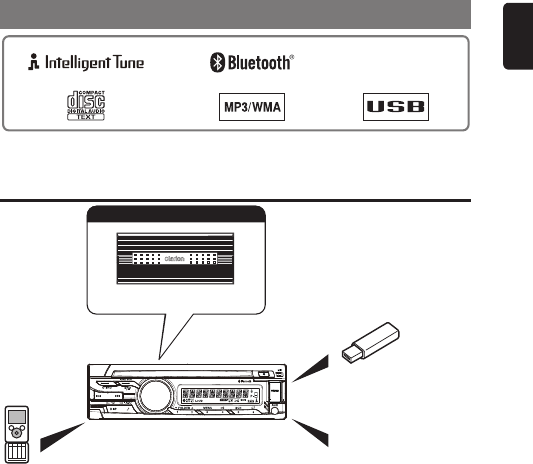
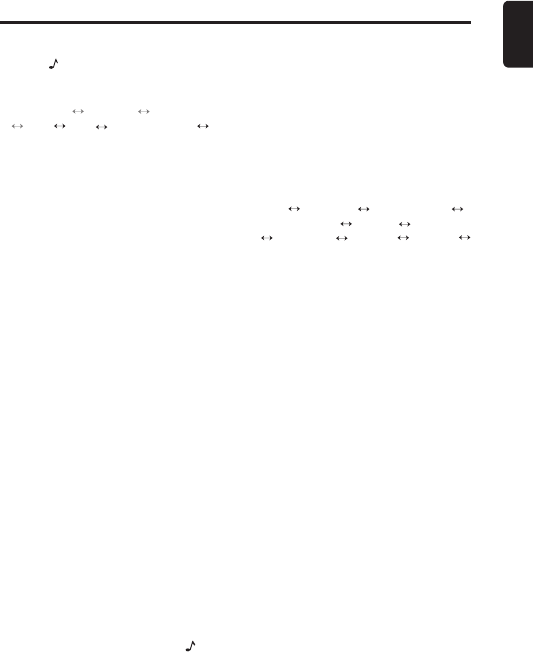
Expanding Systems
4 Chanel Amplifier
Expanding audio features
USB Memory
Portable Player
(Connect via AUX IN Jack)
Bluetooth cellular phone
Note:
• Theitemslistedonlyshowconnectivityoptionsandarenotincludedwiththeunit.

4
English
2. PRECAUTIONS
For your safety, the driver should not operate the controls while driving.
Also, while driving, keep the volume to a level at which external sounds can be heard.
WARNING
INFORMATION FOR USERS:
This unit is applicable for on-road 4 wheel
vehicle purpose only. Use for tractor,
fork truck, bulldozer, off road vehicle, 2
or 3 wheel motor bicycle, marine boat
or other special purpose vehicle is not
appropriate.
CHANGES OR MODIFICATIONS TO
THIS PRODUCT NOT APPROVED BY
THE MANUFACTURER WILL VOID THE
WARRANTY.
This device complies with Part 15 of the
FCC Rules. Operation is subject to the
following two conditions : (1) this device
may not cause harmful interference,
and (2) this device must accept
any interference received, including
interference that may cause undesired
operation.
Handling Compact Discs
• ComparedtoordinarymusicCDs,CD-R
andCD-RWdiscsarebotheasilyaffected
byhightemperatureandhumidityand
someofCD-RandCD-RWdiscsmaynot
beplayed.Therefore,donotleavethemfor
alongtimeinthecar.
• Neversticklabelsonthesurfaceofthe
compactdiscormarkthesurfacewitha
pencilorpen.
Display Screen
In extremely cold, the screen movement
may slow down and the screen may
darken, but this is normal.
The screen will recover when it returns to
normal temperature.
About the registered marks,
etc.
• TheBluetooth®wordmarkandlogosare
registeredtrademarksownedbyBluetooth
SIG,Inc.andanyuseofsuchmarksby
ClarionCo.,Ltd.isunderlicense.Other
trademarksandtradenamesarethoseof
theirrespectiveowners.
USB Connector
• The USB memory stick may stick
out when inserted, so it may cause
danger during driving. When connect
USB memory stick to the main unit,
please use a USB extension cable
(CCA-755, sold separately).
• The USB memory sticks must be
recognized as “USB mass storage
class” to work properly. Some models
may not operate correctly.
When the memorized data is
lost or damaged by any chance,
Clarion shall not be liable for any
damage.
When using the USB memory stick,
we recommend that you backup
your data stored on it before using a
personal computer etc.
• Data files may be broken when using
USB memory sticks in the following
situation:
When disconnecting the USB memory
stick or turning the power off during
reading data.
When affected by static electricity or
electric noise.
Connect/disconnect the USB memory
stick when it is not accessed.
Connecting with the computer is not
covered.
5
English
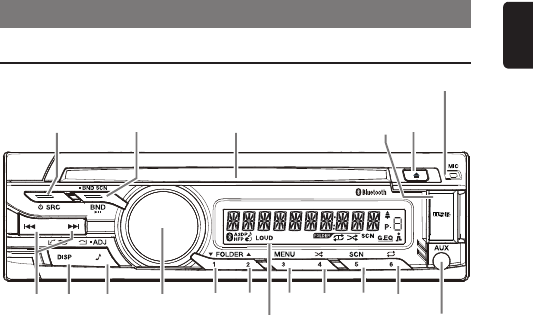
3. CONTROLS
Operational Panel
9 8 7
6
543210 ! #@
9 8
6543210 ! #@
CD Slot USB Connector
AUX Input JackDisplay Screen
Microphone
6
English
Names of Buttons
No. Name Functions
1~6[1]~[6]Short press Radio-Preset station 1~6
Long Press Radio-Store stations in memory
1~2[1]~[2] Short press MP3/WMA/USB-Folder up/ Folder down
3[3] Short press MP3/WMA/USB- Browsing function
4[4] Short press CD/MP3/WMA/USB-Random play
5[5] Short press CD/MP3/WMA/USB-Scan play
6[6] Short press CD/MP3/WMA/USB-Repeat play
7[Q]Short press Eject disc
Long Press Full eject disc
8[BND]Short press Radio-Change bands.
CD/MP3/WMA/USB/BT Audio-Play/pause
Long Press Radio-Band scan
9[SRC]Short press Switch source mode
Long Press Power off
0[x]
[v]
Short press
Items switching
Radio-Tune up/down
CD/MP3/WMA/USB/BT Audio-Track up/down
Long Press
Items switching
Radio-Auto seek up/down
CD/MP3/WMA/USB/BT Audio-Fast-forward / fast-
reverse
![DISP] Short press
Back to the previous layer
CD/MP3/WMA/USB/BT Audio-Switch display
TEL interrupt -Answer a call
@[]Short press Sound setup
TEL interrupt -Reject a call
Long Press System setup
#[ROTARY ]
Rotate Adjust volume
Items switching
Short Press Mute on/off
Long Press Confirm selection
7
English
4. OPERATIONS
Notes:
• Besuretoreadthischapterreferringtothefrontdiagramsofchapter“Operationalpannel”on
page5.
• Ifthesoundbecomesdistorteditwillbetheresultoftheselectedcombinationofsound
adjustmentsettingssuchas,VirtualBass,SoundRestorer,DynamicBeatEnhancer,Bass/
TrebleandGraphicEqualizer.Insuchaneventpleaselowerthelevelofeffect.
Basic Operations
CAUTION
Be sure to lower the volume before
switching off the unit power or the
ignition key. The unit remembers its
last volume setting.
Power on/off
Notes:
• Starttheenginebeforeusingthisunit.
• Becarefulaboutusingthisunitforalong
timewithoutrunningtheengine.Ifyou
drainthebatterytoofar,youmaynotbe
abletostarttheengineandthiscanreduce
theservicelifeofthebattery.
1. Press any button(except [Q] button) to
turn on the power.
2. Long press [SRC] button to turn off the
power.
Selecting a source mode
1. Press [SRC] button to change the
operation mode.
TUNER DISC* USB* BT AUDIO
BT-TEL* AUX TUNER...
* Whendiscisnotloaded,USBdeviceis
notconnected,orBluetoothdeviceisnot
paired,therelatedsourcemodewillbe
skipped.
Adjusting the Volume
1. Turning [ROTARY] knob to adjust the
volume.
∗The volume level is from 0 to 40.
Mute
1. Press [ROTARY] knob to turn mute on
or off.
Title Scroll
1. Long press [DISP] button while in title
display.
The title will scroll 1 time.
Back Function
You can press [DISP] button to return
to the previous layer while in menu
operations.
Clock Setup
1. Press [DISP] button to switch to the
clock display.
2. Press and hold [DISP] button.
3. Turn [ROTARY] knob to select the item
"SET CLOCK", and press [ROTARY]
knob.
SET CLOCK SET ALARM
4. Press [x] or [v] button to select
hour or minute.
5. Turn [ROTARY] knob to set the correct
time.
∗The clock is displayed in 12-hour format.
6. Press [ROTARY] knob to complete
setting.
Note:
• Youcannotsettheclockwhenitis
displayedwithonlytheignitionon.Ifyou
drainorremovethecar’sbatteryortake
outthisunit,theclockisreset.While
settingtheclock,ifanotherbuttonor
operationisselected,theclocksetupmode
iscanceled.

Basic Operations
8
English
Alarm Setup
1. Press [DISP] button to switch to the
clock display.
2. Press and hold [DISP] button.
3. Then press [x] or [v] button to
select the item "SET ALARM", and
press [ROTARY ] knob.
SET CLOCK SET ALARM
4. Turn [ROTARY] knob to switch between
"ON" and "OFF".
ON: Turn on the alarm.
OFF: Turn off the alarm.
If you want to set alarm, you should
switch to "ON" and press [ROTA RY]
knob. Then do the next operations.
5. Press [x] or [v] button to select
hour or minute.
6. Turn [ROTARY] knob to set the correct
time.
∗The clock is displayed in 12-hour format.
7. Press [ROTARY] knob to complete
setting.
9
English
Sound Setup
You can adjust a sound effect or tone
quality to your preference.
1. Press [ ] button.
2. Then press [x] or [v] button to
select the sound setup item:
G-EQ *1 ※ BASS *2 TREB *2
BAL FAD INTEL-TUNE ※
LOUD
Notes:
*1 This item can be performed only when
the system item “EQ-SELECT” is set to
“G EQ”(page 11).
*2 These items can be performed only
when the system item “EQ-SELECT” is
set to “BASS/TREB”(page 11).
※You should press [ROTARY] knob to
adjust the setting for these items.
• G-EQ (Graphic Equalizer): select
the desired audio effect in preset
memory
• BAL (Balance): balance of the right
and left speakers
• FAD (Fader): balance of the rear and
front speakers
• INTEL- TUNE (Intelligent Tune):
Clarion’s sound technology
developed for turning the car
interior into a wonderful listening
environment
• LOUD (Loudness): bass or treble
emphasized
3. Turn [ROTARY] knob to adjust the
value.
• G-EQ: detailed operations are below
• BASS / TREB: -15 ~ +15 (default: 0)
• BAL: L7 ~ R7 (default: 0)
• FAD: R7 ~ F7 (default: 0)
• INTEL- TUNE: detailed operations
are below
• LOUD: ON/OFF (default: OFF)
4. After completing settings, press [ ]
button to return to the previous mode.
Notes:
• During“BASS/TREB/BAL/FAD”setup,if
nooperationisperformedformorethan
10seconds,thismodecanbestoredin
memoryandreturntopreviousmode.
Setting Graphic Equalizer
This unit is provided with 9 types of sound
quality effects stored in memory.
Select the one you prefer.
∗The factory default setting is “OFF”.
1. Select “G-EQ” in audio items, and press
[ROTARY ] knob.
2. Turn [ROTARY] knob, select a tone
effect.
OFF CUSTOM BASS BOOST
HIGH BOOST VOCAL IMPACT
NATURAL USER 1 USER 2
USER 3
• OFF: flat
• CUSTOM: user custom temporarily
• BASS BOOST: bass emphasized
• HIGH BOOST: mid and treble
emphasized
• VOCAL: mid emphasized
• IMPACT: bass and treble emphasized
• NATUAL: calm and moist
• USER 1/2/3: user custom
Setting preferred sound quality effects
1. Select “BASS BOOST/HIGH BOOST/
VOCAL/IMPACT/NATURAL/USER
1/USER 2/USER 3”, and press
[ROTARY ] knob.
2. Press [x] or [v] button to select a
frequency.
3. Turn [ROTARY] knob to change the
setting: –6 ~ +6
4. Long press [1]~[3] button to store the
setting into “USER 1” ~“USER 3”
memory.
Note:
• Ifyoudonotperformstoringasstep4
whenyouselect“BASS BOOST/HIGH
BOOST/VOCAL/IMPACT/NATURAL”,
thesettingwillbestoredin“CUSTOM”
temporarily.

10
English
Setting Intelligent Tune
1. Select “INTEL- TUNE” in audio items,
and press [ROTARY ] knob.
2. Press [x] or [v] button, the tone
effect changes.
S-RESTORER V-BASS D-BEAT
• S-RESTORER (Sound Restorer):
full quality sound reproduction of
compressed audio data (default:
OFF)
• V-BASS (Virtual Bass): delivers
powerful lows just like an add-on
subwoofer (default: OFF)
• D-BEAT (Dynamic Beat Enhancer):
(default: OFF)
3. Press [ROTARY] knob.
4. Turn [ROTARY] knob to adjust the
value.
S-RESTORER/V-BASS/D-BEAT: OFF/
LOW/MID/HIGH.
Sound Setup

11
English
System Setup
1. Long press [ ] button.
2. Then press [x] or [v] button to
select the system setup items:
AUTO STORE ∗ DX/LO ∗
AUX SENS ∗ BT SELECT
BT DELETE BT DISCON
A-ANSWER A-CONNECT
TEL MEMORY PIN CODE
DIMMER BEEP EQ-SELECT
RESET
• BT SELECT: select paired device to
connnet
• BT DELETE: delete paired device
• BT DISCON: disconnect device
• A-ANSWER: auto answer
• A-CONNECT: auto connect
• TEL MEMORY: priority for
phonebook download
• DIMMER: dimmer control
• BEEP: button beep sound
• EQ-SELECT: select rear or
subwoofer
• RESET: memory reset
∗These items are setting for the different
source mode. The detailed operations
please follow the following source mode
operations chapter.
3. Turn [ROTARY] knob to adjust the
setting.
• BT SELECT/BT DELETE/BT
DISCON/A-ANSWER/A-CONNECT:
detailed operations are below
• DIMMER: ON/OFF (default: ON)
• BEEP: TYPE-A/TYPE-B/OFF
(default: TYPE-A)
• EQ-SELECT: G-EQ, BASS/TREBLE
(default: G-EQ)
• RESET: detailed operations are
below
4. After completing settings, press [DISP]
button to return to the previous mode.
Note:
• Youcanpress[DISP]buttontoreturnto
thepreviouslayerduiringoperations.
Select Paired Device
This is a setting for user to select one of
the paired mobile phones to connect.
1. Select “BT SELECT” in system setup
items.
2. Turn the [ROTARY] knob to choose one
of the paired devices.
3. Press the [ROTARY] knob to connect.
Delete Paired Device
This is a setting for user to delete one of
the paired device from the list.
1. Select “BT DELETE” in system setup
items.
2. The paired device appears in the
display, then turn [ROTA RY] knob to
choose one of the paired devices.
3. Press [ROTARY] knob.
4. Turn [ROTARY] knob to select
“CANCEL” or “ARE U SURE”, and
press [ROTARY ] knob.
CANCEL: cancel deleting the paired
device.
ARE U SURE: confirm to delete the
paired device.
Notes:
• Deletedpaireddevicewillnotautomatically
rearrangeinthepaireddevicelist.
• Afterdeletingthedevice,thephonebook
andthecallhistoryrecordswillbedeleted
too.
Disconnect Device
This option is used to disconnect the
currently connected device.
1. Select “BT DISCON” in system setup
items, and press [ROTARY] knob.
2. Press and turn the [ROTARY] knob to
select “ARE U SURE” or “CANCEL”.
ARE U SURE: confirm to disconnect
the paired device.
CANCEL: cancel disconnecting the
paired device.
3. Press the [ROTARY] knob to confirm.

12
English
System Setup
Auto Answer
This is a setting to determine whether
any incoming call will be automatically or
manually answered.
∗The factory default setting is “OFF”.
1. Select “A-ANSWER” in system setup
items.
2. Turn [ROTARY] knob to select “ON” or
“OFF”.
ON: Any incoming call is automatically
answered in 5 seconds.
OFF: User needs to manually answer
the call.
Auto Connect
This function allows the Bluetooth to be
connected automatically with previously
connected device. Connection can be
established at any source mode.
∗The factory default setting is “ON”.
1. Select “A-CONNECT” in system setup
items.
2. Turn [ROTARY] knob to select “ON” or
“OFF”.
Priority for Phonebook
Download
Setting the priority for the phonebook
download automatically while pairing.
∗The factory default setting is “DEVICE”.
1. Select “TEL MEMORY” in system setup
items.
2. Turn [ROTARY] knob to select the
setting: DEVICE/SIM.
DEVICE: Phonebook download from
device firstly.
SIM: Phonebook download from SIM
card firstly.
Pin Code Setting
This pin code is used during pairing. A
maximum of 10 digits can be changed
through this unit.
∗ The factory default pass key is “1234”.
1. Select “PIN CODE” in system setup
items.
2. Press [ROTARY] knob.
3. Press [x] or [v] button to move the
cursor.
4. Turn [ROTARY] knob to select the
desired digits.
5. Long press [ROTARY] knob to store in
memory.
Performing Memory Reset
Reset various settings in the memory.
Note:
• Thesettingswillremaininthememory
evenifyouturnthepoweroff.
1. Select “RESET” in system setup items,
and press [ROTARY ] knob.
2. Turn [ROTARY] knob to select
“CANCLE” or “ARE U SURE”, and
press [ROTARY ] knob.
CANCEL: cancel resetting
ARE U SURE: “CLEARED” appears
in the display, and the memory will be
cleared.

13
English
Radio Operations
Listening to the radio
1. Press [SRC] button and select the radio
mode.
2. Press [BND] button and select the radio
band in the following order:
FM1 FM2 FM3 AM1 AM2
FM1...
Switching display
Press the [DISP] button to change the
display.
Manual tuning
Press [x] or [v] button to manually
tune a station.
Seek mode setting
2 types of seek tuning: DX SEEK and
LOCAL SEEK.
DX SEEK can automatically tune in to
receivable broadcast stations; LOCAL
SEEK can tune in to only broadcast
stations with a good reception sensitivity.
∗The factory default setting is “DX”.
1. Select “DX/LO” in system setup items.
2. Turn [ROTARY] knob to select a seek
mode.
Seek tuning
1. Long press [x] or [v] button to
automatically seek a station.
Recalling a preset station
A total of 30 preset positions (6-FM1,
6-FM2, 6-FM3, 6-AM1, 6-AM2) exists to
store individual radio stations in memory.
Press the corresponding [1]~[6] button
to recall the stored radio frequency
automatically.
Manual store
1. Long press [1]~[6] button to store the
current station into preset memory.
Band scan
Band scan is searching for good
reception stations from current frequency
to higher frequency repeatedly. When a
good reception stations is searched, it will
be listened in 7s. And then it continues
scan.
1. Press [BND] button to select a band.
2. Long press [BND] button.
Auto store
Auto store is a function for storing up to
6stations that are automatically tuned
insequentially. If 6 receivable stations
cannot be received, a previously stored
station remains unover written at the
memory position.
1. Select “AUTO STORE” in system setup
items (page 11).
2. Long press [ROTARY] knob.
The stations with good reception are
stored automatically to the preset
channels.
∗If auto store is performed in the FM bands,
the stations are stored in FM3.
If auto store is performed in the AM bands,
the stations are stored in AM2.

14
English
CD/MP3/WMA Operations
This unit can play back MP3/WMA files
Note:
• IfyouplayalewithDRM(DigitalRights
Management)forWMAremainingON,no
audioisoutput.Instead,“––:––”willblink
for5sintheplaytime,andthengotothe
nexttracktoplay.
To disable DRM (Digital Rights
Management)
When using Windows Media Player
9/10/11, click on TOOL OPTIONS
MUSIC RECORD tab, then under
Recording settings, unclick the Check
box for RECORD PROTECTED MUSIC.
Then, reconstruct files.
Personally constructed WMA files are
used at your own responsibility.
Precautions when creating
MP3/WMA file
Usable sampling rates and bit rates
1. MP3: Sampling rate 8 kHz-48 kHz,
Bit rate 32 kbps-384 kbps/VBR
2. WMA: Sampling rate 22.05 kHz-48
kHz,Bit rate 32 kbps-320 kbps/VBR.
File extensions
1. Always add a file extension “.MP3” or
“.WMA” to MP3 or WMA file by using
single byte letters. If you add a file
extension other than specified or forget
to add the file extension, the file cannot
be played.
2. Files without MP3/WMA data will
extension “.MP3” or “.WMA” will not
play. Instead, “– –:– –” will blink in the
play time.
∗When MP3/WMA files are played, a little
no sound part is caused between tunes.
Logical format (File system)
1. When writing MP3/WMA file on a
CD-R disc or CD-RW disc, please
select “ISO9660 level 1, 2 or JOLIET or
Romeo” or APPLE ISO as the writing
software format. Normal play may not
be possible if the disc is recorded on
another format.
2. The folder name and file name can
be displayed as the title during MP3/
WMA play but the title must be within
64 single byte alphabetical letters and
numerals (including an extension).
3. Do not affix a name to a file inside a
folder having the same name.
Folder structure
A disc with a folder having more than 8
hierarchical levels will be impossible.
Number of files or folders
1. Up to 255 files can be recognized per
folder Up to 255 files can be played.
2. Tracks are played in the order that they
were recorded onto a disc. (Tracks
might not always be played in the order
displayed on the PC.)
3. Some noise may occur depending
on the type of encoder software used
while recording.
Backup Eject function
Just pressing the [Q] button, ejects the
disc even if ACC OFF.
Notes:
• IfyouforceaCDintobeforeauto
reloading,thiscandamagetheCD.
• IfaCD(12cm)isleftintheejected
positionfor10seconds,theCDis
automaticallyreloaded(Autoreload).
• Ifyoulongpress[Q]buttontoejectthe
disc(fulleject),itcannotbeautomatically
reloaded.
Listening to a disc already
loaded in the unit
Press the [SRC] button to select “DISC”
mode.
Loading a CD
1. Insert a CD into the center of the CD
SLOT with the labeled side facing
up. The CD plays automatically after
loading.

15
English
CD/MP3/WMA Operations
Notes:
• NeverinsertforeignobjectsintotheCD
SLOT.
• IftheCDisnotinsertedeasily,theremay
beanotherCDinthemechanismorthe
unitmayrequireservice.
• Discsnotbearingthe markand
CD-ROMscannotbeplayedbythisunit.
• SomeCDsrecordedinCD-R/CD-RW
modemaynotbeusable.
Pausing play
1. Press the [ ] button to pause play.
2. To resume CD play, press the [ ]
button again.
Switching display
This unit can display title data.
Each time you press the [DISP] button to
change the display.
CD-DA disc
Track No./Playtime Clock Disc name
Track name Artist name Album
name Track No./Playtime ...
MP3/WMA disc
Track No./Playtime Folder No./Track No.
Clock Folder name File name
Track name Artist name Album name
Track No./Playtime ...
Note:
• Characterscanbedisplayed:ISO8859-
1,ISO646/ASCII,UTF-16(BOM/BE/LE),
UTF-8,Shift_JIS.
Track up/down
1. Press [v] button to the next track.
2. Press [x] button to the previous track
if the playtime is within 1s; otherwise it
will move ahead to the beginning of the
current track.
Fast-forward/Fast-reverse
1. Long press the [v] button to fast-
forward.
2. Long press the [x] button to fast-
reverse.
Folder up/down
This function allows you to select a folder
containing MP3/WMA files and start
playing from the first track in the folder.
1. Press [1] button to previous folder.
2. Press [2] button to next folder.
Browsing function
This function allows you search a file
while playing MP3/WMA disc.
1. Press [3] button to enter folder search
mode, then press [ROTARY] knob. The
folder list appears.
2. Similar operations are repeated until
the track list is displayed.
3. Turn [ROTARY] knob to switch between
tracks, then press [ROTA RY] knob to
confirm selecting.
4. Press [ROTARY] knob to play.
∗You can press [3] button to cancel the
browsing mode during operations.
∗You can press [DISP] button to return to
the previous layer during operations.
Play mode setting
Scan play
• CD-DA disc - Play the first 10
seconds of all the tracks recorded on
a disc.
• MP3/WMA disc - Play the first 10
seconds of the first track of all the
folders on an MP3/WMA disc.
1. Each time you press [5] button:
Scan disc Scan off
16
English
CD/MP3/WMA Operations
Repeat play
1. Each time you press [6] button:
CD-DA disc - Repeat one Repeat all
MP3/WMA disc - Repeat one
Repeat folder Repeat all
Repeat one - Play the current track
repeatedly.
Repeat folder - Play all the tracks of
the current folder repeatedly.
Repeat all - Play all the tracks of the
disc repeatedly.
Random play
1. Each time you press [4] button:
CD-DA disc - Random all Random
off
MP3/WMA disc - Random folder
Random all Random off
Random all - Play all the tracks of an
disc in a random order.
Random folder - Play all the tracks of
the current folders in a random order.
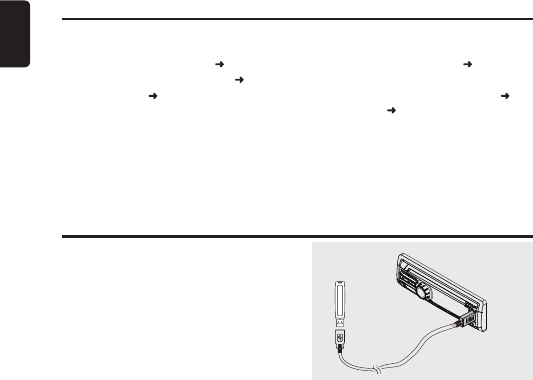
USB Operations
1. Open the cover of the USB connector
on the right. Insert a USB device into
the USB connector.
If 1m extension is necessary, please
purchase the optional CCA-755.
When connecting a USB device, the
unit will read the files automatically.
2. To remove the USB device, you should
first select another source or turn off
the power, in order to avoid damaging
the USB device. Then take off the USB
device. Close the cover to the left.
3. Operations are the same as for MP3/
WMA disc operations.
CCA-755
Note:
• Pleasedonotaddmusiclesotherthan
“.MP3”or“.WMA”intheUSBmemory.

17
English
Bluetooth Operations
Mobile phones and audio devices that
support Bluetooth can be connected for
use on the unit.
Notes:
• Thissystemwillnotoperateormay
operateimproperlywithsomeBluetooth
audioplayersandBluetoothmobile
phones.
• BrowsetheClarionwebsitetoconrm
mobilephonecompatibilitylist.
Bluetooth Pairing
Please pair this unit from your Bluetooth
device.
Up to a maximum of 3 Bluetooth devices
can be paired.
1. Search for this unit on your device
Bluetooth setup menu.
2. Select “Bluetooth_Audio” from the
pairing list on your Bluetooth device.
For the Device (BT Ver.2.1 Above)
1. Please do operation to pair this unit on
your Bluetooth device.
For the Device (BT Ver.2.1 Below)
1. Please enter the pin code on your
Bluetooth device to pair this unit.
Notes:
• Afterpairedsuccessfully,thereisaprompt
onyourBluetoothtelephoneasking
whetherallowtodownloadthephonebook
andtheecallhistoriesintothisunit.
• Uptoamaximumof500telephone
numberscanberegistered.
Bluetooth Audio Operations
The following operations are the same as
for CD mode:
• Pausing Play
• Selecting a track
• Fast-forward/Fast-reverse
Switch to Bluetooth Audio Mode
Press the [SRC] button to switch to “BT
AUDIO” mode.
Switching Display
Each time you press the [DISP] button to
change the display.
BT Device name Clock Title name
Artist name Album name BT Device
name ...

Bluetooth Operations
18
English
Bluetooth Telephone
Operations
Switch to Bluetooth Telephone Mode
Press the [SRC] button to switch to
“BT -TEL” mode.
Make Outgoing Call
There are 3 ways to make outgoing call.
• You can press [ ] button to hang up
during calling.
• You can press [ROTARY ] knob during
calling, the mic will be muted. Press it
again will cancel mute.
•CallfromPhonebook
User can search the contact name in the
phonebook and make call.
Alternatively, user can call from mobile
phone.
1. Press [BND] button.
2. Press [x] or [v] button to select
“PHONE BOOK”.
3. Press [ROTARY] knob to enter the
contact name list (in this case, you
can turn [ROTA RY] knob to select the
desired contact name).
4. Press [ROTARY] knob to enter the
phone number list.
5. If there are more than one phone No. of
the contact name, press [x] or [v]
button to select a phone No.
6. Press the [ROTARY] knob to call the
mobile phone No.
•Dialed&MissedCallHistory
You can search the latest 10
dialed&missed call history.
1. Press the [BND] button.
2. Press [x] or [v] button to select
“REDIALS”
3. Press [ROTARY] knob to enter the
dialed&missed call list.
4. Turn [ROTARY] knob to select a call
history.
5. If the phonebook has been downloaded,
you should press [ROTARY] knob to
display the phone No.
6. Press [ROTARY] knob to call the
mobile phone No.
•ReceivedCallHistory
You can search the latest 10 received call
history.
1. Press the [BND] button
2. Press [x] or [v] button to select to
select “RECEIVED”.
3. Press [ROTARY] knob to enter the
received call list.
4. Turn [ROTARY] knob to select a call
history.
5. If the phonebook has been downloaded,
you should press [ROTARY] knob to
display the phone No.
6. Press [ROTARY] knob to call the
mobile phone No.
Answering a call
You can answer an incoming call by
pressing [DISP] button.
∗Press the [ ] button to reject an incoming
call.
Switch to the secret call
Press the [BND] button to switch to the
secret call mode.
∗When you switch to the secret call mode,
you will not hear the call from this unit and
only can hear it from your mobile phone.

19
English
AUX Operations
AUX function
This system has an external input jack
on the front panel so you can listen to
sounds and music from external devices
connected to this unit.
Selecting AUX IN sensitivity
Make the following settings to select the
sensitivity when sounds from external
devices connected to this unit are difficult
to hear even after adjusting the volume.
∗The factory default setting is “MID”.
1. Select “AUX SENS” in system setup
items(page 11).
2. Turn the [ROTARY] knob to select
“HIGH”, “MID” or “LOW”.

20
English
5. TROUBLESHOOTING
General
Problem Cause Measure
Power cannot be
turned on.
Fuse is blown. Replace with a fuse of the same amperage.
If the fuse blows again, consult your dealer.
Incorrect wiring. Consult your dealer.
No sound output
when operating the
unit with amplifiers
or power antenna
attached.
Power antenna lead is
shorted to ground or
excessive current is
required for remote-on
the amplifiers or power
antenna.
1. Turn the unit off.
2. Remove all wires attached to the power
antenna lead. Check each wire for a
possible short to ground using an ohm
meter.
3. Turn the unit back on.
4. Reconnect each amplifier remote wire
to the power antenna lead one by one.
If the amplifiers turn off before all wires
are attached, use an external relay to
provide remote-on voltage (excessive
current required).
Nothing happens
when buttons are
pressed.
Display is not
accurate.
DCP or main unit
connectors are dirty.
Wipe the dirt off with a soft cloth moistened
with cleaning alcohol.
No sound heard The speaker protection
circuit is operating.
1. Turn down sound volume. Function can
also be restored by turning the power
off and on again. (Speaker volume is
reduced automatically when the speaker
protection circuit operates).
2. If the sound is muted again, consult our
service department.
21
English
USB Devices
Disc Player
Problem Cause Measure
No sound heard MP3/WMA files are
absent in a disc.
Write MP3/WMA files onto the disc
properly.
Files are not
recognized as an MP3/
WMA file.
Use MP3/WMA files encoded properly.
File system is not
correct.
Use ISO9660 level 1, 2 or JOLIET or
Romeo or APPLE ISO file system.
Sound skips or is
noisy.
Compact disc is dirty. Clean the compact disc with a soft cloth.
Compact disc is
heavily scratched or
warped.
Replace with a compact disc with no
scratches.
Sound is cut or
skipped.
MP3/WMA files are not
encoded properly.
Use MP3/WMA files encoded properly.
Sound is bad
directly after
power is turned
on.
Water droplets may
form on the internal
lens when the car is
parked in a humid
place.
Let dry for about 1 hour with the power on.
Wrong filename File system is not
correct.
Use ISO9660 level 1, 2 or JOLIET or
Romeo or APPLE ISO file system.
Problem Cause Measure
No sound heard The device contains no
MP3/WMA files.
Record MP3/WMA files properly to the
device.
The files are not proper
MP3/WMA format.
Use only properly encoded MP3/WMA
files.
Sound is
interrupted or has
noise.
The MP3/WMA
files are improperly
encoded.
Use only properly encoded MP3/WMA
files.
The device isn’t
recognized.
The device is
damaged.
Disconnect the device and reconnect. If the
device is still not recognized, try replacing
with a different device.
Connectors are loose.
Can’t insert the
device.
The device has been
inserted improperly.
Try reversing the connection direction of
the device (usually the brand name surface
should be facing left).
The connector is
broken.
Replace with a new device.

22
English
Bluetooth
Problem Cause Measure
Cannot pair the
Bluetooth enabled
device with the car
audio system.
The device does not
support the profiles
required for the system.
Use another device to pair.
The Bluetooth function
of the device is not
enabled.
Refer to the user manual of the device for
how to enable the function.
The Bluetooth
information does not
match.
Delete the paired device on your bluetooth
device and the car audio system, and then
pair them again.
The Bluetooth
hands-free audio
quality is not
improved after
connection with a
Bluetooth-enabled
device.
The external
microphone is not set
correctly nor properly
positioned.
Adjust the gain and position of the external
microphone.
For example, stick the microphone onto the
dashboard so it is close to the driver.

23
English
6. ERROR DISPLAYS
If an error occurs, one of the following displays is displayed.
Take the measures described below to eliminate the problem.
Error Display Cause Measure
Disc Play
CD MECHA
ERROR
This is a failure of CD deck’s
mechanism.
Eject the disc then reload it.
DISC ERROR A CD cannot be played due to
scratches, etc.
Replace with a non-scratched,
non-warped-disc.
A CD is loaded upside-down inside
the CD deck and does not play.
Eject the disc then reload it
properly.
NO FILE No MP3/WMA file is recorded in
the device.
Record MP3/WMA files in the
device.
USB
USB ERROR Protocol or File system is not
correct.
Replace with a USB device in
correct protocol or file system.
NO DEVICE No connection or the connection is
loose.
Reconnect the device.
NO FILE No MP3/WMA file is stored in the
device.
Store MP3/WMA files in the
device.
HUB NOT
SUPPORT
The HUB devices are not
supported.
Do not use the HUB devices.
DEVICE NOT
SUPPORT
The connected USB is not
supported.
Connect the other supported
device.
If an error display other than the ones described above appears, restart this unit. If the
problem persists, turn off the power and consult your store of purchase.

24
English
7. SPECIFICATIONS
Radio section
Receiving Frequencies:
FM : 87.90 to 107.90 MHz (0.2 MHz
steps)
AM : 530 to 1,710 kHz (10 kHz steps)
CD player section
System: Compact disc digital audio
system
Frequency Response :
17 Hz to 20 kHz (± 3 dB)
Signal to Noise Ratio:
more than 65 dB (1 kHz)
Distortion : less than 0.4%
MP3/WMA
MP3: Sampling rate 8 kHz-48 kHz,
Bit rate 32 kbps-384 kbps / VBR
WMA: Sampling rate 22.05 kHz-48 kHz,
Bit rate 32 kbps-320 kbps / VBR
Logical format:
ISO9660 level 1, 2 Joliet file system
USB
Specification: USB 2.0
Playable audio format:
MP3(.MP3): MPEG 1/2/2.5 Audio Layer-3
MPEG 1/2 Audio Layer-2
WMA(.wma): Ver 9.2
Bluetooth
Specification:
Bluetooth Ver. 2.1 + EDR
Profile:
HFP (Hands-Free Profile): Ver. 1.5
A2DP (Advanced Audio Distribution
Profile): Ver. 1.2
AVRCP (Audio/Video Remote Control
Profile): Ver. 1.3
PBAP (Phone Book Access Profile)
General
Output Power : 12W X 4 ( +B=26.4V)
Power Supply Voltage :
24V DC , negative ground
Power Consumption: Less than 15 A
Speaker Impedance : 8-16 Ω
Weight of Main unit : 1.09 kg
Dimensions of Main unit:
180 (W) X 50 (H) X 175 (D) mm
177.8 mm
180 mm
50 mm
157 mm
2mm
178 mm
175 mm
Note:
• Specicationsanddesignaresubject
tochangewithoutnoticeforfurther
improvement.
The device must not be co-located or operating in conjunction with any other antenna or transmitter.