Faurecia Clarion Electronics QY8600 Car Navigation User Manual
Clarion Co., Ltd. Car Navigation
UserManual.wiki
>
Faurecia Clarion Electronics
>
QY8600 User Manual
User manual
Navigation menu
Upload a User Manual
Namespaces
Wiki Guide
HTML
PDF
Info
Views
User Manual
Discussion / Help
Navigation
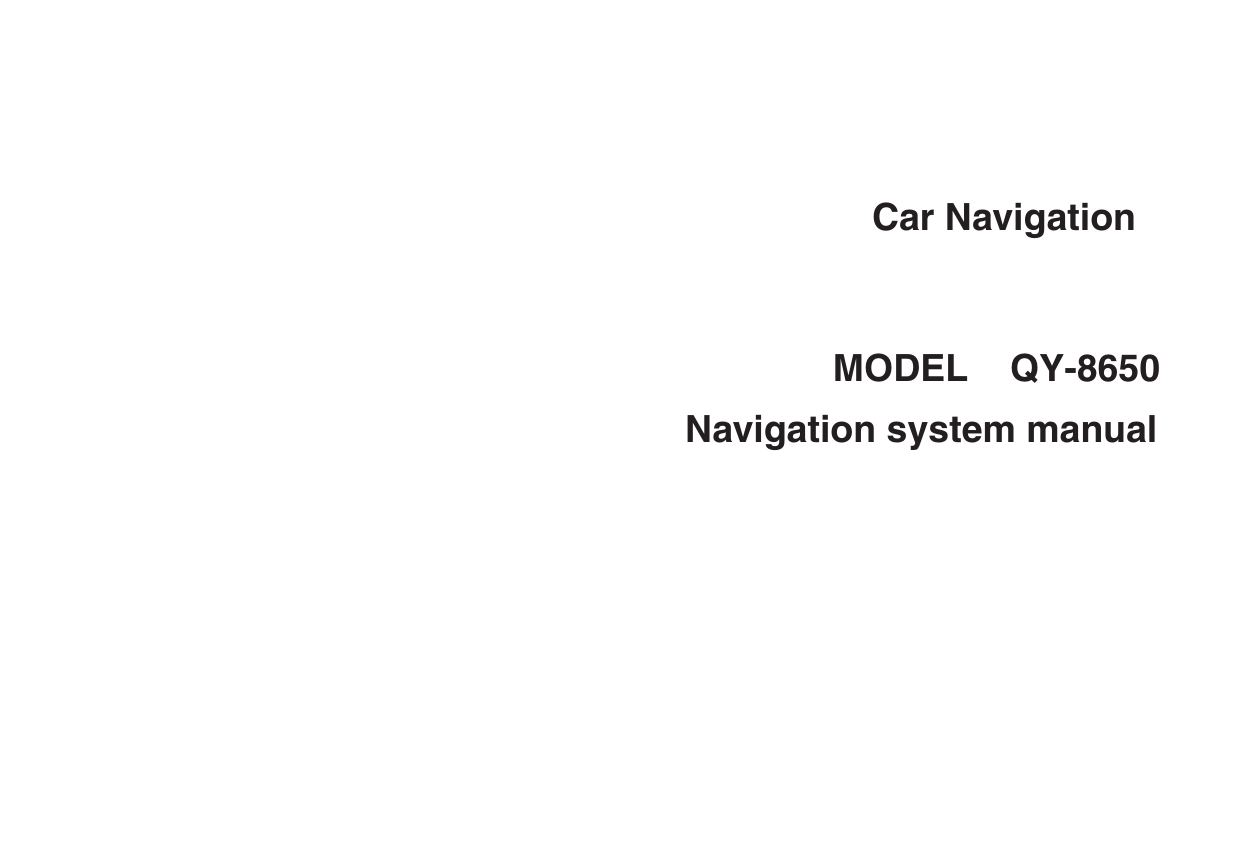
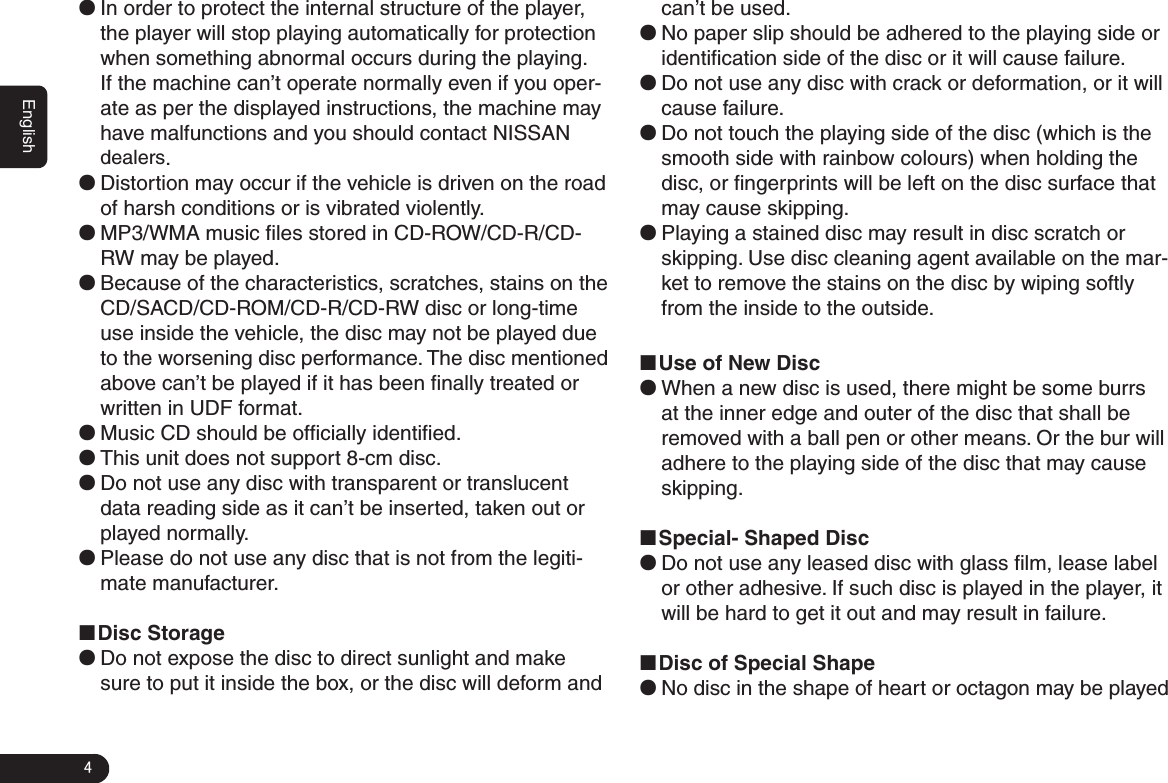
![5Englishor the machine will be damaged. Do not use such kind of discs. ■Disc Decoration ●Do not use any decoration to improve tone quality or protect disc (such as disc case or protective case) as the change in the thickness or dimension of the disc may result in failure. ●Do not use any decoration to improve tone quality or shockproof performance (such as disc ring case or functional protective case), or the decoration may fall inside the machine that the disc can’t be played or taken out and result in failure. LCD ●There will be brightened or darkened visual phenom-enon if you watch the LCD from the sides. ●The screen will become illegible under direct sunlight or external light on the display. ●If the machine is turned on when the temperature is below zero, LCD will appear to be darker than usual until the temperature inside the machine rises. Names of Various PartsPanel Buttons24135678!9@01 LCD(touch screen): To display the working statuses of various modes.2 SD card slot: Map SD card.3 [CAMERA] button: To enter camera mode.4 [D]Next Track button: In SB/iPod/Bluetooth Audio De-vice mode, short press it to select the next track to play, and long press it to Fast Forward; in AM/FM mode, short press to search radio station frequency up manually. 5 [A]Previous Track button: In USB/iPod/ Bluetooth Audio Device mode, short press it to select the previous track to play, and long press it to Fast Reverse; in AM/FM mode, short press to search radio station frequency down manually. 6 [BACK] button: Back to the previous mode. 7 [TUNE SCROLL] knob/[PUSH/SOUND] button: Rotate](https://usermanual.wiki/Faurecia-Clarion-Electronics/QY8600/User-Guide-3140089-Page-6.png)
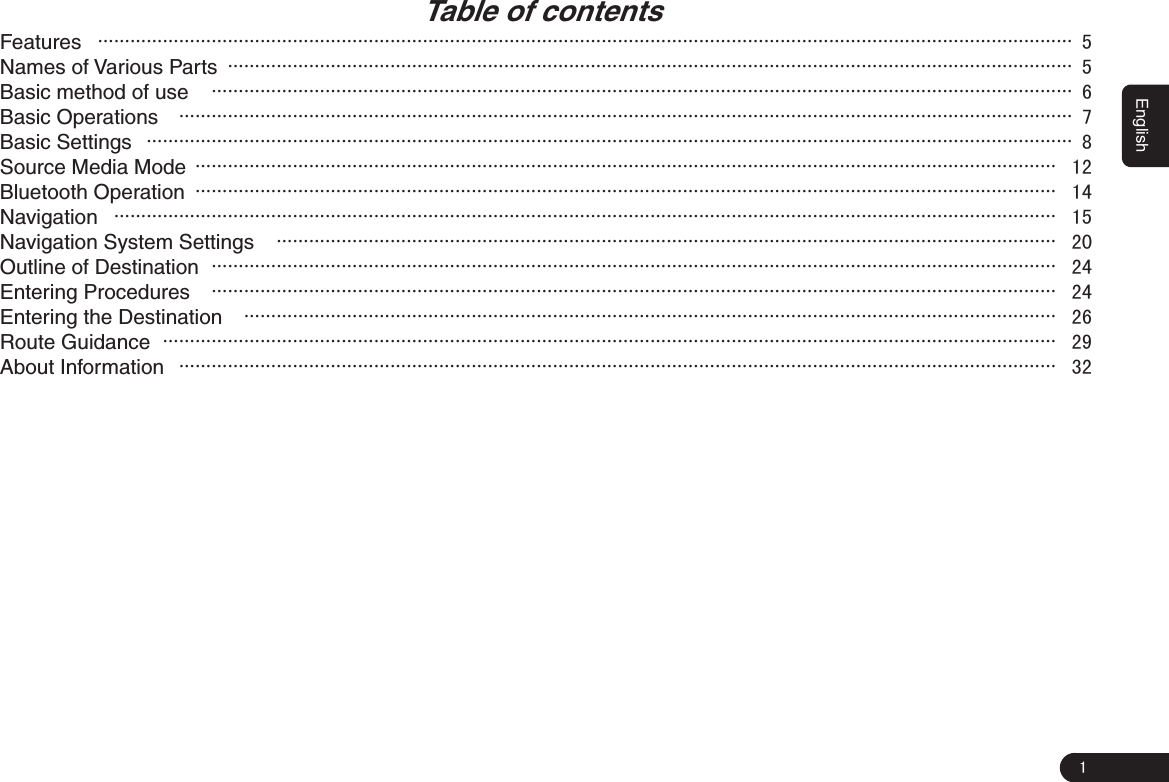
![6Englishto jump to previous or next touch key in the general mode; press and rotate the knob to adjust the sound effect or tone quality. Rotate to zoom in or out the map in the map mode.8 button/[VOL] knob: Rotate to adjust volume; short press to turn off/on audio device. 9 [AUDIO]button: To enter audio selection screen or Audio Mode.0[]Day/night button: Press to switch between day or night mode.![MAP] button: Press to enter the map screen.@[MENU] button: Press to enter Menu Screen to select audio function or navigation function.Caution ●It is prohibited to pull out the map SD card or the system will not work.](https://usermanual.wiki/Faurecia-Clarion-Electronics/QY8600/User-Guide-3140089-Page-7.png)
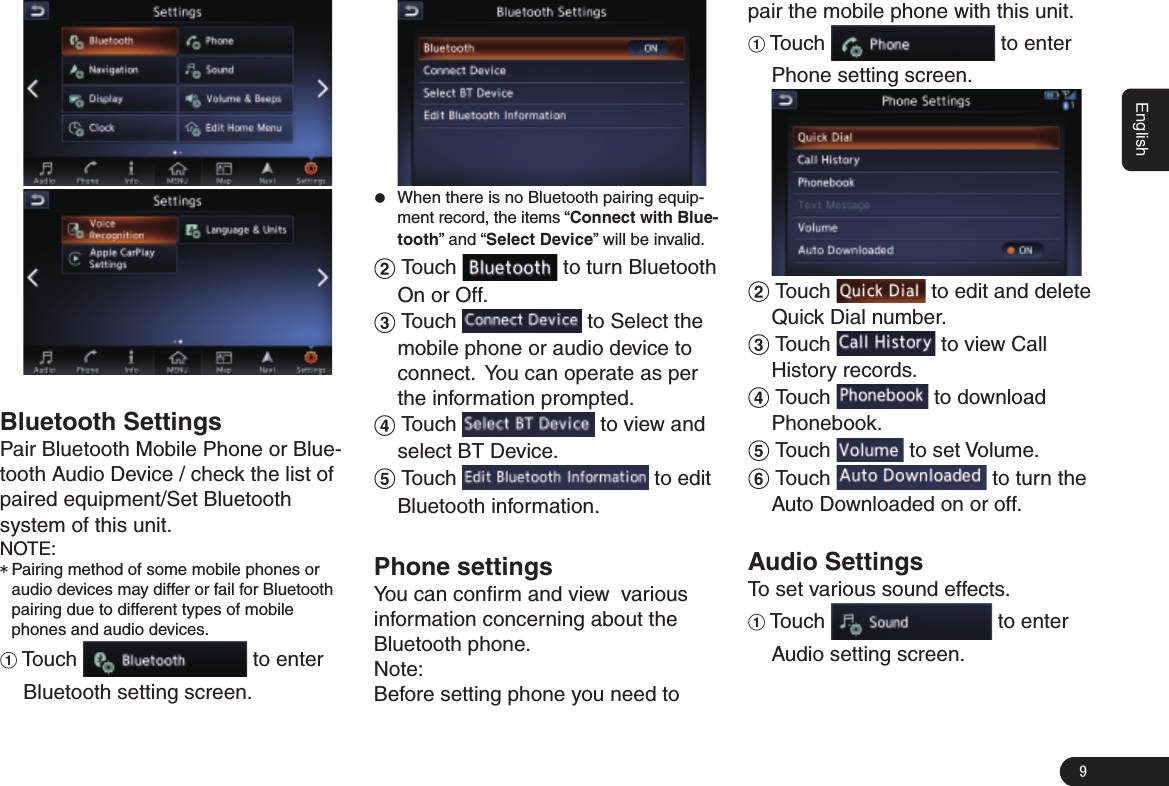
![7EnglishBasic method of useSwitching the languageWhen the unit turns on, the default language is set to English. Switch to your language to use the unit.1 Press [MENU] button on the panel.2 Touch to enter Settings Screen.3 Touch or slide the screen.4 Touch .5 Select the language and unit you use.Setting the time1 Press [MENU] button on the panel.2 Touch to enter Settings Screen.3 Touch .4 Set the clock you need.Mode Switch■Switch to navigation modePress [MAP] button on the panel to switch to navigation mode for map display. ■Switch to Bluetooth mobile phone mode Touch switch to Bluetooth mobile phone mode. ■Switch to source modePress [AUDIO] button on the panel or touch to switch to source mode such as Radio mode. Press [AUDIO] button or touch in Source mode to switch to source selection screen.](https://usermanual.wiki/Faurecia-Clarion-Electronics/QY8600/User-Guide-3140089-Page-8.png)
![8EnglishBasic OperationsMain menu operationsOn main menu screen you can enter corresponding work mode by touch the icons on the screen.1 Press [MENU] on the panel or touch to enter main menu screen. zChange page by dragging left or right or touch and .Adjust Volume1 Turn the [VOL] knob on the panel to adjust the volume. zSource mode: Adjust the volume of source. zBluetooth Mobile Phone mode: Adjust the incoming call ringtone volume when receiv-ing a call, adjust the outgoing call ringtone volume when making a call, or adjust the call volume when speaking on the phone. zMap navigation: Adjust Voice Guidance volume when voice guidance interrupt. zParking guidance: Adjust parking guid-ance volume in parking guidance. For example, turn the volume knob in Source USB mode to adjust the volume as shown below. zTurn the knob clockwise: volume up. zTurn the knob counter clock-wise: volume down.Audio On/OffWhen the radio or media player is ON, you can turn off the Audio device. 1 Short press [ ] button to turn off Audio.2 Short press [ ] button again to resume playing. Day/Night Display Mode SwitchThis can switch the screen display mode. 1 Press [ ] button on the panel to to switch between day and night. Basic Settings1 Press [MENU] button on the panel. 2 Touch to enter Settings Screen.](https://usermanual.wiki/Faurecia-Clarion-Electronics/QY8600/User-Guide-3140089-Page-9.png)
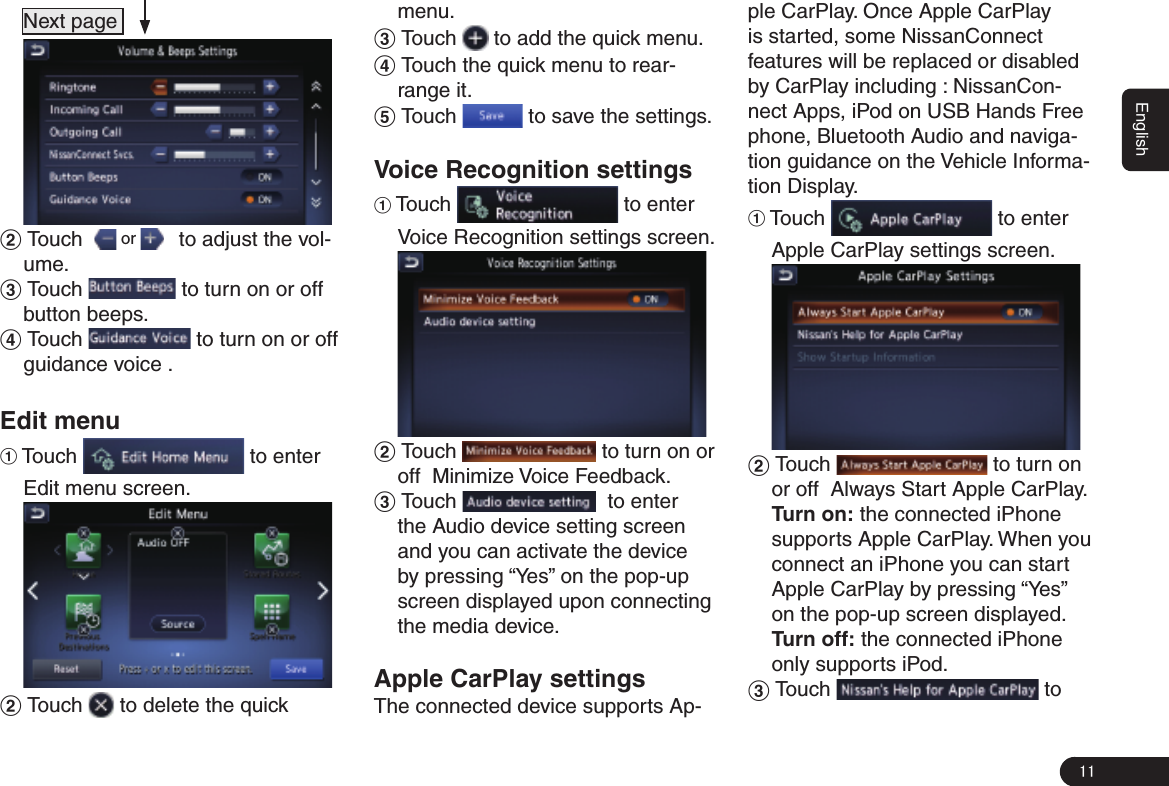
![10English2 Touch , , , , or to adjust the tone quality.Display AdjustmentAdjust the display effect of the screen. 1 Touch to enter Display Adjustment screen. 2 Touch , the screen display can be switched off to enter power save mode. zAfter the screen display is OFF, the buttons on the panel are still operational. Press [] button on the panel will resume the previous source play screen or map navigation screen. Or you can press any button for the corresponding operation.3 Touch to enter brightness adjustment screen. zTouch or to adjust the brightness of display.4 Touch to enter contrast adjustment screen. zTouch or to adjust the contrast of display.5 Touch to enter back-ground colour adjustment screen. zTouch or to change the background colour.Volume and Beeps Adjust the Audio volume/Guidance volume/ Ringtone/ Incoming Call/outgoing Call/NissanConnect Svcs, turn On or Off the button beeps and guidance voice. 1 Touch to enter Volume & Beeps screen.](https://usermanual.wiki/Faurecia-Clarion-Electronics/QY8600/User-Guide-3140089-Page-11.png)
![12Englishdisplays Apple CarPlay Help infor-mation. Source Media Mode1 Press [AUDIO] button on the panel or touch to enter source screen. FM/AM mode1 Touch / to enter FM/AM screen.1231 Back to source screen.2 View station list, RDS Info and turn on or off HD radio mode.3Preset channel list(Station list). Up to 12 channels can be saved. SXM modeBefore to enter this mode you need to check the antenna.1 Touch to enter SiriusXM screen. 12345908761 Channel category.2 Channel name.3 Artist name.4 Song title.5 Save the favorite channel by artist or song alert.6 Preset channel list(Station list).Up to 18 channels can be saved. 7 Switch the play mode between replay and live.8 SiriusXM signal intensity.9 View track list by kinds of categories etc. 0Back to source screen.USB mode1 Touch to enter USB audio screen when you connect a USB.12345671Back to source screen.2Select the folder and track, turn on or off the display of album artwork. 3Turn on or off repeat play.4Short touch: switch to Previous Track; Long touch: Fast Backward.5Touch to Play/Pause6Short touch: switch to next Track;](https://usermanual.wiki/Faurecia-Clarion-Electronics/QY8600/User-Guide-3140089-Page-13.png)
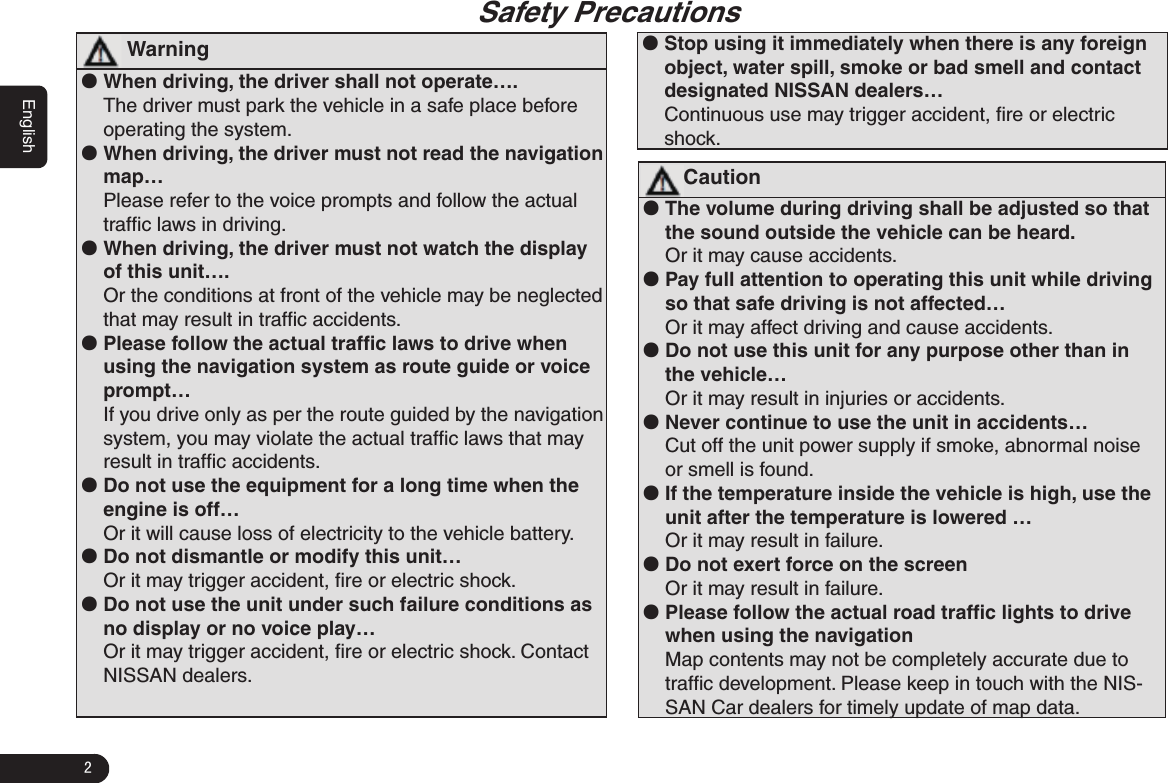
![15EnglishNavigationMenu Types and Operation■Map menu (Menu on current location map)Touch on the map screen to display the Map menu at the left side of the screen. You can store the cur-rent location to the Address Book or change the map appearance.512341 [BACK] key:Return to the map screen.2 [Save Location] key:Save the cur-rent location in the AddressBook.3 [Nearby POIs] key:Displays the Category screen of the POIs nearby the current location.4 [Map View] key: Change the types of the screen and map appear-ance.5 [Map Icons] key: Turn on or off the map icons.■Location menu (Menu on scrolled map)After scrolling the map by touching the Map screen, touch on the screen to display the Location menu at the left side of the screen. You can set the location under the cur-sor at the centre of the screen as the destination or store it to the Address Book.51234 1 [BACK] key: Returns to the scrolled Map screen before touching the key.2 [New Destination] key:Sets the location under the cursor as the destination. When a destination is already set, the old destination is cancelled as soon as the new destination is set.3 [Add to Route] key:When another location is already set as the des-tination, you can set the location under the cursor as a waypoint. Touching this key displays the Edit Route screen. Specify the desired order of passing to set the loca-tion as a waypoint. 4 [Nearby POIs]] key: Displays the Category screen of the POIs nearby the location under the cursor.5 [Save Location] key:Save the location under the cursor in the Address Book.Map Screen Features■Types of the mapThere are two types of map: the 2D map and the 3D map. Such as the method of scrolling the map, some operation are different depending on the map types. ●2D Map](https://usermanual.wiki/Faurecia-Clarion-Electronics/QY8600/User-Guide-3140089-Page-16.png)
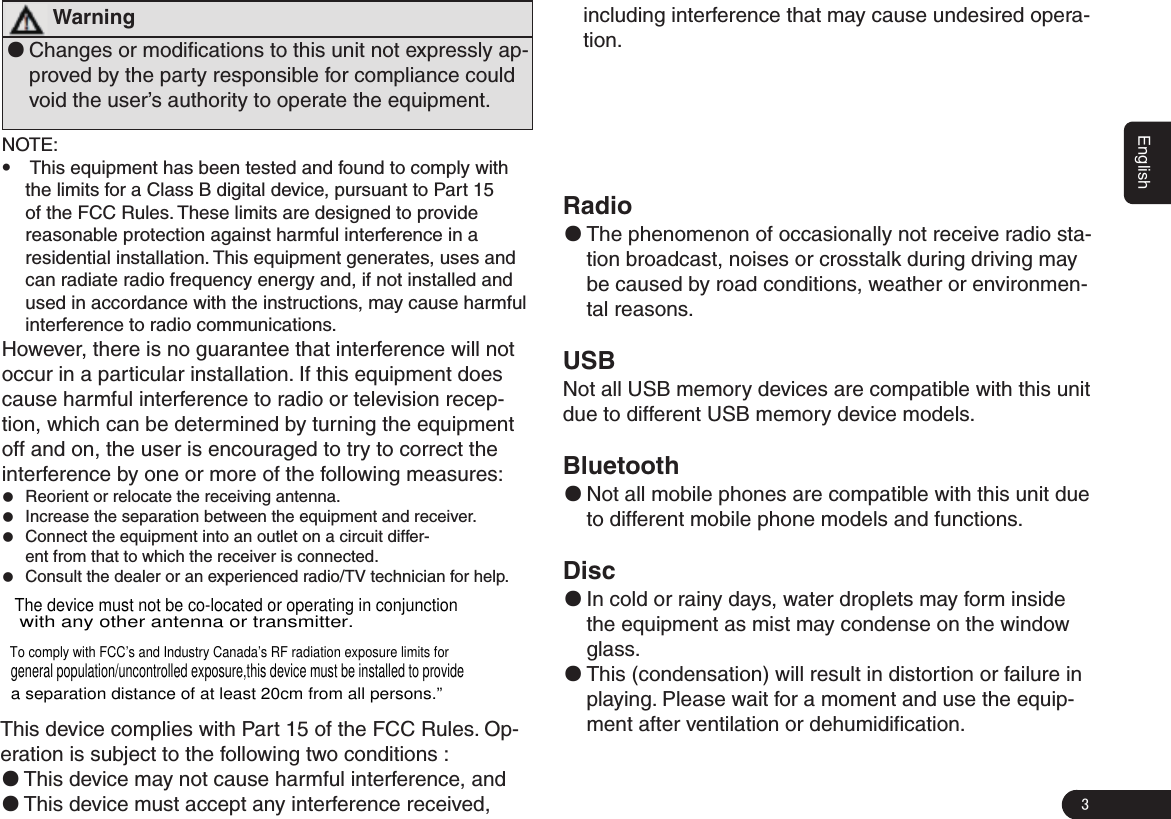
![16EnglishThe 2D map is a map screen repre-sented to the plane just like the map of atlases. It is suitable for searching a destination and confi rming the road or route. ●3D MapThe 3D map is a map screen using a viewing position above the vehicle while looking in the direction of the car heading. It is suitable for under-standing the image of the direction, because the perspective of the trav-elling direction can be adjusted as required.■Indicators on the mapIndicators displayed on the Map screen are different according to the conditions at that time.This section explains the main indicators dis-played on the Map. Indicators on the map of the current location132341 Audio mark: Indicates the current source mode.2 Vehicle mark:Indicates the current location and direction of your vehicle.3 [ ]Map Menu key:Displays the Map menu. 4 [ ]Map scale key: Touch this key to decreases/increases the map scale.5 [ ]Map bearing mark:Indicates the map orientation. You can switch the map orientation between Heading Up, North Up and 3D map by touching this icon.Indicators on the scrolled map Indicators are displayed after scroll-ing the map. During scrolling, only the scroll cursor isdisplayed on the map.1231 [ ] (Slow Scroll)key: Displayed only on the 2D map. Turn on the Slow scroll mode. Scroll cursor: Displayed when scrolling the map.2 Displays the name of the street under the cursor.Indicators displayed during the route guidance modeAfter a destination is set and travel-](https://usermanual.wiki/Faurecia-Clarion-Electronics/QY8600/User-Guide-3140089-Page-17.png)
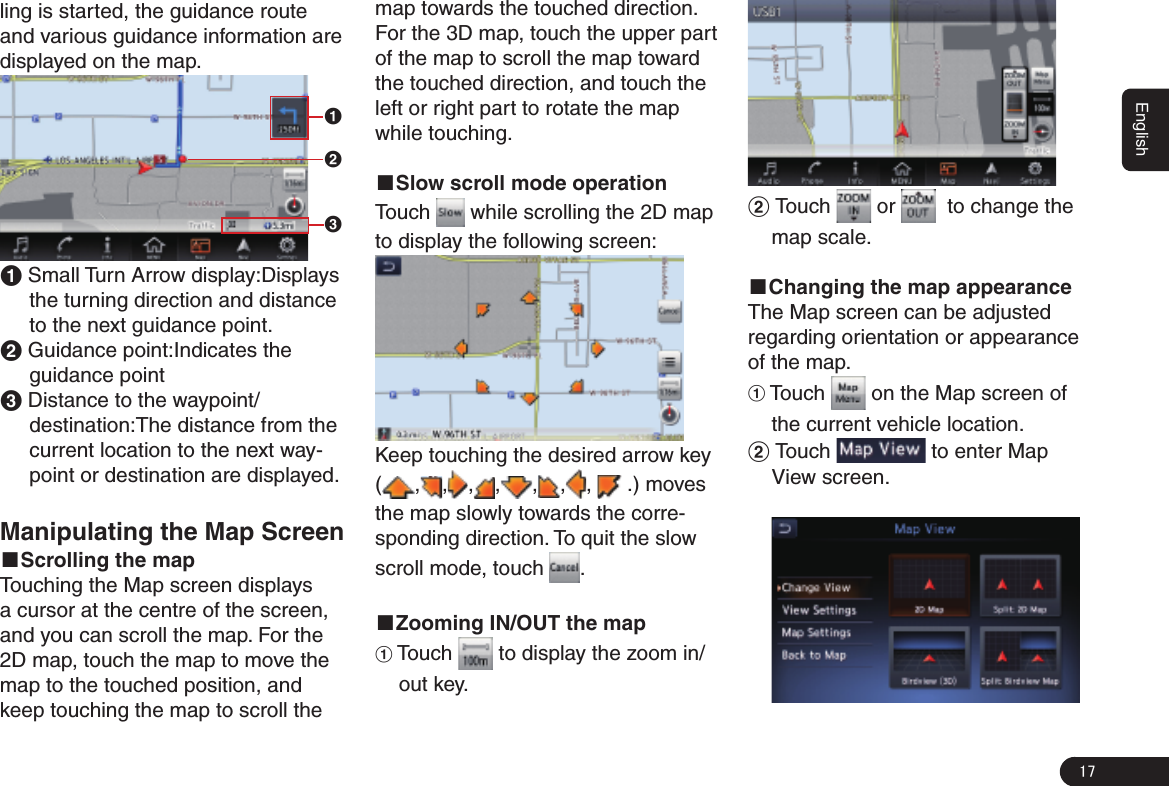
![18English zTouch the corresponding key to change the map view.3 Touch to display the View Settings screen. z [Intersection]:During the route guid-ance mode, displays the Intersection Close-up display which displays the turning direction of the next guidance junction at the left of the screen. z[Turn List]:During the route guidance mode, displays the list of the name, dis-tance, and turning direction of the guid-ance junctions at the left of the screen. z[Drive Report]:During the route guid-ance mode, displays the Drive Report. z[Full Map]:Changes to display one map using full screen.Screen examples• 2D Map• 3D Map2D/2D Map2D/3D Map4 Touch to enter Map Settings screen. ●[Map Orientation] key: Changes the orientation of the map between Heading Up and North Up.](https://usermanual.wiki/Faurecia-Clarion-Electronics/QY8600/User-Guide-3140089-Page-19.png)
![19English zThis control is available when [2D] is selected. ●[Long Range] key: Changes the map view to view a wider area in the direction that the vehicle is travelling. When this feature is ac-tivated, the vehicle mark is located slightly lower than the centre of the screen. zThis control is available when [2D] is selected and the Map Orienta-tion is set to Heading-Up. ●[Map Colour] key:Selects the colours(Map Colour 1/2/3/4) of the map. ●[Map Text Size] key: Change the map text size(Large, Medium,Small). ●[Birdview Angle] key: Changes the angle of the 3D map. Touch to raise the angle, and to lower the angle. zThis control is available when [3D] is selected. ●[North Up when Zoomed Out] key: Turn on or off north up when zoomed. ●[Names Displayed on Map] key: Change the names of place, facil-ity and road displayed on map. ●[Left Split Map Settings] key: Change settings of Map Orienta-tion, Long Range and Map Scale of left split map. ●[Show all Freeway Exits on Route] key: Turn on to show all freeway exits on route. ●[Auto. Show Turn List on Freeway] key: Turn on to show turn list on freeway.Navigation System Settings1 Press [MENU]/[MAP]/[AUDIO] button on the panel to display the function bar.2 Touch , to enter Navigation Settings Screen. Registering/Editing the Address BookFrom the Address Book, you can register the home address, address-es of facilities and places, routes, and Avoid Areas. You can also edit the data registered.The registered places or routes can be set as the destination or as the current route.](https://usermanual.wiki/Faurecia-Clarion-Electronics/QY8600/User-Guide-3140089-Page-20.png)
![20English■Home LocationRegister your home address. You can edit the registered home address.To register the Home LocationThe Home Location can be regis-tered when the key is displayed.1 Touch .2 Search for the location of your home by a similar way as for entering destinations. 3 Touch to register it. To edit the Home Location1 Touch to enter edit Home Location screen .2 Touch the desired Item to edit it.3 Touch to adjust the location by moving the cursor on the Map screen.4 Touch to delete the regis-tered Home location.5 Touch to register it.■Stored LocationsRegisters locations in the Address Book. You can register up to 200 lo-cations, and can also edit the regis-tered locations.To register Location1 Touch .2 Touch .3 Search for the location you wish to register by a similar way as for entering destinations.4 Touch to register it.5 Touch to sort the loca-tions by number,name, icon and group.To edit a Stored Location1 Touch .2 Touch the name of the Stored Location you wish to edit.3 Refer to “To edit the Home Loca-tion” on Page 秋20秋to edit it. ■Stored RoutesRegisters the current route. You can register up to 5 routes, and can also edit the registered routes.To register the current route1 Touch .2 Touch .3 Then touch from the displayed confi rmation screen.To edit the Stored Route1 Touch .2 Touch the name of the Stored Route you wish to edit.3 Touch the desired item, then edit it. ●[Rename] key: Changes the name of the Stored Route. ●[Replace] key: Replaces the Stored Route with the current route. ●[Delete] key: Deletes the Stored Route.4 Touch to register it.■Avoid AreaYou can register areas you do not](https://usermanual.wiki/Faurecia-Clarion-Electronics/QY8600/User-Guide-3140089-Page-21.png)
![21Englishwant to pass or areas that often get congested as an Avoid Area. When you register the Avoid Areas, you can set the system to calculate routes avoiding the registered areas. Up to 10 Avoid Areas can be registered. You can edit the registered Avoid Areas.To register an Avoid Area1 Touch .2 Touch .3 Search the area to avoid by a similar way as for entering a desti-nation.4 Touch to register it.To edit an Avoid Area1 Touch .2 Touch the name of the Avoid Area you wish to edit.3 Touch the desired item to edit, and edit it by similar way as for registering Avoid Areas. ●[Rename] key:You can change the name of the Avoid Area. Enter the name, then touch . ●[Move Location] key:You can ad-just the location of the Avoid Area. ●[Resize Area] key:You can change the size of the Avoid Area([Large], [*], [Medium], [*], or [Small]), then touch . ●[FWY] key:You can set whether to avoid freeway passing the Avoid Area. ●[Delete] key:Deletes the current Avoid Area.4 Touch to register it.■Deleting the Stored Items You can delete various data stored in the navigation system.1 Touch .2 Touch the item key to delete. ●[Delete Home Location] key: De-letes your home location. ●[Delete Address Book] key: z[Delete All]:Deletes all the stored locations. z[Delete 1 Entry]:Deletes only the location that you specify on the Delete One screen. ●[Delete Stored Routes] key: z[Delete All]:Deletes all the stored routes. z[Delete 1 Entry]:Deletes only the route that you specify on the Delete One screen. ●[Delete Avoid Areas] key: z[Delete All]:Deletes all the stored avoid areas. z[Delete 1 Entry]:Deletes only the avoid area that you specify on the Delete One screen. ●[Delete Previous Destination] key: z[Delete All Previous Destinations]:Deletes all the registered previous destinations. z[Delete Previous Destination]:Deletes only the previous destination that you specify on the Delete Previous Destination screen. z[Delete Previous Starting Point]: Deletes the starting point.3 From the displayed confi rmation screen, touch .■Transfer Address BookYou can Transfer Address Book from SD card.1 Touch . ●[Export Data] key:Export data to SD card. ●[Import Data] key:Import data from SD card.Navigation Settings■Map ViewPlease refer to “Changing the map](https://usermanual.wiki/Faurecia-Clarion-Electronics/QY8600/User-Guide-3140089-Page-22.png)
![22Englishappearance” on Page 秋17秋 . ■Map IconsSwitches ON or OFF Landmark icon display for each type.1 Touch .2 Touch the desired item key you wish to change the setting.3 The types of icons that can be set are the following 6 types. ● [Restaurant] key ● [ Station] key ● [Hotel] key ● [ATM] key ● [Rest Area] key■Guidance SettingsYou can change settings concerning the guidance.1 Touch to enter Guidance Settings screen.2 Touch the desired menu item to set. ●[Guidance Volume] key:Adjusts the volume of the voice guidance. ●[Guidance Voice] key: Sets wheth-er to activate the voice guidance. ●[Traffic Announcement] key: Sets whether to read out the traffic information. ●[Intersection Guidance Settings] key: The Intersection Guidance Settings screen is displayed. You can set the intersection guidance for Level1, Level2,Level3 and Level4. ●[Estimated Time] key:Changes the setting of arrival time indication displayed on the Map screen. z[Destination]:Sets to display the ar-rival time to the destination. z[Waypoint]:Sets to display the arrival time to the next waypoint or destination.■Route SettingsYou can change settings concerning the route guidance.1 Touch to enter route Settings screen.2 Touch the desired item key. ●[Basic Route Type] key:You can change the conditions of route calculation. z[Fastest Route]:Calculates the route of which the required time is shortest. z[Minimise Motorways]:Calculates the route of which motorways are not used as much as possible. z[Shortest Route]:Calculates the route of which the distance is shortest. ●[other Routing Choices] key:You can specify other route calculation methods. z[Minimise Toll Roads]: Mini-mises the use of toll roads. z[Use Time Restricted Roads]:Uses roads with restricted usage time. z[Use Real Time Traffic Information] :Con-siders the traffic information for routing. z[Use Avoid Area Settings]:Takes a de-tour to avoid the registered Avoid Area. z[Use Ferries]:Uses car ferries for routing. z[Use Learned Routes]:Considers the Learned Routes for routing. z[Use HOV Lanes]:Uses HOV lanes for routing. z[Auto Reroute]:When leaving the suggested route during the route guidance mode, a new route is automatically recalculated.■Traffic Information SettingsYou can set the various functions concerning the traffic information.1 Touch to enter the Traffic Information Settings screen.2 Touch the desired key on the screen to set it. ●[Use Traffic Information] key: Con-siders the information. ●[Show Incidents on Map] key:](https://usermanual.wiki/Faurecia-Clarion-Electronics/QY8600/User-Guide-3140089-Page-23.png)
![23EnglishSwitches on or off the traffic infor-mation display on the map. ●[Show Traffic Flow on Map] key: Switches on or off the traffic flow display on the map. ●[Traffic Announcement] key: Switches on or off the traffic an-nouncement standby mode.■Others1 Touch to enter the Others settings screen. ●[Map Scrolling Information] key: When you scroll the Map screen and move the cursor on an icon, the information on the location can be displayed. You can set this func-tion whether to activate or not. z[Address Book Icons] key z[TMC Traffic Icons] key z[Destination/Waypoint Icons] key z[Latitude/Longitude Info.] key ●[Customize nearby POIs] key:You can customise the five categories of the Customize nearby POI fea-ture. ●[Keyboard Type] key: To change the keyboard type(QWERTY type and ABC type). ●[Tracking Dots Displayed on Map] key: To change the setting of the tracking dots displayed on map. ●[Adjust Current Location] key:You can correct the vehicle position on the Map screen by Scroll the map.■Resetting All Navigation Settings to DefaultsYou can reset all the Navigation set-tings to return to the factory settings.Note: GThough all the settings are reset, the stored data such as the Address Book, Stored Routes, and Avoid Area are not erased.1 Touch .2 Then touch from the displayed confirmation screen.Outline of DestinationEntering ProceduresTo start route guidance, operate the navigation system with the following procedure: ●Select the method of searching destination from the Destination menu screen, then search for the desired destination.Select a suitable searching method according to the place to search. ●Confirm the position of the place found with the Set Loca-tion menu screen, then start the route guidance.You can store the place found to the Address Book, or can confirm the information according to the place, as well as set it as destina-tion. You can also display other suggested routes, or confirm infor-mation of the route.Setting destination by entering the addressThis section explains the basic oper-ation procedure to set the destination in detail, using the example to specify the destination by entering the ad-dress from the Destination menu. Read this explanation thoroughly because this procedure is similar to other destination entering methods.](https://usermanual.wiki/Faurecia-Clarion-Electronics/QY8600/User-Guide-3140089-Page-24.png)
![24EnglishFor other destination entering meth-ods, please refer to “Entering the Destination” on page 秋25秋.1 Press [MENU]/[MAP]/[AUDIO] button on the panel to display the function bar.2 Touch to enter Destination screen when no route exist. zYou need to touch to enter Destination screen when a route had exist.3 Touch to enter Street Address screen.Note: G You can omit the state/province name entry and directly enter a road name. Proceed to step 9.4 Touch to enter the state/province name you wish to go to by touching the characters on the screen.Note: GDuring the character entry, the system shows the city name list automatically when all the matching cities can be displayed on one page.5 Touch to enter the city name you wish to go to by touching characters on the screen. Then, the system returns to the Street Address screen. Enter the street name by the same way.6 Touch to enter the street name you wish to go.7 Touch to enter the house number input screen. Then enter the house number by touching numbers on the screen, touch .Note: GYou can omit the house number entry. Proceed to step 9.8 Confirm the entries, then touch . ●[Start] key:Sets the location shown by the “ ”on the map as the destination, and starts the route](https://usermanual.wiki/Faurecia-Clarion-Electronics/QY8600/User-Guide-3140089-Page-25.png)
![25Englishguidance. ●[Route Details] key: The Calculate Route menu is displayed. You can change the route search conditions or check the route information. ●[Move Location] key:The Map screen is displayed. You can adjust the location of the destination. ●[Add to Route] key:When the desti-nation is already set, the specified location is set as the waypoint. ●[Save Location] key:Save the specified location into the Address Book. ●[Details] key:Displays information about the specified place if it is included in the map data.9 Touch , the route guidance will be started. The place found is shown with “ ” on the map. Entering the DestinationSearching Your Destination from the Destination MenuYou can search for a destination from the Destination menu by using vari-ous methods. Use a suitable search-ing method according to the place you wish to go to.Destination menu screenFor the operation procedure hereaf-ter, see the explanation of each sec-tion.■By Street AddressFor the operation procedure, refer to “Setting destination by entering the address” on page 秋21秋.■By Nearby Points of Interest 1 Touch .2 Touch your desired category.An example of specifying RESTAU-RANT is explained below.3 Touch the place you wish to go from the displayed place list.4 Confirm the location of the desti-nation, then touch .■Going HomeWhen your home address is regis-tered, you can start route guidance to your home by a simple operation.Note: GWhen your home address is not registered, a message is displayed when touching the [Home] key. Register it by touching the [Yes] key. When the list of searching methods appears, register your home address by the desired method.](https://usermanual.wiki/Faurecia-Clarion-Electronics/QY8600/User-Guide-3140089-Page-26.png)
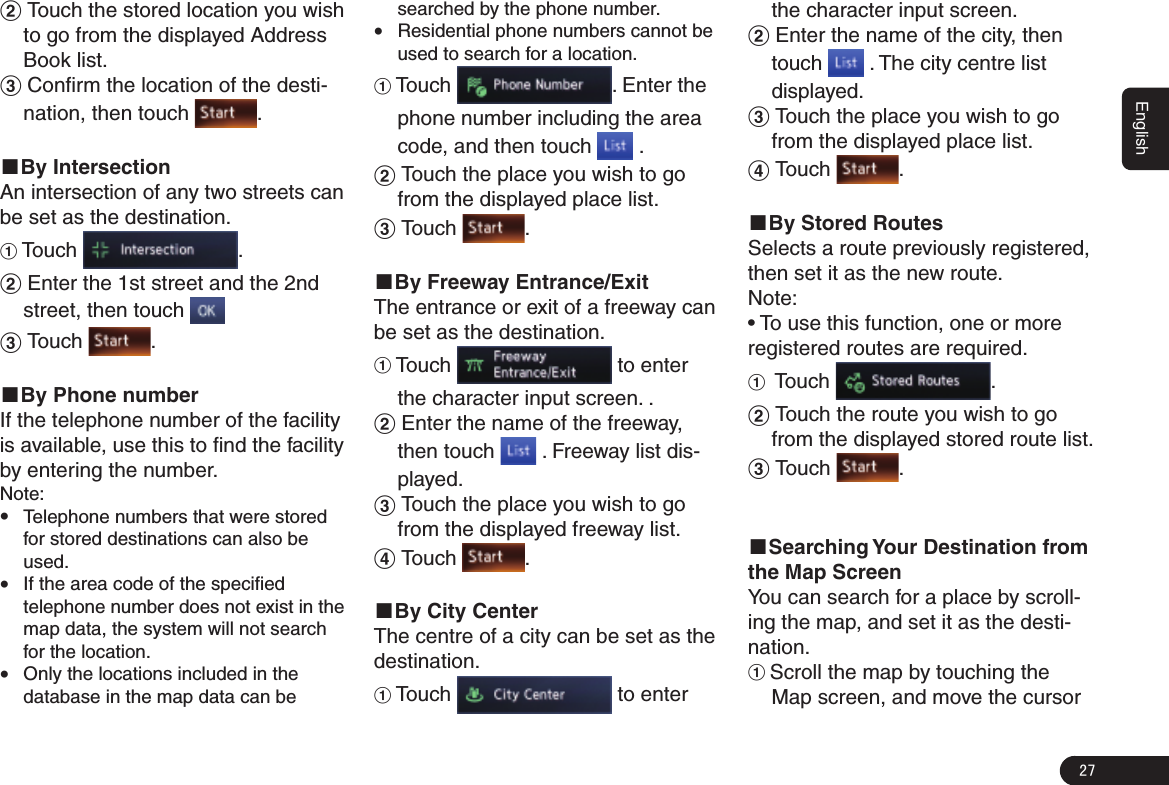
![26English1 Touch .2 Touch .The route to your home is automati-cally calculated and the route guid-ance is started.■By Previous DestinationThe destinations previously used are registered in the previous destination list (up to 100 locations). You can en-ter a destination by selecting it from this list. When the previous destina-tion list exceeds 100 items, the oldest entries are automatically deleted.1 Touch .2 Touch the place you wish to go from the displayed history list.3 Touch .■By Points of Interest (POI)Select the category of the place, nar-row down the data by specifying the area or entering the name, and then select the place you wish to go to.By touching , you can also search a place by simply entering the name.1 Touch .2 Touch your desired category. For example . When a additional category list is displayed, touch a category again to select one.3 Set the narrow down conditions for the places. ●[By Name] key: Input the facility name to narrow down the target place. ●[Select a City] key: Input the city name to narrow down the target place. ●[Near Current Location] key: Shows a list of facilities around the current location. ●[Near Destination] key: When the destination is set, shows the list of facilities around the destination.An example of specifying By Name is explained below.4 Touch . Enter the facility name, and then touch . ●[By Distance] key:Sorts the list by nearby order. ●[New Category] key:Displays the Category screen so you select a new category.5 Touch the place you wish to go from the displayed place list.6 Confirm the location of the desti-nation, then touch .■By Address BookSpecifies a place registered in the navigation system as the destination.Note:• To use this function, register places beforehand.1 Touch .](https://usermanual.wiki/Faurecia-Clarion-Electronics/QY8600/User-Guide-3140089-Page-27.png)
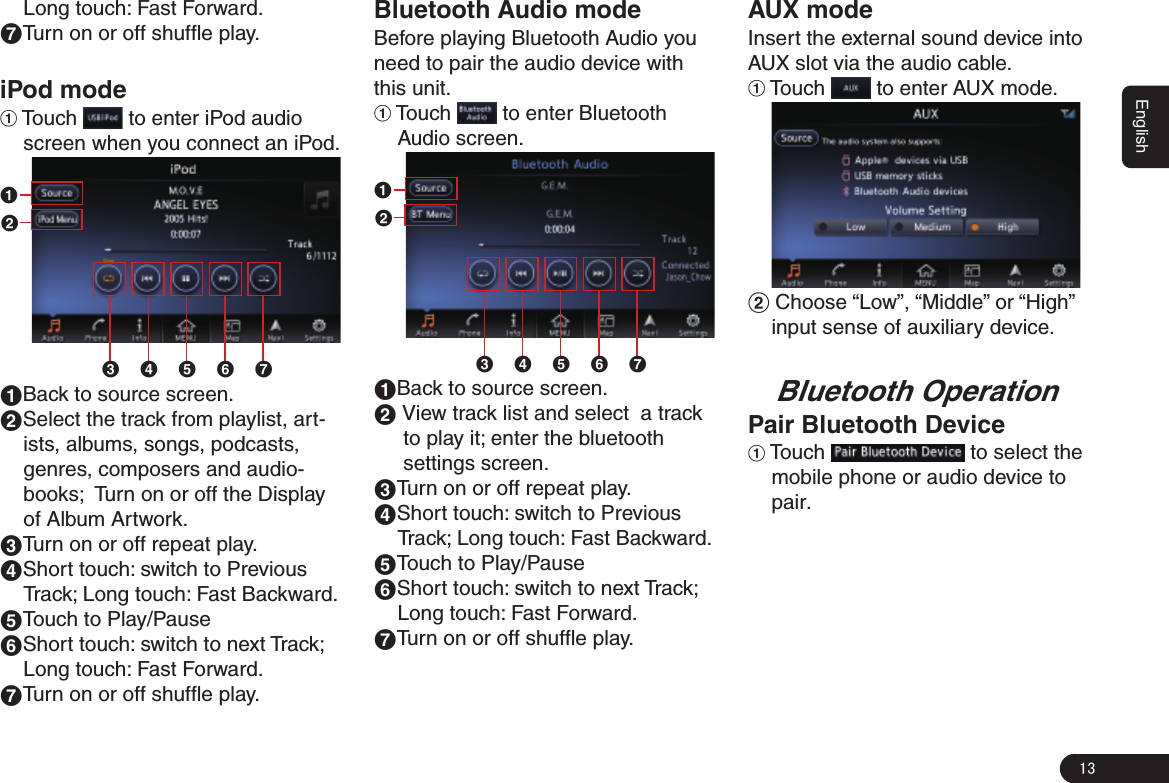
![28Englishto the place you wish to go to. Touch .2 Confirm the location of the desti-nation, then touch . ●[More Routes] key: You can change to other suggested routes with a different priority condition. ●[Route Info] key: Shows the information of the suggested route selected on the screen. ●[Add Waypoint] key: Adds waypoints to the suggested route displayed on the map. Up to five waypoints can be specified.3 Touch .Note: GWhen you search a place far from the current location, change the map scale to search more quickly.Route GuidanceAfter you have entered the destina-tion and started the route guidance, you will be guided along the route by screen display and by voice.Route Guidance ScreenFeaturesAs well as the Map screen, various guidance screens are displayed dur-ing the route guidance mode accord-ing to the situation.Pressing the [MAP] button to switch the screen between the following guidance screens and the full map screen.■Junction MapWhen you get near to approx. 300 m or 300 yd (1 km or 1 mile for a mo-torway) from the next guidance point, the screen will be divided into two displays and the Junction Map will be displayed on the left display.You can set to display the Junction Map screen always in the route guid-ance mode. The default setting is OFF. Note: GBefore the Junction Map is displayed, a voice guidance will be heard at approx. 600 m or 0.4 miles (2 km or 1.3 miles for a motorway) from the next guidance point. You can change this setting by setting the Junction Guidance Settings.1 231 Remaining distance indication: Indicates the remaining distance to the next guidance point with the bar gauge.2 Guidance route: Indicates the direction to travel.3 Guidance point:Indicates the next guidance point.■Turn list on RouteThe screen is always divided into two displays and the Turn List on Route is displayed on the left display](https://usermanual.wiki/Faurecia-Clarion-Electronics/QY8600/User-Guide-3140089-Page-29.png)
![29Englishif Turn List is activated. The Turn List contains the guidance points next to the vehicle position, and will change while travelling.When you get near to the next guid-ance point, the left display is auto-matically changed to the Junction Map.You can set to display the Turn List screen always in the route guidance mode.121 Turn List:The list of the guidance points and turning directions are displayed from the items near to the vehicle position, and it will change while travelling.2 Scrolling key:Scrolls the Turn List on Route screen. About the Voice Guidance After starting the route guidance, not only guidance by screen but also guidance by voice, such as the turn-ing direction or the distance to the guidance point, will be given when you get near to the guidance point.You can set whether to use the voice guidance or not, and set the volume to be changed according to the vehi-cle speed. Changing/Editing the RouteSettingsFrom the Route menu, editing the current route, confirming the route information, setting the conditions of the route calculation, etc. can be performed.1 Press [MENU] button on the panel.2 Touch to enter Route menu screen when a route had exist.■Delete the route guidanceDelete the route guidance/Terminates the route guidance during the route guidance mode.1 Touch . A confir-mation message is displayed.2 Touch , the route guid-ance will be terminated, and the destination and route will be de-leted.■Confirming the route informationConfirm various information of the current route.1 Touch to enter Route Info. screen.](https://usermanual.wiki/Faurecia-Clarion-Electronics/QY8600/User-Guide-3140089-Page-30.png)
![30English ●[Turn List] key: Display the list of route information. The guidance points from the current location to the destination are displayed with the list format. ●[Simulation] key: Simulate the route guidance with moving the vehicle mark automatically on the Map screen. ●[Store Route] key: Store the speci-fied route. A maximum of 5 routes can be stored, and they can be easily retrieved. ●[Map Scroll] key: Displays the Map screen where the specified route can be confirmed.2 Touch the desired item to view the information.■ Editing the routeYou can edit the current route.1 Touch to enter the Edit Route screen.2 [Add Destination] key: Touch this key when you want to set a new destination. The original destina-tion will be set as a waypoint in the route. ●[Add Waypoint] key: Up to 5 way-points can be set. The specified waypoints are displayed by marks with the ordinal number for visiting. ●[(Current destination/waypoint name)] key: You can touch the name of the current destination or waypoints you wish to edit. ●[(Route calculation criteria)] key: You can change the conditions of route calculation. z[ECO Route] z[Fastest Route] z[Minimize Freeway] z[Shortest Route]3 Change settings by touching the desired setting item.4 Touch , The route is recal-culated with specified conditions.■Route settingsYou can change settings concerning the route guidance. About the details, please refer to “Guidance Settings” on page 秋21秋and “Route Calculation Criteria” on page 秋22秋.■ Recalculating the route After changing the conditions of the route calculation or when the status of the route is changed, you can recalculate the route if youwant.1 Touch , the route is automatically recalculated, and the Calculate Route screen is displayed.2 Touch , the route guidance will be restarted.](https://usermanual.wiki/Faurecia-Clarion-Electronics/QY8600/User-Guide-3140089-Page-31.png)
![31English■Setting a diverted route using traffic informationThe route with traffic information considered is automatically calcu-lated, and the route guidance will be restarted.1 Touch . The diverted route is displayed with TMC traffic information taken into account. When no diverted route is found, a message is displayed.2 Confirm the diverted route, then touch .■ Setting the diverting distance Search for a diverted route where the section from the current location up to the specified distance is avoided.1 Touch to enter the Detour screen.2 Touch the distance you want to avoid.The route where the section of se-lected distance is avoided is auto-matically calculated, and the route guidance will be restarted. About InformationThis screen sets or displays various information that is helpful for using the vehicle safely and comfortably.1 Press [MENU] button on the panel.2 Touch to enter Info screen.3 Touch the desired item to view the information, and about some items you can operate as per the infor-mation prompted.](https://usermanual.wiki/Faurecia-Clarion-Electronics/QY8600/User-Guide-3140089-Page-32.png)