Faurecia Clarion Electronics QY8700 Car Navigation User Manual
Clarion Co., Ltd. Car Navigation
UserManual.wiki
>
Faurecia Clarion Electronics
>
QY8700 User Manual
User manual
Navigation menu
Upload a User Manual
Namespaces
Wiki Guide
HTML
PDF
Info
Views
User Manual
Discussion / Help
Navigation
![3EnglishNames of Various PartsPanel Buttons24135678!9@#$01 [Q]Eject button: Short press it to eject the disc inside the unit.2 Disc slot: CD disc can be inserted for playing. 3 LCD(touch screen): To display the working statuses of various modes.4 SD card slot: Map SD card.5 [CAMERA] button: To enter camera mode.6 [x]Next Track button: In CD/USB/iPod/Bluetooth Au-dio Device mode, short press it to select the next track to play, and long press it to Fast Forward; in AM/FM mode, short press to search radio station frequency up automatically. 7 [v]Previous Track button: In CD/USB/iPod/ Bluetooth Audio Device mode, short press it to select the previous track to play, and long press it to Fast Reverse; in AM/FM mode, short press to search radio station frequency down automatically. 8 [BACK] button: Back to the previous mode. 9 [TUNE-SCROLL] knob/[PUSH/SOUND] button: In AM/FM mode, rotate to search radio station frequency manualy; press to store radio stations in memory. Press and turn the knob to jump to previous or next touch key and select it in source and menu mode. In other mode, press and turn the knob to adjust the volume balance.0button/Volume Knob: Switch to adjust volume; short press to turn off/on audio device. ![AUDIO] Audio button: To enter audio selection screen or Audio Mode.@[ ]Day/night button: Press to switch between day or night mode.#[MAP] Map button: Press to enter the map screen.$[MENU] Menu button:Press to enter Menu Screen to select audio function or navigation function.Caution ●It is prohibited to pull out the map SD card or the system will not work.](https://usermanual.wiki/Faurecia-Clarion-Electronics/QY8700/User-Guide-3219321-Page-4.png)
![4EnglishBasic OperationsMode Switch■Switch to navigation modePress [MAP] button on the panel to switch to navigation mode for map display. ■Switch to Bluetooth mobile phone mode Touch switch to Bluetooth mobile phone mode. ■Switch to source modePress [AUDIO] button on the panel or touch to switch to source mode such as Radio mode. Press [AUDIO] button or touch in Source mode to switch to source selection screen. Main menu operationsOn main menu screen you can enter corresponding work mode by touch the icons on the screen.1 Press [MENU] on the panel or touch to enter main menu screen. zChange page by dragging left or right or touch and .Basic Settings1 Press [MENU] button on the panel. 2 Touch to enter Settings Screen.](https://usermanual.wiki/Faurecia-Clarion-Electronics/QY8700/User-Guide-3219321-Page-5.png)
![5English3 Touch the icon to enter the appro-priate setting.Source Media Mode1 Press [AUDIO] button on the panel or touch to enter source screen. 2 Touch the icon to enter the appro-priate source media.Bluetooth OperationPair Bluetooth Device1 Touch to enter Settings Screen.Then touch to enter Bluetooth setting screen. 2 Touch to select the mo-bile phone or audio device to pair. 3 If you want to select the mobile phone 秋to pair, touch . 4 If you want to select the audio device秋to pair, touch , and you have to edit the PIN (minimum 4 digits and maximum 16 digits) to pair the audio device. 5 After entering the PIN, touch and operate as per the information prompted.](https://usermanual.wiki/Faurecia-Clarion-Electronics/QY8700/User-Guide-3219321-Page-6.png)
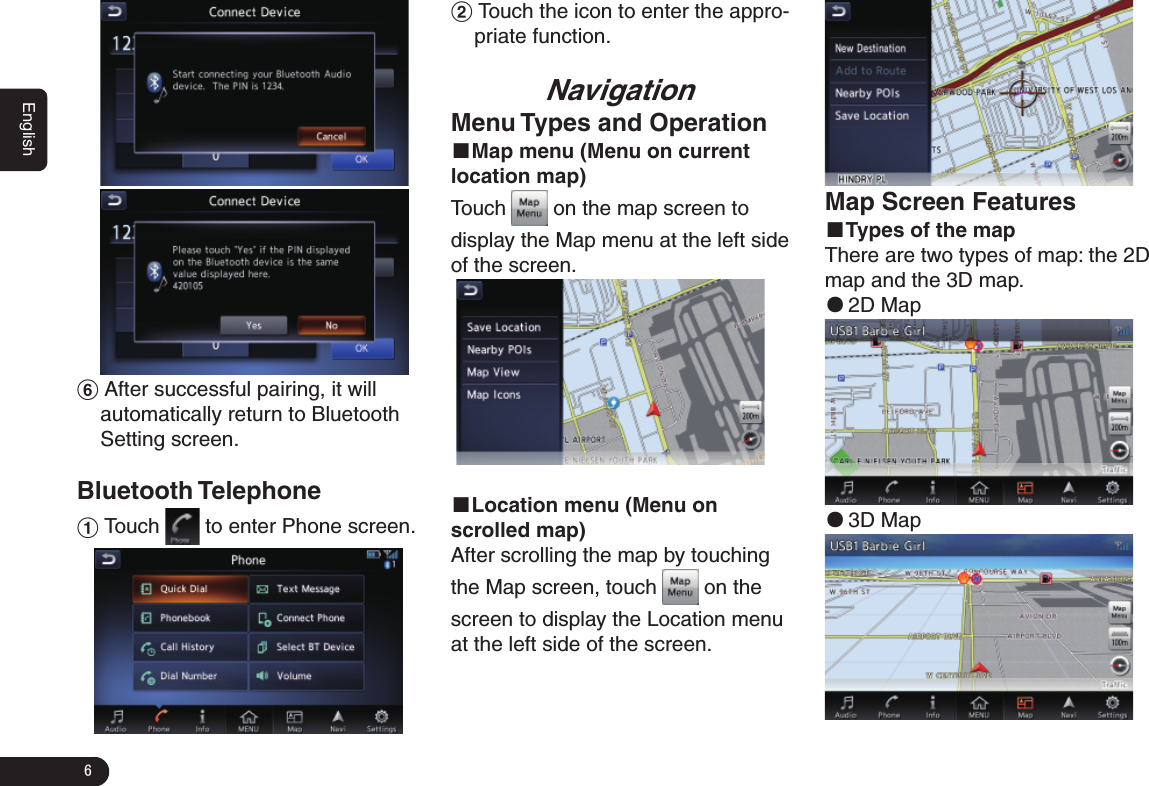
![7English■Indicators on the mapIndicators displayed on the Map screen are different according to the conditions at that time. Indicators on the map of the current location132341 Audio mark2 Vehicle mark3 [ ]Map Menu key 4 [ ]Map scale key5 [ ]Map bearing markIndicators on the scrolled map Indicators are displayed after scroll-ing the map. 1231 [ ] (Slow Scroll)key2 Displays the name of the street under the cursor.Indicators displayed during the route guidance modeAfter a destination is set and travelling is started, the guidance route and various guidance information are displayed on the map.1321 Small Turn Arrow display2 Guidance point3 Distance to the waypoint/destinationManipulating the Map Screen■Scrolling the mapTouching the Map screen displays a cursor at the centre of the screen, you can scroll the map. ■Slow scroll mode operationTouch while scrolling the 2D map to display the following screen:Keep touching the desired arrow key (, , , , , , , .) moves the map slowly towards the corre-sponding direction. To quit the slow scroll mode, touch .■Zooming IN/OUT the map1 Touch to display the zoom in/out key.](https://usermanual.wiki/Faurecia-Clarion-Electronics/QY8700/User-Guide-3219321-Page-8.png)
![8English2 Touch or to change the map scale.■Changing the map appearance The Map screen can be adjusted regarding orientation or appearance of the map.1 Touch on the Map screen of the current vehicle location. 2 Touch to enter Map View screen.3 Touch the corresponding key to change the map view.Navigation System Settings1 Press [MENU]/[MAP]/[AUDIO] button on the panel to display the function bar.2 Touch , to enter Navigation Settings Screen. 3 Touch the item to enter the appro-priate setting. Entering the DestinationSearching Your Destination from the Destination MenuYou can search for a destination from the Destination menu by using vari-ous methods. Use a suitable search-ing method according to the place you wish to go to, then operate as per the information prompted.Destination menu screen](https://usermanual.wiki/Faurecia-Clarion-Electronics/QY8700/User-Guide-3219321-Page-9.png)
![9EnglishRoute GuidanceAfter you have entered the destina-tion and started the route guidance, you will be guided along the route by screen display and by voice.Junction Map1 231 Remaining distance indication2 Guidance route3 Guidance pointTurn list on RouteThe screen is always divided into two displays and the Turn List on Route is displayed on the left display if Turn List is activated. 121 Turn List2 Scrolling key Changing/Editing the RouteSettingsFrom the Route menu, editing the current route, confirming the route information, setting the conditions of the route calculation, etc. can be performed.1 Press [MENU] button on the panel.2 Touch to enter Route menu screen when a route had exist.3 Touch the desired item to change or edit the route settings.](https://usermanual.wiki/Faurecia-Clarion-Electronics/QY8700/User-Guide-3219321-Page-10.png)
![10EnglishAbout InformationThis screen sets or displays various information that is helpful for using the vehicle safely and comfortably.1 Press [MENU] button on the panel.2 Touch to enter Info screen.3 Touch the desired item to view the information, and about some items you can operate as per the infor-mation prompted.](https://usermanual.wiki/Faurecia-Clarion-Electronics/QY8700/User-Guide-3219321-Page-11.png)