Fender Prosonic_manual Prosonic Manual
User Manual: Fender Prosonic_manual Fender® Guitar Amplifier Owner's Manuals (Archived) – Fender
Open the PDF directly: View PDF ![]() .
.
Page Count: 16


ENGLISH - PAGES 4-7
READ ALL INSTRUCTIONS
BEFORE OPERATING UNIT!
ESPAÑOL - PÁGINAS 8-11
¡LÉANSE ANTES DE UTILIZAR EL APARATO Y
GUARDENSE PARA SU USO POSTERIOR!
FRANçAIS - PAGES 12-15
PRIERE DE LIRE AVANT L’EMPLOI ET A
CONSERVER POUR UTILISATION ULTERIEURE!
ITALIANO - PAGINE 16-19
LEGGERE ATTENTAMENTE PRIMA DELL’USO E
CONSERVARE PER UN UTILIZZO SUCCESSIV0!
DEUTSCH - SEITEN 20-23
BITTE VOR GEBRAUCH LESEN UND FÜR
SPÄTEREN GEBRAUCH AUFBEWAHREN!
- 24-27
®

• TO PREVENT DAMAGE, FIRE OR SHOCK HAZARD, DO
NOT EXPOSE THIS UNIT TO RAIN OR MOISTURE.
• NO USER SERVICEABLE PA RTS INSIDE, REFER SER-
VICING TO QUALIFIED PERSONNEL ONLY.
• DO NOT ALTER THE AC PLUG.
• THIS UNIT MUST BE EARTH GROUNDED.
• UNPLUG THE AC POWER LINE CORD BEFORE CLEAN-
ING THE UNIT’S COVERING WITH ONLY A DAMP
CLOTH; WAIT UNTIL THE UNIT IS COMPLETELY DRY
BEFORE RECONNECTING IT TO POWER.
• PARA EVITAR DAÑOS, INCENDIOS Y DESCARGAS
ELÉCTRICAS, NO EXPONGA ESTA UNIDAD A LA LLUVIA
NI A LA HUMEDAD.
• CONTIENE PIEZAS CUYO MANTENIMIENTO NO LO
PUEDE REALIZAR EL USUARIO, SINO SÓLO
PERSONAL CUALIFICADO.
• NO MODIFIQUE EL ENCHUFE DE CA.
•E S TA UNIDAD DEBE CONECTARSE CON TOMA DE TIERRA.
• DESCONECTE EL CABLE DE ALIMENTACIÓN DE CA
ANTES DE LIMPIAR LA CUBIERTA DE LA UNIDAD; ESPERE
A QUE LA UNIDAD ESTÉ COMPLETAMENTE SECA ANTES
DE VOLVER A CONECTARLA A LA CORRIENTE.
• POUR EVITER L'ENDOMMAGEMENT DE L'APPA R E I L ,
UN DEPA R T D'INCENDIE, OU UN CHOC ELECTRIQUE,
NE L'EXPOSEZ JAMAIS A L'HUMIDITE OU A LA PLUIE.
• AUCUNE MAINTENANCE NE DOIT ETRE EFFECTUEE
POUR LES PIECES SITUEES DANS L'APPAREIL. LES
R E PA R ATIONS ET LA MAINTENANCE DOIVENT ETRE
EXECUTEES UNIQUEMENT PAR UN PERSONNEL
Q U A L I F I E .
• NE MODIFIEZ PAS LA PRISE DE CA.
• CET APPAREIL DOIT ETRE MIS A LA TERRE.
• DEBRANCHEZ LE CABLE D'ALIMENTATION AVANT DE
NETTOYER LE BOITIER DE L'APPAREIL ET AT T E N D E Z
QUE L'APPAREIL SOIT COMPLETEMENT SEC AVA N T
DE LE REBRANCHER SUR LE SECTEUR.
• PER EVITARE DANNI, RISCHI DI INCENDI O SCOSSE
ELETTRICHE, NON ESPORRE QUESTA UNITÀ ALLA
PIOGGIA O ALL'UMIDITÀ.
• NON CONTIENE PA R TI RIPARABILI DALL'UTENTE:
FARE ESEGUIRE LA MANUTENZIONE SOLTANTO DA
PERSONALE QUALIFICAT O .
• NON ALTERARE LA PRESA C.A.
•Q U E S TA UNITÀ DEVE ESSERE COLLEGATA A TERRA.
• DISCONNETTERE IL CAVO DI ALIMENTAZIONE C.A.
PRIMA DI PULIRE LA COPERTURA DELL'UNITÀ; AT T E N -
DERE CHE L'UNITÀ SIA COMPLETAMENTE ASCIUTTA
PRIMA DI RICOLLEGARLA ALL'ALIMENTA Z I O N E .
• SETZEN SIE DIESES GERÄT NIEMALS REGEN ODER
FEUCHTIGKEIT AUS, UM BESCHÄDIGUNG, BRANDENTWICK-
LUNG UND ELEKTRISCHE SCHLÄGEN ZU VERMEIDEN.
• IM GERÄT SIND KEINE ZU WA RTENDEN TEILE. WA RT U N G
UND REPERATUREN DÜRFEN NUR VON QUALIFIZIERT E N
TECHNIKERN DURCHGEFÜHRT WERDEN.
• MANIPULIEREN SIE AUF KEINEN FALL DIE NETZAN-
S C H L U S S B U C H S E .
• DAS GERÄT MUSS GEERDET SEIN.
• STECKEN SIE DAS NETZKABEL AUS, BEVOR SIE DAS
GEHÄUSE DES GERÄTS REINIGEN. SCHLIESSEN SIE
DAS GERÄT ERST WIEDER ANS STROMNETZ AN,
WENN ES VOLLSTÄNDIG GETROCKNET IST.
F
Fe
en
nd
de
er
rP
Pr
ro
os
so
on
ni
ic
c
F
Fr
ro
on
nt
t
P
Pa
an
ne
el
l
F
Fu
un
nc
ct
ti
io
on
ns
s
Your Fender’s Prosonic™ professional tube
amplifiers feature welded, all-steel chassis
capable of handling the most extre m e
conditions. Covered in genuine Tolex for long
life and lasting good looks, our cabinets are
c o n s t r ucted from premium, hand-selected
birch/maple plywood. Only the most road-
worthy components are used in the all-tube
circuitry. Fender's all-tube reverb adds depth
and tone that has kept guitarists smiling for
generations.
The All-Tube Prosonic is available in 2 models,
the two 10-inch speaker combo with Reverb and
the Prosonic Head amplifier. Both versions
f e a t u re a 3-way bias/rectifier switch allowing the
player a choice between class A cathode bias,
class AB grid bias, as well as the sounds of both
tube and solid state rectifiers. The Prosonic is
rated at 60 Watts R.M.S. and includes among its
many features two gain controls. Gain 1
functions as a standard gain stage whereas Gain
2 functions similar to a compre s s o r, adding
sustain while reducing “harshness” when the
volume is incre a s e d .
Equipped with 2 channels, the Prosonic c o m b o
o ffers the flexibility of accessing each channel
and the reverb effect from the front panel or the
included two-button footswitch. The Pro s o n i c
head also offers the flexibility of accessing each
channel from the front panel or the included one-
button footswitch.
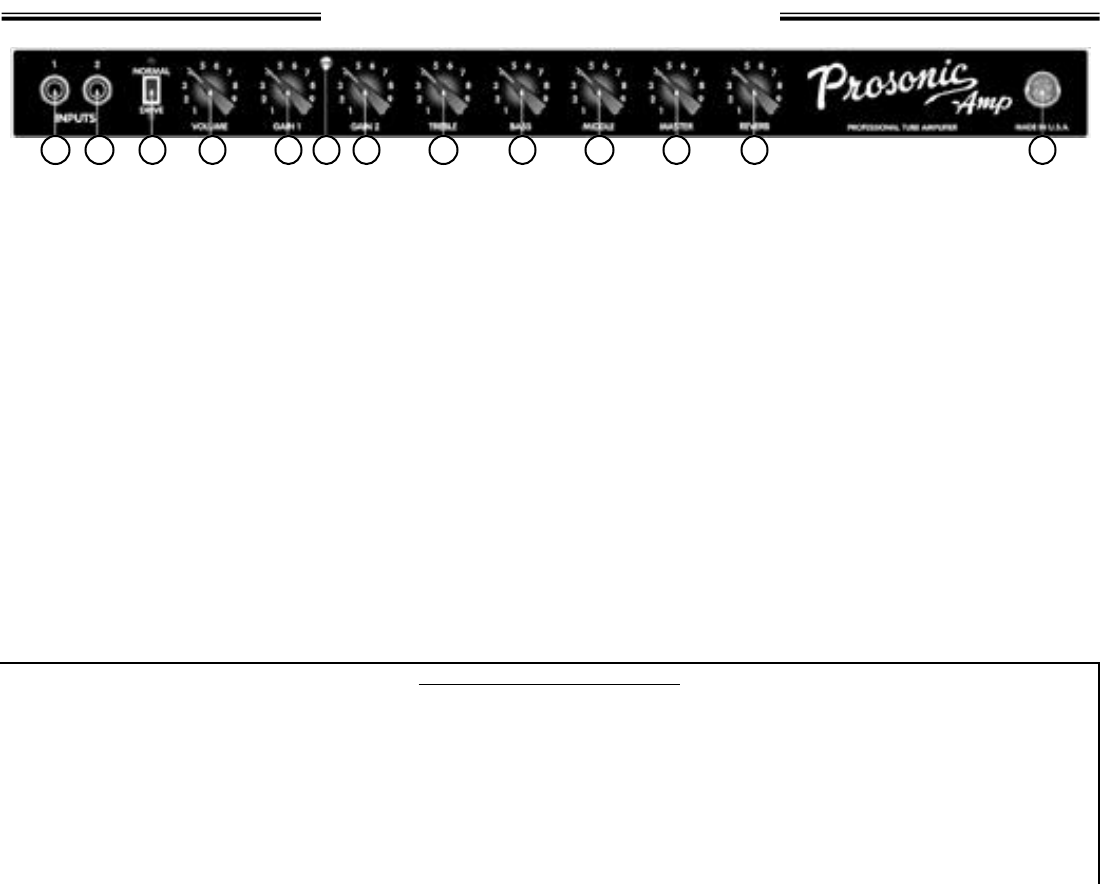
1. INPUTS - Input for the your guitar or other
instrument.
2. INPUT 2 - A lower sensitivity (-3dB) input than
INPUT 1.
3. NORMAL/DRIVE - This switch selects between
the NORMAL and DRIVE channels. This switch is
disabled and when the footswitch is plugged
into to the unit.
4. VOLUME - Controls the volume level of the
normal channel.
5. GAIN 1 - Primary gain adjustment
(distortion/sustain) for the DRIVE channel.
6. LED - Indicates operation of the DRIVE channel.
7. GAIN 2 - Secondary gain adjustment for the
DRIVE channel. Acts much like a compressor at
higher settings.
8. TREBLE - Adjusts the high-frequency level.
9. BASS - Adjusts the low-frequency level.
10. MID - Adjusts the middle-frequency level.
11. MASTER - Adjusts the volume level of the DRIVE
channel.
12. REVERB (Combo units only) - Adjusts the reverb
effect level on both channels. Switch ON/OFF
the reverb effect with the footswitch.
13. PILOT JEWEL - Illuminates when the Prosonic is
switched ON and receiving power unless the
lamp has failed. (To replace the lamp, unplug the
amplifier, unscrew the green jewel and replace
the lamp with type T47 bulb.
1 2
3
4 5
6
78910 11 12
13
Prosonic Tube Replacement
• Tubes must be replaced ONLY with the same type as specified on the tube chart inside the cabinet. To check for
tube wear, replace the set in your amp with your spare new tubes as follows:
-First replace the OUTPUT tubes in the amplifier and listen for any improvement.
-Next, re-insert the original output tubes and replace the PRE-AMP tubes and listen for improvement.
-Finally, try replacing BOTH the OUTPUT and PRE-AMP tubes and listen for improvement.
-If any combination of tube replacements is a noticeable improvement, reset the amp to that configuration and buy
another set of replacement tubes as your spare.
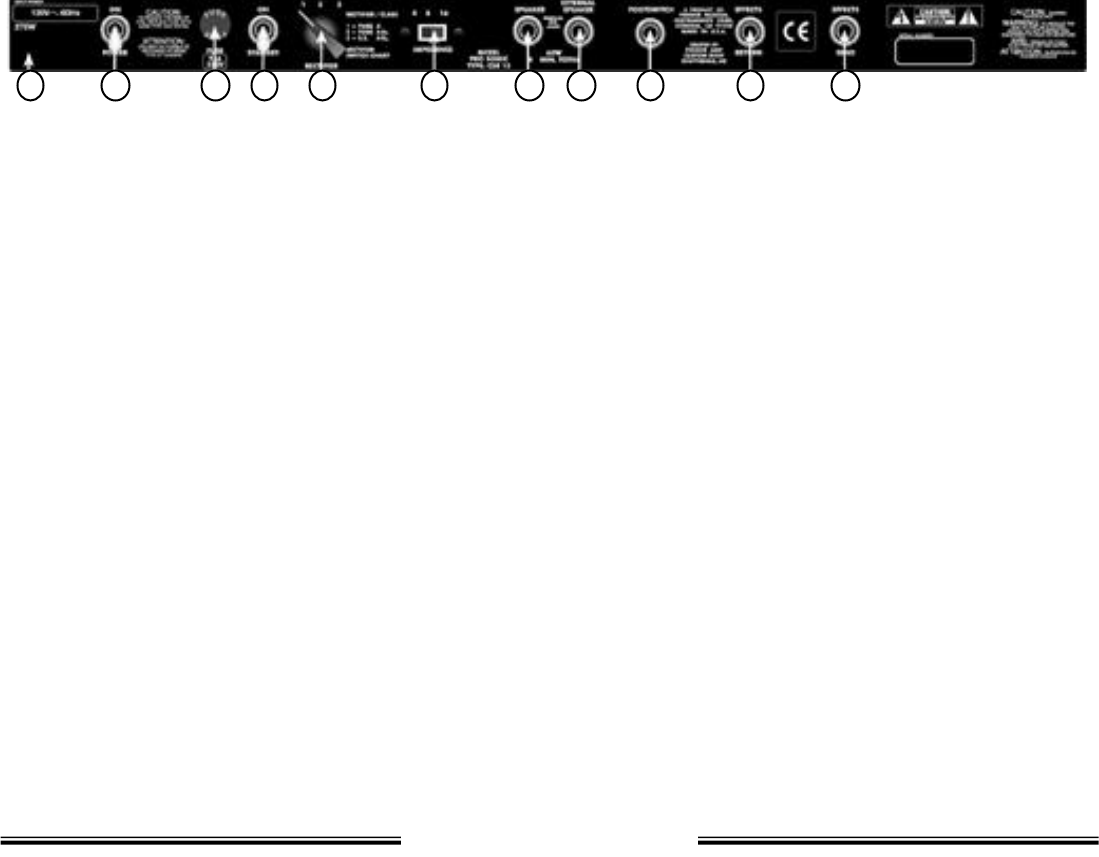
1. LINE CORD - Connect the power line cord to a
g rounded AC receptacle in accordance with the
voltage and frequency ratings as listed on the rear
panel of the Prosonic amplifier.
2. POWER SWITCH - Turns the AC power on and off.
3. FUSE - Located in the AC supply of the amplifier, the
fuse helps protect the unit from electrical fault or tube
failure. Replace a failed fuse with the same type and
rating. If the amplifier repeatedly blows fuses, take it
to an authorized Fender service center.
4. S TANDBY SWITCH - Switches the unit between
operate and stand-by modes when the power switch is
ON. In stand-by mode, no sound will be heard from the
amplifier but power is still supplied to the tube
filaments keeping them warm and the unit ready to
play. Use this switch during short breaks to increase
tube life. Wait at least 50 seconds after the power
switch is on before putting the unit into the standby
mode.
5. RECTIFIER/BIAS SWITCH - Allows for the selection of
rectifier sounds and bias classes to best suit your
playing style (experiment to find a preferred setting).
The (1) TUBE A setting at low volume sounds much like
the (2) TUBE AB2and (3) S.S. “solid state” AB2
settings at high volume.
6. IMPEDANCE SWITCH (Head only) - Sets the output
impedance of the amplifier to match the speaker
impedance for maximum power and tube life.
7. SPEAKER (Combo), SPEAKER 1 (Head) - Primary
output jack for connection to speakers. A speaker
must always be connected at this jack for the unit to be
heard.
8. EXTERNAL SPEAKER (Combo), SPEAKER 2(Head) -
Output jack for connection to an external speaker.
ONLY use in conjunction with the main speaker jack.
Using this jack on the Combo automatically switches
the amplifier impedance to 8Ω.
9. FOOTSWITCH - Jack for connection to the included
footswitch. The footswitch allows remote switching
between channels as well as ON/OFF switching of the
REVERB effect on the combo unit only.
10.EFFECTS RETURN - Connect cord from extern a l
effects devices at this input jack. Inserting a plug at
this jack automatically disconnects the unit’s internal
connection from the pre-amp to the power amp.
11.EFFECTS SEND - Connect cord to external effects
devices at this output jack. This jack can also be used
as a line out.
R
Re
ea
ar
r
P
Pa
an
ne
el
l
F
Fu
un
nc
ct
ti
io
on
ns
s
S
Sp
pe
ec
ci
if
fi
ic
ca
at
ti
io
on
ns
s
1 2 3 4 5 6 7 8 9 10 11
PART NUMBER* - COMBO: 021-1077-x00 (100V) 021-1007-x00 (120V) 021-1047-x00 (230V) UK
021-1067-x00 (230V) 021-1037-x00 (240V) Aust 021-1087-x00 (230V) Nordic
SPEAKER ENCLOSURE: 2-10” Custom Design Celestion®speakers
PART NUMBER* - HEAD: 021-2077-x00 (100V) 021-2007-x00 (120V) 021-2047-x00 (230V) UK
021-2067-x00 (230V) 021-2037-x00 (240V) AUSTRALIA/ NZ
POWER REQUIREMENTS: 360W.
COMPANION SPEAKER ENCLOSURE: 4 12” Celestion®Vintage 30 speakers:
021-3001-100 (RED) 021-3001-200 (GREEN) 021-3001-000 (BLACK)
POWER OUTPUT: Class AB2, Solid state rectifier: 60 W R.M.S. (minimum into 8 or 16 Ω)
Class AB2, 5AR4/GZ34 rectifier: 50 W R.M.S. (minimum into 8 or 16 Ω)
Class A, 5AR4/GZ34 rectifier: 30 W R.M.S. (minimum into 8 or 16 Ω)
OUTPUTIMPEDANCE: 8Ω or 16Ω (Combo), 4Ω, 8Ω or 16Ω, (Head).
INPUTIMPEDANCE: 1 MΩ
TUBES: COMBO HEAD
Two (2) Two (2) 5881/6L6WGC (P/N 099-5090)
Five (5) Four (4) 12AX7A (P/N 099-5091)
One (1) None (0) 12AT7 (P/N 099-5092)
One (1) One (1) 5AR4/GZ34 (P/N 099-5097)
FUSE TYPE: 100/120V units: T3 Amp/250V, 230-240V version T1.6 Amp 250V
DIMENSIONS: COMBO HEAD
HEIGHT: 18.5 in (47 cm) 9 in. (23 cm)
WIDTH: 24 in (61 cm) 24 in. (61 cm)
DEPTH: 10.5 in (26.5 cm) 9.5 in. (24 cm)
WEIGHT: 48 lbs. (22 kg) 42 lbs. (19 kg)
*For Prosonic COLOR DESIGNATED part number, replace “x” with: 1 = RED, 2 = GREEN, 0 = BLACK (Combo Only)
Product specifications are subject to change without notice.

A PRODUCT OF:
FENDER MUSICAL INSTRUMENTS CORP.
CORONA, CA 91720 USA
