Contents
- 1. User Manual
- 2. Users Manual
User Manual
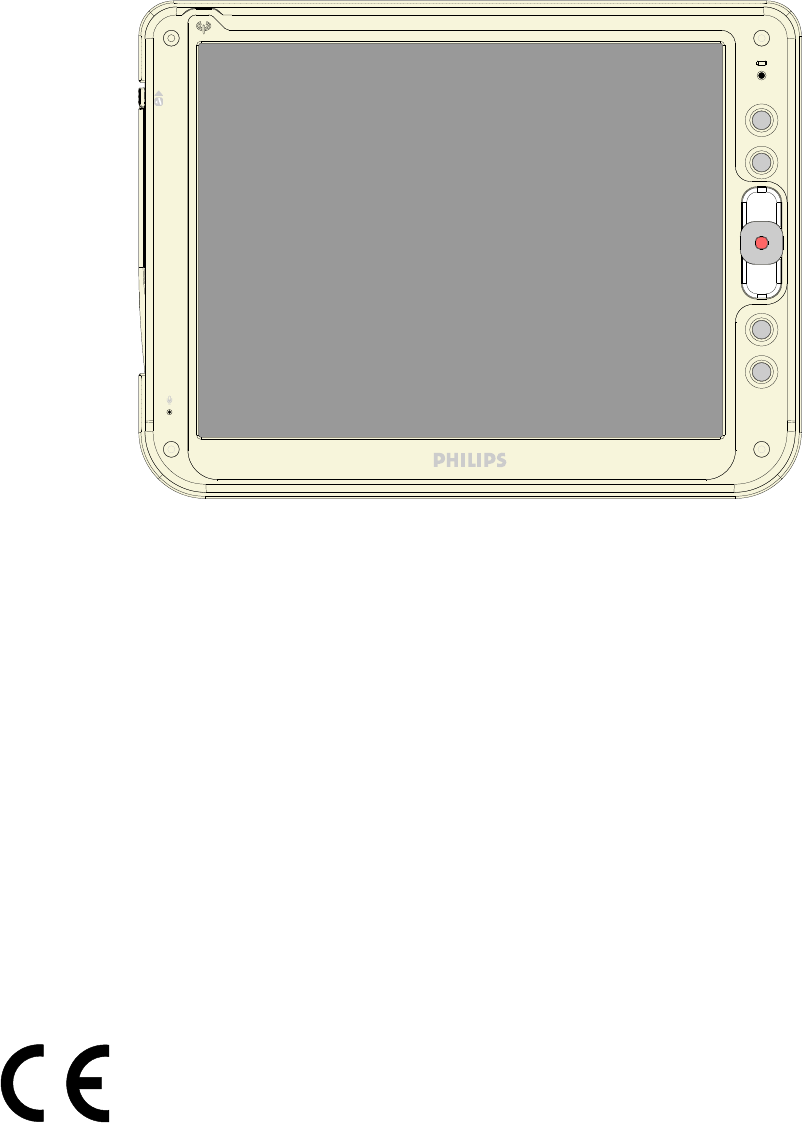
User’s Manual
LCD 12” COLOR PROSCRIBE
CMPD12
Copyright © 2005 FIMI S.r.l. Saronno - Italy
All rights are reserved. Reproduction in whole or in part is prohibited without the written consent of the copyright owner
Printed in Italy (Rev. 0,1)
W
2CMPD12
Copyright ©
This manual is copyrighted with all rights reserved. Under the copy rights law, this manual may not be copied, in whole or
part, without written consent of Philips. Under the law, copying includes translating into another language or format.
The monitor described in this manual, has been certied/registered by the safety agencies/regulatory authorities as
model n° : CMPD12
FCC Notice
This equipment has been tested and found to comply with the limits for a class B digital device, pursuant to Part 15 of
FCC Rules. These limits are designed to provide reasonable protection against harmful interference in a residential
installation.
This equipment generates, uses and can radiate radio frequency energy and , if not installed and used in accordance with the
instructions, may cause harmful interference to radio communications.
However, there is no guarantee that interference will not occur in a particular installation.
If this equipment does cause harmful interference to radio or television reception, while can be determined by turning the
equipment Off and On, the user is encouraged to try to correct the interference by one or more of the following measures.
- Re orient or relocate the receiving antenna.
- Increase the separation between the equipment and receiver.
- Connect the equipment into an outlet on a circuit different from that to which the receiver is connected.
- Consult the dealer or an experienced radio TV technician for help.
Modication
The FCC requires the user to be notied that any changes or modications made to this device that are not expressly
approved by the manufacturer may void the user’s authority to operate the equipment.
Cables
Connections to this device must be made with shielded signals cables with metallic RFI/EMI connector hoods to maintain
compliance with FCC Rules and Regulations.
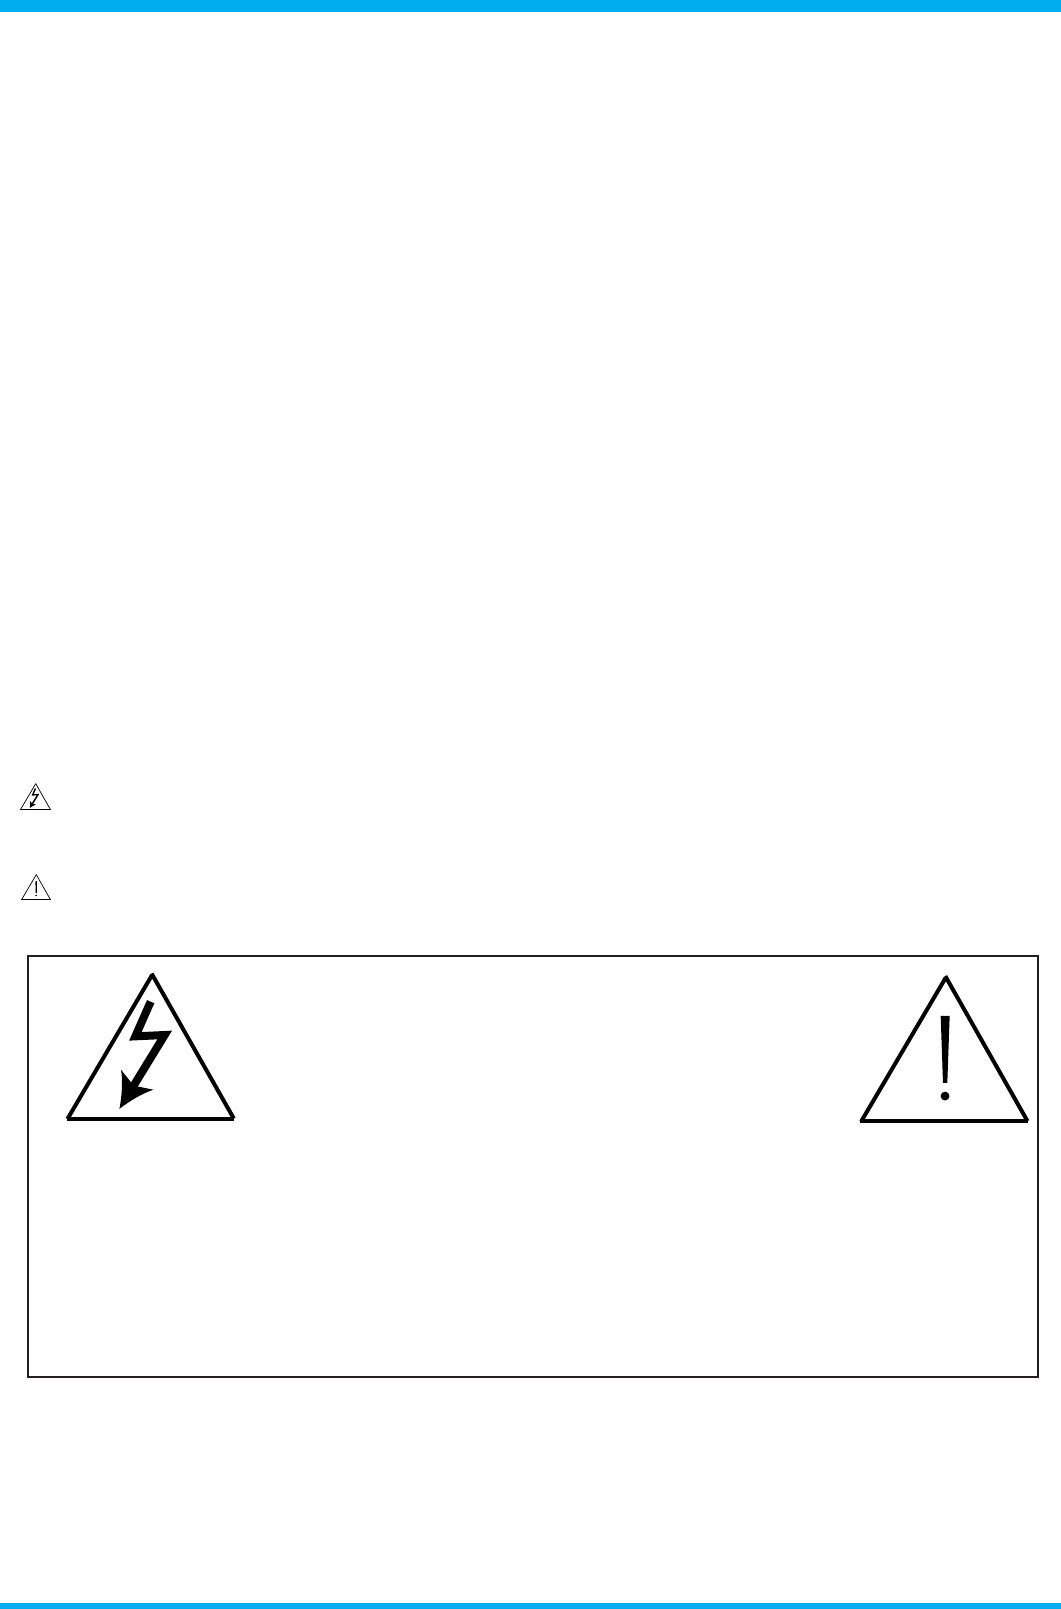
The lighting ash with arrowhead symbol is intend to alert the user of the presence of uninsulated “dangerous voltage”
within the product’s enclosure that may be sufcient magnitude to constitute a risk of electrical shock to people.
The exclamation mark is intended to alert the user of the presence of important operating and maintenance (servicing)
instructions in literature accompanying the appliance.
CAUTION
RISK OF ELECTRICAL SHOCK
DO NOT OPEN
ATTENTION
RISQUE DE CHOC ELECTRIQUE
NE PAS OUVRIR
CAUTION: TO AVOID THE RISK OF ELECTRICAL SHOCK.
DO NOT REMOVE COVER (OR BACK)
NO USER SERVICEABLE PARTS INSIDE
REFER SERVICING TO QUALIFIED SERVICE PERSONNEL
WARNING:
THE ENCLOSURE HAS TO BE CHECKED UPON COLLISION DAMAGE; REFER TO
QUALIFIED SERVICE PERSONNEL
RF Exposure Statement
This EUT is compliance with SAR for general population /uncontrolled exposure
limits in ANSI/IEEE C95.1-1999 and had been tested in accordance with the
measurement methods and procedures specified in OET Bulletin 65 Supplement C.
This equipment complies with FCC radiation exposure limits set forth for an
uncontrolled environment. In order to avoid the possibility of exceeding the FCC
radio frequency exposure limits, human proximity to the antenna shall not be less than
1.5 cm during normal operation.
This device and its antenna(s) must not be co-located or operating in conjunction with
any other antenna or transmitter.

3
CMPD12
1.1.0 TECHNICAL INFORMATION
Processor VIA Low Voltage VIA Eden or C3™-M running at 800MHz and 1GHz (BGA, 133MHz FSB,
64KB L2 cache, 0.13 micron process with 7watt-Thermal-Design-Power)
Chipset VIA CN400 + VT8237R
Bios Insyde version VA03, with the kernel-code-base V4.31
Operating System Microsoft Windows XP Embedded with SP2
Networking Built-in 802.11g mini-PC WLAN module with integral antenna
Remote Protocol Microsoft RDP / Citrix ICA
Memory 256 MB SDRAM on board
Flash ROM 512 MB ash memory module
LCD Panel Characteristic 12.1 “ TFT LCD panel (Mini required : XGA 1024 x 768 resolution for 12.1” ) , LVDS I/F
Audio System AC97 internal microphone and speaker; stereo (supported via earphone jack)
Durability Rugged anti-shock design with standing 3 feet drop / IP53 water and dust resistent construction
PAD I/O •1 x VGA out
•2 x USB
•1 x Network connector (RJ45)
•1 x Audio jack for external earphone
•1 x Audio jack for external microphone
•1 x DC-in jack
•1 x PCMCIA
•1 x SMART card
•1 x Docking connector
•1 x Speaker
•1 x Modular connector
•1 x Internal microphone
Docking device I/O •1 x DC-in jack
•1 x PAD connector
•3 x USB
•1 x Network connector (RJ45)
LED indicator •1 x WLAN LED
•1 x Power LED
Button AND Controls • 4 x Customized hot key
• 1 x Input panel
• 1 x Four-way direction key with Enter
• 1 x Power switch
• 1 x Stylus release
• 2 x Battery latch
Power Supply • Battery: Swappable smart Li-ion battery pack
• AC_IN 100 ~ 240V (1,5A) 50/60Hz - DC_Out 19V (3.42A)
Included Accessory • Battery
• AC adapetr and power cord
• 1 x Stylus
Optional accessories • Hand strip
• Kickstand
4 CMPD12
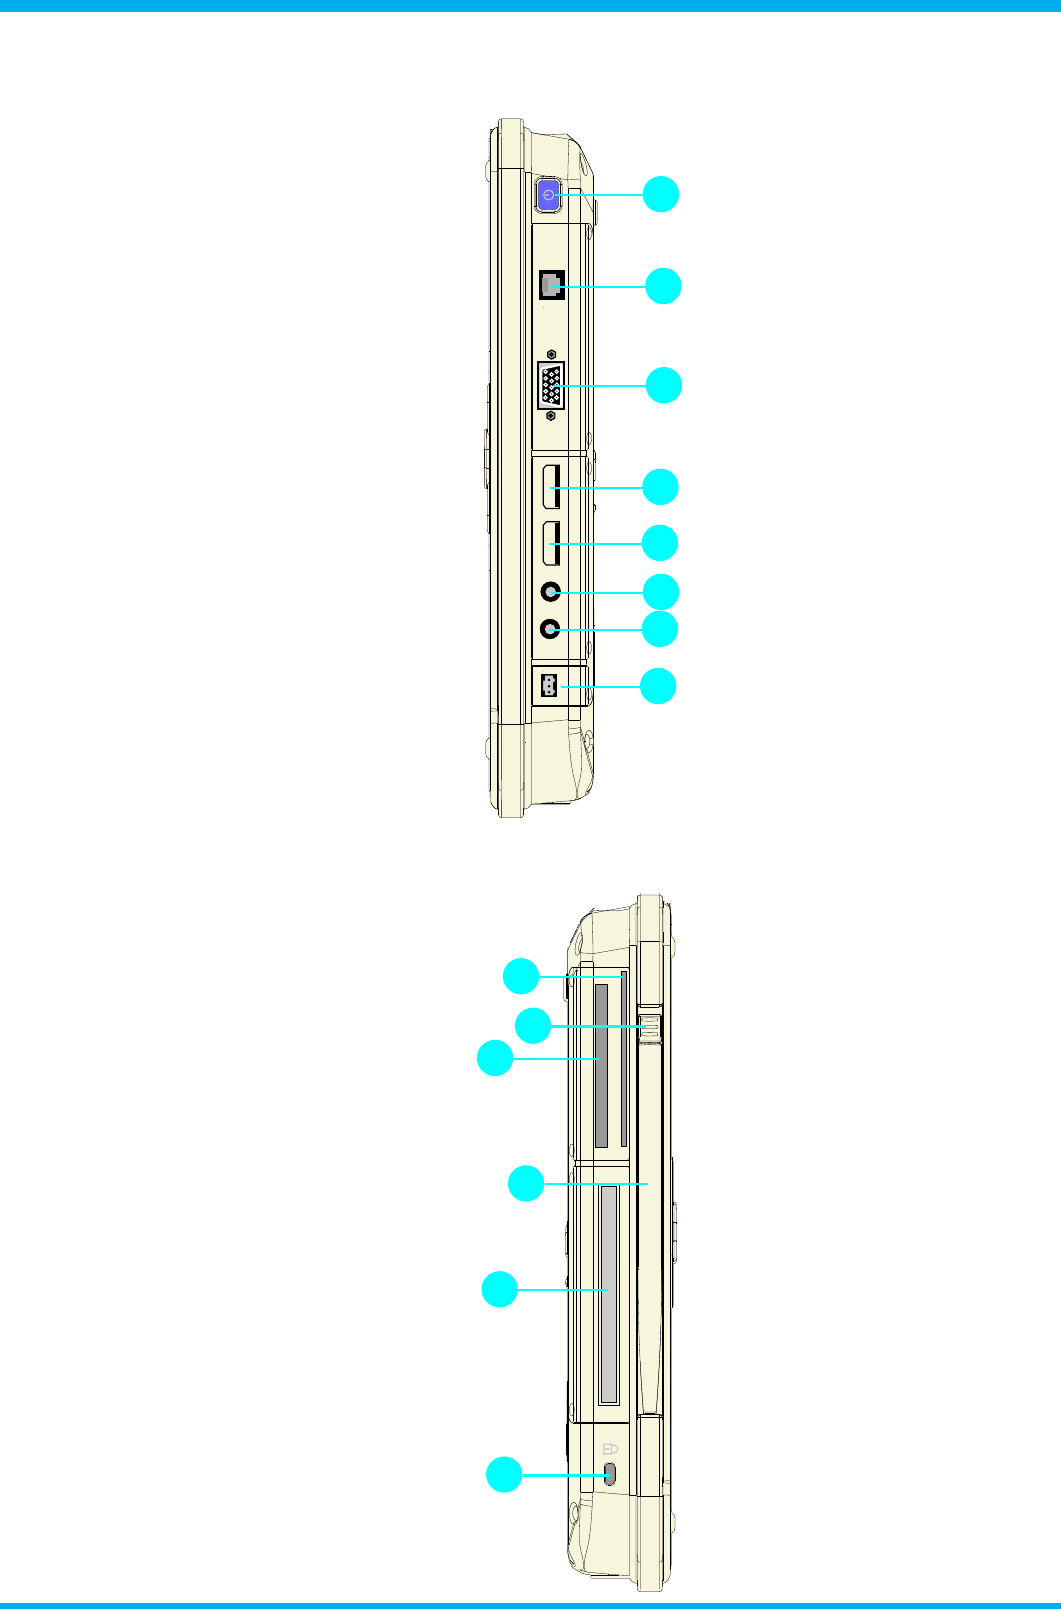
6.1.0 INPUT INSTRUCTION
6.1.1 RIGHT VIEW
1. Power botton
2. Network connector (RJ45)
3. RGB video connector
4. USB 2.0 port type A
5. USB 2.0 port type B
6. External ear set jack
7. External microphone jack
8. AC/DC adapter connector
6.1.2 LEFT VIEW
1. Smart card slot
2. Stylus pen latch release
3. Flash slot
4. Stylus pen
5. PCMCIA slot
6. Security cable slot
1
2
3
4
5
8
7
6
5
6
3
4
2
1
5
CMPD12
1
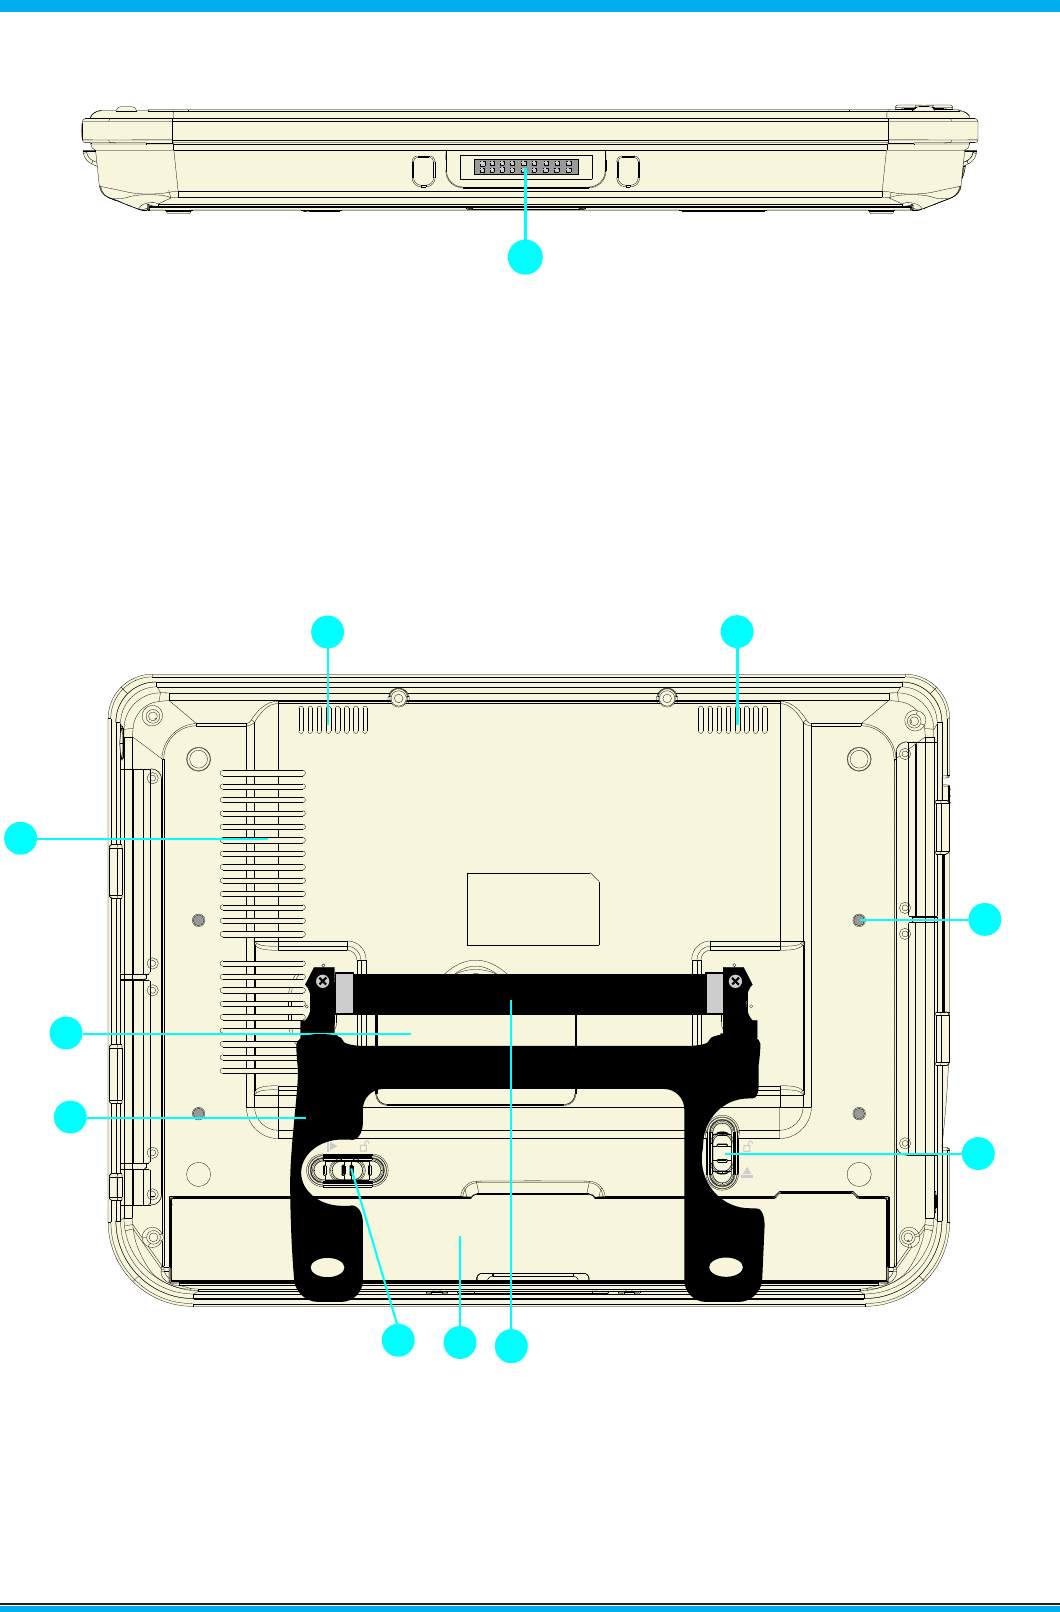
6.1.3 BOTTOM VIEW
1. Docking device slot
6.1.4 BACK VIEW
1. Speackers
2. Mounting screw holes (x4) M2,5
3. Battery latch 1 (lock)
4. Hand strip (optional)
5. Battery
6. Battery latch 2
7. Kickstand (optional)
8. Memory module cover
9. Processor fanless heatsink air vent
1
3
9
11
2
5
6
8
4
7
6 CMPD12
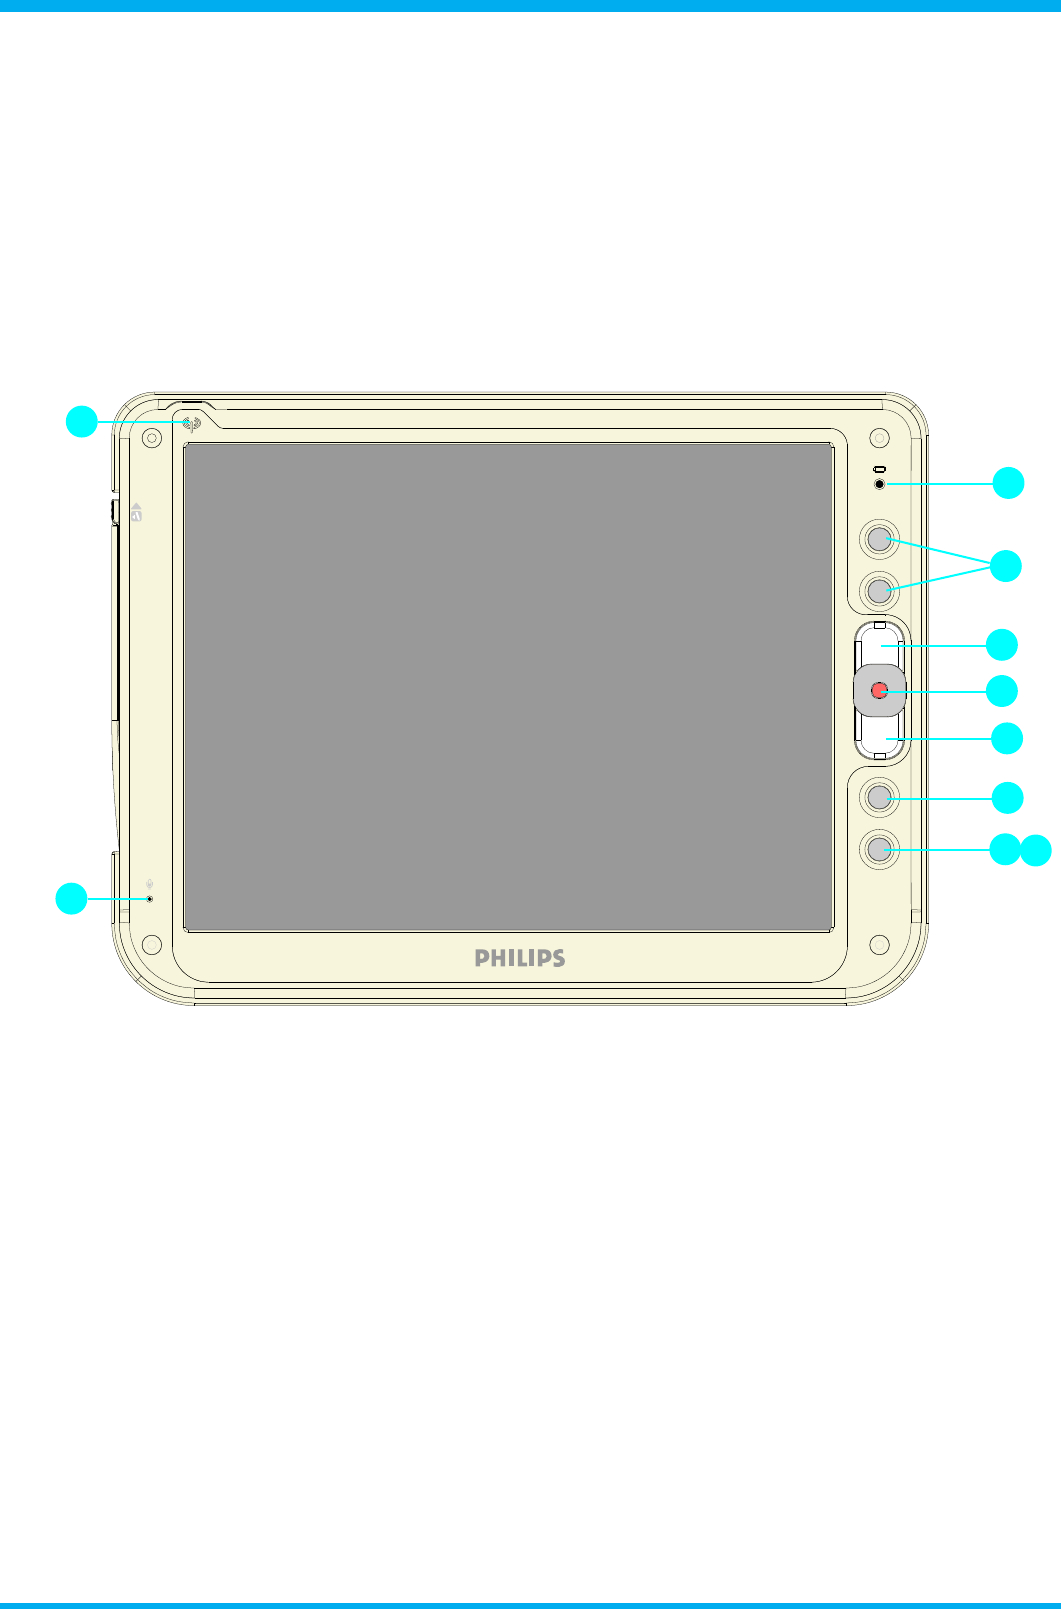
7.1.0 CONTROL PANEL DESCRIPTION
1. Battery LED
2. Programmable buttons
3. Track stick buttons
4. Track stick
5. Programmable buttons
6. OSD keyboard (default)
7. Microphone
8. WLAN status LED
7
1
3
4
3
5
8
56
2

7
CMPD12
7.1.0 GETTING STARTED
7.1.1 BASE STATION SETUP
Connect power cord to the AC power adaptor.
Plug the cord into the base station rst and then plug the other end into a power outlet.
7.1.2 LOAD BATTERY
Make sure the power switch at lower-left corner of your CMPD12 is in the OFF position.
Install the battery.
• Place CMPD12 on your desk with its face down.
• Place the battery in the battery slot then press it down to t in.
• Push battery latch 1 into the locked position.
•For rst time use, the battery requires ve hours to become fully charged.
7.1.3 STYLUS RECALIBRATION
When the pad is powered on for the rst time, the recalibration protocol will automatically launch.
Follow the instructions to walk through the process.
7.1.4 WLAN SETUP
• Tap START
• Tap Network and Dial-up Connections
• Tap ‘Internal Wireless LAN’ Settings icon
• A dialog box pops up. Choose the Wireless Networks tab.Tap the Refresh button in the Available Networks panel. In a few
seconds, a list of available networks is displayed
• Select the network to which you wish to connect
• Tap CONFIGURE
• Tap OK

CMPD12
8.1.0 Power supply
There are two sources of power for CMPD12 operation: the battery and the AC adapter.
8.1.1 AC
You may operate your CMPD12 with AC power in two different ways. Mounted in the base station, or connected directly
to the AC adapter.To run your CMPD12 on the base station, place the pad into and connect the AC adapter to the jack
at the rear of the base station.To plug the product directly to the AC adapter, locate and plug into the DC adapter at the
lower left corner of the product, under the orange rubber protector.
8.1.2 BATTERY
When using the CMPD12 for the rst time, it is advisable to charge the battery for at least 5 hours.
After the initial charging, when not in use, the CMPD12 takes approximately two hours to fully charged; it takes 3 hours to
fully charged while in use.A fully charged battery lasts up to 4 hours.
The power light on the top right indicates the level of battery charge.
Turn on the power to see the power light.
• Full charge The power light is solid green.
• Low charge The power light is blinking green when the battery’s remaining charged falls to less than 6 percent.
• Critical low charge The power light blinks amber when the charge falls under 3 percent.
If your CMPD12 is powered up and immediately enters the suspend mode, it means the battery is uncharged.To avoid loss
of data in memory, fully charge the unit within 24 hours.
CAUTION: Recharge the CMPD12 any time a low charge warning appears.
Failure to recharge the battery will result in loss of data contained in internal memory (RAM).
In order to optimize battery operation, open only the applications you are actually using.
To conserve battery power, disable WLAN when it’s not in use.
To change battery
• Suspend your CMPD12 by turning the power switch to the OFF position.
• Unlock the battery latch 1
• While one hand holds the battery latch two in the unlocked position, use the other hand to pull the battery out of the slot.
•Replace with another battery
NOTE: When fully charged and not in use, your CMPD12 has a life of one week.
CAUTION:
1. Suspend your CMPD12 before removing or changing the battery pack.
2.To avoid loss of data in memory, insert a charged battery in 24 hours.
8

9
CMPD12
11.0.0 PRECAUTIONS
11.1.0 Installation
The equipment should be installed near an easily accessible outlet.
Do not install or leave the monitor:
In places subject to extreme temperatures, for example near a radiator, heating vent, or in direct sunlight. Subjecting the
LCD monitor to extreme temperatures, could cause deformations of the casing or malfunctions.
In places subject to mechanical vibration or shock.
Near any equipment that generates a strong magnetic eld, such as a TV or various other medical appliances.
In places subject to inordinate amounts of dust, dirt, or sand, for example near an open window or an outdoor exit.
If setting up temporarily in an outdoor environment, be sure to take adequate precautions against airborne dust and dirt.
Otherwise irreparable malfunctions could occur.
11.2.0 Handling
Do not press on or scratch the LCD screen. Do not place a heavy object on the LCD screen. This may cause the screen
to lose uniformity or cause LCD panel malfunctions.
If the monitor is used in a cold place, a residual image may appear in the screen. This is not a malfunction.
The screen returns to normal as the temperature rises to a normal operating level.
If a still picture is displayed for a long time, a residual image may appear for a while. The residual image will eventually
disappear.
The LCD panel becomes warm during operation. This is not a malfunction.
11.3.0 Maintenance
Be sure to unplug the power cord from the mains when cleaning your LCD monitor.
The front polarizer can be easily damaged. Take care not to scratch the front surface with any hard or abrasive
material. Dust, nger marks, grease etc. can be removed with a soft damp cloth (a small amount of mild detergent can
be used on the damp cloth). Do not apply water or detergent directly to the front surface as this may cause staining
or damage the electronic components.Never use any solvent on the front polarizer or module as this may cause permanent
damage.Wipe off water drop immediately. Long contact with water may cause discoloration spots.When the panel surface
is soiled, wipe it with absorbent cotton or other soft cloth.”
11.4.0 Transportation
Disconnect all cables from the monitor when transporting.
When you transport this LCD display, hold the base sections of the display stand rmly in both hands. If you drop the
monitor, you may be injured or the monitor may be damaged.
When you transport this monitor for repair or shipment, use the original cardboard box and packing materials.
11.5.0 Replacement of the backlight
A specially designed uorescent tube is installed as the lighting apparatus for this monitor. If the screen becomes dark,
unstable, or does not come on, consult your Customer service for replacing the uorescent tube

10
CMPD12
11.6.0 Disposal of the LCD monitor
Do not dispose of this monitor with general household waste.
The uorescent tube used in this LCD monitor contains mercury. Disposal of this monitor must be carried out in
accordance with the regulations of your local sanitation authority.
For countries in the European Union
This symbol indicates that this product (including the cables, plugs and accessory) must not be
disposed of with the other household waste. Instead, it is your responsibility to dispose of
your waste equipment by handing it over to a designated collection point for the cling of
waste electrical and electronic equipment. The separate collection and recycling of your waste equipment
at the time of disposal will help to conserve natural resources and ensure that it is recycled in a manner
that protects human health and the environment. For more information about where you can drop off your
waste equipment for recycling, please contact your local city ofce, or your supplier’s ofce.
WEEE Symbol
(“crossed-out wheeled bin” )
For countries outside the European Union
Disposal of electrical products in countries outside the European Union should be done in line with local
regulations.
INTENTIONALLY LEFT BLANK

4519 206 1007.1
FIMI S.r.L R&D .CG0506 R2005AC
E
Q802UWG
USB Wireless Adapter
User Manual
Contents
REVISION HISTORY 3
INTRODUCTION 4
Package Contents
Minimum System Requirements
CONNECTING THE WIRELESS ADAPTER 5
STATUS LEDS 6
INSTALLING THE WIRELESS ADAPTER 7
Windows XP Service Pack 2 7
¾ Install the Wireless Adapter Driver and Utility
¾ Configuring the Winbond Wireless Utility
¾ Configuration
¾ Uninstalling the Wireless Adapter Driver and Utility
Windows 2000 19
¾ Install the Wireless Adapter Driver and Utility
¾ Configuring the Winbond Wireless Utility
¾ Configuration
¾ Uninstalling the Wireless Adapter Driver and Utility
TROUBLE SHOOTING 30

Revision History
Revision Updated Notes
1.00 08/15/2005 Initial Release

Introduction
Thank you for purchasing the Wireless Adapter. This Wireless Adapter is easy to use and easy to setup. If
you are tired of all those messy wires needed to connect a lap-top to your Home network, then take your
networking to the next level with the Wireless Adapter. You will be able to share files, printers and even your
High-Speed Internet access wirelessly.
Package Contents
Make sure the following items came in this package:
z Wireless Adapter
z Wireless Adapter Installation and User’s Manual CD
Minimum System Requirements
z Microsoft Windows 98 Second Edition (SE), Windows ME, Windows XP, or Windows
2000 installed
Connecting the Wireless Adapter
1. Your computer can be on or off; it will not affect the installation process. Locate an available USB slot on
your PC. If you are not sure where this may be, please consult your computer’s User Manual.
2. Insert the Wireless Adapter into the appropriate USB slot. Your hardware is now installed.

Status LEDs
LED MEANING
POWER Indicates that the Wireless Adapter is powered on when the LED lights up.
LINK Indicates link status. If the light is blinking, it means there is data
sending or receiving via wireless.
Installing the Wireless Adapter
Windows XP:
Note: If you have installed the Wireless Adapter driver before, please uninstall the old
version first.
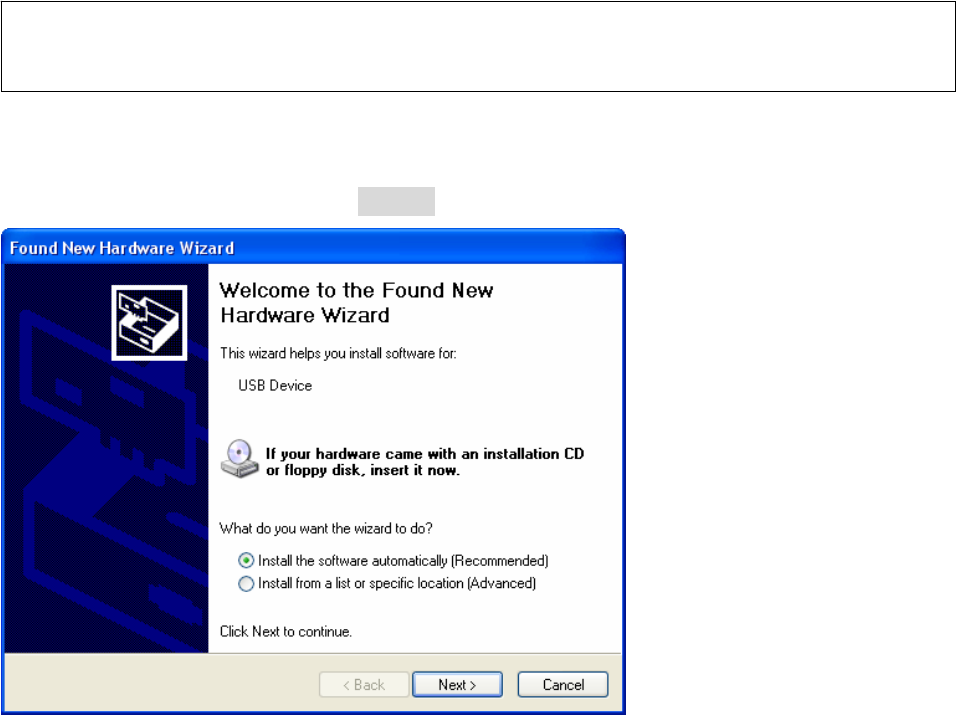
1. After you have installed the Wireless Adapter your computer will display a Found New
Hardware Wizard screen, click Cancel to continue.
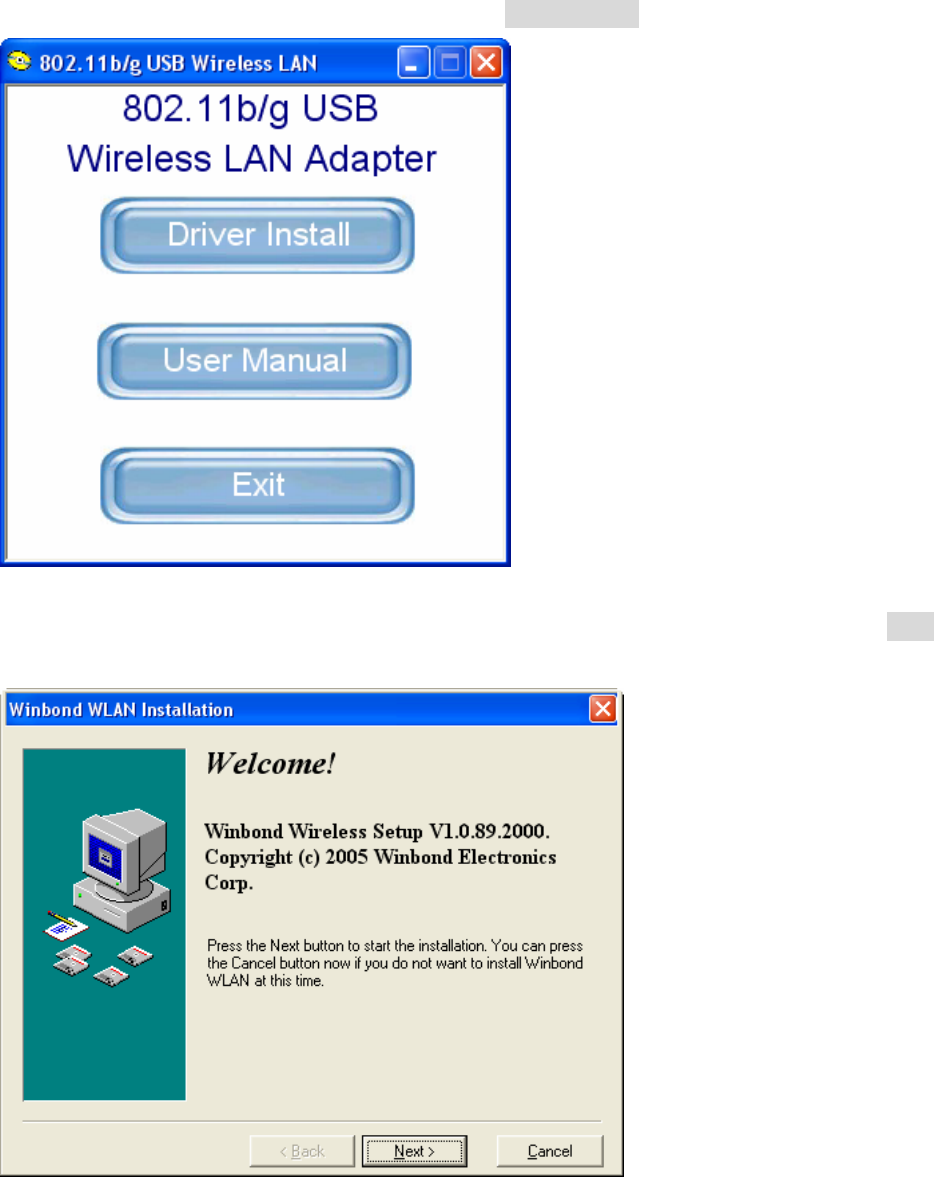
2. Insert Wireless Adapter Installation and User’s Manual CD into your CD-ROM, then the
installation will be activated automatically. Click the Driver Install icon to begin the installation.
3. Winbond Wireless Setup will install the driver and utility on your system, click Next to
continue.
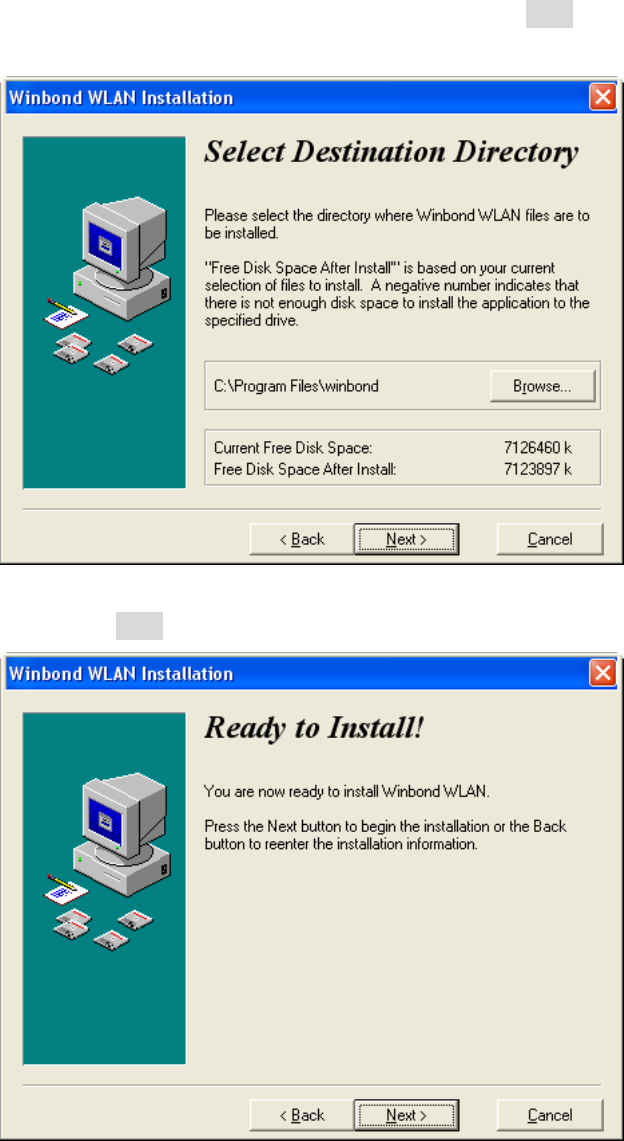
4. On the Select Destination Directory screen, click Next to accept the Destination Directory for
driver installation.
5. Press the Next button to begin the installation.
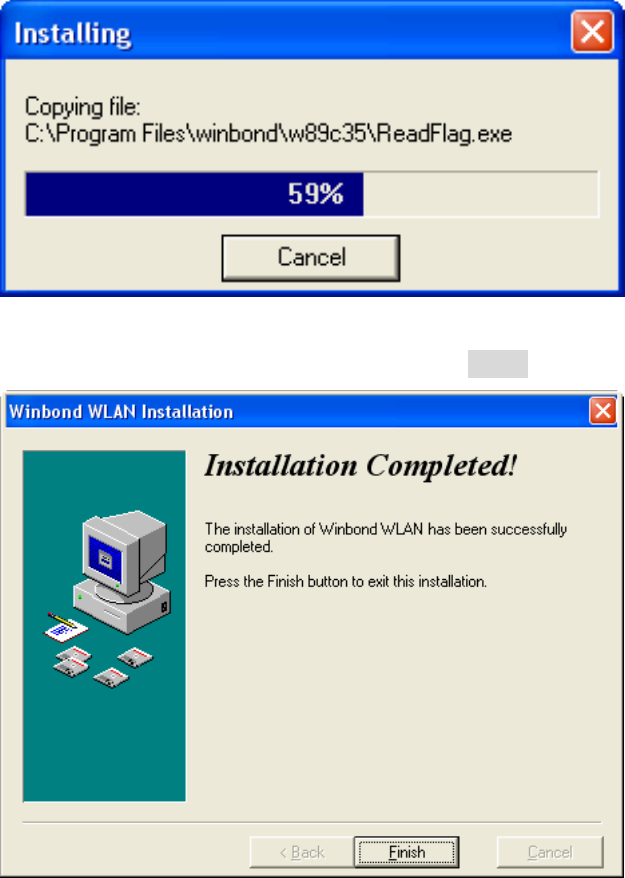
6. Wireless Adapter Driver and Utility are installing.
7. The installation is now complete, please click Finish.
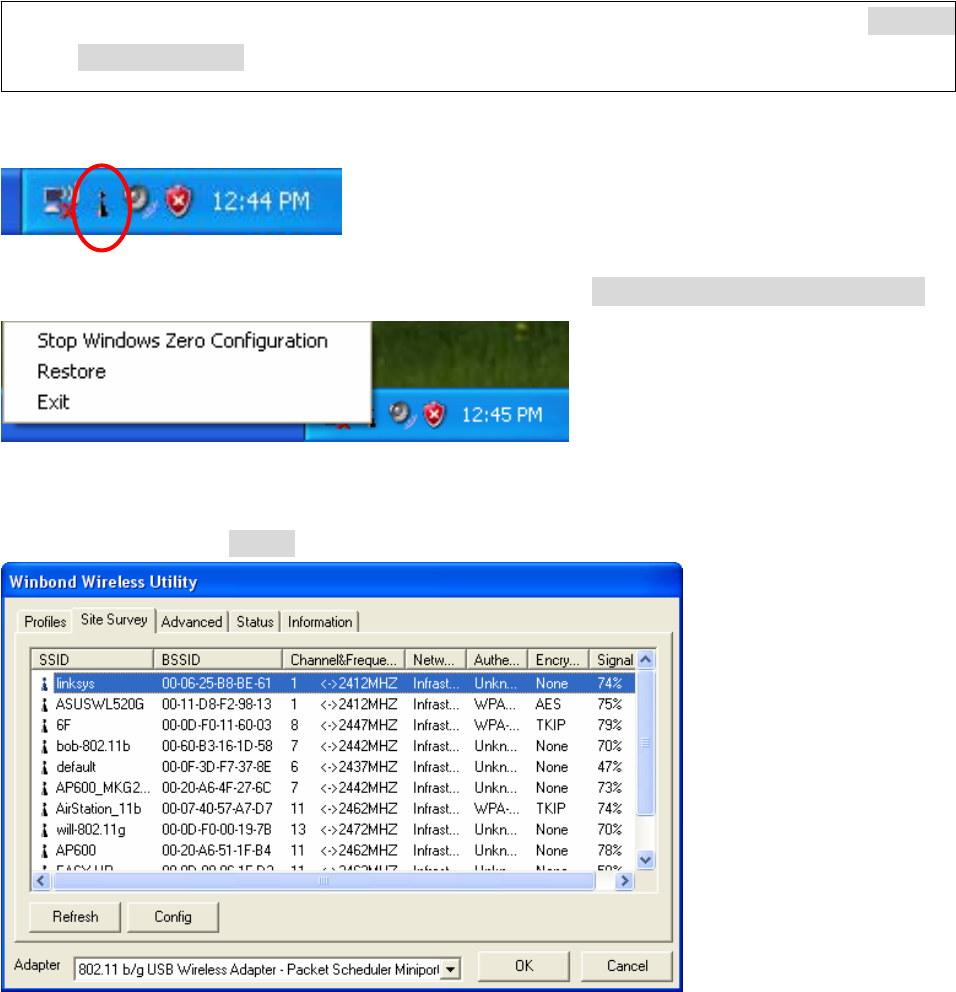
Configuring the Winbond Wireless Utility
Note: If you have installed the Windows XP Service Pack 2. You can use the Windows
Zero Configuration for Wireless Configuring.
1. On the Notification Area, right-click the Winbond Utility icon.
2. Winbond Utility Selection screen will be displayed, click Stop Windows Zero Configuration.
3. Select Site Survey Tab, all available Access Points would be listed. Click on the desired Access
Point, and click the Config button for Wireless configuring.
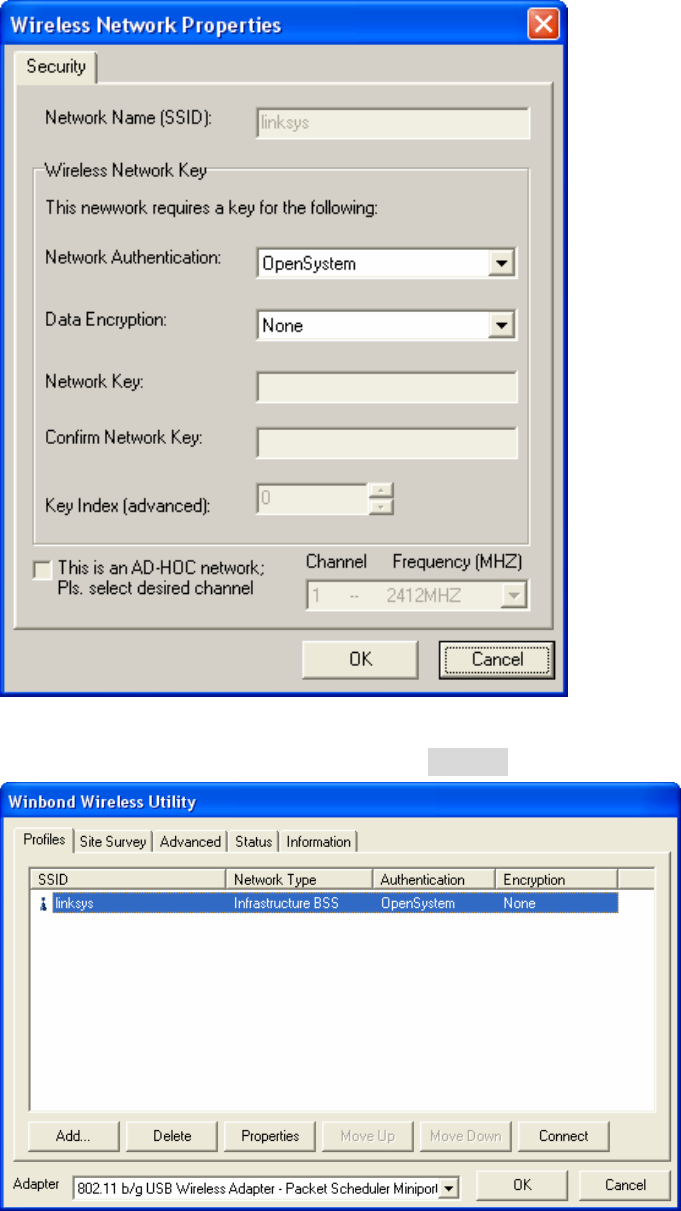
4. On the Wireless Network Properties screen, you may set Network Name (SSID), Wireless
Network Security Key or AD-HOC network.
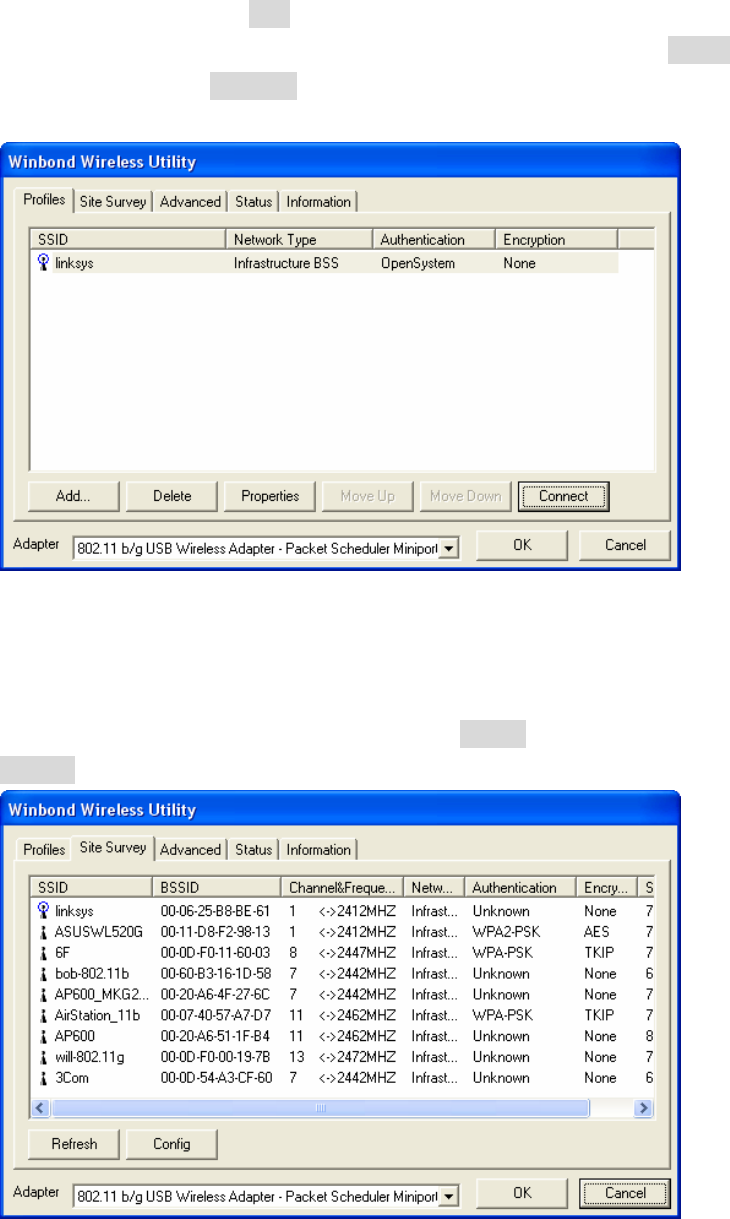
5. Click on the desired profile, and click the Connect button to take effect.
Configuration
z Profile
The Profile Tab allows you to set values for all parameters by selecting a previously defined profile.
To create a profile, click Add, type a profile name and set the corresponding parameters. If one of
the profiles is no longer used, you may remove it by clicking the Delete button. After changing
parameters, click the Connect button to take effect. You can have multiple profiles and modify the
profile at any time.
z Site Survey
Site Survey Tab lists the features of the available Access Points within range of the Wireless
Adapter's signal.
Click on the desired Access Point, and click Config for Wireless Configuration. You may click
Refresh to refresh the list.
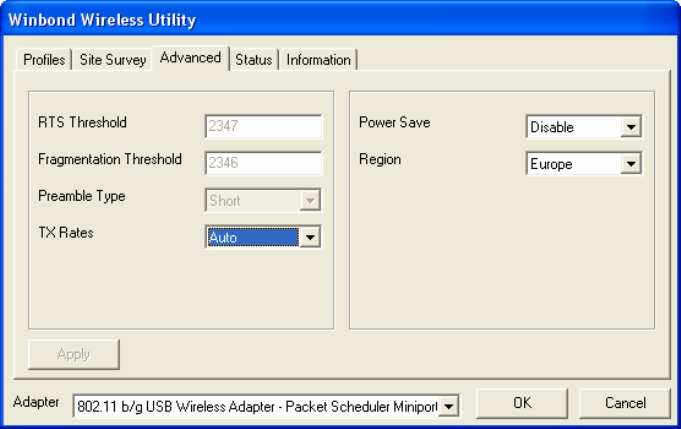
z Advance
The Configuration Utility also offers the advanced configuration for user to set the Wireless
Adapter under certain network environment. These advanced options include RTS Threshold,
Fragmentation Threshold, Preamble Type, Tx Rate, Power Save, and Region.
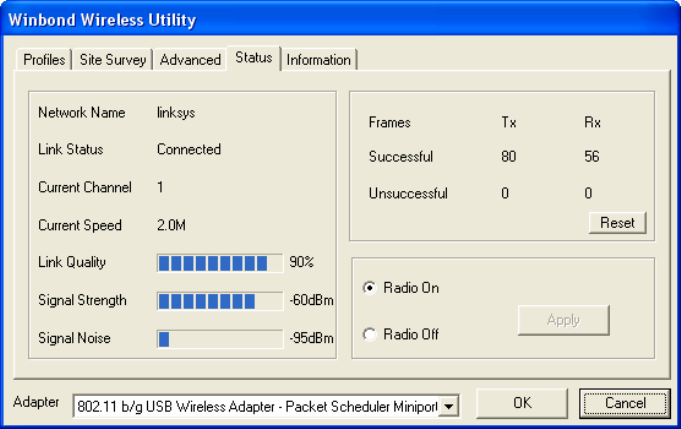
z Status
Network Name
The field shows the association status to available Access Point with SSID of the Access Point.
Link Status
Shows the whether the link is Connect or Disconnected.
Current Channel
Shows the channel on which the connection is made.
Current Speed
Shows the highest transmit rate of the current association.
Link Quality / Signal Strength
The Link Quality and Signal Strength bar graph is only active when the node is in Infrastructure
Mode. The bar graph displays the quality and strength of the link between the node and its Access
Point.
Singnal Noise
This displays the noise level of the link between the node and its Access Point.
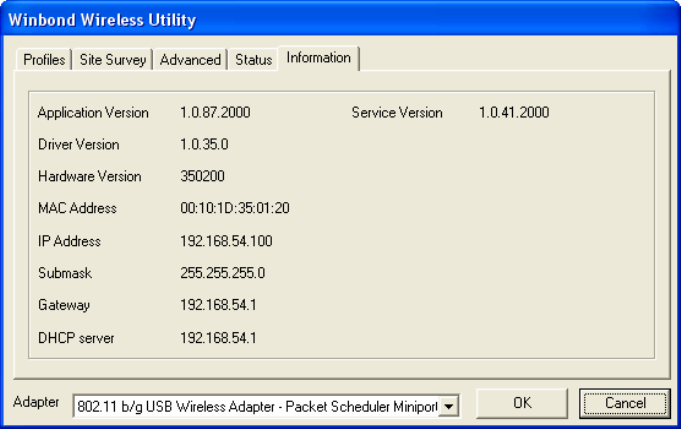
z Information
About Tab shows the product version including the detail of Configuration Utility, Driver, and NIC
MAC Address.
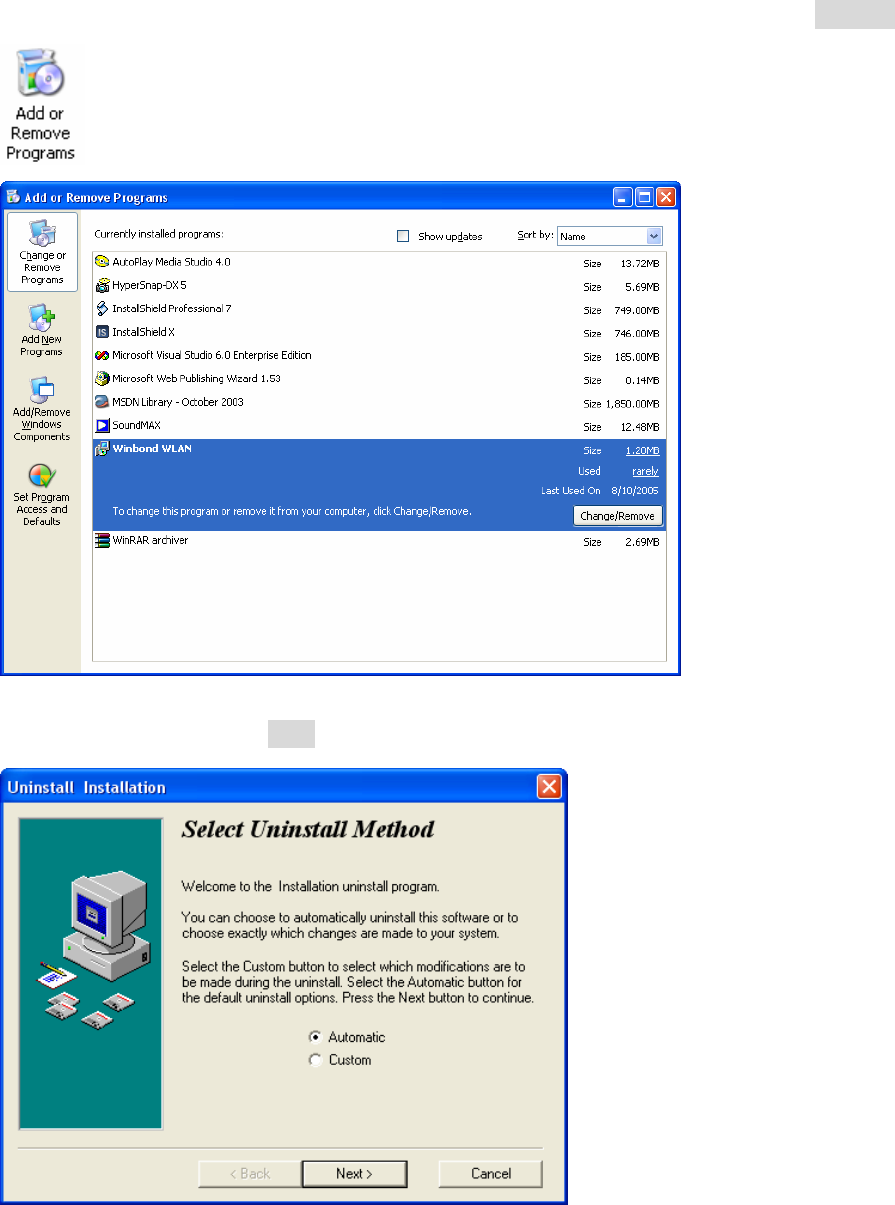
Uninstalling the Wireless Adapter Driver and Utility
1. For uninstalling the Wireless Adapter, please go to:Start->Settings->Control Panel->Add or
Remove Programs->Winbond WLAN under Windows environment. Then click Remove.
2. On the next screen, click Next button to accept automatically uninstall for Wireless LAN Driver.
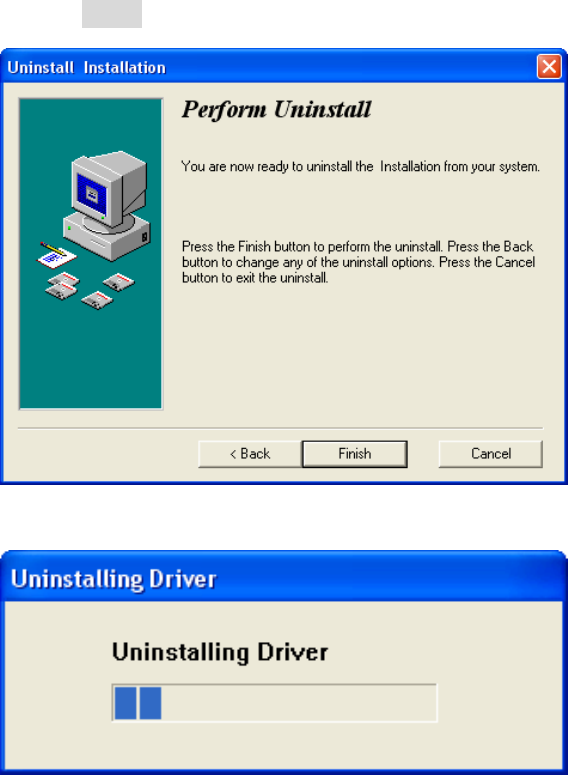
3. Click Finish button.
4. The USB Wireless Adapter can now be safely removed from the system when the un-installation
is done.
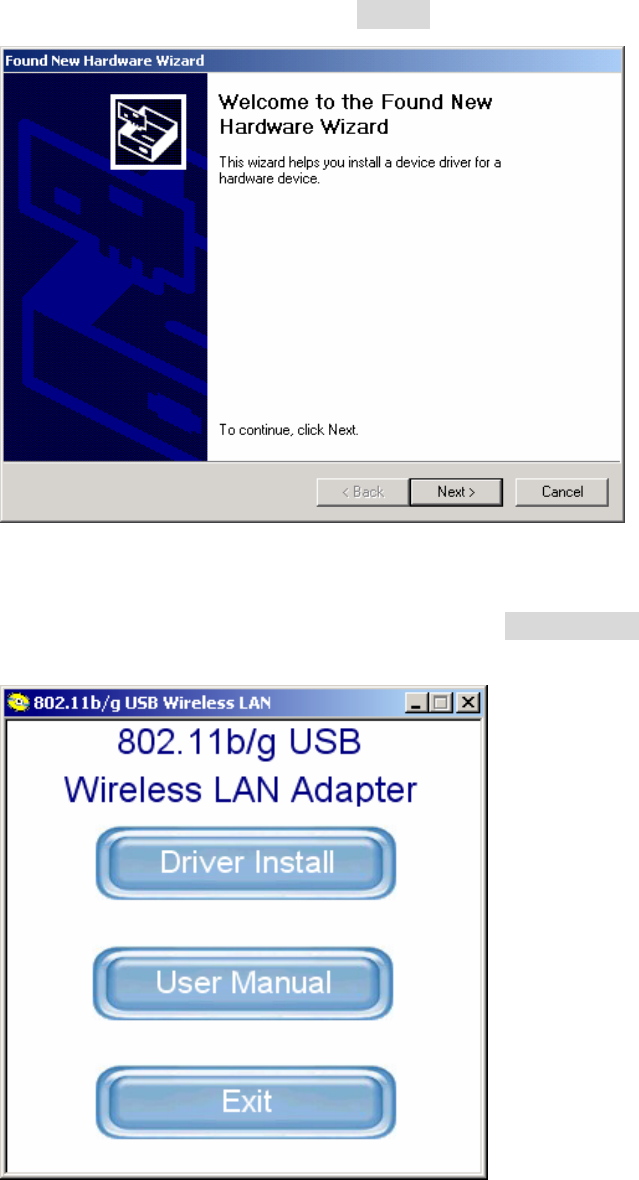
Windows 2000:
1. After you have installed the Wireless Adapter your computer will display a Found New
Hardware Wizard screen, click Cancel to continue.
2. Insert Wireless Adapter Installation and User’s Manual CD into your CD-ROM; then the
installation will be activated automatically. Click the Driver Install icon to begin the installation.
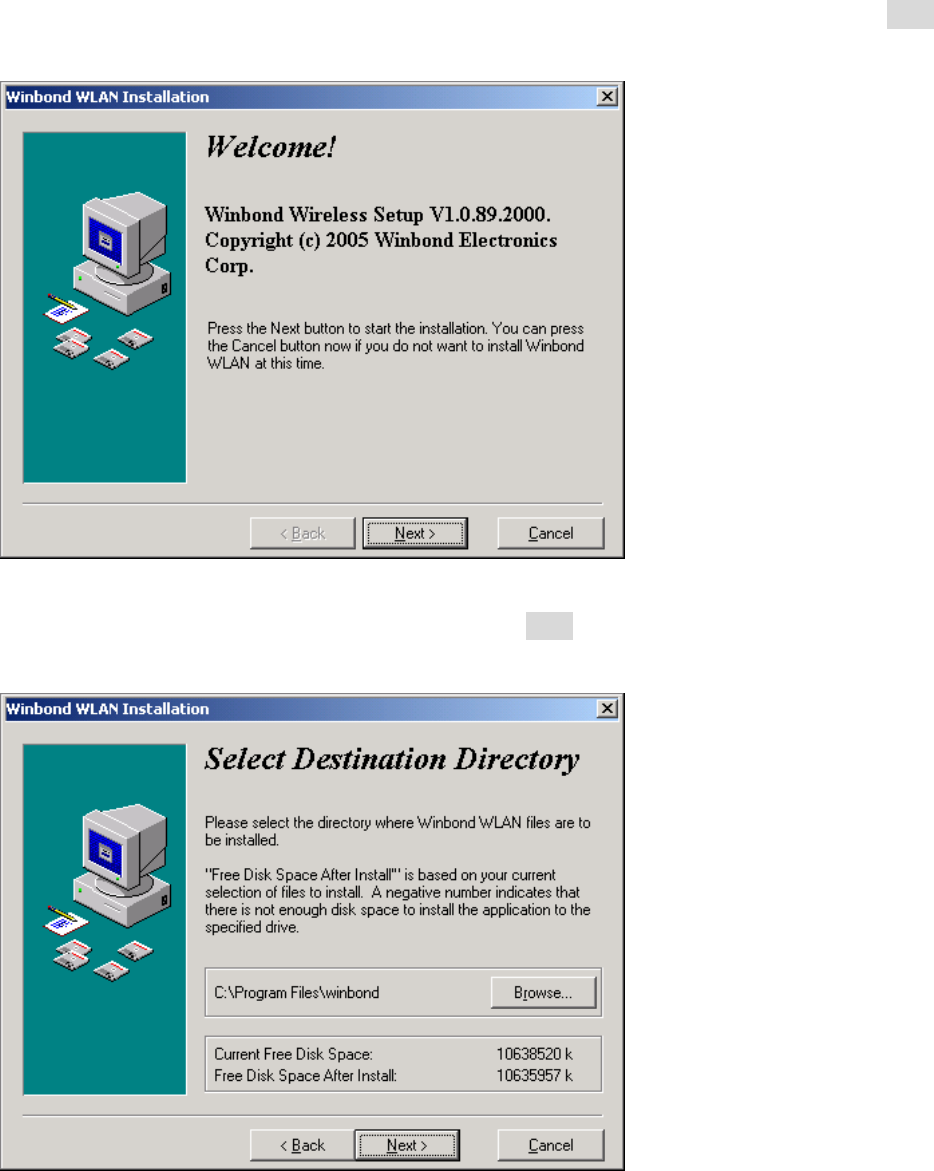
3. Winbond Wireless Setup will install the driver and utility on your system, click Next to
continue.
4. On the Select Destination Directory screen, click Next to accept the Destination Directory for
driver installation..
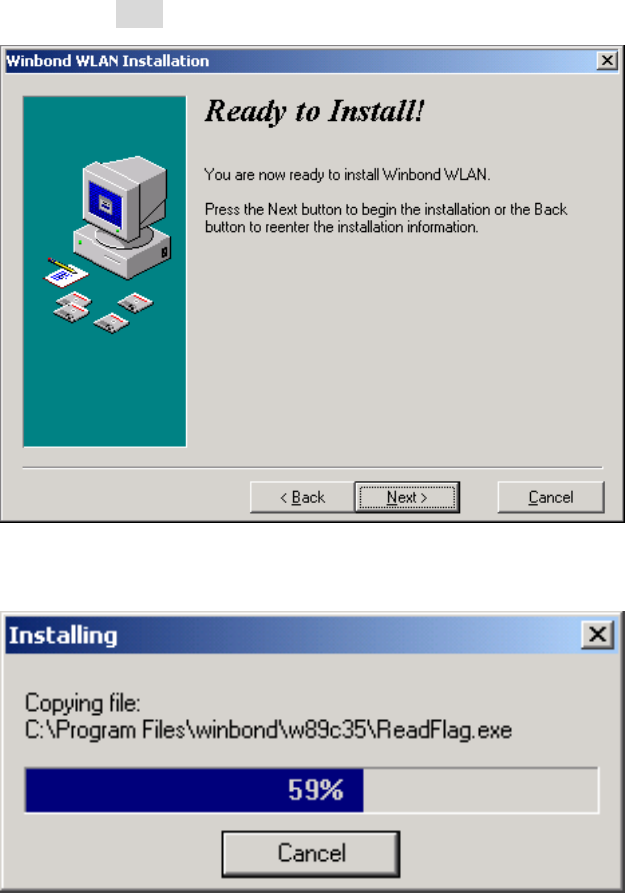
5. Press the Next button to begin the installation.
6. Wireless Adapter Driver and Utility are installing.
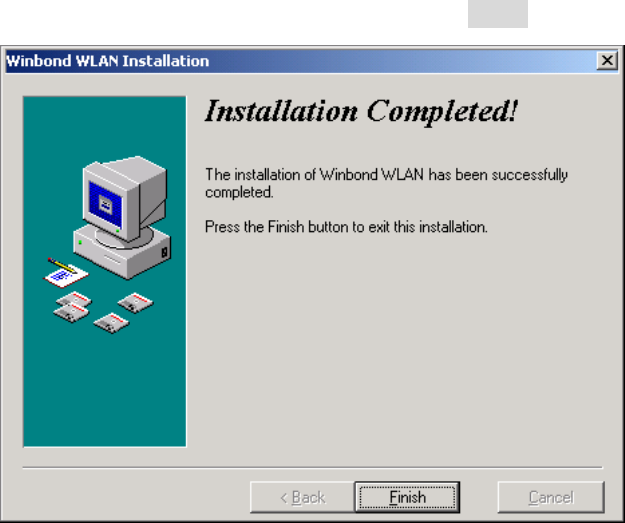
7. The installation is now complete, please click Finish.
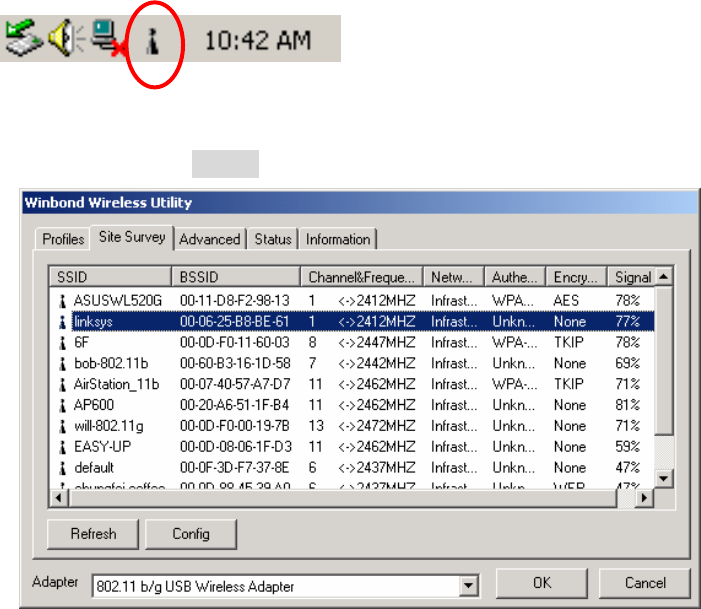
Configuring the Winbond Wireless Utility
1. On the Notification Area, right-click the Winbond Utility icon.
2. Select Site Survey Tab, all available Access Points would be listed. Click on the desired Access
Point, and click Config button for Wireless configuring.
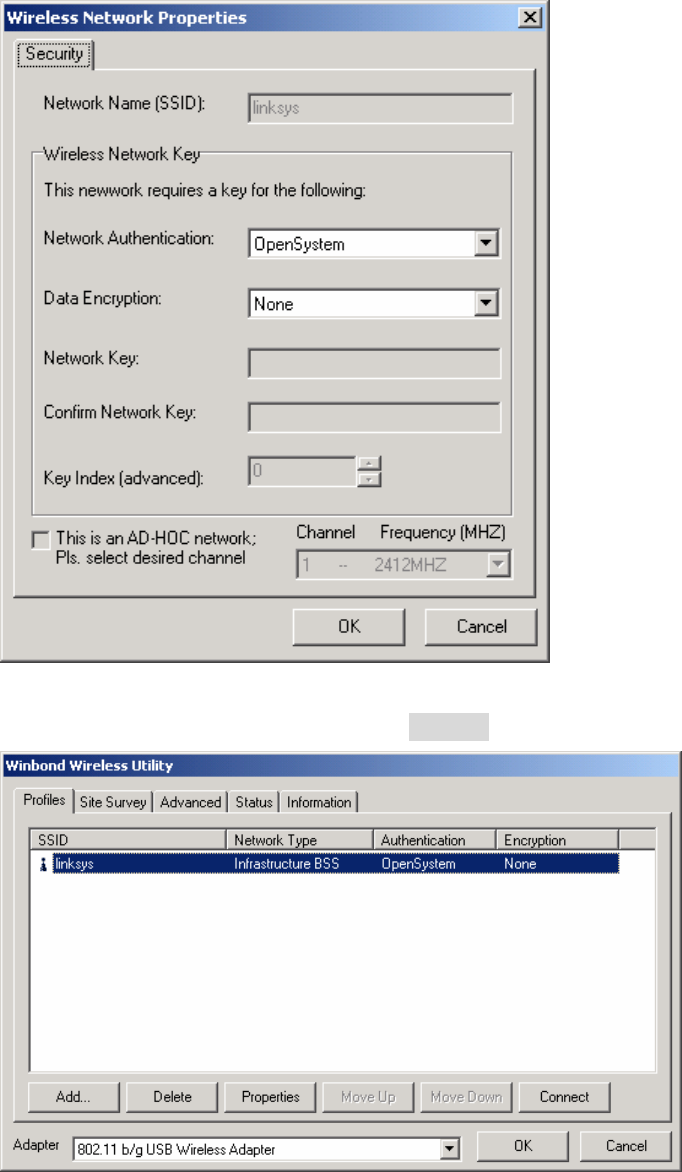
3. On the Wireless Network Properties screen, you may set Network Name (SSID), Wireless
Network Security Key or AD-HOC network.
4. Click on the desired profile, and click the Connect button to take effect.
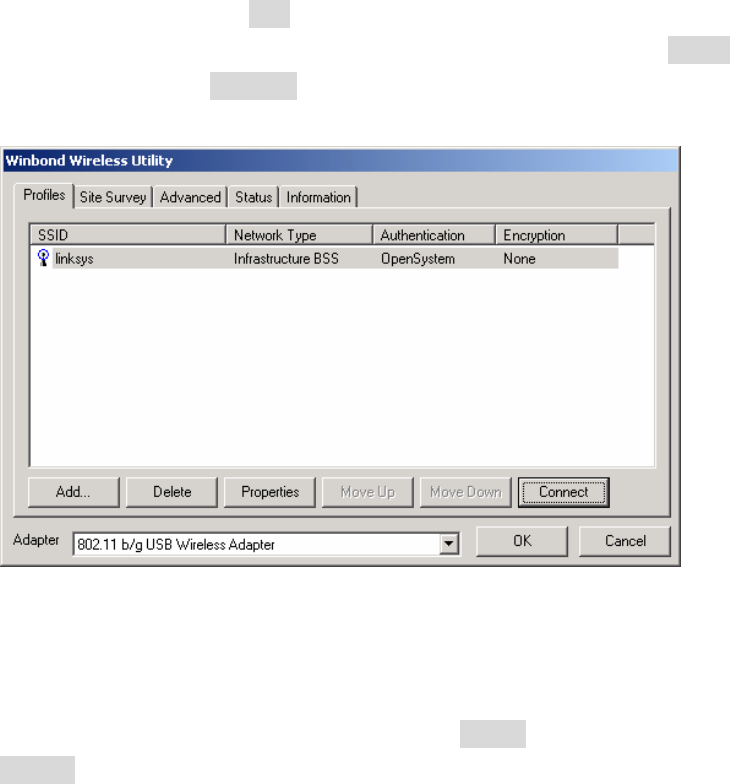
Configuration
z Profile
The Profile Tab allows you to set values for all parameters by selecting a previously defined profile.
To create a profile, click Add, type a profile name and set the corresponding parameters. If one of
the profiles is no longer used, you may remove it by clicking the Delete button. After changing
parameters, click the Connect button to take effect. You can have multiple profiles and modify the
profile at any time.
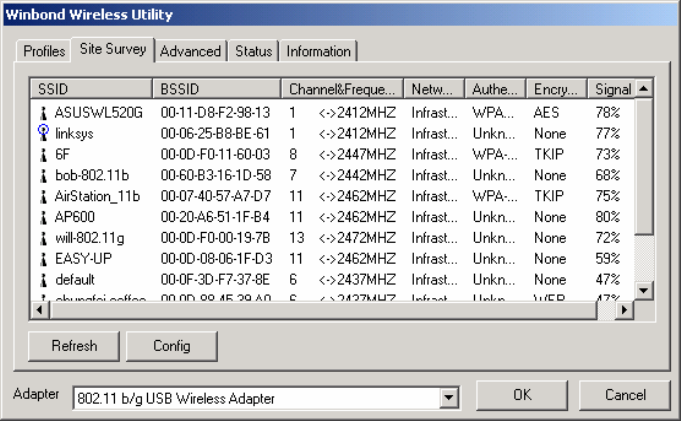
z Site Survey
Site Survey Tab lists the features of the available Access Points within range of the Wireless
Adapter's signal.
Click on the desired Access Point, and click Config for Wireless Configuration. You may click
Refresh to refresh the list.
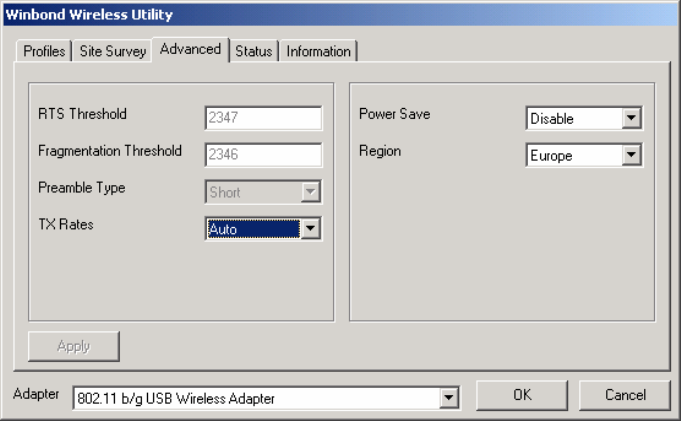
z Advance
The Configuration Utility also offers the advanced configuration for user to set the Wireless
Adapter under certain network environment. These advanced options include RTS Threshold,
Fragmentation Threshold, Preamble Type, Tx Rate, Power Save, and Region.
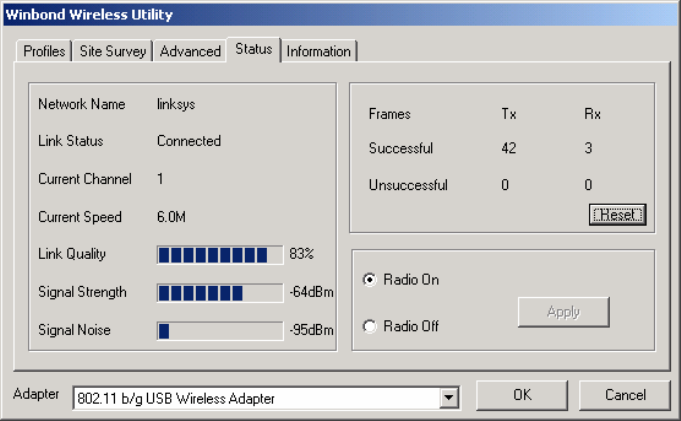
z Status
Network Name
The field shows the association status to available Access Point with SSID of the Access Point.
Link Status
Shows the whether the link is Connect or Disconnected.
Current Channel
Shows the channel on which the connection is made.
Current Speed
Shows the highest transmit rate of the current association.
Link Quality / Signal Strength
The Link Quality and Signal Strength bar graph is only active when the node
is in Infrastructure Mode. The bar graph displays the quality and strength of
the link between the node and its Access Point.
Singnal Noise
This displays the noise level of the link between the node and its Access Point.
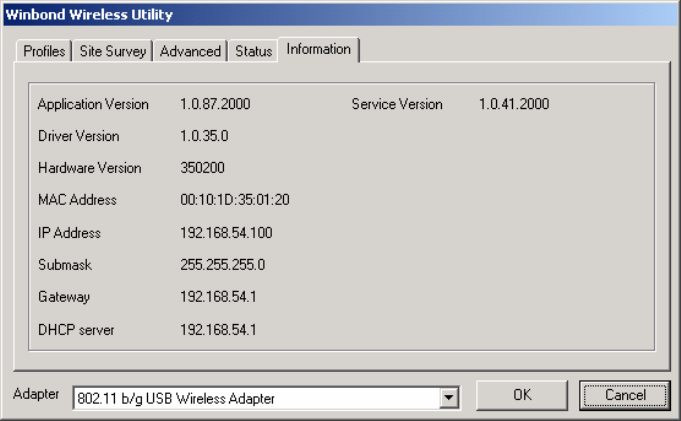
Information
About Tab shows the product version including the detail of Configuration Utility, Driver, and NIC
MAC Address.
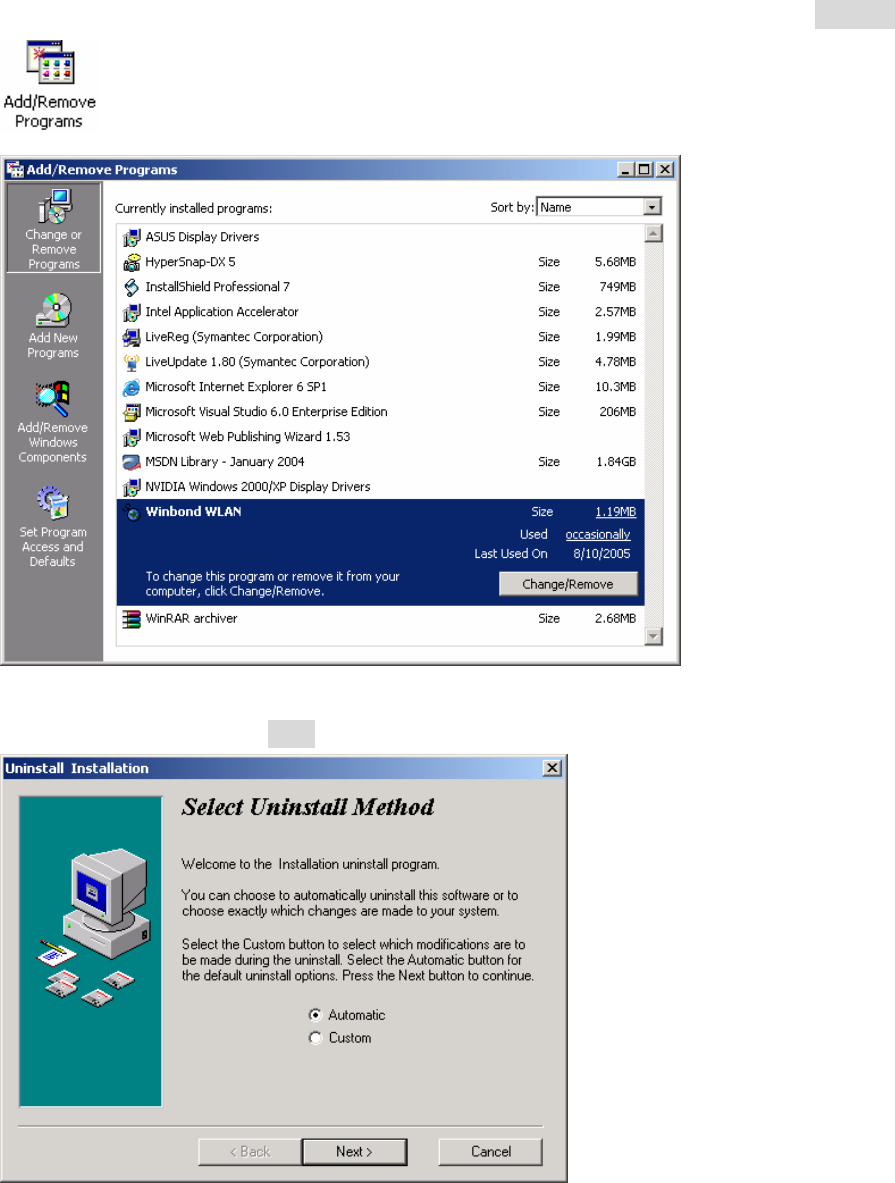
Uninstalling the Wireless Adapter Driver and Utility
1. For uninstalling the Wireless Adapter, please go to:Start->Settings->Control Panel->Add or
Remove Programs->Winbond WLAN under Windows environment. Then click Remove.
2. On the next screen, click Next button to accept automatically uninstall for Wireless LAN Driver.
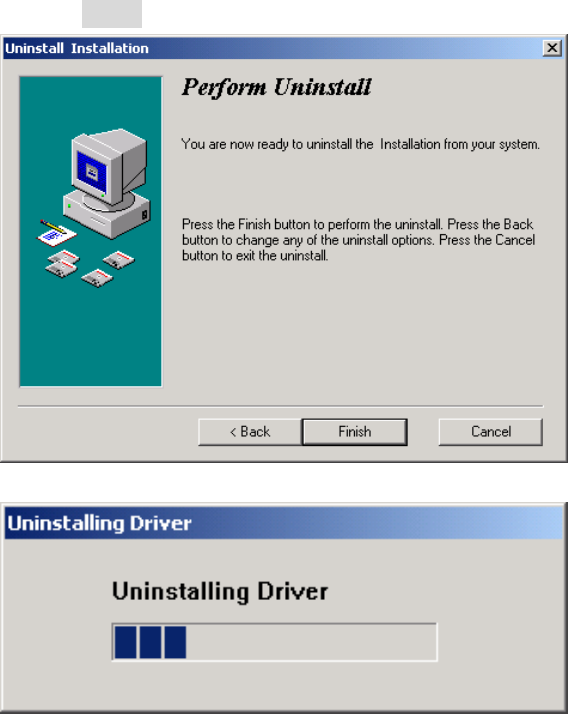
3. Click Finish button.
4. The USB Wireless Adapter can now be safely removed from the system when the un-installation
is done.
Trouble shooting
PING
This section discusses possible solutions using ping command to find your problem if you can’t connect to the
network.
1. Check if you have a valid IP address
2. Test if your TCP/IP works. Under MS-DOS (command prompt), type “ping localhost”. If you didn’t
receive a reply, then you need to re-install your TCP/IP. Proceed to next step if you have received
replies.
3. Using the same procedure, try to ping your Wireless Adapter’s IP. If the Ping command fails, check the
following:
• Your WLAN is connected
• Check that your driver is correctly installed.

Checking Valid IP Addresses
There are restrictions on which IP and addresses you can and cannot use. Some IP addresses are reserved
for testing, multicasting and some IP are restricted by your ISP.
Following IP addresses cannot be used:
¾ 127.x.x.x – this is a loop back address, used for testing
¾ 0.0.0.0 – this IP address represent the host address
¾ 255.255.255.255 – this is local broadcast address
¾ First portion of IP cannot exceed 224, that is, IP addresses which is in the range of 224~239.x.x.x
is not valid. This range of IP is for multicasting. IP range from 240~255.x.x.x are reserved IP
addresses and cannot be used.
¾ 0 or 255 in host ID portion of your IP are not valid. This represent local host or broadcast address
for your class of IP
IP has five classes, namely class A, B, C, D and E. For each class, the host ID portion in the IP field is
different for each of the classes. Figure below illustrate this.
Class A: 1 ~ 127 . Host ID
Class B: 128 ~ 191 . X . Host ID
Class C: 192 ~ 223 . X . X . Host ID
Class D: 224 ~ 239 . Used for Multicasting (no Host ID)
Class E: 240 ~ 255 . Reserved IP address
Host ID cannot be all 0’s or all 255’s.
Note: X denote don’t cares in the above example.