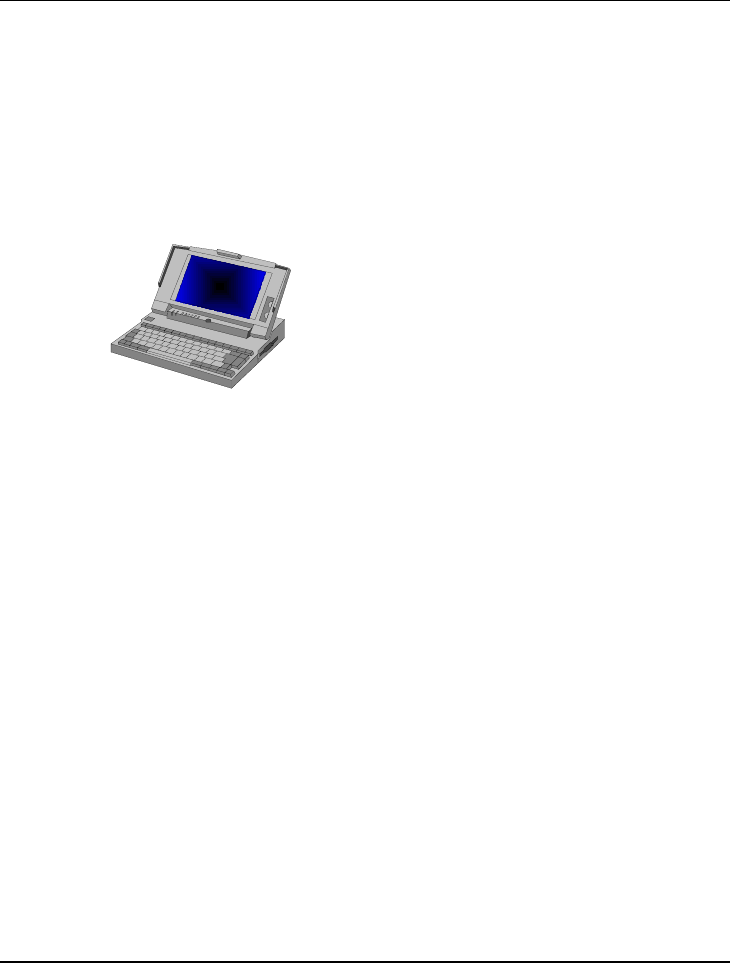
First Computer DARIASVE00 Notebook User Manual
First International Computer Inc Notebook
Contents
- 1. user manual
- 2. User manual
user manual
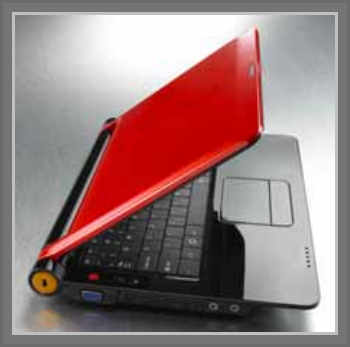
Daria SVE00
Netbook
User Guide

Mini-note User Guide
2
Copyright©2009
All Rights Reserved - Printed in Taiwan
Daria SVE00 Netbook User Guide
Original Issue: 2009/12
This manual guides you in setting up and using your new netbook. Information
in this manual has been carefully checked for accuracy and is subject to change
without notice.
No part of this manual may be reproduced, stored in a retrieval system, or
transmitted, in any form or by any means, electronic, mechanical, photocopy,
recording, or otherwise, without prior written permission.
Trademarks
Product names used herein are for identification purposes only and may be the
trademarks of their respective companies.
Microsoft, Windows 7, Windows XP, Windows Vista, and Windows Sound
System are trademarks of Microsoft Corporation.
Intel ®, Intel ® Atom, Intel ® HD Audio (Azalia) are registered trademark of
Intel Corporation.
Sound Blaster, Sound Blaster Pro are trademarks of Creative Technology.
All other brands or product names mentioned in this manual are trademarks or
registered trademarks of their respective companies.

Notebouide
3
FCC Compliance Statement
This equipment has been tested and found to comply with the limits for a class
B digital device, pursuant to part 15 of the FCC Rules. These limits are
designed to provide reasonable protection against harmful interference in a
residential installation.
This equipment generates uses and can radiate radio frequency energy and, if
not installed and used in accordance with the instructions, may cause harmful
interference to radio communications. However, there is no guarantee that
interference will not occur in a particular installation. If this equipment does
cause harmful interference to radio or television reception, which can be
determined by turning the equipment off and on, the user is encouraged to try
to correct the interference by one or more of the following measures:
z Reorient or relocate the receiving antenna.
z Increase the separation between the equipment and receiver.
z Connect the equipment into an outlet on a circuit different from
that to which the receiver is connected.
z Consult the dealer or an experienced radio/TV technician for
help.
CAUTION:
Any changes or modifications not expressly approved by the party
responsible for compliance could void the user's authority to operate the
equipment.
This device complies with Part 15 of the FCC Rules. Operation is subject
to the following two conditions:
1. This device may not cause harmful interference and
2. This device must accept any interference received, including
interference that may cause undesired operation.
RF exposure warning

Mini-note User Guide
4
This equipment must be installed and operated in accordance with provided
instructions and must not be co-located or operating in conjunction with any
other antenna or transmitter. End-users and installers must be provide with
antenna installation instructions and transmitter operating conditions for
satisfying RF exposure compliance.
SAR Value: 0.00603 W/kg
FCC Declaration of conformity
Model No. : Daria SVE00
Responsible party: First International Computer, Inc.
Address: No. 300, Yang Guang St., Nei Hu, Taipei, Taiwan.
Telephone No.: 886-8751-8751
This device complies with Part 15 of the FCC Rules. Operation is subject to
the following two conditions:
Canadian Department of Communications Compliance Statement
電波障害自主規制について
この装置は、情報処理装置等電波障害自主規制協議会(VCCI)の基
準に基づくクラスB情報技術装置です。この装置は、家庭環境で使用
することを目的としていますが、この装置がラジオやテレビジョン
受信機に近接して使用されると、受信障害を引き起こすことがあり
ます。取扱説明書に従って正しい取り扱いをしてください。
European Notice

Notebouide
5
For the following equipment: Notebook PC
It is herewith confirmed to comply with the requirements set out in the
Council Directive on the Approximation of the Laws of the Member States
relating to Electromagnetic Compatibility (2004/108/EC), Low-voltage
Directive (2006/95/EC) and the Amendment Directive (93/68/EEC), the
procedures given in European Council Directive (1999/5/EC) and
(2004/108/EC).
The equipment was passed. The test was performed according to the following
European standards:
EN55022: 2006 + A1: 2007
EN61000-3-2: 2006
EN61000-3-3: 1995 + A1: 2001 + A2: 2005
EN55024: 1998 + A1: 2001 + A2: 2003
IEC61000-4-2: 1995 + A1: 1998 + A2: 2000;
IEC61000-4-3: 2006; IEC61000-4-4: 2004;
IEC61000-4-5: 2005; IEC 61000-4-6: 2003 + A1: 2004 + A2:2006;
IEC61000-4-8: 1993 + A1: 2000; IEC6100-4-11: 2004
EN 301 489-1 V1.8.1:2008; EN 301 489-17 V1.3.2: 2007
EN 300 328 V1.7.1 (2006-10)
EN 50392: 2002
EN 60950-1:2001

Mini-note User Guide
6
Regulatory statement (R&TTE)
European standards dictate maximum radiated transmit power of 100mW
EIRP and frequency range 2.400-2.4835GHz;
In France, the equipment much be restricted to the 2.4465-2.4835GHz
frequency range and must be restricted do indoor use.
Operation of this device is subjected to the following National regulations and
may be prohibited to use if certain restriction should be applied.
You are cautioned that changes or modifications not expressly approved by the
party responsible for compliance could void your authority to operate the
equipment.
Important Safety Instructions
This section gives you detailed information about how to maintain a safe
working environment while using the Notebook (Laptop). You can maintain its
condition and performance by following these guidelines. Please read it
carefully to ensure maximum safety.
1. Please read these safety instructions carefully.
2. Please keep this User manual for later reference.
3. Please keep this equipment from humidity.
4. Do not use this product near water, for example, near a bathtub, wash bowl,
kitchen sink or laundry tub, in a wet basement or near a swimming pool.
5. Avoid using a telephone (other than a cordless type) during an electrical
storm. There may be a remote risk of electric shock from lightning.
6. Do not use the telephone to report a gas leak in a vicinity of the leak.
7. Lay this equipment on a reliable surface when install. A drop or fall could
cause injury.
8. All cautions and warnings on the equipment should be noted.

Notebouide
7
9. Do not operate the Notebook (Laptop) with the cover removed. For
safety reason, the equipment should only be opened by qualified service
personnel.
10. Always disconnect all telephone lines & all power cords from the wall
outlet before servicing or disassembling this product. To reduce the risk of
personal injury from electrical shock or hot surfaces, disconnect the power
cord from the wall outlet, and allow the internal system components to
cool before touching.
11. Refer your system for servicing to qualified service personal under the
following conditions:
z When the power cord or plug is damaged or frayed.
z If liquid has been spilled into the product.
z If the product has been exposed to rain or water.
z If the product does not operate normally when the operating
instructions are followed. Adjust only those controls that are covered
by the operating instructions, since improper adjustment of other
controls may result in damage and will often require extensive work by
a qualified technician to restore the product to normal condition.
z If the product has been dropped or the cabinet has been damaged.
z If the product displays a distinct change in performance, it indicates a
need for service.
z If the equipment has obvious sign of breakage.
12. The unit can be operated at maximum ambient temperature of 35ºC.
13. Li-Ion battery is vulnerable, do not charge it with other power adapter, or it
may cause fire or explosion
14. This product should be operated from the type of power indicated on the
marking label. If you are not sure of the type of power available, consult
your dealer or local power company.
15. Use only a power adapter approved for use with this Notebook (Laptop).
16. Do not install near any heat sources such as radiators, heat registers, stoves,
or other apparatus (including amplifiers) that produce heat.

Mini-note User Guide
8
17. If the Notebook (Laptop) is not in use for a long time, disconnect it from
mains to avoid possible damage by transient over-voltage.
18. The risk of ignition caused by small metallic objects, such as paper clips or
staples, moving around inside TRANSPORTABLE EQUIPMENT during
transportation shall be reduced objects entering the equipment, please do
not remove dummy card from the product.
Installation Restrictions
1. If an extension cord is used with this product, make sure that the total
ampere rating of the equipment plugged into the extension cord does not
exceed the extension cord ampere rating. Also, make sure that the total
rating of all products plugged into the wall outlet does not exceed the fuse
rating.
2. Never push objects of any kind into this product through cabinet slots as
they may touch dangerous voltage points or short out parts that could
result in a fire or electronic shock. Never spill liquid of any kind on the
product.
3. For electrical safety concerns, only use telephone cables rated 26AWG or
higher.
4. Unplug this product from the wall outlet before cleaning. Do not use liquid
cleaners or aerosol cleaners. Use a dry cloth for cleaning. Ensure that no
liquid enters the system.
Laser Compliance Statement
The CD-ROM/DVD-ROM/CD-RW/DVD-RW drive in this computer is a
laser product. The CD-ROM/DVD-ROM/CD-RW/DVD-RW drive’s
classification label (shown below) is located on the drive.
CLASS 1 LASER PRODUCT
Caution: Use to any controls or adjustments or
procedures other than those specified herein may result
in hazardous radiate exposure. To prevent exposure to
laser emanations (Harmful to Human eyes), do not

Notebouide
9
attempt to disassemble this unit.
Battery (Lithium)
Note:
1. The following caution statement is located in the service and operating
manual or on the label adjacent to the battery.
2. Risk of explosion if battery is replaced by an incorrect type.
3. Do not dispose of batteries in a fire.
1. English
CAUTION: DANGER OF EXPLOSION IF BATTERY IS INCORRECTLY
REPLACED. REPLACE ONLY WITH SAME OR EQUIVALENT TYPE
RECOMMENDED BY THE MANUFACTURER. DISCARD USED
BATTERIES ACCORDING TO THE MANUFACTURER'S
INSTRUCTIONS.
2. French
IL Y A DANGER D'EXPLOSION S'IL Y A REMPLACEMENT
INCORRECT DE LA BATTERIE. REMPLACER UNIQUEMENT AVEC
UNE BATTERIE DU MÊME TYPE OU D'UN TYPE RECOMMANDÉ
PAR LE CONSTRUCTEUR. METTER AU RÉBUT LES BATTERIES
USAGÉES CONFORMÉMENT AUX INSTRUCTIONS DU FABRICANT.
3. German
VORSICHT ! Explisionsgefahr bei unsachgemäßen Austausch der
Batterie. Ersatz nur durch denselben oder einem vom Hersteller
empfohlenem ähnlichen Typ. Entsorgung gebrauchter Batterien nach
Angaben des Herstellers.
4. Swedish
Mini-note User Guide
10
Explosionsfara vid felaktigt batteribyte. Använd samma batterityp eller
en ekvivalent typ som rekommenderas av apparattillverkaren. Kassera
använt batteri enligt fabrikantens instruction.
5. Danish
Lithiumbatteri- Eksplosionsfare ved fejlagtig håndtering. Udskiftning
må kum ske med batteri af samme fabrikat og type. Lever det brugte
batteri tilbage til leverandoren.
6. Norwegian
Ekspolsjonsafe ved feilaktig skifte av batteri. Benytt samme batteritype
eller en tilsvarende type anbefalt av apparatfabriknten. Brukte batterier
kasseres i henhold til fabrikantens instruksjoner.
7. Finnish
Paristo voi räjähtää, jos se on virheellisesti asennettu. Vaihda paristo
ainostaan laitevalmistajan suosittelemaan tyyppiin. Hävitä käyteet
paristo valmistajan ohjeiden mukaisesti.
Power Cord Set Requirements
z An approved power cord has to be used.
z Make sure the socket and any extension cord(s) you use can
support the total current load of all the connected devices.
z Before cleaning the computer, make sure it is disconnected from
any external power supplies (i.e. AC adapter).
z The power cord set (appliance coupler, flexible cord, and wall
plug) you received with the Notebook (Laptop) meets the
requirements for use in the country where you purchased the
equipment.

Notebouide
11
z Power cord sets for use in other counties must meet the
requirements of the country where you use the computer. For
more information on power cord set requirement, contact your
local authorized dealer, reseller, or service provider.
z Protect the power cord form being walked on or pinched
particularly at plugs, convenience receptacles, and the point
where they exit from the apparatus.
Power Lines
Do not locate the antenna near overhead light or power circuits, or where it
could fall into such power or circuits.
Warning: When installing or realigning an outside antenna system, extreme
care should be taken to keep from touch such power lines or circuits. Contact
with them could be fatal.
Mini-note User Guide
12
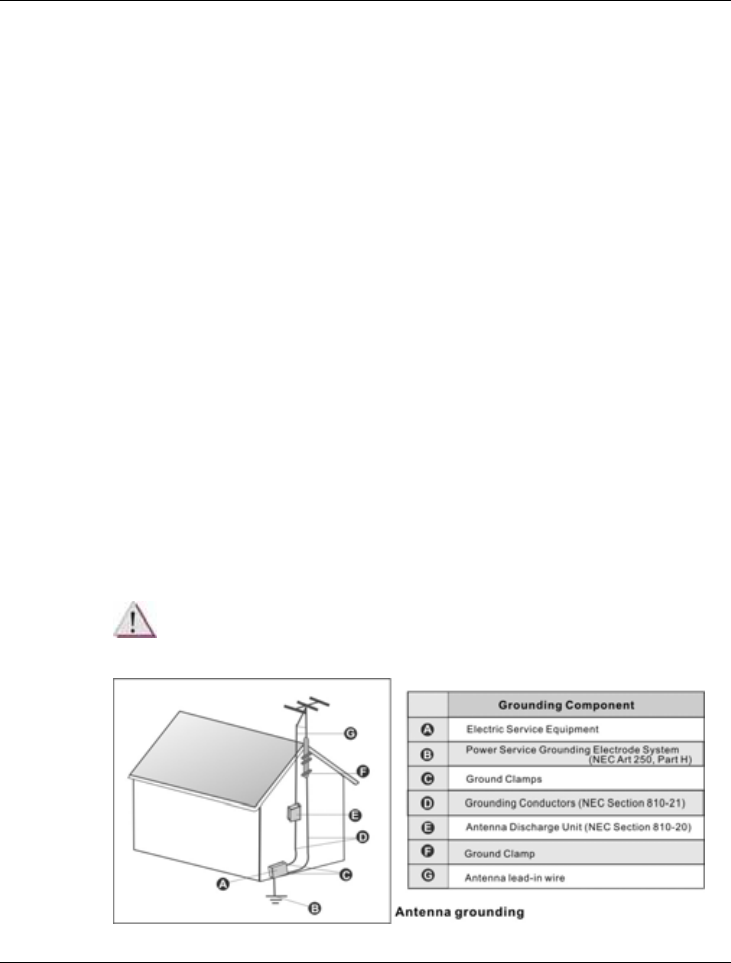
Television antenna connectors protection (for system TV tuner card)
(Optional)
External television antenna grounding
If an outside antenna or cable system is to be connected to your Netbook,
make sure that the antenna or cable system is electrically grounded to provide
some provide some protection against voltage surges and static charges.
Article 810 of the National Electrical Code. ANSI/NFPSA 70, provide
information with regard to proper grounding of the mask and supporting
structure, grounding of the lead-in wire to an antenna discharge unit, size of
grounding conductors, location of antenna discharge unit, connection to
grounding electrodes, and requirements for the grounding electrode.
Lightning protection
For added protection of any product during a lightning storm or when it is left
unattended or unused for long periods of time, unplug the product from the
wall outlet and disconnect the antenna or cable system.
Må Kun tilkoples kabel-TV nett via galvanisk isolator.

Notebouide
13
CATV Cable Safety
Make sure that your CATV system installer has connected the Coaxial cable
shield to the grounding system of the building, as close to the point of cable
entry as practical.
TV Antenna
The TV antenna supplied with any TV Tuner module is intended for Indoor
use only. Please do not use your TV Tuner module outdoors.
Battery Pack
"Do not incinerate, (or) disassemble; may explode or release toxic materials.
Do not short circuit; may cause burns. "
Mini-note User Guide
14
About Your Netbook
Congratulation for having purchased your new Netbook.
This Netbook incorporates the newest features to serve your
daily needs easily for anywhere you go.
Notebouide
15
About Your User Guide
Welcome to your New Netbook User Guide. This manual
introduces you to the basic concepts of your new Netbook.
This manual is divided into eight chapters.
Chapter 1 Introduction
Chapter 2 Getting Started
Chapter 3 Using Your Netbook
Chapter 4 Connecting to Peripherals
Chapter 5 Customizing your Netbook
Chapter 6 Caring for your Netbook
Appendix A System Specifications

Mini-note User Guide
16
Table of Contents
ABOUT YOUR NETBOOK................................................................... 14
ABOUT YOUR USER GUIDE............................................................... 15
1 INTRODUCTION............................................................................. 21
1.1 FEATURE HIGHLIGHT .................................................................... 22
1.2 UNPACKING THE NETBOOK ........................................................... 24
1.3 THE INSIDE OF THE NETBOOK........................................................ 25
Netbook Status Icons .................................................................... 27
The Function of Easy Buttons ...................................................... 29
1.4 THE LEFT SIDE OF THE NETBOOK.................................................. 30
1.5 THE RIGHT SIDE OF THE NETBOOK................................................ 31
1.6 THE UNDERSIDE OF THE NETBOOK................................................ 32
1.7 NETBOOK ACCESSORIES................................................................ 33
2 GETTING STARTED...................................................................... 35
2.1 USING THE BATTERY PACK ........................................................... 36
Extending Battery Life.................................................................. 36
2.2 CONNECTING THE AC POWER SOURCE.......................................... 37
2.3 STARTING YOUR NETBOOK ........................................................... 38
2.4 ADJUSTING THE DISPLAY CONTROLS ............................................ 39
2.5 DEVICE DRIVERS INSTALLATION................................................... 40
Installing Windows 7 from Optical Disk Drive............................... 40
Installing the Chipset Driver........................................................ 40
Installing the VGA Device Driver................................................ 41
Installing the Audio Device Driver .............................................. 42
Installing the Touch Pad Device Driver ...................................... 42
Installing the Wireless LAN Device Driver.................................. 43
Installing the Bluetooth Driver & Utility..................................... 43

Notebouide
17
Installing The Bluetooth Device Driver & Utility........................ 44
Installing the 3G HSDPA Device Driver (Optional).................... 44
Installing the LAN Device Driver................................................. 45
Installing the Camera Device Utility............................................ 45
Installing the Utility Program Component Device Driver........... 46
Installing the Hotkey Utility ......................................................... 46
2.6 TURNING OFF YOUR NETBOOK...................................................... 47
3 USING YOUR NETBOOK .............................................................. 48
3.1 STARTING YOUR OPERATING SYSTEM........................................... 49
3.2 UNDERSTANDING THE KEYBOARD FUNCTIONS.............................. 49
Basic Keyboard Functions ........................................................... 51
Cursor Control Keys..................................................................... 53
Screen Control Keys..................................................................... 53
Windows Hot Keys........................................................................ 54
Special Function Keys.................................................................. 54
3.3 USING THE TOUCHPAD POINTING DEVICE ....................................... 56
3.4 CONFIGURING YOUR SCREEN DISPLAY ......................................... 58
Possible Display Configurations.................................................. 58
Changing the Display Properties under Windows.................................. 59
3.5 KNOWING THE POWER SAVING FEATURES .................................... 59
3.6 WORKING WITH THE BUILT-IN HDD............................................... 61
3.7 SIM CARD..................................................................................... 61
Inserting and Removing a SIM Card............................................ 61
3.8 USING FLASH MEMORY CARDS..................................................... 63
Flash Memory Card ..................................................................... 63
4 CONNECTING TO PERIPHERALS............................................. 65
4.1 USING THE USB PORT ................................................................... 66
4.2 USING AN EXTERNAL MONITOR PORT .................................................. 67
4.3 USING THE EXTERNAL AUDIO SYSTEM.......................................... 68

Mini-note User Guide
18
4.4 USING THE LAN PORT .................................................................. 68
4.5 USING THE WIRELESS LAN........................................................... 69
5 CUSTOMIZING YOUR NETBOOK................................................ 71
5.1 RUNNING THE BIOS SETUP PROGRAM .......................................... 72
5.2 USING THE MAIN MENU SETUP..................................................... 74
5.2.1 Internal HDD Sub-Menu................................................... 76
5.3 USING THE ADVANCED CMOS SETUP........................................... 77
5.4 SECURITY MENU SETUP ................................................................ 78
5.5 USING THE BOOT SETUP................................................................ 79
5.6 HOW TO EXIT THE SETUP PROGRAM.............................................. 80
5.7 HOW TO UPGRADE THE BIOS........................................................ 81
6 CARING FOR YOUR NETBOOK .......................................................... 83
6.1 IMPORTANT SAFETY INSTRUCTIONS .............................................. 84
6.2 CLEANING YOUR NETBOOK .......................................................... 86
6.3 MAINTAINING THE LCD QUALITY ................................................ 86
6.4 MAINTAINING YOUR HARD DISK .................................................. 87
6.5 BATTERY CARE GUIDELINES......................................................... 88
6.6 WHEN YOU TRAVEL...................................................................... 89
APPENDIX A SYSTEM SPECIFICATION........................................ 90
SYSTEM SPECIFICATION .......................................................................... 91
Processor Unit.............................................................................. 91
System Memory............................................................................. 91
LCD Display................................................................................. 91
VGA System.................................................................................. 91
Storage.......................................................................................... 92
Audio System ................................................................................ 92
Webcam ........................................................................................ 92
Touchpad...................................................................................... 92

Notebouide
19
Keyboard ...................................................................................... 93
Flash BIOS ................................................................................... 93
I/O Ports ....................................................................................... 93
Wireless devices............................................................................ 93
AC/DC Power Supply Adapter ..................................................... 93
Battery .......................................................................................... 93
Weight and Dimension ................................................................. 94
Introduction1
21
1 Introduction
Your Netbook is a fully Windows® compatible
portable computer. Slim, sleek ultra-portable
computer. This device matches all the demands for
optimized mobile computing technology.

Mini-note User Guide
22
1.1 Feature Highlight
Before we identify each part of your Netbook, we will first introduce you to
other notable features of your Netbook.
Processing Unit
• Check Your Netbook runs on Intel® N450 Pine-View microprocessor
that is integrated with 512KB L2 Cache. Check with your dealer on the
CPU type and speed.
• Fully compatible with an entire library of PC software based on operating
systems such as Windows 7.
Memory
This Netbook provides one memory slot for installing DDRII SDRAM 200-
pin SODIMM module up to 2GB using 512MB or 1024MB DDRII SDRAM
module.
Wide Screen LCD Display
Provides 10.1" 1024 x 600 (16:9) wide screen LCD display.
Wireless LAN
• IEEE 802.11b/g/n, half PCI-E Mini Card.
Bluetooth
Provides Bluetooth function with USB Interface.

Introduction1
23
HSPDA 3G
Provides greatly expand transfer capacity for data, audio and video
transmission. It is always working with SIM card.
Webcam
Provides Webcam function with 1.3M pixels.
USB 2.0
Provides two USB2.0 ports for fastest I/O data transmission.
Graphic System
Provides blazing graphics controller embedded in Intel N450 CPU.
PCI Local Bus Architecture
32-bit PCI Enhanced IDE optimizes the data transfer between the CPU and
SATA1 hard disk drives. Support ultra DMA ATA-300 PIO Mode up to PIO
Mode 4, bus mastering for LBA Scheme.
Audio System
Compliant with Intel HD Audio (Azalia). Sound Blaster compatible. Support
32-bit, multi-channel audio system output.
Flash BIOS
Flash BIOS allows you to easily upgrade the System BIOS using the Phoenix
Flash utility program.

Mini-note User Guide
24
Power and System Management
• Integrated SMM (System Management Mode) on system chipset that shuts
down components not in use to reduce power consumption. To execute
power management, you can set up the parameter in Power Options
properties by pointing your mouse to Control Panel of Windows.
• Closing the Netbook (lowering the cover) allows you to stand by the
system operation instantly. To wake up the system, press the power
button or open the cover lid.
• System Password for User and Supervisor included on the BIOS SETUP
Program to protect unauthorized use of your Netbook.
1.2 Unpacking the Netbook
Your Netbook comes securely packaged in a sturdy cardboard shipping carton.
Upon receiving your Netbook, open the carton and carefully remove the
contents. In addition to this User Guide, the shipping carton should also
contain the following items:
; The Netbook
; An AC Adapter and AC Power Cord
; Li-Ion Battery Pack
; DVD Driver Utility and User Guide
; Quick Setup Manual
Introduction1
25
Carefully inspect each component to make sure that nothing is missing and/or
damaged. Be sure to save the shipping materials and the carton in case you
need to ship the Netbook or store for an extended period of time.
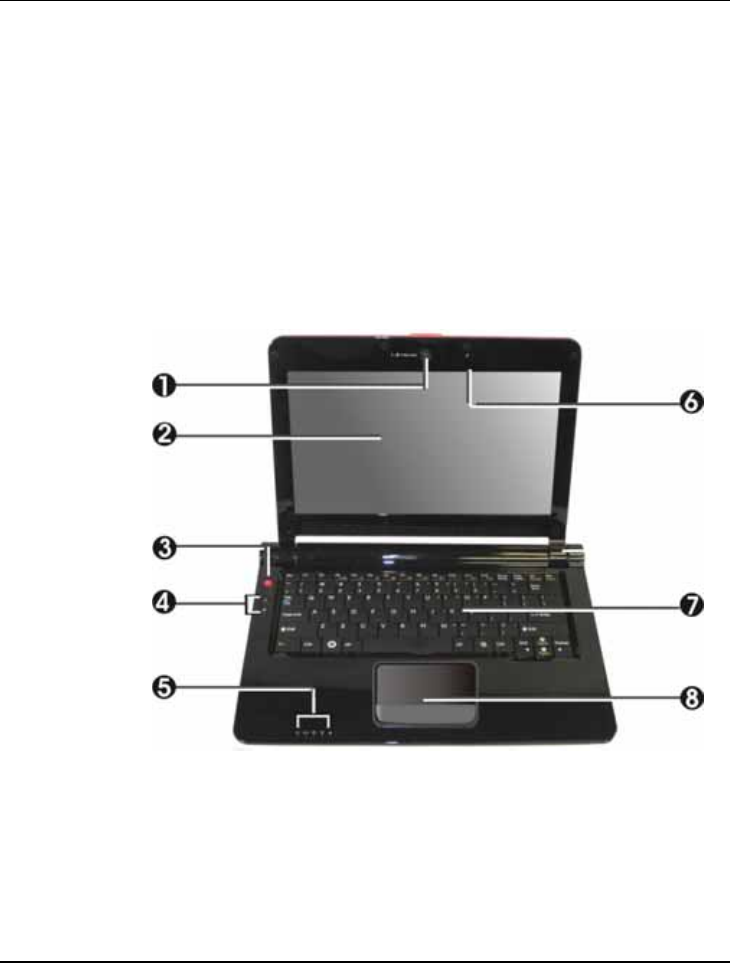
1.3 The Inside of the Netbook
The Netbook is compact with features on every side. First, look at the
inside of the system. The following sections describe inside features.
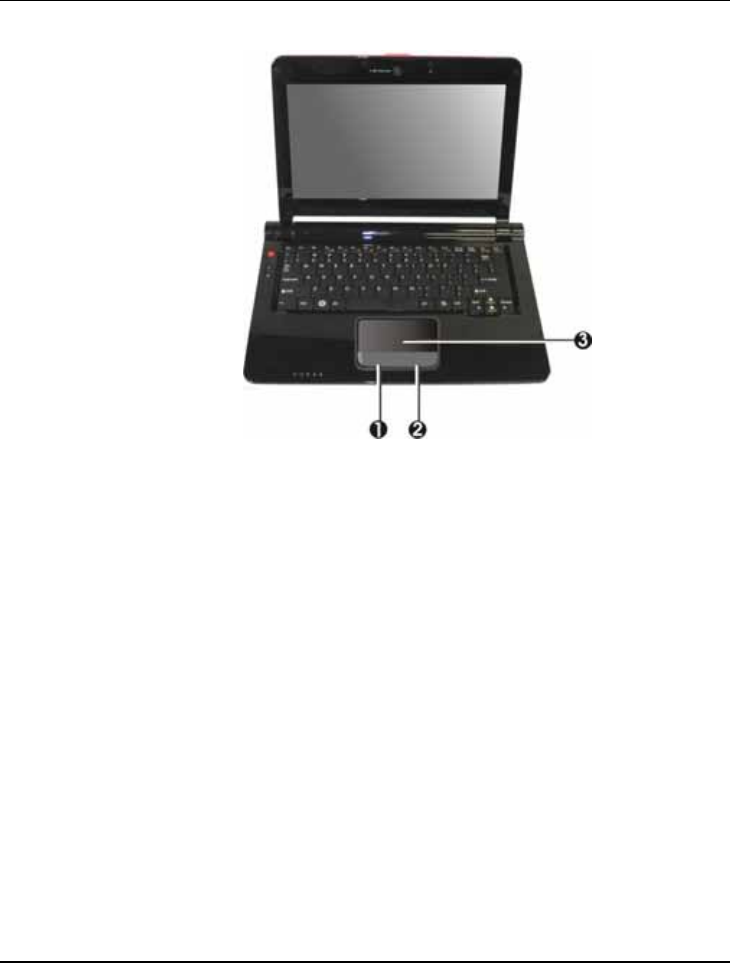
1. Webcam 2. Color Widescreen LCD Display.
3. Power On/Resume Button 4. Easy Buttons
5. LED Indicators 6. Integrated Microphone
7. Keyboard 8. Touchpad Pointing Device

Mini-note User Guide
26
• Webcam
The Webcam is 1.3M pixels. It can be used as a communication device
that transmits instant image through network for conference.
• Color Widescreen LCD Display
The Netbook comes with a color LCD that you can adjust for a
comfortable viewing position. The LCD is 10.1" TFT color LCD with
1024 x 600 (WSVGA) resolution panels. The features of the Color LCD
Display are summarized as follows:
TFT color LCD with Widescreen 10.1" 1024 x 600 (WSVGA)
resolution panels.
Capable of displaying 16M colors (32-bit true color)
LCD display control hot-keys allow you to adjust the brightness of
the LCD.
Simultaneous display capability for LCD and external desktop
computer monitor.
• Power On/Resume Button
Switches the Netbook power on and off, or resumes whenever it is in
Standby and Hibernate mode.
• Easy Buttons
There are two easy buttons used for Wireless LAN accessing and Screen
Rotate executing instantly and easily. Description of the easy buttons
appears in the latter part of this section.
• LED Indicators
Keeps you informed of your Netbook current power status and operating
status. Description of the status icons appears in the latter part of this
section.

Introduction1
27
• Integrated Microphone
Integrated mono microphone for instant voice recording and
simultaneous voice conversation.
• Keyboard
Standard QWERTY-key layout and full-sized 83 keys keyboard with
Windows system hot-keys, embedded numeric keypad, 10 hot keys,
inverted "T" cursor arrow keys, and separate page screen control
keys.
Wide space below the keyboard panel for your wrist or palm to sit-
on comfortably during typing.
• Touchpad Pointing Device
Microsoft mouse compatible with two Touchpad click buttons. The two
select buttons located at each side of the Touchpad support tapping
selection and dragging functions. These buttons work like a standard
notebook mouse. Simply move your fingertip over the Touchpad to
control the position of the cursor. Use the selection buttons at each side
of the Touchpad to select menu items.
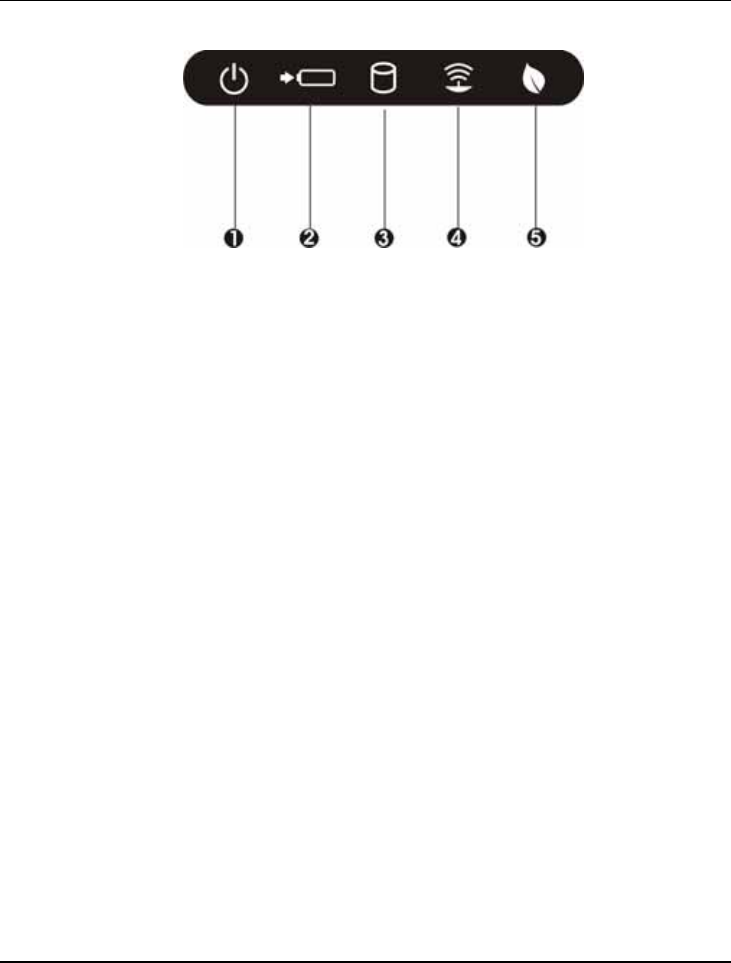
NETBOOK STATUS ICONS
The Status LED Panel keeps you informed of the Netbook’s current power
and operating status. Each LED is marked with an icon to designate the
system status.
Mini-note User Guide
28
1. Power Indicator 2. Battery Charging
3. Drive Access 4. WLAN/Bluetooth Access
5. Silent Mode
• Power Indicator
Lets you know that power to the system is turned on. This LED is
positioned so that you can see the power state whether the LCD panel is
opened or closed.
Lights green when the system is powered on.
Lights green blinking when the system is in Standby mode.
Lights amber blinking when the battery power is critical low.
• Battery Charging LED
Lights to indicate battery in charging status.
Lights on to indicate that the battery is in charging.
When the light is off, it indicates no battery installed.
Lights orange to indicate that the battery is in discharging.
Lights orange blinking when the battery is in low capacity (8%).
Lights green to indicate the battery is fully charged.
Lights green blinking when the battery is in charging.
Introduction1
29
• Drive Access
When LED turns on indicates that the system is accessing the Hard Disk
Drive.
• WLAN/Bluetooth Access
When LED turns on indicates that the wireless LAN & Bluetooth module
is activated. When LED lights off, it indicates that the function is disabled.
• Silent Mode
When LED in blue blinking light indicates that the system is decreasing
the CPU performance speed in order to save power for extending battery
life and operation time.
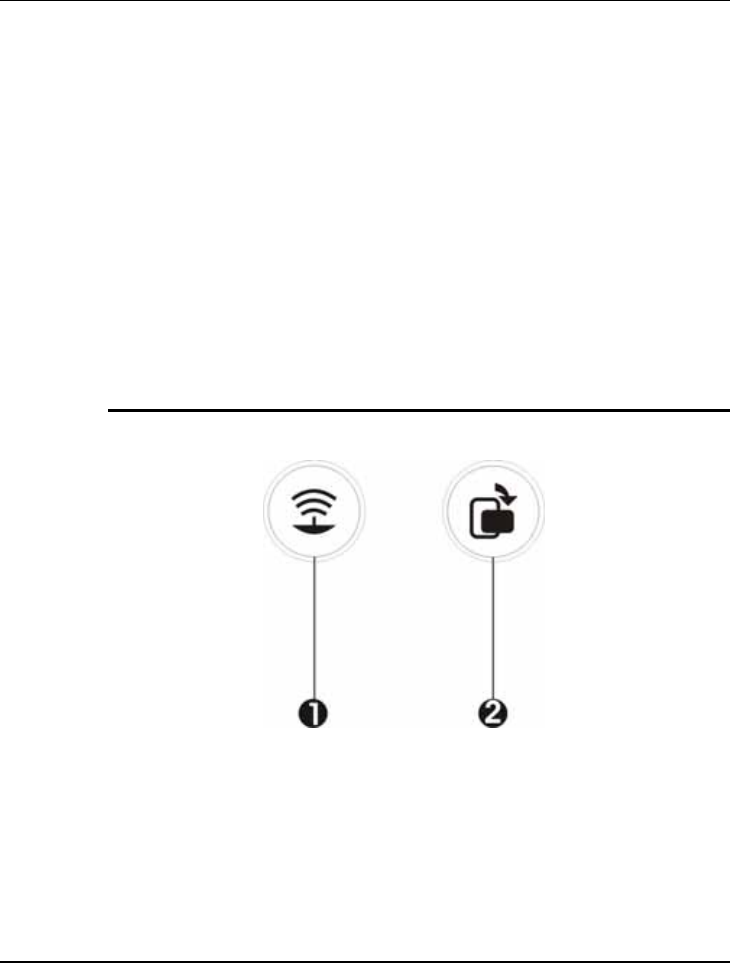
THE FUNCTION OF EASY BUTTONS
1. WLAN/Bluetooth Access Button 2. Screen Rotate Button
• WLAN/Bluetooth Button
Push this button to activate or inactivate the WLAN/Bluetooth. When
you activate the WLAN/Bluetooth function, it will search the
WLAN/Bluetooth signal automatically if you had installed the driver.
Mini-note User Guide
30
• Internet Button
This easy button is designed specifically for executing the Screen Rotate
function on the touchpad.
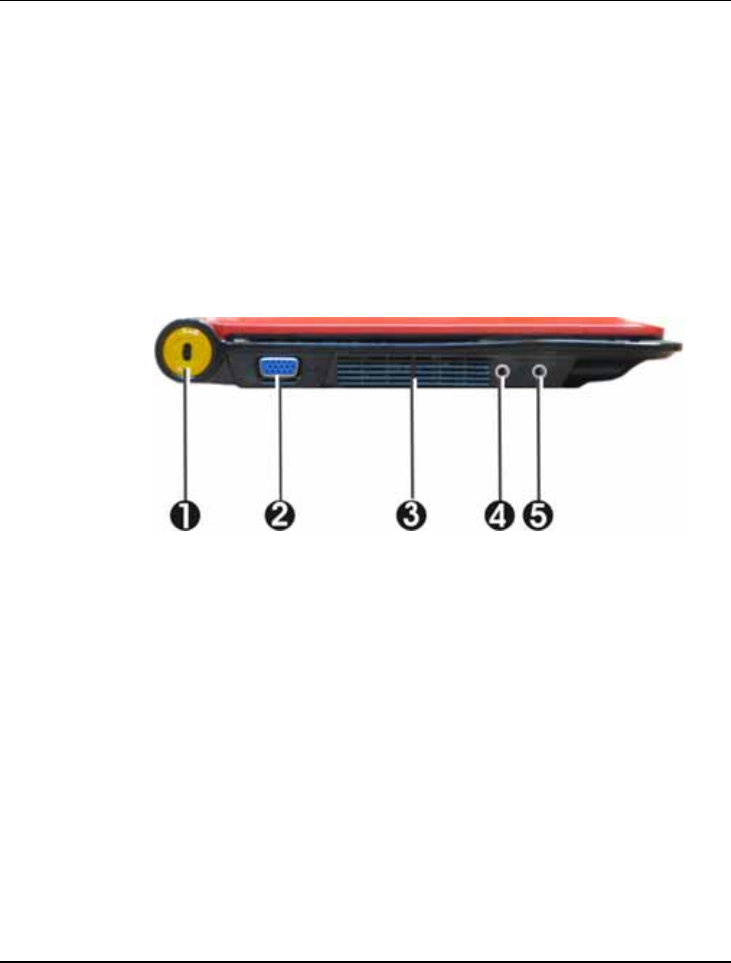
1.4 The Left Side of the Netbook
The left side of your Netbook provides the features shown in the following
figure.
1. Locking Device Keyhole 2. VGA Port
3. Air-Outlet Vent 4. Microphone Jack
5. Headphone Jack
• Locking Device Keyhole
Lets you attach a Kensington security system or a compatible lock to
physically secure your notebook computer.
• VGA Port
Lets you attach an external monitor or projector for wider display. You
can run the LCD display and the external monitor simultaneously or
switch it to monitor only using the display hot-key.
• Air-Outlet Vent
Emits the heat out of your Netbook and keeps it within operating
Introduction1
31
temperature.
• Microphone Jack
Allows you to connect an external microphone for monophonic sound
recording directly into your Netbook computer.
• Headphone Jack
Lets you plug in a stereo headphone, powered speakers, or earphone set
with 1/8 inch phono plug for personal listening.
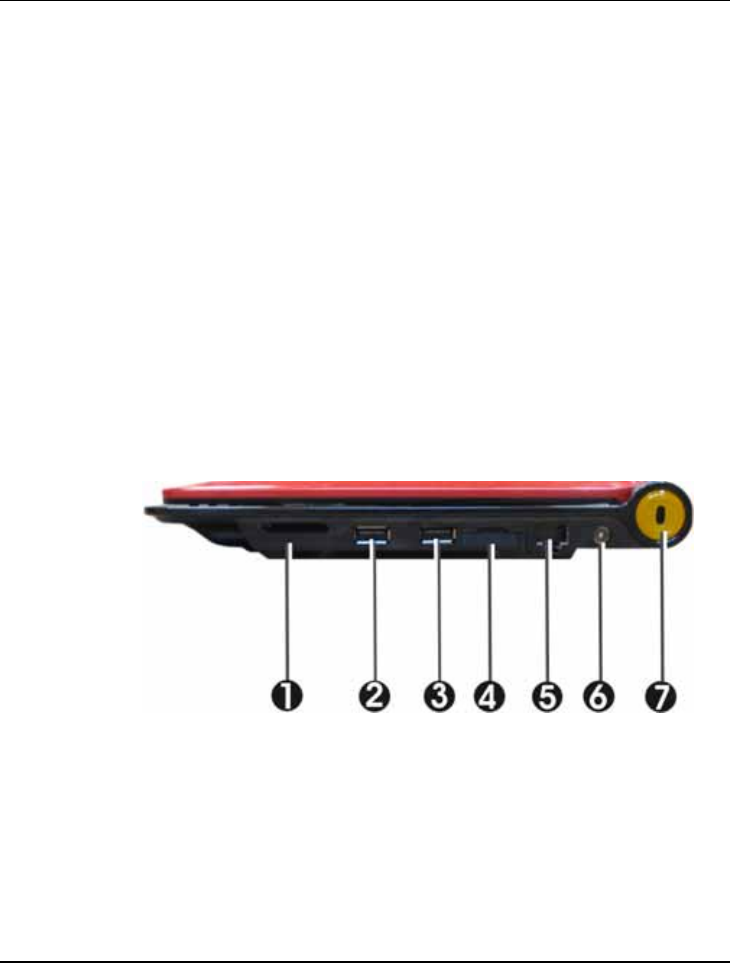
1.5 The Right Side of the Netbook
The right side of the Netbook offers the features shown in the following
figure.
1. 4 in 1 card slot 2. 3. USB 2.0 Port
4. SIM card slot 5. LAN Port
6. DC Power Port 7. Locking Device Keyhole
Right Side Features

Mini-note User Guide
32
• 4 in 1 card slot
The card slot supports SD, MMC, MS (Memory Stick), and MS_Pro flash
memory card format. You can use either of the 4 types flash memory
cards for extra storage media. Please pay attention to correct direction
when you insert the flash memory card. For more detail of flash card, you
can refer to Chapter 3.8.
• USB 2.0 Port
The Universal Serial Bus (USB) port allows you to connect USB 2.0-
compliant devices (for example, printers, scanners and so on) to your
Netbook.
• 3G SIM Card Slot
Open the cover of this slot for SIM Card installation. (SIM card is always
working with 3G HSDPA PCI-E Card)
• LAN Port
An internal 10Base-T/100Base-TX and 1G Ethernet LAN module
connects your computer to other computers/networks through a local
area network (LAN).
• DC Power Port
Lets you connect the AC power adapter in supplying continuous power to
your Netbook and recharging the battery.
• Locking Device Keyhole
Lets you attach a Kensington security system or a compatible lock to
physically secure your Netbook.
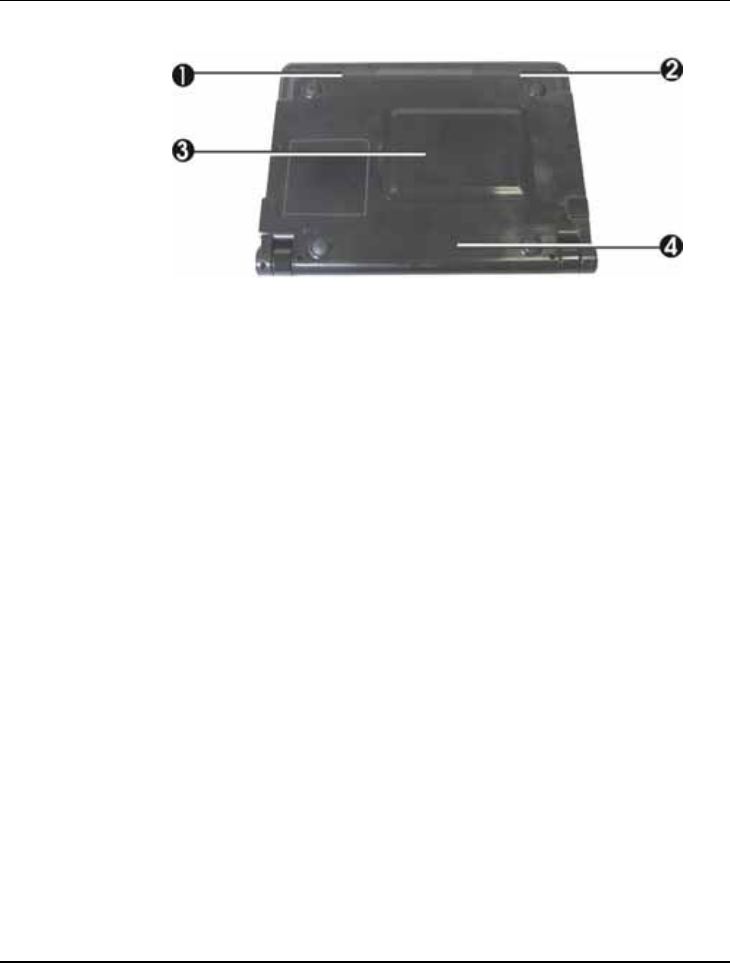
1.6 The Underside of the Netbook
The bottom of the Netbook offers the following features.
Introduction1
33
1. 2. Built-in Stereo Speakers 3. Hard Disk
Compartment 4. Battery Bay
Bottom of the System
• Built-in Stereo Speakers
Integrated mini stereo speaker provides sound and audio output for your
multimedia presentations or listening pleasure.
• Hard Disk Compartment
Open this cover of this compartment to replace with other Hard Disk
Drive.
• Battery Bay
Equipped with a choice of Lithium-Ion (Li-Ion) battery pack.
1.7 Netbook Accessories
AC Adapter
The AC Adapter supplies external power to your Netbook and charges the
internal battery pack simultaneously. The AC adapter has an auto-switching
design that can connect to any 100VAC ~ 240VAC power outlets. Change the

Mini-note User Guide
34
power cord if you are going to use your Netbook in countries with different
connector outlets.
When you connect the AC adapter, it charges the battery whether or not the
Netbook is powered on.
Battery Pack
Aside from the AC adapter, your Netbook can also be powered through the
internal battery pack. The battery pack uses rechargeable Lithium-Ion (Li-Ion)
battery cells that provide long computing hours when fully charged and power
management enabled. You should always leave the battery inside your
Netbook even when using the AC adapter as it also acts as a back-up power
supply in case power from the AC adapter is cut off. It is also very important
to have the battery pack always charged to prevent battery cell degradation.
Connecting to Peripherals 4
35
2 Getting Started
Your Netbook is designed and pre-configured for
easy setup and use. This chapter describes the
installation steps you should follow to get the
Netbook up and running as quickly as possible.

Mini-note User Guide
36
2.1 Using the Battery Pack
The Netbook is designed to operate with one of the following power sources:
• With AC power using the AC adapter connected to an electrical outlet.
• With a Lithium-Ion (Li-Ion) battery pack.
You should use the AC adapter whenever it is possible, relying on the battery
pack only when AC power is unavailable.
When you use your Netbook the first time, please operate it without an
external power source. You can connect the AC power adapter to immediately
recharge the battery, when the battery pack is used up and the Netbook is turn
off. (Before you use your Netbook, recharge the battery pack first. The
rechargeable Li-Ion battery pack allows you to operate the Netbook without an
external power source. When you connect the AC power adapter, the battery
immediately starts to recharge. For maximum battery performance, fully
discharge the battery before recharging it the first time. To do so, unplug the
AC adapter, turn off power management features (through Setup and
Windows), and turn on the system. Once the battery is fully discharged, plug in
the AC adapter and recharge the battery.)
If you do not discharge the battery completely, it fails to accept a full recharge.
Li-Ion battery is vulnerable, do not charge it with other power adapter, or it
may cause fire or explosion.
EXTENDING BATTERY LIFE
It is important to be aware of the simple things for extending the life of the
system main battery while you are on the road. You should find a working
place where the external lighting is not too bright and turn down the screen
Connecting to Peripherals 4
37
brightness. Also, you can choose the available mode on the Power
Management item of the Control Panel in Windows.
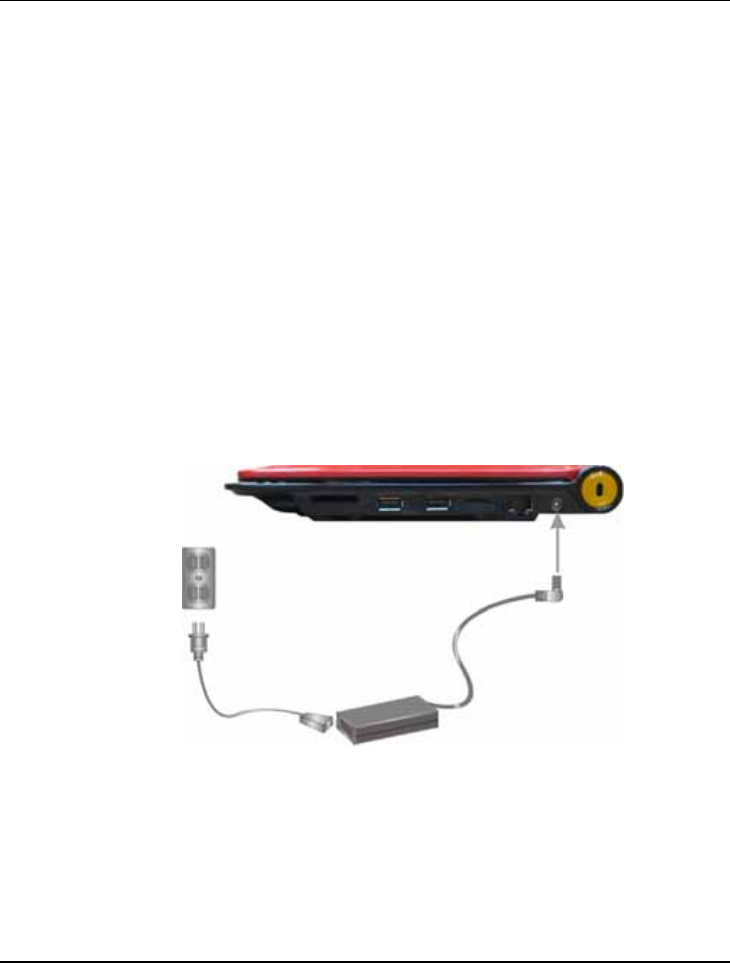
2.2 Connecting the AC Power Source
The AC adapter provides external power source to your Netbook and charges
the internal battery pack at the same time. The AC adapter also has an auto-
switching design that can connect to any 100VAC ~ 240VAC power outlets.
To connect the power adapter:
1. Plug the AC power cord into the power socket of the AC power adapter.
2. Plug the other end of the AC power cord to a live AC wall outlet.
3. Plug the connector of the AC adapter to the DC-IN port found at the
right side of the Netbook.
Mini-note User Guide
38
Whenever possible, it is advisable to always have the AC adapter connected
to the Netbook and the battery pack installed. This ensures continuous
power supply and prevents any data loss incurring from sudden power
breakdown.
y For the power supply of this equipment, an approved power cord has to
be used.
y Make sure the socket and any extension cord(s) you use can support
the total current load of all the connected devices.
y Before cleaning the Netbook, make sure it is disconnected from any
external power supplies (i.e. AC adapter).
2.3 Starting Your Netbook
The Power/Resume button is found on the left-top of the base unit. Press the
Power/Resume button to start your Netbook and check that if the Power
LED turns on.

Connecting to Peripherals 4
39
After a few seconds, the Netbook’s display will turn on and your Netbook will
begin to execute the Power On Self Test or POST to check if all system
components are running properly. Any error found during the test will be
displayed on the screen and may generate short beep sound as well.
After the test, the screen will also display a message "press <F2> to boot
SETUP". You don’t need to run this program at the moment as your dealer
already made the necessary settings for your Netbook optimal operation. Refer
to Chapter 6 on running the SETUP program later.
After the test has completed, your Netbook will start to search and boot up the
operating system from your hard drive. The Netbook normally comes with a
Windows operating system pre-installed in your hard drive. Consult the
Windows manual on how to use the program. If not, contact your dealer for
assistance.
2.4 Adjusting the Display Controls
The LCD brightness adjustment is controlled by <Fn> +<F8> and <Fn> +
<F9> keys respectively. You need to press these hot-key controls after
powering on your Netbook to suit your viewing pleasure.
The Brightness hot-key control adjusts the brightness on the LCD. The
brightness hot-key control will not set the LCD completely dark or bright; it
provides sufficient lighting to the LCD to match the external lighting of the
surrounding. The brighter the room, the more you need to increase the
brightness of the LCD.

Mini-note User Guide
40
2.5 Device Drivers Installation
If you already have an operating system installed into your Netbook., it is best
to install the needed device drivers for using the built-in devices of your
Netbook. Before installing the drivers, check with your dealer first if they have
already installed all the drivers along with the operating system. If not, follow
the procedures below:
INSTALLING WINDOWS 7 FROM OPTICAL DISK DRIVE
To install Windows 7 directly from your USB - Slim Combo Drive (optional),
please go to Boot menu of BIOS setup menu. Use arrow key to select "USB
CDROM", then use "+" or "-" to move it to the top. Go to Exit menu and
select "Exit Saving Changes". Accordingly, insert the Windows 7 installation
DVD into USB - Slim Combo Drive (optional) with following the instructions
on the screen to finish the installation.
Driver Installation Note:
Before install driver & utility , please turn off the item "User Account
Control settings" of User Accounts in Control Panel.
Please install chipset driver first.
Before install Hotkey utility , please install Utility Program Component
driver first .
INSTALLING THE CHIPSET DRIVER
Your Netbook uses the advanced chipset. Installing the driver to enhance the
stability and performance.

Connecting to Peripherals 4
41
Installing Chipset device driver for Windows 7
1. Click the Start button, then point to Run. The Run dialog box appears.
2. Click the Browse button and specify the directory as.
"E:\Drivers\x86\Chipset\Setup.exe".
3. Click "OK" to execute the setup program. The Setup box appears.
4. Click "Next" continuously to install this driver when screen displays this
command.
5. Click "Yes" to accept the License Agreement.
6. Click "Next" twice to continue the following step.
7. Tick the option "Yes, I want to restart this computer now.", and press
"Finish" to restart your system.
INSTALLING THE VGA DEVICE DRIVER
Following is the procedure for installing the Video Accelerator 3D Adapter
VGA driver to your Netbook:
Installing VGA device driver for Windows 7
1. Click the Start button, then point to Run. The Run dialog box appears.
2. Click the Browse button and specify the directory as.
"E:\Drivers\x86\VGA\Setup.exe".
3. Click "OK" to execute the setup program. The Setup box appears.
4. Click "Next" continuously to install this driver when screen displays this
command.
5. Click "Yes" continuously to install driver.
6. Click "Next" twice to continue the installation.

Mini-note User Guide
42
7. Tick the option "Yes, I want to restart my computer now.", and press
"Finish" to restart your system.
INSTALLING THE AUDIO DEVICE DRIVER
Your Netbook uses the Realtek Audio controller.
Installing Audio device driver for Windows 7
1. Click the Start button, then point to Run. The Run dialog box appears.
2. Click the Browse button and specify the directory as.
"E:\Drivers\x86\Audio\Setup.exe" where the audio driver is located.
3. Click "OK" to execute the setup program. The Setup box appears.
4. Click "Yes" to continue the installation.
5. Tick the option "Yes, I want to restart my computer now.", and press
"OK" to restart your system.
INSTALLING THE TOUCH PAD DEVICE DRIVER
Please follow the procedures below for installing the Touch Pad driver:
Installing Touch Pad device driver for Windows 7
1. Click the Start button, then point to Run. The Run dialog box appears.
2. Click the Browse button and specify the directory as.
"E:\Drivers\x86\Touch Pad\Setup.exe"
3. Click "OK" to execute the setup program. The Setup box appears.
4. Click "Next" to execute the setup program. The Welcome box appears.
5. Select "I accept this agreement" and click "Next" to continue the
installation.

Connecting to Peripherals 4
43
6. Click "Finish" to complete the installation.
7. Click "Restart Now" to restart your system.
INSTALLING THE WIRELESS LAN DEVICE DRIVER
Please follow the procedures below for installing the Wireless LAN driver:
Installing
Wireless LAN driver for Windows 7
1. Click the Start button, then point to Run. The Run dialog box appears.
2. Click Browse button and specify the directory as
"E:\Drivers\x86\Wireless Lan\setup.exe".
3. Click "OK" to execute the setup program. The Setup box appears.
4. Click "Install" to begin the installation.
5. Click "Finish" to complete the installation.
INSTALLING THE BLUETOOTH DRIVER & UTILITY
Please follow the procedure for installing the Bluetooth driver & utility:
Installing Bluetooth device driver & utility for Windows7
1. Click the Start button, then point to Run. The Run dialog box appears.
2. Click the Browse button and specify the directory as
"E:\Drivers\x86\Bluetooth\Billionton\Setup.exe".
3. Click "OK" to execute the setup program. The Setup box appears.
4. Click "Next" continuously to install this driver when screen displays this
command.
5. Tick the option "I accept the terms in the license agreement", and
press "Next" to continue.

Mini-note User Guide
44
6. Click "Install" to continue the installation.
7. Press "Finish", then press "Yes" to restart your system.
INSTALLING THE BLUETOOTH DEVICE DRIVER &
UTILITY
Please follow the procedures below for installing the Bluetooth driver & utility:
Installing Bluetooth device driver for Windows 7
1. Click the Start button, then point to Run. The Run dialog box appears.
2. Click the Browse button and specify the directory as.
"E:\Drivers\x86\Bluetooth\AzureWave\Setup.exe".
3. Click "OK" to execute the setup program. The Setup box appears.
4. Click "Next" to continue the following steps.
5. Choose "I accept the terms in the license agreement" and click
"Next" twice.
6. Click "Install" to implement setup program to install this driver.
7. Click "Finish" to complete the installation.
INSTALLING THE 3G HSDPA DEVICE DRIVER
(OPTIONAL)
Please follow the procedures below for installing the 3.5G HSDPA driver:
Installing 3G HSDPA device driver for Windows 7
1. Click the Start button, then point to Run. The Run dialog box appears.
2. Click the Browse button and specify the directory as.
"E:\Drivers\x86\3G\Setup.exe".

Connecting to Peripherals 4
45
3. Click "OK" to execute the setup program. The Setup box appears.
4. Select a language and click "OK" to execute the setup program.
5. Click "Next" to continue.
6. Click "I Agree" the license when it appears the terms for the license
agreement.
7. Click "Next" to implement setup program to install this driver.
8. Click "Install" to continue.
9. Click "Finish" to complete the installation.
INSTALLING THE LAN DEVICE DRIVER
Please follow the procedures below for installing the LAN driver:
Installing LAN device driver for Windows 7
1. Click the Start button, then point to Run. The Run dialog box appears.
2. Click the Browse button and specify the directory as.
"E:\Drivers\x86\LAN\setup.exe "
3. Click "OK" to execute the setup program. The Setup box appears.
4. Click "Next" to execute the setup program
5. Click "Install" to implement setup program to install this driver.
6. Click "OK" to continue the installation.
7. Click "Finish" to complete the installation.
INSTALLING THE CAMERA DEVICE UTILITY
Please follow the procedures below for installing the Camera utility:

Mini-note User Guide
46
Installing Camera utility for Windows 7
1. Click the Start button, then point to Run. The Run dialog box appears.
2. Click the Browse button and specify the directory as
"E:\Drivers\x86\Camera\Utility\setup.exe".
3. Click "OK" to execute the setup program. The Setup box appears.
4. Click "Next" to execute the setup program.
5. Click "Next" to continue the installation.
6. Click "Finish" to complete the installation.
INSTALLING THE UTILITY PROGRAM COMPONENT
DEVICE DRIVER
Please follow the procedures below for installing the Utility Program
Component driver:
Installing Utility Program Component driver for Windows 7
1. Click the Start button, then point to Run. The Run dialog box appears.
2. Click the Browse button and specify the directory as
"E:\Drivers\x86\Utility Program Component\Setup.exe".
3. Click "OK" to execute the setup program. The Setup box appears.
4. Click "Next" to execute the setup program.
5. Click "Finish" to complete the installation.
INSTALLING THE HOTKEY UTILITY
Please follow the procedures below for installing the Hotkey utility:

Connecting to Peripherals 4
47
Installing Hotkey utility for Windows 7
1. Click the Start button, then point to Run. The Run dialog box appears.
2. Click the Browse button and specify the directory as
"E:\Drivers\x86\Hotkey\setup.exe".
3. Click "OK" to execute the setup program. The Setup box appears.
4. Click "Next" to execute the setup program.
5. Click "Install" to implement setup program to install this driver.
6. Tick the option "Yes, restart the computer now", and press "Finish"
to restart your system.
2.6 Turning off Your Netbook
If you are not going to use the Netbook for a while, it is best to turn off the
power of the Netbook. Before turning off the power, you need to first close all
application programs and shut down the operating system.
After turning off the Netbook, make it a habit to leave the LCD panel open
for a while whenever used for an extended period of time. This allows the
inside parts of the Netbook to cool off. Closing the panel will force the heat up
against the LCD screen, which may degrade the LCD when done regularly.
More importantly, never close the LCD panel for a long period of time when it
is on and power saving features are disabled.

Mini-note User Guide
48
3 Using Your Netbook
This chapter describes how to operate the standard
built-in features of the Netbook.

Connecting to Peripherals 4
49
3.1 Starting Your Operating System
The operating system is the software foundation for your Netbook. It is the
platform for all your software application programs to run on. The most
popular operating system today is Microsoft® Windows®. The Netbook
comes with an operating system pre-installed and needs only to be setup and
configured during initial use.
3.2 Understanding the Keyboard
Functions
Your Netbook is equipped with an 87 keys keyboard that provides all the
functionality of a full-sized 101 or 102-key keyboard. Aside from the standard
typewriter-layout keyboard of your Netbook, there are a number of extra
features and function controls on Netbook.
Mini-note User Guide
50
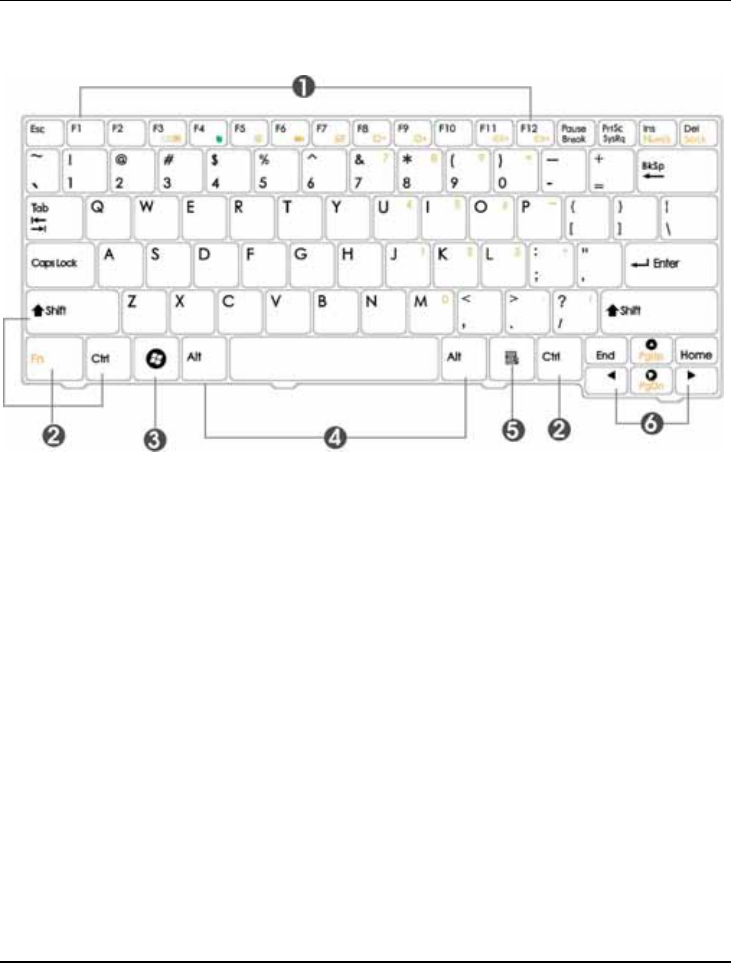
1. Function Keys 2. Control Keys
3. Windows Start Menu Key 4. Control Keys
5. Windows Shortcut Key 6. Cursor Control Keys
Keyboard
Key features and operations are described below:
• Function Keys
Function keys are application-driven, like F1 through F12 can be found on
the keyboard. These keys work together with the Fn key to activate special
functions. Some keys (printed in blue on keypad) are preprogrammed with
dual functions.

Connecting to Peripherals 4
51
• Control keys — Ctrl, Alt, Fn, and Shift are controls used in conjunction
with other keys to change their functions. To use control keys, press and
hold the control key while pressing another key. For example, "Press Ctrl-
C" means to hold down the Ctrl key and type the letter C. Key
combinations work especially to the application you are running.
• Windows keys
Use the following two keys to facilitate your work:
Start Menu key
Displays the Start menu.
Shortcut/Application key
Provides quick access to shortcut menus. This key acts like a right
mouse button.
• Cursor Control keys
Cursor control keys let you position the cursor on the screen where you
want. In the screen, the cursor is a blinking underline, block, or vertical
bar depending on the application. The cursor indicates where the next text
typed is inserted.
• Typewriter keys
Typewriter keys (also called alphanumeric keys) are used to enter text and
characters. Keys with blue print on them behave differently when
combined with control keys.
BASIC KEYBOARD FUNCTIONS
Keypad Function Description
<Enter> key. Execute a command. Within many
text editing application programs, the <Enter> key
inserts a hard carriage return, just like what ordinary
typewriter does.
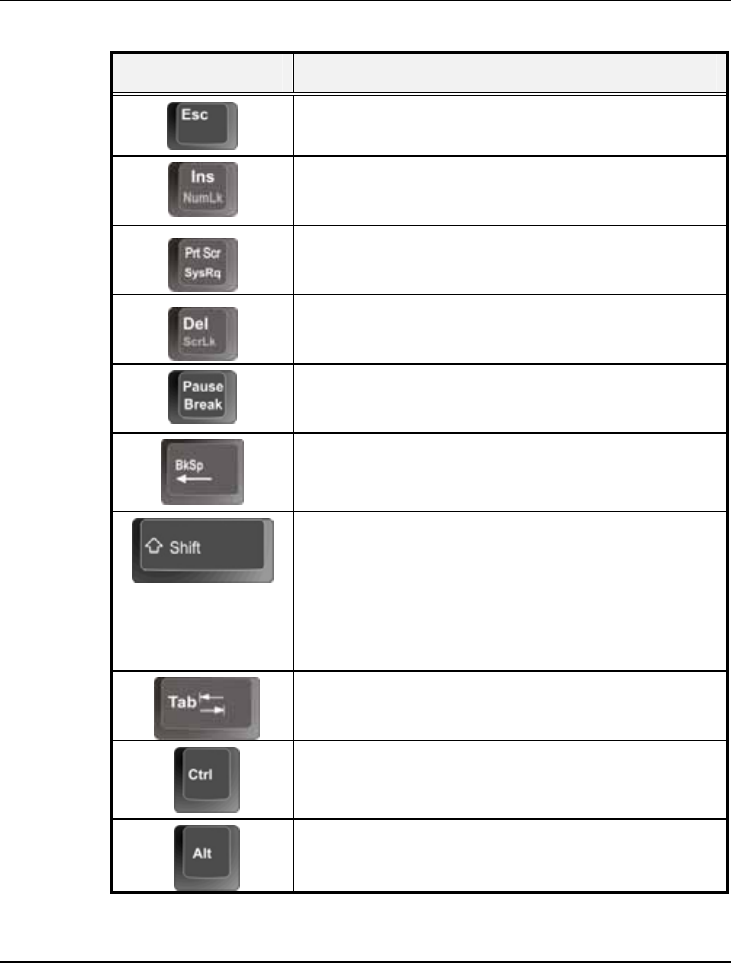
Mini-note User Guide
52
Keypad Function Description
<Esc> key. Press this key to cancel or escape from
a command or function.
<Ins> key. Known as the Insert key. Press this key
to toggle the keyboard data entry from insert to type
over mode.
<PrtScr> key. Known as the Print Screen key. Press
this key to map the whole screen to share memory for
your specific usage.
<Del> key. Known as the Delete key. Press this key
to delete the character to the right of the cursor, or
delete marked texts or items.
<Pause> key. Press this key to temporarily halt
execution of a command. Pressing any other key to
resume execution of a command.
<Backspace> key. Press this key to delete the
character to the left of the cursor.
<Shift> key. Press this key in combination with
alphabet letters to produce uppercase letters in
typing. Use this key in combination with those two-
character keys (found on the second row of the
keyboard) to produce the upper marked keys. Also
used in most application program in combination
with other keys to execute a certain command.
<Tab> key. Press this key to move the cursor to the
next tab stop on the right. This key works much the
same as in ordinary typewriter.
<Ctrl> key. Known as the Control key. Used in
most application program in combination with other
keys to execute a certain command.
<Alt> key. Known as the Alternate key. Used in
most application program in combination with other
keys to execute a certain command.
Connecting to Peripherals 4
53
Keypad Function Description
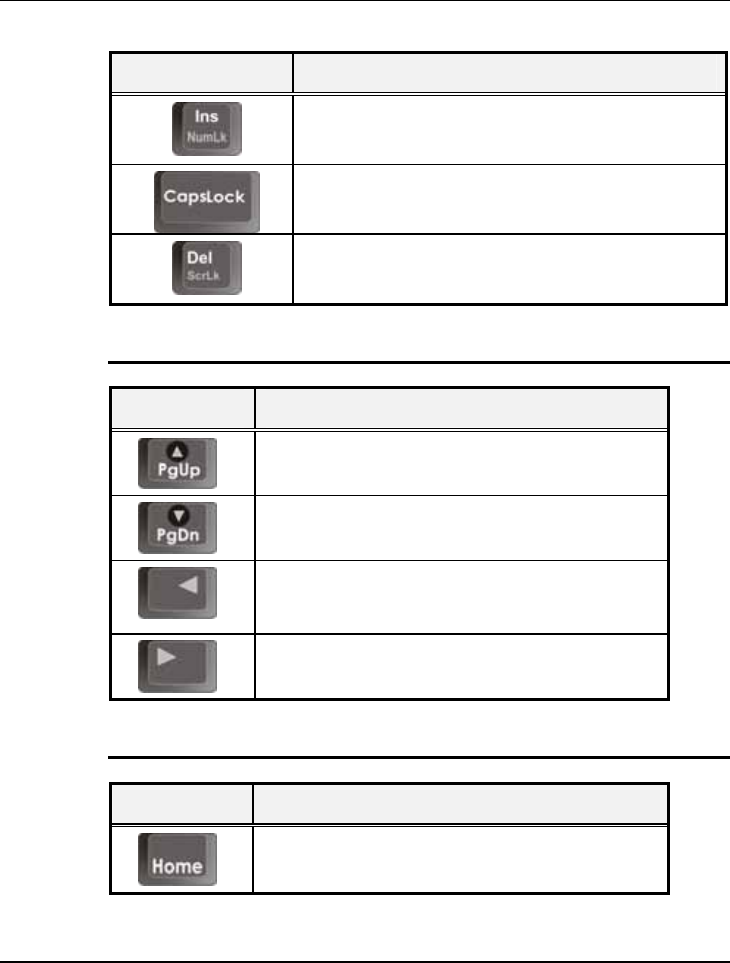
<Fn> + <Num Lock> key. Activates the
embedded 15-key numeric keypad. The keys are
color coded blue.
<Caps Lock> key. Used in most application
program to always activate uppercase alphabet
characters.
<Fn> + <Scroll Lock> key. Used in most
application program to scroll the screen without
having to move the cursor.
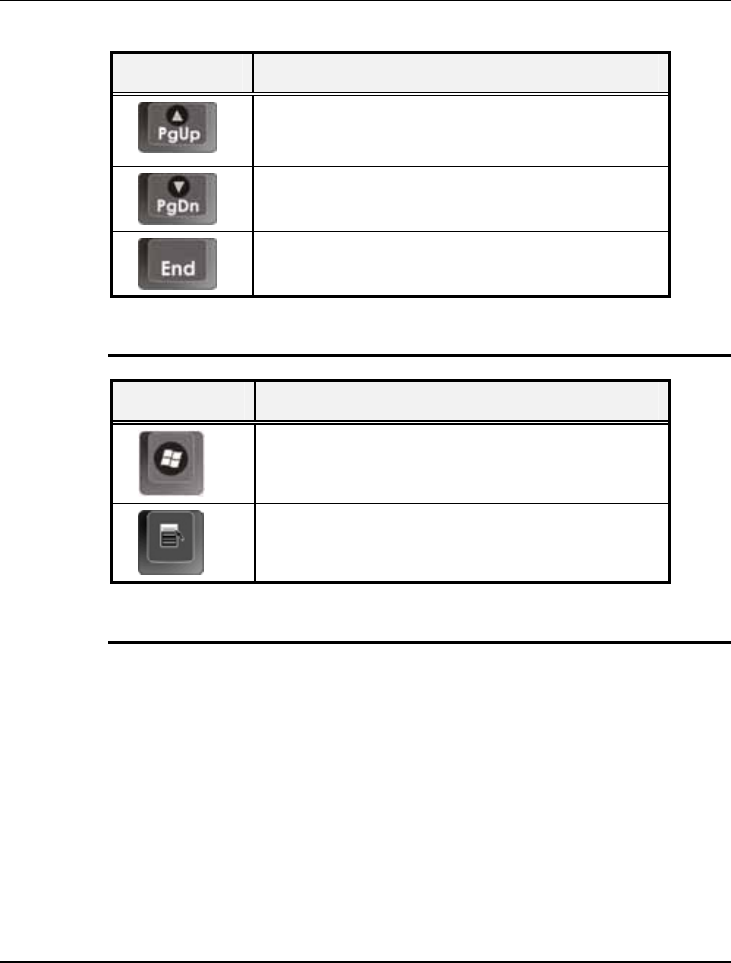
CURSOR CONTROL KEYS
Keypad Function Description
Up arrow key. Moves the cursor up one line at a
time.
Down arrow key. Moves the cursor down one
line at a time.
Left arrow key. Moves the cursor to the left one
space at a time.
Right arrow key. Moves the cursor to the right
one space at a time.
SCREEN CONTROL KEYS
Keypad Function Description
<Home> key. Moves the cursor to the beginning
of a screen or line.
Mini-note User Guide
54
Keypad Function Description
<Fn> + <PgUp> key. Moves the cursor up one
screen at a time
<Fn> + <PgDn> key. Moves the cursor down
one screen at a time
<End> key. Moves the cursor to the end of a
screen or line.
WINDOWS HOT KEYS
Keypad Function Description
<Start> key. Pulls up the Windows Start menu.
<Right Click> key. Performs a mouse right-click
function for Windows system.
SPECIAL FUNCTION KEYS
The Netbook has special system function keys that activate key serving dual
functions. When pressed in conjunction with the <Fn> key, these keys set
specific system parameters and are sometimes referred to as "hot keys".
Connecting to Peripherals 4
55
Keypad Function Description
+
Switches display between LCD, CRT, or
LCD and CRT simultaneously.
+
To open the Power Saving Mode function.
+
To mute or open the built-in system
speaker.
+
To open the Webcam function.
+
To close the touchpad function.
+
Decrease the brightness of LCD display
incrementally.
+
Increases the brightness of LCD display
incrementally.
+
Decrease the audio volume incrementally.

Mini-note User Guide
56
Keypad Function Description
+
Increase the audio volume incrementally.
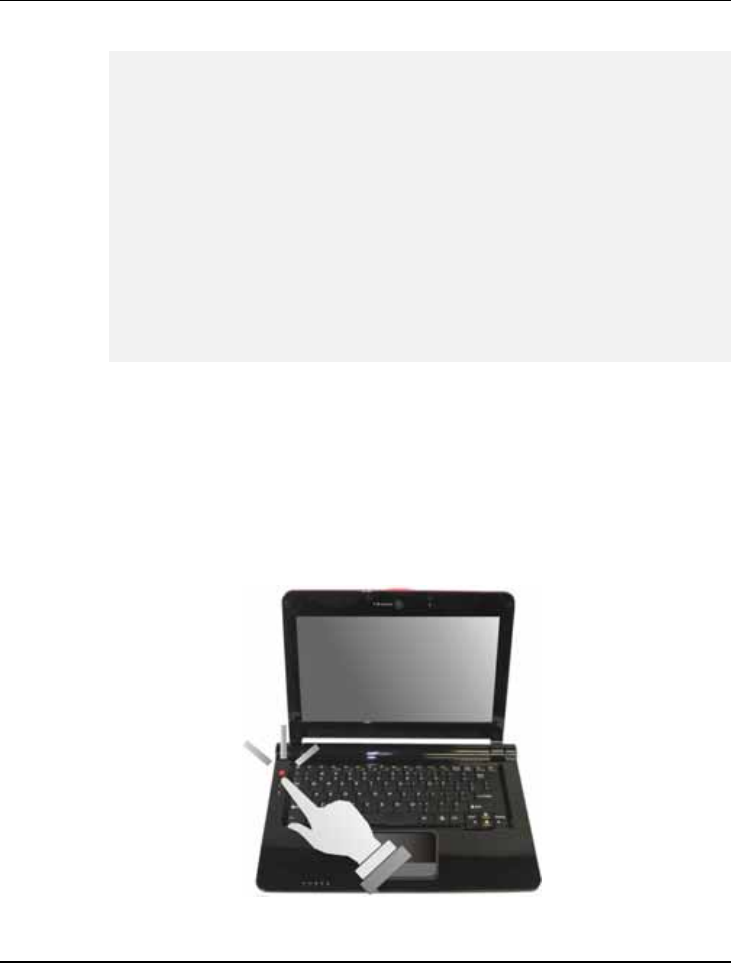
3.3 Using the Touchpad Pointing Device
Your Netbook comes with a built-in Touchpad pointing device that is found
on the center of the palm-rest surface.
The Touchpad offers a number of options that let you customize how it
functions. To access these options, locate the Control Panel and double click
on the Mouse icon. The options let you control the size and color of the
cursor, cursor speed, the accepted double-click speed, and selection button
orientation.
The Touchpad works a mouse pointing device replacement that is used under
Windows-based operating system. You can use the standard Microsoft driver
that is compatible with the Touchpad device and is normally used under
Windows-based operating system. However, if you want to utilize the added
features of the Touchpad, you may want to try installing its own device driver
that comes with added utilities for enhancing the function of the device.
Connecting to Peripherals 4
57
1. Left Selection Button 2. Right Selection Button
3. Touchpad
Touchpad Features
Here how to use the Touchpad pointing device:
1. The rectangular surface acts like a miniature duplicate of your display
screen. To move the mouse cursor, place the finger lightly on the sensor
pad and move in the desired direction. If you reach the end of the pad, lift
your finger and place it back down on the other side of the pad.
2. To select an item, click on the item by pressing the left button control or
by simply tapping on the surface once. A light, quick tap always works
best. To execute an item, click the left button twice or do a quick double
tap on the surface.

Mini-note User Guide
58
Avoid spilling any liquid on the Touchpad surface and always keep the
Touchpad surface and pointing finger dry from sweat built-up. Also do not
expose Touchpad to any magnetic source object.
3.4 Configuring Your Screen Display
The VGA display function of your Netbook contains RAM-based Digital-to-
Analog Converter (RAMDAC) that transforms the digital data from the
graphics and video subsystems to analog data for the CRT monitor. This
controller offers a large set of extended functions and higher resolutions
especially useful when you are connecting an external high-resolution and high-
frequency CRT or LCD.
Please Refer to Section 5 "Installing the Netbook Device Drivers" of Chapter
2 in this manual for the procedures on how to install the VGA device driver
under Windows. After installing the VGA driver, you would then configure the
display resolution or screen size to match your LCD display panel. This
Netbook model provides Wide screen 10.1" 1024 x 600 (WSVGA) resolution
panels. You would also probably want to set the amount of color output to
display sharper images and photos.
POSSIBLE DISPLAY CONFIGURATIONS
The table below shows you the possible display resolution you can set when
using either the LCD display or the external monitor (CRT):
Display Possible Resolution Maximum Colors
Widescreen
10.1" WSVGA LCD 1024 x 600
16 million colors
CRT Only 1400 x1050
(Maximum resolution) 16 million colors

Connecting to Peripherals 4
59
65,536 or 64K colors is also equivalent to 16-bit high color while 16 million or
16M colors is equivalent to 32-bit true color.
You can use the <Fn> + <F3> hot-key to switch the display between LCD
only, CRT only, or both LCD and CRT display.
CHANGING THE DISPLAY PROPERTIES UNDER WINDOWS
To change the display properties of your screen under Windows system, just
right-click on the desktop area and select Properties or go to the Control Panel
and click on the Display icon. The Display Properties dialog box will appear on
your screen. Click on the Settings tab to set your desired configuration. Make
sure to follow the configuration table above.
If you cannot configure the display properties, change the display driver
first as mentioned on Section 5 "Installing the Netbook Device Drivers" of
Chapter 2 in this manual. Consult your dealer for the latest Windows VGA
driver.
3.5 Knowing the Power Saving Features
Aside from its superior performance, one of the great features in your
Netbook is the ability to conserve power. Your Netbook is designed to
incorporate intelligent and advanced power management functions that turn
off power of most components when system is idle or not in use. This feature
not only gives you longer battery life but also cools the systems and
components as well.
The definitions of Standby Mode, Hibernation Mode, and Shutdown are
depicted as follows:

Mini-note User Guide
60
Standby Mode
Standby Mode is mainly for power saving. When the Standby Mode is
activated, your display and hard drive are shut down and all open applications
and documents are stored in RAM (Random Access Memory). This allows
your Netbook to wake up quickly, but a low level of power is required to
maintain this suspended state. How quickly your system power down into
Standby mode is up to you by setting proper times in Power Options of
Control Panel in Window. While the Netbook is in Standby mode, the LED of
power indicator flashes. To resume your working again, you can press the
power button to return your work to the screen where you left off.
Hibernation Mode
In Hibernation mode, all system devices are powered down and the contents
of RAM are stored on your hard drive. Hibernate mode uses less power than
Standby mode, but takes a bit longer time to resume. When your Netbook
goes into hibernation, Windows saves your entire desktop state before
powering down your Netbook. You don’t need to save and close each
document before you put your Netbook into hibernation. When you press
power button again, system will bring your Netbook out of hibernation. You'll
find your applications and documents open on your desktop exactly as you left
them.
Shutdown
All power has been turned off from the Netbook. This means that no power
including external AC power source and battery power source will be consume
by the Netbook.

Connecting to Peripherals 4
61
3.6 Working with the Built-in HDD
Your Netbook is equipped with a built-in large capacity 2.5 inch hard disk
drive where you store and run your Netbook’s operating system and
application software programs.
3.7 SIM Card
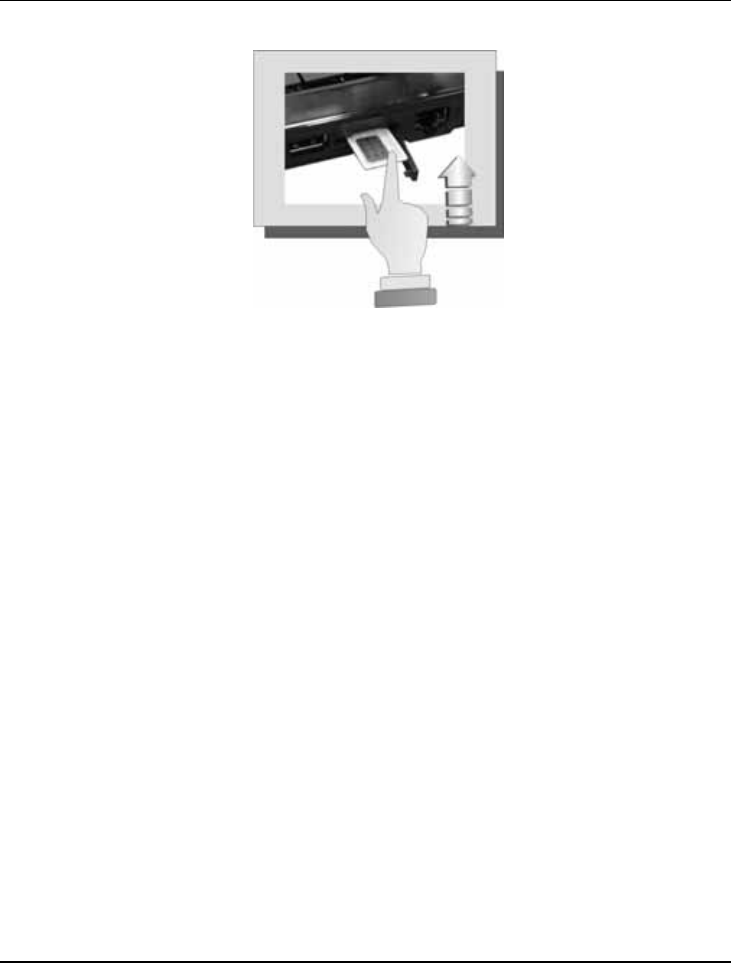
INSERTING AND REMOVING A SIM CARD
For removing or exchanging the SIM card, please turn off the computer first,
then start using this function.
Inserting SIM Card
To insert an SIM Card into the SIM Card slot:
1. Locate the SIM Card slot cover on the right side of the computer.
2. Insert the SIM Card into the SIM Card slot. The face label of the card
should also be facing up.
3. When the full length of the card is almost inside the slot, push firmly but
slowly, to ensure full connection with the computer. The SIM Card will be
automatically detected, and once the needed driver is installed, it will
generate a beep sound to indicate that the card is detected.
Mini-note User Guide
62
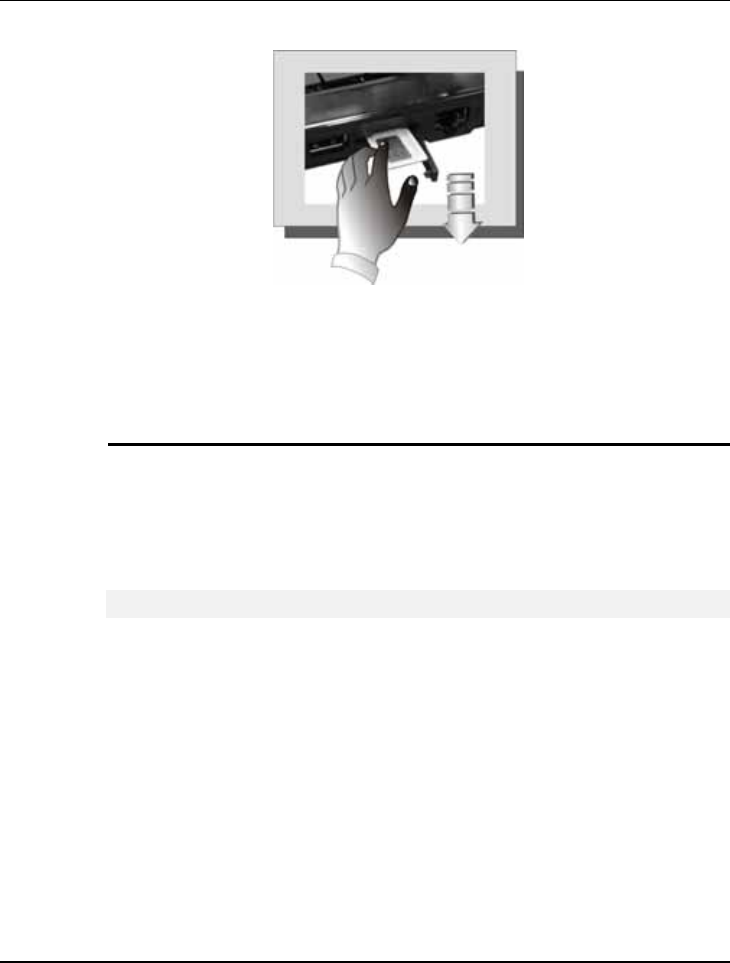
Removing SIM Card
To remove a SIM Card from the SIM Card slot, you should first disable the
SIM Card setting in the system as described followings:
1. Double click the SIM Card icon on the right bottom side of the task bar.
2. Select the socket from the list that you want to remove, and click Stop
button. The system then disables the function of SIM Card.
3. Then you can remove the inserted SIM Card. To release the SIM Card,
just push the SIM Card again to the end. Then the SIM Card will
automatically bounce off the SIM Card slot.
4. When the SIM Card has moved out a space out of the slot, hold the edges
of the card and slowly slide it out.
Connecting to Peripherals 4
63
3.8 Using Flash Memory Cards
FLASH MEMORY CARD
Flash Memory is a memory storage media. It is used by most digital camera,
Flash memory card is built with different form factor and brand name. The 4
in 1 card slot in this Netbook supports following cards as SD, MS (Memory
Stick), MMC, and MS_Pro.
For a single moment, only one card can be inserted into the 4 in 1 card slot.
Inserting Flash Memory Card
To insert a flash memory card into the slot, please pay more attention
whenever insert the flash memory card into the slot with the correct side.
You should position the copper connector at the bottom side. All of these
cards should be located at the center of the slots in inserting.
Only one correct side can be accepted for the 4 in 1 card slot. If you cannot
insert the card into the 4 in 1 slot or you had inserted the card but it is not
recognized by the computer, please remove the card and insert it again. To
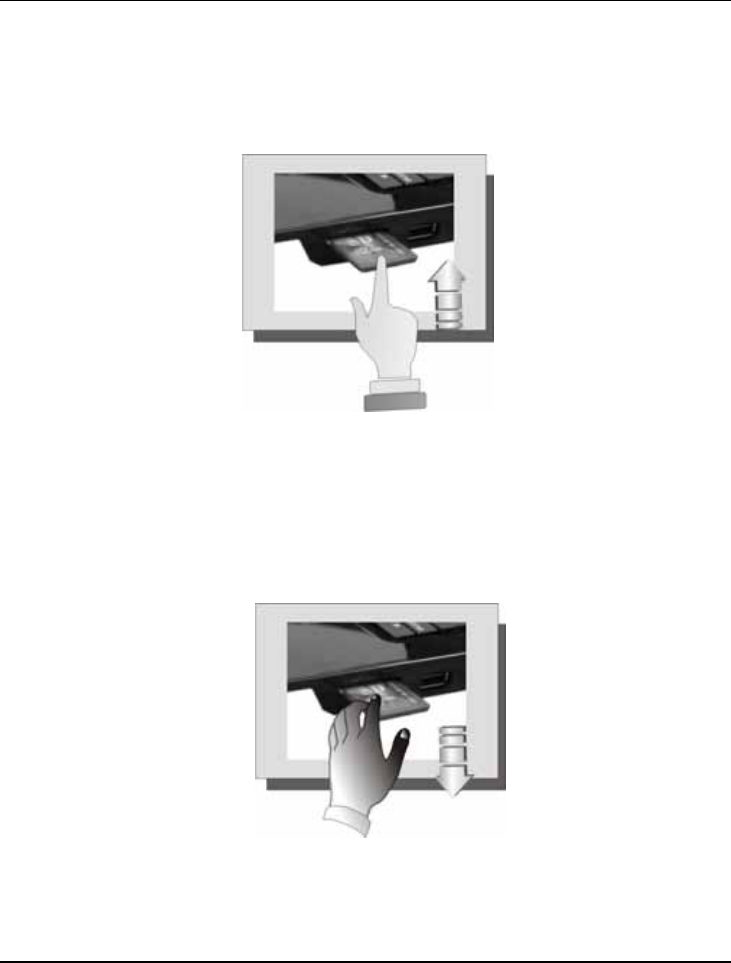
Mini-note User Guide
64
prevent the damage made both on card and the slot, never forced an entry into
the slot with incorrect side.
Removing Flash Memory Card
To remove the flash memory card, you can pull out the card directly, there is
no release button for flash memory slot.
Connecting to Peripherals 4
65
4 Connecting to Peripherals
This chapter describes how you attach additional
peripheral devices to your Netbook. The Netbook
allows you to add a printer or mouse; connect an
external monitor and keyboard, or other compatible
peripheral device. Use of additional devices is
described in this chapter.
Mini-note User Guide
66
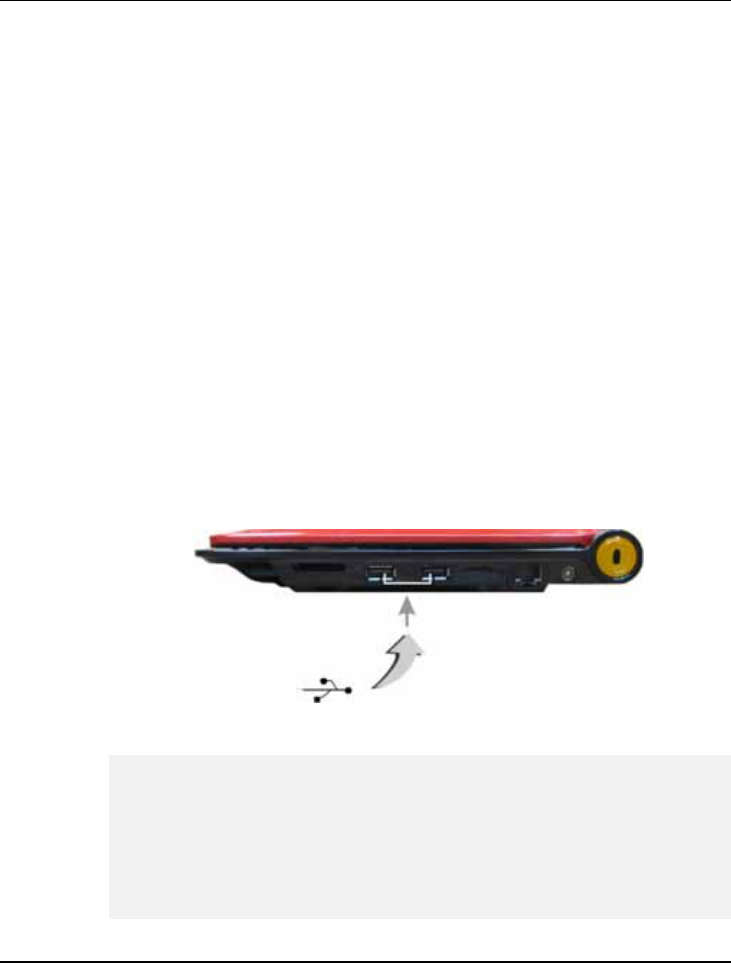
4.1 Using the USB Port
USB (Universal Serial Bus) is a hardware interface that enables you to connect
multiple devices (such as printers, mice, keyboards, storage devices, joysticks,
digital cameras, and video conference cameras, etc.) to your Netbook, and up
to 127 devices can be attached. Besides, USB’s hot swap capability allows
everything to be plugged in and unplugged without turning the system off.
Microsoft, HP, Compaq, Intel, Agere, NEC and Philip are seven core
members of USB-IF to have worked on USB 2.0 standardization. USB 2.0
offers data transfer rate up to 480Mbps (megabits per second) compared to
USB 1.1 devices, which transfer at speeds of 12Mbps. So, you could know that
USB 2.0 can transfer data between the Netbook and its peripherals 40 times
faster than USB 1.1. However, USB 2.0 is fully backward compatible, you will
be able to use a USB 1.1 device in a USB 2.0 compliant system.
Depending on your operational requirements, you may need to disable
other ports in order to release system resource for the USB port.
The USB bus distributes 0.5 amps (500 milliamps) of power through each
port. For the purpose of power saving, please disconnect your USB device
while not in use.

Connecting to Peripherals 4
67
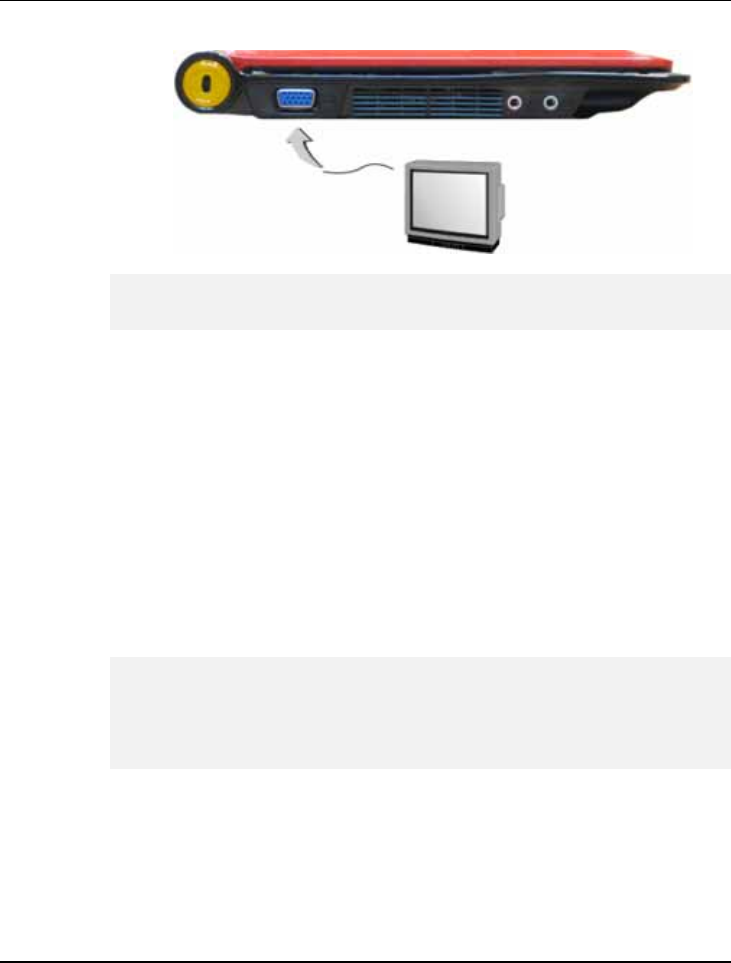
4.2 Using an External Monitor Port
Your computer has a 15-pin Monitor port for supporting any external CRT or
LCD color monitor. You need a display signal cable (usually provided with the
monitor). One end of the cable must have a 15-pin connector for the system.
To connect an external monitor:
1. Turn off your computer and make sure the monitor power switch is
turned off.
The notebook computer must be powered off or suspended while the
monitor is being connected. Although you can connect the external Monitor
without power off the computer and the external monitor, however, it is
harmful to both devices and it shortens the life of these devices.
2. Connect the connector cable of the monitor to the VGA port at the back
of your computer.
3. Connect the monitor power cable and plug it into a properly grounded
wall outlet.
4. Turn on the power of the monitor.
5. Turn on your computer. Both the LCD panel and the monitor screen will
show the display. Your computer is set at default to run at simultaneous
display mode.
6. If you only want to show the display on the external monitor or projector
and shut off the LCD display, you can use the <Fn> + <F3> hot-key to
switch display type between LCD and external monitor. Keep pressing the
hot-key until you get the display to external monitor only.
Mini-note User Guide
68
Refer to Chapter 3 regarding the possible External CRT resolutions and
how to change the display properties.
4.3 Using the External Audio System
At the front side of your Netbook, you will find the built-in audio ports. You
can connect Microphone jacks, earphone or powered speaker.
To connect to an audio jack:
1. Locate the audio port (Microphone, Headphone) that you want to use to
the target device.
2. Plug the jack into the port on the front side of the system.
If you use external speaker and experience the sound distortion or
feedback, please lower the volume. Some factors is caused by too close
locating the microphone and speaker from each other, moving away the
external audio option from the unit may also help.
4.4 Using the LAN Port
This Netbook comes with an internal 10Base-T/100Base-TX LAN and
1000Mbps module that connects your Netbook to other notebook/networks
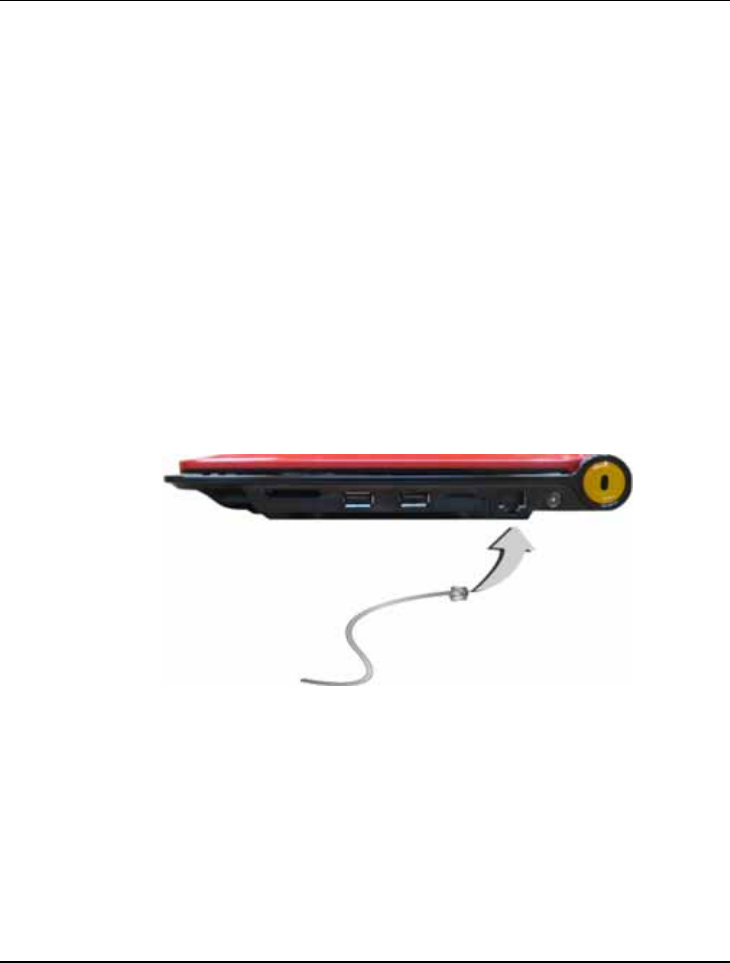
Connecting to Peripherals 4
69
through a local area network (LAN) and supports data transfer rates at 10Mbps
and can be up to 100Mbps. The 10Base-T standard also called Twisted Pair
Ethernet is connected with RJ-45 connectors. The 100Base-TX is based on the
older Ethernet standard. Because it is 10 times faster than Ethernet, it is often
referred to as Fast Ethernet.
The built-in LAN module provides a standard RJ-45 connector.
To connect the twisted-pair cable to your LAN port:
1. Locate the twisted-pair cable in the accessories box in Netbook shipping
carton. Each end of the cable has a RJ-45 connector.
2. Connect one end of the cable into the network wall outlet or HUB.
3. Connect the other end of the cable into the Netbook RJ-45 LAN port.
4.5 Using the Wireless LAN
Wireless LAN lets user connect to the LAN environment without using any
wire to traditional RJ-45 jack. User can enjoy the wireless connection within
the range of Access Point (AP) of LAN.

Mini-note User Guide
70
Access Point (AP) is the wireless transmission and receiving device, it generally
connects to the server of a LAN environment or act as a LAN hub with
wireless connection. Access point can be set in an office environment, airport,
major railway station, etc. that depends on the construction of each country. In
most case, you probably can use it at office, please consult with the network
department of your company for more details.
This Netbook integrates 802.11 b/g/n wireless LAN module. IEEE 802.11b
standard supports 11 Mbps wireless connection speed. However, IEEE
802.11g/802.11n supports 54Mbps and 150Mbps wireless connection speed
respectively, and is backward compatible with the slower 802.11b. IEEE
802.11n uses MIMO Technology. Wireless LAN module is similar to LAN
module. You need to install software driver before using it. Please refer to
chapter 2.5 on how to install the driver.
Customizing Your Mini-note 5
71
5 Customizing Your Netbook
Your Netbook uses the Phoenix BIOS Setup
program allowing your system configuration to be
altered to best suit your computing needs: User-
adjustable options include system time and date, disk
drive configuration and password setup.
BIOS information stored in the CMOS RAM will
remain permanent unless changed. Default factory
settings are used top optimize performance of your
Netbook and do not need further alteration to
operate your Netbook. Use caution when changing
any BIOS settings.

Mini-note User Guide
72
5.1 Running the BIOS Setup Program
Your Netbook is setup and pre-configured. The Netbook’s BIOS (Basic Input-
Output System) Setup program may be used to change system configuration
information such as the current date and time, or your hard disk drive type.
The Setup program can be accessed when you power on the system and
pressing the <F2> function key before the Microsoft® Windows® operating
system begins.
The settings that you specify within the Setup program are recorded in a
special area memory called the CMOS RAM. This memory is backed up by a
battery so that is will not be erased when you turn off or reset the system.
Whenever you turn on the Netbook, the system will read the settings stored in
the CMOS RAM and compare them to the equipment check conducted during
the Power On Self Test (POST). If an error occurs, an error message will be
displayed on the screen, and you will then be prompted to run the Setup
Program.
Press the <F2> key to run the BIOS Setup program. The BIOS Setup
program is organized into five menus which you can select using the <-- and --
> keys. To move from one option to another, you use the up and down arrow
keys while using the <F5> and <F6>, or <+>and <-> keys to change the
settings. On the right hand side of the screen are some brief help descriptions
of each item you want to change.
On the BIOS Setup program, you will find the following parts on the screen:
• Item Specific Help
The right side of the screen. This area describes each parameter and its
available settings.

Customizing Your Mini-note 5
73
• Menu Bar
The top line of the screen. Each of the five selections displays its own
screen.
• Parameters
The left side of the screen. This area lists the parameters and their current
settings.
• Key Status Bar
The bottom part of the screen. These lines display the keys available to
move the cursor, select a particular function and so forth.
To exit the BIOS Setup program, simply press the <Esc> key and select from
the Exit menu whether you want to Save Changes, Discard Changes, and Exit
Discard Changes.
Mini-note User Guide
74
5.2 Using the Main Menu Setup
Phoenix BIOS Setup Utility
Main Advanced Security Boot Exit
Item Specific Help
S
y
stem Time:
[
07 :54 :32
]
<Tab>
,
<Shif
t
-Tab>
,
System Date: [12/11/2009] or <Enter> selects
BIOS revision: SV0E6D-1907-0307 field.
4 SATA1 Port 1 [ATAPI Removable]
CPU Type: Intel (R) Atom(TM) CPU N450
CPU Speed: 1600 MHz
Installed Memory: 2048 MB
Available to OS 2037 MB
Used by devices 11 MB
F1 Help Ç ÈSelect Item ─ / + Change Values F9 Setup Defaults
Esc Exit ÅÎ Select Menu Enter Select Sub-Menu F10 Save and Exit
• System Time
Allows you to change the system time using the hour:minute:second
format of the .
Enter the current time for reach field and use the <Tab>,
<Shift>+<Tab>, or <Enter> key to move from one field or back to
another.
You can also change the system time from your operating system.

Customizing Your Mini-note 5
75
• System Date
Allows you to set the system date using the month/date/year format.
Enter the current time for reach field and use the <Tab>,
<Shift>+<Tab>, or <Enter> key to move from one field or back to
another.
You can also change the system time from your operating system.
• BIOS Revision
This field is for information only as the BIOS displays the BIOS version
during the Power-On Self-Test (POST).
• SATA1 Port 1
This field is for information only as the BIOS automatically detects the
storage media.
• CPU Type
This field reports the CPU type information detected by the BIOS during
Power-On Self-Test (POST).
• CPU Speed
This field reports the CPU speed information detected by the BIOS
during Power-On Self-Test (POST).
• Installed Memory
This field reports the amount of base (or conventional) memory found by
the BIOS during Power-On Self-Test (POST).
• Available to OS
This field reports the amount of Operating System available size found by
the BIOS during Power-On Self-Test (POST).
• Used by Devices
This field is for the information as the BIOS reserved the size for BIOS
processing.
Mini-note User Guide
76
5.2.1 INTERNAL HDD SUB-MENU
Phoenix SecureCore(tm) Setup Utility
Main
SATA Port 1 [ATAPI Removable] Item Specific Help
Type: [Auto] User = you enter parameters
LBA Format of hard-disk drive installed
Total Sector: 312581808 at this connection.
Maximum Capacity: 160GB SATA1 Auto = autotypes hard-disk
drive installed here.
Multi-Sector Transfers: [16 Sectors] CD-ROM = a CD-ROM
LBA Mode Control: [Enabled] drive is installed here.
32 Bit I/O: [Disabled] ATAPI Removable=
Transfer Mode: [FPIO 4 / DMA 2] removable disk drive is
Ultra DMA Mode: [Mode 5] installed here.
SMART Monitoring Enabled
F1 Help Ç ÈSelect Item -/+ Change Values F9 Setup Defaults
Esc Exit Å--> Select Menu Enter Select Sub-Menu F10 Save and Exit
You cannot modify all items on this menu, this sub-menu is for information
only as the BIOS automatically detects the type of Hard Drive.
Customizing Your Mini-note 5
77
5.3 Using the Advanced CMOS Setup
Phoenix BIOS Setup Utility
Main Advanced Security Boot Exit
Item Specific Help
Setup Warning UNIX, Novell NetWare, or
Setting items on this menu to incorrect other operating systems,
value may cause your system to malfunction. select ‘Other’. If you are
installing new software and
Large Disk Access Mode: [Dos] the drive fails, change this
selection and try again.
Legacy USB Support [Enabled] Different operating systems
require different
representations of drive
geometries.
F1 Help Ç È Select Item ─ / + Change Values F9 Setup Defaults
Esc Exit ÅÎ Select Menu Enter Select Sub-Menu F10 Save and Exit
• Large Disk Access Mode:
This field lets you select Other or Dos option for specific operating
system.
• Legacy USB Support
Enable or Disable the Legacy Universal Serial Bus support
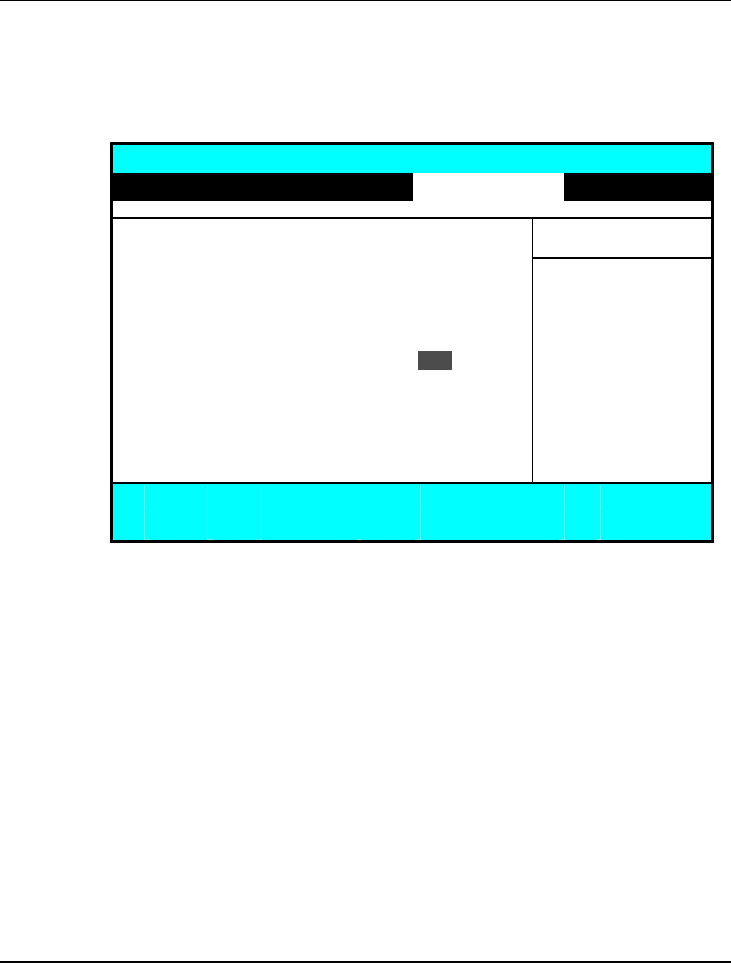
Mini-note User Guide
78
5.4 Security Menu Setup
Phoenix BIOS Setup Utility
Main Advanced Security Boot Exit
Item Specific Help
Supervisor Password Is: Clea
r
User Password Is: Clear Supervisor Password
controls access to the
Set Supervisor Password [Enter] setup utility.
Set User Password [Enter]
Password on boot [Disabled]
F1 Help Ç ÈSelect Item ─ / + Change Values F9 Setup Defaults
Esc Exit ÅÎ Select Menu Enter Select Sub-Menu F10 Save and Exit
• Supervisor Password Is
Set/Clear selections show that the Netbook is under controlled by
Supervisor Password or not.
• User Password Is
Set/Clear selections show that the Netbook is under controlled by User
Password or not.
• Set Supervisor Password
Supervisor password gives you the authority in accessing the setup utility.
You also need to enter this password in system booting. When you press
<Enter> in this field, the Set Supervisor Password dialog box appears.
Enter a new password with up to 8 alpha-numeric characters, and then re-
enter it for confirmation.

Customizing Your Mini-note 5
79
• Set User Password
Enter the user password when boot the system.
• Password on Boot
If you set this field to Enabled, your Netbook will always ask for the
password every time you boot your .
5.5 Using the Boot Setup
This item allows you to set the search drive sequence where the system will try
to boot up first.
Phoenix BIOS Setup Utility
Main Advanced Security Boot Exit
Item Specific Help
Boot priority order Keys used to view or
1: USB FDC: configure devices:
2: USB CDROM: Up and Down arrows
3: USB KEY: select a device.
4: USB HDD: <+> and <-> moves the
5: IDE 2: WDC WD1600BEVT-22A23T0-(S1 device up or down.
6: PCI BEV <f> and <r> specifies the
device fixed or
removable.
F1 Help Ç ÈSelect Item ─ / + Change Values F9 Setup Defaults
Esc Exit ÅÎ Select Menu Enter Select Sub-Menu F10 Save and Exit

Mini-note User Guide
80
• Boot priority order
This item allows you to set the search drive sequence where the system
will try to boot up first.
To select the boot device, you can use the up or down arrow key, then
press <+> to move up the device in the list or press <-> to move down
the device in the list. To exit from this menu, press <Esc>.
5.6 How to Exit the Setup Program
There are two choices to escape from the Setup program.
Phoenix BIOS Setup Utility
Main Advanced Security Boot Exit
Item Specific Help
Exit Saving Changes Exit S
y
stem Setu
p
Exit Discarding Changes and save your
Load Setup Defaults changes to CMOS.
Discard Changes
Save Changes
F1 Help Ç ÈSelect Item ─ / + Change Values F9 Setup Defaults
Esc Exit ÅÎ Select Menu Enter Select Sub-Menu F10 Save and Exit
• Exit Saving Changes
Saves all changes to CMOS while running the BIOS setup program and
exit from the system setup program.

Customizing Your Mini-note 5
81
• Exit Discarding Changes
Allows you to discard all changes made while running the BIOS setup
program and exit from the system setup program.
• Load Setup Defaults
Lets you load the default values for all setup items.
• Discard Changes
Reverts to previously selected settings.
• Save Changes
Saves Setup data to CMOS.
5.7 How to Upgrade the BIOS
Your Netbook uses EPROM Flash BIOS chip that allows you to easily
upgrade the BIOS program. When you update the BIOS, any customized
settings you made are lost.
To upgrade the BIOS:
1. Put in the BIOS Update data into the USB device.
2. Power on the system with the diskette in the diskette drive.
3. On the DOS prompt, type the following command.
A:\>Phlash XXXXXX.ROM (BIOS filename) or
A:\>XXXXXX.BAT (Batch file for BIOS file)
Press <Enter> to run this BIOS utility. After the system has been
successfully run this program, a message similar to the following appears:
Flash memory has been successfully programmed,
press any key to restart the system. If the
system does not restart, turn it off, then turn
on again.

Mini-note User Guide
82
4. Press any key to restart this system.
Contact your dealer for the latest BIOS update file.

System Specification A
83
6 Caring for Your Netbook
Your Netbook the latest features in mobile
computing and multimedia technology. If properly
cared for and maintained, the performance and
reliability of the Netbook can be greatly prolonged.

Mini-note User Guide
84
6.1 Important Safety Instructions
This section gives you detailed information about how to maintain a safe
working environment while using the Netbook. You can maintain its condition
and performance by following these guidelines. Please read it carefully to
ensure maximum safety.
• Before cleaning the Netbook, make sure it is disconnected from any
external power supplies (i.e. AC adapter, car adapter and so on).
• When cleaning, do not use liquid or spray detergent for cleaning. Instead,
use moisture sheet or a cloth for cleaning.
• The socket-outlet shall be installed near the Netbook and shall be easily
accessible.
• Please keep the Netbook away from humidity.
• Lay the Netbook on a reliable flat surface when operating. A drop or fall
may cause injury.
• The openings on the enclosure are for air convection hence the Netbook
can be protected from overheating. DO NOT COVER THE
OPENINGS.
• Be careful of using power supply. The Netbook has specific power
requirements.
• Use only a power adapter approved for use with this Netbook.
• While unplugging the power cord, disconnect it by the plug head, not by
its wire.
• Make sure the socket and any extension cords you may use can support
the total current load of all the connected devices.

System Specification A
85
• Though your AC adapter is suitable for universal international voltage, it
still requires a stable and continual power supply. Make sure the voltage of
the power source when connect the Netbook to the power outlet. If your
are not sure of your local power specifications, consult your dealer or local
power company.
• Place the power cord in such a way that people can not step on it. Do not
place anything over the power cord.
• All cautions and warnings on the Netbook should be noted.
• If the Netbook is not in use for a long time, disconnect it from mains to
avoid possible damage by transient over-voltage.
• Never pour any liquid into openings as this may cause fire or electrical
shock.
• Never open the body of Netbook. For safety reason, the Netbook should
only be opened by qualified service personnel.
• If one of the following situations arises, have the Netbook checked by
service personnel:
The power cord or plug is damaged.
Liquid has penetrated into the Netbook.
The Netbook has been exposed to moisture.
The Netbook has not worked well or you can not get it work
according to user’s manual.
The Netbook has dropped and damaged.
The Netbook shows signs of breakage.
• Do not leave or store this Netbook in an environment unconditioned.
Storage temperature above 60ºC (140ºF) may damage the Netbook.

Mini-note User Guide
86
• An approved power cord has to be used for the Netbook power supply.
For a rated current up to 6A and an equipment weight more than 3kg, a
power cord not lighter than H05VV-F, 2G, 0.75mm2, has to be used.
• To avoid any damage to the internal device, please disconnect the AC
adapter first and remove the battery pack from the Netbook when
replacing any internal device.
6.2 Cleaning Your Netbook
When it is necessary to clean the plastic case and keyboard, use a soft, lint-free
cloth, slightly dampened with a mild detergent solution or use the contents of
any commercially available Netbook cleaning kit.
Never use alcohol, petroleum-based solvents, or harsh detergents to clean the
Netbook. Also never spray any liquids directly on the Netbook case, keyboard,
or screen. If the liquid-crystal display (LCD) screen has become smeared or
dusty, clean the screen by first applying a mild glass cleaner to a soft, clean,
lint-free cloth, and gently wipe the glass. Never apply liquids directly on the
screen surface. Moreover, do not use paper towels to clean the display screen.
Paper can scratch the display screen matte.
6.3 Maintaining the LCD Quality
When it comes to screen problems, heat plays a significant role. After a typical
working session, users routinely close the Netbook the cover. The display
surface - no matter what type it is - and the components inside the Netbook
radiate heat; when you close the cover, you trap the heat against the screen. To
help prolong the life of your Netbook, leave the cover open for ten minutes to
let the heat disperses. (while the heat disperses.)

System Specification A
87
You should also enable the power management of your Netbook to turn off
the LCD power and display when the system is inactive for some time.
Adding a screen saver also helps prolong the life of your Netbook screen.
Follow the safety guidelines mentioned earlier and how to clean your Netbook.
6.4 Maintaining Your Hard Disk
Losing your data has the same consequences as a system break down. Users
must make it a habit of doing hard disk maintenance every week or so. Here is
some maintenance you could do:
• Always back up your data files from your hard disk.
• Install the virus detecting program to monitor virus that could tamper
your files.
• Use SCANDISK occasionally to correct any errors found in the directory
and File Allocation Table. This will also free up space from any unused
sectors.
• Never move or raise the Netbook while the hard disk is being accessed,
most especially don't jar the hard disk as this may cause a hard disk crash.
• Use hard disk maintenance programs like Disk Defragmenter of
Windows. These reorganize your hard disk by eliminating fragmentation
and improving your hard disk access time.
• Install a system password in your Netbook so others won't be able to use
the hard disk.

Mini-note User Guide
88
6.5 Battery Care Guidelines
The battery pack sold with the Netbook requires reasonable care and handling
to ensure efficient operation and maximum life. There is a risk of fire and
chemical burn if the battery pack is handled improperly.
To ensure that the battery pack endures normal life cycle, always observe the
following precautions when handling the battery pack:
• Handle batteries carefully. Do not try to disassemble, crush, puncture,
open, drop, mutilate, short external contacts, disposed of in water or fire,
or expose it to temperatures higher than 45°C.
• Recharge batteries only as described in this manual and only in ventilated
areas. Never use an external charger other than the one supplied with your
Netbook.
• Do not leave batteries in hot locations for more than a day or two.
• Do not leave your battery in your Netbook for longer than 1 month
without plugging in the power adapter.
• Do not leave battery in storage for more than 2 months without
recharging it to prevent over discharge. Over discharge will hurt the
battery
• Dispose dead battery properly to protect the environment. The batteries
contain hazardous chemicals and should not be thrown out with
household or office trash.
• You should always discharge your battery before recharging it on either of
these two conditions: first, this is the first time you start to use your
battery; second, you had not charge the battery for more than 2 months.

System Specification A
89
6.6 When You Travel
For safety and convenience when traveling, please follow these instructions:
• Back up all needed files on your hard disk before traveling.
• Recharge your battery overnight to ensure full battery power before you
leave.
• Don't forget to bring along the AC adapter and extra battery pack.
• Try to bring backup software as well.
• Check the voltage rating and the outlet type of your destination. If the
power cord of the adapter is different, then you need to purchase a
suitable one. Consult your dealer.
• Carry your Netbook in its carrying case or in a briefcase. Never check-in
the Netbook as a luggage.
• Remember to apply those power saving features and techniques to save
battery power.

Mini-note User Guide
90
APPENDIX A
System Specification
This appendix provides technical specifications for
the Netbook.

System Specification A
91
System Specification
PROCESSOR UNIT
• Intel® N450 microprocessor
• 1.6 GHz CPU, FSB 667 MHz
• 512KB integrated L2 cache for the processor
SYSTEM MEMORY
• One 200-pin memory slot
• 512MB and 1024MB up to 2GB memory modules using 200-pin
SODIMM
• DDR2 667 SDRAM modules
• Maximum memory size 2GB
LCD DISPLAY
• 10.1" WSXGA (16:9) Color TFT LCD, 1024 x 600
• Maximum 16M true colors on all LCD display
VGA SYSTEM
• Providing graphic engine Integrated in Intel N450 CPU
• Simultaneous LCD and external monitor (CRT) display
• Maximum 16 million colors on LCD display at 1024 x 600 resolution
(CRT only) for 10.1" LCD

Mini-note User Guide
92
• Maximum 16 million colors on external monitor or projector at
1600x1200 resolution (Non-Interlaced)
STORAGE
• 2.5" Format 9.5 mm High SATA1 HDD Module; Bus Mastering, Ultra
DMA ATA-300 Support for LBA Scheme
• Support system boot from external USB device
• 4-in-1 (SD, MS, MMC, and MS_Pro) card reader
AUDIO SYSTEM
• Compliant with Intel HD Audio (Azalia 2 channels)
• H/W Audio Sound Blaster 16 compatible
• Built-in dual speakers
• Audio input jacks for microphone (MIC)
• Audio output jack for external speaker or headphone (Line-Out)
• Sound volume adjust by K/B Hot-Keys
WEBCAM
One Webcam with USB2.0 CMOS 1.3M pixel
TOUCHPAD
Integrated Touchpad (Serial/USB mouse) pointing device with 2 click buttons

System Specification A
93
KEYBOARD
• Full-sized 87-keys keyboard with Windows systems hot-keys, inverted T-
cursor keys, 9 hot keys, 12 function keys, and embedded numeric keypad
• Provides international language keyboard
FLASH BIOS
512K Flash ROM BIOS for easy BIOS upgrade
I/O PORTS
• 1 x VGA port
• 2 x Universal Serial Bus (USB 2.0)
• 1 x SIM Card slot
• 1 x 4 in 1 Card slot
• 1 x 10/100/1000Mbps LAN port
WIRELESS DEVICES
• IEEE 802.11b/g/n, Half Mini-PCI card
• Bluetooth, USB Interface
• HSDPA 3 G, Full Mini Card or USB Interface
AC/DC POWER SUPPLY ADAPTER
Universal auto-switching (100V~240V) 40W adapter, 20 Volt
BATTERY
• Rechargeable 3 Cells Li-ion battery pack with Smart Battery function

Mini-note User Guide
94
• Approximately 4 Hours (for 3 Cells, 2800mAH) Battery Life (for Idle
Mode)
WEIGHT AND DIMENSION
• 285 (W) x 215 (D) x 26 (H) mm
• Approximately 1.2 kg