First Computer GTA02 NEO 1973 User Manual openmoko manual 20071224
First International Computer Inc NEO 1973 openmoko manual 20071224
USERS MANUAL
www.openmoko.com
1
OpenMoko
Neo1973 user manual

www.openmoko.com
2
Federal Communication Commission Interference Statement
This equipment has been tested and found to comply with the limits for a Class B digital device,
pursuant to Part 15 of the FCC Rules. These limits are designed to providereasonable
protection against harmful interference in a residential installation. Thisequipment generates,
uses and can radiate radio frequency energy and, if not installed and used in accordance with
the instructions, may cause harmful interference to radio communications. However, there is
no guarantee that interference will not occur in a particular installation. If this equipment does
cause harmful interference to radio or television reception, which can be determined by turning
the equipment off and on, the user is encouraged to try to correct the interference by one of the
following measures:
Reorient or relocate the receiving antenna
Increase the separation between the equipment and receiver
Connect the equipment into an outlet on a circuit different from
that to which the receiver is connected
Consult the dealer or an experienced radio/TV technician for help
This device complies with Part 15 of the FCC Rules. Operation is subject to the following two
conditions: (1) This device may not cause harmful interference, and (2) this device must
accept any interference received, including interference that may cause undesired operation.
FCC Caution: Any changes or modifications not expressly approved by the party
responsible for compliance could void the user’s authority to operate this equipment.
IMPORTANT NOTE:
FCC Radiation Exposure Statement
This equipment complies with FCC radiation exposure limits set forth for an uncontrolled
environment. End users must follow the specific operating instructions for satisfying RF
exposure compliance.
For body worn operation, this phone has been tested and meets the FCC RF exposure
guidelines for use with an accessory that contains no metal and the positions the handset a
minimum of 1.5 cm from body. Use of other enhancement may not ensure compliance with
FCC RF exposure guidelines.

www.openmoko.com
3
Chapter 1 Free Your Neo1973
OpenMoko is an Open Source project to create the world's first free mobile
phone operating system. The OpenMoko project is a community that
anyone can join, and help to design their ideal phone. The Neo1973 from
FIC is the first of many phones that OpenMoko will run on.
The long term goal of OpenMoko is that phone software will no longer be
tied to one phone. You can buy any compatible phone, and install any
software over the whole range of phones. If you upgrade your phone, you
don't lose the software. Bugs fixed on one phone are fixed on all.
Please join us in collaborating on the OpenMoko project through any of the
project resources including the OpenMoko wiki. Please see the wiki editing
help page for information on making contributions to this wiki. A core team
of developers funded by FIC, Inc. leads the project.
1-1 Neo1973 package list
All the following information could be found at www.openmoko.org Please
go to the web site for most updated information.
A Neo1973 standard package including:
a. 100 to 220 v adaptor plug
b. USB Charger
c. USB charger cable
d. USB A to mini B cable
e. Stylus
f. Earphone
www.openmoko.com
4
g. Battery
h. SD-Card
1-2 Neo1973 GTA01 Specification
Name Neo1973
Size 120.7 x 62 x 18.5 mm
Weight 135 g
Screen 2.8" 480x640 at 285 ppi, maybe multi-touch later
Flash 128/256 MB
CPU Samsung s3c2442 SoC @ 400 MHz (Source)
SDRAM 128MB
GSM GSM, GPRS 2.5G (Not EDGE), Bluetooth 2.0 EDR, WiFi 812.11 b/g
GPS u-blox GPS
System OpenMoko Linux (Source code available)
Application Basic u-boot included. Software can be created by normal users.
www.openmoko.com
5
Sound Playback and recording, including playback of audio files via GSM and
recording/playback of voice calls. 2x1 watt stereo speaker comment
on performance, 2.5 mm jack
USB Standard USB 1.1 (unpowered), with a Mini-B receptor (can be
connected via adapter to both host and client devices)
Battery replaceable 1200 mAh battery charged via USB and AKII charger
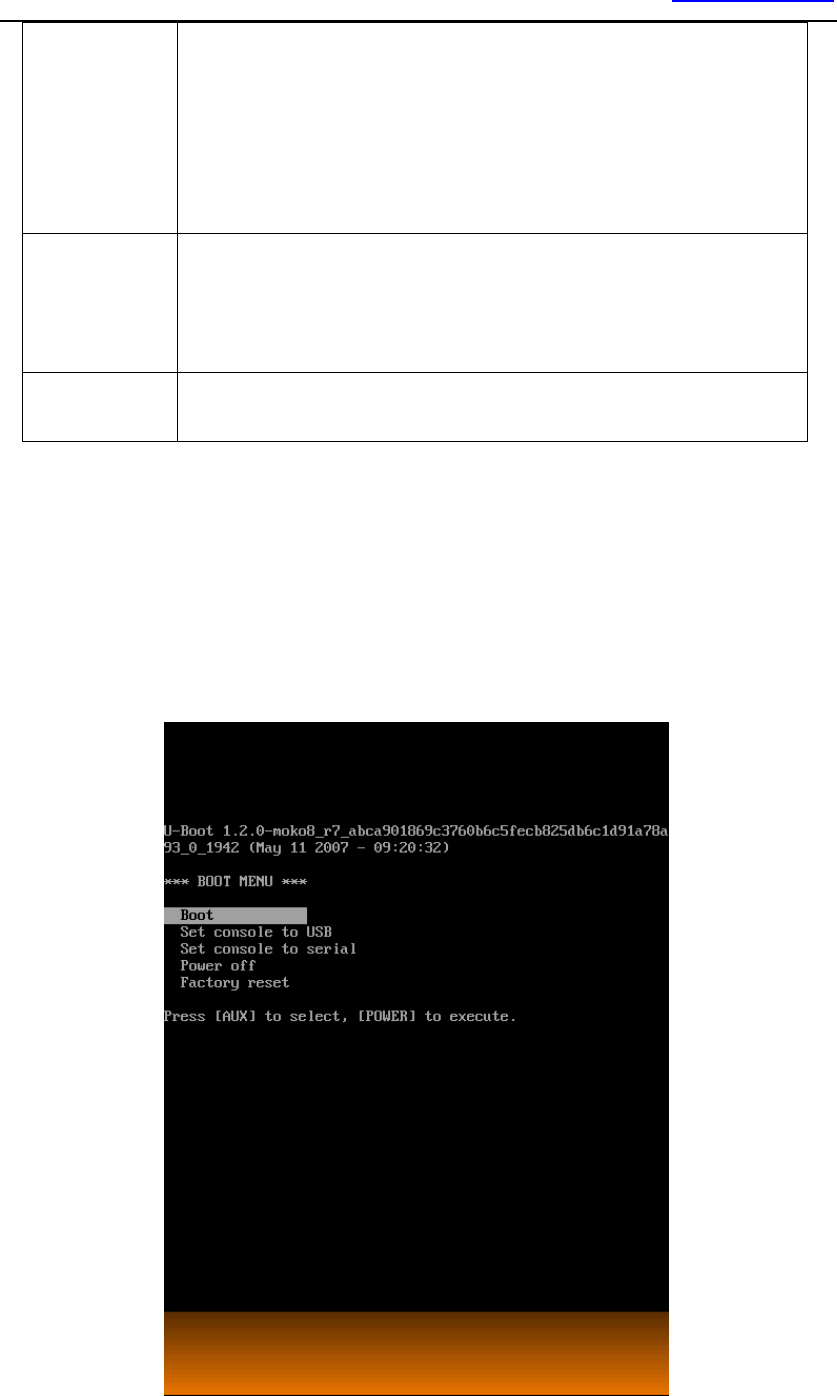
1-3 Enter Neo 1973 U-Boot menu
Please insert the battery into the Neo1973 battery slot, then press Aux key
and power key the same time. Then you could enter following u-boot
menu.

www.openmoko.com
6
After enter u-boot menu, you could use [Aux] key to select the item, and
[Power] key for confirm. There should be 5 items by default:
1. Boot: Direct boot
2. Set console to USB: Could use Linux terminal software (like minicom
to connect Neo1973)
3. Set console to Serial: Re-Direct terminal output to Neo1973 debug
port serial interface.
4. Power off: Power of Neo1973
5. Factory reset: Reset parameter into factory default value.
If your Neo1973 already had kernel image or rootfs installed, once you
select the boot, system will boot. If your Neo1973 doesn’t contain any
kernel image, you will need to use devirginator or DFU-Util to install
system and root file system.
If you using the minicon or other terminal software like hyperterminal,
please using following settings to connect terminal:
Speed: 115200, N ,8, 1
Hardware flow control: Off
1-4 Install OpenMoko Kernel image by using DFU
1-4-1 Purpose
dfu-util is a program that implements the Host (PC) side of the USB DFU
(Universal Serial Bus Device Firmware Upgrade) protocol.

www.openmoko.com
7
In the OpenMoko project, we use this program to communicate with our
specially enhanced u-boot boot loader, which implements the DFU device
side.
Using dfu-util and your Neo1973, you can Link* transfer and flash
partitions to NAND Flash, such as
The Linux kernel
The root file system partition
The splash screen partition
The u-boot environment
Last, but not least: The u-boot bootloader itself.
transfer anything into Neo1973 RAM
this can be used for fast development cycles of low-level code such as
kernels without flashing them
read out the current NAND partitions
this is an easy and efficient way of doing full backups of your phone
1-4-2 Source Code
dfu-util can be found at http://svn.openmoko.org/trunk/src/host/dfu-util/
Binary packages will be made available as part of the regular OpenMoko
builds
1-4-3 help manu
dfu-util - (C) 2007 by OpenMoko Inc.
www.openmoko.com
8
This program is Free Software and has ABSOLUTELY NO WARRANTY
Usage: dfu-util [options] ...
-h --help Print this help message
-V --version Print the version number
-l --list List the currently attached DFU
capable USB devices
-d --device vendor:product Specify Vendor/Product ID of DFU
device
-c --cfg config_nr Specify the Configuration of DFU
device
-i --intf intf_nr Specify the DFU Interface number
-a --alt alt_nr Specify the Altseting of the DFU
Interface
-t --transfer-size Specify the number of bytes per USB
Transfer
-U --upload file Read firmware from device into <file>
-D --download file Write firmware from <file> into device
-R --reset Issue USB Reset signalling once
we're finished
1-4-4 List function
Using the --list option, you can list the available DFU capable devices, their
configuration, interface and altsettings. Below is an example for a current
Neo1973 phone in u-boot Runtime Mode
# ./dfu-util --list
dfu-util - (C) 2007 by OpenMoko Inc.
This program is Free Software and has ABSOLUTELY NO WARRANTY
Found DFU Runtime: [0x1457:0x5119] devnum=0, cfg=0, intf=2, alt=0,
name="USB Device Firmware Upgrade"
Below is an example for a current Neo1973 phone in u-boot DFU Mode
# ./dfu-util --list
dfu-util - (C) 2007 by OpenMoko Inc.
This program is Free Software and has ABSOLUTELY NO WARRANTY
Found DFU: [0x1457:0x5119] devnum=16, cfg=0, intf=0, alt=0,
name="RAM 0x32000000"
Found DFU: [0x1457:0x5119] devnum=16, cfg=0, intf=0, alt=1,
name="u-boot"

www.openmoko.com
9
Found DFU: [0x1457:0x5119] devnum=16, cfg=0, intf=0, alt=2,
name="u-boot_env"
Found DFU: [0x1457:0x5119] devnum=16, cfg=0, intf=0, alt=3,
name="kernel"
Found DFU: [0x1457:0x5119] devnum=16, cfg=0, intf=0, alt=4,
name="splash"
Found DFU: [0x1457:0x5119] devnum=16, cfg=0, intf=0, alt=5,
name="rootfs"
This shows you six interfaces, all in configuration 0 and interface 0, with
altsetting 0...4. The name is currently not yet defined, but will be added to
one of the upcoming u-boot releases. The mapping on the Neo1973 is as
follows:
0: RAM
1: 'u-boot' partition
2: 'u-boot_env' partition
3: 'kernel' partition
4: 'splash' partition
5: 'rootfs' partition
1-4-5 device function
You can specify the USB Vendor and Product ID of the device you want to
program:
dfu-util --device 0x1457:0x5119
If you only have one standards-compliant DFU device attached to your PC,
this is optional. However, as soon as you have multiple DFU devices,
dfu-util will detect this and abort, asking you to specify which device it
shall use.
1-4-6 transfer-size
Specifies the size of each individual USB transfer. If you don't use it, the
maximum possible size for your combination of host operating system and
USB device is chosen (for optimal performance).
1-4-7 download
www.openmoko.com
10
download the given file into the device.
1-4-8 upload
upload from the DFU device into the given file[name].
NOTE: Upload support is currently broken
Phrasebook
There's no full-fledged manual yet. Instead, some examples:
Flashing the kernel
dfu-util -a 3 -R -D /path/to/uImage
Flashing the bootloader
dfu-util -a 1 -R -D /path/to/u-boot.bin
Copying a kernel into RAM
dfu-util -a 0 -R -D /path/to/uImage
Once this has finished, the kernel will be available at the default load
address of 0x32000000 in Neo1973 RAM.
www.openmoko.com
11
Chapter 2 Applications
2-1 Overview
This page describes the set of applications being developed by the core set
of OpenMoko developers. This is what is intended to be eventually released
on the stock firmware of OpenMoko phones (Neo1973 and successors). If
the community develops an application of suitable usefulness and quality,
it may also be included on stock firmware. Community applications may be
found on the Wish List and on projects.openmoko.org
Although OpenMoko is designed for smartphones that use a stylus, it
would be foolish to expect people to only operate their handsets with
stylus. For this reason, some core phone-related applications will be
developed with finger (as opposed to stylus navigation) in mind.
NOTE: Applications listed on this page are listing in order of priority and
by phase. 0th phase is for the developers preview release in March, 1st
phase is for late March. 2nd phase is September... when we are ready
for mass market appeal.

www.openmoko.com
12
2-1-1 General Principles
All modifications are saved instantenously, there should never be a save
command.
Make sure users can't make interface operation errors, or that the effects
are easily reversible, instead of just notifying them of the potential
consequences of their actions.
When you open a document you should be returned to the place where you
were working when you last closed or save it (this is our concept of
sessions).
Label buttons with adjectives, which describe the state of the object
affected
Designers should seek an efficient monotonous solution to gain benefits,
including ease of learning, simplicity of implementation, minimization of
documentation, and lowered maintenance costs.
Whenever you find yourself specifying an error message, please stop; then
redesign the interface so that the condition that generated the error
message doesn't arise.
If the user gets no utility from a process, there is no reason to tell them
that it is happening.
Provide unlimited levels of Undo and Redo whenever possible.
Consider adding a Trash or Deleted Items area that has everything the
user has deleted. The user’s data is the most important priority. Let’s
make it hard for them to lose anything and easy to recover it.

www.openmoko.com
13
NOTE: Innovation usually happens at the bottom. What we need to do is
provide consistent ways to develop and deploy appliations.
2-2 OpenMoko Dialer
2-2-1 Overview
This article defines the Dialer Application, an application designed for the
OpenMoko platform. The Dialer Application handles all call and SMS
related interactions. This is a Native Finger-Based application.
2-2-2 Use Cases
Here are some possible use cases:
I want to be able to dial a number
I want to be able to quickly redial a number
I want to be able to adjust the volume of both the speaker and microphone
while in call
www.openmoko.com
14
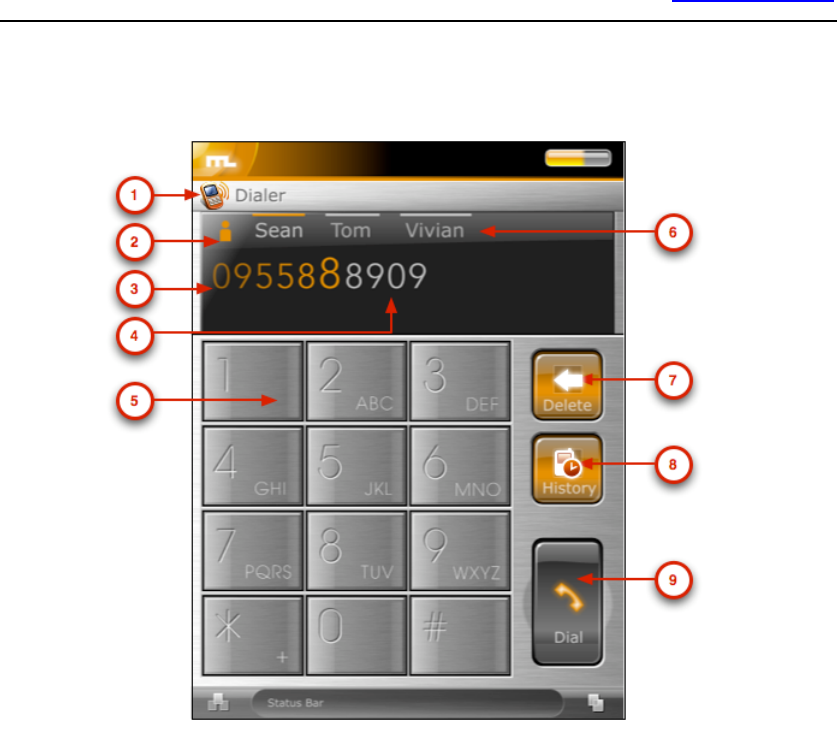
2-2-3 Dial Mode
1) Application Title -- Title of this application.
2) Icon / Photo -- Photo of contact (if available) will be displayed if number
can be autocompleted.
3) Phone Number -- Phone number is displayed. Larger font is used for first
line. After reaching end of first line the entire font size should decrease to
allow for two full lines.
4) Autocompleted Tail -- Automatically complete the tail of phone numbers
from existing contacts (when matched). This uses the Auto-complete
widget.
5) Keypad -- Standard dialing keypad. The '*' key, when pressed quickly,
cycles through this list: {*, +, p, w}.
6) Possible Autocompletions -- A list of contacts that can be autcompleted.
This list is only as long as the visible screen area permits. (Usually 4-5
contacts). These are buttons that, when pressed, will autocomplete the
www.openmoko.com
15
current number string.
7) Delete -- Deletes the last entered digit.
8) History -- Goes to the History mode.
9) Dial -- Dials the entered number string.
NOTE: If a PIN is required to access the SIM card, the "Phone number" (3)
display will change to enter a PIN. "History" (8) will gray-out and "Dial" (9)
will change to "OK."
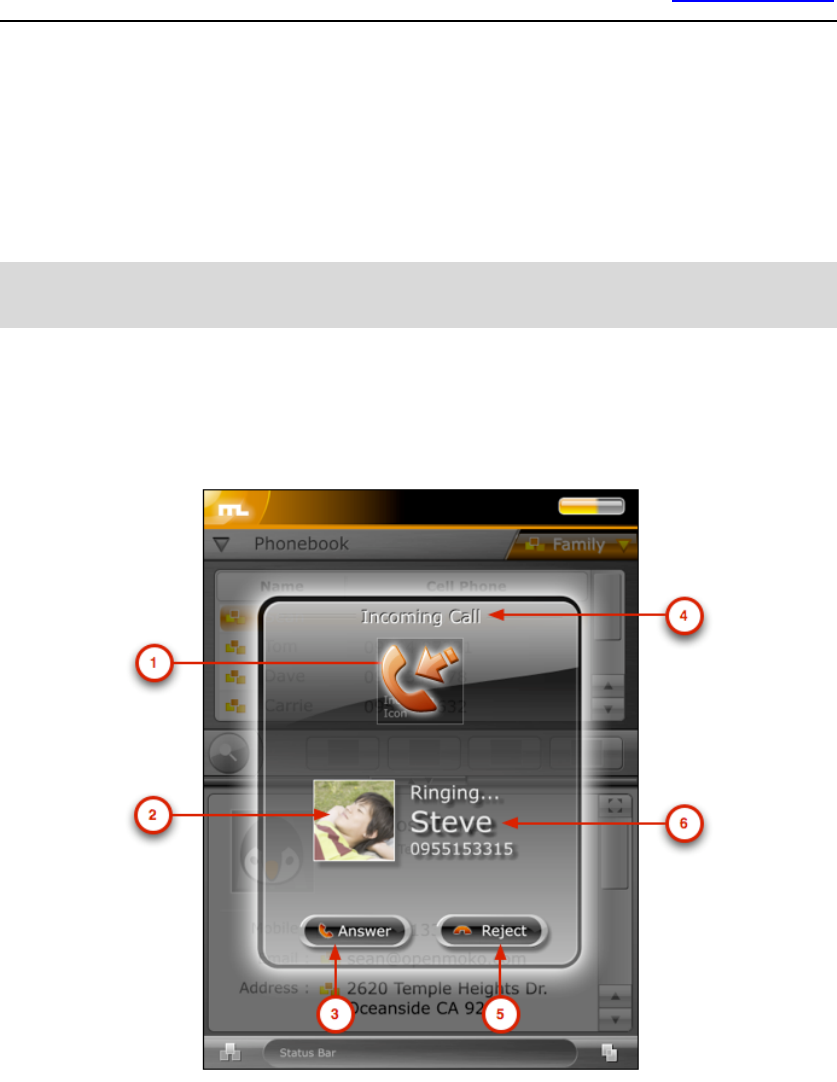
2-2-3 Incoming Call Mode
1) Call Icon -- Icon representing call type.
2) Icon / Photo -- Photo of contact (if available) will be displayed.
3) Answer -- Answer the incoming call.
4) Title -- Title of this window.
5) Reject -- Rejects call. Returns to last application.
www.openmoko.com
16
6) Caller ID Title -- If contact is stored in the handset, the name will be
displayed (Steve in this case). Otherwise display Unknown. Below displays
the phone number of the other party.
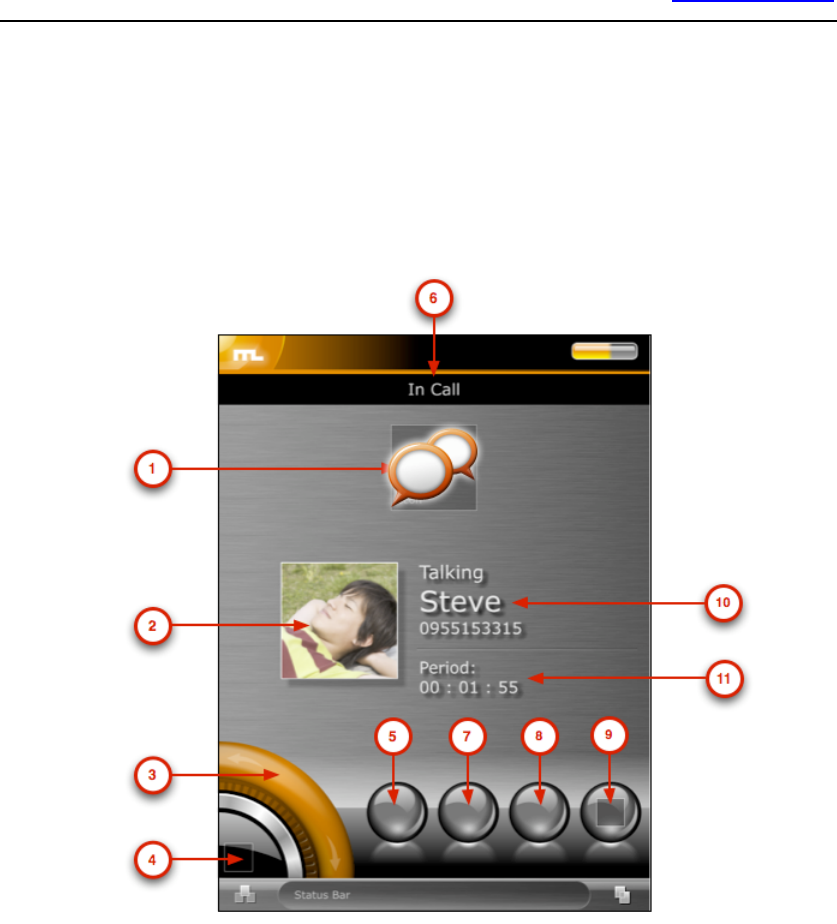
2-2-3 In Call Mode
1) Call Icon -- Icon representing call type.
2) Icon / Photo -- Photo of contact (if available) will be displayed.
3) Volume control -- Adjust the speaker volume level. While adjusting 5)
will display percentage (%) level information
4) Control Button -- This mode only has volume control. Tapping will do
nothing.
5) Speaker Phone -- Turns on the speaker phone mode
6) Application Title -- Title of this application.
www.openmoko.com
17
7) DTMF -- Changes to Dial Mode for DTMF support.
8) Hang-up -- Disconnects the current phone call. Returns to Dial Mode.
9) EMPTY -- Nothing for now. (Can be toggle of dictation)
10) Caller ID Title -- If contact is stored in the handset, the name will be
displayed (Steve in this case). Otherwise display Unknown. Below displays
the phone number of the other party.
11) Talk Time -- Displays call talk time.
2-2-4 Outgoing Call Mode
1) Call Icon -- Icon representing call type.
2) Icon / Photo -- Photo of contact (if available) will be displayed.
3) Speaker -- Turn on speaker phone mode
www.openmoko.com
18
4) Title -- Title of this window.
5) Cancel -- Cancels call. Returns to last application.
6) Caller ID Title -- If contact is stored in the handset, the name will be
displayed (Steve in this case). Otherwise display Unknown. Below displays
the phone number of the other party.
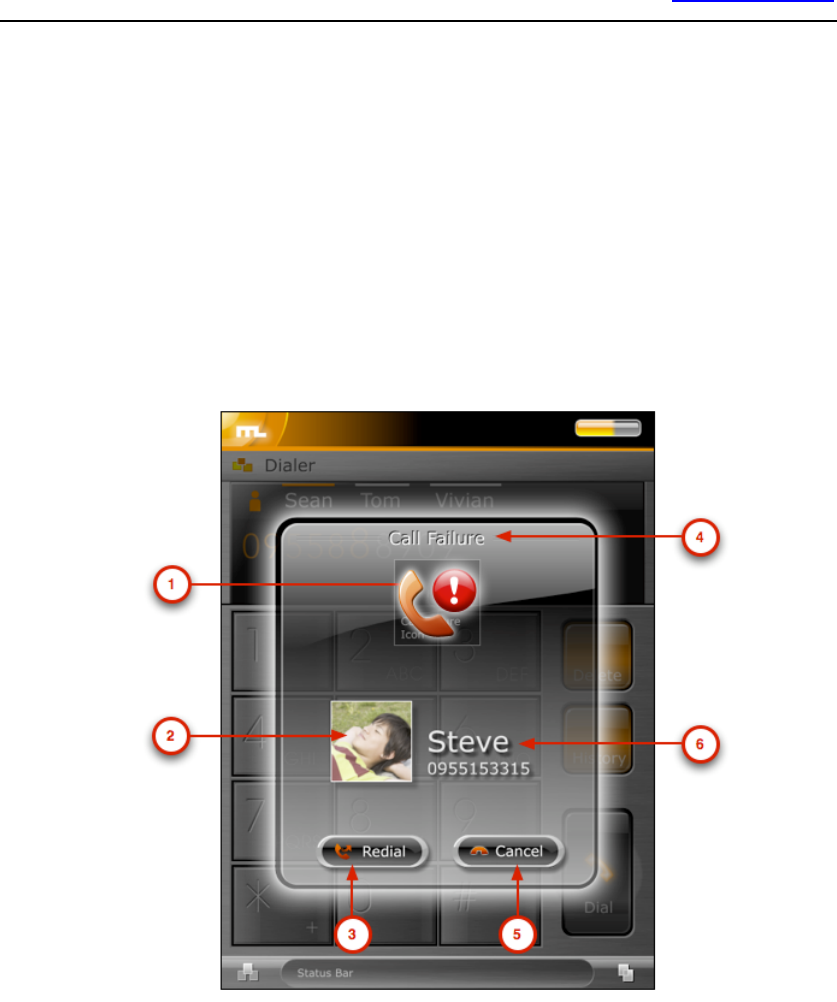
2-2-5 Connection Error Mode
1) Call Icon -- Icon representing call type.
2) Icon / Photo -- Photo of contact (if available) will be displayed.
3) Redial -- Redials the last number.
4) Error Title -- Title of this error.
5) Cancel -- Cancels call. Returns to last application..
6) Caller ID Title -- If contact is stored in the handset, the name will be
displayed (Steve in this case). Otherwise display Unknown. Below
displays the phone number of the other party.
www.openmoko.com
19
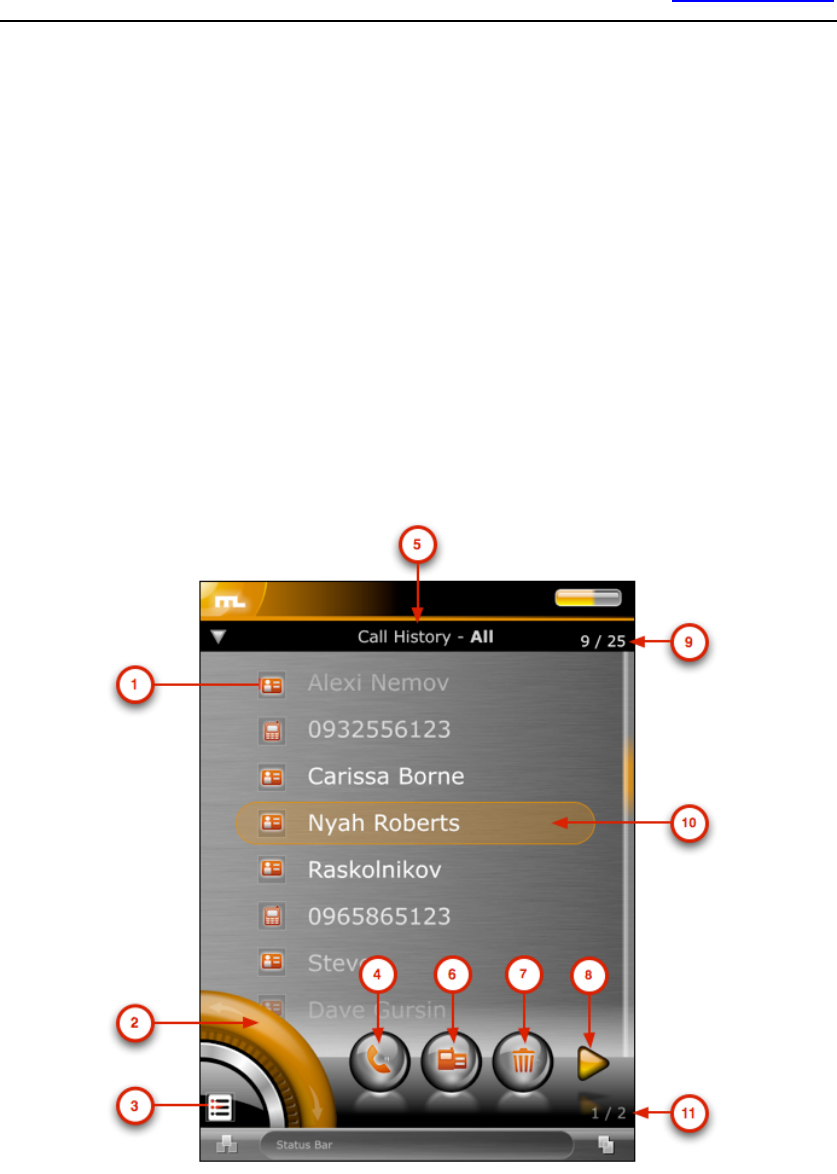
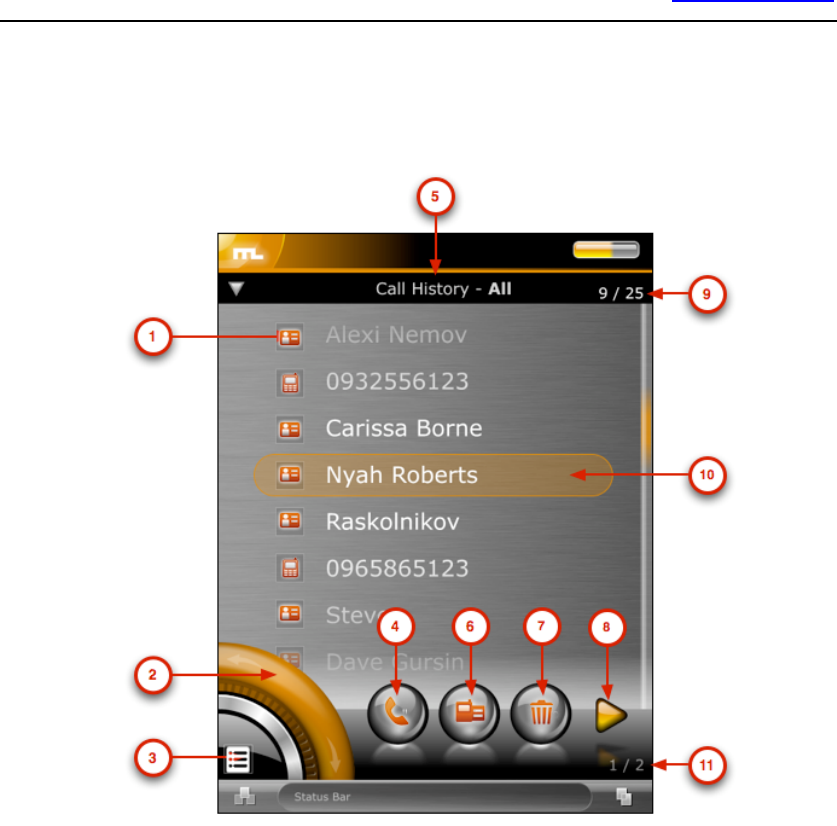
2-2-6 Call History Mode
1) Caller ID Title -- If contact is stored in the handset, the name will be
displayed. Otherwise display number. An icon will represent the type
(incoming, outgoing, missed) of call.
2) List Scroll -- Scrolls through the call history list. While scrolling, 3) will
display the current / total item information (for example 2/8).
3) Control Button -- Tapping will change between the following modes:
{Call History Mode, Close and returns to Dialer}.
www.openmoko.com
20
4) Call -- Call the current selected number. Grayed-out if number is
unknown.
5) Application Title -- Title of this application.
6) SMS -- Send a message to this number. This will open the Messages
application with a new (SMS) message.
7) Delete -- Removes this number from the call history list.
8) More Items -- Tap to reveal the next list of items. The second list has the
following items: { Save, All Calls, Missed Called, Dialled Calls, Received
Calls, Back}
9) List counter -- Displays the current list entry / total list entries.
10) Current List Entry -- The current list entry. The position of the highlight
is fixed. Only the text moves up/down with scrolling. User can tap a list
item to have this move to center. Also, scrolling effect should ease in.
11) More Items Counter -- Displays the current set / total sets of More
Items.
NOTE: The call list slides behind the scrolling widget. The scrolling
widget and horizontal bar are 80% transparent.
2-3 OpenMoko Main menu
2-3-1 Overview
This article defines the Main Menu Application, an application designed for
the OpenMoko platform. The Main Menu application provides both a
finger-friendly and a stylus-driven interface to lauch all installed
applications.
Here are some possible use cases:
I want to be able to launch an application
www.openmoko.com
21
I want to rearrange applications in the menu
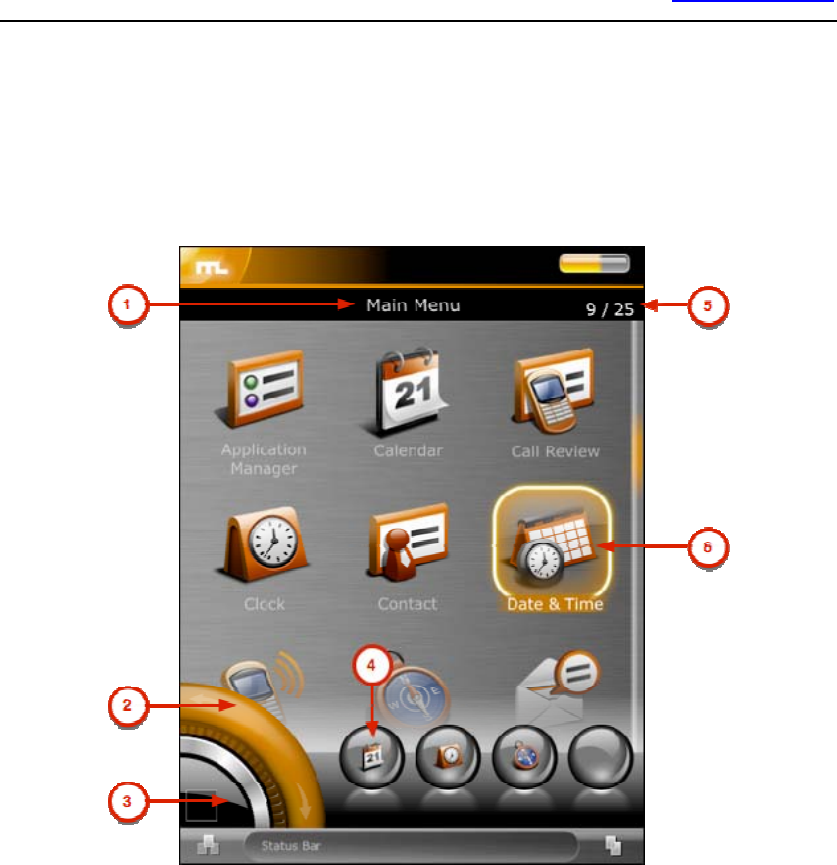
Activated by pressing the auxilary key. This is the base layout:
1) Section Name -- The name of the current section.
2) List scrolling -- Will scroll through the list of icons. While scrolling, 3)
will show how many items exist in this list.
3) Control Button -- Tapping cycles through the following controls {Scroll
List Control, Back}. Currently at Scroll List Control. The List is broken up
into sections of applications.

www.openmoko.com
22
4) History Applications -- Are the last 3 applications launched.
5) Item / Total -- Displays the current selected item number along side the
number of items.
6) Sections or Applications -- Tapping on a section will lead to subgroups
of applications. Tapping on an application will launch that application.

www.openmoko.com
23
Neo1973 emulation
This target will (obviously) run original OpenMoko rootfs images, but then
it should also be able to run the original u-boot and kernel images, the
same ones that a real Neo1973 uses. Among other differences you will
notice between this approach and the Integrator/CP target is you also get
correct screen resolution, some (fake) battery readings, and other
goodness. Currently missing parts of the emulator are: AGPS and
Bluetooth - these things will still be worked on, as well as general usability.
Even with these things missing, QEMU should provide substantial help in
debugging kernel and u-boot issues to developers.
What QEMU can *not* be used for, and probably no other emulator can, is
speed measures and getting the general feel of OpenMoko performance.
Code running in qemu runs with the maximum speed your host computer
can provide with an overhead of translating target code to host code, and
this overhead is not uniform across different instructions. This means that
even if your virtual Neo reports near 100 BogoMIPS (which is the speed of
a real Neo), different actions performed in the emulator will not run with
the same speed. On most PCs you will notice the real Neo running faster
than a virtuel one.
What hardware is supported
Rough status for each of the components that need emulation, following
the outline of Neo1973 Hardware page.
Hardware Status
Usage notes
S3C2410A Processor
ARM920T core Works Already in mainline QEMU.

www.openmoko.com
24
Basic guts Work
This includes GPIO interface, DMA, Interrupt
Controller, Timers, NAND controller, MMC/SD
host, I2C and IIS interfaces, Memory & Clock &
Power management controllers, RAM.
Serial ports Works
Use the "-serial" switch (maybe be specified
multiple times) to tell QEMU where serial
input/output should go to. GSM module will be
connected on UART0.
RTC Works
On start QEMU will load it with current time/date -
the Neo1973 kernel doesn't use it for time/date
source currently.
SPI Works The guest kernel can drive it using either the SPI
interface or raw GPIO bitbanging.
LCD Works
The virtual LCD will display contents in QEMU
window unless "-nographic" is specified on
command line.
ADC Works
Mouse events in QEMU window generate what
would be touchscreen events on a Neo1973 and
are passed to the guest OS through the on-chip
ADC.
OHCI USB Works
This part is in mainline QEMU. Use the "-usb"
switch to enable the controller and "usb_add" in
QEMU monitor to attach new virtual or physical
USB devices.
Slave USB Works
Linux's dummy HCD in conjunction with gadget
filesystem API is used to make the virtual Neo
appear as a real one connected to the host
computer. See Setting up USB connection below.
(Experimental)
www.openmoko.com
25
Watchdog Works
This is one of the less important on-chip
peripherals in S3C2410. It is however used by
Linux for rebooting the board.
I2C bus peripherals
PCF50606 Works
(Aka PMU) Fakes the battery charge level (set at
88%), POWER button, etc. Also contains an RTC,
also unused by Linux.
LM4857 Works
WM8753L Works
The CODEC is also connect to the CPU's IIS port.
Basic audio functionality is supported - see QEMU
documentation on
g
ettin
g
audio input/output from
the emulator. Volume control has no effects.
Other peripherals
NAND Flash Works
However, some pieces are not confirmed to be
completely compatible with the real hardware
because of lack thereof. Use "-mtdblock
flashimagefilenamehere" switch to point QEMU to
your flash image. The file should be at least
69206016 bytes big.
JBT6K74-AS(PI)
Works (Aka LCM) Wired to the SPI channel 1
Buttons Work
Enter is the AUX button, Space is the POWER
button. Wired to on-chip GPIO and PCF50606.
www.openmoko.com
26
SD card Works
This part is already in mainline QEMU. Use the "-sd
cardimagegoeshere" switch to point QEMU to the
card ima
g
e. The re
g
ular QEMU monitor commands
for removable media can also be used. The card
works, however the on-chip host controller gave
block length errors on heavy I/O despite working
as described in specification. I suspect the kernel
driver. DMA operation is not tested.
Bluetooth Works
A generic Bluetooth HCI (just like the BlueCore4
chip) is connected to internal USB hub (just like
the Delta DBFM don
g
le). Currently qemu emulates
no other bluetooth devices, so the don
g
le behaves
as if there was no BT-enabled slaves around, bein
g
the only device on the piconet, i.e. is not really
useful. Likely a Bluetooth keyboard will be
emulated. A physical Bluetooth don
g
le can also be
attached to the emulator (see USB documentation
in QEMU).
GSM Works
A fake modem is connected to UART0
understandin
g
a (currently quite limited) subset of
AT commands. Ultimately it should support as
much functionality as possible (basic AT command
set, fake GPRS connections, dialing and SMS
send/receive). This way all parts of the phone
subsystem (CALYPSO, TWL3014, TRF6151) will
not have to be emulated. There is a possibility to
wire a real GSM modem to QEMU's serial port, or
the phonesim modem simulator from the Qtopia
project (use the --enable-phonesim switch
to ./configure) as well as the atinterface modem
emulator, also from Qtopia.
www.openmoko.com
27
AGPS
T
o Do
There are obvious difficulties emulating the chip,
but hopefully it can be made to present the
g
uest
OS with some fixed coordinates later when more is
known about the chip. Again a real chip could be
connected to QEMU's serial port.
Current development is aiming for GTA01Bv4 compatibility; earlier
revisions can also be emulated if needed. The differences between the
hardware revisions currently only manifest themselves in GPIO wiring.
Hardware emulation is implemented in a clean-room manner using official
specifications where possible.
[edit]
How to get it running
[edit]
Using MokoMakefile
This is arguably the easiest way of building qemu-neo1973 since you won't
need to deal with the compiling and flashing processes yourself. See
MokoMakefile for details. (Installation instructions)
If you *just* build QEMU and use the official images by typing "make
qemu" only (as opposed to setting up monotone and openembedded and
building an entire new image for yourself with MokoMakefile), then the
build takes less time than the manual instructions below (since it's all done
automatically).
Manual setup
To obtain the latest source code for the emulator, you will want to do
something like the following:
$ svn checkout https://svn.openmoko.org/trunk/src/host/qemu-neo1973
$ cd qemu-neo1973
Now, we're going to configure and build the emulator (Note

www.openmoko.com
28
Requirements below):
$ ./configure --target-list=arm-softmmu # GCC 3.x will be required, see
--cc=
$ make
See other available options for the configure script by appending "--help".
Now you should have a working emulator under the name
"arm-softmmu/qemu-system-arm". To run OpenMoko you will also need to
somehow install OpenMoko on your virtual phone, which is totally clean of
any software at this moment. There are several block devices to choose
from, the best option is probably to do exactly what the Neo1973
manufacturer does before it ships the device to the final user. This process
is described in Bootloader, Kernel, NAND bad blocks and Devirginator but
you don't need to know all the details. Two scripts are provided to generate
a firmware for your phone, as realistic as possible. First run
$ openmoko/download.sh
which will look up the list of latest available OpenMoko snapshot builds
from buildhost.openmoko.org and choose the most recent u-boot, Kernel,
and root filesystem images, and download the images (unless they are
already found in the openmoko/ directory). These binaries will be used by
the flash.sh script. First make sure you have the netpbm package installed
for some graphics conversion utilities. On Ubuntu this can be done by:
sudo apt-get install netpbm
Then run:
$ openmoko/flash.sh
which runs the emulator, loads u-boot into it and then uses u-boot's
capability to program the Flash memory to install all the necessary parts of
the system into the virtual Flash. It will also set up all the bootloading
process including a boot menu (ENTER is [AUX] and SPACE is [POWER]),
splash, u-boot environment and some default kernel parameters. If
everything goes OK, the script should print a command which you can use
to start using the emulator.

www.openmoko.com
29
QEMU has *tons* of commandline switches and things that can be
configured. You can look them up in QEMU user docs. You will probably
want to use the "-snapshot" switch, among other ones. Saving and
restoring emulation state at any point (unrelated to "-snapshot") should
work as per QEMU user docs too. In addition the monitor commands "help"
and "info" are of great help. The monitor usually sits in second virtual
console, thus ctrl-alt-2 and ctrl-alt-1 switch to monitor and back.
Pre-built binaries
Win32 binaries shipped with firmware can be downloaded from
openmoko-emulator-win32-bin-20070625.zip (or a mirror here). Tested
on MS Windows XP and Vista Business.
Requirements
This QEMU tree has only been tested on GNU/Linux. To get graphical (not
counting VNC) and/or audio output from the emulator you will need either
SDL or Cocoa installed on your computer. To enable audio, see the
available switches to the ./configure script.
The scripts that sit in openmoko/ require lynx, wget, python, netpbm and
most GNU base utilities installed in standard locations. The netpbm
package contains tools necessary for bootsplash image conversion.
All of the build-time and run-time requirements listed in QEMU
documentation apply. This includes zlib, etc. On distributions that use
binary packages, remember that you need the packages ending in -dev or
-devel.
QEMU and GNU debugger
QEMU lets you debug operating system kernels and bootloaders like you
debug all other programs. To do this you will need a debugger that
speaks the GDB remote debugging protocol - GDB is the obvious choice.

www.openmoko.com
30
Some cross toolchains come with GDB already set up. Otherwise building
cross-GDB yourself is quick and easy (compared to building binutils and
cross-gcc).
To debug u-boot, load the file "u-boot" into gdb (not "u-boot.bin") that is
produced by "make" when building u-boot. To debug a Linux kernel, load
the file "vmlinux" from the main source directory into gdb. These files are
in ELF format and contain all the symbol information and are not stripped
of debugging data until you run "strip" on them, unlike "u-boot.bin" and
"Image"/"zImage"/"uImage". Next, tell QEMU to enable the gdbserver by
appending the "-s" switch or issuing "gdbserver" in the monitor. Use the
command
(gdb) target remote localhost:1234
to make a connection to the emulator. From there you should be able to
use all the usual GDB commands, including stepping instructions, setting
breakpoints, watchpoints, inspecting stack, variables, registers and more.
If gdb is running in the same directory from which it grabbed the ELF
executable, the "edit" command should work so you can jump right to the
source line which is executing.
Simple network connection with pppd
One simple way to get a network connection from the emulated Neo is via
an emulated serial port and pppd. Add -serial vc -serial pty to the QEMU
command line, and QEMU prints a device name on a line like "char device
redirected to /dev/pts/12".
On the Neo side, open a terminal and run the command "pppd nodetach
debug /dev/ttySAC1".
On the host computer side, open a root terminal and run the command
"pppd nodetach debug 192.168.68.1:192.168.68.2 noauth /dev/pts/12",
substituting the actual device name from above.
Now on the host computer side, you should be able to "ping 192.168.68.2"
and "ssh root@192.168.68.2".

www.openmoko.com
31
Setting up USB connection
It is possible (although not very straight forward, probably about the
complexity of tun-tap networking) to connect the virtual, emulated
Neo1973 to the Linux PC on which the emulator is running, and work with
it as if a real Neo1973 was plugged into the computer's USB port, but no
twiddling with cables is needed. If you're testing your applications on the
Neo, it may be worth setting up this kind of connection because it lets you
enable normal networking between the PC and the phone and ssh into it
(which is much more comfortable than typing commands into the
OpenMoko's terminal emulator via on-screen keyboard). Here's what you
will need in order to get this working:
A Linux host with a 2.6 series kernel. The following drivers compiled-in or
in modules: dummy_hcd, gadgetfs, usbnet, cdc_ether. A detailed guide to
building the necessary modules is available (primarily Ubuntu focused).
Generic instructions follow.
Note that you need root access to perform most actions described here.
Here's how to enable the drivers in menuconfig.
Find and enable Device Drivers -> USB support -> USB Gadget Support ->
Support for USB Gadgets
Find Device Drivers -> USB support -> USB Gadget Support -> USB
Peripheral Controller and set it to Dummy HCD (DEVELOPMENT)
Find and enable Device Drivers -> USB support -> USB Gadget Support ->
Gadget Filesystem (EXPERIMENTAL) (this one is good to have as a module)
Find and enable Device Drivers -> USB support -> USB Network Adapters
-> Multi-purpose USB Networking Framework
Find and enable Device Drivers -> USB support -> USB Network Adapters
-> Multi-purpose USB Networking Framework -> CDC Ethernet support
(smart devices such as cable modems)
These last two drivers are the same drivers that you need to work with a
real Neo over USB network. After you've built the drivers, make sure
that the copy of kernel headers in /usr/include/linux is up to date. In

www.openmoko.com
32
particular the file /usr/include/linux/usb_gadgetfs.h needs to be present
and if your distribution came with headers older than 2.6.18 or so, then
you need tell the package manager to update them, or you can do that
manually with
# cp -a /usr/src/linux/include/linux/* /usr/include/linux/
(assuming that your kernel sources are in /usr/src/linux). It is important
that this is done before building qemu because the build system checks if
these headers are functional and in case they aren't found it will disable
the USB Slave functionality. Run "grep CONFIG_GADGETFS config-host.h"
in qemu build directory to make sure that the detection succeeded. If it
didn't, correct your linux headers and reconfigure qemu.
After building qemu and before running it, make sure that the modules are
loaded into the kernel. I found it useful to load gadgetfs with the following
command:
# modprobe gadgetfs default_uid=1000 # assuming my User ID is 1000
and added the following line to my /etc/fstab:
gadget /dev/gadget gadgetfs noauto,user,group
0 0
Make sure that the mountpoint /dev/gadget exists:
# mkdir -p /dev/gadget
After that the rest of the procedure can be performed from your regular
user account. Mounting gadgetfs is done with:
$ mount /dev/gadget
The "default_uid" parameter changes the ownership on all files under
/dev/gadget to your own and since the files there are created and
destroyed dynamically, there's no easy way to have that performed by
udev. Now running qemu as you usually do but appending "-usb
-usbgadget" (in the current version of the MokoMakefile this is not
included) should enable the USB Slave functionality. The qemu monitor
commands "info usbslave" and "usb_add gadget" will be useful. The

www.openmoko.com
33
former instruction asks the OS running under the emulator (OpenMoko) to
describe its slave features (that's what lsusb does after a Neo1973 is
connected to a PC). You can see the available USB configurations in this
command's output. Since gadgetfs allows only one configuration, we will
need to choose the desired configuration - most device have only one such
configuration, in which case you can use just "usb_add gadget" to connect
to host; CDC ethernet devices however usually include a second
configuration for RNDIS networking (i.e. Ms Windows compatibility) and so
does OpenMoko when using the g_ether driver. Hence, to get this right,
wait for OpenMoko to fully boot up and execute the following in QEMU
monitor:
QEMU 0.9.0 monitor - type 'help' for more information
(qemu) info usbslave
USB2.2 device 1457:5122:
Manufacturer: Linux 2.6.20.7-moko8/s3c2410_udc
Product: RNDIS/Ethernet Gadget
Configuration 0: RNDIS
Configuration 1: CDC Ethernet
(qemu)
(qemu) usb_add gadget:1
If qemu gives "couldn't add device gadget:1", double-check that it was
built against gadgetfs - the file config-host.h must contain the line
"#define CONFIG_GADGETFS 1".
The "1" in "usb_add gadget:N" is the number of the USB configuration that
we want to use. If everything went correctly - you can check that in dmesg
- you should now have a new network interface called usb0 on the PC,
through which you can talk to the OpenMoko running in QEMU:
$ dmesg | tail
<6>gadgetfs: bound to dummy_udc driver
<7>hub 3-0:1.0: debounce: port 1: total 100ms stable 100ms status
0x101
<6>usb 3-1: new high speed USB device using dummy_hcd and address 3
<6>gadgetfs: connected
<7>usb 3-1: default language 0x0409
<7>usb 3-1: new device strings: Mfr=1, Product=2, SerialNumber=0

www.openmoko.com
34
<6>usb 3-1: Product: RNDIS/Ethernet Gadget
<6>usb 3-1: Manufacturer: Linux 2.6.20.7-moko8/s3c2410_udc
<6>usb 3-1: configuration #1 chosen from 1 choice
<7>usb 3-1: adding 3-1:1.0 (config #1, interface 0)
<7>usb 3-1:1.0: uevent
<7>cdc_ether 3-1:1.0: usb_probe_interface - got id
<7>cdc_ether 3-1:1.0: status ep3in, 16 bytes period 14
<7>usb 3-1: adding 3-1:1.1 (config #1, interface 1)
<7>usb 3-1:1.1: uevent
$ su -
Password:
# tail /var/log/everything/current
May 8 19:25:32 [kernel] gadgetfs: connected
May 8 19:25:32 [kernel] gadgetfs: disconnected
May 8 19:25:32 [kernel] gadgetfs: configuration #1
May 8 19:25:32 [kernel] usb0: register 'cdc_ether' at usb-dummy_hcd-1,
CDC Ethernet Device, 52:e7:eb:76:0a:d0
# lsusb -vvv
Bus 003 Device 003: ID 1457:5122
Device Descriptor:
bLength 18
bDescriptorType 1
bcdUSB 2.00
bDeviceClass 2 Communications
bDeviceSubClass 0
bDeviceProtocol 0
bMaxPacketSize0 64
idVendor 0x1457
idProduct 0x5122
bcdDevice 2.12
iManufacturer 1 Linux 2.6.20.7-moko8/s3c2410_udc
iProduct 2 RNDIS/Ethernet Gadget
iSerial 0
bNumConfigurations 1
Configuration Descriptor:
bLength 9
bDescriptorType 2
wTotalLength 80

www.openmoko.com
35
bNumInterfaces 2
bConfigurationValue 1
iConfiguration 7 CDC Ethernet
bmAttributes 0xc0
Self Powered
MaxPower 0mA
Interface Descriptor:
bLength 9
bDescriptorType 4
bInterfaceNumber 0
bAlternateSetting 0
bNumEndpoints 1
bInterfaceClass 2 Communications
bInterfaceSubClass 6 Ethernet Networking
bInterfaceProtocol 0
iInterface 5 CDC Communications Control
CDC Header:
bcdCDC 1.10
CDC Union:
bMasterInterface 0
bSlaveInterface 1
CDC Ethernet:
iMacAddress 3 52E7EB760AD0
bmEthernetStatistics 0x00000000
wMaxSegmentSize 1514
wNumberMCFilters 0x0000
bNumberPowerFilters 0
Endpoint Descriptor:
bLength 7
bDescriptorType 5
bEndpointAddress 0x83 EP 3 IN
bmAttributes 3
Transfer Type Interrupt
Synch Type None
Usage Type Data
wMaxPacketSize 0x0010 1x 16 bytes
bInterval 14
Interface Descriptor:

www.openmoko.com
36
bLength 9
bDescriptorType 4
bInterfaceNumber 1
bAlternateSetting 0
bNumEndpoints 0
bInterfaceClass 10 Data
bInterfaceSubClass 0 Unused
bInterfaceProtocol 0
iInterface 0
Interface Descriptor:
bLength 9
bDescriptorType 4
bInterfaceNumber 1
bAlternateSetting 1
bNumEndpoints 2
bInterfaceClass 10 Data
bInterfaceSubClass 0 Unused
bInterfaceProtocol 0
iInterface 4 Ethernet Data
Endpoint Descriptor:
bLength 7
bDescriptorType 5
bEndpointAddress 0x81 EP 1 IN
bmAttributes 2
Transfer Type Bulk
Synch Type None
Usage Type Data
wMaxPacketSize 0x0040 1x 64 bytes
bInterval 0
Endpoint Descriptor:
bLength 7
bDescriptorType 5
bEndpointAddress 0x02 EP 2 OUT
bmAttributes 2
Transfer Type Bulk
Synch Type None
Usage Type Data
wMaxPacketSize 0x0040 1x 64 bytes

www.openmoko.com
37
bInterval 0
Device Qualifier (for other device speed):
bLength 10
bDescriptorType 6
bcdUSB 2.00
bDeviceClass 2 Communications
bDeviceSubClass 0
bDeviceProtocol 0
bMaxPacketSize0 64
bNumConfigurations 1
# ifconfig usb0 inet 192.168.0.200 netmask 255.255.255.0
# exit
$ ssh root@192.168.0.202
The authenticity of host '192.168.0.202 (192.168.0.202)' can't be
established.
RSA key fingerprint is
de:21:87:93:52:1c:6b:c7:69:29:6c:af:66:50:02:02.
Are you sure you want to continue connecting (yes/no)? yes
Warning: Permanently added '192.168.0.202' (RSA) to the list of known
hosts.
root@192.168.0.202's password:
root@fic-gta01:~$ uname -a
Linux fic-gta01 2.6.20.7-moko8 #1 PREEMPT Wed Apr 25 11:13:52 UTC
2007 armv4tl unknown
[edit]
Connecting to the serial port/Communicating with u-boot
If you add the option -serial telnet:localhost:1200,server to QEMU will
create a telnet server on port 1200 that you can connect to as the serial
port.
This will allow you to experiment with u-boot configuration without risking
to brick the real device.
Please note that QEMU will wait for you to connect to the telnet server at
port 1200 before starting the emulation.
(use the command telnet localhost 1200 to establish the connection)

www.openmoko.com
38