First Computer GTA02E NEO 1973 User Manual openmoko manual 20071224
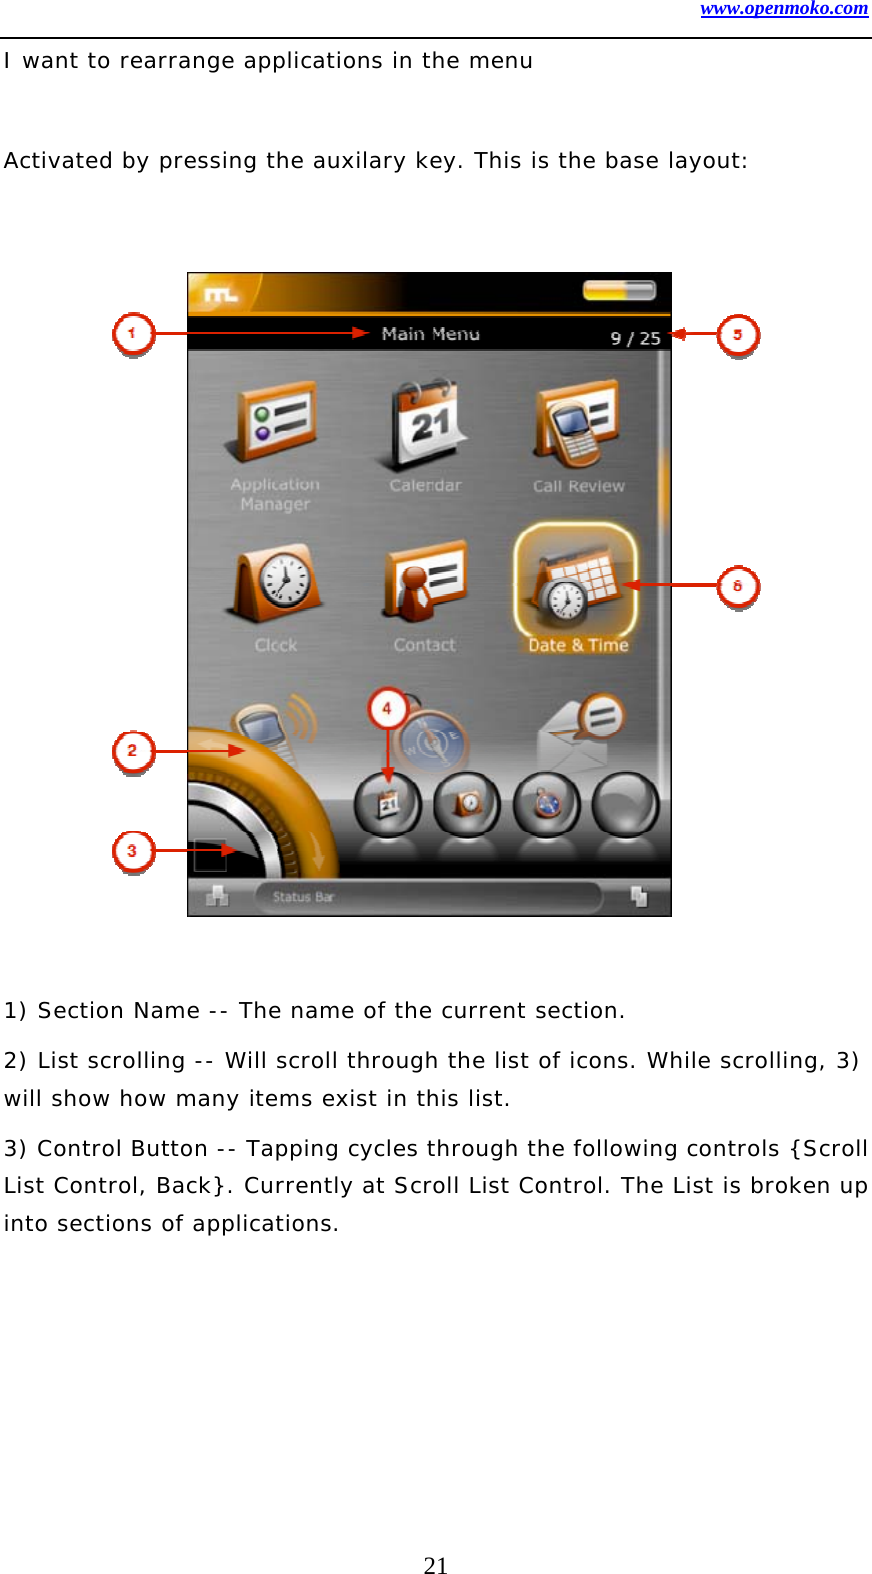
First International Computer Inc NEO 1973 openmoko manual 20071224
UserManual.wiki
>
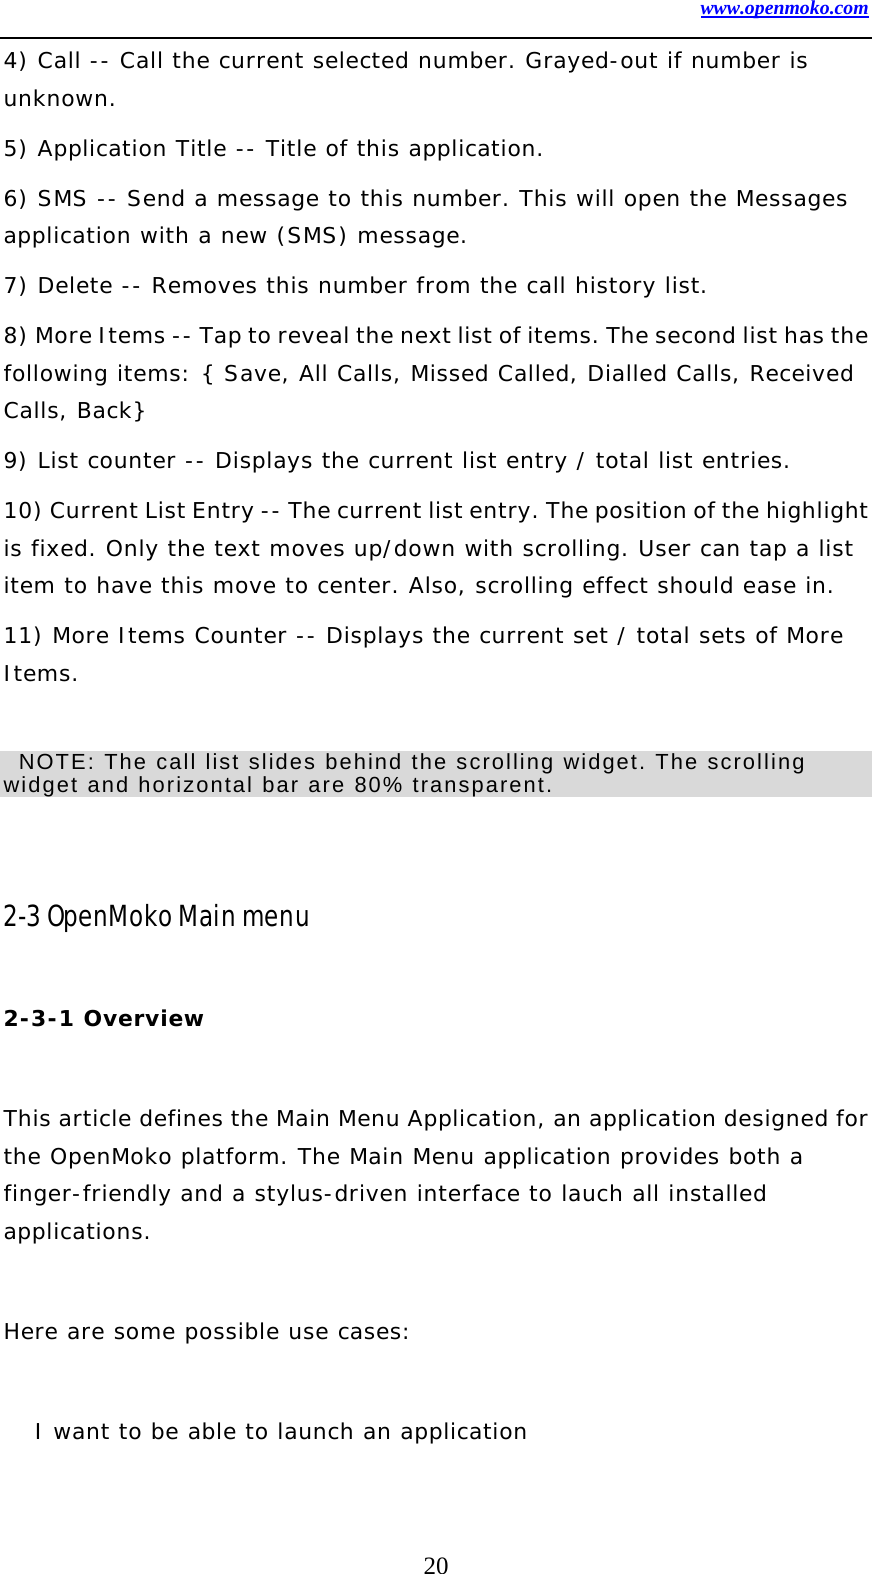
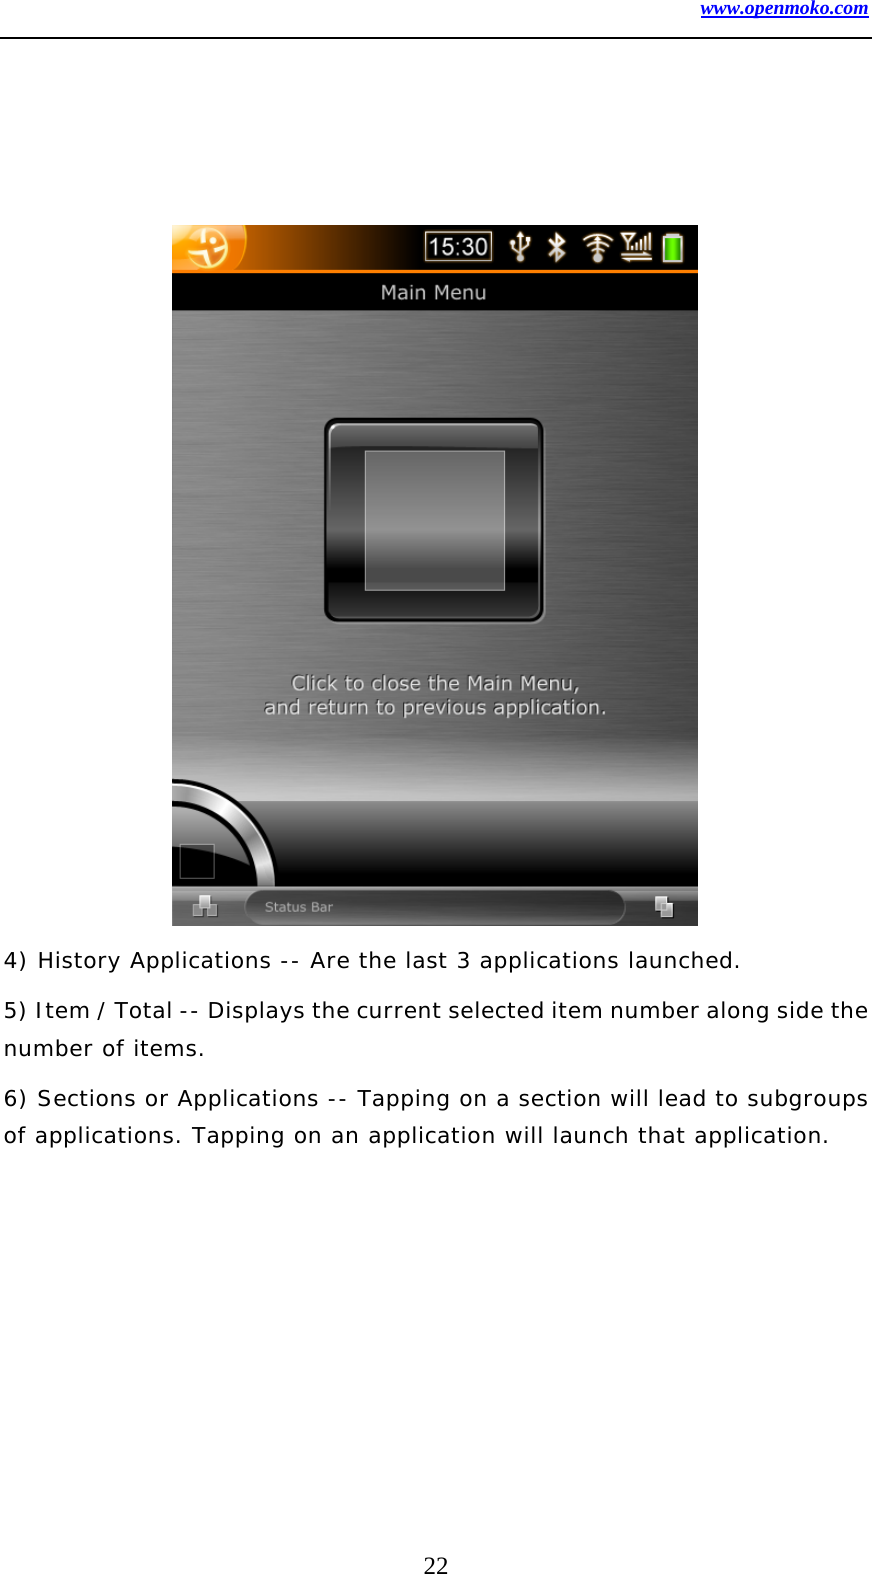
First Computer
>
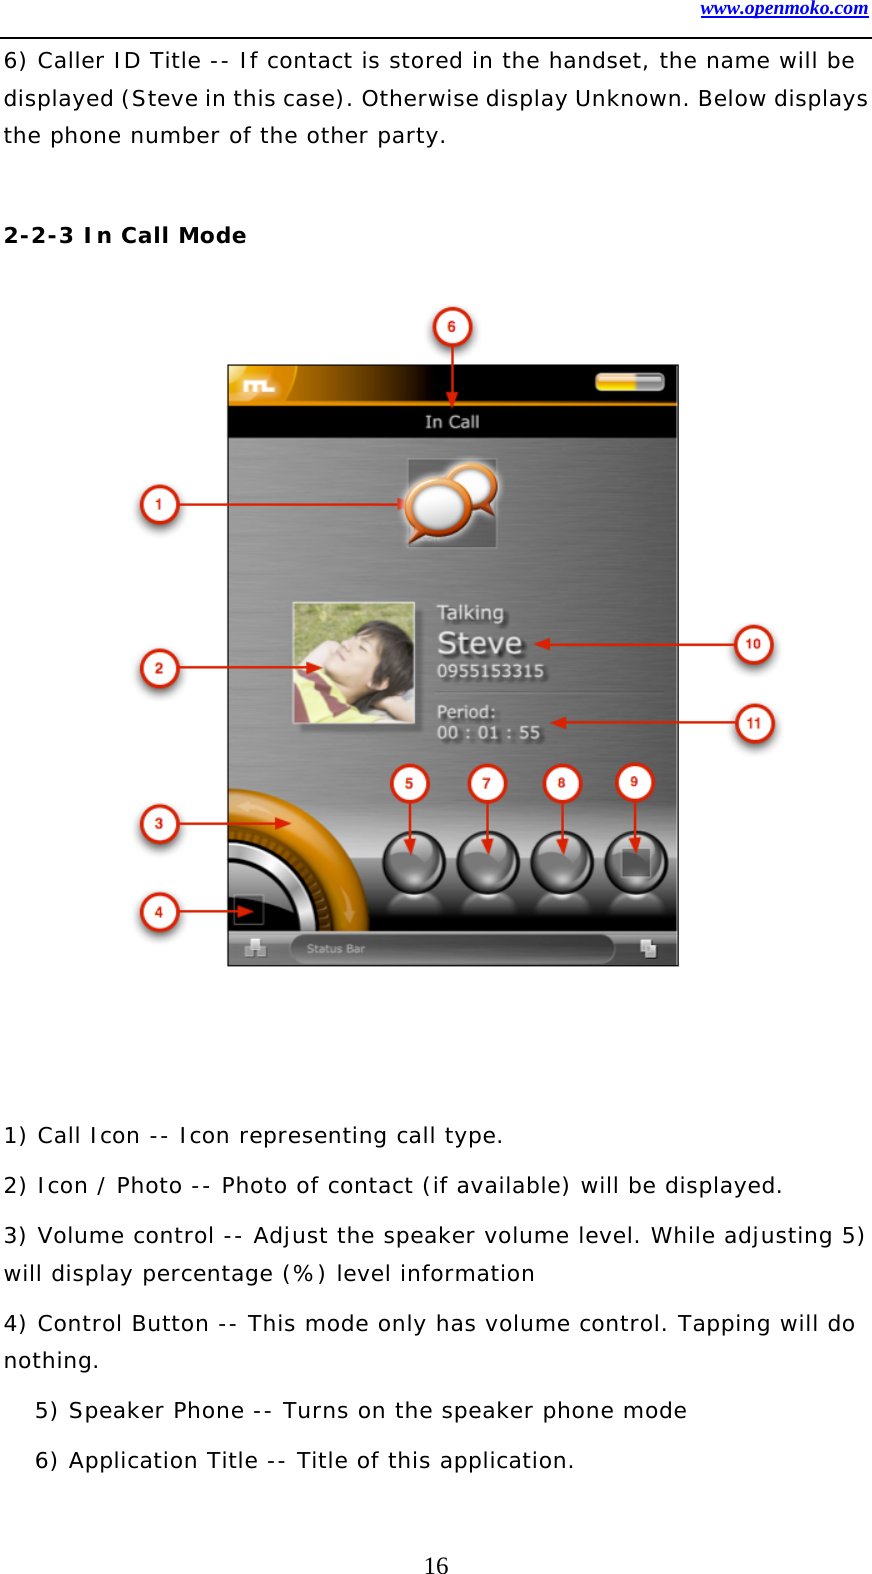
GTA02E User Manual
USERS MANUAL
Navigation menu
Upload a User Manual
Namespaces
Wiki Guide
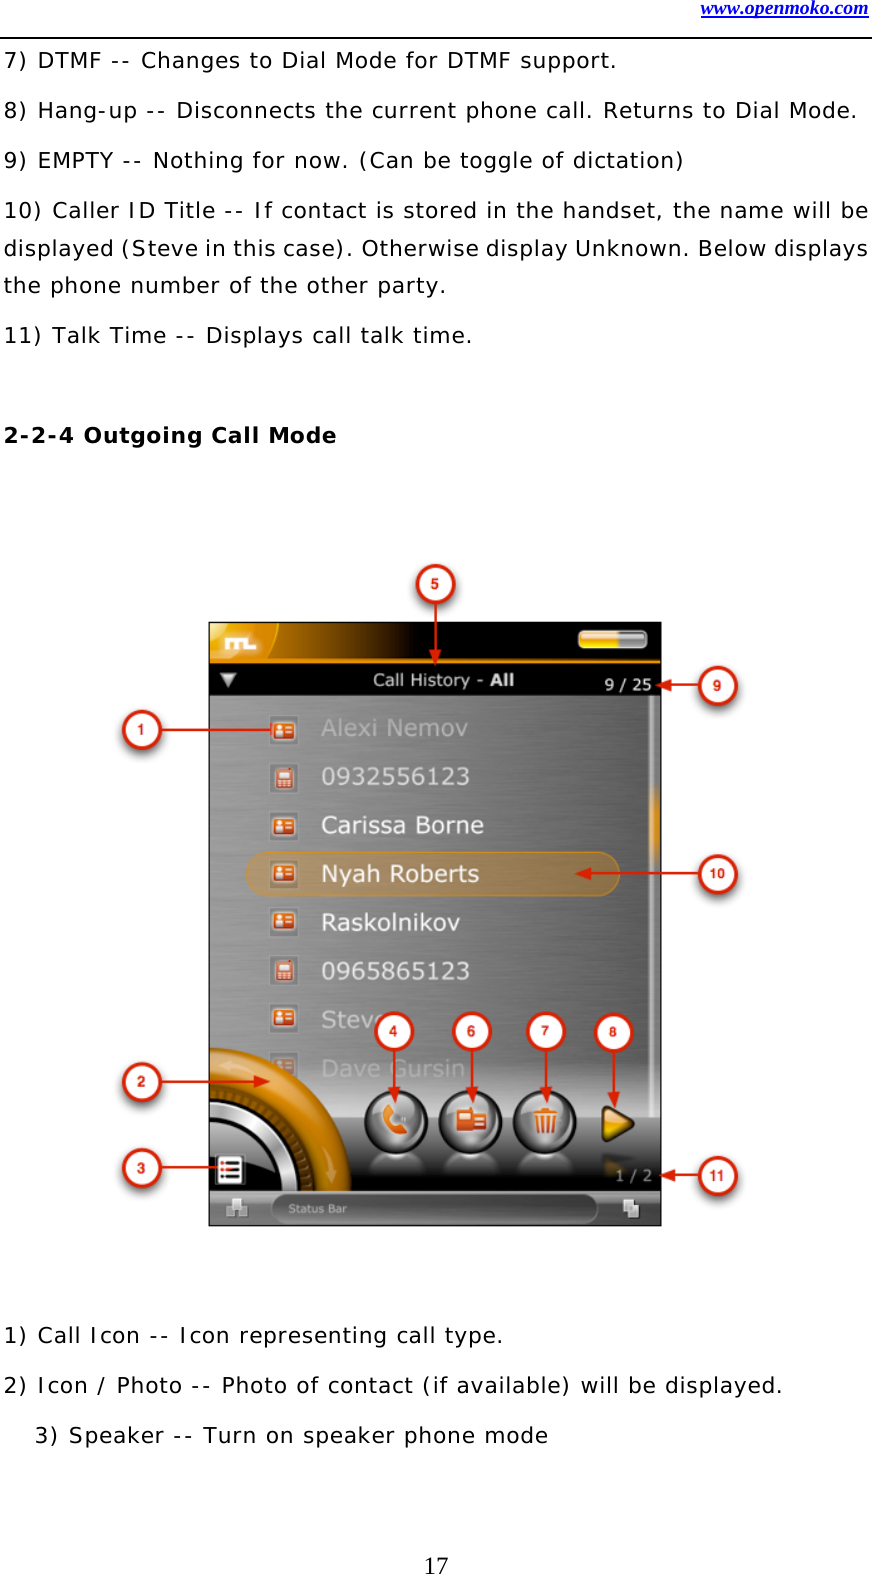
HTML
PDF
Info
Views
User Manual
Discussion / Help
Navigation
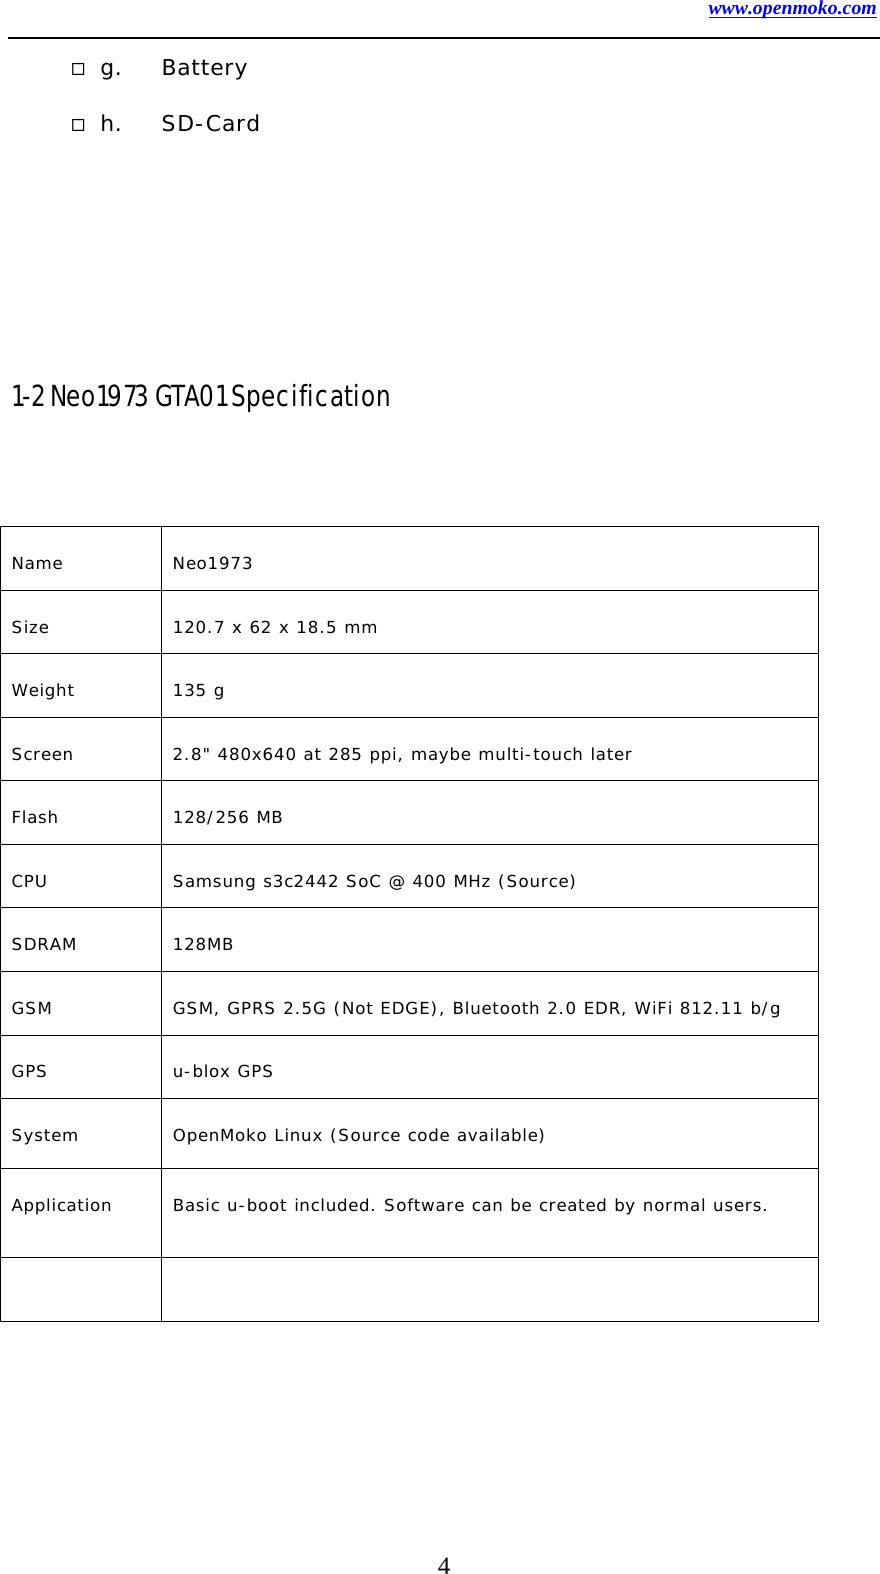
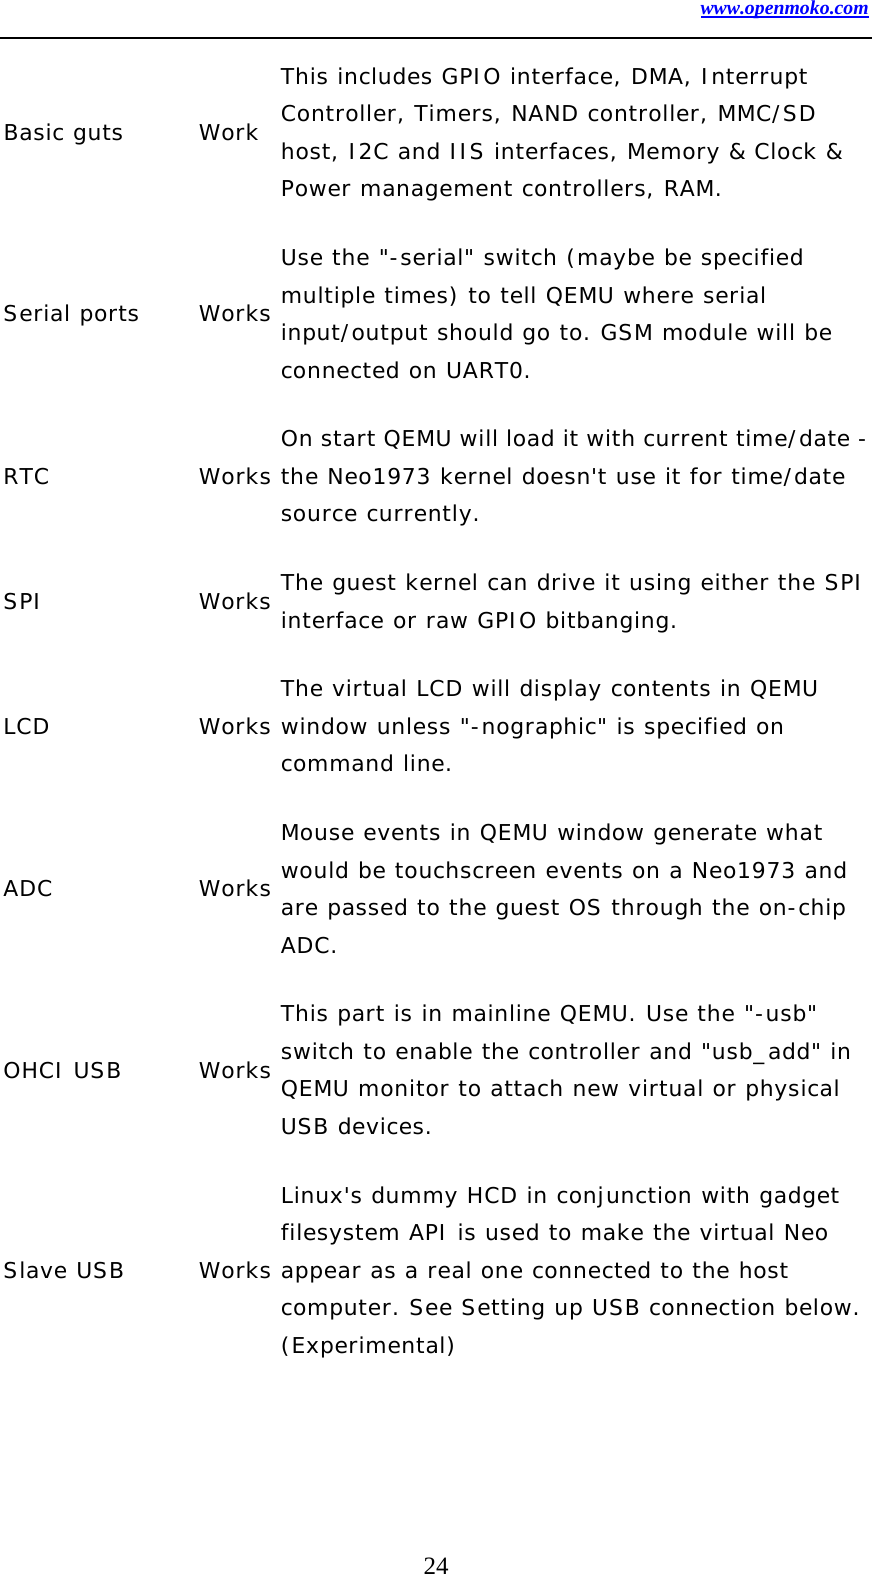
![www.openmoko.com 6 After enter u-boot menu, you could use [Aux] key to select the item, and [Power] key for confirm. There should be 5 items by default: 1. Boot: Direct boot 2. Set console to USB: Could use Linux terminal software (like minicom to connect Neo1973) 3. Set console to Serial: Re-Direct terminal output to Neo1973 debug port serial interface. 4. Power off: Power of Neo1973 5. Factory reset: Reset parameter into factory default value. If your Neo1973 already had kernel image or rootfs installed, once you select the boot, system will boot. If your Neo1973 doesn’t contain any kernel image, you will need to use devirginator or DFU-Util to install system and root file system. If you using the minicon or other terminal software like hyperterminal, please using following settings to connect terminal: Speed: 115200, N ,8, 1 Hardware flow control: Off 1-4 Install OpenMoko Kernel image by using DFU 1-4-1 Purpose dfu-util is a program that implements the Host (PC) side of the USB DFU (Universal Serial Bus Device Firmware Upgrade) protocol.](https://usermanual.wiki/First-Computer/GTA02E/User-Guide-888450-Page-6.png)
![www.openmoko.com 8 This program is Free Software and has ABSOLUTELY NO WARRANTY Usage: dfu-util [options] ... -h --help Print this help message -V --version Print the version number -l --list List the currently attached DFU capable USB devices -d --device vendor:product Specify Vendor/Product ID of DFU device -c --cfg config_nr Specify the Configuration of DFU device -i --intf intf_nr Specify the DFU Interface number -a --alt alt_nr Specify the Altseting of the DFU Interface -t --transfer-size Specify the number of bytes per USB Transfer -U --upload file Read firmware from device into <file> -D --download file Write firmware from <file> into device -R --reset Issue USB Reset signalling once we're finished 1-4-4 List function Using the --list option, you can list the available DFU capable devices, their configuration, interface and altsettings. Below is an example for a current Neo1973 phone in u-boot Runtime Mode # ./dfu-util --list dfu-util - (C) 2007 by OpenMoko Inc. This program is Free Software and has ABSOLUTELY NO WARRANTY Found DFU Runtime: [0x1457:0x5119] devnum=0, cfg=0, intf=2, alt=0, name="USB Device Firmware Upgrade" Below is an example for a current Neo1973 phone in u-boot DFU Mode # ./dfu-util --list dfu-util - (C) 2007 by OpenMoko Inc. This program is Free Software and has ABSOLUTELY NO WARRANTY Found DFU: [0x1457:0x5119] devnum=16, cfg=0, intf=0, alt=0, name="RAM 0x32000000" Found DFU: [0x1457:0x5119] devnum=16, cfg=0, intf=0, alt=1, name="u-boot"](https://usermanual.wiki/First-Computer/GTA02E/User-Guide-888450-Page-8.png)
![www.openmoko.com 9 Found DFU: [0x1457:0x5119] devnum=16, cfg=0, intf=0, alt=2, name="u-boot_env" Found DFU: [0x1457:0x5119] devnum=16, cfg=0, intf=0, alt=3, name="kernel" Found DFU: [0x1457:0x5119] devnum=16, cfg=0, intf=0, alt=4, name="splash" Found DFU: [0x1457:0x5119] devnum=16, cfg=0, intf=0, alt=5, name="rootfs" This shows you six interfaces, all in configuration 0 and interface 0, with altsetting 0...4. The name is currently not yet defined, but will be added to one of the upcoming u-boot releases. The mapping on the Neo1973 is as follows: 0: RAM 1: 'u-boot' partition 2: 'u-boot_env' partition 3: 'kernel' partition 4: 'splash' partition 5: 'rootfs' partition 1-4-5 device function You can specify the USB Vendor and Product ID of the device you want to program: dfu-util --device 0x1457:0x5119 If you only have one standards-compliant DFU device attached to your PC, this is optional. However, as soon as you have multiple DFU devices, dfu-util will detect this and abort, asking you to specify which device it shall use. 1-4-6 transfer-size Specifies the size of each individual USB transfer. If you don't use it, the maximum possible size for your combination of host operating system and USB device is chosen (for optimal performance). 1-4-7 download](https://usermanual.wiki/First-Computer/GTA02E/User-Guide-888450-Page-9.png)
![www.openmoko.com 10 download the given file into the device. 1-4-8 upload upload from the DFU device into the given file[name]. NOTE: Upload support is currently broken Phrasebook There's no full-fledged manual yet. Instead, some examples: Flashing the kernel dfu-util -a 3 -R -D /path/to/uImage Flashing the bootloader dfu-util -a 1 -R -D /path/to/u-boot.bin Copying a kernel into RAM dfu-util -a 0 -R -D /path/to/uImage Once this has finished, the kernel will be available at the default load address of 0x32000000 in Neo1973 RAM.](https://usermanual.wiki/First-Computer/GTA02E/User-Guide-888450-Page-10.png)
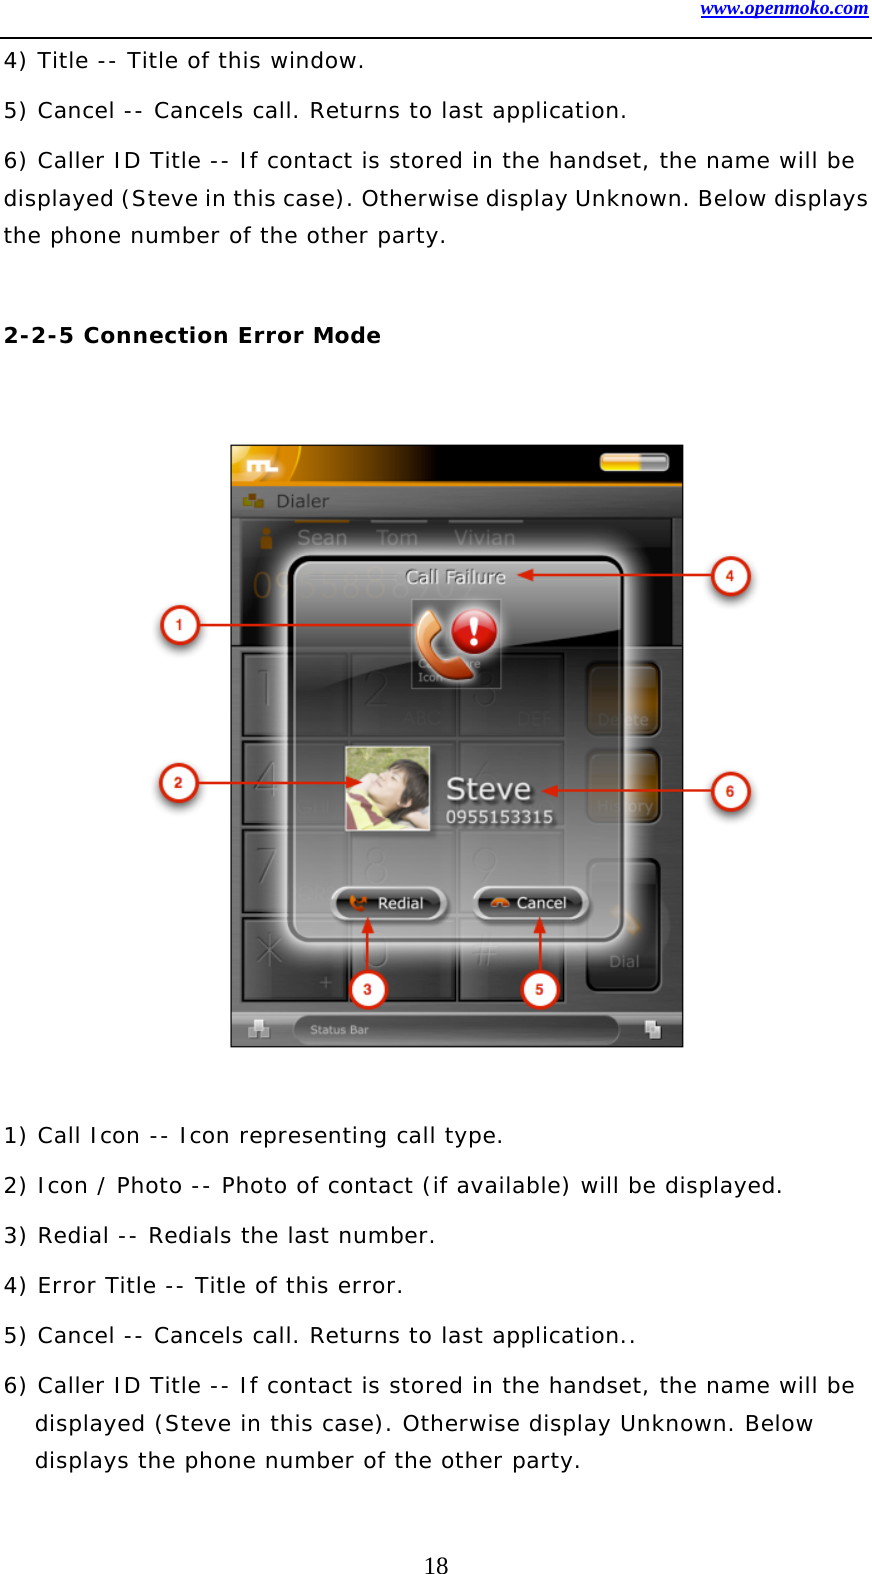
![www.openmoko.com 27 AGPS To Do There are obvious difficulties emulating the chip, but hopefully it can be made to present the guest OS with some fixed coordinates later when more is known about the chip. Again a real chip could be connected to QEMU's serial port. Current development is aiming for GTA01Bv4 compatibility; earlier revisions can also be emulated if needed. The differences between the hardware revisions currently only manifest themselves in GPIO wiring. Hardware emulation is implemented in a clean-room manner using official specifications where possible. [edit] How to get it running [edit] Using MokoMakefile This is arguably the easiest way of building qemu-neo1973 since you won't need to deal with the compiling and flashing processes yourself. See MokoMakefile for details. (Installation instructions) If you *just* build QEMU and use the official images by typing "make qemu" only (as opposed to setting up monotone and openembedded and building an entire new image for yourself with MokoMakefile), then the build takes less time than the manual instructions below (since it's all done automatically). Manual setup To obtain the latest source code for the emulator, you will want to do something like the following: $ svn checkout https://svn.openmoko.org/trunk/src/host/qemu-neo1973 $ cd qemu-neo1973 Now, we're going to configure and build the emulator (Note](https://usermanual.wiki/First-Computer/GTA02E/User-Guide-888450-Page-27.png)
![www.openmoko.com 28 Requirements below): $ ./configure --target-list=arm-softmmu # GCC 3.x will be required, see --cc= $ make See other available options for the configure script by appending "--help". Now you should have a working emulator under the name "arm-softmmu/qemu-system-arm". To run OpenMoko you will also need to somehow install OpenMoko on your virtual phone, which is totally clean of any software at this moment. There are several block devices to choose from, the best option is probably to do exactly what the Neo1973 manufacturer does before it ships the device to the final user. This process is described in Bootloader, Kernel, NAND bad blocks and Devirginator but you don't need to know all the details. Two scripts are provided to generate a firmware for your phone, as realistic as possible. First run $ openmoko/download.sh which will look up the list of latest available OpenMoko snapshot builds from buildhost.openmoko.org and choose the most recent u-boot, Kernel, and root filesystem images, and download the images (unless they are already found in the openmoko/ directory). These binaries will be used by the flash.sh script. First make sure you have the netpbm package installed for some graphics conversion utilities. On Ubuntu this can be done by: sudo apt-get install netpbm Then run: $ openmoko/flash.sh which runs the emulator, loads u-boot into it and then uses u-boot's capability to program the Flash memory to install all the necessary parts of the system into the virtual Flash. It will also set up all the bootloading process including a boot menu (ENTER is [AUX] and SPACE is [POWER]), splash, u-boot environment and some default kernel parameters. If everything goes OK, the script should print a command which you can use to start using the emulator.](https://usermanual.wiki/First-Computer/GTA02E/User-Guide-888450-Page-28.png)
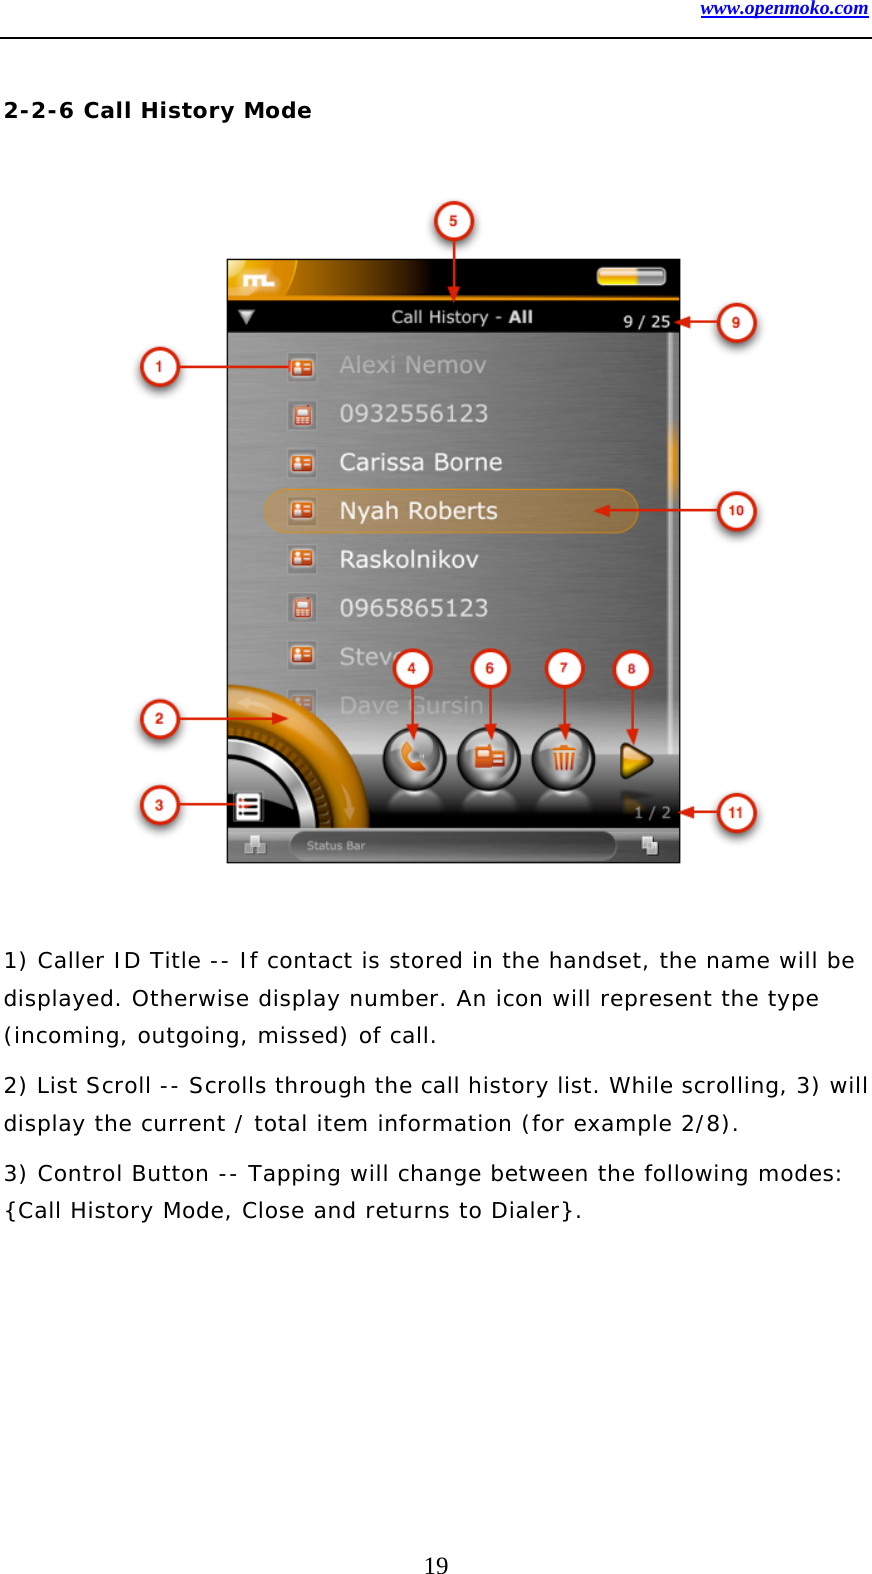
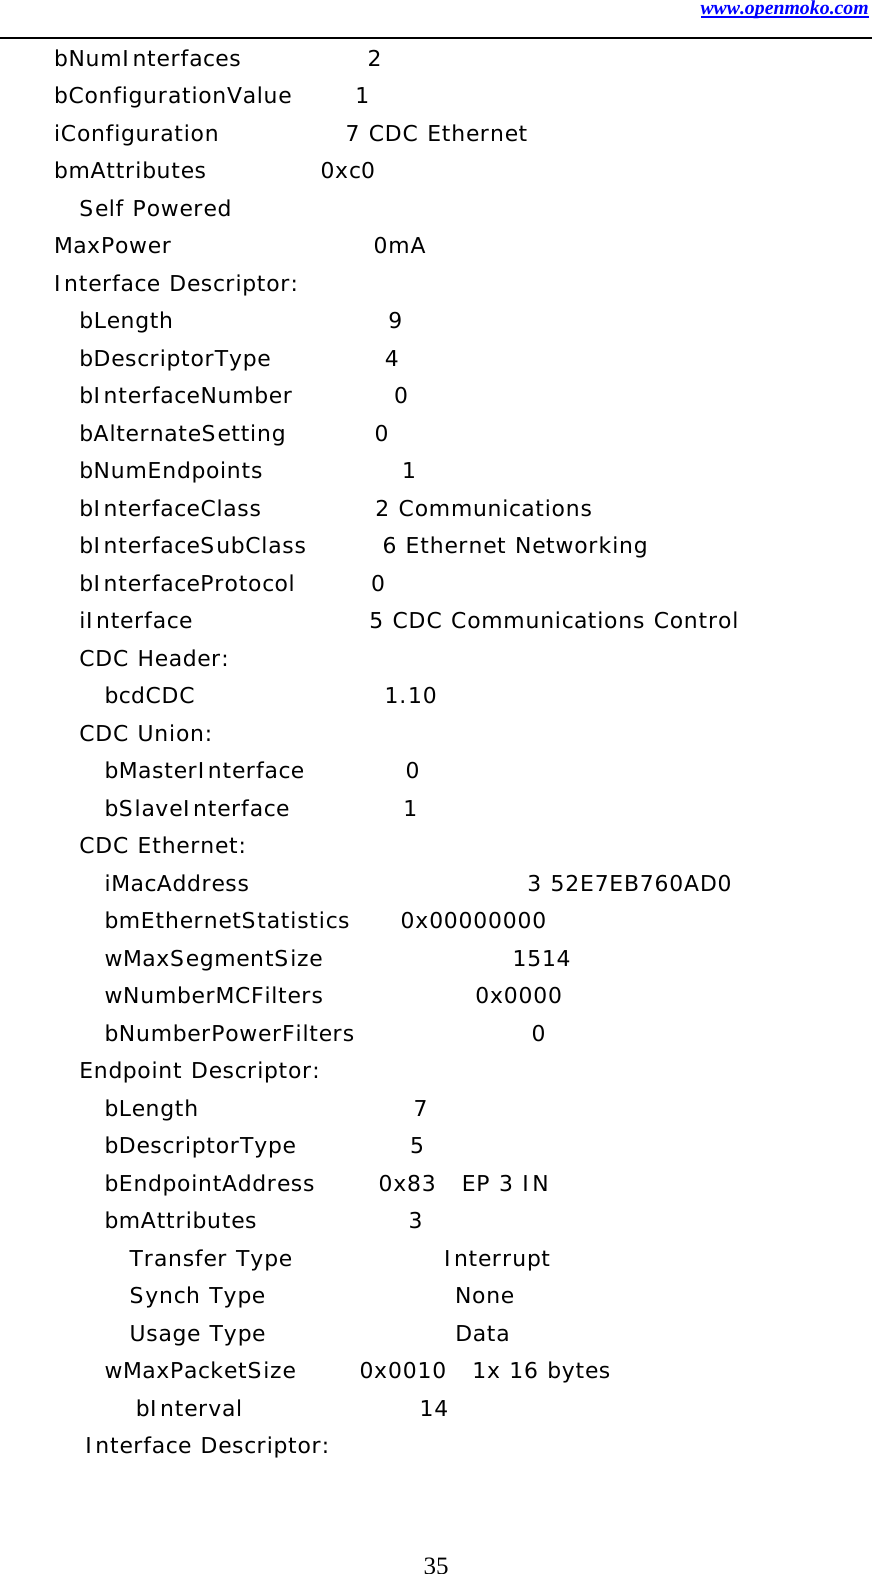
![www.openmoko.com 34 <6>usb 3-1: Product: RNDIS/Ethernet Gadget <6>usb 3-1: Manufacturer: Linux 2.6.20.7-moko8/s3c2410_udc <6>usb 3-1: configuration #1 chosen from 1 choice <7>usb 3-1: adding 3-1:1.0 (config #1, interface 0) <7>usb 3-1:1.0: uevent <7>cdc_ether 3-1:1.0: usb_probe_interface - got id <7>cdc_ether 3-1:1.0: status ep3in, 16 bytes period 14 <7>usb 3-1: adding 3-1:1.1 (config #1, interface 1) <7>usb 3-1:1.1: uevent $ su - Password: # tail /var/log/everything/current May 8 19:25:32 [kernel] gadgetfs: connected May 8 19:25:32 [kernel] gadgetfs: disconnected May 8 19:25:32 [kernel] gadgetfs: configuration #1 May 8 19:25:32 [kernel] usb0: register 'cdc_ether' at usb-dummy_hcd-1, CDC Ethernet Device, 52:e7:eb:76:0a:d0 # lsusb -vvv Bus 003 Device 003: ID 1457:5122 Device Descriptor: bLength 18 bDescriptorType 1 bcdUSB 2.00 bDeviceClass 2 Communications bDeviceSubClass 0 bDeviceProtocol 0 bMaxPacketSize0 64 idVendor 0x1457 idProduct 0x5122 bcdDevice 2.12 iManufacturer 1 Linux 2.6.20.7-moko8/s3c2410_udc iProduct 2 RNDIS/Ethernet Gadget iSerial 0 bNumConfigurations 1 Configuration Descriptor: bLength 9 bDescriptorType 2 wTotalLength 80](https://usermanual.wiki/First-Computer/GTA02E/User-Guide-888450-Page-34.png)
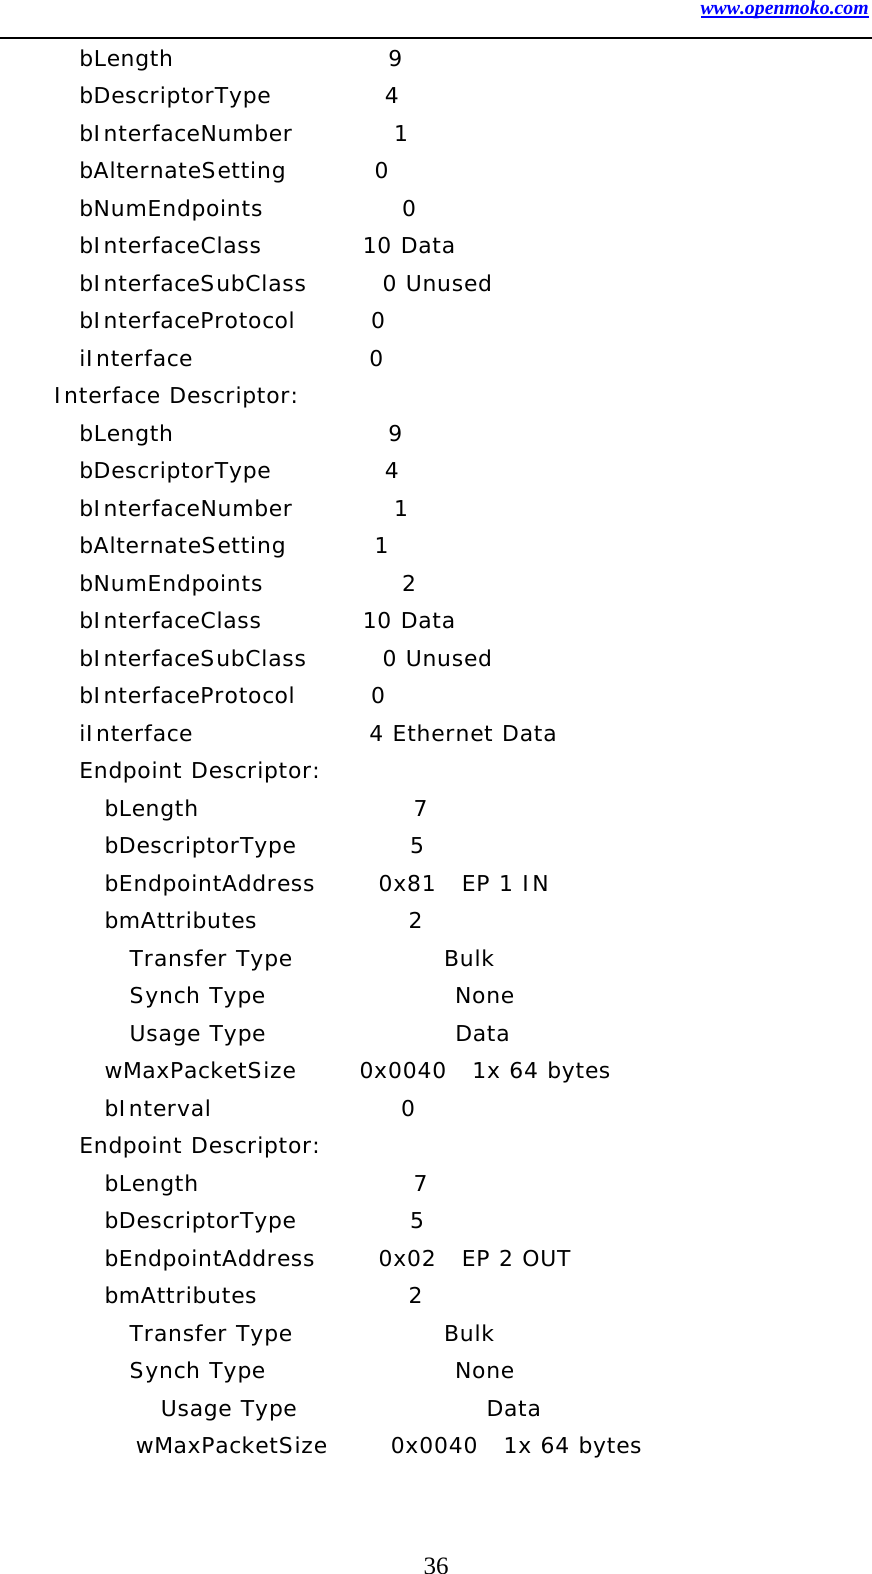
![www.openmoko.com 37 bInterval 0 Device Qualifier (for other device speed): bLength 10 bDescriptorType 6 bcdUSB 2.00 bDeviceClass 2 Communications bDeviceSubClass 0 bDeviceProtocol 0 bMaxPacketSize0 64 bNumConfigurations 1 # ifconfig usb0 inet 192.168.0.200 netmask 255.255.255.0 # exit $ ssh root@192.168.0.202 The authenticity of host '192.168.0.202 (192.168.0.202)' can't be established. RSA key fingerprint is de:21:87:93:52:1c:6b:c7:69:29:6c:af:66:50:02:02. Are you sure you want to continue connecting (yes/no)? yes Warning: Permanently added '192.168.0.202' (RSA) to the list of known hosts. root@192.168.0.202's password: root@fic-gta01:~$ uname -a Linux fic-gta01 2.6.20.7-moko8 #1 PREEMPT Wed Apr 25 11:13:52 UTC 2007 armv4tl unknown [edit] Connecting to the serial port/Communicating with u-boot If you add the option -serial telnet:localhost:1200,server to QEMU will create a telnet server on port 1200 that you can connect to as the serial port. This will allow you to experiment with u-boot configuration without risking to brick the real device. Please note that QEMU will wait for you to connect to the telnet server at port 1200 before starting the emulation. (use the command telnet localhost 1200 to establish the connection)](https://usermanual.wiki/First-Computer/GTA02E/User-Guide-888450-Page-37.png)