First Computer KJ610 Pocket PC Cavalry Series & Mobile Crossing WLAN User Manual Pocket PC
First International Computer Inc Pocket PC Cavalry Series & Mobile Crossing WLAN Pocket PC
Users Manual
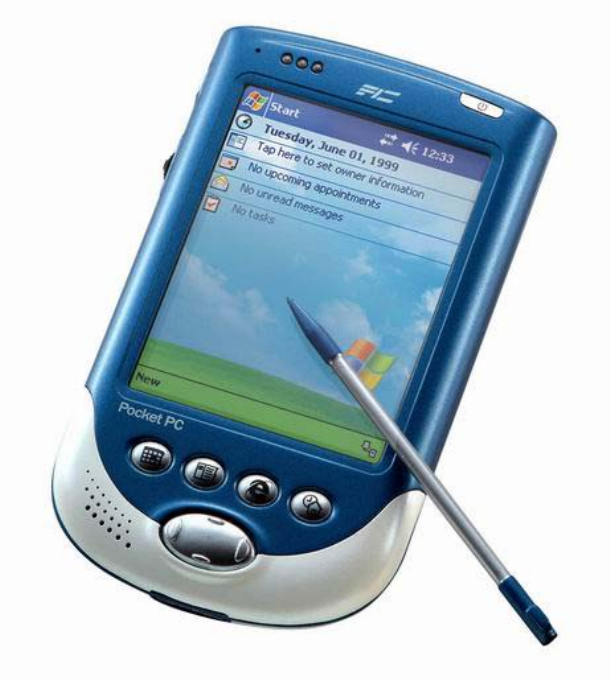
FIC, Cavalry Series
Pocket PC 2003
User Guide

Prefix
COPYRIGHT
© FIC All rights reserved.
Disclaimer: FIC shall not be liable for any technical or editorial errors or omissions contained herein;
or for incidental or consequential damages resulting from furnishing this material, or the
performance or use of this product.
FIC reserves the right to change product specifications without notice. Information in this document
may change without notice.
No part of this document may be copied, reproduced, or transmitted by any means, for any purpose
without prior written permission from FIC
Cavalry Series
Third Edition: April, 2004
USING THIS GUIDE
This User’s Guide provides a brief explanation of the product, including hardware and software
features. It is designed to provide a basic understanding of your new Pocket PC, enabling you to
get started quickly.
To ensure that you can use the product safely and correctly, please read this manual carefully
before you start using your Pocket PC. For future reference, keep this User’s Guide handy at all
times.
WHERE TO FIND ADDITIONAL INFORMATION
You can find up-to-date information on Windows-powered devices from Microsoft on the Internet at:
http://www.microsoft.com/mobile/pocketpc.
You can find additional product information at the following website:
http://www.fic.com.tw
1

CONTENTS
PREFIX
Copyright
Using This Guide
Where To Find Additional Information
CONTENTS
1. INTRODUCTION
1.1 Welcome
1.2 Summary of Features
1.3 Safety Instructions
1.3.1 Power Cord Set Requirements
1.3.2 Interference
1.4 Caring For Your Pocket PC
1.4.1 Routine Care
1.4.2 AC Adapter Care
1.4.3 Display Care
1.4.4 Care While Traveling
2. GETTING STARTED
2.1 Unpacking the Box
2.2 Product Overview
2.3 Power
2.3.1 Using Battery Power
2.3.2 Using Mains Power
2.3.2.1 Direct Mains Connection
2.3.2.2 Mains Power Using USB Cradle
2.3.3 USB Charging
2.3.4 Maintaining the Batteries
2.4 Turning Your Pocket PC On and Off
2.4.1 The First Time You Use Your Pocket PC
2.4.2 Turning Your Pocket PC On
2

2.4.3 Turning Your Pocket PC Off
2.5 Quick Start
3. EXPLORING YOUR POCKET PC
3.1 Basic Operation
3.1.1 The Operating System
3.1.1.1 The Navigation Bar
3.1.1.2 The Command Bar
3.1.1.3 Launching and Switching Between Programs
3.1.2 Navigation
3.1.2.1 Using the Stylus
3.1.2.2 Using the Navigation Button
3.1.2.3 Using the Rock Switch
3.1.2.4 Using the Programmable Application Buttons
3.1.3 Entering Data
3.1.3.1 Using the Input Panel to Enter Typed Text
3.1.3.2 Writing on the Screen
3.1.3.3 Drawing on the Screen
3.1.3.4 Recording a Voice Message
3.1.4 Finding and Organizing Information
3.1.4.1 Using Find
3.1.4.2 Using File Explorer
3.2 Organizing Your Schedule with the Personal Information Manager
3.2.1 Today Screen
3.2.2 Calendar
3.2.2.1 Meeting Reminder
3.2.2.1 Sending a Meeting Request
3.2.3 Maintaining Your Contacts List
3.2.4 Task List
3.2.5 Taking Notes
3.3 Playing Audio and Video
3.4 Internet, Email and Messages
3.4.1 Pocket Internet Explorer
3.4.2 Inbox
3

3.4.2.1 Viewing Received Messages
3.4.2.2 Composing and Sending Messages
3.4.3 MSN Messenger
3.4.3.1 Managing Contacts
3.4.3.2 Chatting
3.5 Productivity Software
3.5.1 Pocket Word
3.5.1.1 Typing Mode
3.5.1.2 Writing Mode
3.5.1.3 Drawing Mode
3.5.1.4 Recording Mode
3.5.2 Pocket Excel
3.5.2.1 Tips for Working in Pocket Excel
3.6 Pictures
4. CONNECTING
4.1 Connecting to a PC
4.1.1 Connecting Via the USB Cable
4.1.2 Connecting Via the USB Cradle
4.1.2.1 Connecting the USB Cradle to a PC
4.1.2.2 Docking the Pocket PC in the USB Cradle
4.1.3 Connecting Via Infrared
4.2 Synchronizing with a PC
4.2.1 Changing Your Synchronization Settings
4.2.2 Moving Files To and From Your PC
4.2.3 Installing Applications on Your Pocket PC
4.2.3.1 Installing Software via Your PC
4.2.3.2 Installing Software Directly
4.2.4 Backing Up and Restoring Data Using Microsoft ActiveSync 3.7
4.3 Connecting to the Internet or Your Network
4.3.1 Setting Up a Remote Connection Using a Modem Card
4.3.2 Setting Up a Remote Connection Using an Ethernet / Wireless LAN Card
4

4.3.3 Setting Up a Remote Connection Using an Bluetooth Card
4.3.4 Synchronizing Information With Your Server
4.3.5 Synchronizing Links To Web Sites
5. CONFIGURING AND OPTIMIZING YOUR POCKET PC
5.1 Managing Power
5.2 Managing Memory
5.3 Removing Programs
5.4 Configuring the Menus
5.5 Configuring the Buttons
5.6 Adjusting Settings
5.6.1 Screen
5.6.2 Sounds
5.6.3 Clock
5.6.4 Owner Information
5.6.5 Password
5.6.6 Today Screen
5.6.7 Backlight
6. TROUBLESHOOTING
6.1 Resetting Your Pocket PC
6.2 Restoring the Factory Defaults
6.3 Tips
6.3.1 Frequently Asked Questions
6.3.2 Problems and Solutions
7. SPECIFICATIONS
APPENDIX A
Regulatory Notice
APPENDIX B
Operating Conditions
5

1. Introduction
1.1 WELCOME
Congratulations on purchasing your new Pocket PC. You now have the convenience and flexibility
of a full-featured personal digital assistant, enabling you to control your schedule and stay on top of
your work wherever you go. Powered by Microsoft® Pocket PC 2003 Premium Edition, your Pocket
PC offers a host of functions designed to make your life easier.
1.2 SUMMARY OF FEATURES
Take a look at some of the benefits your new Pocket PC offers:
• A sleek and attractive design, combining enhanced portability with chic style.
• A large high quality TFT color display providing maximum viewing comfort and efficiency.
• A handy stylus and large buttons providing superior ease-of-use.
• A powerful processor and large memory, enabling you to manage your work effortlessly.
• Great functionality including email, web browsing, personal scheduling, word processing
and spreadsheet applications, graphics handling capability, video playing, and audio
recording and playback.
• A USB cradle for convenient recharging and synchronization with your PC. The cradle
may also be used to charge a spare battery.
• A Compact Flash card slot and Secure Digital card slot offering a host of expansion
options.
• Low power consumption for extended mobile productivity.
• Internal backup battery to safeguard data and settings.
1.3 SAFETY INSTRUCTIONS
This product has been tested for conformance to international safety regulations. Like any electrical
device, however, it should be used with care. To protect yourself from possible injury and to
minimize the risk of damage to the product, it is important that you follow these safety instructions.
1. Follow all warnings and instructions marked on the product.
2. Do not attempt to service the product yourself. Please refer servicing to qualified personnel.
3. Unplug the product from the wall outlet before cleaning. Use a damp cloth. Do not use liquid or
aerosol cleaners.
6
4. Do not use the product near water. Never spill liquid of any kind on the product.
5. Do not place the product on an unstable surface.
6. Do not expose the product to a heat source or leave it in direct sunlight for a prolonged period
of time.
7. The product should be operated from the type of power supply indicated on the label. If you are
unsure of the type of power supply available, consult your dealer or local power company.
8. Do not allow anything to rest on the power cord. Do not locate the product where persons will
tread on the cord.
9. If an extension power cord is used, make sure that the total ampere rating of the equipment
plugged into the extension cord does not exceed the extension cord ampere rating. Also, make
sure that the total rating of all products plugged into the wall socket does not exceed the fuse
rating.
10. Never push objects of any kind into this product.
1.3.1 Power Cord Set Requirements
The included power cord set (appliance coupler, flexible cord, and wall plug) meets the
requirements for use in the country of purchase.
Power cord sets for use in other countries must meet the requirements of those countries. For more
information on power cord set requirements, contact your local authorized dealer, reseller, or
service provider.
1.3.2 Interference
This equipment has been tested and found to comply with K-mark Rule. These limits are designed
to provide reasonable protection against harmful interference in a residential installation. This
equipment generates, uses, and can radiate radio frequency energy, and if not installed and used in
accordance with the instructions, may cause harmful interference to radio communications.
However, there is no guarantee that interference will not occur in a particular installation. If this
equipment does cause harmful interference to radio or television reception (which can be
determined by turning the equipment off and on), the user is advised to take one or more of the
following measures:
• Reorient or relocate the receiving antenna.
• Increase the distance between the equipment and the receiver.
• Connect the equipment into an outlet on a circuit different from the device that is
experiencing interference.
• Consult your dealer or an experienced radio/TV technician for help.
The FCC requires the user to be notified that any changes or modifications made to this device that
are not expressly approved by FIC may void the Reference authority to operate the equipment.
7

1.4 CARING FOR YOUR POCKET PC
1.4.1 Routine Care
To keep your Pocket PC working properly, please follow these guidelines.
• Do not attempt to disassemble or modify the product.
• Never place anything on top of the product.
• Avoid using or storing the product in places where static electricity or electrical noise is
likely to be present.
• Avoid using or storing the product in direct sunlight, or in places that are subject to
extreme temperatures or sudden changes in temperature.
• Keep the product away from liquids. Do not expose it to condensation, precipitation or
excessive moisture.
• To clean the product, first unplug it from the wall socket. Wipe the screen and the exterior
with a soft, damp cloth. Only use water to moisten the cloth; do not use soap or other
cleaning products.
• Your Pocket PC features a lithium-ion battery and a backup battery. To reduce the risk of
fire or burns, do not disassemble, crush, puncture, short the external contacts, or dispose
of the batteries in fire or water. Replacement of the internal backup battery should be
performed by an authorized service provider using the designated spare part for this
device.
• This device may be damaged if an attempt is made to remove the main battery before
releasing the battery locking latch first.
1.4.2 AC Adapter Care
• Always use the AC adapter provided, or use an optional adapter supplied by the
manufacturer.
• Grasp the plug, not the cord, when unplugging the adapter from a wall socket.
• If the power cord becomes damaged, replace it immediately.
• Use the power button to turn the device off. Disconnect the Pocket PC from the AC
adapter before unplugging it from a wall socket.
1.4.3 Display Care
• Clean the screen by wiping with a soft, damp cloth. Moisten the cloth with water only; do
not use soap or other cleaning products.
• Do not spray liquid directly onto the screen. Prevent excess liquid from leaking into the
device at the edge of the screen.
• Never place anything on the screen.
• Avoid scratching the screen with hard objects.
• Do not expose the product to direct sunlight for a prolonged period of time.
8
1.4.4 Care While Traveling
• Safeguard your data by making a backup copy.
• Turn the power off and disconnect all external devices.
• Take the included AC adapter along with you.
• Pack the product in a protective case and carry it in your hand luggage.
• Avoid exposing the product to magnetic security devices.
• To avoid radio interference, do not use the product on an airplane.
• When shipping, pack the product and all external devices in the original packing boxes or
in similar packaging with sufficient protective padding material.
9
2. Getting Started
2.1 UNPACKING THE BOX
Start by preparing a suitable workspace to unpack the box and set up your Pocket PC. Select a
place that is located close to an electrical outlet, making sure that the surface is stable, level and
clean.
Open the box carefully, ensuring that you do not damage the box or any of the other packing
materials. The box will be required if you ever have to store or ship your Pocket PC.
The package contains the following items:
• Pocket PC
• Y cable
• Main Battery
• Stylus
• USB Cradle
• USB Cable
• Companion CD and Utility CD
• User Manual
• Warranty Card
• Brochure
Please contact your dealer if any of the items are damaged or missing.
2.2 PRODUCT OVERVIEW
Take a few moments to study your new Pocket PC. Learn the locations of the buttons, connectors
and other hardware features.
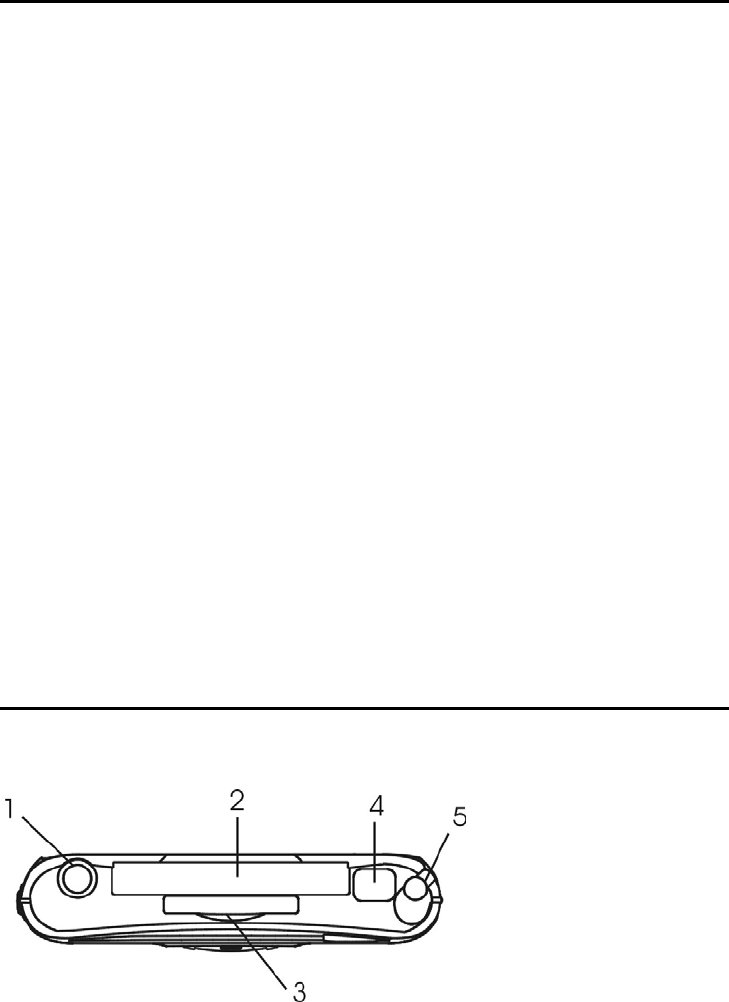
1) Stereo Headphone
Jack
2) Compact Flash
Expansion Slot
3) Secure Digital card
slot
4) IR port for Infra Red
10

Top view of the Pocket PC communications
5) Stylus – pull to remove
Left Side View of Pocket PC
6) Voice Recorder – press and hold to
start recording sound via the
microphone. Release to stop.
7) Rock Switch – press to operate: move
up/move down/enter
11
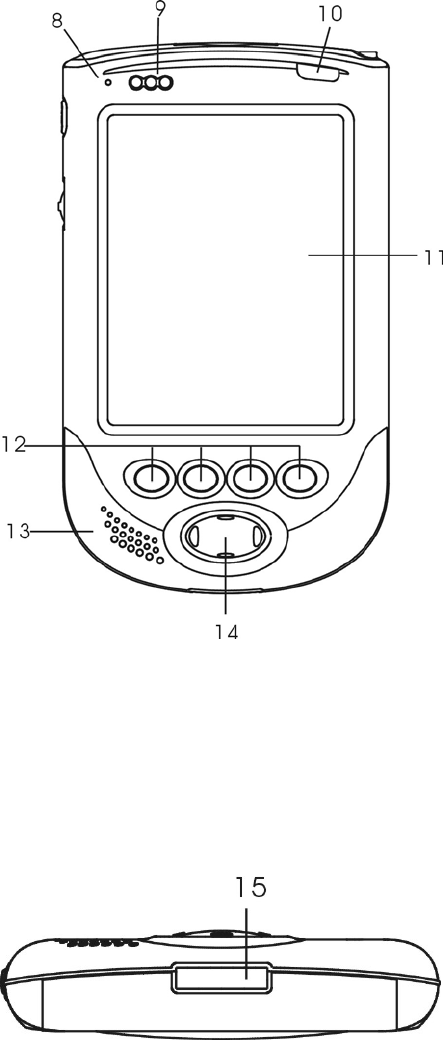
Front view of the Pocket PC
8) Microphone
9) LED – Left: battery
charging indicator
(flashing red – battery
fast charging / continuous
green – battery 80% full
and trickle charging )
Middle: Alarm(red light)
Right: WiFi(option)
10) Power Button
11) Touch Screen
12) 4 Programmable
Application Buttons – can
be set to launch
applications quickly.
Default settings (left to
right): 1. Calendar 2.
Contacts 3. Tasks 4.
Internet Explorer
13) Speaker
14) Navigation Button – press
to operate: move
up/move down/move
left/move right
Bottom view of the Pocket PC
15) Charging /
Communications Port –
connects to the USB
cradle or to a PC via the
USB cable.
12
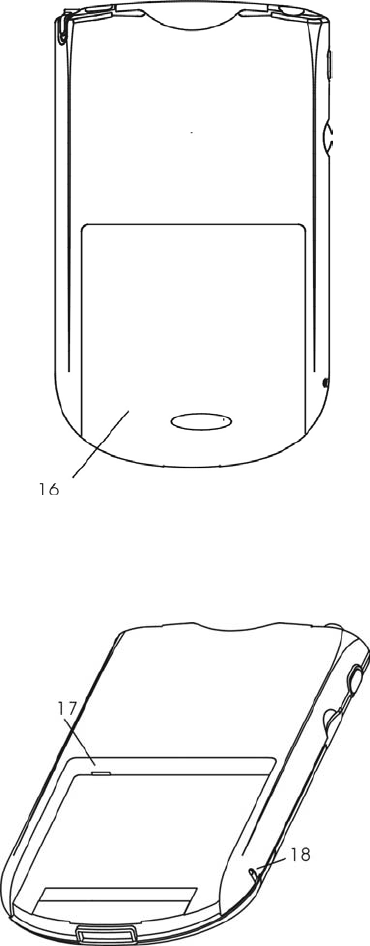
Rear view of the Pocket PC
16) Main battery - To remove the
battery cover: Press the button
on the battery cover and slide it
downwards. The battery cover
can then be lifted off. Please note
that when the button on the
battery cover is pressed, the
device goes into sleep mode. To
replace the battery cover: The
cover should be pushed firmly
over the battery compartment,
making sure that the fixings on
the cover engage with the guides
in the battery compartment. The
cover can then be slid up into
place. The cover should fit
snuggly into place with no gaps.
17) Hardware Reset Switch -
Unscrew the end of the stylus
and use to operate the switch
18) Software Reset Button –Unscrew
the end of the stylus and use it to
press the software reset button
13
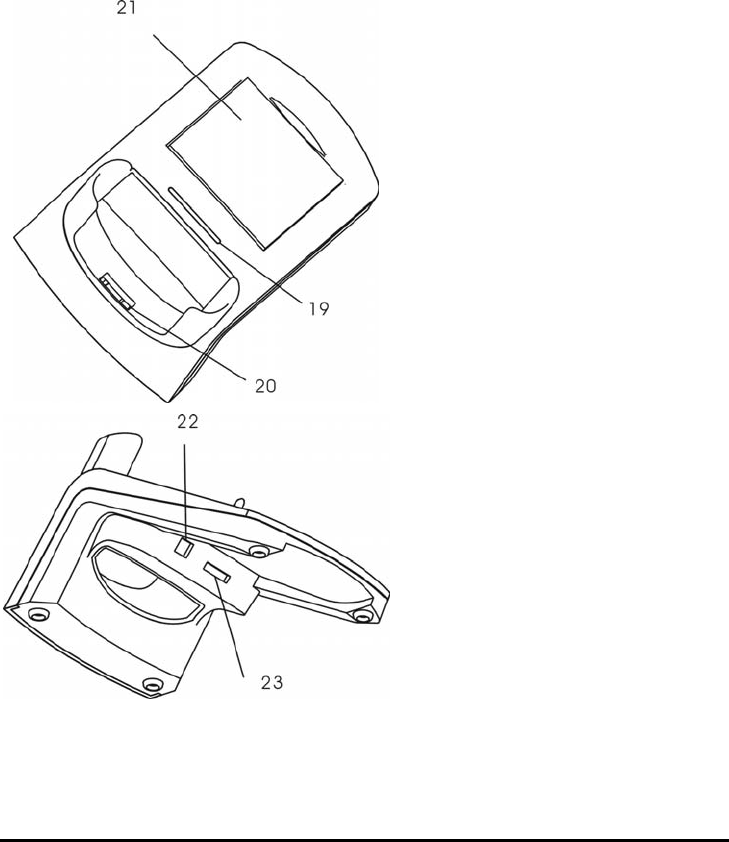
USB cradle
19) LED Charge Indicator
20) Charging/Communications
Connector – connects to the
Charging/Communications Port
on the base of the Pocket PC
21) Charging Bay for spare battery
22) DC in jack
23) USB Cable Port
2.3 POWER
2.3.1 Using Battery Power
Your Pocket PC features a main battery and a backup battery. The backup battery will ensure that
no data or settings are lost when the main battery is removed or runs out of charge.
When fully charged, the main battery will provide enough power for more than 8 hours use under
normal operating conditions. However, the actual battery life is dependent on the type of use, as
some functions, such as the front light, raise power consumption considerably.
The main battery is charged whenever mains power is connected, even if you continue to operate
the Pocket PC. However, connecting to mains power with the Pocket PC turned off results in a
much faster charge time.
The backup battery is charged from the main battery or from mains supply when the unit is
connected to the power outlet. When the main battery is removed, the backup battery maintains
power to the memory of you Pocket PC and no data or settings are lost.
14
When the main battery is removed the backup battery maintains power to memory for up to 30
minutes. If the main battery goes flat but is not removed, data and settings are maintained for 72
hours.
Your Pocket PC will automatically go into sleep mode when the main battery is removed and
cannot be woken up until the main battery has been replaced.
2.3.2 Using Mains Power
Connecting your Pocket PC to the mains power supply offers an alternative to using battery power.
As well as allowing unlimited use of the Pocket PC while you stay connected, mains power also
charges the battery, ensuring that the Pocket PC is ready for future mobile use.
2.3.2.1 Direct Mains Connection
The included AC adapter accepts 100V to 240V, enabling worldwide use with the appropriate local
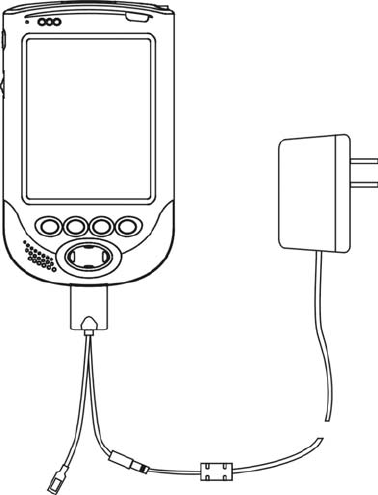
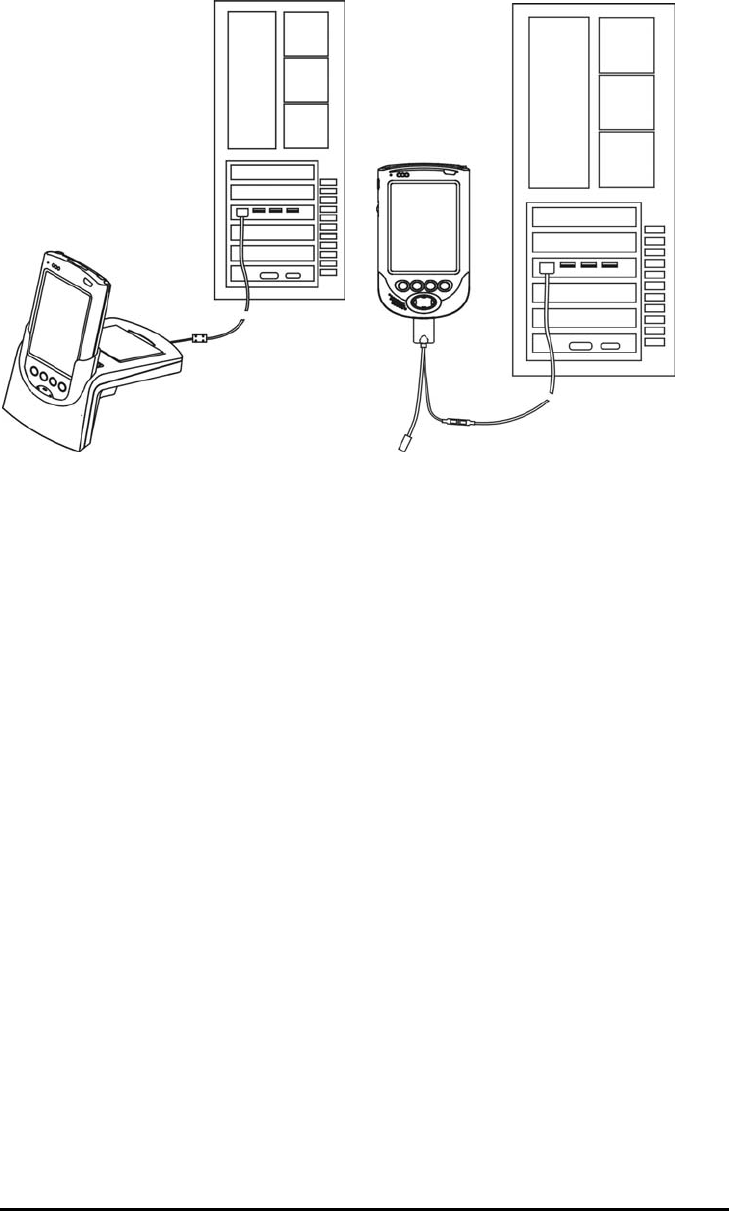
connector. To charge the device using the AC adapter, connect the Y-cable to the
charging/communications port on the base of your Pocket PC, connect the adapter cord to the
adapter cord connector of the Y-cable and plug the adapter into a mains outlet. The power LED
shows flashing red while the battery is fast charging and continuous green light when the battery is
in trickle charging at least 80% charged.
Direct Connection to the Mains Power Supply
It is recommended that you fully charge the battery the first time you operate your Pocket PC. A full
charge of both main battery and backup battery will take approximately 4 hours.
2.3.2.2 Mains Power Using the USB Cradle
By keeping the USB cradle connected to the mains power supply, your Pocket PC can be charged
whenever it is docked. Spare batteries may also be charged on their own using the cradle.
15
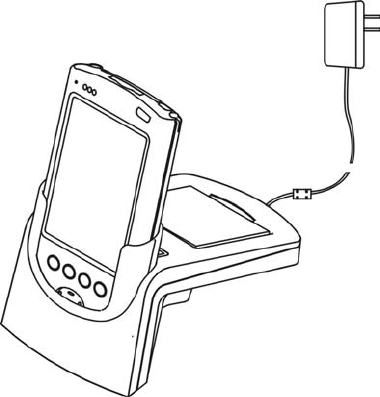
To connect the USB cradle to the mains power supply, insert the power cord jack into the DC-IN
jack socket on the USB cradle, and then plug the adapter into a mains outlet. See 4.1.2.2 Docking
the Pocket PC in the USB Cradle for more information.
USB Cradle
The cradle may also be used to charge a spare battery that is not installed in your Pocket
PC. To charge a spare battery, place the battery in the battery bay and connect the USB
cradle to the mains supply using the cradle’s DC in jack socket.
2.3.3 USB Charging
The batteries in your Pocket PC can be charged using a USB connection to a PC, even though the
device itself is not connected to the mains power supply. There are two ways of making a USB
connection to a PC: you can make a direct cable connection from the Pocket PC, or you can use
the USB cradle. See 4.1 Connecting to a PC for more information.
The Pocket PC cannot be charged via a Bus-powered USB hub. USB charging is only effective via
a self-powered USB hub, or when the Pocket PC has exclusive use of a USB port.
16
Pocket PC Connected to a PC via the USB Cable
2.3.4 Maintaining the Batteries
All programs, files, data and custom settings that you save are stored in RAM. This is a volatile
storage medium requiring electrical power to remain operational. Therefore it is essential that the
Pocket PC receives a continuous power supply, as any interruption will result in the RAM contents
being lost. Although the operating system and pre-installed programs, stored in Flash ROM, will be
unaffected, you will have to re-enter all other information. To safeguard your data, you should
periodically back up your files. See 4.2.4 Backing Up and Restoring Data Using Microsoft
ActiveSync 3.7 for information on how to do this. Users can also use CF storage card or SD storage
card to back up data or personal settings in PIM using the backup application.
You will receive a notification when either the main battery level or the backup battery level is low.
You can also check the remaining charge in either battery at any time by tapping “Settings” on the
start menu, and then selecting the System tab and tapping “Power”.
When fully charged, the backup battery will maintain power to volatile memory for up to 30 minutes
if the main battery is removed. If the main battery runs out of charge, power to volatile memory is
maintained for 72 hours as along as the main battery is not removed.
To remove the main battery it is necessary to move the battery release switch on your Pocket PC to
the release position and remove the battery cover. When the battery release switch is in the release
position the unit will automatically go into sleep mode and cannot be woken up until the main
battery has been replaced and the release switch returned to the original position.
2.4 TURNING YOUR POCKET PC ON AND OFF
2.4.1 The First Time You Use Your Pocket PC
1. You will need to use mains power to charge the battery before you use your Pocket PC
for the first time. There are two ways to do this:
17
(a) Connect your Pocket PC to a wall outlet (see 2.3.2.1 Direct Mains Connection).
(b) Plug the USB cradle into a wall outlet and dock the device in the cradle (see
2.3.2.2 Mains Power Using the USB Cradle).
2. Allow at least 1 hour to charge your main battery before you turn on your Pocket PC. It is
recommended that you fully charge the battery before disconnecting the device from the
mains.
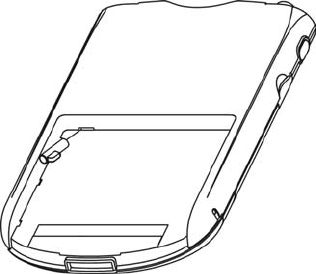
3. To prepare your Pocket PC for use, follow this simple procedure the first time you turn the
device on. First, locate the hardware reset switch beneath the main battery. Unscrew the
top of the stylus and use it to slide the hardware reset switch from left to right and then
put in the main battery. Wait 1 minute for the Welcome Wizard to be displayed, and
follow the on-screen instructions to calibrate the screen and set up the operating system.
Slide the Hardware Reset Switch from Left to Right the First Time You Use Your Pocket
PC. Please note that the reset switch should remain switched to the right when the Pocket
PC is in use to ensure that the internal backup battery is able to function.
2.4.2 Turning Your Pocket PC On
Your Pocket PC offers the convenience of “instant on,” enabling you to start work immediately
without waiting for lengthy initiation procedures to complete. To turn on your Pocket PC, press the
power button, the recorder button or one of the 4 programmable application buttons.
2.4.3 Turning Your Pocket PC Off
When you turn your Pocket PC off, the device does not shut down completely, but instead enters
standby mode. Although power consumption is extremely low, the system clock continues to run
and the RAM contents are maintained (see 2.3.4 Maintaining the Batteries for more information).
Furthermore, if you turn your Pocket PC on again within 4 hours, operation will resume where you
left off the last time you used the device.
To turn your Pocket PC off, press the power button on the front of the device.
18
Your Pocket PC is set to turn itself off after three minutes of inactivity when operating on battery
power. You can change these settings by tapping “Settings” on the start menu, and then selecting
the System tab and tapping “Power”.
2.5 QUICK START
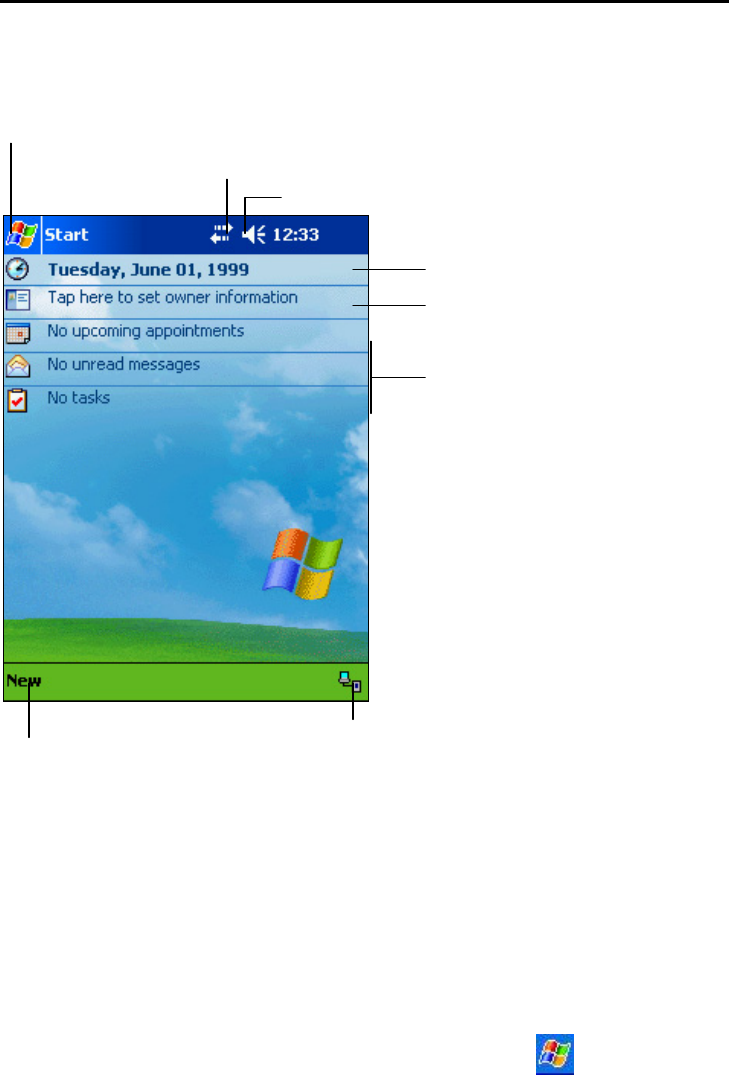
When you turn on your Pocket PC for the first time each day, or after 4 hours of inactivity, you will
see the Today screen.
Tap to switch to a program
Tap to view notification messages
Tap to change volume or mute all sounds
Tap to change date and time
Tap to open an item
Your day at a glance
Tap to create a new item Tap to view connection status
The Today Screen
A glance at the Today screen provides you with a summary of all the important information for the
day. This includes, the time and date, a summary of the owner information, upcoming appointments,
unread messages and tasks waiting to be done.
Tap the date to change the date and time settings, or tap any of the other items to open them.
In the navigation bar at the top of the screen, you can tap the start button to change the
device settings and launch any of the applications stored on your Pocket PC. You can also view
any notification messages or change the speaker volume.
19
In the command bar at the bottom of the screen, you can create a new appointment, contact, email
message, Excel workbook, note, task, or Word document. The icon on the right hand side of the
command bar shows the status of the connection between your Pocket PC and host PC during
synchronization.
For more information on the Today screen, as well as using the navigation and command bars, see
3.1.1 The Operating System.
20
3. Exploring Your Pocket PC
3.1 BASIC OPERATION
Your Pocket PC is designed for easy operation, enabling you to conveniently enter and access data
wherever you are.
3.1.1 The Operating System
Your Pocket PC uses the Microsoft Pocket PC 2003 Premium Edition operating system. This
makes navigating on your Pocket PC similar to using Microsoft Windows on your desktop or
notebook PC. You will find many familiar features, such as the start menu, pop-up menus and
toolbars.
3.1.1.1 The Navigation Bar
The navigation bar is found at the top of the screen. It displays the start button , the name of
the active program, the speaker volume icon and the time.
• Tap the speaker volume icon to change the volume level or to mute the Pocket PC
(see 3.1.2.1 Using the Stylus).
• Tap the start button to display the list of programs, and then select a program from
the list (see 3.1.2.1 Using the Stylus).
The navigation bar also displays notification icons. The following are some of the icons you may
see.
21
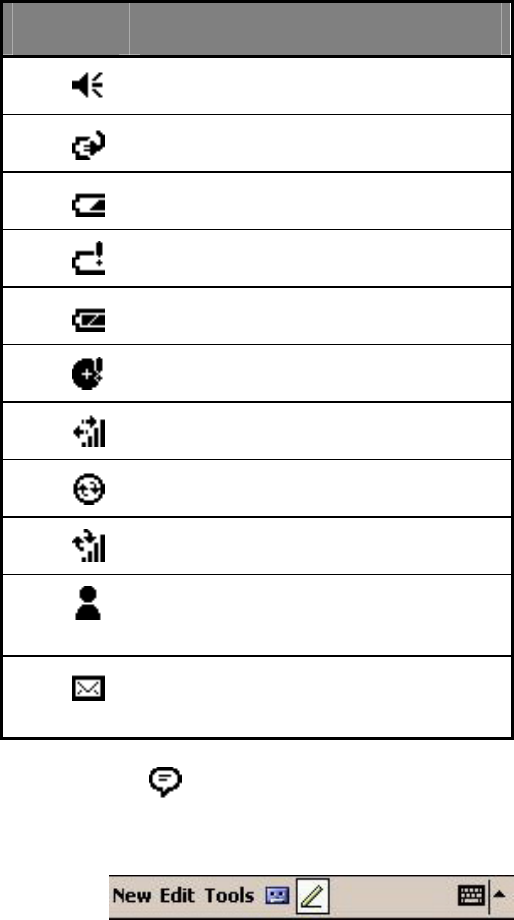
If more notification icons need to be displayed than there is room to display them, the Notification
icon, , will display. Tap the icon to view all notification icons.
Icon Meaning
Turns all sounds on and off
Main battery is charging
Main battery is low
Main battery is very low
Main battery is full
Backup-battery low
Connection is active
Synchronization is beginning or ending
Synchronization is occurring
Notification that one or more instant messages
were received
Notification that one or more e-mail messages
were received
3.1.1.2 The Command Bar
The command bar is found at the bottom of the screen. It displays menu names and available
buttons, as well as the input panel button. These controls allow you to perform tasks in programs.
• Tap a menu name to see its pup-up list, and then select an action on the list (see 3.1.2.1
Using the Stylus).
• Tap a button to perform an action. Tap and hold the stylus on a button to see the name of
a button, and then drag the stylus off the button to prevent the action from being
performed (see 3.1.2.1 Using the Stylus).
3.1.1.3 Launching and Switching Between Programs
Use the start menu or the home menu application to launch programs.
Use the task switcher or the start menu to move between programs that are already running.
22
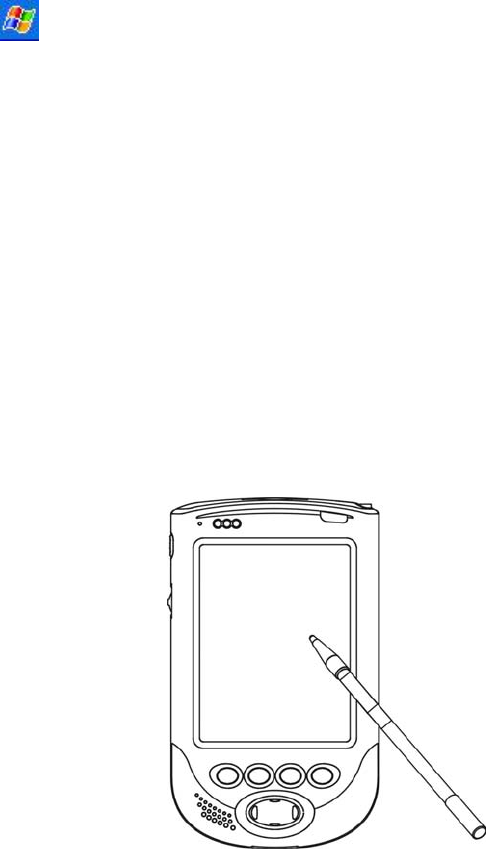
To open or switch between running programs using the start menu, tap on the start button
in the navigation bar, and then select the program you want from the list (see 3.1.2.1
Using the Stylus).
3.1.2 Navigation
Navigating on your Pocket PC is easily done by tapping on-screen buttons with the stylus. You will
also find the Navigation Button a useful feature for moving between pages and scrolling through
menus and lists. Finally, the home menu button, together with the other Programmable Application
Buttons, makes your favorite applications just a button push away.
3.1.2.1 Using the Stylus
Use the stylus to navigate and select items on-screen.
• Tap the screen once to select an item.
• Drag the stylus to select text and images. In a list, drag to select multiple items.
• Tap and hold an item to display a pop-up menu listing available actions. Tap your
selection to perform the action.
3.1.2.2 Using the Navigation Button
Use the Navigation Button to move up and down, and side to side, when navigating on-screen
buttons and controls. You can also use this feature to scroll through lists of files and documents.
3.1.2.3 Using the Rock Switch
Use the Rock Switch to move up and down when navigating on-screen buttons and controls. Press
to make your selection.
3.1.2.4 Using the Programmable Application Buttons
The Programmable Application Buttons provide a fast and convenient way to open your favorite
programs. Press one of the Programmable Application Buttons to instantly open the application
assigned to that key.
23
3.1.3 Entering Data
There are several ways to enter data in your Pocket PC:
• Use the input panel to enter typed text. You have the option of using the onscreen (soft)
keyboard, or selecting an alternative method from the input list.
• Use the stylus to write directly on the screen. Your handwriting will be recognized and
converted to text.
• Use the stylus to draw a picture on the screen. The drawing box is opened when you
cross three ruled lines.
• Record a message using the voice recorder.
• Connect to a PC using a cable, the USB cradle link or infrared (see 4.1 Connecting to a
PC).
• Connect to a network or the Internet using a CompactFlash card(see 4.3 Connecting to
the Internet or Your Network).
3.1.3.1 Using the Input Panel to Enter Typed Text
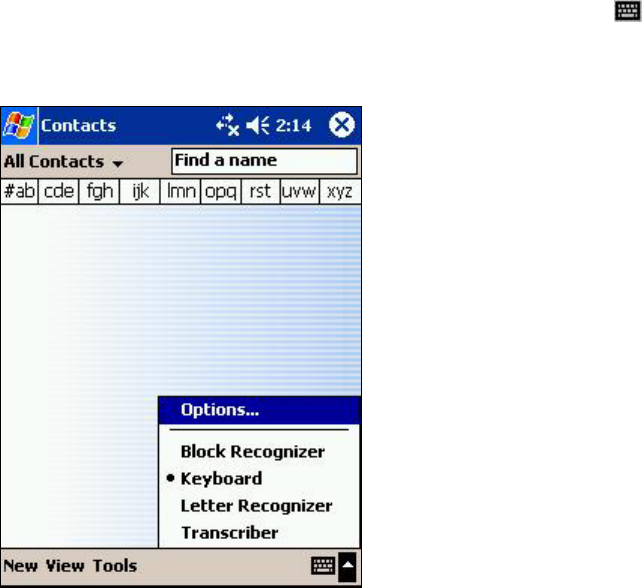
The input panel can be used to input text in any program. Tap the input panel button on the
command bar to display the input panel. Tap the arrow next to the button to see the list of input
options.
The Input Panel
The following input options are listed:
• Block Recognizer
Block Recognizer allows you to input characters using prescribed strokes. After you write
a character it is converted to text that is displayed on the screen.
24

Tap the input panel arrow and select Block Recognizer. For help with using Block
Recognizer, click the help button .
• Keyboard
The onscreen keyboard allows you to enter text by tapping the displayed “keys” with the
stylus.
To display the onscreen keyboard, tap the input panel arrow and select Keyboard.
• Letter Recognizer
Letter Recognizer allows you to use the stylus to write onscreen, just as you would write
with a pen on paper. After you write each letter it is converted to a text character.
Tap the input panel arrow and select Letter Recognizer. For help with using Letter
Recognizer, click the help button .
• Transcriber
Transcriber also allows you to write onscreen with the stylus. However, this method
allows you to write blocks of information before pausing for the characters to be
recognized.
Tap the input panel arrow and select Transcriber. For help with using Transcriber, click
the help button .
Please note that this function is not supported in the Spanish-language version.
3.1.3.2 Writing on the Screen
You can write on the screen with the stylus in any program that accepts handwriting, such as
Calendar, Tasks and Contacts. Your handwriting will be entered as it is, although you have the
option of editing and formatting it. Later, if required, you can convert your handwriting to text.
Writing
To write on the screen in a program that accepts handwriting, first tap the pen button
on the command bar. If the program accepts writing, but does not have a pen
button, check the help for instructions on how to enter write mode in that program. After
you enter write mode, ruled lines will appear on the screen to help you write.
25
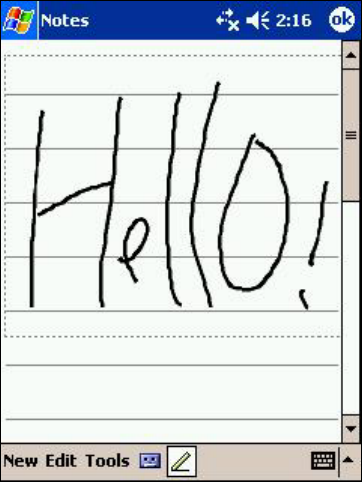
Writing on the screen
Editing and Formatting Your Writing
To edit or format your writing, tap the screen at the place where you want to begin. This
will move the insertion point. Select a word or multiple words by dragging the stylus. If
you accidentally start to write, tap “Edit”, then try dragging the stylus again. Deselect
words by tapping on the screen to bring the insertion point back. Use the “Cut”, “Copy”
and “Paste” commands in the “Edit” menu to edit your selection, or tap and hold your
selection and then chose an edit command from the pup-up list that appears. Use the
“Tools” menu to format your selection.
Converting Writing to Text
To convert handwriting to text, first make a selection by dragging the stylus. Unselected
words will be left as handwriting after you convert the selected words. However, if you
chose not to select any part of your writing, all the words will be converted.
Next, tap “Tools”/”Recognize.” Alternatively, you can tap and hold the selected words,
and then chose “Recognize” from the pup-up menu that appears. The selected words
are converted to text.
If a word is incorrectly converted you can return to the original writing or chose from a
list of alternates. Tap the incorrect word and then select an alternate or the original
handwritten word from the pup-up list that appears.
For improved word recognition:
- write neatly using the onscreen lines as guides
- write the letters of a word close together
- leave large spaces between words
- use the “Tools” menu to increase the zoom level to 300%
26
- be aware that hyphenated words and words using some special characters or
punctuation cannot be converted
- if you change a word after attempting to recognize it, the new word will not be
recognized. It is better to write the whole word again.
3.1.3.3 Drawing on the Screen
Drawing on the screen is very similar to writing onscreen. However, selecting and editing items is
different in a drawing. For example, a drawing can be resized, but handwriting cannot.
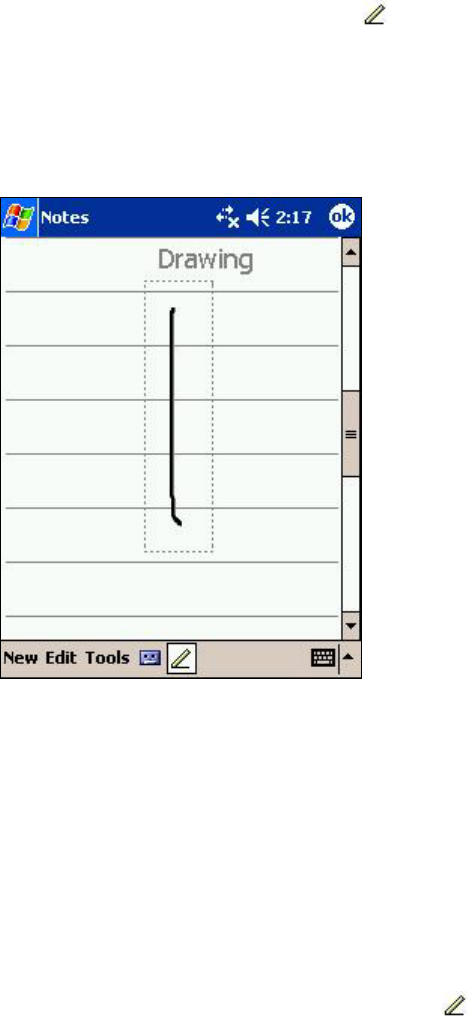
• Drawing
To create a drawing, tap the pen button in the command bar to enter write mode.
Ruled lines appear on the screen. Cross three ruled lines with your first stroke and a
drawing box appears. If you fail to open a drawing box in this way, your input will be
treated as writing. Once the drawing box is open, anything you draw or write in the box
will be treated as part of the drawing. You may find it easier to work if you increase the
zoom level in the “Tools” menu.
Drawing on the screen
Editing and Formatting Your Drawing
To edit or format your drawing, first tap and hold the drawing with the stylus until the
selection handle appears. Use the “Cut”, “Copy” and “Paste” commands in the “Edit”
menu to edit your selection, or tap and hold your selection and then chose an edit
command from the pup-up list that appears. Use the “Tools” menu to format your
selection.
To resize a drawing, first deselect the pen button . Then, tap the drawing to bring up
the selection handle. Finally, tap and drag a corner of the drawing box.
27

3.1.3.4 Recording a Voice Message
Recording a voice message is a quick and convenient way of saving information and reminders.
You can make a voice recording in any program that allows you to write or draw on the screen,
such as Calendar, Tasks and Contacts. These programs allow you to embed a voice recording in a
written note. Alternatively, you can make a stand-alone recording in the Notes tab.
Your Pocket PC supports several recording formats. These formats differ in quality and file size, as
well as their compatibility with other programs and devices. To change the format, tap “Settings” on
the start menu. Next, tap the “Input” icon and select the “Options” tab.
Making a Recording
To make a recording, press and hold the voice recorder button. (Alternatively, you can tap the
record button in the recording toolbar). An audible beep informs you that the device is recording.
Speak into the microphone. When the message is complete, release the voice recorder button to
stop recording. Two beeps indicate that recording has stopped, and the message appears in the
note list or as an audible message icon embedded in the text.
The default sampling frequency has been set at 22KHz. This bandwidth can be altered to improve
quality, but doing this will use more memory. To change the setting, tap “Start
Menu”/”Settings”/”Input,” and then select the Options tab. Select a higher or lower frequency from
the voice recording drop-down menu.
Playing a Recording
To play a recording, tap on the message in the note list or the audible message icon
in the text.
3.1.4 Finding and Organizing Information
File management using Microsoft Pocket PC 2003 on your Pocket PC is similar to using the
Windows operating system on your PC.
3.1.4.1 Using Find
Files can be located quickly by tapping the “Find” command on the start menu. Enter the text you
are looking for, select a data type, and then tap “Go.”
28

The Find screen
3.1.4.2 Using File Explorer
Tap “Programs” on the start menu, and then tap “File Explorer” to display the folders and files
stored on your Pocket PC.
The File Explorer screen
29
Use File Explorer to view, create, move and delete files and folders. Tap and hold the File Explorer
box, or individual folder and file icons, to see a pup-up list of available actions.
3.2 ORGANIZING YOUR SCHEDULE USING PERSONAL INFORMATION
MANAGER
Your Pocket PC includes PIM (Calendar/Note/Task/Content), making it the perfect tool for
organizing your schedule, keeping track of appointments and listing the tasks you have to complete.
You can use Microsoft ActiveSync to synchronize the information in PIM and files on your Pocket
PC with Microsoft Outlook 2000/ 2002 or Microsoft Exchange on your PC.
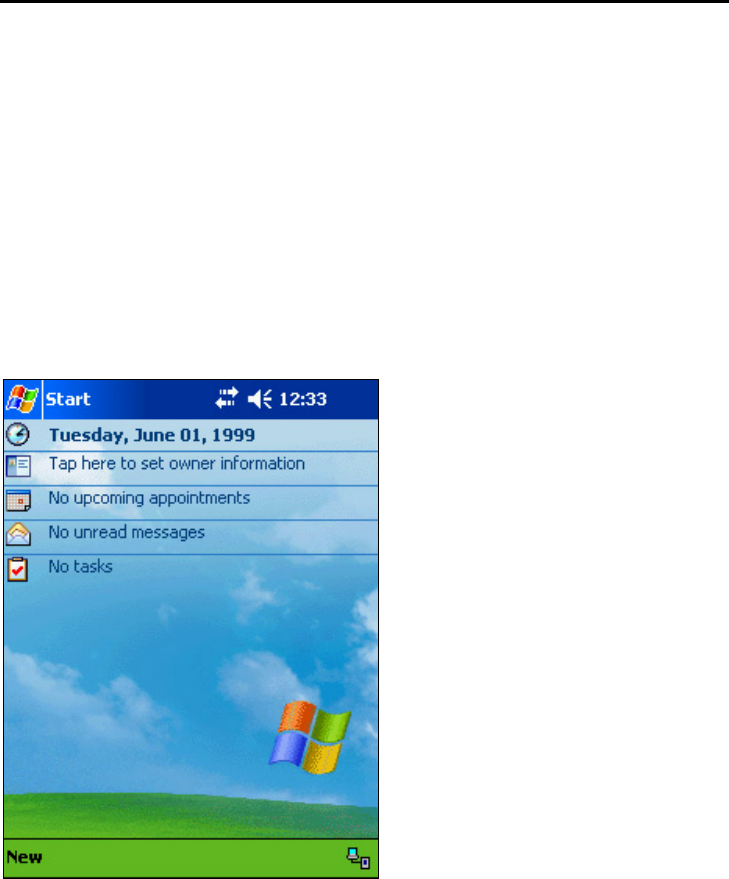
3.2.1 Today Screen
The Today screen is displayed when you turn on your Pocket PC for the first time each day, or after
4 hours of inactivity. You can also display the Today screen at any time by tapping “Today” on the
start menu.
A glance at the Today screen provides you with a summary of all the important information for the
day. Tap the time/date icon to change its settings. Tap any of the other items to open them.
The Today screen
3.2.2 Calendar
Calendar enables you to schedule meetings and other events. Tap “Calendar” on the start menu to
open it. A choice of views (Agenda, Day, Week, Month, Year) is available by tapping the view icons
on the command bar.
• Tap the arrows at the top of the screen to select the day.
30

The Calendar screen
• Tap “Tools”/”Options” on the command bar to customize Calendar.
• Tap “New” on the command bar to create a new appointment.
• Tap an appointment to view the appointment details.
The appointment details screen
31
• Tap “Edit” on the command bar to change the appointment details.
3.2.2.1 Meeting Reminder
You can set up a meeting reminder when you create a new appointment, or when you edit an
existing appointment. On the appointment details screen, select “Remind Me” to receive a reminder
before the appointment occurs. In the start menu, tap “Settings”/“Sounds and Notifications” to
change the reminder properties.
3.2.2.2 Sending a Meeting Request
You can use Calendar to request a meeting with other Outlook and Pocket Outlook users. The
meeting notice will be sent when you use the Pocket PC to connect to your mail server, or via your
PC using ActiveSync (see chapter 4 Connecting). Select how you want to send your meeting
requests by tapping “Tools”/”Options.”
To set up a meeting, do the following:
• With an appointment details screen displayed, tap the input panel icon in the command
bar, and then tap ‘Attendees.”
• The Contacts list is displayed. Select the people on the list you want to invite.
• The meeting notice is placed in the Outbox folder. (The Outbox folder is located in the
Inbox).
See Calendar Help and Inbox Help for more information on requesting meetings.
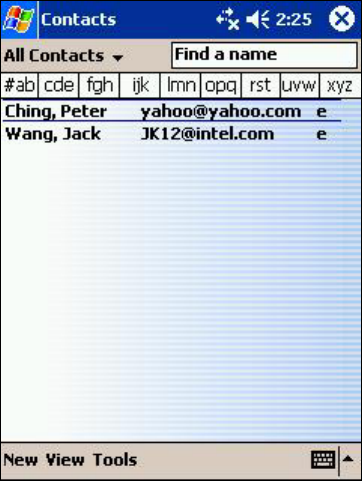
3.2.3 Maintaining Your Contacts List
You can use Contacts to keep important contact information on all your friends, colleagues and
business associates. In addition, you can quickly share this information with other mobile device
users by making a infrared connection. See chapter 4 Connecting for information on how to do this.
32
The Contacts screen
• Open Contacts and tap “Tools”/”Options” in the command bar to change the way
information is displayed.
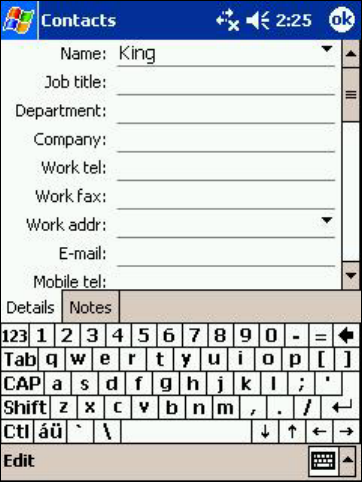
• Tap “New” on the command bar to create a new contact. Use the input panel to enter
information.
The new contact screen
• Assign the new contact to a category by scrolling down to “Categories” and selecting one
from the list.
• You can find contacts or groups of contacts by tapping “Find” on the start menu, and
selecting “Contacts” for the type.
• Tap a contact in the contacts list to display a contact summary screen.
• With a contact summary screen displayed, tap “Edit” on the command bar to change the
information.
3.2.4 Task List
You can use Tasks to create a to-do list, helping you keep track of all your jobs.
• Open Tasks and tap “Tools”/”Options” in the command bar to change the way information
is displayed.
• Select the category of tasks you want to display by tapping on the left side of the
navigation bar.
• Select the sort order for the task list by tapping on the right side of the navigation bar.
33

• Tap and hold a task to display a pup-up menu of actions.
• Tap a task to display the task summary screen. Tap “Edit” on the command bar to change
the information.
The task summary screen
• With the task list displayed, tap “New” on the command bar to create a new task. Use the
input panel to enter information. See 3.1.3 Entering Data for more information on using
the input panel.
34
The new task screen
3.2.5 Taking Notes
The Notes program allows you to quickly capture ideas and important information in the form of a
written note, a drawing or a sound recording.
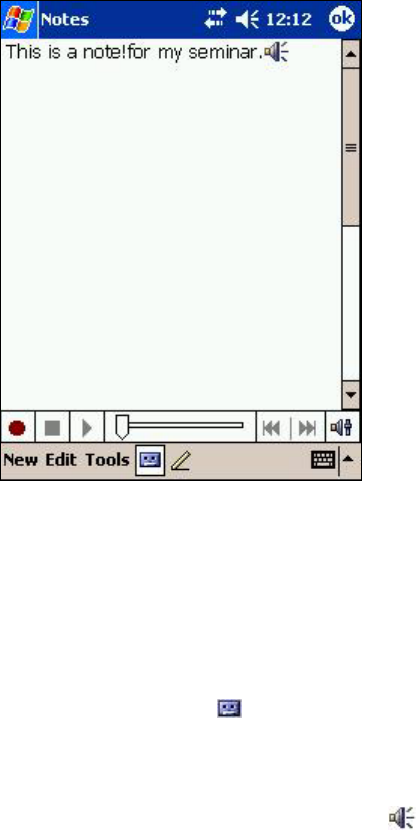
• Open the Notes program to display a list of notes.
• Select the folder containing the notes you want to display by tapping on the left side of the
navigation bar.
• Select the sort order for the note list by tapping on the right side of the navigation bar.
• Tap and hold a note to display a pup-up menu of actions.
• Tap on a note in the list to display its contents.
The Notes screen
• With the note list displayed, tap “New” on the command bar to create a new note. Use the
input panel to enter information. See 3.1.3 Entering Data for more information on writing,
drawing and recording.
• Tap the record icon on the command bar to display the recording toolbar. Tap the
record button to start recording.
If you make a recording in an open note, the audio will be embedded in the note. With the
note open, tap the embedded speaker icon to play the recording.
35
If you make a recording when the note list is displayed, a stand-alone recording will be
made and listed along with the other notes. Tap the recording in the note list to play it.
3.3 PLAYING AUDIO AND VIDEO
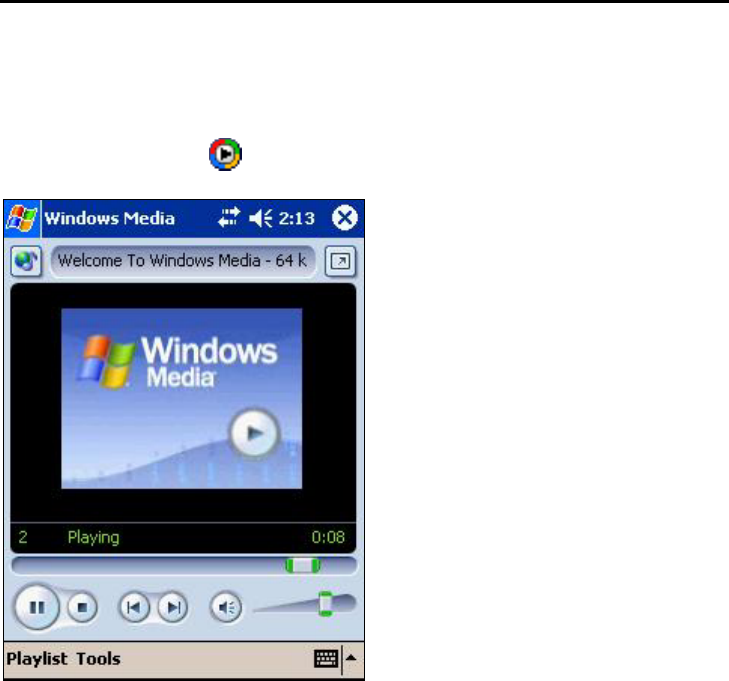
Your Pocket PC features Microsoft Windows Media Player for Pocket PC, enabling you to play
music recordings and movie clips. For information on the audio and video file formats that are
supported, tap on “Help”/”Windows Media Player” on the start menu.
• To open Media Player, tap on “Programs” on the start menu, and then tap the Windows
Media Player icon .
The Windows Media Player screen
• Tap “Select” on the command bar to find the file you want to play.
• Tap the onscreen buttons to control the playing of the file.
• Tap on the progress slider control to jump to a different section of the file you are playing.
• Tap on the volume slider control to adjust the volume level.
• Save battery power by turning off the display when playing audio files. To do this, you
must set one of the Programmable Application Buttons to control the screen toggle
function. Tap “Tools”/”Settings”/”Button” on the command bar, and then select “Screen
Toggle”. For more information, refer to “Help”/”Windows Media Player”/”Using Hardware
Buttons.”
• You can download audio and video files from the Internet. Alternatively, use your PC to
convert (“rip”) files from CDs, and then copy them to your Pocket PC using ActiveSync.
36
• As audio and video files require large amounts of memory, you might prefer to save them
on an optional CompactFlash or SD storage card.
3.4 INTERNET, EMAIL AND MESSAGES
3.4.1 Pocket Internet Explorer
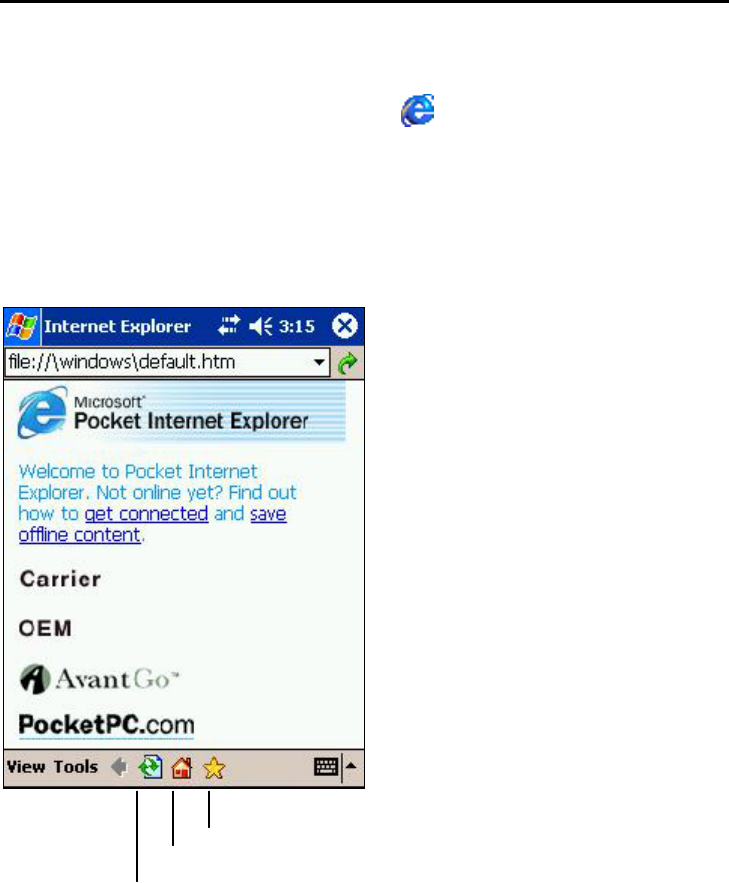
Using Pocket Internet Explorer on your Pocket PC is similar to using Internet Explorer on your
desktop or notebook PC. Tap Pocket Internet Explorer on the start menu to open it.
You must set up a network connection or dial-up ISP connection using a LAN or modem
CompactFlash card before you can use the Internet. See 4.3 Connecting to the Internet or Your
Network for information on how to do this. Alternatively, you can access the Internet via your PC’s
Internet connection if you connect to your PC and run ActiveSync. See 4.1 Connecting to a PC for
information on how to make a USB cable or USB cradle connection.
Hide pictures button
Favorites button
Refresh button
The Pocket Internet Explorer screen
After Pocket Internet Explorer opens you can select one of the mobile services displayed on the
screen. Alternatively, tap “View” on the command bar and then select “Address Bar” from the pup-
37
up menu. The address bar is displayed below the navigation bar at the top of the screen, allowing
you to enter an Internet address. After you have typed your desired Internet address, tap the “Go”
button on the right side of the address bar.
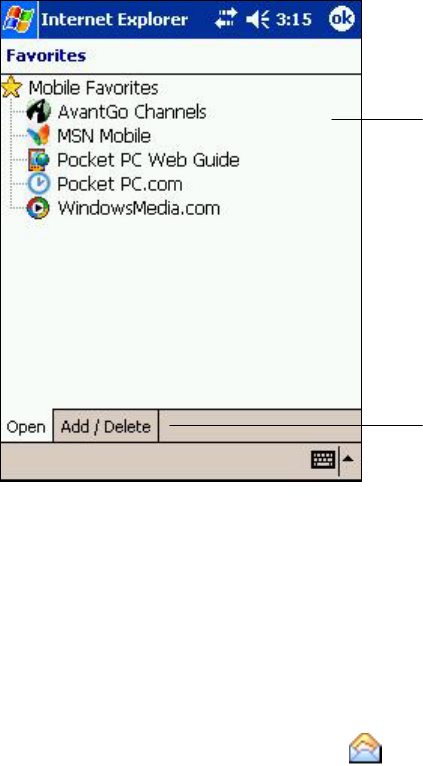
You can also open websites by tapping the favorites button on the command bar, and then
selecting a website from one of the folders. You can add new sites and delete current favorites
using the pup-up menu, or you can download favorites from your PC using ActiveSync. See 4.3.5
Synchronizing Links to Web Sites for more information.
Tap the favorite you want to view
Tap the add or delete a folder or favorite link
The Favorites screen
3.4.2 Inbox
The Inbox displays messages received on your desktop or notebook computer and then transferred
to your Pocket PC using ActiveSync. You can also send and receive messages directly via a phone
or network connection to a mail server, or via your PC’s connection to a mail server when you are
connected and running ActiveSync. Tap “Inbox” on the start menu to open it.
To send and receive messages via a mail server you will need to establish a connection using a
LAN card or modem card. See 4.3 Connecting to the Internet or Your Network for information on
how to do this. To send and receive messages via your PC, you first have to connect your Pocket
PC and then run ActiveSync. See 4.1 Connecting to a PC for information on how to do this.
3.4.2.1 Viewing Received Messages
38
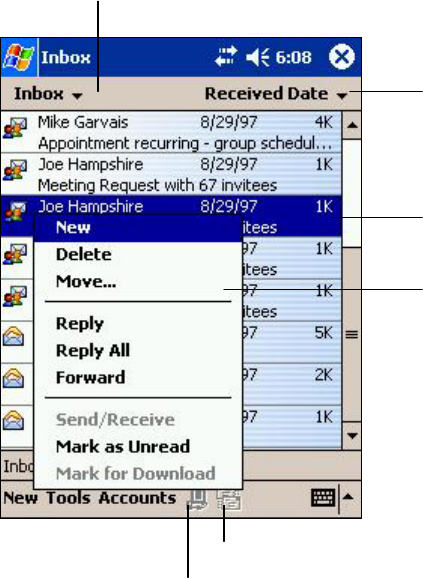
Select the service and folder you want to display
`
Select the sort order for message
Tap to open a message
Tap and hold to display a pop-up menu of actions
Tap to connect and to send and receive e-mail
Tap to connect to the selected service
The Inbox screen
You can use Inbox to work online or offline. When working online, messages are sent as soon as
you tap “Send.” When you delete or move messages on your Pocket PC, the messages will be
removed from your mail server.
Messages you receive are displayed in the message list. By default, the most recently received
messages are displayed first in the list. When you receive a message, tap it to open it. Unread
messages are displayed in bold.
39
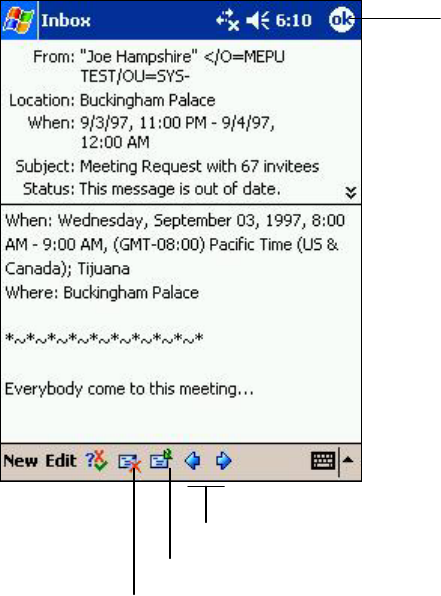
Tap to return to the message list
Tap to view the previous or next message
Tap to reply to or forward this message
Tap to delete this message
An opened message
When you connect to your email server or synchronize with your desktop computer, by default,
you’ll receive messages from the last five days only, the first 100 lines of each new message, and
file attachments of less than 100 KB in size. The original messages remain on the email server or
your desktop computer. These settings can be changed, however, enabling you to receive full size
email messages, including attachments, on your Pocket PC.
You can mark the messages that you want to retrieve in full during your next synchronization or
mail server connection. In the message list, tap and hold the message you want to retrieve. On the
pop-up menu, tap “Mark for Download.” The icons in the Inbox message list give you visual
indications of message status.
You specify your downloading preferences when you set up the service or select your
synchronization options. You can change them at any time:
You can change options for Inbox synchronization using ActiveSync options. For more information,
see ActiveSync Help. You can change options for direct mail server connections in Inbox on your
device. Tap “Tools” and then tap “Options.” On the Service tab, tap the service you want to change.
Tap and hold the service and select “Delete” to remove a service.
3.4.2.2 Composing and Sending Messages
To compose a message, first tap “New” on the command bar. In the “To” field, enter an email
address of one or more recipients, separating them with a semicolon, or select a name from the
40
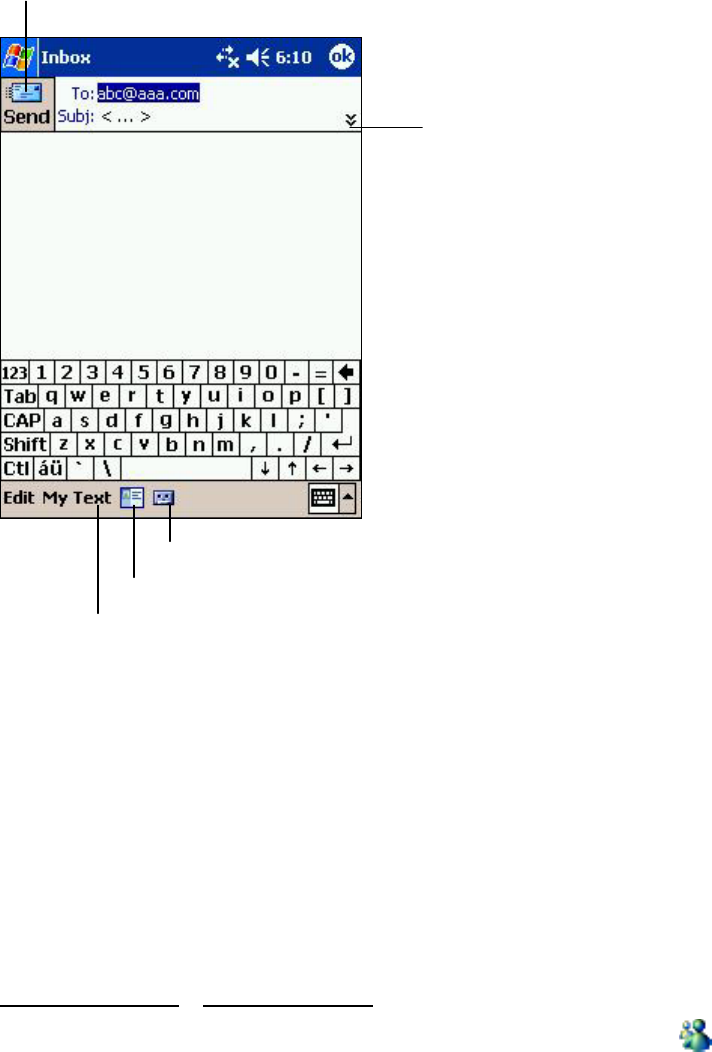
contact list by tapping the Address Book button. Next, compose your message. To enter preset or
frequently used messages, tap “My Text” on the command bar and select a message. Tap “Send”
when you’ve finished the message. If you are working offline, the message is moved to the Outbox
folder and will be sent the next time you connect.
Ta
p
to send the messa
g
e
Ta
p
to show or hide the com
p
lete header
Ta
p
to show/hide the recordin
g
toolbar
Ta
p
to dis
p
la
y
the Address Book
Ta
p
to insert common messa
g
es
Composing a new message
3.4.3 MSN Messenger
MSN Messenger is an instant messaging program that allows you to see who is online, send and
receive instant messages and have instant message conversations with groups of contacts. You
must connect to the Internet before you can use these functions.
To use MSN Messenger, you must have a Microsoft Passport™ account or a Microsoft Exchange
email account. If you have a Hotmail or MSN account, you already have a Passport. Visit
http://www.passport.com or http://www.hotmail.com for more information.
To open MSN Messenger, tap “Programs” on the start menu, and then tap “MSN Messenger” .
To set up an account and sign in, tap “Options” on the Tools menu. Next, in the Accounts tab, enter
your Passport or Exchange account information. To sign in, tap the sign-in screen and enter your
email address and password.
41
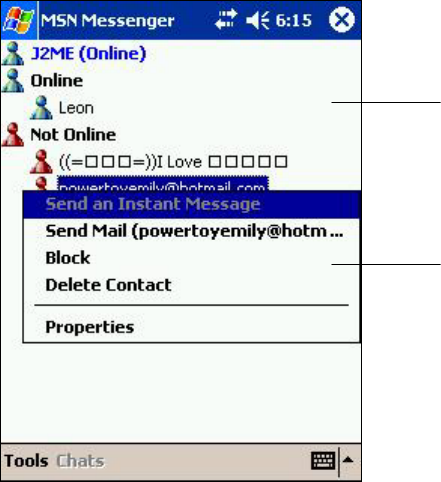
3.4.3.1 Managing Contacts
If you already use MSN Messenger on your desktop computer, your contacts will show up on your
device without being added again. The MSN Messenger window shows all of your messenger
contacts at a glance, divided into Online and Not Online categories. From this view, while
connected, you can chat, send email, block the contact from chatting with you, or delete contacts
from your list using the pup-up menu.
Tap a contact to start a chat
Tap and hold to display a pop-up
menu of actions
The MSN Messenger Contacts Screen
If you block a contact, you will appear offline but will remain on the blocked contact’s list. To
unblock a contact, tap and hold the contact, then tap “Unblock” on the pup-up menu.
3.4.3.2 Chatting
Tap a contact name to open a chat window. Enter your message in the text entry area at the bottom
of the screen, or tap “My Text” on the command bar to enter a preset message, and tap “Send.” To
invite another contact to a multi-user chat, in the Tools menu, tap “Invite” and then tap the contact
you want to invite.
42
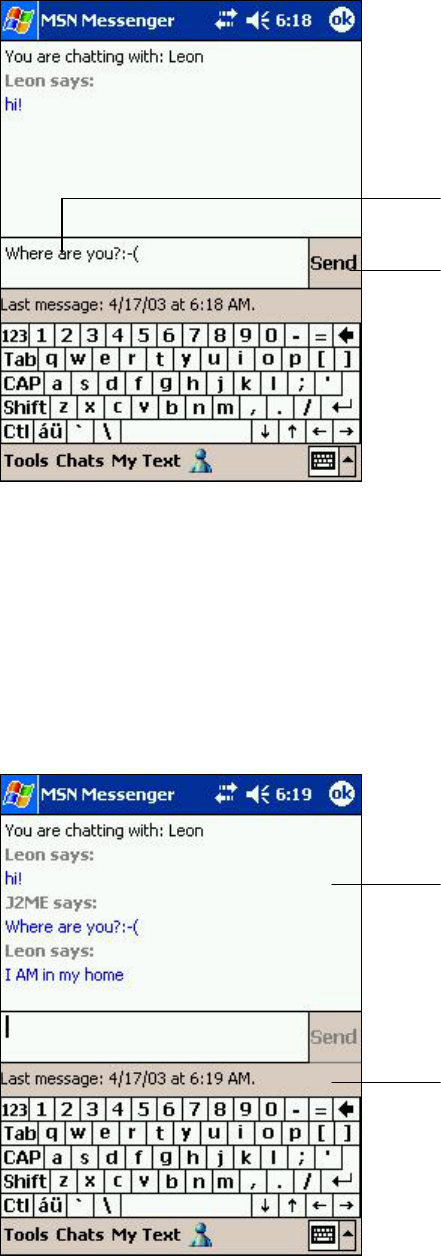
Enter messa
g
e
Ta
p
to send messa
g
e
Entering Text in the MSN Messenger Chat Window
To switch back to the main window without closing a chat, tap the Contacts button on the command
bar. To revert back to your chat window, tap Chats on the command bar, and then select the
person whom you were chatting with.
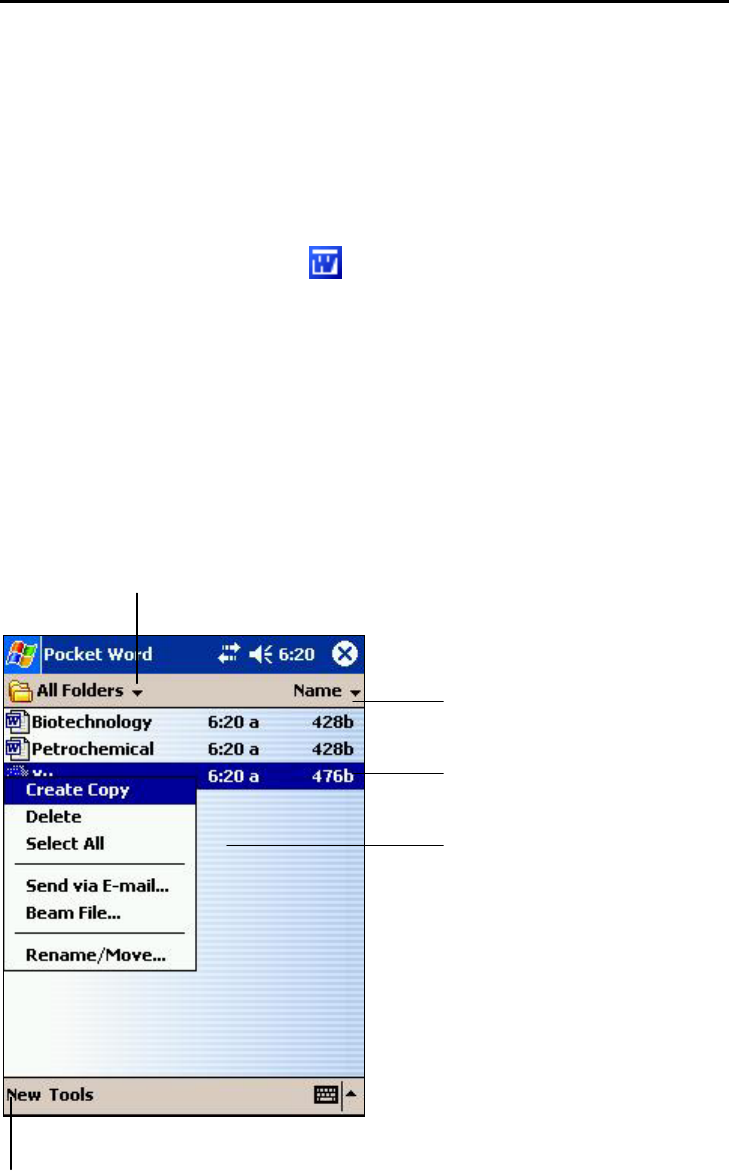
To know if the contact you are chatting with is responding, look for the message under the text
entry area.
View full chat
View status of the chat
Waiting for a Reply in the MSN Messenger Chat Window
43
3.5 PRODUCTIVITY SOFTWARE
Your Pocket PC comes with productivity software to enable you to work wherever you are.
Microsoft Pocket Word and Microsoft Pocket Excel on your Pocket PC are similar to Word and
Excel on your desktop or notebook computer. By copying files between your Pocket PC and PC
using ActiveSync, you can reference or continue to work on the most up-to-date versions of your
documents and workbooks.
3.5.1 Pocket Word
Use Pocket Word to create documents, such as letters, meeting minutes, and trip reports. To create
a new file, tap, “Programs”/”Pocket Word” on the start menu, and then select “New” on the
command bar. You can also select a template for new documents in the “Tools”/”Options” dialog
box to open a template with appropriate text and formatting already provided.
You can open only one document at a time; when you open a second document, you will be asked
to save the first. You can save a document you create or edit in a variety of formats, including Word
(.doc), Pocket Word (.psw), Rich Text Format (.rtf), and Plain Text (.txt).
When you open Pocket Word you will see a list of the documents stored on your device. Tap the
arrow at the top to change the folder, and then tap a file in the list to open it. To delete, copy, and
send files, tap and hold a file in the list, and then select the appropriate action on the pop-up menu.
Select the t
yp
e of folder
y
ou want dis
p
la
y
ed in the list
Ta
p
to chan
g
e the sort order of the list
Ta
p
to o
p
en a document
Tap and hold an item to see a pop-up menu
of actions.
Tap to create a new documenet
44
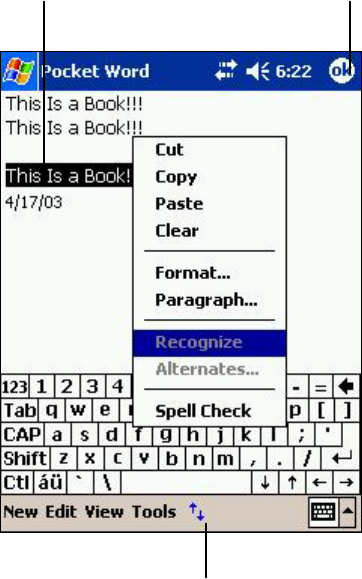
Pocket Word Files List Screen
You can enter information in Pocket Word in one of four modes: typing, writing, drawing, and
recording. Tap the View menu on the command bar to select the input mode. Each mode has its
own toolbar, which you can show and hide by tapping the Show/Hide Toolbar button on the
command bar.
You can change the zoom magnification by tapping “View”/“Zoom,” and then selecting the
percentage you want. Select a higher percentage to enter text and a lower one to see more of your
document. If you are opening a Word document created on a desktop computer, select “Wrap to
Window” on the View menu so that you can see the entire document.
3.5.1.1 Typing Mode
Using the input panel, enter typed text into the document. See 3.1.3.1 Using the Input Panel to
Enter Typed Text for more information.
To format existing text and to edit text, first select the text. You can select text as you do in a Word
document, using your stylus instead of the mouse to drag through the text you want to select. You
can search a document to find text by tapping “Edit” and then “Find/Replace.”
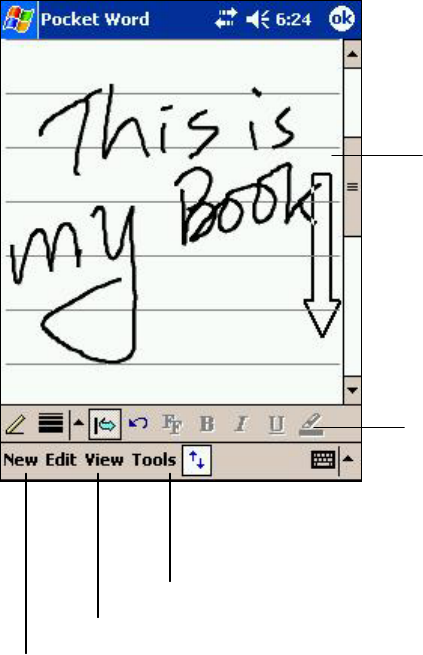
Tap and hold to see a pop-up
menu of actions.
Tap to return to the document list
(
chan
g
es
are saved automatically).
Tap to show or hide the toolbar.
Using the Typing Mode to Enter Text in a Word Document
45
3.5.1.2 Writing Mode
In writing mode, use your stylus to write directly on the screen. Ruled lines are displayed as a guide,
and the zoom magnification is greater than in typing mode to allow you to write more easily. See
3.1.3.2 Writing on the Screen for more information.
With Space button selected, drag to
insert space. An arrow appears showin
g
the apace direction and size.
Tap to highlight selected text
S
p
ace button
Tap to select formattin
g
options, such as
pen weight and line color.
Pen button
Using the Writing Mode to Enter Text in a Word Document
If you cross three ruled lines in a single stylus stroke, the writing becomes a drawing, and can be
edited and manipulated as described in the following section.
Written words are converted to graphics (metafiles) when a Pocket Word document is converted to
a Word document on your desktop computer.
3.5.1.3 Drawing Mode
In drawing mode, use your stylus to draw on the screen. Gridlines appear as a guide. When you lift
your stylus off the screen after the first stroke, you’ll see a drawing box indicating the boundaries of
the drawing. Every subsequent stroke within or touching the drawing box becomes part of the
drawing. See 3.1.3.3 Drawing on the Screen for more information.
46
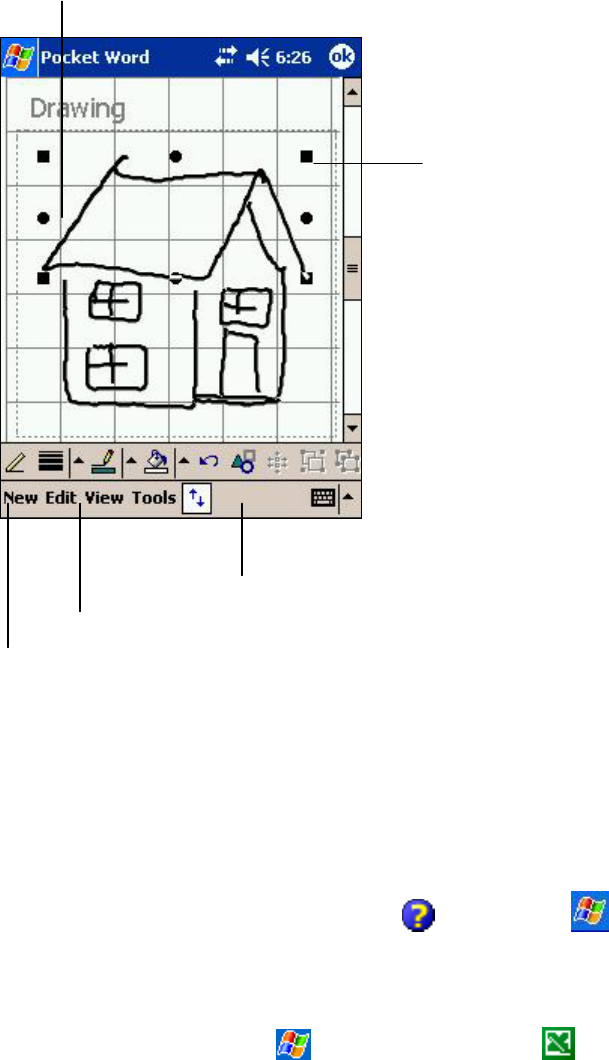
Select shape on the pop-up menu to convert object to proper shapes
Resize an object by dragging the
selection handles shapes
Tap to select formatting options, such as line weight, fill color, and line color.
Ta
p
an arrow to see
y
our choices
Pen button
Using the Drawing Mode in a Word Document
3.5.1.4 Recording Mode
In recording mode you can embed a recording into your document. Recordings are saved as .wav
files. See 3.1.3.4 Recording a Voice Message for more information.
For more information on using Pocket Word, tap “Help” on the start menu .
3.5.2 Pocket Excel
Use Pocket Excel to create workbooks, such as expense reports and mileage logs. To create a new
file, tap “Programs” on the start menu , and then tap the Pocket Excel icon. Tap “New” on
the command bar. You can also select a template for new workbooks in the “Tools”/”Options” dialog
box to open a template with appropriate text and formatting already provided.
You can open only one workbook at a time; when you open a second workbook, you’ll be asked to
save the first. You can save a workbook you create or edit in a variety of formats, including Pocket
Excel (.pxl) and Excel (.xls).
Pocket Excel contains a list of the files stored on your device. Tap a file in the list to open it. To
delete, copy, and send files, tap and hold a file in the list, and then select the appropriate action
from the pop-up menu.
47
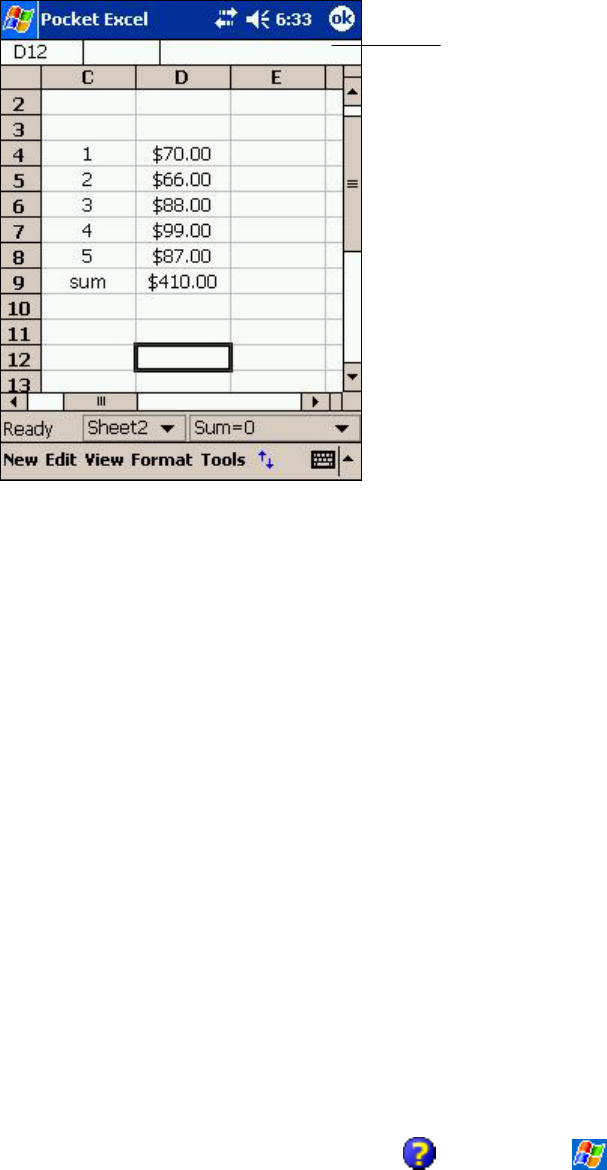
Pocket Excel provides fundamental spreadsheet tools, such as formulas, functions, sorting, and
filtering. To display the toolbar, tap “View,” and then “Toolbar.”
Cell contents appear here as you
enter them
A Pocket Excel Workbook
If your workbook contains sensitive information, you can protect it with a password. To do so, open
the workbook, tap “Edit,” and then “Password.” Every time you open the workbook, you will need to
enter the password, so choose one that is easy for you to remember but hard for others to guess.
3.5.2.1 Tips for Working in Pocket Excel
View in full-screen mode to see as much of your worksheet as possible. Tap “View” and then “Full
Screen.” To exit full-screen mode, tap “Restore” at the top of the screen.
Show and hide window elements. Tap “View” and then tap the elements you want to show or hide.
Freeze panes on a worksheet. First select the cell where you want to freeze panes. Tap “View” and
then “Freeze Panes.” You might want to freeze the top and leftmost panes in a worksheet to keep
row and column labels visible as you scroll through a sheet.
Split panes to view different areas of a large worksheet. Tap “View,” and then “Split.” Drag the split
bar to where you want it. To remove the split, tap “View,” and then “Remove Split.”
Show and hide rows and columns. To hide a hidden row or column, select a cell in the row or
column you want to hide. Next, tap “Format”/”Row” or “Column,” and then “Hide.” To show a hidden
row or column, tap “Tools,” and then “Go To.” Type a reference that is in the hidden row or column,
and then tap “Format”/”Row” or “Column”/”Unhide.”
For more information on using Pocket Excel, tap “Help” on the start menu .
48
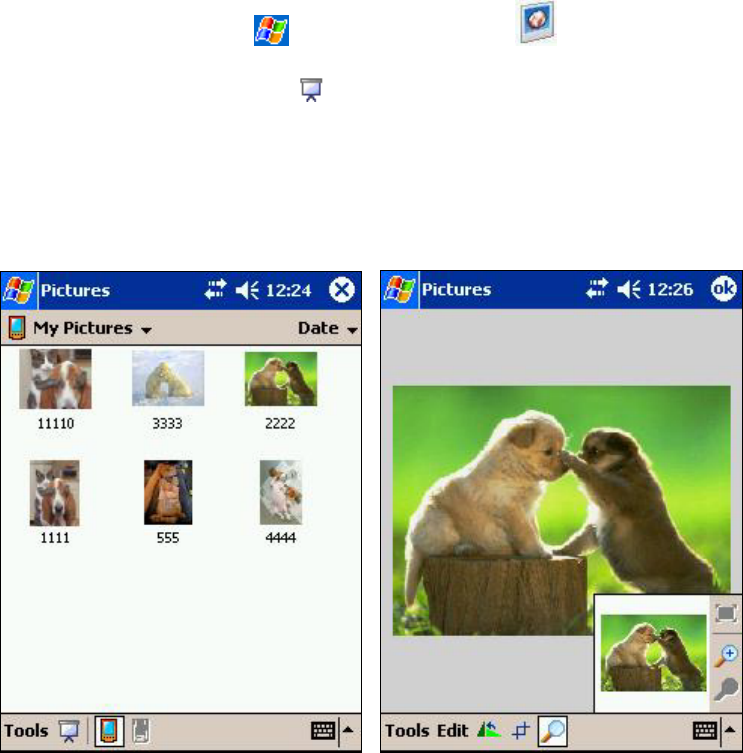
3.6 Pictures
Use the PICTURES application to view .jpg pictures stored on your device or on a storage card.
The application can also be used to send pictures to others, view a slideshow of pictures or set a
picture as the background on the Today screen. To execute the PICTURES application, tap
Programs on the Start Menu and then tap the Pictures icon . You can browse all .jpg
files in the My Device, My Documents, My Pictures or all .jpg pictures within CF or SD storage card.
You can also tap the slideshow icon to start a slideshow. More settings can be found in
“Options” under the “Tools” menu.
Tap any picture in the browsing screen and you can edit, zoom in or rotate the picture. While
viewing a picture, you can Tap Edit then select Brightness and Contrast to increase or decrease
the brightness or contrast of pictures. You can also select any picture you like and set it as the
Today wallpaper.
49
4. Connecting
4.1 CONNECTING TO A PC
To maximize the usefulness of your Pocket PC you need to connect to your desktop or mobile
computer. After making a connection you will be able to do the following:
• Back up your files to safeguard all your important data.
• Transfer files so that you can continue working wherever you are.
• Synchronize your calendar, to-do list and contacts list so that you can manage your
schedule, tasks and appointments.
• Synchronize your favorite website links.
• Synchronize your mailboxes so that you have an accurate record of all your incoming and
outgoing messages.
• Use your PC to send email composed on your Pocket PC.
• Use your PC to download files from the Internet before copying them to your Pocket PC.
• Use your PC to copy files or install programs from CDs or floppy disks.
You must install Microsoft ActiveSync on your PC before you can perform these functions.
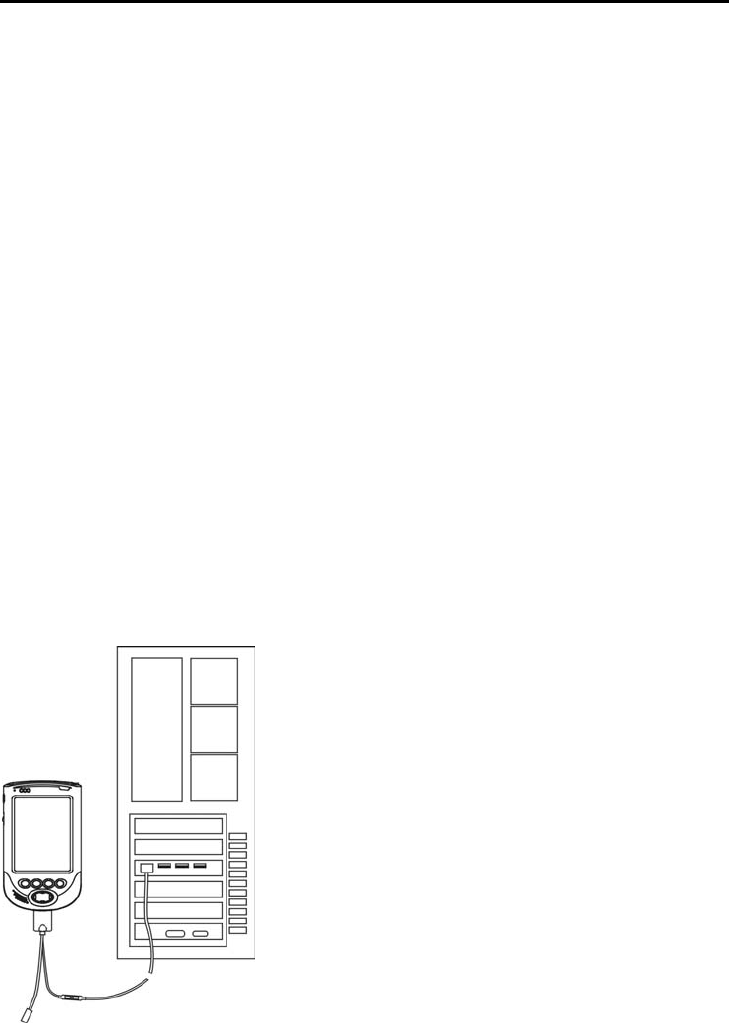
4.1.1 Connecting Via the USB Cable
To make a direct connection to a PC using the USB cable, insert the USB plug in the computer’s
USB port, and connect the Y-cable to the charging/communications port on the base of your Pocket
PC, connect the other end of the cable to the USB connector of the Y-cable.
50
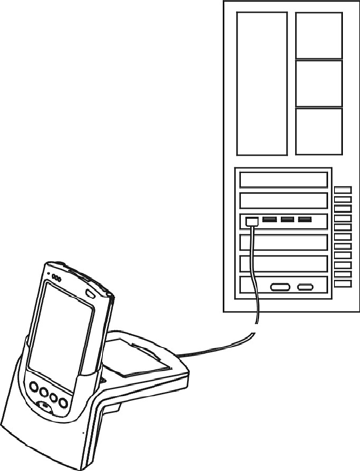
Pocket PC Connected to a PC via the USB Cable
4.1.2 Connecting Via the USB Cradle
The optional USB cradle allows hassle-free connectivity with a desktop or notebook PC, enabling
you to synchronize your files with a minimum of fuss. It also offers a convenient recharging station,
ensuring that the battery is always ready for use.
4.1.2.1 Connecting the USB Cradle to a PC
The USB cradle includes a cable for connecting to a USB port on a PC. By keeping the cradle
connected to your PC, you can back up your data at any time without having to deal with cable
connections. To synchronize files, see 4.2.4 Backing Up and Restoring Data Using Microsoft
ActiveSync 3.7
Insert the USB plug in the computer’s USB port, and then connect the other end of the cable to the
charging/communications port on the back of the USB cradle.
USB Connection to a Computer via the USB Cradle
4.1.2.2 Docking the Pocket PC in the USB Cradle
To dock your Pocket PC in the USB cradle, first make sure that the USB cradle contacts, as well as
the contacts on the base of the Pocket PC, are clean and unobstructed. Place the Pocket PC in the
cradle and gently push the device onto the cradle contacts.
Do not shut down or restart your PC while the Pocket PC is connected. Turn off the Pocket PC or
remove it from the USB cradle before shutting down your PC.
51
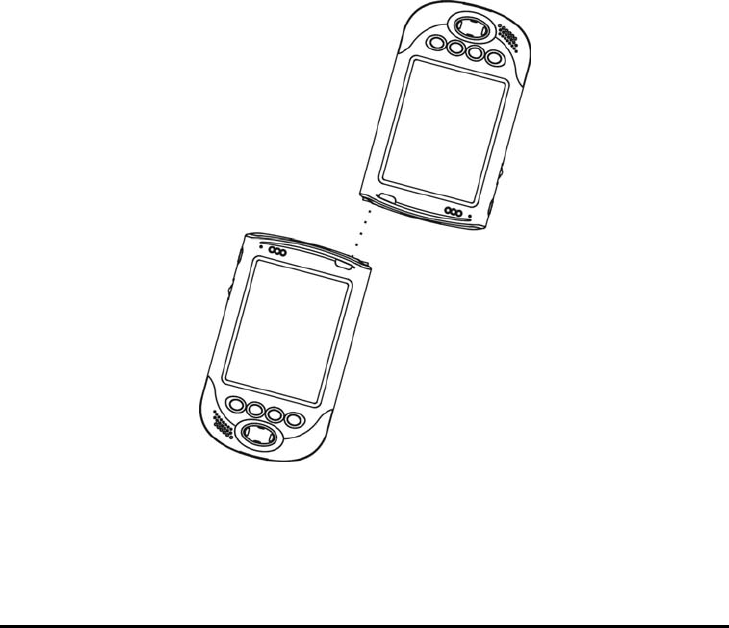
4.1.3 Connecting Via Infrared
Making an infrared connection is a fast and convenient way of synching your Pocket PC without
making a USB connection via the USB cable or USB cradle. Infrared ports are included on many
mobile PCs, although they are less common on desktop systems.
To transfer files or PIM data via infrared port:
1. Ensure that the IR Port on your Pocket PC has a good line of sight to the IR Port on the device
you are attempting to connect to. The second device could be a second PDA or a PC with IR port.
The distance between IR ports should be less than 30 cm.
2. Tap and hold the file or data you need to transfer to the other device. When the pop-up menu is
displayed, tap "Beam Files" to start the process.
3. The transfer will take a little time. When the transmission is complete, the display will show
"done".
Refer to the ActiveSync online help About Beaming for details on beaming files and enabling your
infrared connection.
Making an Infrared Connection with Another Device
4.2 SYNCHRONIZING WITH A PC
Your Pocket PC comes with Microsoft ActiveSync 3.7 preinstalled. Use the included CD to install
ActiveSync on your PC before you attempt to synchronize with your Pocket PC. ActiveSync 3.7 is
supported by the Microsoft Windows 98, Windows Millennium Edition, Windows 2000 Professional ,
Windows XP home edition and Windows XP Professional operating systems.
52
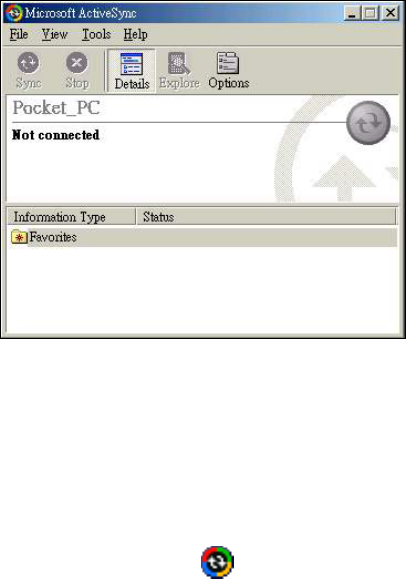
The setup wizard allows you to customize the settings, and guides you through the process of
establishing a connection with your Pocket PC. Your first connection begins as soon as you have
completed the setup wizard.
When using ActiveSync for the first time, users are given the option of 2 different modes of
connection. A standard partnership can be created in which the files stored on Pocket PC and host
PC are compared. The oldest versions are then replaced with the newest versions. A guest
partnership can also be created which will allow the user to browse files on the Pocket PC from the
host PC and edit them if required.
Microsoft ActiveSync works by comparing the files stored on your Pocket PC and host PC.
Depending on the options you select, new files and newer versions of existing files can be copied
from one to the other. Refer to the ActiveSync online help files on your Pocket PC and PC for more
information on using the application.
The ActiveSync Screen
4.2.1 Changing Your Synchronization Settings
You can change your synchronization settings for connecting to your PC.
• Tap “ActiveSync” on the start menu.
• Tap “Tools” on the command bar.
• Select “Options” on the pup-up menu.
• Make sure that the PC tab is selected.
• Tap “When Synchronizing with a PC, use these settings.”
4.2.2 Moving Files To and From Your PC
You can move files between your Pocket PC and your computer using “Explore” in ActiveSync 3.7
combined with Windows Explorer.
• On your PC, open Microsoft ActiveSync 3.7.
• Click “Explore.”
53
• Double click “My Pocket PC” to open it.
• Open Windows Explorer.
• If necessary, resize the windows to allow you to see the files and folders on your PC and
Pocket PC.
• Drag and drop files between the two windows.
4.2.3 Installing Applications on Your Pocket PC
You can add to the functionality of your Pocket PC by adding more software. A wide range of
software, from business applications to games, is available for Windows Powered Pocket PCs.
These programs can be purchased on the Internet, as well as from software vendors. However,
before purchasing additional software, check the hardware requirements to make sure it will run on
your Pocket PC.
4.2.3.1 Installing Software Via Your PC
You can install software via your PC using ActiveSync.
• To install new software, first download the files to your PC or insert the installation CD in
your PC’s CD drive.
• Next, connect your Pocket PC to your PC. See 4.1 Connecting to a PC for information on
how to do this.
• Run the software installation program on your PC. The application will be set up on your
Pocket PC.
• If the software does not feature an installation program, use ActiveSync to copy the
program file to the Program Files folder on your Pocket PC. Refer to the software
documentation for more information on installation.
4.2.3.2 Installing Software Directly
It is possible to download software from the Internet directly to your Pocket PC.
• Use your Pocket PC to connect to the Internet. See 3.4 Internet, Email and Messages
and 4.3 Connecting to the Internet or Your Network for more information on using your
Pocket PC on the Internet.
• Download the installation program, saving it to a folder on your Pocket PC.
• Use File Explorer to locate the program on your Pocket PC, and then tap the program
icon to start the installation.
4.2.4 Backing Up and Restoring Data Using Microsoft ActiveSync 3.7
Use Microsoft ActiveSync to back up your files regularly. This allows you to safeguard your data in
case of power loss and also provides peace of mind when deleting files on your Pocket PC for
memory management.
In the event of data becoming lost or deleted, ActiveSync allows you to copy files back to your
Pocket PC.
54
Users can also use CF storage card or SD storage card to back up data or personal settings in PIM
using the backup application.
4.3 CONNECTING TO THE INTERNET OR YOUR NETWORK
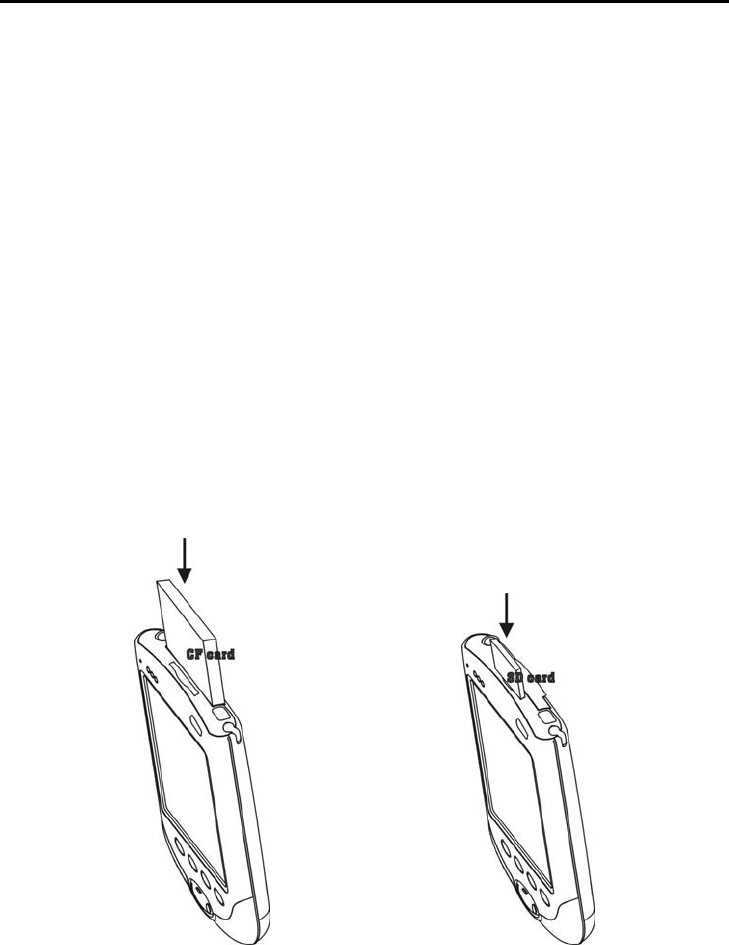
The CompactFlash (CF) and Secure Digital (SD) Expansion card slots support Type I or Type II
CompactFlash cards, greatly increasing the functionality of your Pocket PC. Hardware vendors
offer cards providing additional memory, peripheral and network interfaces, and various types of
modems.
Please note that the SD card slot in this device supports only memory cards. Expansion card
peripherals such as modems or network cards are supported only in CompactFalsh card format.
To load a CompactFlash card in your Pocket PC, simply align the card with the CompactFlash
Expansion slot on the top of the device, ensuring that the edge with the connectors enters the slot
first. Many cards are marked with an arrow to help you insert them correctly. Slide the card into the
slot, and then push down gently to make contact. This product ships with a dummy CompactFlash
card installed. Please ensure that the dummy CompactFlash card is removed before a new
CompactFlash card is installed.
Secure Digital cards can be inserted by simply pushing the card into the Secure Digital card slot,
ensuring the correct orientation first. Push the card down into the slot until it clicks. To release an
Secure Digital card simply press the card further into the slot and it will spring out when pressure is
released. This product ships with a dummy Secure Digital card installed. Please ensure that that
dummy Secure Digital card is removed before attempting to install a new Secure Digital card.
Inserting a CompactFlash Card and Secure Digital Card
To remove a CompactFlash card, pull it gently until the card is free of the contacts, and then
withdraw it from the slot.
55
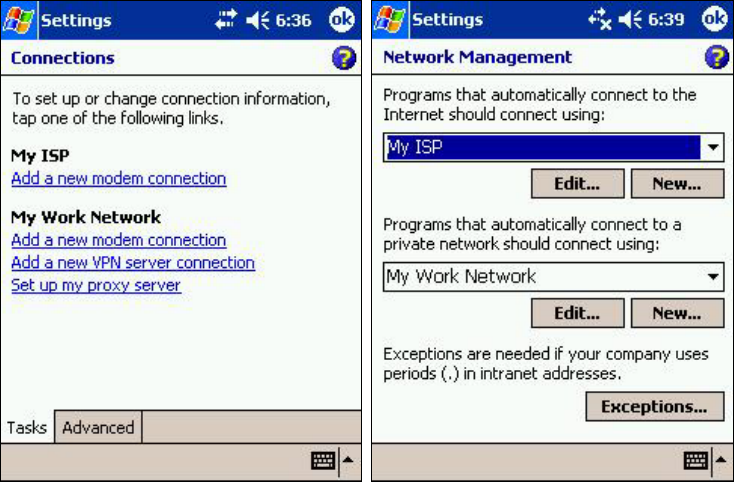
4.3.1 Setting Up a Remote Connection Using a Modem Card
A Compact Flash modem card can be used to connect to an ISP dial-up account or log onto your
network over a phone line. The operating system will detect the card when a wizard is used to set
My ISP or My Work Network.
Tap Add a new modem connection to begin configuration of the new card. Follow the instructions
in the New Connection wizard and refer to the documentation provided with your new card to
complete the installation.
To change modem connection settings either in My ISP or My Work Network, tap Manage
existing connections and select the desired modem connection. Then tap Edit and follow the
instructions on the screen.
Tap the Select Location tab to change dialing rules according to where you are connecting from
e.g. Mobile or Home. Specific dialing rules can be edited manually by users .
To make a connection, tap and hold the connection that you require and then tap Connect in the
pup-up menu.
56
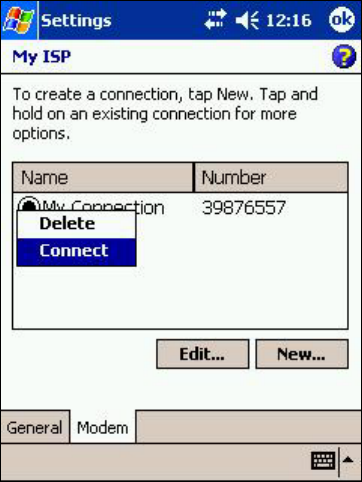
The Connection Manager Screen
4.3.2 Configuring a Remote Connection Using Ethernet / Wireless LAN Card
A network card or wireless LAN card can be used to connect to a network, a cable or ADSL modem
or a Wireless LAN access point on the Internet.
The operating system will automatically detect a new card and open the setup wizard to install the
necessary drivers. Follow the on-screen instructions and refer to the documentation provided with
your new card to complete the installation. When choosing a network card, make sure that it is fully
compatible with your device.
Before attempting to connect using a new network card, a connection must be configured using the
Connection Manager as described in 4.3.1, Setting Up a Remote Connection Using an Ethernet
LAN Card.
57
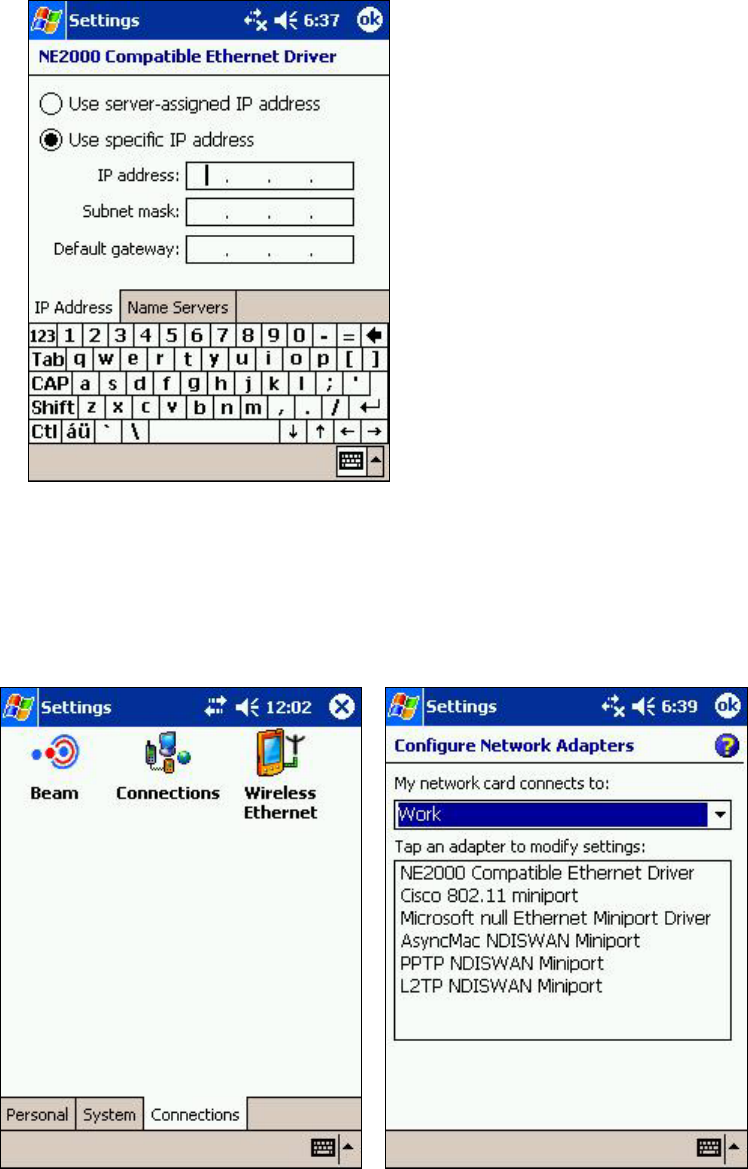
A wireless LAN card can be used to connect to the internet or intranet. Networks that have already
been configured on the device are designated “preferred” networks and are listed in Wireless
networks. The device can be configured to connect only to preferred networks or to search for and
connect to any available network, whether it is preferred or not. For more information about wireless
networking, please refer to “Set up a wireless network” in online help.
58

4.3.3 Synchronizing Information with Your Server
Microsoft ActiveSync 3.7 allows you to share information between your Pocket PC and your
exchange server.
• Tap “ActiveSync” on the start menu.
• Tap “Tools” on the command bar.
• Select “Options” on the pup-up menu.
• Select the Server tab.
• Tap the information to synchronize.
• Tap “Settings” to change the synchronization settings, and then tap OK to save.
• Enter the server name, and then tap “Edit” to change your connection options.
4.3.4 Synchronizing Links to Web Sites
If you are using Microsoft Internet Explorer 5.0 or later on your desktop computer, you can
download mobile favorites to your device. Synchronizing mobile favorites downloads Web content
to your device so that you can view pages while you are disconnected from your ISP and desktop
computer.
Only items stored in the Mobile Favorites subfolder within the Favorites folder in Internet Explorer
will be synchronized with your Pocket PC. This folder is created automatically when you install
Microsoft ActiveSync 3.7 on your computer. It can also be created manually by tapping the “Create
Mobile Favorites” icon in the IE toolbar.
During synchronization, the list of favorite links in the Mobile Favorites folder on your desktop
computer is synchronized with Pocket Internet Explorer on your Pocket PC. Both your computer
and your Pocket PC are updated with changes made to either list each time you synchronize.
Unless you mark the favorite link as a mobile favorite, only the link will be downloaded to your
device, and you will need to connect to your ISP or network to view the content. For more
information on synchronization, see ActiveSync Help on your computer.
59
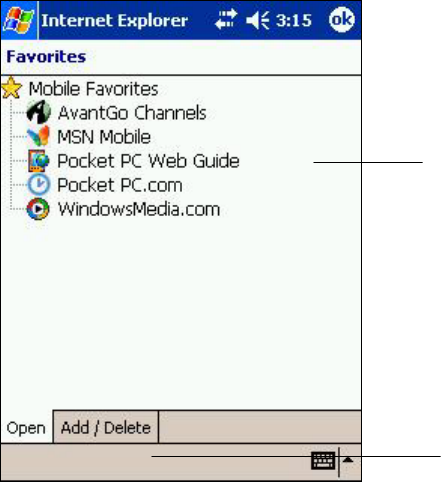
Tap the favorite you want to view
Tap to add or delete a folder or favorite link
The Mobile Favorites Folder on Your Pocket PC
60

5. Configuring and Optimizing Your Pocket PC
5.1 MANAGING POWER
As programs, files, data and custom settings that you save are stored in RAM, it is essential that
your Pocket PC receives a continuous power supply. Although the operating system and pre-
installed programs will be unaffected, you will have to re-enter all other information if your Pocket
PC loses power. See 2.3.4 Maintaining the Battery for more information about using battery and
mains power.
• Safeguard your data by regularly backing up your files. See 4.2.4 Backing Up and
Restoring Data Using Microsoft ActiveSync 3.7. Data and personal settings stored in PIM
can also be backed up to CF storage card or SD storage card using the backup
application.
• Change from battery to mains power as soon as you receive a low battery warning.
• Save important information on CompactFlash or Secure Digital cards rather than in RAM.
The card contents will not be lost if your battery is exhausted.
• Some functions, such as playing music and using CompactFlash or Secure Digital cards,
are power intensive. Avoid using these if your battery is low and you are unable to switch
to mains power.
• Turn off the display when playing audio files. See 3.3 Playing Audio and Video.
• Use the Suspend function in the power control panel whenever you are not using your
Pocket PC.
• Use mains power when synchronizing with your PC.
• Adjust the settings for automatically turning off your Pocket PC after a period of inactivity
by tapping “Settings”/”Power” on the start menu.
• Before removing the main battery from your Pocket PC, ensure that the internal backup
battery is well charged. See 2.3.4 Maintaining the Batteries.
61
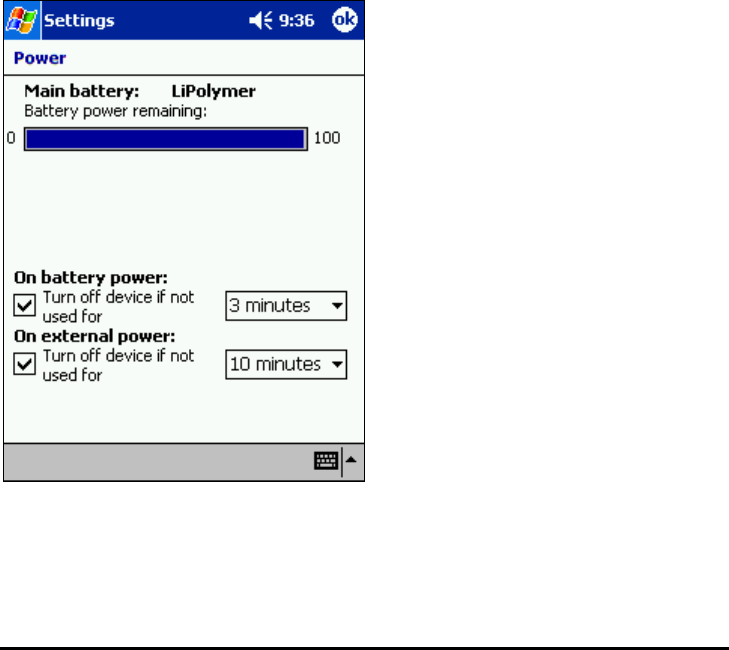
The Power Settings Screen
5.2 MANAGING MEMORY
The operating system and preloaded programs are stored in Flash ROM. Although this memory is
not available for saving programs and files, it does not use up valuable RAM.
Your Pocket PC comes with 64MB of RAM storage space. More storage space can be added by
inserting an optional CompactFlash card or Secure Digital card in one of the expansion slots.
Storage space is allocated for two purposes: to store applications and files, and to run programs.
If you receive a low memory warning you should try the following:
• Move files and programs to a CompactFlash or Secure Digital card.
• Move seldom-used files to your PC.
• Remove unnecessary programs and delete files.
• Close some applications that are running.
• Use the Memory control panel to clear memory.
Memory is managed automatically by the operating system. However, you can temporarily adjust
the allocation of storage and program memory. Tap on “Settings” on the start menu, select the
System tab, and then tap on the Memory icon to open the Memory Manager. Use the slider control
to adjust the setting.
Close programs that are running by selecting the Running Programs tab in Memory Manager. Tap
“Remove programs” at the bottom of the screen to remove programs stored in RAM. Tap “Find” to
search for large files that can be removed from memory.
62
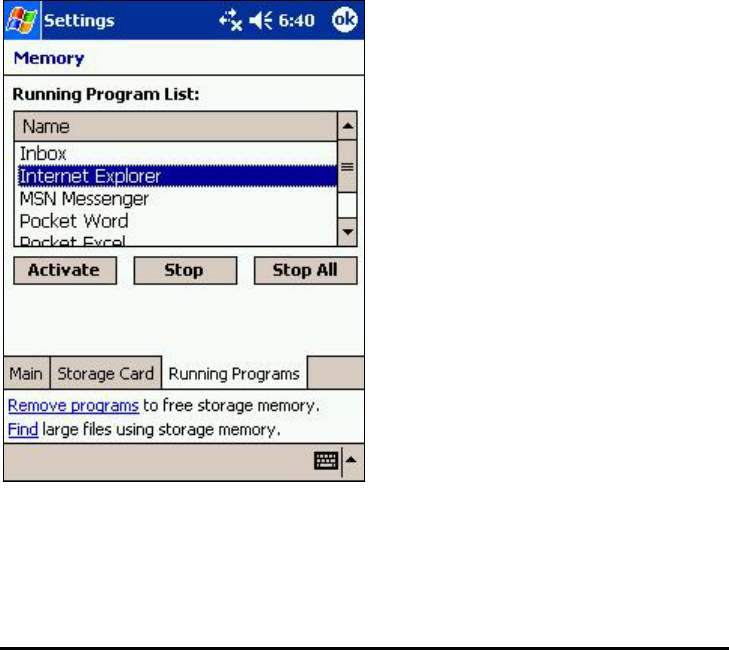
The Memory Settings Screen
5.3 REMOVING PROGRAMS
You can free up memory by removing unwanted programs from your Pocket PC. Preinstalled
software is stored in Flash ROM and cannot be removed. However, these applications do not use
valuable RAM storage space.
• To remove a program, first tap “Settings” on the start menu.
• Tap the “System” tab.
• Tap “Remove Programs.”
• Find the program you want to remove in the list of installed programs.
• Finally, select the program, and then tap “Remove.”
If the program does not appear on the list, use Explorer to locate the file or files. Tap and hold the
file(s), and then select “Delete” on the pup-up menu.
63
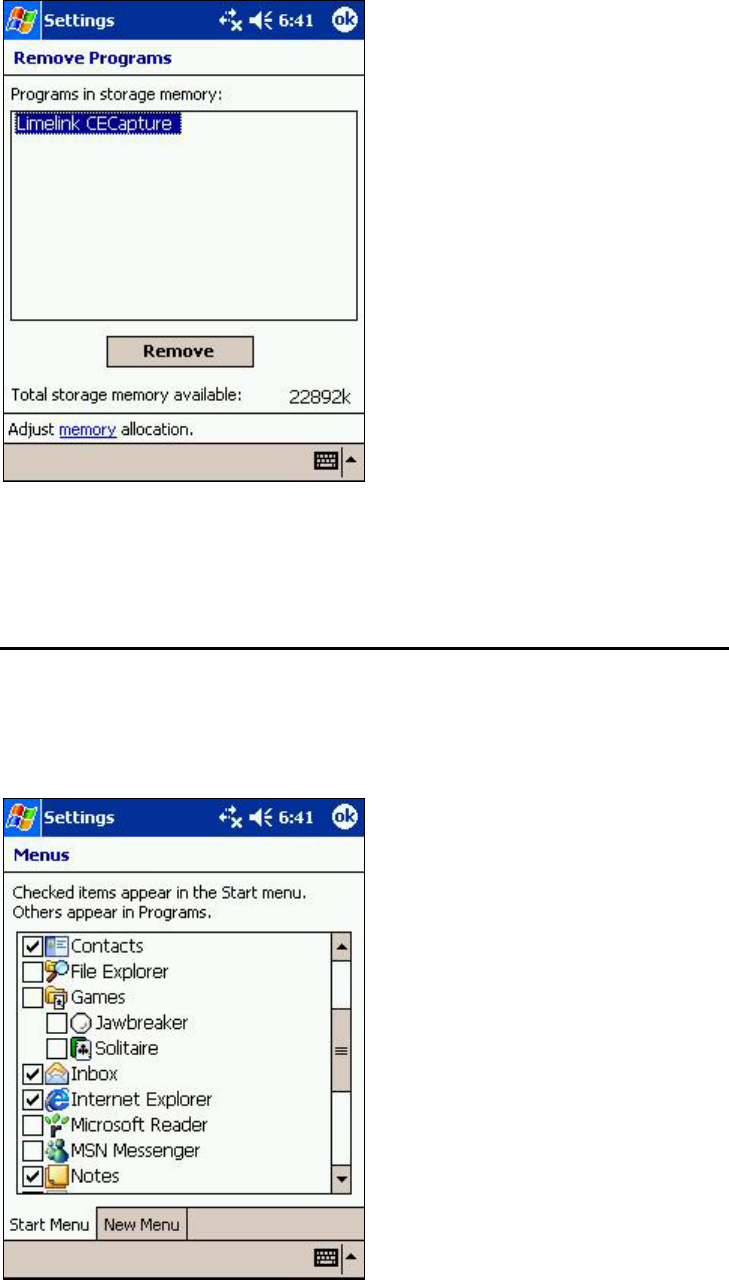
The Remove Programs Screen
5.4 CONFIGURING THE MENUS
Add or remove programs on the start menu by tapping “Settings”/”Menus” (Personal tab) on the
start menu, and then selecting or deselecting programs on the list. Only programs stored in the
Start Menu folder are displayed in the list. If a program you want to add is not on the list, first open
Explorer and move the program to the Start Menu folder.
64
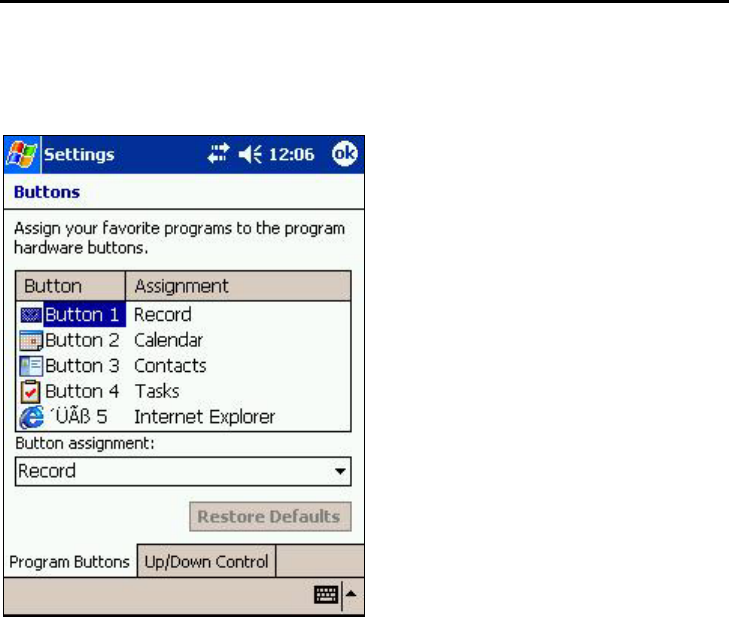
The Menus Screen
5.5 CONFIGURING THE BUTTONS
You can reprogram the four Programmable Application Buttons, enabling you to open your favorite
applications quickly and easily.
Tap “Settings”/”Buttons” on the start menu to change the applications assigned to the buttons.
The Buttons Screen
65
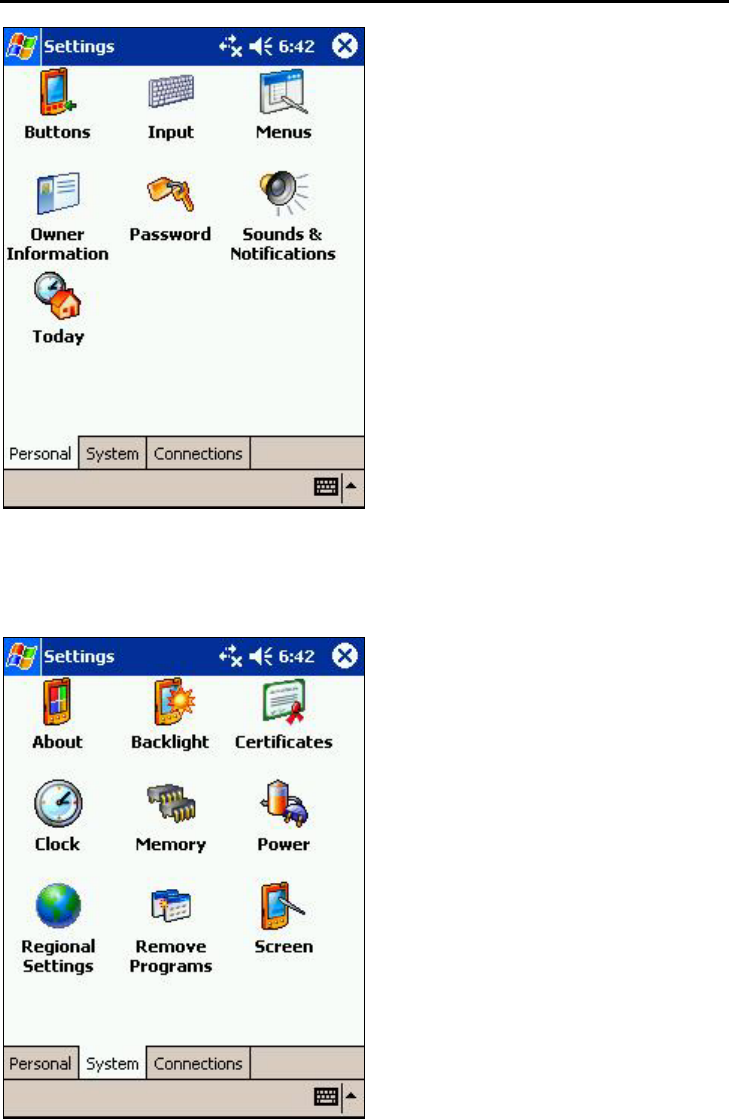
5.6 ADJUSTING SETTINGS
The Personal Settings Screen
The System Settings Screen
Tap “Settings” on the start menu to adjust your Pocket PC’s settings. The settings you are able to
change include the following:
66
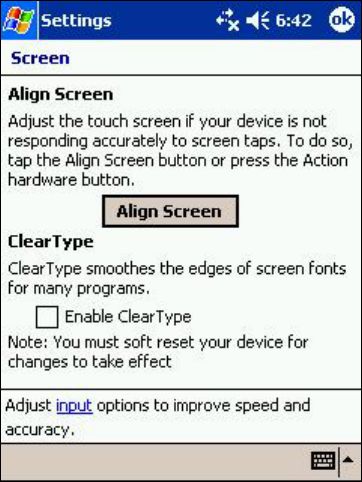
5.6.1 Screen
You should adjust the touch screen if your Pocket PC is not responding accurately to screen taps.
Select the System tab, and then tap the Screen icon. Follow the on-screen instructions.
The Screen Settings Screen
5.6.2 Sounds
Select the Personal tab, and then tap on the Sounds & Notifications icon. Use the slider to adjust
the system volume, and then select the conditions for which you want to enable sounds. Select the
Notifications tab to assign sounds and messages to various events.
67

The Sounds & Notifications Screen
5.6.3 Clock
Select the System tab, and then tap on the Clock icon to change the time zone or adjust the time
and date. You can set up two locations, home and visiting, enabling you work on local time when
you make a trip without losing your home settings. Tap the “Home” or “Visiting” button to change
the setting you want to use.
The Clock Screen
68
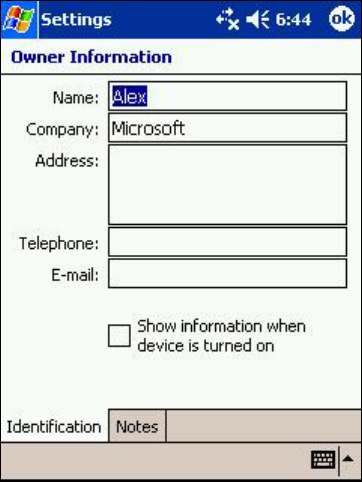
5.6.4 Owner Information
Select the Personal tab and tap on the Owner Information icon to enter your personal details. You
can display a summary of the information when you turn your Pocket PC by selecting the box at the
bottom of the screen. Tap on the Notes tab to enter additional information.
The Owner Information Screen
5.6.5 Password
Select the Personal tab and tap on the Password icon to set up a password. This allows you to
prevent unauthorized use of your Pocket PC if you leave it lying around. Select an idle time period
after which you will be prompted for the password before you can resume using your Pocket PC.
69

The Password Screen
5.6.6 Today Screen
You can customize the appearance of the Today screen by selecting the Personal tab, and then
tapping on the Today icon. Select a theme from the list and check the “Use this picture as
background” box if required.
Tap the Items tab to select or deselect items you want to appear on the Today screen. Change the
order in which items are displayed by selecting an item and then tapping on the “Move Up” and
“Move Down” buttons.
70
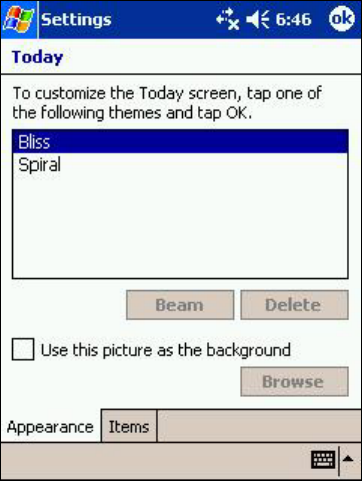
The Today Screen Appearance Settings Screen
Tap on the “Options” button to modify the selected item. Check the box at the bottom of the screen
if you want to display the Today screen after a period of inactivity; tap on the arrow to change the
period of inactivity.
The Today Screen Items Settings Screen
5.6.7 Backlight
Select the System tab and tap on the Backlight icon to change the options for using the backlight.
You can also use this facility to adjust the brightness. The backlight greatly improves the readability
of the display, especially in low light conditions. However, it also significantly increases battery
consumption.
71
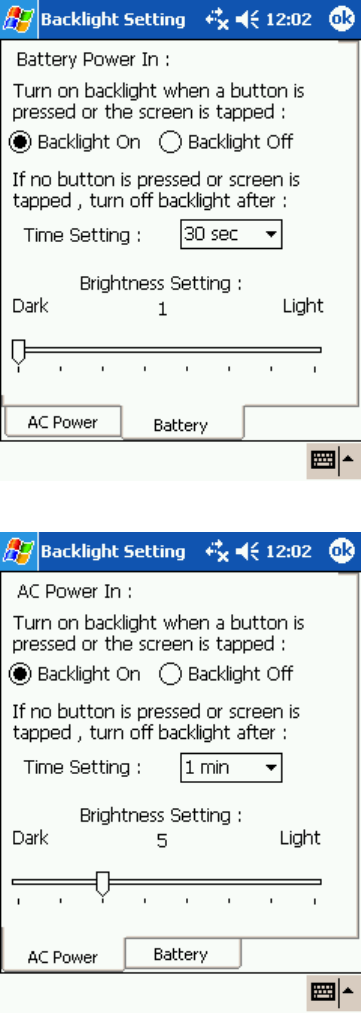
The Backlight Screen
5.6.8 CPU Mode
Select the "System" tab and tap on the "Power" icon, then select the "CPU Speed" tab to change
the CPU Speed. The CPU can be run in 3 different modes:
- Normal Mode – This is the default CPU mode. This mode is adequate for most applications.
72
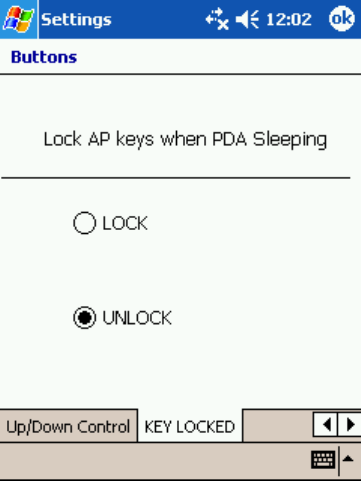
- Performance Enhance Mode – The CPU runs fastest in this mode but also consumes the
most power. This mode may be needed when using applications that require high CPU
performance.
5.6.9 CPU Lock
CPU Lock function is designed to prevent application buttons initiate Pocket PC. In order to lock
the CPU, please follow the following instruction:
73
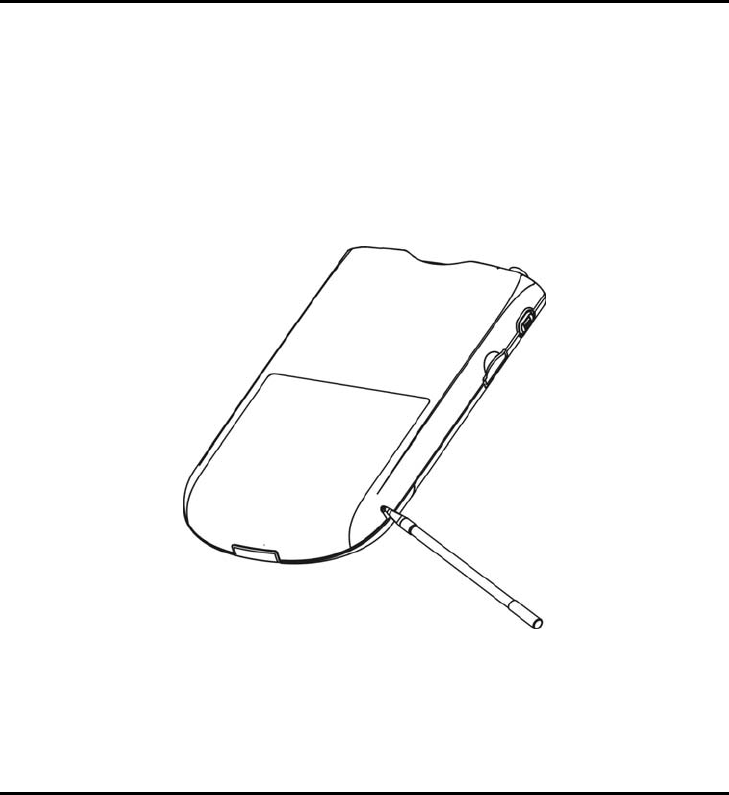
6. Troubleshooting
6.1 RESETTING YOUR POCKET PC
You will need to reset your Pocket PC after restoring data from files backed up on your PC, or in
the event of the operating system “freezing up.” Resetting provides a similar function to rebooting
your PC, restarting the operating system. All saved files and settings are preserved, although any
unsaved files will be lost.
To reset your Pocket PC, remove it from the USB cradle and make sure that the CF Expansion slot
and SD card slot are empty. Locate the software reset button on the back of the device. Unscrew
the end of the stylus and use it to push the button.
Push the Software Reset Button with the Stylus
6.2 RESTORING THE FACTORY DEFAULTS
If your Pocket PC fails to respond after being reset, you might have to restore the factory defaults.
This is the software state that the device was in when you first started using it; the operating system
and preloaded software stored in Flash ROM are preserved, but the programs, files and settings
stored in RAM are erased.
To return your Pocket PC to its factory state, unscrew the top of the stylus and use it to slide the
hardware reset switch from left to right to turn the device off, and then back to the left “on” position
again, see sec 2.4.1, The First Time You Use Your Pocket PC. Alternatively, you can simply allow
74
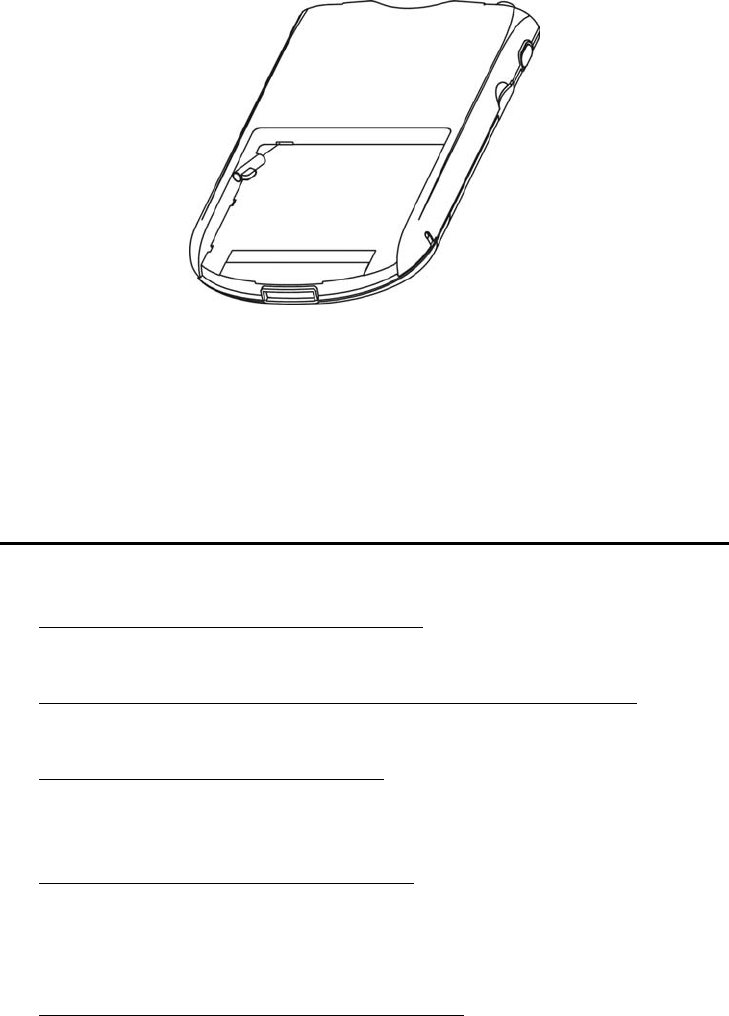
the batteries to run down completely. Once you have restored the factory defaults, you will need to
re-install your programs, reload backed up files and adjust the settings to suit your personal
preferences.
Hardware Reset Switch
Slide the Hardware Reset Switch from Left to Right, and Then Back to Left Again
6.3 TIPS
6.3.1 Frequently Asked Questions
What Operating System does my Pocket PC use?
Your Pocket PC is loaded with Microsoft® Pocket PC 2003 Premium Edition operating system.
Will it be possible to upgrade my PocketPC when updates become available?
Upgrade is easy using XIP update files when they become available on the Internet or CDROM.
Will I ever need to perform a software reset?
If a software application starts failing to respond, a software reset may solve the problem. See 6.1
Resetting Your Pocket PC for instructions.
What can I do if a software reset does not work?
If a software reset does not solve your problem you can perform a hardware reset. See 6.2
Restoring the Factory Defaults for instructions. Any unsaved data will be lost when a hardware
reset is performed.
How can I back up and restore data on my Pocket PC?
Microsoft® ActiveSync provides convenient backup and restore functions for your Pocket PC. All
data and applications may be stored in the *.stg file in a folder on your desktop PC. See 4.2.4
Backing Up and Restoring Data Using Microsoft ActiveSync 3.7. Users can also use CF storage
card or SD storage card to back up data or personal settings in PIM using the backup application.
75

How do I know when my battery is fully charged?
While the battery in your Pocket PC is fast charging, the power LED will show flashing red. When
the battery is 80% charged the unit switches to trickle charge mode and the LED will show a
continuous green light.
Why does my clock keep resetting to 12.00, 1st March 2002?
The real Time Clock on your Pocket PC defaults to this time and date automatically when power is
lost or after reset.
Why can’t I tap the right place on the screen with my stylus?
You probably need to recalibrate your device. See 5.6.1 Screen for more information.
Can I adjust the brightness of the screen?
You can adjust the intensity of the screen backlight. See 5.6.7 Backlight for more information.
Can I configure my device to turn off the backlight automatically to save power?
The device can be configured to turn off the backlight when idle for a preset period of time. See
5.6.7 Backlight for more information.
How can I turn off the backlight in my device?
The backlight in your pocket PC can be disabled using backlight tools found in the control panel.
See 5.6.7 Backlight for more information.
Why do I sometimes get poor quality sound when playing music through the internal
speaker?
Playback from the internal speaker may become distorted if the volume level is set too high.
When I use media player the pause function sometimes fails to work, why is this?
Check that the repeat function is not turned on. The pause function is disabled when the repeat
function is used.
Sometimes I use Windows® Media player to play music stored on a Compact Flash card
and there is a pause when the device wakes up from sleep mode, why is this?
The Compact Flash card needs these few seconds to reinitialize after the device comes out of
sleep mode. Interaction with the device at this time can cause problems and should be avoided.
Can I improve the recording quality?
The default sampling frequency has been set at 22KHz. This bandwidth can be altered to improve
quality, but doing this will use more memory. Tap “Start Menu”/”Settings”/”Input,” and then select
the Options tab. Select a higher frequency from the voice recording drop-down menu.
Why do I get an error message in calendar or tasks application after I have chosen to
use a better recording quality?
To conserve memory, the calendar and tasks applications can only support a sampling frequency of
up to 8KHz.
What type of Compact Flash card does my Pocket PC support?
Your Pocket PC supports Compact Flash type I or II, 3.3V. Before inserting your CompactFlash
card in your Pocket PC, check that it does not use more than 500mA.
76

Why does my device turn on automatically when I insert or remove a Compact Flash
card?
This is a requirement for Pocket PC devices and is quite normal.
Why can’t I connect to my PC using ActiveSync via a USB interface?
Windows® NT and Windows® 95 do not support the USB standard, and so an ActiveSync
connection using USB will not work.
Why is ActiveSync invoked when I plug my serial cable into my device?
A: Make sure that you disable the “synchronization when cradled” option in the ActiveSync Tools
menu.
Why can’t I connect to my PC via ActiveSync using IR?
Make sure there is less than 30cm between devices and that the angle is no more than 30°.
Can I transfer data via IR to Palm OS-based devices?
Peacemaker is a cross platform, infrared transfer utility for handheld devices. More information can
be found at http://www.conduits.com/ce/peacemaker
Some games I have downloaded from the internet do not work very well on my Pocket
PC. Why is this?
Compatibility with software that does not fully conform to Pocket PC standards cannot be
guaranteed. To ensure compatibility, use only fully conforming software.
6.3.2 Problems and Solutions
My Pocket PC does not turn on when disconnected from mains power.
Possible reason: the battery is too low.
Solution: connect to the mains power supply and recharge the battery.
The battery runs down too quickly.
Possible reason: you are using power-intensive functions, such as playing music or running a
CompactFlash card.
Solution: stop using these functions, or operate your Pocket PC from mains power. To keep the
battery fully charged, dock your Pocket PC in the cradle whenever it is not in use.
My Pocket PC automatically shuts down or suspends.
1) Possible reason: the battery is too low and your Pocket PC performs a safety shutdown.
Your Pocket PC will automatically go into sleep mode when 95% of its charge is used up.
Solution: recharge the battery or use mains power.
2) Possible reason: auto-suspend is activated after a period of inactivity (the default setting is 3
minutes).
Solution: restart your Pocket PC. You can change the auto-suspend setting by tapping
“Settings”/”Power” on the start menu.
77

3) Possible reason: the operating system is “locked up.”
Solution: reset the device (see 6.1 Resetting Your Pocket PC), but be aware that any
unsaved data will be lost.
My Pocket PC locks up or runs slowly when I try to run applications.
1) Possible reason: your Pocket PC doesn’t have enough power.
Solution: recharge the battery or use mains power.
2) Possible reason: your Pocket PC doesn’t have enough memory.
Solution: try closing some applications or deleting files. 5.2 Managing Memory for more
information.
The display is off even though my Pocket PC is turned on.
1) Possible reason: your battery has run out of power.
Solution: recharge the battery or use mains power.
2) Possible reason: the backlight turned off automatically to save power.
Solution: change the backlight settings. See 5.6.7 Backlight for more information.
3) Possible reason: the display is toggled off.
Solution: toggle the display back on. See 3.3 Playing Audio and Video for more information.
4) Possible reason: there is not enough light to see the display.
Solution: turn on lights or move to a place with more light.
I installed a driver, but it isn’t recognized.
Possible reason: the operating system hasn’t registered the new driver.
Solution: Unscrew the end of the stylus and use it to press the software reset switch to “reboot” the
operating system. Note that any unsaved information will be lost. See 6.1 Resetting Your Pocket
PC for more information.
My Pocket PC does not respond accurately to my screen taps.
Possible reason: the screen needs to be realigned.
Solution: (1) hold the rock switch and press the IE Button, or (2) tap the Align Screen button in
“Settings”/”Display” and follow the on-screen instructions.
Data is lost.
Possible reason: the battery ran out of power, causing the memory contents to be lost.
Solution: recharge the battery and restore backed up files.
78

I can’t connect with my PC.
1) Possible reason: you are using the wrong cable.
Solution: make sure that you are using the USB cable that came with your Pocket PC.
2) Possible reason: the cable is not connected correctly.
Solution: check that the USB plug is correctly inserted in one of your computer’s USB
ports, and that the charging/communications plug is correctly inserted in the
charging/communications port on your Pocket PC or USB cradle. If you are connecting
via the USB cradle, check that your Pocket PC is docked correctly.
3) Possible reason: your computer is running an operating system that doesn’t support
Microsoft ActiveSync 3.7, or you are using an earlier version of Microsoft ActiveSync.
Solution: Make sure that you your computer is running Windows 98, Windows Millennium
Edition, Windows 2000 Professional or Windows XP and you have installed Microsoft
ActiveSync 3.7 or a later version. You can download the latest version of Microsoft
ActiveSync at www.microsoft.com/pocketpc.
4) Possible reason: Microsoft ActiveSync 3.7 is not installed on your computer.
Solution: Install Microsoft ActiveSync 3.7.
I can’t connect with my network.
1) Possible reason: your Ethernet/LAN card is incompatible with your Pocket PC.
Solution: Check the documentation that came with your Ethernet/LAN card to make sure
that it is compatible with your Pocket PC.
2) Possible reason: the correct drivers for your Ethernet/LAN card are not installed.
Solution: Check the documentation that came with your Ethernet/LAN card for information
on installing the correct drivers.
3) Possible reason: you are trying to connect to an incompatible server.
Solution: make sure you have a DHCP server.
4) Possible reason: you have entered incorrect information for connecting with your server
Solution: tap “Start Menu”/”Settings”/”Network Adapters,” and then tap the name of your
Ethernet driver. Next, tap “Properties”/”Servers.” Enter the correct server information
provided by your network administrator, and then tap “OK” to save.
79
5) Possible reason: you have entered incorrect information for logging into your account on
your server.
Solution: Enter the correct username and password for the connection. See 4.3
Connecting to the Internet or Your Net for information on setting up and modifying a
connection.
6) Possible reason: the network is busy or unavailable at this time.
Solution: wait and then try to connect later.
80

7. Specifications
Item Feature
Operating system Microsoft Pocket PC 2003 Premium Edtion
CPU Intel Dalhart 260 400MHz
LCD Display 3.5’ Transfelctive TFT Module with Touch Panel
Resolution: 320X240 (64K Color)
System Memory SDRAM: 64M Byte On Board
Flash Memory: 64M Byte On Board
AUDIO:
Build in Speaker & MIC
Wireless: IrDA115Kbps
Wifi Module Option
Extension Interfaces:
1. Compact Flash X1 (Type Π)
2. Secure Digital X1
3. Client USB X1
4. RS232 X1
5. DC IN +5V / 2A
Function Keys: 1. Power Button
2. H/W reset Switch
3. Rock Switch
4. Software Reset Switch
5. Recording switch
6. Application Buttons x4
7. Direction Key
8. Battery remove & lock Switch
Battery Back up Battery: 20mA/1.2V Ni-mH
Main Battery: 1250 mAH Replaceable Smart Battery Pack
81

Power Adapter Input:100~240VAC, 50~60Hz
Output: (Voltage: 5 VDC; Current: 3A)
LED Green/ Red LED for charged indicator
RED LED for O/S Alarm
Dimensions
135(L)㎜ × 79(W)× 16 (H)
82

Appendix A
REGULATORY NOTICE
This equipment has been tested and found to comply with MIC Rules. These limits are designed to
provide reasonable protection against harmful interference in a residential installation. This
equipment generates, uses, and can radiate radio frequency energy, and if not installed and used in
accordance with the instructions, may cause harmful interference to radio communications.
However, there is no guarantee that interference will not occur in a particular installation. If this
equipment does cause harmful interference to radio or television reception (which can be
determined by turning the equipment off and on), the user is advised to take one or more of the
following measures:
• Reorient or relocate the receiving antenna.
• Increase the distance between the equipment and the receiver.
• Connect the equipment into an outlet on a circuit different from that to which to receiver is
connected.
• Consult your dealer or an experienced radio/TV technician for help.
Modifications
The MIC requires the user to be notified that any changes or modifications made to this device that
are not expressly approved by FIC may void the Reference authority to operate the equipment.
Cables
Connections to this device must be made with shielded cables with RFI/EMI connector hoods in
order to maintain compliance with MIC Rules and Regulations.
83

84
Appendix B
OPERATING CONDITIONS
Operation Temperature & Relative
Humidity
0-40ºC, 10-90%RH
Non-operation Temperature & Relative
Humidity
-10-50ºC, 10-90%RH
Storage Temperature & Relative
Humidity
-25-65ºC, 10-90%
