FirstCom Technology 07HP8P9C Wireless Skype phone (Handset) User Manual P812N manual Draft V4
FirstCom Technology Co., Ltd Wireless Skype phone (Handset) P812N manual Draft V4
Contents
- 1. Users Manual P812N
- 2. Users Manual P912N
Users Manual P812N

1
1. Getting Started………………………………………………………………………………4
1.1 USB handset outlook………………………………………………………………………4
1.2 Charging the Battery…………………………………………………………………….…5
1.3 Switch the wireless handset On / Off…………………………………………………...6
1.4 LCD outlook ………………………………………………………………………………..6
1.5 Icon indications (PC side) ………………………………………………………………..7
1.6 LED light indication for the USB Dongle………………………………………………7
2 Driver Installation and Handset Set ups. ………………………………………………8
2.1 Driver Installation…………………………………………………………………………..8
2.1.1 Step-by-Step Driver installations …………………………………………………..…8
2.1.2. Synchronization between PC and handset………………..………………………10
2.1.3 Manual Synchronize name lists between PC and handset ………………….…11
3. Using the wireless USB handset………………………………………………………...12
3.1 Basic operating functions ……………………………………………………………….12
3.1.1 Volume setup……………………………………………………………………………..12
3.1.2 Skype
TM
User Status setup…………………………………………………...………..13
3.1.3 Language Setup……………………………………………………………………….…14
3.1.4 Ring Tone Setup………………………………………………………………………….15
3.1.5 Ring Volume Setup………………………………………………………………………16
3.1.6 LCD Contrast Setup……………………………………………………………………..17
3.1.7 LCD backlight time Setup………………………………………………………………18
3.1.8 Factory Default Setup……………………………………………………………………19
3.1.9 Update list - Synchronize name list with PC…………………………………………20
3.1.10 Paring up - USB phone and Dongle………………………………………….………21
3.2 Using Skype
TM
to make calls…………………………………………………………..…22
3.2.1 Making calls from Name lists in handset…………………………………………..…22
3.2.1.1 Contact person status……………………………………………………………....…24
3.2.2 Making Conference calls from name lists in handset………………………..….…24
3.2.3 Making Skype
TM
Out from handset…………………………………………………….26
3.2.4 Making Speed dial from handset ………………………………………………...…….27
3.3 Using Handset to remote control Skype
TM
software………………………….....……28
3.4 Calling History……………………………………………………………………………….29
4 Using Utility Control……………………………………………………….………………….30
4.1 Utility control panel………………………………………………………………………....30
4.1.1 Device Setup………………………………………………………………………….....…30
4.1.2 Favorite Website………………………………………………………………………...…31

2
5. Assigning PC Audio to PC Speakers………………………………………………………32
6. Package and accessories ……………………………………………..……………………33
7. Technical Specification…………………………………………………………………….…34
8. Technical problem / Q & A……………………………………………………………………35

3
Safety Instruction:
Please read this section carefully before start using wireless USB handset for Skype
TM
.
Battery Safety Instructions
•
Do not burn, disassemble, strike or mutilate the battery. The battery contains toxic materials
that could release, resulting in injury.
•
There is a risk of explosion if you replace the battery with an incorrect battery type. Use only
the battery that came with your phone.
•
Remove batteries if storing over 30 days.
•
Do not short circuit battery.
•
Do not dispose the battery in fire that could result in explosion.
•
Use specified chargers only.
•
Keep out of the reach of children.
The rechargeable battery must be disposed of properly and may need to be recycled. Refer to your
battery's label for battery type. Contact your local recycling center for proper disposal methods.
Disposal of the device
Some of the product material can be reuse if you bring them to a recycling point. Please contact
your local authorities in case you need more information on the collection points in your area.
Cleaning
Clean the headsets with a slightly damp cloth or with an anti-static cloth. Please do not use
abrasive solvent for cleaning purpose.
WARNING:
Skype
TM
software does not support calls to any emergency number nor emergency
service (e.g. 211, 911, 999 etc). To perform calls of this type please make sure to use a
landline telephone or a cellular/mobile phone.
4
1. Getting Started
This section provides the information about the wireless USB handset and step-by-step
instructions for using the wireless USB headset.
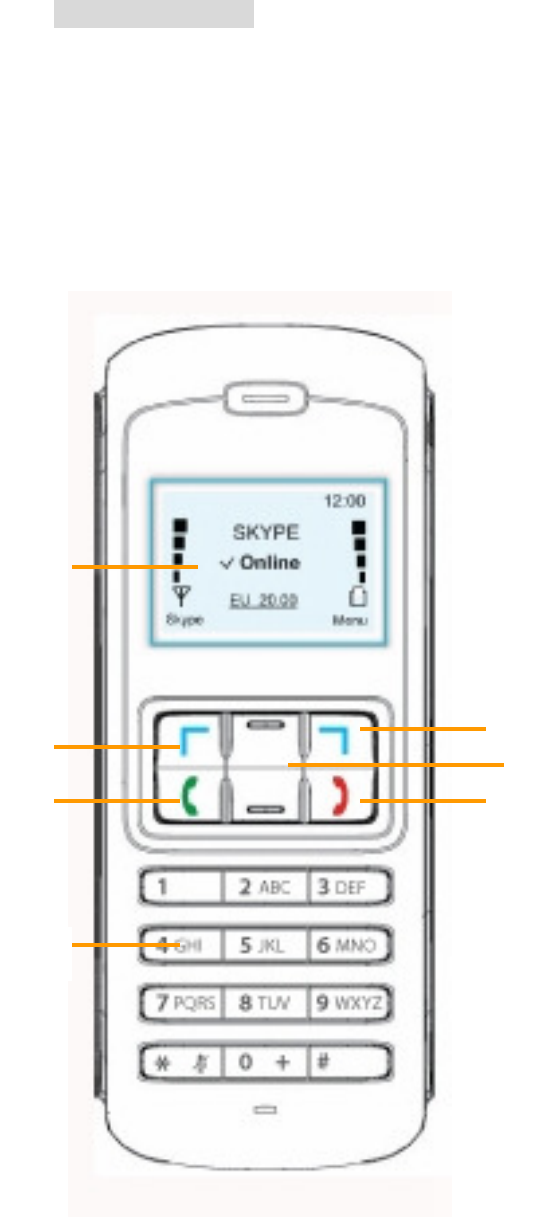
1.1 USB handset outlook:
1. LCD Display.
2. Skype
TM
/ Tab / Select Button.
3. Answer / Call / Hold / History Button.
4. Numeric / Mute Keys.
5. Menu / Exit Button
6. Up/Down / Name List /
Speaker Volume Control:
::
:
7. Power On / Off / Call Ending /
Delete Button.
3
2
1
4
5
6
7
5
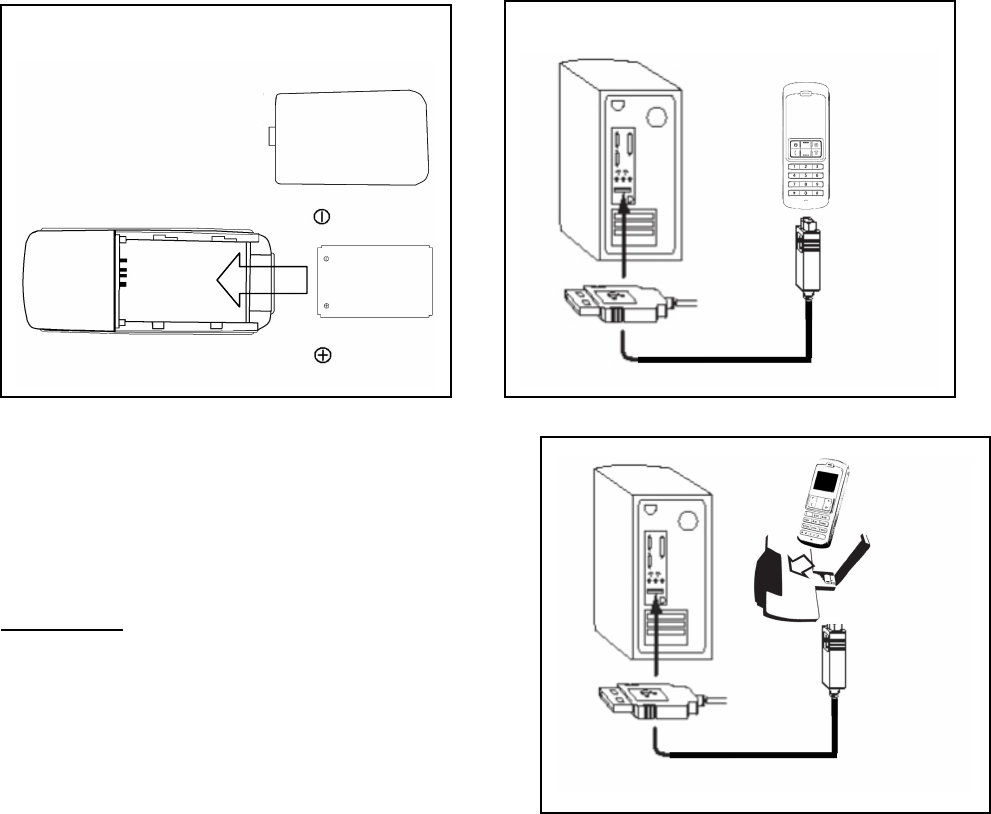
1.2 Charging the Battery:
Before you use the wireless Skype
TM
handset for the first time, you must make sure that the battery
is fully charged. For battery charging, do the following:
a) Open the battery compartment.
b) Insert the battery as indicated. (See below)
c) Your PC or notebook must be in "Power on" status.
d) Plug the USB cord charger into the Wireless Skype
TM
phone and connect to the USB jack of
your PC or notebook.
OPTIONAL:
Place the USB Wireless Phone on the charging
cradle. Connect the USB cord in the back of
the cradle to start charging.
While charging, the battery indicator bar will show the progress of charging in the LCD display.
Battery Insert picture.
Battery charging picture.
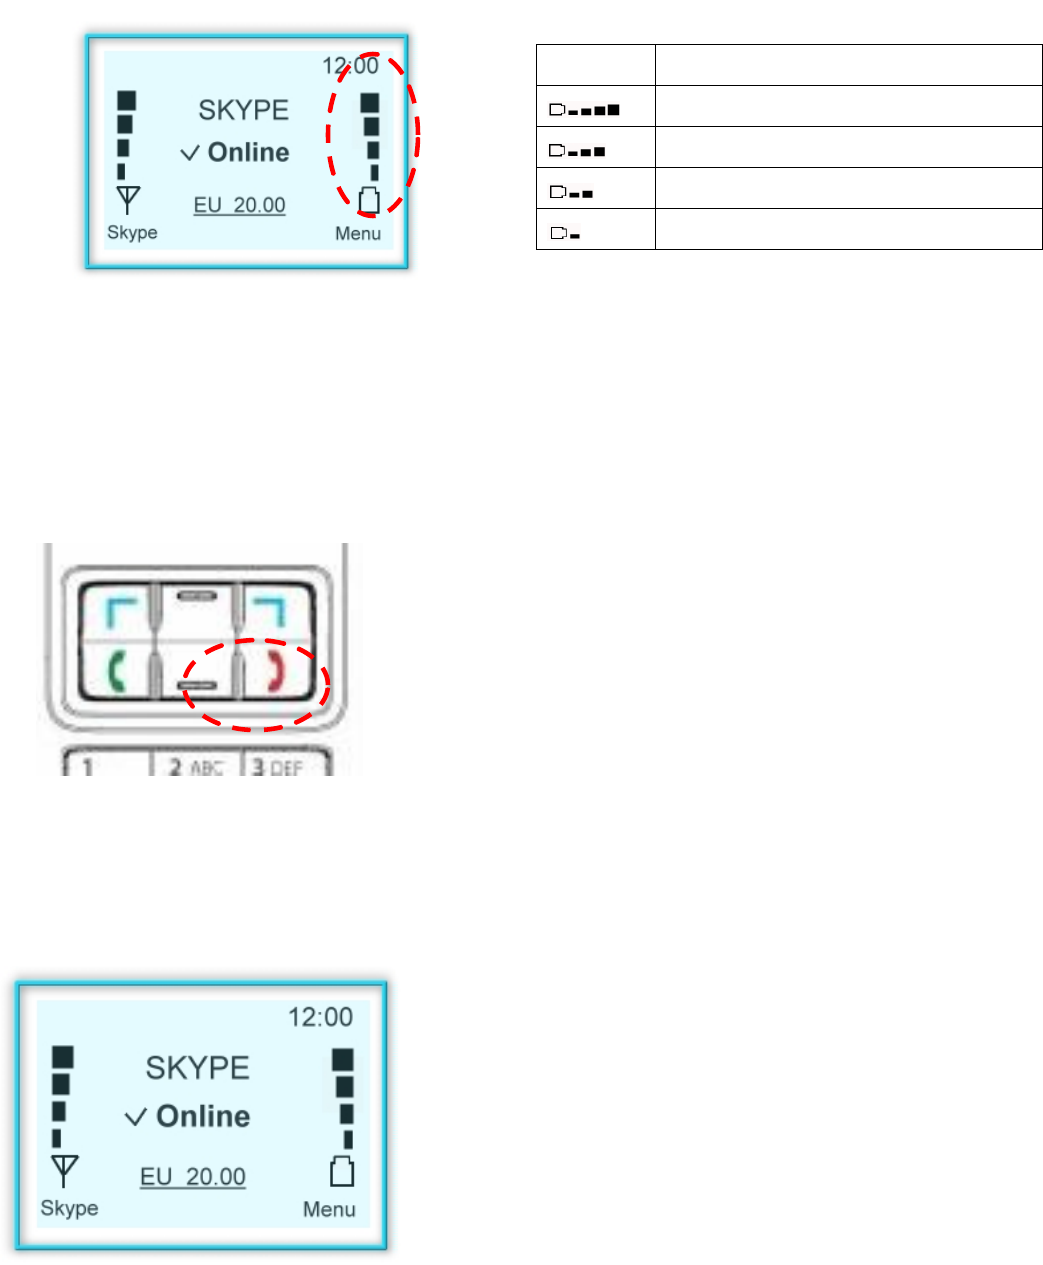
6
Icon Description
Battery power : 65% ~ 100%
Battery power : 35% ~ 65%
Battery power: less than 35%
LOW Battery. Need to charge.
1.3 Switch the wireless handset On / Off:
In order to achieve longer talking/standby hours, it is recommended switching off the handset when
the PC is shut down for power saving purpose. To switch the handset On/Off:
a) Press the call ending button on the handset
for 3~5 consecutive seconds.
b) A “Beep” tone and the LCD display on/off
indicate the on/off status.
1.4 LCD outlook:
Handset Standby Status:
7
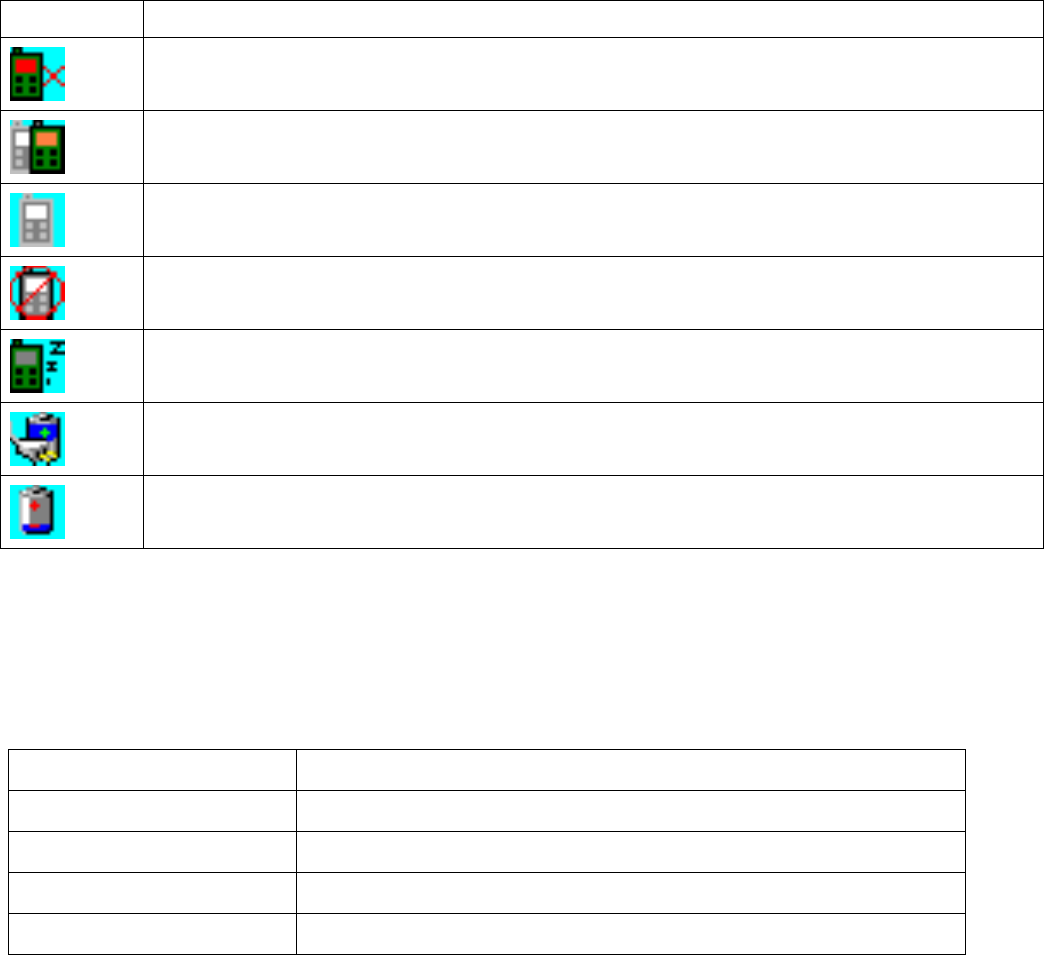
1.5 Icon indications (PC side)
You will find an icon appear in the tool bar of your PC or notebook. Each icon indicates different
status of the wireless handset:
ICON Phone status indication
Failure to establish connection between handset and the Dongle. Please check if
the handset is power “ON” and the Dongle is properly installed in the USB jack.
2 or more Dongle are found. Please remove the excess Dongle.
Unable to find Dongle.
No driver is installed or, system can’t find driver.
Phone is in STAND BY Mode.
Recharging battery.
Low in battery. Please recharge the battery. (See section 1.2 for detail)
1.6 LED light indication for the USB Dongle
There is a LED light on the USB Dongle. The flashing of the LED light indicates:
Flashing style Status Indication
Rapidly Connection has just been established.
Flash in every 1.5 sec. Connection established and the handset is read to use.
Short flash in every 3 sec.
Searching for handset. (Unit paring up in progress)
No flash PC or Notebook is power off. No connection established.
8
2. Driver Installation and Handset Set ups.
This section provides the step-by-step instructions for driver installation and setups for the wireless
USB handset setups.
2.1 Driver Installation:
Before using the wireless USB handset, the driver must be installed first. Please follow the
installation procedures appear in the PC screen.
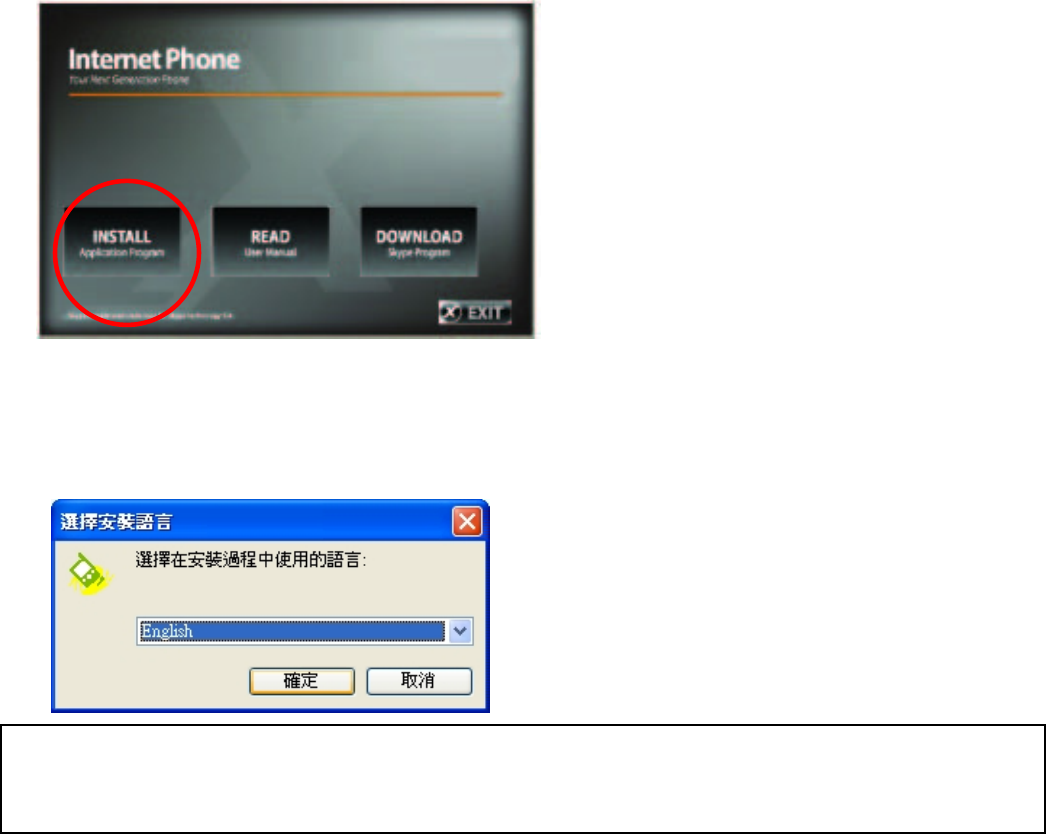
2.1.1 Step-by-Step Driver installations:
Step1: Please follow below indicated procedures to install the Driver for wireless USB handset.
Step 2: Select language:
Language is preset following the language set in the windows’ OS. If the windows’ preset
language is not recognizable, the language in this selection will be set in English.
9
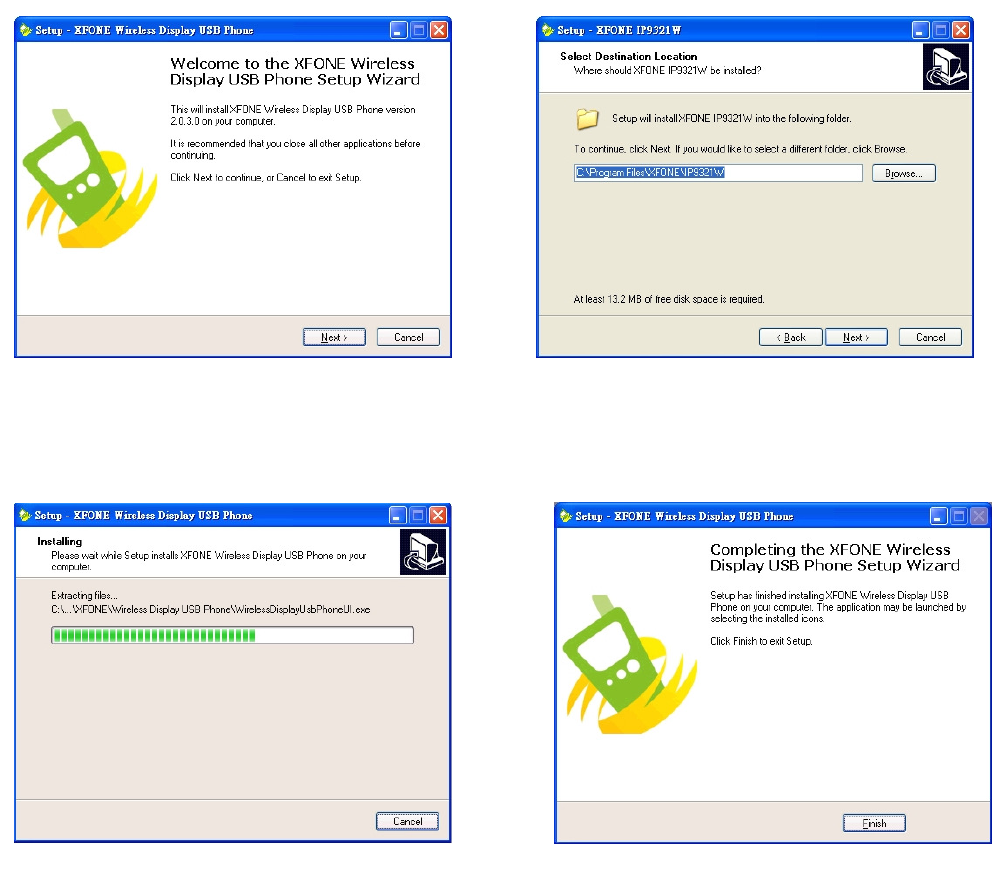
Step 3: Select “NEXT” to proceed.
a) Welcome page. b) Select disk
c) Installation d) Completed
10
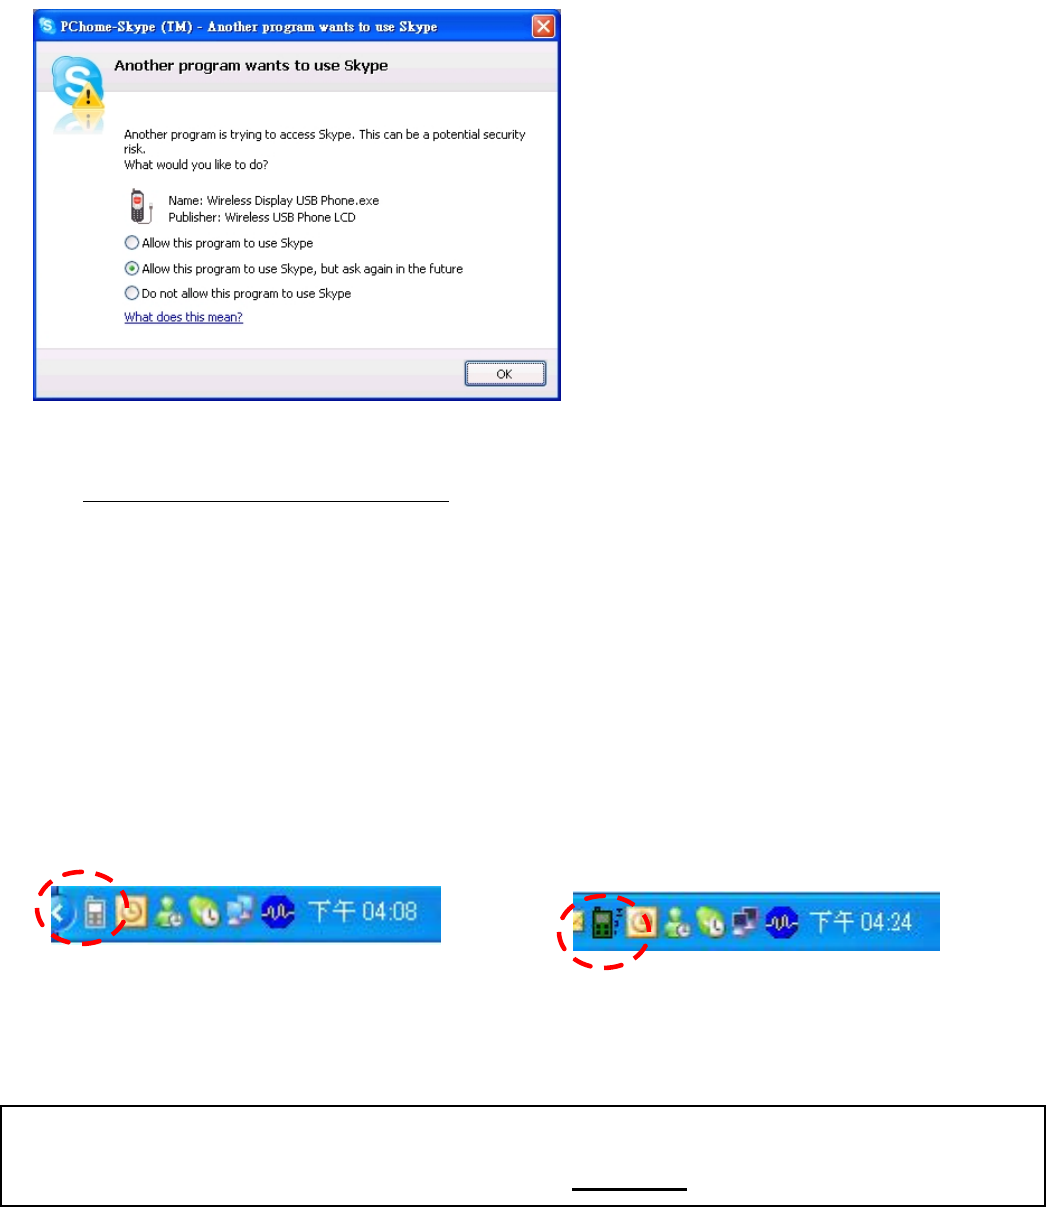
Step 4: Another Program wants to use Skype
TM
When Driver installed completed, this message will show if Skype
TM
program is activated.
Select “Allow this program to use Skype
TM
”.
2.1.2. Synchronization between PC and handset:
Once the driver is installed and the Skype
TM
program has been properly set (Section 2.1.1.), please
connect the dongle to your PC / Laptop for phone set up.
PC side will show this icon if dongle is not
plug-in.
PC side will show this icon if dongle is plug-in.
Remark:
a) Please make sure the wireless handset is in “Power ON” status. (see 1.3 for detail)
11
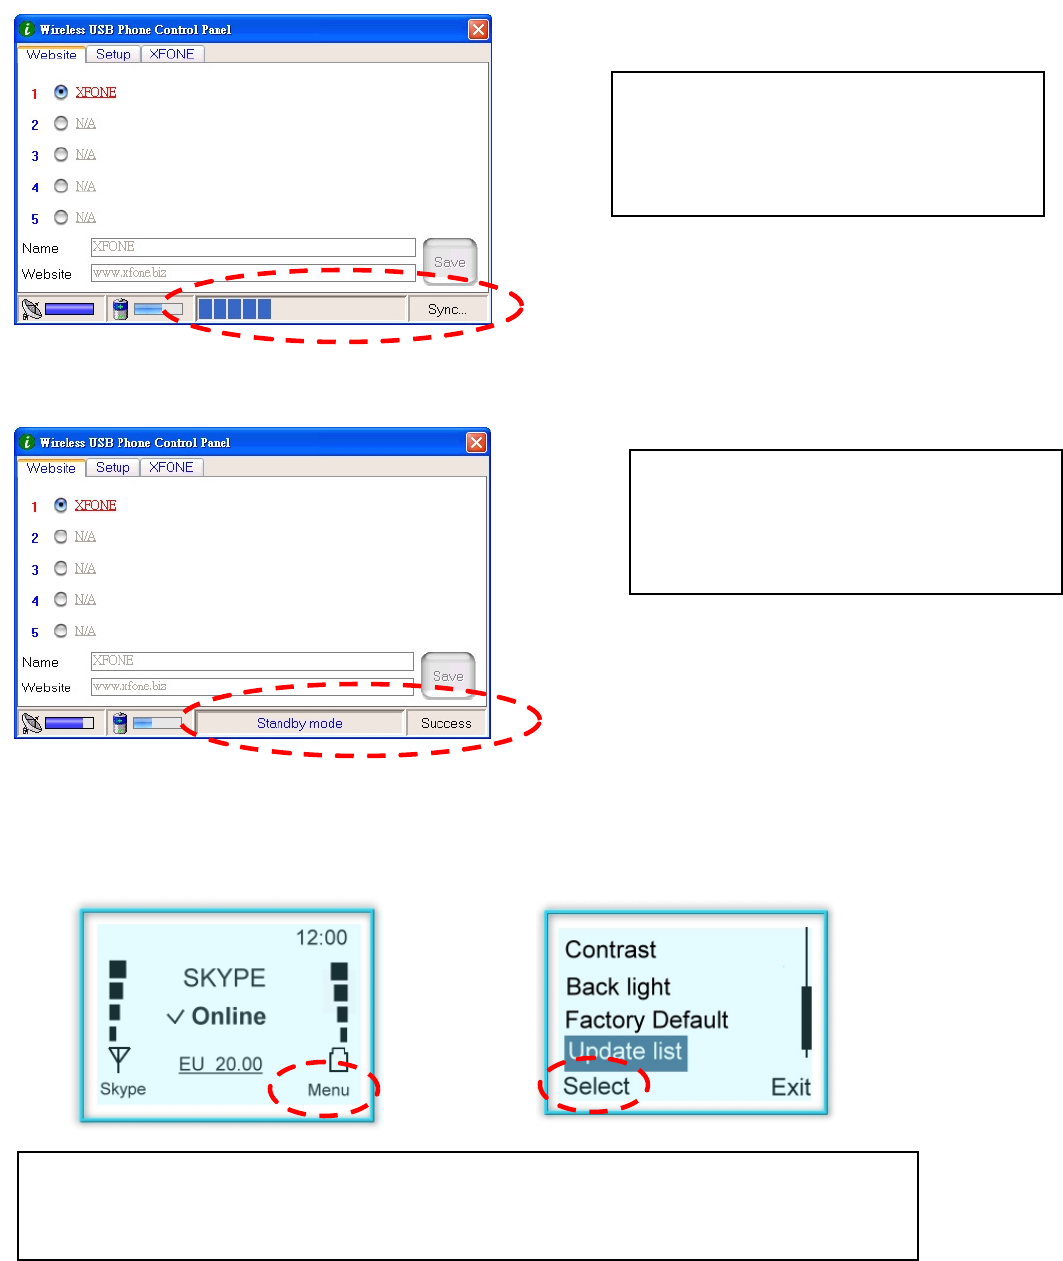
The Utility window will pop-up and show the “Synchronizations” process with PC when dongle plug
in the USB slot (for the 1
st
time after driver installed) and the handset is in Power On status
a) Synchronization in progress.
b) Synchronization successful.
2.1.3. Manually Synchronize name lists between PC and handset:
Manual synchronization can also be done by following steps: (Also refer to Section3.1.9)
Remark: Please DO NOT remove
dongle nor power off handset while
“Sync” is in process.
Remark: It will take few seconds
for handset to completed name list
updating.
Remark: Please ensure Skype
TM
program, Driver, dongle
and handset are in
operative status.
12
3. Using the wireless USB handset
This section provides you the basic functions of the wireless USB handset.
3.1 Basic handset operating functions
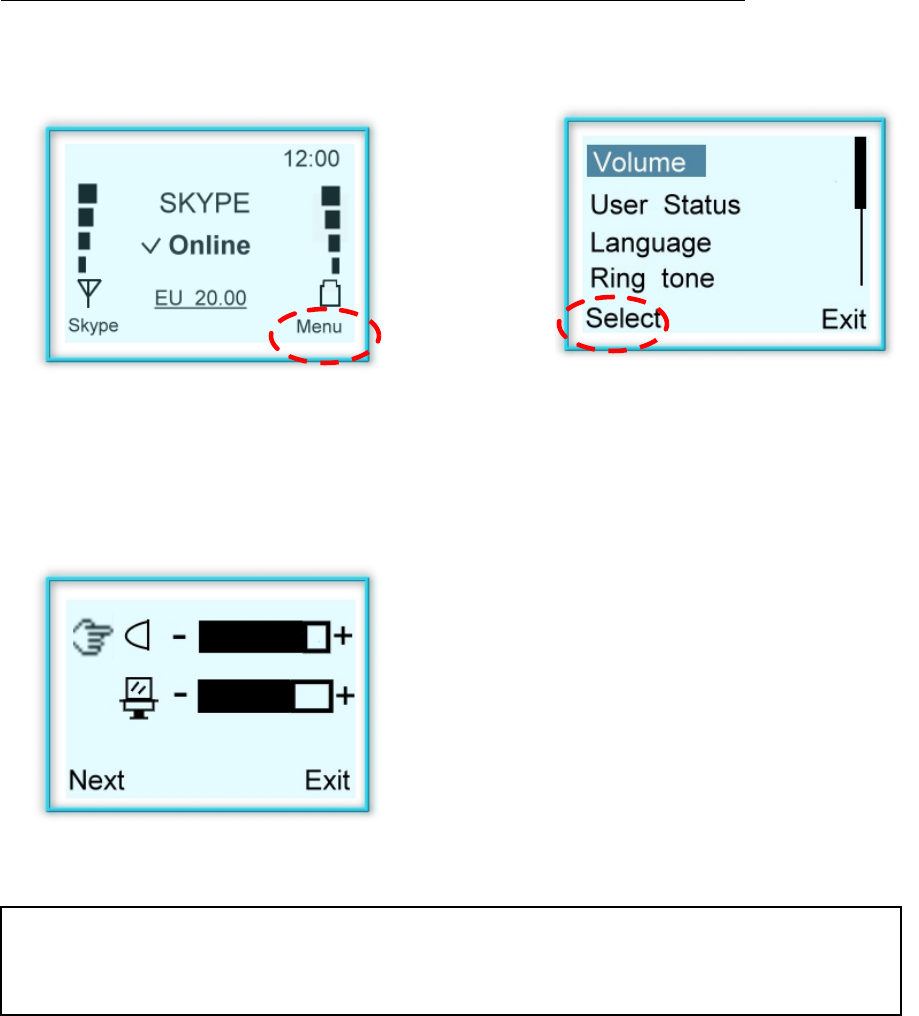
3.1.1 Volume setup
Speak and Microphone volume can be adjusted by the following steps:
a) Press “Menu” to enter Menu mode.
b) Scroll up and down to “Volume” and press
“Select”.
c) Using “Up and Down” key for adjusting
Speaker and Microphone volume. Press
“Next” to select device or “Exit” to exit.
Remark: The Volume may also be adjusted when there is a call in progress.
While on the call, press UP / DOWN button to adjust.
13
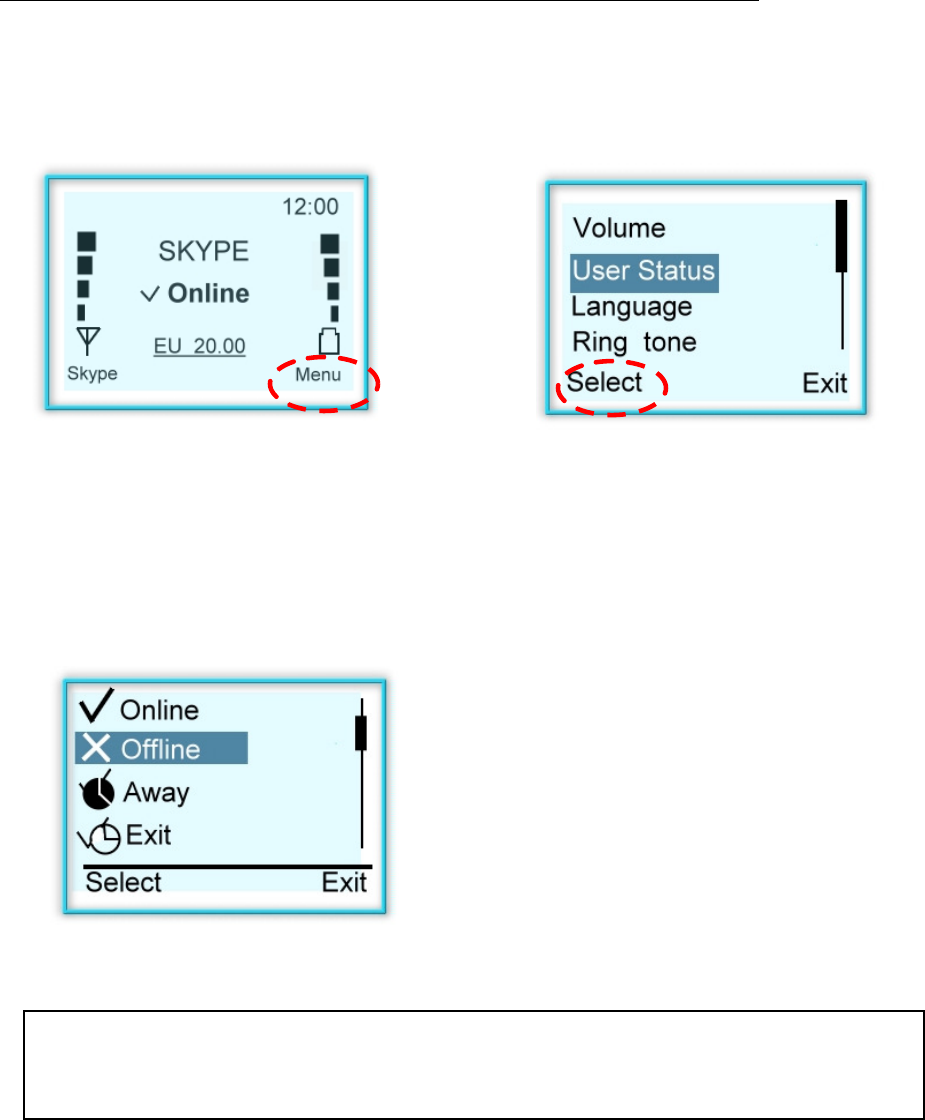
3.1.2 Skype
TM
User Status setup
Skype
TM
user status can be modified by handset by the following steps:
a) Press “Menu” to enter Menu mode
b) Scroll up and down to “User Status” and
press “Select”
c) Using “Up/Down” key for modifying the
user’s status. Press “Select” to confirm or
“Exit” to exit.
Remark: In order to select the user status, please ensure that Skype
TM
program, driver, handset and dongle are in operative status.
14
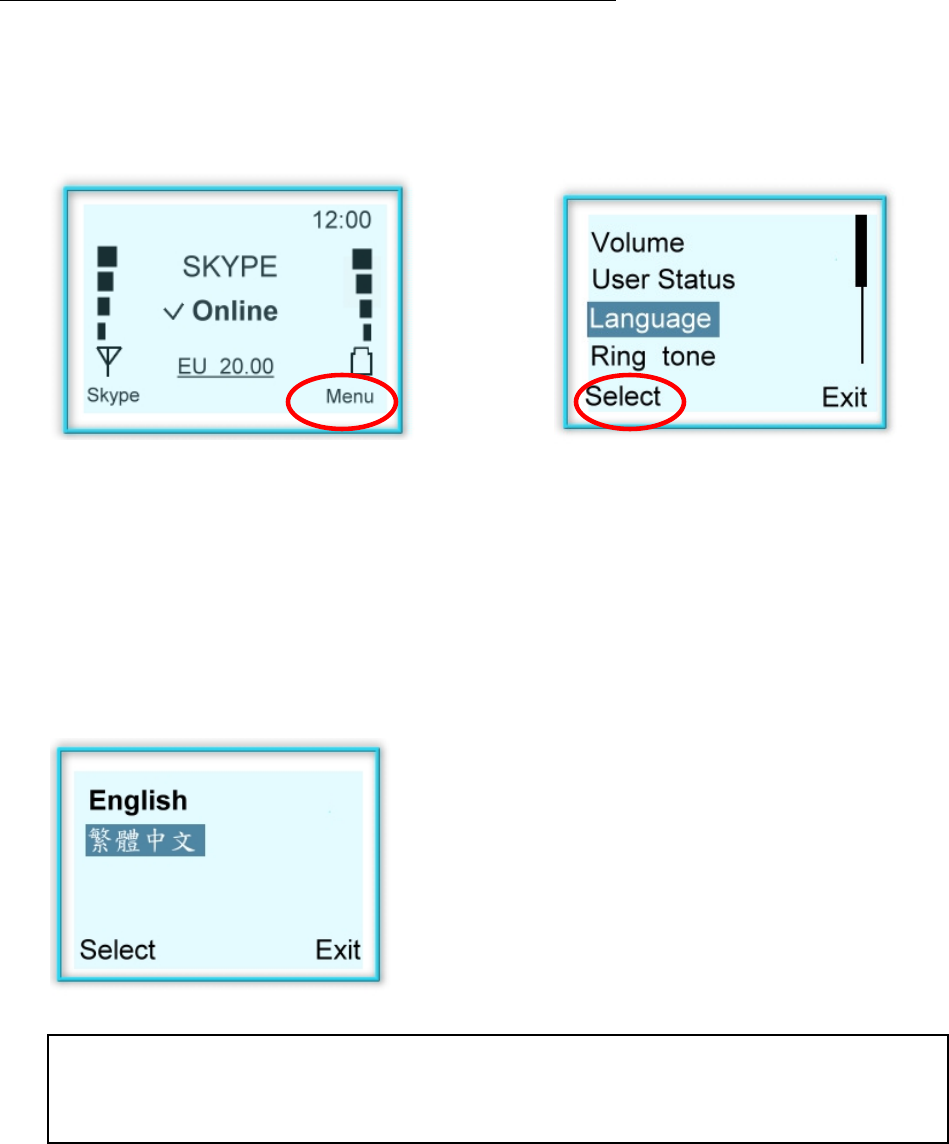
3.1.3 Language setup – Handset only
Handset language can be modified by the following steps:
a) Press “Menu” to enter Menu mode.
b) Scroll up and down to “Language” and
press “Select”.
c) Using “Up/Down” key for selecting the
languages pre-set in the handset. Press
“Select” to conform or “Exit” to exit.
Remark: The language in the language setup functions is pre-
set function by
OEM customers.
15
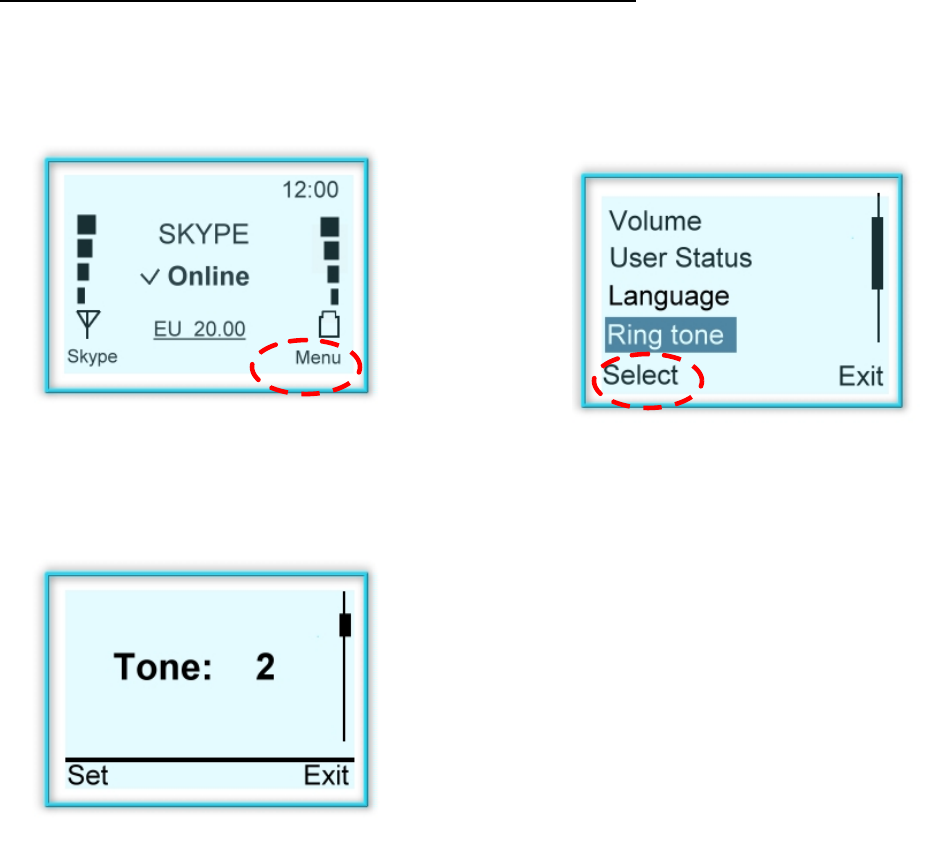
3.1.4 Ring tone setup
15 kinds of ring tone can be selected by the following steps:
a) Press “Menu” to enter Menu mode
b) Scroll up and down to “Ring tone” and press
“Select”
c) Using “Up and Down” key for ring tone
selection. Press “Set” to select or “Exit” to exit.
16
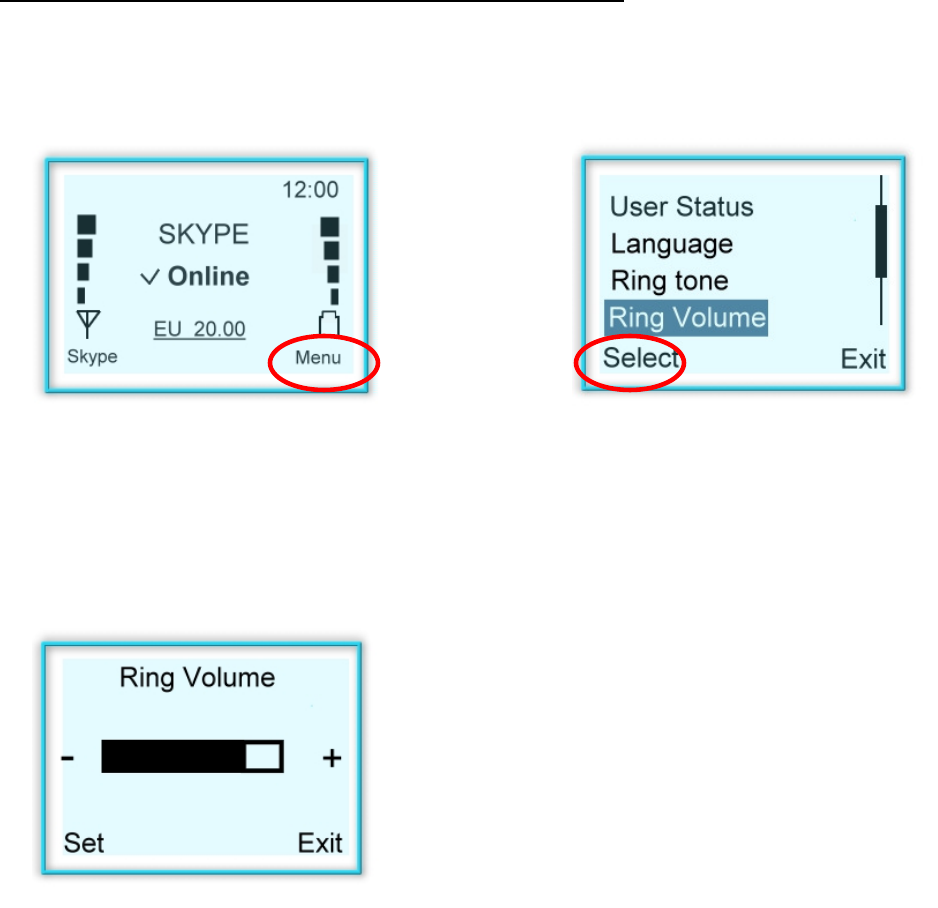
3.1.5 Ring Volume setup
The Ring tone volume can be modified the following steps:
a) Press “Menu” to enter Menu mode
b) Scroll up and down to “Ring Volume” and
press “Select”
c) Using “Up and Down” key for ring tone
selection. Press “Set” to select or “Exit” to exit.
17
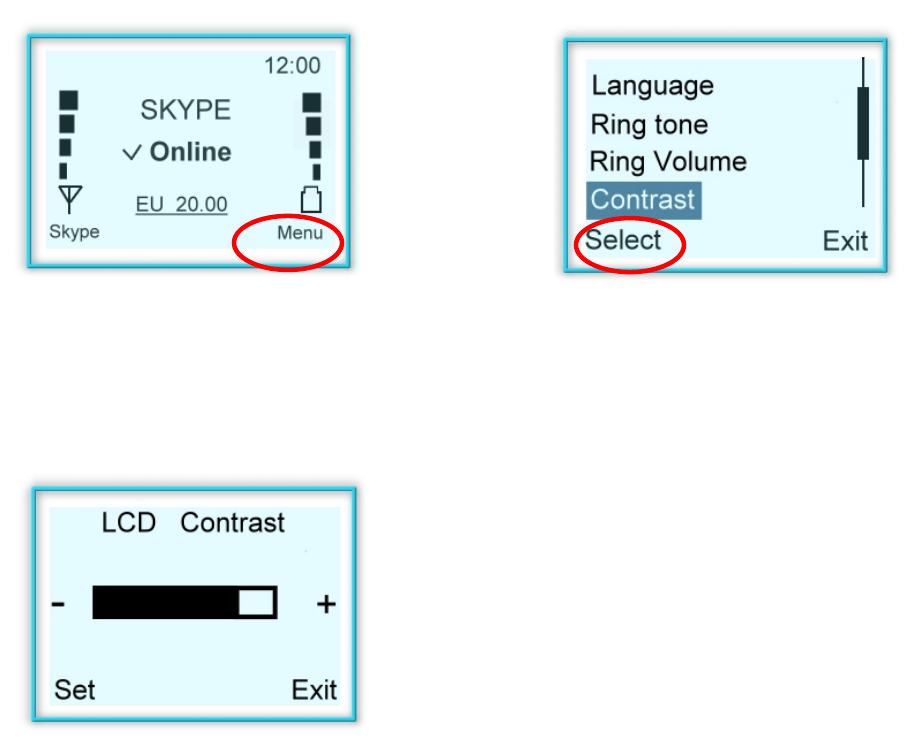
3.1.6 LCD Contrast setup
a) Press “Menu” to enter Menu mode
b) Scroll up and down to “Contrast” and press
“Select”
c) Using “Up and Down” key ring tone selection.
Press “Set” to select or “Exit” to exit.
18
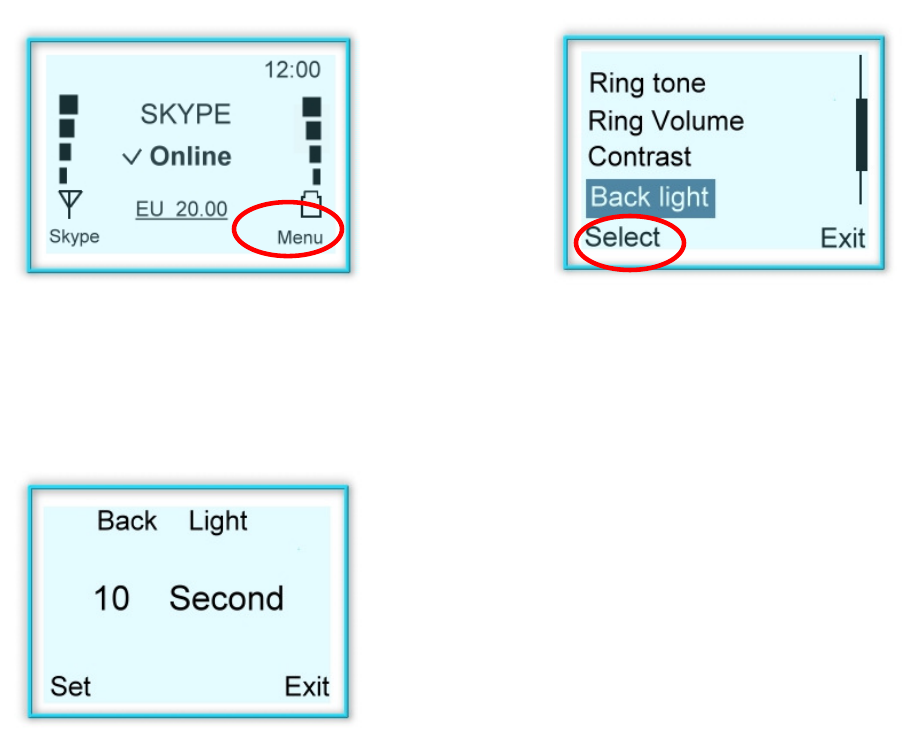
3.1.7 LCD backlight time setup
a) Press “Menu” to enter Menu mode
b) Scroll up and down to “Back light” and press
“Select”
c) Using “Up and Down” key to adjust time
duration. Press “Set” to set or “Exit” to exit.
19
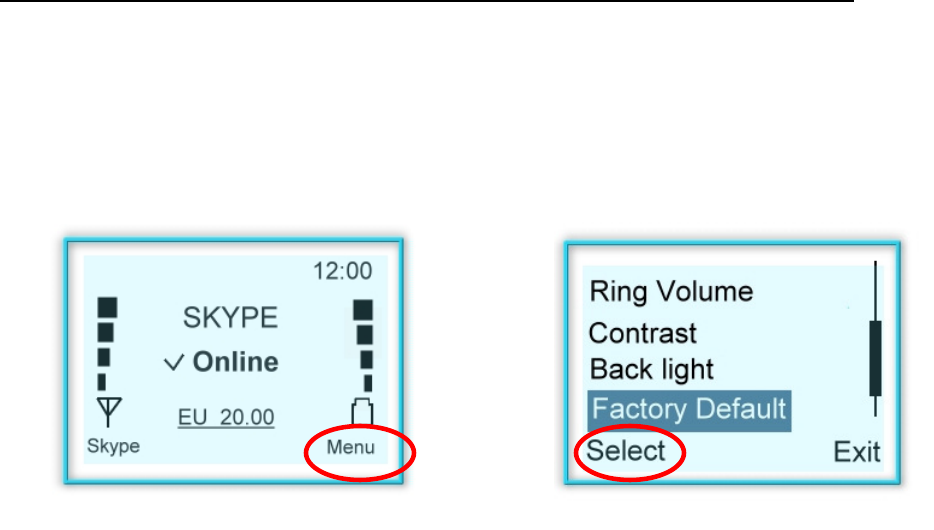
3.1.8 Factory Default setup:
If you wish to return to the factory default settings, please do the following steps:
a) Press “Menu” to enter Menu mode
b) Scroll up and down to “Factory Default” and
press “Select”
20
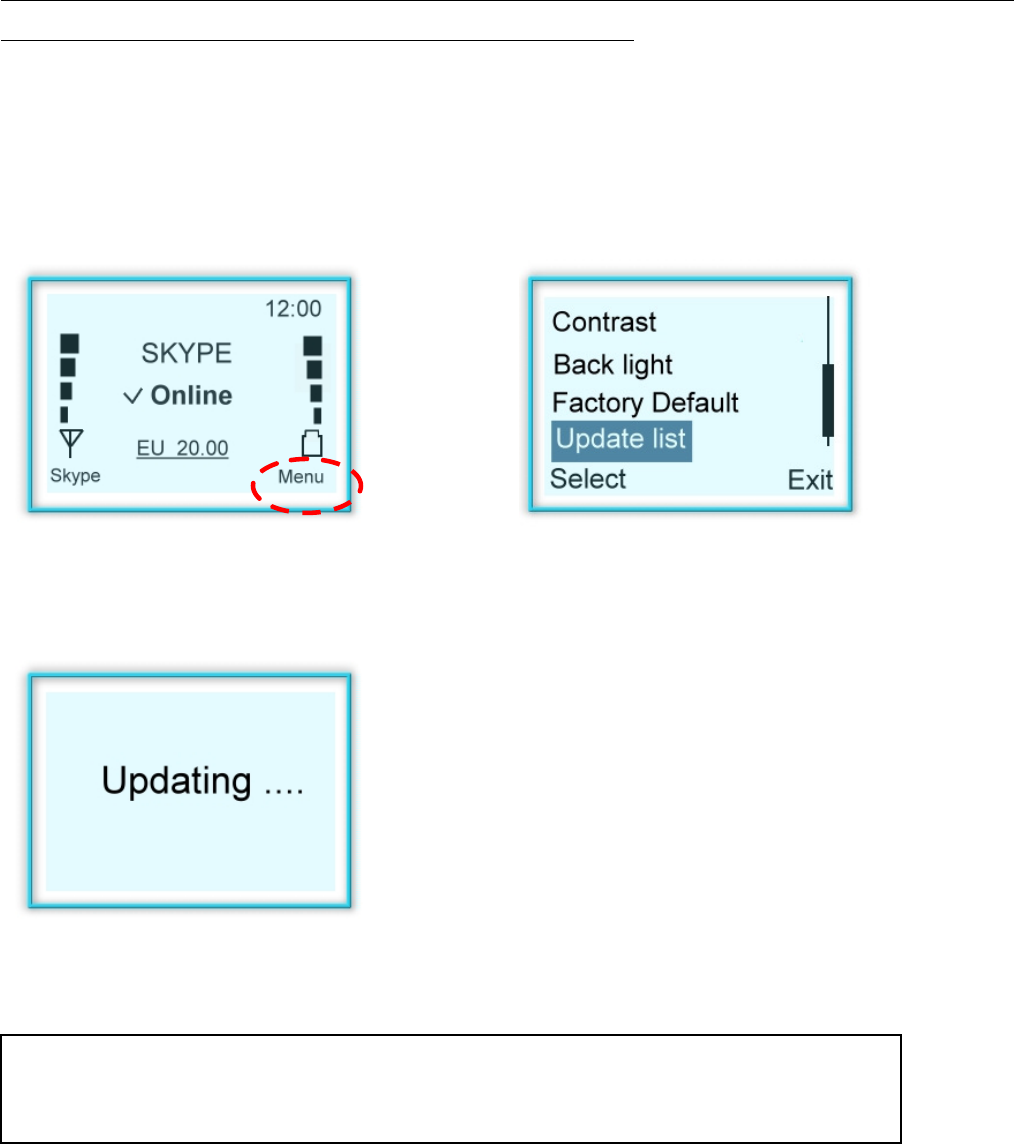
3.1.9 Manually name list update:
(Also refer to Section: 2.1.2~2.1.3)
If you find the name list on the handset is different from the name list on the Skype
TM
software,
please do the following steps to synchronize the name lists:
a) Press “Menu” to enter Menu mode
b) Scroll up and down to “Update list” and
press “Select”
c) “Updating…..” indicated update on progress.
Remark: Please ensure Skype
TM
program, Driver, dongle and hands
et are in
operative status.
21
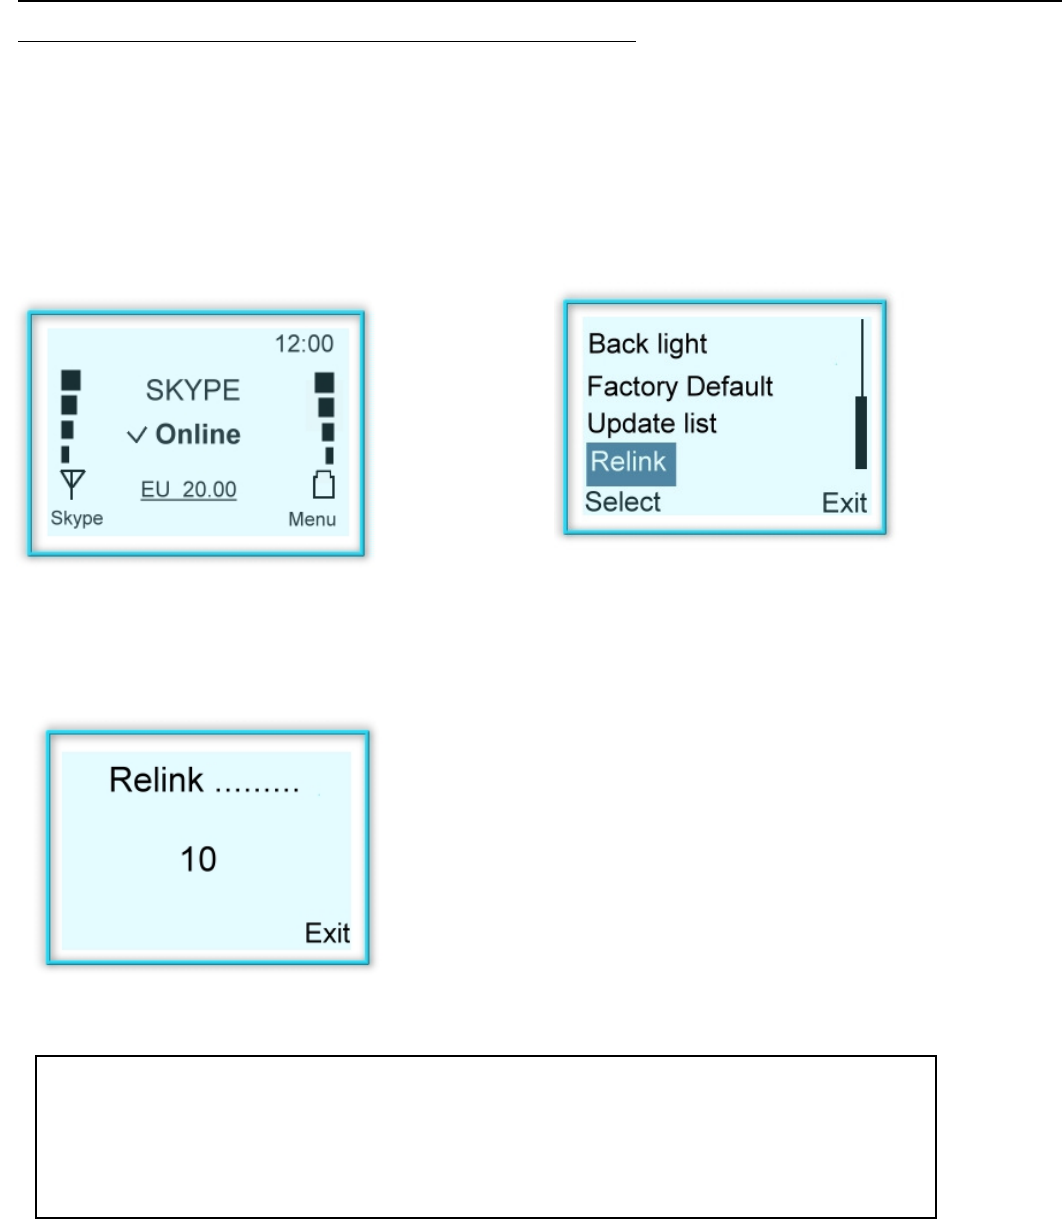
3.1.10 Paring up – USB phone and Dongle
You might need to re-pair-up your USB pone and Dongle if you find connection error between these
two devices. Please do the following steps for paring-up:
a) Press “Menu” to enter Menu mode
b) Scroll up and down to “Relink” and press
“Select”.
c) A timer indicated update on progress.
Remark: Please ensure Skype
TM
program, Driver, dongle and ha
ndset are in
operative status. Do not remove Dongle or Power off handset when
pairing
-up is in progress.
22
3.2. Using Skype
TM
to make calls
For more information about Skype
TM
program and how to make Skype
TM
calls though PC,
please visit Skype
TM
official website: www.Skype.com
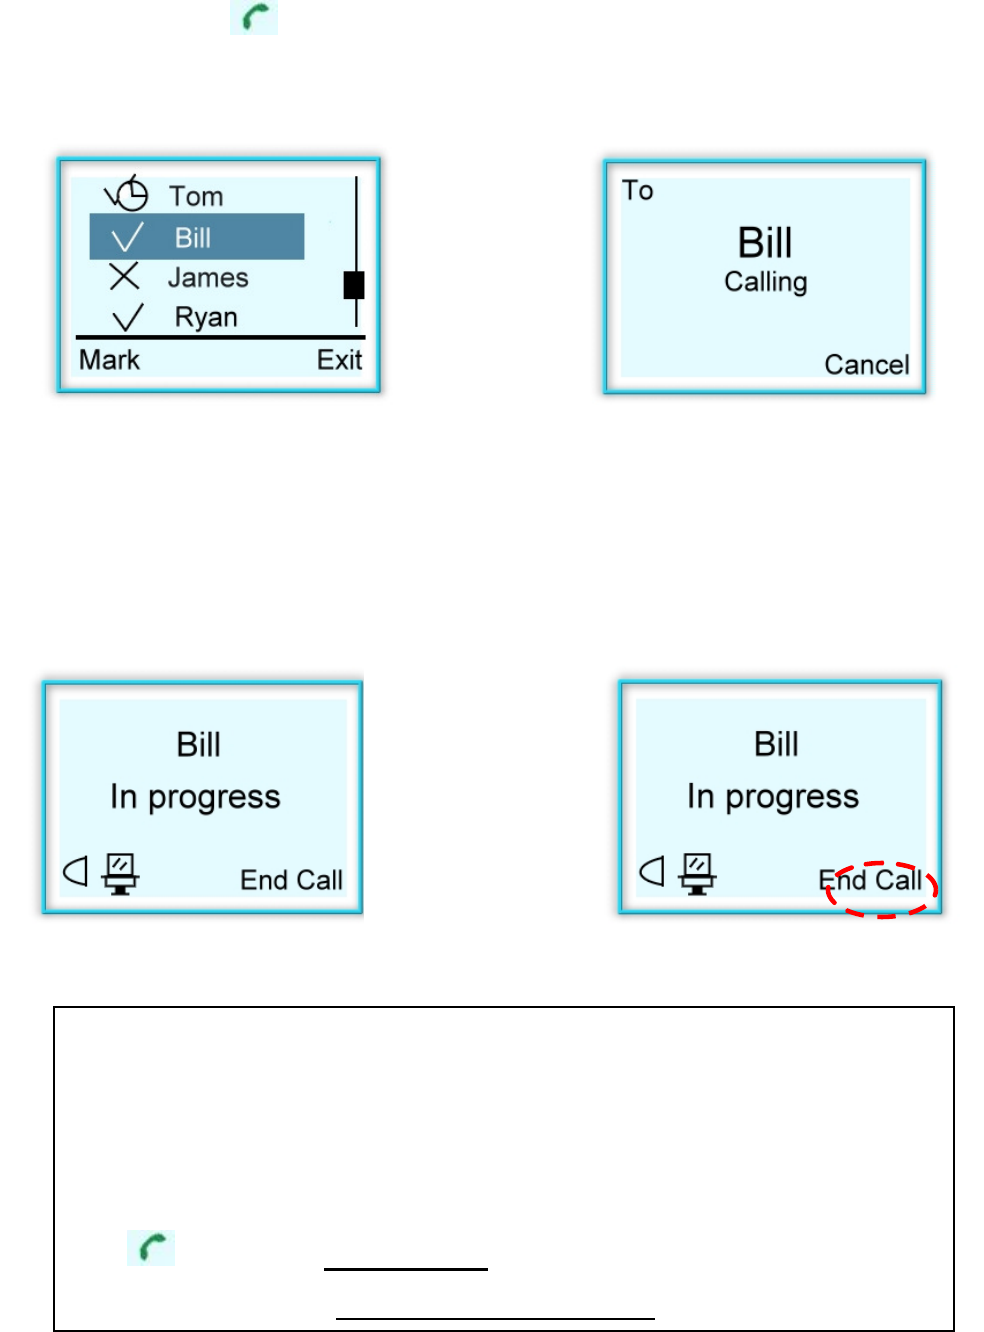
3.2.1 . Making calls from Name lists in handset:
Follow the steps to make internet calls from your handset name list:
a) Return to the following page.
b) Press “Up/Down” key to enter phone book.
Remark: The handset only display name lists which is stored in your Skype
TM
account. If the name lists are not the same, please refer to section 3.1.9 for name list
synchronization
.
WARNING:
Skype
TM
software does not support calls to any emergency number nor emergency
service (e.g. 211, 911, 999 etc). To perform calls of this type please make sure to use a
landline telephone or a cellular/mobile phone.
23
c) Press “Call” or “ “ to dial out or “Exit” to
exit.
d) Waiting for other side to pick up.
e) Calling in progress.
f) Hang up by press “End call”.
Remark:
1. The Volume may also be adjusted when there is a call in progress.
While on the call, press UP / DOWN button to adjust.
2. While phone call in progress, the following buttons have designated
functions:
“ ” Button => Hold / un-Hold
“
*
“ Button => Microphone Mute / un-Mute.
24
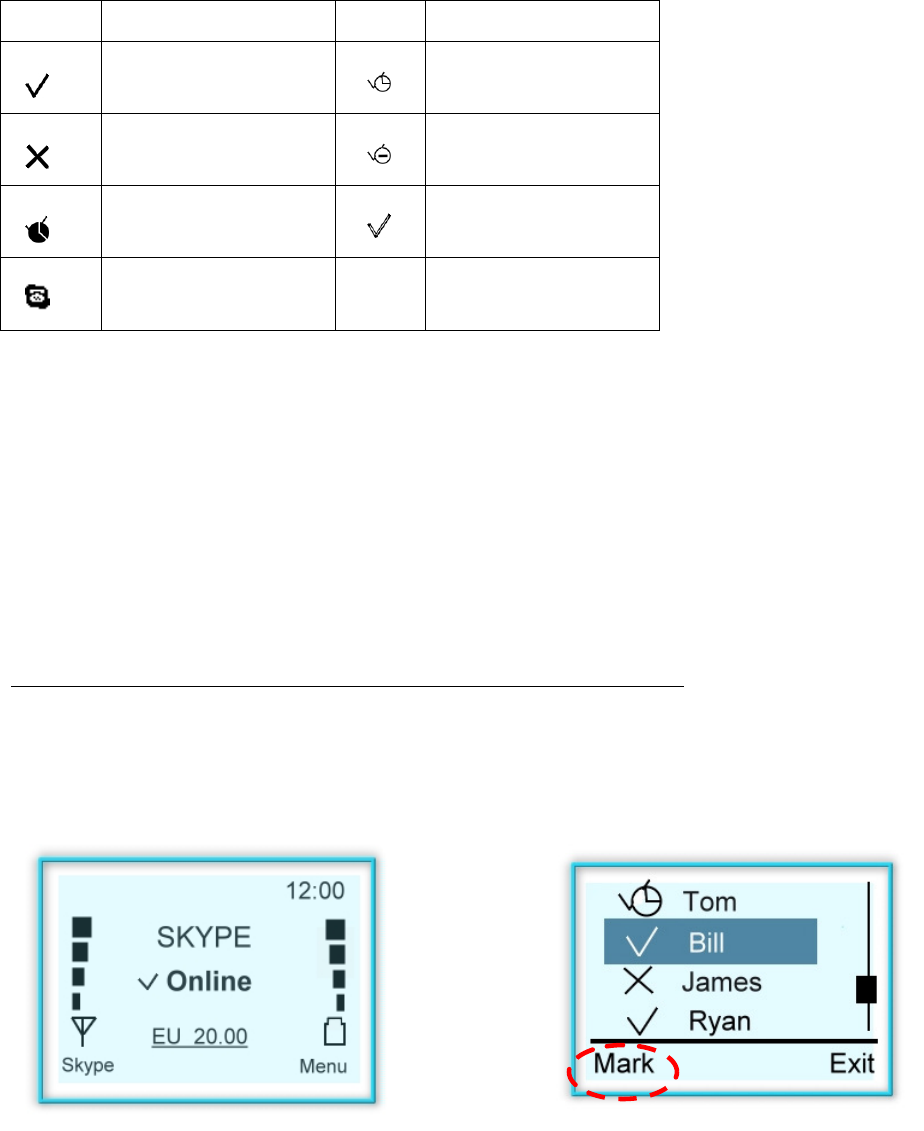
3.2.1.1 Contact person status
There are some icons in front of each name in the phone book. Below chart indicates the
description of each icon.
Icon Description Icon Description
Online Exit / Not available
Offline Do Not Disturb
Away Hide / Invisible
Pre-set telephone
number
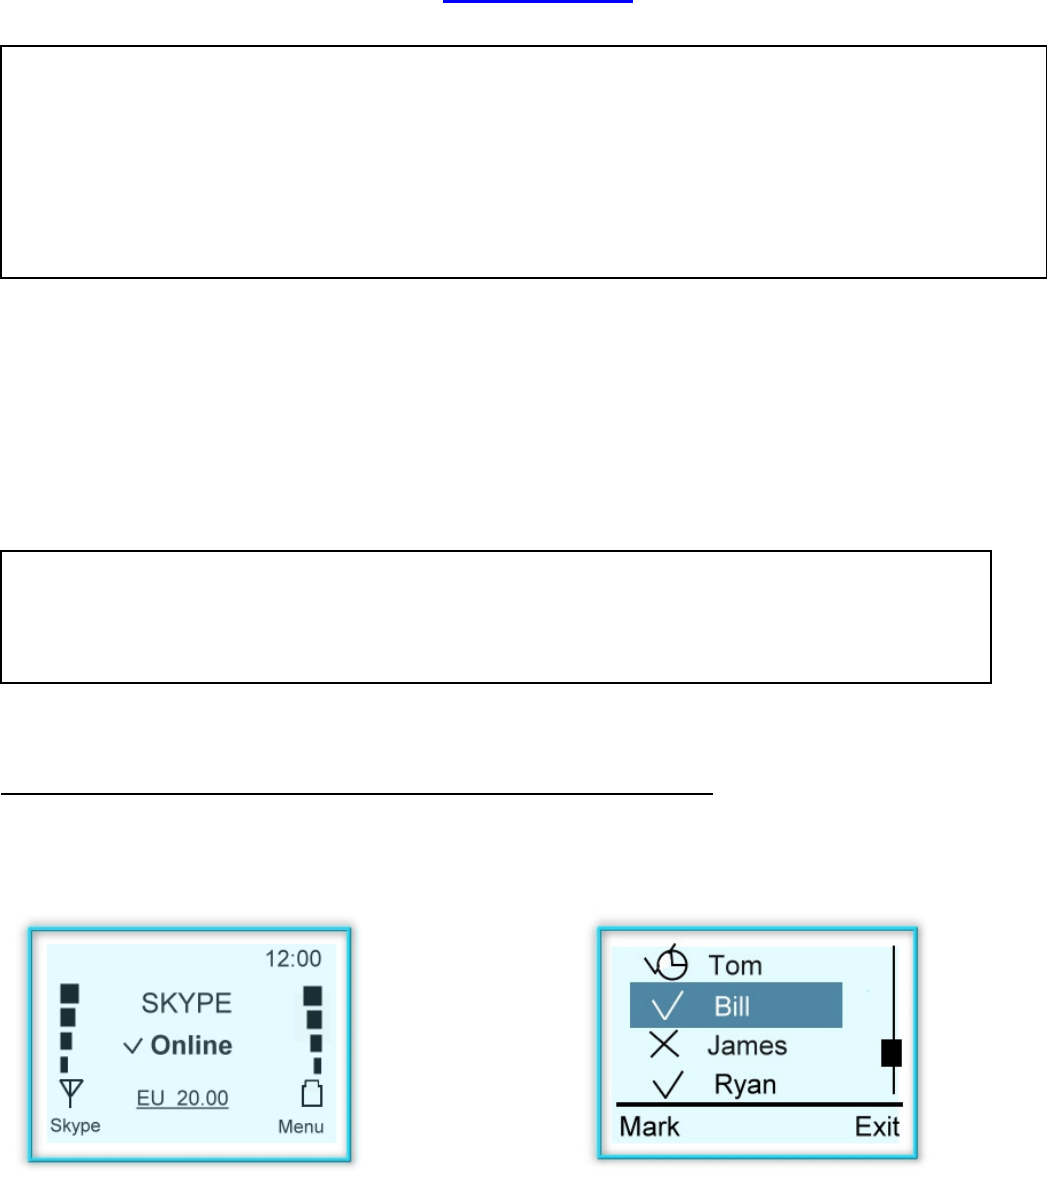
3.2.2 Making Conference calls from name lists in handset:
Follow the following steps to host a multi-users conference call:
a) Return to the following page.
b) Press “Up/Down” key to enter phone book.
Press “Mark” for con-call members.
25
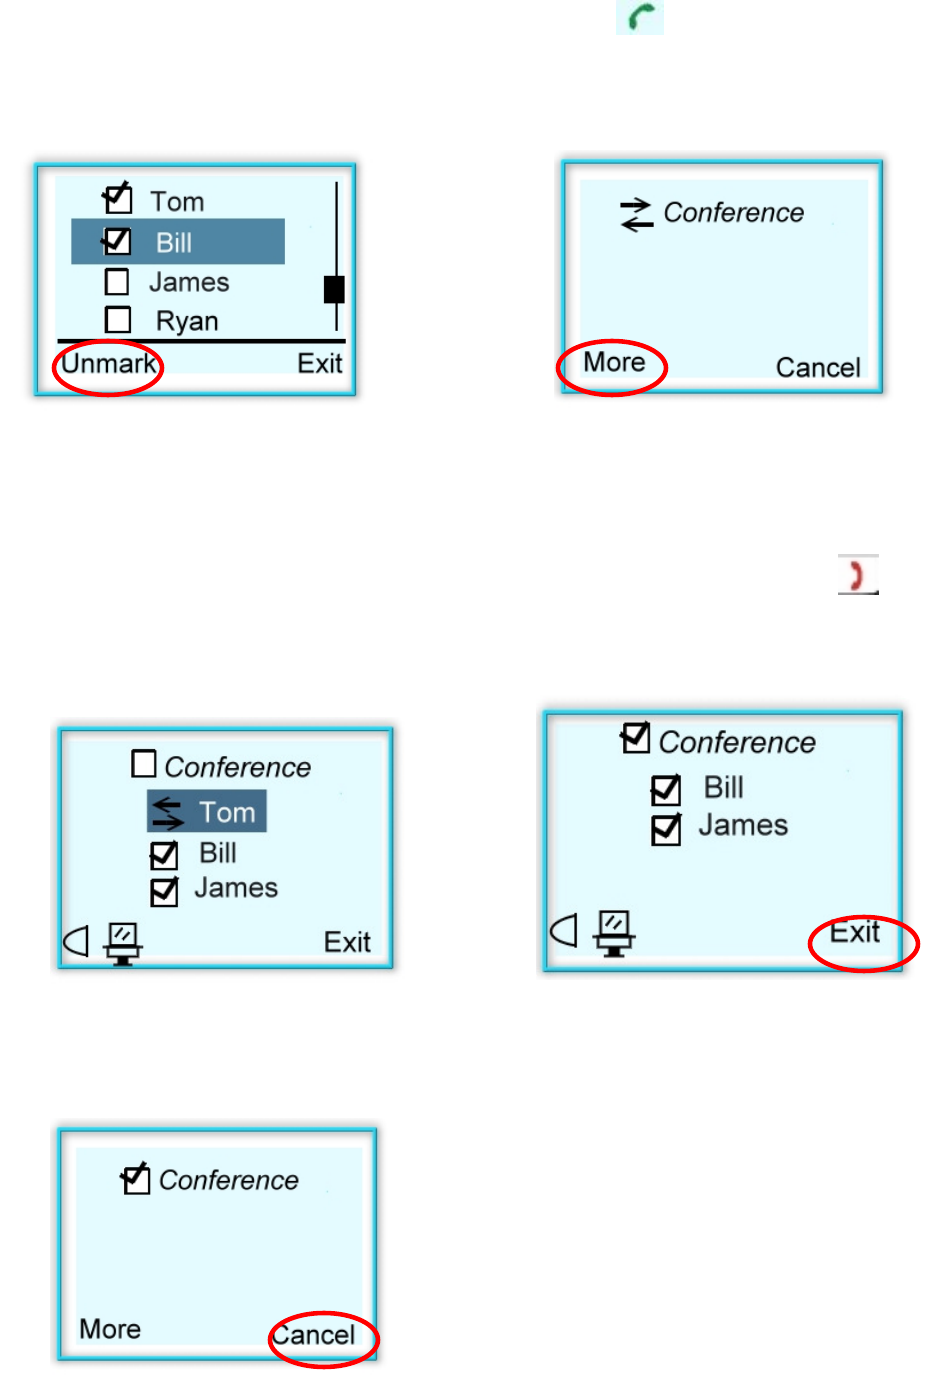
c) Multiple users can be selected by scrolling
up/down and “Mark”.
d) Once all con-call members are marked,
press “ “ to call. “More” button will show
con-calls’ details.
e) Conference call details as shown:
f) Using Up/Down key to highlight the caller you
wish to hang up and press “ ” to terminate
the caller. Press “Exit” to the main page.
g) Press “Cancel” to hang up all calls in conference call section.
26
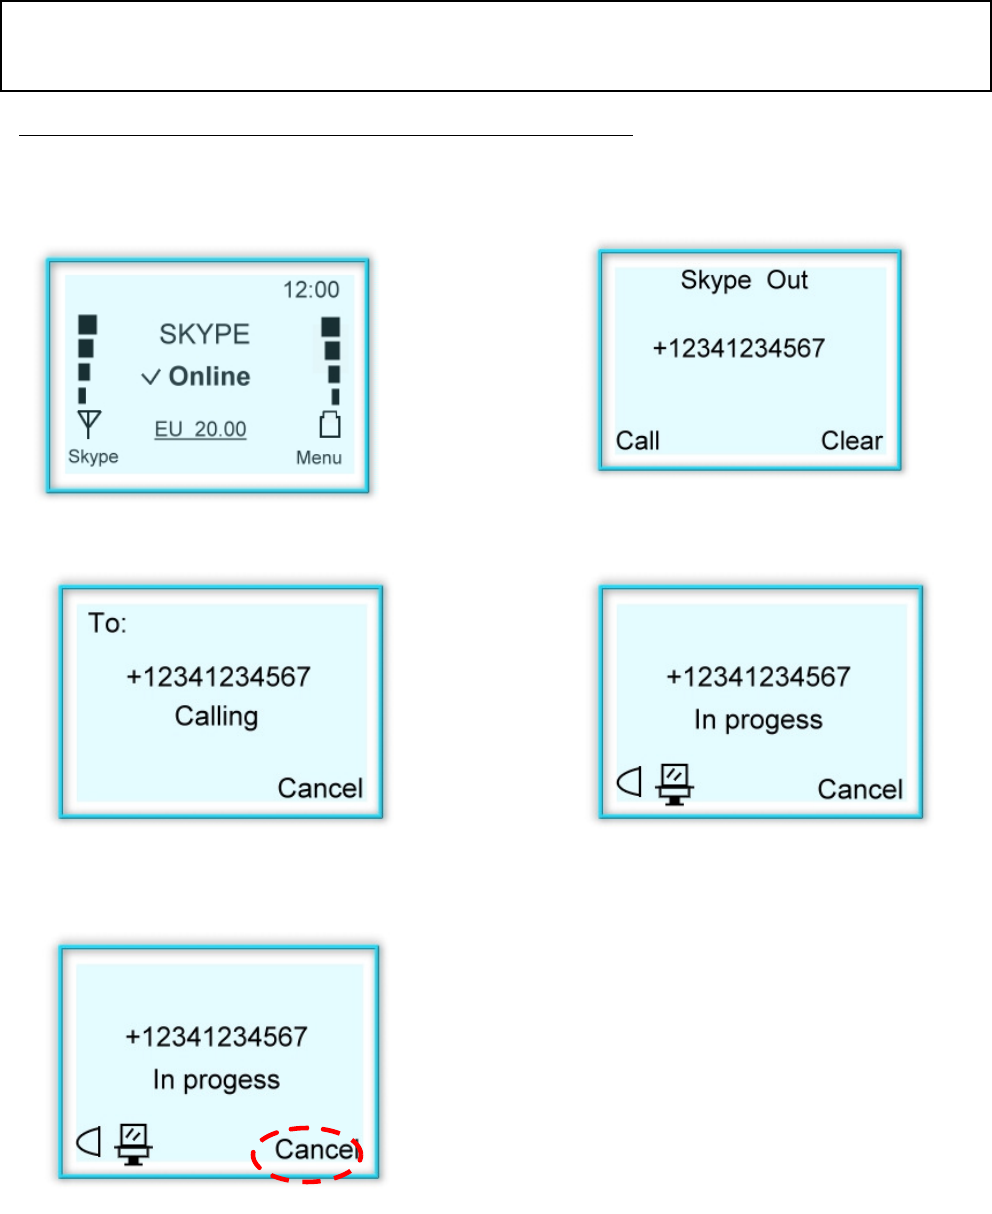
3.2.3 Making Skype
TM
Out from handset:
Follow the steps to make Skype Out
TM
from your handset:
a) Return to the following page.
b) Press number you wish to dial.
“Call” to dial out, “Clear” for back spacing.
c) Waiting for other side to pick up.
d) Call in progress.
e) Hang up by Press “End call”
WARNING: Skype
TM
software does not support calls to any emergency number nor
emergency service (e.g. 211, 911, 999 etc). To perform calls of this type please make sure to
use a landline telephone or a cellular/mobile phone.
Remark: You must have Skype
TM
Out credit to active this function. For more
SkypeTM out
information
, please visit:
www.SkypeTM.com
for details.
27
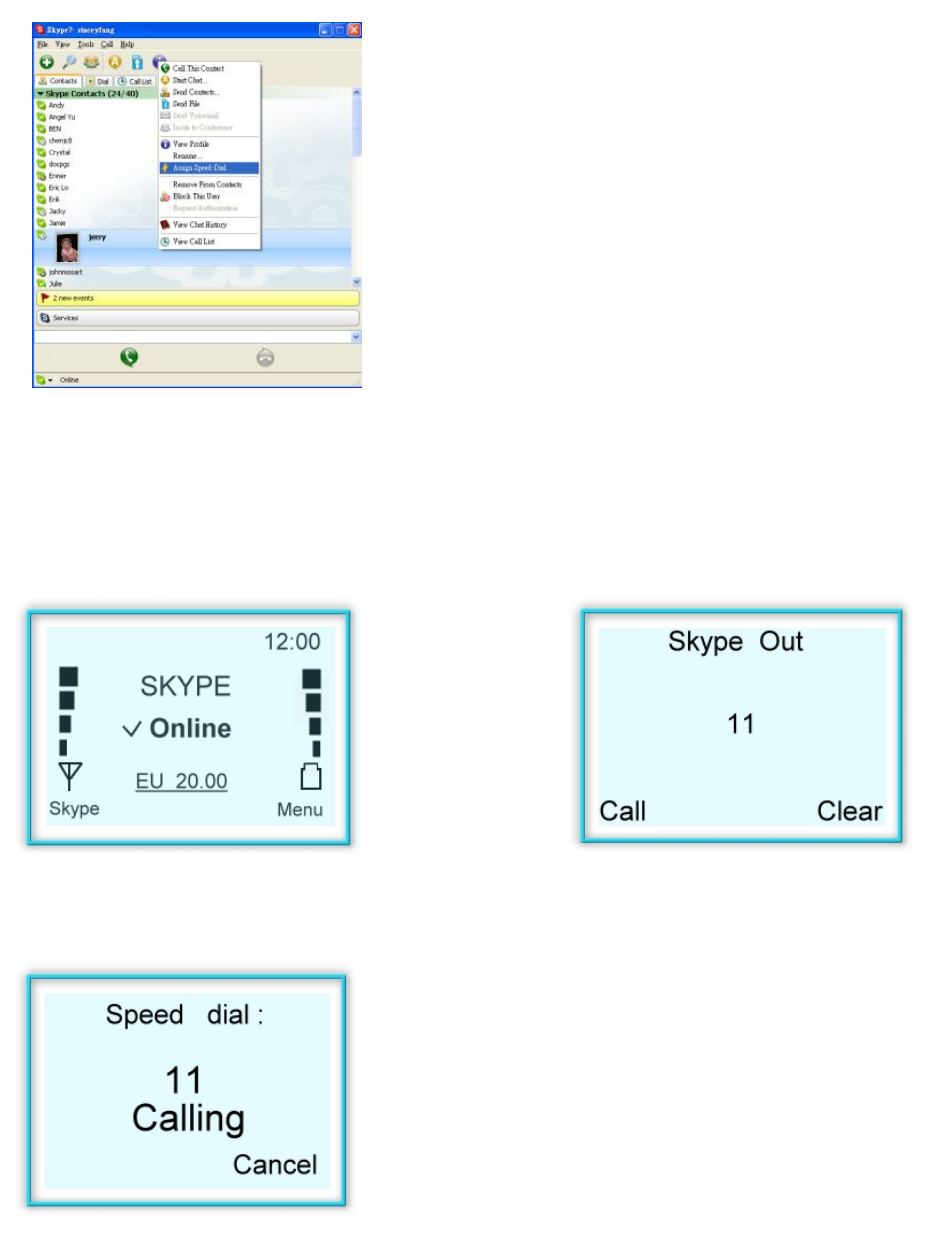
3.2.4. Making Speed dial from handset:
This function is the most convenient and the most useful dialing method offered by the Skype
TM
.
Simply follow the Skype
TM
speed dial section to
preset the desire name list.
a) Return to the following page.
b) Press pre-set speed dial number you wish to
call. “Call” to dial out, “Clear” for back spacing.
c) Speed dial in progress.
28
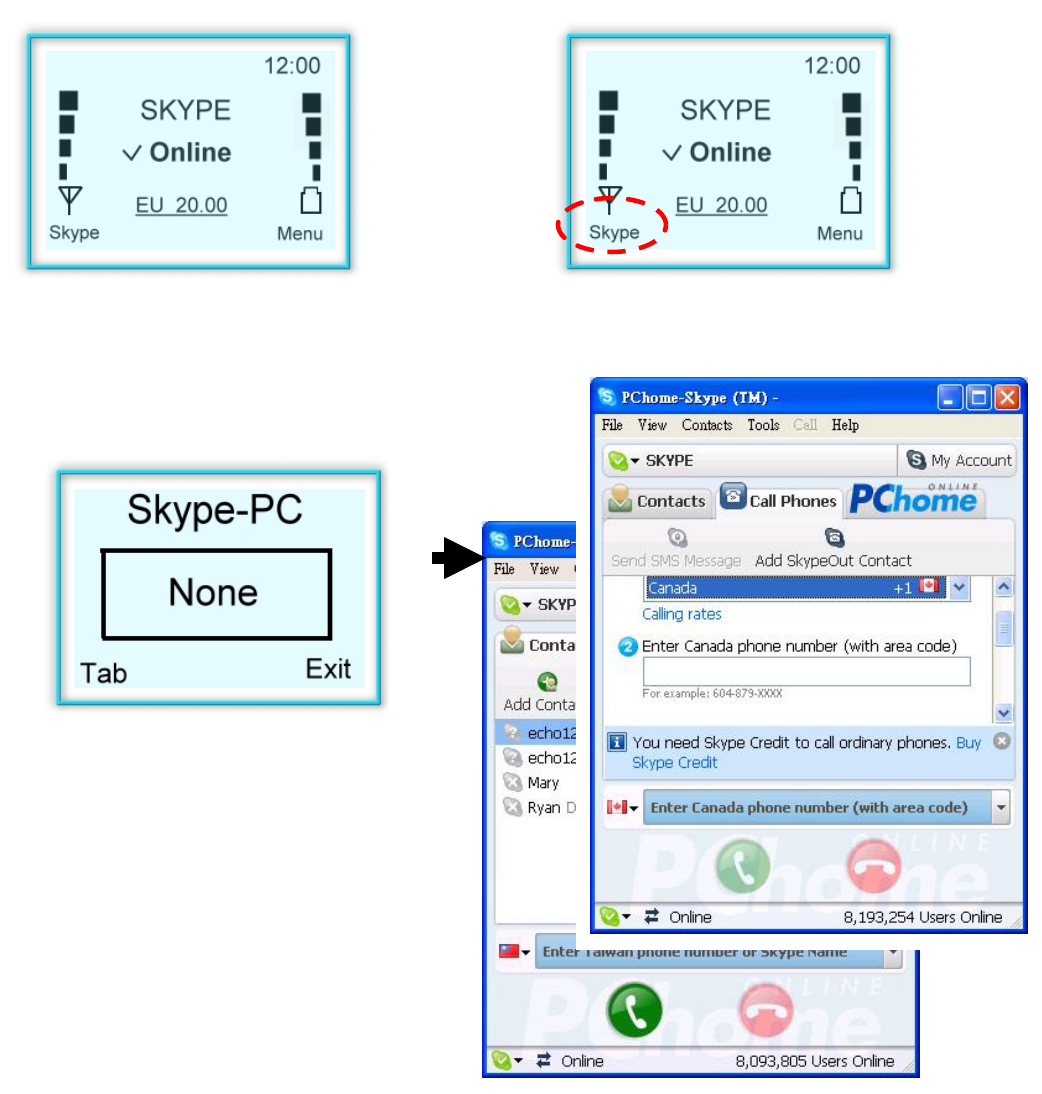
3.3 Using Handset to remote control Skype
TM
software
The handset is able to remote control the Skype
TM
program in PC side while Skype
TM
software is
running properly in PC side.
a) Return to the following page
b) Press “Skype
TM
” key to activate remote
control function.
c) press the “Skype
TM
” key to select Skype
TM
Tab in PC.
29
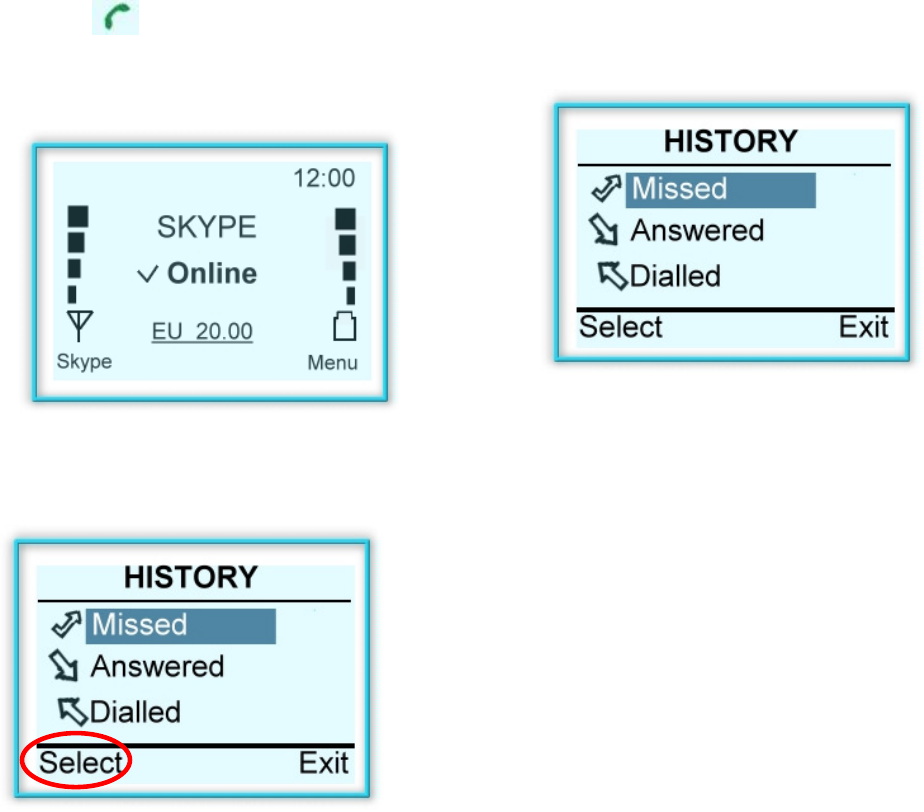
3.4 Calling History
This function allows users to check calling history.
a) Press “ ” bottom in the following
page.
b) Select desire function by pressing
“Up/Down”.
c) Press “Select” for details.
30
4 Using Utility Control
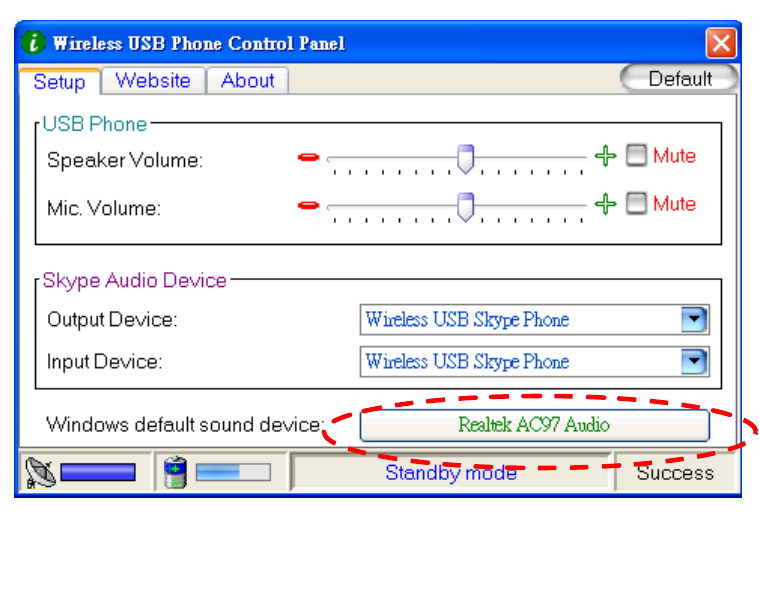
4.1 Utility control panel:
Some basic functions can be adjusted in the PC using the Utility Control Panel.
Double click on the “ ” in the Icon bar in the PC to activate the control panel.
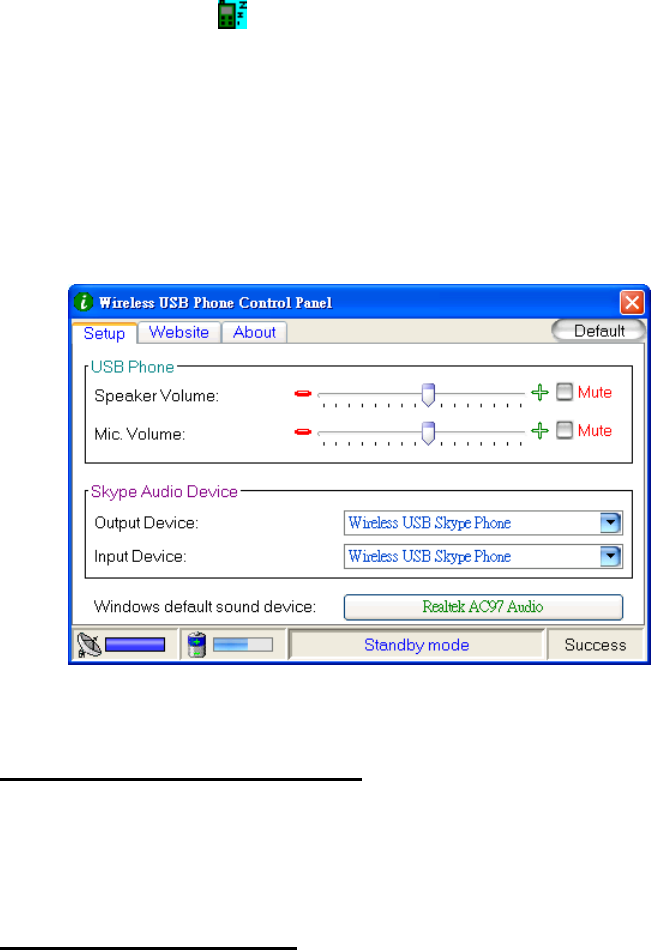
4.1.1 Device Setup
The audio settings can be modified in this section. Use the Mouse to complete the setups:
USB Phone Volume Adjustment
a) Using the Mouse to select the sound device.
b) Press the Mouse to volume up/down the speaker and Microphone volume.
Skype
TM
Audio Devices: (Refer to section 5)
Please set both output and input device in the Skype
TM
Audio Device section to "USB Phone" to
get the proper USB Phone function.
If you connect your speaker with your computer units, please change the "Windows default sound
device" to your system sound card.
31
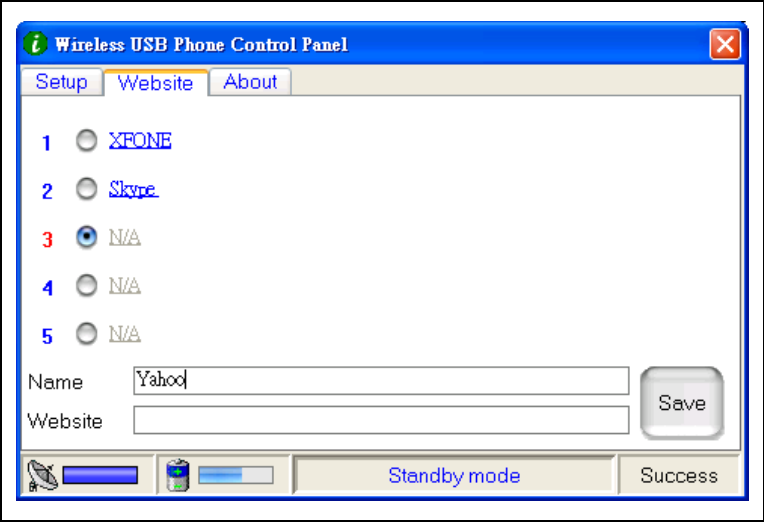
4.1.2. Favorite Website :
You may set your favor website address here to have easy and quick access into the designate
website. Follow the simple steps of programming your favor websites as below
a) Set your favor website by entering the “Name and “Website” address in the designated column
and click “Save”.
b) Access the pre-set web address by pointing at the highlighted word.
32
5. Assigning PC Audio to PC Speakers
Skype
TM
handset has a built-in audio chip, which is equivalent to an external sound card device.
Therefore, when the handset is connected to a PC, the Windows operation system will recognize it
as default audio output device and replace the original audio output device. This facilitates
plug-and-play of the USB handset, but it may interfere with the music or video files used to be
played through your speakers or stereo headset that are connected to the original sound card in
your PC once the USB handset is plugged in. To allow music and sound effect be played through
the original speakers, you must reset audio output device of your PC.
1. Refer for to section : 4.1Utility Control Panel.
2. To adjust the Skype
TM
Audio Device, select the desire device under the “Input Device
and “Output device”.
3. To check the Windows default sound device, press the button for windows Sounds
and Audio Devices Properties” (See below Picture A)
Picture A
33
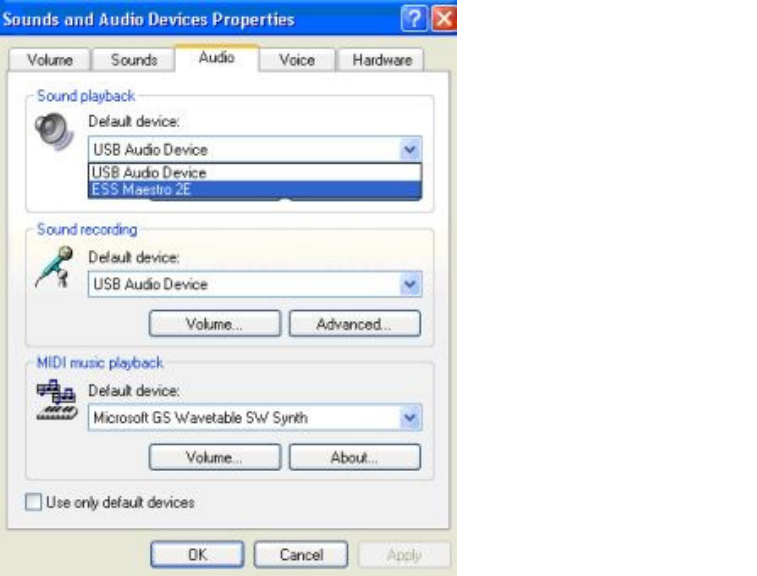
4. After the “Sounds and Audio Devices Properties” window is opened, select “Audio”
tab, and you will see that the default device for sound playback is “USB Audio
Device”.
5. If you wish to have proper sound out from your original speaker, select your system
build in sound card. (See below Picture B)
6. Package and accessories
You will find the package contains:
Wireless phone for Skype
TM
x 1 pc
USB Dongle x 1 pc
Driver CD x 1 pc
Rechargeable Battery x 1 pc
USB recharge cord x 1 pc
Charging Cradle x 1 pc (Optional)
QIG x 1 pc
Picture B
34
7. Technical Specification:
A. System Requirements:
Window Vista / XP / 2000 operation system
400MHz processor speed.
128MB RAM or above.
Minimum 15 MB Hard Disk Drive Space.
Internet connection. (Any broadband connection or 56Kbps dial up modem)
USB 1.1 or USB 2.0 Port
Skype
TM
software.
B. Phone/Dongle 2.4GHz RF Information
1. Frequency band: 2413.152 ~2470.176 MHz
2. Channel Number: 34 Channel(s)
3. Operation range: 30 Meter at free space
C. Phone Specification:
1. Speaker: 32 ohm, 500mW Max, Frequency response:300Hz ~3400Hz
2. Microphone: Condenser microphone, -42dB +/- 3dB, 20Hz ~20,000Hz
3. Connection type: USB connector for battery charger ; Version: 1.1/ 2.0
4. LCD display:
Size 30 mm x24 mm
Pixel 101 x 79 dots
Menu Support language Chinese & English (Multi-languages
with content translated)
Contact List Support
Language
Uni-Code depends on PC
Contrast Level 16
Remark: For more information about Skype
TM
, please visit: www.Skype.com.
35
5. Battery Type: 3.7V, 600mAh, Li-Ion Battery
6. Recharging function (to Handset directly): USB cable
7. Talking time: 6~8 hr. (With fully charged battery)
8. Standby time: 300 hr. (PC status: ON, Fully charged battery)
9. Recharging time: 3 hr by USB cord.
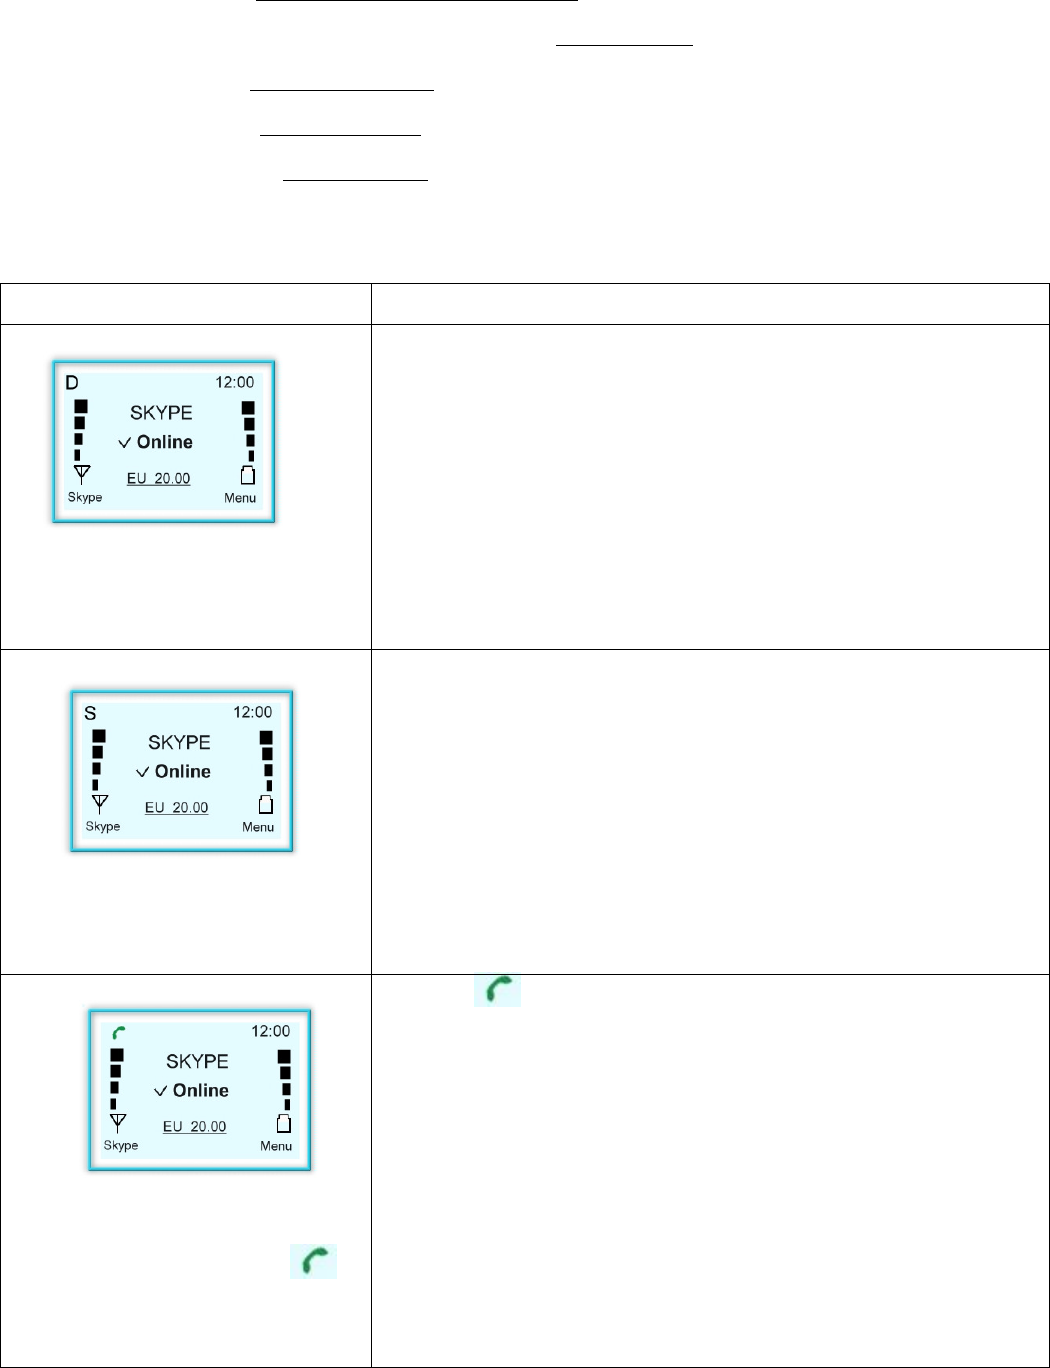
8. Technical problems / Q & A
Question Answer
The LCD display shows “D” on
the left hand corner, what does it
mean?
The “D” indicates there is no Driver install or the driver is
not activated in the PC side.
Bad wireless internet connection.
Please re-install the Driver using CD-Rom or activate the
driver again.
Check your internet connection again.
The LCD display shows “S” on
the left hand corner, what does it
mean?
The “S” indicates that the Skype
TM
program in the PC side
has been log-out or not activated.
Please re-run the Skype
TM
program in PC.
The LCD display shows “ ”
on the left hand corner, what
does it mean?
The “ ” indicates there are un-answered calls in the
phone book.
Please refer to Section 3.4 “Calling History”.
Federal Communication Commission Interference Statement
This equipment has been tested and found to comply with the limits for a Class B digital
device, pursuant to Part 15 of the FCC Rules. These limits are designed to provide
reasonable protection against harmful interference in a residential installation. This
equipment generates, uses and can radiate radio frequency energy and, if not installed
and used in accordance with the instructions, may cause harmful interference to radio
communications. However, there is no guarantee that interference will not occur in a
particular installation. If this equipment does cause harmful interference to radio or
television reception, which can be determined by turning the equipment off and on, the
user is encouraged to try to correct the interference by one of the following measures:
- Reorient or relocate the receiving antenna.
- Increase the separation between the equipment and receiver.
- Connect the equipment into an outlet on a circuit different from that to which the
receiver is connected.
- Consult the dealer or an experienced radio/TV technician for help.
FCC Caution: Any changes or modifications not expressly approved by the party
responsible for compliance could void the user's authority to operate this equipment.
This device complies with Part 15 of the FCC Rules. Operation is subject to the
following two conditions: (1) This device may not cause harmful interference, and (2)
this device must accept any interference received, including interference that may
cause undesired operation.
This transmitter must not be co-located or operating in conjunction with any other
antenna or transmitter.
36
Product name: Wired USB Phone for Skype
TM
Software version: V. 3.0.0.1
www.xfone.biz
©2007 FirstCom Technology Co., Ltd.