Firstview Electronic JH201011617V MID User Manual YW5 JH201011617V Usermanual
Shenzhen Firstview Electronic Co. Ltd. MID YW5 JH201011617V Usermanual
User Manual

MID User Guide
1
Table of Contents
Table of Contents............................................................................................................................1
1. Outlook Description....................................................................................................................3
2. Getting Started Guide.................................................................................................................4
2.1 Battery Charging.................................................................................................................4
2.2 How to use Memory Card...................................................................................................4
2.3 How to use U disk...............................................................................................................5
2.4 Remove and insert memory card and U disk ......................................................................6
2.5 Storage Space......................................................................................................................6
2.6 Power On and Off ...............................................................................................................6
2.7 Vibrate.................................................................................................................................6
2.8 Interface rotation.................................................................................................................6
2.9 External Network Cable and U Disk...................................................................................6
2.10 Connecting to the Internet.................................................................................................7
2.11 USB connection ................................................................................................................7
3. Input Operation ..........................................................................................................................8
3.1 Keyboard.............................................................................................................................8
3.2 Touch Screen.......................................................................................................................8
4. Desktop.........................................................................................................................................9
4.1 Status Bar............................................................................................................................9
4.2 Shortcuts .............................................................................................................................9
4.3 Current Desktop Lamp........................................................................................................9
4.4 Add To The Screen..............................................................................................................9
5. Web Browsing ...........................................................................................................................11
6. Application Management .........................................................................................................12
6.1 Install and Uninstall ..........................................................................................................12
6.2 App Market .......................................................................................................................14
7. Typical Applications Introduced.............................................................................................16
7.1 Chat Tools .........................................................................................................................16
7.2 E-mail................................................................................................................................16
7.3 File Browser......................................................................................................................17
7.4 My Photo...........................................................................................................................18
7.5 My Video...........................................................................................................................22
7.6 YouTube ............................................................................................................................23
7.7 Magic Album.....................................................................................................................23
7.8 My Music..........................................................................................................................24
7.9 Camera..............................................................................................................................26
7.10 Camcorder.......................................................................................................................27
8. Tips and Tricks .........................................................................................................................28
8.1 Some convenient mode of operation.................................................................................28

MID User Guide
2
8.2 Convenient Set..................................................................................................................28
8.3 Battery Tips.......................................................................................................................30
9. Personalized settings.................................................................................................................31
9.1 Wireless controls...............................................................................................................31
9.2 Ppoe settings .....................................................................................................................31
9.3 Sound &display.................................................................................................................31
9.4 Applications ......................................................................................................................32
9.5 SD card, U-disk &device storage......................................................................................32
9.6 Date &Time.......................................................................................................................34
9.7 Locale &text......................................................................................................................34
9.8 About device .....................................................................................................................34
9.9 Touchpanel Calibration .....................................................................................................35
10. MID Locked.............................................................................................................................35
11. Troubleshooting ......................................................................................................................35
11.1 Forced shutdown .............................................................................................................35
11.2 Restore default settings ...................................................................................................35
12. FCC Note .................................................................................................................................36
MID User Guide
3
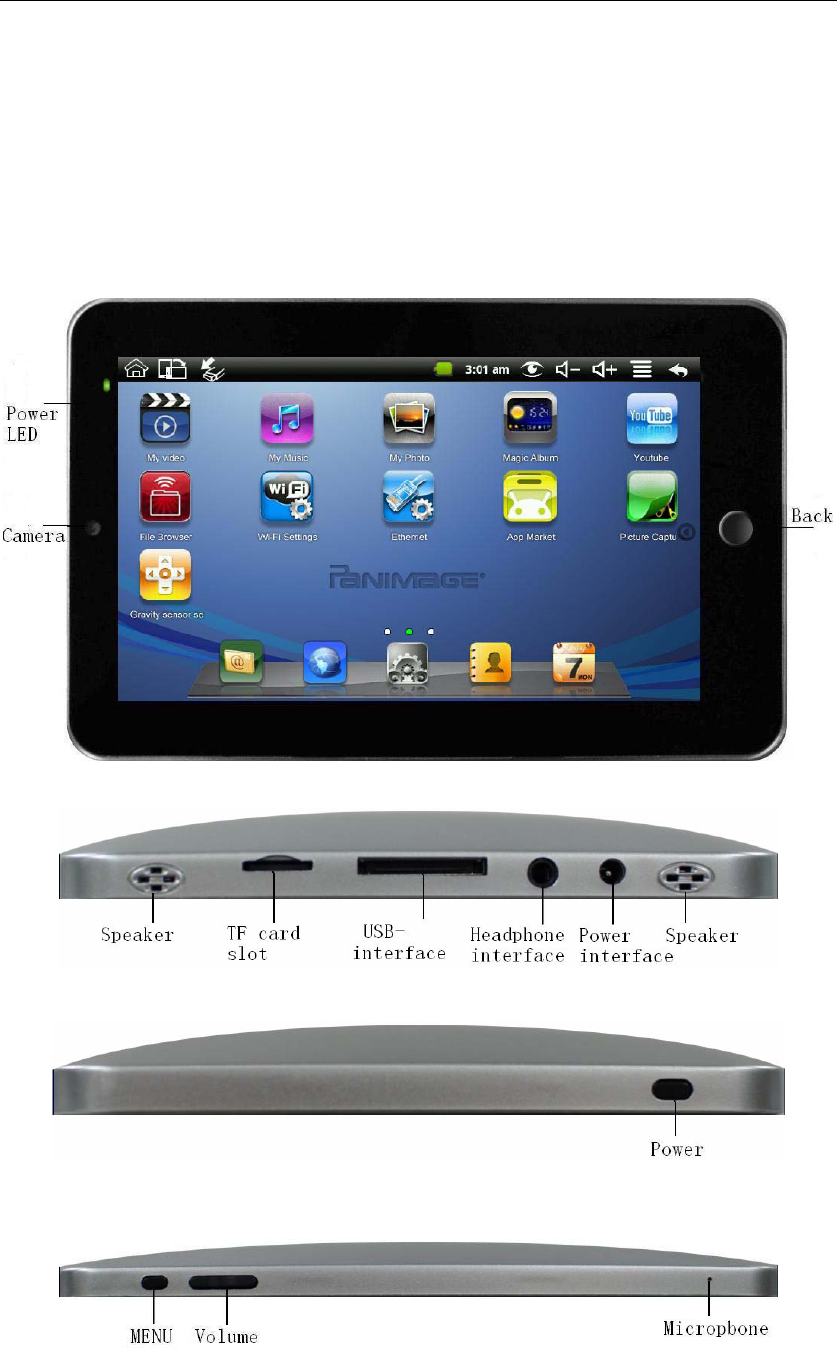
1. Outlook Description
Front View:
Right side View:
Left side View:
Top View:
MID User Guide
4
2. Getting Started Guide
Statement:The company has committed to the quality, while software update. If the final
version of products has any differences from the description of the user guide, please subject to
the final product. Thank you!
2.1 Battery Charging
MID has an internal charging battery. We suggest to charge up the battery when the battery power
is low.
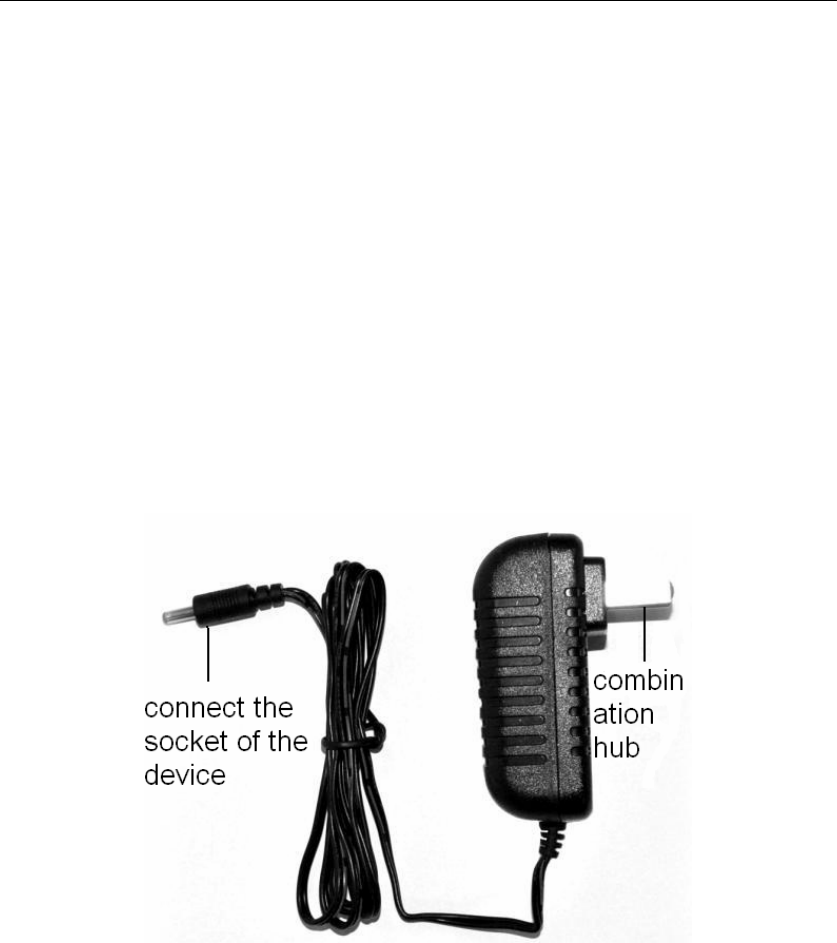
Power Adapter
One end of the power adapter connecting the socket, and the other end of the power adapter
connecting the socket of the device, then the device can be charged.
Way to Charging Battery
1. Plug in the power adapter, the battery charge indicator turns red, indicating charging. Plug when
the battery is fully charged, the indicator shows green. After unplug the power adapter, the
indicator always shows green.
2. During Battery Charging, user can operate MID.
Note:
The charging time will be longer when operating and charging at same time.
2.2 How to use Memory Card
Insert memory card:
Insert memory card to the Card slot. Use finger to put the card into the slot until “click” sound
heard.
Upper left corner of the screen will prompt: SD cards are ready.
Browsing files in memory card:
Run "File Browser" program, showing all the files under the root directory. Select "SD card"
open to browse the contents of Cary.
Remove memory card:
Method 1: Close all applications or documents which have been opened from the card.
MID User Guide
5
Press the card lightly. It will be ejected partly. Pull the card out. Upper left corner of the screen
will prompt "has been removed SD card".
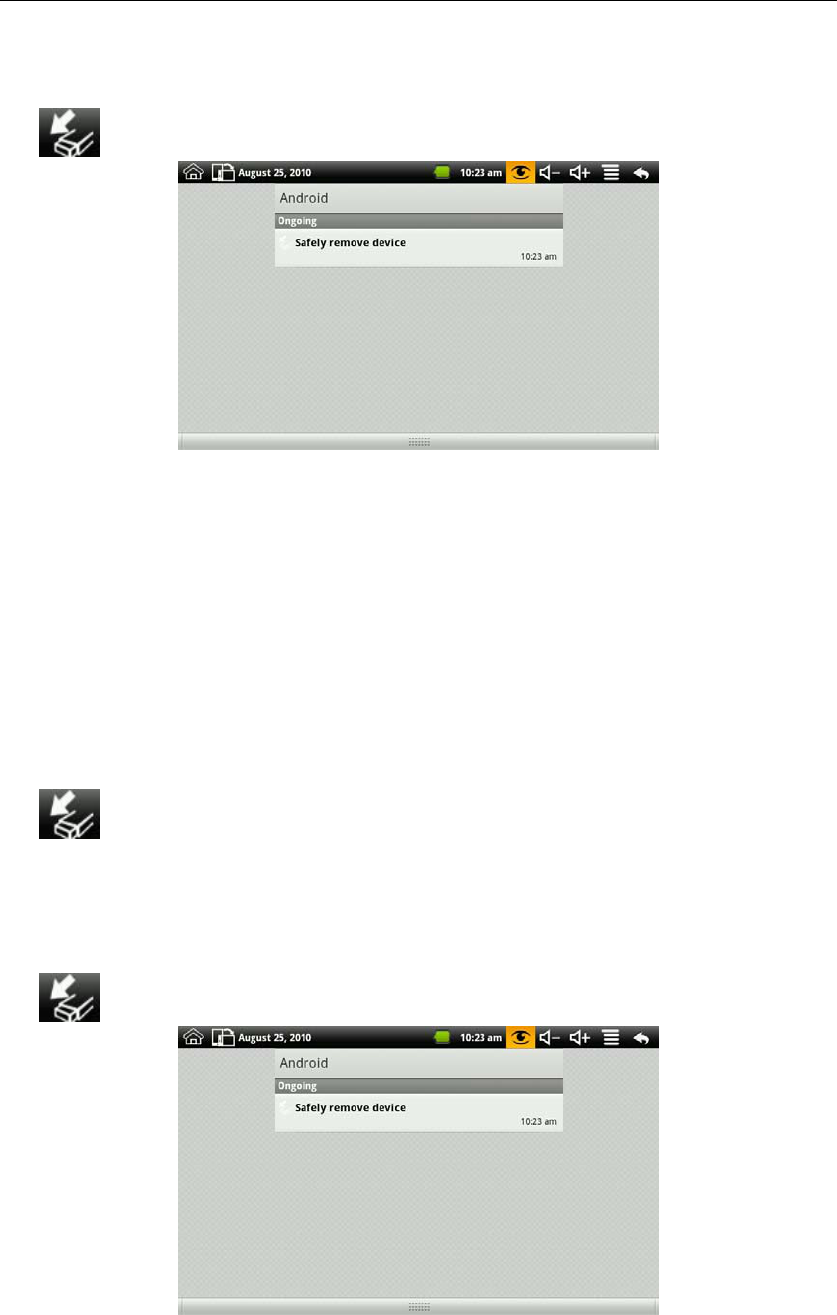
Method 2: Close all applications or documents which have been opened from the card. Click
icon , it will show the next interface:
Click “Safely remove device” it will enter “SD card, U-disk &device storage”. Click “Unmount
SD card” and the status of the screen will prompt "has been removed SD card". And then you can
unplug the SD card.
Note:
1. Insert card to the right position. Otherwise it will damage the card.
2. Once the card has been locked, it can not be formatted or written.
3. Don’t insert and remove the card repeatedly in a short time. It may cause the card damaged.
4. Suggest using major brands of memory card to avoid any incompatibility.
2.3 How to use U disk
Insert U disk:
Insert the U disk to the transfer box, and then insert the transfer box to device switch interfaces.
Screen status bar Tip: Preparing U disk. After the status bar in the top of the screen will display the
icon , and directly into the File Browser to open U disk folder.
Remove U disk:
Method 1: Close all applications or documents which have been opened from the U disk. Press the
MENU → Settings → SD card, U-disk &device storage, click “Unmount U-disk” and the status
of the screen will prompt "has been removed SD card". And then you can unplug the U-disk.
Method 2: Close all applications or documents which have been opened from the U disk. Click
icon , it will show the next interface:
Click “Safely remove device” it will enter “SD card, U-disk &device storage”. Click “Unmount
U-disk” and the status of the screen will prompt "has been removed U disk". And then you can
unplug the U-disk.
Note:

MID User Guide
6
Don’t insert and remove the U disk repeatedly in a short time. It may cause the U disk damaged.
2.4 Remove and insert memory card and U disk
Please don’t remove the memory card and U disk while you are using the files of it. For
example, when you are viewing files in my photo, my video or my music, you remove the
memory card or U disk directly may cause the memory card and U disk damaged and the device
may exit automatically for protection. Remove memory card please refer to“2.2 How to use
Memory Card”; remove U disk please close all applications or documents which have been
opened from the U disk.
2.5 Storage Space
The device has three storage spaces: Internal device storage, U-disk and memory card. Internal
device storage is divided into system storage space and LocalDisk. The memory card named
“sdcard”; and the external U disk named “udisk”. System space only for storing system files;
LocalDisk can be used to store data files, the user can use space in the localdisk is probably 1GB.
The U disk and memory card is on its specific capacity, the maximum support to 32GB memory
card.
The specific storage-related information, please refer to 9.5 SD card, U-disk &device storage.
2.6 Power On and Off
1、Power On: When power adaptor is plugged, User can long press Power button (2 seconds) to
enter the Window Platform.
2、Power Off: User can long press (2 seconds) power button, then system will pop up equipment
selection dialog box. Select shutdown, System will then pop off the confirmation dialog box,
select OK you can shut down. User can long press (8 seconds) power button to shut down the
machine.
3、Hibernate: User can long press (2 seconds) power button, then system will pop up equipment
selection dialog box. Select dormancy, the system will into hibernation. In hibernate mode press
the power button to boot, and press the other key is invalid.
4、Airplane mode: User can long press (2 seconds) power button, then system will pop up
equipment selection dialog box. Select airplane mode, the system will into airplane mode.
2.7 Vibrate
Open vibrate:
Click volume icon on the status bar to adjust the volume to zero to put it on vibrate mode.
Close vibrate:
Make the volume is not zero, and then the vibrate mode closed.
2.8 Interface rotation
System interface can rotate the screen automatically according to the direction of the device.
Screen time on a two second, the conversion process will become dimmer, the screen rotate to
normal after finishing.
2.9 External Network Cable and U Disk
Transfer Box:
If you want to connect Ethernet or USB, you need to connect a transfer box first.
External network cable:
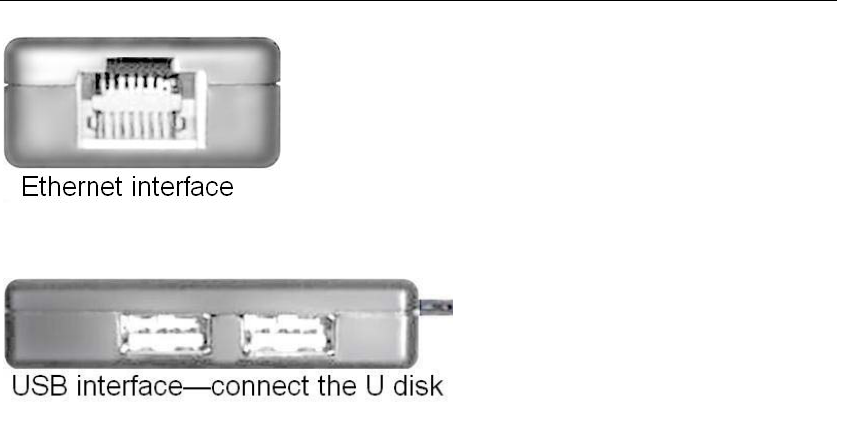
Make the interface of the adapter connect to
the USB interface of the device. There are
two USB interface and an Ethernet interface
on the adapter. You can connect external
network cable and U disk.
MID User Guide
7
External U disk:
2.10 Connecting to the Internet
Connecting to the internet by Ethernet:
Make the transfer box connected to the USB switch interface of the devices, and then plug the
network cable into the Ethernet port of the transfer box, in the upper right corner of the screen
appears "ETH".MID automatically obtain IP address via DHCP to connect the network. If you
want to set IP, please go to the Ethernet, and refer to “8.2 Convenient Set”.
Connecting to the internet by Wi-Fi:
1. Click MENU key to pop-up the menu, and then select "Settings";
2. Select "Wireless Control" in the settings menu;
3. Select the box behind to open Wi-Fi;
4. Open Wi-Fi Settings;
5. All the AP in the vicinity will be listed, click to select the name you want to connect to AP;
6. If the AP before the connection is successful, the AP information will be saved in the pop-up
window, select "Connect" starts to connect, choose "forget" to remove AP information;
7. If the AP is not encrypted, in the pop-up window, select "Connect" Start Connection;
8. If the AP is encrypted, enter the password in the pop-up window, and click "Connect" Start
Connection;
9. When internet connections are successful, the wireless connection icon in the status bar appears.
ADSL Settings:
The specific operations please refer to “8.2 convenient setting” ADSL settings.
2.11 USB connection
Device can connect to the computer, and then can copy files each other. If the devices with
memory card, it will display two available disks in the computer after connecting the computer.
One is memory card, and the other is the internal device storage.
Connect:
1. Make the device connected to the computer with USB data wire;
2. Now the device has been connected with the computer, then going to My Computer under
removable disk devices can copy files among the internal device storage, SD card and the
computers.
Turn off:
Method 1.Tap MENU→Notification→Turn off USB storage, and then tap “Turn off” you can
disconnect the device and the computer after the pop-up boxes.
Method 2.Click to move the letter icon on the computer, and select the security you can disconnect
the device connected to the computer.
You can unplug the USB cable after disconnecting.
Insert the network cable into the Ethernet interface like the left
picture after the adapter is connected to the device. You can
get the IP address automatically and also can select to set the
IP address by hand.
Insert the U disk into the USB interface
like the left picture after the adapter is
connected to the device. You can copy files
among SD card, U disk and internal device
storage after the U disk is connected to the
device. Copy method you can refer to“7.3
File Browser”.

MID User Guide
8
3. Input Operation
3.1 Keyboard
When you need to enter text and numbers using the program or file, the touch screen keyboard
will appear automatically.
The device support for external USB keyboard, and when using an external USB keyboard
support shortcut keys, the shortcut keys corresponding to the following functions:
The device support USB keyboard and when using the USB keyboard can support some shortcut
keys, the following shortcut key features :
Key Function Key Function
F1 Browser F2 My Music
F3 My Video F4 My Photo
F5 Magic Album F6 Camera
F7 Camcorder F8 Alarm Clock
F9 Calendar F10 File Browser
F11 YouTube F12 Setting
Prt Sc Picture capture Shift Switch between English
and Chinese
Home Back to desktop End Screen Timeout
Menu Search
Esc Back
Ctrl + Alt
+Del
Power off immediately
(Note: no dialog box
prompts directly off)
Note: Under the current Android system, when use the external USB keyboard Pause Break, Page
Up, Page Down, and Insert keys have no effect (depending on the external USB keyboard you
use).
3.2 Touch Screen
Touch Screen senses the finger trajectory and can do the following:
Note: Please do not place objects on the touch screen surface, it may be scratched or crushed.
Click: Select an icon to click, and then you can select the icon or option;
Long press: Select a single icon and do long press and then you can drag it to the desktop display.
Drag and Drop: Drag the desktop you can switch between the three interfaces.
In the process of using the screen process you can use a pencil instead.
MID User Guide
9
4. Desktop
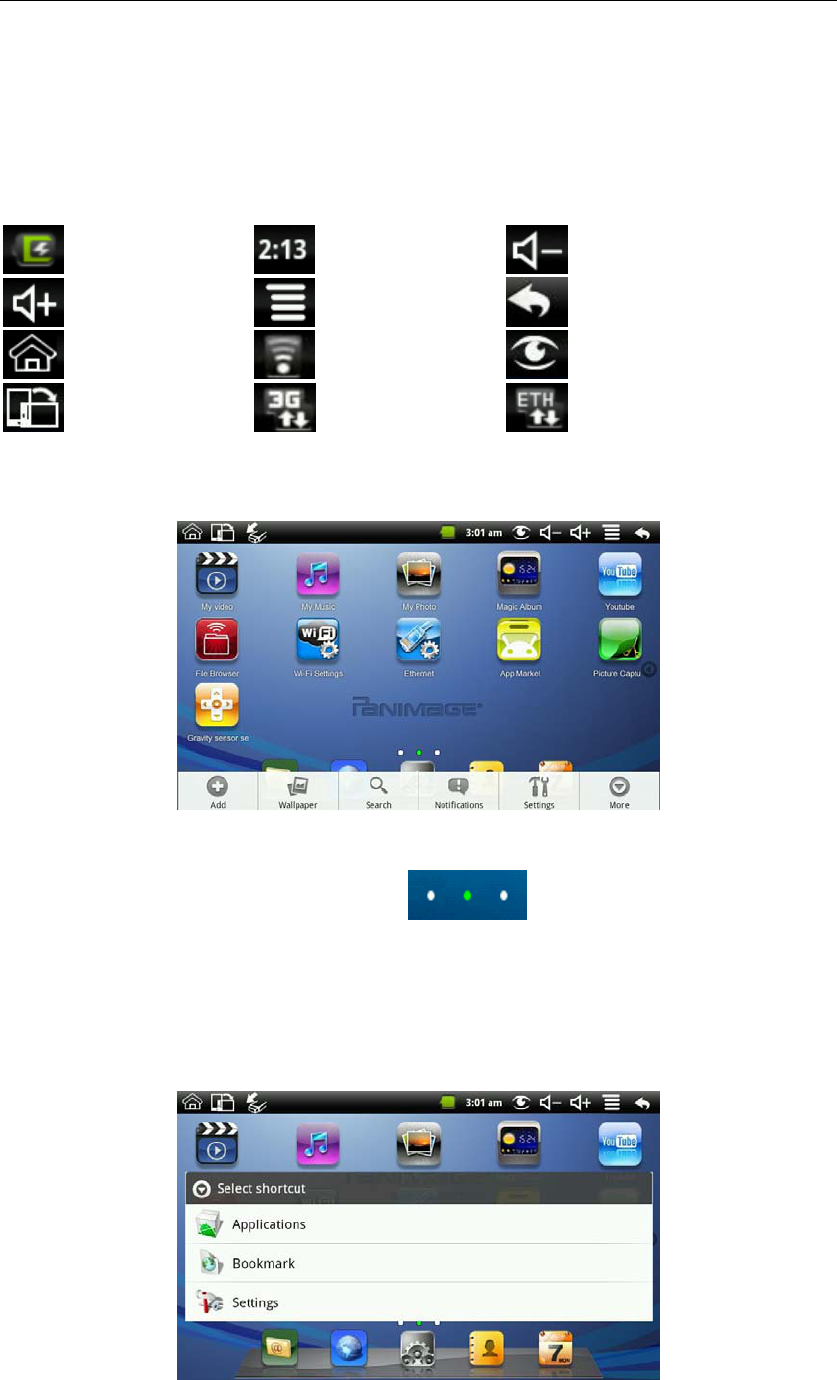
4.1 Status Bar
The top screen for the status bar, display SD card, network, battery status, time and volume
change, etc…
Battery status icon Time display Volume reduction icon
Volume increase icon Shortcut menu icon Back icon
Desktop icon Wi-Fi status icon Picture capture icon
Rotating screen icon 3G icon Ethernet icon
4.2 Shortcuts
On the desktop, press the MENU, bottom of the screen will pop up the shortcut menu. Menu items
include: Add, wallpaper, search, notification, settings and hide. It shows like the following picture:
4.3 Current Desktop Lamp
The device Desktop has three dots light, that is, a total of three interfaces, the current interface will
display the green dot. If the indicator shows like , then the current in the second
interface.
4.4 Add To The Screen
Shortcuts
To add a shortcut to the main screen, press MENU → Add → Shortcuts. Select the shortcut and
then it can be added to the main screen. After adding you can click the shortcut icon on the main
screen to do the corresponding shortcuts.
MID User Guide
10
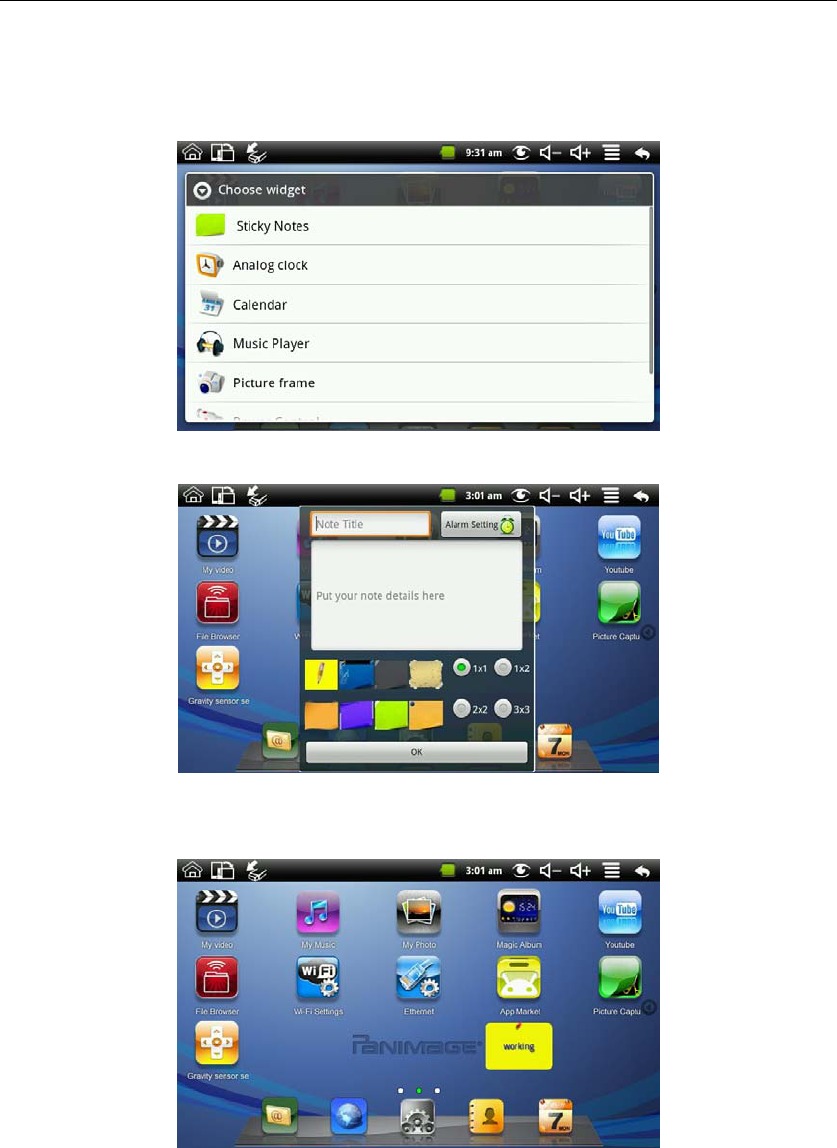
Widgets
To add a widgets to the main screen, press MENU → Add → Widgets. Select the widget and
then it can be added to the main screen. The widgets can add to the screen like:
For example: click “Sticky Notes” to enter the Sticky Notes’s setting interface:
Input the Note Title and the note details, and then set the alarm to finish a note. You can choose
the type of the note. The next picture is the paper note has been created to display in the screen.
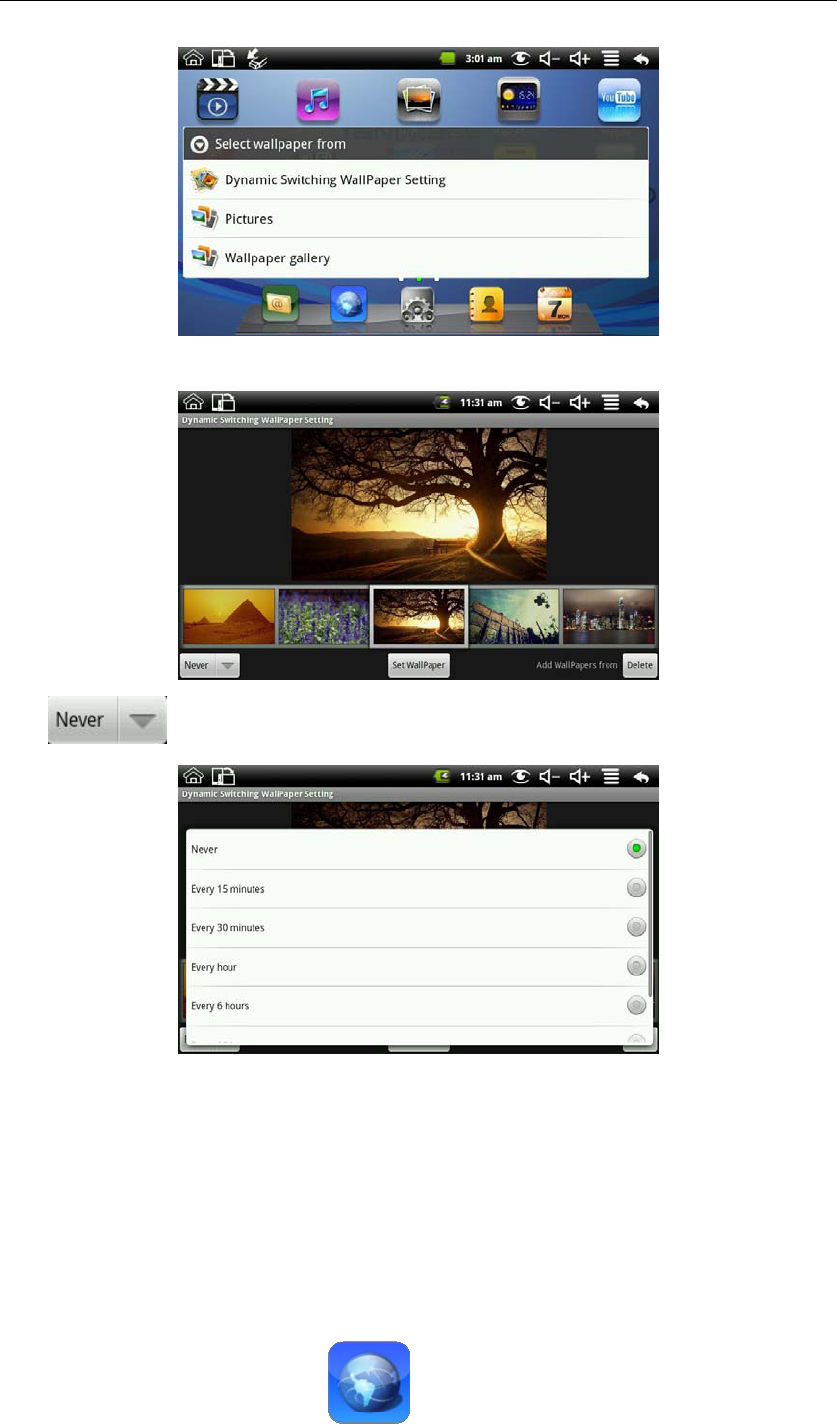
Wallpapers
To add wallpapers,please press MENU → Add → Wallpapers. You can select wallpapers from.
MID User Guide
11
Click “Dynamic Switching Wallpaper Setting” to enter the next interface:
Click can set the time of Dynamic wallpaper settings automatically switch:
Click “Set Wallpaper” can set the selected picture to wallpaper, and click “Delete” can delete the
selected picture from the Dynamic Wallpaper Gallery. Add dynamic wallpaper please refer to 7.4
My Photo.
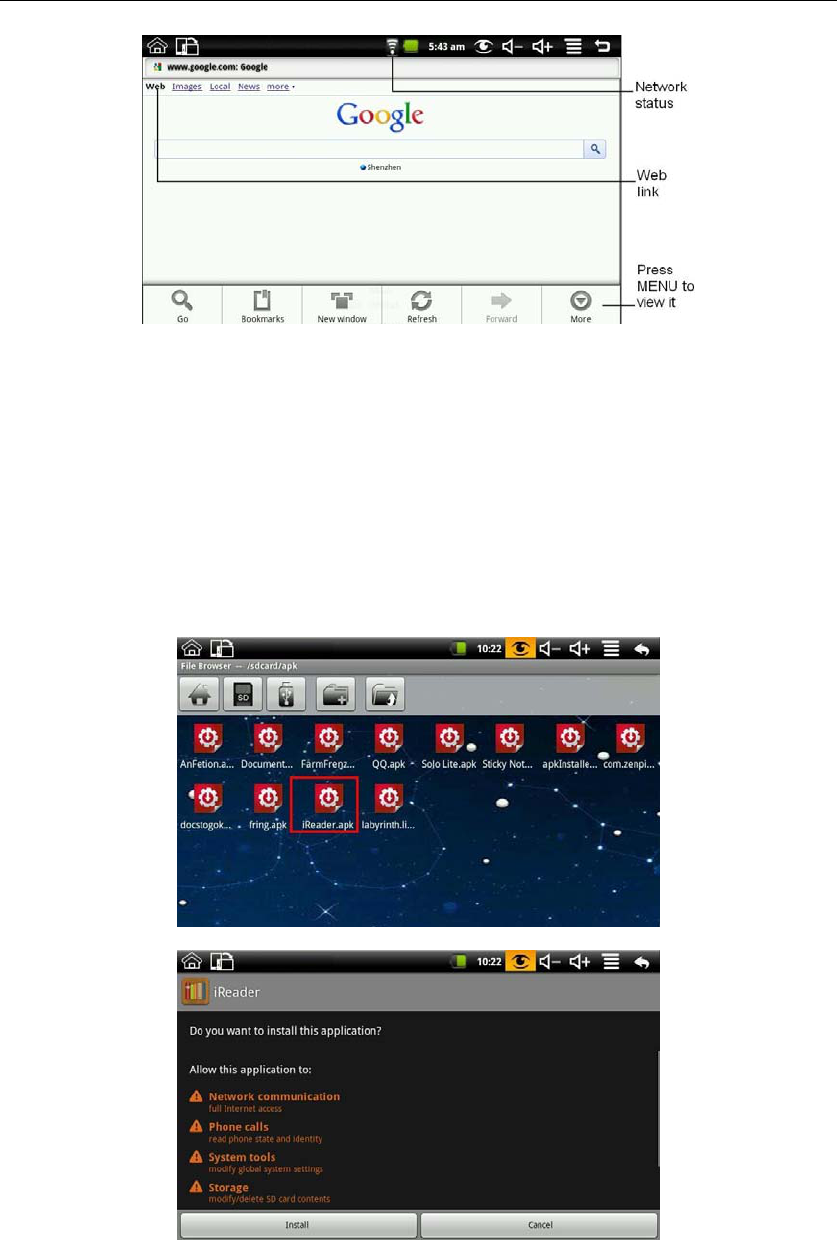
5. Web Browsing
Users can connect to the Internet through a browser.
Click the browser icon on the Desktop , and then you can open the Web browser.
MID User Guide
12
6. Application Management
This chapter describes the software install, uninstall and download the software from the App
Market.
6.1 Install and Uninstall
Install
To install third-party software, please enter file browser first. And then find the APK file from the
memory card, like the following picture:
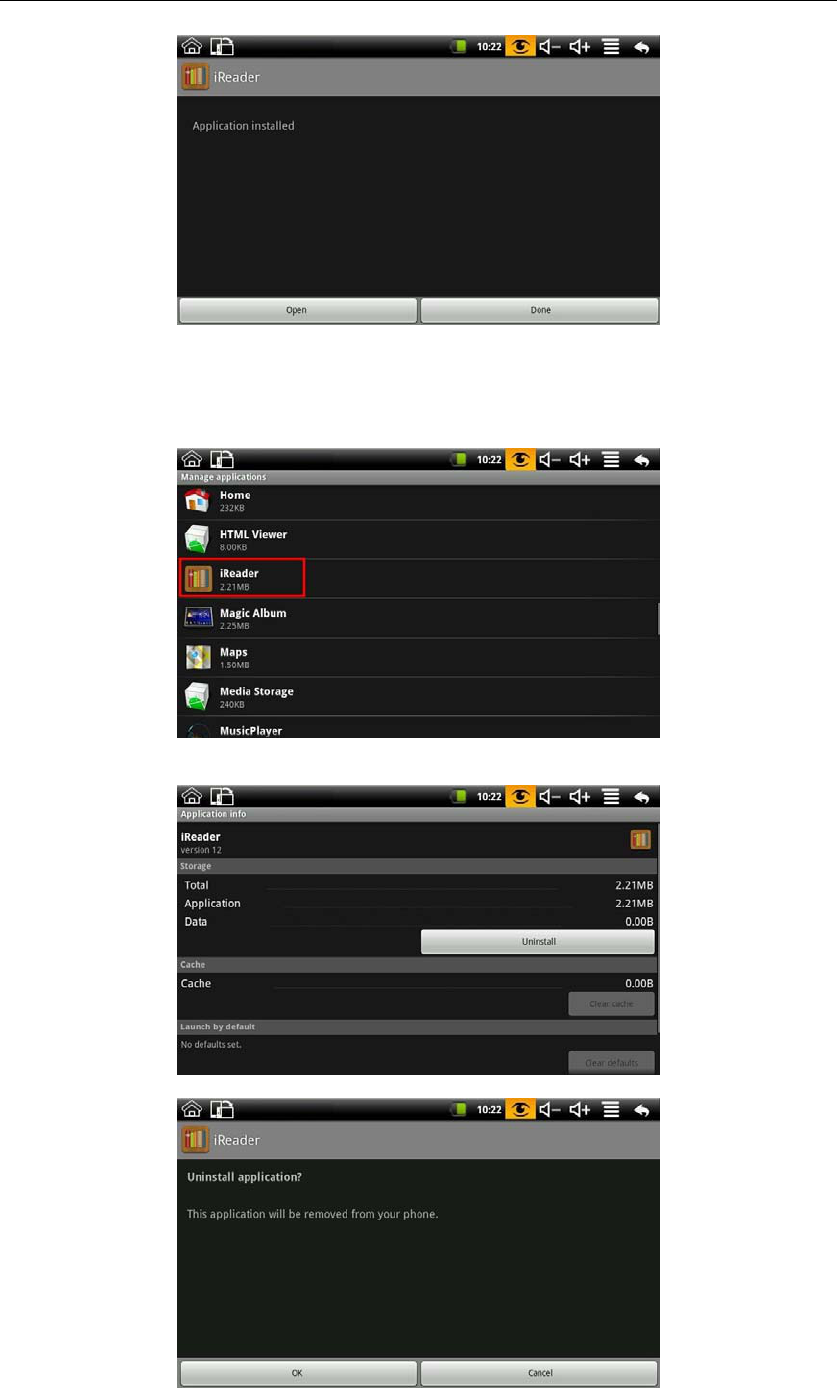
Click iReader.apk like the above picture to pop up the install interface:
Click install button, and then the device will begin to install iReader. It shows like the following
picture after installing:
MID User Guide
13
Now the application is installed. Click open can open iReader directly and click done to back to
the file browser.
Uninstall
To uninstall third-party software installed, press MENU → Settings → Applications →
Management applications. Like the following picture:
Click the application you want to uninstall, like iReader on the above picture. It will pop up the
uninstall interface like the following picture:
Click Uninstall to enter the confirmation uninstall interface:
Click OK to uninstall the application. Uninstall finished interface shows like the following picture:

MID User Guide
14
By now, iReader is uninstalled from the device.
6.2 App Market
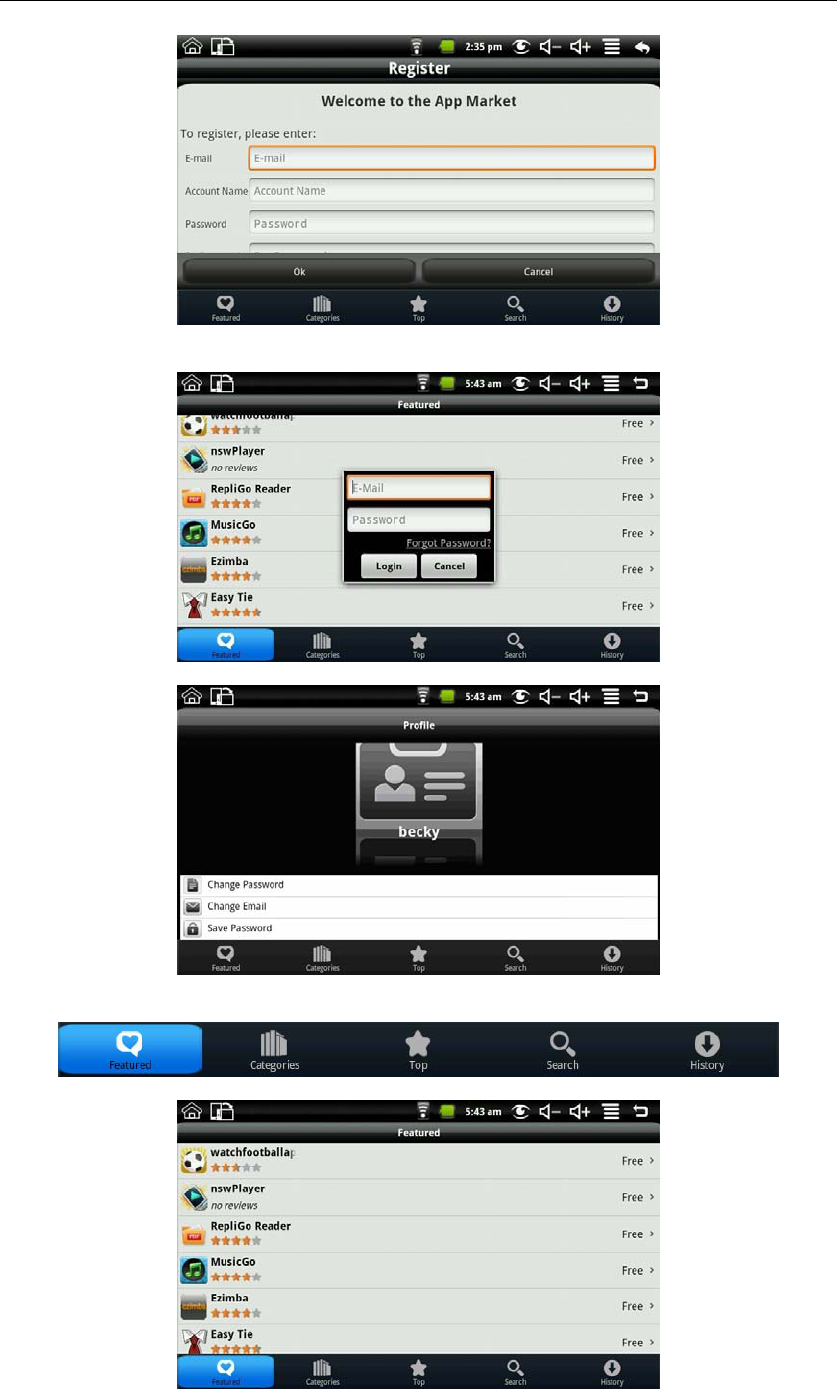
Click App Market icon to enter the following interface:
You can click on the Featured, Categories,Top, Search and History to see the relevant information.
Press MENU to pop-up shortcut menu as follows:
Click login, it shows like:
If no account, select register, and you need to enter E-mail, Account Name and password. The
registration interface as follows:
MID User Guide
15
If there is account, select the login, and enter the account number and password to login; it shows
like:
After login you can enter the following interface:
You can choose to change password, change Email and save password. If you want to download
the application software, you only need to click the icon on the following picture:
For example: click featured to enter the next interface:
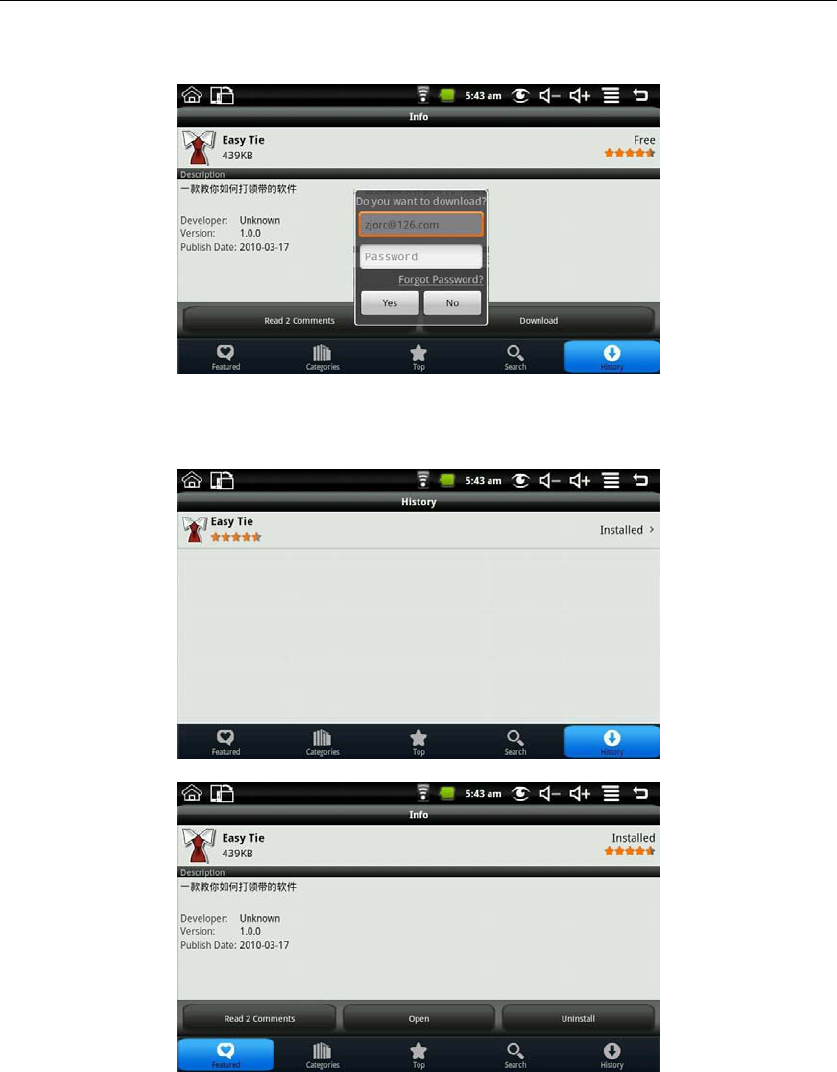
Click the application you want to download to enter the details interface. Click download, it will
MID User Guide
16
pop up enter account password. Enter your account password after the start the download. The
next picture is an example for Chinese Chess:
After the download is complete it will pop up installation tips automatically, click install the
application can be installed on the device.
After installation is complete you can click history to manage the installed applications. As the
following figure on history for the application:
The action could do with the application are: comment, open and uninstall.
Click comment you can comment with the application; click open you can open the application;
click uninstall you can uninstall the application from the device.
7. Typical Applications Introduced
7.1 Chat Tools
You can download the chat tools such as FRING, QQ and MSN.
7.2 E-mail
MID User Guide
17
Click the E-mail icon can enter the e-mail, and then you can proceed as follows:
1. Set e-mail account;
2. Open a new e-mail;
3. Send and receive e-mail.
Note: Press MENU to pop-up shortcut menu.
7.3 File Browser
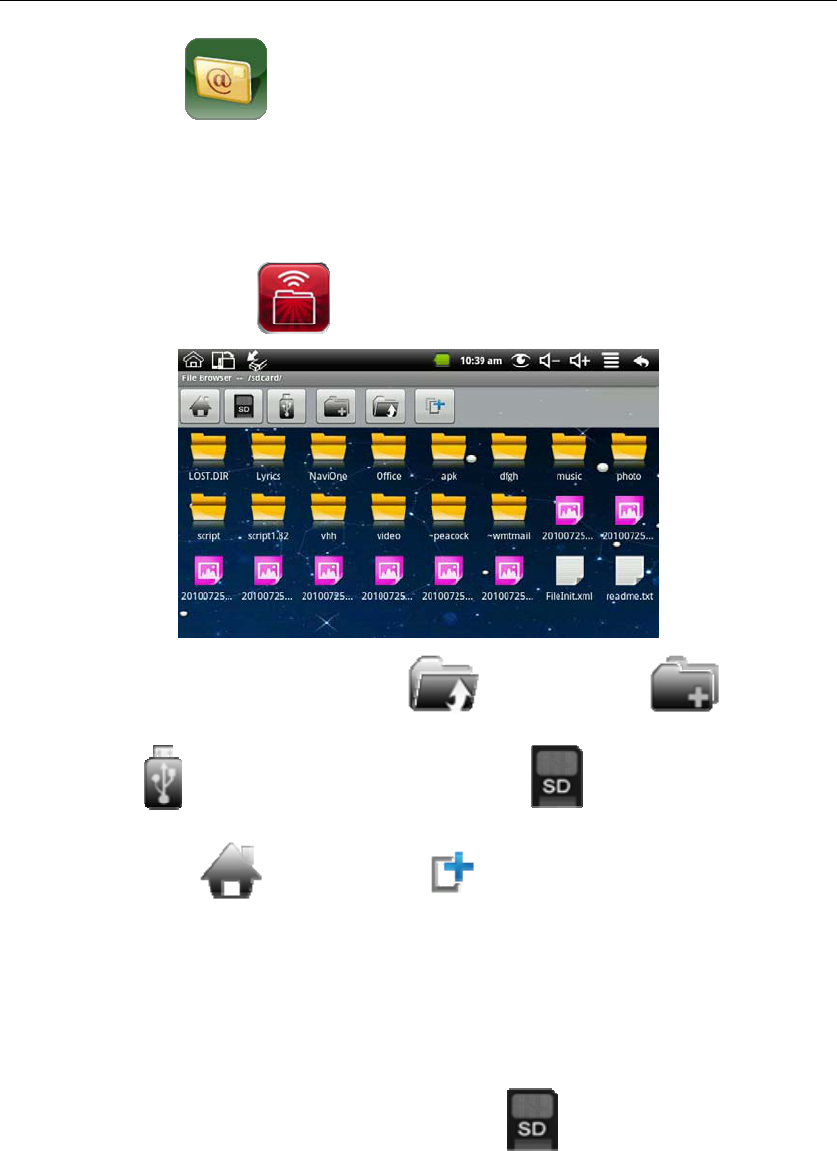
Click the file browser icon to enter file browser interface:
In the file browser, it can back to the previous , create new folder , switch to U
disk “udisk” , switch to memory card “sdcard” , switch to internal device
storage “Local Disk” and Multi-select .
Copy files:
In the file browser, the internal device storage named “LocalDisk”; the memory card named
“sdcard”; and the external U disk named “udisk”. If you want to copy files among memory card,
U disk and internal device storage, please refer to the following actions:
Example: copy files from external U disk to the internal device storage.
1. Enter the file browser and click the memory card icon to enter the sdcard folder;
2. Select the file you want to copy and press the icon for 2 seconds, then it will pop the
following list:
MID User Guide
18
3. Click copy;
4. Click the internal device storage icon to enter the LocalDisk folder;
5. Long press the blank to pop the following list:
6. Click paste to paste this file into the current directory.
Delete files:
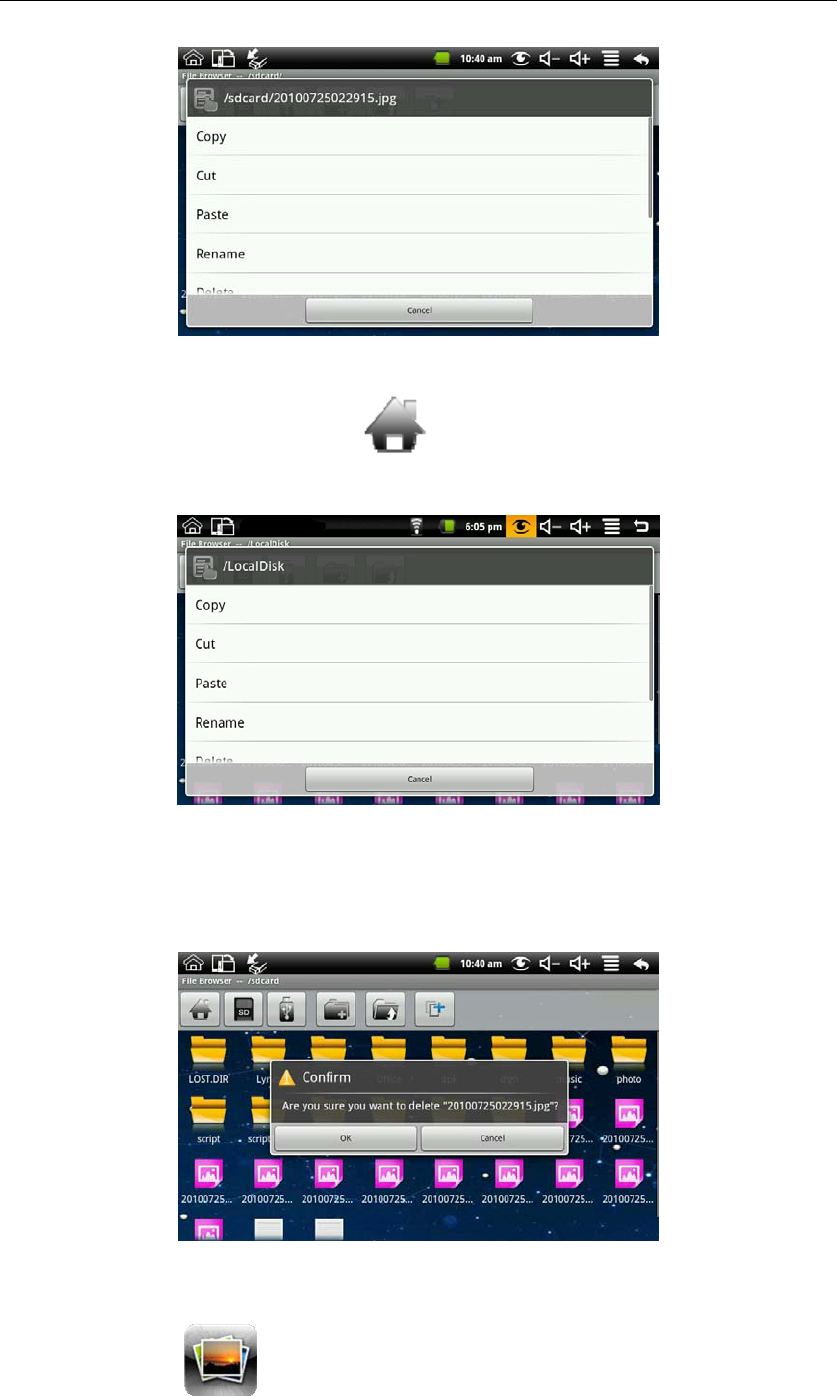
Select the file you want to delete and press the icon for 2 seconds, then it will pop an operating list.
Select delete to pop the following confirmation delete dialog:
Click OK to delete the file.
7.4 My Photo
Click My Photo icon to browse pictures:
MID User Guide
19
Click on any picture to enter slideshow mode. The mode can be full-screen pictures, rotate
pictures, select the picture effect, change the picture arrangement, operation and slide play set.
Click to switchable arrangement of pictures;
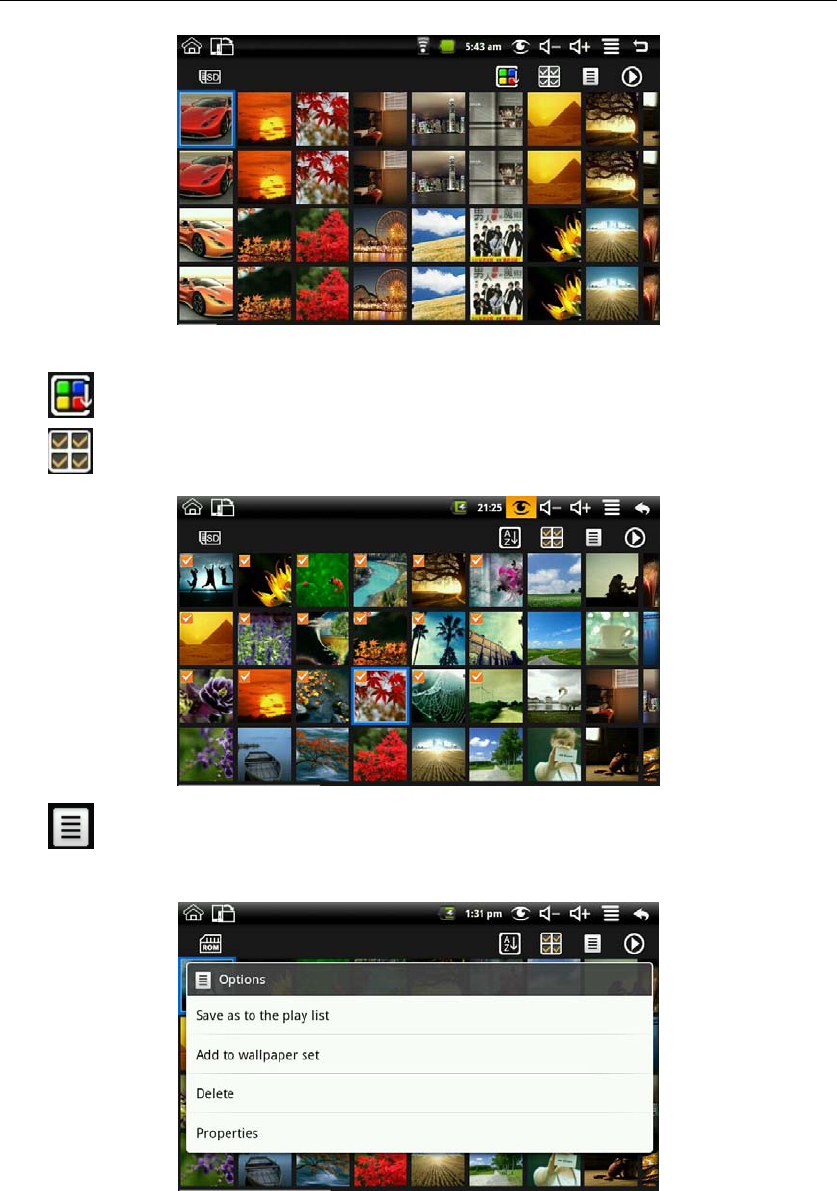
Click to make multiple, like the next interface:
Click can do delete and properties, in multiple you can save as to the play list and add to
wallpaper set.
Multiple choice picture and click Save the playlist that is more than the current selection of images
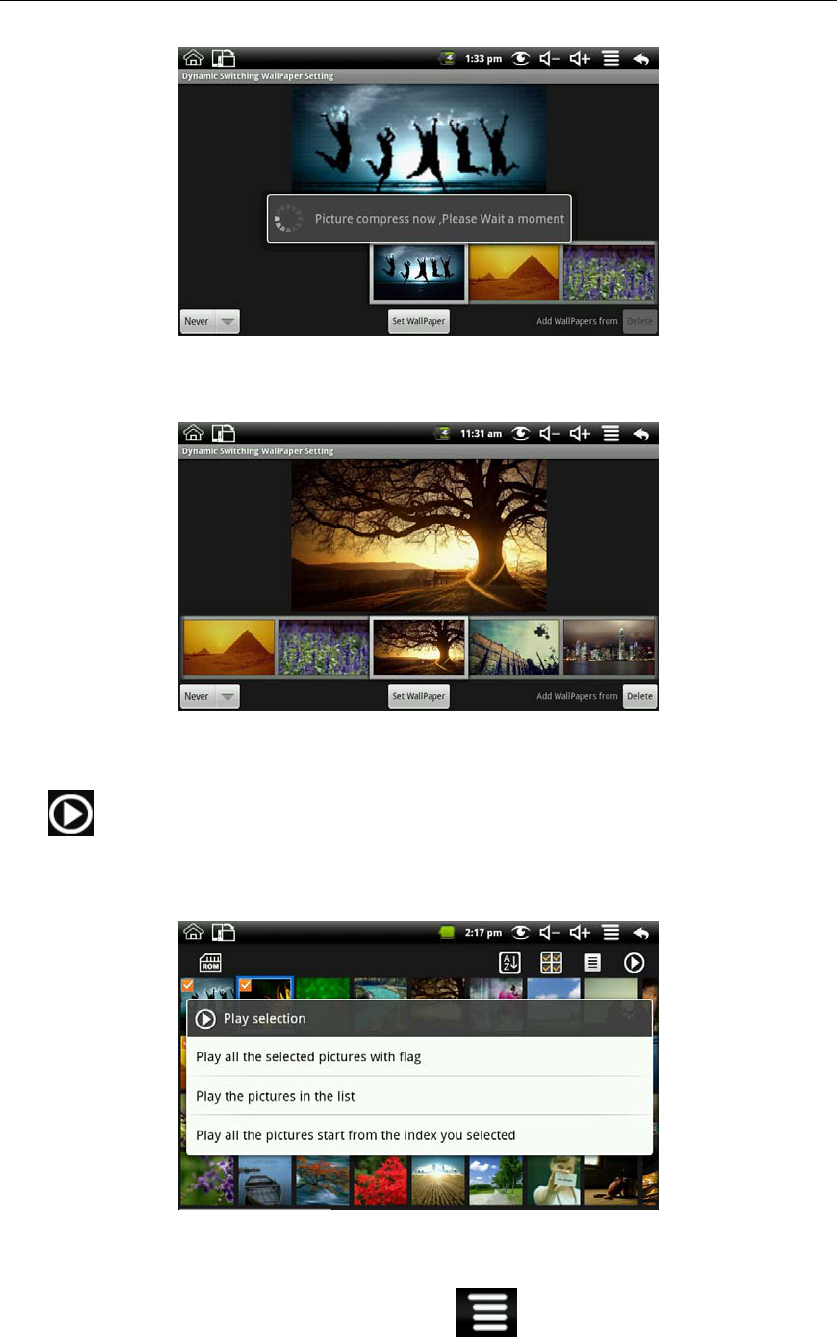
saved for Slide list. Multi-select images and click to set wallpaper and more elections began to
save the wallpaper image compression:
MID User Guide
20
After finish compress, you will enter “Dynamic Switching Wallpaper Setting”, and it shows like
the next picture:
Management of the wallpaper from the menu can be entered on the map interface, the specific
wallpaper management operations please refer to 4.5 Add to the screen.
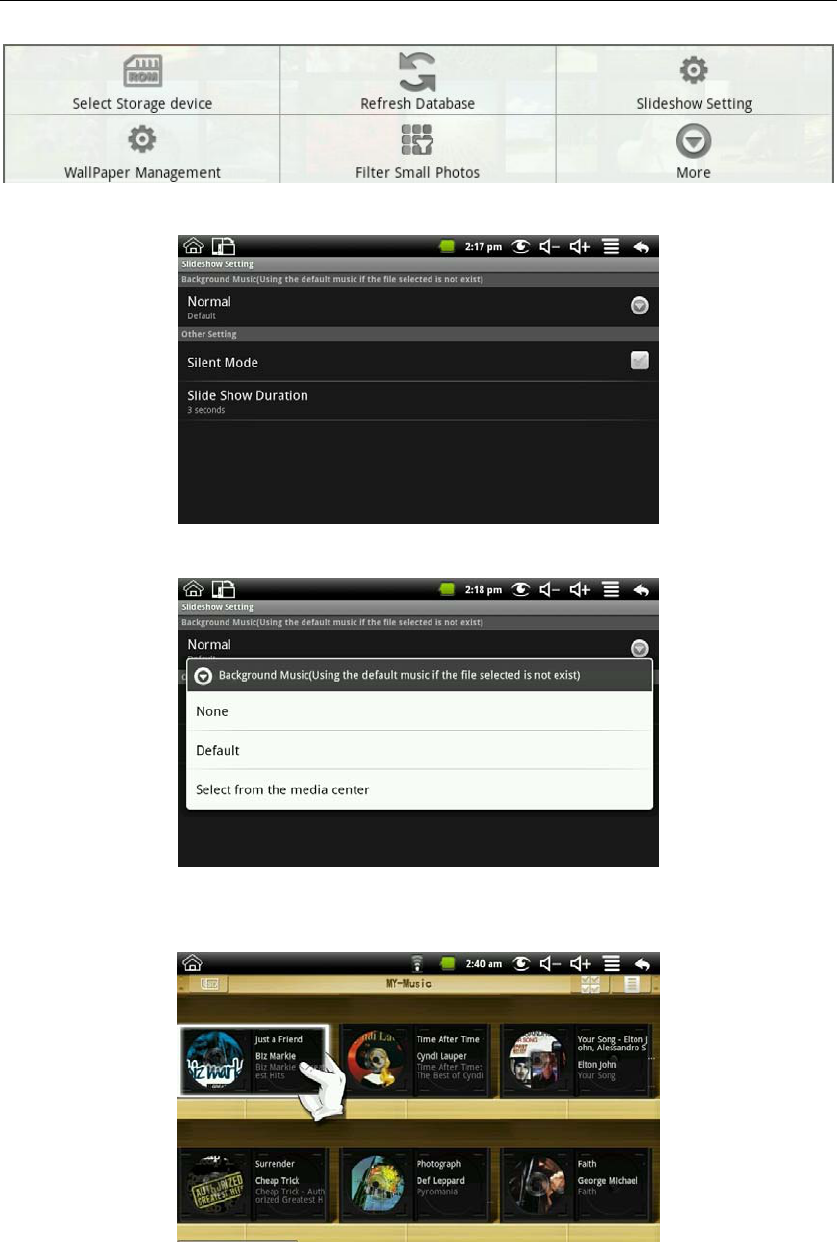
Click can do play selection,include “Play the pictures in the list” and “Play all the pictures
start from the index you selected”, in multiple it also include “Play all the selected pictures with
flag”.
After finish play selection will begin playing.
Slideshow Setting:
In My Photo press MENU button or click menu icon it will pop up the next list:
MID User Guide
21
Click “Slideshow Setting” to enter the next interface:
Click “Normal” to enter background music setting:
Select “None” with none music, select“Default” with the default music, select “Select from the
media center” to enter the next interface:
Click one of the music it will pop up a “Select the music?” dialog, click “Sure” to set it to the
background music of normal.
In the Slideshow setting can set Silent mode and Slide show duration. There will be none
background music when you select “Silent mode”. Select “Slide show duration” can set the
duration of the slide show.
MID User Guide
22
Click can do delete and properties;
Click can set the picture slide player mode. There is general play, miss, dynamic, romantic,
quiet and clean.
Filter folder:
Press MENU button or click MENU icon in My Photo will pop up the following shortcut
menu:
Click filter folder in the more and then you can filter all the folders with photos, like the following
picture:
If “Select/Clear All” is selected, all the photos will be displayed; and if “Select/Clear All” is not
selected, there will no photo be displayed.
If you don’t select one folder single with “Select/Clear All” is selected, the photos in this folder
will not be displayed; and if you select one folder single with “Select/Clear All” is not selected,
there will only displayed the photos in this folder.
The picture format can be supported: JPEG, BMP and PNG.
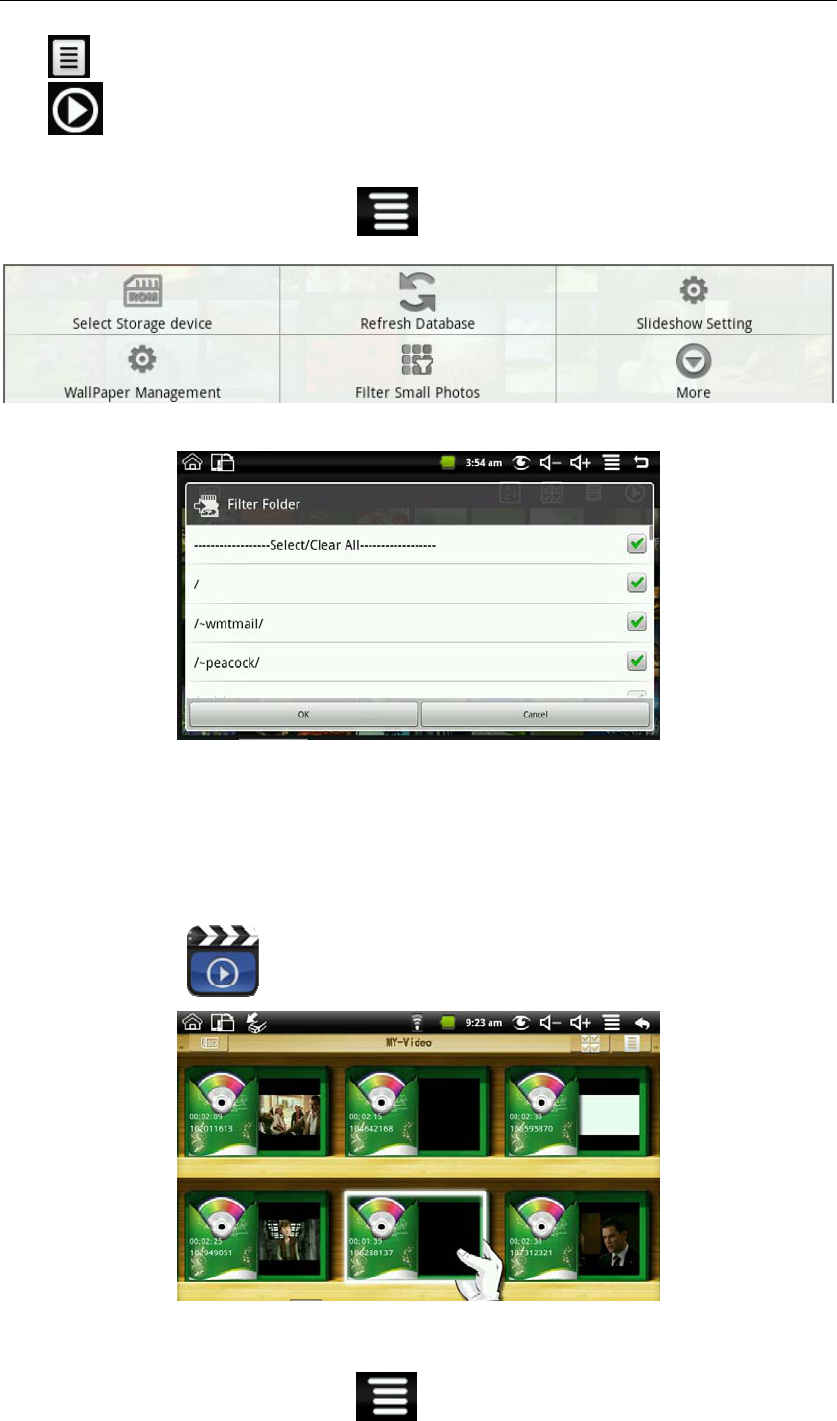
7.5 My Video
Click My Video icon to get in the list of the video
Click one of the video can be broadcast, can adjust the volume during playback, fast forward,
rewind, pause, adjusting brightness and return.
Filter folder:
Press MENU button or click MENU icon in My Video will pop up the following shortcut
MID User Guide
23
menu:
Click filter folder and then you can filter all the folders with videos, like the following picture:
If “Select/Clear All” is selected, all the videos will be displayed; and if “Select/Clear all” is not
selected, there will no video be displayed.
If you don’t select one folder single with “Select/Clear All” is selected, the videos in this folder
will not be displayed; and if you select one folder single with “Select/Clear All” is not selected,
there will only displayed the videos in this folder.
The video format can be supported: H263, MPEG4 and 3GP. It supports 320x240 resolution
and less than or equal 512KBPS stream video.
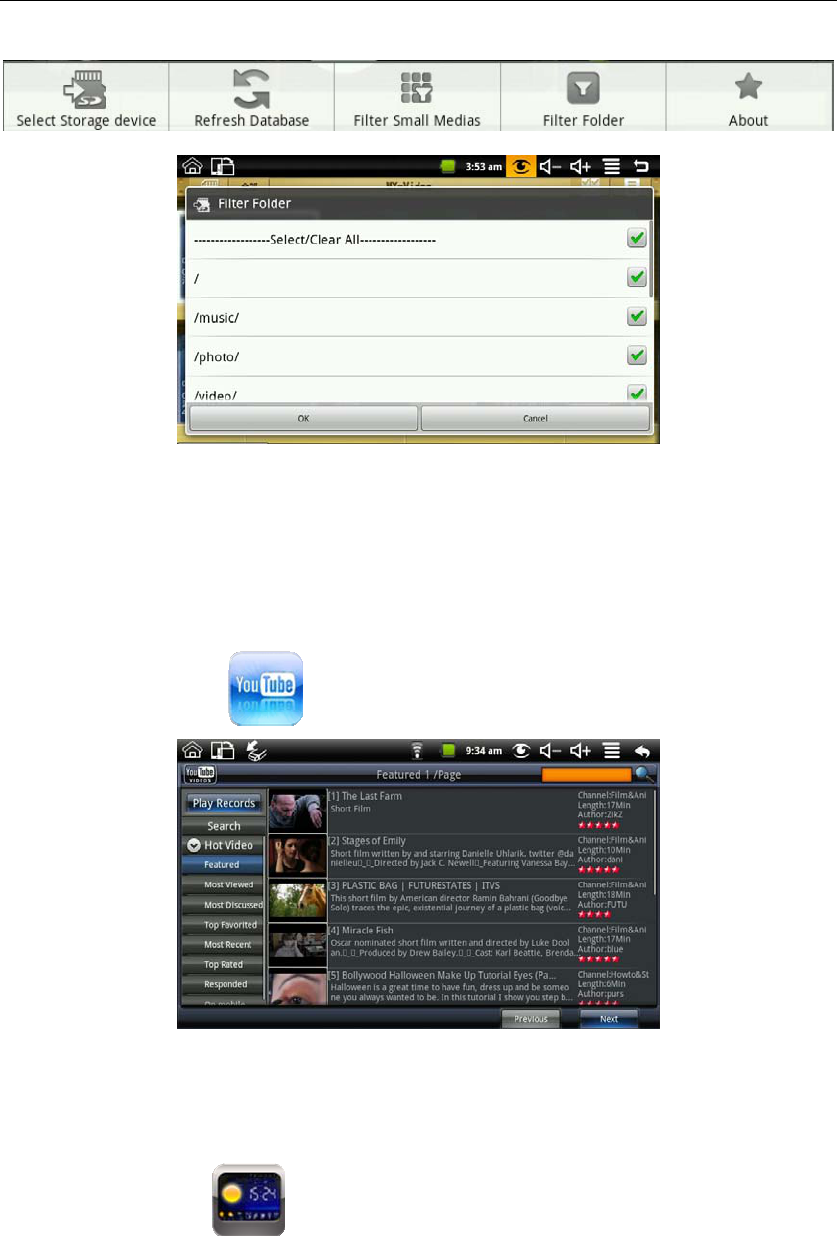
7.6 YouTube
Click YouTube video icon to view all videos:
Search: You can input a search.
Hot Video: Including by featured, most viewed, most discussed, top favorited, most_recent, top
rated, responded and on mobile.
Click the video on the list can be directly played.
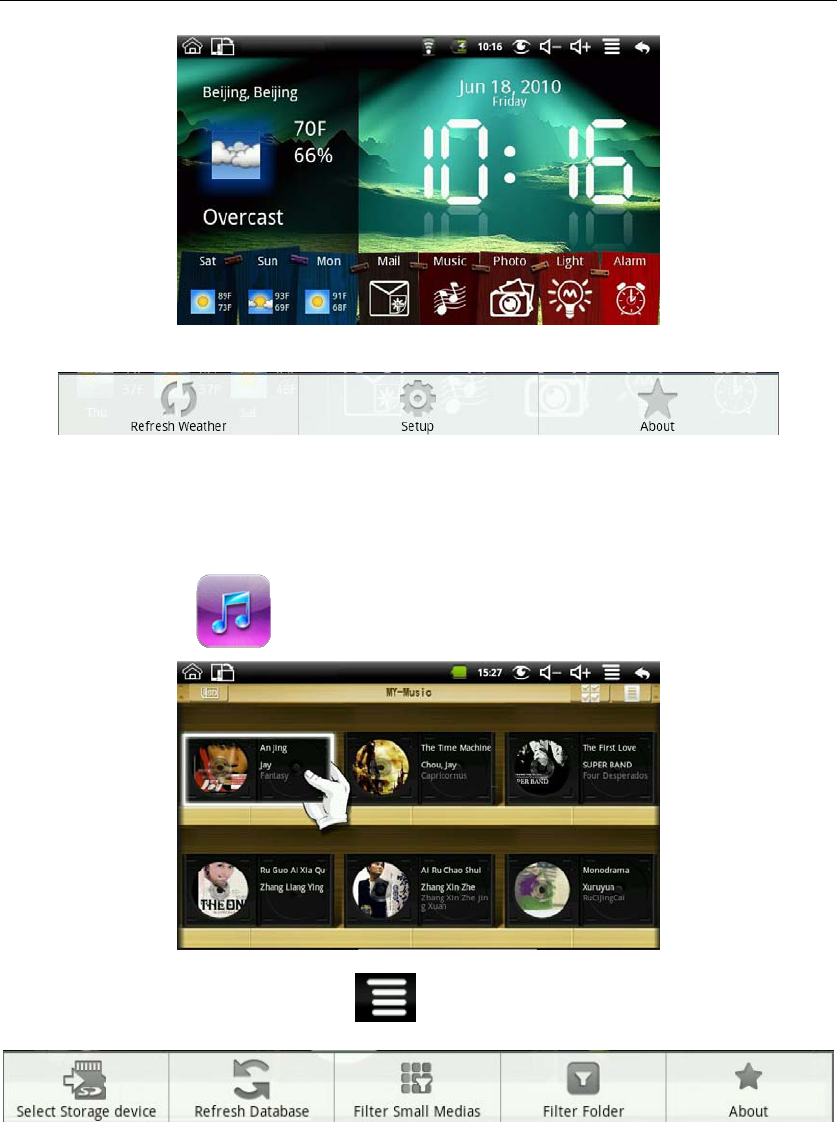
7.7 Magic Album
Click Magic album icon into the magic album interface. It can display weather, date and
time, My Photo, my music, brightness adjustment and alarm clock.
MID User Guide
24
Click the mail icon to enter my photo to view all of the pictures in the Email.
Press MENU to pop up the shortcut menu, including flushing the weather, setting and on.
Setting: Can do the city, date and time, the background image, open the screensaver settings.
Photo Mail:
When the system out a new mail instructions, enter the magic album, the Mail icon will become
green. Click the mail icon into my photo to check the picture of e-mail.
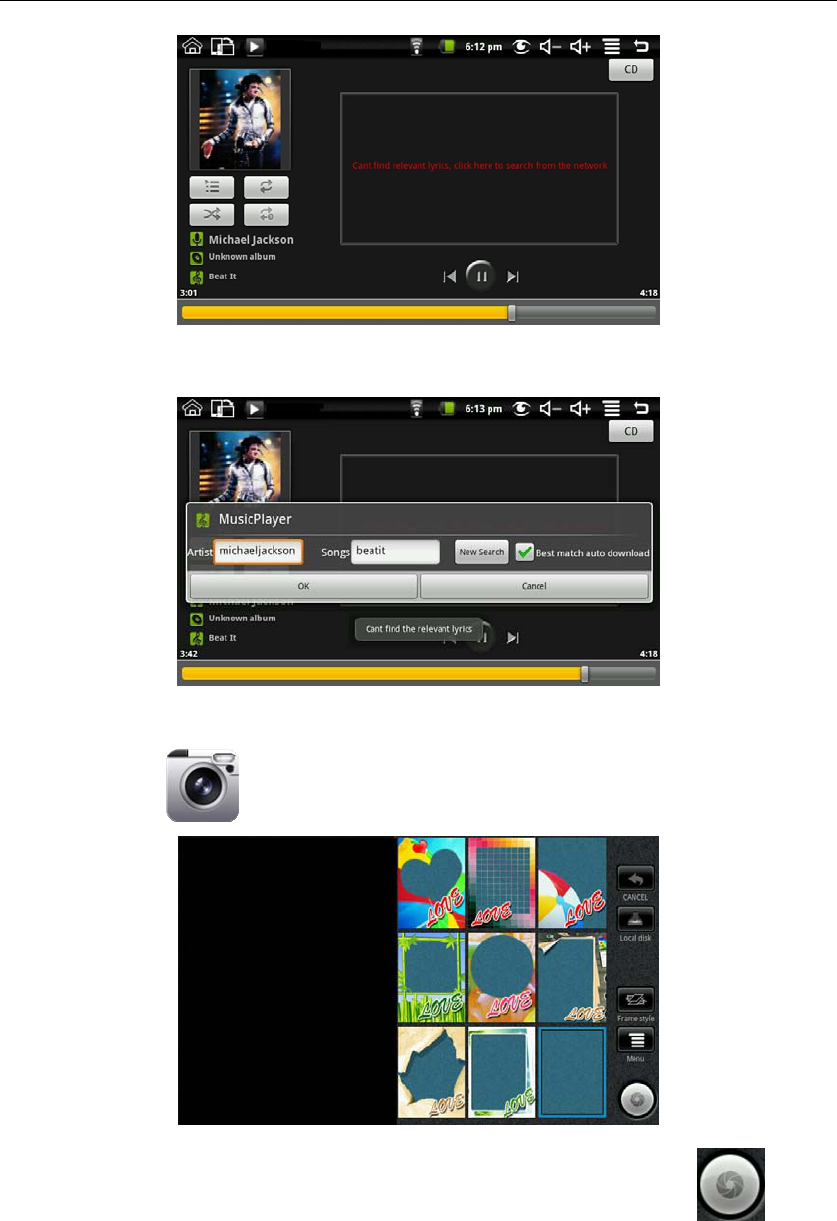
7.8 My Music
Click My Music icon to enter it, and you can click to play songs.
Filter folder:
Press MENU button or click MENU icon in My Music will pop up the following shortcut
menu:
Click filter folder and then you can filter all the folders with music, like the following picture:

MID User Guide
25
If “Select/Clear All” is selected, all the music will be displayed; and if “Select/Clear all” is not
selected, there will no music be displayed.
If you don’t select one folder single with “Select/Clear All” is selected, the music in this folder
will not be displayed; and if you select one folder single with “Select/Clear All” is not selected,
there will only displayed the music in this folder.
Play music:
Click the volume increase and the volume reduction icon of the status bar can adjust the volume.
In the process of play music you can drag CD discs through your fingers to achieve quickly turned
and hit back :
Click the lyrics button on the top right corner and then the discs icon will become to lyrics table. It
shows like the following picture:
Click the up and down arrows icon in the right the Lyrics can fast forward and rewind.
If there are no relevant lyrics, it will display like the following picture after clicking the lyrics
button:
MID User Guide
26
Click the lyrics box on the above picture, and then it will appear a search box. Input the singer’s
name in the artist, input the song’s name in the songs, and select best match auto download. Then
press OK to download the lyrics from the network.
The Audio format can be supported: MP3, WAV and OGG.
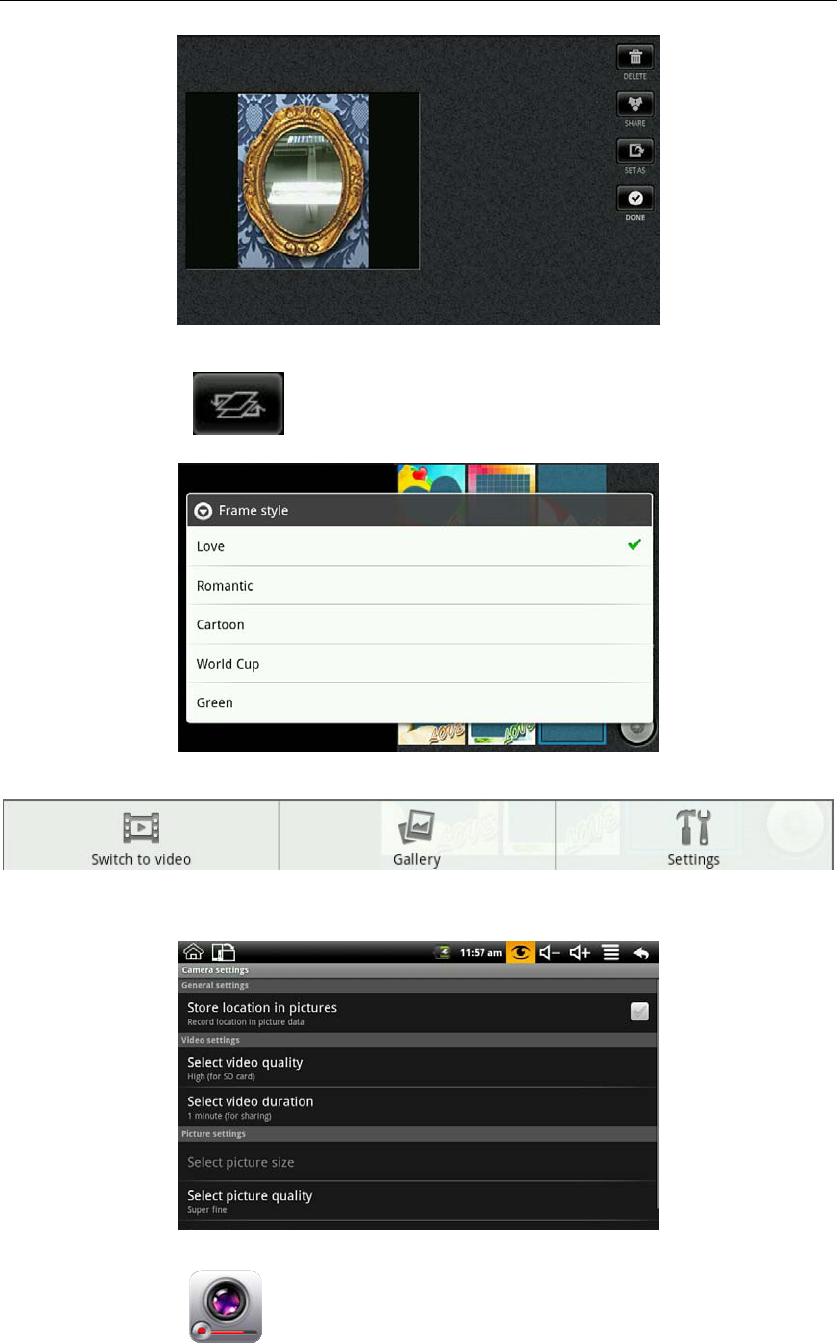
7.9 Camera
Click Camera icon to get in, and you can take photos.
Click photo frame can take different photo stickers. You can choose to save photos in LocalDisk
or memory card, the default is saved the photos in the LocalDisk. Click the icon to take
pictures, and then select a frame to enter photo storage interface.
MID User Guide
27
Click “Done” to save the photo and back to the camera interface.
Frame style:
Click Frame style icon can switch different frame style, and the frame styles of specific
types can be switched as follows:
Menu functions:
Press MENU to pop-up the next shortcut menu:
Click the Gallery into Gallery to view all photos taken with the camera.
Click Settings to enter the camera settings, you can do camera-related settings. Include: Store
location in pictures, Select picture size, Select picture quality and Select focus mode.
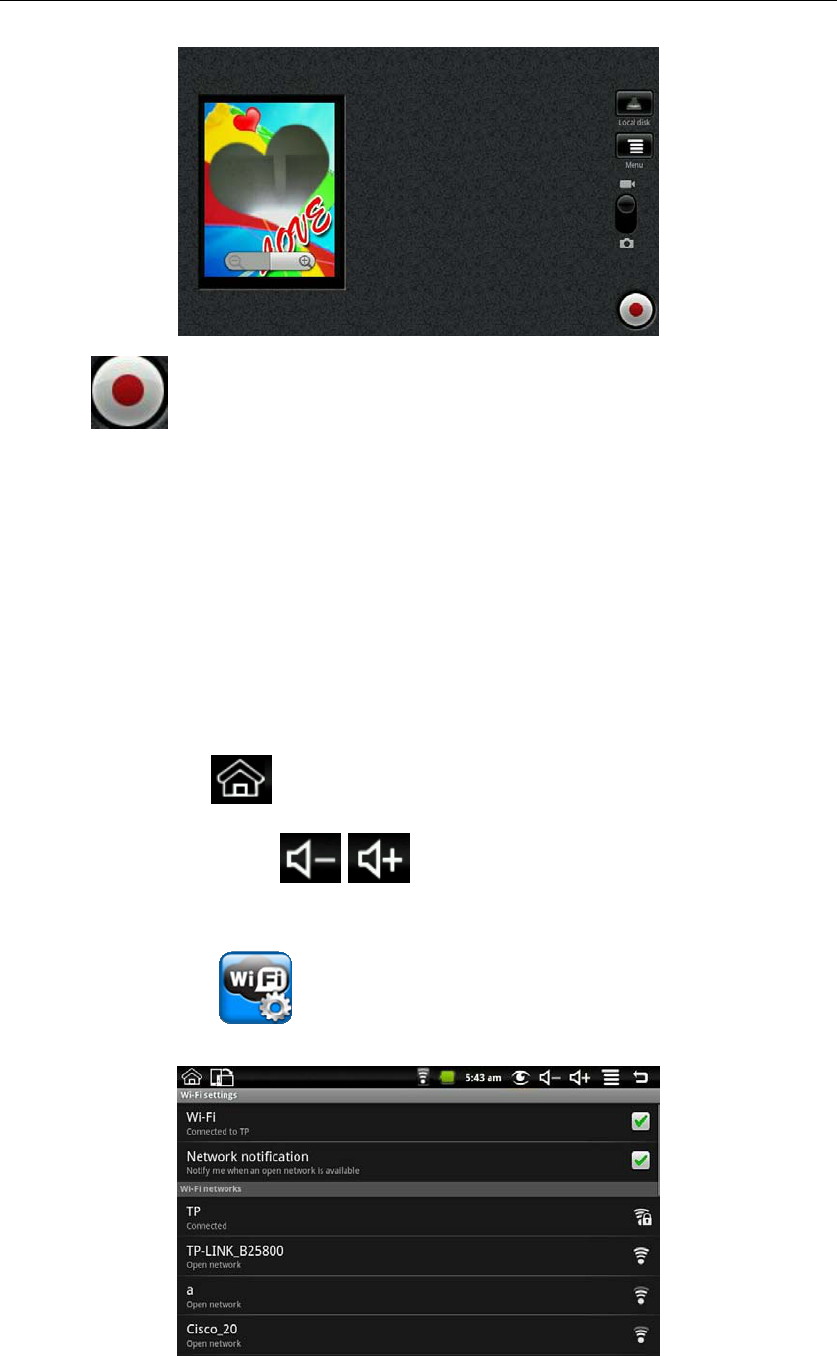
7.10 Camcorder
Click camcorder icon to enter,you can record video.
MID User Guide
28
Click icon to begin recording, and click it again to stop recording. The videos are stored
in LocalDisk by default. And you can also choose to store it in memory card.
Click “Switch to camera” can switch to camera to take pictures.
Click “Gallery” can enter the Gallery to view all the videos.
The settings in the menu please refer to 7.9 Camera.
8. Tips and Tricks
8.1 Some convenient mode of operation
Home screen——Click , or pressing “Back” button 2 seconds long can be back to Home
screen.
Adjusting the volume——Click /
8.2 Convenient Set
Wi-Fi settings:
Click Wi-Fi settings icon to enter the Wi-Fi settings. The interface to the following figure
shows:
Ethernet:
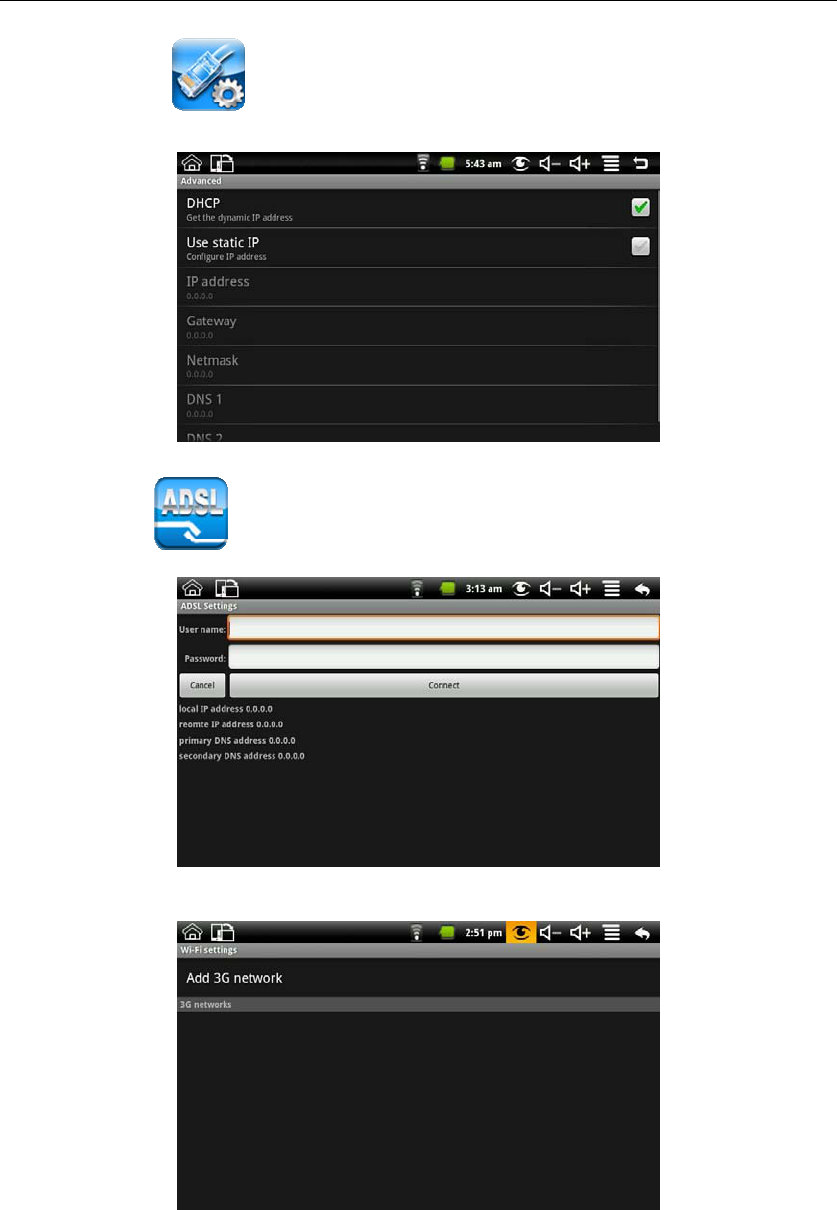
MID User Guide
29
Click Ethernet icon to enter the Ethernet. You can set IP by hand. The interface to the
following figure shows:
ADSL Settings:
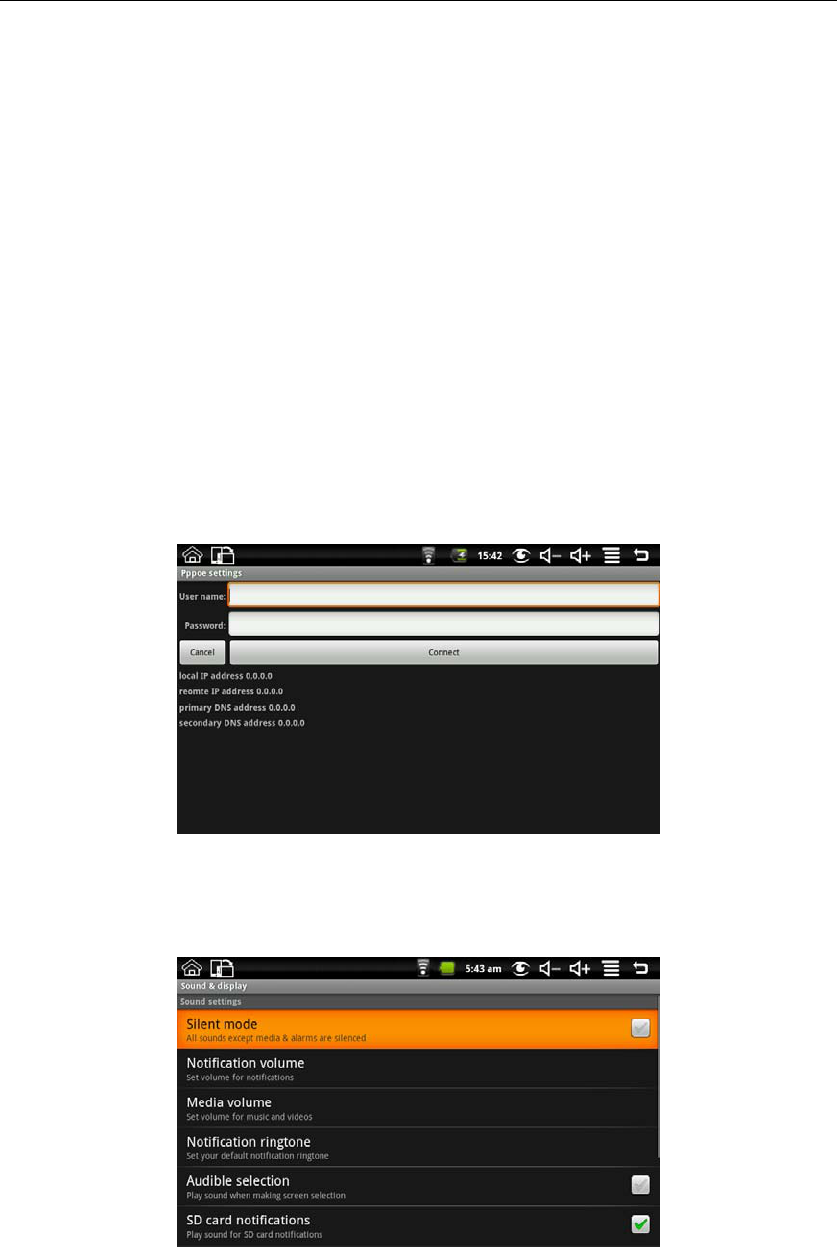
Click ADSL icon ,enter Pppoe settings,and it will shows like:
Input name and password then click connect to access the broadband network.
MID User Guide
30
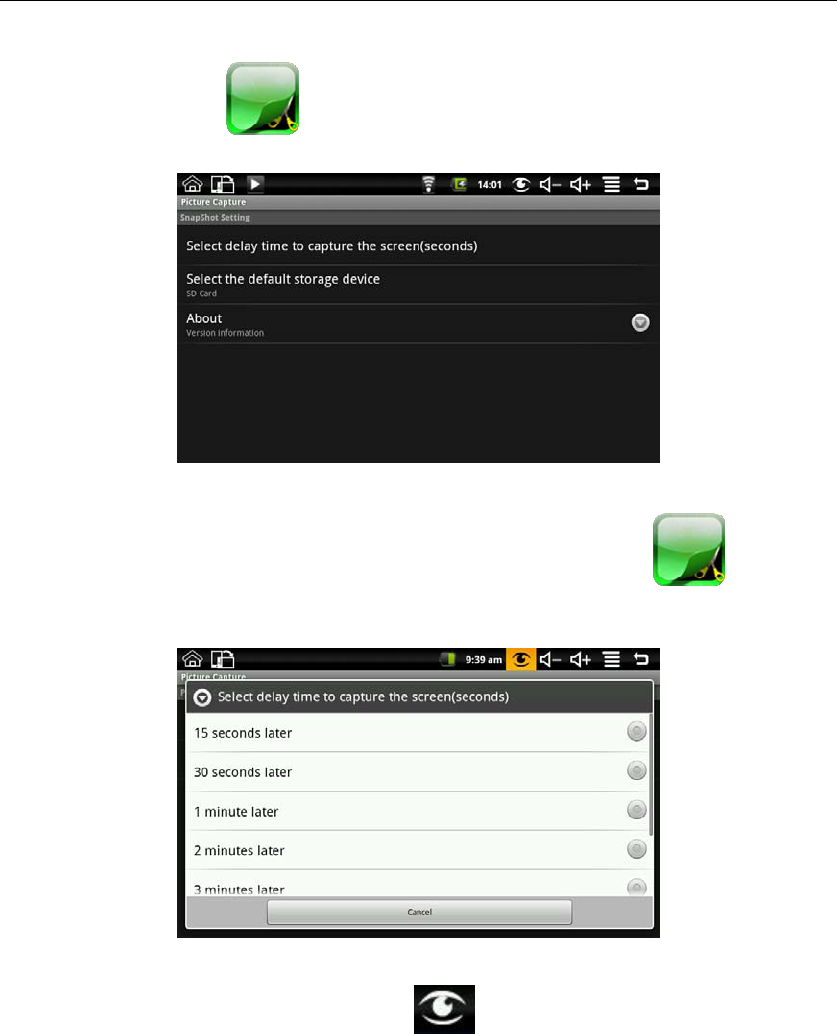
Picture Capture:
Click picture capture icon to do picture setting. You can set select delay time to capture
the screen and select the default storage device.
Picture storage: The pictures captured are saved in the Internal Flash (ROM) default, and you can
select the default storage device to be SD card and USB storage.
Delay capture: if you need to delay capture, please click picture capture icon on the
desktop to enter first, and then select “Select delay time to capture the screen (seconds)” to enter
the next interface like the following picture:
Select the delay time and then the device begin timing, after the timer it will capture the interface.
The method applies to the full screen interface don’t have the status bar to the desktop.
Immediate capture: click the picture capture icon on the status bar to capture the interface.
The method applies to the interface have the status bar to the desktop.
8.3 Battery Tips
As the device has a large screen, it will consume a lot of power. To extend battery life, you can
reduce the frequency of use of the following features:
1. Watching videos, listening to music or take photographs;
2. Display brightness: Please press MENU → Settings → Sound & display (Display Settings)
→ Brightness (reduce the brightness);
3. Web Search: Please press MENU → Settings → Wireless controls → Wi-Fi settings →
Network notification;
4. Wi-Fi use: Please press MENU → Settings → Wireless controls → Wi-Fi (turn off Wi-Fi).
MID User Guide
31
9. Personalized settings
Click the settings on the shortcut menu can be personalized settings.
9.1 Wireless controls
Manage Wi-Fi and airplane mode
Wi-Fi
If you want to open and close the Wi-Fi, please press MENU → Settings → Wireless controls→
Wi-Fi.
Wi-Fi Settings
If you want to set up and manage the wireless access point, please press MENU→ Settings →
Wireless controls → Wi-Fi settings.
Airplane mode
If you want to set airplane mode and disable all wireless connections, please press MENU→
Settings → Wireless controls → Airplane mode.
9.2 Ppoe settings
Connect broadband connection
Press MENU → Settings → Pppoe settings to enter. Input user name and password and then
click connect to connect broadband connection.
9.3 Sound &display
Set t ringtones, notification, and screen brightness.
Silent mode
To make the addition to the media and the alarm clock, all located to mute the sound, press MENU
→ Settings → Sound & display (Sound settings) → Silent mode.
Notification volume
To set the volume of inform, press MENU → Settings → Sound & display (Sound settings) →
Notification volume.

MID User Guide
32
Media volume
To set the volume of music and video, press MENU → Settings → Sound & display (Sound
settings) → Media volume.
Notification ringtone
To set the ring of the default notification, press MENU → Settings → Sound & display (Sound
settings) → Notification ringtone.
Audible selection
To make sound choices for the screen, press MENU → Settings → Sound & display (Sound
settings) → operation sound choice.
SD card notifications
To make the SD card notification sound, press MENU → Settings → Sound & display (Sound
settings) → SD card notifications.
Orientation
Press MENU →Settings → Sound & display (Sound settings) → Orientation, you can switch
orientation automatically when rotating. If you choose “switch orientation automatically when
rotating”, the interface will switch automatically when the device had rotated. If you don’t choose
“switch orientation automatically when rotating”, there will display a rotating screen icon
on the status, and the interface will switch following the device only if you click the
rotating screen icon.
Animation
To open and close the window to display animation, press MENU → Settings → Sound &
display(Display settings) → Animation.
Brightness
To adjust the brightness of the screen, press MENU →Settings → Sound & display(Display
settings) → Brightness.
Screen timeout
To adjust the screen automatically turns off before the delay, press MENU → Settings → Sound
& display(Display settings) → Screen timeout.
Suspend timeout
To adjust the delay before the Device automatically suspend, press MENU → Settings →
Sound & display(Display settings) → Suspend timeout.
9.4 Applications
Unknown Source
After checking it is allowed to install application which is not provided by the electronic market.
Manage applications
To manage and remove the installed applications, press MENU → Settings → Applications →
Management applications.
Development
To set options for application development, please press MENU → Settings → Applications →
Development.
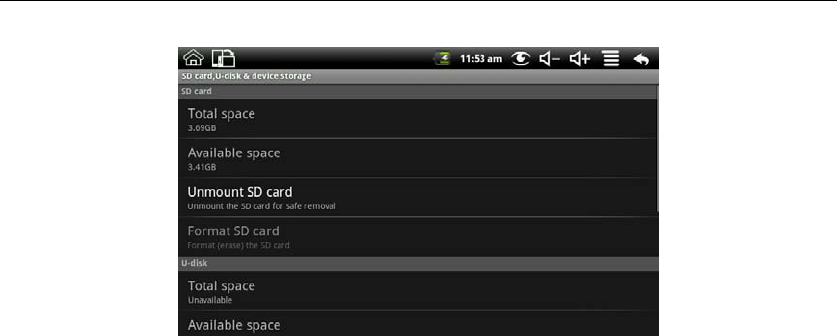
9.5 SD card, U-disk &device storage
Unmount SD card and U-disk, view available storage
MID User Guide
33
SD Card
Total space:
Press the MENU → Settings → SD card, U-disk &device storage(SD card) → Total space,
you can view the total space of SD card .
Available space:
Press the MENU → Settings → SD card , U-disk &device storage(SD card) → Available
space, you can view the available space of SD card.
Unmount SD card:
To unmount the SD card for safe removal, press the MENU → Settings → SD card , U-disk
&device storage(SD card) → Unmount SD card.
Format SD card:
To format (erase) the SD card, press the MENU → Settings → SD card , U-disk &device
storage(SD card) → Formatted SD card.
U-disk
Total space:
Press the MENU → Settings → SD card, U-disk &device storage(U-disk) → Total space, you
can view the total space of U-disk .
Available space:
Press the MENU → Settings → SD card , U-disk &device storage(U-disk) → Available space,
you can view the available space of U-disk.
Unmount U-disk:
To unmount the SD card for safe removal, press the MENU → Settings → SD card , U-disk
&device storage(U-disk) → Unmount U-disk.
Format SD card:
To format (erase) the SD card, press the MENU → Settings → SD card , U-disk &device
storage(U-disk) → Formatted U-disk.
Internal device storage
Total space:
Press the MENU → Settings → SD card, U-disk &device storage(Internal device storage) →
Total space, you can view the total space of Internal device storage .
The Internal device storage has 2 GB space.
System space:
Press the MENU → Settings → SD card , U-disk &device storage(Internal device storage) →
System space, you can view the total space and available space of Internal device storage.
The System space has 0.93GB space, it is used to store system files and install the APK file
system files generated.
LocalDisk:
Press the MENU → Settings → SD card , U-disk &device storage(Internal device storage) →
LocalDisk, you can view the total space and available space of LocalDisk.
MID User Guide
34
The LocalDisk has 1.07GB space, and it is used to store data files.
Factory data reset
To restore factory settings, press MENU → Settings → SD card , U-disk &device storage →
Factory data reset.
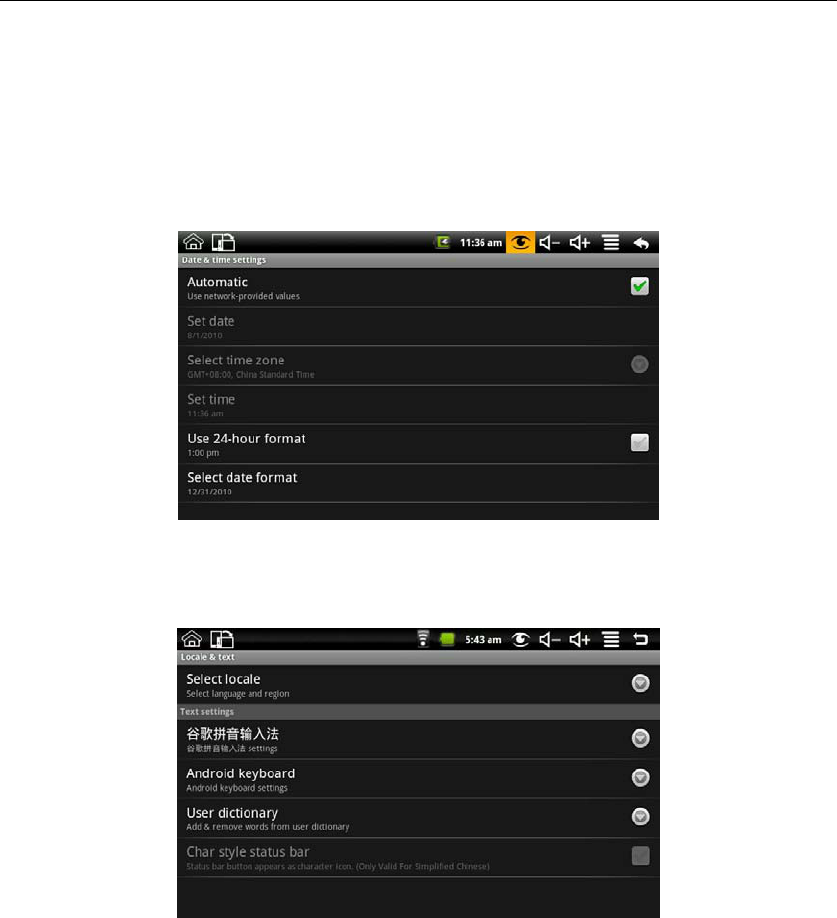
9.6 Date &Time
To set the date, time, time zone, time and format of the system, press MENU → Settings →
Date &Time.
Check the “Automatic”, and it will update the time automatically if the currently connected
network.
9.7 Locale &text
Set local (language and region), text input and auto-correction options
Select local
To select the language and region, press MENU → Settings → Local &text → Select local.
Android keyboard
To choose Android keyboard and do Android keyboard settings, press MENU → Settings →
Local &text → Android keyboard.
Google Pinyin Input Method
To select the Google Pinyin input method, and to set up Google Pinyin input method, press
MENU → Settings → Local &text → Google Pinyin input method.
User dictionary
To add words to the user dictionary and remove the word from the user dictionary, press the
MENU → Settings → Local &text → User dictionary.
9.8 About device
Status
To view the battery status, battery power, WIFI address and boot time, press MENU → Settings
→About device → Status.
Battery use
To view the power situation, press MENU → Settings →About device → Battery use.
Legal information

MID User Guide
35
To view the relevant legal information, press MENU → Settings → About device→ Legal
information.
Model number
To view the model, press MENU → Settings → About device→ Model number.
Firmware version
To view the firmware version, press MENU → Settings →About device → Firmware version.
Kernel version
To see the kernel version, press MENU → Settings → About device→ Kernel version.
Build number
To view the build number, press MENU → Settings → About device→ Build number.
9.9 Touchpanel Calibration
If you want to calibration the touch screen, press MENU → Settings → Touchpanel calibration.
Follow the prompts touch screen calibration, the calibration is complete there will be prompt and
returns the corresponding list of settings.
10. MID Locked
Screen / device lock:
1. When screen idle (do not press any buttons), the device will lock the screen automatically in
accordance with the system;
2. Short press the power button in any system interface can turn off the screen light and lock the
screen.
Screen / device unlock:
1. Press Back or Menu to display unlock screen requirements;
2. If you have a set pattern or password locked, the system will ask you to enter the information.
11. Troubleshooting
11.1 Forced shutdown
Press and Machinery Power key for 5 seconds, device will force the shutdown.
11.2 Restore default settings
To restore the device to factory settings and clear all information, press MENU → Settings →
SD card, U-disk &device storage → Factory data reset.
Warning: Reset the device selected will delete Google accounts, system and application data and
settings, downloading applications, please use this carefully.

MID User Guide
36
12. FCC Note
This device complies with Part 15 of the FCC Rules. Operation is subject to the following two
conditions: (1) this device may not cause harmful interference, and (2) this device must accept any
interference received, including interference that may cause undesired operation.
The manufacturer is not responsible for any radio or TV interference caused by unauthorized
modifications to this equipment. Such modifications could void the user's authority to operate
the equipment.
This equipment has been tested and found to comply with the limits for a Class B digital device,
pursuant to Part 15 of the FCC Rules. These limits are designed to provide reasonable protection
against harmful interference in a residential installation. This equipment generates, uses and can
radiate radio frequency energy and, if not installed and used in accordance with the instructions,
may cause harmful interference to radio communications. However, there is no guarantee that
interference will not occur in a particular installation. If this equipment does cause harmful
interference to radio or television reception, which can be determined by turning the equipment off
and on, the user is encouraged to try to correct the interference by one or more of the following
measures:
-- Reorient or relocate the receiving antenna.
-- Increase the separation between the equipment and receiver.
-- Connect the equipment into an outlet on a circuit different from that to which the receiver is
connected.
-- Consult the dealer or an experienced radio/TV technician for help.