Fisher And Paykel Bi601 451 Users Manual
BI601451 to the manual 36467799-5315-456c-8b2d-ffa6e3b37810
2015-02-02
: Fisher-And-Paykel Fisher-And-Paykel-Bi601-451-Users-Manual-406205 fisher-and-paykel-bi601-451-users-manual-406205 fisher-and-paykel pdf
Open the PDF directly: View PDF ![]() .
.
Page Count: 4

INSTALLATION INFORMATION FOR QUANTUM BI601/451 SERIES BUILT-IN OVENS
Read the instructions before installing or using this
product.
Please make this information available to the person
responsible for installing this oven as soon as possible,
it could reduce your installation cost.
In order to avoid a hazard these products must be installed
according to these instructions for installation.
Please follow installation information carefully. If in doubt
consult your local building authority by-laws.
Failure to install the appliance correctly could invalidate any
warranty or liability claims and lead to prosecution.
The product is to be installed only by an authorised
person.
DO Ensure a suitable disconnection switch is
incorporated in the permanent wiring, positioned to comply
with the Local Wiring Rules and Regulations.
DO Ensure that the location of the oven connection
socket is outside the installation space if the appliance is
flush to the rear wall.
DO Ensure the benchtop and the oven cavity are square
and level.
DO Ensure the electrician allows at least 1.5m free
length of connection cable within the cavity for ease of
installation and service of the oven.
DO Ensure that the interconnection cord between the
cooktop and the oven or control box is not accessible
via cupboard doors after installation. This applies to any
extension cord as well, even though they are double
insulated.
DO Use easy to clean finishes for the wall surfaces
surrounding the oven and cooktop to aid removal of any
cooking fume staining resulting from the use of the oven
and cooktop.
DO Check the height from the floor suits the user.
DO Ensure that drawers and doors will be clear of
obstruction when fully opened.
The cavity must be a completely sealed box with no gaps.
This will ensure the cooling air flows under the product
to give the correct venting and cooling for the oven and
cabinet surround.
Take care of sharp edges when handling products.
IMPORTANT INFORMATION
CAUTION
WARNINGS
Part No. 541001 QBI601/451 NZ ERC E September 2001
BEFORE YOU START
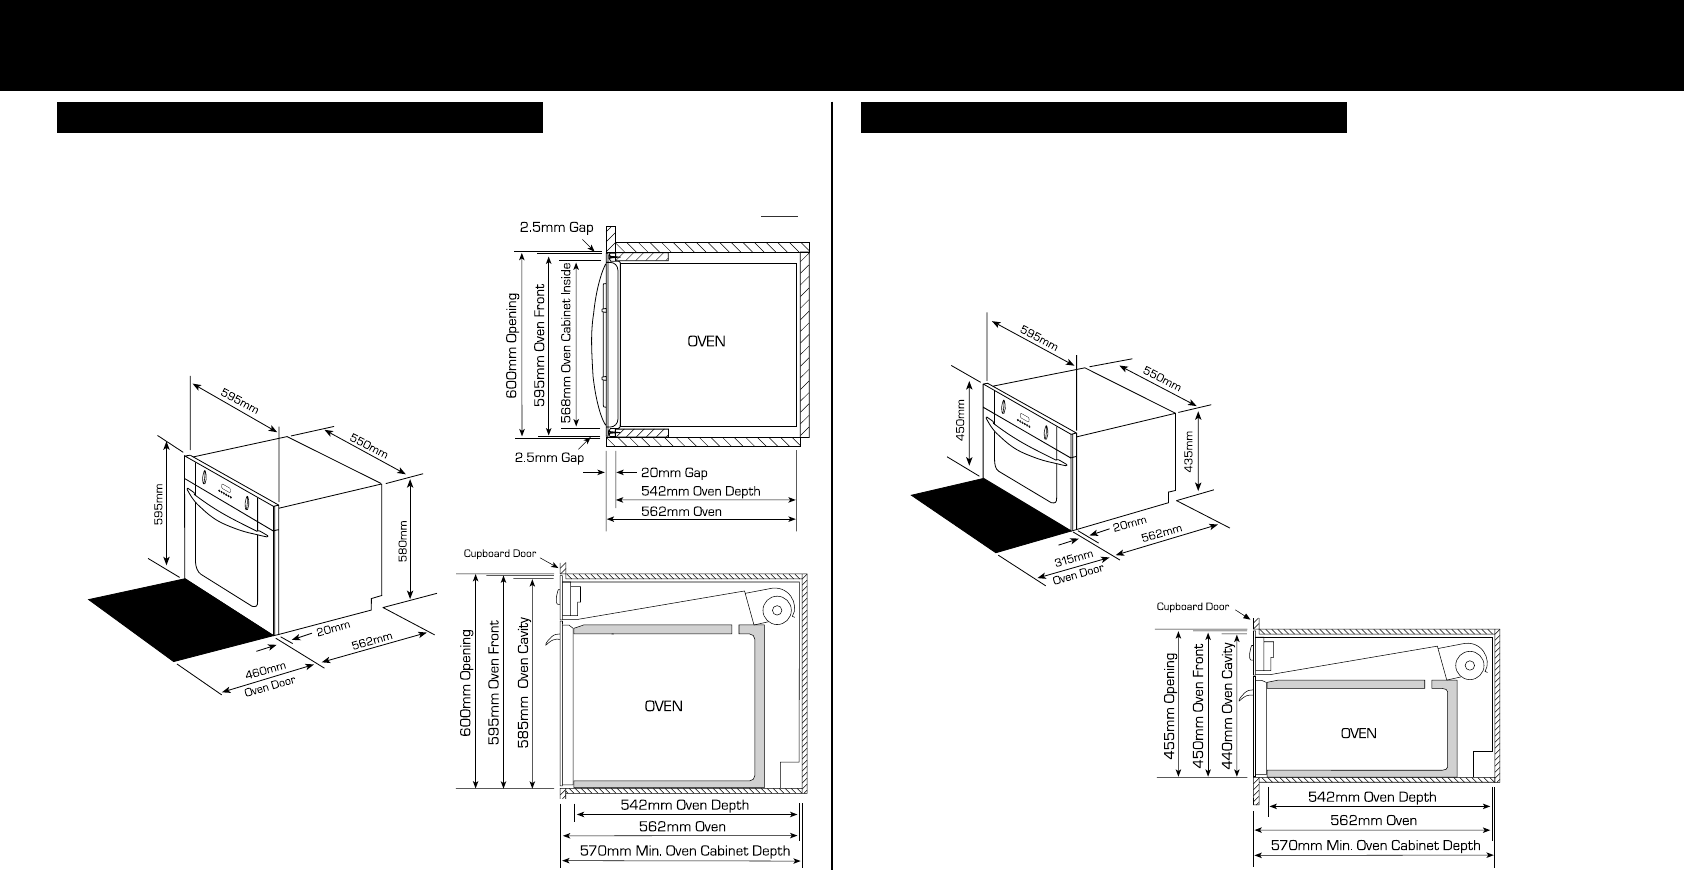
ASTRO/AERON SINGLE BUILT-IN OVEN SERIES SPECIFICATIONS
AERON SINGLE (BI601QAE/QAA) OVEN &
ASTRO SINGLE (BI601QASX/QASE) OVEN
Oven Cabinet
Overall Width 595 mm 568 mm
Overall Height 595 mm 585 mm
Depth 562 mm 550 mm
Note Oven front dimensions
differ from cabinet dimensions.
SINGLE OVEN SPECIFICATIONS
ASTRO COMPACT (BI451QASP) OVEN
Oven Cabinet
Overall Width 595 mm 568 mm
Overall Height 450 mm 440 mm
Depth 562 mm 550 mm
Note Oven front dimensions differ from cabinet dimensions.
COMPACT OVEN SPECIFICATIONS
AERON SINGLE
(BI601QAE/QAA)
&
ASTRO SINGLE
(BI601QASX/QASE)
ASTRO COMPACT
(BI451QASP)
SIDE VIEW
SIDE VIEW
TOP VIEW FOR ALL
BUILT -IN OVENS
Note Astro Compact Oven
‘Top View’ is the same as for
Single Ovens.

ASTRO E1.5 (BI601QASE1.5)
DOUBLE OVEN
Oven Cabinet
Overall Width 595 mm 568 mm
Overall Height 932 mm 922 mm
Depth 562 mm 550 mm
Note Oven front dimensions differ from cabinet dimensions.
DOUBLE OVEN SPECIFICATIONS
ASTRO DOUBLE BUILT-IN OVEN SERIES SPECIFICATIONS
ASTRO E2 (BI601QASE2)
TOWER OVEN
Oven Cabinet
Overall Width 595 mm 568 mm
Overall Height 1078 mm 1068 mm
Depth 562 mm 550 mm
Note Oven front dimensions differ from cabinet dimensions.
TOWER OVEN SPECIFICATIONS
ASTRO E1.5
(BI601QASE1.5)
DOUBLE
ASTRO E2
(BI601QASE2)
TOWER
SIDE VIEW
SIDE VIEW
Note Astro Double & Tower
Ovens ‘Top View’ is the same
as for Single & Compact
Ovens.

Check the things you can do yourself.
Refer to your User Guide and check...
1. Your product is correctly installed.
2. You are familiar with its normal operation.
If after checking these points you still need assistance, please
call your Fisher & Paykel retailer who is trained to provide
information on your product, or if we can be of any further
help, please contact our Customer Care Centre.
P. O. Box 58550, Greenmount, Auckland.
Toll Free 0800 FP CARE Fax 09 273 0656
(0800 37 2273) Email Customer.Care@fp.co.nz
P. O. Box 798, Cleveland, QLD 4163.
Toll Free 1300 650 590 Fax 07 3826 9298
Tel 07 3826 9100 Email Customer.Care@fp.com.au
Fisher & Paykel Appliances Ltd.
Broxell Close, Wedgnock Industrial Estate, Warwick,
Warwickshire, CV34 6QF.
Tel 01 926 626700 Fax 01 926 626701
C&F Quadrant, Quadrant House, Chapelizod, Dublin 20.
Tel 01 626 5711/4917 Fax 01 626 7863/3251
Current Installation Instructions, Product dimensions and
specifications are available on the Fisher & Paykel web site.
www.fisherpaykel.com
Before you call for service or assistance...
CUSTOMER SUPPORT
CURRENT INFORMATION
1. Check that the kitchen cavity is square and within the
limits in the installation dimensions.
2. Lift oven and slide into place. Locate oven in the centre
of the cavity, ensuring that the front is flush with surrounding
cabinetry.
3. Secure oven in cavity, using the four ‘wood screws’ and
washers supplied, through the enamelled frame at either
side of the oven.
4. Check that the oven is firmly secured in the kitchen unit.
If installing a cooktop above the oven, ensure adequate
clearance is provided for the cooktop as per the Cooktop
Manufacturers Instructions.
BUILT-IN OVEN INSTALLATION INSTRUCTIONS
FLUSH FITTING INSTALLATION OPTIONS
COOKTOP ABOVE SINGLE OR
COMPACT OVEN
INSTALLATION INSTRUCTIONS
FOR NEW ZEALAND
FOR AUSTRALIA
FOR UNITED KINGDOM (GB)
FOR IRELAND (IE)
