Fisher Price 72911-27TX User Manual 72911 0920
Fisher-Price Inc. 72911 0920
draft users manual
Please keep these instructions for future reference.
Adult assembly is required.
Requires two size “AA” (LR6) alkaline batteries in the truck (not included).
Requires one 9-volt alkaline battery in the transmitter (not included).
Tool required to install batteries: Phillips Screwdriver.
RC Stunt Raceway
Instructions
Product Number: 72911
Draft
Instructions
2
Radio interference can occur if more than one radio control car or radio device is operating on the same frequency. Radio
interference can cause the truck to operate erratically. For best performance, please be sure to maintain a distance from or
do not operate this toy near:
• radio devices such as nursery monitors, cordless telephones or other radio control cars on the same frequency,
• high voltage electrical wires, reinforced concrete buildings or CB radios.
Any modification of the transmitter or the receiver (truck) will violate FCC compliance and can void the user’s
authority to operate the equipment.
RF Output Power: 10,000uV/m @ 3m.
IMPORTANT!
Two (2) Year Limity Warranty
Consumer Information
Questions? We’d like to hear from you!
Call Fisher-Price®Consumer Affairs, toll-free at 1-800-432-KIDS, 8 AM - 5 PM EST Monday through Friday.
Hearing-impaired consumers using TTY/TDD equipment, please call 1-800-382-7470. Or, write to:
Fisher-Price®Consumer Affairs
636 Girard Avenue
East Aurora, New York 14052
FCC Note (United States Only)
RC Stunt Raceway
Model Number: 72911
This device complies with Part 15 of the FCC Rules. Operation is subject to the following two conditions: (1) This device may not
cause harmful interference and (2) this device must accept any interference received, including interference that may cause
undesired operation.
RC Stunt Raceway
Consumer Affairs Department
636 Girard Avenue
East Aurora, New York 14052
Fisher-Price, Inc., 636 Girard Avenue, East Aurora,New York 14052, warrants that the Radio-Control Raceway is free from
all defects in material and workmanship when used under normal conditions for a period of two (2) years from the date
of purchase.
Should the product fail to perform properly, we will repair or replace it at our option, free of charge. Purchaser is responsible
for shipping the product to Fisher-Price Consumer Affairs at the address indicated above and for all associated freight and
insurance cost. Fisher-Price, Inc. will bear the cost of shipping the repaired or replaced item to you.This warranty is void if
the owner repairs or modifies the product.This warranty excludes any liability other than that expressly stated above includ-
ing but not limited to any incidental or consequential damages.
SOME STATES DO NOT ALLOW THE EXCLUSION OR LIMITATION OF INCIDENTAL OR CONSEQUENTIAL DAMAGES,
SO THE ABOVE LIMITATION OR EXCLUSION MAY NOT APPLY TO YOU.
THIS WARRANTY GIVES YOU SPECIFIC LEGAL RIGHTS, AND YOU MAY ALSO HAVE OTHER RIGHTS WHICH MAY
VARY FROM STATE TO STATE.
Fisher-Price, Inc., a subsidiary of Mattel, Inc.
East Aurora, New York 14052, U.S.A.
©1999 Mattel, Inc. All Rights Reserved. Printed in Hong Kong
® and ™ designate U.S. trademarks of Mattel, Inc. 72911-0920
3
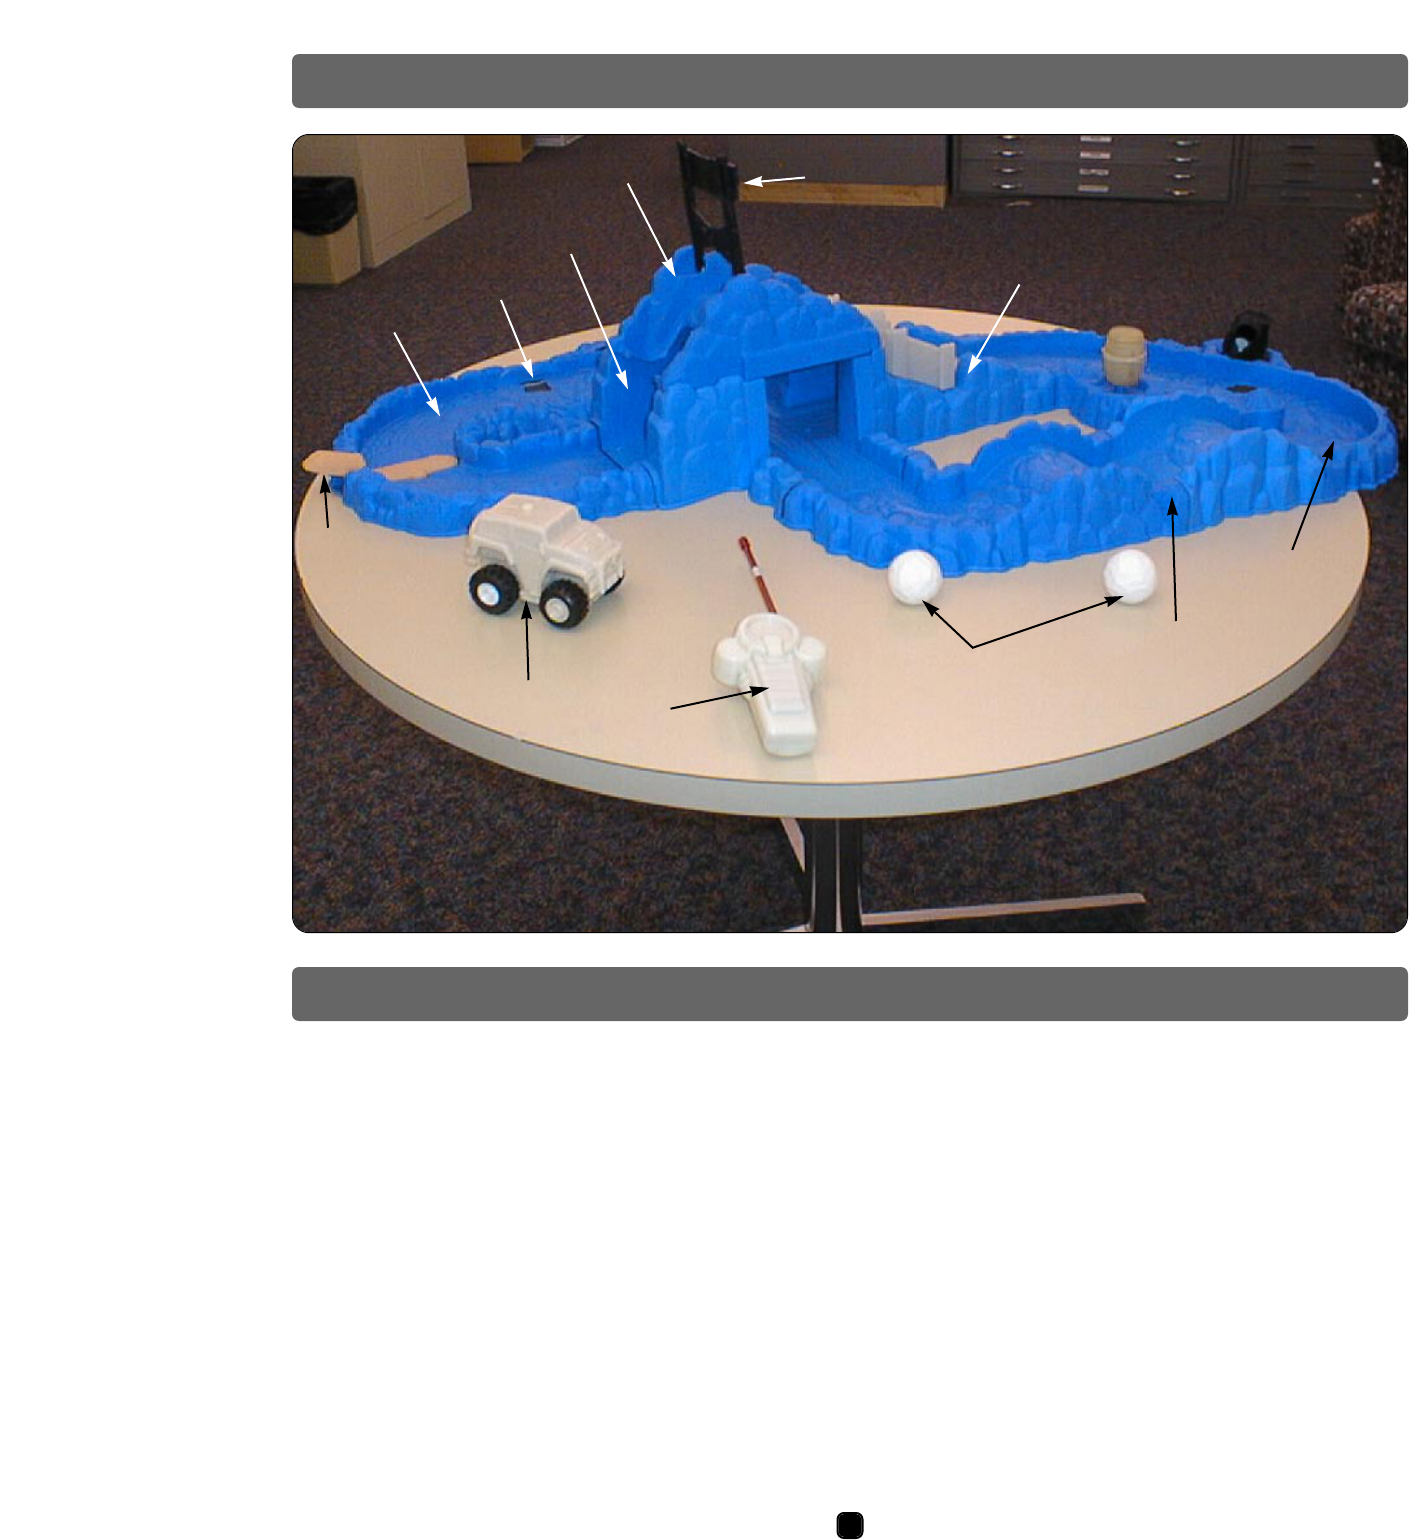
Parts
Label Decoration
Proper label application will help to keep the labels looking their best!
• Wash your hands before applying the labels.
• Make sure the areas where the labels will be applied are clean and dry. Wipe this product with a clean, soft, dry cloth to
remove any dust or oils.
• For best results, do not attempt to apply a label more than once.
• Apply the labels as shown in the illustration.
Illustration to Come
Truck Transmitter
2 Boulders
2 Break-thru Gates
Wavy Track
Mountain Bridge
Mountain Track
Log
Ramp Track
Curved
Barrel Track
Curved
Creek
Track
Stump

3
Assembly
• Copy to come. Copy to come. Copy to come. Copy to
come.Copy to come.Copy to come.Copy to come.
• Copy to come.Copy to come.Copy to come.Copy to come.
• Copy to come. Copy to come. Copy to come. Copy to
come.Copy to come.Copy to come.Copy to come.
• Copy to come.Copy to come.Copy to come.Copy to come.
13
• Copy to come. Copy to come. Copy to come. Copy to
come.Copy to come.Copy to come.Copy to come.
• Copy to come.Copy to come.Copy to come.Copy to come.
• Copy to come. Copy to come. Copy to come. Copy to
come.Copy to come.Copy to come.Copy to come.
• Copy to come.Copy to come.Copy to come.Copy to come.
24
Illustration to Come
Illustration to Come Illustration to Come
Illustration to Come

4
Assembly
• Copy to come. Copy to come. Copy to come. Copy to
come.Copy to come.Copy to come.Copy to come.
• Copy to come.Copy to come.Copy to come.Copy to come.
• Copy to come. Copy to come. Copy to come. Copy to
come.Copy to come.Copy to come.Copy to come.
• Copy to come.Copy to come.Copy to come.Copy to come.
57
• Copy to come. Copy to come. Copy to come. Copy to
come.Copy to come.Copy to come.Copy to come.
• Copy to come.Copy to come.Copy to come.Copy to come.
• Copy to come. Copy to come. Copy to come. Copy to
come.Copy to come.Copy to come.Copy to come.
• Copy to come.Copy to come.Copy to come.Copy to come.
68
Illustration to Come
Illustration to Come Illustration to Come
Illustration to Come
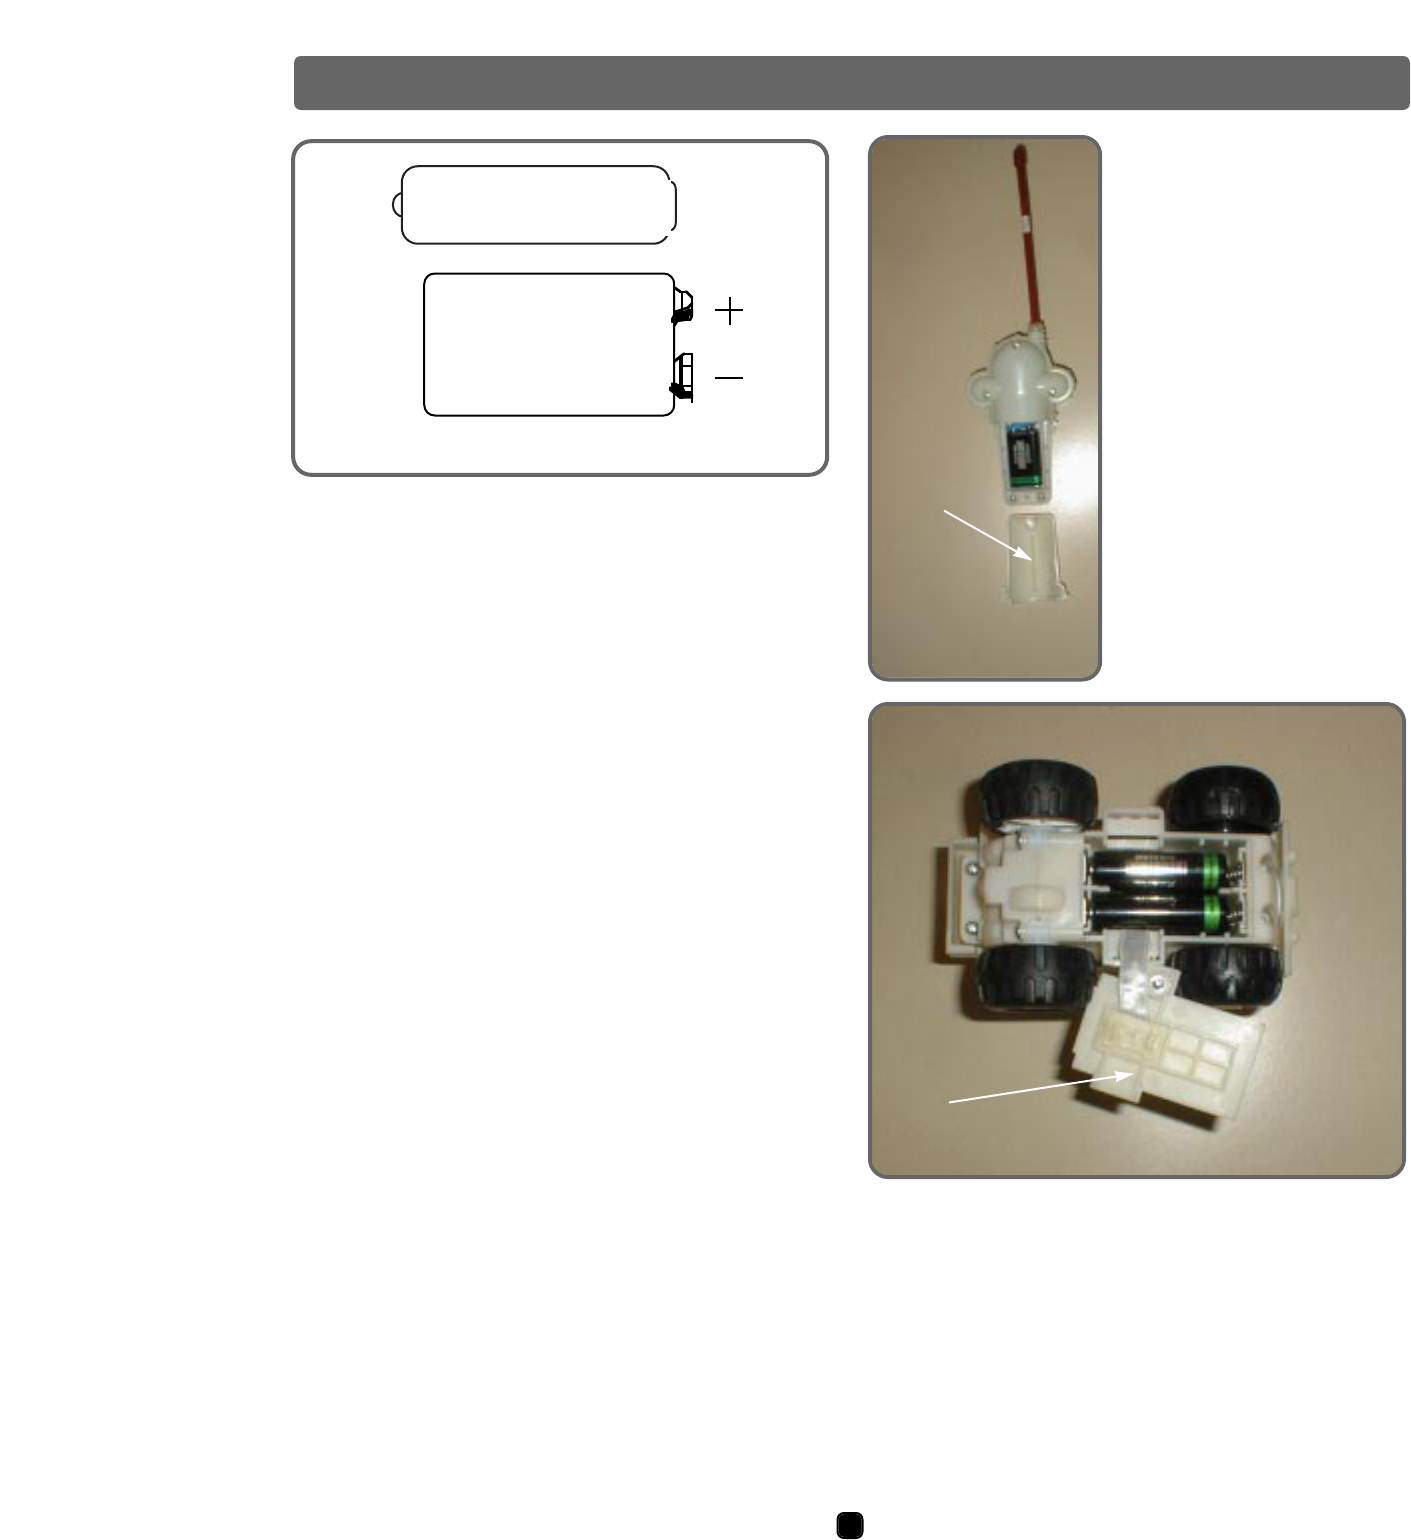
Truck
• Unfasten the screw in the battery compartment door with a
Phillips screwdriver. The screw will remain in the door.
• Remove the battery compartment door.
• Insert two, new, size “AA” alkaline batteries as indicated
inside the battery compartment. Place the batteries on
top of the ribbon.
• Replace the battery compartment door and tighten the
screw with a Phillips screwdriver. Do not over-tighten.
+-
1.5V x 2
“AA (LR6)”
9V
Both Shown Actual Size
Transmitter
• Unfasten the screw in the
battery compartment door
with a Phillips screwdriver.
The screw will remain in
the door.
• Lift the battery compartment
door open.
• Insert a new 9-volt alkaline
battery into the battery
compartment, as indicated
inside the battery compart-
ment.
• Close the battery compartment
door and tighten the screw with
a Phillips screwdriver. Do not
over-tighten.
5
Battery Installation
Battery Tips
• The 9-volt battery in the transmitter has a longer life than
the “AA” batteries in the truck.You may need to change
the “AA” batteries more often than the 9-volt battery.
• Do not mix old and new batteries.
• Do not mix different types of batteries: alkaline, standard
(carbon-zinc) or rechargeable (nickel-cadmium).
• Remove the batteries during long periods of non-use.
Always remove exhausted batteries from the toy. Battery
leakage and corrosion can damage the toy.
• Never short circuit the battery terminals.
• Non-rechargeable batteries are not to be recharged.
• Only batteries of the same or equivalent type as recom-
mended in the “Battery Installation” instructions are to
be used.
• If removable rechargeable batteries are used, they are only
to be charged under adult supervision.
• Rechargeable batteries are to be removed from the toy
before they are charged.
• If you use a battery charger, it should be examined regu-
larly for damage to the cord, plug, enclosure and other
parts. Do not use a damaged battery charger until it has
been properly repaired.
Battery
Compart-
ment
Door
Battery
Compartment
Door
Illustra-
tion to
Come
Illustration to Come
7
Use
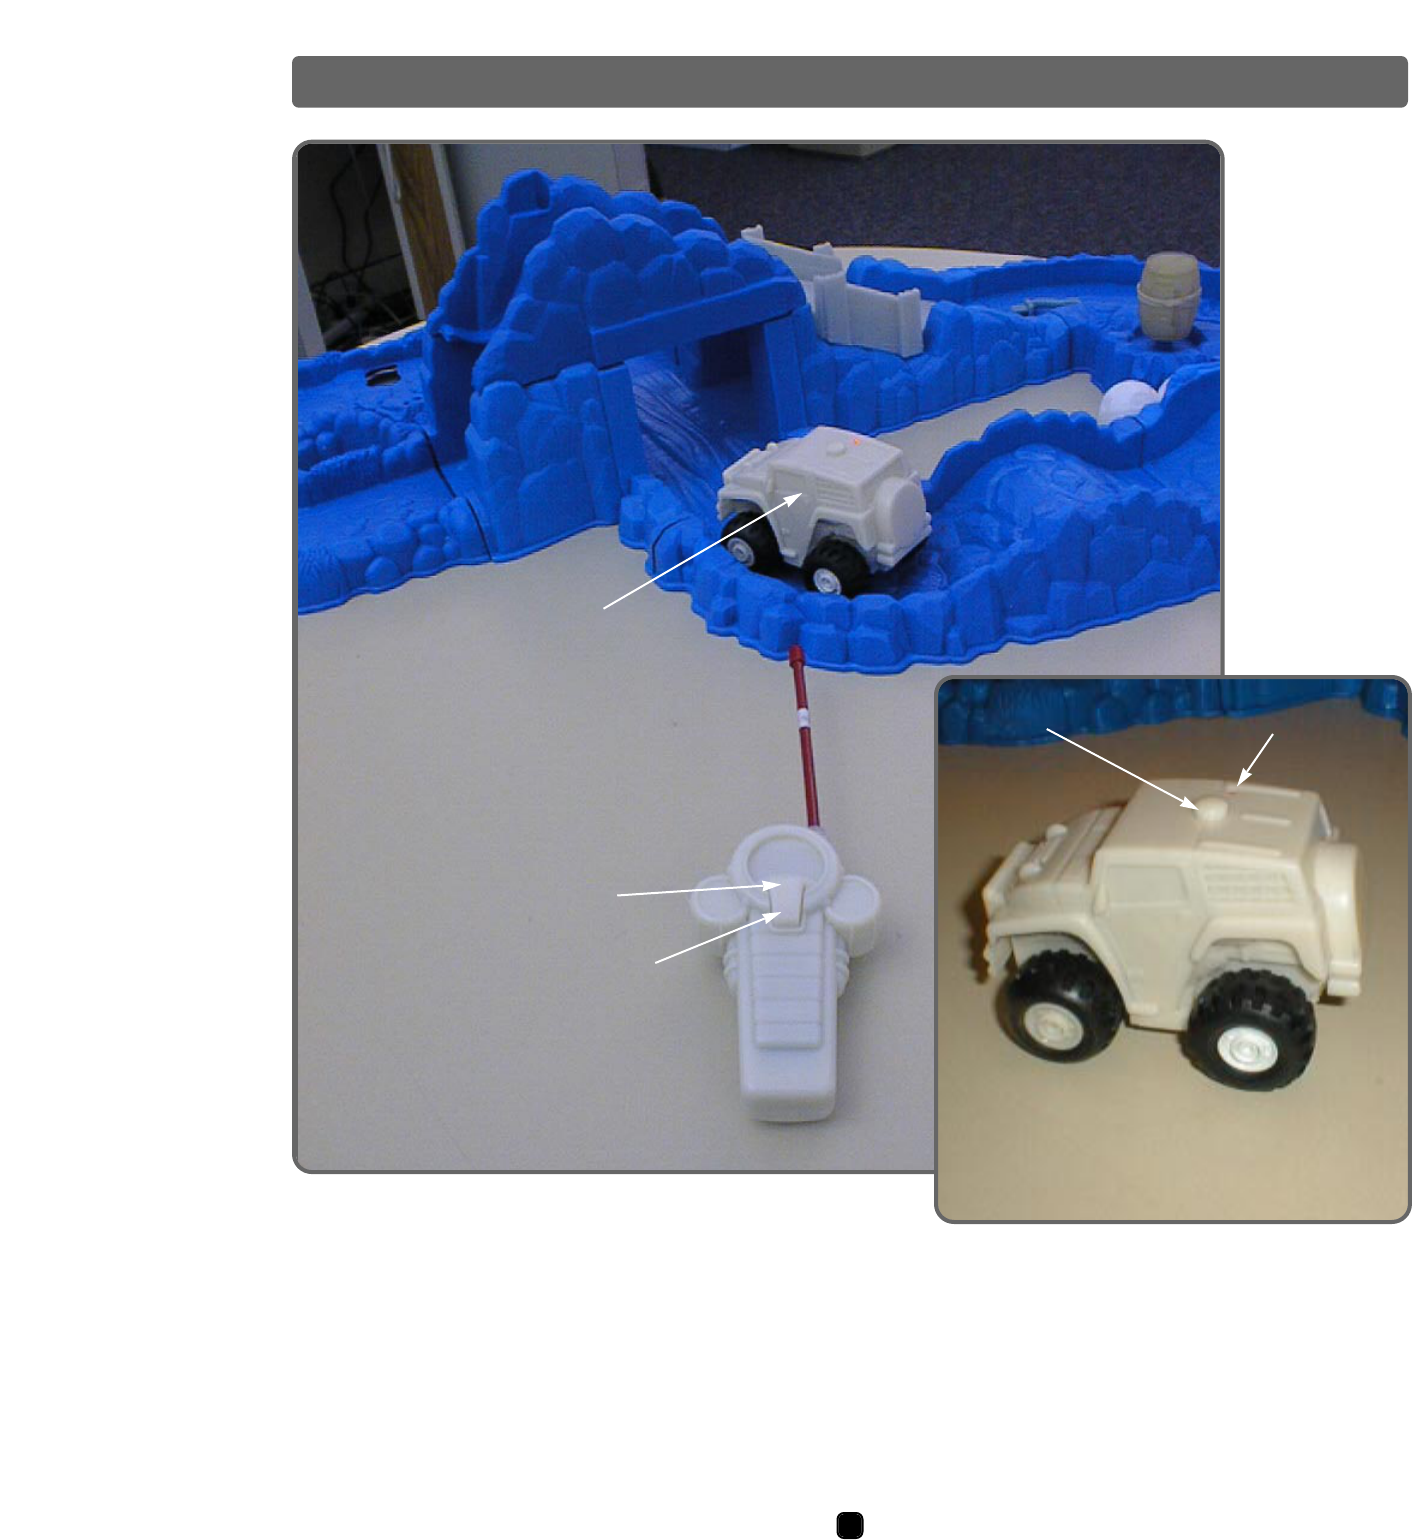
• Press the button on the top of the truck to turn power on. The power indicator lights.
• Place the truck on the raceway.
• Press the top end of the transmitter button to make the truck go forward.
• Press the buttom of the transmitter button to make the truck go backward.
• Release the button on the transmitter and the truck stops.
Illustration to Come
Illustration to Come
Button
Top of Button
Truck
Bottom of Button
Power Indicator

No power • Incorrect • Remove the car
battery batteries and replace
orientation in correct orientation,
as shown inside the
battery compartment.
•Remove the transmitter
battery and replace in
correct orientation, as
shown on the battery
compartment door.
• Dead batteries •Replace truck batteries
with two, new “AA”
alkaline batteries
and/or the transmitter
battery with a new
9-volt alkaline battery.
• Truck powerh • Press the button on
button not pressed the truck.
and power indica-
tor not lit”
• Car has auto- • Press the button
matically shut off. on the truck.
• Dirty battery • Clean battery
contacts terminals.
Truck goes •Truck batteries • Replace truck batteries
slowly weak with two, new, “AA”
alkaline batteries.
Truck runs • Interference • Change your location.
erratically Move away from other
radio devices, such as
nursery monitors and
cordless phones.
• Weak signal • Point the transmitter
antenna upward.
•Move the transmitter
closer to the truck
(within 8 feet for best
results).
•Replace truck batteries
with two, new “AA”
alkaline batteries
and/or the transmitter
battery with a new
9-volt alkaline battery.
Truck has no • Dirty track/ • Wipe the track surface
traction tires and the truck tires with
a cloth, dampened with
water.
8
Notes
Care
Problems and Solutions
Problem Cause Solution
• The transmitter controls the truck up to an approximate
distance of eight feet, depending on the condition of the
batteries and the environment.
• This product will not operate properly when used near
nursery monitors or cordless telephones.
• To conserve batteries, the truck is designed to automati-
cally switch “OFF” approximately 1-5 minutes after receiv-
ing the last signal from the transmitter. To turn the truck
truck back on, press the button on the truck. The power
indicator lights.
• Clean the track and the car tires with a cloth, dampened
with water, if the cars need better traction.
• Do not immerse any part of this product. Surface wash
this toy with a mild detergent and clean, soft cloth.
• If the truck moves slowly, or does not move at all,
remove the batteries in the truck and dispose of them
properly. Replace the batteries with two, size “AA” (LR6)
alkaline batteries.