Fit2Go TPMS ELTS TPMS Sensor User Manual Michelin TPMS Operations Manual 120mm X 170mm
Fit2Go TPMS Ltd TPMS Sensor Michelin TPMS Operations Manual 120mm X 170mm
User Manual
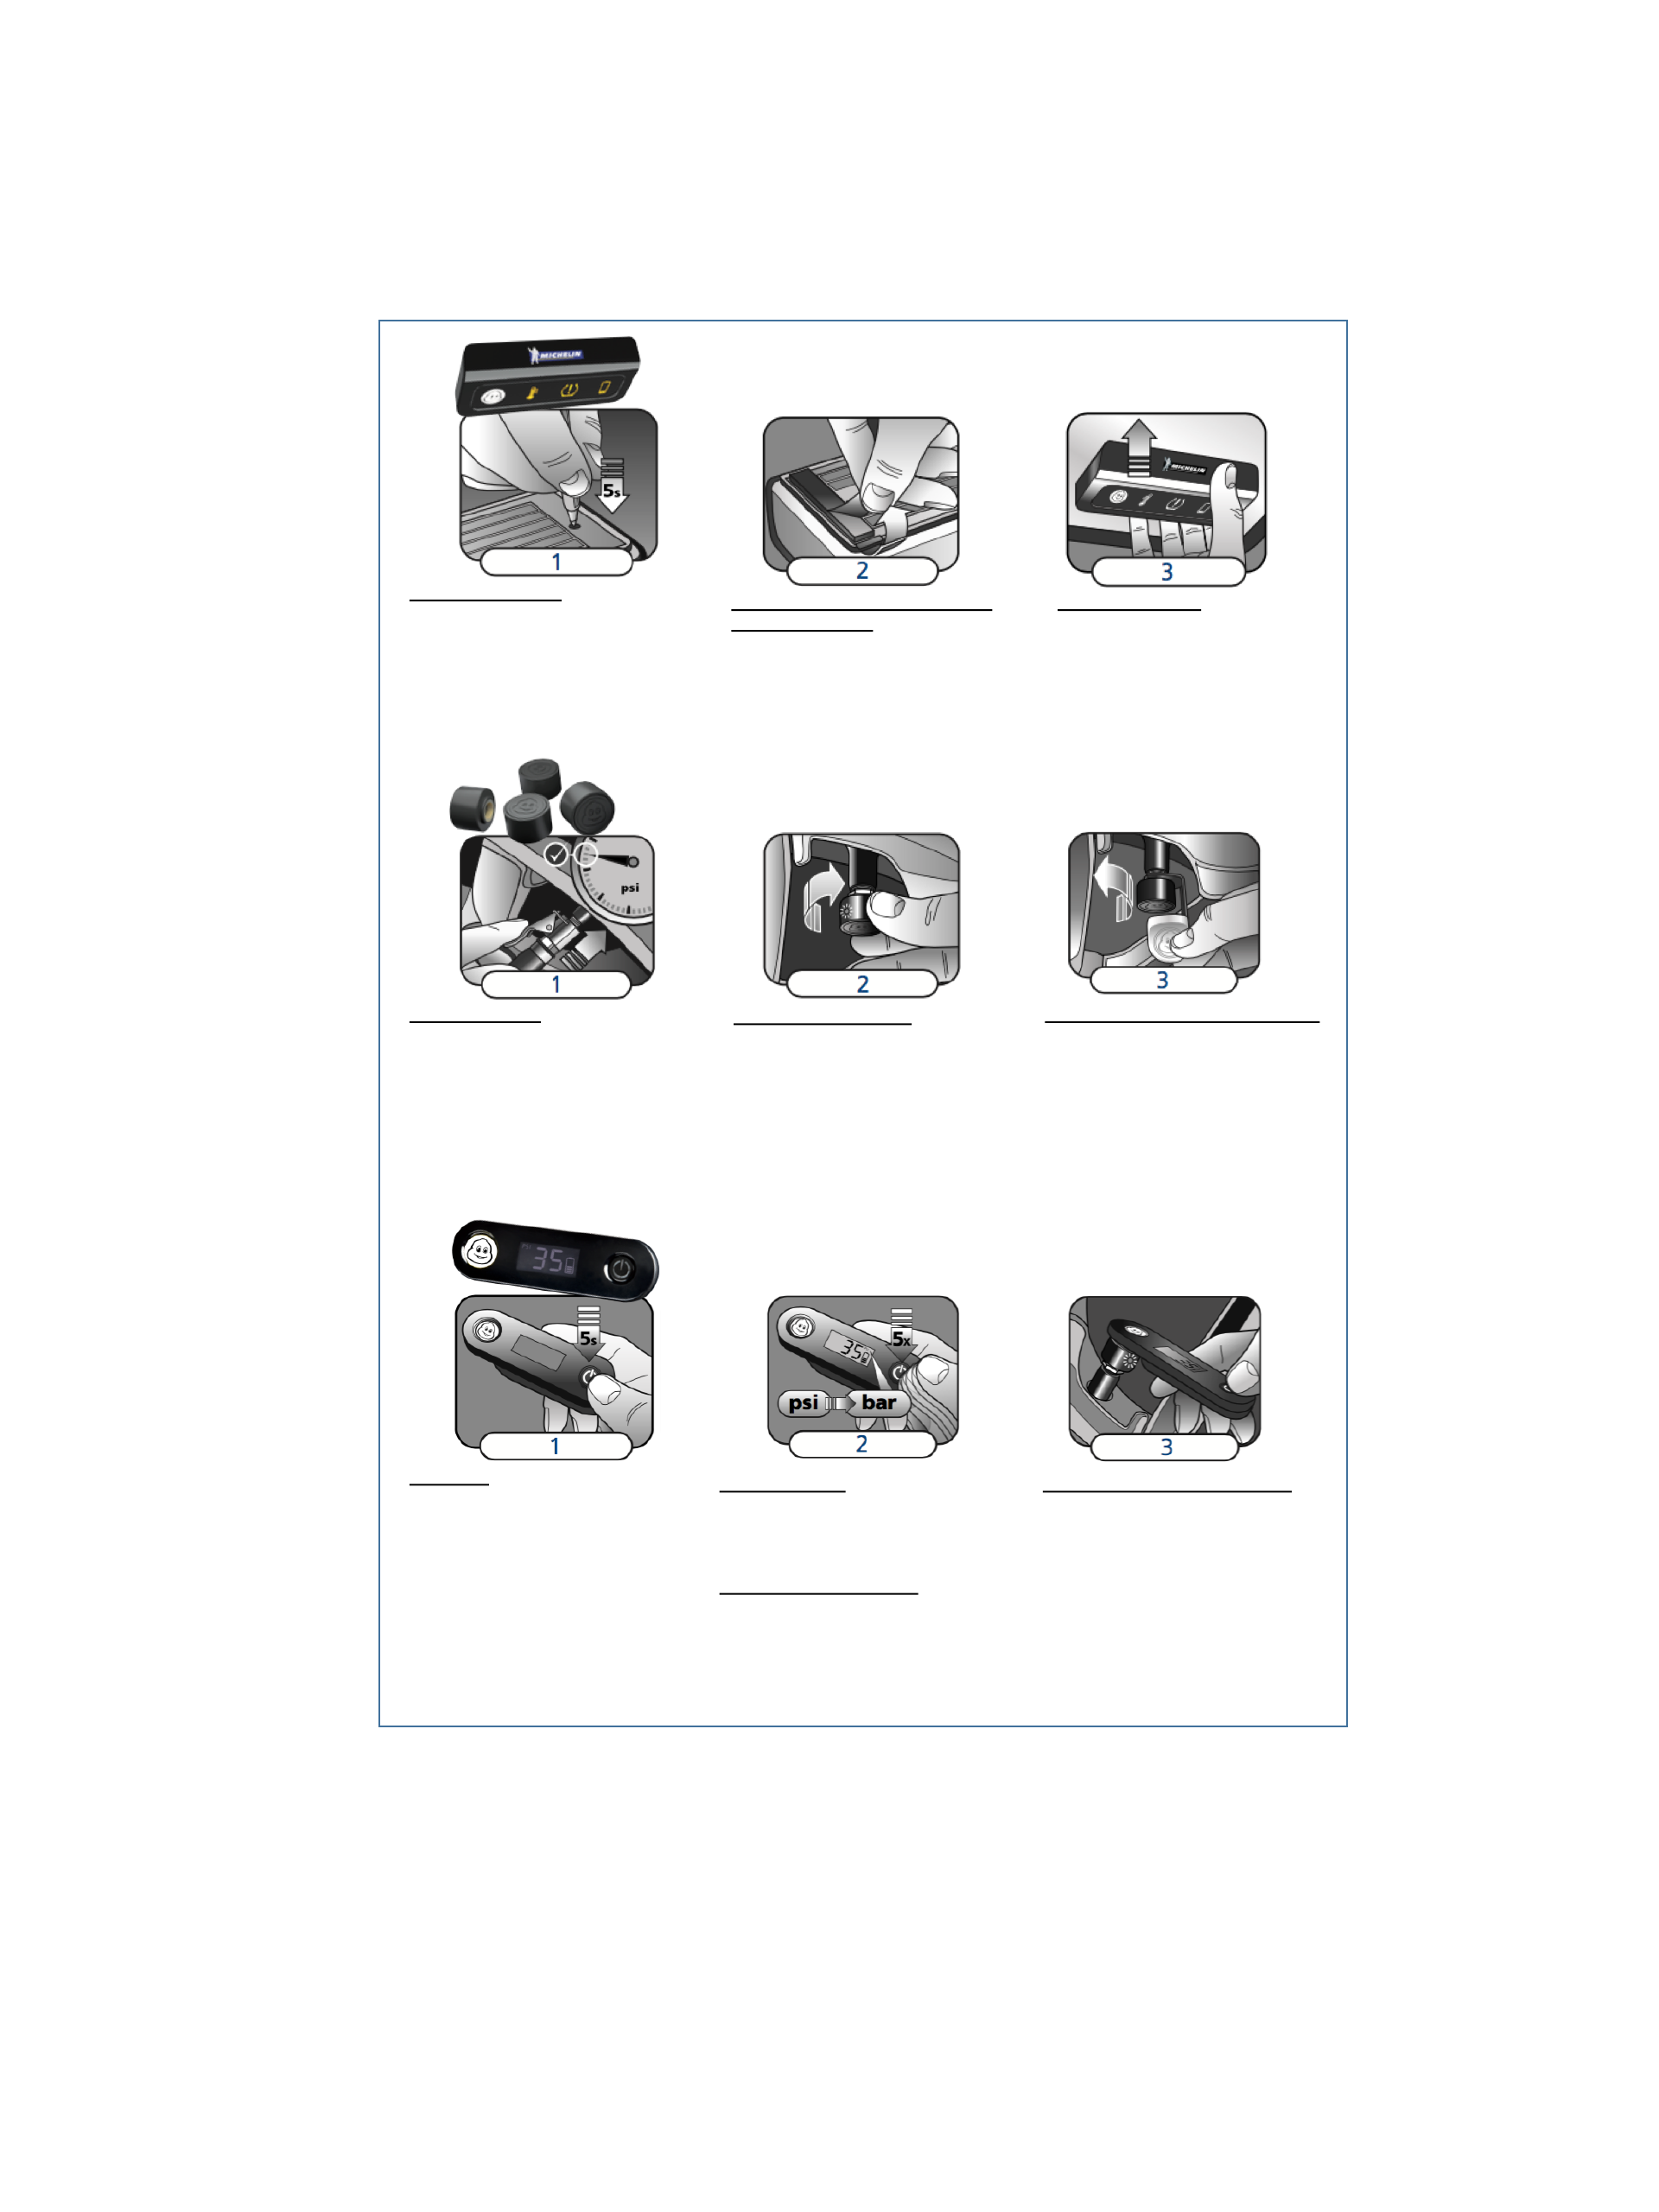
1. TURN ON RECEIVER
Using a pen simply press and hold down for 5
seconds the small button on the rear as
shown. When the Receiver Powers up the
Icons will flash and there will be a loud bleep.
The white Power Icon will flash ON every 3
seconds for half a minute before reverting to
normal working mode.
2. RECEIVER POSITION, REMOVAL OF
ADHESIVE BACKING
Find the ideal position for the receiver along the
top of the windscreen ensuring that it is outside
the wiper sweep. Ensure the solar panel is not
blocked by the black border which exists on many
windscreens. Clean the windscreen area selected.
Remove the backing from both adhesive pads.
Take care not to touch the adhesive surface.
3. FITTING RECEIVER
Place the receiver in the correct position
and push firmly against the windscreen,
holding and pushing for up to 10 seconds.
1. TYRE PRESSURE
IMPORTANT : ALL TYRE PRESSURES
MUST BE INFLATED TO THE CORRECT
PRESSURE BEFORE FITTING THE TPMS
SENSORS
The target pressure is the normal cold operating
pressure that you require for each tyre. The
vehicle manufacturer provides this information
and it is usually printed in the vehicle manual
and on a label in the driver’s door frame.
2. ATTACH TPMS SENSOR
a) Remove the dust cap.
b) Twist on a anti-theft lock nut (clockwise).
c) Twist on the Fit2Go TPMS Sensor until
FINGER TIGHT.
d) Check for the Red LED flashing on while
the clever TPMS sensor self-calibrates to
the current tyre pressure.
3. TIGHTEN THE ANTI-THEFT LOCK NUT
Using the special lock nut tool supplied in
your kit, tighten the anti-theft lock nut anti-
clockwise, until it locks tightly against the
TPMS Sensor. Take care to ensure that the
TPMS Sensor does not loosen during this
operation.
NOTE : The TPMS Sensor will auto-pair to
your receiver and auto-calibrate to the tyre
pressure.
1. TURN ON
(the pressure checker require 2 X AAA
batteries).
To turn on simply Press down the Power
button for five seconds and the Pressure
Checker will Power up and you will hear a
bleep sound. There will be a battery indication
in the bottom right of the screen and this is
representative of the battery level of the 2 X
AAA batteries in the Pressure Checker.
2. CHANGE UNITS
Factory setting is in psi. To change to bar,
press the Power button five times quickly. The
screen indication will now show bar.
3. TYRE PRESSURE MEASUREMENT
Place the MICHELIN head logo of the
pressure checker over the MICHELIN head
logo on the TPMS sensor (you will feel a
magnetic pull). Witihn 5 seconds TPMS
sensor will detect the presence of the
pressure checker and transmit the actual
pressure of the tyre. The TPMS sensors will
flash RED once and the tyre pressure and
sensor battery level will be displayed on the
pressure checker.
TURN OFF / AUTO-TURN OFF
To turn off the Pressure Checker simply hold
down the Power Button for 3 seconds and with a
bleep the Pressure Checker will be turned OFF.
Alternatively the Pressure Checker has an auto
switch off function if not used for one minute.
Receiver'Fitting'Instructions
TPMS'Sensors'Fitting'Instructions
Pressure'Checker'Operation'Instructions
TPMS Pressure CheckerTPMS Pressure CheckerTPMS Pressure Checker
Model: PC-1
TPMS SensorTPMS SensorTPMS Sensor
Model: ELTS-1
Operating Frequency: TX-125KHz; RX-433.92MHz
Operating Frequency: TX-433.92MHz; RX-125KHz
Warnings,'Alarms'&'Specifications
RECEIVER SPECIFICATION
Working temperature: -20℃to 80℃
Storage temperature: -40℃to 85℃
Standby current: ≦30uA
Working current: ≦1mA
Size: 102mm ×42mm x 16.5mm
Weight: 69g
TPMS SENSOR SPECIFICATION
Working temperature: -20℃to 80℃
Storage temperature: -40℃to 85℃
Pressure range: 0-92 psi / 0-6.3 bar
(not suitable for trucks)
Pressure Accuracy: ±0.5 psi
Temperature Accuracy: ±3℃
Size: 19.8mm×14.4mm
Weight: 8g
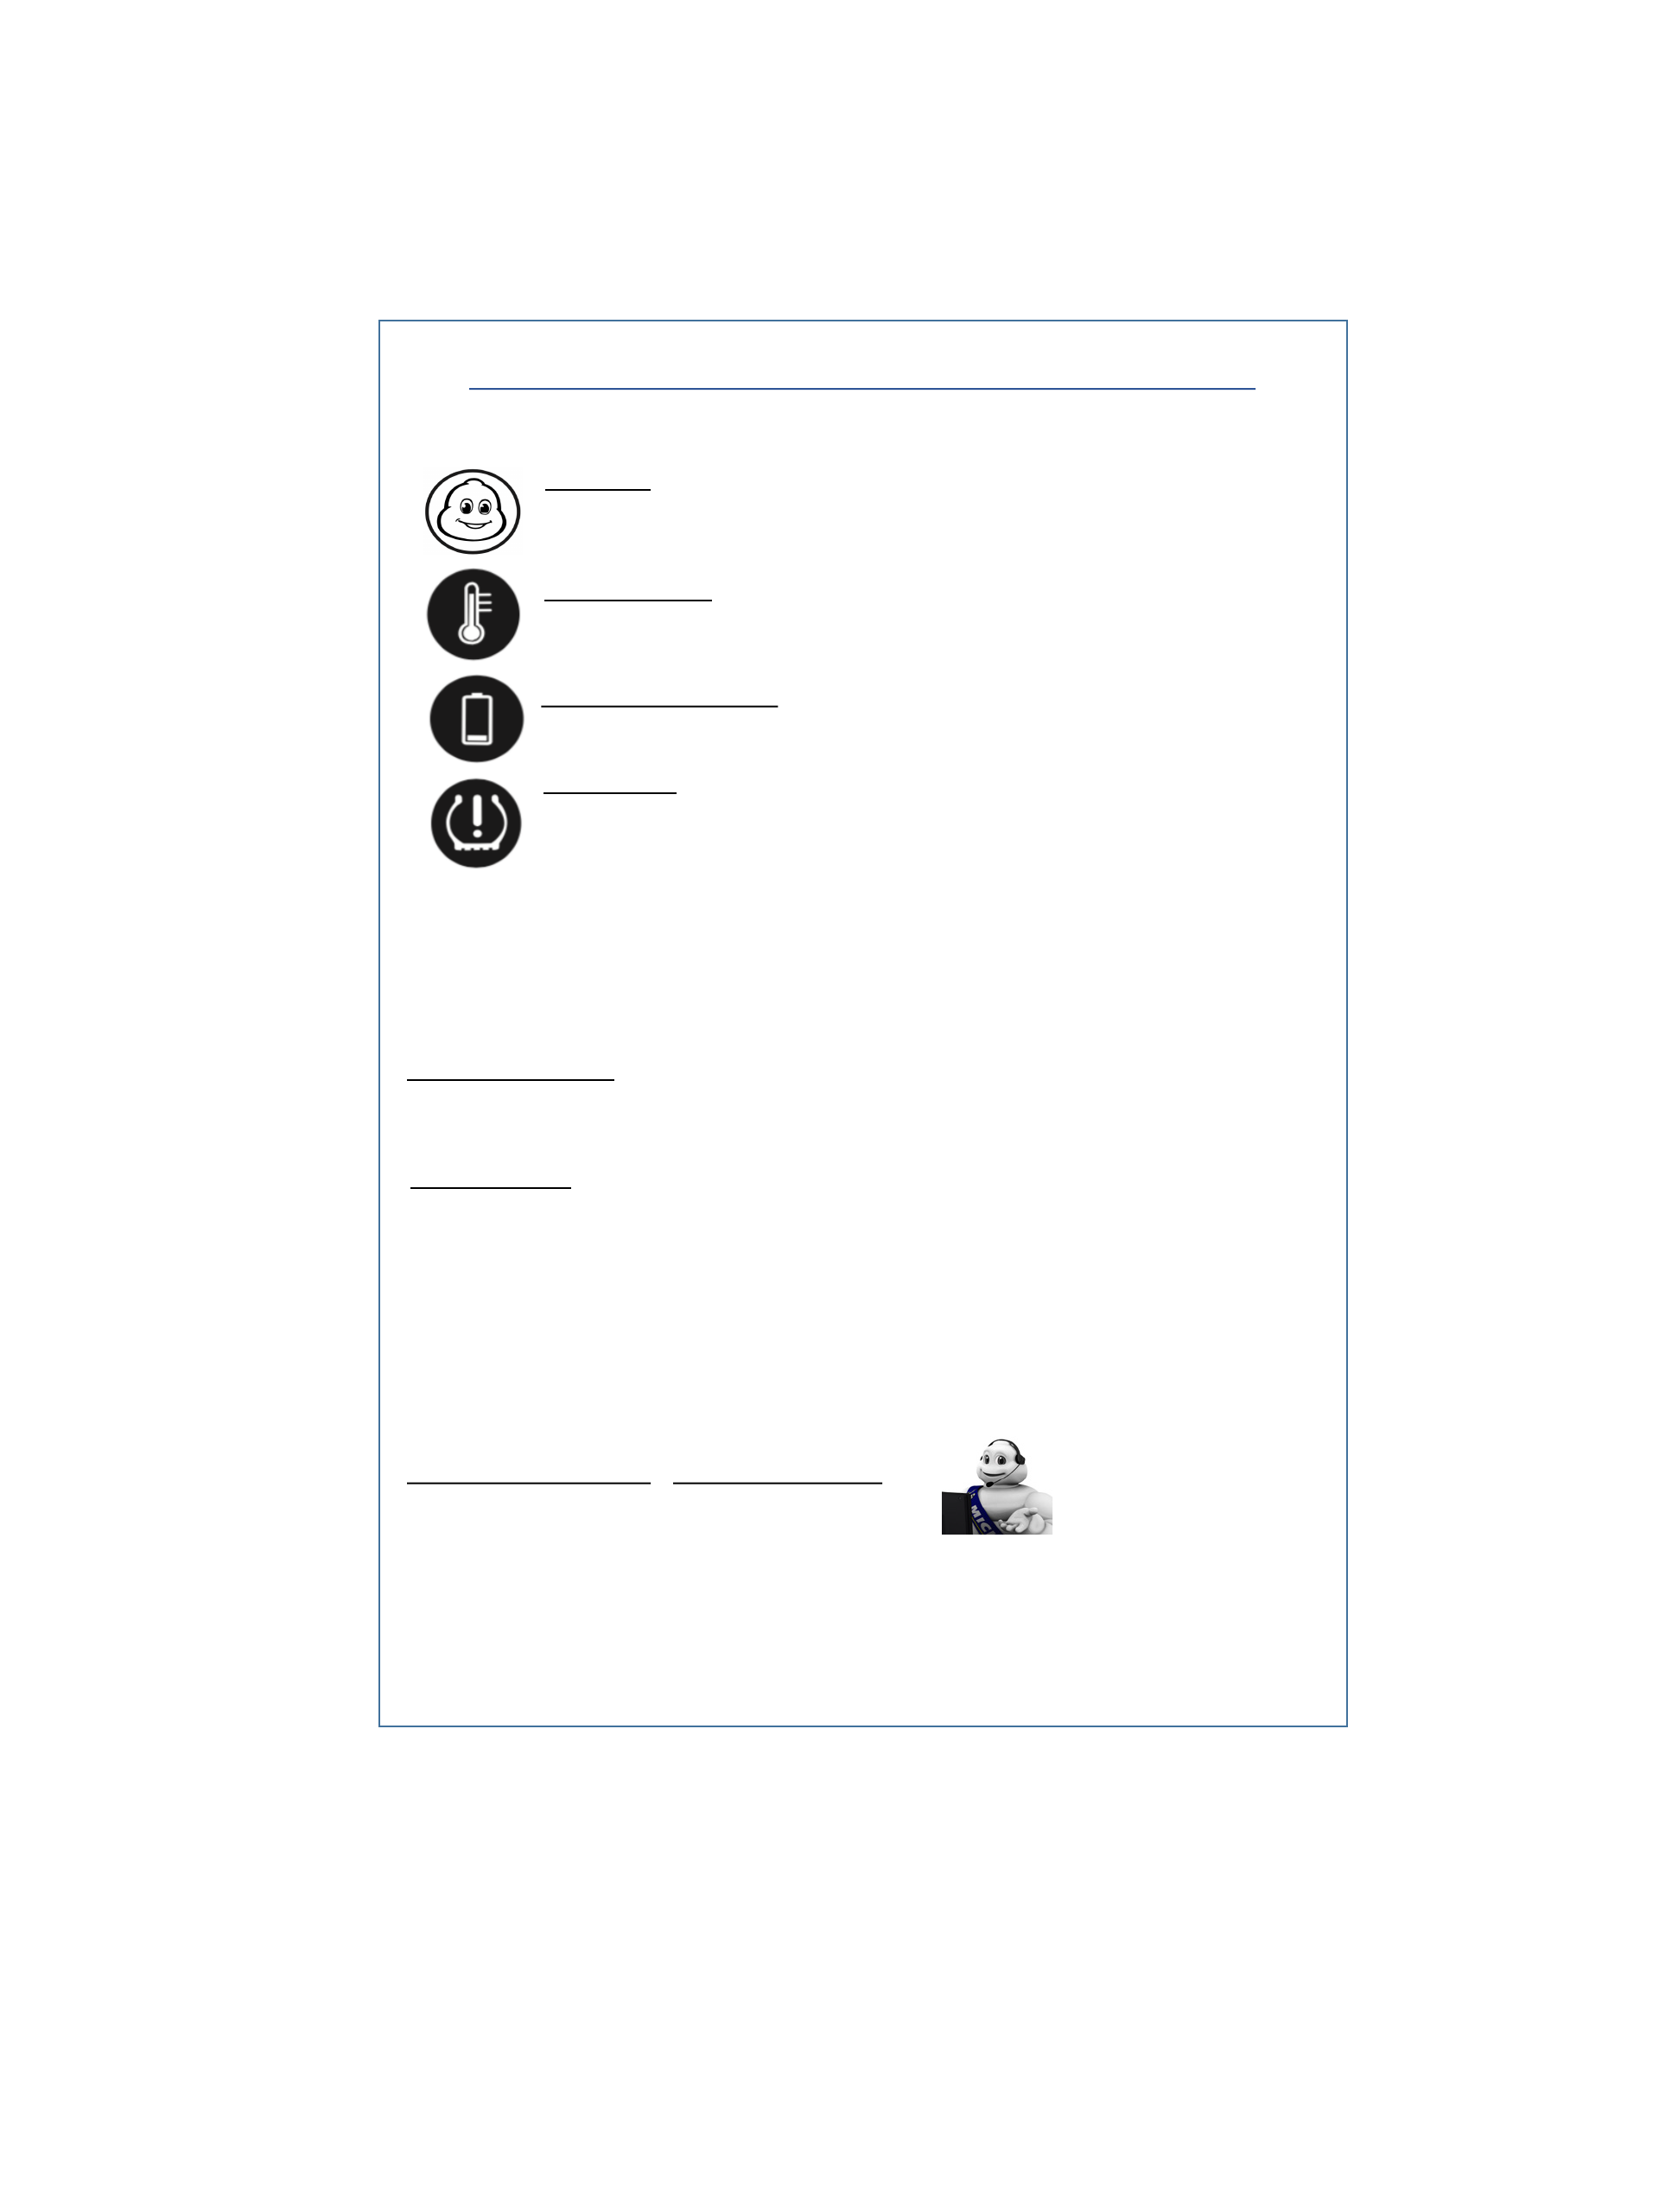
POWER ICON
The POWER Icon will flash white every 60 seconds when the receiver battery power is OK. This Icon will flash
RED when the battery power is low. If there is no power the Icon will not flash and the receiver needs solar
power.
TEMPERATURE ICON
The Temperature Icon will flash ORANGE if the tyre temperature is too high. STOP the vehicle and check the
TPMS Sensors for RED flashing LEDs.
PRESSURE ICON
A. EARLY LOW PRESSURE (-15%)
The Pressure Icon will flash ORANGE every 20 seconds. Please drive carefully as this is the onset of handling
problems. Inflate tyres to the correct pressure at your earliest convenience.
B. HIGH PRESSURE (+35%) / LOW PRESSURE (-25%) / MINIMUM PRESSURE (22psi/1.5bar)
The Pressure Icon will flash ORANGE every 5 seconds and there will be a bleep sound. After 30 seconds this
warning will continue as Pressure Icon flashing ORANGE every 20 seconds. STOP the vehicle at nearest
convenience and check the TPMS Sensors for RED flashing LEDs.
C. MEDIUM / FAST LEAKAGE (1.5 psi / 3 psi per minute leakage)
The Pressure Icon will flash ORANGE every 5 seconds and there will be a bleep sound. After 60 seconds this
warning will continue as Pressure Icon flashing ORANGE every 5 seconds. STOP the vehicle at nearest
convenience and check the TPMS Sensors for RED flashing LEDs.
LOW SENSOR BATTERY ICON
The Sensor Low Battery Icon will flash ORANGE to warn of a low battery in one or more sensors.
Consumer enquiries:
Tel. 01543 415823
emaill: michelin@fit2gotpms.co.uk
© 2017 Michelin. www.michelin-lifestyle.com
MICHELIN and/or the Michelin Man Device and/or
BIBENDUM are trademark(s) ow end by, and us ed with
the permission of, the Michelin Group.
Distributed under licence by
Fit2Go TPMS Ltd.Unit 52,Britannia Way, Britannia
Enterprise Park, Lichfield,Staffordshire, WS14 9UY,UK
SERVICE AND WARRANTY
Please register your guarantee by completing your details on our web site. The system is warranted to be free from manufacturing
defects and is guaranteed for a period of twelve months from date of purchase. There are no user-serviceable parts inside and if
internal parts have been tampered with, the warranty may be void. The warranty does not affect your statutory rights.
PRODUCT DISCLAIMER
The Michelin Tyre Pressure Management System is designed as a driver assistance device, and should not be used as a substitute for regular
manual tyre safety checks.
Neither the seller nor the manufacturer will be liable for any loss damage or injury directly or indirectly arising from the use or inability to
determine the use of this product. Before using, the user shall determine the suitability of the product for its intended use, and th e user sha ll
assume all responsibility and risk in connection herewith.
The driver is always responsible for the condition of tyres on their vehicle and regular visual checks are essential to stay tyre safe. All Tyre
pressures should be checked at the very least once a month or before any long journey, when the tyres are in their cold state, using an supplied
Michelin Pressure Checker. Whilst checking pressures it is also recommended to give the tyres a thorough inspection for any tyre damage, tread
depth or uneven wear.
Information has been carefully checked and is believed to be accurate; however, no responsibility is assumed for inaccuracies. Fit2Go TPMS Ltd
reserves the right to make changes without further notice to any products to improve reliability, function, or design. Fit2Go TPMS Ltd does not
assume any liability arising out of the application or use of any product.
MICHELIN'Tyre Pressure'Management'System
FCC Statement:
This equipment has been tested and found to comply with the limits for a Class B digital device,
pursuant to part 15 of the FCC Rules. These limits are designed to provide reasonable protection
against harmful interference in a residential installation. This equipment generates, uses and can
radiate radio frequency energy and, if not installed and used in accordance with the instructions,
may cause harmful interference to radio communications. However, there is no guarantee that
interference will not occur in a particular installation. If this equipment does cause harmful
interference to radio or television reception, which can be determined by turning the equipment
off and on, the user is encouraged to try to correct the interference by one or more of the
following measures:
• Reorient or relocate the receiving antenna.
• Increase the separation between the equipment and receiver.
• Connect the equipment into an outlet on a circuit different from that to which the receiver is
connected.
• Consult the dealer or an experienced radio/TV technician for help.
Caution: Any changes or modifications to this device not explicitly approved by manufacturer
could void your authority to operate this equipment.
This device complies with part 15 of the FCC Rules. Operation is subject to the following two
conditions: (1) This device may not cause harmful interference, and (2) this device must accept
any interference received, including interference that may cause undesired operation.
The device has been evaluated to meet general RF exposure requirement. The device can be used
in portable exposure condition without restriction.