User Manual
Product(Manual!
Version(1.0!
Table of Contents
Getting Started ......................................................................................................................................... 1!
Welcome .................................................................................................................. 1!
What’s included ........................................................................................................ 1!
How to put on your Charge ...................................................................................... 1!
Setting up Fitbit Charge Using a Computer ................................................................................ 3!
Mac & PC requirements ............................................................................................ 3!
Installing Fitbit Connect on a computer .................................................................... 3!
Mac installation ..................................................................................................... 3!
PC installation ....................................................................................................... 3!
Pairing to a computer ............................................................................................... 4!
Wireless sync to a computer ..................................................................................... 4!
Setting up Fitbit Charge Using a Mobile Device ........................................................................ 6!
Mobile device requirements ...................................................................................... 6!
Installing the Fitbit app ............................................................................................ 6!
iOS pairing ............................................................................................................... 6!
iOS syncing .............................................................................................................. 7!
Manual sync .......................................................................................................... 7!
Real-time dashboard ............................................................................................. 7!
All-day sync .......................................................................................................... 8!
Android pairing ........................................................................................................ 8!
Android syncing ....................................................................................................... 9!
Tap to open app using Near-Field Communication (NFC) .................................... 10!
Manual sync ........................................................................................................ 10!
Background sync ................................................................................................. 10!
Tracking with Fitbit Charge ............................................................................................................ 11!
Tracking sleep with Charge .................................................................................... 11!
Tracking sleep on your mobile device .................................................................. 12!
Tracking goals with Charge .................................................................................... 12!
Tracking activities with Charge ............................................................................... 13!
Wearing your Fitbit Charge .............................................................................................................. 14!
Wearing on your dominant vs. non-dominant wrist ................................................ 14!
Using your Charge in wet conditions ...................................................................... 14!
Silent Alarms .......................................................................................................................................... 15!
Setting silent alarms from a computer .................................................................... 15!
Setting silent alarms from an iOS device ................................................................. 15!
Setting silent alarms from an Android device .......................................................... 16!
Dismissing silent alarms ......................................................................................... 16!
Caller ID .................................................................................................................................................... 17!
Battery Life and Power ....................................................................................................................... 18!
Battery life .............................................................................................................. 18!
Charging your Charge ............................................................................................ 18!
Memory .................................................................................................................. 19!
Your Fitbit.com Dashboard .............................................................................................................. 20!
Browser requirements ............................................................................................ 20!
Using your dashboard ............................................................................................ 20!
Logging food, activities, and sleep ...................................................................... 20!
Device info .......................................................................................................... 21!
Managing your Charge from Fitbit.com ............................................................... 21!
Updating Fitbit Charge ...................................................................................................................... 22!
Updating Charge on a computer ............................................................................. 22!
Updating Charge on an iOS device .......................................................................... 22!
Updating Charge on an Android device ................................................................... 23!
Fitbit Charge General Info & Specifications ............................................................................. 24!
Sensors and motors................................................................................................ 24!
Size ........................................................................................................................ 24!
Environmental conditions ....................................................................................... 24!
Help ....................................................................................................................... 25!
Return policy and warranty ..................................................................................... 25!
Regulatory & Safety Notices ............................................................................................................ 26!
USA and Canada ..................................................................................................... 26!
European Union ...................................................................................................... 27!
Australia and New Zealand ..................................................................................... 27!
Singapore ............................................................................................................... 27!
Israel ........................................................................... Error! Bookmark not defined.!
Korea .......................................................................... Error! Bookmark not defined.!
Mexico ........................................................................ Error! Bookmark not defined.!
Russia .................................................................................................................... 28!
South Africa ................................................................ Error! Bookmark not defined.!
Taiwan ........................................................................ Error! Bookmark not defined.!
United Arab Emirates ................................................... Error! Bookmark not defined.!
China .......................................................................... Error! Bookmark not defined.!
Disposal and Recycling Information ........................................................................ 29!
Important Safety Instructions ................................................................................. 30!
Cautions ............................................................................................................. 30!
Care and Wearing Tips ........................................................................................ 30!
Built-In Battery Precautions ................................................................................. 31!
1
Getting Started
Welcome
Welcome to Fitbit Charge, the high-performance wristband tracker that helps you meet
your fitness goals.
What’s included
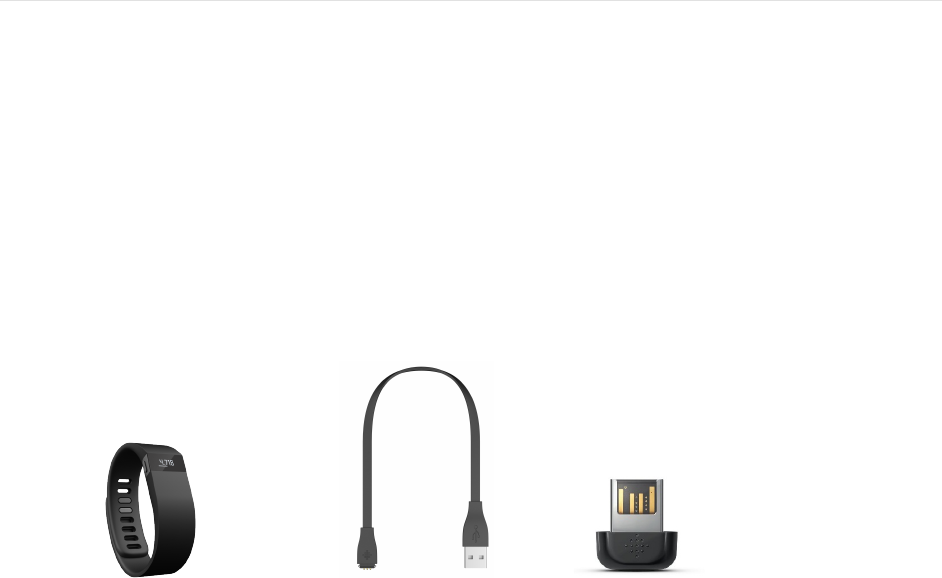
Your Fitbit Charge Wireless Activity + Sleep Wristband box includes:
Charge wristband
Charging cable
Wireless sync
dongle
How to put on your Charge
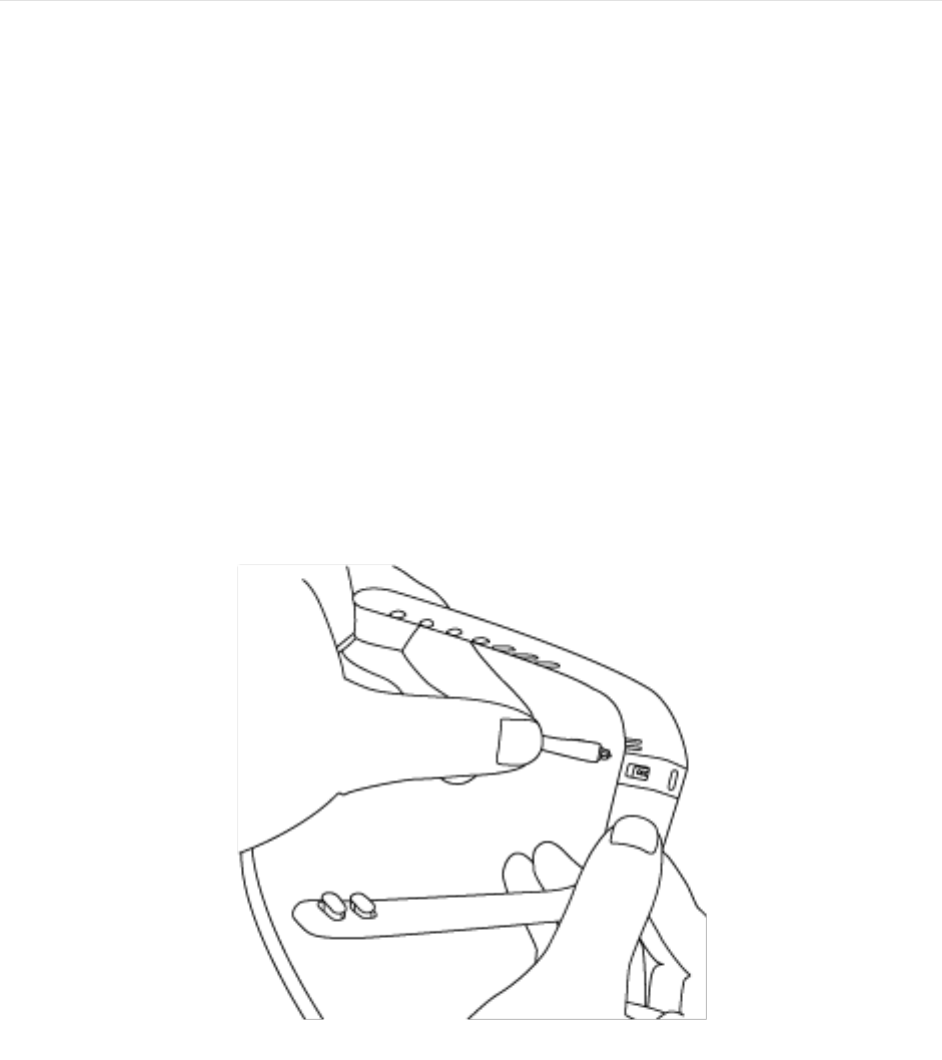
1. Put on the wristband so the screen is closest to the outside of your wrist and
facing you.
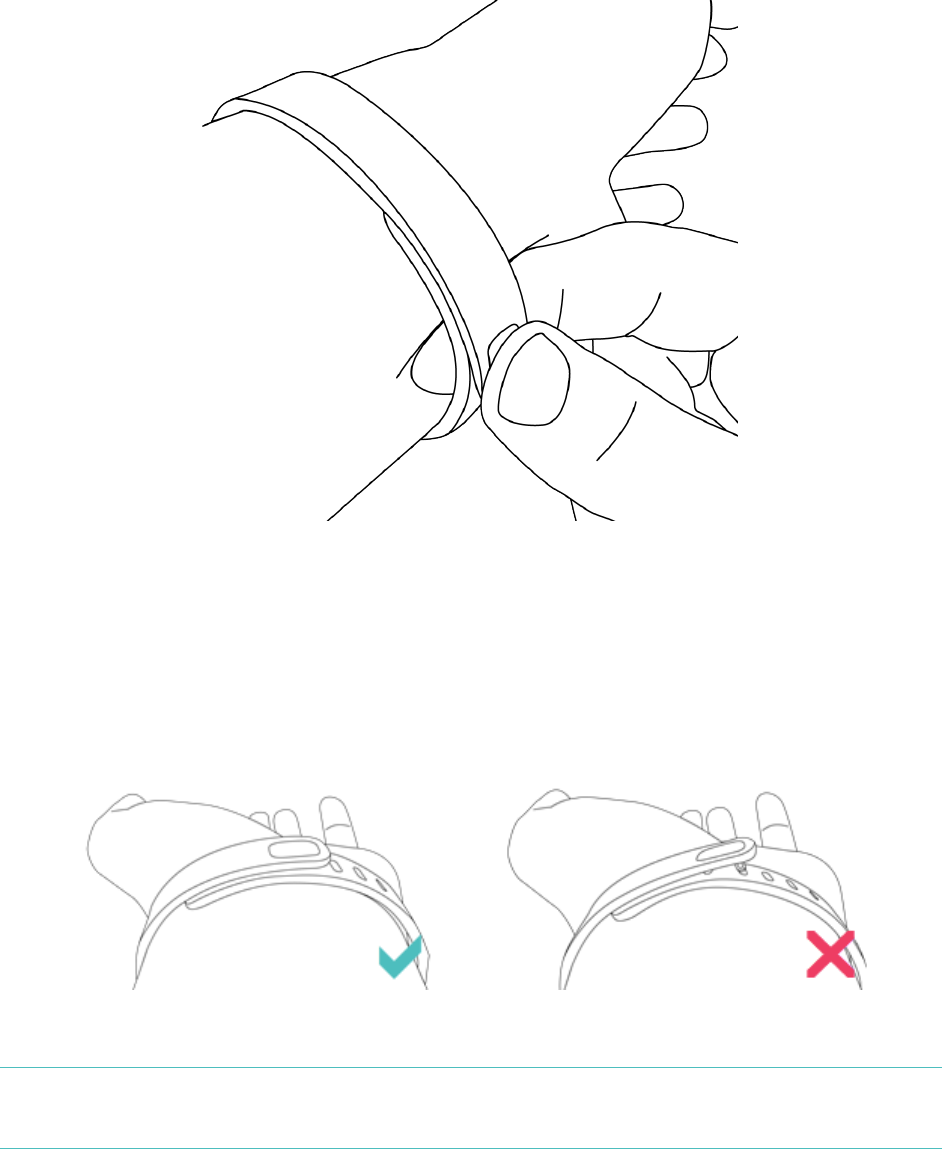
2. Align both ends of the wristband so they are directly overlapping each other
with the clasp over the two holes that best fit your wrist.
FPO (adding illustration)
3. Squeeze both the clasp and the wristband between your thumb and forefinger
until you hear a soft click.
2
You’ll know your Charge wristband is securely fastened if both pegs on the clasp are
fully inserted.
NOTE: If you’re having trouble, try securing the wristband off your wrist to get a feel
for how it securely clasps and then try again on your wrist.
3
Setting up Fitbit Charge Using a
Computer
Mac & PC requirements
Software
Mac OS 10.5 or later
Internet Connection
Hardware
USB port
Software
Windows XP, Vista, 7, 8
Internet Connection
Hardware
USB port
Installing Fitbit Connect on a computer
Fitbit Connect is the software application that connects your Charge wristband to your
Fitbit.com dashboard and services. It’s free to download at Fitbit.com.
Mac installation
1. Go to http://www.fitbit.com/setup.
2. Verify that Mac is highlighted and click the Download Here button below
Charge.
3. Double-click the .dmg file in your Downloads folder.
NOTE: If the file does not appear on your desktop, search for “Fitbit Connect” using
the Spotlight search feature.
4. Run the Fitbit Connect installation package by double-clicking
Install Fitbit Connect.pkg.
5. Follow the onscreen instructions to complete setup.
PC installation
1. Go to http://www.fitbit.com/setup.
2. Verify that PC is highlighted and click the Download Here button below Charge.
3. Go to your Downloads folder and double-click the FitbitConnect_Win.exe file.
4. Choose your language and follow the onscreen instructions.

4
Pairing to a computer
Once Fitbit Connect is installed on your computer, you can pair your Charge to your
account. This will allow you to sync your data and manage device settings.
Onscreen setup instructions guide you through the pairing process. Use the following
steps if the setup guide doesn’t appear.
1. Mac users: On the Menu Bar of your Mac, click the Fitbit Connect icon and
choose Open Main Menu.
PC users: In the Windows System Tray, right-click the Fitbit Connect icon and
choose Open Main Menu.
2. From the main menu, select Set Up a New Fitbit Device.
3. Account Setup:
a. Select New to Fitbit to set up your device if you don’t already have a
Fitbit.com account.
b. Select Existing User to log into your existing Fitbit.com account and
replace an existing device with your Charge.
NOTE: Only one Fitbit tracker can be paired to an account.
4. Enter or confirm your personal information and click Next. This information
personalizes your Fitbit experience and improves the accuracy of your calorie
burn and distance data. By default this personal information is visible only to
your friends, but you can adjust your privacy settings from your Fitbit.com
account to control what information is shared with others.
5. Choose Charge and follow the onscreen instructions to power on your Charge.
6. Insert the wireless sync dongle into your computer and click Next.
7. Fitbit Connect will search for your Charge. Once found, a four-digit number will
appear on your Charge display. Enter this number where prompted and click
Next.
8. You’re all set. Follow the onscreen instructions to put on the wristband and view
an introduction.
Wireless sync to a computer
Wireless syncing to Fitbit.com is automatic, as long as:
• Your computer is powered on, awake, and connected to the internet
• The wireless sync dongle is plugged in
• Fitbit Connect is installed and running
When your Charge is within 15-20 feet of your computer, it will sync every 15 minutes.
5
You can manually sync your Charge by clicking on the Fitbit Connect icon that is
located near the time and date on your computer. Select Sync Now to start the manual
sync.

6
Setting up Fitbit Charge Using a Mobile
Device
Mobile device requirements
You can set up and sync your Charge using select mobile devices that support
Bluetooth 4.0 technology. To see if your mobile device is compatible with your Charge,
visit http://www.fitbit.com/devices.
NOTE: If your mobile device is not compatible to sync via Bluetooth 4.0, you can still
use the Fitbit app to view your data and track your progress, you’ll just need to
set up and sync using a Mac or PC.
Installing the Fitbit app
You can find the Fitbit app on the iOS App store or Google Play store by searching for
“Fitbit.” If you already have the Fitbit app installed, check for available updates to make
sure you have the latest version.
iOS pairing
Unlike most Bluetooth accessories, like headsets, your Charge must be paired directly
through the Fitbit app, not through the Settings app on your iOS device.
1. Open the Fitbit app.
2. Create an account:
a. Select Join Fitbit if you don’t already have a Fitbit.com account.
NOTE: Click Log In if you’re an existing Fitbit app user. Only one Fitbit
tracker can be paired to an account.
If you’re replacing an existing tracker, at the top of your dashboard
tap Charge and then Set Up a New Fitbit Device.
(TBD – may be possible to pair two trackers at once)
b. Tap Charge and then Set up your Charge.
c. On the next few screens enter your personal information. This
personalizes your Fitbit experience and improves the accuracy of your

7
calorie burn and distance data. By default this personal information is
visible only to your friends, but you can adjust your privacy settings on
the Fitbit website to control what information is shared with others.
d. Enter your name and the email address and password that you want to
use for your Fitbit account.
3. Follow the onscreen prompts to power on your Charge. The app will begin
searching for it.
4. Once the Charge is found, enter the four digits that appear on its display and
click Next.
5. Once the Fitbit app shows the message “Your Charge is linked to Fitbit” you can
tap Next to see an introduction to Charge.
NOTE: If you experience trouble pairing your Charge, you can get support at
http://help.fitbit.com.
iOS syncing
Your Charge can sync directly to supported iOS devices via Bluetooth. To see if your
iOS device is compatible with your Charge, go to http://www.fitbit.com/devices.
As long as Bluetooth is enabled in the iOS settings, syncing occurs automatically every
time you open the app and when the app is running in the background on your device.
Manual sync
To initiate a manual sync while the app is already open, tap Charge at the top of your
dashboard and tap the Sync Now icon.
Real-time dashboard
You can use the Fitbit app to see your stats update in real time. Open the Fitbit app.
Once your Charge syncs, a message stating that the Charge is connected will appear at
the top of the screen. Take a few steps to see your stats update instantly.

8
All-day sync
The Fitbit app also supports all-day sync. This setting allows your Charge to sync with
your iOS device while the Fitbit app is running in the background. All-day sync is on by
default.
To turn this setting on or off, tap Charge on your dashboard and adjust the All-Day
Sync toggle as needed.
Android pairing
Unlike most Bluetooth accessories, your Charge must be paired directly through the
Fitbit app, and not through your Android device’s Bluetooth preferences.
1. Open the Fitbit app.
2. Create an account:
a. Select Set up if you don’t already have a Fitbit.com account.
NOTE: Are you an existing Fitbit app user? Only one Fitbit tracker can be
paired to an account.
If you’re replacing an existing tracker, log into your account and tap
the Menu button > Devices > Set up new device.
(TBD – may be possible to pair two trackers at once)
b. Tap Charge and then enter the email address and password for your
Fitbit account.
c. Enter your personal details, then tap Save. This information personalizes
your Fitbit experience and improves the accuracy of your calorie burn and
distance data. By default this personal information is only visible to your
friends, but you can adjust your privacy settings on the Fitbit website to
control what information is shared with others.
3. Follow the onscreen prompts to power on your Charge. The app will begin
searching for it.
4. Once the Charge is found, enter the four digits that appear on its screen and
click Next.
5. Once the Fitbit app shows the message “Your Charge is linked to Fitbit” you can
tap Next to see an introduction.

9
Android syncing
Your Charge can sync directly to supported Android devices via Bluetooth. To check if
your Android device is compatible with your Charge, see
http://www.fitbit.com/devices.
Syncing will occur automatically when you open the Fitbit app if Bluetooth is enabled in
both the Android device settings and the Fitbit app. To turn on Bluetooth in the Fitbit
app, tap the Menu button > Devices > check Use Bluetooth.

10
Tap to open app using Near-Field Communication (NFC)
Your Charge is equipped with Near-Field Communication (NFC) technology, allowing it
to interact with Android devices that support this feature.
With the screen on and unlocked, hold your Android device to your Charge’s display.
You may need to adjust the location based on where your Android device’s NFC chip is
located.
After a moment, the Fitbit app will automatically open. If you haven’t opened the Fitbit
app recently, launching will automatically sync via Bluetooth.
Manual sync
To initiate a manual sync with your Charge and Fitbit.com:
1. Open the Fitbit app.
2. Tap the Menu button.
3. Tap Devices.
NOTE: Make sure Use Bluetooth is checked.
4. Tap Charge.
5. Tap the Sync Now icon.
Background sync
The Fitbit app also supports background sync. This setting allows your Charge to sync
with your Android device while the Fitbit app is in the background or minimized.
To turn on background sync, tap the menu button > Devices > Charge > Background
Sync.
11
Tracking with Fitbit Charge
Your Charge tracks:
• Steps taken
• Distance traveled
• Floors climbed
• Calories burned
• Hours slept
• Quality of sleep
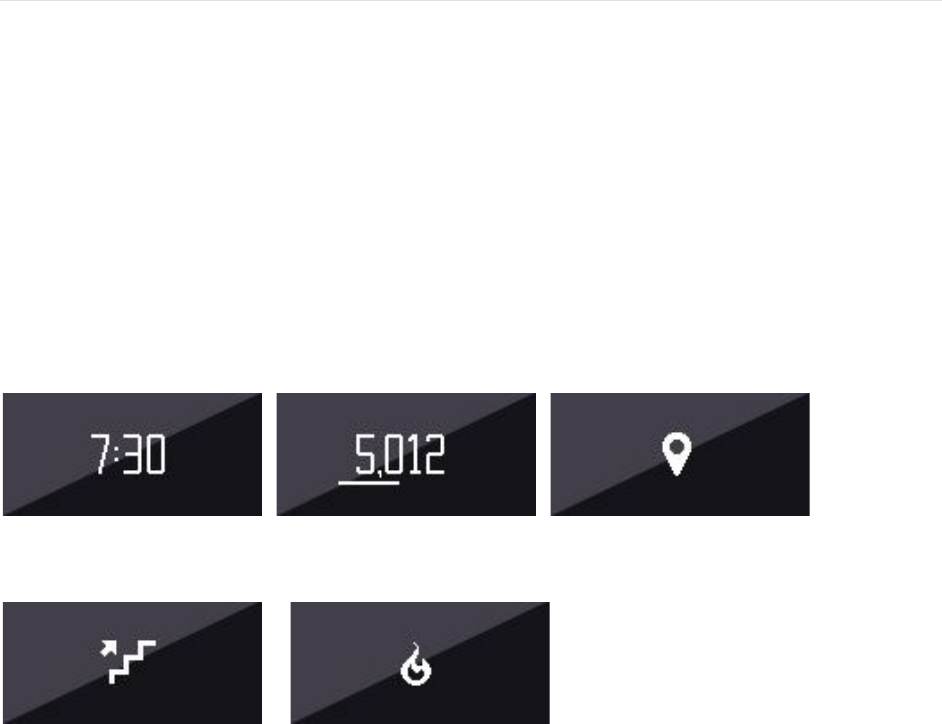
To scroll through your stats simply press the button on the side of your Charge. You’ll
see the time followed by an icon and stat in turn. If you have an alarm set, your
display will also show the next alarm time.
Time Steps Taken Distance Traveled
Floors Climbed Calories Burned
Tracking sleep with Charge
TBD – this section will change if autosleep is available at launch. To be determined in
July.
Your Charge can track the hours you sleep and your movement during sleep to help
you understand your sleep quality.
To enter sleep mode, press and hold the button on the side of your Charge. You’ll feel
a vibration and a stopwatch icon will appear, indicating that sleep mode has begun.

12
When you wake up, exit sleep mode by pressing and holding the button until it
vibrates. Log into Fitbit.com and go to Log > Sleep or the sleep dashboard tile to view
last night’s sleep summary. You can also view the information on your mobile device.
If you forget to put your Charge into sleep mode, you can always enter your sleep time
at http://www.fitbit.com/sleep.
Tracking sleep on your mobile device
You can track your sleep using the Fitbit app on your mobile device.
To track sleep on your iOS device:
1. Open the Fitbit app.
2. Scroll down your dashboard and tap the sleep tile.
3. Tap the + button in the top-right corner.
4. Tap Begin Sleep Now.
To track sleep on your Android device:
1. Open the Fitbit app.
2. Tap the menu in the top-left corner of the app.
3. Tap Sleep.
4. Tap the + button in the top-right corner.
5. Tap Begin Sleep Now.
If you forget to track your sleep you can manually log it the next morning by following
the steps above for tracking sleep on an iOS or Android device but choosing Add Sleep
Log instead of Begin Sleep Now.
If you close the Fitbit app by pressing the home button, your sleep will continue to be
tracked. When you awaken, just open the Fitbit app again and tap I'm Awake, then tap
View Summary to see a summary of your sleep.
Tracking goals with Charge
Your Charge is designed to track your progress towards a main goal that you define on
your Fitbit.com dashboard. The goal can be set for steps taken, distance traveled,
calories burned, or floors climbed. A progress bar below your goal keeps you
motivated throughout the day. When you reach your goal your Charge will vibrate and
flash to celebrate.
To choose the specific goal you want to track:
13
1. Log in to your Fitbit.com dashboard.
2. Click the gear icon in the top-right corner of the page.
3. Click Settings.
4. Click Devices.
5. Under Main Goal, choose the goal you would like to track on your Charge.
6. Sync your Charge to send the new goal to your tracker.
Once you’ve chosen which goal you want to track, you can set a specific value for that
goal on the Fitbit.com dashboard page or using the Fitbit app for mobile. For example,
instead of the default 10,000 steps per day, you may want your goal to be 15,000 per
day. To change your goal value using your dashboard:
1. Log into your Fitbit.com dashboard.
2. Find the tile that corresponds to your goal.
3. Click the gear icon in the lower left corner of the tile.
4. Change your Daily Goal value.
Tracking activities with Charge
Your Charge automatically tracks your steps taken, distance traveled, floors climbed,
and calories burned throughout the day. Using the activity mode feature you can
choose to track a specific activity in greater detail. Activity mode works similar to the
trip mode on a car’s odometer. For example, if you put your tracker in activity mode
and go for a run, once you stop activity mode at the end of the run and sync your data,
you’ll see an entry on your activity log. The entry provides a summary of the activity's
stats as well as a minute-by-minute graph.
To put your Charge in activity mode, press and hold the button until a stopwatch icon
appears. When you finish the activity, press and hold the button again to turn off
activity mode.

14
Wearing your Fitbit Charge
Your Charge is designed to be most accurate when worn on your wrist.
Wearing on your dominant vs. non-dominant wrist
To get the most accurate reading from your Charge, you can configure whether you are
wearing the wristband on your dominant or non-dominant wrist.
NOTE: Your dominant wrist is that which you use for most day-to-day activities, e.g.,
writing, washing dishes, or throwing a ball.
To configure this setting:
1. Log in to Fitbit.com.
2. Click the gear icon in the top-right corner of the dashboard.
3. Click Settings.
4. Click Devices on the left sidebar.
5. Under Dominant Hand choose the correct setting.
NOTE: Changes to this setting will not appear until you sync your Charge.
Using your Charge in wet conditions
Your Charge is water resistant. It should not be used while swimming but is splash,
rain, and sweat-proof.

15
Silent Alarms
Your Charge gently vibrates to wake or alert you with its silent alarm feature. You can
set alarms using your computer or a compatible mobile device.
Silent alarms can be configured to recur every day or on particular days of the week.
You can set up to eight alarms on your Charge.
NOTE: Setting multiple alarms may diminish the battery life of your Charge.
Setting silent alarms from a computer
You can set silent alarms from your computer by using the Fitbit.com dashboard.
1. Log in to your Fitbit.com dashboard.
2. Click the gear icon in the top-right corner of the page.
3. Click Settings.
4. Click Silent Alarms.
5. Click the Add Alarm button.
6. Enter the time you want the alarm to alert you.
7. Choose how often you want the alarm to occur:
a. Once – Your alarm will alert you at the specified time and not repeat.
b. Repeats – Choose which days you want this alarm to repeat every week.
8. Click Save.
Your new alarm will be saved to your Charge the next time you sync your tracker. If
you want to sync the alarm immediately, open Fitbit Connect and select Sync Now.
Setting silent alarms from an iOS device
To set silent alarms using the Fitbit app for iOS, Bluetooth must be enabled in your iOS
Settings app.
Your iOS device also must support wireless sync. To see if your device is supported, go
to http://www.fitbit.com/devices.
1. Open the Fitbit app.
2. Tap Account.
3. Tap Silent Alarms.
4. Tap Add a new alarm.

16
5. Set the time by adjusting the click-wheel.
6. If you prefer, tap the days of the week you want this alarm to repeat.
7. Tap Save.
Your iOS device will now sync the alarm to your Charge.
Make sure your Charge is nearby in order to sync your alarm. To manually sync the
alarm, tap Charge at the top of your dashboard and then tap the Sync Now icon.
Setting silent alarms from an Android device
To set silent alarms using the Fitbit app for Android, Bluetooth must be enabled in
your Android device settings, as well as the Fitbit app Devices screen.
Your mobile device also must support Wireless Sync. To check if your device is
supported, see http://www.fitbit.com/devices.
1. Open the Fitbit app.
2. Tap the menu button.
3. Tap Devices.
4. Choose Charge.
5. Tap Silent Alarm.
6. Tap Add a new alarm.
7. Tap Next.
8. Tap Add a new alarm.
9. Tap the time to enter a time.
10. If you prefer, tap the Repeats checkbox and tap the days of the week you want
this alarm to repeat.
11. Tap Done.
12. Tap the Sync tracker to save alarms button.
NOTE: Make sure your Charge is nearby in order to sync your alarm. To manually sync
the alarm, tap the Menu button > Device Settings > choose Charge > tap the
Sync Now icon.
Dismissing silent alarms
Your Charge will vibrate when your silent alarm goes off and the screen will flash. This
notification will repeat several times until dismissed. You can dismiss the alarm by
pressing the button on the side of the Charge. If you do not dismiss the alarm, it will
repeat after nine minutes.

17
Caller ID
With iPhone 4S and higher iOS devices using iOS 7, you can choose to receive incoming
smart call notifications right on your Charge when your phone is within about 15 to 30
feet (5 to 10 meters).
When you receive a phone call, your Charge vibrates once and the incoming number or
name (if the contact is in your address book) scrolls across the display. The notification
scrolls for 10 seconds or until the call is answered. You can dismiss the notification at
any time by pressing the button on your Charge.
To turn Caller ID on or off:
1. Open the Fitbit app on your iOS device.
2. Click Charge at the top of your dashboard.
3. Toggle Caller ID on or off.
4. The first time you turn on Caller ID, you’ll receive a Bluetooth pairing request.
Tap Pair.
18
Battery Life and Power
Battery life
Your Charge contains a rechargeable lithium-polymer battery.
With normal use, your fully charged Charge should last about 7 to 10 days before
needing a charge. You can check the level of your battery by logging into Fitbit.com
and clicking the gear icon on the top-right corner of the page.
When you press the button on your Charge to cycle through your stats, the first screen
will show a battery if there is approximately one day or less of battery life remaining.
Charging your Charge
To charge your Charge, plug the charging cable into the USB port on your computer
and plug the other end into the port on the back of the Charge.
Charging completely takes an average of one and a half to two hours.

19
Memory
When you sync your Charge, your activity data is uploaded to your Fitbit.com
dashboard. Your Charge holds detailed minute-by-minute information for the most
recent 7 days, and up to 30 days of daily activity summaries.
Your recorded data consists of steps taken, distance traveled, calories burned, floors
climbed, and sleep tracked.
Sync your Charge regularly to have the most detailed data available to view on your
Fitbit.com dashboard.
NOTE: Your Charge starts tracking your goal for the next day at 12:00AM for the time
zone selected in your personal settings on your Fitbit.com account. You can
adjust your time zone at http://www.fitbit.com/user/profile/edit.
Though your stats reset to zero at midnight this does not delete the previous
day’s data; that data will be uploaded to your Fitbit.com dashboard the next
time you sync your Charge.
20
Your Fitbit.com Dashboard
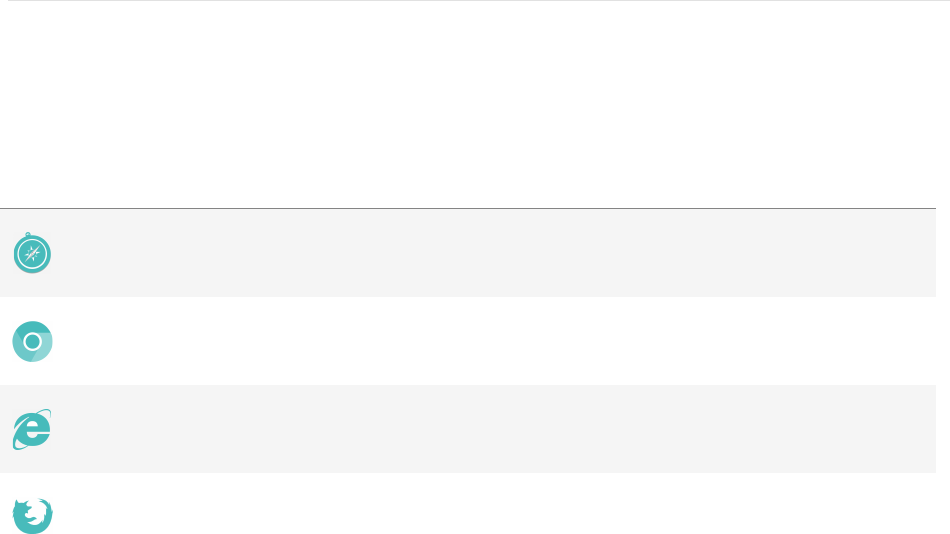
Browser requirements
Browser
Mac Version
Windows
Version
Apple Safari
5.0.5 and higher
Not supported
Google Chrome
12 and higher
12 and higher
Microsoft Internet Explorer
Not supported
8 and higher
Mozilla Firefox
3.6.18 and higher
3.6.18 and higher
Using your dashboard
Fitbit provides you with a free online tool to help track, manage, and evaluate your
fitness progress.
When you log into Fitbit.com, you will automatically be taken to your dashboard. Your
dashboard shows an overview of your progress towards your goals, as well as graphs
with historical data.
Logging food, activities, and sleep
From your dashboard, you can launch individual log pages to keep track of your food,
activities, sleep, and other custom trackers. Custom trackers are available to log
anything we have not already provided a tracker for; for example, you may want to
track how many sit-ups you do per day or how many caffeinated beverages you
consume.

21
Device info
You can see a quick preview of your tracker’s last sync, battery level, and upcoming
alarms if you click on the gear icon in the top-right corner of the page.
Managing your Charge from Fitbit.com
Manage your tracker from Fitbit.com by clicking the gear icon in the top-right corner
of the page, clicking Settings, and choosing Devices from the left sidebar.
The Devices screen allows you to change:
• Display Settings: Hide and show items to customize what you see on your
Charge’s OLED display. You can also drag items up and down to change the
order in which they appear.
• Main Goal: Choose which goal you want your Charge to track for you throughout
the day. You can edit the value of this goal from the Fitbit.com dashboard or
your mobile device using the Fitbit app.
• Tap Gesture: If you want your Charge to respond to taps, choose whether you
want the clock or your main goal displayed when you double tap your Charge.
• Clock Display: Choose from four different clock styles.
• Dominant Hand: Choose which wrist you wear your Charge on to get the most
accurate data readings. More information on this topic is located here.
• Sleep Tracking: Set the sensitivity of your sleep tracking by changing this
setting. The Normal setting is sufficient for most people. If you are a sound
sleeper, you can choose Sensitive to capture the smallest movements of your
body.
You can manage silent alarms by clicking Silent Alarms from the left sidebar.
NOTE: You must sync your Charge in order to apply any changed settings to your
tracker.

22
Updating Fitbit Charge
Fitbit may release free updates for your Charge. You can update your Charge using
Fitbit Connect on your computer or the Fitbit app on your mobile device.
We recommend that you keep your Charge up to date. The latest feature enhancements
and product improvements are made through updates.
NOTE: Updating your Charge takes about 5 to 7 minutes and is demanding on the
battery. We recommend that you charge your Charge prior to updating or while
the update is in progress.
Updating Charge on a computer
To update your Charge on a Mac or PC:
1. Click the Fitbit Connect icon near the time and date.
2. From the Main Menu, choose Check for device update.
3. Log in to your account using your Fitbit.com credentials. Fitbit Connect will now
look for your Charge.
NOTE: Make sure your wireless sync dongle is plugged in.
4. If an update has been found for your Charge, Fitbit Connect will display a
progress bar indicating that the update is in progress. Keep your Charge close
to your computer while you perform the update.
You’ll see a notification when the update completes.
If you have trouble updating your Charge on a computer, see http://help.fitbit.com.
Updating Charge on an iOS device
Your Charge can be updated using the Fitbit app for iOS if your iOS device is
compatible with the wireless sync feature. To see if it is compatible, go to
http://www.fitbit.com/devices.
1. Open the Fitbit app.
2. Tap your tracker name at the top of the app dashboard. If an update is available,
the option Update Available will appear in pink toward the top of this screen.

23
3. Make sure your tracker remains near your iOS device while it updates. You can
make your tracker easier to find by pressing its button to wake it up.
You’ll see a notification when the update completes.
If you have trouble updating your Charge with the Fitbit app for iOS, see
http://help.fitbit.com for more information.
Updating Charge on an Android device
Your Charge can be updated using the Fitbit app for Android if your Android device is
compatible with the wireless sync feature. To see if it is compatible, go to
http://www.fitbit.com/devices.
1 Open the Fitbit App.
2 Tap the Menu button.
3 Tap Devices.
NOTE: Make sure Use Bluetooth is checked.
4 Tap Charge.
5 If there is an update available, tap the Update Available button at the top of this
screen.
NOTE: Make sure your Charge remains near your Android device while finding and
updating it.
6 When the update completes, the Fitbit app will say “You’re all set!”
If you have trouble updating your Charge with the Fitbit app for Android, see
http://help.fitbit.com for more information.

24
Fitbit Charge General Info &
Specifications
Sensors and motors
Your Charge uses a MEMS 3-axis accelerometer that measures your motion patterns to
determine your steps taken, distance traveled, calories burned, and sleep quality. Its
altimeter also measures floors climbed. Charge also contains a vibration motor, which
allows it to vibrate when alarms go off.
Size
Length
Width
Small wristband
5.5 – 6.9 in
140 – 176
mm
20.9 mm
Large wristband
6.3 – 8.2 in
161 – 209
mm
20.9 mm
Environmental conditions
Operating Temperature
-4° to 113° F
(-20° to 45° C)
Non-operating Temperature
-22° to 140° F
(-30° to 60° C)
Water Resistant
Device is splash proof
Maximum Operating Altitude
30,000 feet
(9,144 m)

25
Help
Troubleshooting and assistance for your Charge can be found at http://help.fitbit.com.
Return policy and warranty
Warranty information and the Fitbit.com Store Return Policy can be found online at
http://www.fitbit.com/returns.

26
Regulatory & Safety Notices
Model Name:
USA and Canada
This device complies with FCC Part 15 and Industry Canada license exempt RSS
standard(s). Operation is subject to the following two conditions: (1) this device
may not cause interference, and (2) this device must accept any interference,
including interference that may cause undesired operation of the device.
Cet appareil est conforme à FCC Partie15 d’Industrie Canada RSS standard exempts de
licence (s). Son utilisation est soumise à Les deux conditions suivantes: (1) cet appareil
ne peut pas provoquer d’interférences et (2) cet appareil doit accepter Toute
interférence, y compris les interférences qui peuvent causer un mauvais
fonctionnement du dispositif.
FCC Warning
Changes or modifications not expressly approved by Fitbit, Inc. could void the user’s
authority to operate the equipment. Note: This equipment has been tested and found
to comply with the limits for a Class B digital device, pursuant to part 15 of the FCC
Rules. These limits are designed to provide reasonable protection against harmful
interference in a residential installation. This equipment generates, uses and can
radiate radio frequency energy and, if not installed and used in accordance with the
instructions, may cause harmful interference to radio communications. However, there
is no guarantee that interference will not occur in a particular installation. If this
equipment does cause harmful interference to radio or television reception, which can
be determined by turning the equipment off and on, the user is encouraged to try to
correct the interference by one or more of the following measures:
• Reorient or relocate the receiving antenna
• Increase the separation between the equipment and receiver.
• Connect the equipment into an outlet on a circuit different from that to which
the receiver is connected.
• Consult the dealer or an experienced radio/TV technician for help.
This device meets the FCC and IC requirements for RF exposure in public or
uncontrolled environments.
Les changements ou modifications non expressément approuvés par la partie
responsable de la conformité pourraient annuler l'autorité de l'utilisateur à utiliser cet
équipement.
27
This device complies with Health Canada’s Safety Code. The installer of this device
should ensure that RF radiation is not emitted in excess of the Health Canada’s
requirement. Information can be obtained at http://www.hc-sc.gc.ca/ewh-
sem/pubs/radiation/radio_guide-lignes_direct-eng.php
Cet appareil est conforme avec Santé Canada Code de sécurité 6. Le programme
d’installation de cet appareil doit s’assurer que les rayonnements RF n’est pas émis
au-delà de I’exigence de Santé Canada. Les informations peuvent être obtenues:
http://www.hc-sc.gc.ca/ewhsemt/pubs/radiation/radio_ guide-lignes_direct-eng.php
This Class B digital apparatus complies with CAN ICES-3 (B)/NMB-3(B).
Cet$appareil$numérique$de$la$classe$B$est$conforme$à$la$norme$NMB"003!du!Canada.!
European Union
Declaration of Conformity with Regard to the EU Directive 1999/5/EC. Fitbit Inc. is
authorized to apply the CE Mark on its product, thereby declaring conformity to the
essential requirements and other relevant provisions of Directive 1999/5/EC and other
applicable Directives.
Compliant with the standard R&TTE 99/CE/05
Conforme(à(la(norme(R&TTE(99/CE/05!
The complete Declaration of Conformity can be found in the specific product section at
help.fitbit.com/safety.
Australia and New Zealand
!
R-NZ
!
Singapore
!
!
!
Complies with
IDA Standards
DA00006A

28
Russia
!
!

29
Disposal and Recycling Information
The symbol on the product or its packaging signifies that this product must be
disposed of separately from ordinary household wastes at its end of life. Please kindly
be aware that it is your responsibility to dispose of electronic equipment at recycling
centers to help conserve natural resources.
Each country in the European Union should have its collection centers for electrical and
electronic equipment recycling. For information about your recycling drop off point,
please contact your local related electrical and electronic equipment waste
management authority or the retailer where you bought the product.
Le symbole sur le produit ou son emballage signifie que ce produit doit être traité
séparément des déchets ménagers ordinaires à la fin de sa vie. S'il vous plaît être
conscient qu'il est de votre responsabilité de vous débarrasser de l'équipement
électronique dans les centres de recyclage pour aider à préserver les ressources
naturelles.
Chaque pays de l'Union européenne devrait avoir ses centres de collecte pour le
recyclage des équipements électriques et électroniques. Pour plus d'informations au
sujet de votre perte de recyclage point de départ, s'il vous plaît contactez votre
autorité de gestion locale des déchets connexes équipements électriques et
électroniques ou le détaillant où vous avez acheté le produit.
• Do not dispose of your Fitbit product with household waste
• Disposal of the packaging and your Fitbit product should be done in accordance
with local regulations.
• Batteries are not to be disposed of in the municipal waste stream and require
separate collection.
!
!

30
Important Safety Instructions
Cautions
• Prolonged contact may contribute to skin irritation or allergies in some users. If
you notice any signs of skin redness, swelling, itchiness, or other skin irritation,
please discontinue use or wear the product clipped over a piece of clothing.
Continued use, even after symptoms subside, may result in renewed or
increased irritation. If symptoms persist, consult your doctor.
• The device contains electrical equipment that could cause injury if not handled
properly.
• This product is not a medical device, and is not intended to diagnose, treat,
cure, or prevent any disease.
• Maps, directions, and other GPS or navigation data, including data relating to
your current location, may be unavailable, inaccurate, or incomplete.
• Consult your doctor before beginning or modifying any exercise program.
• Consult your doctor before use if you have any preexisting conditions that
might be affected by your use of this Fitbit product.
• Do not check call notifications or other data on the product’s display while
driving or in other situations where distractions could be hazardous.
• This product is not a toy. Do not allow children or pets to play with your Fitbit
product. The product contains small components that can be a choking hazard.
• Your Fitbit product is water resistant to 10m and is splash and rain proof. It can
be worn in the shower but should not be worn while swimming or bathing and
should not be submerged under water.
• PurePulse products have a heart rate tracking feature that may pose risks to
users with certain health conditions. Consult your doctor prior to use if you:
o Have a medical or heart condition.
o Are taking any photosensitive medicine.
o Have epilepsy or are sensitive to flashing lights.
o Have reduced circulation or bruise easily.
Care and Wearing Tips
• Clean and dry your Fitbit product regularly, particularly in areas in contact
with the skin. Use a clean, damp cloth. Do not wash the product under a
faucet.
• Wear your Fitbit product loosely enough to allow air circulation. Review
the sizing guide at www.fitbit.com/__________ for more information.
• Use skin care products sparingly on the areas of the skin covered by your
Fitbit product.
• Take the product off from time to time to clean it and allow for your skin
to be uncovered
31
• Do not open the enclosure or disassemble your Fitbit product.
• Do not use your Fitbit product if the display is cracked.
• Substances in this product and its battery may harm the environment or
cause injury if handled and disposed of improperly.
• Do not place your Fitbit product in a dishwasher, washing machine, or
dryer.
• Do not expose your Fitbit product to extremely high or low temperatures.
• Do not use your Fitbit product in a sauna or steam room.
• Do not leave your Fitbit product in direct sunlight for an extended period
of time.
• Do not dispose of your Fitbit product in a fire. The battery could
explode.
• Do not use abrasive cleaners to clean your Fitbit product.
• Do not wear your Fitbit product while charging it.
• Do not charge your Fitbit product while it is wet.
• Remove your Fitbit product if it feels warm or hot.
Built-In Battery Precautions
• Your Fitbit product features a built-in battery, which is not user
replaceable. Tampering with your product, or attempting to open it, will
void the warranty and can result in a safety hazard.
• Use only the charger cable that shipped with your product to charge the battery.
• Charge the battery using a computer, powered hub, or power supply that
is certified by a recognized testing laboratory.
• Charge the battery in accordance with the instructions supplied with this guide.
!

32

33