FL Full Manual
2017-03-08
: Fitlight Fl Full Manual FL Full manual
Open the PDF directly: View PDF ![]() .
.
Page Count: 70
FITLIGHT Trainer™ User Manual

INDEX
..................................................................................................................................................................................................................................
GENERAL INFORMATION
FCC STATEMENTS
REGISTRATION & SUPPORT
HANDLING INSTRUCTIONS
IMPORTANT NOTICES
WARRANTY
SYSTEM INFORMATION
CHARGING THE SYSTEM
OPERATIONAL TIPS
QUICK GUIDE: MAIN MENU
SYSTEM OPERATION
RANDOM TRAINING
PARAMETER EXPLANATIONS
PROGRAM OR EDIT SEQUENCE
RUN PROGRAMMED SEQUENCE
SPLIT TIME TRAINING
HAND / EYE COORDINATION
FITLIGHT GAME
RESULTS / DATA
GROUP SET UP
HOW TO CREATE ONE OR MULTIPLE GROUP
SUPPORT
TROUBLE SHOOTING
INSTALLING THE RECHARGEABLE BATTERIES
NETWORK & WIRELESS TEST
2
2
3
4
5
6
9
11
13
15
16
18
24
33
36
39
41
43
48
57
59
63
While the information contained in this manual is deemed to be accurate at the time of publishing, FITLIGHT Sports Corp.
reserves the right to make changes and additions, deletions without notice. This publication cannot be copied without the prior
written consent of FITLIGHT Sports Corp.

GENERAL INFORMATION
GENERAL INFORMATION 2
..................................................................................................................................................................................................................................
This equipment has been tested and found to comply with the limits for a Class B digital device, pursuant to
Part 15 of the FCC Rules. These limits are designed to provide reasonable protection against harmful
interference in a residential installation. This equipment generates/uses and can radiate radio frequency
energy and, if not installed and used in accordance with the instructions, may cause harmful interference to
radio communications. However, there is no guarantee that interference will not occur in a particular
installation.
If this equipment does cause harmful interference to radio or television reception, which can be determined
by turning the equipment off and on, the user is encouraged to try to correct the interference by one or
more of the following measures:
• Re-orient or relocate the receiving antenna.
• Increase the separation between the equipment and receiver.
• Connect equipment and receiver to outlets on different circuits.
• Consult the dealer or an experienced radio/TV technician for help.
US FCC Labeling Requirements (FCC Part 15.19)
This device complies with Part 15 of the FCC Rules.
Operation is subject to the following two conditions: (1) this device may not cause harmful interference, and
(2) this device must accept any interference received, including interference that may cause undesired
operation.
US FCC Modification warning (FCC Part 15.21)
Warning: Any changes or modifications not expressively approved by FITLIGHT SPORTS CORP. could
void the user’s authority to operate this equipment
Contains FCC ID: OA3MRF24J40MB
Contains IC: 7693A-24J40MB
FCC STATEMENTS
REGISTRATION & SUPPORT 3
REGISTRATION & SUPPORT
..................................................................................................................................................................................................................................
REGISTER your FITLIGHT Trainer™ to comply with
the Warranty Requirements.
Please go to www.Fitlighttraining.com and click on
the “Register” link on the upper right hand corner of
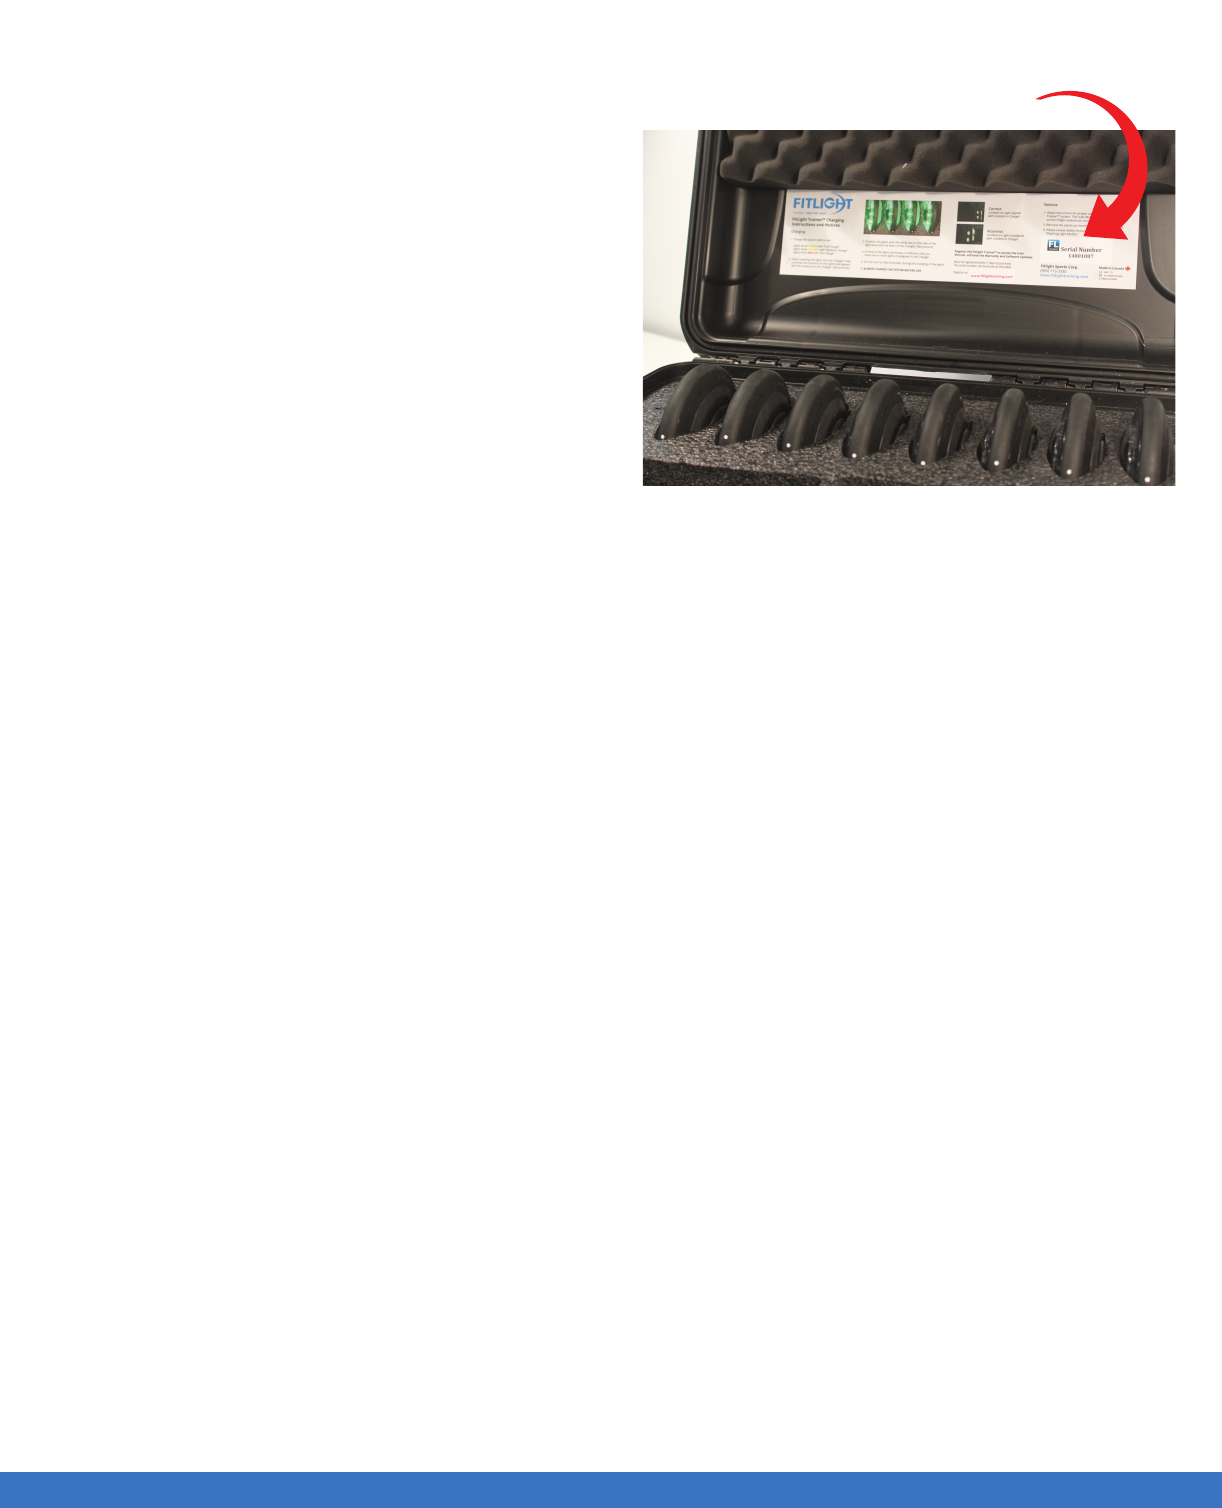
the page. You will need the serial number of the
FITLIGHT Trainer™ which is located on the inside of
the Charger case. Failure to register your system may
void your warranty.
Registration also allows the user to be notified of new
protocols and the ability to download software
updates.
SUPPORT
A full range of drill concepts, examples and videos are
available through the FITLIGHT Trainer™ website.
You also have access to this information oce you
successfully register the FITLIGHT Trainer™.
Please go to www.fitlighttraining.com .
For further support please contact us at:
support@fitlighttraining.com
Serial number
HANDLING INSTRUCTIONS 4
HANDLING INSTRUCTIONS
..................................................................................................................................................................................................................................
• Please take the time to read the following
instructions carefully so that you can get the most
enjoyable experience from the FITLIGHT Trainer™.
• These instructions will guide you through the entire
set up, operation and programming of the FITLIGHT
Trainer™ whereby you can experience the full
benefits of the equipment while safely carrying out
your exercise routine trouble free.
• It is recommended that you keep all of the
information included with your FITLIGHT Trainer™
in a safe place in the event you need to reference it
again. Should you lose it, you can readily request
another copy on line from FITLIGHT Sports Corp. at
info@fitlighttraining.com.
• Should you have any queries about the
use/operation of the FITLIGHT Trainer™ product,
you can contact FITLIGHT Sports Corp. at:
info@fitlighttraining.com.

IMPORTANT NOTICES 5
IMPORTANT NOTICES
..................................................................................................................................................................................................................................
DO NOT REMOVE THE BLUE PROTECTIVE CASE FROM THE TABLET
• The FITLIGHT Trainer™ is designed to be used as a training aid for athletic conditioning and should not
be used for any other purpose for which it was not intended.
• Please use the necessary precautions in the use of the FITLIGHT Trainer™ and follow the instructions
to avoid any accidental injury.
• The FITLIGHT Trainer™ should only be recharged using FITLIGHT Trainer™ approved equipment,
using unapproved accessories can lead to damage of the FITLIGHT Trainer™ or personal injury.
• The FITLIGHT Trainer™ should not be recharged in any environment that is exposed to rain or water.
Recharging of the FITLIGHT Trainer™ should be done under dry conditions when used externally.
• Do not attempt to alter the characteristics of the FITLIGHT Trainer™ in any way that can lead to
damage to the FITLIGHT Trainer™ or personal injury.
• The FITLIGHT Trainer™ has been designed to withstand a high degree of force but it should not be
subjected to possible penetration of sharp objects which can potentially damage the FITLIGHT Trainer™.
• The FITLIGHT Trainer™ should not be subjected to falls from elevated distances.
• The FITLIGHT Trainer™ is designed to be water resistant and as such can readily function in very wet
conditions and puddles of water. However the FITLIGHT Trainer™ is not designed to be submerged at
the bottom of swimming pools for any length of time.
• Some images in the Manual may appear different or may not match exactly to the actual.
DO NOT REMOVE THE BLUE PROTECTIVE CASE FROM THE TABLET

..................................................................................................................................................................................................................................
SYSTEM INFORMATION
SYSTEM INFORMATION
WARRANTY
Subject to the exclusions, limitations and conditions stated, FITLIGHT Sports Corp. warrants to the original
purchaser that FITLIGHT™ products shall be free from defects in material and workmanship for the period
of one year under normal consumer use, unless specified otherwise on your product package and / or
contained in your user documentation, from the original date of purchase. You may also find this
information by selecting your product in the Online Support section of our website at
www.fitlighttraining.com. Except where prohibited by applicable law, this warranty is non-transferable and is
limited to the original purchaser. This warranty gives you specific legal rights, and you may also have other
rights that vary under local laws.
FITLIGHT TRAINER™ LIMITED HARDWARE WARRANTY
FITLIGHT Sports Corp. SHALL NOT BE LIABLE FOR ANY SPECIAL, INDIRECT, INCIDENTAL OR CON-
SEQUENTIAL DAMAGES WHATSOEVER, INCLUDING BUT NOT LIMITED TO LOSS OF PROFITS,
REVENUE OR DATA ( WHETHER DIRECT OR INDIRECT ) OR COMMERCIAL LOSS FOR BREACH OF
ANY EXPRESS OR IMPLIED WARRANTY ON YOUR PRODUCT EVEN IF FITLIGHT Sports Corp. HAS
BEEN ADVISED OF THE POSSIBILITY OF SUCH DAMAGES ,FITLIGHT Sports Corp.’s ENTIRE LIABILI-
TY SHALL BE LIMITED TO COSTS OF REPLACEMENT, REPAIR, OR REFUND OF THE PURCHASE
PRICE PAID, AT THE SOLE OPTION OF THE COMPANY. THE FOREGOING WARRANTIES AND REM-
EDIES ARE EXCLUSIVE AND IN LIEU OF ALL OTHER WARRANTIES, EXPRESS OR IMPLIED,
INCLUDING WARRANTIES OF MERCHANTABILITY, FITNESS FOR A PARTICULAR PURPOSE, PER-
FORMANCE, ACCURACY CORRESPONDENCE WITH DESCRIPTION, AND NONINFRINGEMENT, ALL
OF WHICH ARE EXPRESSLY DISCLAIMED.IN NO EVENT SHALL FITLIGHT Sports Corp. BE LIABLE,
WHETHER IN CONTRACT OR TORT ( INCLUDING NEGLIGENCE ) FOR DAMAGES IN EXCESS OF
THE PURCHASE PRICE OF THE PRODUCT, ACCESSORY OR SOFTWARE, OR FOR ANY INDIRECT,
INCIDENTAL, SPECIAL, CONSEQUENTIAL, OR PUNITIVE DAMAGES OF ANY KIND OR LOSS OF
REVENUE OR PROFITS, LOSS OF BUSINESS, LOSS OF INFORMATION OR DATA, SOFTWARE OR
APPLICATIONS OR OTHER FINANCIAL LOSS ARISING OUT OF OR IN CONNECTION WITH THE
ABILITY OR INABILITY TO USE THE PRODUCTS, ACCESSORIES OR SOFTWARE TO THE FULL
EXTENT THESE DAMAGES MAY BE DISCLAIMED BY LAW.
Some jurisdictions do not allow the exclusion or limitation of special, indirect, incidental or consequential
damages, so the above limitation or exclusion may not apply to you. This warranty excludes (1) cosmetic
or physical damage to the surface of the product, including cracks or scratches on the LCD screen or
outside casing; (2) damage caused by misuse, neglect, improper installation or testing, unauthorized
attempts to modify the product, attempted servicing, except for battery replacement, by anyone other than
an authorized service representative of FITLIGHT Sports Corp. or any other cause beyond the range of the
intended use; (3) damage caused by accident, fire, water or liquids, power changes, other hazards, or acts
of God; (4) use of the product with any non-FITLIGHT™ device, component, such as chargers or
connection cables, or service if such device, component or service causes the problem; (5) use of this
product for any non-consumer, commercial; (6) failure to perform required preventative maintenance; (7)
normal wear and tear or rental purpose.
LIMITATIONS OF LIABILITY & EXCLUSIONS
6

..................................................................................................................................................................................................................................
SYSTEM INFORMATION
SYSTEM INFORMATION
FITLIGHT Sports Corp.’s entire liability and your exclusive remedy for any breach of warranty shall be, at
FITLIGHT Sports Corp.’s option, (1) to repair or replace the hardware, or (2) to refund the price paid,
provided that the hardware is returned to the point of purchase or such other place as FITLIGHT Sports
Corp. may direct with a copy of the sales receipt or dated itemized receipt. Shipping and handling charges
may apply except where prohibited by applicable law. FITLIGHT Sports Corp. may, at its option, use new or
refurbished or used parts in good working condition to repair or replace any hardware product. Any
replacement hardware product will be warranted for the remainder of the original warranty period or thirty
(30) days, whichever is longer or for any additional period of time that may be applicable in your jurisdiction.
This warranty does not cover problems or damage resulting from (1) accident, abuse, misapplication, or
any unauthorized repair, modification or disassembly; (2) improper operation or maintenance, usage not in
accordance with product instructions or connection to improper voltage supply; or (3) use of consumables,
such as replacement batteries, not supplied by Fitlight Sports Corp. except where such restriction is
prohibited by applicable law.
Before submitting a warranty claim, we recommend you visit the support section at www.fitlighttraining.com
for technical assistance in the event of a covered defect during the warranty period, FITLIGHT Sports Corp.
will, at its sole option, repair or replace the product at no charge to Customer for parts or labor. To obtain
warranty service for FITLIGHT Training™ products, the Customer must contact FITLIGHT Sports Corp.’s
customer service center at info@fitlighttraining.com or 1-905-713-3330 for a return authorization code, and
return the unit shipping prepaid, with proof of the date of original purchase, return authorization code, and
Customer return address to: Warranty Returns, FITLIGHT Sports Corp. 14845-6 Yonge Street, Suite 376,
Aurora, Ontario, Canada,L4G 6H8. Shipping labels must contain the return authorization code. ANY
shipments sent for warranty service WITHOUT the appropriate return authorization code will be refused
and returned to Customer at Customer’s expense. FITLIGHT Sports Corp. will not be responsible for any
loss or damage to the product incurred while the product is in transit from Customer for repairs. Customer
should, as a precaution, purchase adequate insurance for the unit while it is in transit. FITLIGHT Sports
Corp.’s total obligation under this warranty shall be, at FITLIGHT Sports Corp.’s sole discretion, to repair or
replace the product or part with a comparable product or part, or if neither repair nor replacement is
reasonably available, FITLIGHT Sports Corp. may refund to Customer the purchase price paid for the
product or part. Parts removed by FITLIGHT Sports Corp. shall become the sole property of FITLIGHT
Sports Corp.
EXCEPT TO THE EXTENT PROHIBITED BY APPLICABLE LAW, ANY IMPLIED WARRANTY OR CON-
DITION OF MERCHANTABILITY OR FITNESS FOR A PARTICULAR PURPOSE ON THIS HARDWARE
PRODUCT IS LIMITED IN DURATION TO THE DURATION OF THE APPLICABLE LIMITED WARRANTY
PERIOD FOR YOUR PRODUCT. Some jurisdictions do not allow limitations on how long an implied
warranty lasts, so the above limitation may not apply to you.
Consumers have legal rights under applicable national legislation governing the sale of consumer goods.
Such rights are not affected by the warranties in this Limited Warranty.
EXCLUSIVE REMEDIES & PROCEEDURE
DURATION OF IMPLIED WARRANTIES
NATIONAL STATUTORY RIGHTS
7

..................................................................................................................................................................................................................................
SYSTEM INFORMATION
SYSTEM INFORMATION
No FITLIGHT Sports Corp. dealer, distributor, agent, or employee is authorized to make any modification,
extension, or addition to this Limited Warranty, oral or written.
NO OTHER WARRANTIES
Please note that in the European Union, FITLIGHT Sports Corp. warrants their products in accordance to
the required European Union regulatory period.
WARRANTY PERIODS
This Registered User Limited Warranty shall be governed by the laws of the Province of Ontario, Canada,
and by the laws of the Canada, excluding their conflicts of laws principles. The United Nations Convention
on Contracts for the International Sale of Goods is hereby excluded in its entirety from application to this
Limited Warranty.
GOVERNING LAW
8
SYSTEM INFORMATION
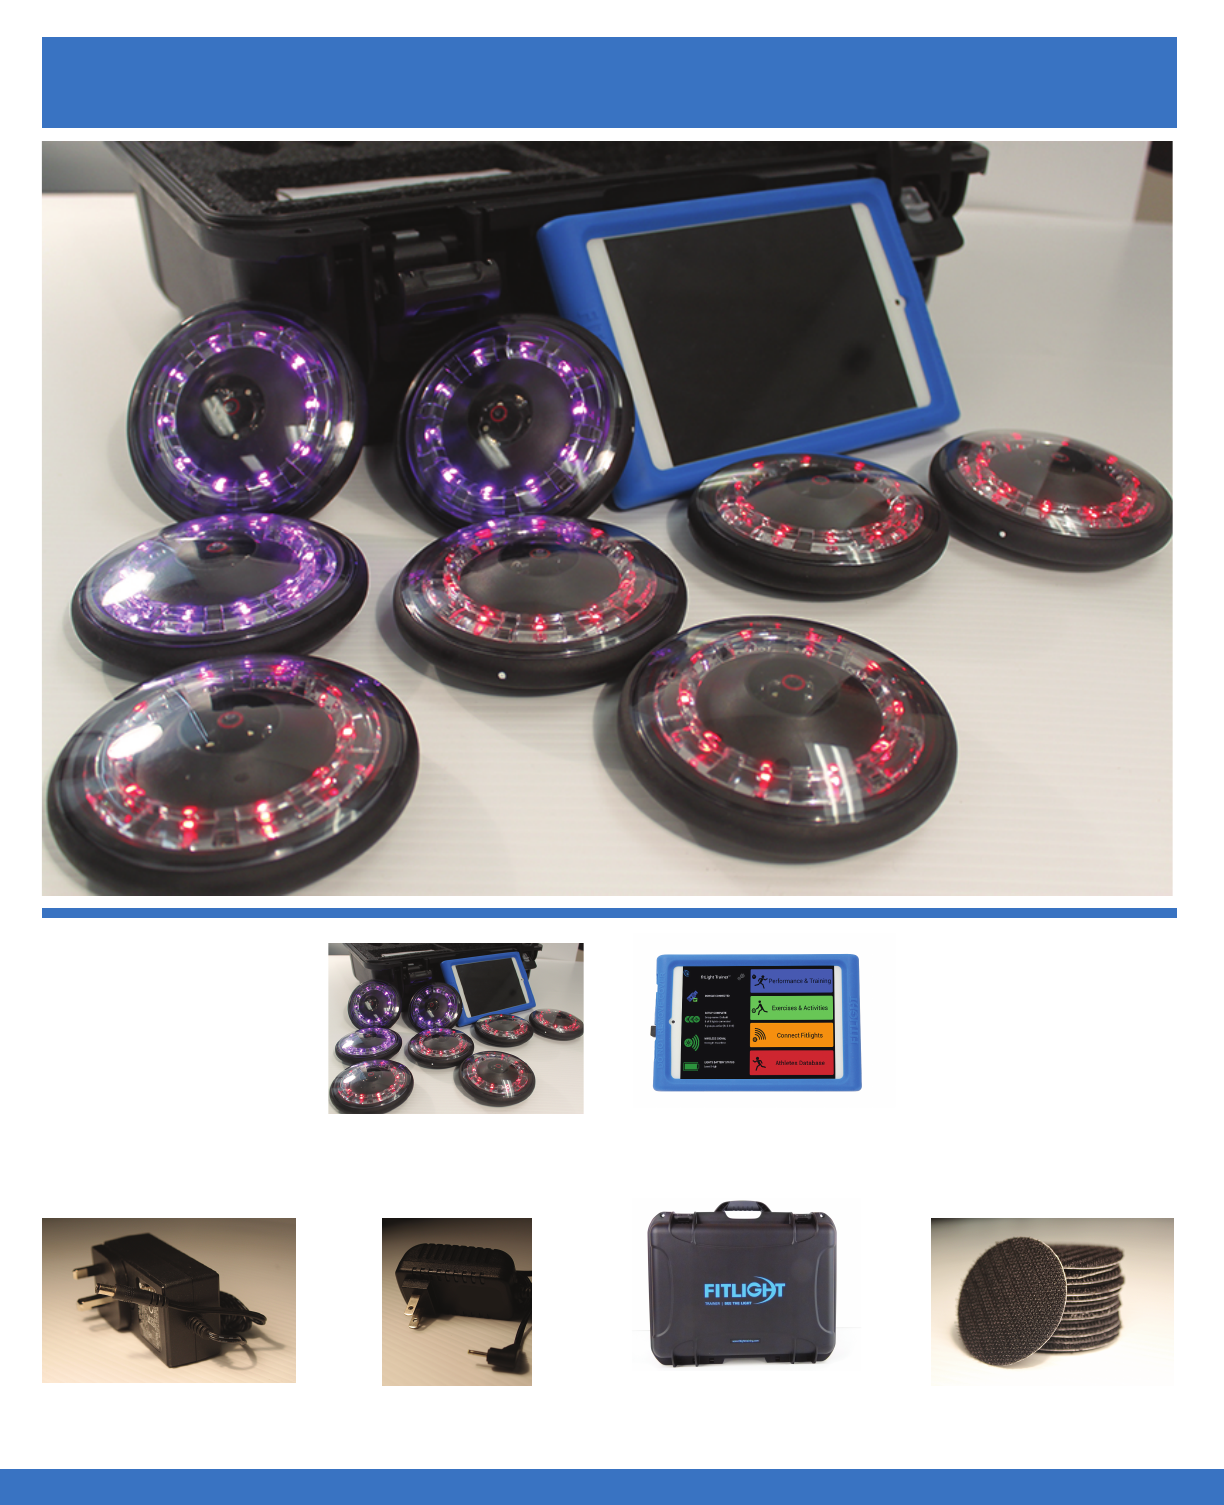
WHAT’S INCLUDED?
..................................................................................................................................................................................................................................
SYSTEM INFORMATION
FITLIGHTS ™ TABLET CONTROLLER
CHARGER CASE
CHARGER POWER SUPPLY TABLET POWER SUPPLY 16 VELCRO PADS
9

SYSTEM INFORMATION
..................................................................................................................................................................................................................................
SYSTEM INFORMATION
SYSTEM SPECIFICATIONS
Wireless Range
Battery Charge ( Lights )
Battery Type
Universal Charger Voltage
Activation Distance ( Programmable )
Activation Times ( Programmable )
Flashing Light Mode ( Programmable )
Constant Light Mode ( Programmable )
Multi Coloured Light ( Programmable )
Water Resistant
Outdoor Capable
Proximity Sensing
Contact Sensing
Accelerometer
Sound
Maximum Lights per Controller
Data Capture
Impact Resistant
Size ( Lights )
Weight ( Lights )
75 Meters
10-12 Hours
NiMH
100/240 V
0-80 cms
Yes
Yes
Yes
Yes
Yes
Yes
Yes
Yes ( Multi-Directional )
2g, 4g, 8g, Sensitivity
Yes, Multi-Tone buzzer
32
Yes
Yes
10 cms
0.3 kg
TECHNICAL SPECS
ELECTICAL DATA PHYSICAL DATA
100-240VAC - AC to DC
Universal Power Supply
Frequency: 50/60Hz
Power Consumption: 30 Watts.
BATTERY DATA
NiMH 1,2V TYP.820mAh
Li-ion 3.7V, 1180mAh
COMPLIANCE RATING
The FITLIGHT Trainer™ has been tested against industry standards and is approved to the following:
FCC: 0A3MRF24J40MB
IC 7693A - 24J40MB CE 681
Weight: 0.3 Kg ( 10oz ) per light
Weight ( Case & Lights ): 3.4Kg.
10
CHARGING THE SYSTEM
CHARGING THE SYSTEM
..................................................................................................................................................................................................................................
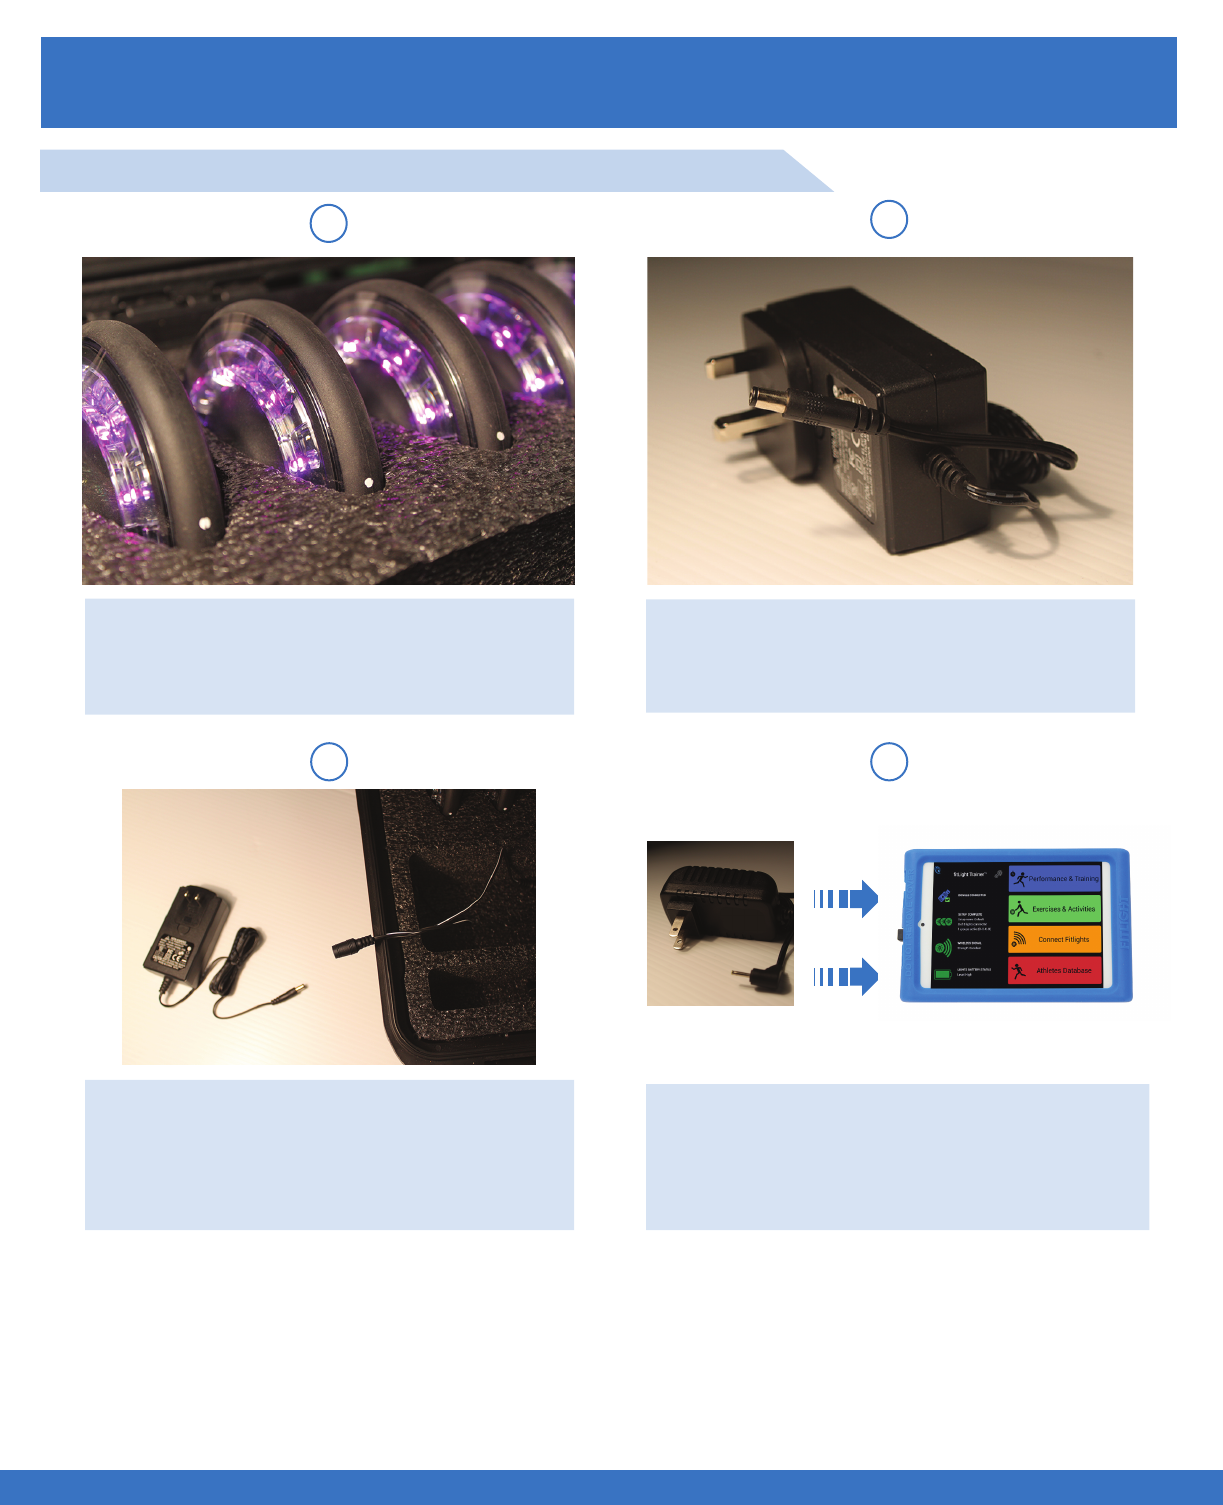
CHARGING INSTRUCTIONS
12
3 4
Lights properly nested in charger case.
White dots visible.
Insert the Power Supply jack into the free
end of the input jack from the Charger
case.
Insert the Charger Power Supply into the
dual jack as shown. Dual jack can be
found attached to the inside of the
Charger Case.
It is recommended that the FITLIGHTS™ and Tablet Controller are charged for at least 3 hours to
fully charge the batteries as this will ensure an uninterrupted operation of the system from the begin-
ning of its use.
To fully charge the FITLIGHTS™ and Tablet Controller, place them into the charging case and
connect the power supply adaptor to the charging case. Connect to a 110/220V outlet. Charge the
Tablet Controller with the supplied Power Supply, plug into120/220 V electrical outlet.
Connect the Tablet Controller Power Supply
to an electrical outlet. Once completed, insert
the other end into the Tablet Controller.
4 EASY STEPS TO CHARGE THE FITLIGHT TRAINER™
11
CHARGING THE SYSTEM
CHARGING THE SYSTEM
..................................................................................................................................................................................................................................
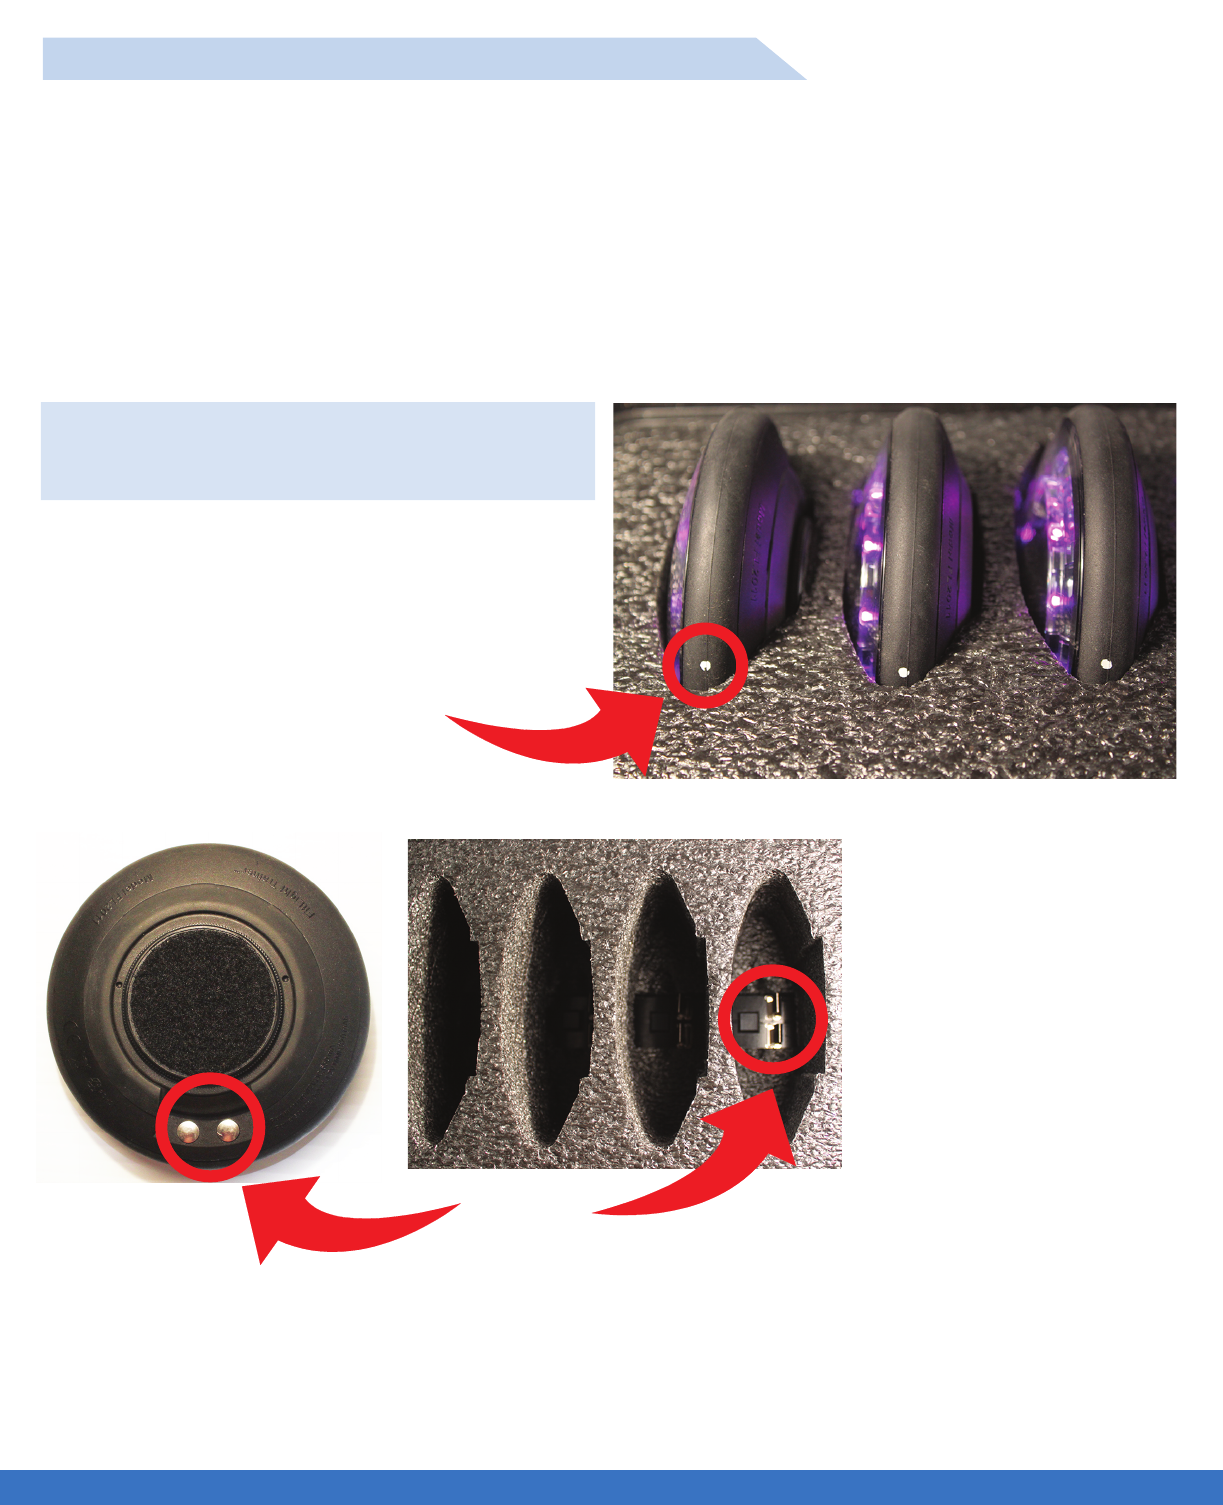
The Lights should be inserted into the Charger with the two contact points facing downwards to match the
contact points in the Charger. Make sure that the contacts are in line with the contacts in the Charger
Case and the “White Dots” are aligned with the top of the foam insert.
Note: If the Lights are not inserted correctly into the charger case, the Power Supply will shut off and there
will be no power to the Charger until the Lights are inserted correctly.
Interrupted power to the Charger is easily determined by removing one light at a time and the remaining
Lights will come on once the misaligned Light is removed. Reposition the Lights in the Charger until the
Lights are all illuminated.
White dots
Contacts
Quick tips to ensure the Lights are placed correctly.
Insert the Lights so that the
contacts on the Lights are
properly aligned with the
contacts in the Charger.
1. Make sure the Lights are properly centered onto the contacts of the Charger.
2. Should the Light not illuminate, check to make sure that the Light is correctly positioned.
3. As the system is used continuously, the contacts may be pushed out of contact with the Lights, they can
easily be adjusted by pulling them forward until contact is made with the Light.
4. Always charge the Lights with the Velcro attachment on, as this aligns the Lights in the Charger slot.
INSERTING THE LIGHTS INTO THE CHARGER CASE
12

OPERATIONAL TIPS
..................................................................................................................................................................................................................................
OPERATIONAL TIPS
1. It is important that the Lights are positioned in the charging case correctly and are seated in the cradle.
Always place the Lights in the Charger with the Velcro attachment on the Light.
2. When the Lights are inserted correctly and the system is powered up, the Lights will be yellow.
3. When the Lights are charging, they will cycle from yellow to green.
4. When the system is fully charged, the Lights will go completely green.
5. If the Lights are not powered on, check that all of the Lights are seated correctly in the case and the
“White Dots” on the Lights are visible above the foam insert.
6. The system should be charged for 3 hours for the first time before use.
7. The Lights will flash red when they are low on battery charge.
8. Allow the Tablet Controller ample time to find all of the Lights. The Lights should all be found within
90-120 seconds. If all Lights are not found reboot the system.
9. To reboot the system, press and hold the “On” at the side of the Tablet Controller button for 5 seconds.
TIPS
13
OPERATIONAL TIPS
..................................................................................................................................................................................................................................
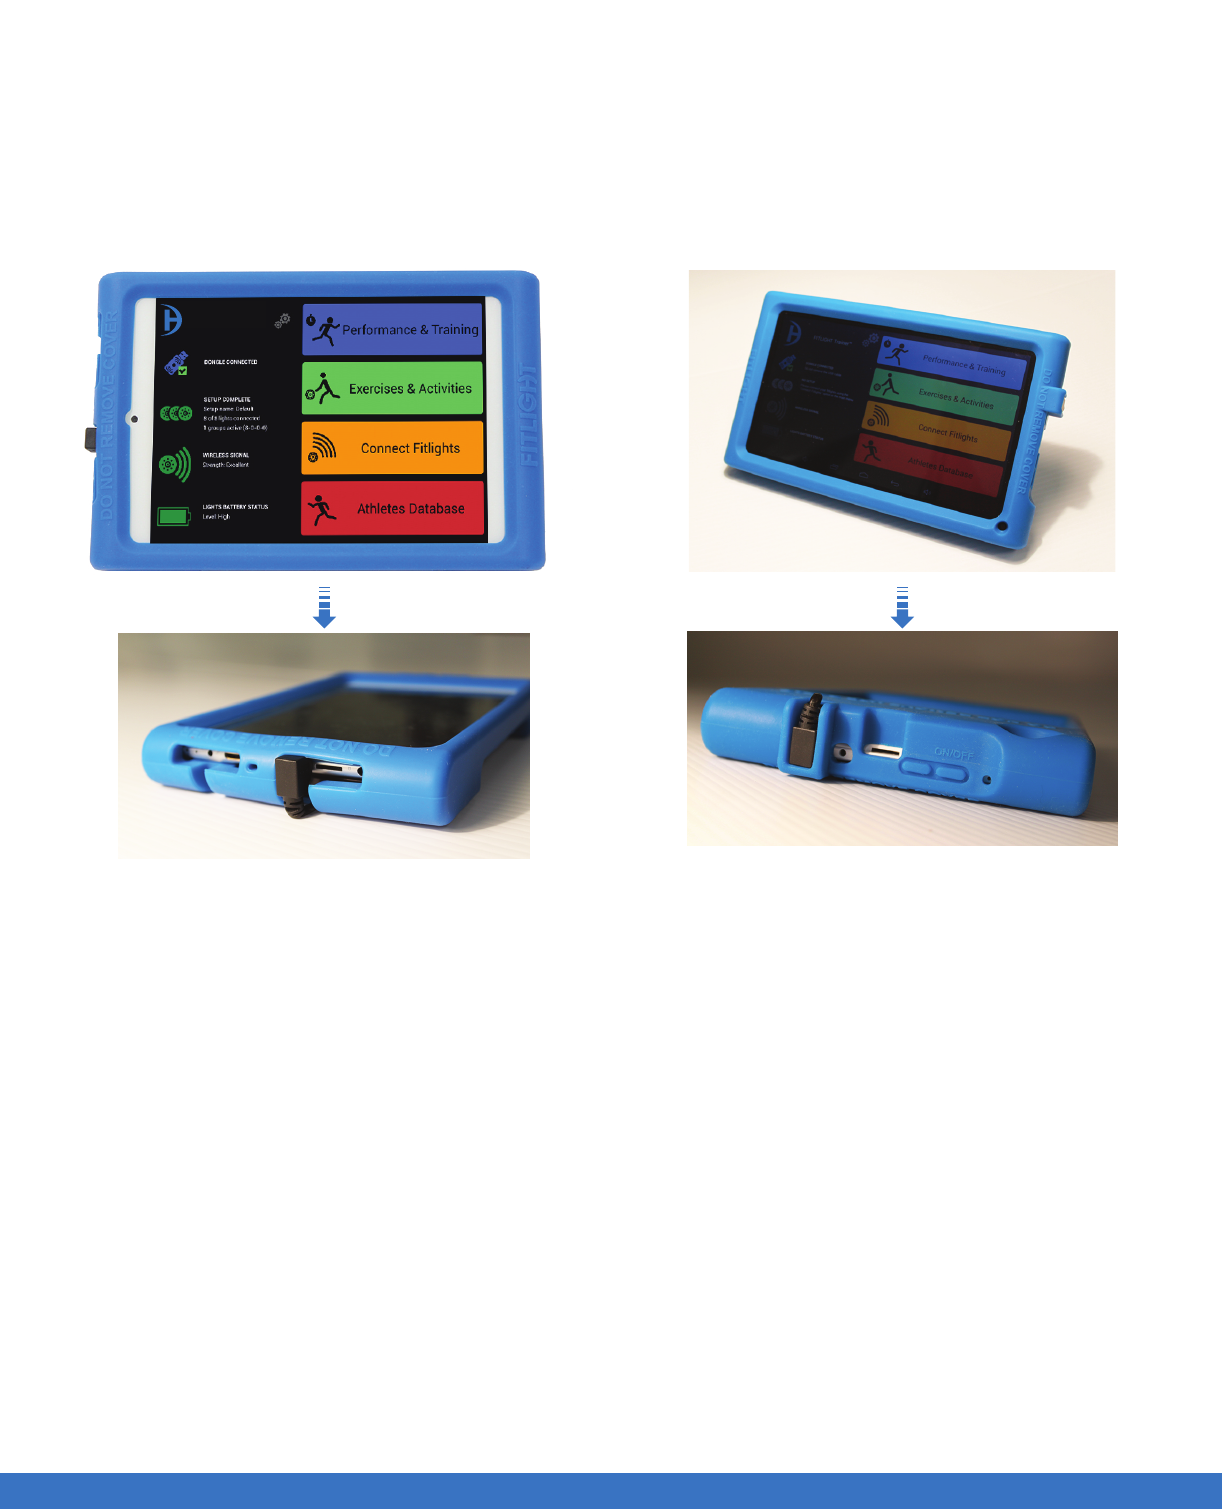
CHARGING THE SYSTEM
The Tablet Controller enables you to operate the FITLIGHT Trainer™. You can program routines, collect
and store data, edit drills and create various exercise programs. The Tablet Controller can also be used to
download data to the FITLIGHT™ Data Management Utility on your computer for further analysis.
Identify which type of Tablet Controller that you have.
Use the following instructions if your Tablet
Controller looks like this.
1. Power on the Tablet Controller by depressing
the On/Off button for 5 seconds. If done
correctly, you will notice 5 penguin icons at the
top of the screen.
2. On the homepage, touch the FITLIGHT™ icon
to launch the software.
Use the following instructions if your Tablet
Controller looks like this.
1. Power on the Tablet Controller by depressing
the On/Off button.
2. The FITLIGHT™ software will launch
immediately.
14
FITLIGHT Trainer™
OPERATIONAL TIPS
..................................................................................................................................................................................................................................
OPERATIONAL TIPS
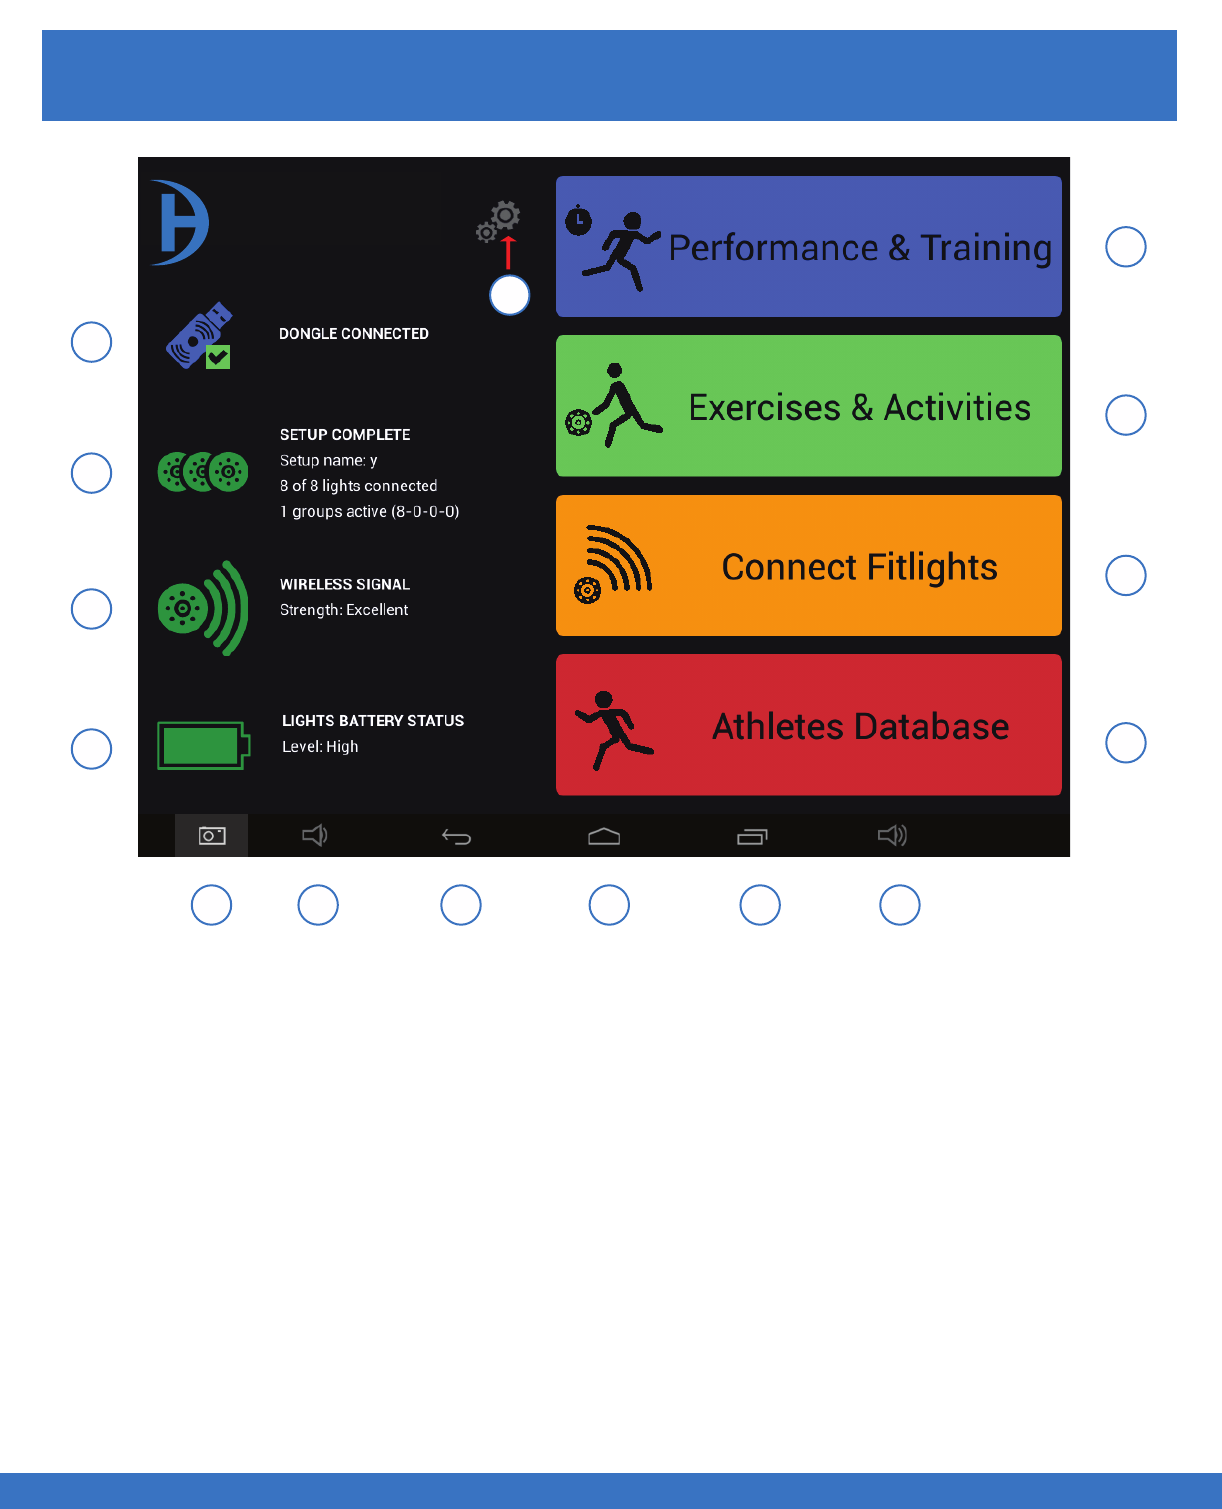
A
B
C
D
E F G H IJ
K
L
M
N
A. Indicates the status of the dongle
B. Indicates the status of the Light set up
C. Indicates the status of the wireless connection
D. Indicates the status of the Light battery charge
E. Captures a picture of the screen ( Screenshot )
F. Volume control of the tablet ( decreases the volume )
G. Previous Screen
H. Home Screen
I. Multiple Screens of the tablet
J. Volume control of the tablet ( increases the volume )
K. Menu for recording Data
L. Menu for Wireless connection of the Lights
M. Menu for FITLIGHT™ Games
N. Menu for Training Programs
O. Settings menu
QUICK GUIDE: MAIN MENU
15
FITLIGHT Trainer™
O
SYSTEM OPERATION - RANDOM TRAINING
..................................................................................................................................................................................................................................
RANDOM TRAINING SET UP
Select
Performance & Training
CHARGING THE SYSTEM - RANDOM TRAINING
Select Random Training
16
FITLIGHT Trainer™
SYSTEM OPERATION - RANDOM TRAINING
..................................................................................................................................................................................................................................
CHARGING THE SYSTEM - RANDOM TRAINING
1.The deactivation distance can be set from 10 cms to 80 cms.
2. The time out can be set from 0.10 seconds to 10 seconds.
3. There are 3 deactivation modes to select from. Distance only, Impact only or both, which means the
Light can be deactivated by motion or Impact.
4. Select the “LED” mode of the Light, there are 4 selections, which will have the LEDs flash rapidly or
slowly etc. per your preference and ease of visibility.
5. Select if sound ( Beep ) is required.
6. Select the sensitivity of ‘Impact” as required, “soft hit or a firm hit”.
7. Select the number of hits/Lights required in the routine. The example shows 25.Use the +/- buttons to
increase or decrease the number.
8. Select the “Delay” interval between Lights coming on in succession.
9. There are 3 choices, Full Light, Perimeter Light or just the Centre of the Light that illuminates.
10. Select “Save Data” if you require the results of the routine to be saved for future analysis.
11. Select “Start by Light” if you would like the “User” to start the routine.
12. Select “Start” if the routine is to be controlled by the administrator.
13. This displays the results of the run, see following pages for explanation of the “Results”.
14. Add a penalty for those lights that were not deactivated.
15. This gives a choice of 6 different colours. See the following pages for more info.
16. Select “Load Preset” if the set up has been saved before.
17. Select this to save the current set up.
18. If the set up has been saved before, select “Delete preset” to remove it.
814
7
9
12
11
6
10
15
1
2
3
2
5
16
17
13
18
PLEASE NOTE: Depending on the Tablet Controller that you have, you may have to scroll up/down
within the “Sequence Step Setup” to view all of the options.
17
SYSTEM OPERATION - RANDOM TRAINING
PARAMETER EXPLANATIONS
..................................................................................................................................................................................................................................
CHARGING THE SYSTEM - RANDOM TRAINING
LED MODE
STANDARD: Light does not flash when it activates
FLASH: Light flashes initially when it activates
SLOW BLINK: Light flashes slowly when it activates
FAST BLINK: Light flashes rapidly when it activates
LIGHT MODE
FULL LIGHT: Light is fully illuminated when it activates
RING ONLY: Light outer ring is illuminated when it activates
CENTER ONLY: Light center only is illuminated when it activates
SENSOR MODE
DISTANCE: Light deactivates by proximity sensing
IMPACT: Light deactivates by impact sensing
BOTH: Light deactivates by proximity and / or impact sensing
BEEP MODE
NO BEEP: Sound to the Light is turned off
BEEP WHEN ARMED: Sound to the Light is turned on when Light illuminates
BEEP ON HIT: Light beeps when deactivated
BEEP ON TIMEOUT: Light beeps if not deactivated
18
SYSTEM OPERATION - RANDOM TRAINING
..................................................................................................................................................................................................................................
CHARGING THE SYSTEM - RANDOM TRAINING
LIGHT COLOUR SELECTION SET UP
Touch “Select Colours” and a new menu will appear.
3 choices will appear ( as shown above )
RANDOM COLOUR DISTRIBUTION DEFINE HITS PER COLOUR USE INDIVIDUAL GROUP COLOURS
19
SYSTEM OPERATION - RANDOM TRAINING
..................................................................................................................................................................................................................................
CHARGING THE SYSTEM - RANDOM TRAINING
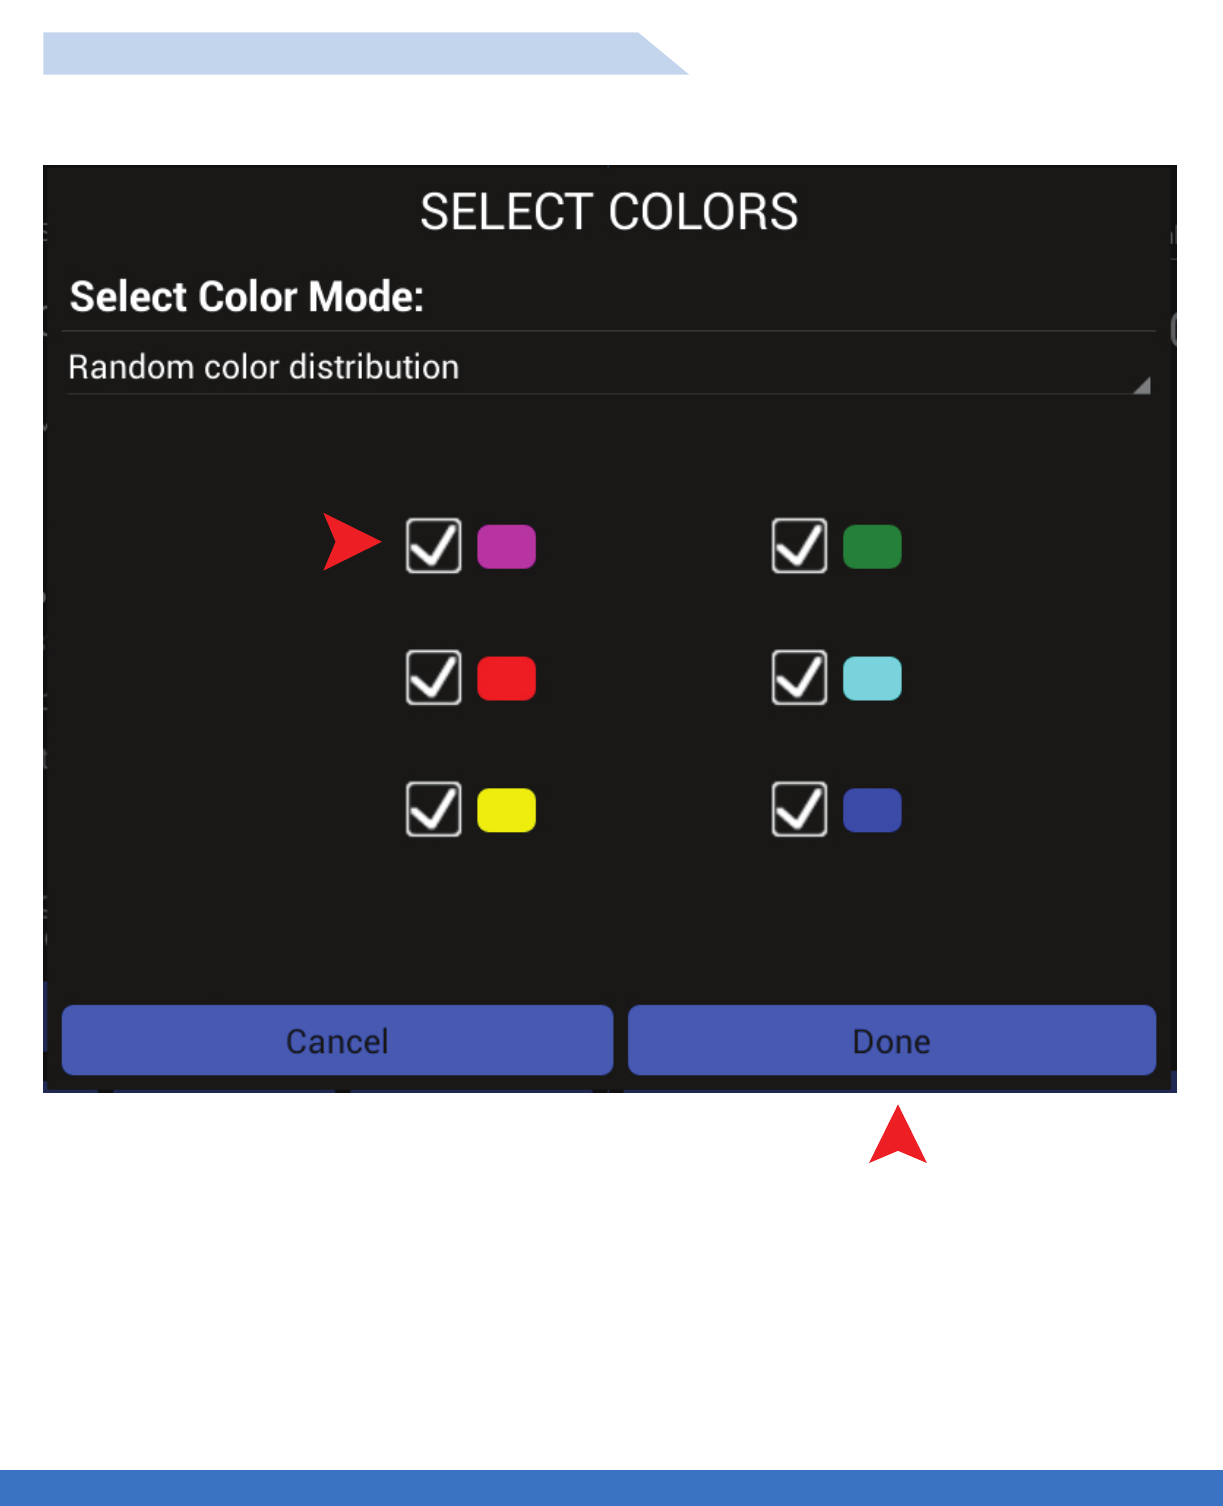
1.Select the Lights clours required for the Routine by ticking the colour boxes.
2. Select “Done” once all colours required are selected.
RANDOM COLOUR DISTRIBUTION SET UP
1
2
FUNCTION: The colours selected will appear randomly during the routine.
20
SYSTEM OPERATION - RANDOM TRAINING
..................................................................................................................................................................................................................................
CHARGING THE SYSTEM - RANDOM TRAINING
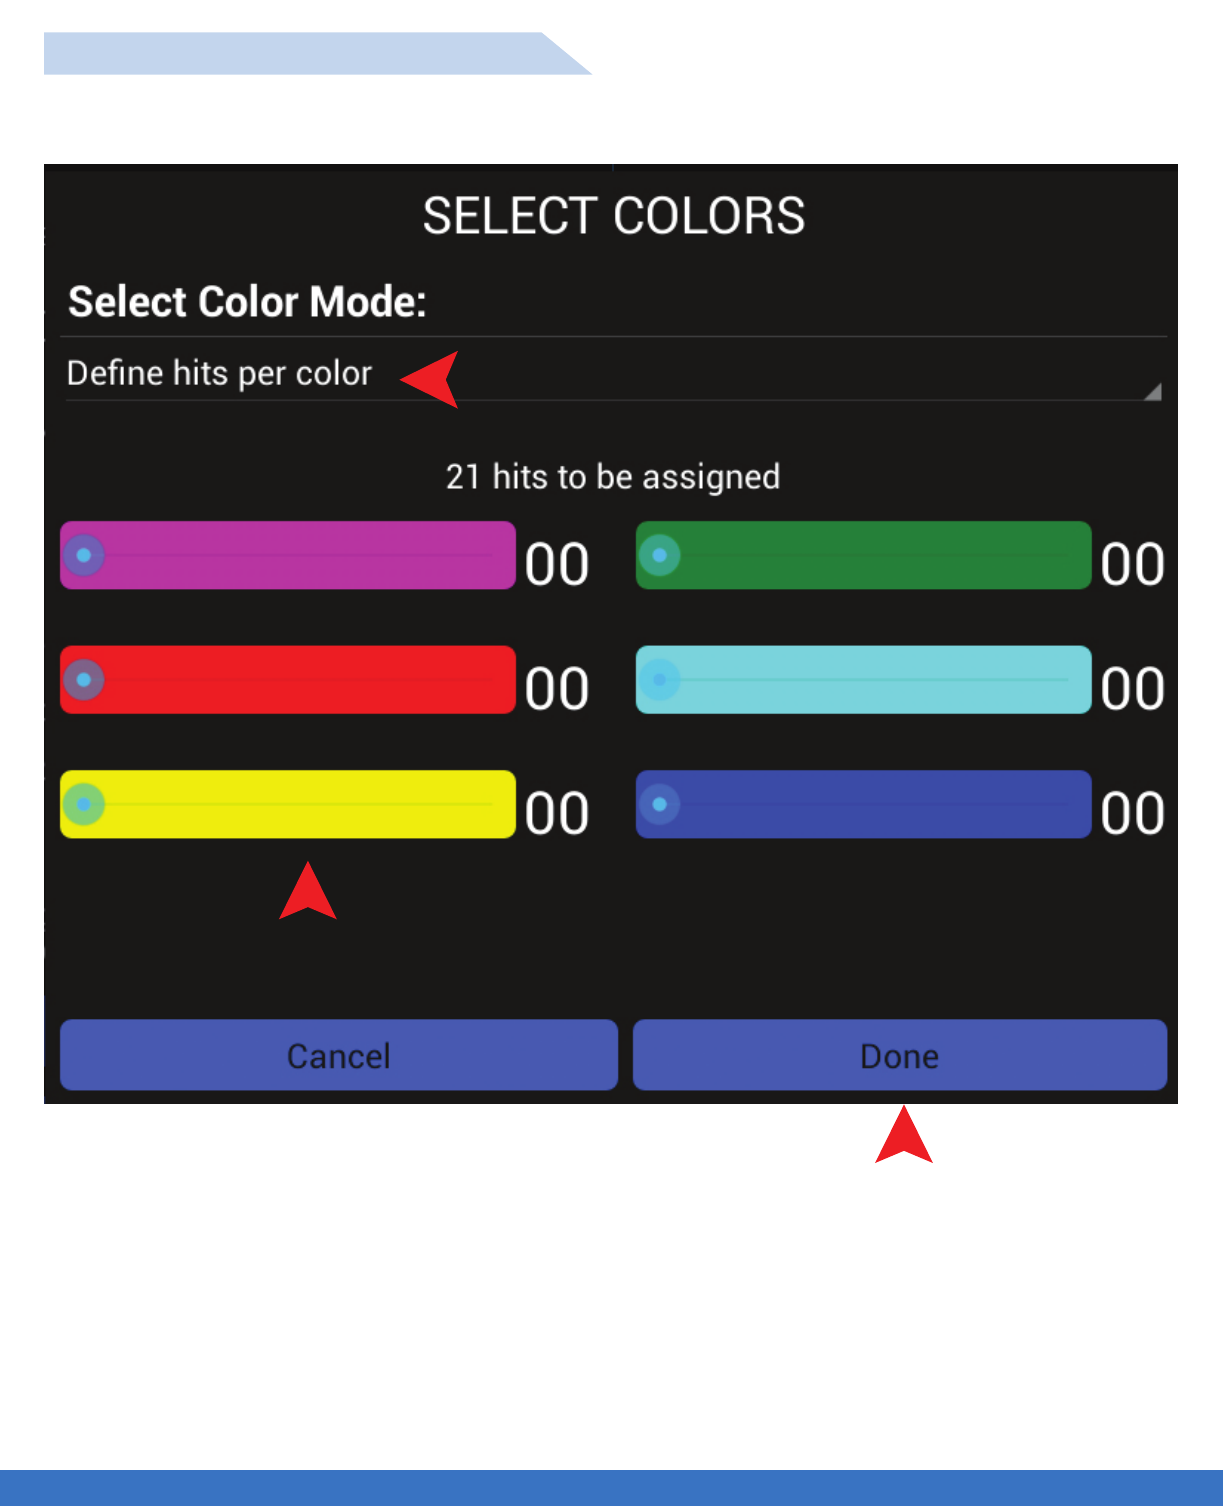
1. Select “Define hits per colour” and a new menu screen will appear for the selection of hits per colour.
2. Select the number of hits per Light by moving the slide bar to the desired number of hits per colour. The
number of hits per colour will be illustrated and the total hits will be deducted from the original set up.
3. Select “Done” once all hits are selected.
DEFINE HITS PER COLOUR SET UP
1
2
3
FUNCTION: The program will randomly select the colours as per the number of hits defined per colour.
21
SYSTEM OPERATION - RANDOM TRAINING
..................................................................................................................................................................................................................................
CHARGING THE SYSTEM - RANDOM TRAINING
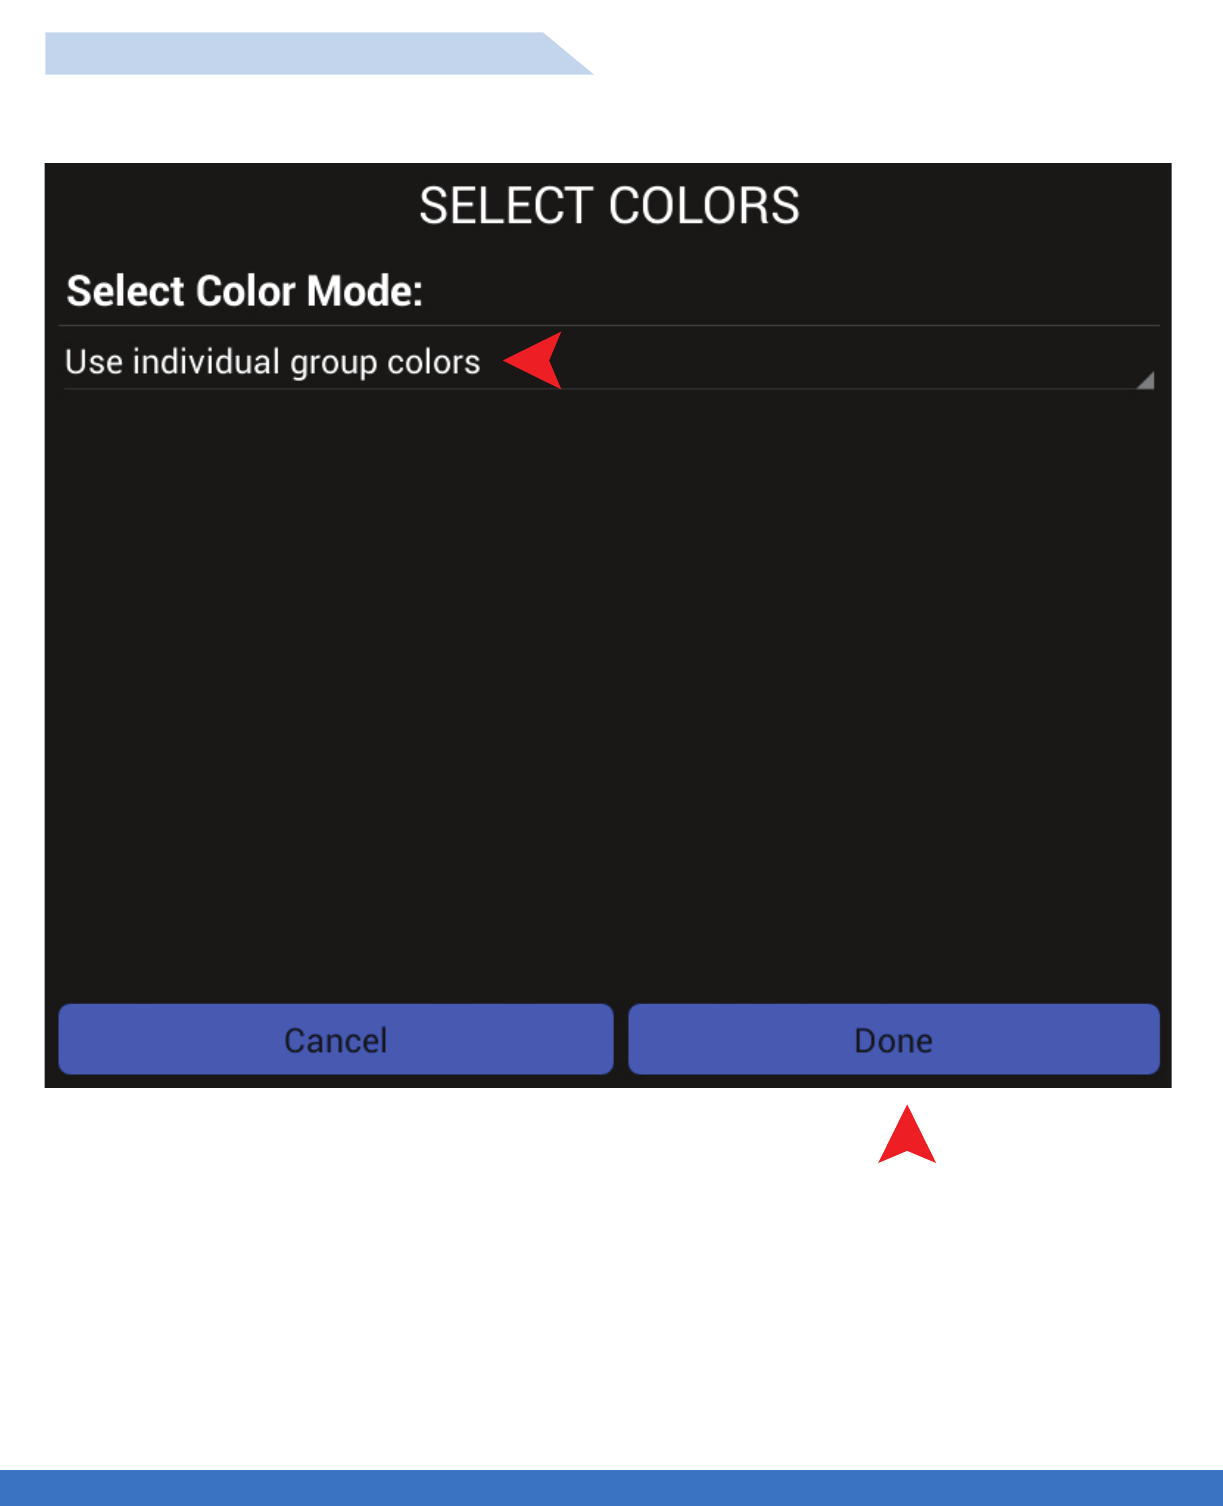
1. Select “Use individual group colours” to assign different colours per group as required.
2. Select “Done” once all group colours are selected.
1
2
USE INDIVIDUAL GROUP COLOURS
FUNCTION: Use this function when lights are assigned to groups. Colours will be automatically assigned.
22
SYSTEM OPERATION - RANDOM TRAINING
..................................................................................................................................................................................................................................
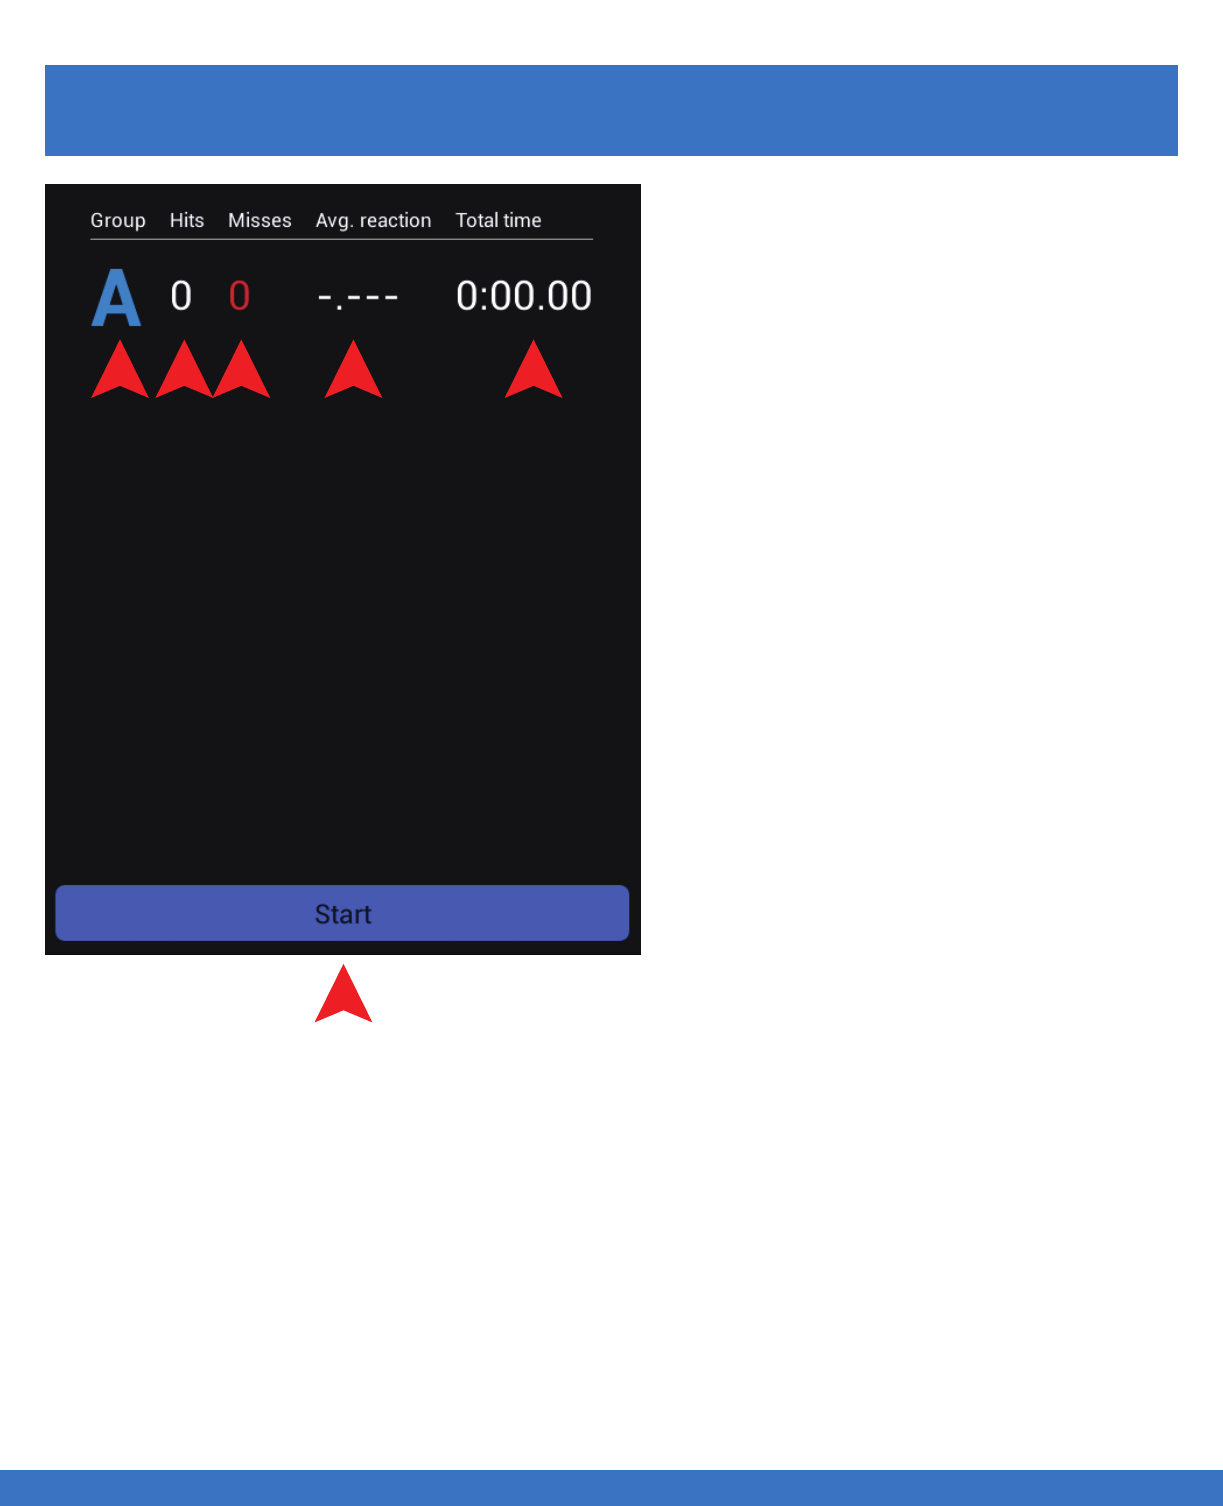
RESULTS
CHARGING THE SYSTEM - RANDOM TRAINING
1. Indicates the Group or Groups in the routine
2. Indicates the number of hits actually
performed in the routine
3. Indicates the numbers of misses from the
routine
4. Indicates the average time per
hit / deactivation
5. Indicates the total time used to complete the
routine
6. “Stop” can be used at any time to cancel the
routine
6
1 2 3 45
23
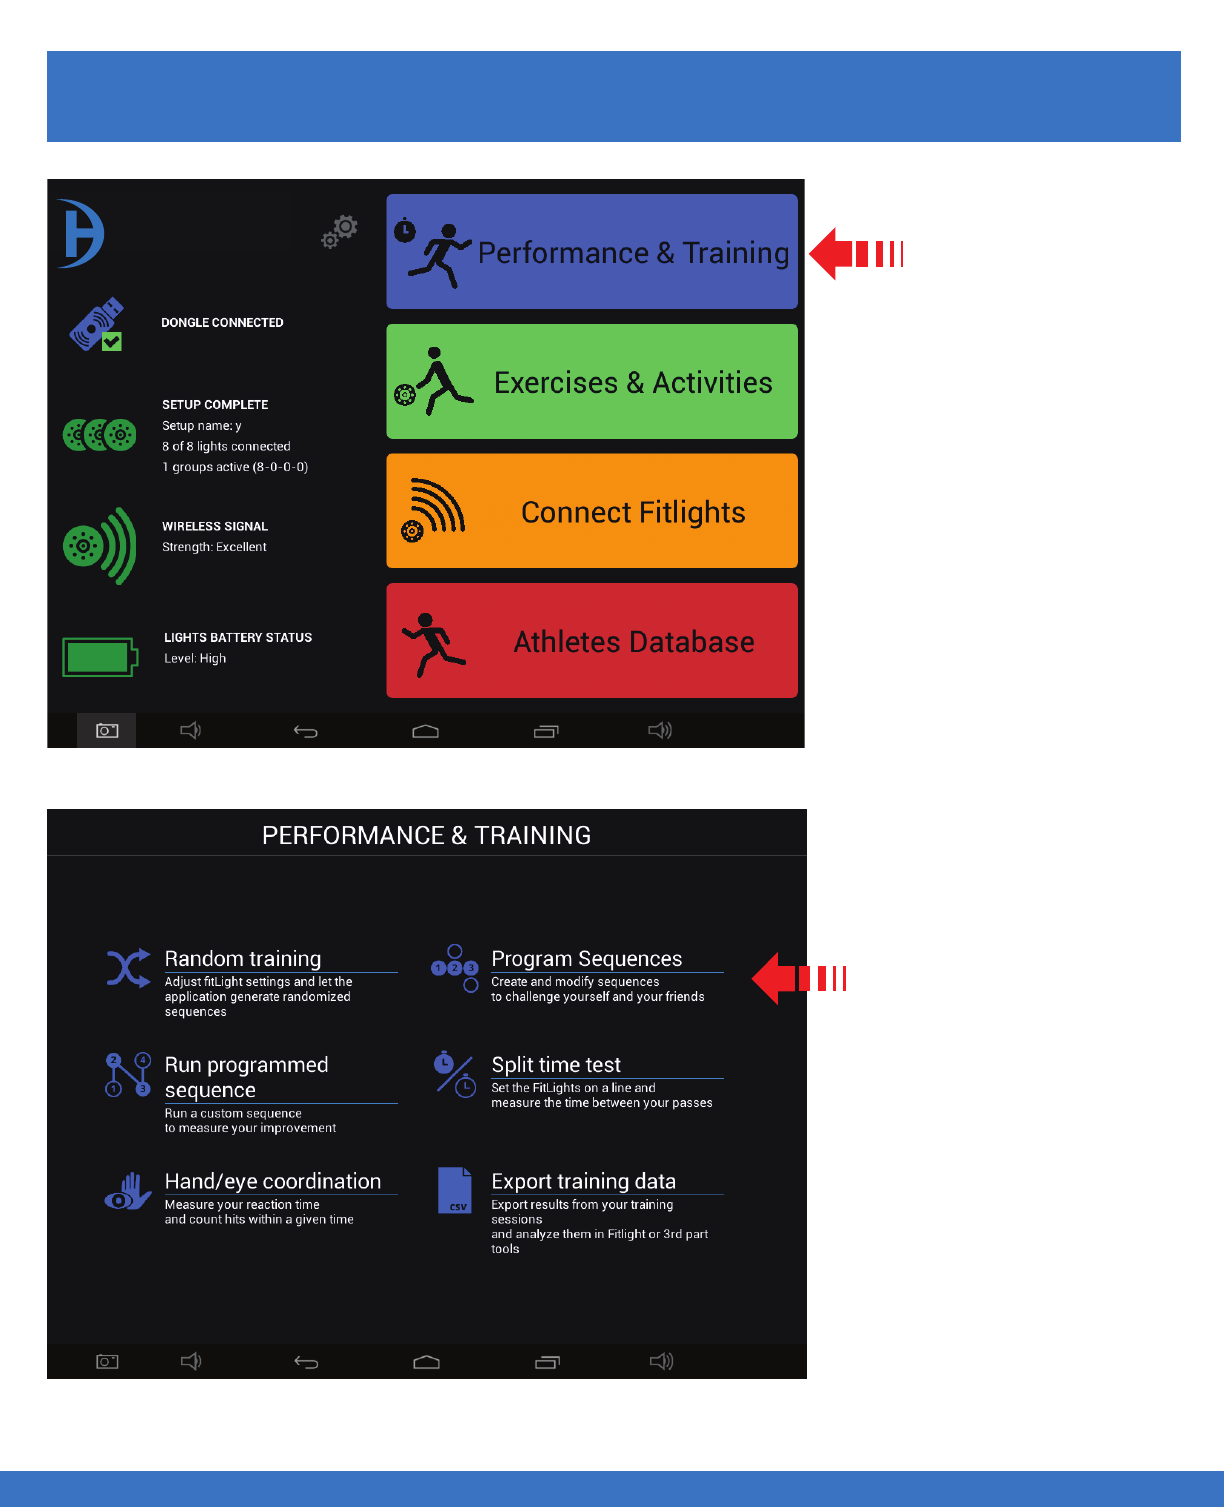
SYSTEM OPERATION - PROGRAM OR EDIT A SEQUENCE
SYSTEM OPERATION - PROGRAM OR EDIT A SEQUENCE
..................................................................................................................................................................................................................................
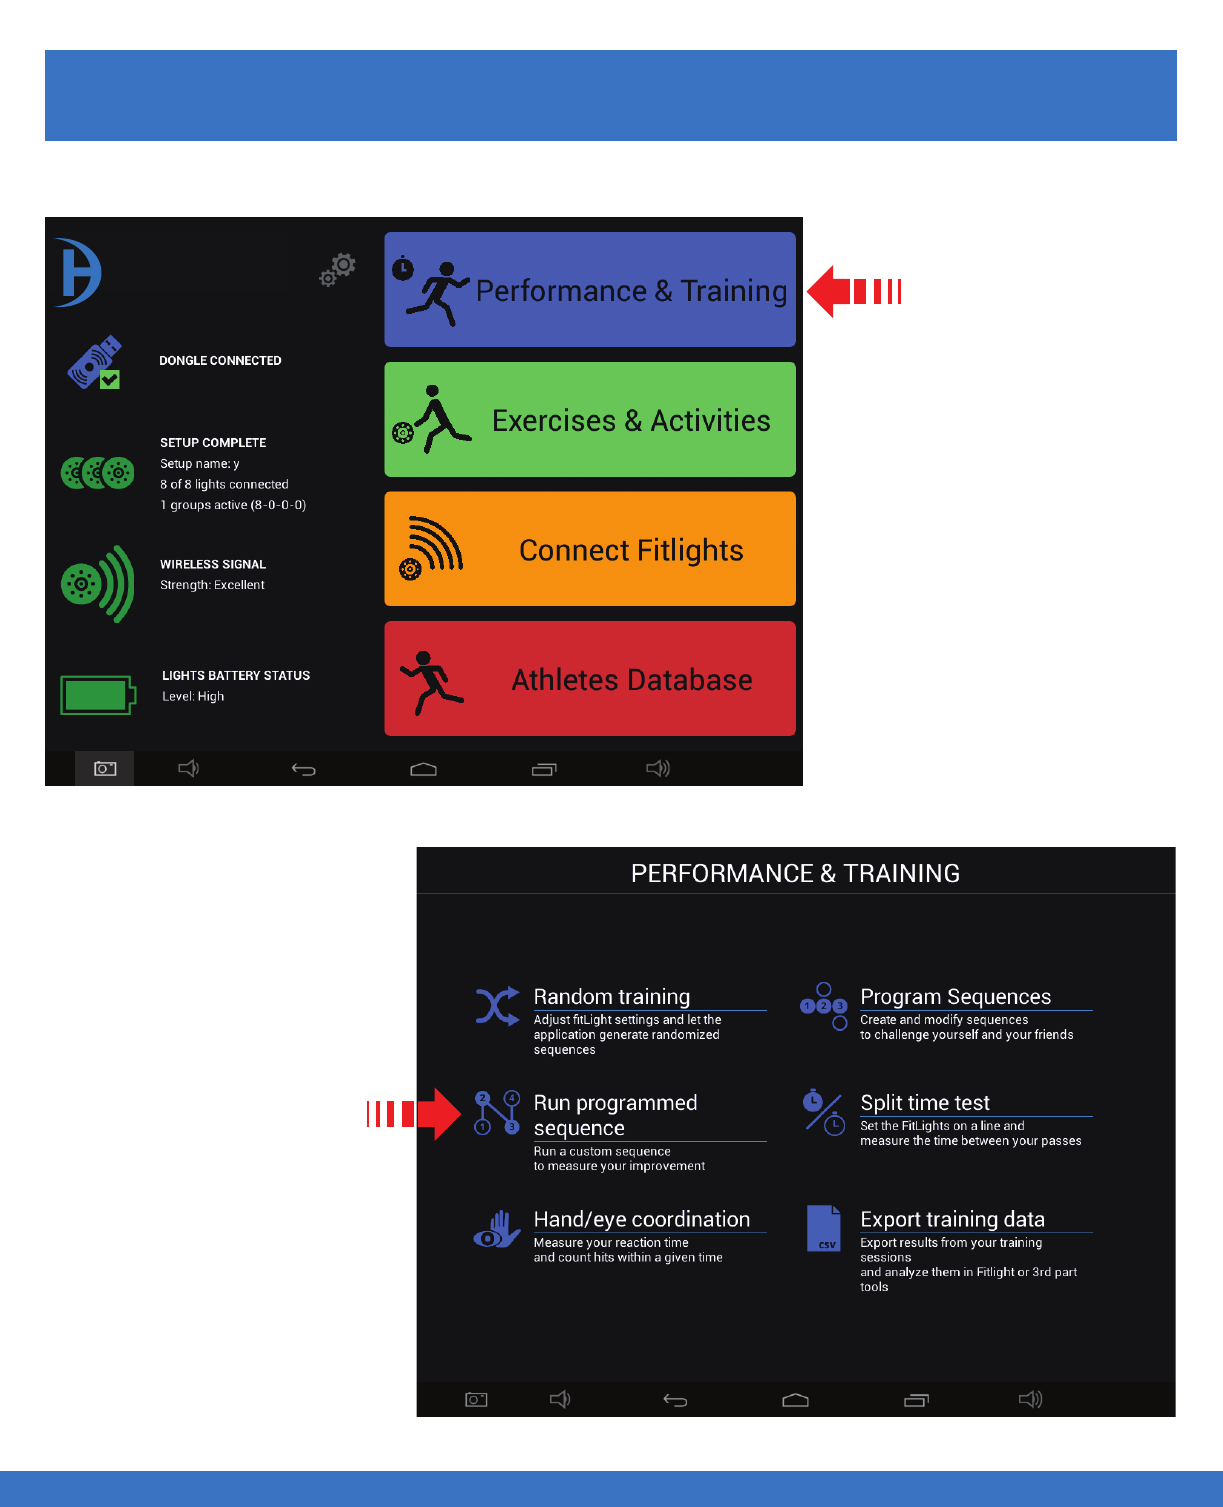
PROGRAM OR EDIT A SEQUENCE
Select
Performance & Training
Select
Program Sequences
24
FITLIGHT Trainer™
SYSTEM OPERATION - PROGRAM OR EDIT A SEQUENCE
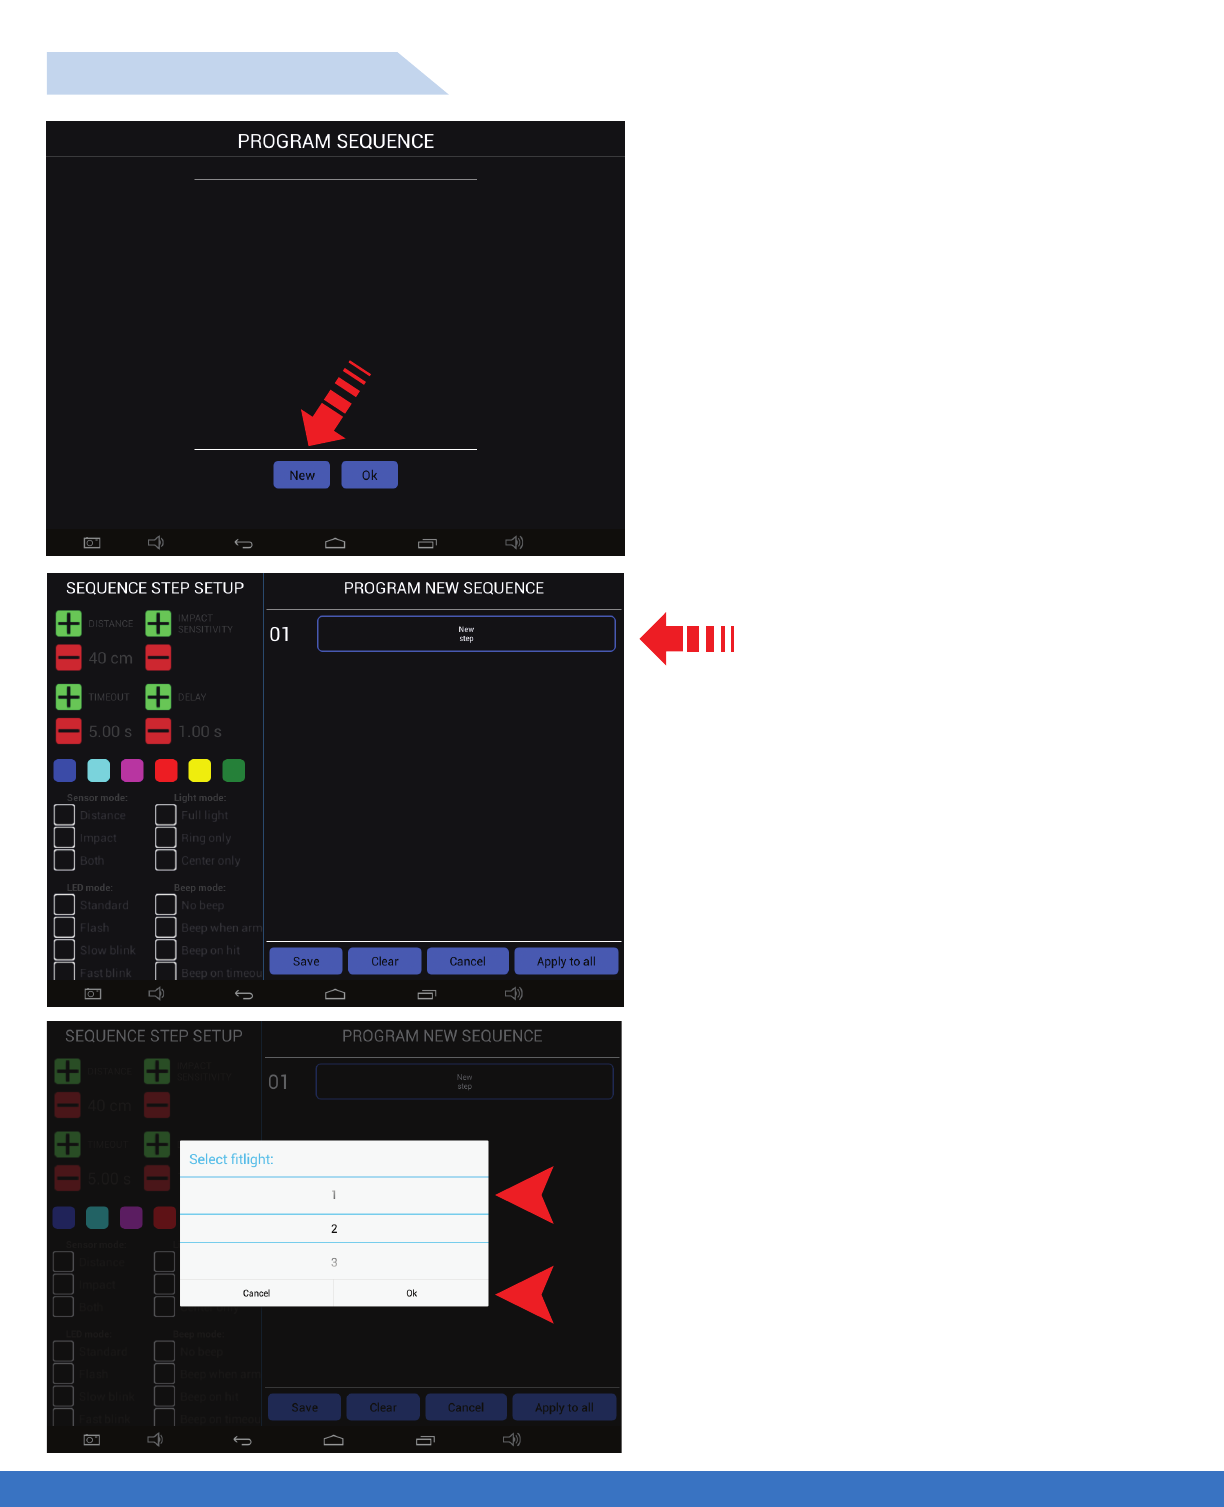
..................................................................................................................................................................................................................................
Select “ New Step”. A drop down menu
will appear to enable you to select
the Light number.
PROGRAM A SEQUENCE
Select “New” to start the programming process.
A new menu will open to allow programming.
1. Select the light number by scrolling down.
2. Once the number appears in the window, touch
“OK”. In this example, Light #1 is selected.
3. Once “Ok” is selected a new screen will appear
which will allow the selection of all the Light
parameters.
1
2
SYSTEM OPERATION - PROGRAM OR EDIT A SEQUENCE 25
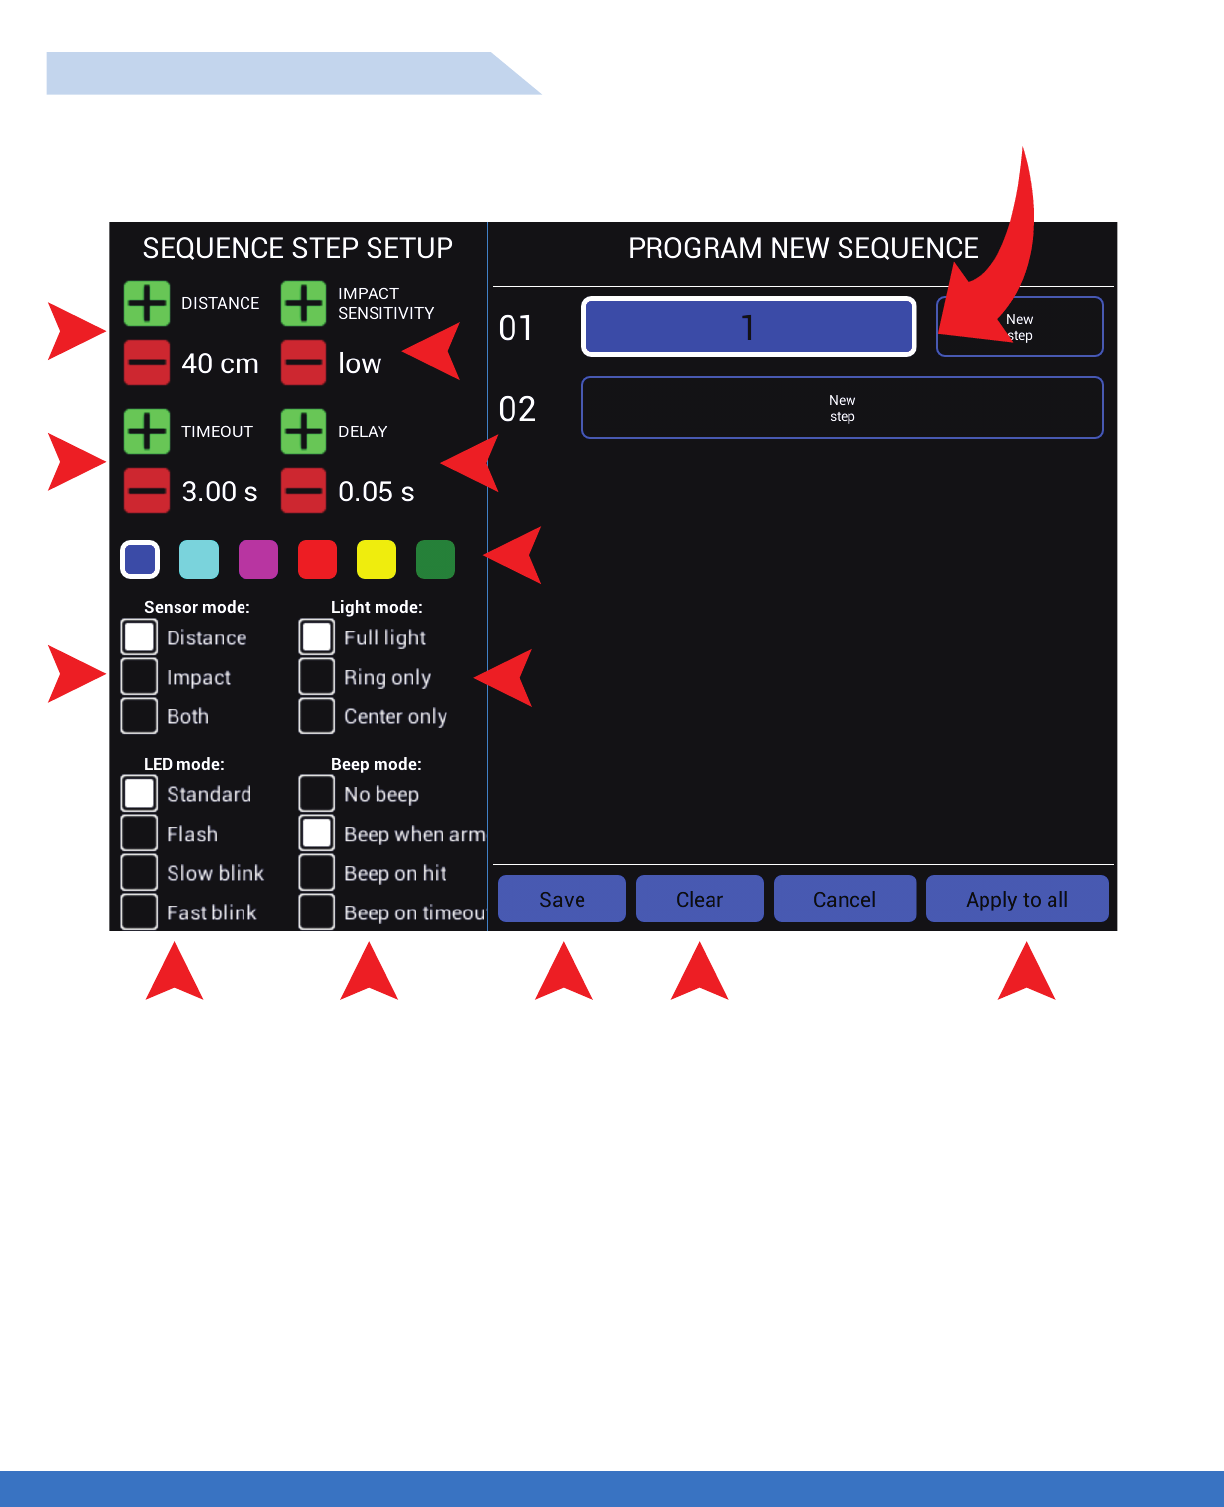
SYSTEM OPERATION - PROGRAM OR EDIT A SEQUENCE
..................................................................................................................................................................................................................................
PROGRAM / EDIT A SEQUENCE
5
6 7 8
3
13
12
1
2
4
910 11
Indicates Light #1 is the first step and it is Blue.
The Light parameters can now be selected as per requirements.
1. The deactivation distance can be set from 10 cms to 80 cms, use the +/- to adjust. The distance incre
ments are 10 cms.
2. The time out can be set from 0.10 seconds to 120 seconds. The time out increments are 0.10 seconds
up to 10 seconds , after which it increments by 10 seconds. The “Time Out” function can also be turned
off by going past 120 seconds.
3. Select Light colour as required by selecting the colour box.
4. There are 3 deactivation modes to select from. Distance only, Impact only or both, which means the
Light can be deactivated by motion or impact.
SYSTEM OPERATION - PROGRAM OR EDIT A SEQUENCE 26
SYSTEM OPERATION - PROGRAM OR EDIT A SEQUENCE
..................................................................................................................................................................................................................................
5. Select, the mode for the Lights, there are 3 choices, Full light, Perimeter Light or just the Centre of the
Light that illuminates.
6. Select the “LED” mode of the Light, there are 4 selections, which will have the LEDs flash rapidly or
slowly etc. per your preference and ease of visibility.
7. Select if sound (Beep) is required.
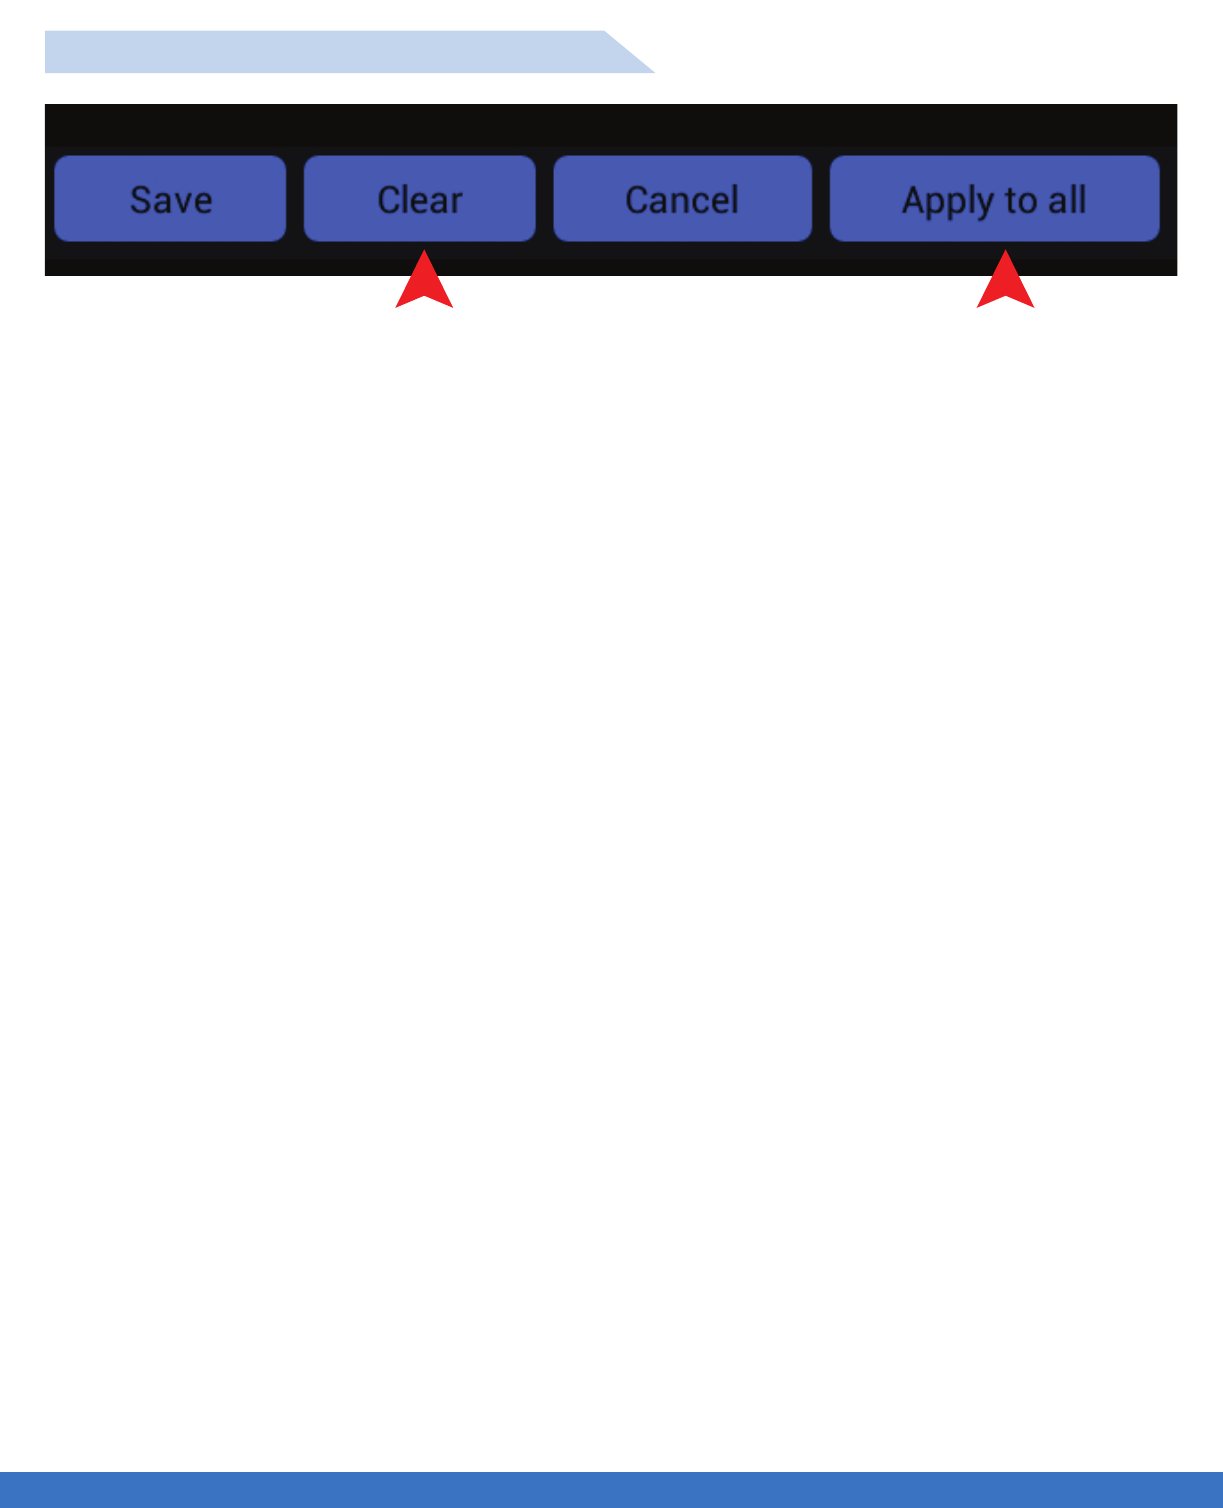
8. Select “Save” to save your program, a drop down menu will appear to enable you to name the program
as required.
9. Select clear to remove all data. A drop down menu will appear to query if you are sure as all data inputs
will be cleared and cannot be recovered.
11. Select “Apply to All” if you require the Lights to have all of the same parameters.
12. Select the sensitivity of ‘Impact” as required, “soft hit or a firm hit”.
13. Select the “Delay” interval between Lights coming on in succession.
Repeat the process as per
the previous step for all
subsequent Lights required
for the Routine. In this
example, Light #3 is shown
as the second Light in the
sequence with a YELLOW
colour selected.
PLEASE NOTE: Depending on the Tablet Controller that you have, you may have to scroll up/down
within the “Sequence Step Setup” to view all of the options.
SYSTEM OPERATION - PROGRAM OR EDIT A SEQUENCE 27
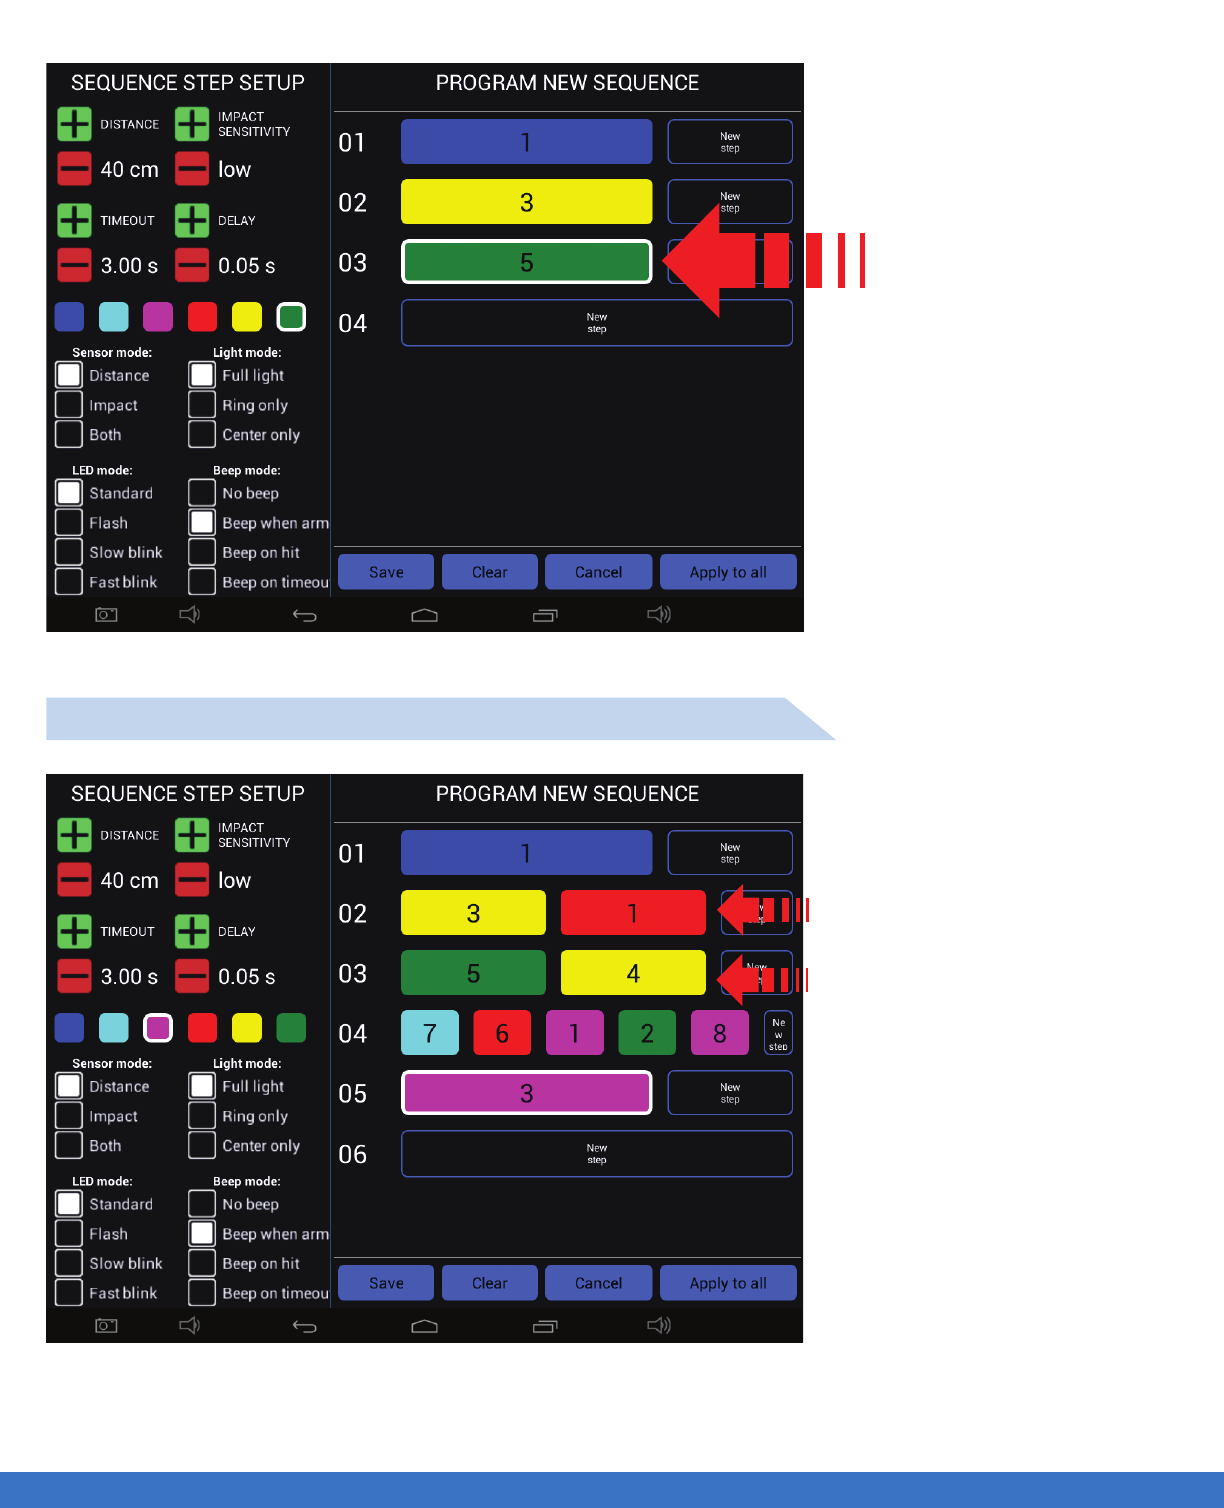
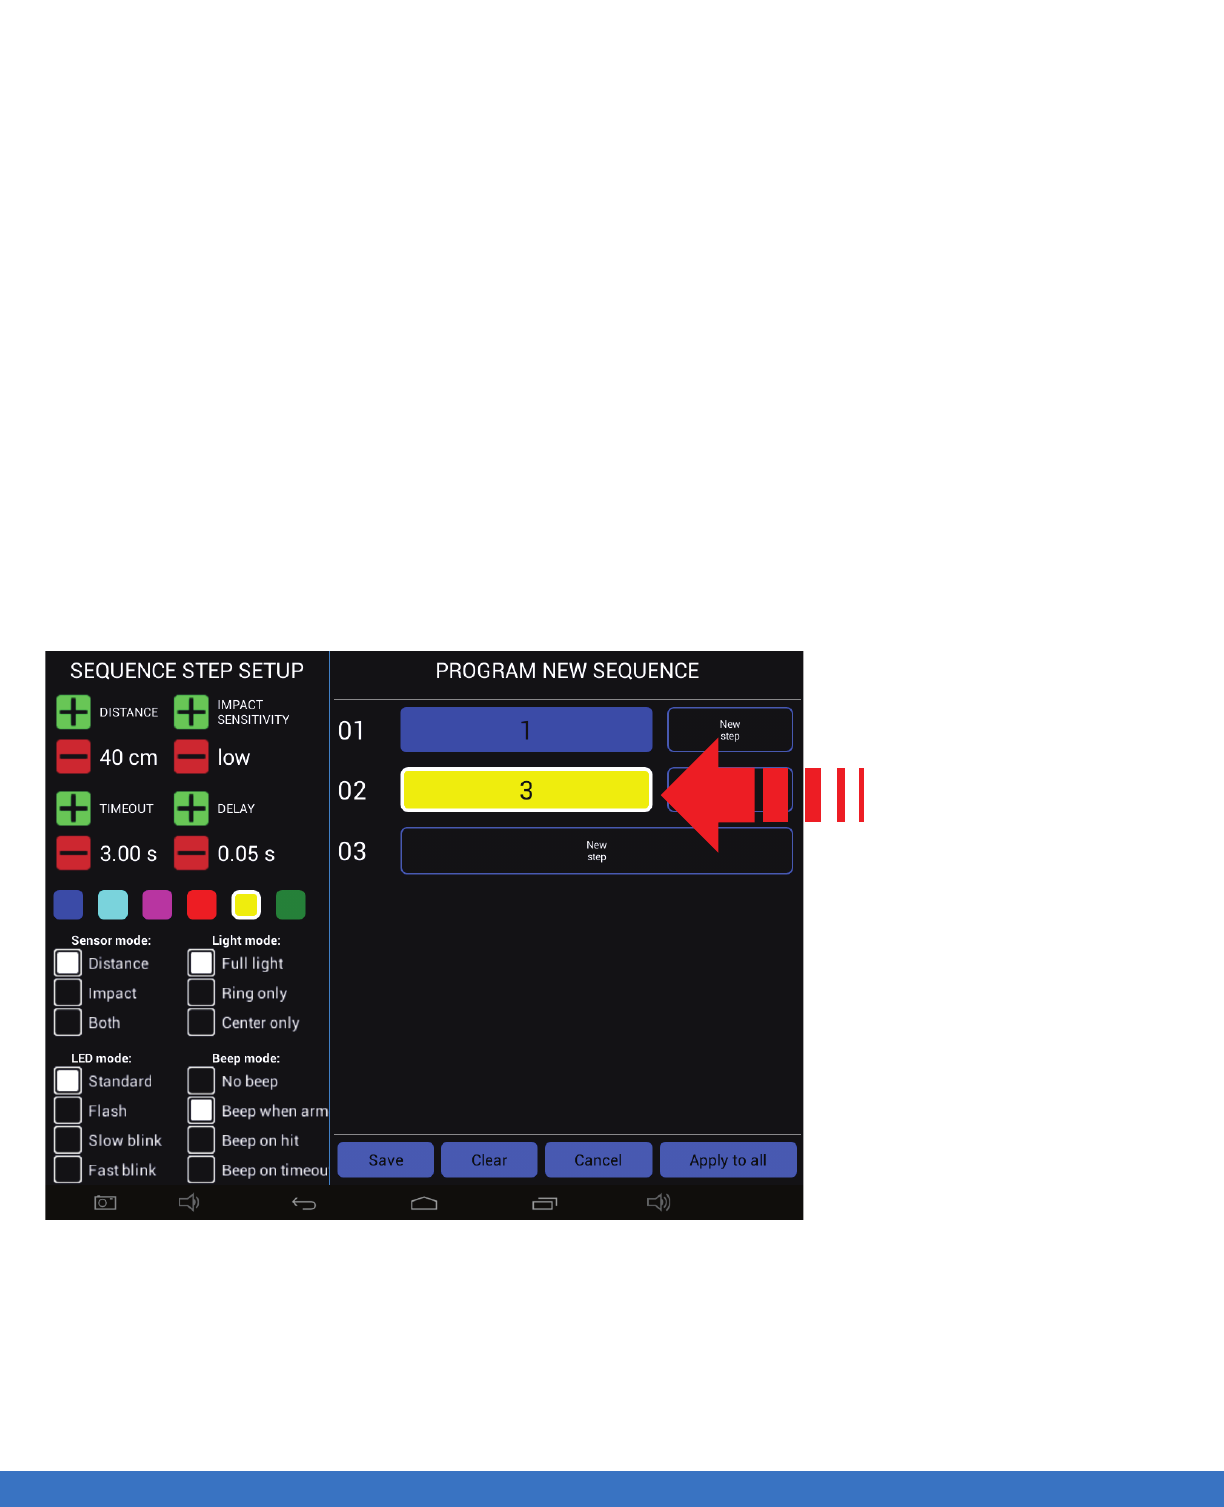
SYSTEM OPERATION - PROGRAM OR EDIT A SEQUENCE
..................................................................................................................................................................................................................................
In this example, Light #5 is
shown as the third light in
the sequence with a
GREEN colour selected.
In this example, Light #3 and
Light #1 will activate at the same
time.
In this example, Light #5 and
Light #4 will activate at the same
time.
MULTIPLE LIGHT ACTIVATION PROGRAM EXAMPLE
SYSTEM OPERATION - PROGRAM OR EDIT A SEQUENCE 28
SYSTEM OPERATION - PROGRAM OR EDIT A SEQUENCE
..................................................................................................................................................................................................................................
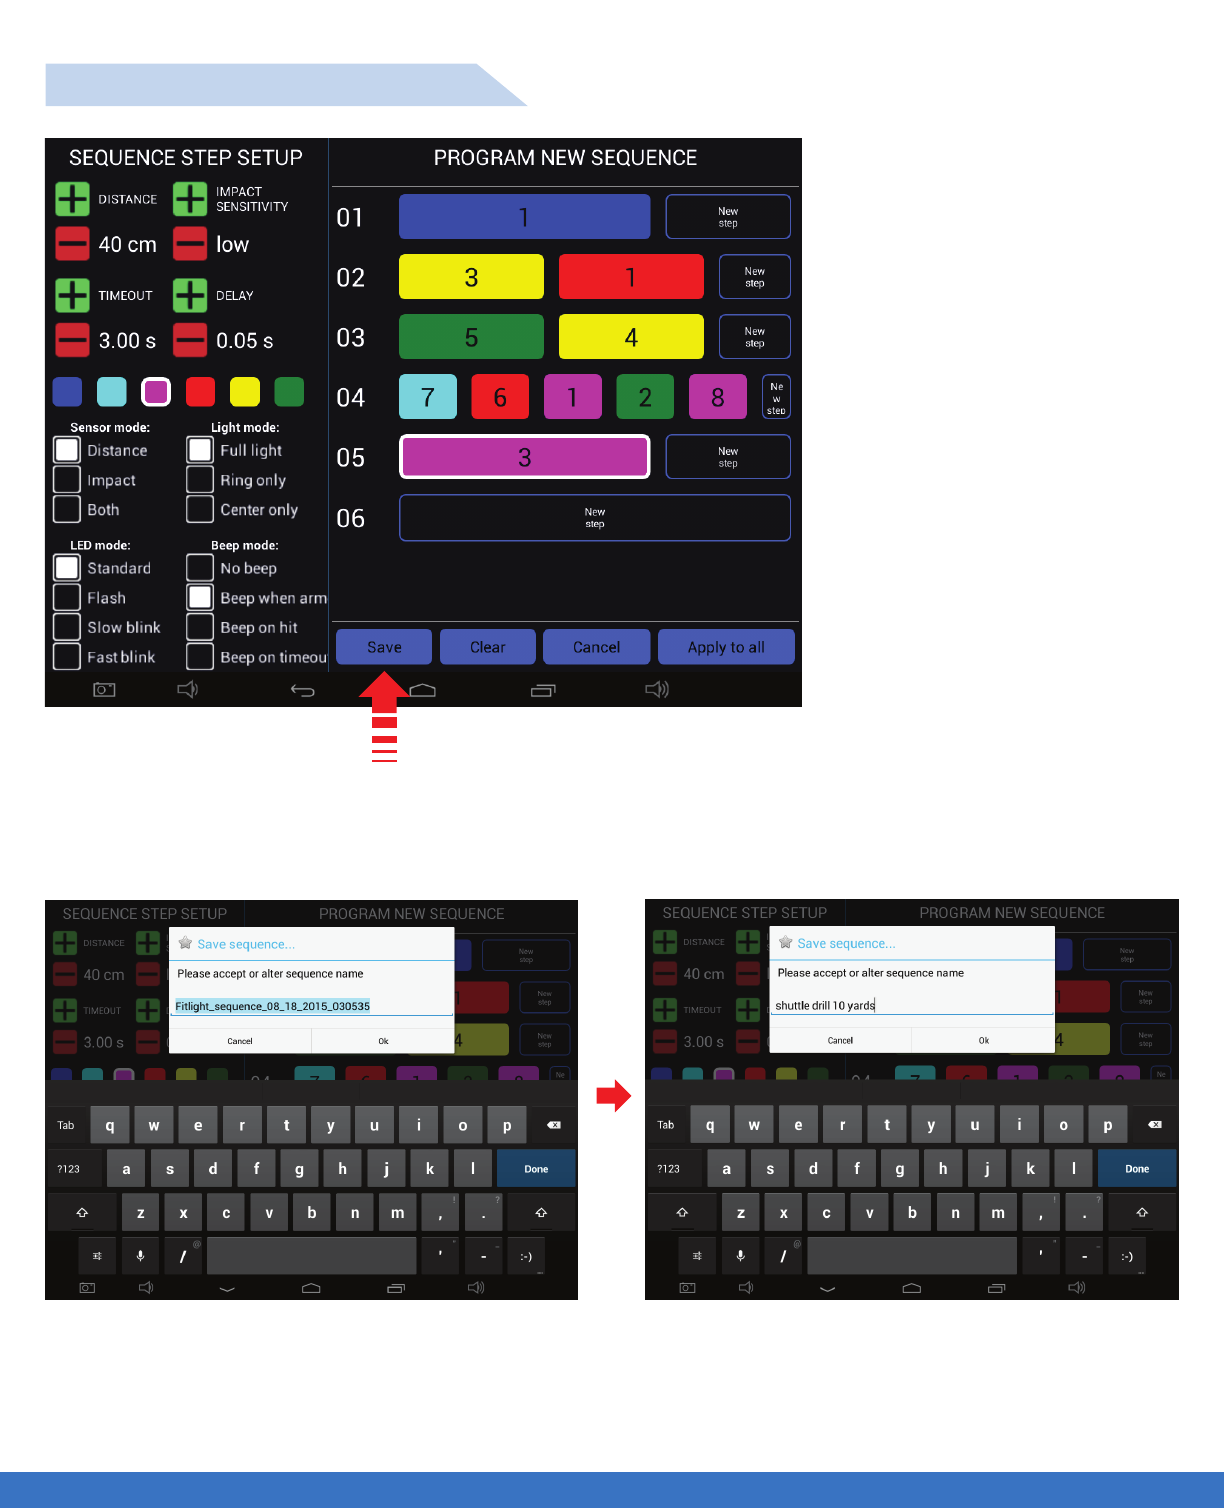
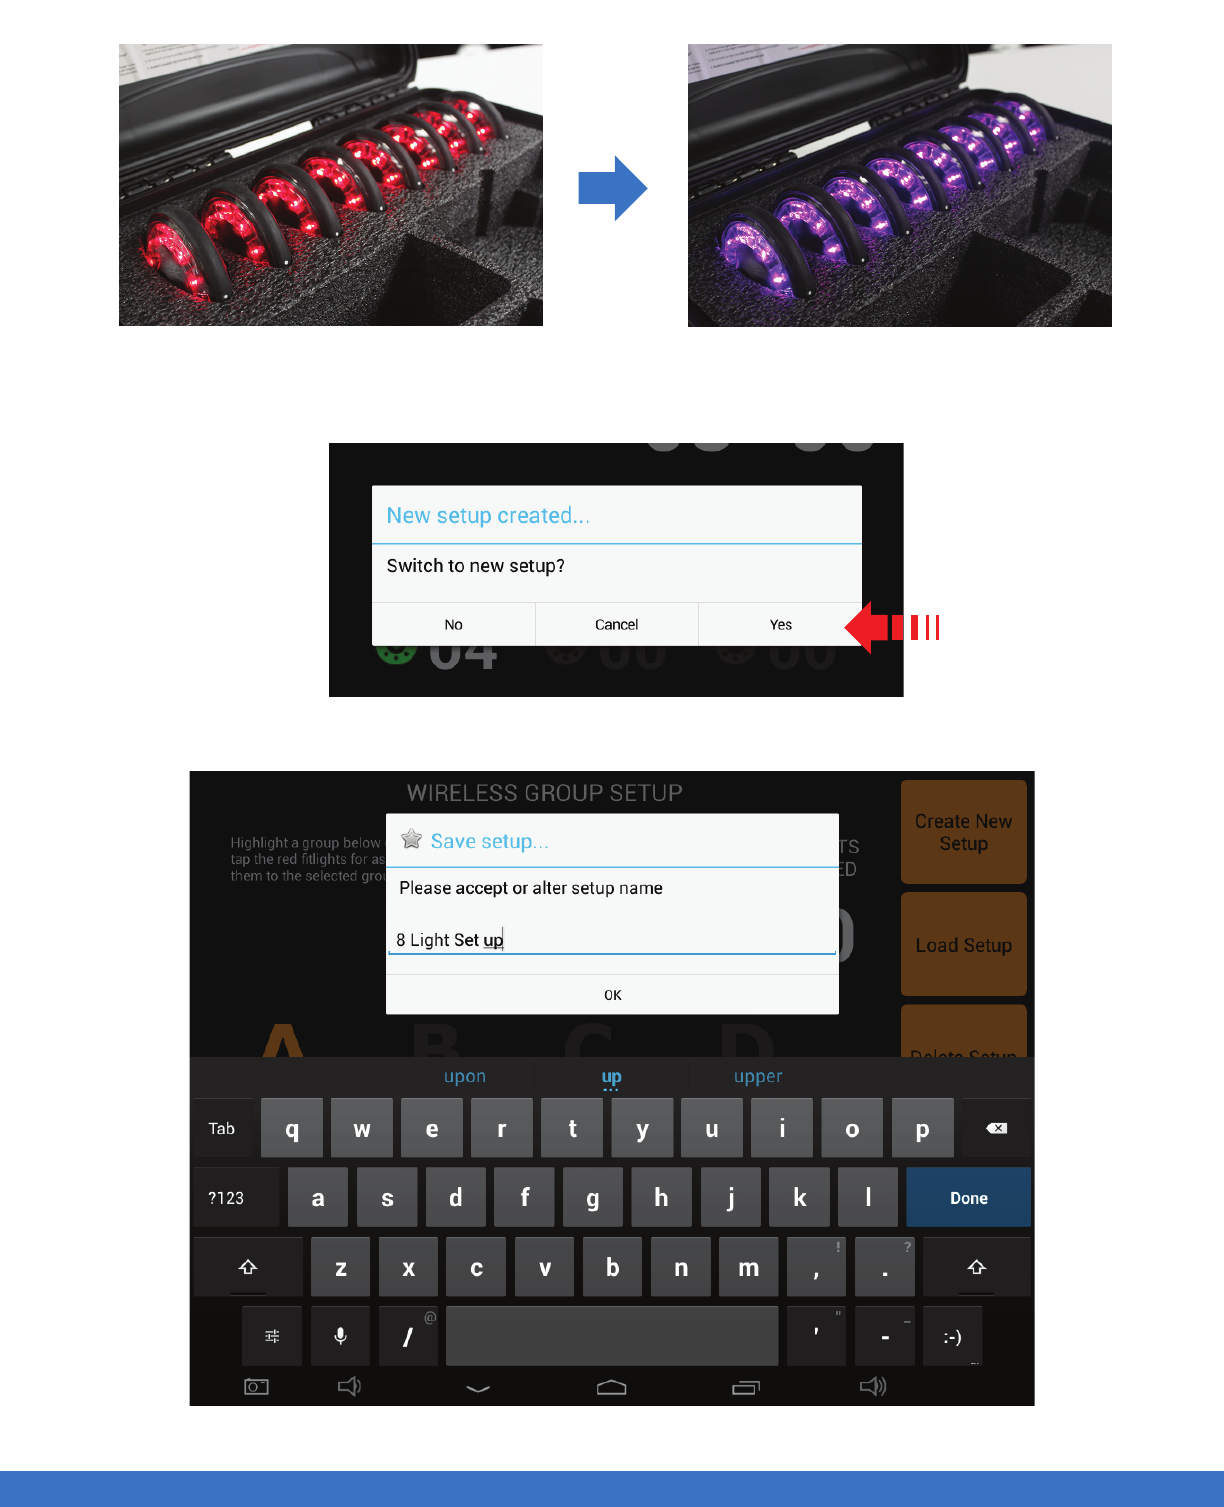
Once a Program is complete, it can be saved by touching “Save” and a drop down menu will appear
allowing you to name and save the Sequence.
Type the name of the sequence as required using
the keypad provided on the Tablet screen. Best
practice should be naming the sequence which
will allow you to easily recognize it for recall.
Once the name has been typed as required,
select “OK”. Best practice is to use names of
sequences that best describe the activity for easy
recall.
SAVE AND NAME A PROGRAM
SYSTEM OPERATION - PROGRAM OR EDIT A SEQUENCE 29
SYSTEM OPERATION - PROGRAM OR EDIT A SEQUENCE
..................................................................................................................................................................................................................................
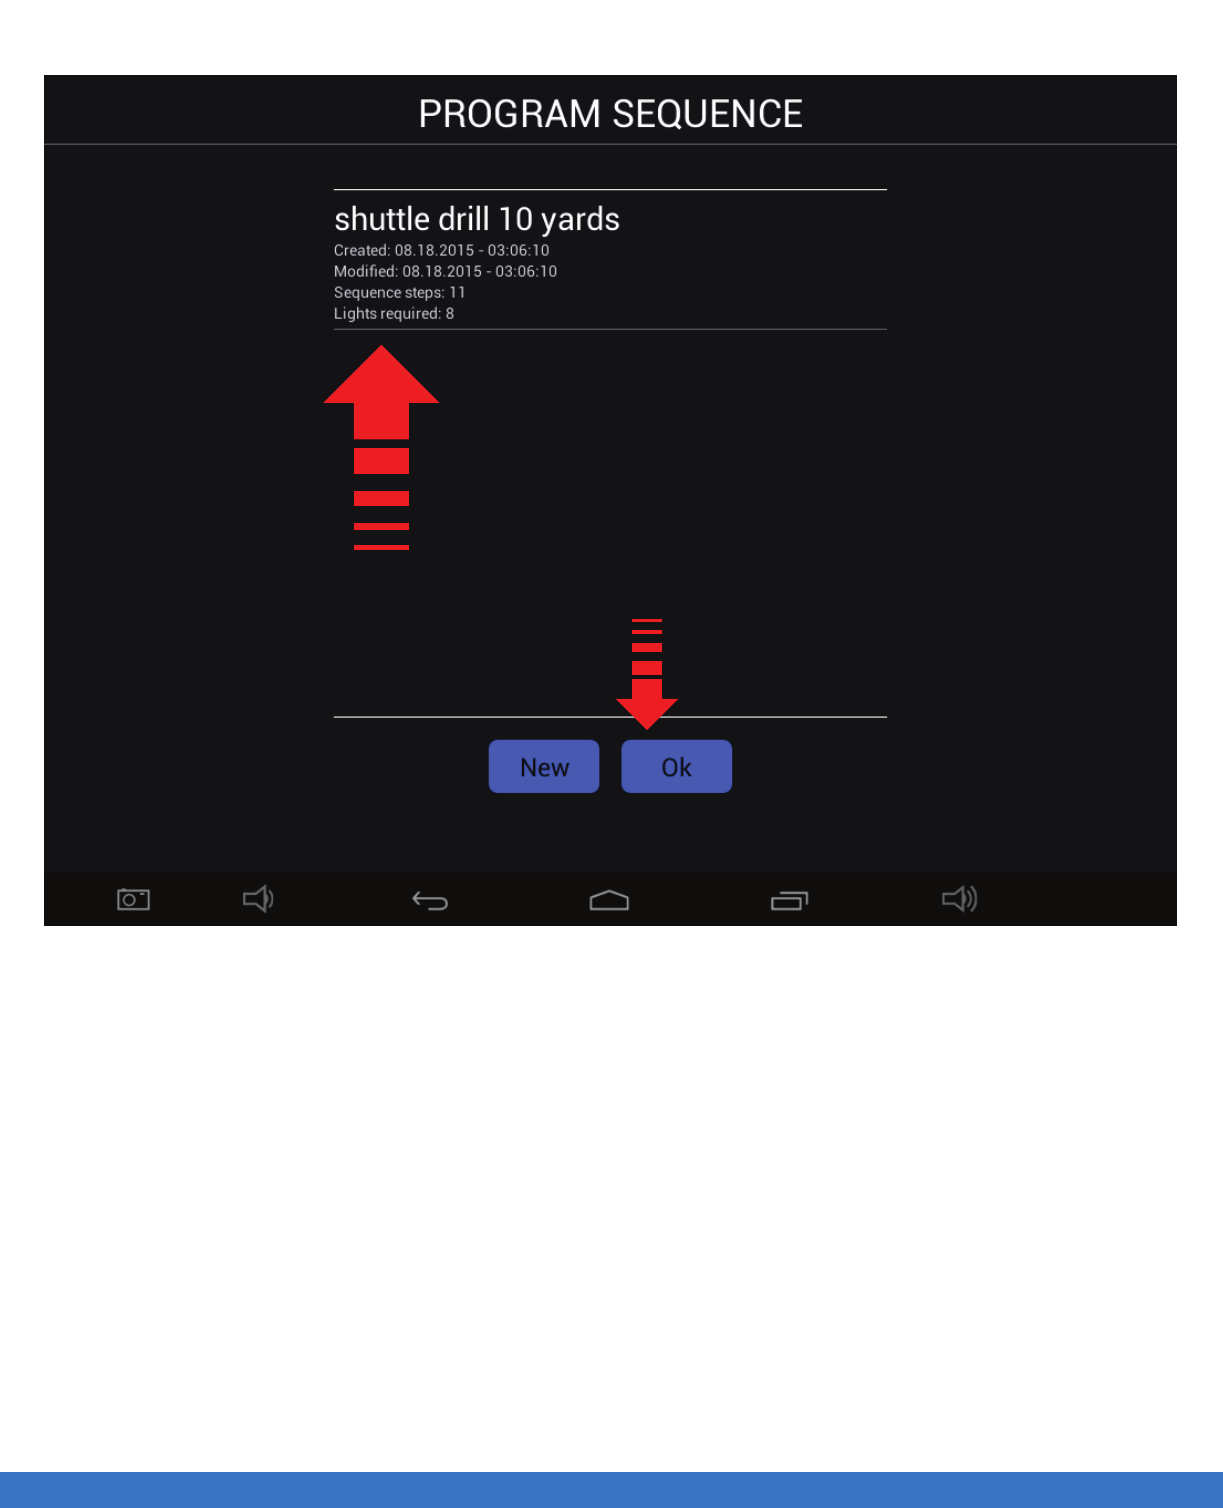
Once the Sequence has been saved it will appear in the
Sequence library for recall. It will also indicate the profile of the
Sequence, date, number of steps etc.
To generate a new sequence, touch “New”
or touch “OK” to return to the main menu.
SYSTEM OPERATION - PROGRAM OR EDIT A SEQUENCE 30
SYSTEM OPERATION - PROGRAM OR EDIT A SEQUENCE
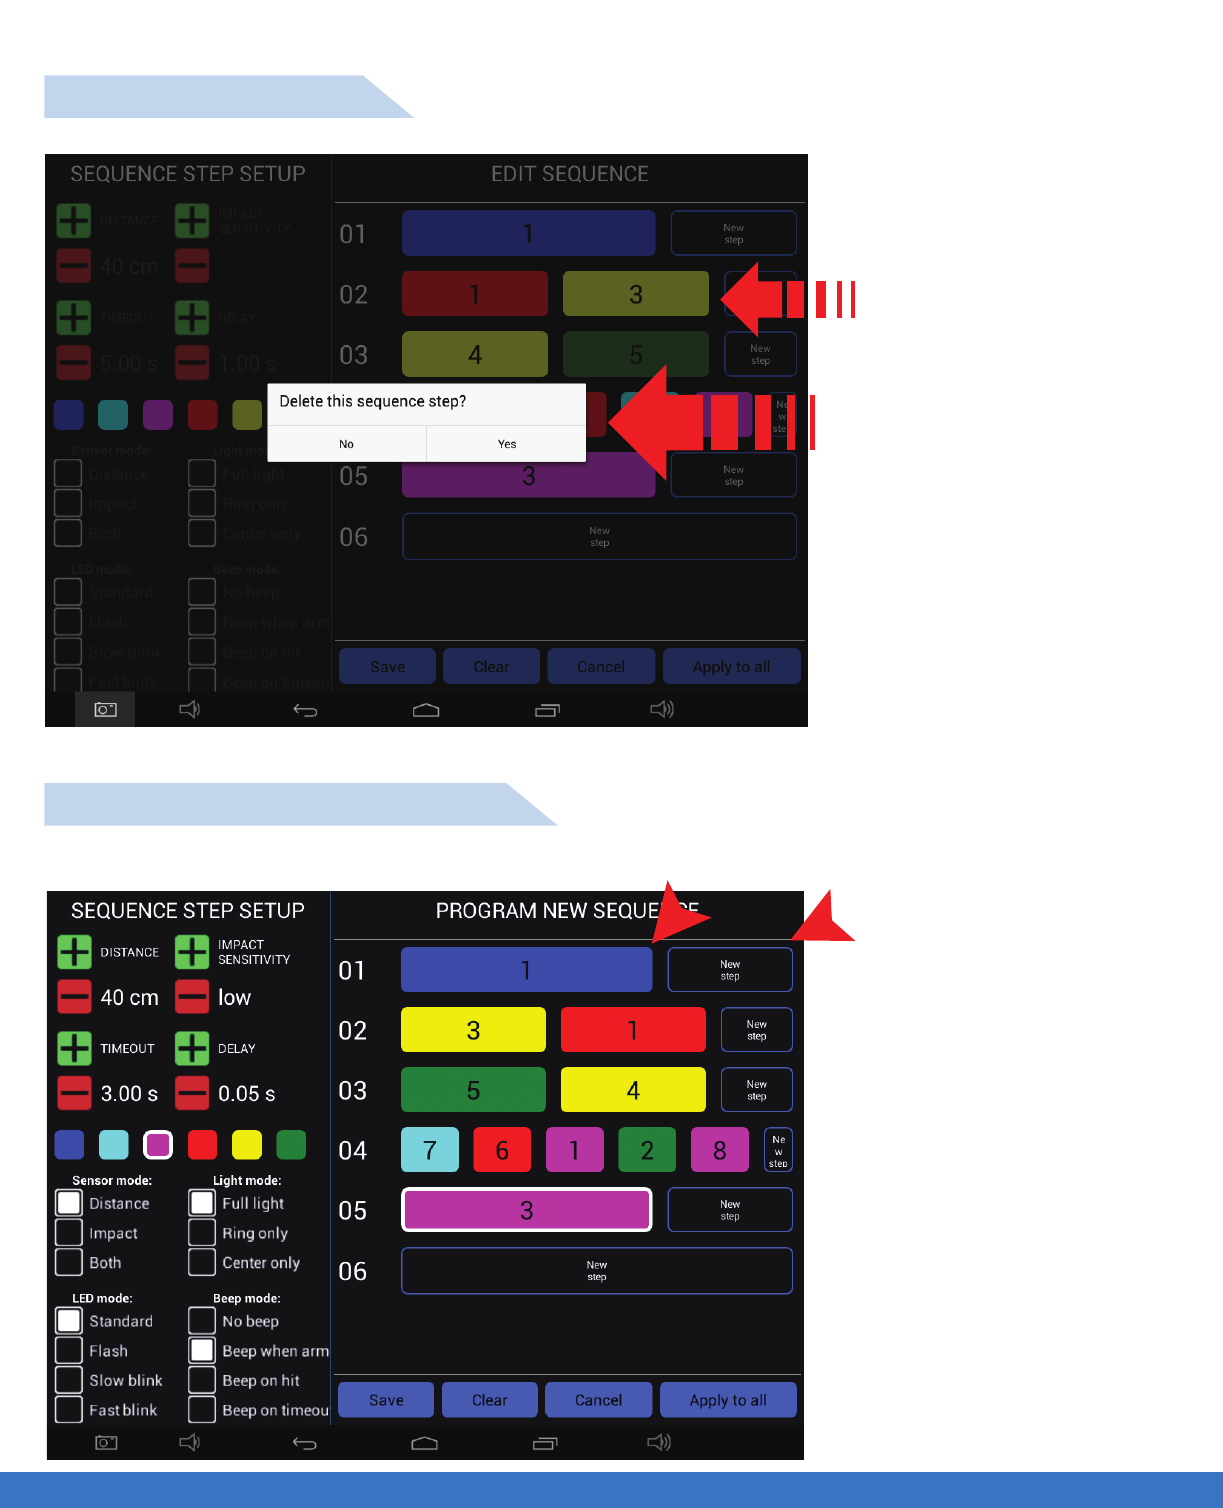
..................................................................................................................................................................................................................................
Press and hold to edit this
sequence in this example.
EDIT / DELETE A STEP
EDIT / CHANGE / INSERT A STEP
To “Edit / Delete” a step, touch
the step and a pop up menu will
appear. Select “yes” to delete
the step or “No” to cancel.
1. To remove and replace
an incorrect insertion of a
Light/step,first create a new
step of the correct Light,
adjacent to the light that you
wish to remove or edit.
Once this is done move to
the next part of the edit
process.
2. Touch an hold the Light/-
step that you would like
removed. A pop up menu
appears, select “Yes” and
the step will be removed
and replaced with the new
step executed in the first
step above.
Example of changing step 1 from Light #1 to Light # 6
1
2
SYSTEM OPERATION - PROGRAM OR EDIT A SEQUENCE 31
SYSTEM OPERATION - PROGRAM OR EDIT A SEQUENCE
..................................................................................................................................................................................................................................
1. The entire sequence that was programmed will be deleted. Once executed it cannot be
reversed/recovered.
2. Selecting this will apply all of the same parameters to every light in the sequence. Once this function is
selected it cannot be reversed.
SEQUENCE “POP UPS” EXPLANATIONS
12
SYSTEM OPERATION - PROGRAM OR EDIT A SEQUENCE 32
SYSTEM OPERATION - RUN PROGRAMMED SEQUENCE
SYSTEM OPERATION - RUN PROGRAMMED SEQUENCE
..................................................................................................................................................................................................................................
RUN PROGRAMMED SEQUENCE
Select
Performance & Training
Select
Run Programmed Sequence
33
FITLIGHT Trainer™
SYSTEM OPERATION - RUN PROGRAMMED SEQUENCE
..................................................................................................................................................................................................................................
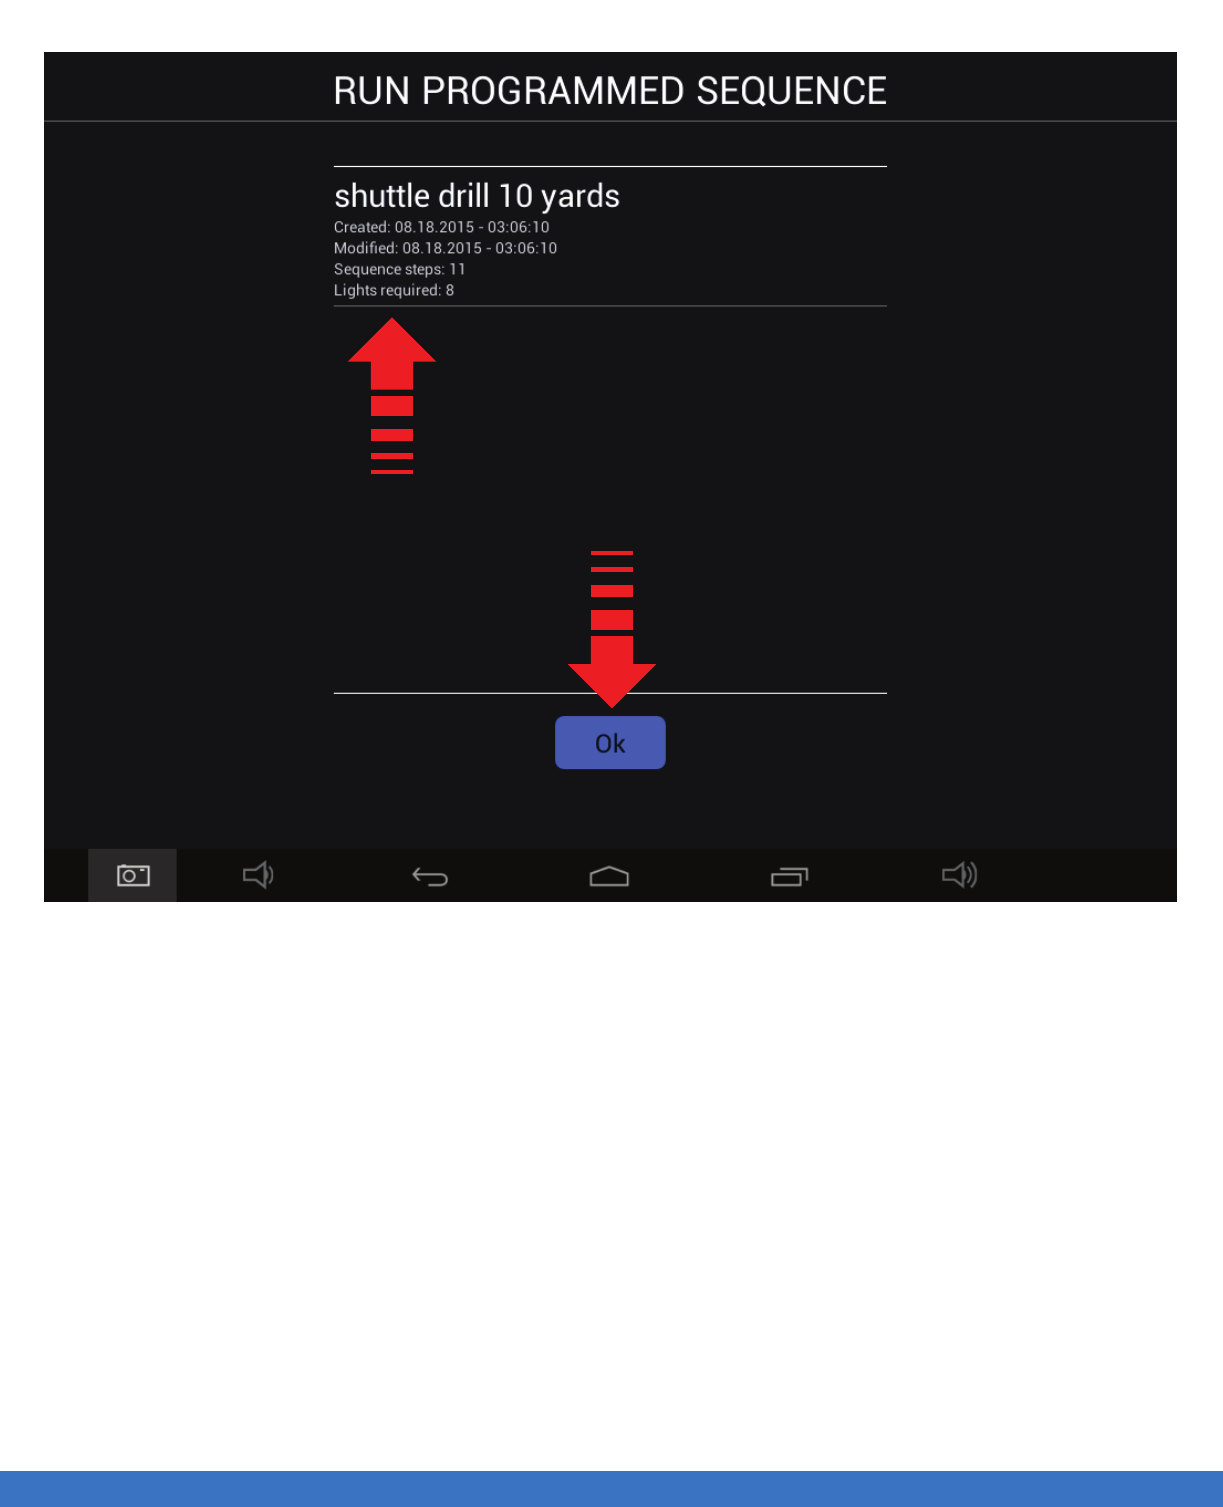
Select Sequence
Then select “Ok”
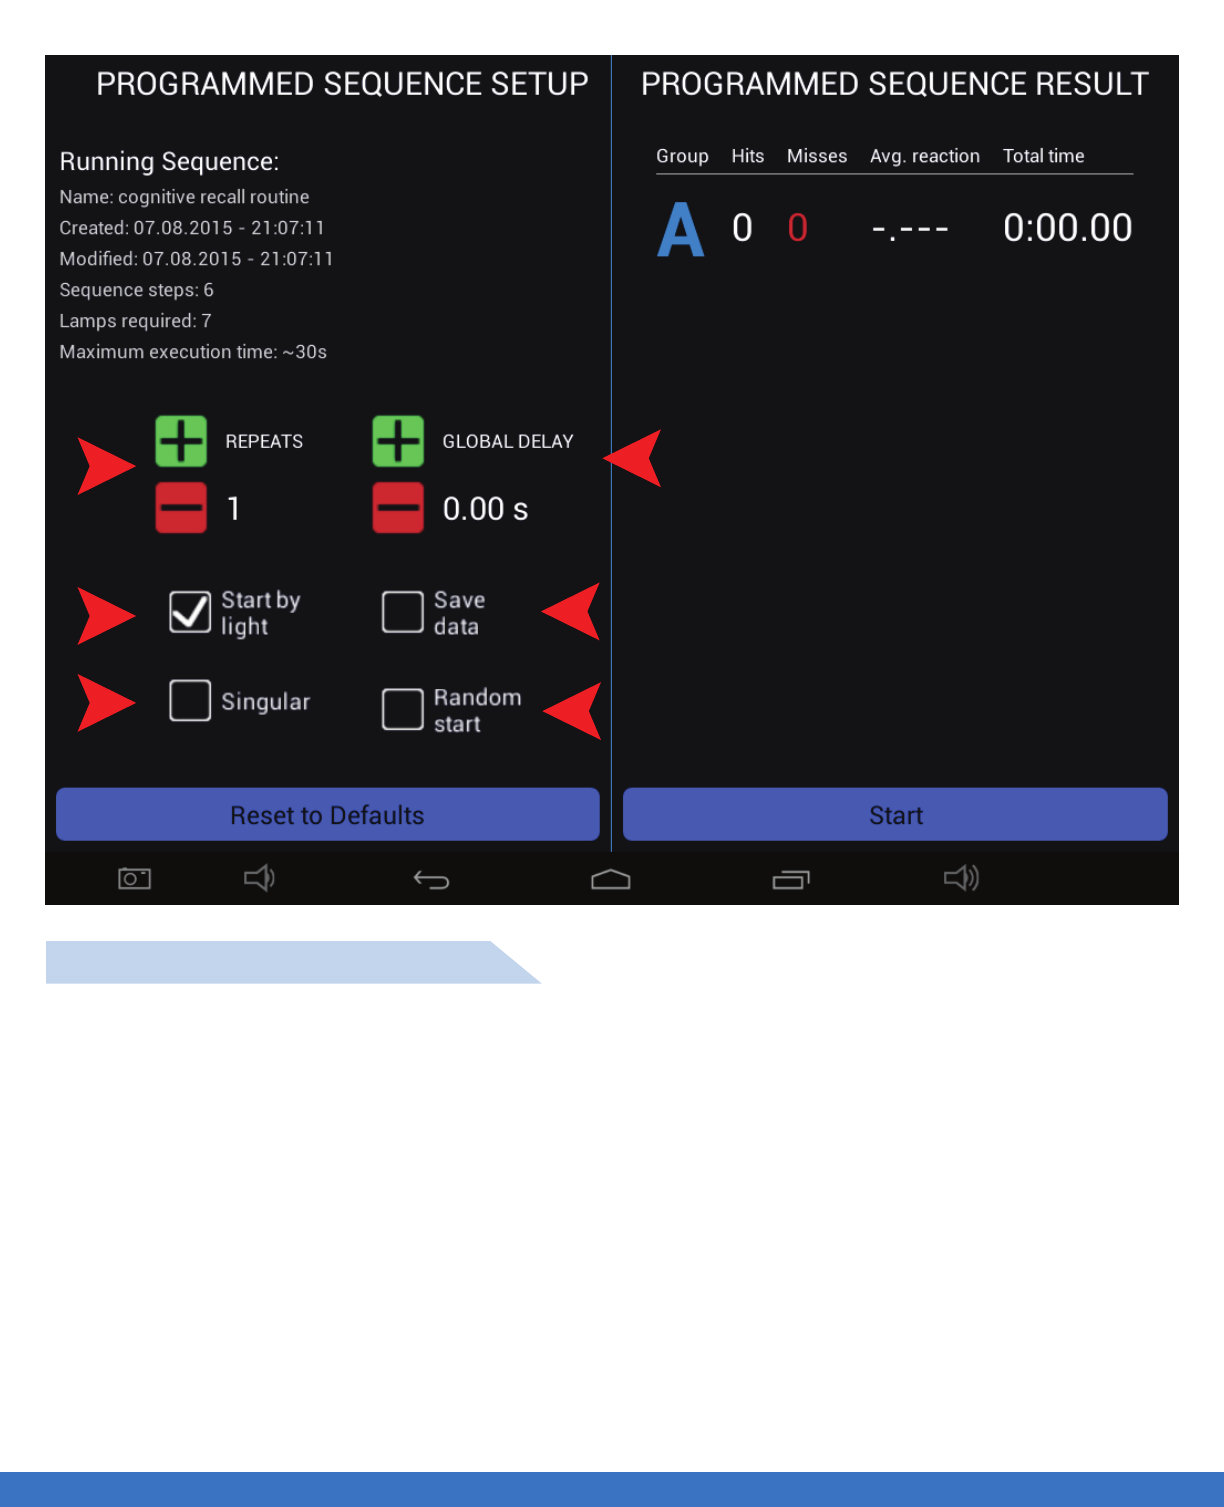
Once the parameters have been set ( shown through numbers 1 - 6 ) you can select “Start” to begin the
sequence. The parameters are explained in the following page.
SYSTEM OPERATION - RUN PROGRAMMED SEQUENCE 34
SYSTEM OPERATION - RUN PROGRAMMED SEQUENCE
..................................................................................................................................................................................................................................
1
2
36
5
4
1. Repeats: This will repeat the sequence based on the number of times requested.
2. Start by Light: This will start the sequence when the flashing Light is deactivated.
3. Singular: This will select one Light in a row of Lights. This option is used when there are more than 2
Lights in a row.
4. Global Delay: This enables the system to follow the users hit rate, as the user speeds up so does the
triggering of the lights. The Lights are paced to the rate at which they are being hit.
5. Save Data: This will save the data when the sequence has completed.
6. Random Start: This will start the sequence at a random point in the sequence.
EXPLANATION OF PARAMETERS
SYSTEM OPERATION - RUN PROGRAMMED SEQUENCE 35
The Light parameters can now be selected as per requirements.
1. The deactivation distance can be set from 10 cms to 80 cms, use the +/- to adjust. The distance incre
ments are 10 cms.
2. The time out can be set from 0.10 seconds to 120 seconds. The time out increments are 0.10 seconds
up to 10 seconds , after which it increments by 10 seconds. The “Time Out” function can also be turned
off by going past 120 seconds.
3. Select Light colour as required by selecting the colour box.
4. There are 3 deactivation modes to select from. Distance only, Impact only or both, which means the
Light can be deactivated by motion or impact.
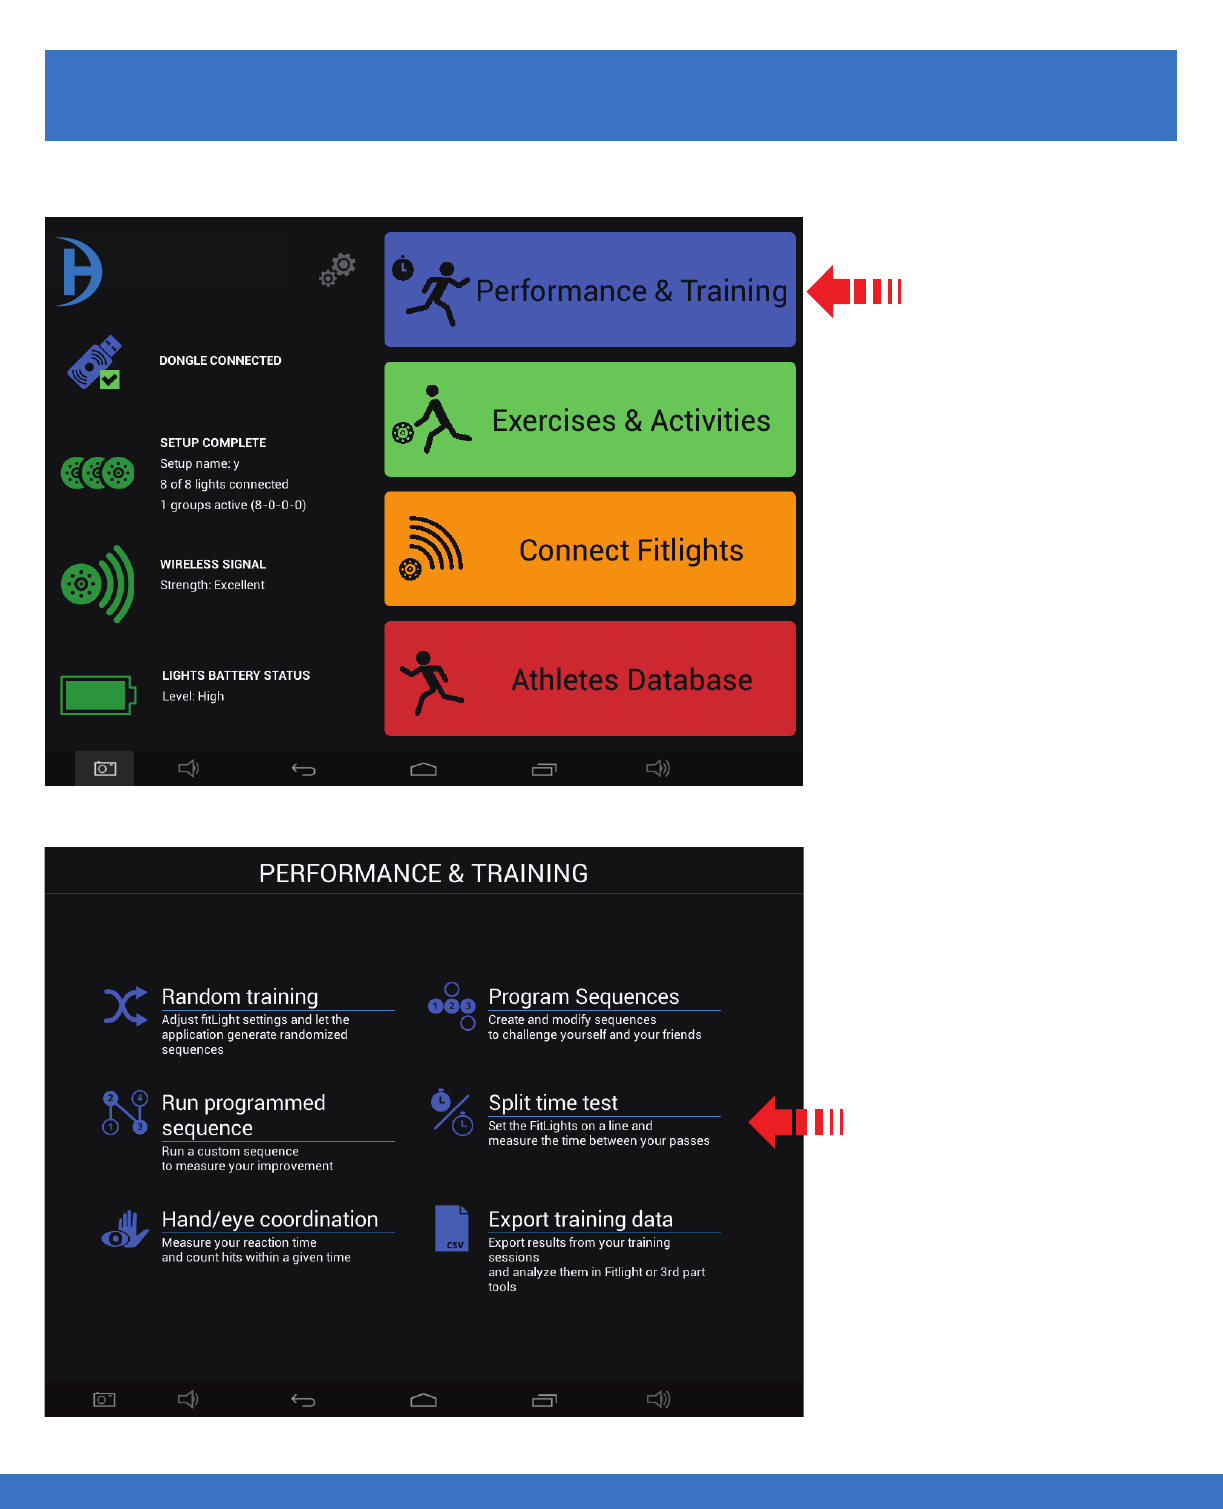
SYSTEM OPERATION - SPLIT TIME TRAINING
SYSTEM OPERATION - SPLIT TIME TRAINING
..................................................................................................................................................................................................................................
SPLIT TIME TRAINING SET UP
Select
Performance & Training
Select
Split Time Test
36
FITLIGHT Trainer™
SYSTEM OPERATION - SPLIT TIME TRAINING
..................................................................................................................................................................................................................................
1. Distance: Indicates the deactivation range from the center of the Light.
2. Impact Sensitivity: This setting is not relevant for Split Time testing.
3. Colour: Choose from 6 different colours.
4. Sensor Mode: For Split Time testing, it’s suggested you only use the “Distance” setting.
5. Start by Light: Allows the athlete to start on their own readiness.
6. Retrigger: This feature will automatically restart the routine.
7. Save Data: Allows the user to save the split times.
8. Load Preset: Only used if the user has saved the preffered settings.
9. Save Preset: Allows the user to save the current settings.
10. Delete Preset: Allows the user to remove the previously saved settings.
TIPS
- When using the Split Time Test, you will get better performance if the athlete wears light coloured clothing,
black or dark clothing is none preferred attire as dark colours are not reflective.
- To enable a wider deactivation range lights can be placed opposite each other 120 cms. apart.
- Make sure that the lights are in sequential order, from 1 to 8 in the split segments. It can be checked by
cycling the Lights and observing the sequence in which they activate.Once the Lights are set up continue
to the training menu.
123
567
4
8 9 10
SYSTEM OPERATION - SPLIT TIME TRAINING 37
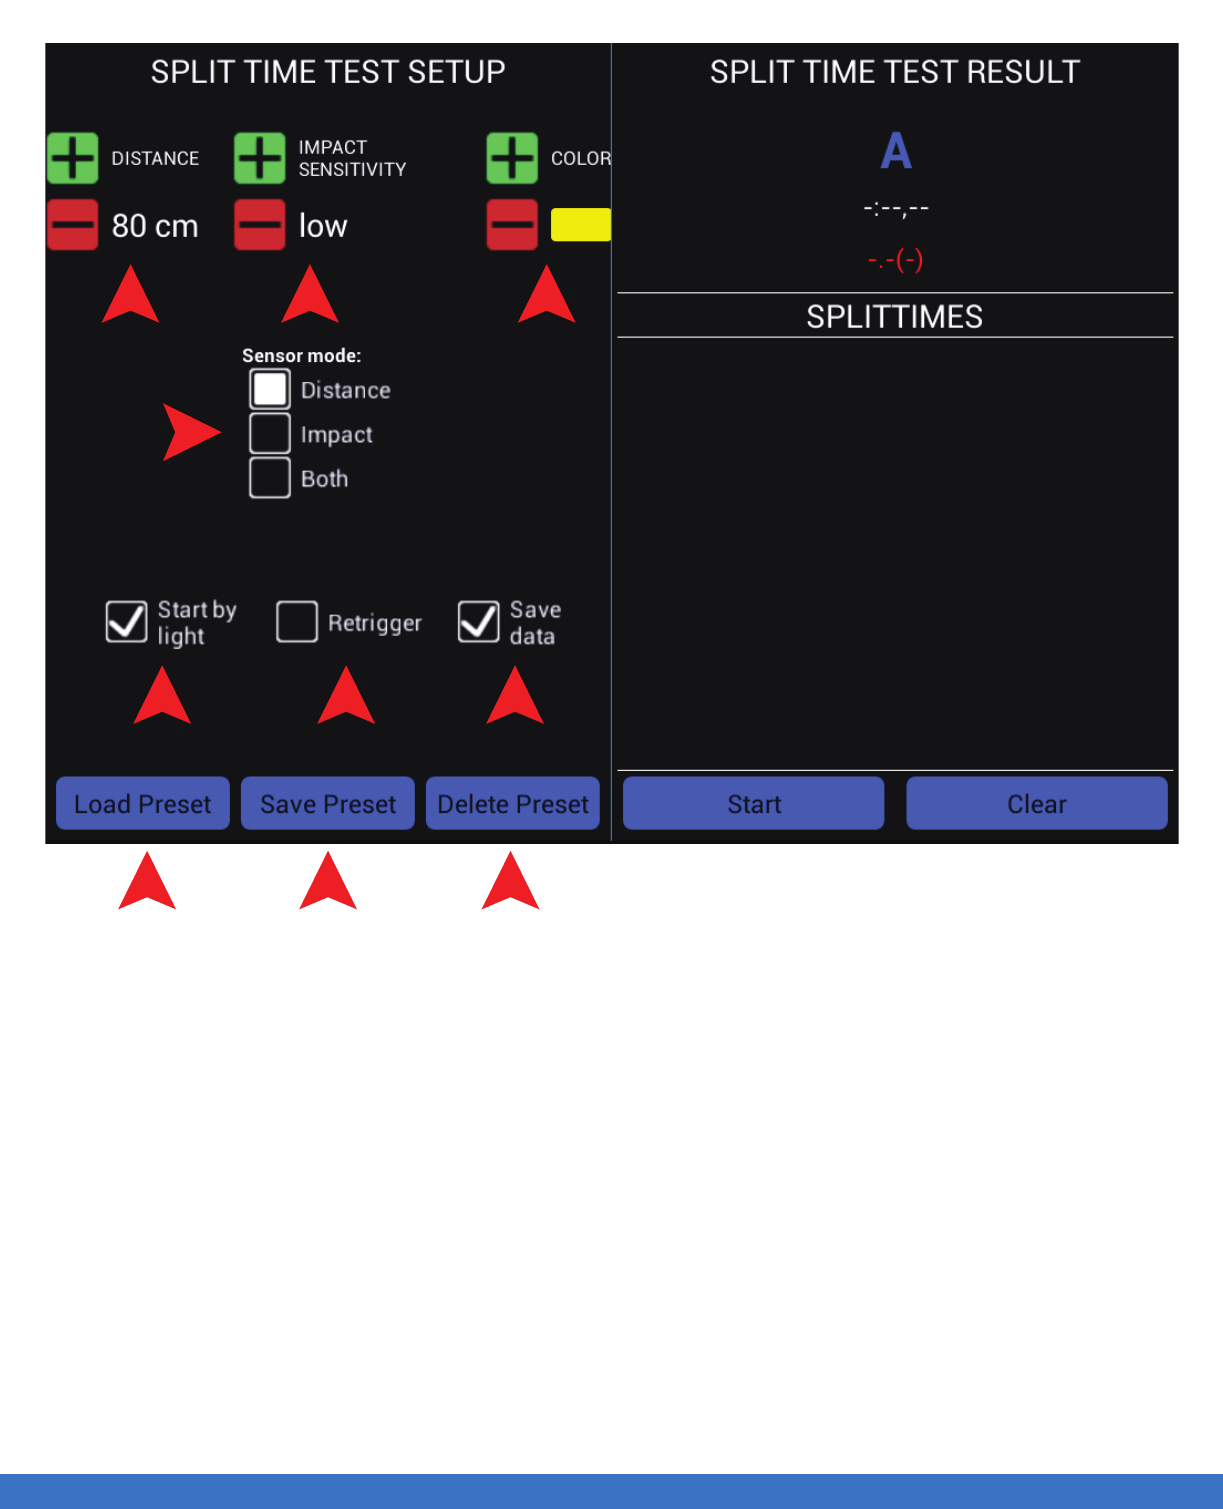
SYSTEM OPERATION - SPLIT TIME TRAINING
..................................................................................................................................................................................................................................
1. The results are shown under the right hand column for each split.
2. The Running and Total time will be displayed at the top.
3. Note well when starting by Light, the first split is “zeroed”.
Group
Running Time
Time of deactivated Light
Split Times will be recorded at each Light and
displayed here
SYSTEM OPERATION - SPLIT TIME TRAINING 38
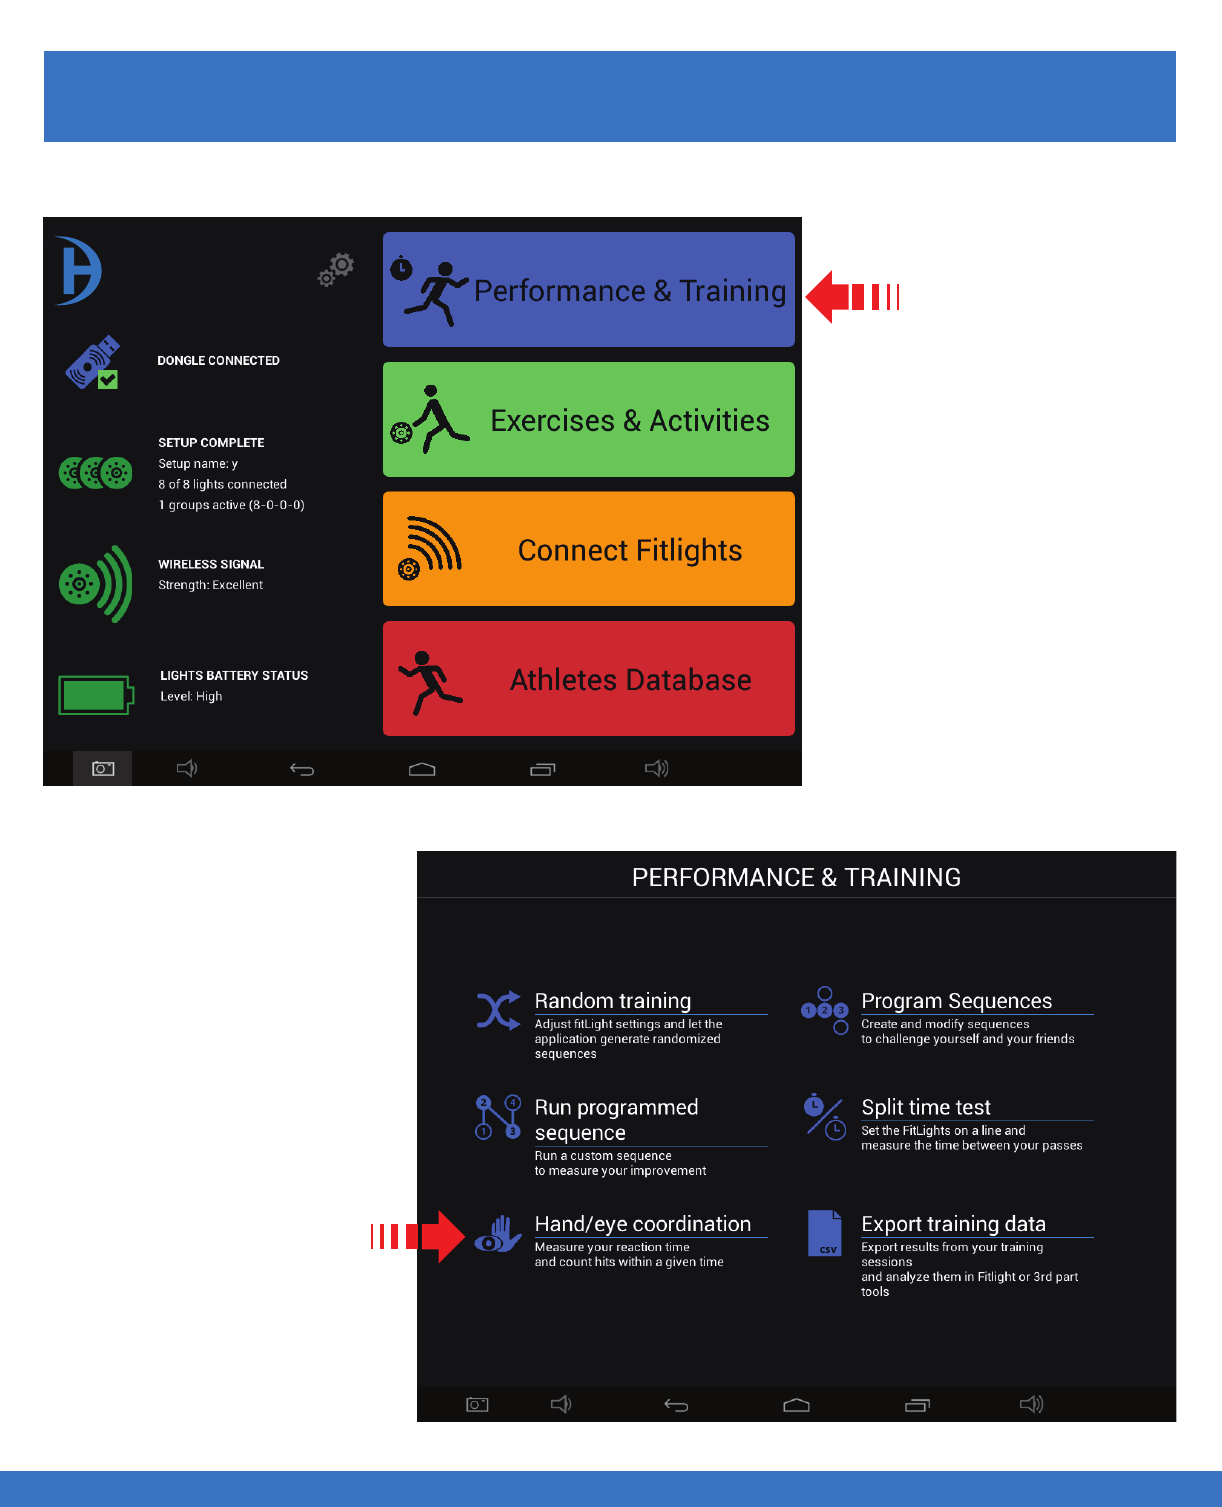
SYSTEM OPERATION - HAND/EYE COORDINATION
SYSTEM OPERATION HAND / EYE COORDINATION
..................................................................................................................................................................................................................................
HAND / EYE COORDINATION SET UP
Select
Performance & Training
Select Hand/Eye Coordination
39
FITLIGHT Trainer™
Running Time
Time of deactivated Light
Split Times will be recorded at each Light and
displayed here
SYSTEM OPERATION HAND/EYE COORDINATION
..................................................................................................................................................................................................................................
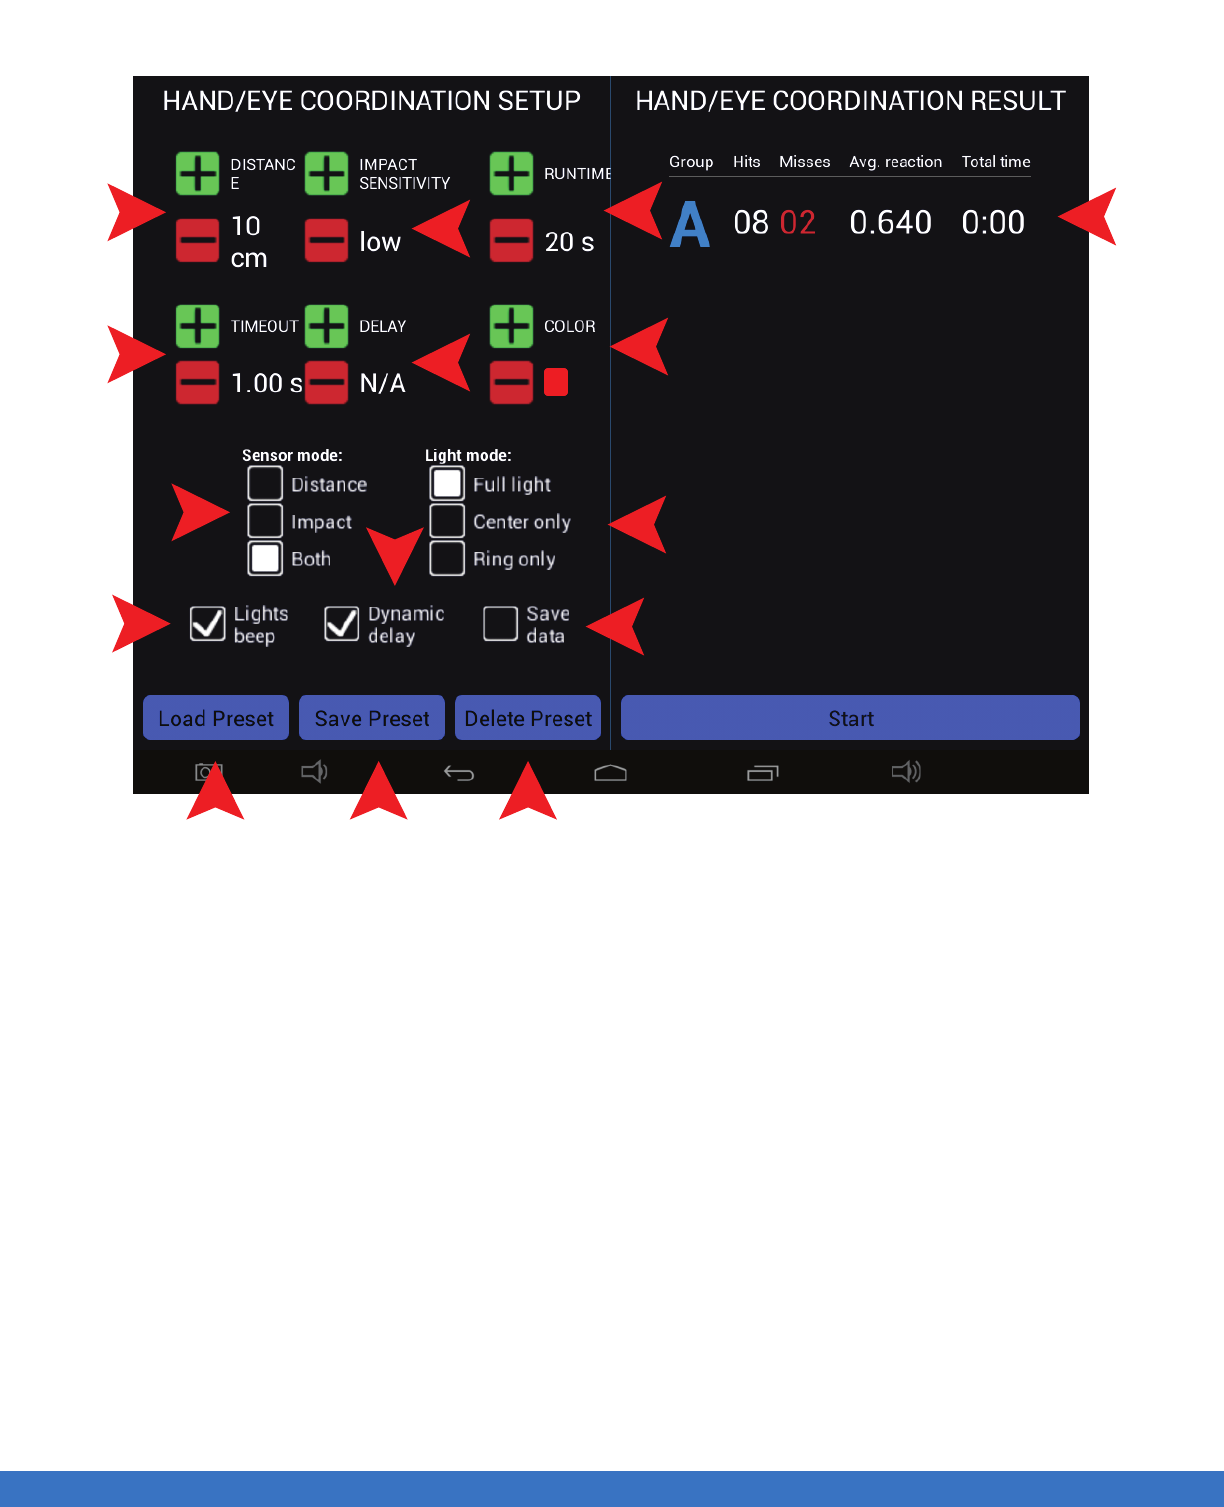
Select the routine parameters before selecting “Start”. All parameters are similar to previous setting modes.
1. The deactivation distance can be set from 10 cms to 80 cms.
2. The time out can be set from 0.10 seconds to 10 seconds.
3. There are 3 deactivation modes to select from. Distance only, Impact only or both, which means the
Light can be deactivated by motion or Impact.
4. Select if sound (Beep) is required.
5. Select the sensitivity of “Impact” as required, “soft hit or a firm hit”.
6. Select the “Delay” interval between lights coming on in succession.
7. Indicates the duration of the routine.
8. This gives a choice of 6 different colours.
9. There are 3 choices, Full light, Perimeter light or just the Centre of the Light that illuminates.
10. Select “Save Data” if you require the results of the routine to be saved for future analysis.
11. Select “Load Preset” if the set up has been saved before.
12. Select this to save the current set up.
13. If the set up has been saved before, select “Delete preset” to remove it.
14. This enables the system to follow the users hit rate, as the user speeds up so does the triggering of the
Lights. The Lights are paced to the rate at which they are being hit.
15. This displays the results of the run.
PLEASE NOTE: Depending on the Tablet Controller that you have, you may have to scroll up/down
within the “Sequence Step Setup” to view all of the options.
The object of the test is to hit as many Lights in the selected time.
1
2
3
4
11 12 13
10
9
8
7
5
6
15
14
SYSTEM OPERATION - HAND/EYE COORDINATION 40
SYSTEM OPERATION - FITLIGHT GAME SET UP
SYSTEM OPERATION - FITLIGHT GAME SET UP
..................................................................................................................................................................................................................................
FITLIGHT GAME SET UP
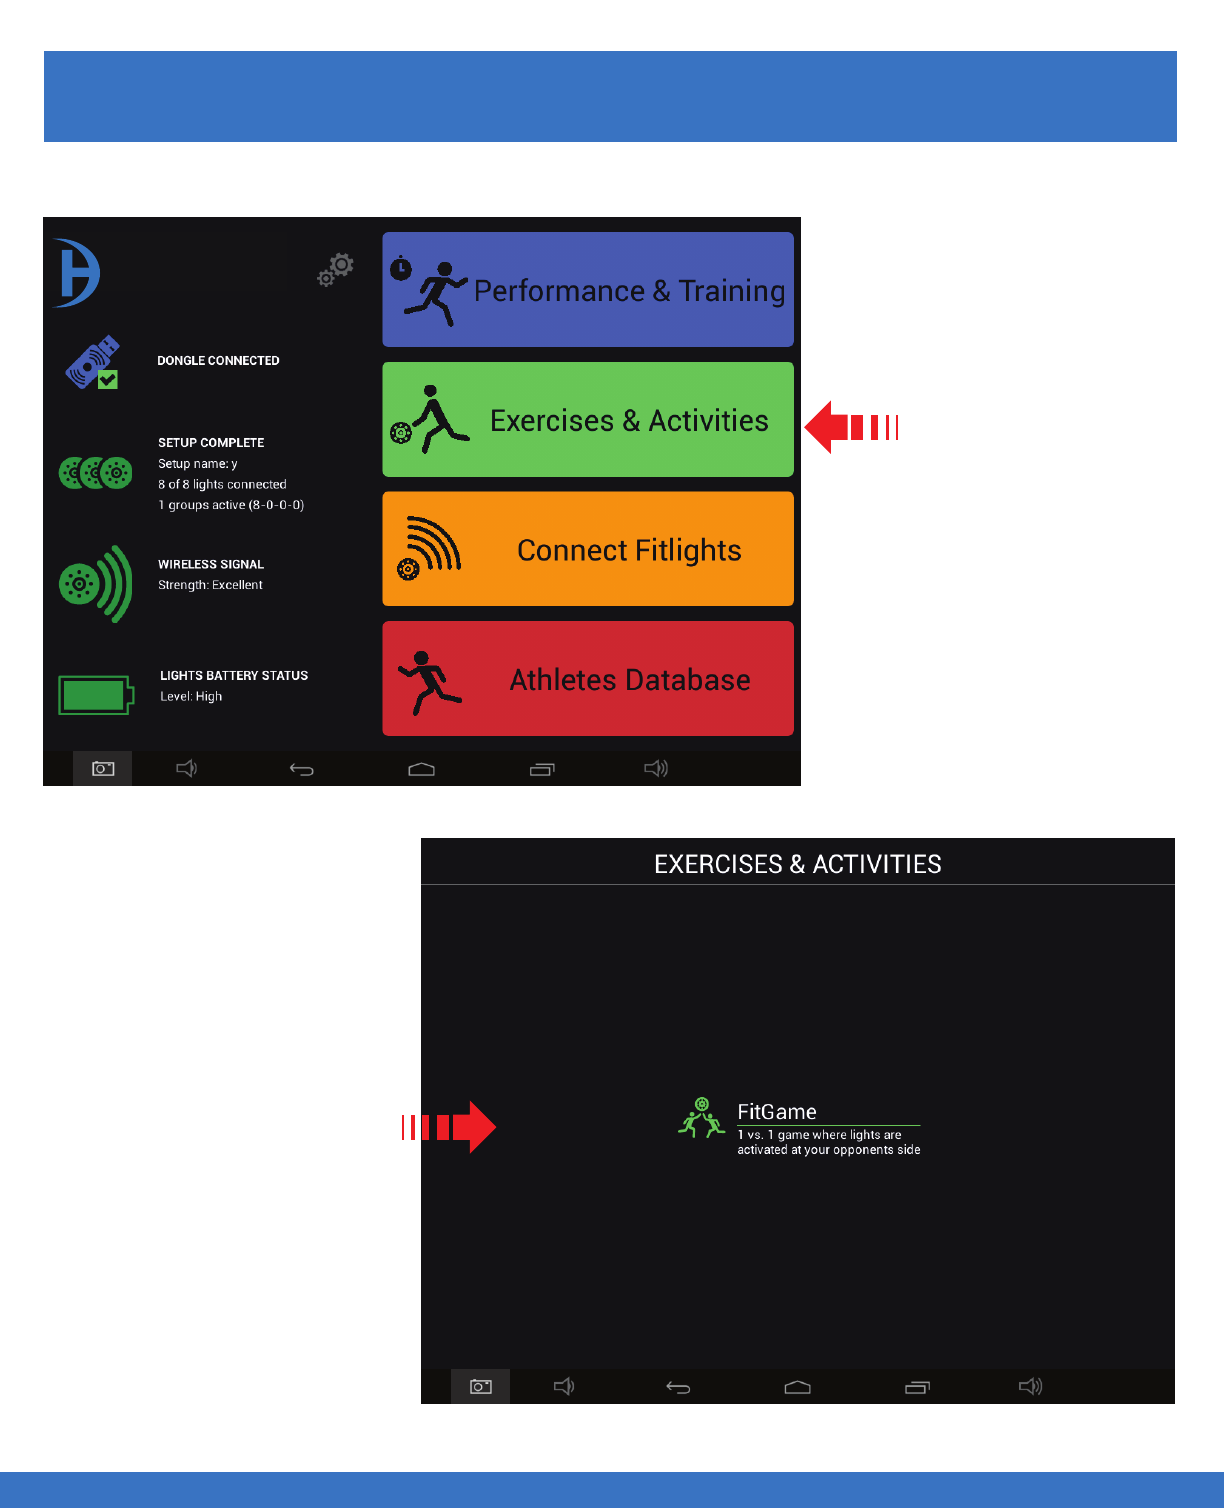
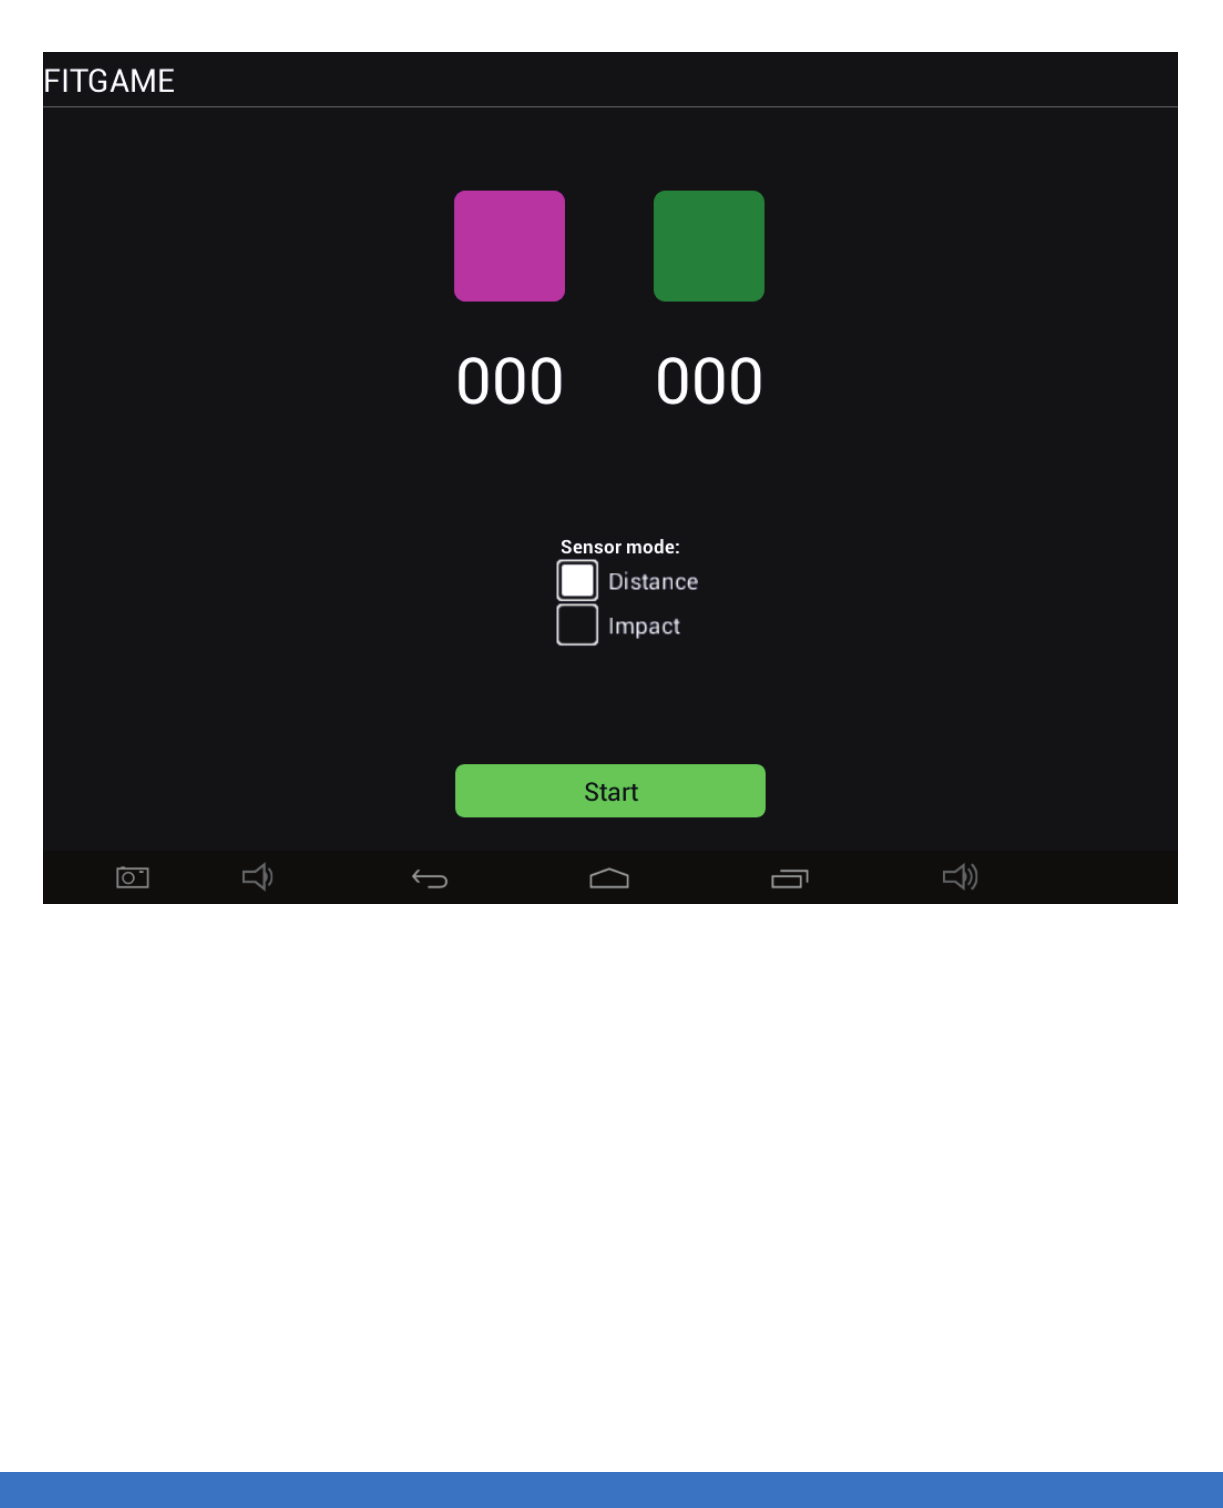
Select
Exercises & Activities
Select
FitGame
41
FITLIGHT Trainer™
1. To remove and replace
an incorrect insertion of a
Light/step,first create a new
step of the correct Light,
adjacent to the light that you
wish to remove or edit.
Once this is done move to
the next part of the edit
process.
2. Touch an hold the Light/-
step that you would like
removed. A pop up menu
appears, select “Yes” and
the step will be removed
and replaced with the new
step executed in the first
step above.
SYSTEM OPERATION - FITLIGHT GAME SET UP
..................................................................................................................................................................................................................................
1.This game is based on 2 or more groups of people playing. Each group is assigned a colour. The object
of the game is to compete 1V1 or 2V2 depending on the number of Lights. Each player has their own
colour and as the user hits their Light, a red light is triggered on the opponents' side.
2. The opponent is required to deactivate the red light, at the same time trying to activate a red light on
their opponents’ side.
3. As the red lights are missed, the players are assigned a point depending on who misses the red light.
4. The first to score 25 points wins and the game stops and the winner’s Lights will activate indicating the
winner.
5. The game is best played within a grid.
6. Depending on the number of Lights assigned the system automatically divides the Lights equally.
SYSTEM OPERATION - FITLIGHT GAME SET UP 42
SYSTEM OPERATION - DATA / RESULTS
SYSTEM OPERATION - DATA / RESULTS
..................................................................................................................................................................................................................................
DATA / RESULTS
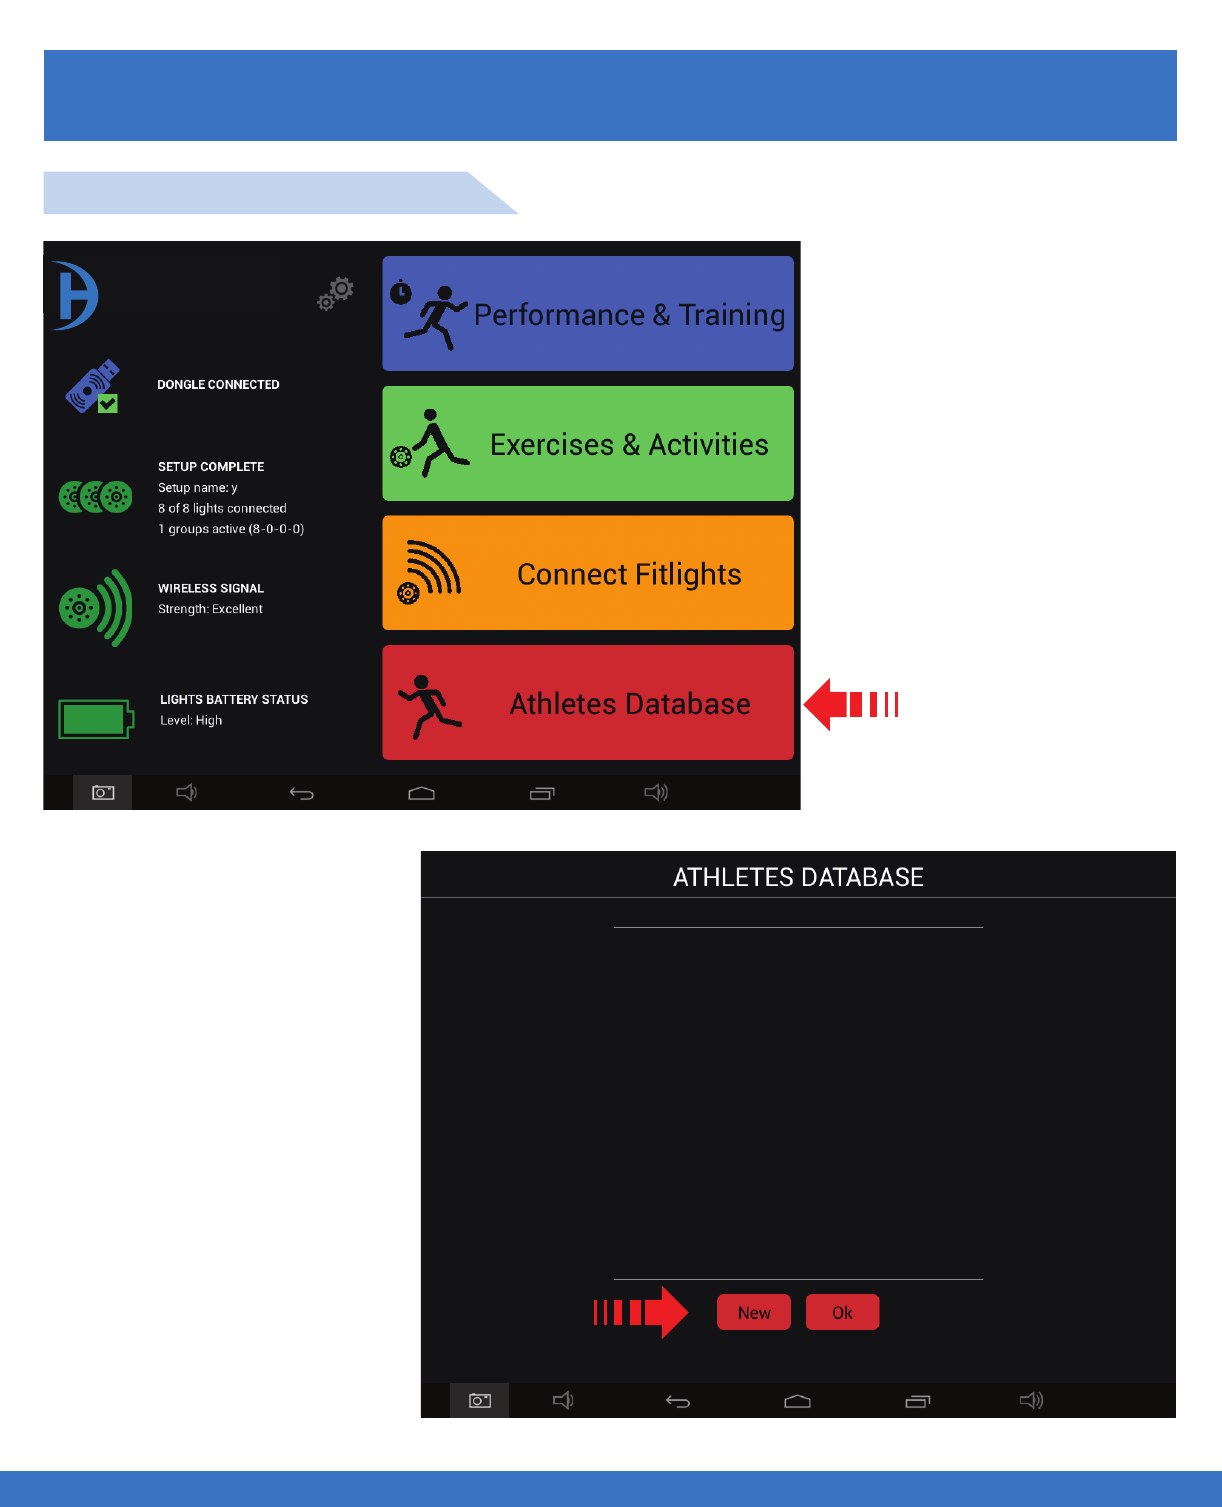
Select
Athletes Database
Select New
ATHLETE DATABASE SET UP
43
FITLIGHT Trainer™
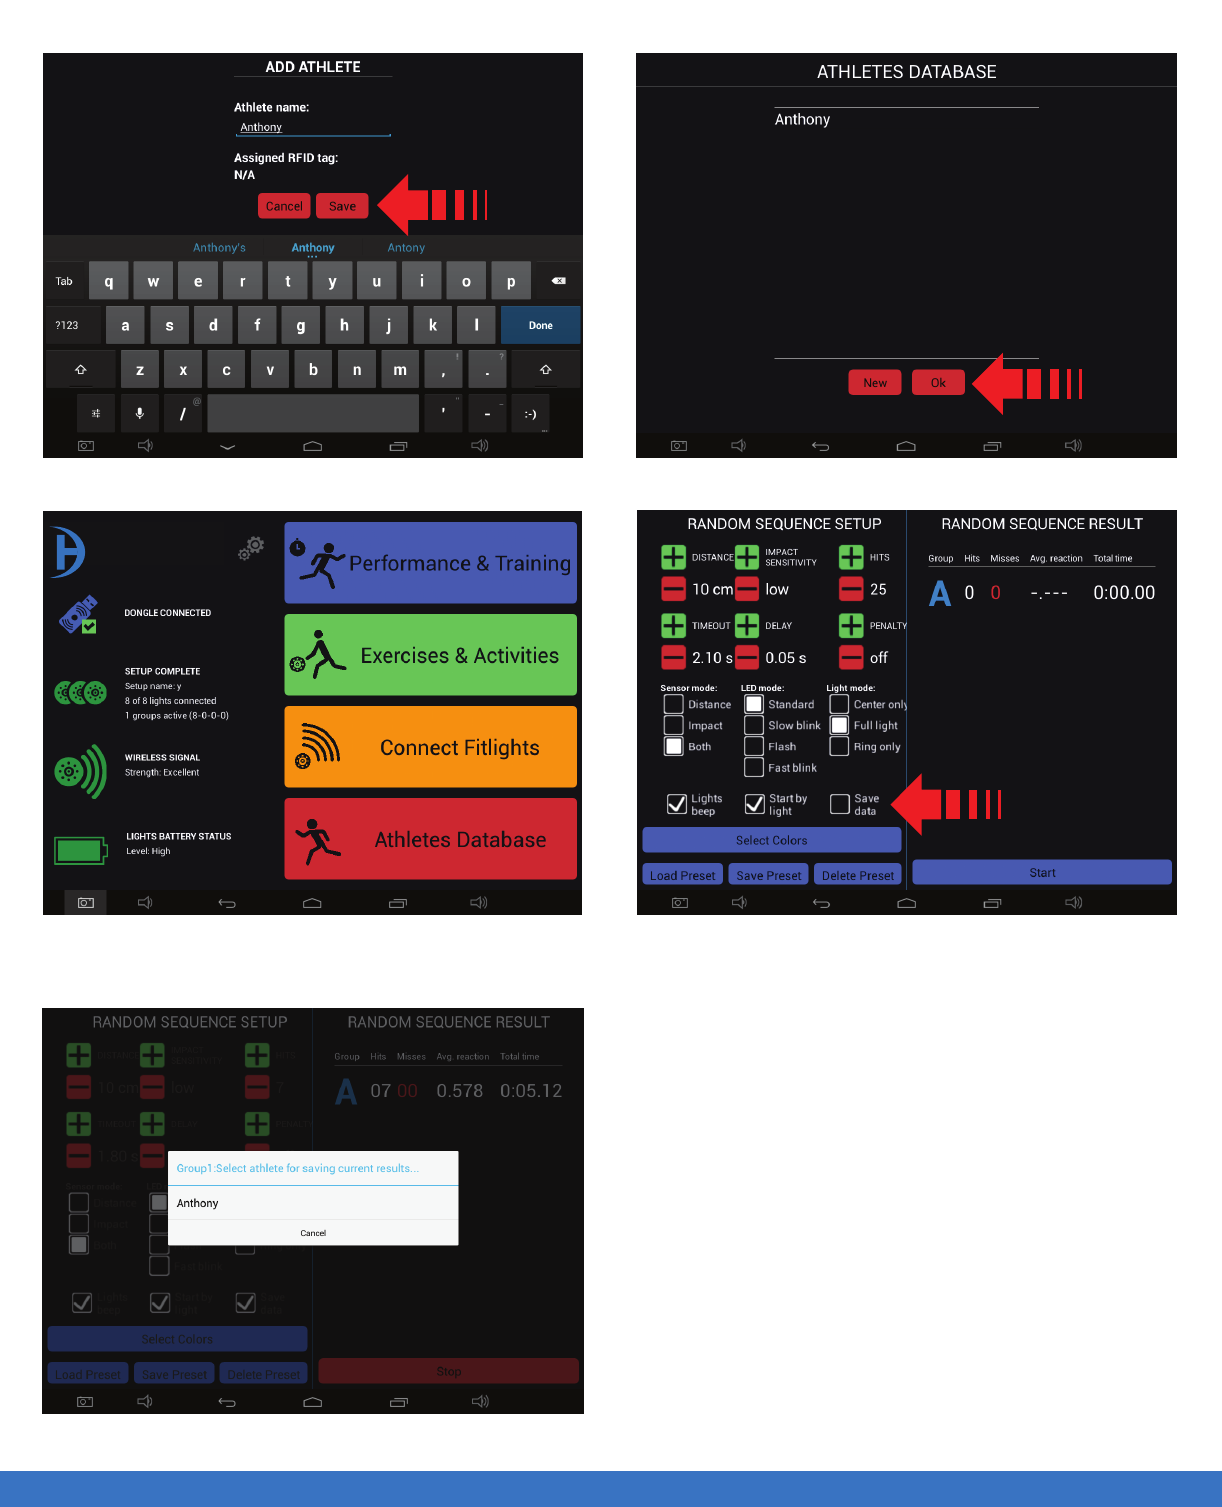
SYSTEM OPERATION - DATA / RESULTS
..................................................................................................................................................................................................................................
SYSTEM OPERATION - DATA / RESULTS
1. Type name(s) then select “Save”. 2. Name(s) appears in the database. Select “Ok”.
3. Select “Performance & Training”.
5. Select the name.
1
2
4
4. Ensure that the “Save Data” box is selected
prior to starting the particular routine.
Note: In the step #5, you can still continue doing
the routine. At the end of your session or when you
are finished you can then go to back to the
Performance and Training menu and select
“Export Training Data”.
Repeat the these steps for Split Time, Hand eye,
and Running the Programmed Sequence.
44
FITLIGHT Trainer™
SYSTEM OPERATION - DATA / RESULTS
..................................................................................................................................................................................................................................
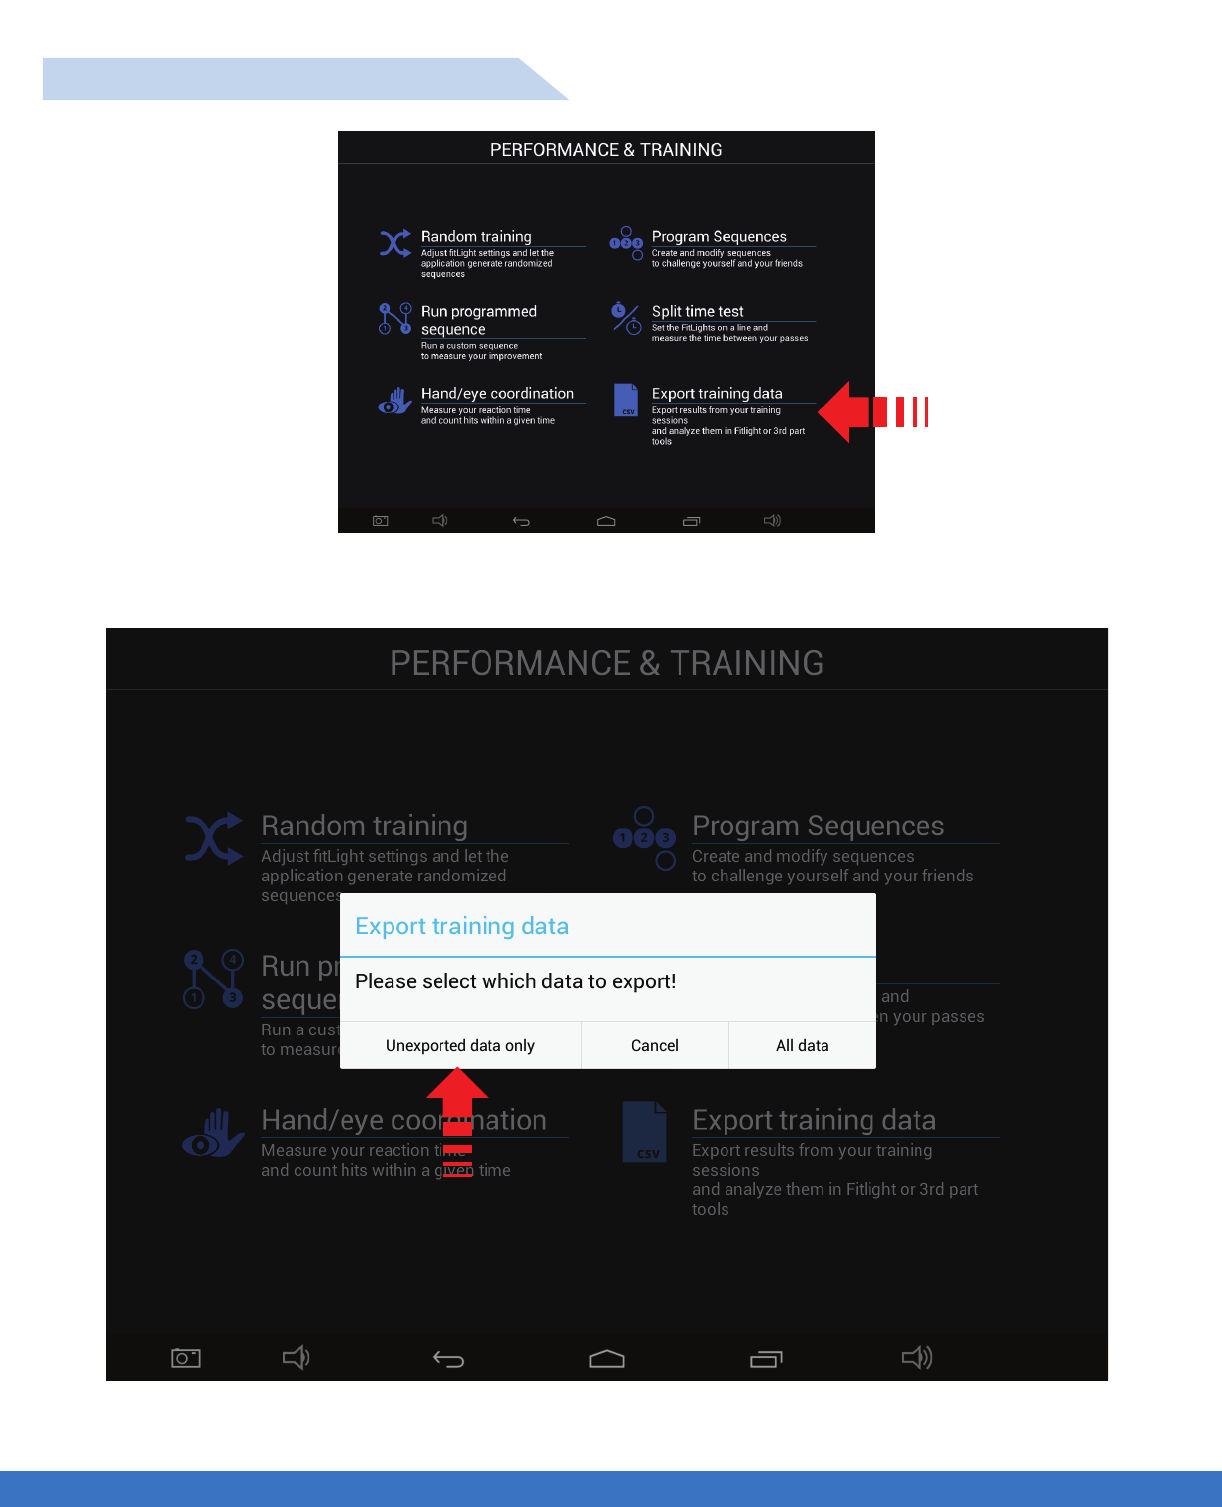
SYSTEM OPERATION - DATA / RESULTS
Select Export Training Data
Select Unexported data only
EXPORT TRAINING DATA SET UP
45
SYSTEM OPERATION - DATA / RESULTS
SYSTEM OPERATION - DATA / RESULTS
..................................................................................................................................................................................................................................
Select Email or View
Email: Enables the export of the data to the FITLIGHT™ Utlity
View: Enables the user to view the data on the Tablet ( only if you have downloaded the CSV Viewer app )
Select Email
46

SYSTEM OPERATION - DATA / RESULTS
SYSTEM OPERATION - DATA / RESULTS
..................................................................................................................................................................................................................................
Enter Email address and send data.
47
1. Distance: Indicates the deactivation range from the center of the Light.
2. Impact Sensitivity: This setting is not relevant for Split Time testing.
3. Colour: Choose from 6 different colours.
4. Sensor Mode: For Split Time testing, it’s suggested you only use the “Distance” setting.
5. Start by Light: Allows the athlete to start on their own readiness.
6. Retrigger: This feature will automatically restart the routine.
7. Save Data: Allows the user to save the split times.
8. Load Preset: Only used if the user has saved the preffered settings.
9. Save Preset: Allows the user to save the current settings.
10. Delete Preset: Allows the user to remove the previously saved settings.
TIPS
- When using the Split Time Test, you will get better performance if the athlete wears light coloured clothing,
black or dark clothing is none preferred attire as dark colours are not reflective.
- To enable a wider deactivation range lights can be placed opposite each other 120 cms. apart.
- Make sure that the lights are in sequential order, from 1 to 8 in the split segments. It can be checked by
cycling the Lights and observing the sequence in which they activate.Once the Lights are set up continue
to the training menu.
..................................................................................................................................................................................................................................
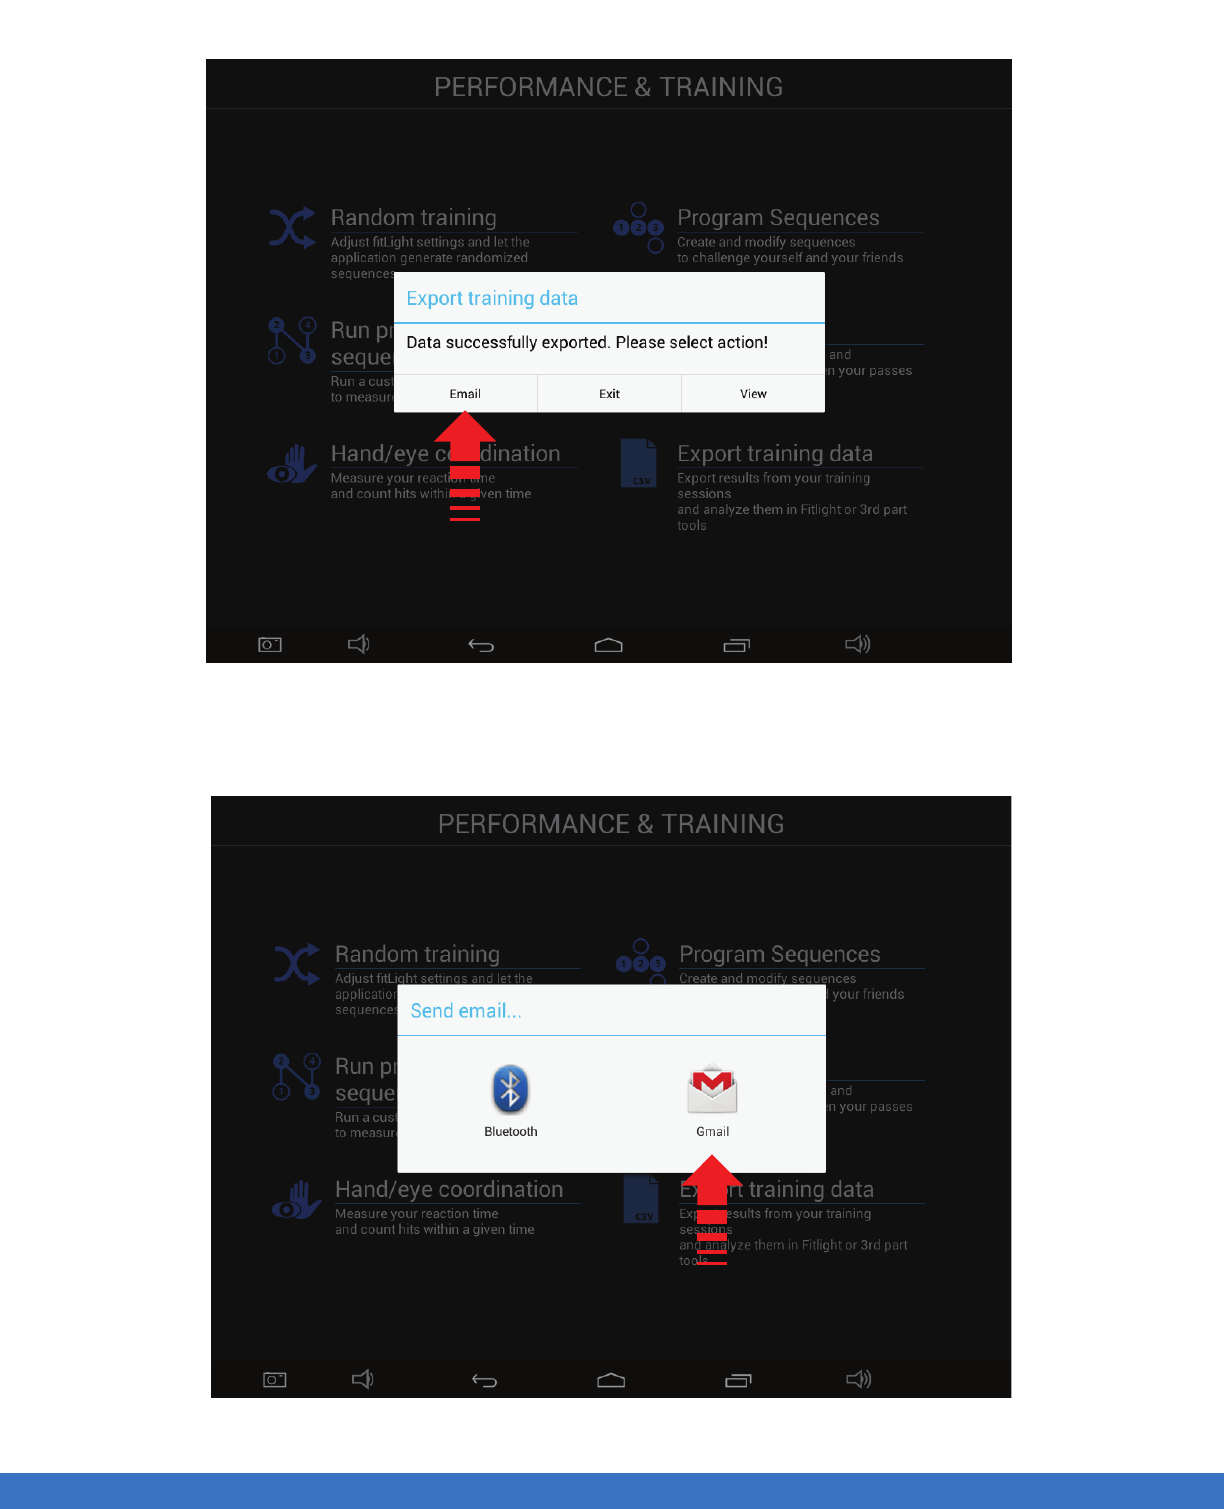
GROUP SET UP
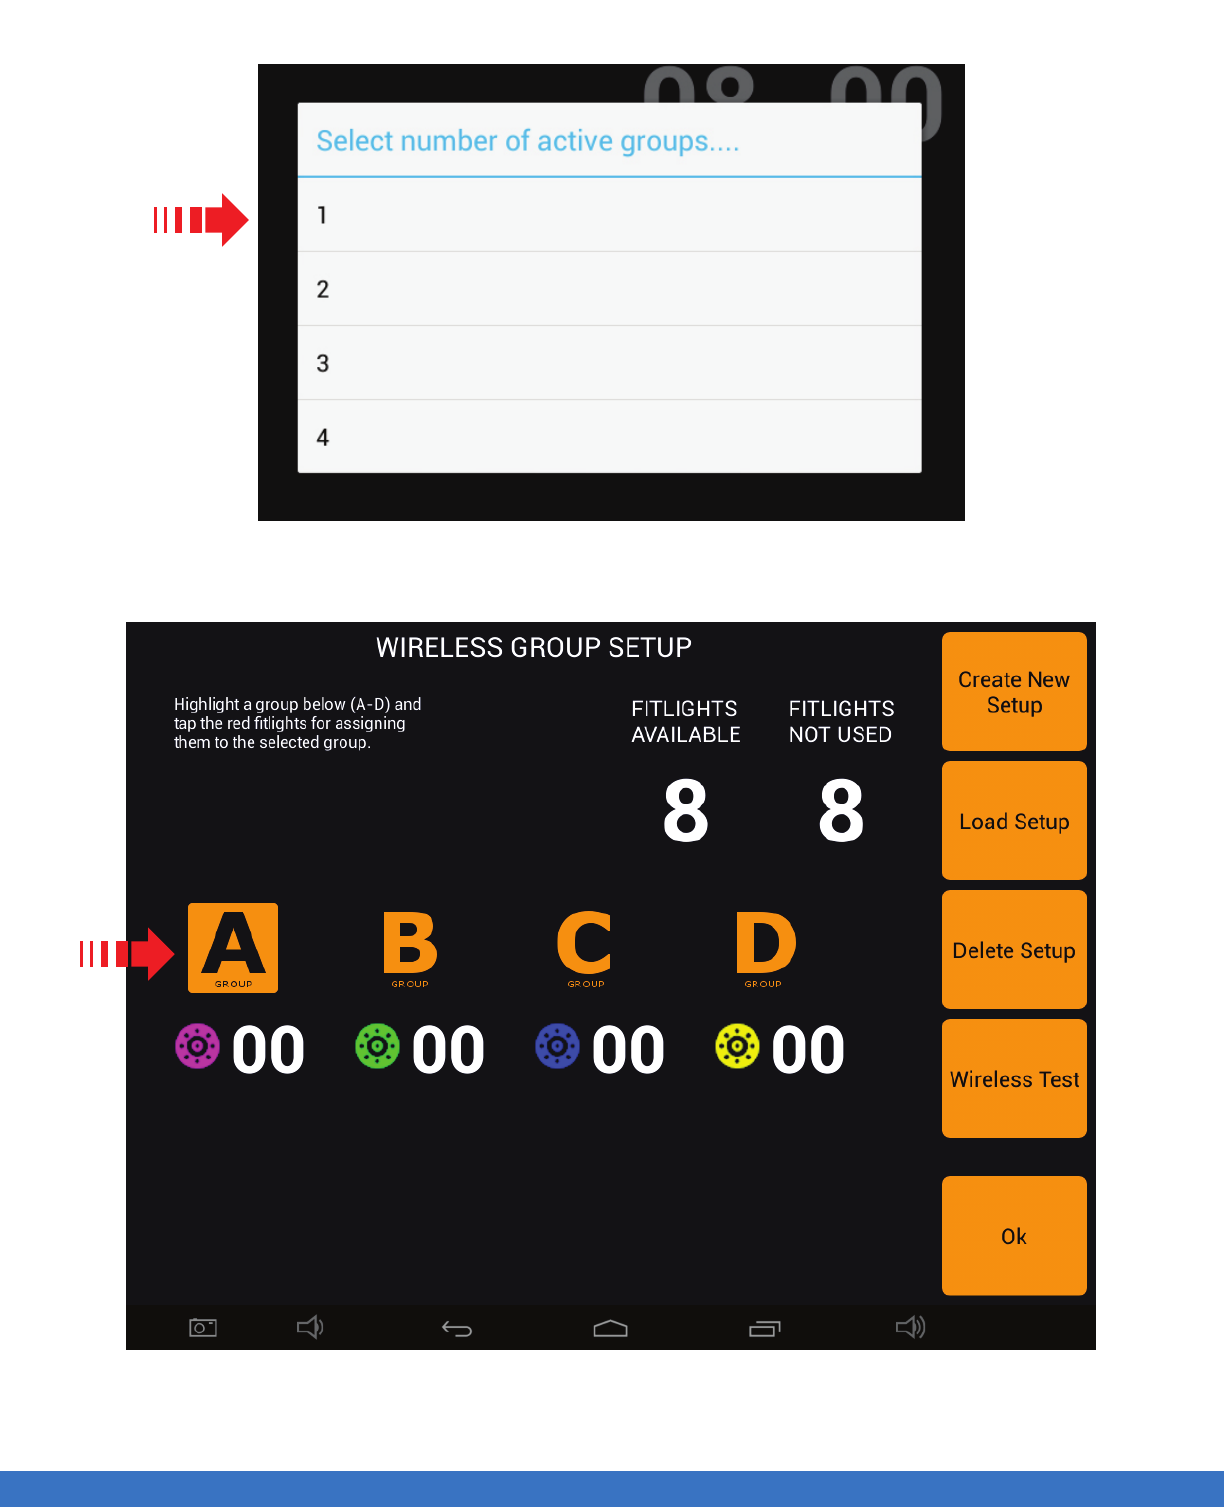
HOW TO CREATE ONE GROUP
Select
Connect Fitlights
Select
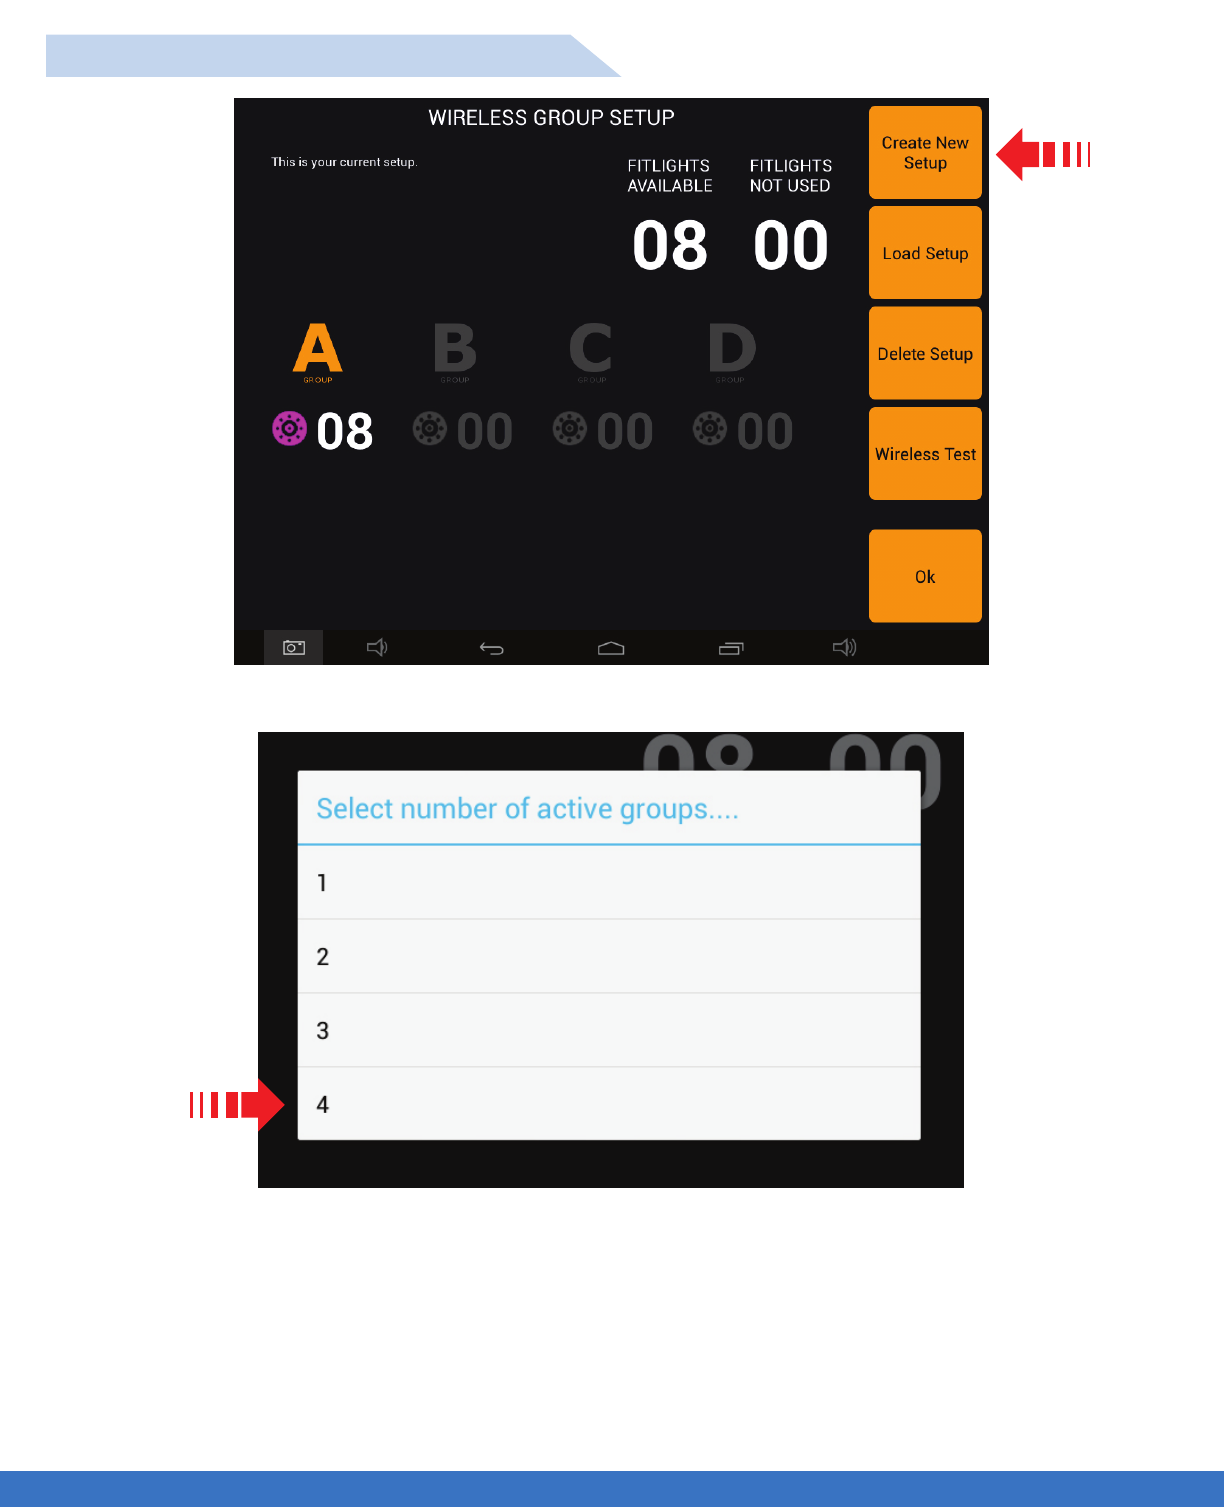
Create New Setup
GROUP SET UP
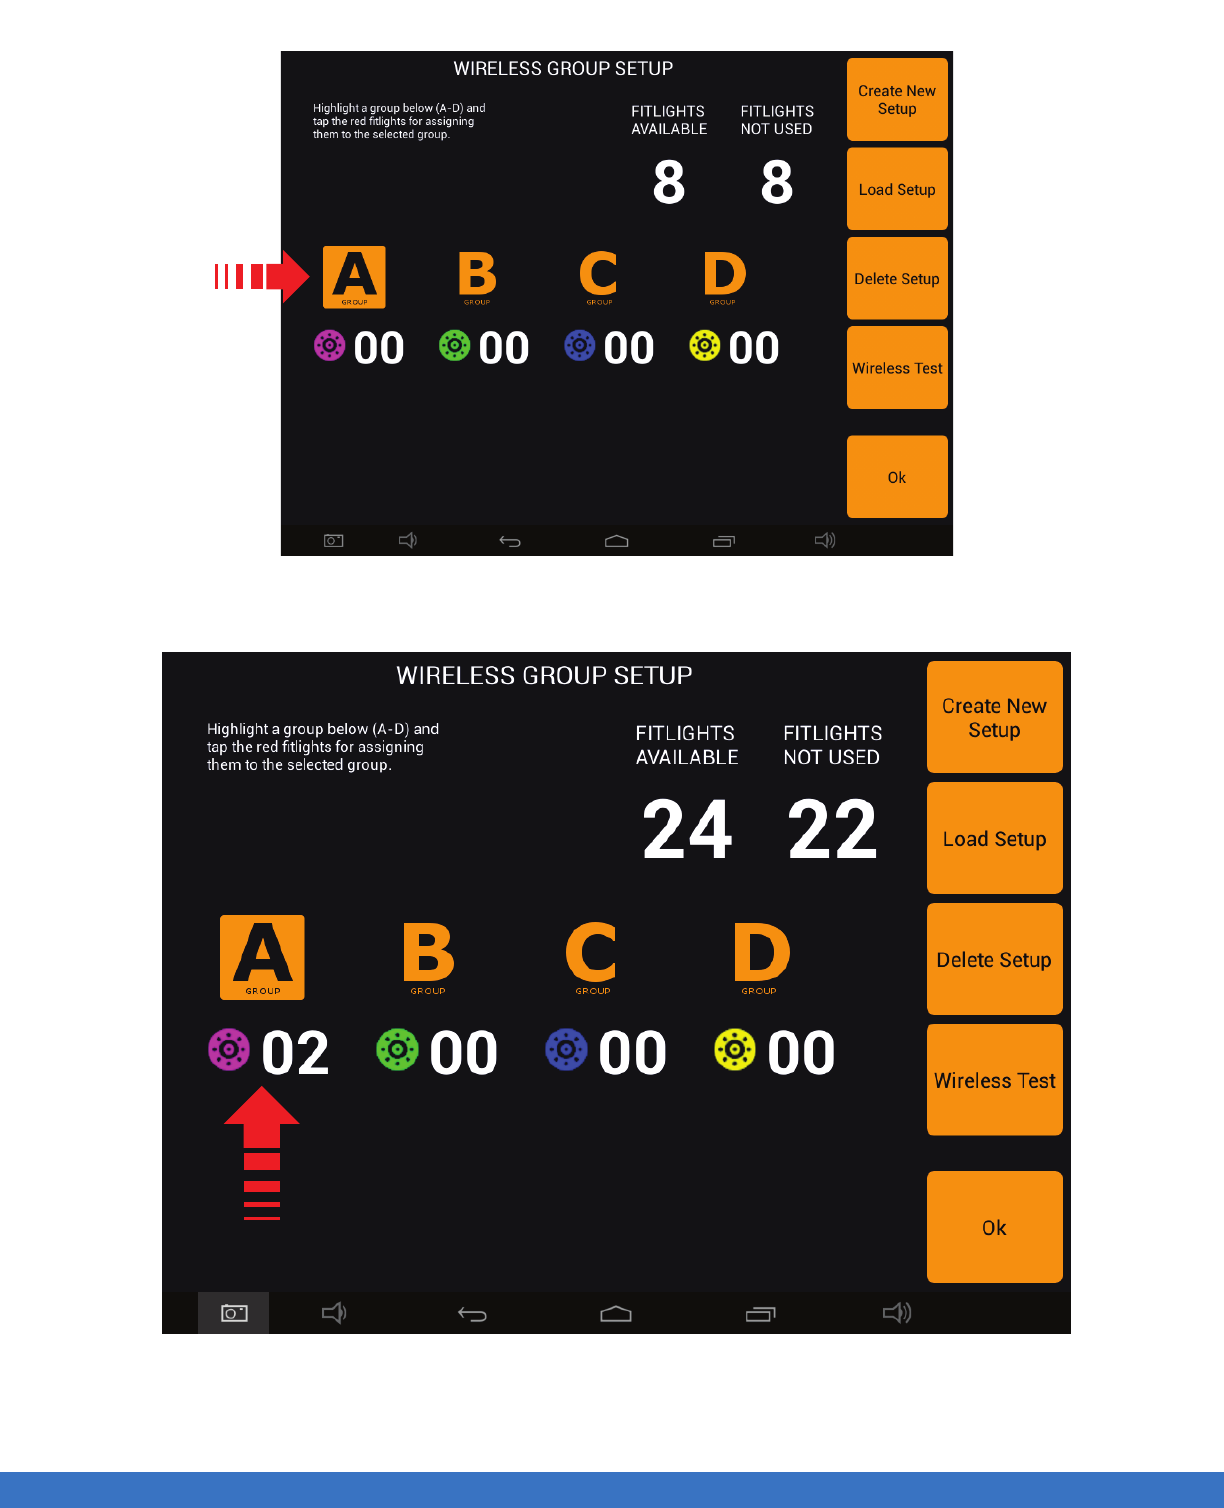
HOW TO CREATE ONE OR MULTIPLE GROUPS
8 Lights are available
48
FITLIGHT Trainer™
..................................................................................................................................................................................................................................
GROUP SET UP
Select the number of groups. In this example, shows 1 group of 8 Lights
Group “A” is automatically selected
GROUP SET UP 49
..................................................................................................................................................................................................................................
GROUP SET UP
Lights will turn RED Tap each Light until they turn purple
Once the Lights have been assigned to the group, select “OK”
Select “Yes”
Input new set up name using the keypad and select “Ok”
GROUP SET UP 50
..................................................................................................................................................................................................................................
GROUP SET UP
HOW TO CREATE MULTIPLE GROUPS
GROUP SET UP
Select the number of groups. This example will use 4 groups of 2 Lights per group
Select Create New Setup
51
..................................................................................................................................................................................................................................
GROUP SET UP
Select “A” and tap 2 Lights to change from RED to PURPLE
2 Lights conected for Group A
GROUP SET UP 52
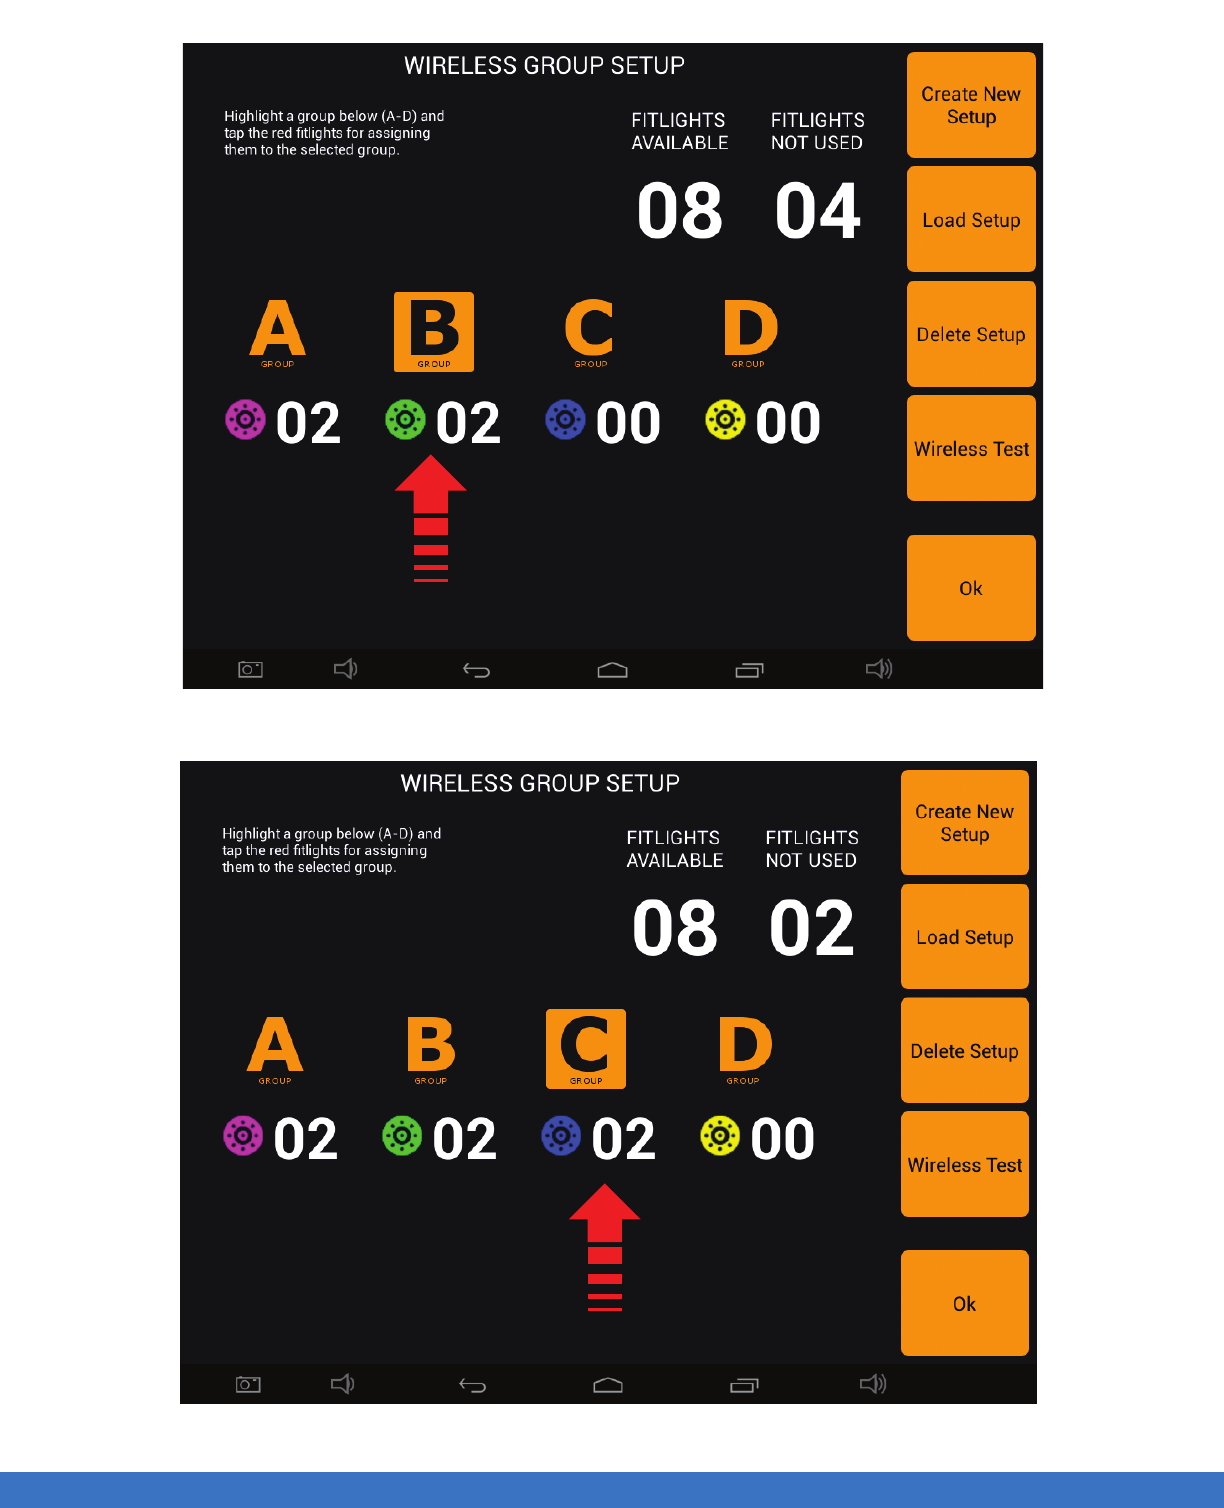
..................................................................................................................................................................................................................................
GROUP SET UP
Select “B” and tap 2 Lights to change from RED to GREEN
Select “C” and tap 2 Lights to change from RED to BLUE
GROUP SET UP 53
..................................................................................................................................................................................................................................
GROUP SET UP
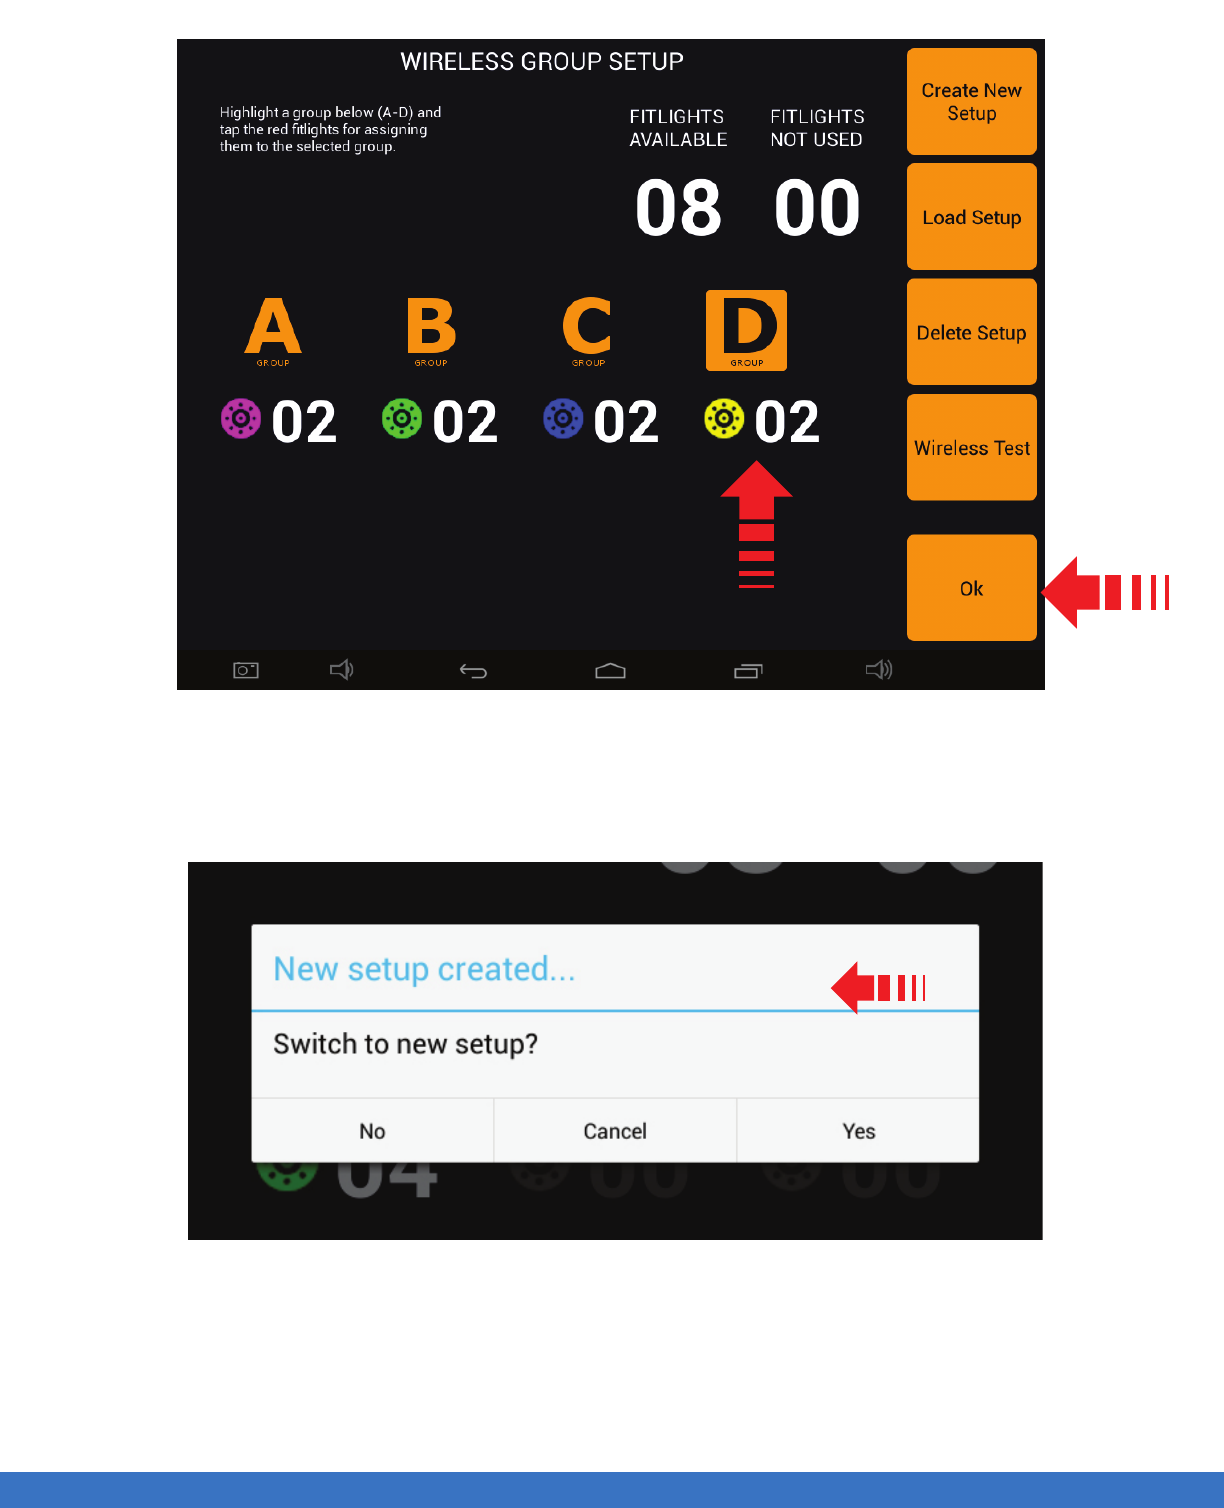
1. Select “D” and tap 2 Lights to change from RED to YELLOW
2. Once all the groups have been assigned, select “Ok”
Select “Yes”
GROUP SET UP
1
2
54
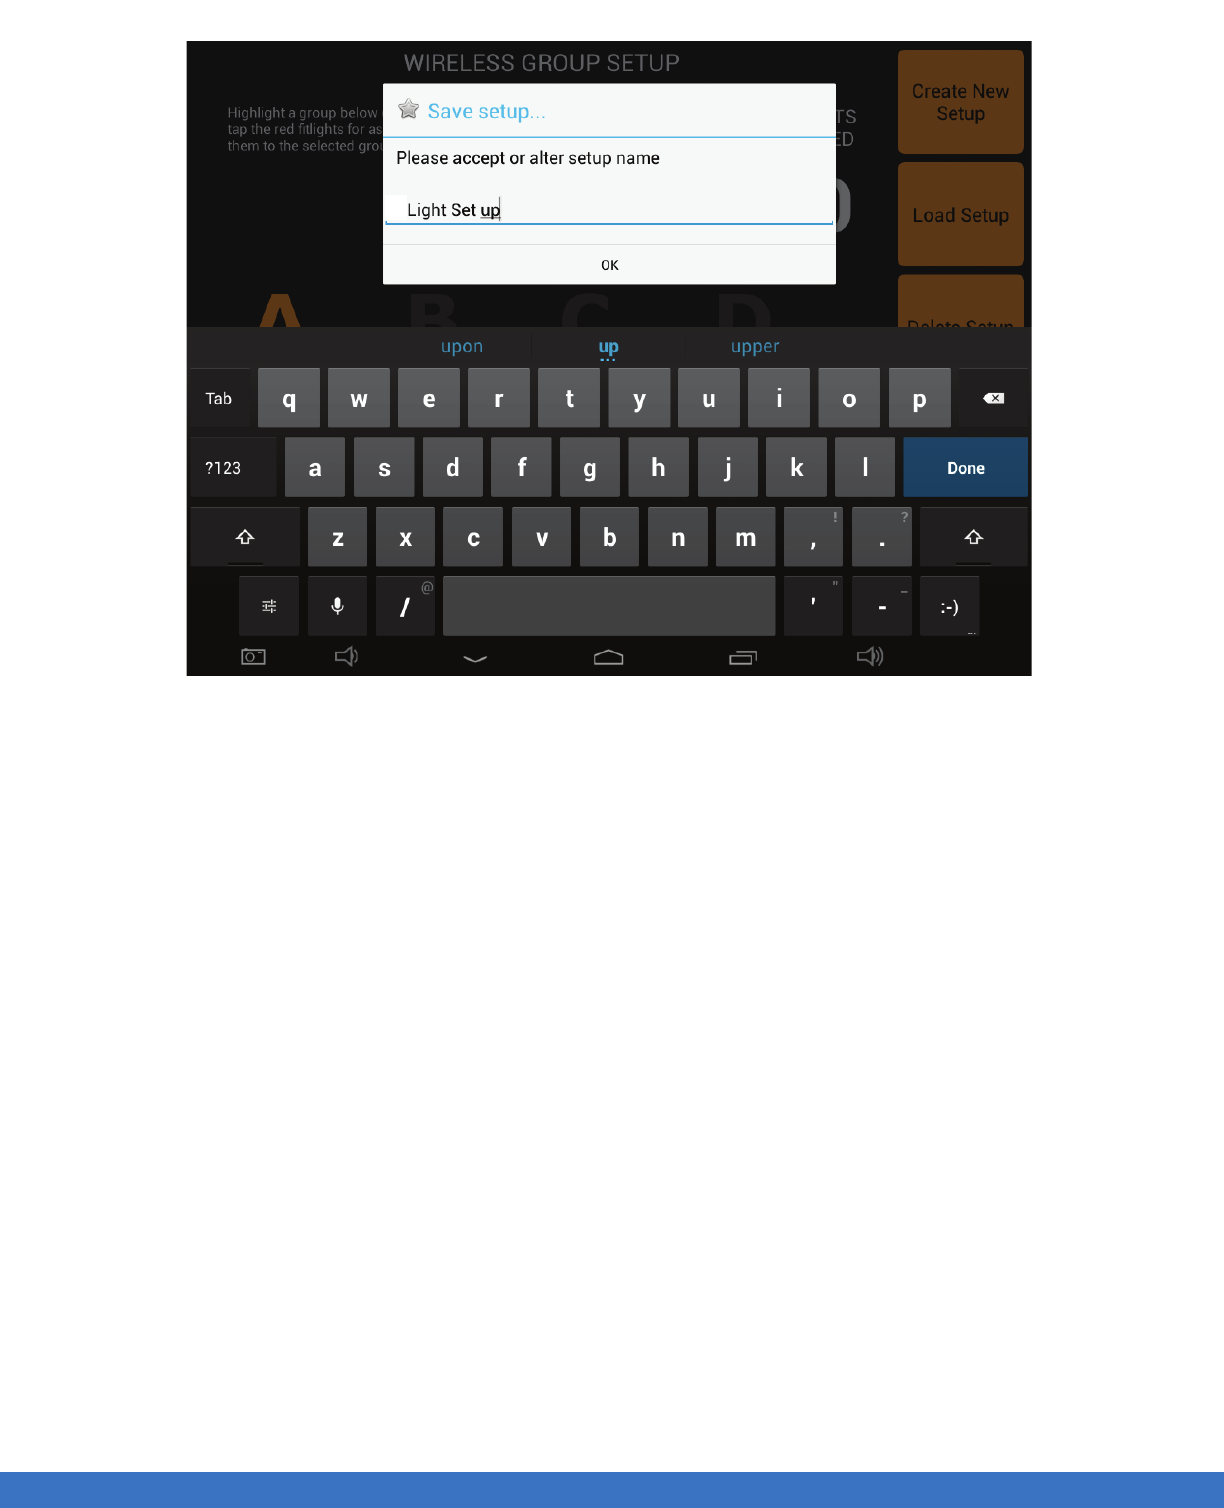
..................................................................................................................................................................................................................................
GROUP SET UP
GROUP SET UP
Input new set up name using the keypad and select “Ok”
4
55
GROUP SET UP
..................................................................................................................................................................................................................................
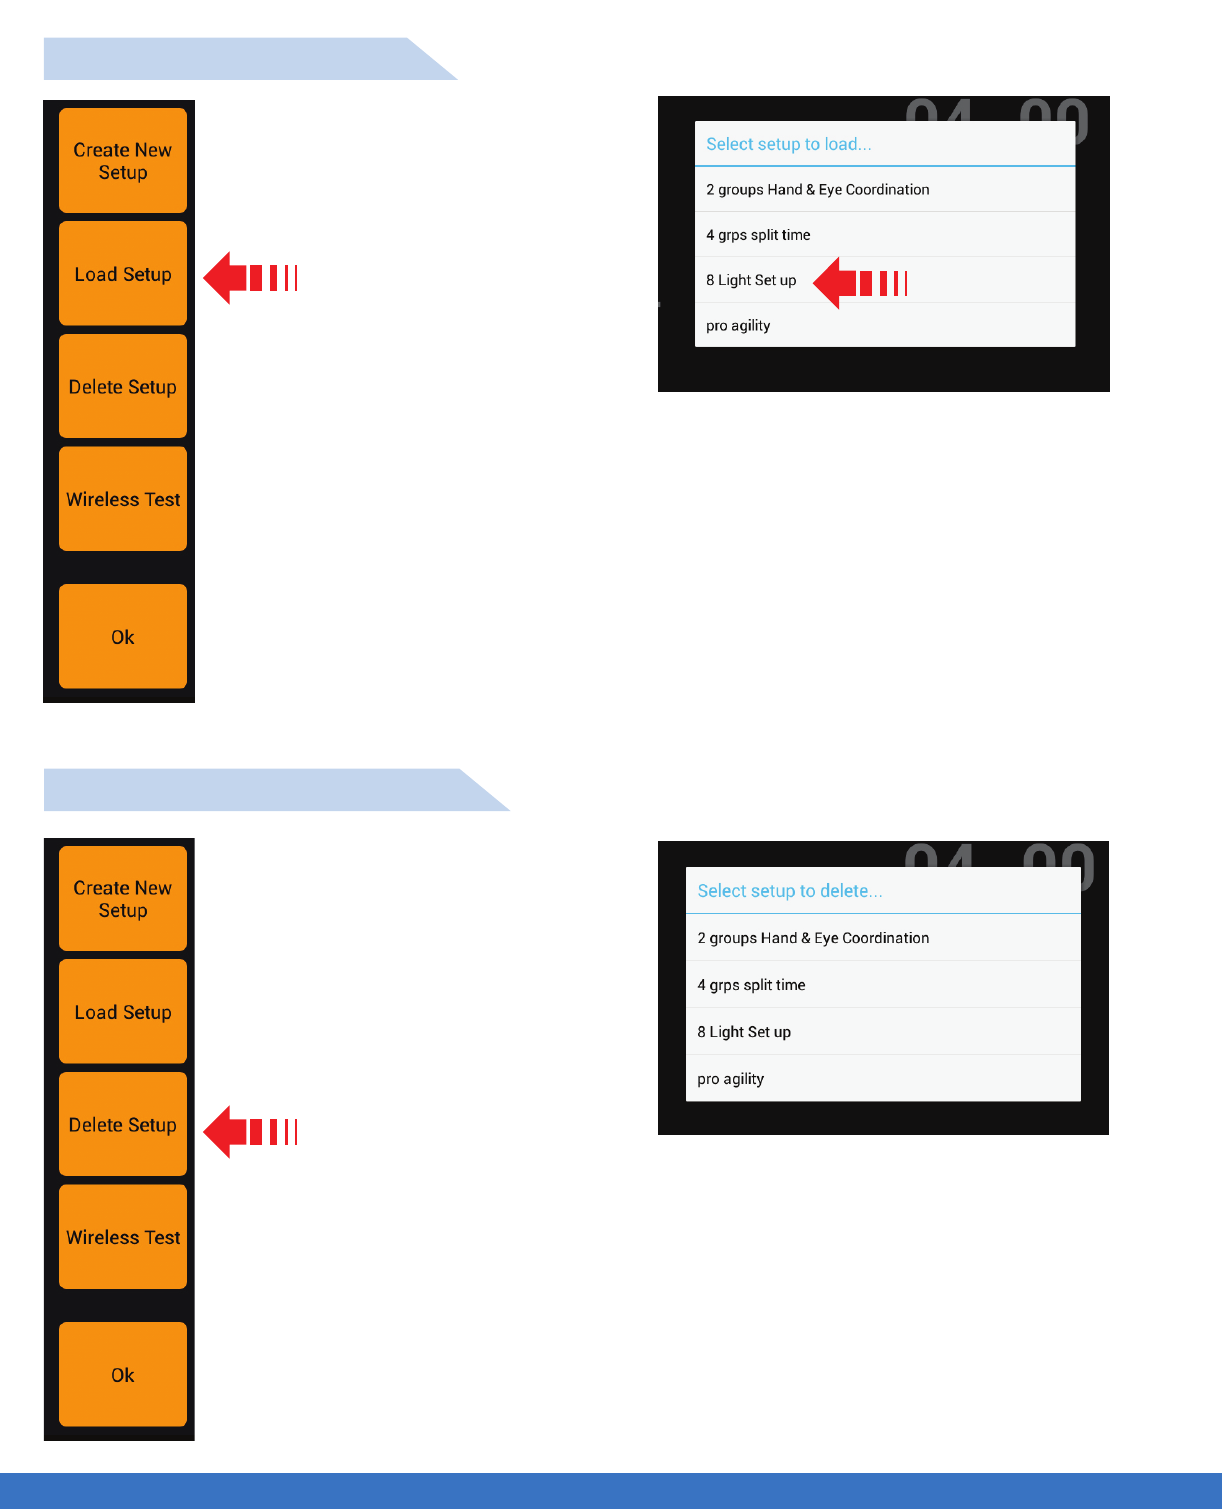
HOW TO LOAD A GROUP
HOW TO DELETE A GROUP
Select Load Setup
GROUP SET UP
Select Delete Setup
Select the setup to load. In this example,
“8 Light Set up” was previously created
and saved
Select the setup to delete.
56

SUPPORT
..................................................................................................................................................................................................................................
TROUBLE SHOOTING
SUPPORT
TABLET CONTROLLER ISSUES
The Controller does not turn on / no Power to the Tablet Controller
1. Make sure that the battery is fully charged. If unsure recharge again until the fully charged indicator is
visible.
2. Battery has discharged and is no longer rechargeable. Service required.
DISPLAY ISSUES
The Display does not turn on / not visible
1. Make sure that the Controller is fully charged. If unsure recharge again.
2. Turn off the Tablet Controller and reboot.
3. Reload Firmware.
The FITLIGHTS™ do not change colour
1. Check that the program is set to change colour as defined.
2. Reboot the Tablet Controller.
3. Check that you have a good wireless connection to the Lights.
The FITLIGHTS™ do not connect to the Controller Tablet
1. Check that the Lights are fully charged
2. Reboot the Tablet Controller.
3. Check that the Tablet Controller is fully charged.
4. Restart the wireless by touching restart on the Tablet Controller set up screen.
5. Check that the Dongle is properly connected to the Tablet Controller.
The Display Touch Screen does not function
1. Turn off the Tablet Controller and Reboot.
2. Reload Firmware.
57

SUPPORT
..................................................................................................................................................................................................................................
LIGHT ISSUES
FITLIGHT(s)™ does ( do ) not turn on / No Power to the FITLIGHT (s)™
1. Check that the polarities of the batteries are installed correctly, positive (+) to positive (+) / negative (-)
to negative (-).
2. Make sure that the batteries are fully charged, if unsure recharge again until the Light is green.
3. Try a different set of fully charged batteries. If the Light works it indicates that the replaced battery life
has been depleted and the batteries should be discarded according to your local disposal regulations for
batteries.
4. Make sure that the correct voltage batteries are inserted into the Lights. They should be 1.2 volts DC
5. Make sure that you are using rechargeable batteries.
6. Make sure that all of the batteries are fully charged and that there is not a weak charge battery within
the group.
7. Check that you have a good wireless connection to the Lights.
CHARGER ISSUES
The Charger does not turn on / No Power to the Charger
1. Check that there is power to the charger; make sure that the electrical outlet that the charger power
supply is connected to is functioning correctly. You can test the outlet by simply plugging a lamp or cell
phone charger into the outlet to see if it is functioning.
2. Check that the power supply is properly plugged into the wall outlet and also the Charger unit.
3. Check to make sure the small cable is not unplugged from the charging case, lift the foam in the
Charger case and check the connection of the cable.
4. Check that the power supply connection to the case cable is functional, rotate cable connection and
observe if problem is resolved.
The FITLIGHTS™ are not charging
1. Check that the Lights are correctly inserted into the Charger.
2. Make sure that there are batteries in the Lights.
3. Check that the polarities of the batteries in the Lights are installed correctly, positive (+) to positive (+) /
negative (-) to negative (-).
4. Try a different set of Batteries. If the Light charges it indicates that the replaced battery life has been
depleted and the batteries should be discarded according to your local disposal regulations for batteries.
5. Make sure that the correct voltage batteries are inserted into the Lights. They should be 1.2 volts DC
6. Make sure that you are using rechargeable batteries.
7. Make sure that there is no weak charge battery within the group by replacing one at a time.
8. Make sure that the lights are making contact with the terminals in the charger.
9. Check that the power supply connection to the case cable is functional, rotate cable connection and
observe if problem is resolved.
SUPPORT 58
SUPPORT
..................................................................................................................................................................................................................................
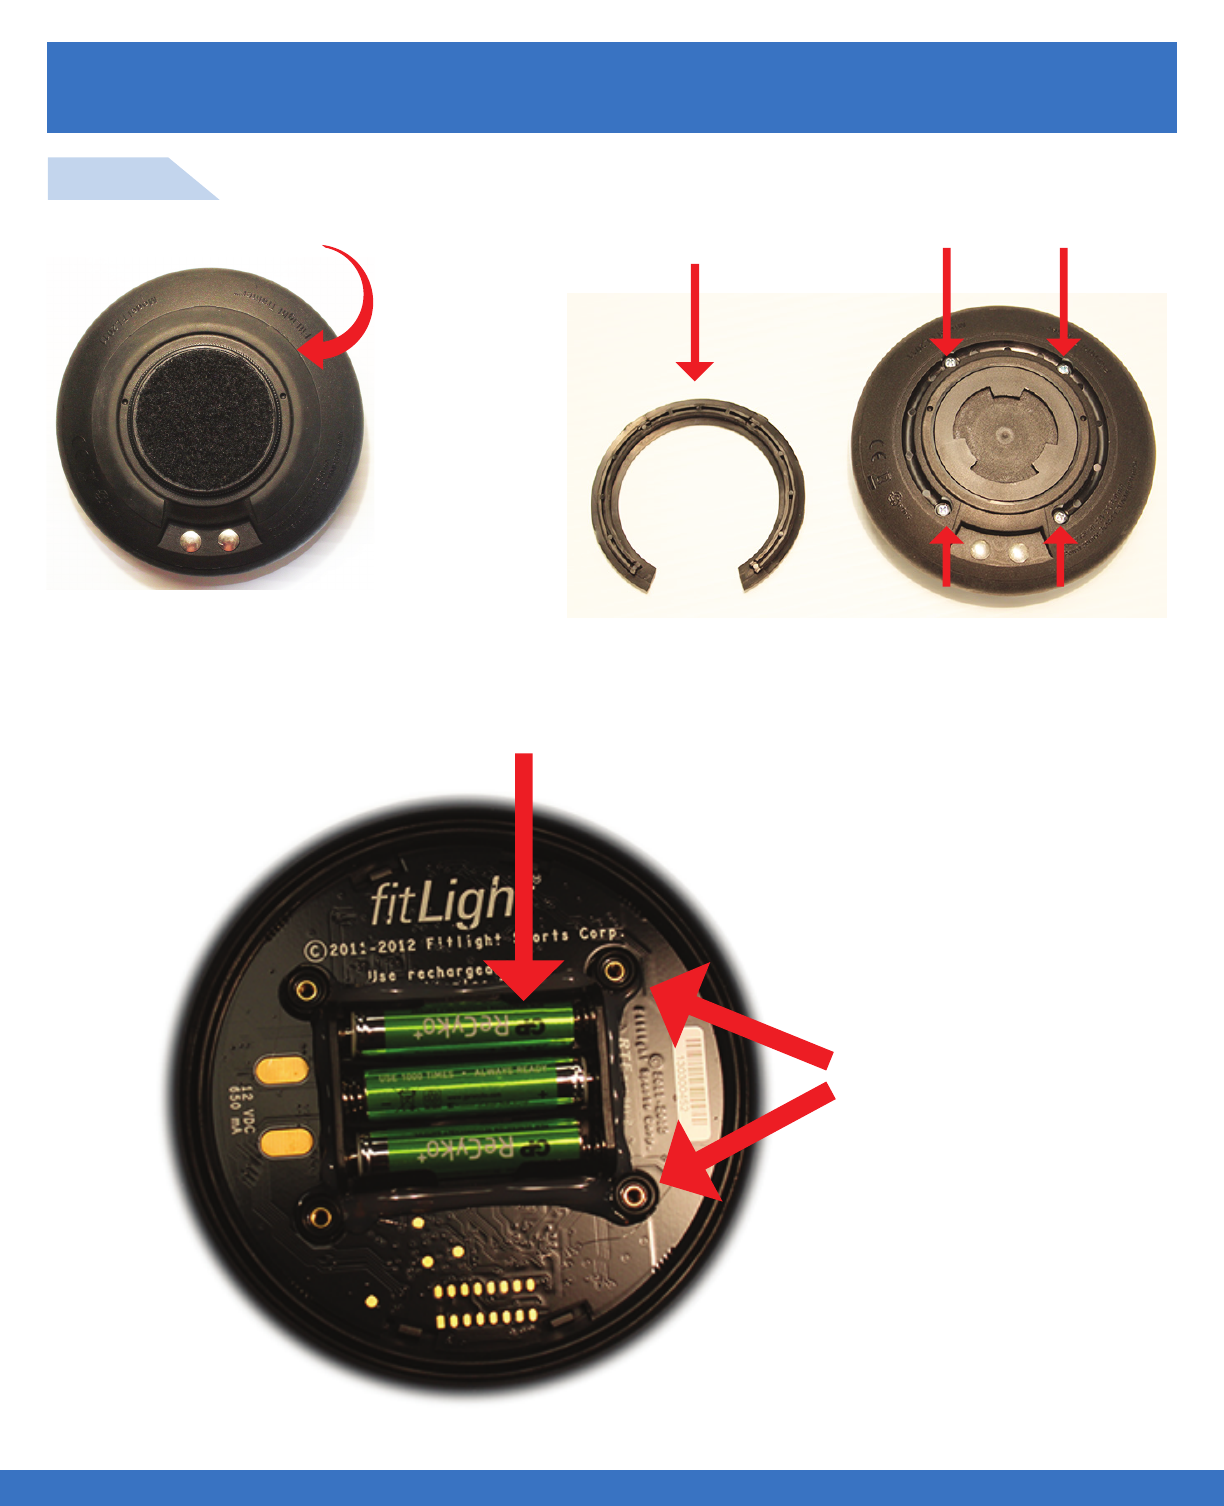
INSTALLING THE RECHARGEABLE BATTERIES
STEP 1
SUPPORT
Remove Rubber Guard
Rubber Guard removed and 4 screws exposed
Unscrew the cover and expose batteries for replacement
NOTE: There are 4 “O” Rings
on the posts of the plastic,
make sure they are not
displaced. These “O” Rings
protect against water entering
the Light.
59
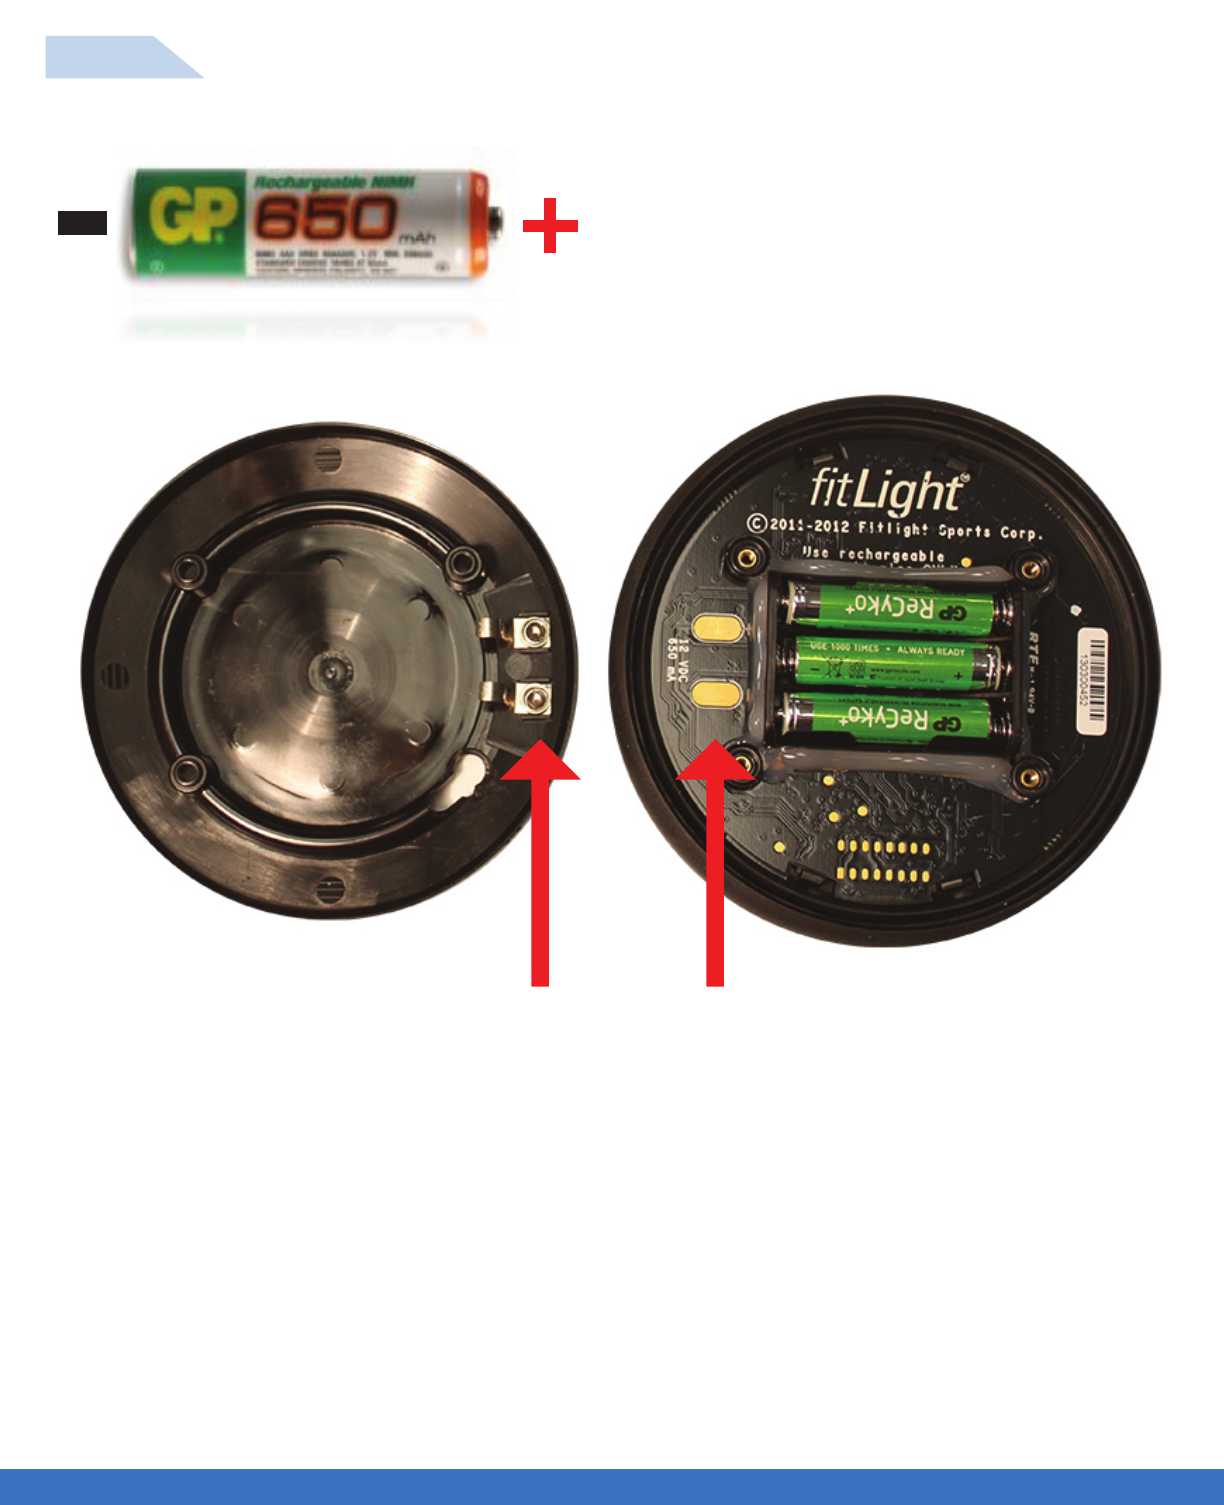
SUPPORT
..................................................................................................................................................................................................................................
SUPPORT
STEP 2
Installation into the FITLIGHTS™
Take special care inserting the batteries as indicated
by the markings on the case, making sure that the
polarity (Positive+ / Negative-) is correctly oriented.
Reverse the process to close the Light. It is important that the contacts on the bottom cover are aligned
with the contacts on the top case.
60
SUPPORT
..................................................................................................................................................................................................................................
MAINTENANCE & CHARGING
BATTERY INFO & SAFETY REQUIREMENTS
Batteries will discharge over time if left unused.
Batteries have a recharge life of typically 600 times.
Keep the battery away from sources of excessive heat such as fire or direct sunlight.
Keep the battery away from sources of high voltage or static discharge.
Do not use or store the battery with other batteries or where it could touch metal.
Do not put the battery into a microwave oven.
Do not allow the battery to be crushed.
Keep the batteries away from children.
Do not disassemble, destroy, or attempt reassembly of the battery.
Do not place or leave the battery in a damp or wet environment.
Do not allow water to touch the battery.
Do not wrap the batteries with conductive material.
Do not incinerate or burn the battery.
Do not leave or discard the battery where it could get wet or become submerged in water.
Do not weld or solder anything to the battery, attach wires, or to the connector.
Dispose of the battery per local / country regulations.
Do not remove the blue protective cover from the Tablet Controller.
Do not store the FITLIGHT Trainer™ in hot areas. Extreme high temperatures can damage
the batteries.
Do not use harsh cleaning solvents to clean the FITLIGHTS™, Tablet Controller or
accessories.
Do not let your system become fully discharged.
Do not use the Charger or batteries if they are damaged.
Do not use batteries or Charger that are not specified for the system.
Do clean the FITLIGHT Training™ System with a damp cloth only for optimum visual
performance
Do keep your system properly charged at all times. The system is never off and so it should
be left charged at all times.
Do charge your system for only 12 hours maximum per single charge.
Do charge your system before every training session.
Do keep the contacts of the Lights clean for optimum charging.
Do turn the system off when not in use.
Do remove the batteries from your system if it will be stored for more than 1 month.
Do try to charge the batteries as close to room temperature as possible for better charging.
Do dispose of batteries as per local regulations.
SUPPORT 61
SUPPORT
..................................................................................................................................................................................................................................
POWER SUPPLY CAUTION / WARNING ELECTRICAL SHOCK
For indoor use only, do not expose to moisture, liquid or heat. Do not use any other power supply with
your FITLIGHT Training™ system.
The System has been tested to and is in compliance to the following standards:
EN 60950-1:2006
EN 62471:2008
EN 62311:2008
FCC CFR 47 Part 15 Subpart C
FCC CFR 47 Part 15 Subpart B
EN 300328V1.7.1:2006
EN 301489-1V1.8.1:2008
RSS-210
RSS102
RSS-Gen
Warning:
Please be aware that the use of the Flashing Option of the lights may cause a reaction to
persons prone to Epilepsy. Please exercise caution when using this option.
SYSTEM SAFETY INFORMATION
The System has been tested to and is in compliance to the following standards:
EN 60950-1:2006
EN 62471:2008
EN 62311:2008
FCC CFR 47 Part 15 Subpart C
FCC CFR 47 Part 15 Subpart B
EN 300328V1.7.1:2006
EN 301489-1V1.8.1:2008
RSS-210
RSS102
RSS-Gen
EU BATTERY DIRECTIVE
SUPPORT 62
..................................................................................................................................................................................................................................
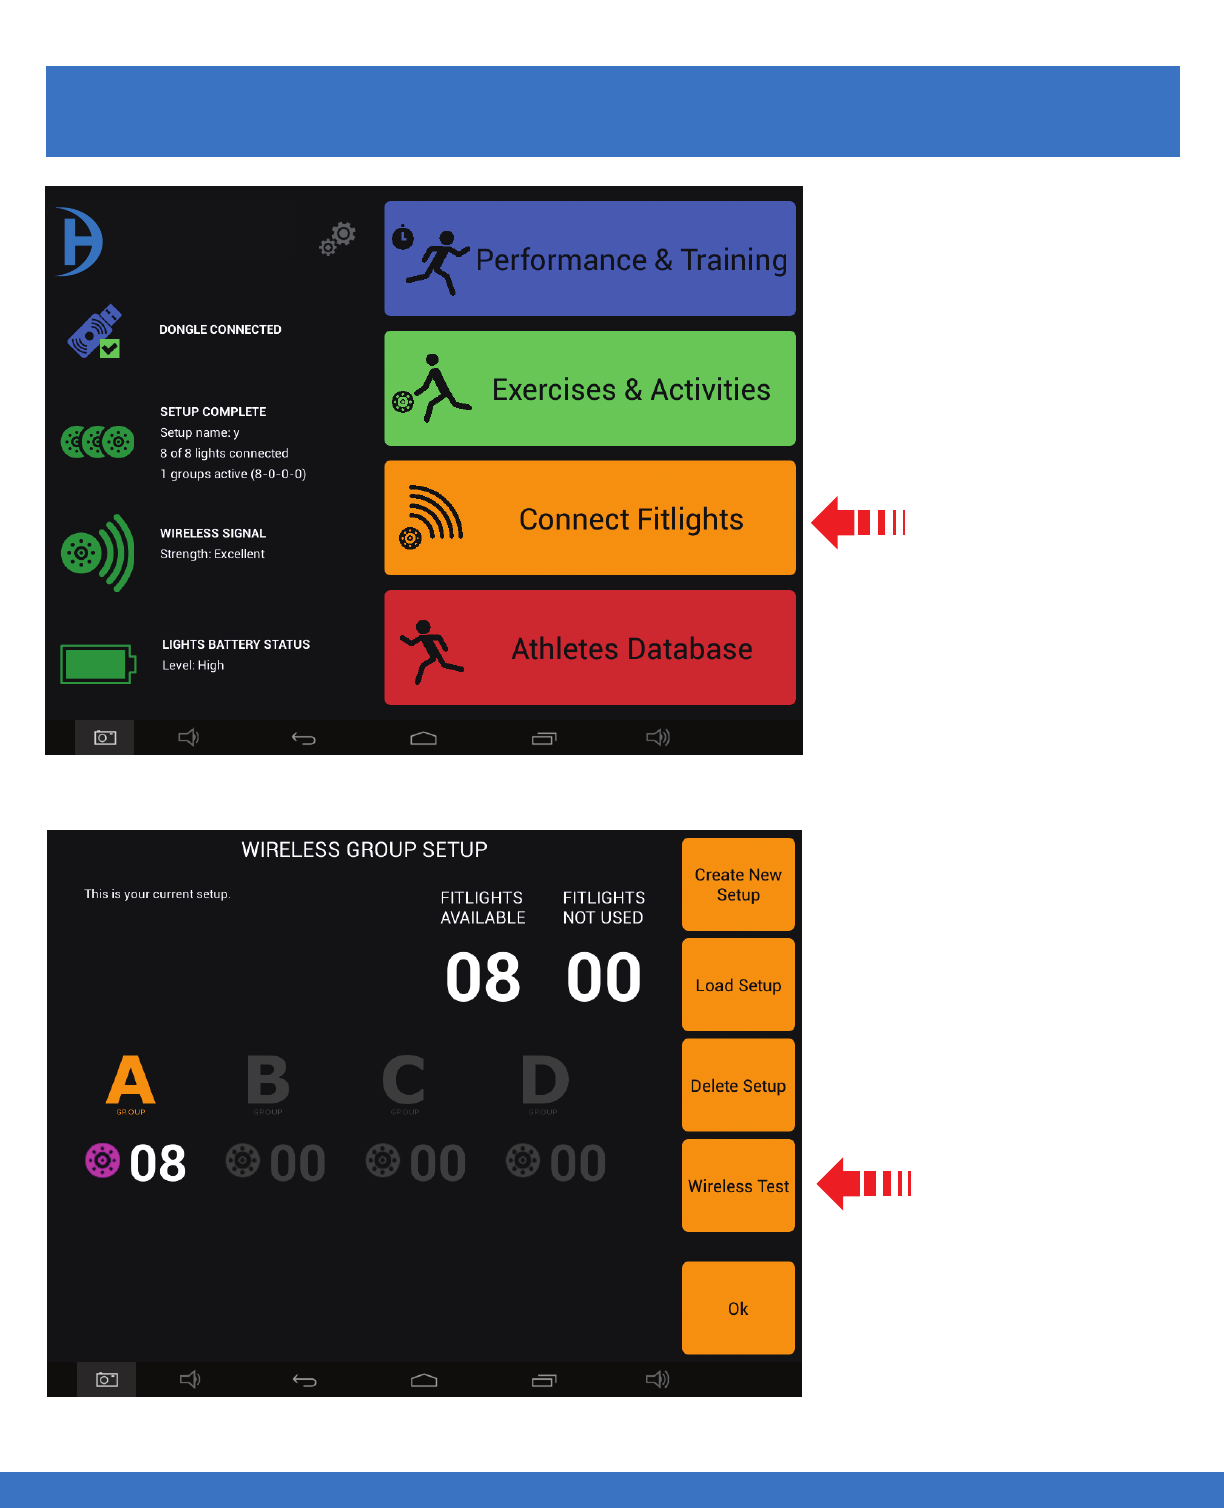
NETWORK & WIRELESS TEST
Select
Connect Fitlights
Select
Wireless Test
NETWORK & WIRELESS TEST
WIRELESS TEST
63
FITLIGHT Trainer™
..................................................................................................................................................................................................................................
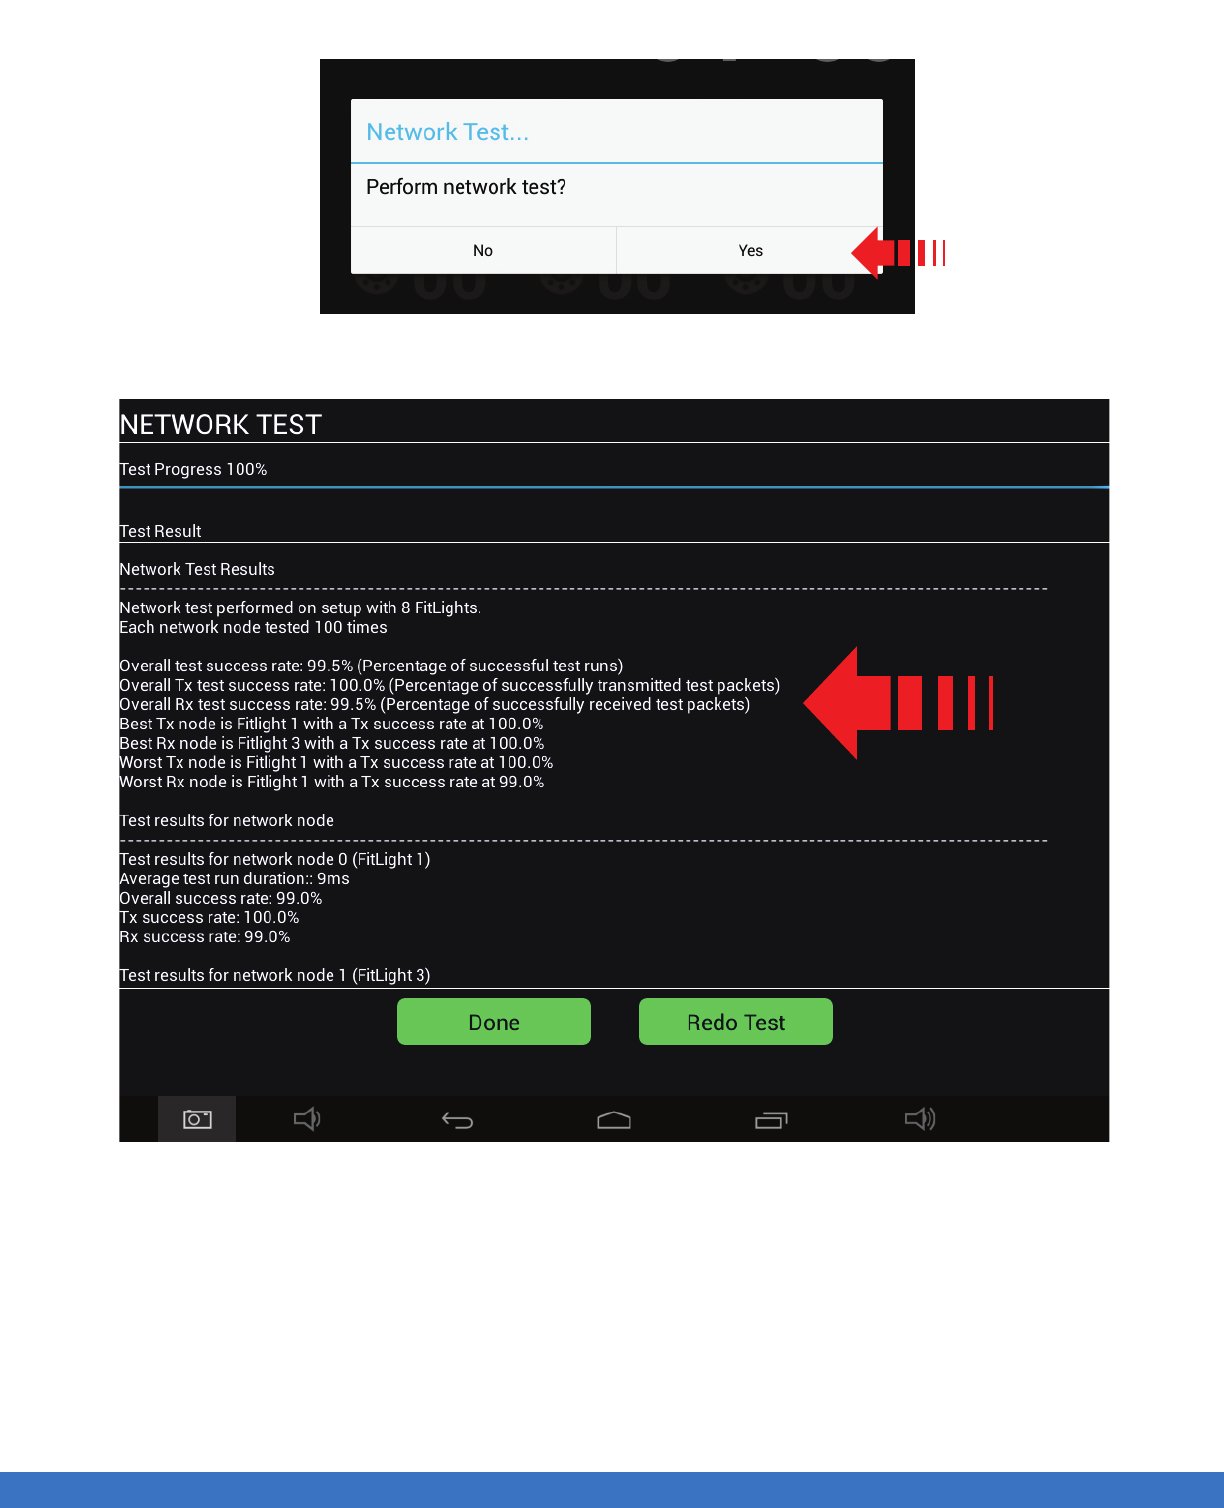
NETWORK & WIRELESS TEST
NETWORK & WIRELESS TEST
Select “Yes”
The results of the test, indicate that the wireless connection is performing to specifications. Should there
be poor wireless connectivity, then Manual Channel selection is recommended. Refer to Wireless Channel
settings for the set up proceedure.
64
..................................................................................................................................................................................................................................
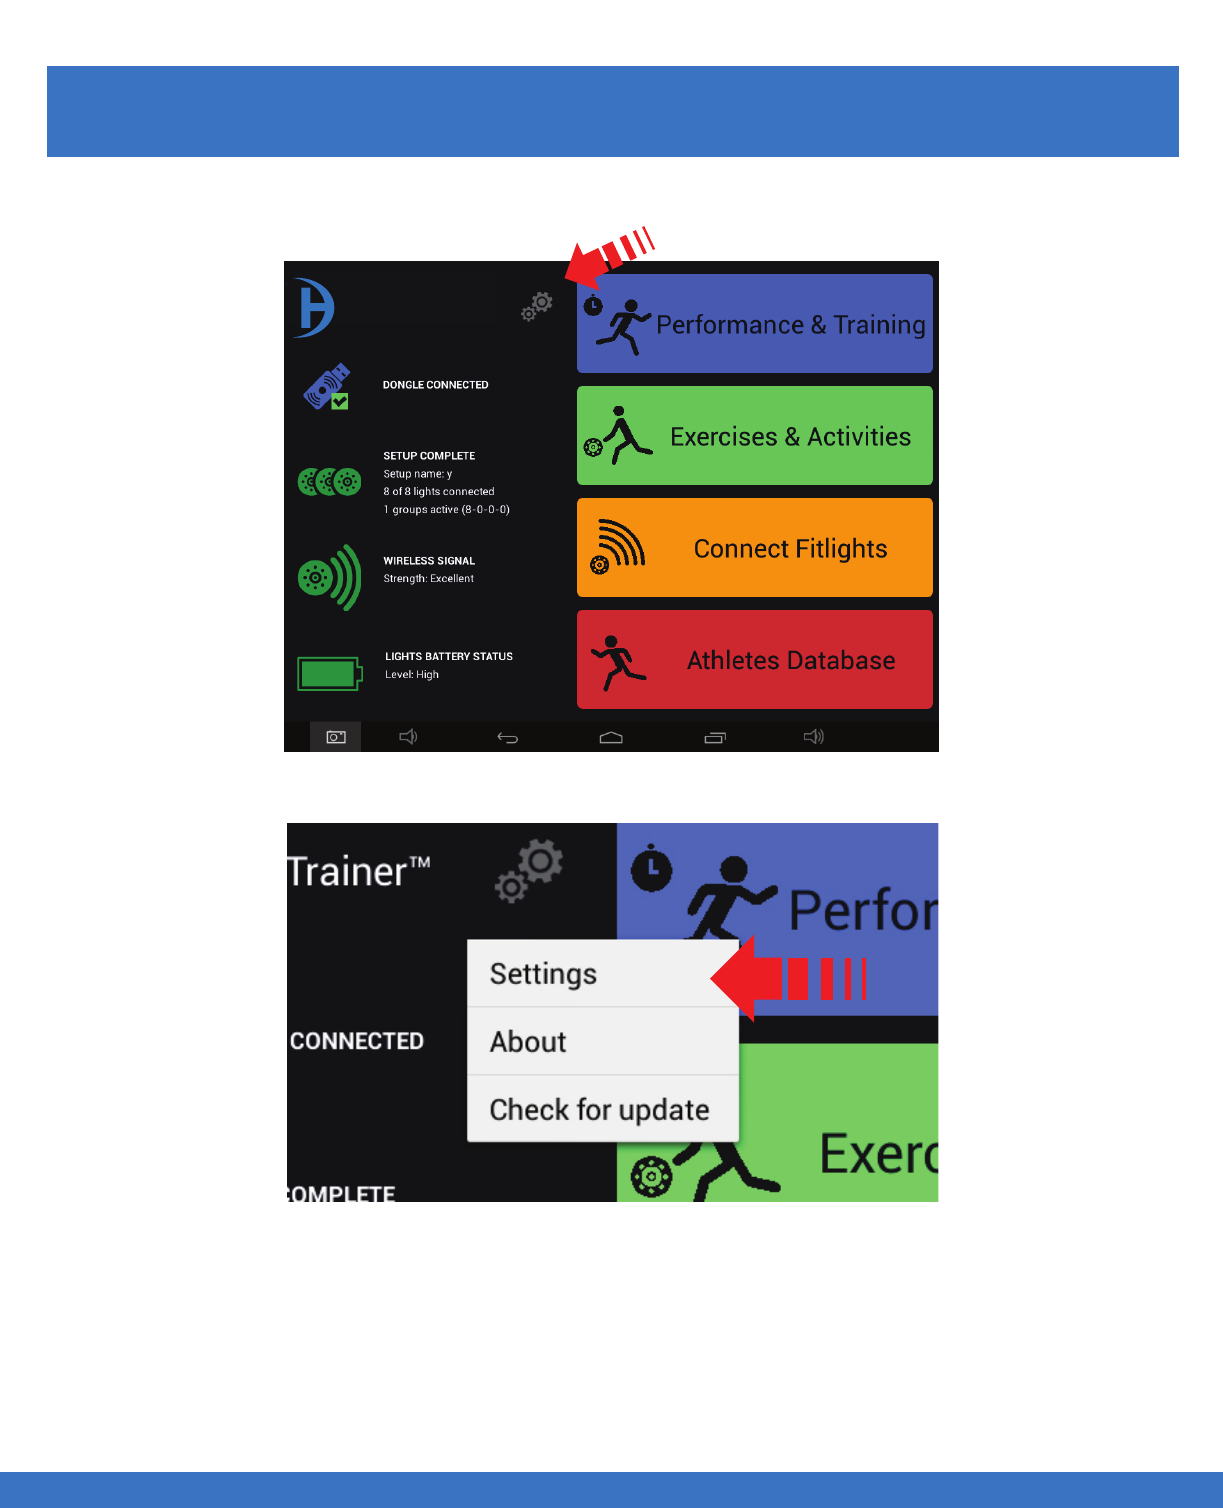
NETWORK & WIRELESS TEST
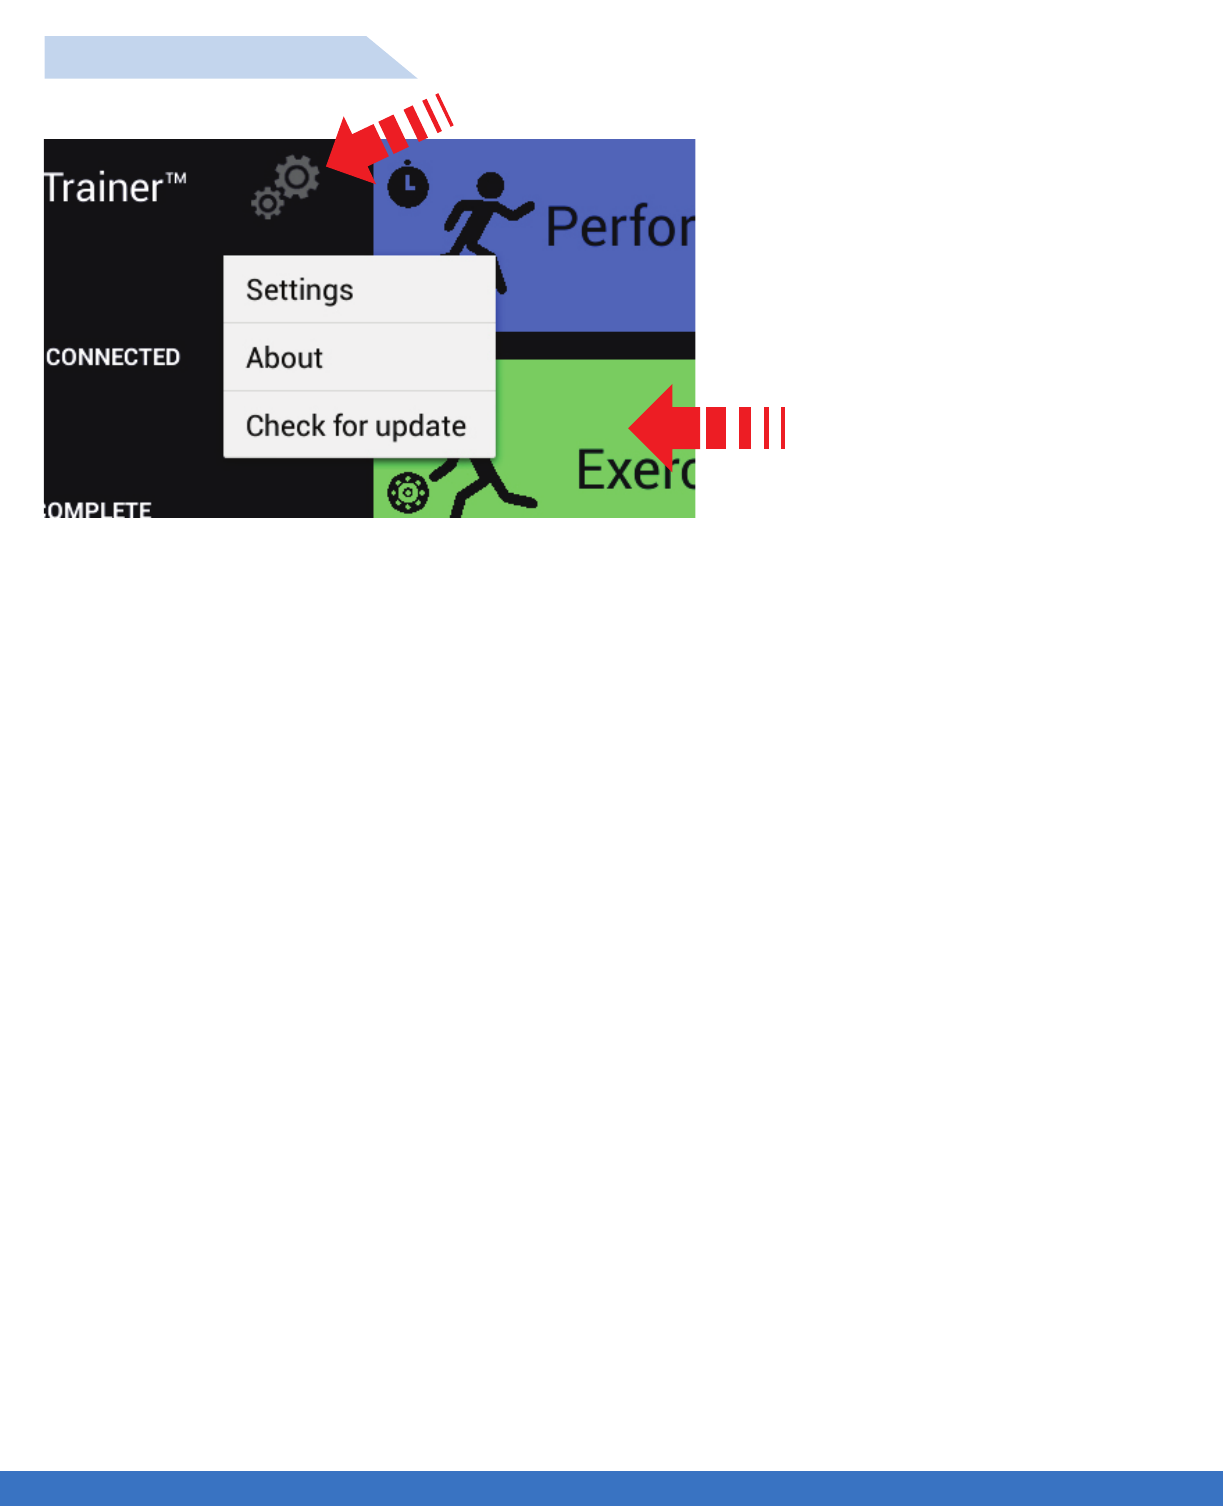
Select the gear icon
Select Settings
NETWORK & WIRELESS TEST
LIGHT SETTINGS
65
FITLIGHT Trainer™
..................................................................................................................................................................................................................................
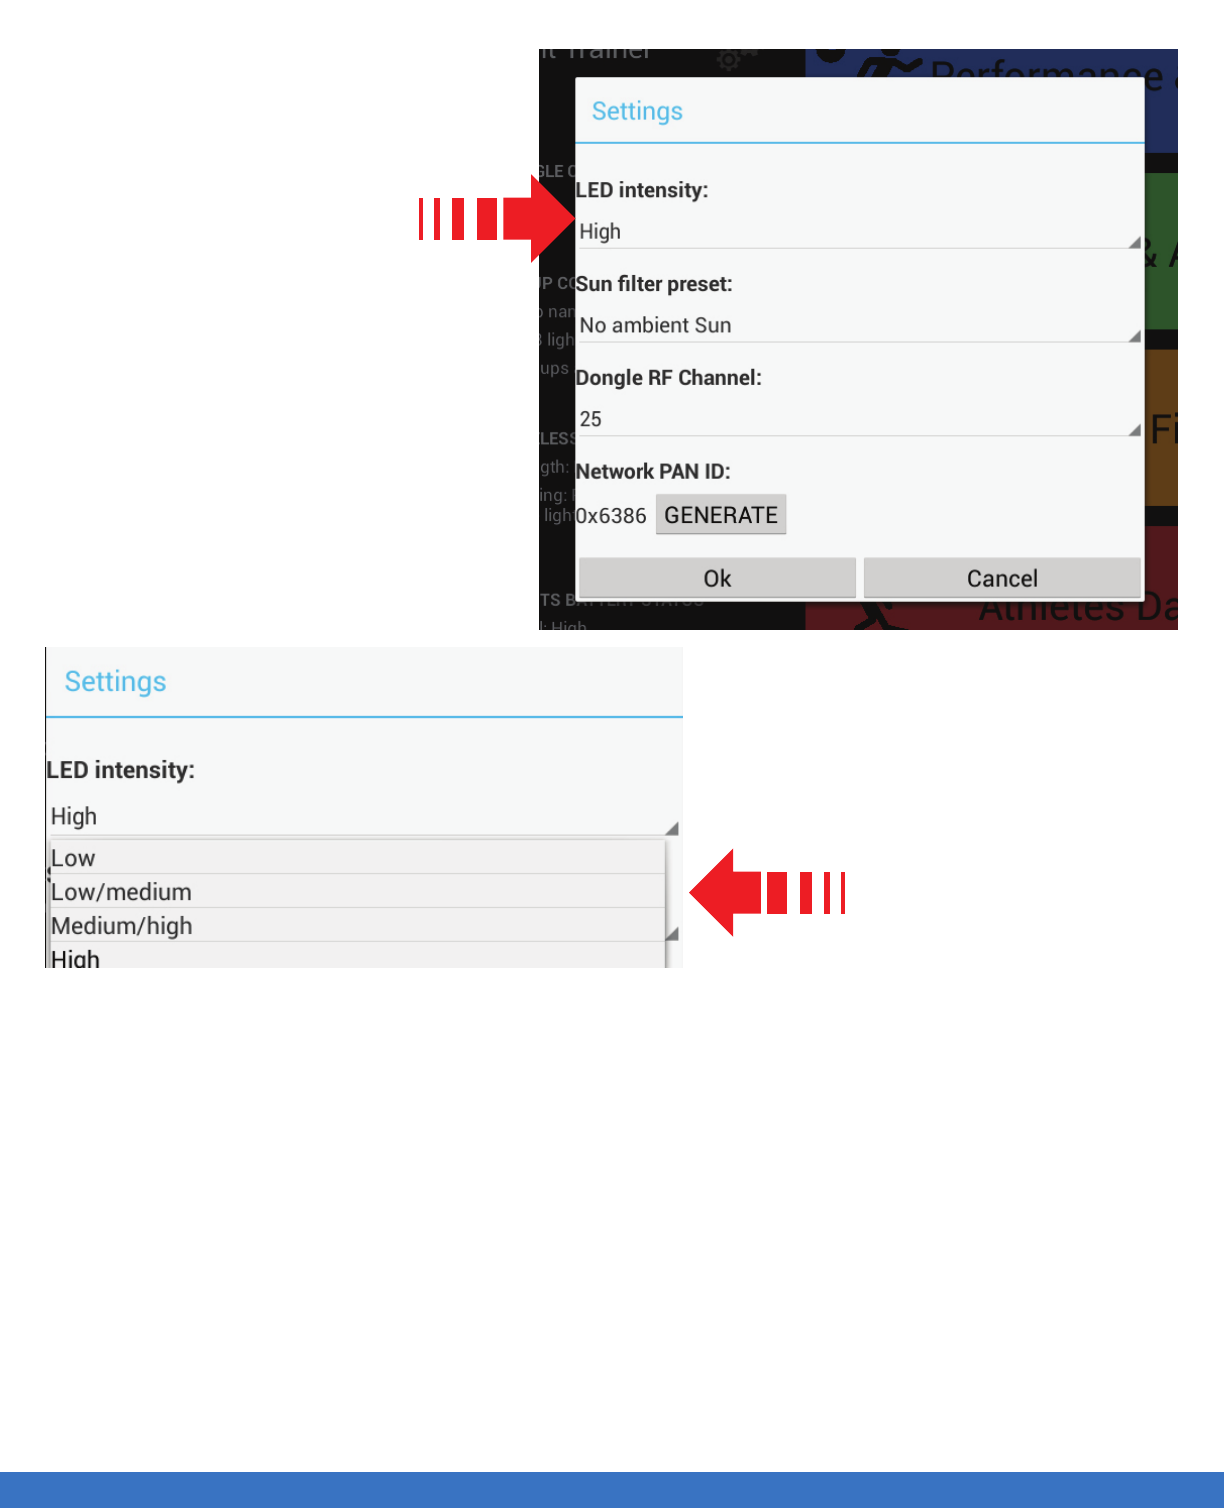
NETWORK & WIRELESS TEST
NETWORK & WIRELESS TEST
Light Intensity Settings are used
to adjust the brightness of the
Lights.
Select “High” to adjust the
brightness of the Light.
Menu will open for intensity
level selections.
A drop down menu will
appear.
66
..................................................................................................................................................................................................................................
NETWORK & WIRELESS TEST
NETWORK & WIRELESS TEST
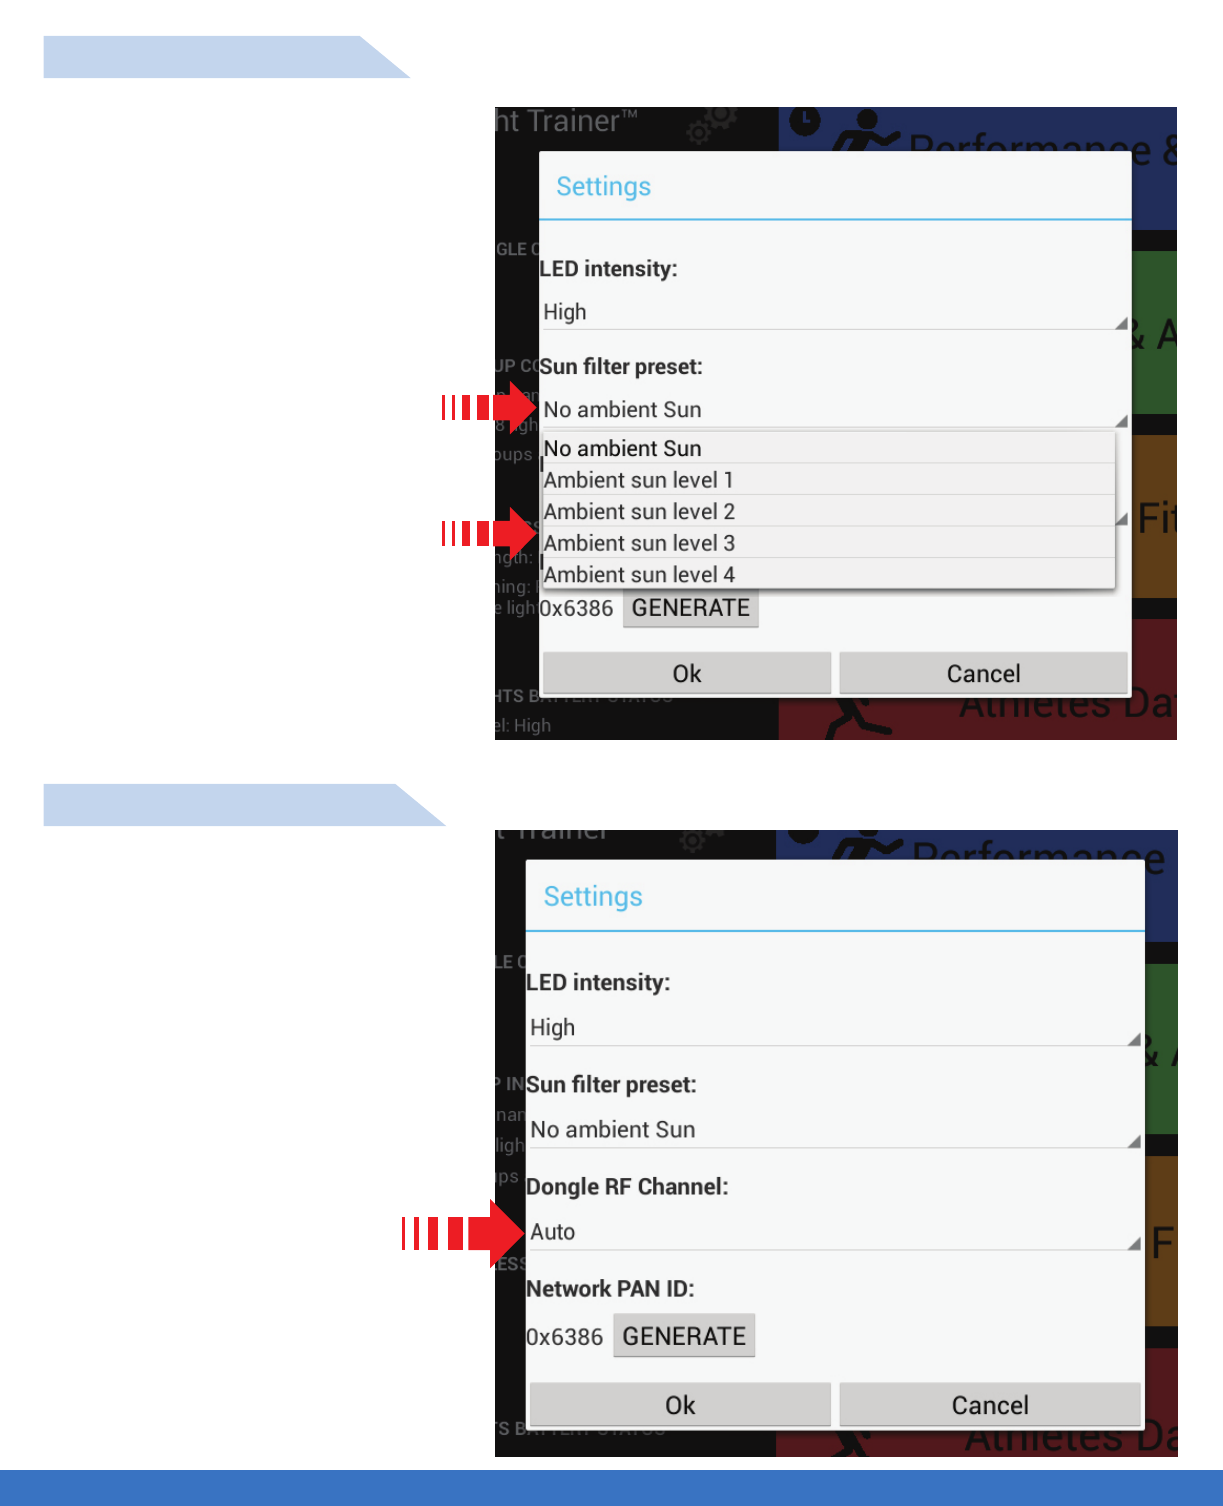
Select No ambient Sun
A drop down menu appears
( as shown ).
Select the level that best suits the
ambient sun that matches the sun’s
intensity.
Note: “No ambient Sun” indicates
no direct sunlight”
Select AUTO to allow the
system to automatically select
the best Channel for the
wireless reception. A drop down
menu will appear to allow
manual selection of the best
channel for wireless reception.
SUNLIGHT SETTINGS
RF CHANNEL SETTINGS
67
..................................................................................................................................................................................................................................
NETWORK & WIRELESS TEST
NETWORK & WIRELESS TEST
SYSTEM SOFTWARE
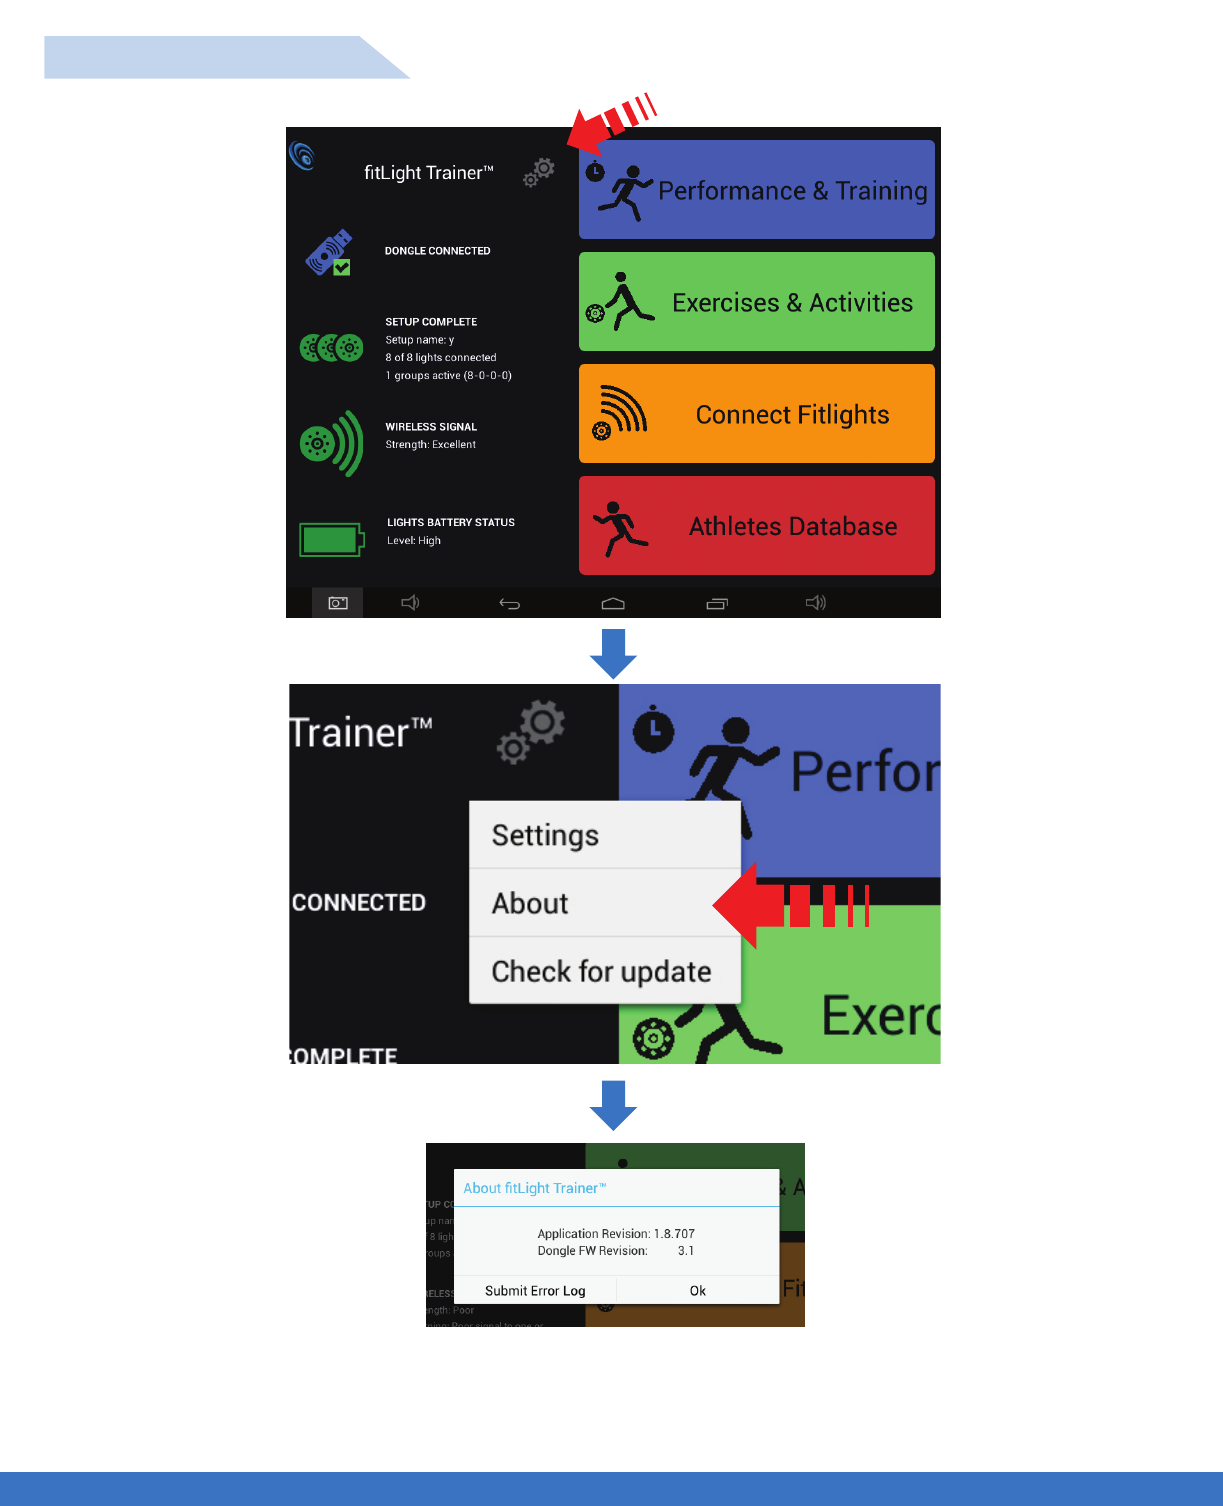
Select the gear icon
Select About
Shows the information on the current level of software loaded
onto your system. This is useful to know when upgrading the
new software to your system.
68
..................................................................................................................................................................................................................................
NETWORK & WIRELESS TEST
NETWORK & WIRELESS TEST
SOFTWARE UPDATES
Select the gear icon
Select Check for update
69
