FLAIR OWNERS MANUAL V1.05 02202018
2018-02-20
: Flair Flair Owners Manual V1.05-02202018 FLAIR OWNERS MANUAL v1.05-02202018 Public s
Open the PDF directly: View PDF ![]() .
.
Page Count: 44
Owner’s Manual


Table of Contents
Getting Started 5
Quick Start 5
Install the Flair App 5
WiFi 5
Rooms, Integrations, and Settings 6
Puck 7
Installation 7
Configuration 7
Making A Puck A Gateway 7
Factory Reset 7
Forgetting WiFi 8
Adding Pucks to Your Home 8
Communications 10
Firmware Updates and IR Downloads 10
Firmware Versions 10
Vent 12
Installation 12
Light Bar 12
Automation 13
Add to Existing Network 13
App 14
Installing the App and Signup 14
Accessing the API 14
Initial Setup 14
Creating a Home 14
Integrations 15
Setting Up WiFi 16
Adding Devices To Your Home 16
IR-Device Setup 16
Deleting a Home 16
System Configuration 18
Zones 18
Zone Verification 18
2

Manual Mode 19
Auto Mode 19
Selecting Manual/Auto Mode 19
Temperature Set Point 20
Set Point Controller 21
Set Point Mode 21
Home/Away Mode 22
Holds 22
Home and Away 23
Manual 23
Auto 23
Away Modes and Options 24
Off Only 24
Smart Away 24
Away Temperature Minimum 24
Away Temperature Maximum 24
Preheat/Precool 25
Frequently Asked Questions and Troubleshooting 26
General 26
WiFi 28
IR 29
Puck 30
Vents 31
Setup Mode 32
Power Adapters and Cables 33
Batteries 33
Contact Us 34
Glossary 35
Support 41
Legal 42
FCC Statement 42
Canada Statement 42
Privacy Policy 42
Warranty 42
Quebec Warranty 42
3


Getting Started
Quick Start
1) Install the Flair App
Install our App from the Apple App Store or the Google Play Store. You can also use
our web application on mobile and desktop browsers.
Register for an Account and Log In.
(Note: You may already have a Flair account if you have used our Forum or API)
Browser my.flair.co
iOS flair.co/ios
Android flair.co/android
2) WiFi
FIRST-TIME SETUP
To set up your first Puck (known as a Gateway Puck), plug it in using the Flair power
adapter and follow the instructions in the App for Connecting to WiFi. Make sure
your other Flair Pucks and/or Smart Vents are powered on and installed.
Alternatively, you can follow along with our video setup guide at flair.co/videosetup.
You only need to setup your first Puck on WiFi. Additional Pucks should be left as
Sensor Pucks, unless you have a large system of 9 or more Flair devices. If you have 9
or more Flair devices (Smart Vents plus Pucks), please visit flair.co/large-systems to
determine if you need additional Gateways.
5
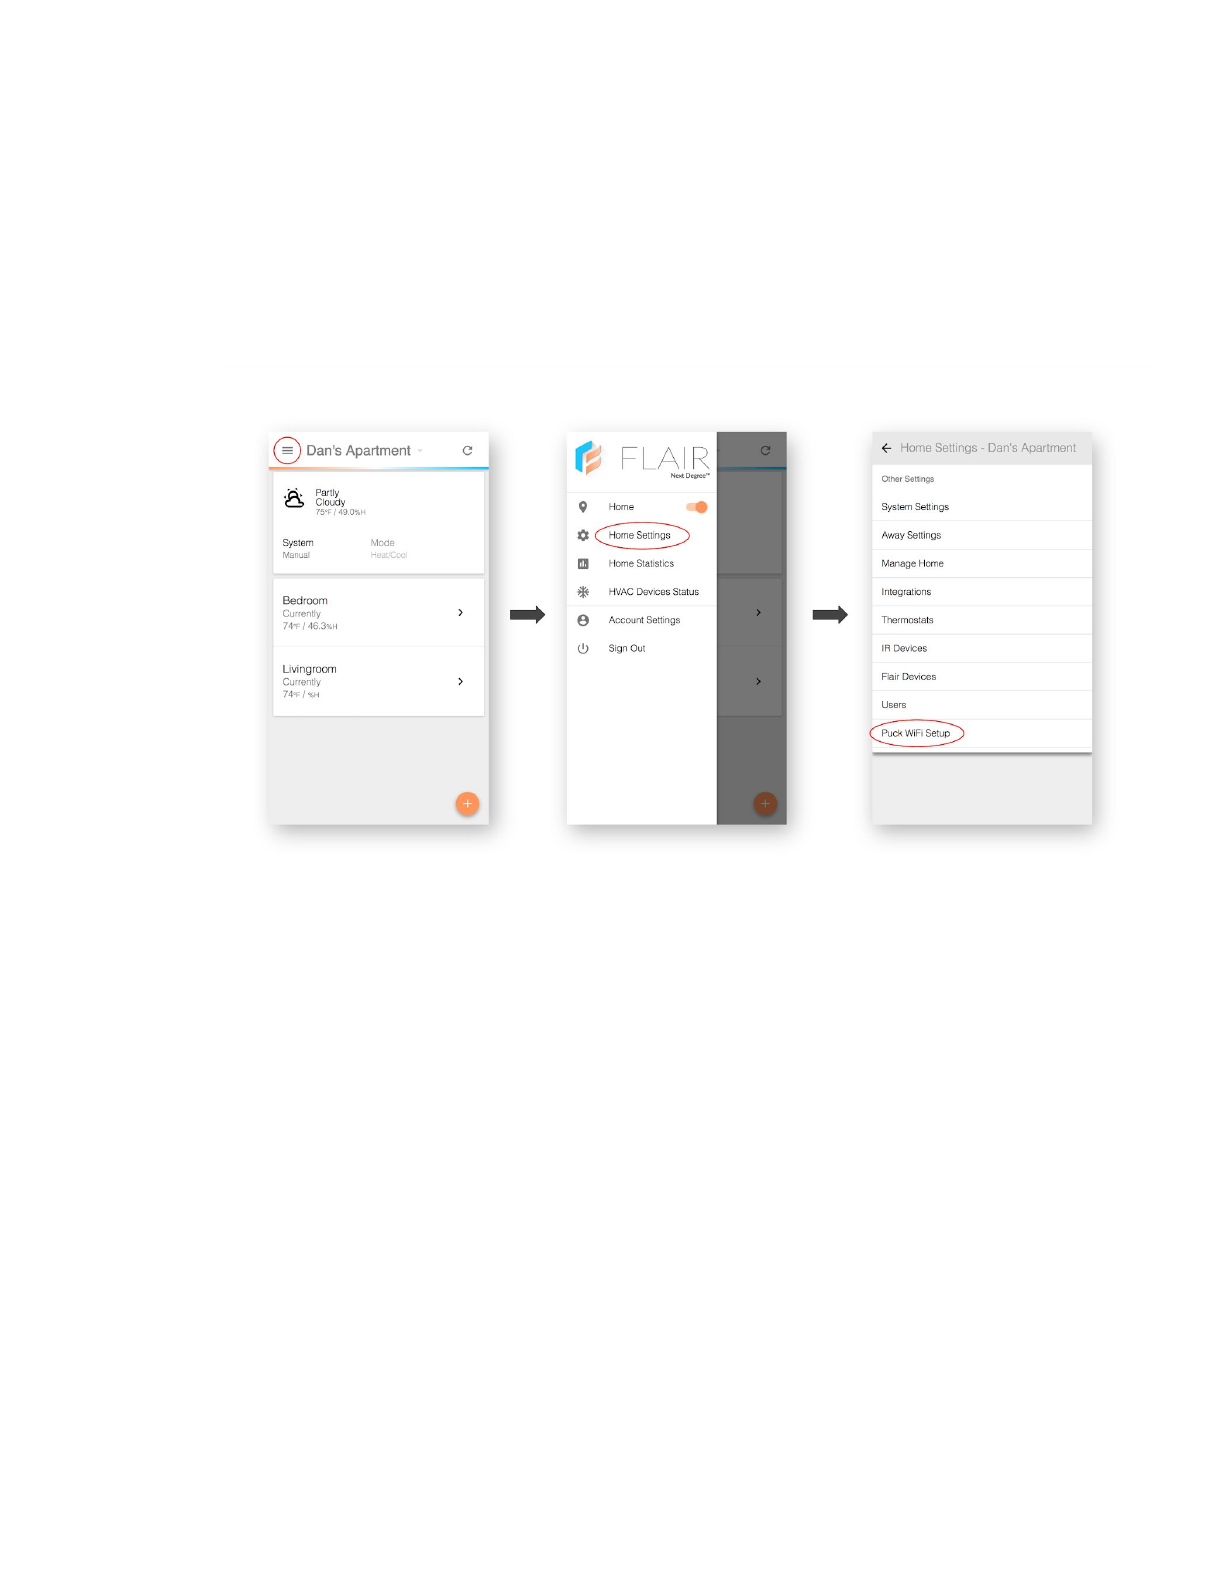
MAKING CHANGES
If you need to make a change to your WiFi settings at anytime, go to:
Home Settings → Puck WiFi Setup.
Change WiFi settings:
3) Rooms, Integrations, and Settings
In the App, you can create rooms, associate devices with rooms, set up integrations,
and set your preferred settings.
For more info on the App settings and system configurations, refer to the sections on
the App and System Configuration in this manual
6
Puck
Installation
For installation instructions, review the included instruction booklet or download
them at: flair.co/puck-manual.
Configuration
MAKING A PUCK A GATEWAY
A Gateway Puck is the internet-connected hub for your Flair system. A
Gateway Puck is powered by AC power and communicates to the Flair Cloud
via WiFi.
Gateway Pucks have all the same functionality as Sensor Pucks, but also
bridge Sensor Pucks and Smart Vents to the internet.
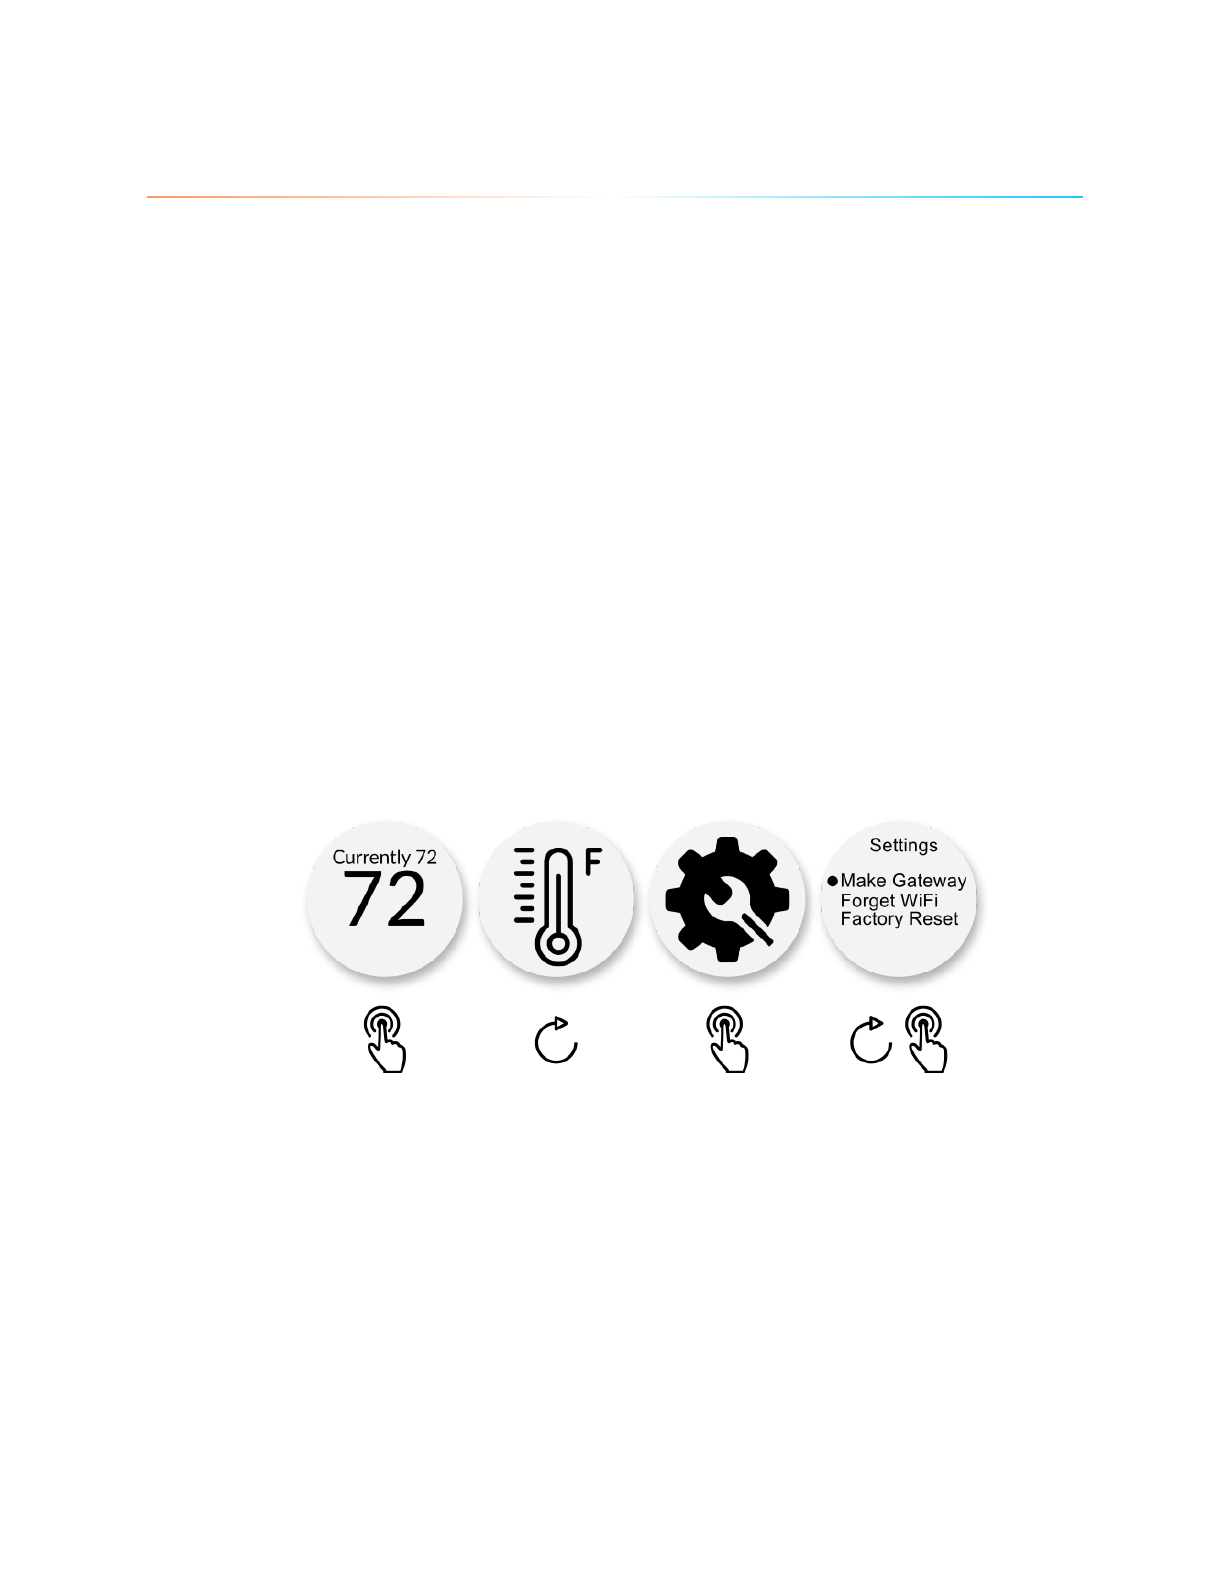
Set up a Gateway Puck:
FACTORY RESET
A Factory Reset is primarily used to put the original firmware onto the device.
If you are having other issues with connectivity, responsiveness, or IR, it’s
possible, but highly unlikely that a factory reset will solve the issue.
7
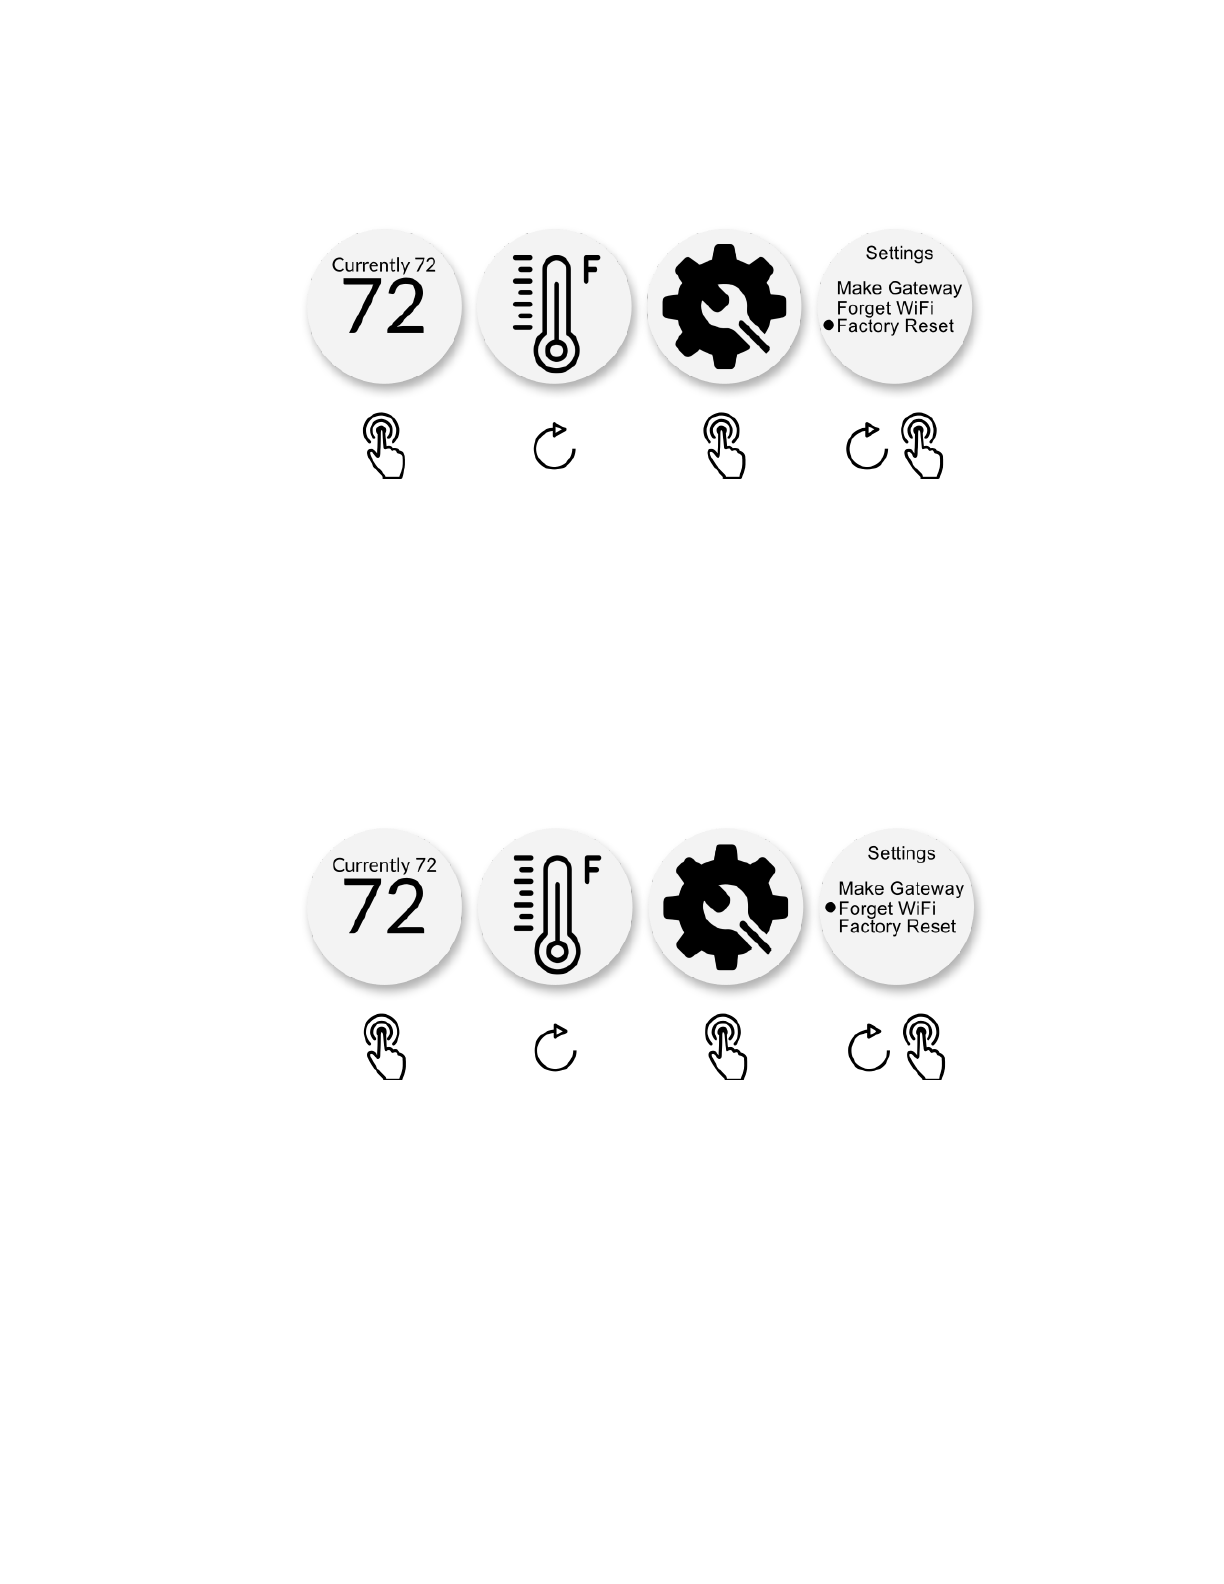
Conduct a factory reset:
FORGETTING WIFI
You may want your Gateway Puck to forget WiFi if you would like to change
the WiFi network with which a Gateway Puck is associated. You can also use
this feature if you are changing the home with which a Flair Network is
associated.
Make a Puck forget a WiFi network:
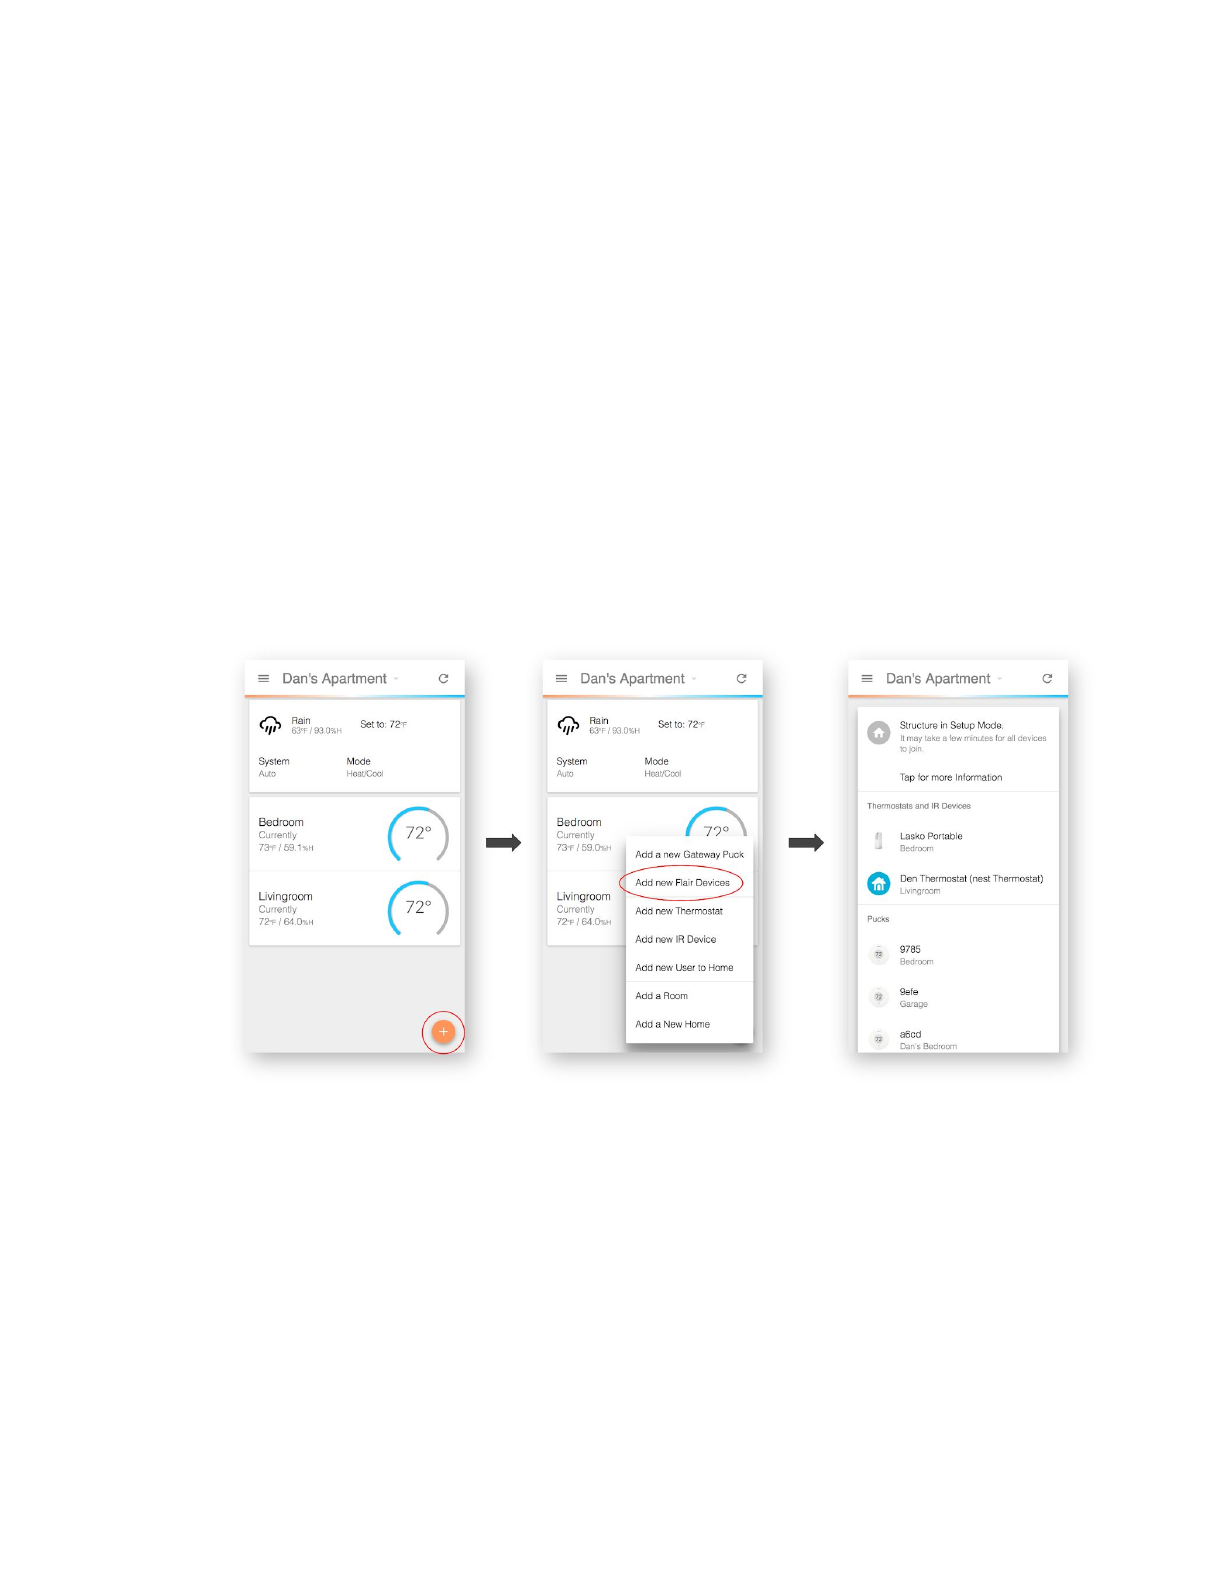
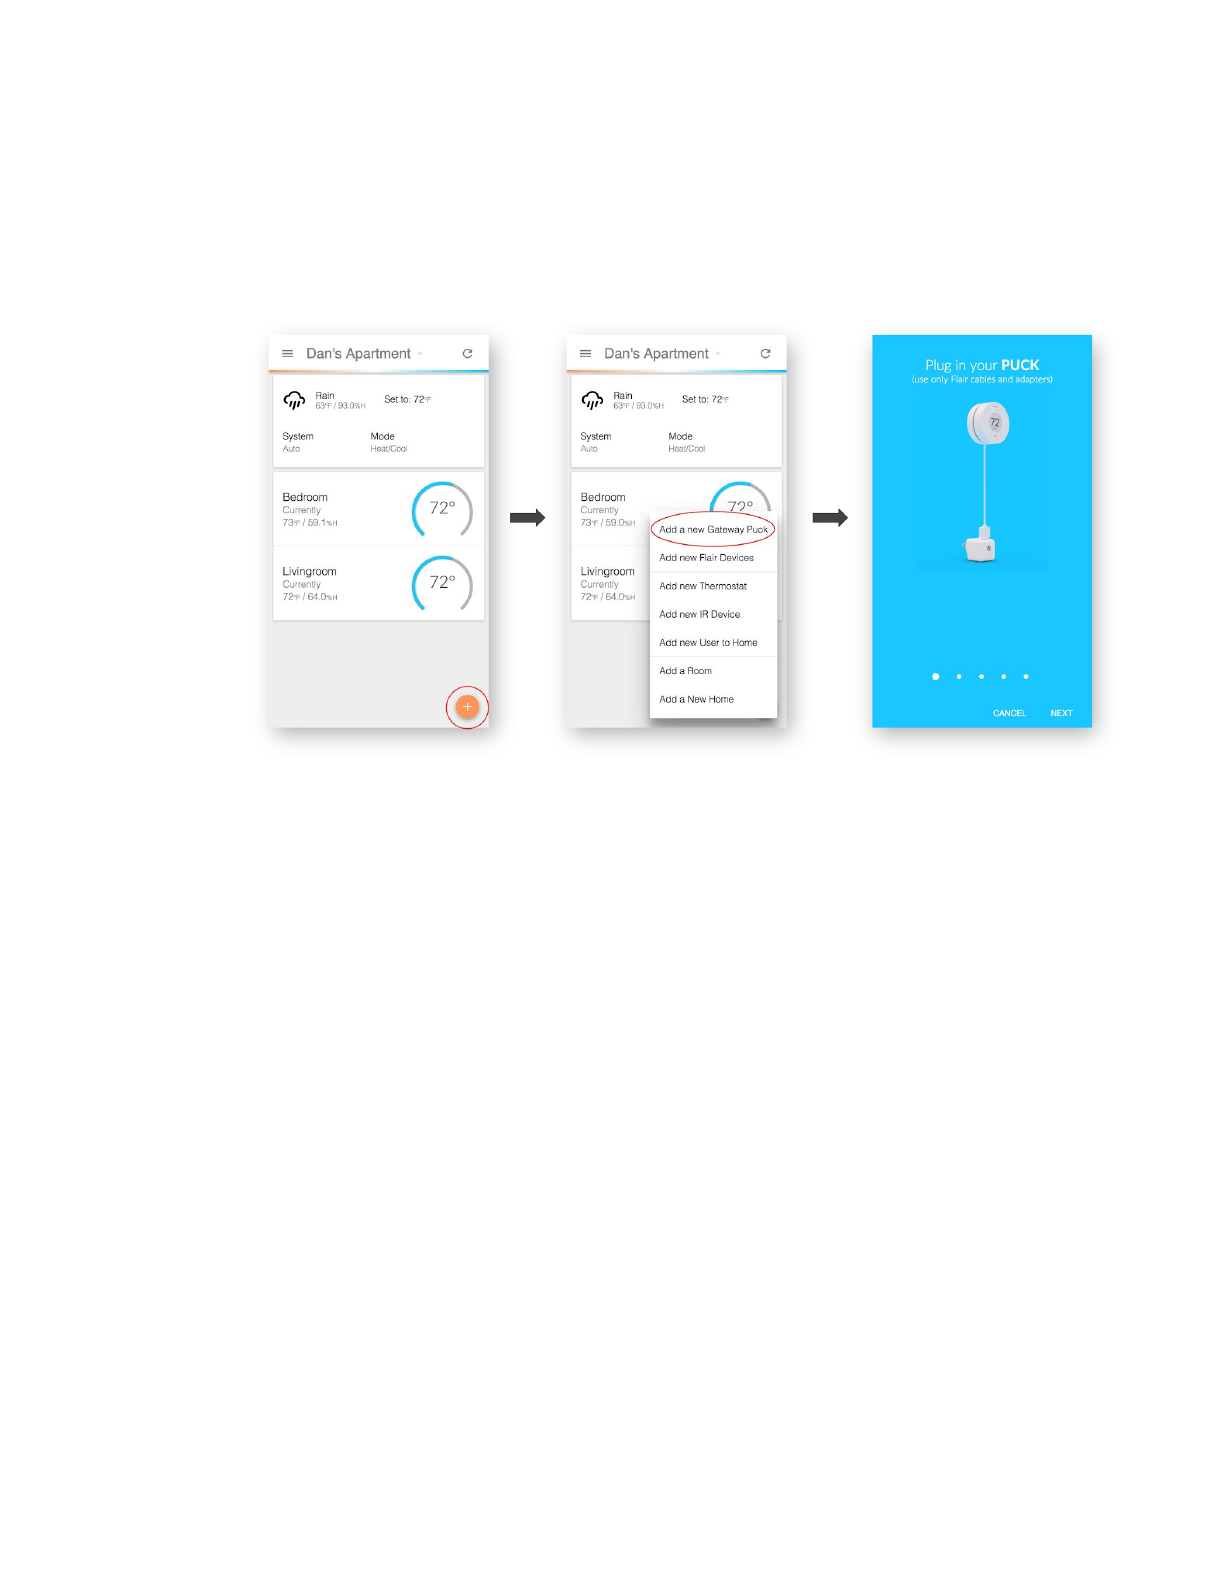
Adding Pucks to Your Home
To add more Pucks to your home, navigate to the Flair App on your browser or
device. On the App home screen, click the + button, followed by Add new Flair
Devices. After a few minutes, you should see a unique code on the Puck screen. A
matching Puck (with the unique code) will also appear in the App. Assign the new
Puck(s) to the appropriate room(s) and exit Setup Mode.
8
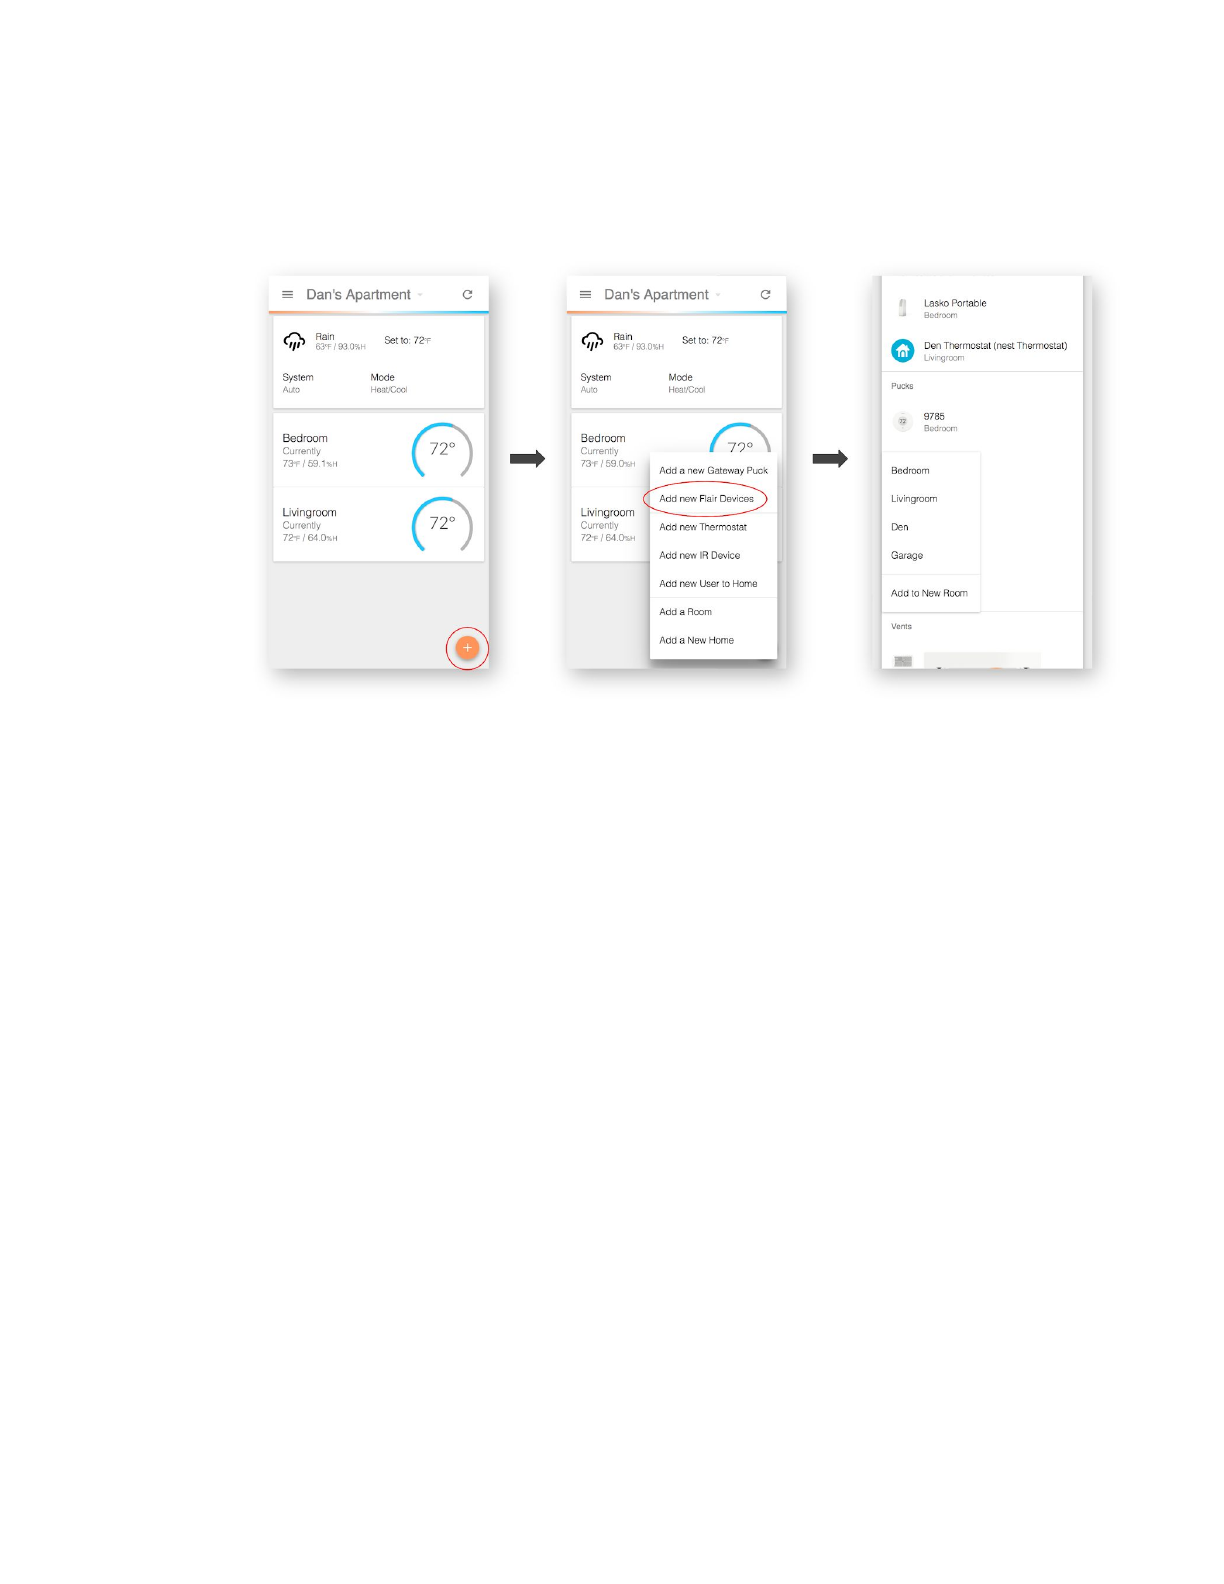
Add Pucks to your home:
9

Communications
Flair Devices communicate with each other using 915MHZ radios (in North America).
The expected range between Flair devices is at least 80 meters (approximately 262
feet). Range may vary due to placement and the number of RF-impeding structures
(large metal objects, etc.). Flair uses Bluetooth as Beacons and zero-configuration
temperature-information broadcast. Gateway Pucks use WiFi to relay information
between between the Flair App, the Flair Cloud, integrations, and devices. For talking
to Minisplits, Window ACs, Portable heaters/ACs, fans, and/or AV devices, the Pucks
use built-in IR (infrared) blasters.
Firmware Updates and IR Downloads
Flair periodically releases firmware updates to add features, improve security, or
resolve issues. Firmware updates are downloaded over WiFi and only take a few
seconds to install. When a new firmware version is available, you will be notified via
email. These updates will only download and install after your click a link to confirm
installation.
Firmware updates require WiFi. In some instances, Flair’s radio range is larger than
the range of most WiFi networks. This means that a Puck may operate normally, but
may be unable to download firmware updates without temporarily being moved
closer to your WiFi router. In this scenario, we will send a second email letting you
know that your Puck was unable to update. The email will include further instructions
on how to solve the problem.
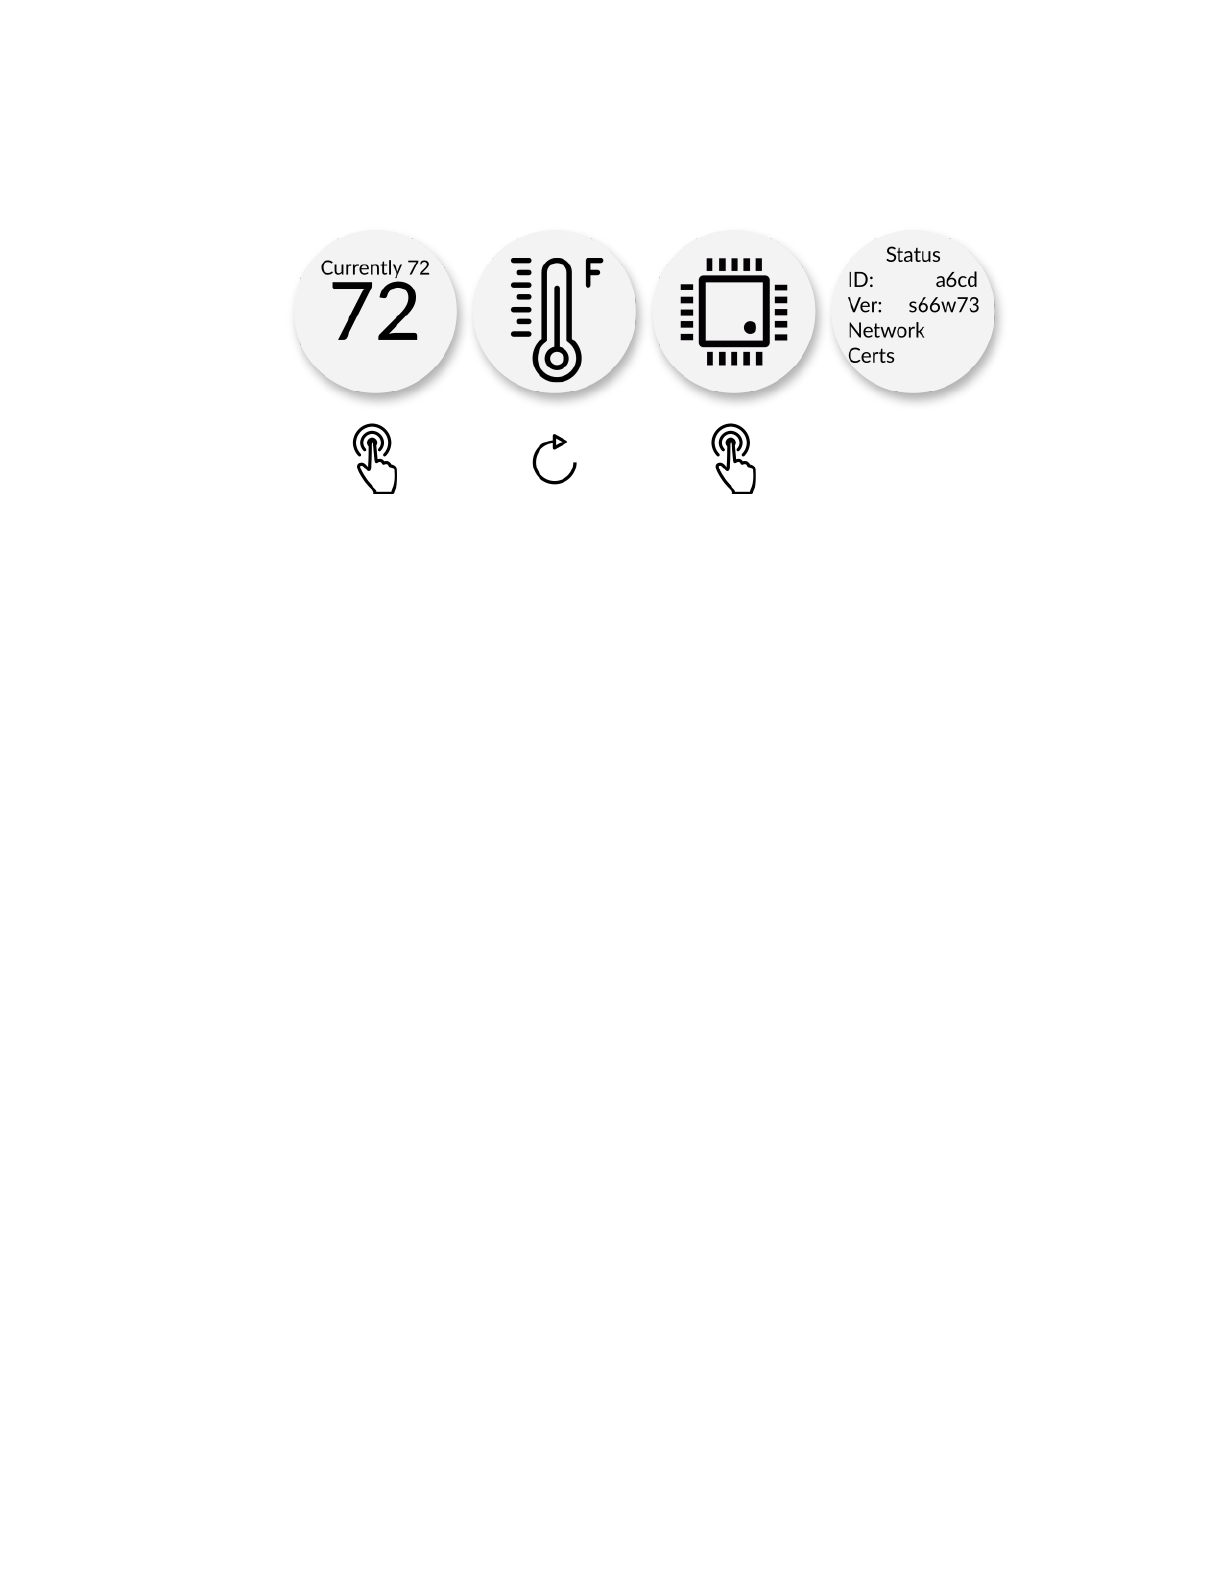
Firmware Versions
You can check the firmware version on any Puck by navigating to the Status screen on
the device. The firmware’s version number will be different for Gateway and Sensor
Pucks. The row labelled “Ver:” contains the firmware version number.
10
Check firmware version:
11
Vent
Installation
Refer to flair.co/vent-manual for more information on installation, including
information on how to wire Smart Vents to 24 VAC power.
You may also want to watch our Smart Vent installation video at
flair.co/vent-installation-video
Light Bar
Flair Smart Vents use a Light
Bar to help identify the unit.
The Light bar is used during
installation, setup, room
association, battery changes,
and troubleshooting.
You can activate the Light Bar
pattern at any time by enabling
Setup Mode in the App.
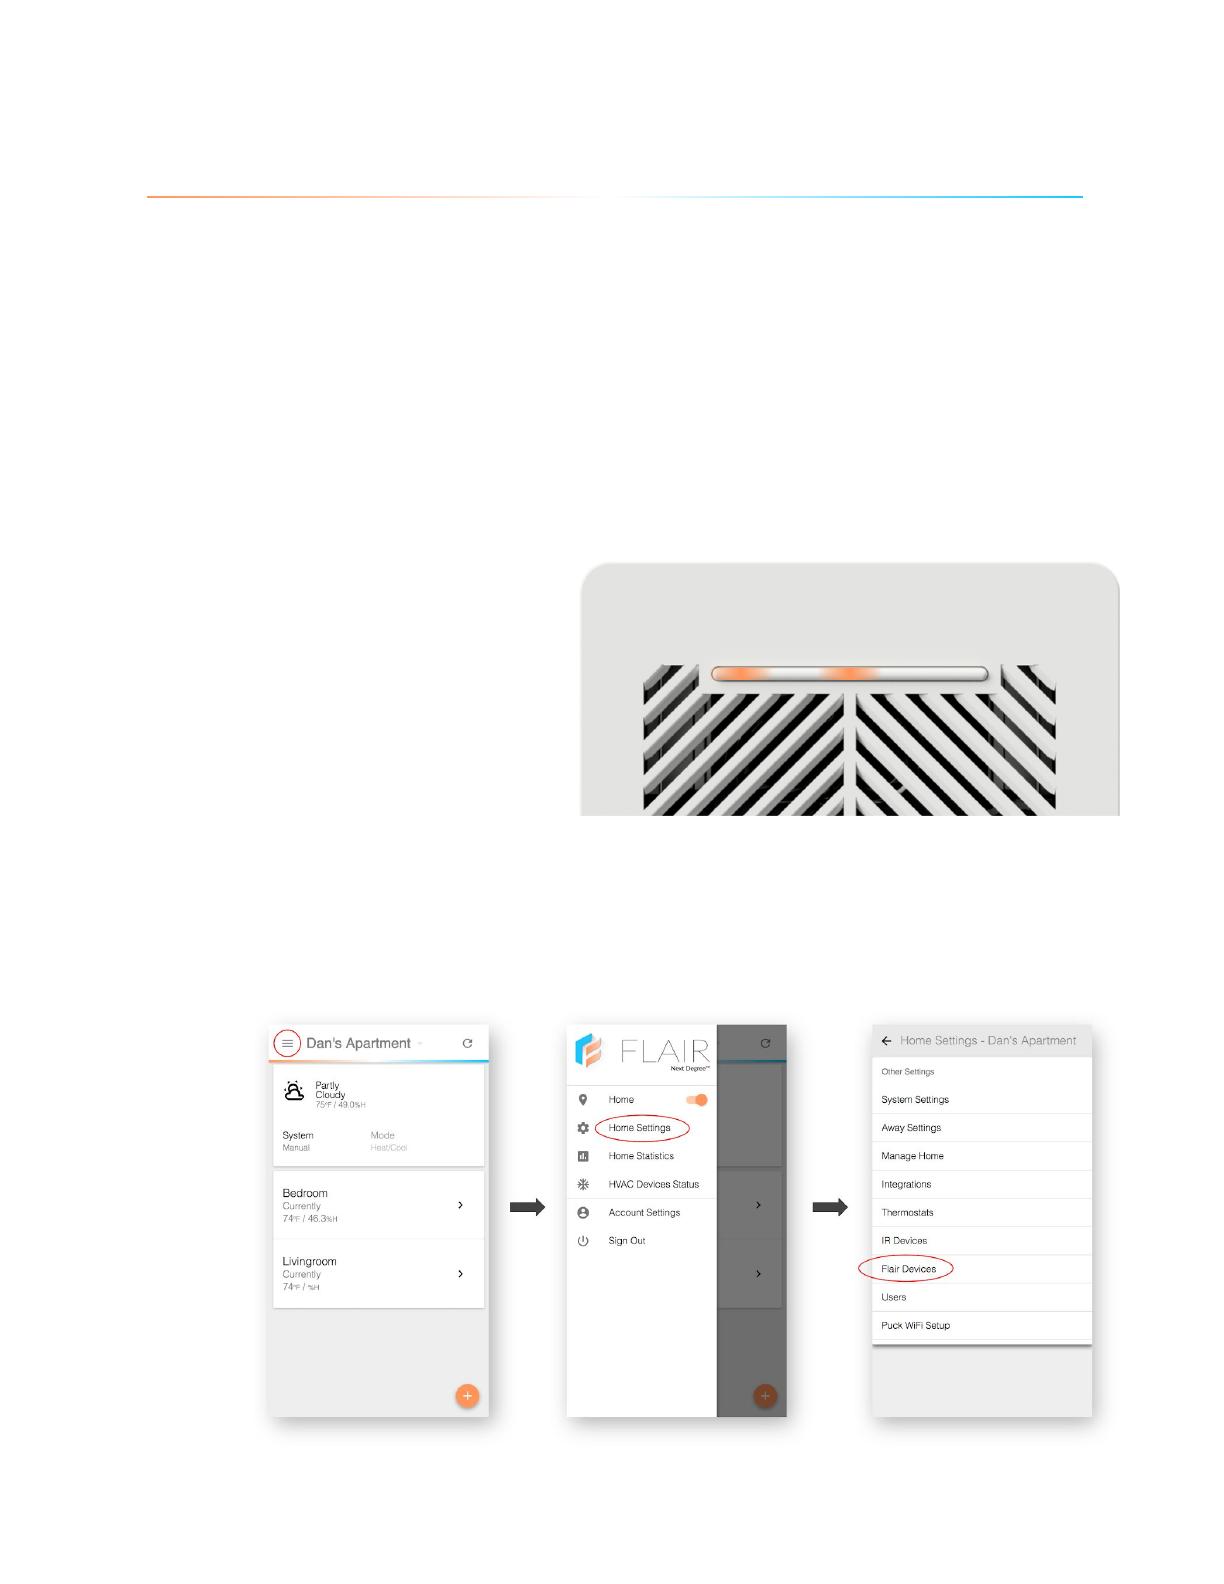
Navigate to Home Settings → Flair Devices.
Activate the Light Bar:
12
Automation
When Flair is in auto mode, your Smart Vents will automatically open and close based
on a number of factors, such as temperature and occupancy. Flair Smart Vents also
record pressure and temperature in the duct to collect system information, detect
performance changes, and provide diagnostics for advanced users and HVAC
installers.
Add to Existing Network
To add more Smart Vents to your home, navigate to the Flair App on your browser or
device. On the App home screen, click the + button, followed by Add New Flair
Devices.
Add Smart Vents to your home:
After a few minutes, you should see a unique pattern on the Smart Vent Light Bar. A
matching Smart Vent (with the unique pattern) will also appear in the App. Assign the
new Smart Vent(s) to the appropriate room(s) and exit out of setup mode.
13

App
Installing the App and Signup
Install the Flair App from the Apple App Store or the Google Play Store. You can also
use our web application on mobile and desktop browsers.
Register for an Account and Log In.
(Note: You may already have a Flair account if you have used the Flair Forum or API)
Browser my.flair.co
iOS flair.co/ios
Android flair.co/android
Accessing the API
Flair has a full-featured REST API available at api.flair.co. For access, please email
hello@flair.co with the email address associated with your registered Flair account.
This email address will also be associated with your integration or app.
Initial Setup
You can follow along with our video setup guide at flair.co/videosetup.
CREATING A HOME
When you first create your account, you will be prompted to create your first
home in the Flair App.
If you are creating a second home, click the + button on the App home screen.
Click Add New Home and follow the instructions in the in-app wizard.
14
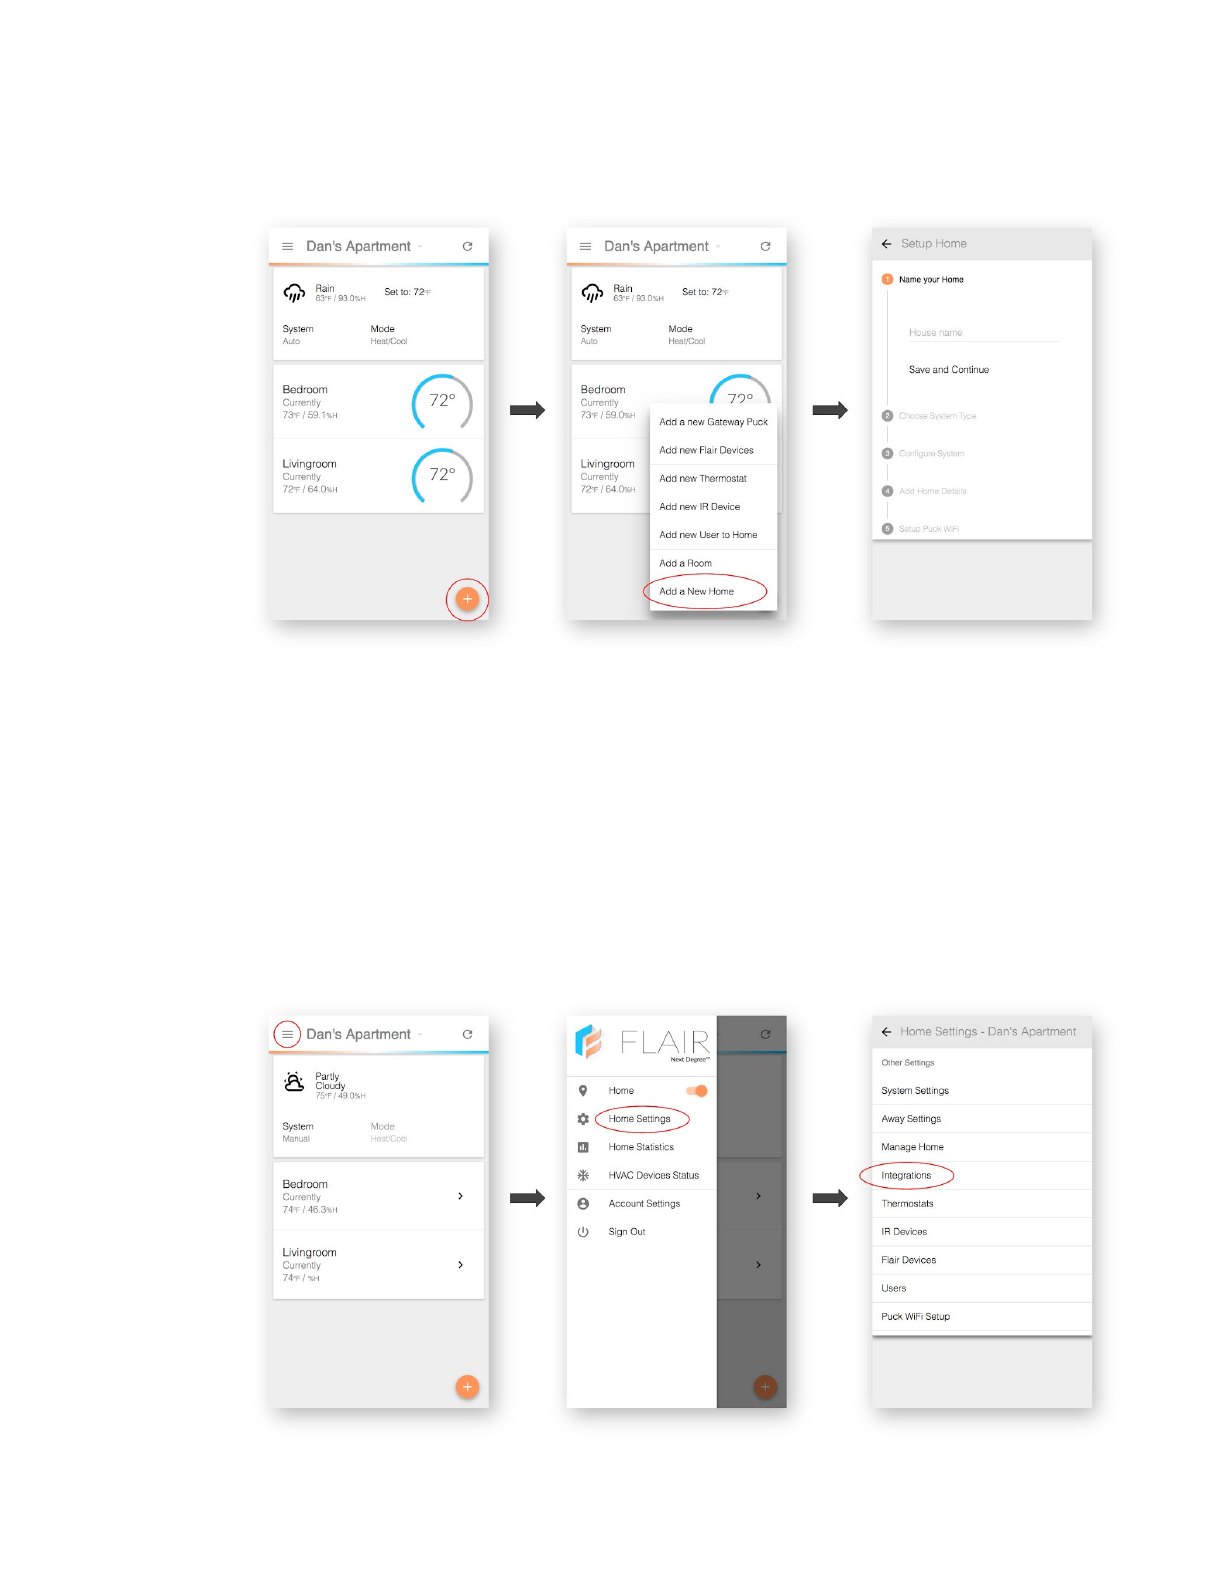
Add a new home:
INTEGRATIONS
You can configure your integrations during your initial setup.
If you need to add integrations after initial setup, navigate to Home Settings
and click Integrations.
Add Integrations:
15

SETTING UP WIFI
The wizard will ask you if you would like to setup WiFi or skip for now. Skip this
step only if you do not have any Pucks to add to your home.
If you are setting up your first Puck, the WiFi setup wizard will guide you
through getting your system online. You can also follow along with our video
setup guide at: flair.co/videosetup.
ADDING DEVICES TO YOUR HOME
After your Gateway Puck is connected to your WiFi network, you will enter
Setup Mode. Setup Mode will list devices and allow you to assign them to
rooms. You will also be able to assign integrated Smart Thermostats and
IR-controlled devices to rooms.
After you have connected your devices and assigned them to rooms, scroll to
the bottom of the page and click Done with Setup.
Any remaining required steps will be shown on the App home screen if you
have forgotten to complete them during setup.
IR-DEVICE SETUP
If you are setting up an IR device, you will need to select the specific IR Model
in IR setup wizard. An IR Model refers to the codeset that will work with your
IR device.
The IR setup wizard will help you assign Pucks to your IR device. It will also
help you identify the correct IR Model with IR device.
DELETING A HOME
If you accidently created a second home or simply want to start over, you can
delete your home. Before deleting your home, please delete or remove any
third-party devices and integrations associated with this home.
If you have multiple homes in the Flair App, select the correct home by clicking
the home name on the top bar in the App. You will then see a drop-down menu
featuring each home in your Flair App.
16
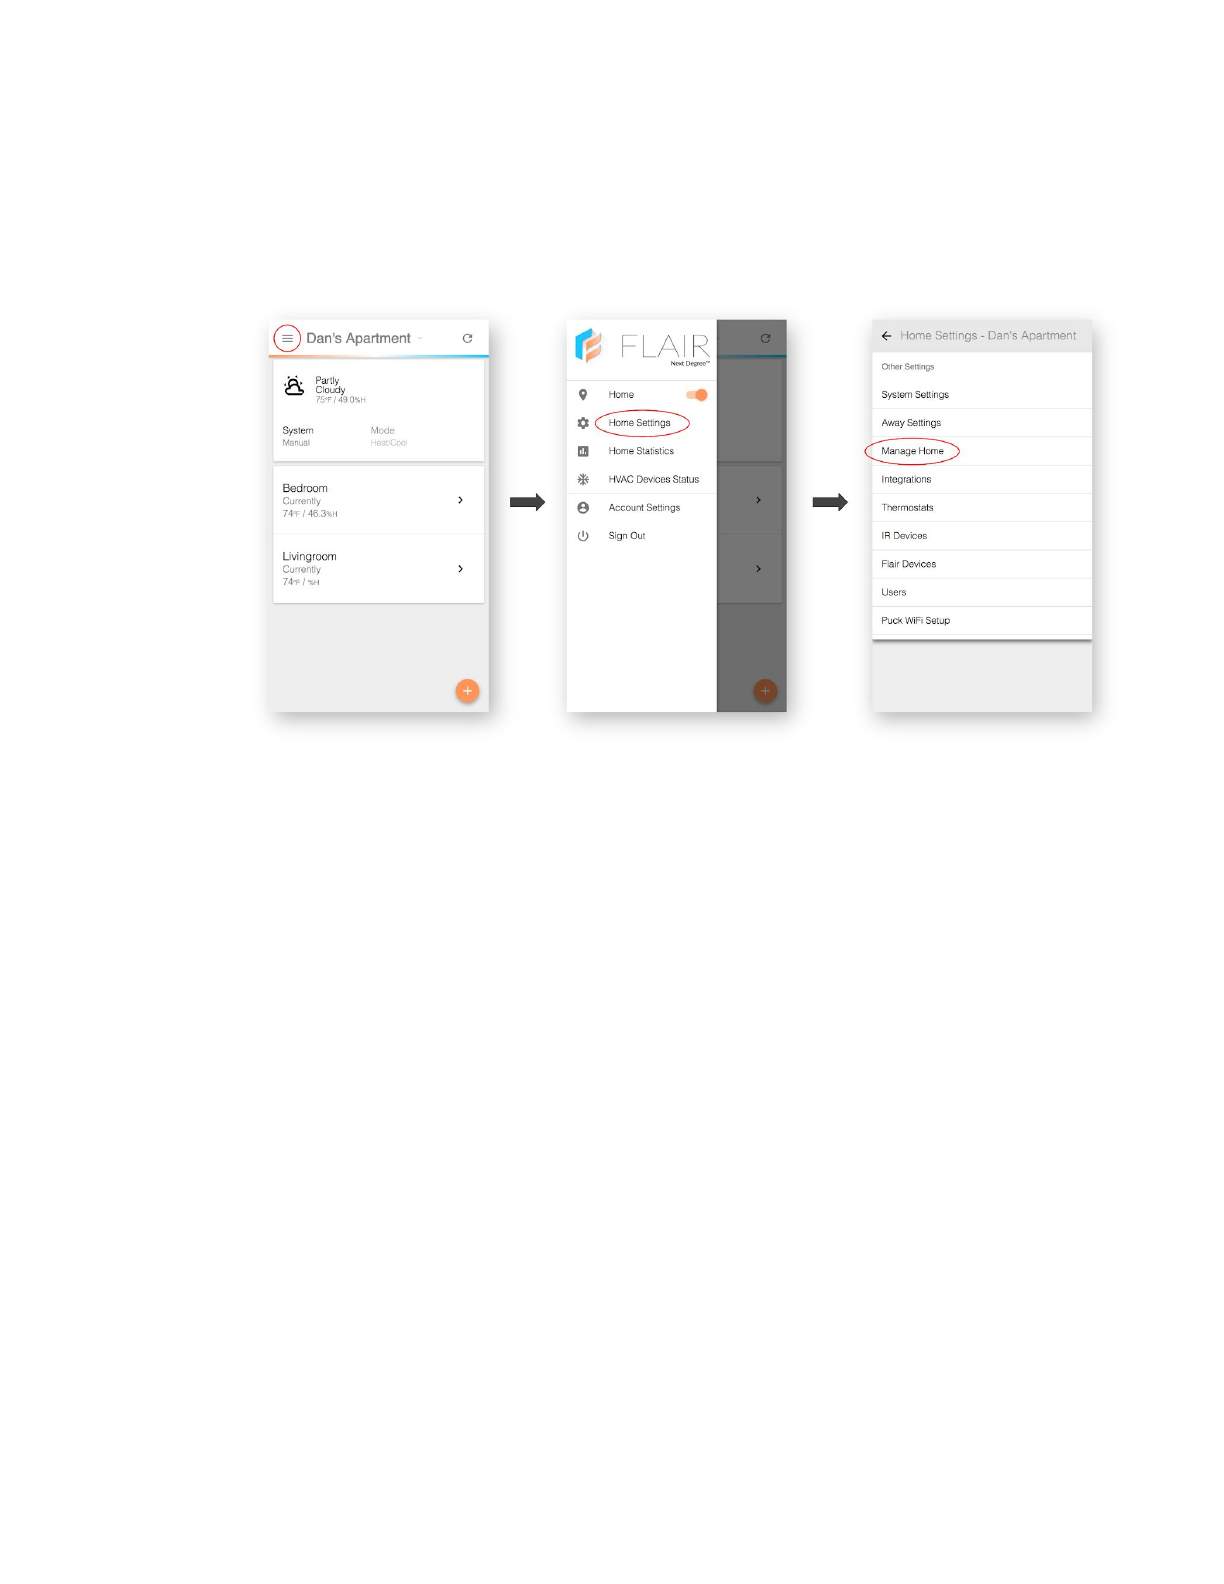
After selecting the correct home, go to the side menu, click Home Settings →
Manage Home → Delete Home.
Delete a home:
17

System Configuration
Zones
Zones are the regions of a home that can be heated, cooled or ventilated by an HVAC
Device (a Smart Thermostat, Minisplit, Window AC, etc.). Flair uses zone information
to understand how rooms will be affected by central heating or cooling. It also uses
zone information to understand what rooms are heated or cooled with IR devices.
Flair supports complex zone configurations. For example, a home with two Smart
Thermostats usually has two zones. Each room in that home may belong to one zone
or both zones. Another example of a complex zone configuration is a home with a
Smart Thermostat for central heating and in-room Minisplits for cooling. Flair can
support this dual-zone setup.
Flair must be configured in the App to accurately reflect your home’s HVAC
equipment and zonal layout. Otherwise, automatic control may operate in unclear or
unintentional ways.
Zone Verification
To verify zone configuration, click a Room Tile. Then in the upper-right corner, click
Settings from the drop-down menu. Confirm that your room belongs to the correct
zone for each Smart Thermostat, Minisplit, etc.
18
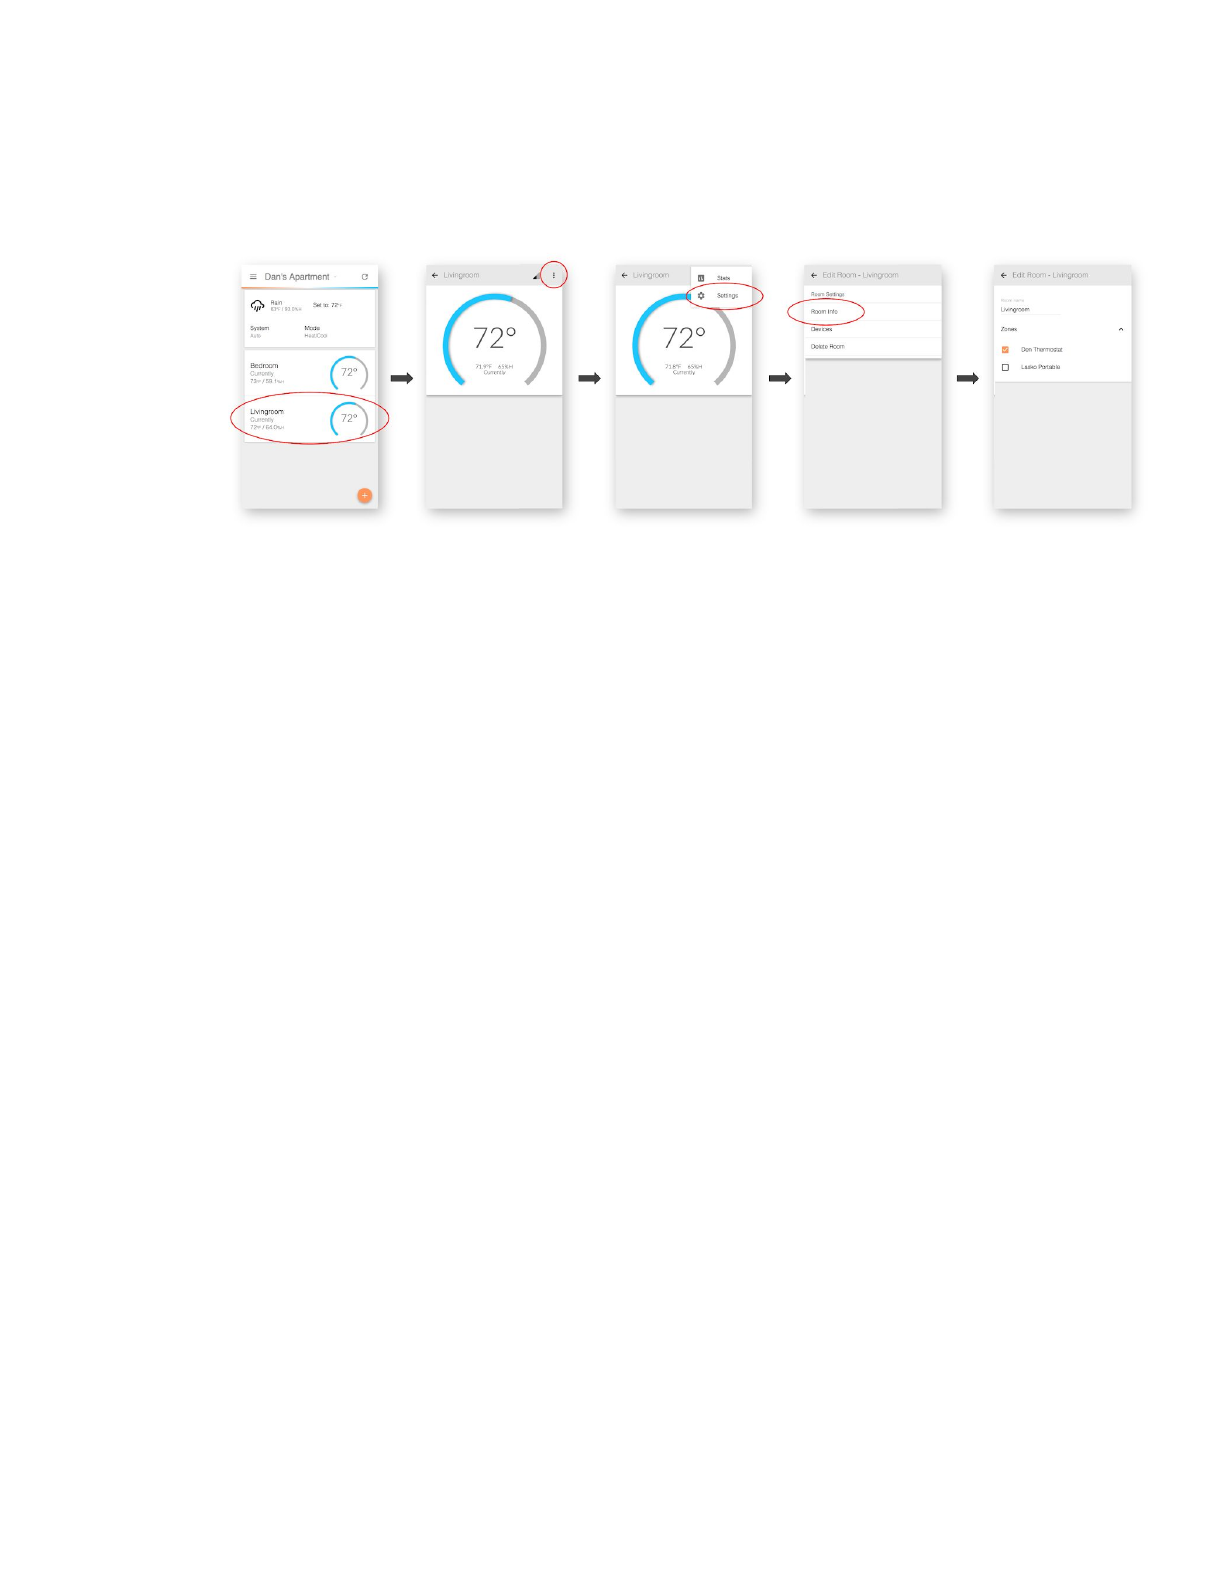
Verify zone configuration:
Manual Mode
Manual mode allows for basic control over Flair Devices. Manual mode does not
automatically adjust Smart Thermostat set points, send commands to IR devices,
and/or modify Smart Vent configurations. These adjustments can only occur when a
user adjusts devices on the App home screen.
We encourage users to use Manual Mode to troubleshoot their Flair configuration.
Auto Mode
Auto mode allows for hands-off control of home-heating-and-cooling devices.
For central-heating-and-cooling systems, Flair will use environmental data (including
temperature and humidity) to adjust your Smart Thermostat and/or Smart Vents.
Flair will do this by matching room temperatures with user-specified set points.
For non-central systems such as Minisplits, Window ACs, and portable devices, Flair
will automatically control your unit in order to maintain a set-point temperature.
Auto mode has numerous options that can be configured to achieve the desired
control and behavior that works best for your home.
Selecting Manual/Auto Mode
You can switch between Manual and Auto mode on the App home screen. Select
System → Manual or System → Auto.
19
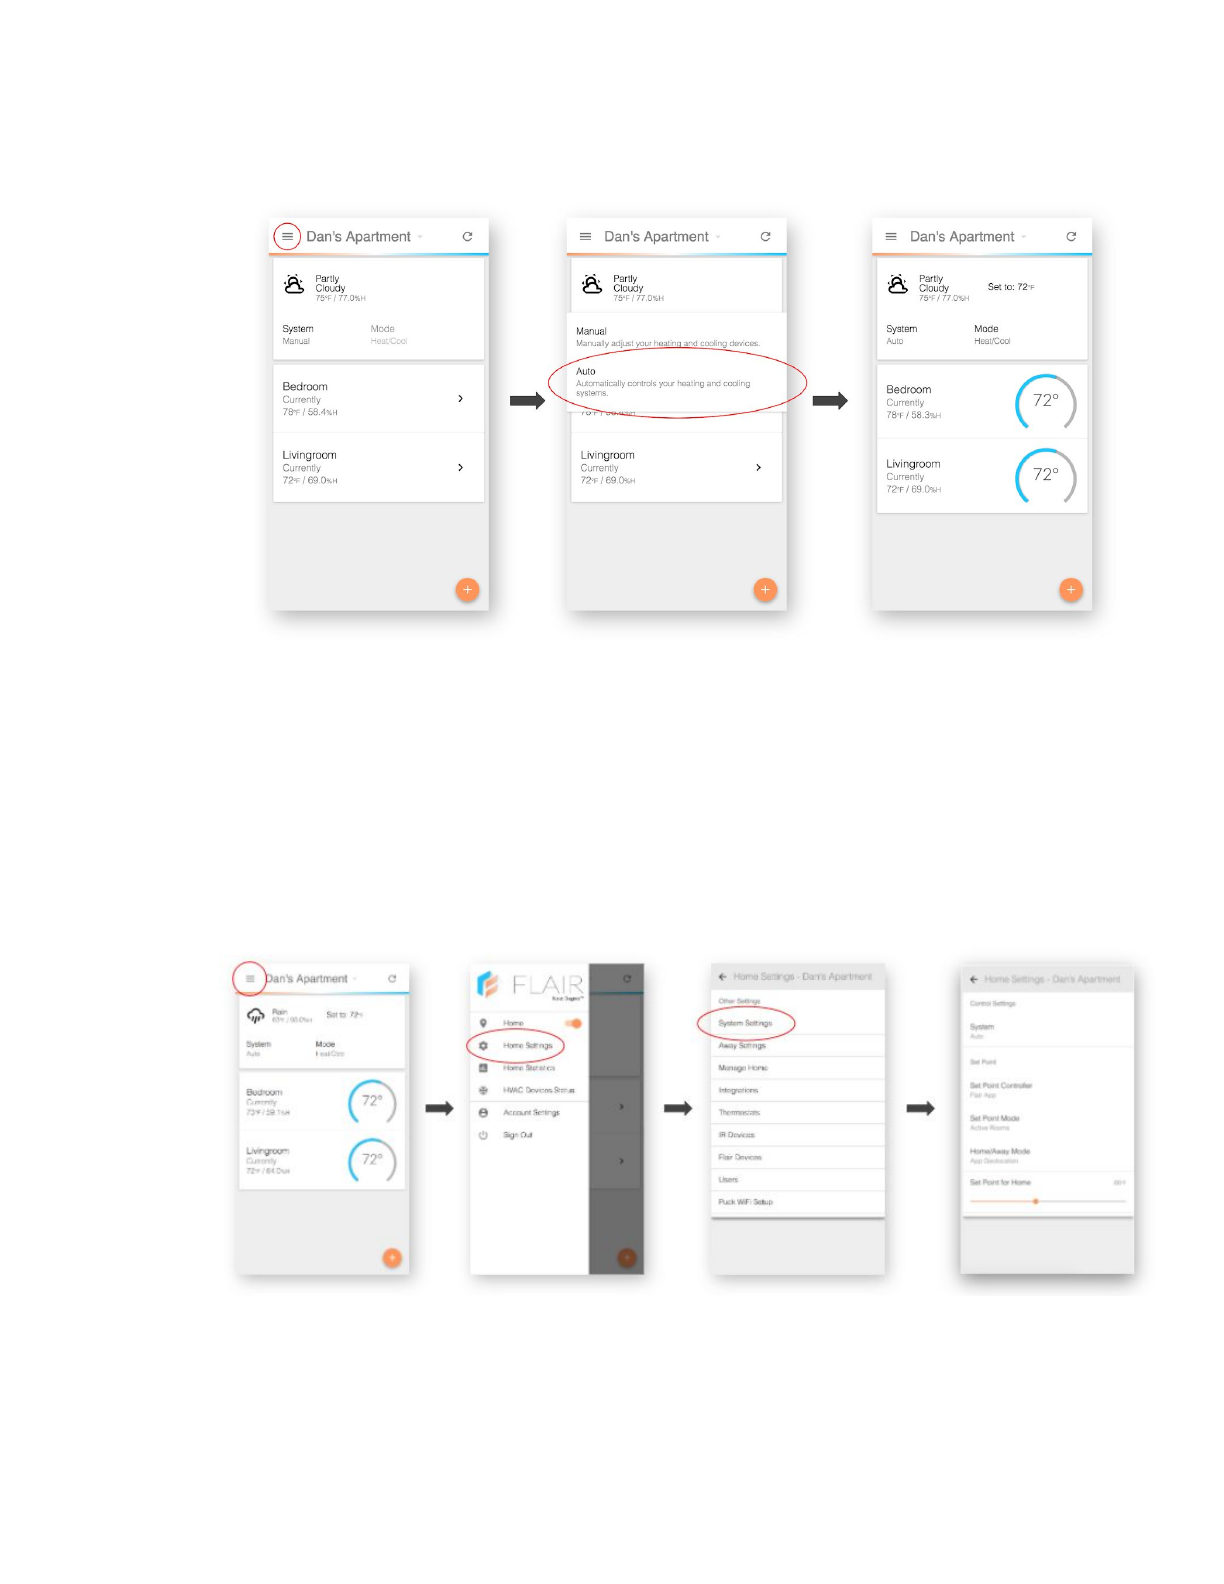
Switch between Manual and Auto mode:
Temperature Set Point
Your Flair system can be configured for a variety of temperature settings.
To access this menu click Home Settings → System Settings
Access Temperature Set Point settings:
20
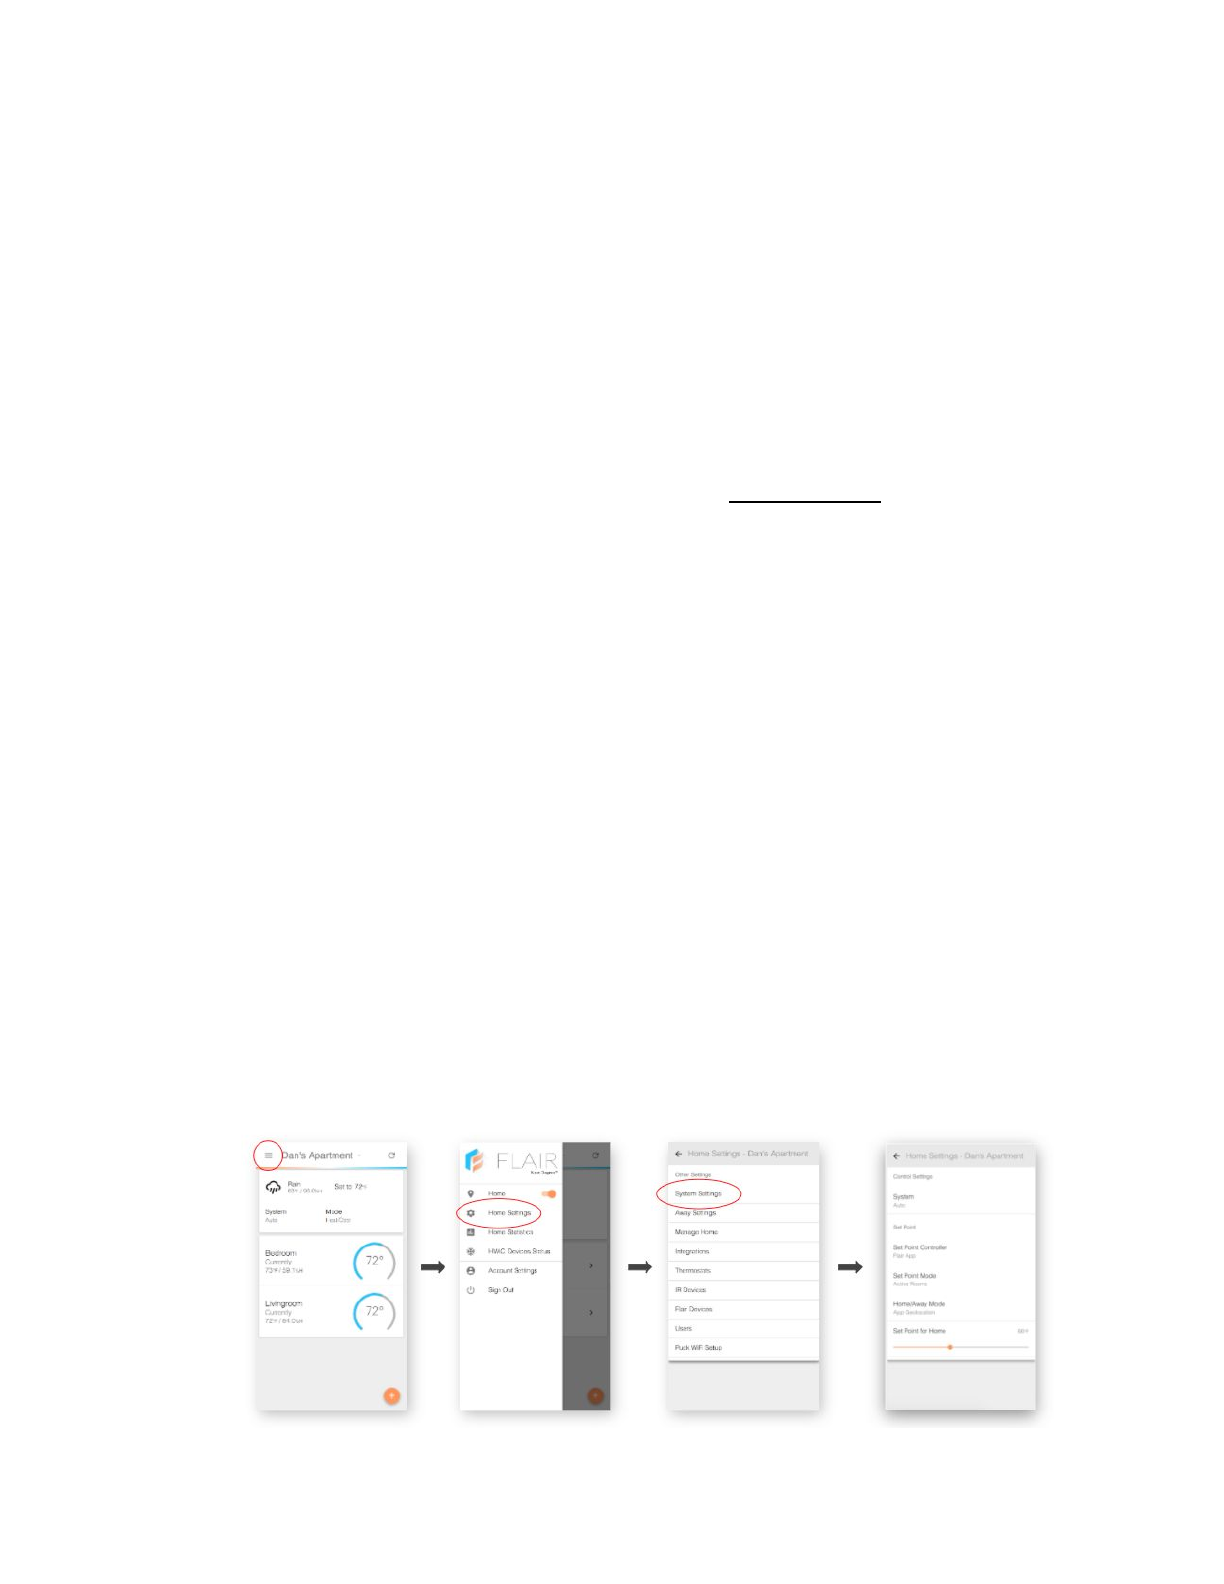
SET POINT CONTROLLER: FLAIR APP
If you select this mode, you will see a slider at the bottom of the menu screen
labelled “Set Point for Home.” The Set Point for Home setting is used as the
default temperature set point for each room in your home. Flair will use that
temperature set point and periodically push it to your thermostat.
SET POINT CONTROLLER: THERMOSTAT
With this enabled, Flair will use your integrated Smart Thermostat(s) to
maintain the temperature for each zone according to the temperature set on
your Smart Thermostat. In this mode, Flair will not adjust your thermostat
settings and will only adjust Smart Vents and IR devices.
SET POINT MODE: ALL ROOMS
While in All Rooms mode, Flair will make sure that every room in your home is
the same temperature. User-specified holds will override All Rooms (see the
section below on holds for more information).
SET POINT MODE: ACTIVE ROOMS
This mode adds an option to set rooms as Active or Inactive. If a room is
marked as Active, the set point will be maintained by adjusting Smart Vents, IR
devices, and/or Smart Thermostats.
If a room is marked as Inactive, the set point will not be maintained for that
room. That room may also be treated as a “dump zone,” where Flair may send
excess heated or air-conditioned air (see the glossary for more information).
Create a Set Point for Home:
21

HOME/AWAY MODE: APP GEOLOCATION
Flair will determine whether you’re home or not by checking to see if your
occupancy-determining devices (your Android or iOS phone) are near the
address you entered for your home. Flair will use the Home and Away settings
you set in Away Settings. See Home and Away below for more information.
HOME/AWAY MODE: MANUAL
Home and Away in manual mode can be set by using the Home/Away toggle in
the Flair App sidebar.
HOME/AWAY MODE: THERMOSTAT
Flair will take the Home and Away status from your thermostats. For example,
if your Smart Thermostat has determined that you are Away, Flair will enter
Away mode.
Holds
Holds are temporary overrides to your set point temperature. They can be set
in the App or by rotating the Puck while on the temperature screen.
You can set a Hold for any room. Flair will then adjust the temperature of that
room to your Hold temperature for the duration of that Hold.
When a Hold is set by rotating the Puck, the default duration of that Hold is 3
hours. The Hold only applies to the room in which the Puck is currently
assigned.
When a Hold is set by adjusting the blue bar in the App Room Tile, the default
duration of that Hold is 3 hours. To cancel or adjust the duration of that Hold,
click HOLDING in the temperature widget.
22
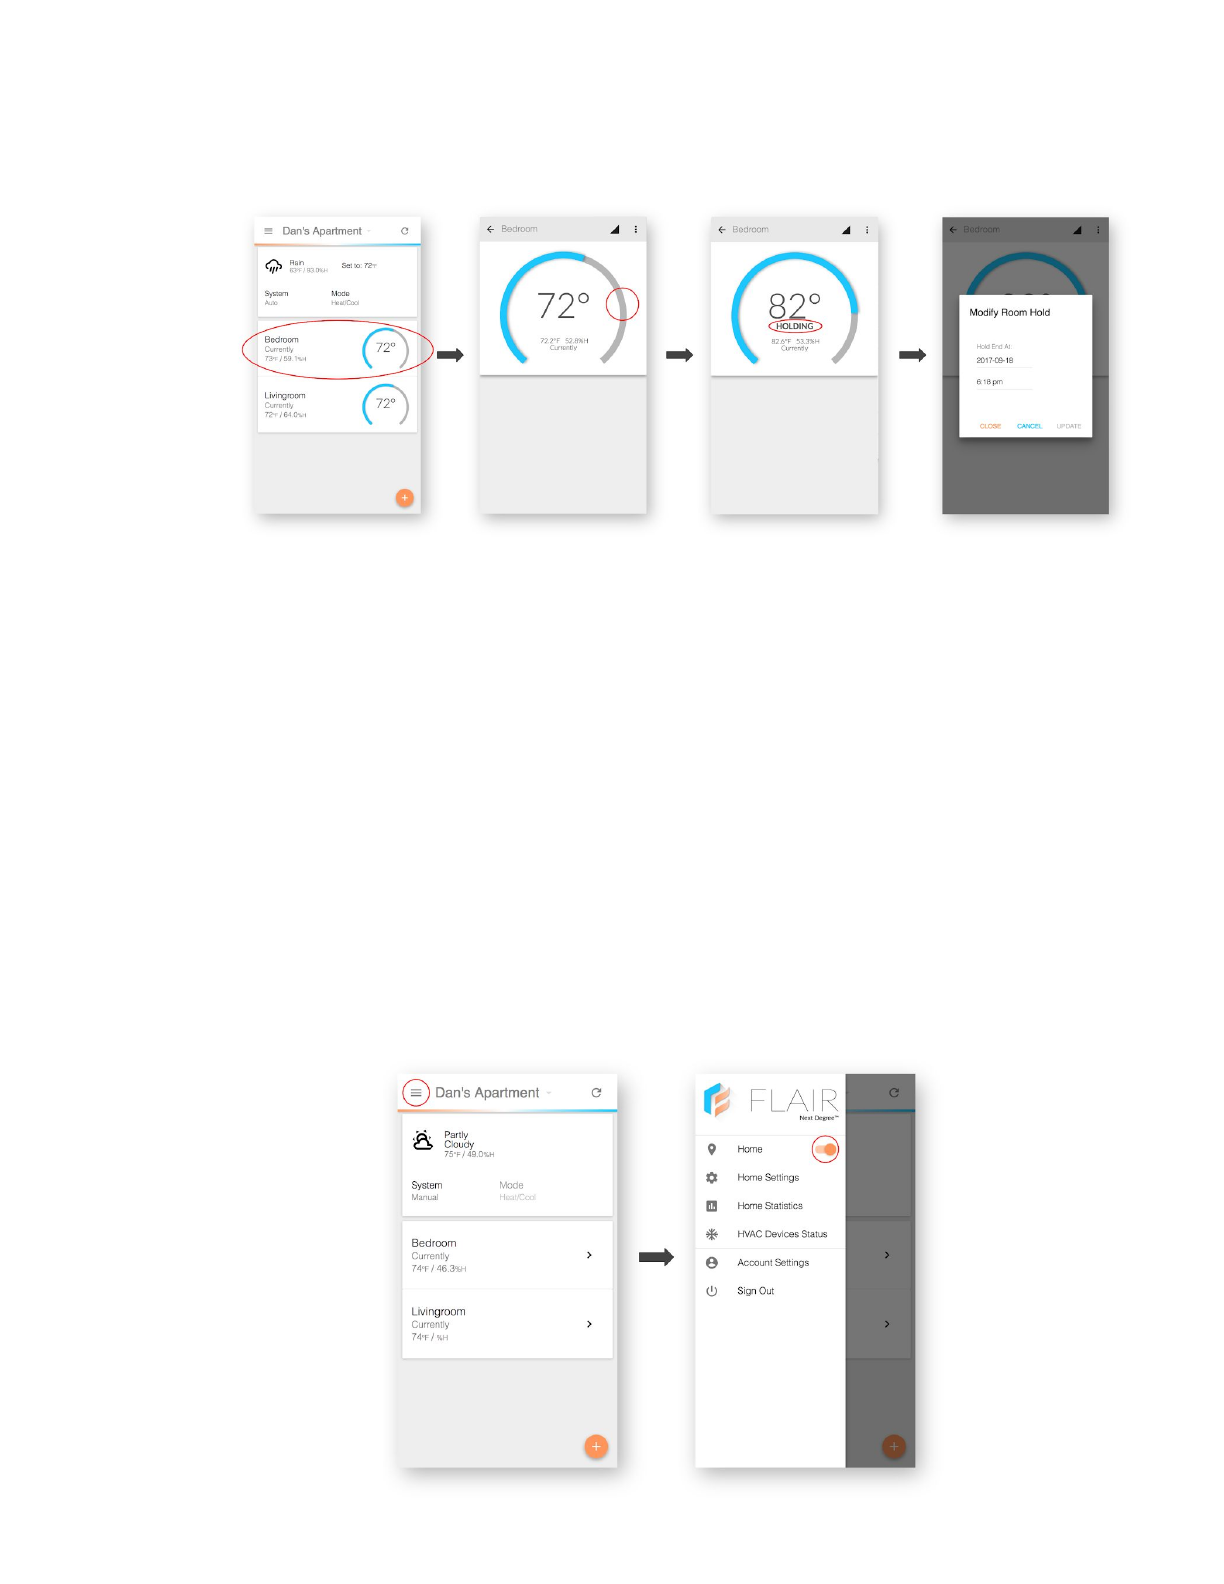
Modify a Hold:
Home and Away
Your Flair system can automatically or manually be set to either Home or Away.
When a home is set to Home or Away, Flair uses different set point temperatures to
either make your home more comfortable or to minimize unneeded heating and
cooling to save energy. Home and Away can only be used while your home is in Auto
Mode.
MANUAL
Home and Away in manual mode can be set by using the Home/Away toggle in
the Flair App sidebar.
Toggle between Home and Away:
23

AUTO
When Home and Away is set to auto, Flair will automatically determine Home
and Away status using its algorithm. However, a user may still change the
Home and Away status manually by using the Home/Away toggle in the Flair
App sidebar.
Manual control of the Home/Away toggle while in auto mode creates a
three-hour hold. For example, if Home and Away is set to auto and a user
manually selects Home, Flair will hold Home for three hours before resuming
normal automation.
Away Modes and Options
There are a few options to consider for Away mode. If you live in a temperate climate,
you may simply want all your home-heating-and-cooling devices to turn off while you
are away. Or you may want to use more-advanced features like preheating,
precooling, and temperature bounds to keep your home comfortable in hotter or
colder environments.
OFF ONLY
When the Away mode is set to Off Only, Flair will only turn off your IR devices
when you leave your home. It will turn them back on when you return.
Flair will NOT turn off your Smart Thermostat. Flair will instead defer to your
Smart Thermostat’s Home/Away algorithm.
SMART AWAY
When the Away mode is set to Smart Away, Flair will ensure that your rooms
do not get too hot or too cold.
AWAY TEMPERATURE MINIMUM
The lower-bound temperature for a room in Smart Away mode.
AWAY TEMPERATURE MAXIMUM
The upper-bound temperature for a room in Smart Away mode.
24

PREHEAT/PRECOOL
This geolocation feature uses your phone to determine when you are coming
home. It will then begin to heat or cool your home so that you arrive to a
comfortable temperature.
25
Frequently Asked Questions and Troubleshooting
General
General troubleshooting suggestions
If you experience unexpected behavior from your Sensor Pucks, Gateway Pucks, or
Smart Vents, we recommend power cycling your Gateway Puck. To do so, unplug it
from either end of the cable, wait 10 seconds, and plug it back in.
If you are not seeing your Flair devices in the App, we recommend refreshing your
browser or closing and reopening your App.
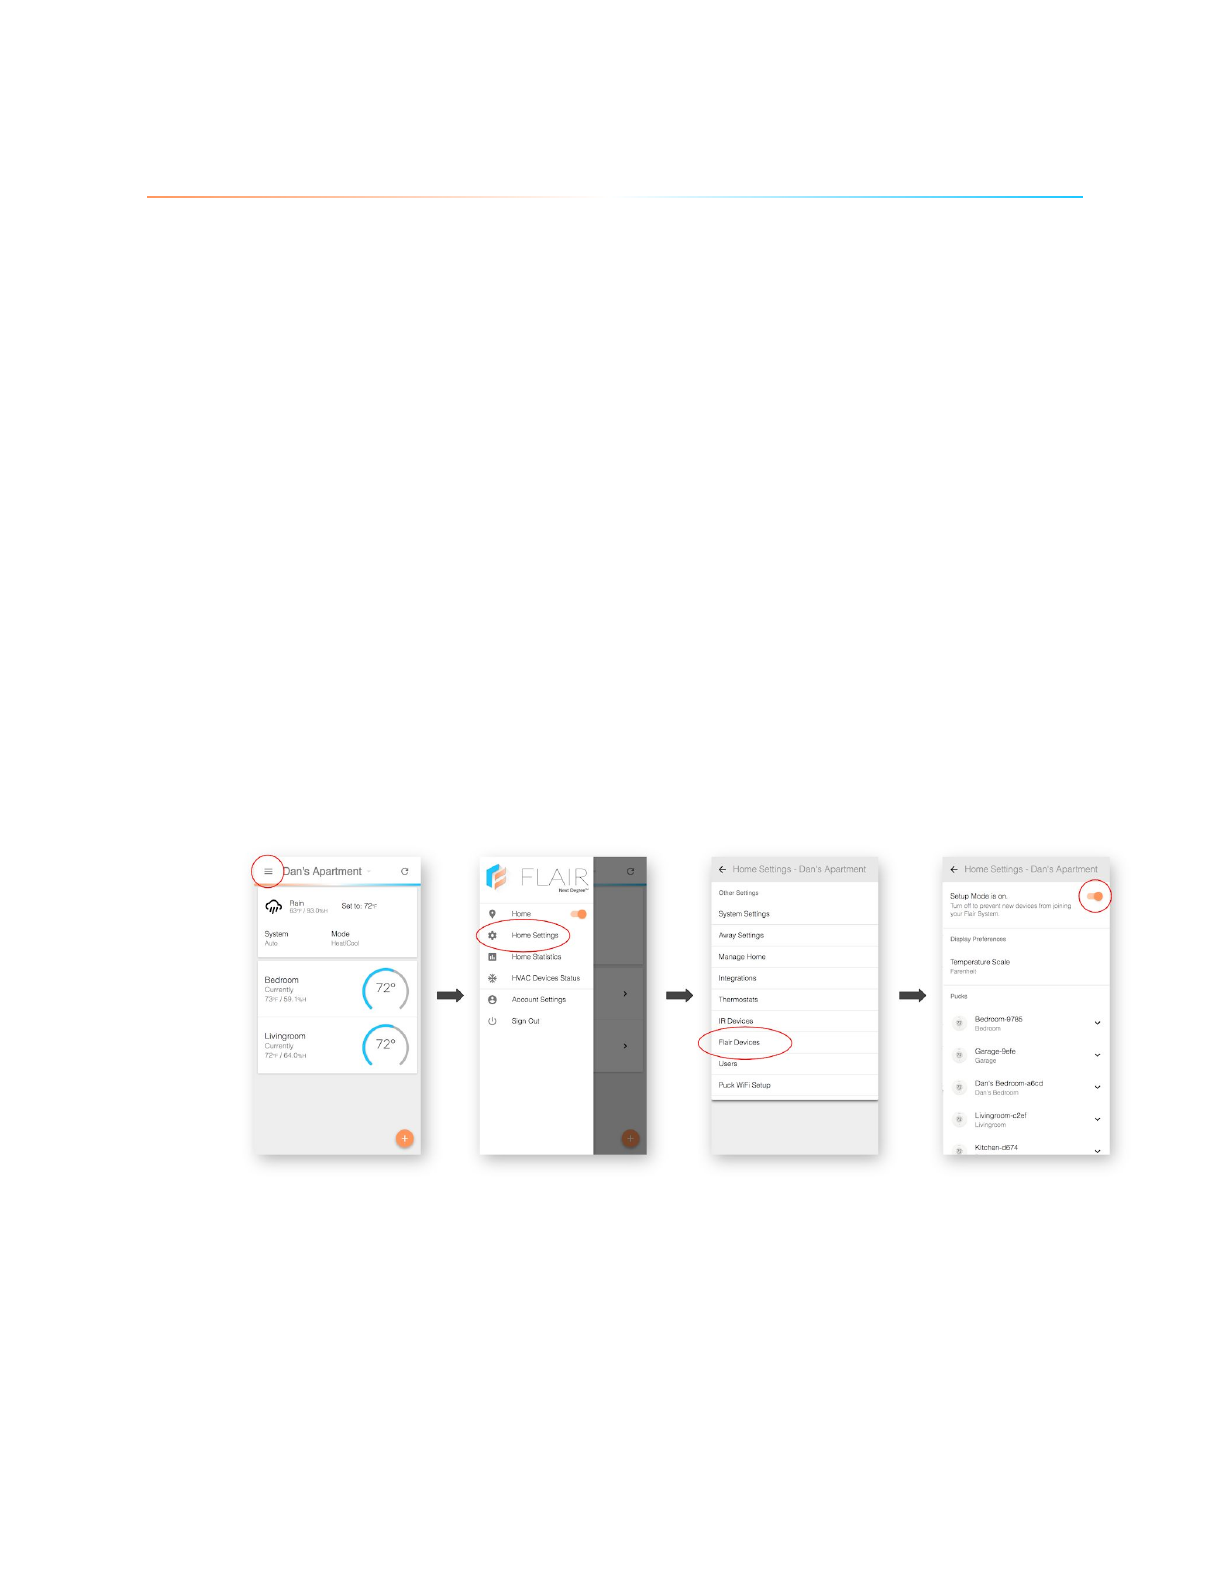
If you still don’t see your units, turn on Setup Mode for a few minutes. This can be
done by clicking Home Settings → Flair Devices and flipping the Setup Mode slider to
On.
Turn Setup Mode on:
Wait a few minutes for all your devices to enter Setup Mode. Confirm that all your
Flair devices have been added to your Home before turning Setup Mode off.
26

My whole system is offline?
Double-check that you have a wired Gateway Puck and that it is plugged in. If your
Gateway Puck is online and the rest of your units are not showing up in the Flair App,
follow the instructions above to place your Flair system into Setup Mode.
The E-Paper displays on the Puck continue to display even without power. That
means that a Gateway Puck screen may show the WiFi symbol when unplugged. Click
or rotate the display on the Puck if you are unsure whether it is powered.
My Puck or Vent doesn’t seem to be working?
If you have already setup your system, we recommend troubleshooting your system
in Manual Mode. After placing your Flair system in Manual Mode, click the Room Tile
in the App and try to open/close a Smart Vent or perform any other action.
This will allow you to see whether the issues you are having are limited to your Flair
system or are stemming from Flair’s automated algorithmic control.
My Puck or Vent is Offline or Inactive?
First, make sure that your Gateway Puck is reporting to your Flair system by
confirming that it is on, online, and connected to your Flair system.
After confirming that your Gateway Puck is reporting, turn on Setup Mode for a few
minutes. This can be done by clicking Home Settings → Flair Devices and flipping the
Setup Mode slider to on. Wait up to five minutes for all your devices to enter Setup
Mode. Confirm that all your Flair devices have been added to your home before
turning Setup Mode off.
After turning off Setup Mode, refresh the data in the App (either by refreshing your
browser or closing and reopening the App) to confirm that your units are visible.
Do I need to add WiFi to each Puck?
No. Only Gateway Pucks need to be setup with WiFi. Sensor Pucks will get WiFi
information from Gateway Pucks when they need to communicate with the Flair
Cloud (for firmware updates, for example).
27

How many Gateways do I need?
Most Flair systems need only one Gateway Puck. In large networks, more than one
Gateway Puck may be needed. If you think you may have a large network, visit
flair.co/large-systems for more information.
Can I run my Gateway Puck on batteries?
No. Gateway Pucks are used to keep Flair Systems connected to the internet using
WiFi. Additionally, Gateway Pucks communicate with your other Flair Devices. The
power requirements of these features require you to use your Gateway Puck with AC
power.
WiFi
I can’t see my WiFi network on the Puck WiFi Setup Page? / The Puck
WiFi Setup Page is stuck on “Scanning…”
○The Puck can only see visible 2.4 GHz networks. Your 2.4 GHz WiFi network
must be at least temporarily visible for setup.
○If the WiFi Setup Page has been stuck on “Scanning…” for more than a few
minutes, refresh the App either on your device or in your browser
○If you have a Batch 1 Puck (shipped August 2017), please email hello@flair.co
if you are having Puck WiFi setup issues.
Why can’t I see or join Flair WiFi xxxx?
○If you are doing an initial setup, please make sure you have one Puck plugged
in and set to Gateway Mode.
○If you have completed a setup, you will no longer see Flair WiFi xxxx. To start
WiFi setup again, go to the Setup Menu on your Puck and click Forget WiFi.
You can then restart Puck WiFi Setup in the App.
I joined the Flair WiFi xxxx network and now the App won’t load?
Close the app on your phone or tablet and rejoin your regular WiFi network. Now
reopen the App and it should load correctly. Follow the on-screen instructions when
setting up your Gateway Puck.
28

IR
I tried each Model for my brand but nothing worked?
When completing IR Setup, make sure your Puck has a clear line of sight to your IR
device. If you imagine the Puck as a clock, IR signals are sent out from 2:00 and 10:00,
as well as from the Puck face. It may help to aim these parts of the Puck directly at
your IR device to ensure that your IR setup issue is not related to range, alignment, or
a blocked transmitter.
For certain models, you may need to turn your IR device on before beginning IR
Setup. After turning your IR device using your remote, continue IR Setup as described
in the App.
If you are still unable to find a successful IR model after trying both these steps,
please email hello@flair.co. Please include your IR device’s model number as well as
your remote model number in that email. We may have to manually upload your IR
codeset into our cloud. We will either purchase a copy of your IR device’s remote or,
in rare instances, send you a prepaid shipping label to ship your remote to us.
Flair was working with my IR Device, but isn’t any longer?
Make sure your Puck has a clear line of sight to your IR device. If you imagine the
Puck as a clock, IR signals are sent out from 2:00 and 10:00, as well as from the Puck
face. It may help to aim these parts of the Puck directly at your IR device to ensure
that your issue is not related to range, alignment, or a blocked transmitter.
If that did not work, place your system into Manual Mode and send a command to
your IR device using the Room Tile on the App home screen. Please wait up to one
minute for an IR code to send.
It is also possible that there is a configuration issue with your system. Ensure that the
Puck being used as the IR device’s “Controller Puck” is correct: that it is in the same
room as your IR device, that it is powered (either with batteries or AC power), and
that an “IR Sending” message or screen change appears when you send an IR
command to your device.
29
I don’t see my brand in the brand list.
If your brand is missing from our list, please email hello@flair.co and we will help you
identify brands with matching codesets that we already have. Alternatively, we will
make sure that we get your brand added to our database.
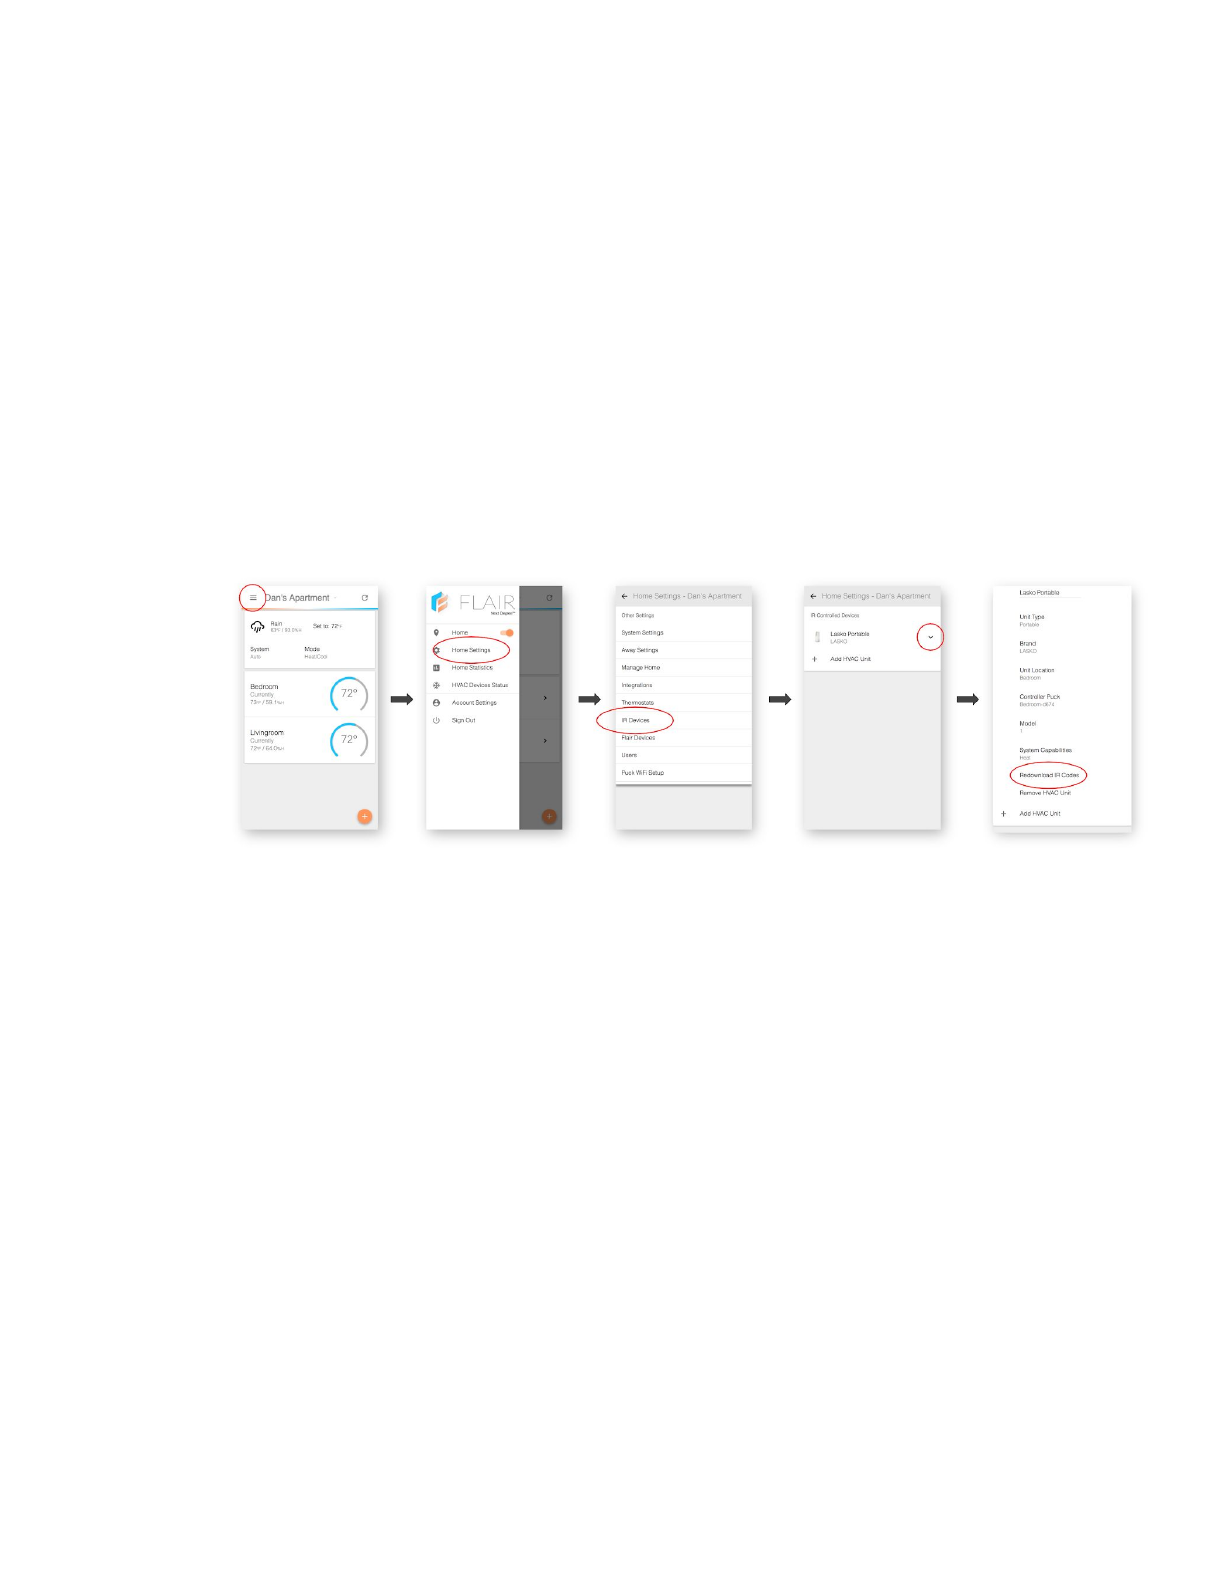
IR Code Download is spinning forever?
Something may have occurred during IR code download to cause this error. You can
force Flair to redownload your IR codes by going to Home Settings → IR Devices,
expanding the settings for the device you are setting up, and clicking Redownload IR
Codes.
Redownload IR codes:
Puck
The Puck Display Says Something Even Without Power!
Puck displays use E-Paper (similar to the displays found in many e-readers). This type
of display allows for the screen to stay in its last-used state before power was shut
off. This feature allows for low-power use, but it may cause confusion as it may seem
that the Puck is on when it is not.
My Puck Temperature readings seem high/low/inconsistent?
The answers to the following two questions explain why the Puck may appear to be
reading above or below the expected temperature.
30

Please ensure that your Puck is placed out of direct sunlight, away from exterior
walls, vents, returns, windows, fans, and other devices that generate heat (computers,
ovens, appliances, etc).
We recommend that you mount your Puck on an interior wall approximately 5 feet
(1.5 meters) away from the floor.
Why are my Gateway Puck Temperature readings not accurate?
Gateway Pucks may temporarily show inaccurate temperatures during setup. The
setup process involves heavy WiFi usage. Furthermore, temperature calibration data
does not sync until after the Puck is connected to the internet. It may also take a few
minutes for the unit to equilibrate with its environment after initial setup.
If your Puck says “Syncing…” and you don’t see a WiFi icon on the Gateway Puck or
have setup your Gateway Puck within the last few minutes, please disregard any
temperature readings.
If after a few hours, your Gateway Puck is still not reading correctly, we can help with
a field calibration process. If you believe your Puck needs calibration, please email
hello@flair.co.
Why are my Sensor Puck Temperature readings not accurate?
In general, sensor Pucks should be accurate to ± 0.1ºC. To keep power consumption
low, we only update the displayed temperature when the temperature change
registers 1ºC (1.8ºF) or greater.
Data in the App and in automated-control algorithms use temperature readings to
the tenth decimal point (0.1). To force the Puck to show the latest temperature
reading, simply interact with it by clicking down or turning the click wheel.
Vents
What is the Light Bar for?
Flair Smart Vents use a Light Bar to help identify the unit. The Light bar is used during
installation, setup, room association, battery changes, and troubleshooting.
31

Setting the Smart Vent to half-open has mixed results.
Smart Vents are calibrated at the factory but can lose calibration during transit or
certain setup processes. Smart Vents recalibrate themselves by opening and closing a
few times. You can do this process in Manual Mode. In Auto Mode, the Smart Vents
will automatically recalibrate themselves as they open and close during day-to-day
operation.
The Light Bar isn’t turning on?
It may take a few moments for the Smart Vent Light Bar to turn on during Setup
mode. If after 5 minutes in Setup Mode, the Light Bar is still not illuminated, power
cycle your Smart Vent.
To power cycle a Smart Vent, remove the batteries for five seconds before putting
them back in. If your Smart Vents are hard-wired, remove the 24 VAC power lines,
wait five seconds, and plug them back in. To manually reset your Smart Vent, follow
the instructions at flair.co/reset-vent.
A Smart Vent is not appearing in the App?
It may take a few moments for your Smart Vents to join your Flair network. After
inserting batteries or wiring your Smart Vent, you should have seen the Light Bar
briefly illuminate to confirm proper setup.
During Setup Mode, please give the Smart Vent up to 5 minutes to join. If the Smart
Vent Light Bar is illuminated and you still don’t see the the Vent on the App, you may
want to refresh the App on your device or in your browser.
Setup Mode
I can’t get past “Looking for Devices”
If you have been waiting for more than five minutes and have yet to see any of your
Flair devices quit and reopen the App on your device or refresh your browser page.
If you still are unable to see any of your devices, make sure your Gateway Puck is
connected to WiFi. If you have already completed WiFi setup, forget the WiFi
network on your Puck (see Puck: Forgetting WiFi). In the App, click + → Add New
32
Gateway Puck. Follow along with the on-screen setup wizard. You may need to exit
Setup Mode in order to see the + button.
Add a new Gateway Puck:
Power Adapters and Cables
My Puck isn’t working and it’s plugged in?
Flair devices have only been tested to work with the Flair Adapters Cables included
with your order. If you are using a non-Flair Adapter or Cable, it is possible that you
device may not power on or work as expected.
If you need a replacement cable or adapter visit flair.co or email hello@flair.co
Batteries
My Puck batteries died faster than expected?
Please email hello@flair.co with the email address associated with your Flair account.
In that email, include and the device ID/name that had a battery issue.
33

My Vent batteries died faster than expected?
Please email hello@flair.co with the email address associated with your Flair account.
In that email, include and the device ID/name that had a battery issue.
Contact Us
Nobody responded on the forum?
The Flair Forum (forum.flair.co) exists to help Flair users, provide feedback, get help
or suggestions from the community, and to connect Smart Home and HVAC
enthusiasts.
Members of the Flair Team often respond on the Forum, but may not if it is a question
that has been answered elsewhere.
If you require an answer from the Flair Team, please email us directly at
hello@flair.co.
I emailed the Flair Team but haven’t heard back?
We try to reply to all emails within one business day, but in certain cases it can take
longer to reply to a message. If you have not heard back from us within three business
days, please do not hesitate to send us a follow-up message.
34

Glossary
PUCK
A Flair device used to measure environmental conditions, control temperature and
other settings in a room, determine occupancy, and communicate with air
conditioning, heating, fan and AV devices.
GATEWAY
A Puck set to “Gateway Mode.” A Gateway Puck is the hub for your Flair system. A
Gateway Puck is powered by AC power and communicates to the Flair Cloud via
WiFi. Gateway Pucks have all the same functionality as Sensor Pucks, but also bridge
Sensor Pucks and Smart Vents to the internet.
SENSOR
A Puck set to “Sensor Mode.” A Sensor Puck communicates a Gateway Puck. Sensor
Pucks can be powered by AAA batteries or the Flair adapter and cable.
SMART VENT
A Flair device used in central heating and cooling systems to intelligently regulate
airflow in a room or throughout a house.
ADAPTER
A Flair accessory used to power Gateway Pucks or wired Sensor Pucks. The only
recommended adapter for the Puck is provided by Flair. Using other adapters may
cause problems or unexpected behavior.
BATTERIES
Flair Pucks are designed for use with AAA batteries. Flair Vents use C-Cell Batteries.
Both devices are designed for use with Alkaline batteries, but may work with other
chemistries such as rechargeable NiMH.
SETUP MODE
Setup Mode allows for all your Flair devices to join your home. It can also be for
identifying devices in your home. While in Setup Mode, Pucks display a 4-digit
identification code and Smart Vents display an identification pattern on their Light
Bar.
35

PRIMARY HOME
A Primary Home is the default home that you will see when you open the Flair App.
To make a home into your primary home, click the dropdown menu at the top of the
App. Then, navigate to Home Settings → Manage Home. Then, click Make Primary
Home.
IR MODEL
IR Models are used during Puck IR Setup. Each IR Model refers to a codeset used to
control an IR Device. Each IR Model may work for a variety of units for any given
brand. Multiple IR models may also work for any given IR device.
ADDRESS
Flair uses your address to give you weather information and to activate geofencing,
so your system knows when you’re coming home. Geofencing can be used for Flair’s
preheating and precooling features as well as Home and Away.
ROOM TILE
The home screen of the Flair App features a box for each room. These boxes are
referred to as Room Tiles. Each Room Tile features room controls, a room’s devices,
as well as settings for that room.
AUTO MODE
Auto Mode allows for hands-off control of home-heating-and-cooling devices.
For central-heating-and-cooling systems, Flair will use environmental data (including
temperature and humidity) to adjust your Smart Thermostat and/or Smart Vents to
best match room temperatures to user-specified set points.
For non-central systems such as Minisplits, Window ACs, and Portable devices, Flair
will automatically control your unit in order to maintain a set-point temperature.
Auto mode has numerous options that can be configured to get the desired control
and behavior that works best for your home.
MANUAL MODE
Manual Mode allows for basic control over Flair Devices. Manual mode will not adjust
Smart Thermostat set points, dispatch IR codes, and/or modify Smart Vent
configurations unless the user specifically adjusts the devices on the App home
screen.
36

HEAT ONLY
Heat Only will only set your Smart Thermostat, Minisplit, or Window AC to heat
mode. This will prevent unwanted air conditioning. Users may elect to use this mode
to prevent any air conditioning or cooling systems from running while in Auto Mode.
COOL ONLY
Cool Only will only set your Smart Thermostat, Minisplit, or Window AC to cool
mode. This will prevent unwanted heating. Users may elect to use this mode to
prevent any heating systems from running while in Auto Mode.
HEAT AND COOL
Heat and Cool will only set your Smart Thermostat, Minisplit, or Window AC to allow
for both heating and cooling mode. Users who want both heating and cooling to run
while in Auto Mode should select this option.
ACTIVE / INACTIVE
When in Auto mode, marking a room as Active tells Flair’s to actively control the
climate of this room. If marked as Inactive, this room will not be actively controlled
When a room is marked as Inactive in a central-heating-and-cooling system, that
room may be used as a dump zone. When a room is being used as a dump zone, it will
use the temperature upper and lower bounds from the Away settings set in the App.
HOME / AWAY
Depending on your configuration, Home or Away may be automatically determined,
determined from your Smart Thermostat, or set manually. It can be used to adjust set
points for maximum comfort while home and minimal energy usage when away. You
can also disable automatic Home and Away determination or use the Home and Away
settings from your Smart Thermostat. You can also manually set Home and Away
mode.
INTEGRATIONS
Integrations are how Flair connects to other Smart Home devices and software
services. Each integration features a unique setup. However, each integration needs
to be authorized by the software provider or the device manufacturer. After the
integration is authorized, you may need to confirm that your device is properly paired
37

to your home in Flair. You may also need to configure details in Flair, such as the room
location of your Smart Thermostat.
SMART THERMOSTAT
Smart Thermostats are thermostats connected to the internet. Smart Thermostats,
such as Ecobee, Nest, and Honeywell, have APIs for easy integration with Flair. Some
Smart Thermostats do not have APIs, making integration difficult or impossible. For
an up-to-date listing of compatible Smart Thermostats, visit flair.co/integrations.
SMART HOME PLATFORM
Flair supports a number of Smart Home Platforms, including Wink and SmartThings.
We are developing support for more platforms. There are also third-party
integrations to connect Flair with SmartThings. For the status of Smart Home
Platform development and availability, visit flair.co/integrations.
ZONES
Zones are the regions of a home that can be heated, cooled or ventilated by an HVAC
Device (a Smart Thermostat, Minisplit, Window AC, etc.). If a home has a single
thermostat, the entire home has one zone. Each climate-controlled room in this home
is part of this zone. A home with two Smart Thermostats usually has two zones. Each
room in that home may belong to one zone or both zones. For example, if your master
bedroom is on the second floor and is controlled by a separate Smart Thermostat
from your first-floor rooms, the master bedroom is part of the second floor’s
thermostatic zone.
Minisplits and other devices are typically designed to heat or cool a single room. In
this situation, that room doubles as a zone.
Some Smart-Home systems use the term “zone” to refer to a collection of rooms.
Flair’s usage of “zone” refers only to the HVAC-related definition.
DUMP ZONE
A room or collection of rooms that are used to collect excess heat or cool air.
IR/INFRARED
Infrared (commonly shortened to IR) refers to infrared communications. Most
remote controls communicate via IR. The Puck uses IR to control Minisplits, Window
ACs, and AV devices. Ceiling fans with remote controls often use RF (radio
frequency) communications instead of IR.
38
IR devices communicate over line-of-sight. Obstructions such as walls, people or long
distances may prevent IR transmission. It is recommend that you test the location
where you intend to install a Puck for IR control before permanently installing it.
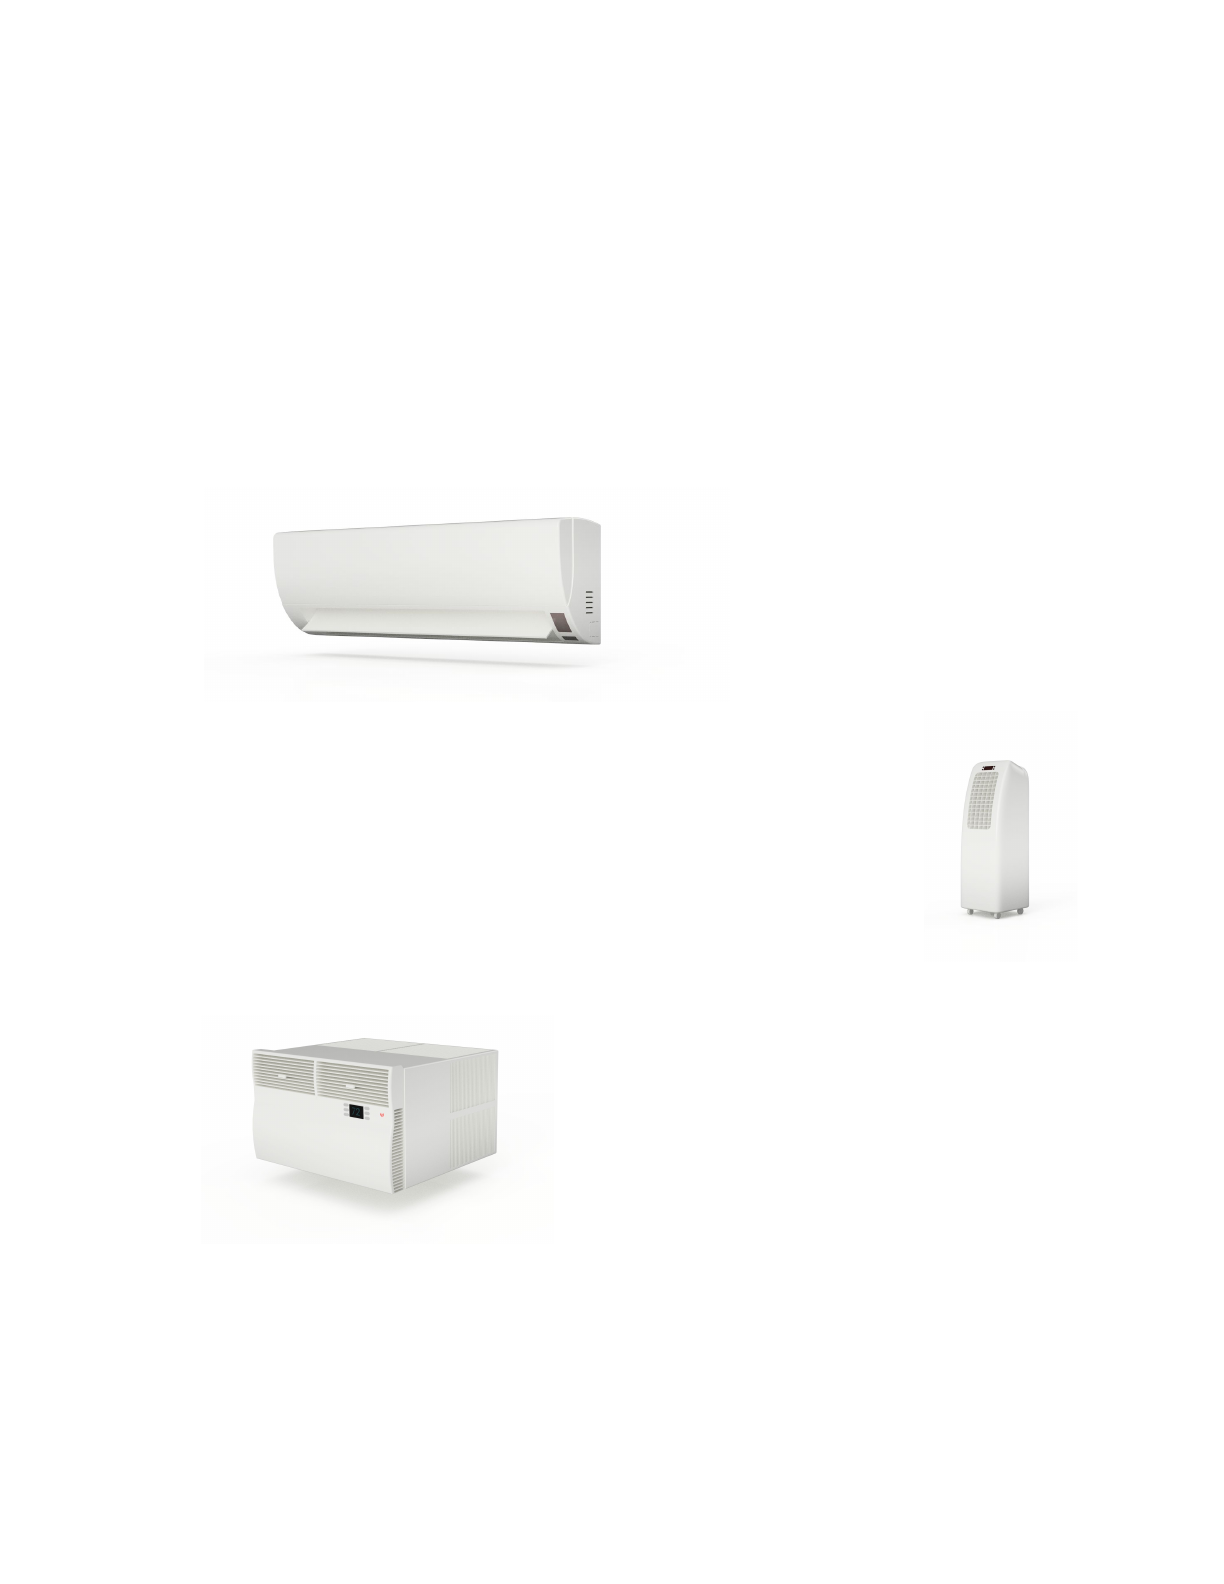
MINISPLIT
A ductless air conditioner or heater that is split between the outside and inside of a
home. The outside portion often appears as a rectangular box with holes for
exhausting heat. The inside portion of the unit is referred to as a head unit, wall unit,
and/or evaporator. Minisplits have a variety of configurations: wall-mounted,
ceiling-mounted, and in-floor.
To the left is a Minisplit head
unit that is typically found
mounted to an interior wall of a
home.
PORTABLE
An air conditioner or heater that can be moved from room to room.
If you use a portable in multiple rooms, you will need to make a copy
of the IR device for each room in the App.
WINDOW AC
Window ACs are air conditioners that are often mounted in
windows, but can also be placed in walls. Half of
the unit is located outside the building. This half
exhausts heat. The other half is located inside the
building. This half collects heat and provides a
user interface to control the device.
Many Window ACs have remote controls, but
some do not. Flair can only control Window ACs
that have an IR remote.
HVAC
An acronym meaning “Heating, Ventilation and Air Conditioning.”
39

DUCT
Ducts are found in forced air heating and cooling systems and are used to transport
air. Ducts are typically constructed of sheet metal in square or round (often called
spiral duct) profiles or may be flex duct. A length of ducting is referred to as a run.
Ducts are used to supply rooms with air and can also return air back to the air
handler. Ducts are often located in attic spaces, basement ceilings, walls, floors, or
exposed in loft layouts.
Ducts terminate in grills, vents or diffusers. Between the main duct run and the vent,
can be a boot. The boot is used to connect the duct to the vent, as well as provide
insulation and mounting options in some cases.
BOOT
Found at the end of duct runs, boots transition from the duct to the vent or return
grill. In-floor boots are usually made from bent and/or crimped sheet metal. Ceiling
and wall boots commonly feature insulation. They also tend to have additional metal
flanges to securely hold the screws that secure the vent in place.
40

Support
We encourage you to search our troubleshooting information, our support knowledge base
(flair.co/support), and our Forum to get answers and help as fast as possible.
If after consulting these resources, you are still experiencing an issue with your Flair
products, you can create a support ticket by emailing hello@flair.co
41

Legal
FCC STATEMENT
Changes or modifications not expressly approved by the party responsible for compliance could void the user’s authority to
operate the equipment.
This equipment has been tested and found to comply with the limits for a Class B digital device, pursuant to Part 15 of the
FCC Rules. These limits are designed to provide reasonable protection against harmful interference in a residential
installation. This equipment generates, uses and can radiate radio frequency energy and, if not installed and used in
accordance with the instructions, may cause harmful interference to radio communications. However, there is no guarantee
that interference will not occur in a particular installation.
If this equipment does cause harmful interference to radio or television reception, which can be determined by turning the
equipment off and on, the user is encouraged to try to correct the interference by one or more of the following measures:
-- Reorient or relocate the receiving antenna.
-- Increase the separation between the equipment and receiver.
-- Connect the equipment into an outlet on a circuit different from that to which the receiver is connected.
-- Consult the dealer or an experienced radio/TV technician for help.
This equipment complies with FCC radiation exposure limits set forth for an uncontrolled environment. This equipment
should be installed and operated with minimum distance 20cm between the radiator and your body. This transmitter must
not be co-located or operating in conjunction with any other antenna or transmitter.
CANADA STATEMENT
This device complies with Industry Canada license-exempt RSS standard(s). Operation is subject to the following two
conditions: (1) this device may not cause interference, and (2) this device must accept any interference, including
interference that may cause undesired operation of the device.
Le présent appareil est conforme aux CNR d'Industrie Canada applicables aux appareils radio
exempts de licence. L'exploitation est autorisée aux deux conditions suivantes : (1) l'appareil ne
doit pas produire de brouillage, et (2) l'utilisateur de l'appareil doit accepter tout brouillage
radioélectrique subi, même si le brouillage est susceptible d'en compromettre le fonctionnement.
This equipment complies with FCC/IC RSS-102 radiation exposure limits set forth for an uncontrolled environment. This
equipment should be installed and operated with minimum distance 20cm between the radiator & your body.
Ce matériel est conforme aux limites de dose d'exposition aux rayonnements, fac / ic rss-102 énoncée dans un autre
environnement.cette equipment devrait être installé et exploité avec distance minimale de 20 entre le radiateur et votre
corps.
PRIVACY POLICY
Visit flair.co/privacy-policy
WARRANTY
Visit flair.co/warranty
QUEBEC WARRANTY
Visit flair.co/quebec-warranty
42

LIMITATION OF DAMAGES
IN ADDITION TO THE ABOVE WARRANTY DISCLAIMERS, IN NO EVENT WILL STANDARD EULER, INC. BE LIABLE FOR
ANY CONSEQUENTIAL, INCIDENTAL, EXEMPLARY, OR SPECIAL DAMAGES, INCLUDING ANY DAMAGES FOR LOST
DATA OR LOST PROFITS, ARISING FROM OR RELATING TO THIS LIMITED WARRANTY OR THE PRODUCT, AND
STANDARD EULER, INC.’S TOTAL CUMULATIVE LIABILITY ARISING FROM OR RELATED TO THIS LIMITED WARRANTY
OR THE PRODUCT WILL NOT EXCEED THE AMOUNT ACTUALLY PAID FOR THE PRODUCT BY THE ORIGINAL
PURCHASER.
LIMITATION OF LIABILITY
THE STANDARD EULER, INC. ONLINE SERVICES (“SERVICES”) PROVIDE YOU INFORMATION (“PRODUCT
INFORMATION”) REGARDING YOUR STANDARD EULER, INC. PRODUCTS OR OTHER PERIPHERALS CONNECTED TO
YOUR PRODUCTS (“PRODUCT PERIPHERALS”). THE TYPE OF PRODUCT PERIPHERALS THAT MAY BE CONNECTED
TO YOUR PRODUCT MAY CHANGE FROM TIME TO TIME. WITHOUT LIMITING THE GENERALITY OF THE
DISCLAIMERS ABOVE, ALL PRODUCT INFORMATION IS PROVIDED FOR YOUR CONVENIENCE,“AS IS”, AND “AS
AVAILABLE”. STANDARD EULER, INC. DOES NOT REPRESENT, WARRANT, OR GUARANTEE THAT PRODUCT
INFORMATION WILL BE AVAILABLE, ACCURATE, OR RELIABLE OR THAT PRODUCT INFORMATION OR USE OF THE
SERVICES OR PRODUCT WILL PROVIDE SAFETY IN YOUR HOME. YOU USE ALL PRODUCT INFORMATION, THE
SERVICES, AND THE PRODUCT AT YOUR OWN DISCRETION AND RISK. YOU WILL BE SOLELY RESPONSIBLE FOR
(AND STANDARD EULER, INC. DISCLAIMS) ANY AND ALL LOSS, LIABILITY, OR DAMAGES, INCLUDING TO YOUR
WIRING, FIXTURES, ELECTRICITY, HOME, PRODUCT, PRODUCT PERIPHERALS, COMPUTER, MOBILE DEVICE, AND
ALL OTHER ITEMS AND PETS IN YOUR HOME, RESULTING FROM YOUR USE OF THE PRODUCT INFORMATION,
SERVICES, OR PRODUCT. PRODUCT INFORMATION PROVIDED BY THE SERVICES IS NOT INTENDED AS A
SUBSTITUTE FOR DIRECT MEANS OF OBTAINING THE INFORMATION. FOR EXAMPLE, A NOTIFICATION PROVIDED
THROUGH THE SERVICE IS NOT INTENDED AS A SUBSTITUTE FOR AUDIBLE AND VISIBLE INDICATIONS IN THE
HOME AND ON THE PRODUCT, NOR FOR A THIRD PARTY MONITORING SERVICE THAT MONITORS ALARM STATE.
Flair Owner’s Manual v1.05-02202018
© 2018 Flair. Flair is a registered trademark of Standard Euler, Inc.
43
