Flaircomm Technologies BTHF361 Bluetooth Handsfree Speaker User Manual BTHF361
Flaircomm Technologies Inc. Bluetooth Handsfree Speaker BTHF361
(BTHF361) User manual
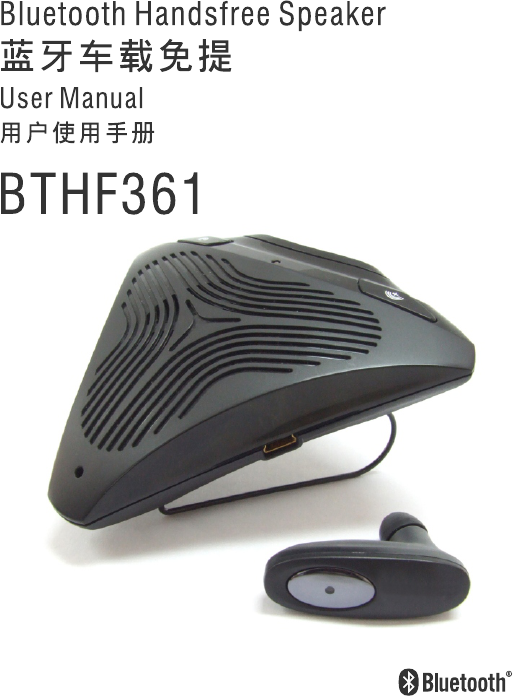

BTHF361
2
Declaration:
Without written permission from original manufacturer, reproduction, transfer,
distribution or storage of part or all of the contents in this document in any form is
prohibited.
The company reserves rights to make any changes and improvements to the
product described in this document without prior notice.
Notice :
Please make sure your mobile phone supports Bluetooth profiles and network
operator supports the functions described in this manual, otherwise the relative
functions cannot be realized on this Handsfree device.
Safety
z Use the charger that comes with package.
z Caution, risk of explosion if battery is replaced by an incorrect type.
z Check the laws and regulations on the use of mobile phones and handsfree
equipment in the areas where you drive. Always give full attention to driving and
pull off the road and park before making or answering a call if driving conditions
require.
z Do not allow children to play with your Bluetooth Handsfree Speaker since it
contains small parts that could become detached and create a choking hazard.
z This device contains a Li-polymer battery. Please keep it away from fire anytime
(including discarding the device) or the battery may explode.
z The Handsfree Speaker, especially the embedded battery must be properly
disposed or may be recycled, contacts your local recycling centers for disposal
methods.

BTHF361
3
Certification and Safety Approvals
This product has been tested and found to comply with Bluetooth BQB requirements,
part 15 of FCC rules, R&TTE Directive(99/5/EC) or CE marked requirements. Users
should not make changes or modify the device in any way. Changes or modifications
without expressly approved by the party responsible for compliance could void the user’s
authority to operate the device.
This device complies with part 15 of the FCC Rules. Operation is subject to the following
two conditions: (1) This device may not cause harmful interference, and (2) this device
must accept any interference received, including interference that may cause undesired
operation.
FEDERAL COMMUNICATIONS COMMISSION INTERFERENCE STATEMENT
This equipment has been tested and found to comply with the limits for a Class B digital
device, pursuant to part 15 of the FCC Rules. These limits are designed to provide
reasonable protection against harmful interference in a residential installation. This
equipment generates, uses and can radiate radio frequency energy and, if not installed
and used in accordance with the instructions, may cause harmful interference to radio
communications. However, there is no guarantee that interference will not occur in a
particular installation. If this equipment does cause harmful interference to radio or
television reception, which can be determined by turning the equipment off and on, the
user is encouraged to try to correct the interference by one or more of the following
measures:
-Reorient or relocate the receiving antenna.
-Increase the separation between the equipment and receiver.
-Connect the equipment into an outlet on a circuit different from that to which the receiver
is connected.
-Consult the dealer or an experienced radio/ TV technician for help.
CAUTION:
Any changes or modifications not expressly approved by the grantee of this device could
void the user's authority to operate the equipment.
RF exposure warning ·
This equipment must be installed and operated in accordance with provided instructions
and the antenna(s) used for this transmitter must be installed to provide a separation
distance of at least 20 cm from all persons and must not be co-located or operating in
conjunction with any other antenna or transmitter. End-users and installers must be
provided with antenna installation instructions and transmitter operating conditions for
satisfying RF exposure compliance.
CE command:
ETSI EN 301 489-1 V1.6.1(2005-09);
ETSI EN 301 489-17 V1.2.2(2002-08);
ETSI EN 300 328 V1.6.1(2004-11);
IEC 60950-1:2001,EN 60950-1:2001+A11:2004

BTHF361
4
Contents:
1. INTRODUCTION .................................................................................................5
1.1 BLUETOOTH TECHNOLOGY ..............................................................................5
1.2 BLUETOOTH HANDSFREE SPEAKER .................................................................5
1.3 PRODUCT FEATURES.......................................................................................5
1.4 PACKAGE CONTENTS ......................................................................................6
1.5 OVERVIEW ......................................................................................................6
2. USING YOUR HANDSFREE...............................................................................8
2.1 BATTERY CHARGING AND USAGE.....................................................................8
2.1.1 Battery Charging................................................................................8
2.1.2 Battery Information.............................................................................9
2.2 MOUNTING YOUR HANDSFREE .........................................................................9
2.3 TURNING ON/OFF HANDSFREE ......................................................................10
2.4 PAIRING/CONNECTING YOUR HANDSFREE WITH BLUETOOTH EQUIPMENT.......10
2.4.1 Pairing your Handsfree with Bluetooth handset...............................10
2.4.2 Connecting your Handsfree with Bluetooth Equipment....................11
2.5 CALL FUNCTIONS ..........................................................................................11
2.5.1 Basic Call Operations.......................................................................11
2.5.2 Voice Dialing....................................................................................12
2.5.3 Transferring Calls to/from your Handset ..........................................12
2.5.4 Volume Adjustment..........................................................................12
2.6 TWO-LINK OPERATION...................................................................................12
2.6.1 Connecting with Two Handsets Simultaneously ..............................12
2.6.2 Call Operations ................................................................................13
3. QUICK USER GUIDE........................................................................................14
4. MAINTENANCE ................................................................................................16
5. IMPORTANT MESSAGES AND FREQUENTLY ASKED QUESTIONS...........17

BTHF361
5
1. Introduction
1.1 Bluetooth Technology
Bluetooth is an internationally standardized technology supporting short distance
wireless communications. Any two Bluetooth-compatible equipments can wirelessly
communicate with each other via Bluetooth connection.
Though line-of-sight is not required, Bluetooth connections could be subject to
interferences from obstructions such as walls, human bodies, and other electronic
devices. In addition, due to variations on product implementation, it is likely that
Bluetooth equipments from different manufacturers have interoperability issues. In that
case, you may consult with manufacturers to check product compatibility.
Note that, there could be some restrictions imposing on using Bluetooth devices in some
countries. Please check with your local authorities.
1.2 Bluetooth Handsfree Speaker
This Bluetooth handsfree speaker is a specially designed product allowing car drivers to
make and receive calls without holding a mobile phone. It provides a clean wireless
audio connection with your Bluetooth mobile phone and PDA.
In addition to vehicle environment applications, this portable equipment, supported by an
internal rechargeable Li-ion battery, can also be used in office environment as normal
handsfree equipment to make/receive conference phone calls. It can also be placed
beside a Bluetooth-enabled PC to make voice calls over the Internet.
1.3 Product Features
z Bluetooth 2.1+EDR compliant, and data rate up to 2.1 Mbps
z Class II, operating range up to 10 meters
z Support HSP, HFP profile
z Compatible with most Bluetooth-enabled devices such as cellular phones, PDAs,
and computers for voice communication
z Support up to 8 handset pairing info simultaneously
z Best-in-class voice quality ensured by cutting-edge noise suppression and echo
cancellation techniques
BTHF361
6
z Voice security ensured by using 128-bit encryption
z Better portability with internal rechargeable battery
z Low power consumption; the headset supports up to 3.5 hours talk time and 150
hours standby time, while the handsfree with up to 5 hours active time and more
than 300 hours standby time.
z Easy-to-mount with Sun visor clip
z Robust performance, fast connection, accurate and sensible search of devices in
range
z Stylish, portable, lightweight, mini-sized, suitable for vehicle and office
environment
1.4 Package Contents
z BTHF361(include a master handsfree car kit and a headset)
z 12/24V Car Charger Set(or Traveling Charger Set optional)
z User Manual
1
1
1
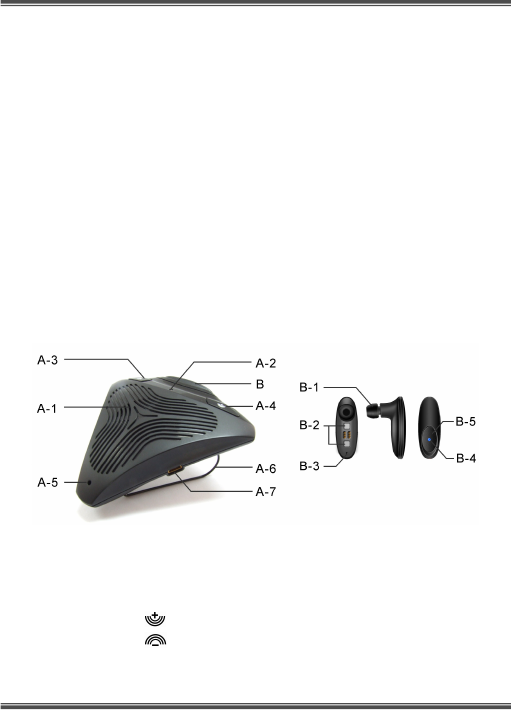
1.5 Overview
Figure 1 Overview
A: Master Handsfree Car Kit
A-1. Speaker: Voice delivery.
A-2. Red LED: Indicate device status.
A-3. Button : Volume up.
A-4. Button : Volume down.
A-5. Microphone: Voice pick-up.

BTHF361
7
A-6. Sun-visor Clip: Fix the device onto sun-visor
A-7. Charging Port : Connect to the travel (or car) charger to charge
the battery of device.
B:Headset
B-1. Earphone: Voice delivery.
B-2. Magnet: Adsorb headset onto handsfree
B-3. Microphone: Voice pick-up.
B-4. Red/Blue LED: Indicate device status.
B-5. Main Button: Turn on/off headset, pair, receive, reject and end call, etc.
BTHF361
8
2. Using Your Handsfree
2.1 Battery Charging and Usage
2.1.1 Battery Charging
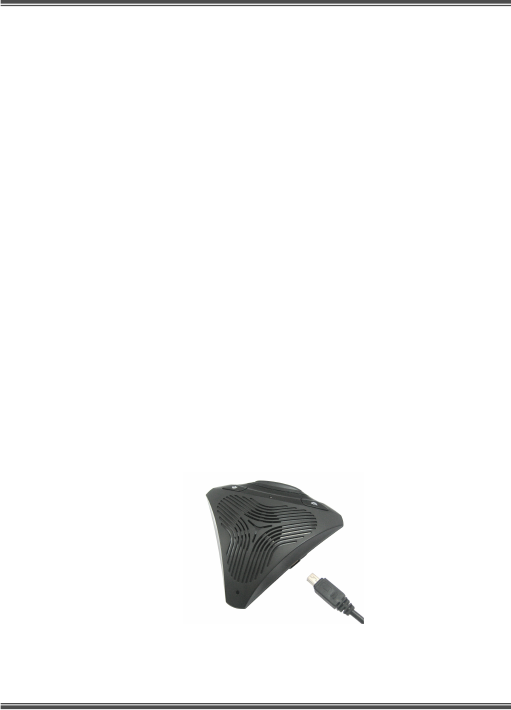
This device contains a rechargeable Li-Polymer battery. First-time charging time is about
4 hours. Later-on recharging time is around 2-3 hours. Detailed charging procedures are
as follows:
Master Handsfree Car Kit :
1. Connect the car charger to the cigarette lighter, or plug the USB cable into PC.
2. Referring to Figure 2, plug the connector of the charger to handsfree’s charging
port to start charging. The Red LED will be on during charging. Once the Red
LED turns off, the battery is fully charged and you should disconnect the charger
from the handsfree and the power outlet.
Headset:
1. Place the headset into its seat on the master handsfree car kit.
2. The master handsfree car kit will charge the headset with its remaining battery
power without being connected with power outlet. If there is no remaining power of
the battery, you need to take above steps to charge the handsfree and headset.
Note that once the headset is placed into the seat, it will be charged by the master
handsfree automatically until the handsfree runs out of power or the headset is fully
charged.
Figure 2 Battery Charging
BTHF361
9
You can also use the USB charging cable to charge the device on your PC, which will
take longer to charge as the power output of the USB port is lower than it is with the car
charger.
Note:
1. It is recommended to charge your device when it is not in use.
2. Please note that “inserting” charger will cause a device reset and power off. The
existing connection between the device and the mobile phone will be
disconnected.
2.1.2 Battery Information
1. Once fully charged, BTHF361 headset supports continuous talk time up to 3.5
hours and standby time about 150 hours and the master handsfree car kit can
work up to 5 hours and standby for more than 300 hours.
2. When the battery is low, the Red LED will give 2 blinks per 3 seconds, and then
you need to charge the battery as described above.
Note that, over-charging will reduce battery life. If a fully charged battery is left unused, it
will lose power over time. Extreme temperature (either too hot or too cold) will also affect
its ability to charge, capacity, and lifetime.
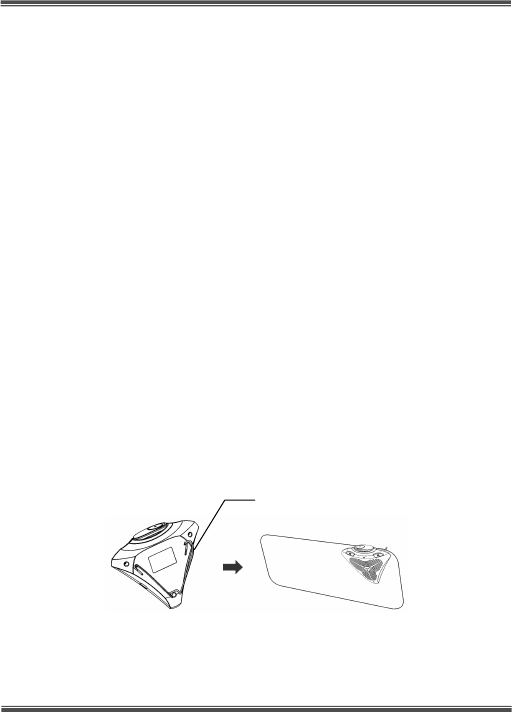
2.2 Mounting your Handsfree
This Handsfree device can be easily mounted inside the car by using the companion
Sun-Visor Clip to fix the product on the sun-visor over the driver’s seat.
Note that, the microphone of the Handsfree must aim at the sound bearing.
Figure 3 Fixing the Sun-visor Clip
Note that, the sun visor clip is an integrated design with the product and users shall not
try breaking it apart from the product, or damages will be caused.
Sun-visor Cli
p

BTHF361
10
With great portability and flexibility, this device can also be used outside of such car
environment such as in office and/or at home.
2.3 Turning On/Off Handsfree
Turning on the Handsfree: Press and hold main button for 1 second, you will hear 3
power-up tones. The Blue LED gives 2 blinks per 2 seconds; the Red LED is off. This
indicates the handsfree is power on.
Turning off the Handsfree: Press and hold main button for at least 2 seconds, you will
hear 1 key tone and 4 power-down tones. The Red and Blue LEDs will both be on for 1
second and then be off. This indicates the handsfree is power off.
2.4 Pairing/Connecting your Handsfree with Bluetooth Equipment
2.4.1 Pairing your Handsfree with Bluetooth handset
Before making and answering calls, you must pair your handsfree and phone. Pairing
sets up a unique relationship between your handsfree and your handset. The handset
will memorize the handsfree’s unique ID (or passkey). This ensures that a unique and
encrypted wireless link between your handsfree and handset will be used during calls.
Detailed operation procedures are as follows:
1. Place your handsfree close to your Bluetooth handset, and ensure your handsfree
is power off while your handset is power on.
2. Press and hold main button for at least 3 seconds until the Blue and Red LEDs
alternate continuously. You will hear 3 power-up tones and a high pairing tone to
indicate that the handsfree has successfully entered paring mode.
3. Follow your phone user guide to activate Bluetooth device search on the phone
side, on your phone screen you will see a list of Bluetooth equipment found by the
phone at the end of the searching process. Select this Bluetooth Handsfree from
the list ‘BTHF361’, and initiate pairing following handset’s on-screen prompts.
4. Continue to follow on-screen prompts to enter passkey “0000”and confirm to pair
the handsfree with your handset. Once the pairing procedure is completed, you
will hear a high connecting tone, and then Blue LED gives 3 quick blinks per 2
seconds. It indicates that the handsfree device and the handset are paired and
connected.

BTHF361
11
Note
:
1. If pairing is successful, handsfree’s Red LED is off. The Blue LED gives 3 quick
blinks per 2 seconds. If your handset shows that pairing is failed and the
handsfree is still in the paring mode, you need to go back to above steps 3-4 to
repeat the pairing process.
2. Your handsfree will remain in the pairing mode for about 2 minutes. If pairing
cannot be finished within 2 minutes, the handsfree will enter into the standby
mode (without Bluetooth connection in this case). You need to turn the handsfree
off and then repeat the above steps 2-4 to restart the pairing process.
2.4.2 Connecting your Handsfree with Bluetooth Equipment
This handsfree can be paired with up to 8 Bluetooth equipments (including mobile
handsets). The corresponding 8 sets of pairing information are recorded by the
handsfree. Each paired equipment can be wirelessly communicated with the handsfree
after setting up a Bluetooth connection.
Connecting your Handsfree with Bluetooth Handset:
Initiating a request from either the handsfree or the handset can set up Bluetooth
connection. Detailed operations are as follows:
1. Initiating connection request from the Handsfree: Place the handsfree close to the
Bluetooth handset and then press main button.
2. Initiating connection request from the Bluetooth handset: Place the handsfree
close to the Bluetooth handset and then follow the handset user guide to find the
handsfree and send connection request.
After connecting, you will hear a high connecting tone. The Blue LED gives 3 quick
blinks per 2 seconds
2.5 Call Functions
2.5.1 Basic Call Operations
Before dialing, both your handsfree and handset must be power on. And you also need
to ensure your handsfree and handset have been linked with Bluetooth connection.
Answer Call: Press main button.

BTHF361
12
Reject Call: Press and hold main button for 1 second.
End Call: Press main button.
Redial: Press and hold main button for 1 second.
2.5.2 Voice Dialing
If the connected handset supports voice dialing, you can press main button to activate
voice dialing. Before using voice dialing, you must record voice tags in your handset.
Please refer to your handset manual for detailed descriptions on how to set up voice
dialing and recording voice tags.
2.5.3 Transferring Calls to/from your Handset
Transferring calls to your handset: Press and hold main button for 1 second.
Transferring calls from your handset: Press and hold main button for 1 second.
2.5.4 Volume Adjustment
When in the connected or talk/play mode, you can adjust sound volume up or down by
pressing and holding buttons or for 1 second respectively. You can repeat the
above operation until the speaker volume reaches a desirable level.
Note
:
For most Bluetooth handset, handsfree volume control will synchronize with the
handset. That is, the sound volume of your handsfree can be controlled by your handset,
vice versa. However, this may not be always true due to variations on handset
implementations chosen by different manufacturers.
2.6 Two-Link Operation
Compared with the ordinary Bluetooth handsfree devices in the market which can only
connect to one single handset at one time, BTHF361 allows you to connect with two
paired handsets simultaneously. Thus, this is very convenient for users with two
handsets.
2.6.1 Connecting with Two Handsets Simultaneously
To connect with two paired handsets you can:
1. Pair and connect the handsfree with each handset respectively and turn it off.
(Refer to Section 2.4.1 for pairing procedures)

BTHF361
13
2. Switch on the handsfree. The handsfree automatically starts to connect the last
two connected handsets.
When two handsets are connected with the handsfree, the first connected one works as
the primary device and the other the secondary.
Any operation initiated from the handsfree side, such as redialing and voice dialing, will
only be applied to the primary device. If you want to initiate the operation for the
secondary device, you must disconnect with both two handsets, and then connect with
the secondary device only.
Operations initiated from either handset shall be applied to the handsfree as usual.
2.6.2 Call Operations
When two handsets are both connected to the Handsfree:
1. If only one handset receives a call, the call will be transferred to the handsfree and
all call operations will be the same as in the case of single connection.
2. If both of the connected handsets receive incoming calls at the same time, only
the first call will be transferred to and controlled by the handsfree (call waiting and
conference call are also controlled by the handset which receives the first
incoming call). After the first call is terminated, the call on the other device will
transfer to the handsfree automatically.

BTHF361
14
3. Quick User Guide
You can follow the instructions listed in Table below to operate your handsfree devices.
(Please refer to section 1.5 for details of key and key press duration definitions.)
CURRENT STATUS HANDSFREE INDICATOR
FUNCTI
ON HANDS
ET HF
OPERATION AUDIO
TONE HF
Turn On Power
Off
Press and hold
main button for
1 second
3 power-up
tones
Blue LED
gives 2
blinks per 2
seconds
Turn Off Standby
Press and hold
main button for
at least 2
seconds
1 key tone
and 4
power-down
tones
Red and
Blue LEDs
will both be
on for 1
second and
then off
Enter
pairing
mode Power
Off
Press and hold
main button for
at least 3
seconds
3 power-up
tones and a
high tone
Blue and
Red LEDs
alternate
continuousl
y
Pair
handsfre
e with
handset
Power
on Pairing
mode
Follow your
handset user
guide to
complete
pairing
procedure.
Passkey is
“0000”
1 low tone
Blue LED
gives 2
blinks per 2
seconds
Connect
(handsfr
ee with
handset)
Standb
y
(discon
nec-
ted)
Standby
(disconn
ect-ed)
Press main
button or set
up connection
from the
handset
1 high
connecting
tone
Red LED
gives 3
quick blinks
per 2
seconds
Answer
Call Incomin
g call Incomin
g call Press main
button 1 high long
tones
Blue LED
gives 1
slow blink
per 0.5
second 三
BTHF361
15
Reject
Call Incomin
g call Incomin
g call
Press and hold
main button for
1 second 2 high tones Blue LED
gives 2
quick blinks
End Call Talk Talk Press main
button 1 short tone
Blue LED
gives 3
quick blinks
per 2
seconds
Last
number
Redial
Standb
y Standby Press and hold
main button for
1 second 1 short tone
Blue LED
gives 1
quick blink
per 0.5
seconds
Voice
Dialing Standb
y Standby Press main
button 1 short tone
Blue LED
gives 3
quick blinks
per 2
seconds
Volume
up Talk Talk
Press and hold
button for
1 second
No
indication No
indication
Volume
down Talk Talk
Press and hold
button for
1 second
No
indication No
indication
Low
Power
Warning Except
power
off Power off No
indication
Red LED
gives 2
blinks per 3
seconds
Call
Transfer
(handsfr
ee to
handset)
Talk Talk Press and hold
main button for
1 second Key tone
Blue LED
gives 1
quick blink
per 0.5
seconds
Call
Transfer
(handset
to
handsfre
e)
Talk Talk Press and hold
main button for
1 second Key tone
Blue LED
gives 1 slow
blink per 0.5
seconds

BTHF361
16
4. Maintenance
BTHF361 is a well-designed communications device; careful maintenance and proper
use will extend the product life and keep its elite performance in delivering voice and
music. Following maintenance procedures may be helpful to you:
z Always turn off power and keep your device in a safe place when it is not in use
z Keep the device dry, away from water, precipitation, humidity, moisture, and
various liquids that may corrode electronic circuits. If your device gets wet, turn it
off immediately and wait until the device gets dry completely before using it
z Keep the device away from dusty and dirty places. Otherwise, the mechanic and
electronic parts could be damaged
z Do not store the device in high temperatures or in direct sunlight. Extreme high
temperature could degrade performance, reduce battery lifetime, and wrap or melt
the certain plastics.
z Do not store the device in too cold place. Moisture could form inside the device
when you take it to a warm place. This could damage the internal electronic
circuits.
z Avoid dropping, knocking, and shaking the device. The mechanical parts and the
internal electronic circuits could be broken.
z Avoid using hash chemicals, cleaning solvents, and any other strong detergent to
clean the device. You may use a clean and slightly damp cloth to clean the device
z Always take to device to the nearest authorized service facility for repairing if it is
malfunctioning. Disassembling, modifying, and replacing components yourself
could degrade product performance, cause damages, and terminate warranty

BTHF361
17
5. Important Messages and Frequently Asked Questions
Q1. Power off :
Low battery indicator; please recharge your battery as soon as possible.
Q2. Can't power up the device after charging more than 20 minutes:
For first time use, the device should be charged at least 40 minute in advancve.
It is recommended that the battery should be fully charged before using the
device.
Q3. Without charging indicator:
When the battery runs off or the handsfree has not been used for a while, the
Red LED may take a while to light up after the charger connected.
Q4. Can't hear anything on handsfree: you should check the followings
z Handsfree is power on
z Handsfree has paired with a handset
z Handsfree has connected with a handset (except the handset only supports
headset Profile)
z Handsfree and handset are within 10m
z Handsfree and handset have good single strength
Q5. Does the paired handsfree or the paired handset need to be repaired
after power off:
No. Please note that for the handset supports handsfree profile, the handsfree
and the handset must be connected first before making/receiving.
Q6. Voice dialing does not work:
First check whether or not the handset supports voice dialing function. Then
make sure you have recorded the voice tag. Please note that noisy
environment may affect voice dialing.