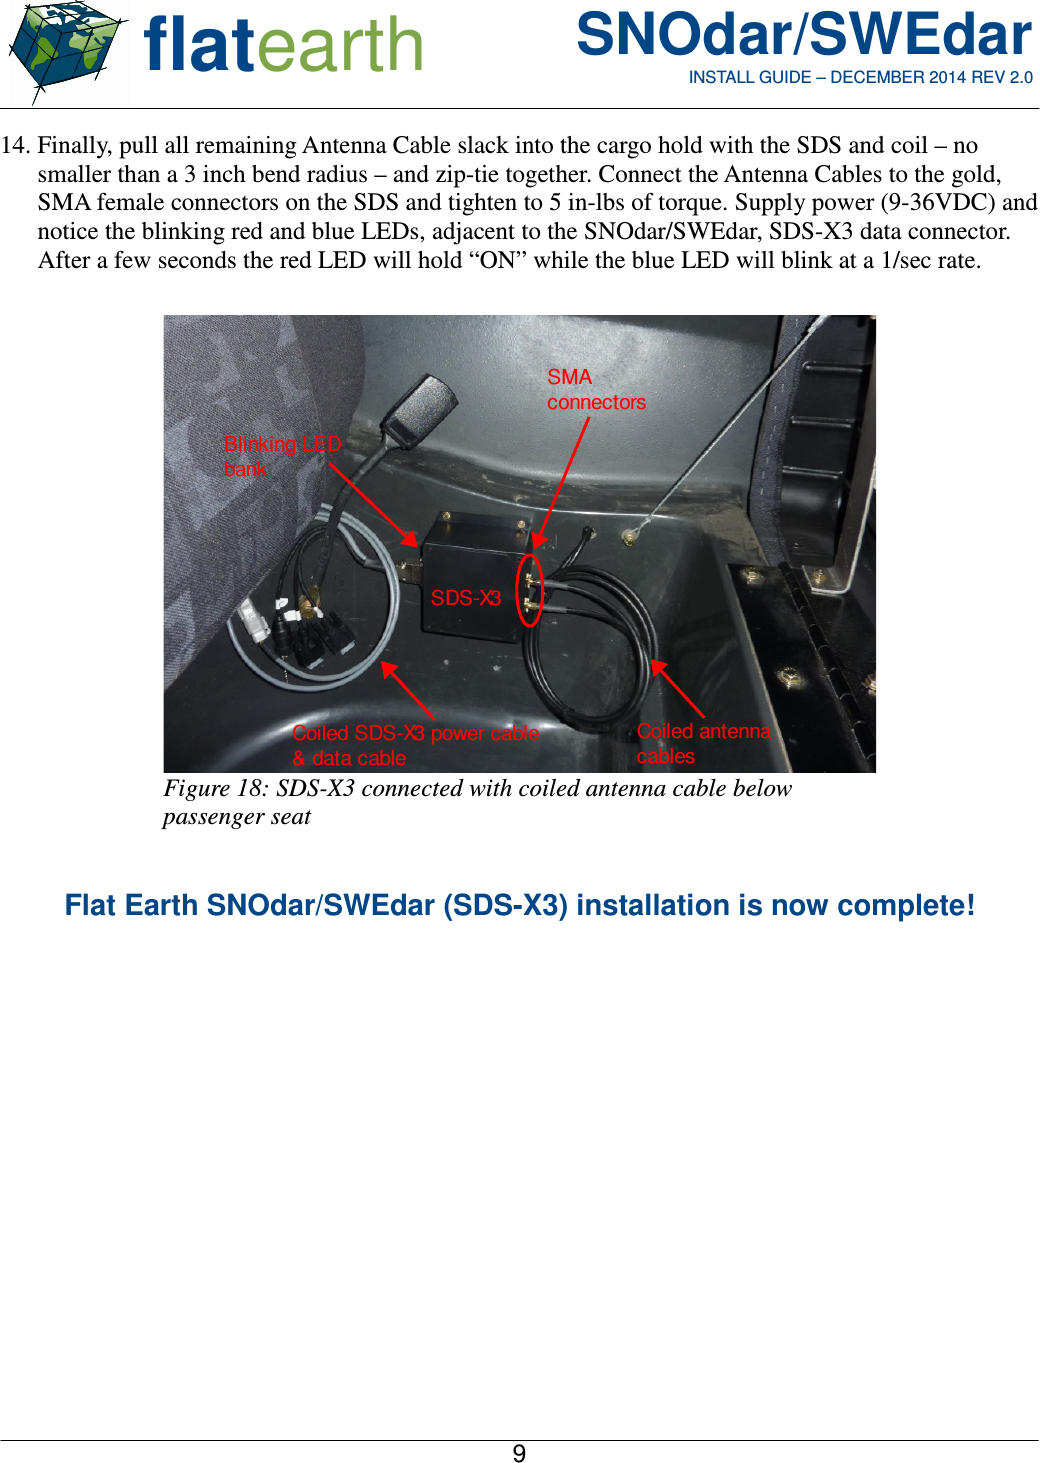
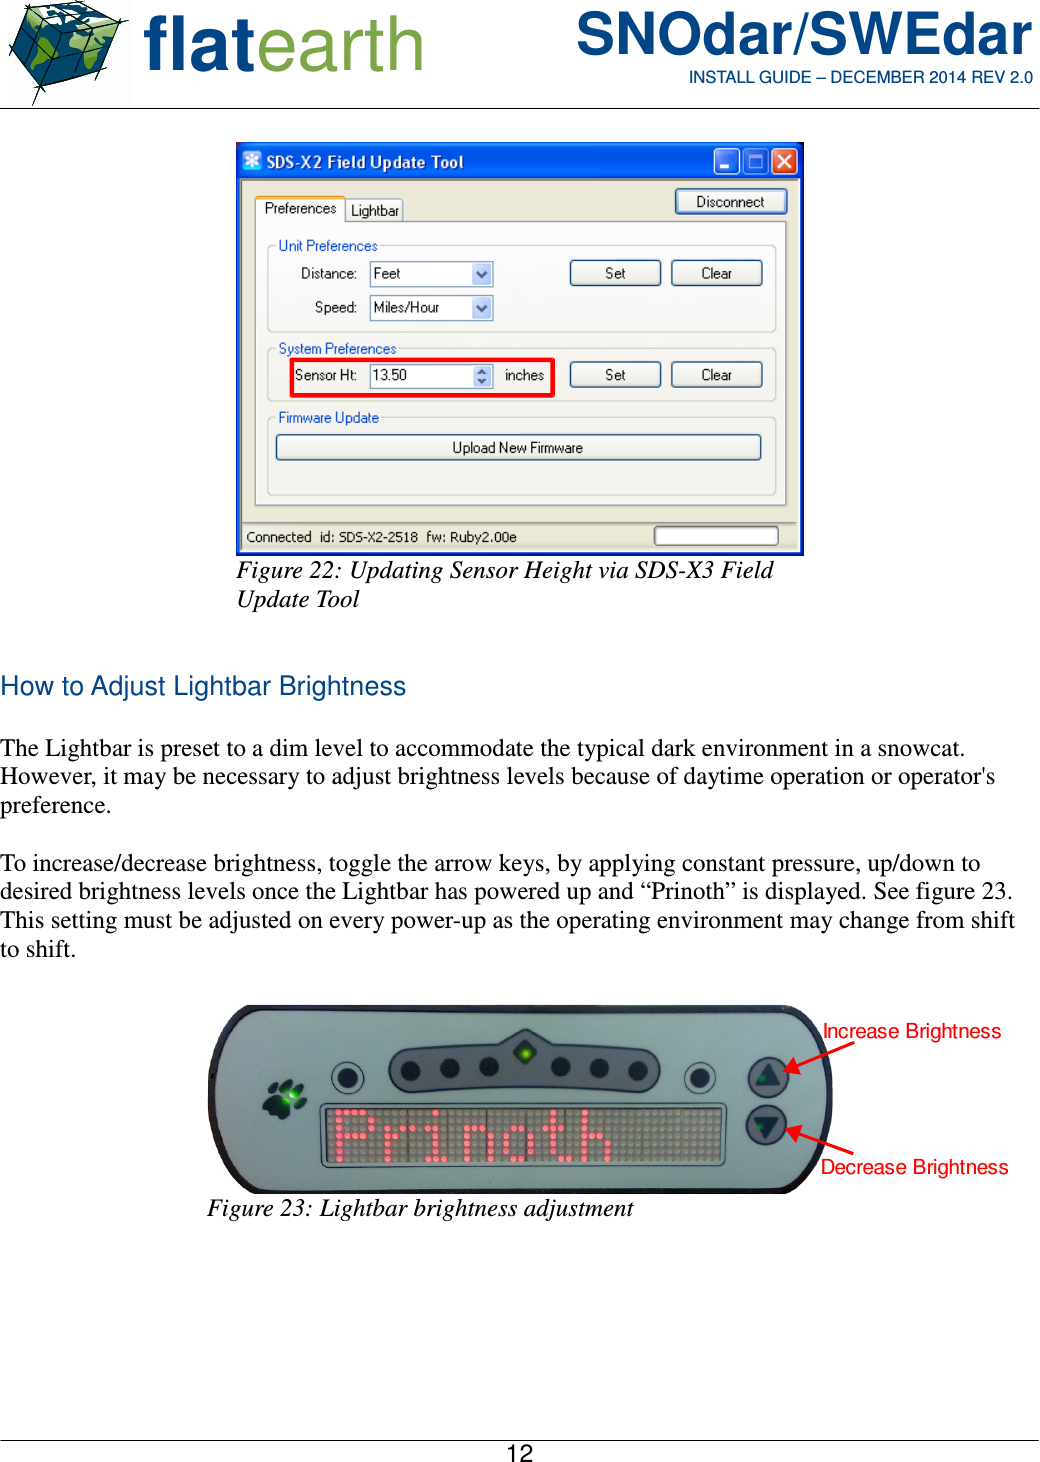
Flat Earth PGC2661184 Ground penetrating radar to measure snow depth User Manual FlatEarth SDS X3 Installation Guide

Flat Earth Inc. Ground penetrating radar to measure snow depth FlatEarth SDS X3 Installation Guide

User Manual

 flatearth SNOdar/SWEdarINSTALL GUIDE – DECEMBER 2014 REV 2.0SNOdar/SWEdar (SDS-X3)Mobile Installation Guide 1
 flatearth SNOdar/SWEdarINSTALL GUIDE – DECEMBER 2014 REV 2.0Parts List1.  1 – SDS-X32.  1 – Outrigger Antenna  w/ drill template3.  2 – 10 ft. LMR240 Antenna cables4.  1 – SDS-X3 data cable5.  1 – SDS-X3 power cable6.  1 – Roll, cold shrink black tape7.  1 – Lightbar w/ attached ball mount8.  1 – Lightbar power cable9.  1 – Ball Mount 10.  1 – Mounting Clip1. 2.3. 4.5. 6.7. 8.  9. 10.2
 flatearth SNOdar/SWEdarINSTALL GUIDE – DECEMBER 2014 REV 2.0OverviewThe FlatEarth SNOdar/SWEdar, SDS-X3 system is designed for ease of operation and installation. Thefull installation should take less than 2 hours per vehicle once you are familiar with the steps involved.Some general considerations for the installation are:a) The Lightbar should be located within the operator’s field of view, to usefully observe snow-depth messages, without obscuring the view of the blade or other vital components. b) A specific mounting location for the Outrigger Antenna-X3 is outlined below, but may have tobe customized depending on the model and year of the vehicle. However, always mount theOutrigger Antenna along the center line of the vehicle and parallel to the ground.c) The SDS-X3 should be mounted under the vehicle's passenger seat or in the center console toensure the provided Antenna Cables properly span the distance between the Outrigger Antennaand the SDS. The exact position my need to be customized depending on the model and year ofthe vehicle.Power requirements for the FlatEarth SNOdar/SWEdar, SDS-X3 system are 9-36 VDC. Connection toa power source for the X3 components is provided by wiring power leads with the red/positive wireconnected to ignition sense power and the black/brown/negative wire properly grounded. This ensuresthat the system will only be on when the ignition key is on and will not drain the vehicle battery. Also,ensure all components use the same ignition sense power source so everything powers upsimultaneously.Installation StepsLightbar1. Locate Ball Mount (#9) for Lightbar (#7) ondash cover toward the front of the operator'sview in the vehicle cab. Be sure to locate theBall Mount where mounting holes can bedrilled through the dash cover withoutinterfering with underlying electroniccomponents and wiring in the vehicle. Drillthree holes using a 3/16 inch drill bit andsecure the ball mount with the three 10-24mounting bolt and nut pairs.2. Attach Mounting Clip (#10) to Ball Mount and Lightbar. Position Lightbar toward operator andsecure by tightening mounting clip, see figures 2 and 3. Route the Lightbar power cable (#8),pigtail side, to the desired power supply location in the cab. Attach the blue cap end of the Lightbarpower cable to the Lightbar. If desired, wrap the exposed Lightbar power cable wires in plastic3Figure 1: Lightbar ball mount in centralviewing locationBall Mount (#9)
 flatearth SNOdar/SWEdarINSTALL GUIDE – DECEMBER 2014 REV 2.0sheathing for maximum protection against wear. To change Lightbar brightness see the Appendix.SNOdar/SWEdar, SDS-X33. Next, locate a sufficiently sized space, similar tothe dashed area in the figure 4 photo, in the cargohold underneath the vehicle's passenger seat formounting the SDS (#1). Use the mounting flangeholes as a template to drill 4 pilot holes. *Note:For ISAAC configuration skip step 4 below.4. Route the SDS-X3 power cable (#5),pigtail side first, to the desired powersupply location in the cab, e.g. DC-DCconverter beneath the backrest of thepassenger seat. Connect the power leadsappropriately (red/positive &brown/negative) with a 1 Amp in-line fuse.4Ball MountMounting ClipLightbar Power CableFigure 2: Lightbar on center dash in vehicle cab Figure 3: Lightbar in driver's field of view Ball Mount (#9)Lightbar mounting clip (#10)Lightbar power cable (#8)Figure 4: Cargo hold under passenger seatFigure 5: DC-DC converter under backrestPassenger SeatSDS-X3 power cable (#5)Deutsch connectorDC-DC converter
 flatearth SNOdar/SWEdarINSTALL GUIDE – DECEMBER 2014 REV 2.05. Connect the SDS-X3 data cable (#4) to the SDS,and tighten the captive screws on either side ofthe connector (2, #4-40 slot-head). Mount theSDS with 4 screws of your choice, depending onthe material to which you are mounting, using thepreviously drilled pilot holes. Finally, connect thepower cable to the data cable via the Deutschconnector interface. For StandaloneConfiguration details see the Appendix.*Note: If CAN interface communication isdesired for ISAAC configuration; instead,connect the existing ISAAC CAN/PWR cable tothe Deutsch connector on the SDS data cable. 6. Drill an elongated hole through the snowcat body and insulating foam, near the SDS-X3 as seen infigure 6 above, slightly larger than two SMA connectors side by side (small gold connectors, seefigure 8 below).  Be careful to drill above any horizontal metal tubing, supporting the cab.  Thishole will provide a pathway for the Antenna Cables (#3) to enter the cab and attach to the SDS.The other end of the cables will be dropped through the frame via the cab pivot joint down to theOutrigger Antenna-X3 (#2) mounting position.7. While the cab is elevated, route the Antenna Cables – SMA end first – into the cab from the cavity,under the cab and above the gas tank. Keep the cables secured behind the cab frame, and leavethem hanging free as the cable slack will have to be drawn up and coiled in the cargo hold beneaththe passenger seat. See example in figures 9 and 10. Route the larger Type-N side of the AntennaCables around the cab pivot joint and down to the main forward-facing cross-member of the frame,near to where the Outrigger Antenna will be mounted. For routing, follow an established routingpath of the factory installed wiring harness/plastic sheathing. Leave the connectors hanging freeover the beam with 12-18 inches of slack.5Figure 6: SDS-X3 mounted in cargo spaceunder passenger seatFigure 7: Right Angle (RA) Type-NconnectorFigure 8: SMA maleconnector
 flatearth SNOdar/SWEdarINSTALL GUIDE – DECEMBER 2014 REV 2.0Outrigger Antenna-X38. Locate the main cross-member of the frame underneath the snowcat vehicle for Outrigger Antennamounting. Find the horizontal center of the beam, as the antenna will be mounted along the center-line of the vehicle. The top of the Outrigger Antenna will be mounted just below the top of thebeam. This ensures the proper sensor height and ease of cable installation.6Figure 11: Main, forward frame cross-member underneath snowcatCL Bottom of exterior corner round/chamfer Mounting holesMain cross-member beamFigure 9: Antenna cable routed beneath cabframe under elevated cabRouting hole from under passenger seat  Antenna cables behind cab frame  Drop cable through openingFigure 10: Antenna cable routed into cargo holdfrom underneath cabSDS-X3 data cable (#4) SDS-X3 (#1) Antenna cables (#3)Fuel tank
 flatearth SNOdar/SWEdarINSTALL GUIDE – DECEMBER 2014 REV 2.09. Position and clamp the supplied drill template according to your measurements: horizontallycentered and vertically, position the top of the template flush with the bottom of the exteriorcorner round of the beam. Make sure the template is kept precisely parallel with the beam so theOutrigger Antenna is mounted parallel with the ground. Punch all four holes according to thetemplate. The hole pattern is shown to the right. Use a Q size drill bit (0.332 in.) and a 3/8-24 tapto thread the drill holes. Clean the holes with a thread chaser if needed.10. Attach the Type-N connectors on the antennacables to the outrigger antenna and tighten to15 in-lbs of torque, angling the connectorsslightly for easier routing. Wrap eachconnector with the supplied Cold ShrinkBlack Tape (#6), a.k.a. vulcanizing tape, tosufficiently cover the connector junction, asseen in figure 13. This acts as a moisture andtemperature barrier at this interconnect.11. Mount the Outrigger Antenna with four 3/8-24, 1-1/4 inch long Grade-8 bolts, four flat washers,and four lock washers. Apply a liberal amount of blue Loctite on each bolt before assembly toensure the bolts stay securely threaded in place over the life of the antenna and torque to a7Figure 12: Antenna Outrigger-X3 drill templateTemplate TopTemplate BottomThis side up! Flush against exterior corner round.  Figure 13: Outrigger Antenna with N-typeconnectors attached and wrapped with cold shrinktape (not yet mounted)Cold shrink tapeOutrigger Antenna-X3 (#2)Fuel Tank
 flatearth SNOdar/SWEdarINSTALL GUIDE – DECEMBER 2014 REV 2.0comfortable force. Do not over tighten or threads may strip! To properly measure and update theOutrigger Antenna-X3 sensor height see the Appendix.12. Zip-tie the cables together near their connection to the Outrigger Antenna, and/or to any secure areaon the frame where the cables appear loose or in danger of catching on a foreign object.13. Also, zip-tie the antenna cables to the factory tubing every 12 to 18 inches to secure the cables frommovement. Keep cables elevated and taut; protected by the factory tubing. Start at the OutriggerAntenna and work your way backward to the SDS in the cab, pulling the cable slack into the cargohold, or other chosen mounting space. If possible, route the antenna cables similar to the pathshown in the figures below (photos are specific to a Prinoth BR350). 8Figure 14: Outrigger Antenna mounted parallel togroundOutrigger Antenna-X3Figure 15: Cables slightly angled androuted/secured along frameOutrigger Antenna-X3Antenna cables routed and securedFuel tankGrade-8, 3/8”-24 boltsFigure 16: Zip-tie to frame under elevatedcabRouting hole from under passenger seat Zip-tied to cab frameAntenna cablesFigure 17: Zip-tie to ground strap underelevated cabZip-tied to ground cable at cab pivot jointAntenna cablesFuel tank
 flatearth SNOdar/SWEdarINSTALL GUIDE – DECEMBER 2014 REV 2.014. Finally, pull all remaining Antenna Cable slack into the cargo hold with the SDS and coil – nosmaller than a 3 inch bend radius – and zip-tie together. Connect the Antenna Cables to the gold,SMA female connectors on the SDS and tighten to 5 in-lbs of torque. Supply power (9-36VDC) andnotice the blinking red and blue LEDs, adjacent to the SNOdar/SWEdar, SDS-X3 data connector.After a few seconds the red LED will hold “ON” while the blue LED will blink at a 1/sec rate.Flat Earth SNOdar/SWEdar (SDS-X3) installation is now complete!9Figure 18: SDS-X3 connected with coiled antenna cable belowpassenger seatSDS-X3Coiled antenna cablesCoiled SDS-X3 power cable & data cableBlinking LED bankSMA connectors
 flatearth SNOdar/SWEdarINSTALL GUIDE – DECEMBER 2014 REV 2.0AppendixGPS Installation for Standalone ConfigurationIf standalone configuration is required, a GPS unit must be connected to the SDS to relay speed andposition data. The data stream must be reported in NMEA (National Marine Electronics Association)format using $GPVTG and $GPGGA strings. Speed is mandatory while position data is optional.*Note: The SDS does not use GPS position data to track the snowcat vehicle.Install the GPS receiver per manufacturers instructions. The GPS receiver must draw power from thesame ignition sense power as the X3 system to ensure they are powered simultaneously.Configure the GPS receiver with the following RS-232 communication attributes:Baud rate 19200Data bits 8Parity NoneStop bits 1Securely route the GPS data cable (most likely a male DSUB-9 type RS-232 cable) to the mountingposition of the SDS.Attach the  male DSUB-9 GPS cable to the female DSUB-9 connector on the SDS-X3 data cable,labeled COM1, as shown in figure 19. Secure the connection with the thumb screws on either side ofthe connector. If connector genders are mismatched, a gender changer can be used between connectorsfor proper hookup.  GPS receiver will now automatically relay data to the SDS.10Figure 19: SDS-X3 data cable connected to GPSdata cable via COM1 SDS-X3 data cableGPS data cableCOM1USBCOM2Deutsch Connector (CAN/PWR)
 flatearth SNOdar/SWEdarINSTALL GUIDE – DECEMBER 2014 REV 2.0How to Measure and Update Antenna Sensor HeightDepending on the vehicle model and the actual placement of the Outrigger Antenna-X3, the antenna“Sensor Ht” attribute may have to be adjusted using the SDS-X3 Field Update Tool. This software toolis provided by FlatEarth to communicate with the SDS-X3 via USB and is referenced in thesdsX3_firmware_update_guide_rev1_0.pdf. To accurately measure the antenna sensor height use a standard or metric tape measure to record thedistance from the bottom of the Antenna Outrigger-X3 radome, point A (white, glossy covering), to thebottom of the vehicle track rubber, point B. This is precisely where the grousers are bolted to therubber.  See figure 20-21 as a measurement guide.*Example: Using the standard mounting position on a BR350, the sensor height should beapproximately 32 cm.*Note: For best results measure the distance to the nearest centimeter or half an inch.Once the antenna sensor height is successfully measured and recorded, use the SDS-X3 Field UpdateTool to set the “Sensor Ht” attribute for the given snowcat vehicle. Follow the instructions in thesdsX3_firmware_update_guide_rev1_0.pdf. As a reference the software interface is shown in figure 22.11Figure 21: Grouser/Rubber Interface, point BPoint APoint B (bottom of rubber)Sensor HtFigure 20: Antenna Outrigger-X3, point ATo Point BPoint ASensor Ht
 flatearth SNOdar/SWEdarINSTALL GUIDE – DECEMBER 2014 REV 2.0How to Adjust Lightbar BrightnessThe Lightbar is preset to a dim level to accommodate the typical dark environment in a snowcat.However, it may be necessary to adjust brightness levels because of daytime operation or operator'spreference.To increase/decrease brightness, toggle the arrow keys, by applying constant pressure, up/down todesired brightness levels once the Lightbar has powered up and “Prinoth” is displayed. See figure 23.This setting must be adjusted on every power-up as the operating environment may change from shiftto shift.12Figure 23: Lightbar brightness adjustmentIncrease BrightnessDecrease BrightnessFigure 22: Updating Sensor Height via SDS-X3 FieldUpdate Tool
 flatearth SNOdar/SWEdarINSTALL GUIDE – DECEMBER 2014 REV 2.0Operating RestrictionsOperation of this device is limited to purposes associated with law enforcement, fire fighting,emergency rescue, scientific research, commercial ski areas, commercial mining, governmentagencies, or construction. Parties operating this equipment must be eligible for licensingunder the provisions of Code of Federal Regulations: CFR 47 Part 15 Subpart F. Operationby any other party is a violation of 47 U.S.C. 301 and could subject the operator to seriouslegal penalties.This Ground Penetrating Radar Device shall be operated only when in contact with or within 1m of the ground, or anticipated snow pack surface.IMPORTANT NOTE: The SNOdar/SWEdar systems are considered UWB imaging devices and are subject to FCCCoordination requirements under the  CFR Tile 47 Chapter I, Sub chapter A, Part 15, SubpartF , Section 15.525.  As such it is the responsibility of the users of theses systems to submitthe following information to the FCC prior to use of these systems. The users of UWB imaging devices shall supply operational areas to the FCC Office ofEngineering and Technology, which shall coordinate this information with the FederalGovernment through the National Telecommunications and Information Administration. Theinformation provided by the UWB operator shall include the name, address and otherpertinent contact information of the user, the desired geographical area(s) of operation, andthe FCC ID number and other nomenclature of the UWB device. If the imaging device isintended to be used for mobile applications, the geographical area(s) of operation may be thestate(s) or county(ies) in which the equipment will be operated. The operator of an imagingsystem used for fixed operation shall supply a specific geographical location or the address atwhich the equipment will be operated. This material shall be submitted to Frequency Coordination Branch, OET, FederalCommunications Commission, 445 12th Street, SW, Washington, D.C. 20554, Attn: UWBCoordination.The operator shall comply with any constraints on equipment usage resulting from thiscoordination.THIS DEVICE COMPLIES WITH PART 15 OF THE FCC RULES. OPERATION IS SUBJECT TO THEFOLLOWING TWO CONDITIONS.(1) THIS DEVICE MAY NOT CAUSE HARMFUL INTERFERENCE, AND (2) THIS DEVICE MUSTACCEPT ANY INTERFERENCE RECEIVED, INCLUDING INTERFERENCE THAT MAY CAUSEUNDESIRED OPERATION.13
 flatearth SNOdar/SWEdarINSTALL GUIDE – DECEMBER 2014 REV 2.0Warning: Changes or modifications not expressly approved by the party responsible for compliancecould void the user’s authority to operate this equipment. Note: This equipment has been tested and found to comply with the limits for a Class B digitaldevice, pursuant to part 15 of the FCC Rules. These limits are designed to providereasonable protection against harmful interference in a residential installation. This equipmentgenerates, uses and can radiate radio frequency energy and, if not installed and used inaccordance with the instructions, may cause harmful interference to radio communications.However, there is no guarantee that interference will not occur in a particular installation. Ifthis equipment does cause harmful interference to radio or television reception, which can bedetermined by turning the equipment off and on, the user is encouraged to try to correct theinterference by one or more of the following measures:•Reorient or relocate the receiving antenna.•Increase the separation between the equipment and receiver.•Connect the equipment into an outlet on a circuit different from that to which thereceiver is connected.•Consult the dealer or an experienced radio/TV technician for help.This radio transmitter, FCC ID:  2AEJO-PGC2661184, and IC: 20216-PGC2661184,  hasbeen approved by Industry Canada to operate with the antenna types listed below with themaximum permissible gain indicated. Antenna types not included in this list, having a gaingreater than the maximum gain indicated for that type, are strictly prohibited for use with thisdeviceMfg.: Flat Earth, Inc.Type: Bowtie Planar Outrigger AntennaGain: 0.5-6 dBiThis device complies with Industry Canada licence-exempt RSS standard(s). Operation issubject to the following two conditions: (1) this device may not cause interference, and (2) thisdevice must accept any interference, including interference that may cause undesiredoperation of the device.Le présent appareil est conforme aux CNR d'Industrie Canada applicables aux appareilsradio exempts de licence. L'exploitation est autorisée aux deux conditions suivantes : (1)l'appareil ne doit pas produire de brouillage, et (2) l'utilisateur de l'appareil doit accepter toutbrouillage radioélectrique subi, même si le brouillage est susceptible d'en compromettre lefonctionnement.14

Navigation menu