Forus Electronics FSV-1000 Digital Voice Recorder User Manual FSV 1000
Forus Electronics Co., Ltd. Digital Voice Recorder FSV 1000
Users Manual

Made in korea Version 2005.2
Voice Recorder
Be sure to read this user manual before using the recorder.
Keep this manual in good custody as it may be useful later.
Voice Recorder

Features
Name of Each Part
Putting the battery
Power ON/OFF
External Power Supply
HOLD Setting
Volume Adjustment
Folder Selection
1
3
5
5
6
6
7
7
Preparing
Recording through an External Microphone
Connecting to an Audio System
Listening through an Earphone
Recording Telephone Message
Connecting to a PC
31
32
33
33
35
Connecting to an External Device
Precautions
Troubleshooting
Specifications
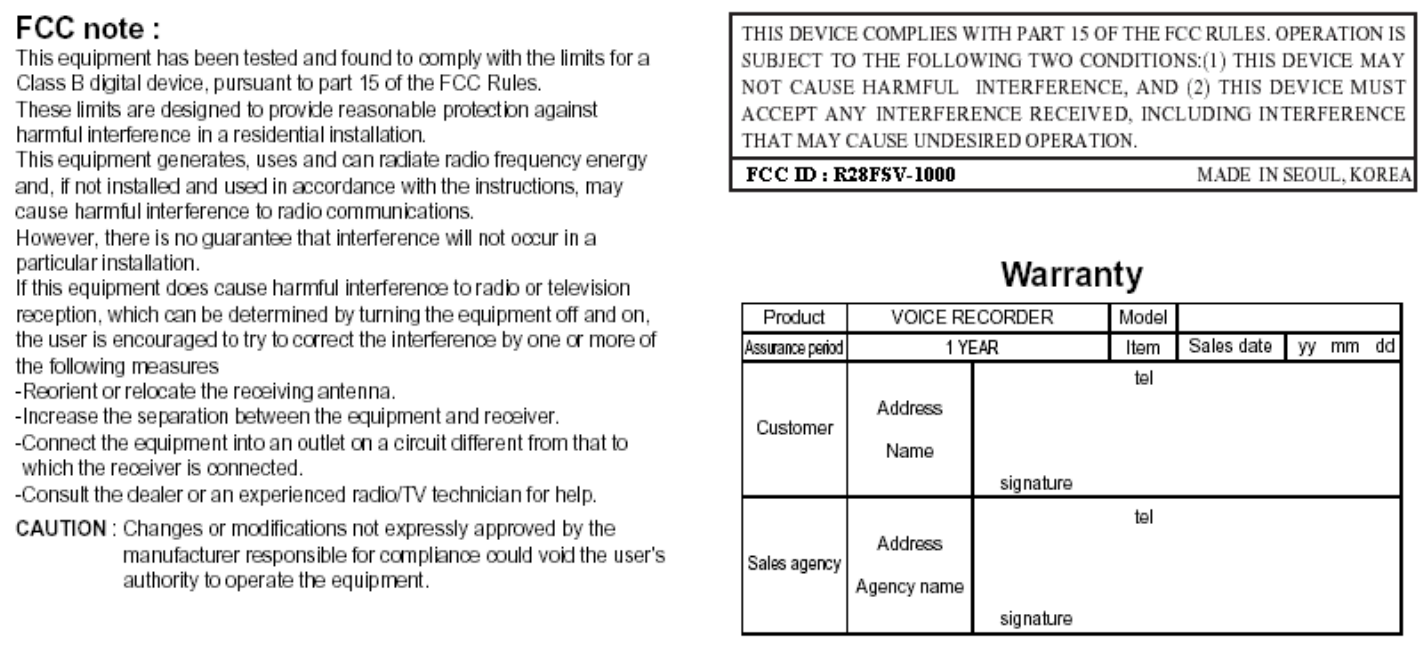
Warranty
43
45
Others
Recording
Playback
Section Repeat Playback
Intro Scan
Deleting Recorded File
Recovery of erased file
8
9
11
11
12
14
Using
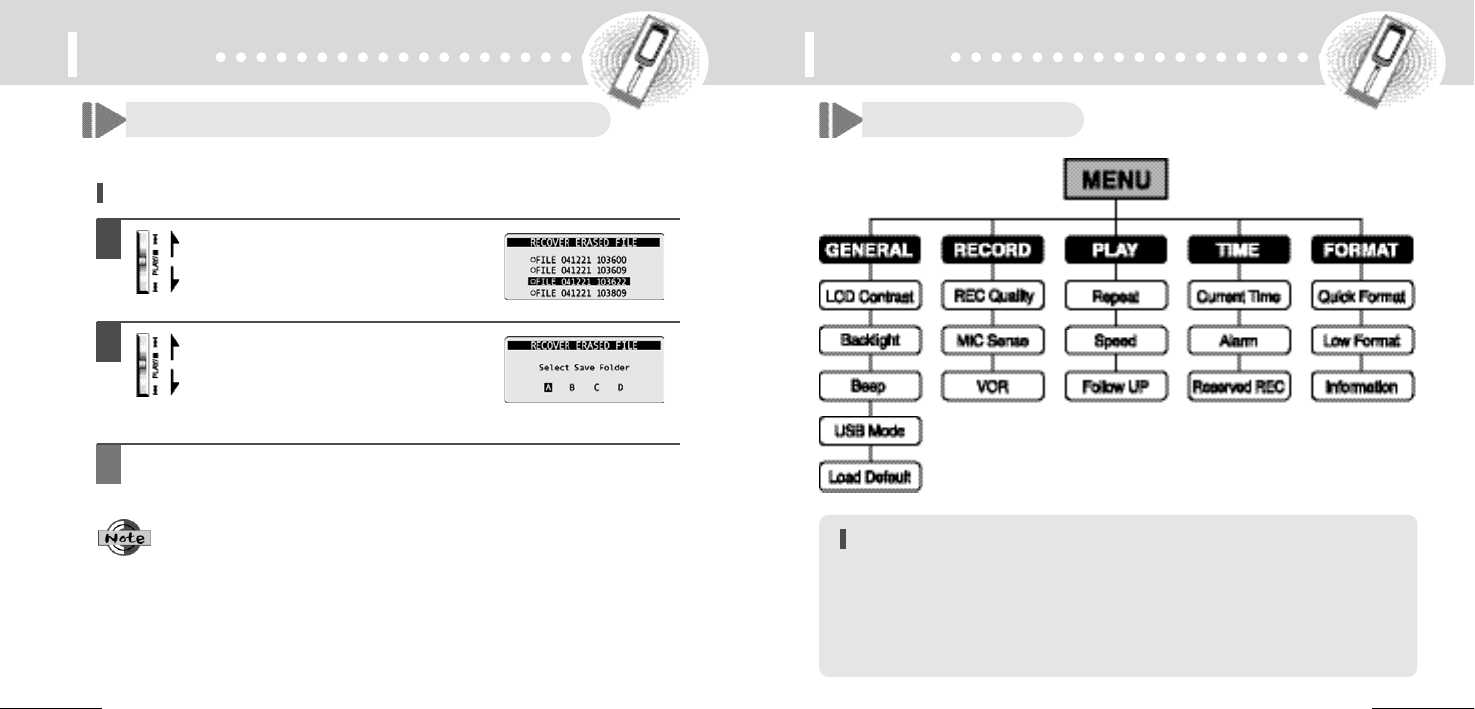
Menu Structure
General Setting
Recording Setting
Playback Setting
Time Setting
Format Setting
16
17
19
21
23
29
Menu
Features
Long Recording Time
In LP mode :
130 hours and 20 minutes(256MB)
.
Recording Quality Mode
XQ/HQ/SP/LP
VOR Recording
The recorder operates only when an audible
sound exists and it enables to use efficient max.
recording time.
Microphone Sensitivity
Microphone sensitivity can be adjusted
according to the distance from the sound source
and the ambient noise level.
Additional Recording (Append)
You can add the recording to the same file
number without affecting the original.
Power Supply Selection
For power, you can use two ways, DC supply
and USB supply.
Playback Speed :7 steps.
LCD Backlight :7 colors selectable.
Clock Setting
You can set the current time
(year/month/day/hour/minute/second).
Recovery of erased files
You can renew the files even though you have
erased the recorded files.
Alarm
If you set the desired time, alarm sounds at the
time.
Reserved Recording Time
If you set the desired time, recording starts from
the time.
File Search (Intro Scan)
Intro scan function consecutively plays the first
7 seconds of each file for easy search of the
recorded messages.
Hearing Aid
You can listen to the voice coming from the
microphone on earphones and adjust the sound
levels without using the recording function.
World-wide Language Support for File
name
USB Digital Interface
Telephone Message Recording
Repeat Playback
Contents
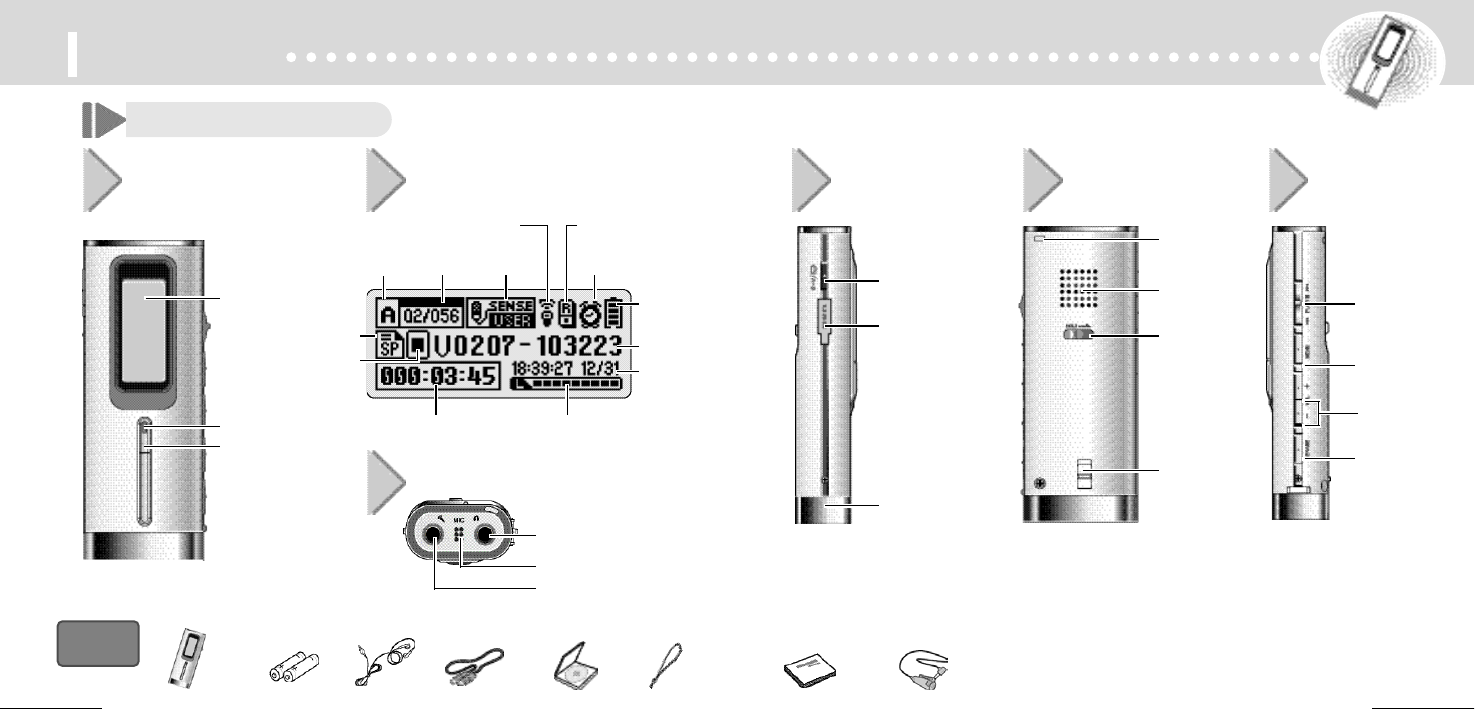
Left View
Top View
Back View Right View
Earphone/Output Terminal
Folder/Section Repeat
Playback
(Folder/A->B) Button
Battery Cover
USB Port Terminal
Battery Cover
Lock Switch
HOLD Switch
Built-in Speaker
Hand Strap
JOG Button
Erase Button
Menu Button
Volume Button
Built-in Mic.
Microphone/Input Terminal
Preparing
Name of Each Part
Front View LCD Display
File No.
Indicator
VOR Recording Indicator Reserved Recording
Indicator
Folder
Indicator
Recording Quality Indicator
Current Status Indicator
(Stop/Playback/
Pause/
Rec)
Recording/Playback Level Indicator
Recording/Playback
Time Indicator
Mic. Sensitivity
Indicator
Alarm Indicator
Battery Level
Indicator
File Information
Indicator
Current date &
Time Indicator
LCD
Display
REC/STOP
Button
Recording Indicator
Recorder Manager
CD-ROM Microphone
Earphone Hand Strap User's Manual External
Battery(AAAX2)
USB Connection Cable
Package
Contents
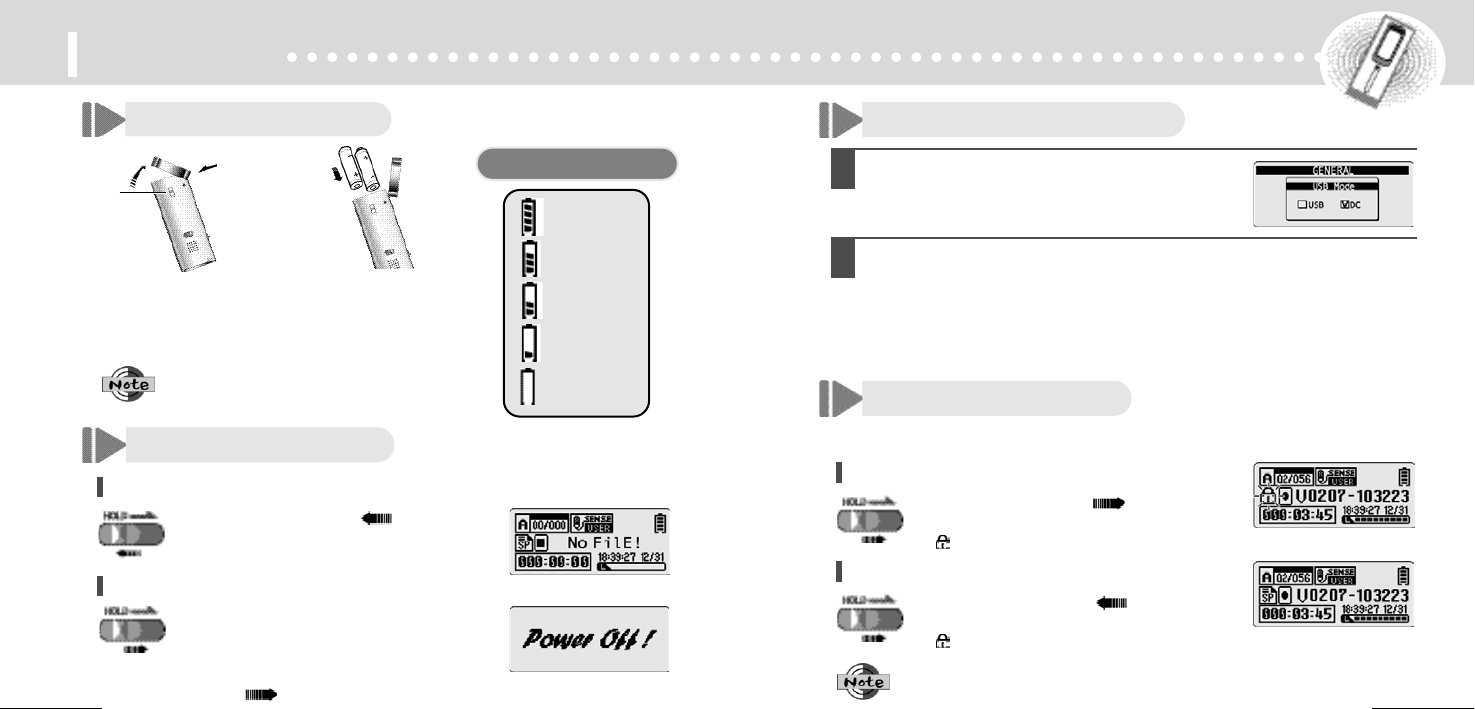
Power ON/OFF
Power ON
Slide HOLD switch in the direction,
and press the REC/STOP button.
Power OFF
Automatic Power OFF - The power
automatically turns off when the recorder is not
in use for more than 1 minute at stop mode.
Manual Power OFF - Slide HOLD switch
in the direction at stop mode.
External Power Supply
Preparing
Putting the battery
1. To open the battery cover.
Push the Lock switch down
and slide the Battery cover.
2. Insert two batteries with
the correct polarity as
indicated by the
and
symbols.
Checking the batteries Level
Full
High-Normal
Low-Normal
Weak
Exhausted
Recorded files will not be erased during replacing
the batteries.
Battery Cover
Lock Switch
Select "DC" at the menu of USB Mode in
General.
Pls. refer to the page 17 ~ 18.
Connect the Recorder to PC by USB cable.
Recorder operates with PC power supply.
HOLD Setting
HOLD function locks all the button functions to prevent unwanted use and the discharge of the batteries.
To Set HOLD
Slide HOLD switch in the direction
during recording or playback.
flickers and HOLD is set.
To Release HOLD
Slide HOLD switch in the direction during
recording or playback.
disappears and HOLD is released.
HOLD switch performs locking function during playback or recording
and manual power off function at stop mode.
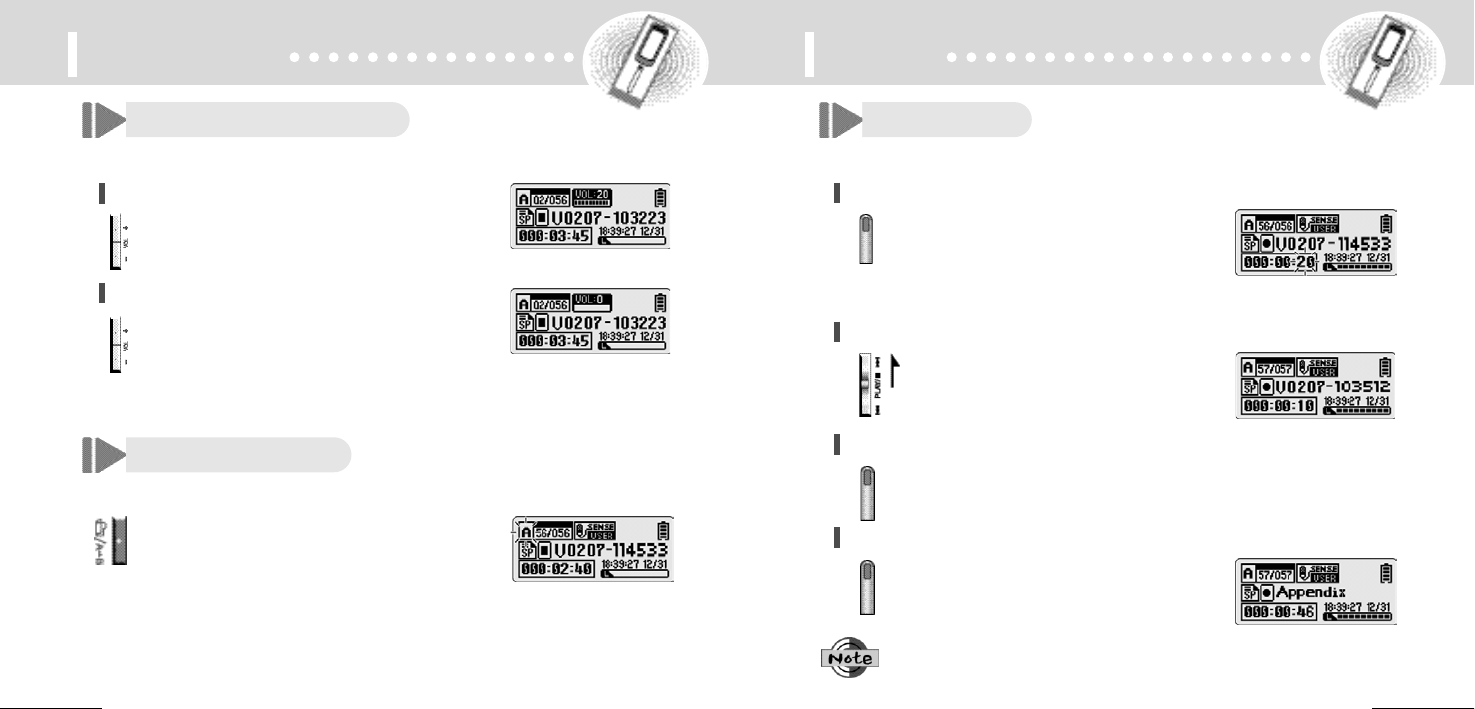
Volume Adjustment
Volume can be adjusted from level 0 to 20 at stop mode or during playback.
To Turn up the Volume
Press
symbol of the VOL button.
As the number on the LCD display increases, the volume
increases.
To Turn Down the Volume
Press
symbol of the VOL button.
As the number on the LCD display decreases, the volume
decreases.
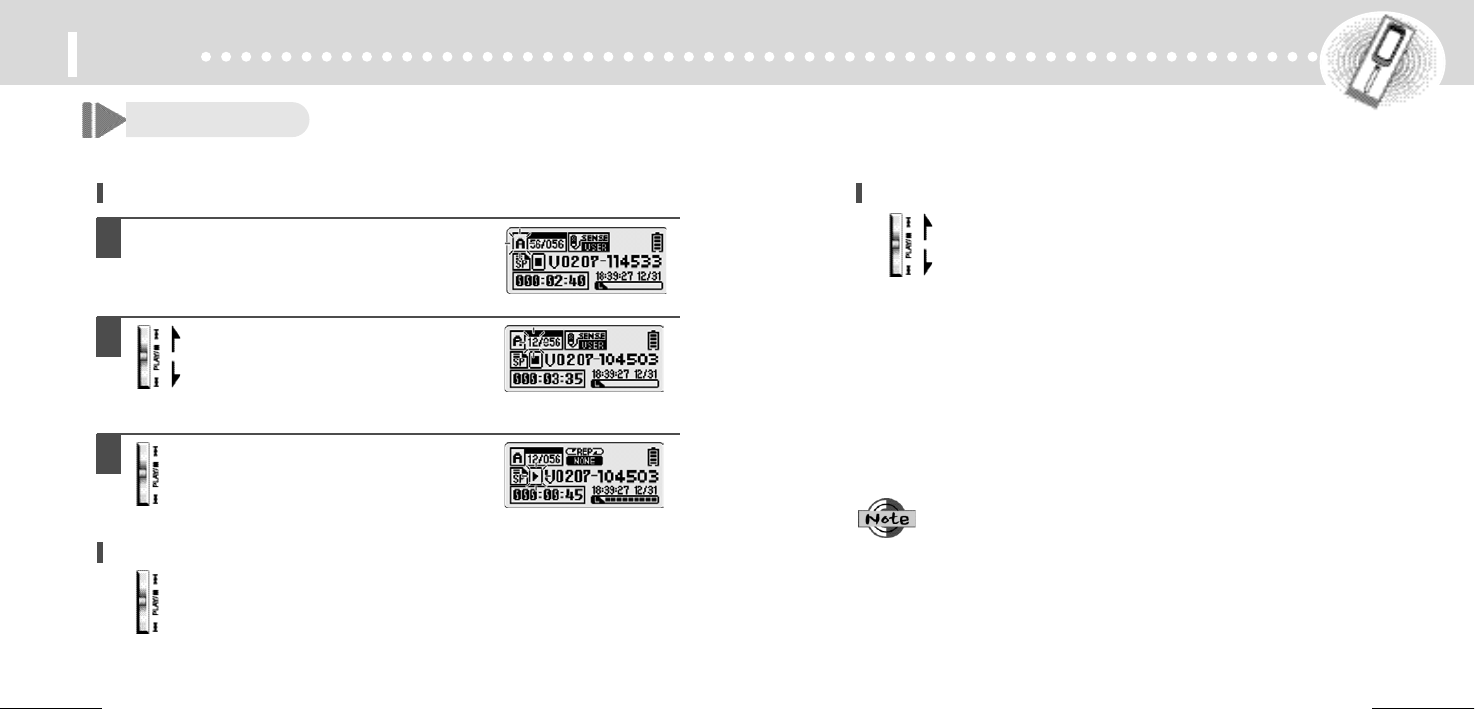
Folder Selection
Folder can be selected during playing back and recording.
Press FOLDER/A->B button at stop mode.
At every press of the button, Folder indicator changes
in the sequence of A, B, C and D.
Preparing Using
Recording
In recording, please position the built-in microphone toward the sound source.
To Start Recording
Press REC/STOP button.
Recording begins with the red light on the recording
indicator. The LCD shows the current folder, file number,
recording elapsed time and the recording sound level.
The recorder automatically selects the file number next to
the previously recorded file in current folder.
To Record into the next file number during recording
Press JOG button upward while recording.
The recording stops at the current file number and
continues recording into the next file number.
To Stop Recording
Press REC/STOP button once again.
The red light goes off and recording stops.
To Add Recording
Press REC/STOP button for more than 3
seconds at stop mode.
The recorder attaches the message additionally to the
current file number.
Press JOG button in while recording to display the recording remaining time and if you
press once more, the current recording time is displayed.
Press MENU button during recording in order to change previous setting of VOR function
(Pls. refer to Page 20).
Using
Select the folder to playback.
Pls. refer to page 7.
In stop mode, push up or pull down
the JOG button to select the file number
to playback.
For careful search, press the button briefly.
For quick search, press and hold the button for
a few seconds.
Press JOG button in.
The Recorder starts playback with the file
number, playback elapsed time and playback
sound level.
To Start Playback
To Stop Playback
Press JOG button in again.
Now, press JOG button in again to resume playback from the previous stop position.
Playback
To playback other recorded file during playback of current file
Wheel JOG button upward shortly during playback.
The playback of current file stop and playback of next file starts.
Wheel JOG button downward shortly during playback.
The playback of previous file starts.
Press REC/STOP button in while playback to display the playback remaining time and
if you press once more, the current playback time is displayed.
Using
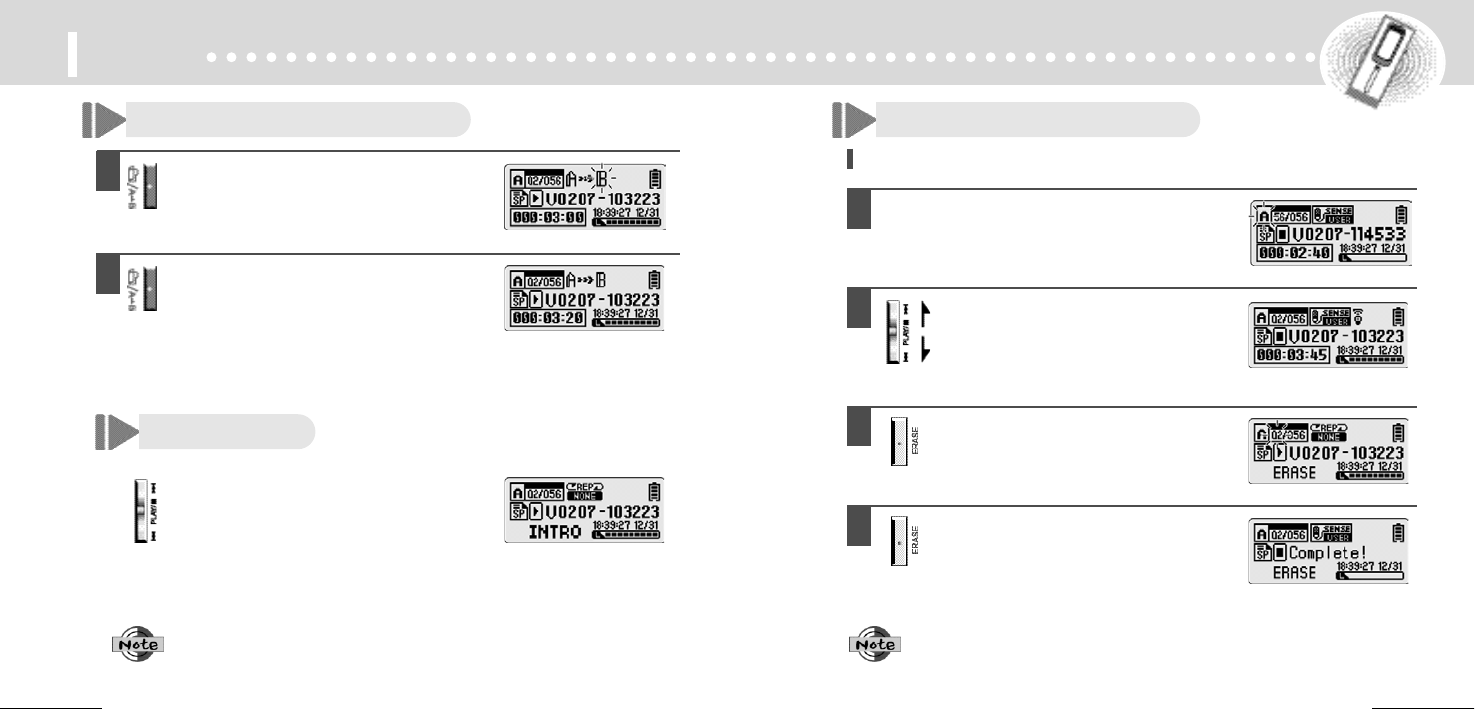
Section Repeat Playback
Intro Scan
Press FOLDER/A->B button at the starting
point of the desired section.
'A' appears and 'B' flickers.
Press FOLDER/A->B button again at the ending
point of the desired section.
'B' appears and the section from 'A' to 'B' is repeated.
Press FOLDER/A->B button once again to cancel Section
Repeat Playback and then, normal playback continues.
Press JOG button for more than 3 seconds
at stop mode.
This function enables fast file search by playing back
the first 7 seconds of each file.
To delete a recorded file
Deleting Recorded File
Select the folder that contains the file to be
deleted.
Pls. refer to page 7.
In stop mode, push up or pull down
the JOG button to select the recorded
file to delete.
For careful search, press the button briefly.
For quick search, press and hold the button
for a few seconds.
Press ERASE button briefly.
The selected file number flickers and the selected
file is played back.
Press ERASE button again briefly.
The selected file is deleted and file numbers are
automatically rearranged.
The ERASE operation is cancelled if any other button is pressed during the selected file
number is flickering or the ERASE button is not pressed again in 5 seconds.
For playback the file during scanning, press JOG button in.
Using
To delete all the files in the selected folder
Select a folder to be deleted.
Pls. refer to page 7.
Press ERASE button more than 5
seconds.
The selected folder flickers and 1-FOLDER and
ERASE is displayed.
Press ERASE button for more than 5
seconds again.
All the selected folder is deleted.
The ERASE operation is cancelled if any other button is pressed during the selected file
number is flickering or the ERASE button is not pressed again in 5 seconds.
Deleting Recorded File (continued)
Press MENU button at stop mode.
Select 'RECORD' by wheeling JOG button
upward or downward.
Press FOLDER/A->B button for more than
5 seconds.
Recovery screen is displayed
Select 'YES' by wheeling JOG button
upward or downward and press JOG
button in.
Recovery file list is displayed.
In the Recovery file list, recorded date, time and
erased file name is displayed.
Recovery of Erased File
This function enables to recovers the erased file by mistake of user.
To recover the erased file
Press JOG button in after selecting the file
to recover by wheeling JOG button upward
or downward.
Press JOG button in after selecting the
folder location to save by wheeling JOG
button upward or downward
The selected file is saved in the selected folder.
If you wait for a while or press other button than JOG button after recovery, the recovery
function is finished.
In recovery file list, max. 16 files are displayed on LCD at a time.
If the selected file is recovered, the other file which was not showed is displayed
automatically.
In case of erasing by using Low Format function, the recovery function is not available.
In case of using recording function after erasing file, some files cannot be recovered.
To recover other files, follow up the procedure of
the above 5, 6.
Recovery of Erased File (Continued)
To recover the erased file
1. Press MENU button at stop mode.
2. Press JOG button in after selecting the item to be desired by wheeling JOG button upward
or downward.
3. Press JOG button in after selecting the sub-item to be desired by wheeling JOG button upward
or downward.
4. Set up the sub-item by wheeling JOG button upward or downward.
5. To exit from MENU, press MENU button.
The way to operate Menu
Menu Structure
Using Menu

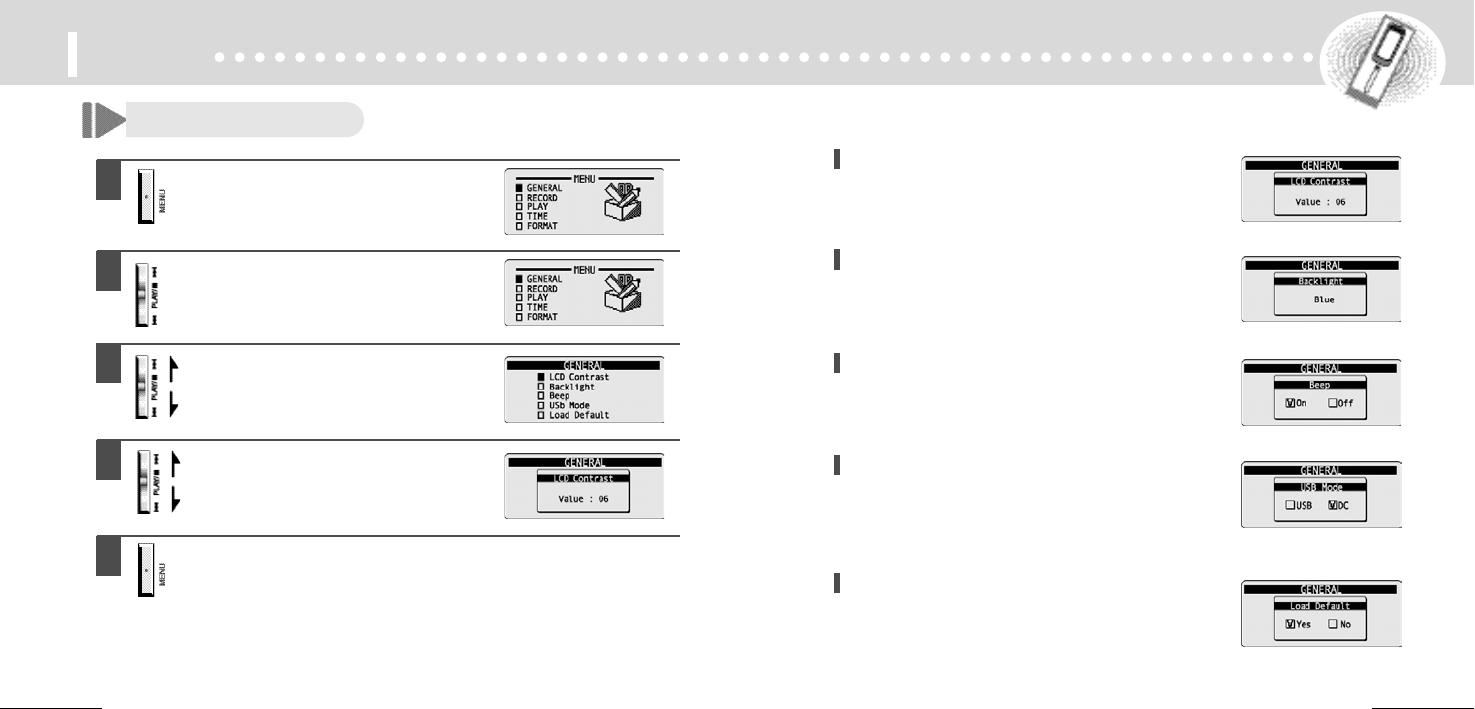
LCD Contrast Adjustment
It's available to adjust contrast from 00 to 10.
Press MENU button at stop mode or
playback status.
Press JOG button in at the status which
'GENERAL' is selected.
Press JOG button in after selecting the
sub-item to be desired by wheeling JOG
button upward or downward.
Set up the sub-item by wheeling JOG
button upward or downward.
To exit from MENU, press MENU button.
Menu
General Setting
Backlight Adjustment
You can select among Red, Green, Blue Yellow, Cyan, Magenta
and White.
Beep Sound ON/OFF
It enables to make beep sound whenever you press button.
USB Mode Setting
In case of connecting Recorder to PC by USB cable.
USB : For USB power supply
DC : For DC power supply
Load Default Setting
You can set initialization in purchasing Recorder.

Playback Setting
Menu
Press MENU button at stop mode or
playback.
Press JOG button in after selecting 'PLAY'
by wheeling JOG button upward or
downward.
Press JOG button in after selecting sub-
item by wheeling JOG button upward or
downward.
Set the sub-item by wheeling JOG button
upward or downward.
Repeat Playback Setting
All : For all recorded files
Folder : For 1 Folder
File : For 1 recorded file
None : No repeat
Playback Speed Adjustment
Playback speed can be adjusted in 7 levels as follows.
SPR: 50, 70, 100(normal), 130, 150, 170, 200%.
Hearing and Follow-up
You can hear and follow-up because the concerned time has no
sound after repeat section playback is made.
On : For this function
Off : No for this function
Exit from MENU by pressing MENU button.
Menu
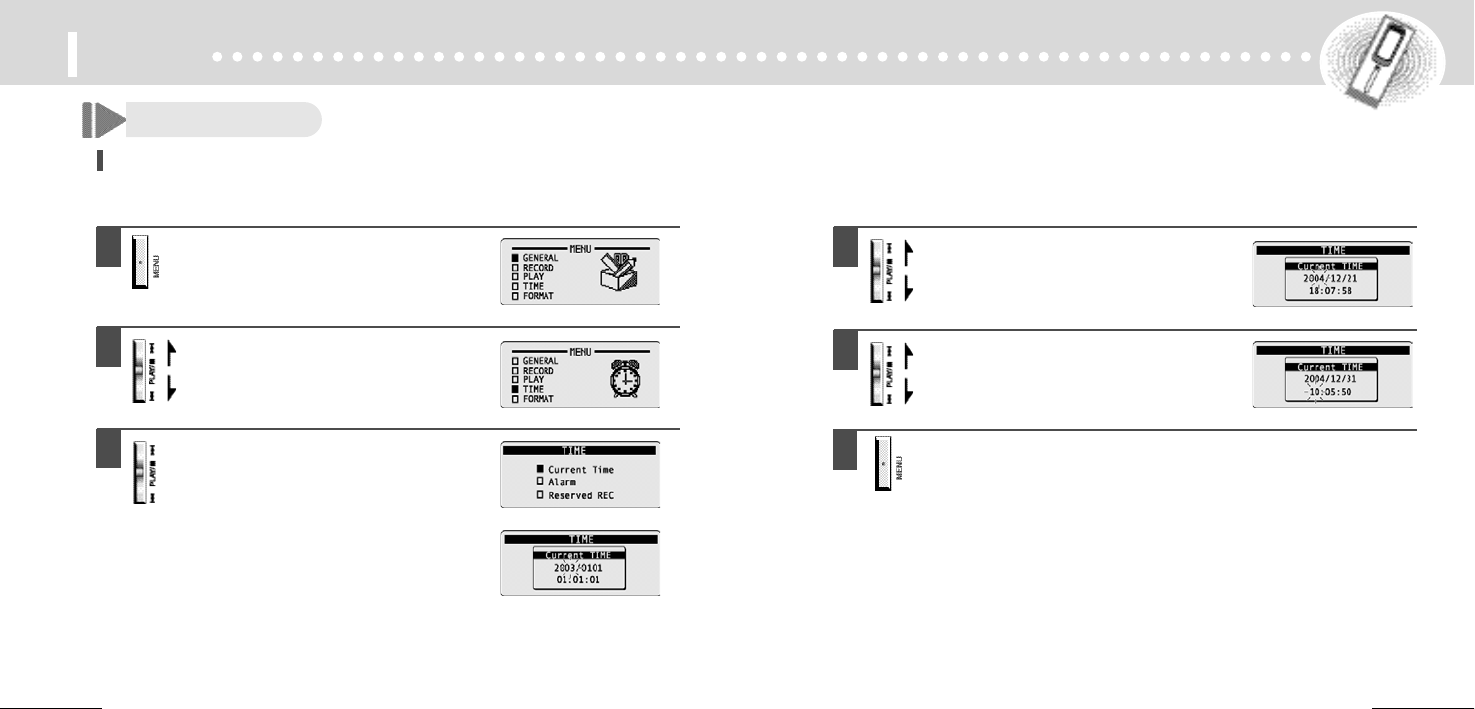
Time Setting
Press MENU button at stop mode.
Press JOG button in after selecting 'TIME'
by wheeling JOG button upward or
downward.
Press JOG button in at the condition to
be selected for 'Current Time'.
It enables the condition of the current time set-up
menu and year flickers.
Press JOG button in after selecting 'YEAR'
by wheeling JOG button upward or downward.
Set Month, Day, Hour, Minute, Second
by repeating the above # 4.
To set the current time
If you set the current time, you can see the time always and also, you can set the function of alarm &
reserved recording.
Exit from MENU by pressing MENU button.

Menu
Time Setting (Continued)
Press MENU button at stop mode.
Press JOG button in after selecting 'TIME'
by wheeling JOG button upward or
downward.
Press JOG button in after selecting 'Alarm'
by wheeling JOG button upward or downward.
The current time set-up is made and year flickers.
Press JOG button in after selecting 'On'
by wheeling JOG button upward or downward.
Folder indicator A flickers.
Press JOG button in after selecting beep sound
by wheeling JOG button upward or downward.
A
B
C
D
Beep is displayed.
Press JOG button in after selecting desired
file by wheeling JOG button upward or
downward.
Press JOG button in after setting up 'Hour'
by wheeling JOG button upward or
downward.
Press JOG button in after setting up 'Minute'
by wheeling JOG button upward or downward.
To release Alarm
Press MENU button and select 'Off' at TIME>Alarm.
Alarm mark disappears and this function is released.
To set Alarm
Exit from MENU by pressing MENU button.
Menu
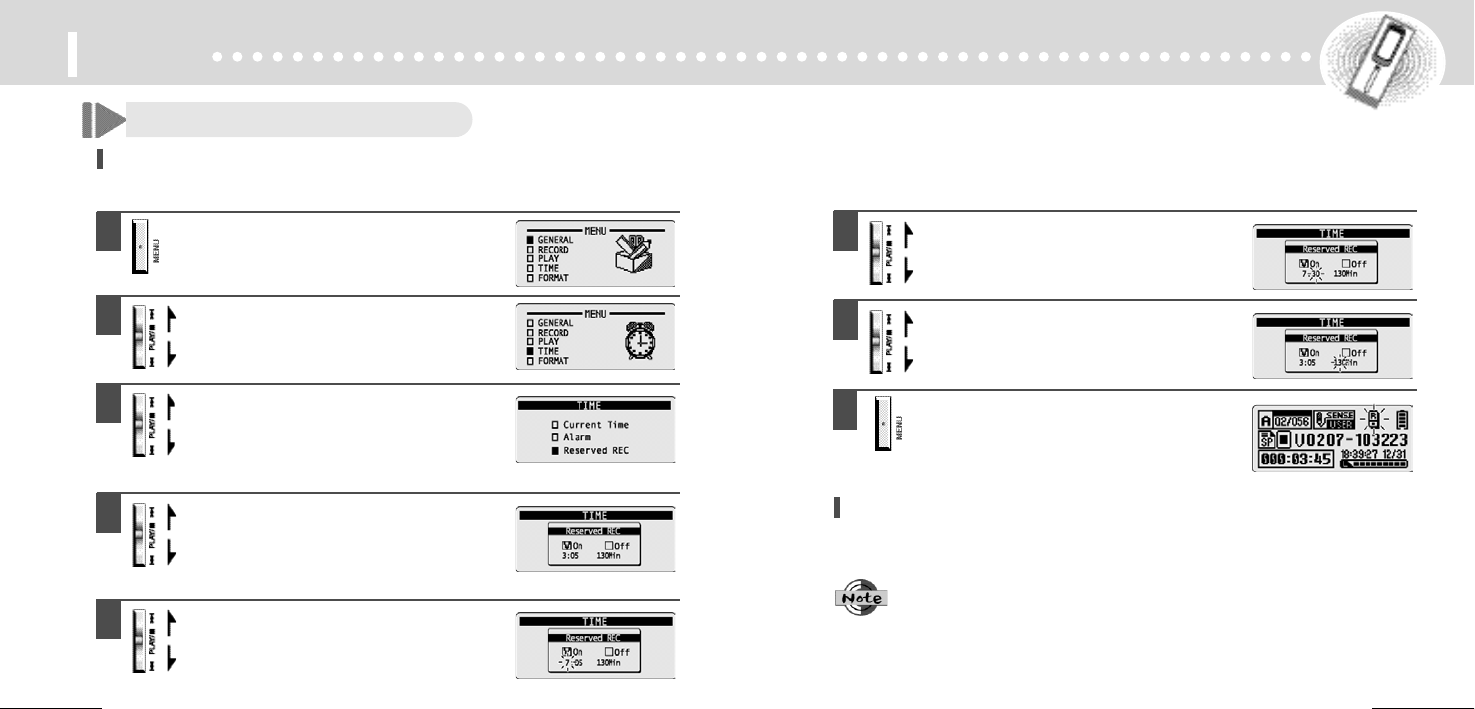
Time Setting (Continued)
Press MENU button at stop mode.
Press JOG button in after selecting 'TIME'
by wheeling JOG button upward or
downward.
Press JOG button in after selecting 'Reserved
REC' by wheeling JOG button upward or
downward.
Press JOG button in after selecting 'On'
by wheeling JOG button upward or
downward.
Hour flickers.
Press JOG button in after selecting 'Hour'
by wheeling JOG button upward or downward.
Press JOG button in after selecting 'Minute'
by wheeling JOG button upward or downward.
Press JOG button in after setting up 'Recording
time' by wheeling JOG button upward or
downward.
Reserved recording time range is 10 ~ 240 minutes.
To release reserved recording function
Press MENU button and select 'Off' at TIME>Reserved REC.
Reserved recording starts after setting this function at power-off of recorder.
To set reserved recording
Exit from MENU by pressing MENU button.
If reserved recording is completed, the reserved recording
indicator displayed.
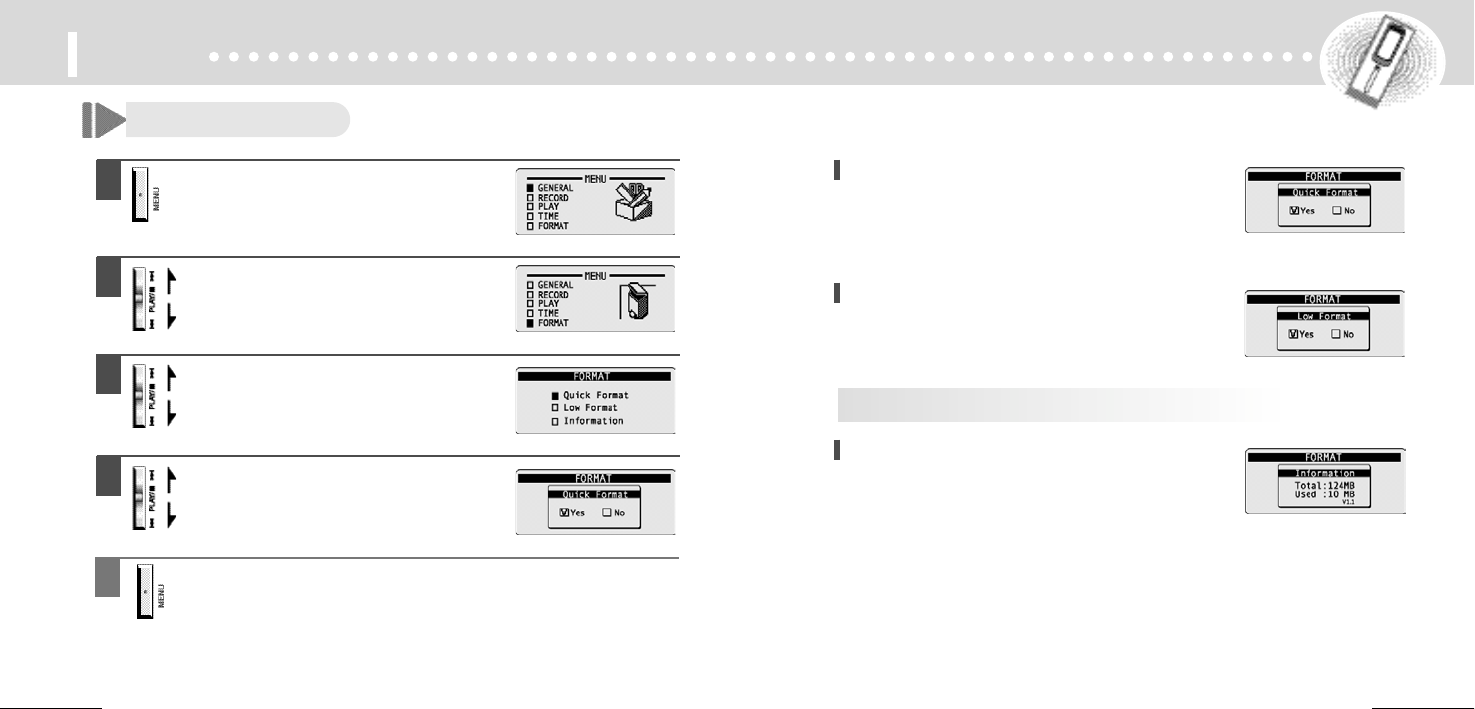
Format Setting
Menu
Press MENU button at stop mode or playback.
Press JOG button in after selecting 'FORMAT'
by wheeling JOG button upward or downward.
Press JOG button in after selecting sub-item
by wheeling JOG button upward or
downward.
Set the sub-item by wheeling JOG button
upward or downward.
Note : Please keep in you mind that the erased file by using this Low Format function
cannot be restored.
Quick Format Setting
This enables to recover file in needed if you erase the
recorded file.
Yes : For erasing all recorded files.
No : Not for erasing all recorded files.
Low Format Setting
In case of erasing the recorded file by using this function, the
recorded file is erased completely and it's not possible to recover.
Yes : For erasing all recorded files.
No : Not for erasing all recorded files.
Information Review
You can check full memory capacity, used memory capacity,
version.
Exit from MENU by pressing MENU button.
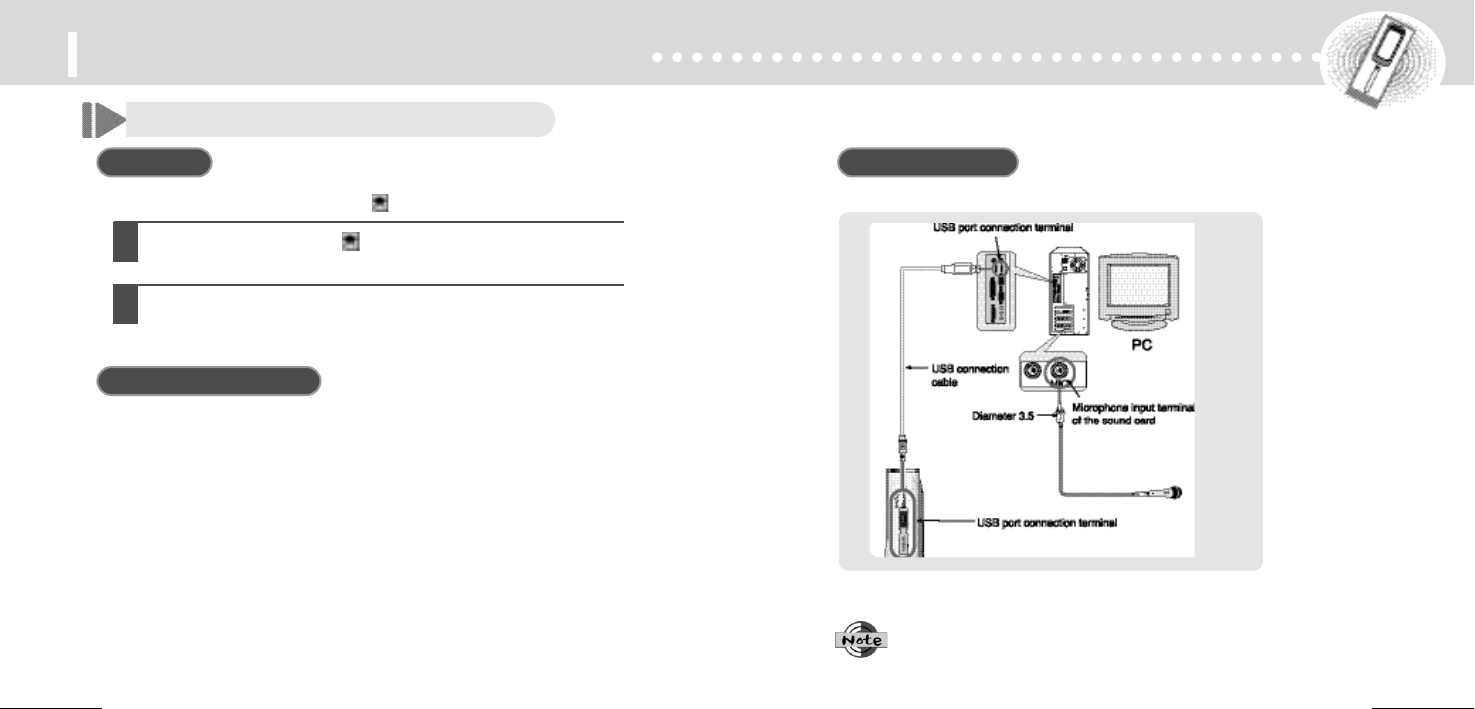
Connecting to an Audio System
Connecting to an Audio System
To Record contents of the Audio into the Voice
Recorder Connect the Voice Recorder to the audio
system.
Connect the Microphone/Input terminal to the Earphone
terminal of the audio system using the supplied external
device connection cable.
Press REC/STOP button and the play button of the audio
system simultaneously.
The Voice Recorder starts recording the audio contents.
Press REC/STOP button and the stop button of the audio
system simultaneously.
Recording stops.
Adjust the recording sound volume with the volume control of the audio system.
Recording quality may be affected by the performance of the external device.
To start Recording
To finish Recording
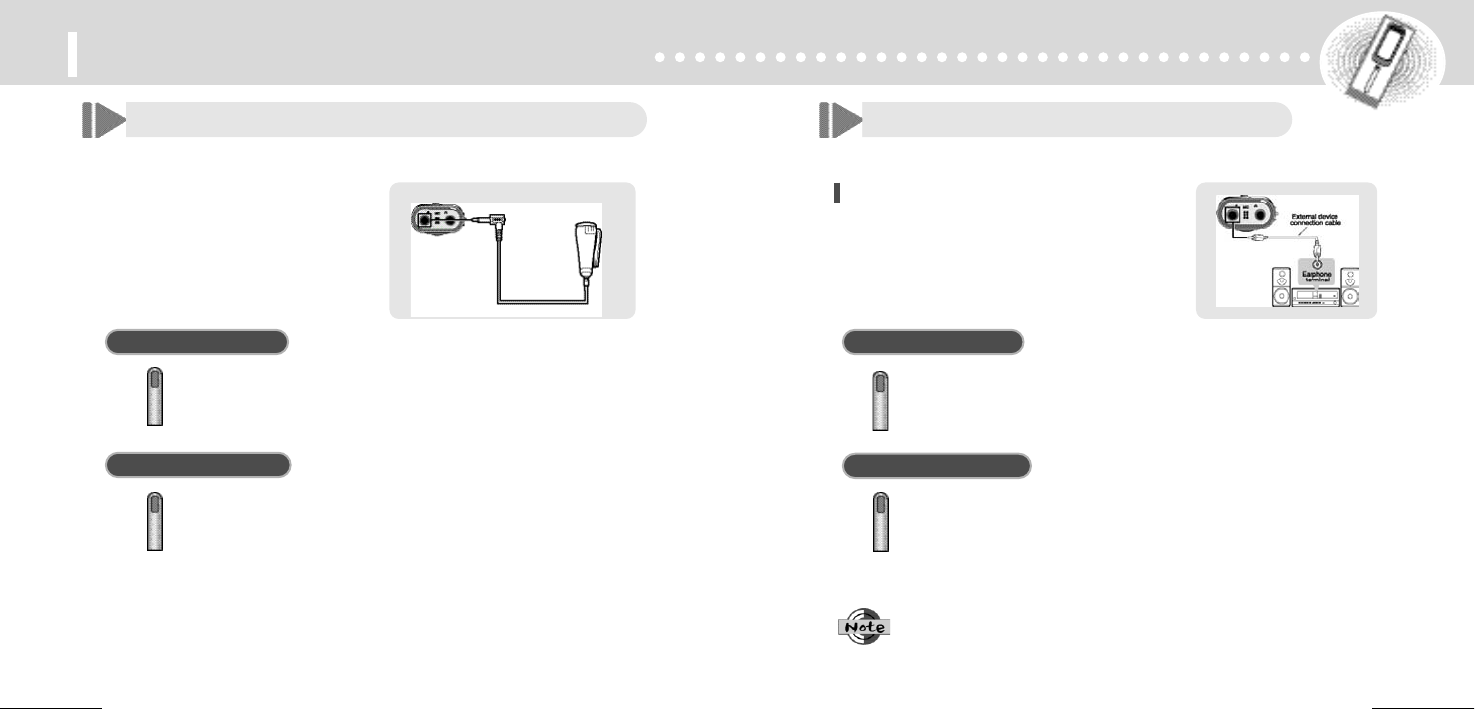
Recording through an External Microphone
Connect external microphone
to Voice Recorder.
Plug the external microphone into the
Microphone/Input terminal of the Recorder.
Press REC/STOP button.
Voice is recorded through the external microphone.
Press REC/STOP button again.
Recording stops.
To start Recording
To finish Recording
Connecting to an External Device
Recording Telephone Message
Telephone messages can be recorded on the Voice Recorder.
Connect the Voice Recorder to the telephone.
Using the external device connection cable, connect the
Microphone/Input terminal of the Voice Recorder and the
telephone recording adapter as shown in the picture.
Press REC/STOP button during the telephone conversation.
The Voice Recorder starts recording the conversation.
Press REC/STOP button again.
Recording stops.
The digital telephone cannot be connected to the Voice recorder.
To record only when you talk on the telephone, please select VOR recording and then
press REC/STOP button. (For details, pls. refer to page 20)
If the VOR function does not work properly, set the MIC sensitivity low.
(For details, pls. refer to page 20)
The input volume of the recorded sound is affected by the telephone and phone line
condition. If input volume is too low, disable the VOR function.
(For details, pls. refer to page 20.)
To Start Recording
To finish recording
Connect the Voice Recorder to the audio system.
Connect the Earphone/Output terminal to the microphone terminal
of the audio system using the supplied external device connection cable.
Select the file to be recorded.
To see how to select a file, please refer to page 9.
Press JOG button of the Voice Recorder and the record button
of the audio system simultaneously.
The selected file in the Voice Recorder is recorded into the audio system.
Press JOG button of the Voice Recorder and the stop button
of the audio system.
Recording stops.
The recording sound volume can be adjusted using VOL button of the Voice Recorder.
Recording quality may be affected by the performance of the external device.
To start recording
To finish recording
Listening through an Earphone
Plug the earphone to the Earphone/Output terminal.
The playback sound is automatically routed to the earphone.
The playback volume can be adjusted by and of
VOL button.
Earphone/Output terminal
Connecting to an External Device
Connecting to an Audio System(continued)
To Record contents of the Recorder into an Audio System
Installation has been completed and
the shortcut icon appears.
5
Type in your name and company name.
8
Click
9
Click
3
Click
6
Click
4
Click
7
Click
Connecting to a PC
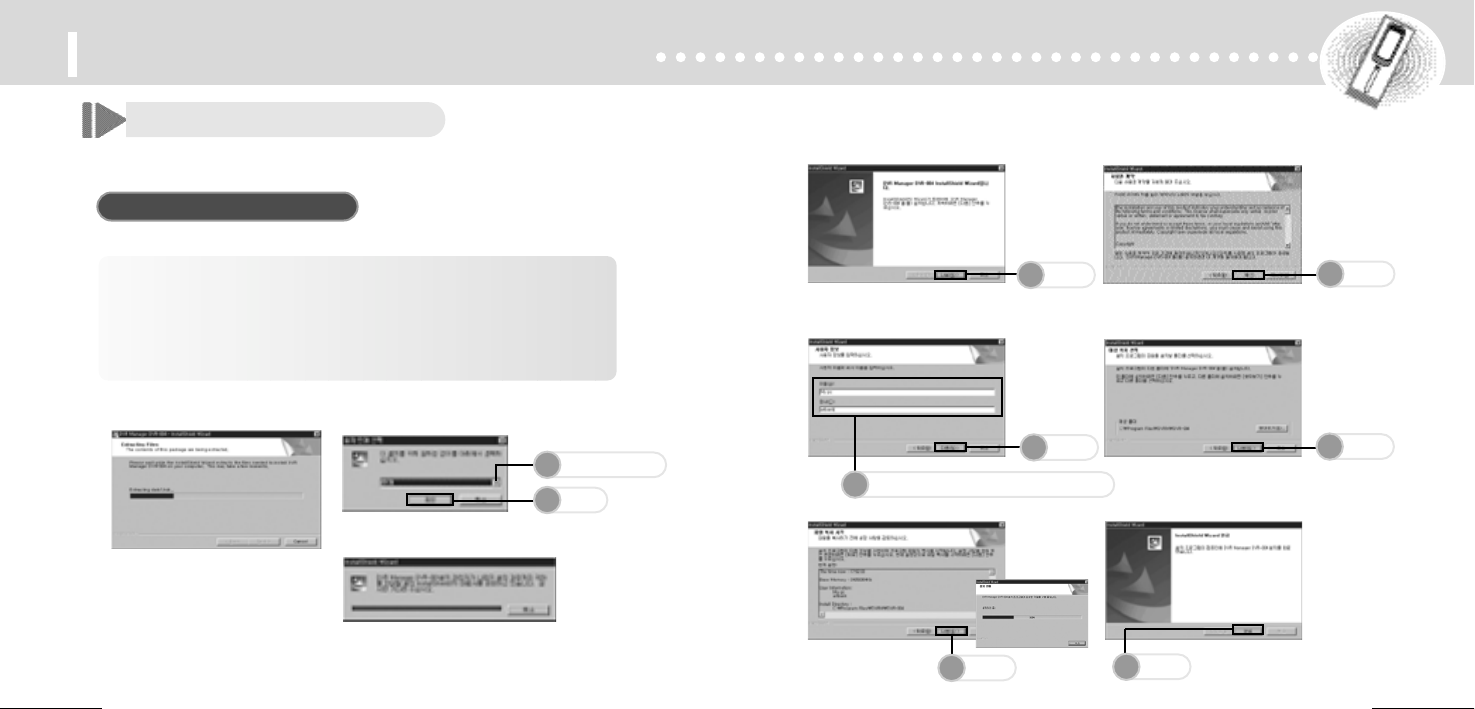
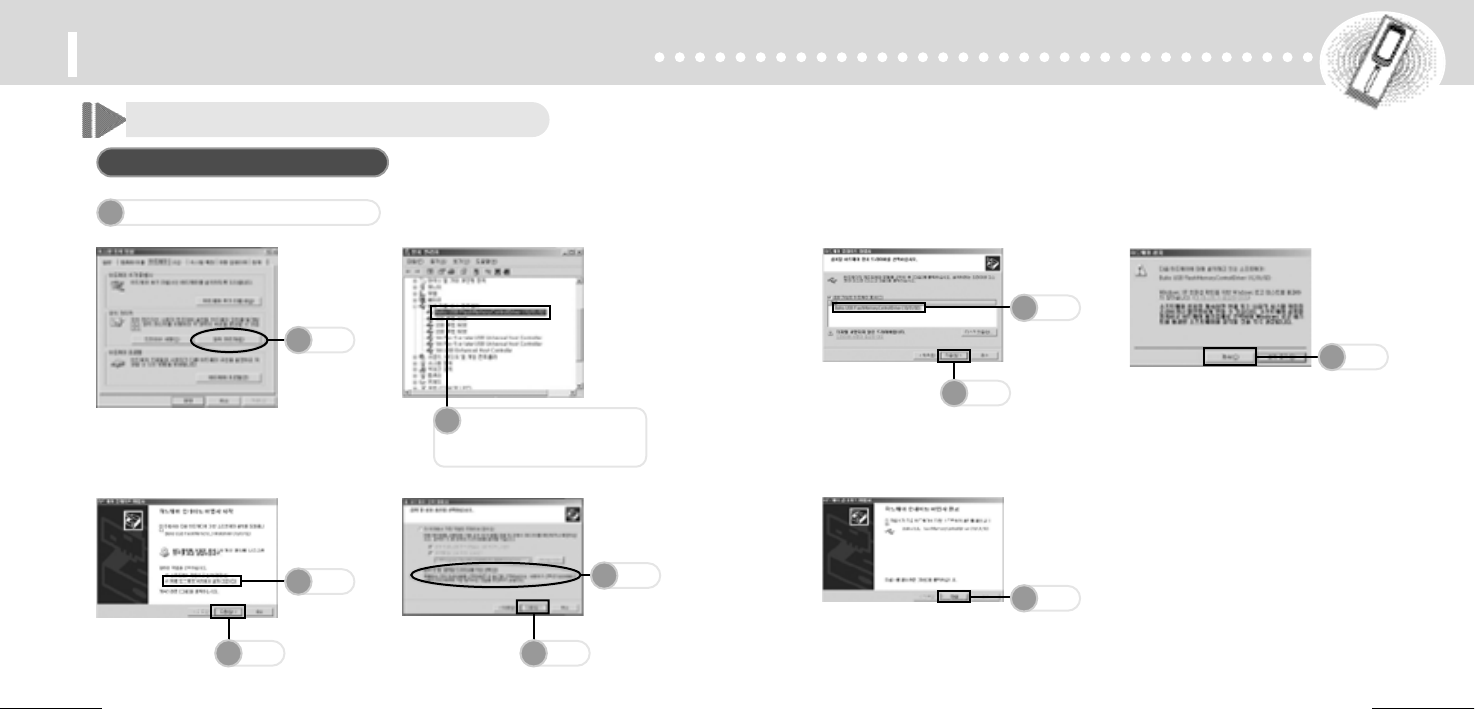
DVR-Manager should be installed to PC prior to connecting Voice Recorder to PC.
When you insert DVR-Manager CD into CD-ROM drive, the language selection window appears.
System
Requirements
Computer : IBM-compatible, Intel Pentium (or better) based
with USB port support
Memory : More than 64MB of RAM
OS : Windows 98/Me/2000/XP
Hard Disk : More than 50MB space
For Playing : Sound card and speaker
For Recording : Sound card and microphone
Installation of DVR-Manager
DVR-Manager software provides the functions for connection, playback, recording and editing
of recorded files.
1
Select language
2
Click
Connecting to an External Device
Connecting to a PC(continued)
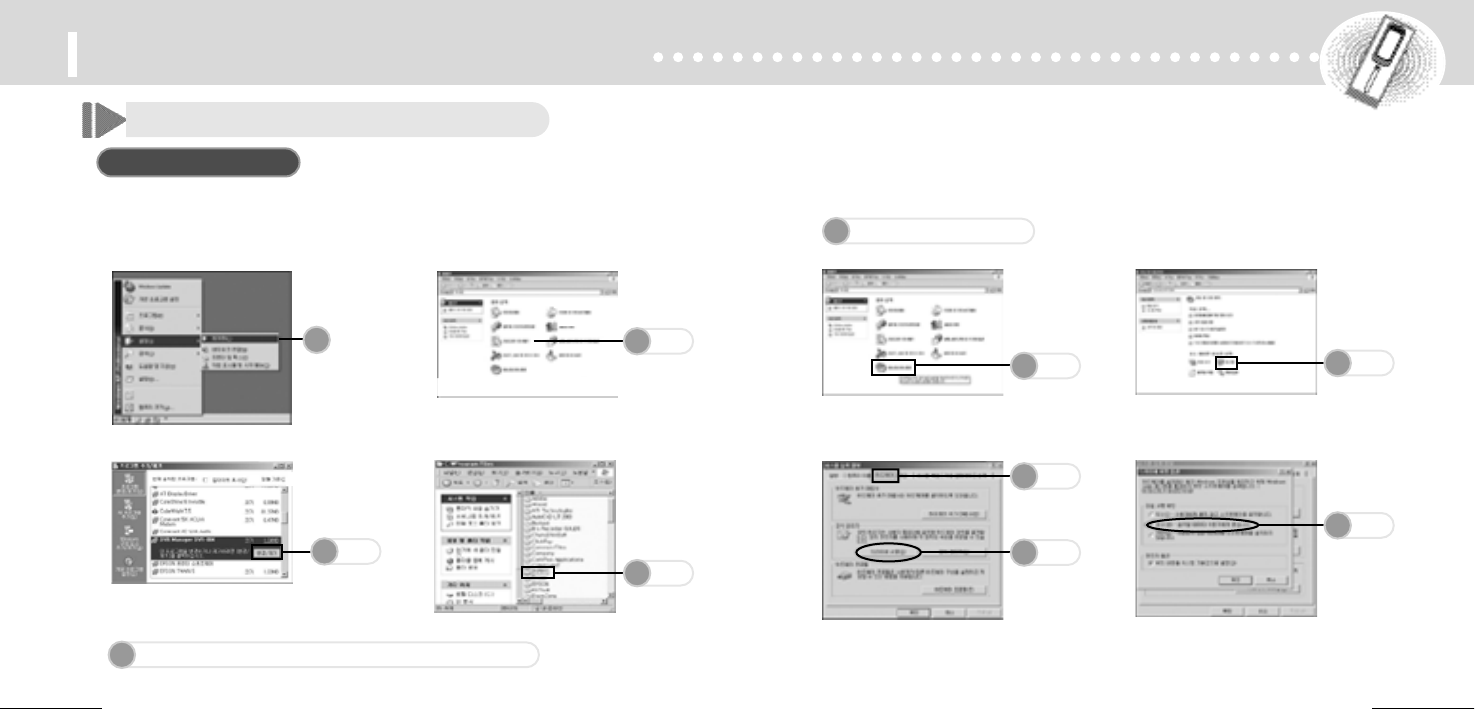
Upon connecting Voice Recorder and PC using USB connection cable after execution of DVR-Manager,
driver is automatically installed. In case driver is not installed automatically, specify another file.
Note!! Be sure to install after putting off the batteries.
Installation of Driver
12
Click
7
Click
10
Click
9
Click
8
Click
11
Click
3
Click
5
6
4
Click
Connecting to an External Device
Connecting to a PC(continued)
Installation of Driver(continued)
Connecting to an External Device
13
Click
15
Click
16
Click
19
Click
20
Click
22
Click
21
Click
17
Click
18
Click
14
12
Connect the Recorder to PC by USB cable.
Connecting to a PC(continued)
Connecting to an External Device
If installation is finished, shortcut icon is displayed .
In case of managing files in PC, you can use conveniently because multi-language for file name or
error message is supported.
Multi-language Support
Double click the shortcut icon .
DVR-Manager is executed.
Select Help of main menu.
After connecting the Recorder to PC, try not to touch the Recorder
since it may cause the malfunction of the device.
If you have connected USB cable while batteries are installed,
you must first press REC/STOP button to power on Recorder.
First connect Recorder to PC for the better use of the Recorder Manager Pro software.
Connecting to PC

For the Battery
For your safety
Others
Precautions
Important information on safe and efficient operation. Read this information
before using your voice recorder.
1. Do not drop the unit or give a shock to the unit. It may cause a
malfunction.
2. Do not leave the unit in such a location as described below.
- A place of very high temperature (60)
- A place subject to direct sunlight or near heat sources
- A car with its windows closed (especially in summer)
- A place subject to excessive moisture like a bathroom
- A place subject to excessive dust
3. Do not apply heavy forces to the LCD (Liquid Crystal Display) unit,
or it may cause breakage or abnormal display taking into account
the properties of liquid crystal.
4. If you place cards using magnetism such as cash cards or transportation
pass cards near to the speaker of the unit, the magnetism may be
transformed due to magnetic influence so that the magnetic cards cannot
be used any more.
5. Our company does not reimburse you for any loss from the use of the
Voice recorder or any demand of indemnity from a third party.
6. Message loss due to malfunctions, repairs, etc is not a responsibility
of ours. Please understand this.
For the unit
1. Do not repair, disassemble or modify this unit by yourself.
2. If smoke or deformation occurs due to the generation of heat, remove the
battery from the unit immediately.
3. Do not use this unit in an airplane or place where the use of electronic
machines are prohibited.
4. Do not use during you are driving or walking. It may cause an accident.
1. Do not short-circuit, disassemble or heat the battery, or do not put the
battery into a fire. Electrolyte such as an alkaline solution may flow out,
so you may get it in your eyes, or it may cause the generation of heat,
or the breakdown of the battery.
2. When the skin or clothes are stained with electrolyte such as an alkaline
solution, wash the stain out with water immediately. If you get it in your
eyes, seek immediate medical treatment after washing out the area of the
eye with water.
3. Do not use the different kind of batteries together.
4.
When the unit is not in use for a long time, remove the battery from the unit.

The earphones
do not work.
Is the volume set to '0'? Adjust the volume.
(Refer to page 7)
CHECK1
Is the earphone plugged
in properly?
Plug the earphone in properly.
CHECK2
For DVR-Manager
Has the sound card
been installed? Install the sound card first and then
reinstall the 'DVR-Manager' software.
CHECK1
REC/PLAY icons
are inactive.
Is the volume set
excessively high?
Adjust the volume of the DVR-
Manager, since the excessively high
volume may cause noise.
CHECK2
Can't hear the
voice due to noise.
Is the external
microphone connected
to the PC (Sound Card)?
Connect the external microphone
to the sound card and start
recording.(Refer to page 42)
CHECK1
Does the MIC IN (Microphone)
become active at the
Recording Control Window,
when you click : Control Panel
> Multimedia > Audio >
Recording?
Cancel Mute function, if the
unit is in the mode, and select
the MIC IN.
CHECK2
Can't record with an
external microphone.
No sound comes
from the speaker.
Is the volume set to '0'? Adjust the volume.(Refer to
page 7)
Is the earphone plugged in?
Pull out the earphone completely.
CHECK2
CHECK1
Troubleshooting
Is the battery's power
exhausted ?
Replace the battery with a new
one. (Refer to page 5)
CHECK1
Is the battery installed
to the correct polarity? Install the battery to the correct
polarity.
CHECK2
LCD doesn't
work .
Is the device locked
by the HOLD key? Release the HOLD key.
CHECK1
Has the memory or file
numbers been used up? Delete unnecessary files.
(Refer to pages 12~13, 29 ~30)
CHECK2
Is the battery's power
exhausted? Replace the battery with a new
one. (Refer to page 5)
CHECK3
Recording
doesn't work.
Is the device locked
by the HOLD key? Release the HOLD key.
CHECK1
Is there any recorded file?
Check the folder and file numbers.
CHECK2
Playback
doesn't work.
Is the battery's power
exhausted? Replace the battery with a new
one. (Refer to page 5).
CHECK3
Check the following items before asking a technical support.
When using Voice Recorder
Others
Specification
Item
Continuous recording time
Maximum number of recording files
Dimensions
Weight
Power Source
Battery life
Recording medium
Effective maximum output
Frequency range
PC interface
Operational condition
Accessories
Input
Output
Internal
External
Earphone
Speaker
Digital Voice Recorder
128MB XQ 14H 55M / HQ 21H 45M / SP 29H 50M / LP 65H 10M
256MB XQ 29H 50M / HQ 43H 30M / SP 59H 40M / LP 130H 20M
512MB XQ 59H 40M/ HQ 87H 00M / SP 119H 20M / LP 160H 40M
99 files per folder x 4 folders = 396 files
3219.386.5(mm)
33.3g (excluding the batteries weight of 24g)
Two DC 3V (Size "AAA", Alkaline) batteries, External Adapter
Recording: Approx. 12 hours / Playback: Approx. 12 hours (E/P normal level)
Speaker : 25mW
500Hz ~ 3.5KHz
USB(Universal Serial Bus)
Omni-directional electret condenser microphone
Plug-in electret condenser microphone
Earphones (3.5 / mono / 16)
Diameter 20mm, 16
Temperatures: 0 to 40
Recorder, Battery(AAAX2), Earphone , USB Connection Cable,
Manager CD-ROM, Hand Strap, User's Manual, External Device
Connection Cable, Telephone Recording Adaptor, Telephone
Connection Cord, External Microphone , DC Adapter(Option)
Others
Troubleshooting
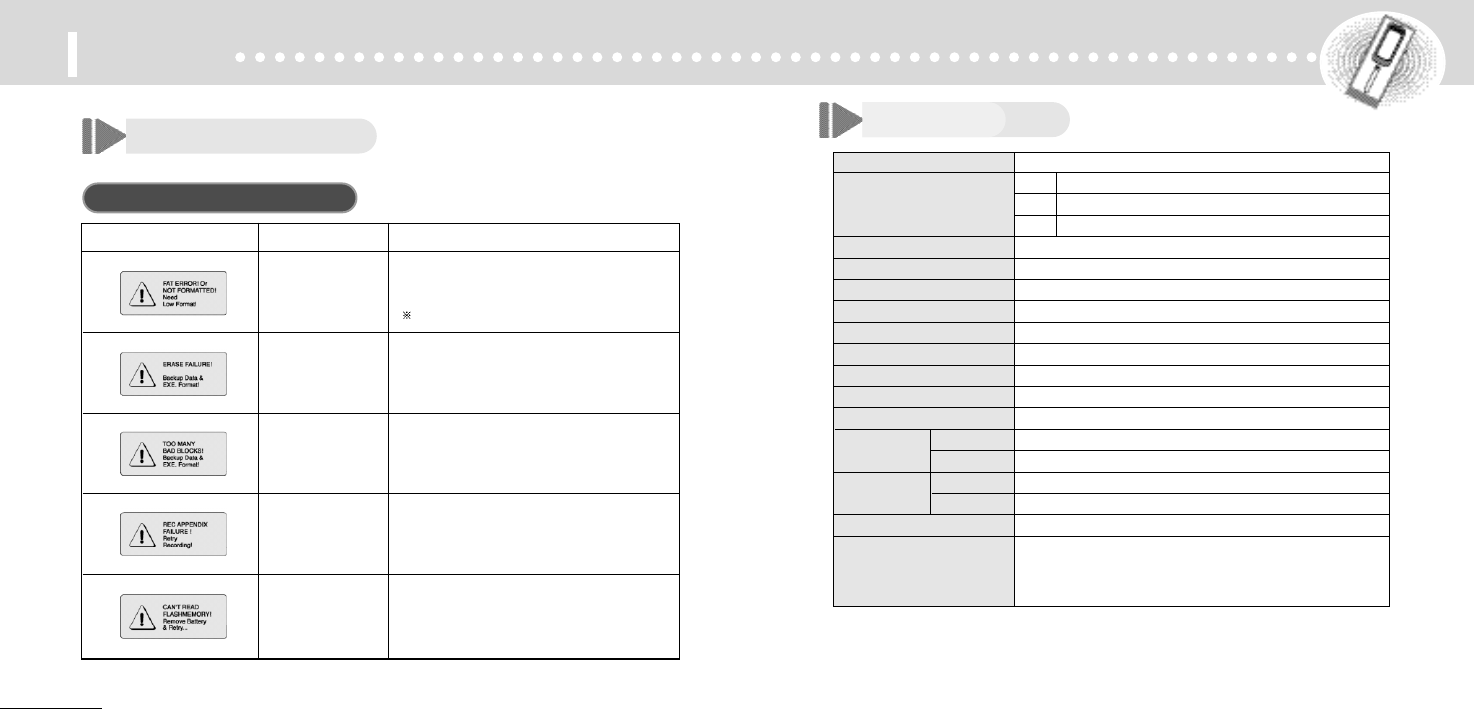
When error message appears
Cannot read memory.
Recording Append is
not available.
There are too many
blocks not to be used
in memory.
Erased function is not
available.
File list of memory is
abnormal.
Remove batteries.
Put batteries in Recorder again and power on.
Retry
Connect Recorder to PC.
Save the recorded file of Recorder in PC.
Use Low Format (Refer to page 29 ~ 30)
Connect Recorder to PC.
Save the recorded file of Recorder in PC.
Use Quick/Low Format (Refer to page 29 ~ 30)
Remove batteries. Put batteries in Recorder again and
power on. In case of same error message appears,
please use Low Format (Refer to page 29 ~ 30).
The erased file by using Low Format is not recovered.
Indication in PC Contents Arrangement