Fossil Group BT2006 Caller ID watch with Bluetooth User Manual Manual
Fossil Partners, L.P. Caller ID watch with Bluetooth Manual
Manual

4
5
Caller ID Watch
Congratulations on your purchase of the Caller ID watch with
Bluetooth® wireless technology.
With the Caller ID watch you are notified when your phone rings and
when you receive a text message. A previously saved name or number of
the caller is displayed and you can mute or reject incoming calls.*
You can also use the watch to keep track of time and date in the phone.
The watch is waterproof down to 30 meters.
*Visit www.fossil.com or www.abacuswatches.com for an overview of
which phone models support the Caller ID watch. Not all phones will
allow the functionalities listed above.
Watch Overview
Top key
Crown
Bottom key
Display
Icons
Status icons
Incoming call
Incoming phone call muted in the phone
Message received
Bluetooth® function on, no connection to phone
Bluetooth® function on, watch connected to phone
Bluetooth® function connecting
Bluetooth® function off
Battery level low, Bluetooth® function off
Battery level
Battery charging
Pairing succeeded
Watch is out of range of the phone, or connection cannot be
established
Watch in pairing mode
Setting icons
Bluetooth® function on
Bluetooth® function off
Message notification on
Message notification off
Out of range notification on
Out of range notification off
Start pairing mode
6
7
Getting Started
Kit content
Before you start using the watch, make sure the following items are in
the box:
• AC charger
• Charging clip
• The Caller ID watch
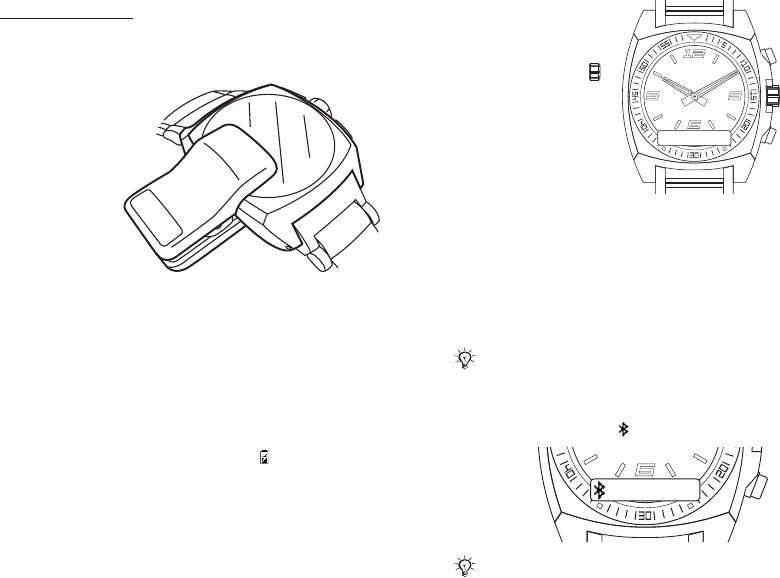
Charging
Make sure your watch
battery is fully charged.
Minimum charging time is 3 hours by AC power.
If the battery does not work properly it needs to be replaced by an
authorized service center.
To charge the battery
1. Connect the battery charger plug to the charging clip with the symbols
on the charger and clip facing in the same direction.
2. Connect the charging clip to the watch by opening the clip and sliding
it over the watch. Make sure that the contact pins of the cradle are
connected to the hole/gap on the back of the watch.
3. Connect the battery charger to the mains. The appears. Wait
approximately 2 hours or until the battery icon indicates charging is
complete.
4. Pull out the charger plug.
Under normal conditions, you should be able to use the watch for at least
a week if the battery is fully charged.
Setting the time
To set the time
Gently pull out the crown
and rotate it to set the time.
Push the crown back in when
the time is set.
The Bluetooth® function
The Bluetooth® function makes wireless connection to your phone
possible.
The first time you turn the Bluetooth® function on, the watch enters
pairing mode.
You should turn the Bluetooth® function off, in sensitive areas like
airplanes or hospitals.
If the battery level is low, the Bluetooth® function is automatically
turned off. Turn the Bluetooth® function on again when the battery
is fully charged.
To turn the Bluetooth® function on
Press and hold the bottom key. appears.
The first time you turn the Bluetooth® function on, the watch
enters pairing mode. If you want to exit the pairing, press and hold
the bottom key.
°
¢Q

8
9
To turn the Bluetooth® function off
Press and hold the bottom key. appears.
To check if the Bluetooth® function is on
Press the bottom key. If shows, press the top key to turn the
Bluetooth® function on.
Pairing Mode
Your watch has to be paired with your phone before you can use it. Follow
instructions in the phone’s user guide on how to turn Bluetooth® on in
the phone.
To set the watch to pairing mode
Press the bottom key four times to select pairing mode and then press
the top key. The icon appears.
To pair your watch with a phone
1. Turn Bluetooth® function on in your phone.
2. Turn the Bluetooth® visibility on in your phone. This makes your
phone visible to other Bluetooth® devices.
3. Turn the Bluetooth® function on in your watch.
4. Turn the pairing mode function on in your watch.
5. Prepare your phone according to the phone’s user guide on how to pair
a Bluetooth® device.
6. For some phones you may need to enter a passcode. The default
passcode is 0000.
After you have paired your watch with a phone, the watch will
automatically connect to the phone as soon as the phone is on and
within range.
°
If the pairing is successful, the pairing icon appears and the watch
vibrates.
If the pairing fails, you need to set the watch to pairing mode, and
repeat step 5.
Using Your Watch
Settings
Settings are shown as icons in the display.
To enter the settings menu
Press the bottom key.
To turn a setting on or off
1. Press the bottom key repeatedly until the setting is highlighted.
2. Press the top key to turn the setting on or off.
Calls
When the phone rings the watch vibrates and a previously saved name
or number of the caller is displayed.* You can mute or reject the call by
pressing the top key.
*The information displayed will vary depending on your phone model.
10
11
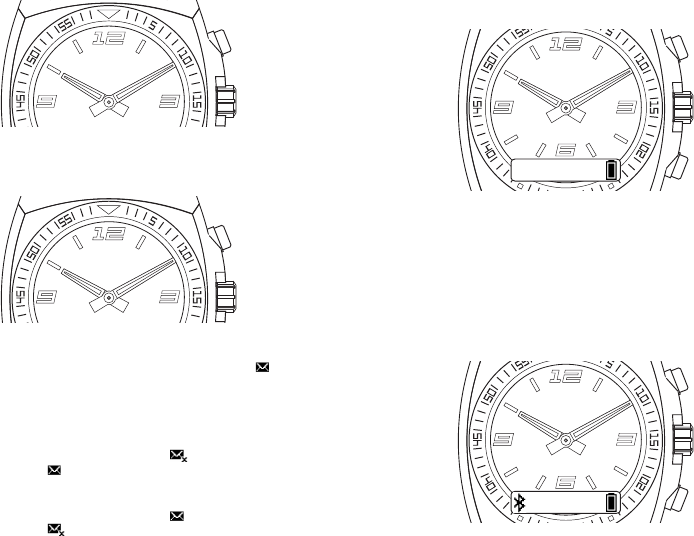
To mute an incoming call
Press the top key.
To reject an incoming call
Press the top key twice.
Text messages
When message notification is on, the watch vibrates and the appears
when you receive a text message. If you have unread messages in your
phone inbox, you will not get additional notifications when you receive
new text messages.
To turn message notification on
1. Press the bottom key repeatedly to select .
2. Press the top key. appears.
To turn message notification off
1. Press the bottom key repeatedly to select .
2. Press the top key. appears.
°
°°
Battery status
To check the watch battery status
Press the top key.
Date
To check the phone date
Press the top key once. The watch battery status is also shown.
Time
To check the phone time
Press the top key twice. The phone time, watch battery status and
Bluetooth® function status are also shown.
°
2006/09/13
°°
14:20

12
13
Out of range
The watch vibrates and the icon appears when the phone is out
of range.
The watch continues searching for the phone for 30 minutes.
We recommend that your watch and phone are within a range of
2 meters. The connection may be improved if there are no solid
objects between your watch and phone.
To turn out of range notification off
1. Press the bottom key repeatedly to select .
2. Press the top key. appears.
3. Repeat to turn the notification on again.
Phone settings
If the phone is out of range of your watch, you are asked if you would like
to reconnect again. You can choose between “Always ask” and “Always
allow” in your phone.
“Always ask”
If you choose “Always ask,” you will always be asked if you would like to
reconnect each time the watch and the phone are within range.
“Always allow”
If you choose “Always allow,” the watch automatically reconnects to the
phone each time they are within range of each other.
Master reset
Set the watch back to factory default settings and delete the changes you
have made to the settings.
To reset the watch
1. Enter pairing mode.
2. Press and hold the top and bottom key until the display lights up.
After a few seconds it dims again and your watch is reset.
Troubleshooting
Battery capacity
If the battery does not work properly it needs to be replaced by an
authorized service center.
Software version
To check software version:
1. In pairing mode, press the bottom key 5 times.
2. To stop checking software version, press top key twice. Ignore pairing
request in the phone.
Dashes on the display
If dashes (- - -) appear on the display when you press the top key, pair
your watch with the phone again.
Pairing with Dial-Up Networking
For some phones you may receive a message about dial-up networking. If
this happens, press “Yes” to continue.

14
15
Declaration of Conformity
We, Fossil Partners LP of
2280 N. Greenville Road
Richardson, TX 75081
declare under our sole responsibility that our product
Caller ID Watch
to which this declaration relates is in conformity with the appropriate
standards EN 300 328, EN 301 489-17, EN 301 489-7 and EN 60950
following the provisions of Radio Equipment and Telecommunication
Equipment directive 1999/5/EC with requirements covering EMC
directive 89/336/EEC and Low Voltage directive 73/23/EEC.
Richardson, TX September 2006.
Bill Geiser, V.P. Watch Technology
FCC and IC Statements
This device complies with part 15 of the FCC rules. Operation is subject
to the following two conditions: (1) This device may not cause harmful
interference, and (2) This device must accept harmful interference
received, including interference that may cause undesired operation.
Compliance Statement (Part 15.19)
Warning (Part 15.21)
Changes or modifications to this product that are not expressly approved
by Fossil may void your authority to operate the watch.
Industry Canada Statement per Section 4.0 of RSP-100
The term “IC:” before the certification / registration number only signifies
that the Industry Canada technical specifications were met.
Section 7.1.5 of RSS-GEN
Operation is subject to the following two conditions:
1) this device may not cause harmful interference, and
2) this device must accept any interference received, including
interference that may cause undesired operation.
Section 2.6 of RSS-102
This portable transmitter with its antenna complies with Industry Canada
RF Exposure Limits for General Population / Uncontrolled Exposure.
FCC Interference Statement [Part 15.105(b)]
This equipment has been tested and found to comply with the limits for
a Class B digital device, pursuant to Part 15 of the FCC Rules. These
limits are designed to provide reasonable protection against harmful
interference in a residential installation. This equipment generates uses
and can radiate radio frequency energy and, if not installed and used
in accordance with the instructions, may cause harmful interference to
radio communications. However, there is no guarantee that interference
will not occur in a particular installation. If this equipment does cause
harmful interference to radio or television reception, which can be
determined by turning the equipment off and on, the user is encouraged
to try to correct the interference by one of the following measures:
- Reorient or relocate the receiving antenna.
- Increase the separation between the equipment and receiver.
- Connect the equipment into an outlet on a circuit different from that
to which the receiver is connected.
- Consult the dealer or an experienced radio/TV technician for help.
This portable transmitter with its antenna complies with FCC’s RF
exposure limits for general population / uncontrolled exposure.