Foxda Technology ARM20 HIGH FIDELITY HI-RES MUSIC PLAYER User Manual
Foxda Technology Industrial (Shenzhen) Co., Ltd. HIGH FIDELITY HI-RES MUSIC PLAYER Users Manual
Users Manual
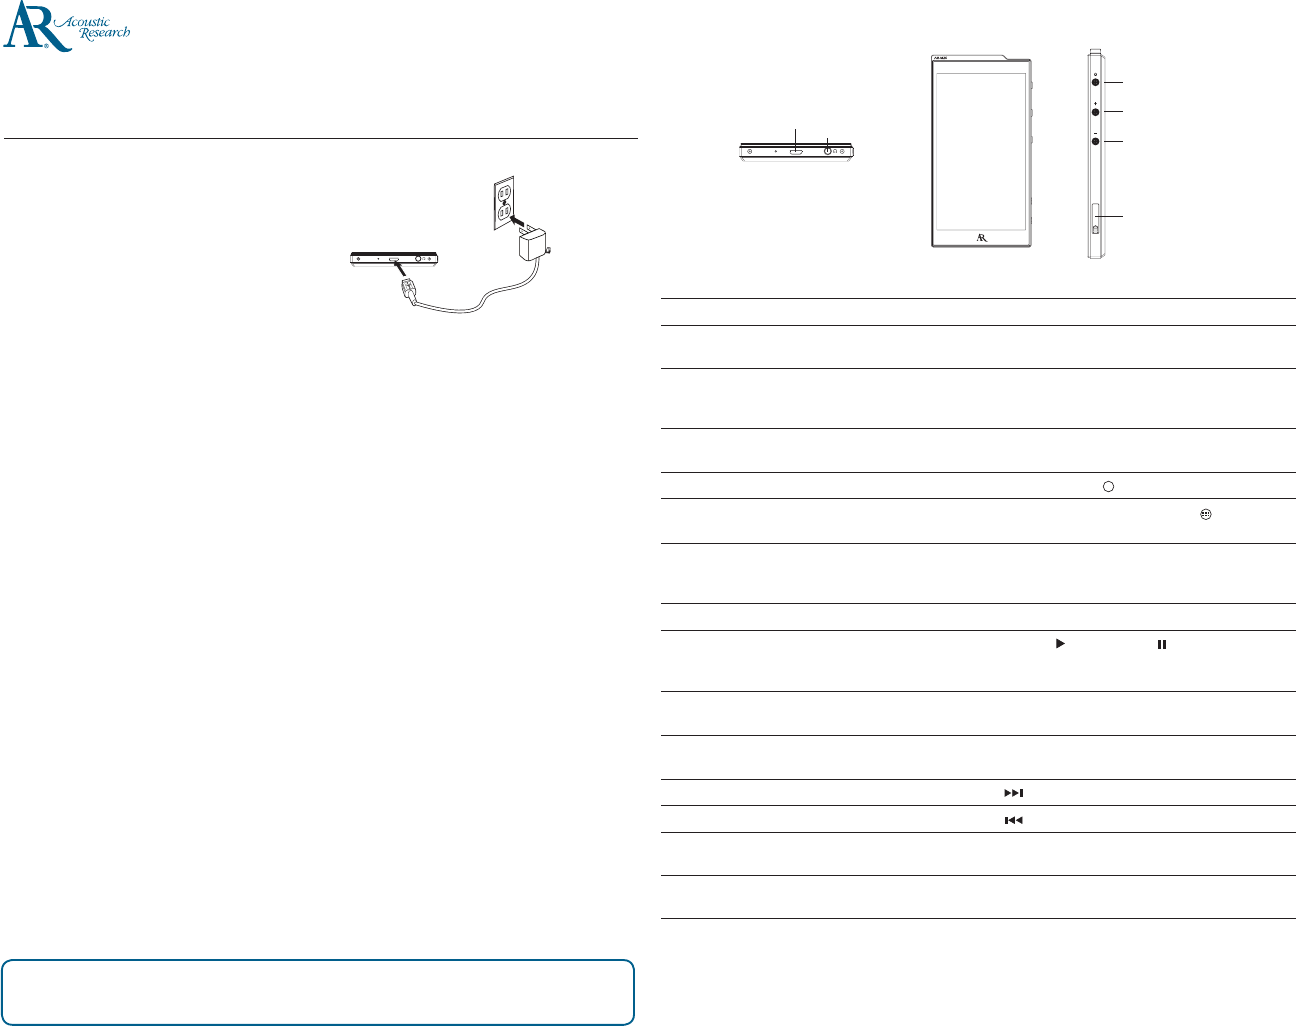
Getting Started
1. Charging your Player
• ChargethePlayerwithUSBpoweradapter
conformingwiththeUSBBatteryCharging
Specications1.2orabove(notsupplied).
• Poweradapterwith5V2Aoutputisrecommended
forhighspeedcharging.
•
ThePlayershouldbecharged for at least 6 hours
beforeusingforthersttime.
• Alternatively,thePlayerchargesautomaticallyevery
timeyouconnectittoyourcomputer.Charging
processmaybeslowerandthechargingtime
dependsonthecurrentoutputoftheUSBport.
2. InstallorremovemicroSDcard
• OpentheprotectioncoverofthemicroSDexpansionslot.GentlyinsertamicroSDcard*intothe
microSDexpansionslot.Closetheprotectioncover.
• BeforeremovingamicroSDcard,taponSD card connected - Touch to unmount sdcard on the
noticationbar.Afterthat,opentheprotectioncoverandgentlypushthecardtoreleaseit.
3. TransferaudiolestoyourPlayer
Windows 7/Windows 8/Windows 10:
• ConnectyourPlayertothecomputer
• OpenWindows Explorer,selectComputer,openAR-M20 under PortableDevices
• Openthedesiredstoragemedia Internal SD card or SD card(Optional,onlyifmicroSDcardisinstalled)
• Drag-and-dropaudioles(orfolderscontainingaudioles)tothedesireddestination**
Mac OS X (10.5 or above):
• DownloadandinstallAndroid File Transfer from www.android.com/letransfer/
(Firsttimeinstallationonly)
• ConnectyourPlayertothecomputer
• RunAndroidFileTransferifitdoesnotpopupautoatically
• Selectthedesiredstoragemediabyclickingonthetab Internal SD card or SD card(Optional,onlyif
microSDcardisinstalled)
• Drag-and-dropaudioles(orfolderscontainingaudioles)tothedesireddestination**
4. DisconnectthePlayerfromthecomputerandenjoymediaonthego.
AcousticResearchM20
www.acoustic-research.com
Congratulations on purchasing your new Acoustic Research High Resolution Music Player.
PleasereadtheseinstructionsforquicktipsonusingthePlayer.
QuickStartGuide
*Upto200GBmicroSDcardissupported.
**Musiclesareautomaticallyorganizedunderdierentviewsaccordingtotheembeddedmusictagsineachle.
Needmorehelp?Donotreturnthisproducttothestore.
Visit www.acoustic-research.comforthelatestrmware,usermanualandFAQ’s.
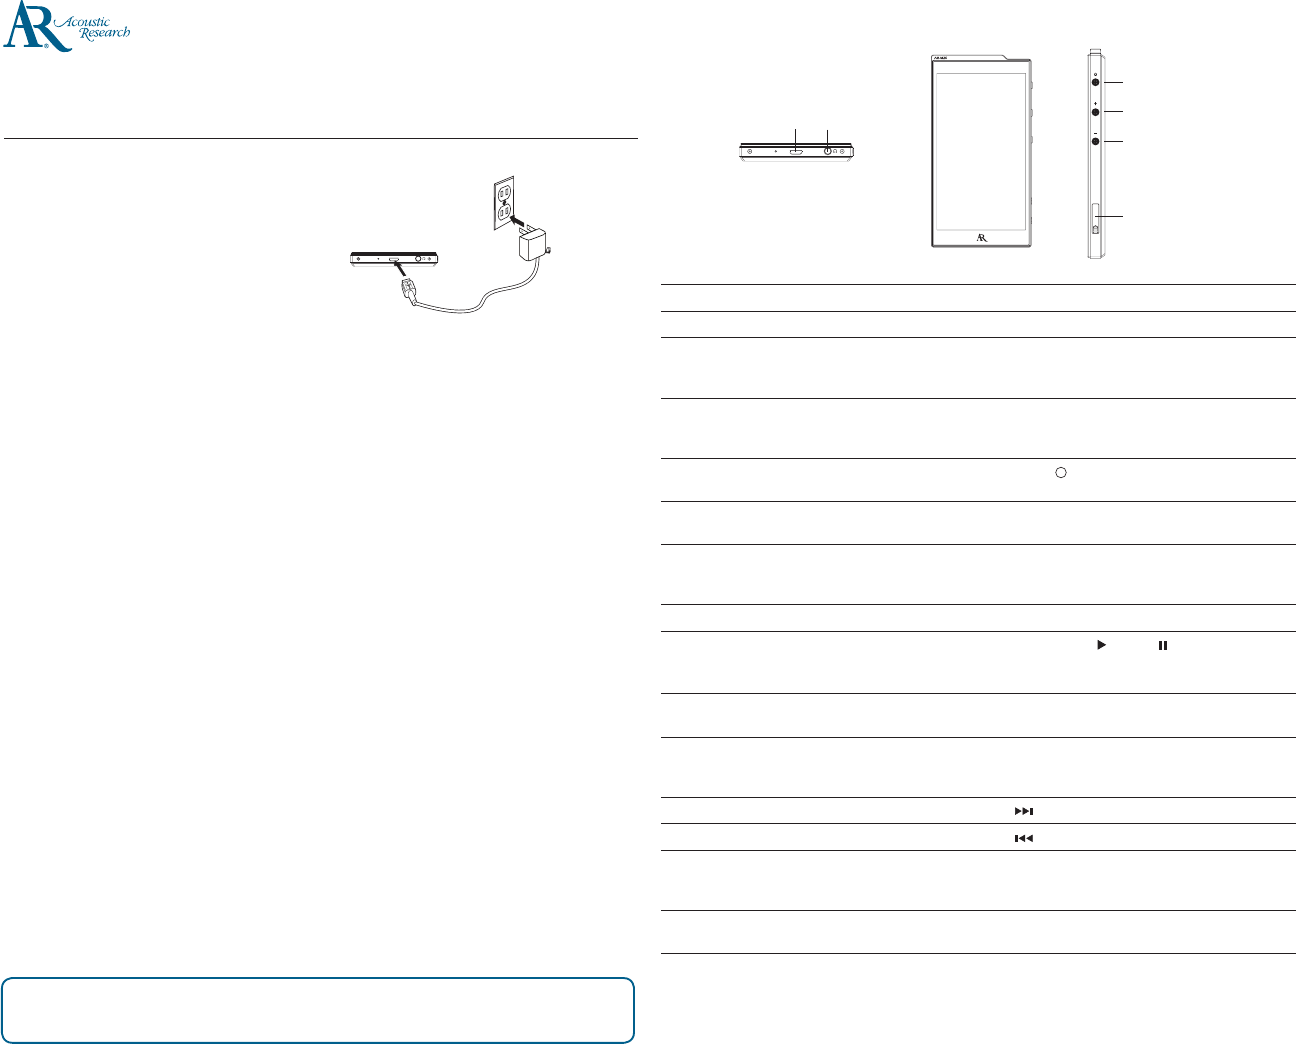
Generalcontrols
Touch
Display
Headphones
Jack
USBPort
Volumeup
Volumedown
Poweron/offbutton
microSDexpansionslot
Player
100-240VACwall
outlet
AC/DCpower
adapter
USBconnectorcable
*UseonlyUSBpoweradapterconformingwithUSBBatteryCharging
Specifications1.2orabove(notsupplied)
*Imageisforreferenceonly,theAC/DCadaptershownintheimage
mayvaryfromtheactualproduct
*Musicplaybackduringbatterychargingispossible,butitwillslow
downthechargingprocess
SwitchonthePlayer PressandholdthePowerbuttonfor3seconds.
SwitchothePlayer PressandholdthePowerbuttonfor1secondand
thenselectPowerO.
Switchothedisplayandlockthetouchdisplay Whenthedisplayison,pressthePowerbutton.
Thedisplaywillalsoswitchoautomaticallyaftera
periodofinactivity(1minutebydefault).
Switchonthedisplayandunlockthetouchdisplay Whenthedisplayiso,pressthePowerbutton.
Swipethelockicontowardsanyedgesofthescreen.
GototheHomescreen TapontheHomeicon toaccesstheHomescreen.
GototheAPPSmenu AtHomescreen,tapontheAPPSicons atthelower
right corner.
Navigatetoanaudiole InAPPSmenu,taponAR Music Player.
InARMusicPlayer,taponyourdesiredviewbyselect-
ingthecorrespondingtabatthescreentop.
Play an audio le Taponamusicleinanyview.
Pauseplayback Pressthe Play /Pause button duringmusicplay-
backinthewidgetorintheARMusicPlayerapp,
pressagaintoresume.
ShowtheOptionmenu Inanynavigationview,tapandholdonanymedia
item.
Adjustthevolume Pressthevolumedownbuttontoreducethevolume
orvolumeupbuttontoincreaseit.
Skiptothenextle Press inthewidgetorintheARMusicPlayerapp.
Skiptothepreviousle PressinthewidgetorintheARMusicPlayerapp.
DeletelesfromthePlayer TapandholdontheleuntiltheOptionmenuap-
pears.ThenselectDeleteandconrmtheaction.
ForcethePlayertoshutdown
(ifitisnotresponding)
PressandholdthePowerbuttonfor10seconds.
Erste Schritte
1. Laden des Players
• LadenSiedenPlayermitdemUSB-Netzteil,das
derUSB-Akkuladespezikation1.2oderhöher
entspricht(nichtmitgeliefert).
• EinNetzteilmiteinemAusgangvon5V/2Awird
zumHochgeschwindigkeitsladenempfohlen.
• VorderErstinbetriebnahmesolltederPlayer
mindestens 6 Stunden lang geladen werden.
• DerPlayerwirdauchimmerautomatischgeladen,
wennSieihnmitIhremComputerverbinden.Der
Ladevorgangkannlangsamerstattnden,unddie
LadedauerhängtvomStromausgangsdesUSB-
Portsab.
2. EinsetzenoderEntfernendermicroSD-Karte
• ÖnenSiedenSchutzdeckeldesmicroSD-Steckplatzes.SetzenSiediemicroSD-Karte*sanftinden
microSD-Steckplatzein.SchließenSiedenSchutzdeckel.
• VordemEntferneneinermicroSD-Kartedieangeschlossene SD-Karteantippen-Inder
BenachrichtigungsleistedieSD-Karte antippen, um die Bereitstellung der SD-Karte aufzuheben.
DanachdenSchutzdeckelönenunddieKartesanfthineindrücken,damitsiefreigegebenwird.
3. ÜbertragungvonAudiodateienaufIhrenPlayer
Windows 7/Windows 8/Windows 10:
• VerbindenSieIhrenPlayermitdemComputer.
• ÖnenSieWindows Explorer,wählenSie ComputerundönenSieAR-M20 unterTragbareGeräte.
• ÖnenSiedasgewünschteSpeichermediumInterneSD-KarteoderSD-Karte(optional,fallsnurdie
microSD-Karteinstalliertist).
• DurchDrag-and-dropkönnenSiedieAudiodateien(oderOrdnermitAudiodateien)andiegewünschten
Zielorteübertragen.**
Mac OS X (10.5 oder höher):
• Android File Transfervonwww.android.com/letransfer/downloadenundinstallieren(nurbeider
Erstinstallation).
• VerbindenSieIhrenPlayermitdemComputer.
• FührenSieAndroidFileTransferaus,fallsdasProgrammnichtautomatischerscheint.
• WählenSiedasgewünschteSpeichermedium,indemSieaufdieRegisterkarteInterne SD-Karteoder
SD-Karteklicken(optional,fallsnurdiemicroSD-Karteinstalliertist).
• DurchDrag-and-dropkönnenSiedieAudiodateien(oderOrdnermitAudiodateien)andiegewünschten
Zielorteübertragen.**
4. TrennenSiedenPlayervomComputerab,undgenießenSiedieMusikwiedergabeunterwegs.
AcousticResearchM20
www.acoustic-research.com
Herzlichen Glückwunsch zum Erwerb Acoustic Research Music Players mit hoher Auösung.
LesenSiebittedieseSchnellanleitungfürHinweisezumGebrauchdesPlayers.
Schnellstartanleitung
*microSD-Kartenbiszu200GBwerdenunterstützt.
**MusikdateienwerdenautomatischunterverschiedenenAnsichtenorganisiert,jenachdeninjederDateieingebetteten
Musik-Tags.
BrauchenSieHilfe?SchickenSiedasProduktnichtandasGeschäftzurück.
BesuchenSie www.acoustic-research.comfürdieneuesteFirmware,dieBedienungsanleitungundFAQ.
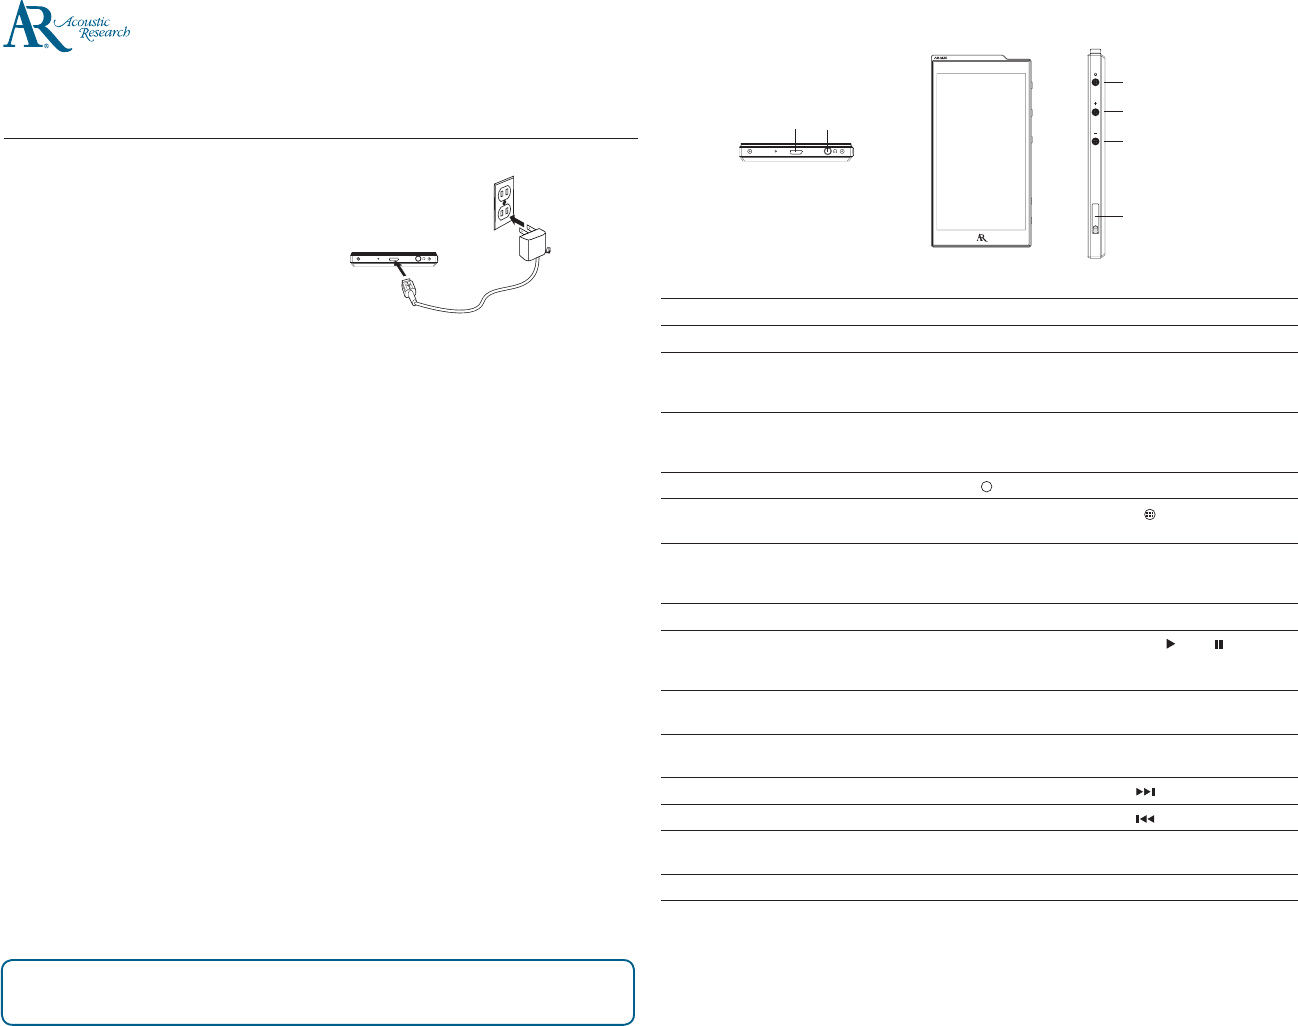
AllgemeineBedienungselemente
Touch-
Display
Kopfhörerbuchse
USBPort
Lautstärkeerhöhen
Lautstärkeverringern
Ein-/Ausschalttaste
microSD-Steckplatz
Player
100-240VNetzstrom
AC/DC-Netzteil
USB-Verbindungskabel
*VerwendenSienurdasUSB-Netzteil,dasderUSB-Akkuladespezifikation
1.2oderhöherentspricht(nichtmitgeliefert).
*DasBilddientnurzuReferenzzwecken.DasimBildgezeigte
AC/DC-NetzteilkannvomtatsächlichenProduktverschiedensein.
*DieMusikwiedergabeistmöglich,währendderAkkugeladenwird,
dochwirdderLadevorgangdadurchverzögert.
Schalten Sie den Player ein DrückenundhaltenSiedieEin-/Ausschalttaste3Sekundenlang.
SchaltenSiedenPlayeraus DrückenundhaltenSiedieEin-/Ausschalttaste1Sekundelang.
SchaltenSiedasDisplayaus,und
sperrenSiedasTouch-Display
WenndasDisplayeingeschaltetist,drückenSiedieStromtaste.Das
DisplayschaltetsichnacheinerPeriodederInaktivitätebenfalls
automatischaus(standardmäßignach1Minute).
SchaltenSiedasDisplayein,und
lösenSiedieSperredesTouch-
Displays
WenndasDisplayausgeschaltetist,drückenSiedieStromtaste.
FührenSiedasSchloss-SymboldurcheineWischbewegunggegen
einenRanddesBildschirms.
GehenSiezumStartbildschirm TippenSiedasStart-Symbolan,umdenHauptbildschirm
aufzurufen.
GehenSiezumAPPS-Menü TippenSieimStartbildschirmdasAPPS-Symbolinderunteren
rechtenEckean.
ZueinerAudiodateinavigieren TippenSieimAPPS-MenüeinenAR Music Playeran.TippenSie
imARMusicPlayerdiegewünschteAnsichtan,indemSiedie
entsprechendeRegisterkarteamoberenBildschirmrandwählen.
EineAudiodateiwiedergeben TippenSieeineMusikdateiineinerbeliebigenAnsichtan.
DieWiedergabeunterbrechen DrückenSiedieTasteWiedergabe( )/Pause( )währendder
MusikwiedergabeimWidgetoderinderARMusicPlayerApp.Zur
FortsetzungderWiedergabeerneutdrücken.
DasOptionsmenüanzeigen InderNavigationsansichttippenSieeinenMedienartikelanund
haltenSieihngedrückt.
DieLautstärkeeinstellen DrückenSiedieTaste‘Lautstärkeverringern’,umdieLautstärkezu
verringern,bzw.dieTaste‘Lautstärkeerhöhen’,umdieLautstärkezu
erhöhen.
ZurnächstenDateispringen DrückenSiedieTaste imWidgetoderinderARMusicPlayerApp.
ZurvorherigenDateispringen DrückenSiedieTasteimWidgetoderinderARMusicPlayerApp.
DateienvomPlayerlöschen TippenSiedieDateianundhaltenSiesiegedrückt,bisdasOptions-
menüangezeigtwird.WählenSie‘Löschen’,undbestätigenSieden
Vorgang.
ErzwungenesAbschaltendesPlayers
(fallsernichtanspricht)
DrückenundhaltenSiedieEin-/Ausschalttaste10Sekundenlang.
시작하기
1. 충전하기
• AR-M20를 USB 배터리 충전 규격 1.2 이상을
지원하는 아답터 (미제공)를 사용하여 충전하시기
바랍니다.
• 빠른 충전을 위하여 5V, 2A 출력의 아답터를
권장합니다.
• 최초 사용시 최소 6시간 이상 충전 후 사용 하시기
바랍니다.
• AR-M20를 컴퓨터에 연결하면 자동 충전이
진행됩니다. 이 경우 충전 시간은 컴퓨터 USB port의
전류 용량에 따라 달라집니다.
2. microSD 카드의 삽입 및 제거.
• microSD 확장 슬롯의 덮개를 열고, microSD카드*를
확장슬롯에 삽입 후 덮개를 닫아 주세요.
• microSD 카드를 제거하기 전, 상태표시창의 SD Card Connected – Touch to unmount sdcard를
실행 후, 카드 슬롯 덮개를 열고 microSD Card를 살짝 눌러 카드를 제거 합니다.
3. AR-M20로 오디오 파일 전송
Windows 7/Windows 8/Windows 10:
• AR-M20의 전원을 켜고 컴퓨터에 연결합니다.
• 윈도우 탐색기를 열고, 컴퓨터를 선택, ARM20를 선택합니다.
• 저장하고자 하는 위치를 Internal SD Card 혹은 SD Card (microSD Card 삽입시) 선택합니다.
• 저장하고자 하는 폴더나, 음악 파일을 원하는 저장위치로 끌어 넣기 (Drag & Drop)하면 파일이 복사
됩니다.**
MacOSX(10.5이상):
• MAC용 Android File Transfer ( https://www.android.com/filetransfer/)를 설치해 주세요.
(최초 1회 설치)
• AR-M20의 전원을 켜고 컴퓨터에 연결합니다.
• Android File Transfer가 자동으로 실행되지 않으면 파일을 실행해 주세요.
• 저장하고자 하는 위치를 Internal SD Card 혹은 SD Card (microSD Card 삽입시) 선택합니다.
• 저장하고자 하는 폴더나, 음악 파일을 원하는 저장위치로 끌어 넣기 (Drag & Drop)하면 파일이 복사
됩니다.**
4. 이제 AR-M20를 컴퓨에서 분리하고 음악을 즐기시면 됩니다.
Acoustic Research M20
www.acoustic-research.com
AcousticResearch의HighResolutionMusicPlayer를구입해주셔서감사드립니다.
사용전 아래 내용을 충분히 숙지해 주시기 바랍니다.
QuickStartGuide
* microSD 카드 용량 200GB까지 지원
** 음악파일은 곡명, 아티스트등 파일 Tag 정보에 따라 자동 배열 됩니다.
도움이필요하신가요?
www.acoustic-research.kr에 접속해 최신 펌웨어, 사용설명서 및 FAQ를 확인해 주세요.
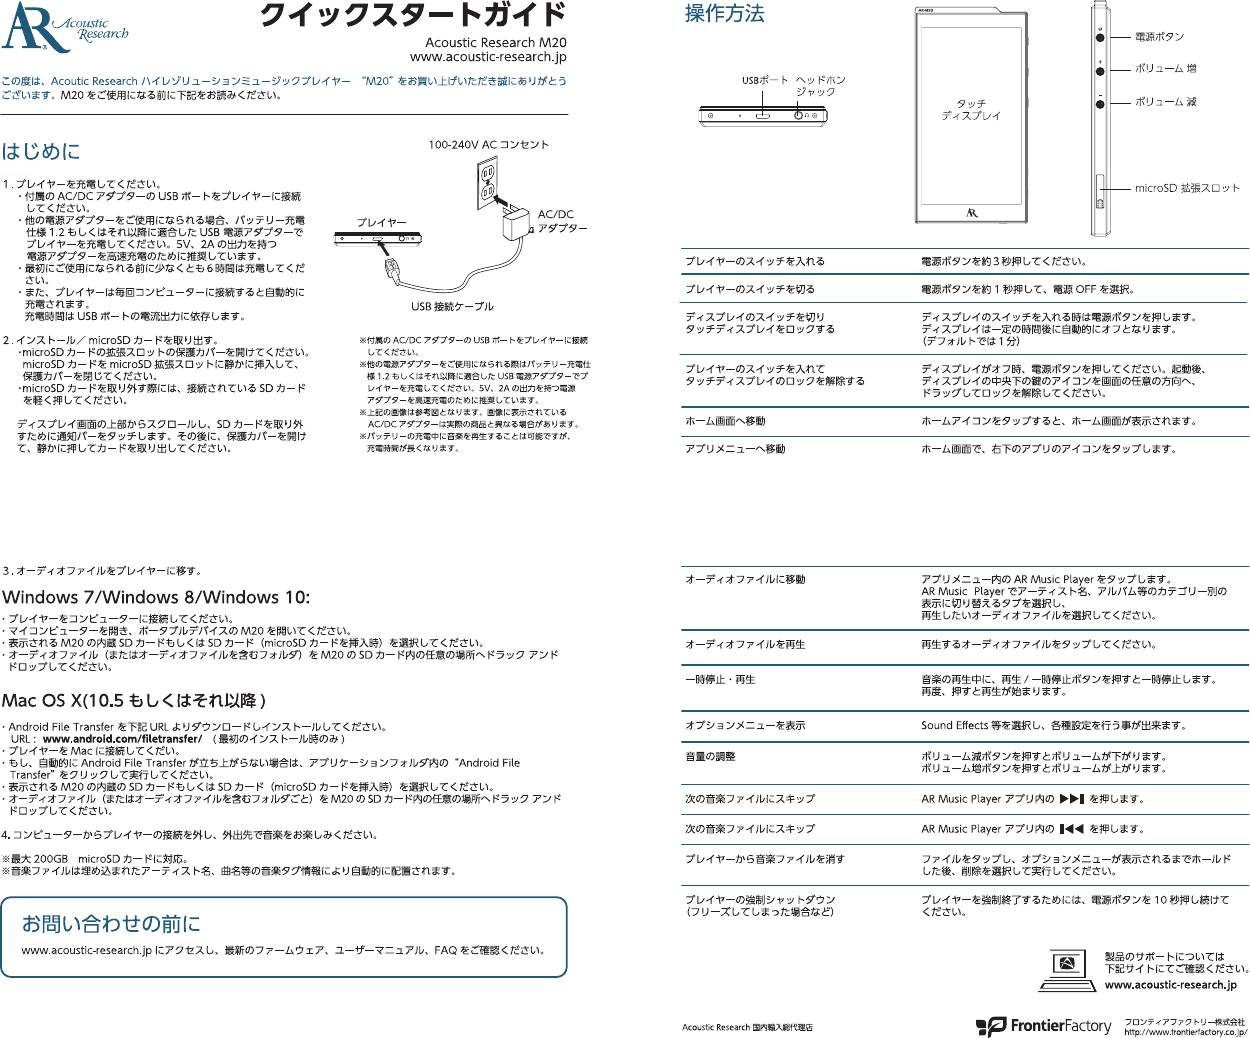
조작방법
터치디스플레이
헤드폰잭USB포트
볼륨 업
볼륨 다운
전원
microSD 확장 슬롯
Player
110-240V AC 전원
AC/DC 아답터
(미제공)
USB 케이블
* USB 배터리 충전 규격 1.2 이상을 지원하는 아답터(미제공)만
사용하시기 바랍니다.
* 참조용 이미지로 실제 AD/DC 아답터는 제공되지 않습니다.
* 충전중 음악 재생이 가능하나 충전 시간이 길어 질 수 있습니다.
전원 켜기 전원버튼을 약 3초간 눌러주세요.
전원 끄기 전원버튼을 약 1초간 누른 후 종료를 선택합니다.
디스플레이 끄기, 터치 화면 잠금 디스플레이가 켜진 상태에서 전원 버튼을 누릅니다.
또한 사용하지 않을 경우 일정 시간 후 자동으로 꺼집니다.
(기본 설정 1분)
디스플레이 켜기, 터치 화면 잠금 해제 디스플레이가 꺼진 상태에서 전원 버튼을 누릅니다.
자물쇠 모양 잠금 아이콘을 화면 모서리 방향으로 이동시키면 화
면 잠금이 해제됩니다.
홈 화면으로 이동 홈 아이콘 ( 모양)을 터치하면 홈 화면으로 이동 합니다.
Apps 메뉴로 이동 홈 화면에서 우측 하단의 Apps 아이콘( )을 터치하면 Apps 메
뉴로 이동합니다.
오디오 파일 검색 Apps메뉴에서 AR Music Player를 선택하여 실행합니다.
AR Music Player에서 화면 상단의 All, Album, Artist등 원하는
항목을 선택하여 파일을 검색합니다.
오디오 파일 재생 음악파일을 탭하면 재생이 됩니다.
재생 정지 AR Music Player App 혹은 위젯에서 재생 /정지 버튼 누릅
니다.
다시 재생하려면 버튼을 한 번 더 눌러 줍니다.
옵션 메뉴 보기 AR Music Player의 검색창에서 미디어 파일을 누르고 있으면 옵
션 메뉴가 나타납니다.
볼륨 조정 볼륨 업 버튼을 누르면 볼륨이 커지고 볼륨 다운 버튼을 누러면 볼
륨이 줄어듭니다.
다음 곡으로 이동 AR Music Player App 혹은 위젯에서 버튼을 누릅니다.
이전 곡으로 이동 AR Music Player App 혹은 위젯에서 버튼을 누릅니다.
파일 삭제하기 삭제하고자 하는 파일을 누르고 있으면 옵션 메뉴가 뜹니다.
메뉴중 Delete를 선택후 확인을 누르면 삭제 됩니다.
강제 종료하기 전원 버튼을 10초 이상 누르고 있으면 강제 종료 됩니다.
Important Safety Instructions
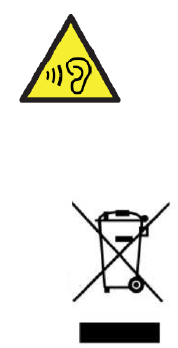
To prevent possible hearing damage, do not listen at high volume levels for long periods.
Please use appointed battery in case of explosion risk, please dispose of lifeless battery under guidance.
Recycle your phone
TheWEEElogo(shownattheleft)appearsontheproducttoindicatethatthisproductmustnotbe
disposedoffordumpedwithyourotherhouseholdwastes.Youareliabletodisposeofallyourelectronicor
electricalwasteequipmentbyrelocatingovertothespecifiedcollectionpointforrecycling.ofsuchhazardous
waste.
FCC Caution:
Any Changes or modifications not expressly approved by the party responsible for compliance
could void the user's authority to operate the equipment.
This device complies with part 15 of the FCC Rules. Operation is subject to the following
two conditions: (1) This device may not cause harmful interference, and (2) this device
must accept any interference received, including interference that may cause undesired
operation.
Note: This equipment has been tested and found to comply with the limits for a Class B digital
device, pursuant to part 15 of the FCC Rules. These limits are designed to provide
reasonable protection against harmful interference in a residential installation. This
equipment generates, uses and can radiate radio frequency energy and, if not installed and
used in accordance with the instructions, may cause harmful interference to radio
communications. However, there is no guarantee that interference will not occur in a
particular installation. If this equipment does cause harmful interference to radio or television
reception, which can be determined by turning the equipment off and on, the user is
encouraged to try to correct the interference by one or more of the following measures:
—Reorient or relocate the receiving antenna.
—Increase the separation between the equipment and receiver.
—Connect the equipment into an outlet on a circuit different from that to which the receiver is
connected.
—Consult the dealer or an experienced radio/TV technician for help.
Specific Absorption Rate (SAR) information
SAR tests are conducted using standard operating positions accepted by the FCC with the
device transmitting at its highest certified power level. For body-worn, this device was tested
and meets FCC RF Exposure guideline for general/public enviornment. To satisfy RF exposure
requiremetns, for body worn operation, this device must be limited to the belt/clip/holster accessoried
that have no metallic component in the assembly that positions a minimum of 5 mm distance from body.
Non-compliance with the above restrictions may result in violation of RF exposure guideline.
IC Warning
This device complies with Industry Canada licence-exempt RSS standard(s). Operation is subject to the
following two conditions:
(1) this device may not cause interference, and
(2) this device must accept any interference, including interference that may cause undesired operation
of the device.
Le présent appareil est conforme aux CNR d'Industrie Canada applicables aux
appareils radio exempts de licence. L'exploitation est autorisée aux deux conditions
(1) l'appareil ne
(2) l'utilisateur de l'appareil doit accepter tout
même si le brouillage est susceptible d'en compromettre le fonctionnement
7.1.4 Radio Apparatus Containing Digital Circuits (ICES-003)
IC SAR Waring
The device has been tested and compliance with SAR limits, users can obtain Canadian information on
RF exposure and compliance
Le présent appareil est conforme
Après examen de ce matériel aux conformité aux limites DAS et/ou aux limites d’intensité de champ RF,
les utilisateurs peuvent sur l’exposition aux radiofréquences et la conformité and compliance d’acquérir
les informations correspondantes
This Class B digital apparatus complies with Canadian ICES-003.
Cet appareil numérique de la classe B est conforme à la norme NMB-003 du Canada.
The minimum distance from body to use the device is 5mm.
La distance minimale du corps à utiliser le dispositif est de 5mm.
doit pas produire de brouillage, et.
brouillage radioélectrique subi,
of the device.
suivantes : (1) l'appareil ne suivantes :