Foxpro 618 Remote Control Transmitter User Manual Firestorm Manual
Foxpro Inc Remote Control Transmitter Firestorm Manual
Foxpro >
User Manual


Page | 2
TOPIC
PAGE
IMPORTANT
INFORMATION
3
USING THE
FOXPRO
®
FIRESTORM
4
1.0 QUICK OPERATING GUIDE
5
1.1 Installing Batteries in the FIRESTORM
5
1.2 Installing Batteries in the TX9
5
1.3 Playing Sounds Manually
5
1.4 Playing Sounds with the TX9 Remote Control
6
2.0 ABOUT THE SPEAKERS
6
2.1 Using external speakers
7
2.2 Connecting external speakers
7
2.3 Disabling internal speakers
7
3.0 BATTERIES AND CHARGING
7
4.0 “AUX” JACK FUNCTION
9
5.0 USING EXTERNAL POWER SOURCES
9
6.0 TX9 REMOTE CONTROL
11
6.1 Installing Batteries in the TX9
11
6.2 Turning the TX9 On/Off
11
6.3 Playing Sounds
12
6.4 Mute
12
6.5 Recall
12
6.6 Volume Control
13
6.7 Timer
13
6.8 Setting Presets P1 and P2
13
7.0 PROGRAMMING THE FIRESTORM
14
7.1 Purchasing new sounds
14
7.2 Downloading the FOXPRO
®
Programming Utility
14
7.3 Programming with the Utility
15
7.4 Downloading new Playlist to the TX9
17
FCC STATEMENT
19
LIMITED WARRANTY STATEMENT
20

Page | 3
Important Information
FOXPRO
®
’s goal is to provide our customers with the highest quality products
in the industry. We take great pride in manufacturing our products in the USA.
Please do not hesitate to contact us for assistance, comments or questions.
FOXPRO
®
Inc.
14 Fox Hollow Drive
Lewistown, PA 17044
(717) 248-2507
Fax: (717) 247-3594
Hours of Operation
Monday – Friday
8AM – 5PM EST
Contact Us
Customer Service: (717) 248-2507
Toll Free Orders Only: 866-463-6977
General Inquiry E-mail: sales@goFOXPRO.com
Stay up to date with the latest sounds by visiting our online sound library.
Watch for new products and upgrades from FOXPRO
®
. Visit us online:
www.goFOXPRO.com
This manual, the animal sounds stored in your caller, and animal sounds
purchased from FOXPRO
®
Inc. for installation in your caller are protected
by copyright.
Copyright ©
©©
©
℗
℗℗
℗
2010 by FOXPRO
®
Inc.
Page | 4
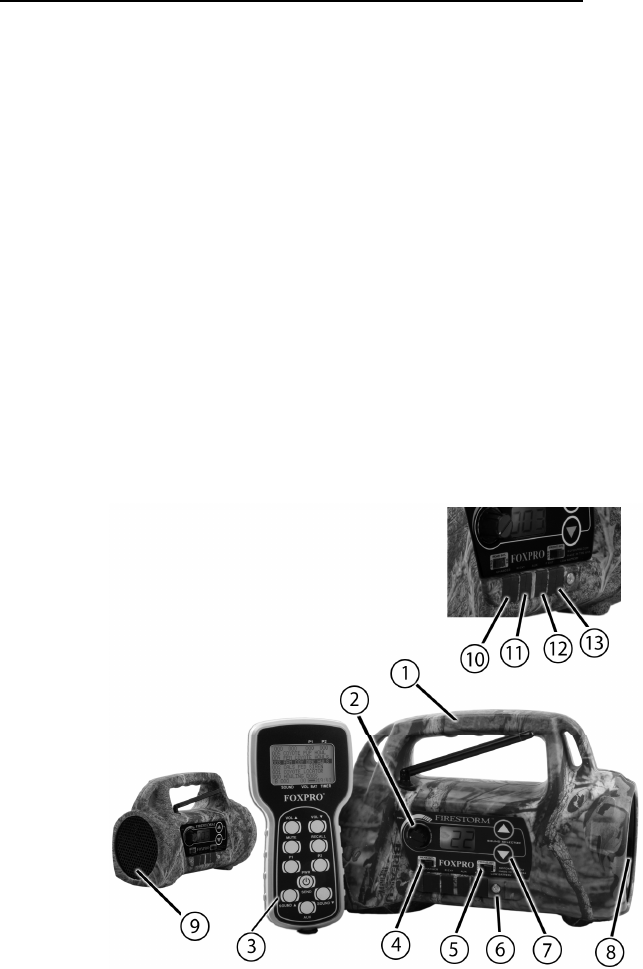
Using the FOXPRO® FIRESTORM Digital Game Call
Congratulations on the purchase of your FOXPRO
®
FIRESTORM digital
wildlife caller! You have chosen a highly advanced product with reliability, ease-
of-use, and features that are second to none. Please take this time to read and
understand the information in this instruction booklet. This will ensure that you
receive the maximum benefit from your new FOXPRO
®
FIRESTORM.
Features
1. Rugged injection molded ABS housing
2. On/Off switch/manual volume control
3. TX9 remote control
4. Rear speaker slide switch
5. Front speaker slide switch
6. Low battery LED
7. Sound up/down buttons
8. Front horn speaker
9. Rear cone speaker
10. Charge jack
11. Rear external speaker jack
12. Auxiliary device jack
13. Front external speaker jack

Page | 5
1.0 QUICK OPERATING GUIDE
Since the FIRESTORM is shipped from the factory with no batteries installed;
the first step is to install 8 “AA” batteries. These may be alkaline or
rechargeable types. We strongly recommend high capacity NiMH rechargeable
batteries over alkaline types for maximum performance, particularly when using
loud volume levels.
1.1 Installing Batteries in the FIRESTORM
1. To install batteries, remove the battery door. The battery door is
located on the side of the caller, and is held in place with a knurled
thumbscrew.
2. Orient the batteries as per the directions shown in each cavity within
the holder.
NOTE: The battery polarity alternates.
3. Replace the battery door after the batteries are installed.
1.2 Installing the TX9 Battery
The TX9 transmitter operates from a 9V battery. Please use a high quality
alkaline battery.
1. Remove the battery compartment cover located on the rear of the
transmitter.
2. Connect the 9V battery to the connector plug, and orient the battery in
the transmitter.
3. Replace the battery compartment cover.
1.3 Playing Sounds Manually
1. Make sure that at least 1 of the speaker selector slide switches is set to
the right, or “ON” position.
2. Click the On/Off/Volume switch to the on position. Please note that this
switch is also the volume control when the unit is operated without the
remote control. The further clockwise you turn the knob, the louder the
unit will play. At this point, the LCD display on the FIRESTORM should
display two bars “- -“.

Page | 6
3. Press the up or down arrow keypad button on the FIRESTORM to
select a sound number. Once selected, release the button, and the
sound will play. To select a different sound, simply press the up or
down arrow buttons again to your desired sound. Please note that by
pressing and holding either the up or down keys the numbers will ramp
slowly at first, and then increase to a faster ramp speed.
1.4 Playing Sounds with the TX9 Remote Control
1. Turn on the TX9 remote control by pressing and holding the “PWR”
button for a few seconds.
2. Use the sound up or sound down arrow buttons to scroll through your
available sounds. The selector bar highlights the sound that is currently
selected.
NOTE: When scrolling through sounds, the playlist will change in
pages. The first page will show sounds 000 – 005, page two will
show 006 – 011, etc.
3. After you pick the sound you wish to play, press the “SEND” button.
The sound number is displayed on the screen the bottom left side after
you have press “SEND”.
4. Raise your volume level by pressing and holding the volume up button.
As you raise the volume level, the on screen volume level indicator will
increment. You can decrease the volume by pressing and holding the
volume down button.
5. Use the mute button to pause/stop the sound you are playing.
6. To switch sounds, repeat step 2.
7. To turn off the TX9, press and hold the “PWR”/”SEND” button for a few
seconds. You will see a message appear on the screen saying
“Release key to turn off transmitter”. As soon as you release your hold
on the button, the TX9 will power down.
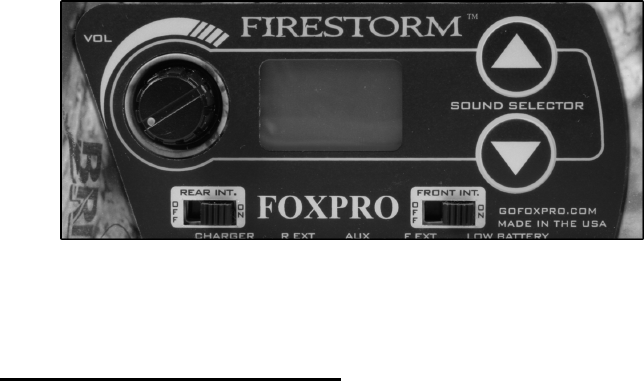
2.0 ABOUT THE SPEAKERS
The FIRESTORM incorporates two different types of loudspeakers. The front
speaker is a high efficiency horn with maximum sensitivity in the frequency
range necessary to reproduce small animal distress sounds. Distress sounds of
rabbits, small rodents, birds, canines, and many others are best reproduced by
using the front horn only with the rear cone speaker turned off. This will also
ensure maximum battery life as playing both speakers requires almost twice as
much battery power.
The rear cone speaker is best suited to sounds that have significant lower
frequency content. These sounds would include bear growls, mountain lion
roars, certain owl hoots and some other large mammal sounds. The rear
speaker, however, is not as efficient as the front horn. Because of this, it will
not play as loud as the horn. Understand that not all calling sounds will benefit
greatly from playing both speakers at once. If you elect to do this, remember
that battery life will be reduced.
Page | 7
2.1 Using External Speakers
The FIRESTORM is equipped with two External Speaker Jacks which allows
you to connect up to two additional speakers. The internal speakers perform
admirably; however, you may encounter situations that require higher volume
levels. By connecting a larger and more efficient external speaker(s) to the
FIRESTORM, the volume level can be increased significantly.
2.2 Connecting External Speakers
The external speaker jacks on your FIRESTORM accept standard 3.5mm
plugs. When choosing an external speaker it is recommended to use one with
an impedance rating of 8-ohms.
NOTE: Be sure the FIRESTORM is turned OFF before connecting an
external speaker.
To connect an external speaker, plug the connector of the external speaker into
one of the external speaker jacks. You will notice that each external speaker
jack corresponds with one of the internal speakers. For example, internal front
speaker and front external speaker are linked together. If you wish to have
ONLY the external speaker(s) produce sound, you must disable the internal
speakers as the internal speakers are not disabled automatically.
2.3 Disabling Internal Speakers
Move the speaker slide switch to the “OFF” position for the desired speaker you
wish to disable (front or back). The following image shows that each internal
speaker has an independent on/off switch.
To re-enable the speaker later, simply place the slide switch back to the “ON”
position. By disabling the internal speaker(s) when using an external
speaker(s), battery life will be extended longer than having all of the speakers
operating at once.
3.0 BATTERIES AND CHARGING
Your FIRESTORM operates on 8 “AA” batteries. For optimal performance and
run times, we recommend high capacity 2000 mAh or greater NiMH (Nickel
Metal Hydride) rechargeable cells rather than alkaline types.
Page | 8
CAUTION: NEVER CONNECT ANYTHING OTHER THAN A FOXPRO
®
APPROVED CHARGER TO THE CHARGE JACK!
NOTE: Remove batteries from battery holder when caller will not be used
for prolonged periods to help prevent deep discharge.
When you ask your FIRESTORM caller to play at extremely loud volume levels,
the current demand on the batteries is much more than alkaline cells can
deliver. Consequently, the run time of these batteries can be very short. The
Zinc Carbon so-called “Heavy Duty” cells are expressly NOT recommended at
all. The performance of your FIRESTORM will be much better with high
capacity NiMH batteries.
CAUTION: Never attempt to charge batteries that are not intended to be
recharged! This includes both Zinc Carbon and alkaline cells. The
resulting damage can be serious, and will not be covered by the warranty.
For maximum charge efficiency, we recommend charging your
FIRESTORM in temperatures ranging from 40°F to 85°F (5°C to 30°C).
To charge the batteries connect the FOXPRO
®
8 ‘AA’ charger (available from
most FOXPRO
®
dealers and factory direct) to the FIRESTORM charge jack.
Be aware that the green LED may or may not extinguish when the batteries are
fully charged. Your FOXPRO
®
unit incorporates circuitry to terminate charge
current if high battery temperatures are detected. Battery temperatures
increase at the end of the charge cycle. If the temperature edges towards a
dangerous level, the charge current will be interrupted and the green LED will
extinguish. If excessive temperature is not detected, the green LED will not be
extinguished. It is quite possible for the batteries to be fully charged without
their temperature rising to the dangerous level. For this reason, the LED should
not be considered as a “full charge” indicator as it may or may not extinguish
when the batteries are fully charged. The batteries are fully charged any time
their temperature rises substantially above ambient. How long this takes
depends on how much charge has been taken from the batteries and how
much time has passed since the last charge. If the green LED goes out, the
batteries are definitely charged. If the green LED is on and the batteries are
cool, they are still charging. If the green LED is on and the batteries are very
warm, they are fully charged and you should terminate the charge by
unplugging the charger. You should not permit the charge to continue for
more than 12 hours under any circumstances. The batteries need to be
recharged when the “Low Battery” LED is blinking while the FIRESTORM is in
use. If this warning is ignored, the FIRESTORM will abruptly shut off and
display “LO” on the LCD display. Battery run time is directly related to how loud
you operate the FIRESTORM. Using both speakers at the same time rather
than only the most appropriate one will have a negative impact on run time.

Page | 9
With one speaker playing, expect 6 to 15 hours of run time, depending on the
loudness setting. With both speakers playing, expect 3 to 10 hours. Remember
that very loud volumes are rarely needed, as animals hear much better than we
do.
4.0 “AUX” JACK FUNCTION
The FIRESTORM is equipped with an auxiliary jack labeled “AUX”. The
purpose of this jack is to allow for the connection of certain external devices,
such as the FOXPRO
®
Jack-in-the-Box or Jack-Attack Decoy and to be able to
turn these on and off with the TX9 remote control transmitter. However, there
are some strict electrical limits involved with this jack. If these limits are
exceeded, damage to your FIRESTORM will result. This damage is not
covered by the warranty.
The electrically inclined will want to know that the jack is connected to the drain
of an internal Field Effect Transistor with a maximum current rating of 100mA.
The “tip” polarity of the 3.5mm jack is positive, while the sleeve is negative. If
the external device is connected with the polarity reversed, an internal
protection diode within the FET will conduct, causing the device to stay on
constantly. The maximum voltage applied to this jack must never exceed 15
volts. Typical uses for this jack would be to control the FOXPRO
®
Jack-in-the-
Box or Jack-Attack Decoy, or to start and stop a video recorder. Instructions on
connecting various devices to the “AUX” jack are beyond the scope of this
manual. You are urged to seek help from a knowledgeable professional before
connecting any unapproved device to this jack. Remember that damage to your
FIRESTORM caused by improper use of the “AUX” jack is not covered by the
warranty, nor will FOXPRO
®
be liable for damage to any device connected to
this jack.
5.0 USING EXTERNAL POWER SOURCES
CAUTION: NEVER CONNECT ANYTHING OTHER THAN A FOXPRO
®
APPROVED CHARGER TO THE CHARGE JACK! Doing so will surely cause
damage to the FIRESTORM as well as to the batteries. This damage is not
covered by the warranty.
Unlike some older FOXPRO game calls, you cannot connect an external power
source to the charge jack on the FIRESTORM. An external power source can
only be connected through the back of the unit where the battery tray connects.
FOXPRO offers a replacement door for the FIRESTORM that is fitted with the
appropriate jack for connecting an external power supply.
The design of the FIRESTORM permits the use of certain external power
sources, so long as some precautions are observed. The 8-cell internal battery
pack will serve about 98 percent of the users about 98 percent of the time. This
makes for a caller that is compact and lightweight, highly portable, and has very
Page | 10
good battery life. However, we recognized that there may be times when
extended run-times and additional loudness are more important than light
weight and absolute portability. You can have the best of both worlds with the
FIRESTORM!
By connecting a large external 12-volt battery to the external power adapter
replacement door (sold separately at FOXPRO), you can operate the
FIRESTORM and obtain run-times measured in days rather than hours. The
internal NiMH battery pack supplies 9.6 volts to the power amplifier, while an
external battery can supply up to 14 volts. This additional voltage will offer an
increase in power output to the speakers, equating to additional loudness. But
there is a double-edged sword involved here. By giving the user the ability to
get more power from the amplifier, there is also a much greater chance of
causing damage to the built-in speakers. For this reason, we recommend using
one of our large external speakers, such as the SP108, if you really need to,
say, call crows from the next county. Not only are these speakers more
efficient, they will have no problem dealing with the extra power.
NOTE: If you must use extreme volume without the external speaker, use
only the front horn. The rear cone speaker is somewhat more delicate
than the front horn. Please be careful with the volume control, and
remember these cautions when using an external battery:
1. NEVER connect an external battery to the charge jack.
2. NEVER connect a battery or power supply capable of delivering more
than 15 volts to the charge jack.
3. NEVER charge the external battery while it is connected to the
FIRESTORM.
4. ALWAYS use a 5 amp (max) fuse in the positive battery lead.
5. ALWAYS act responsibly with the volume control to prevent speaker
damage.
6. For maximum possible loudness, use one of our optional external
speakers, such as the SP108.
Page | 11
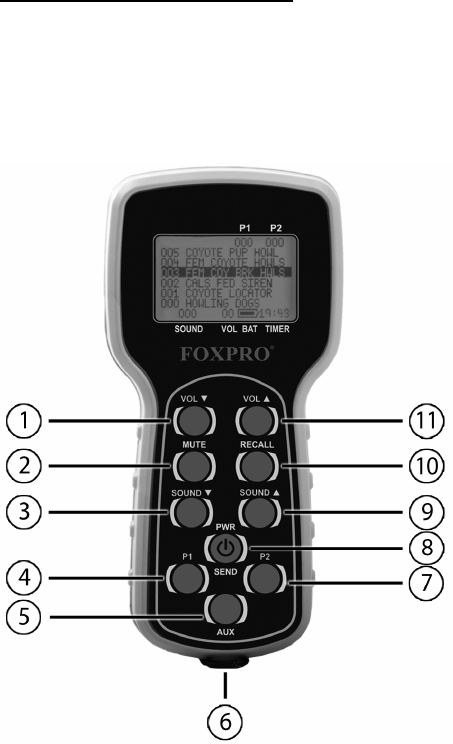
6.0 TX9 REMOTE CONTROL
The FIRESTORM features the TX9 remote control. The TX9 includes a graphic
display (no printed sound lists), two custom presets buttons that provides you
with one button access to your most commonly used sounds, volume level
indicator, recall button, an elapsed timer, and battery level indicator for the
transmitter battery.
TX9 Features
1. Volume Down
2. Mute
3. Sound Down
4. Preset 1
5. Auxiliary
6. Lanyard Loop
7. Preset 2
8. Power/Send
9. Sound Up
10. Recall
11. Volume Up
6.1 Installing the TX9 Battery
The TX9 transmitter operates from a 9V battery. Please use a high quality
alkaline battery.
1. Remove the battery compartment cover located on the rear of the
transmitter.
2. Connect the 9V battery to the connector plug, and orient the battery in
the transmitter.
3. Replace the battery compartment cover.
6.2 Turning the TX9 On/Off
1. Press and hold the “PWR”/”SEND” button for a few seconds. The
screen will illuminate and display “FOXPRO”. After a brief pause, you
Page | 12
should see the main screen listing the first six sounds starting with 000.
2. To turn off the TX9, press and hold the “PWR”/”SEND” button for a few
seconds. You will see a message appear on the screen saying
“Release key to turn off transmitter”. As soon as you release your hold
on the button, the TX9 will power down.
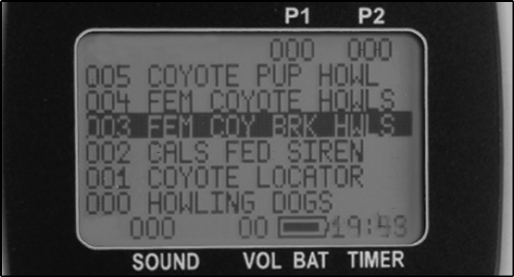
6.3 Playing Sounds
The TX9 remote control features a graphic display that shows the names of the
sounds loaded in the unit. The sounds are displayed in pages at a time. The
first screen will indicate the first six sounds from 000 through 005.
1. Use the sound up or sound down arrow buttons to scroll through your
available sounds. The selector bar highlights the sound that is currently
selected.
2. After you pick the sound you wish to play, press the “SEND” button.
The sound number is displayed on the screen the bottom left side after
you have press “SEND”.
NOTE: The first time you press the “SEND” button, your sound
will be muted by the FIRESTORM. You will need to increase your
volume in order to hear it.
3. Raise your volume level by pressing and holding the volume up button.
As you raise the volume level, the on screen volume level indicator will
increment. You can decrease the volume by pressing and holding the
volume down button.
6.4 Mute
The mute function on the TX9 silences the sound you are playing and pauses
the sound in that position. Upon un-muting the sound, it will begin playing from
where it left off.
6.5 Recall
The recall button remembers the last sound and volume level that you were
Page | 13
operating with. For example, if you are playing sound 001 at volume 9, and
then switch to sound 002 at volume 5, by pressing the recall button you will
jump back to sound 001 and volume 9.
6.6 Volume Control
The TX9 provides you with 10 volume steps controlled by the volume up and
volume down arrow buttons. The volume level is displayed on the remote
control screen.
6.7 Timer
The elapsed timer allows you to see how long you have been on a stand. The
timer starts as soon as you turn on the TX9 transmitter. You can reset the timer
by pressing the Recall and P1 buttons simultaneously. The timer will
automatically reset to 00:00 if it is allowed to continue beyond the 99:99 mark.
6.8 Setting Presets P1 and P2
The TX9 allows you to have two presets. Each preset provides one button
access to your most frequently used sounds. To program a preset, perform the
following:
1. Press and hold P1 for 5 seconds. The top line of the TX9 display will
change to: “SEL SND/VOL PRESS P1”
2. Use the sound up/down arrow buttons to highlight the sound you wish
to have set on P1.
3. Use the volume up/down arrow buttons to set the volume level.
4. Press P1 a final time to lock in your preset.

Page | 14
7.0 PROGRAMMING THE FIRESTORM
You can locate an extensive guide to programming your FIRESTORM on the
FOXPRO
®
website at:
http://www.gofoxpro.com/program.php
Also featured is a video that guides you through the programming process. We
recommend visiting the website and viewing the information and video for
additional assistance in programming your FIRESTORM.
The FIRESTORM comes standard with a USB 2.0 port built in (no reader /
writer is necessary), which makes reprogramming or adding sounds to your
FIRESTORM easier than ever. A computer is required in order to reprogram
your sounds. The FIRESTORM can be reprogrammed by using personal
computers equipped with Windows operating system version 2000 ME or later
(98 SE or earlier not compatible), or a Macintosh computer with an operating
system of 9.X or later.
7.1 Purchasing New Sounds
You can access the FOXPRO
®
website at any time to purchase new sounds to
program in your FIRESTORM. The website is located at:
http://www.gofoxpro.com
Once you are at the site, access the “Sounds” option from the main menu and
click on “Purchase Sounds.” You can purchase 4 sounds of your choice for
$8.00, 8 sounds of your choice for $15.00, and 16 sounds of your choice for
$25.00. Consult the programming link listed at the beginning of this section for
more details on purchasing, downloading, and installing new sounds from the
website.
NOTE: Prices mentioned in the proceeding section are accurate as
of the publication date found on the back of this manual. All prices
are subject to change without notification. No guarantees are made
in product pricing. Always consult the website before making a
decision to purchase. If you do not have access to a computer,
sounds can be reprogrammed or added for a fee by sending your
FIRESTORM to FOXPRO
®
7.2 Downloading the FOXPRO
®
Programming Utility
We have developed a utility that simplifies the reprogramming of sounds on
your FIRESTORM. You can download the utility from our website.
To download and install the Programming Utility from the website
1. Using your web browser, navigate to: http://www.gofoxpro.com
Page | 15
2. Click on “Programs/Utilities” from the main menu
3. Locate and click on “FOXPRO
®
Programming Utility”
4. Click on “Download Now”
5. Click on the Save button to save the executable file to your hard drive
for installation. If you choose to save the file to your hard drive, we
recommend saving it to your desktop.
NOTE: When saving the file, the name of the file on your Desktop (if
you choose your desktop as the location to save) will be labelutil.exe.
1. Double click the labelutil.exe icon, and select Run. The installation
process will now begin.
2. At the next screen, select OK.
3. Click on the button where prompted (the button is the one that
resembles a computer).
4. Click on the continue button. This should complete the setup of the
FOXPRO
®
Programming Utility
NOTE: The icon on your desktop is only an .exe file used to install
the programming utility to your computer. Once you have completed
the installation of the program, this icon can be deleted. The actual
program will be in your program files on your computer, and is called
FOXPRO
®
Programmer.
The Programming Utility is also stored on the FIRESTORM memory card.
To download and install the Programming Utility from your FIRESTORM
1. Connect your FIRESTORM to your PC with a standard USB cable
(type A/B). Once the FIRESTORM is recognized by the PC it will be
assigned a drive letter.
2. Enter your “MY COMPUTER” icon and locate the FIRESTORM from
the list of available drive letters. Once you have located the drive for
the FIRESTORM, double-click on the icon to open it up.
3. After the drive is opened, locate the file named labelutil.exe and then
refer to steps 6 through 9 for installation of the Programming Utility.
7.3 Programming with the Utility
To gain access to the FIRESTORM’s USB port
Page | 16
1. Remove the battery compartment door from the back side of the
FIRESTORM and remove the batteries. The USB port will be
accessible through the bottom of the battery compartment.
2. Connect a USB cable between this port, and the USB port on your
computer. Once the connection is made, your computer should
recognize the FIRESTORM as a removable drive.
Programming Process
1. Double click the folder on your desktop or go to your programs folder
and open the FOXPRO
®
Programmer. You will be prompted to make a
backup of your sounds.
2. Select OK, you will then be taken to the programming utility.
3. Select the proper USB drive for the FIRESTORM. This is marked as
Select Device, located in the upper right portion of the programming
utility.
NOTE: This drive varies on different computers. Once you have
selected the drive, the list of sounds currently on your FIRESTORM
appears in the right vertical window. You will now notice that a new
button appears above the Select Device window that reads
“Backup”. If you have not made a backup of your sounds, simply
click on this button. The programmer by default will backup your
sounds to a “FOXPRO
®
” folder, and a sub folder “Backup”. This is
also a good folder to use to add new sounds prior to adding sounds,
or reprogramming your FIRESTORM. You can also create sub
folders for different species, if you choose, rather than to have all
sounds located in one folder. Once your backup is complete, you are
ready to reprogram your FIRESTORM.
4. Select the “source” folder of your new sounds (Located on the left hand
side of the programmer screen). This is the folder where your sounds
are located.
5. Double click on the C:\ prompt, and locate the “FOXPRO
®
” folder. The
sounds sub folder should show up, assuming that you have used this
folder to store your sounds. If this is not the folder that your sounds are
located in, select the proper folder.
6. Once the proper folder is selected, double click the folder. The sounds
should now appear in the left side column, called “Source Sound Files”.
Now, determine the position that you would like to add new sounds to your
FIRESTORM. For example, if you would like to add the Jackrabbit Distress to
Page | 17
your FIRESTORM, highlight the sound in the left side column.
NOTE: If this sound does not have a three digit number and a space
located at the beginning of it, you must check the Append Sound
Number box located below the left column. By selecting this box, the
sound name will not be shortened. If there is a three digit number
and a space before the name of the sound, there is no need to check
this box. The first four characters will be either truncated or ignored,
by not selecting this box.
7. Select the position in the right column where you would like to add the
sound. If you want to overwrite the sound in that position, then click on
the overwrite box, located between the two columns. This will replace
the current sound in that position.
NOTE: The sound that was located in that position will be deleted.
If you choose to insert the sound in that position and move all other
sounds down one, click the insert button. This will add the sound in
that position and not overwrite the current sound. If you would like to
remove sounds from the right side column before adding new ones,
simply highlight the sound, and click on the “Remove From List”
button, located between the two columns.
If you would like to relocate a sound in the right sound column, you can
highlight the sound and then type the position number that you would like to
move it to in the “Move To” box (located below the right side column). This will
move the sound to your designated number. You can also highlight the sound
that you wish to move on the right column, and then click on the up or down
arrows below the right side column to move the sound one position at a time. If
you would like to reset your list at any time, click on the Clear/Reset List button
located on the right side of the screen. This will reset the list to its initial sounds.
8. Click on the “Copy to Caller” button located on the right side of the screen.
Your sounds will now be programmed to your FIRESTORM.
IMPORTANT NOTE: Your FIRESTORM will play .FXP, .mp3 and
.wav files. Other file types are not supported. Although you may
store .FXP and .24b sounds on your computer for later use, they
cannot be played on your computer, or on any audio player other
than a FOXPRO
®
caller.
7.4 Downloading a New Playlist to the TX9
Now that you are done programming your FIRESTORM, you are ready to
download the new playlist to the TX9 transmitter. You will need to obtain a
3.5mm male-to-male stereo patch cable for this process.
1. Disconnect all accessories from the FIRESTORM (i.e. speakers or
Page | 18
decoy)
2. Turn the power off on both the FIRESTORM and the TX9.
3. Connect patch cable from the sound upload jack on the TX9 to the
AUX jack on the FIRESTORM.
4. Turn on the TX9
5. After being powered on, the TX9 display will say “TURN ON CALLER
TO BEGIN TRANSFER”
6. Power on the FIRESTORM. The display should show two solid dashes
“- -“.
7. The display on the TX9 will display “TRASNFERRING DATA PLEASE
WAIT”. When it’s done, the display will say “TRANSFER COMPLETE
REMOVE CABLE”.
8. Unplug the cable from both the transmitter and FIRESTORM
9. Press and hold the send button for several seconds. The playlist has
been transferred.
NOTE: This process may take a few seconds. DO
NOT turn off the TX9 or FIRESTORM during this
process.

Page | 19
FCC Information
NOTE: This equipment has been tested and found to comply with the limits for
a Class B digital device, pursuant to Part 15 of the FCC Rules. These limits are
designed to provide reasonable protection against harmful interference in a
residential installation. This equipment generates, uses, and can radiate radio
frequency energy and, if not installed and used in accordance with the
instructions, may cause harmful interference to radio communications.
However, there is no guarantee that the interference will not occur in a
particular installation. If this equipment does cause harmful interference to radio
or television reception, which can be determined by turning the equipment off
and on, the user is encouraged to correct the interference by one or more of
the following measures:
• Reorient or relocate the receiving antenna.
• Increase the separation between the equipment and receiver.
• Connect the equipment into an outlet or circuit different that to which
the receiver is connected.
• Consult the dealer or an experienced radio/TV technician for help.
Operation is subject to the following two conditions: (1) this device may not
cause harmful interference, and (2) this device must accept any interference
received, including interference that may cause undesired operation of this
device.
Modifications not expressly approved by the manufacturer could void the user’s
authority to operate the equipment under FCC rules.

Page | 20
LIMITED WARRANTY STATEMENT
Your FOXPRO
®
wildlife caller is warranted to be free from defects in materials
and workmanship that diminish its usefulness for a period of five years from the
date of purchase. Return the unit prepaid and packaged securely along with
proof of purchase to the address shown below. Include a note describing the
defect or problem. This limited warranty is void if the unit is physically
damaged, used in a manner contrary to intended use, or otherwise abused,
either intentionally or unintentionally. Also specifically excluded are batteries
and damage caused by attempts to charge batteries not intended to be
recharged, and water damage.
Please record t
he serial number for
your
FIRESTORM
(Located on a sticker in the back of the battery compartment)
Serial Number
FOXPRO Inc.
14 Fox Hollow Drive
Lewistown, PA 17044
717-248-2507
Publication Date: April 26, 2010