Franklin Technology C801 CPE Router User Manual
Franklin Technology Inc. CPE Router Users Manual
Users Manual
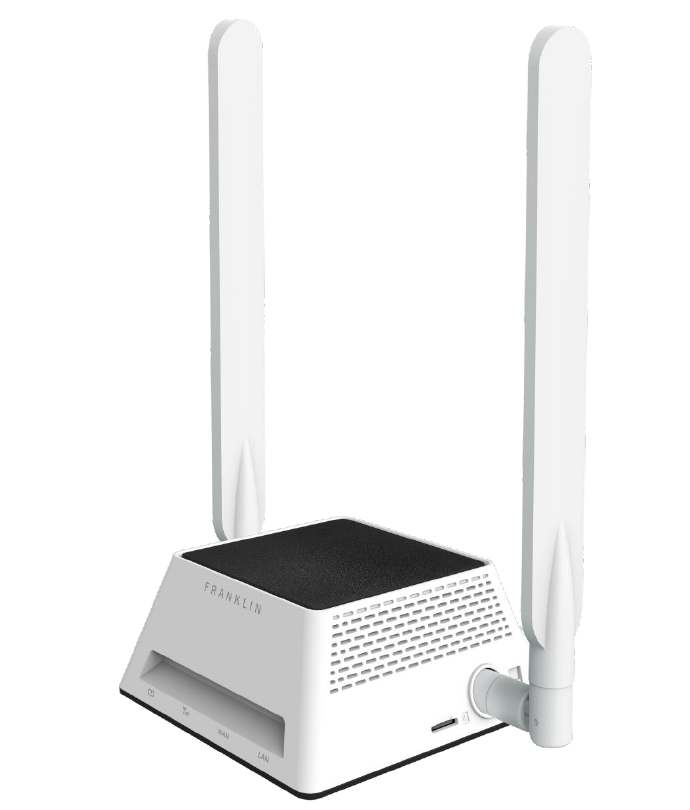
C801 4G Router
User Guide

Table of Contents
Introduction.................................................................................................................................................... 1
Before You Begin .................................................................................................................................. 1
Compatible Operating Systems (OS).................................................................................................... 1
Package Contents ................................................................................................................................. 2
Additional Information ........................................................................................................................... 2
Get Started .................................................................................................................................................... 3
Parts and Functions .............................................................................................................................. 3
LED Light Indicators .............................................................................................................................. 5
Data Transfer Volume and Transfer Speed .......................................................................................... 5
SIM Card ............................................................................................................................................... 5
Device Setup ................................................................................................................................................. 7
Install and Remove the SIM card .......................................................................................................... 7
Attach Antennas .................................................................................................................................... 8
Power Device On or Off ........................................................................................................................ 8
Restart Your Device .............................................................................................................................. 9
Wiring your C801 ........................................................................................................................................ 10
Wiring your device ............................................................................................................................... 10
Settings ....................................................................................................................................................... 12
Web UI Overview ................................................................................................................................ 12
Web UI Window .................................................................................................................................. 12
Home ................................................................................................................................................. 12
Settings Tab ........................................................................................................................................ 14
About ................................................................................................................................................. 25
Support Tab ........................................................................................................................................ 26
Appendix ..................................................................................................................................................... 27
Troubleshooting .................................................................................................................................. 27
Specifications ...................................................................................................................................... 28
Warranty and Service.......................................................................................................................... 30
Customer Service ................................................................................................................................ 30
Trademarks and Copyright Information .............................................................................................. 30
Safety and Notices ...................................................................................................................................... 31
Safety Precautions .............................................................................................................................. 31
Important Notice ................................................................................................................................... 31
Safety and Hazards .......................................................................................................................... 31
FCC Compliance .............................................................................................................................. 32

1
Introduction
The following topics describe the basics of using this guide and your new broadband device.
Before You Begin
Thank you for purchasing your new C801 4G Router!
The following topics explain how best to use this guide to get the most out of your broadband device.
Before Using Your Device
Read Safety and Notices thoroughly for proper usage.
Accessible services may be limited by subscription contract conditions.
Guide Usage Notes
Note that most descriptions in this guide are based on your device's default settings at the time of
purchase.
Screenshots and Key Labels
Screenshots and Key labels are provided for reference only. Actual windows, menus, etc. may differ in
appearance.
Other Notations
In the user guide, the broadband device may be referred to either as "C801," "router," or "device".
Compatible Operating Systems (OS)
The table below outlines the compatible operating systems (OS) for your device. Use outside these
environments may affect performance. Additional factors (hardware, connected peripherals, installed
applications, etc.) may also affect performance.
● For computer support, OS version upgrade information, etc., see the corresponding
manufacturer's product support documentation.
● The information for operating system (compatible OS) listed below is the current information for
your device sold as of Jan.2017.
Item
Description
Compatible operating systems (OS)
Windows 7, 8, 10
MacOS 10.5 or later
Android 2.1 or later

2
Item
Description
Compatible browsers
Chrome 36.0 or later
Internet Explorer 8.0 or later
Firefox 3.1 or later
Safari 5.0 or later
Package Contents
See below for details on everything you will find in the box for your C801.
● C801 4G Router
● A pair of external antennas
● AC Adapter
● Get Started Guide
● Important Information Booklet
Additional Information
The following list describes additional information before you begin using your C801.
● Your broadband device accommodates software updates. Always use the latest software.
● Note that connection speeds may drop or connections may be disabled depending on line traffic
or connection environments.
3
Get Started
The following topics give you all the information you need to set up your device and wireless service for
the first time.
Parts and Functions
Learn your device's primary parts and functions.
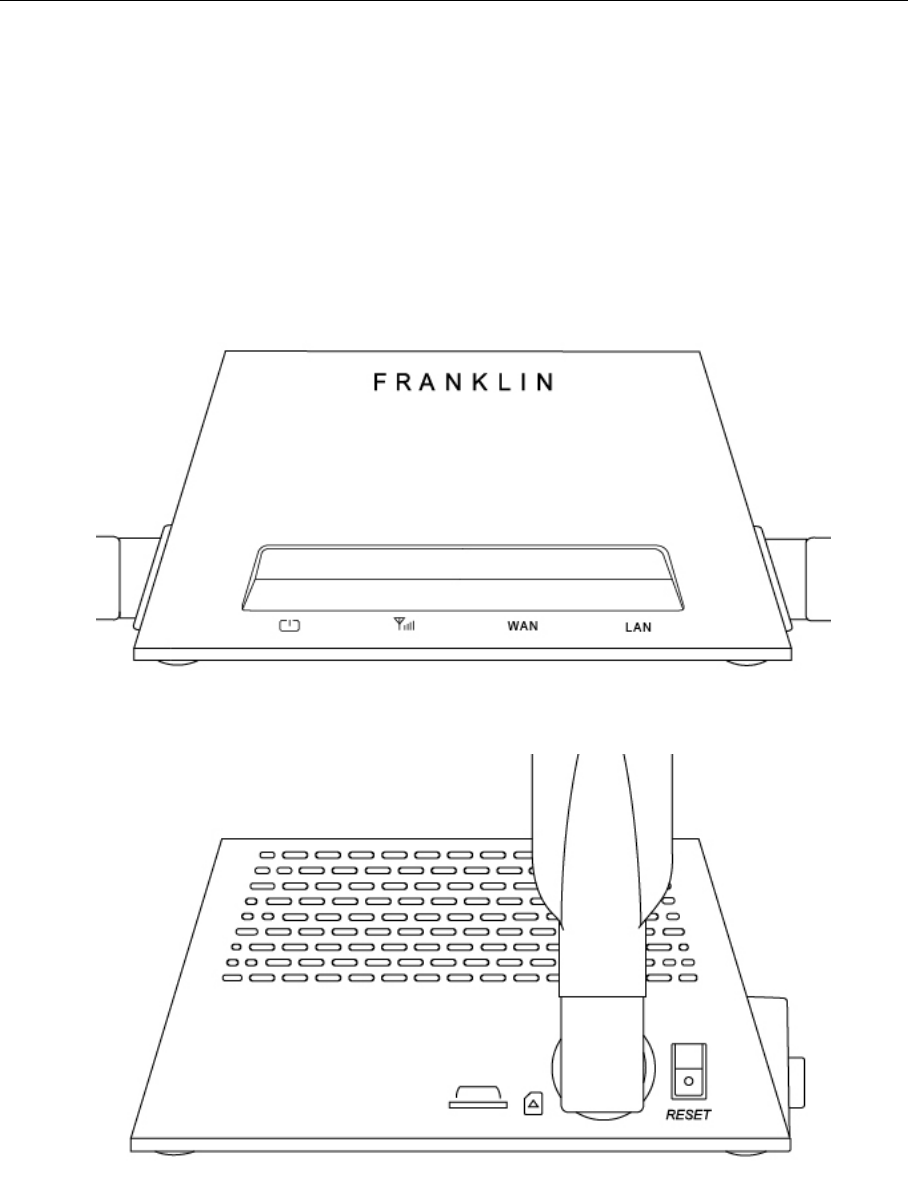
Device Layout
The following illustration outlines your device's primary external features and buttons.
Frontal View
Side View
4
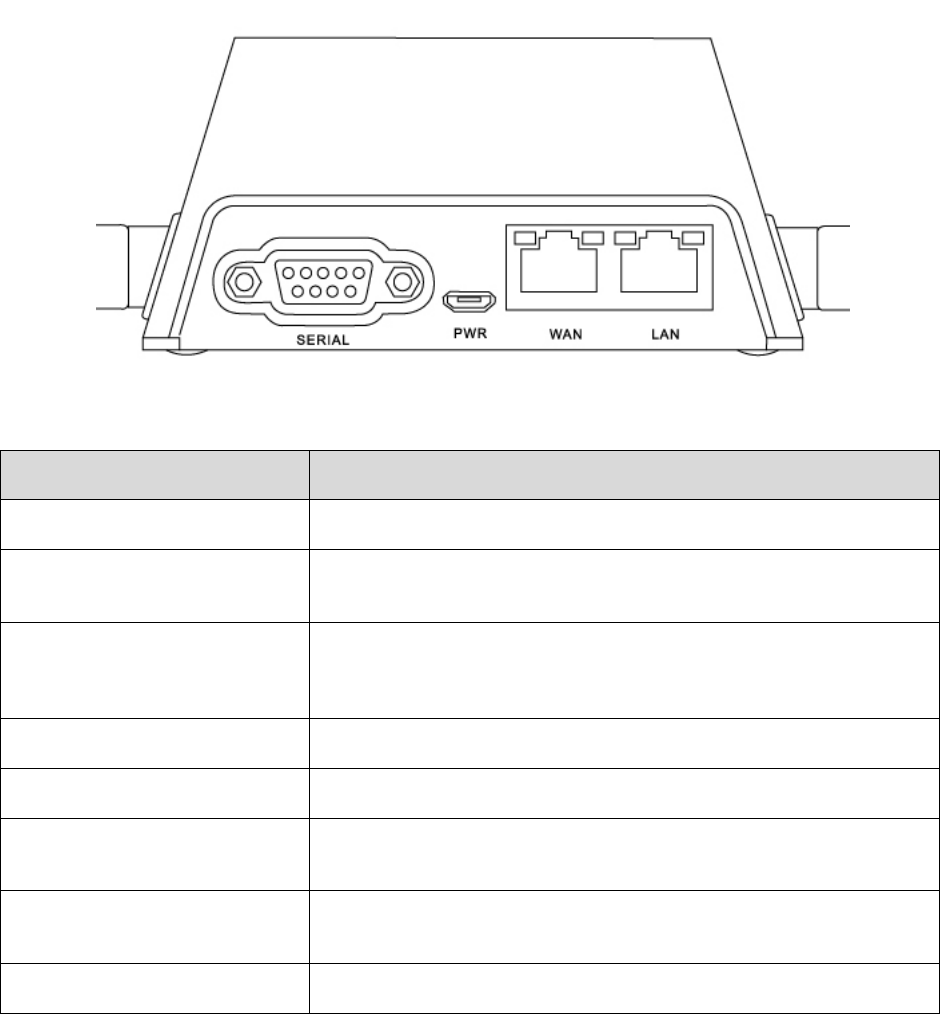
Rear View
Part
Description
SIM card slot
Install the SIM card.
Micro USB port
Power on device by plugging in micro USB to device and AC
adapter end to power outlet
Reset button
Located on the side of device. Press and hold until all lights blink to
factory reset your device. (Device must be On when pressing reset
button.)
External antennas
Attach provided antennas to the sides of device for optimal speeds.
Serial port
Connect the serial cable to utilize the Out of Band Feature.
LAN port (PoE Compatible)
Connect one end of ethernet cable here and other end to desired
device depending on your network.
WAN port (PoE Compatible)
Connect one end of ethernet cable here and other end to desired
device depending on your network.
LED Light Indicators
Indicates the status and activity of your router.
5
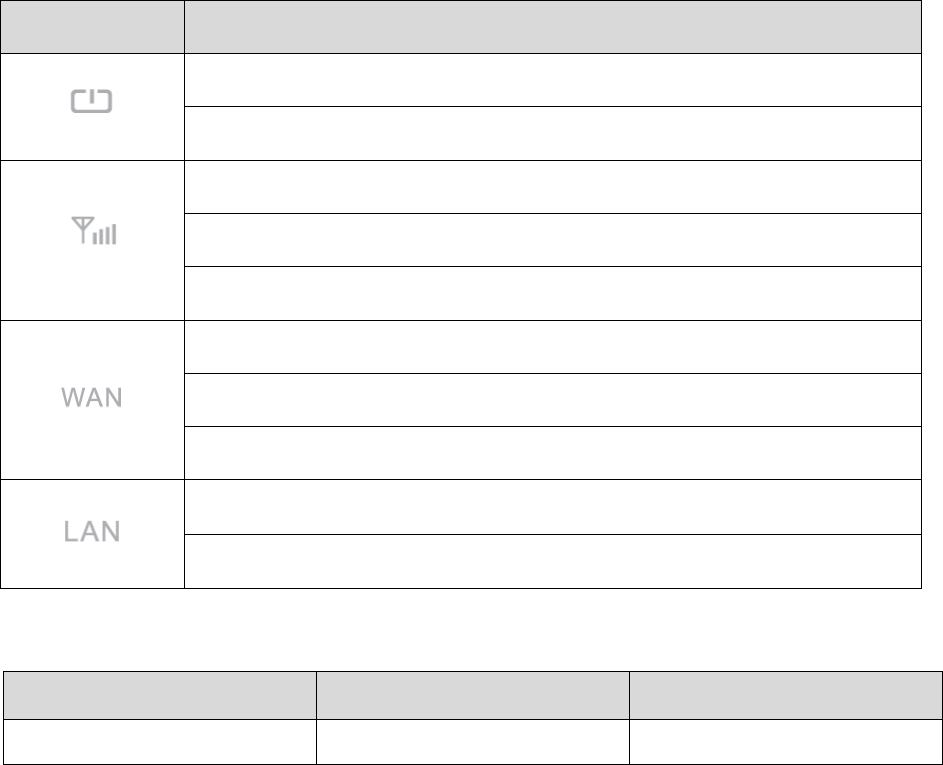
LED Light Indicators
The LED Light Indicators on the front of the device will show the status of C801’s power, signal strength,
WAN activity, and LAN activity.
Icon
Description
Green : Power On
No Light : Power Off
Red : No service
Yellow : Moderate Service Area
Green : Good Service Area
Green (Solid) : WAN connected. No data transmission.
Green (Blink) : WAN connected. Data is being transferred.
No Light : WAN not connected
Green : LAN connected
No Light : LAN not connected
Data Transfer Volume and Transfer Speed
Wireless Mode
Maximum Downlink Speed
Typical Downlink Speed
4G/LTE
150 Mbps
50 Mbps
Note: Actual speeds depend on several factors, including network conditions.
SIM Card
The SIM card is an IC card containing your device's phone number and other customer information.
Note: Your device's SIM card is preinstalled.
Handling a SIM Card
Keep the following in mind when handling a SIM card.
● Customer is responsible for any damage caused by inserting the SIM card in another-brand IC
card reader, etc. The company is not responsible in such case.
● Always keep the IC chip clean.
● Wipe clean with a dry, soft cloth.
● Avoid applying labels. May damage the SIM card.
6
● See instructions included with the SIM card for handling.
● The SIM card is the property of the company.
● The SIM card is replaceable (at cost) in case of loss/damage.
● Return the SIM card to the company when cancelling subscription.
● Returned SIM cards are recycled for environmental purposes.
● Note that SIM card specifications and performance may change without notice.
● It is recommended that you keep a separate copy of information that is stored on the SIM card.
The company is not responsible for damages from stored information that is lost.
● Always follow emergency procedures to suspend service if your SIM card or device (SIM card
inserted) is lost or stolen. For details, contact Customer Service.
● Always power off the broadband device before inserting or removing the SIM card.
7
Device Setup
The following topics outline basic features and operations of your device.
Install and Remove the SIM card
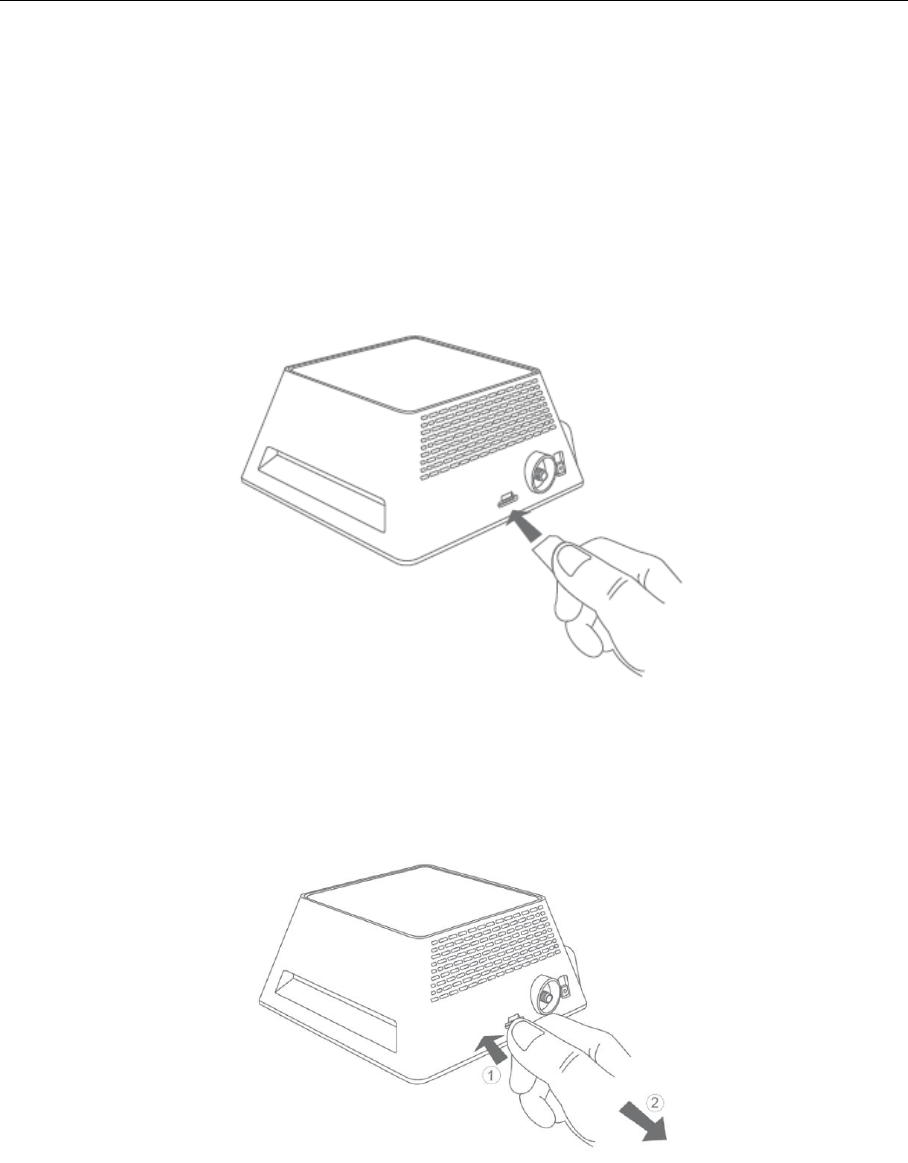
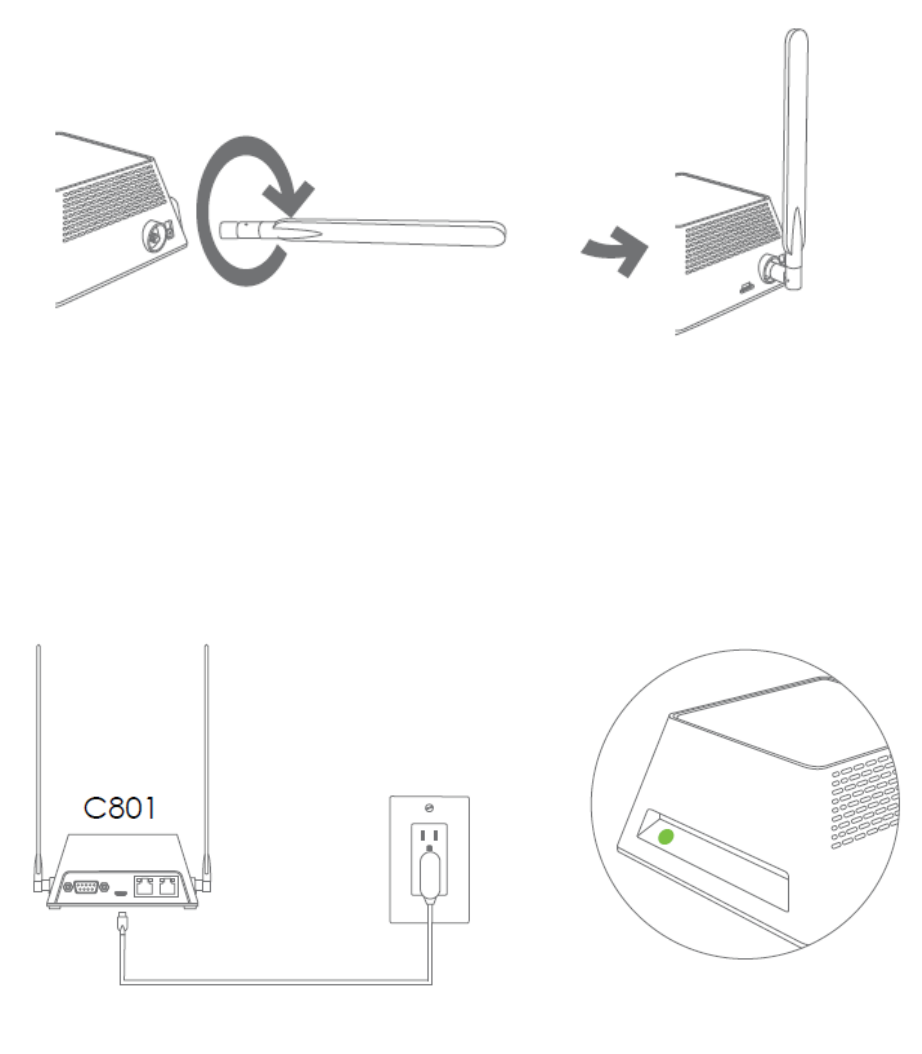
Locate the SIM slot which is on the right side of the device and follow the steps below:
1) Install the SIM card
a) Insert SIM card into SIM slot, notch end first and gold contacts facing down. (Refer to engraving next
to the SIM slot)
b) Gently insert the SIM into the slot until you hear a click.
2) Remove the SIM card
a) Gently push the SIM card until you hear a click.
b) The SIM card will now be sticking out
8
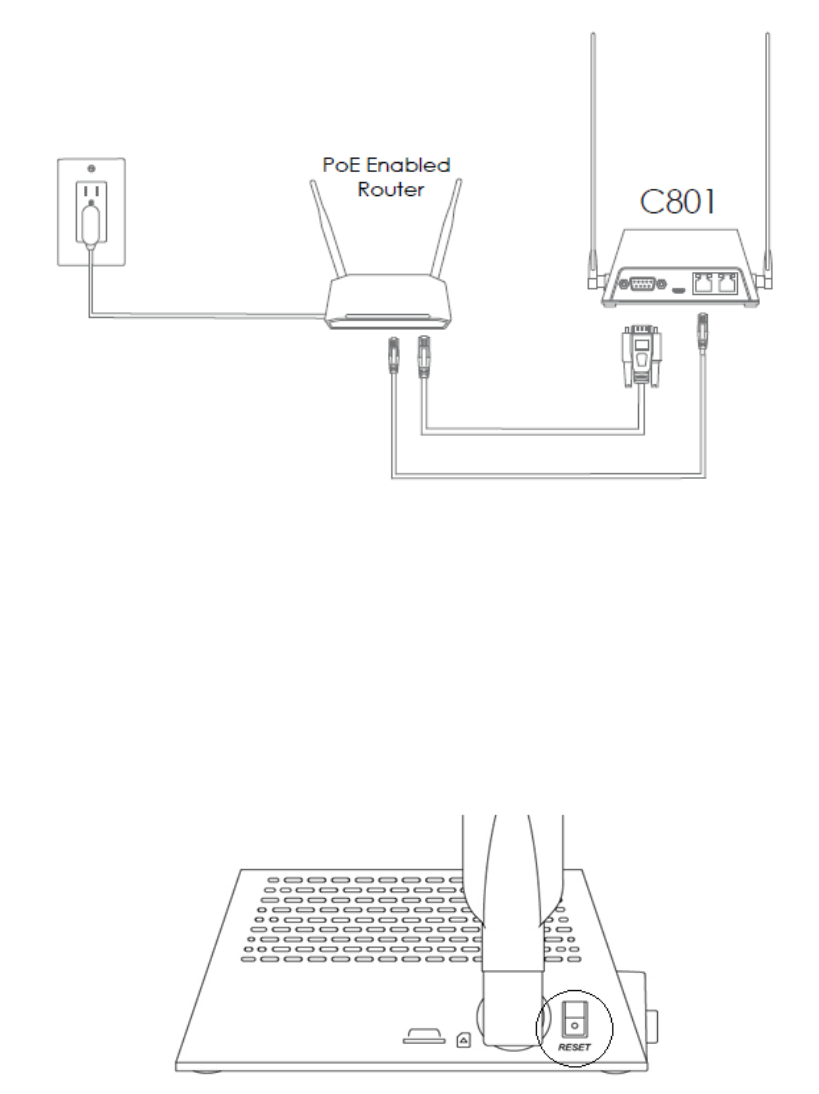
Attach Antennas
a) Align the antennas with the antenna posts which are located on the sides of the device.
b) Twist the antennas on and make sure they are secure.
c) You may carefully adjust the antenna to improve signal.
Power Device On or Off
1) Power your device on
Option 1: Using the included AC Adapter
Plug in the AC Adapter to the power outlet and plug the micro USB end to the C801’s micro USB port,
which is located at the back of the device. Once connected, a green light will appear above the power
icon.
9
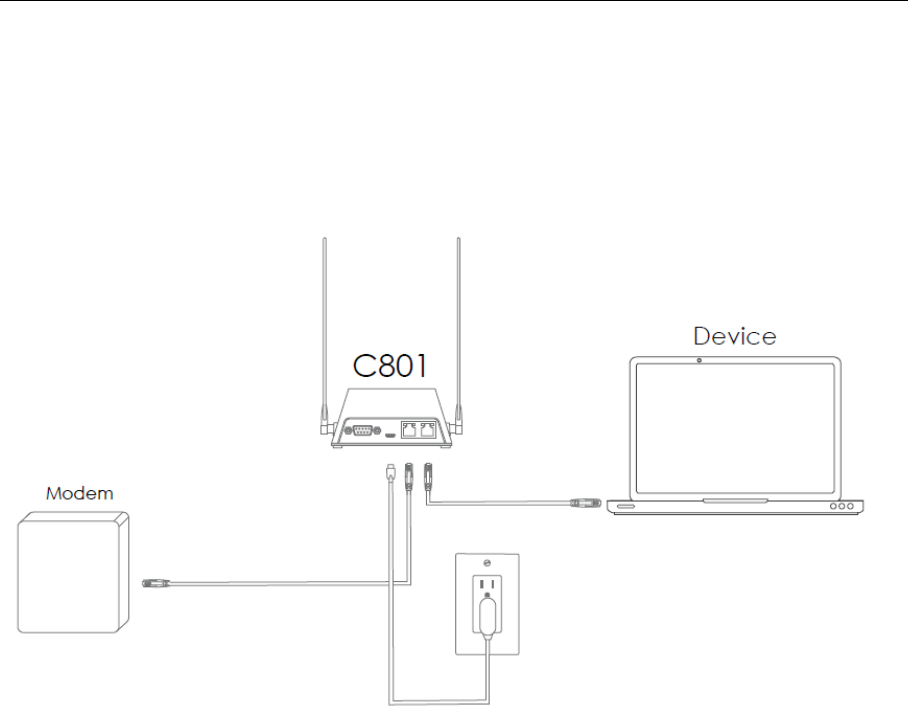
Option 2: Use a PoE (Power over Ethernet) connection
Note: The C801 can be powered through Ethernet cable connected to a PoE power source such as PoE
injector, PoE enabled router etc.. When powered through Ethernet cable, you don’t need to connect the
AC adapter to C801.
Connect PoE powered Ethernet cable to either WAN or LAN port as needed for your network. Once
powered On, a green light will appear above the power icon on the device. C801 will be powered on.
2) Power your device off
Your device will power off once AC adaptor or PoE connection is unplugged.
Restart Your Device
If you are experiencing problems with your device, try restarting your device.
Note: If you are still experiencing problems, locate the Reset button on the side of the device. Press and
hold while device is On until the front LED lights start blinking to Factory Reset the device.
10
Wiring your C801
Note: Options below are setup instructions for basic use cases. Depending on desired use case or
user’s current network setup, setup may differ from options below.
Wiring your device
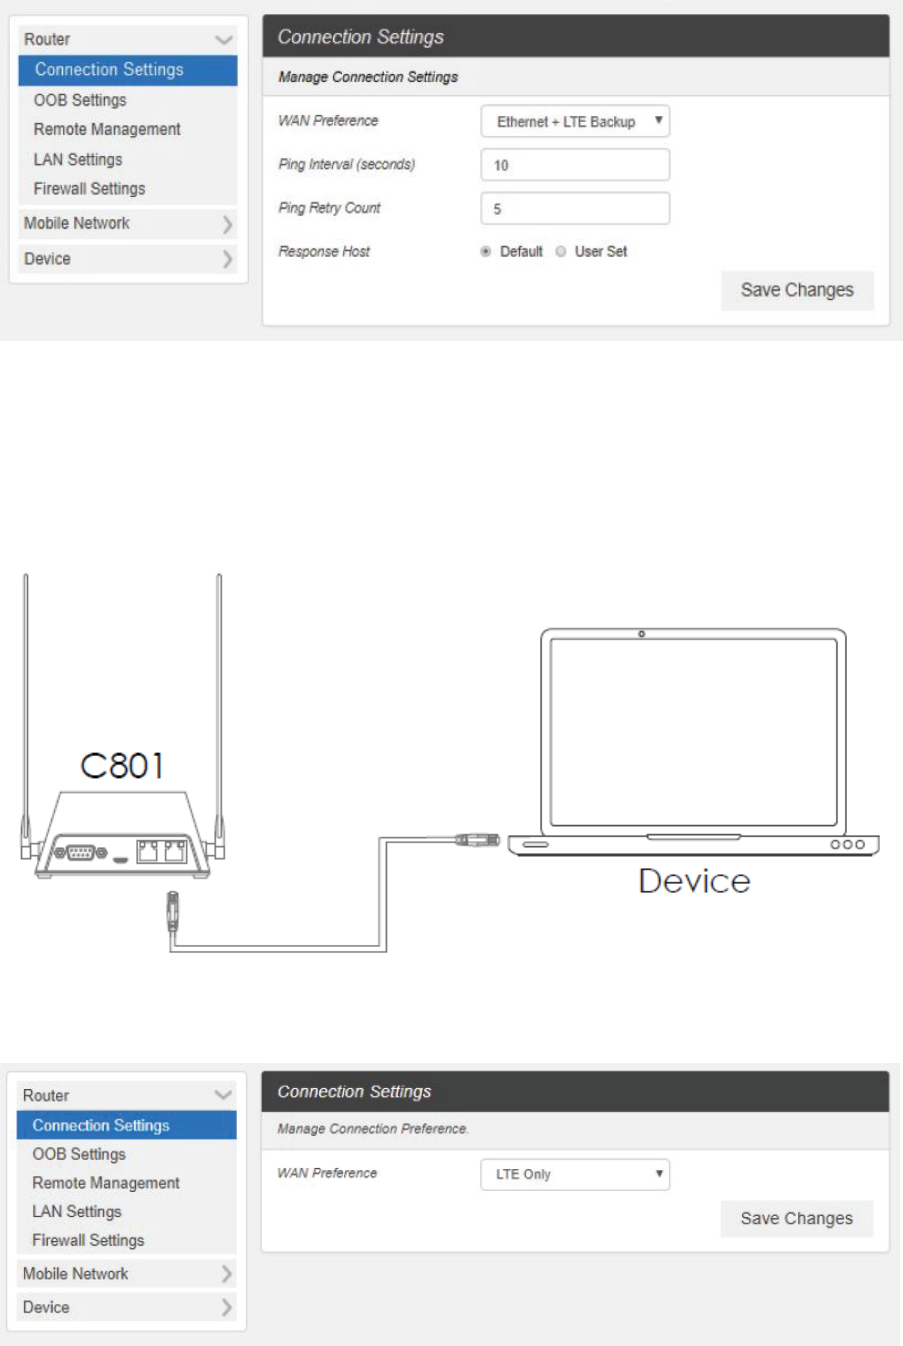
Option 1: Using your C801 as failover backup
Note: Ethernet cables are not included.
a) Connect one end of the ethernet cable to the LAN port of your Modem that provides a connection to
the internet.
b) Then connect the other end to the WAN port of the C801.
c) Using another Ethernet cable, connect one end of the cable to the LAN port of the C801, and connect
the other end of the cable to device requiring failover backup.
d) Next, access the Web UI, Log in and click the Settings Tab. (See Settings in this guide for access to
Web UI and Admin Log In which is under Settings for Log in information.)
e) While in Settings, click Connection settings menu on the left in the Router menu pane.
f) Then set the WAN Preference to Ethernet+LTE Backup and click Save Changes.
11
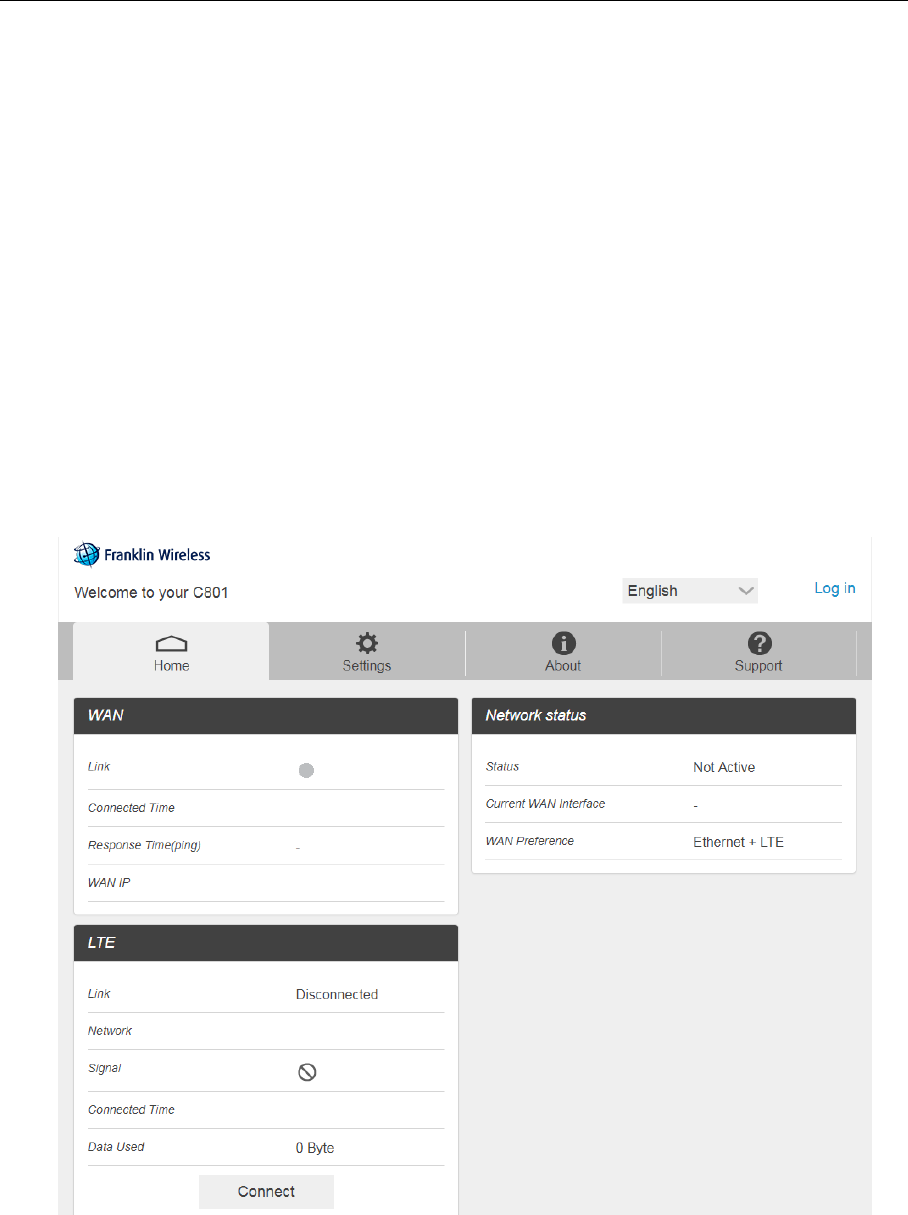
Option 2: Using your C801 as main connection to internet
Note: Ethernet cables are not included.
a) Connect one end of the ethernet cable to C801’s LAN port.
b) Then connect the other end to device requiring internet connection.
c) Next, access the Router Manager, Log in and click the Settings Tab. (See Settings in this guide for
access to Web UI and Admin Log In which is under Settings for Log in information.)
12
Settings
The following topics provide an overview of items you can change using the device setting menu
accessed through the Web UI.
Web UI Overview
Use the device Web UI in a browser to check or change your C801 settings from a device connected via
Wi-Fi.
Web UI Window
Explore the options available through the device's Web UI window.
1. Connect your C801 to an external device via a LAN connection.
2. Launch a browser and access the Web UI via http://myrouter or http://192.168.128.1 .
The Web UI launches and displays the main window.
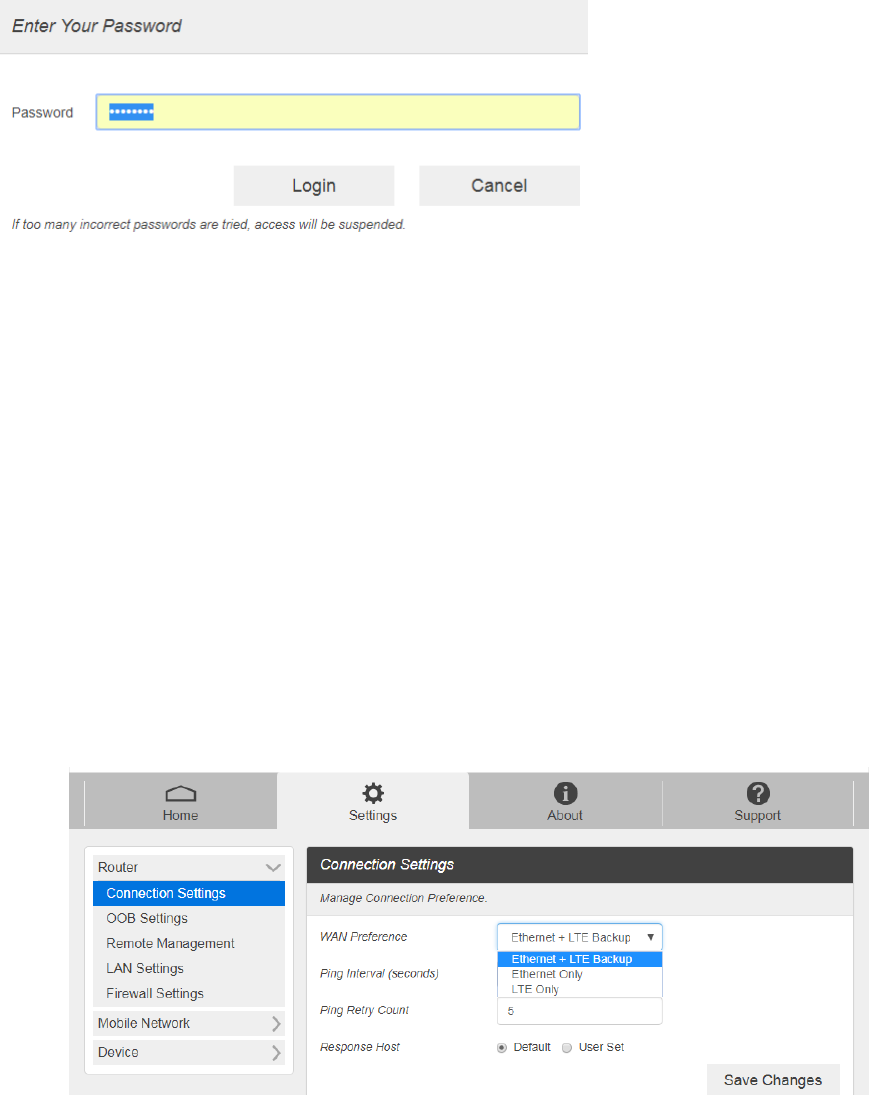
Home
Check current status of network connection and data usage on the Home page.
From the Web UI, click the Home tab. (For connection information, see Web UI Overview.)
13
Admin Log in
Accessing other menus from the home screen requires admin log in.
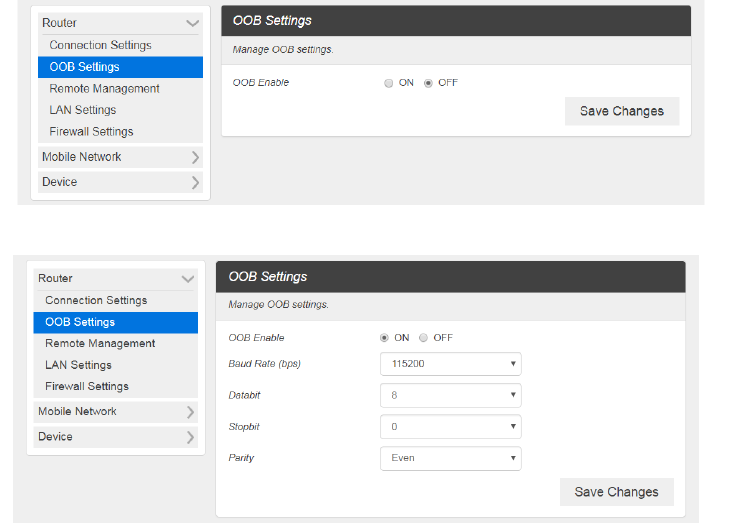
1. Click "Log in" on the upper right corner of the main screen to log in. (clicking other menu on the main
screen will prompt the log in page as well.)
2. Enter the password and click "Login".
Note: The default password is "password." It's recommended to change the password for your security.
Settings Tab
Set your device options, including Router, Mobile Network and Device.
Router
Connection Settings
Set the Connection Settings for your device.
1. From the Web UI, click Settings>Router>Connection Settings to display the manage connection
preference parameters.
■ WAN Preference: Select the preference for your wide access network connection.
14
Ethernet + LTE Backup: This setting will prioritize Ethernet connection as the main source
of internet and failover to LTE when connection is lost. (Once the Ethernet connection is
restored, the C801 will failback to Ethernet connection.)
Ethernet Only: This setting will only allow Ethernet connection as the primary source of
internet.
LTE Only: This setting will only allow LTE as the primary source of internet.
Note: Items below only apply when WAN Preference is set to Ethernet + LTE Backup mode.
Depending on the settings below, ping packet is sent to the response host address through Ethernet
interface.
If ping is successful, connection will be made via ethernet. If not, device will failover to LTE connection.
■ Ping Interval (seconds) : Set how often the device is to ping in seconds.
■ Ping Retry Count: Set the number of times the device should ping.
■ Response Host: Set the host address.
Default: Ping is sent and received at the default host address
User Set: Set the desired host name / IP address
2. Click Save Changes to save your settings.
OOB Settings
1. From the Web UI, click Settings> Router>OOB Settings to display the device information shown
in the following figure.
2. If ON is selected for OOB Setting, an extra menu will appear like below.
15
Please configure the C801 Out of Band settings to match your router configuration. Your router should
have the following information below.
Baud Rate(bps) : Input and output baud rate
Databit : Character size mask
Stopbit : stop bits. If enable, send two stop bits, else one.
Parity : parity bit. Odd or even.
3. Click Save Changes to save your settings.
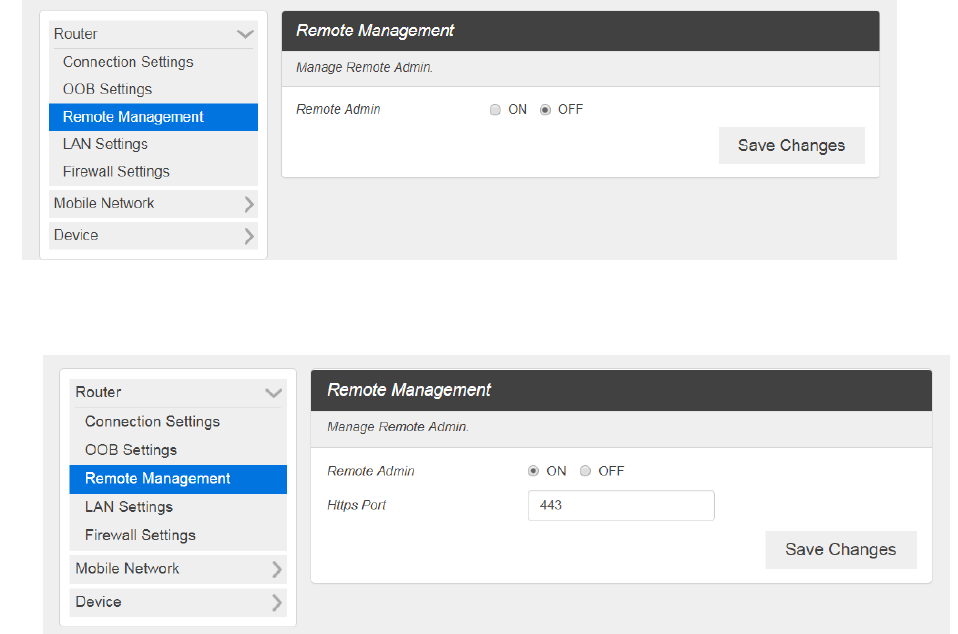
Remote Management
1. From the Web UI, click Settings> Router>Remote Management to display the device information
shown in the following figure.
If ON is selected for Remote Management, user will be able to access the C801’s webpage
remotely via HTTPS. The standard port is 443.
2. Click Save Changes to save your settings.
16
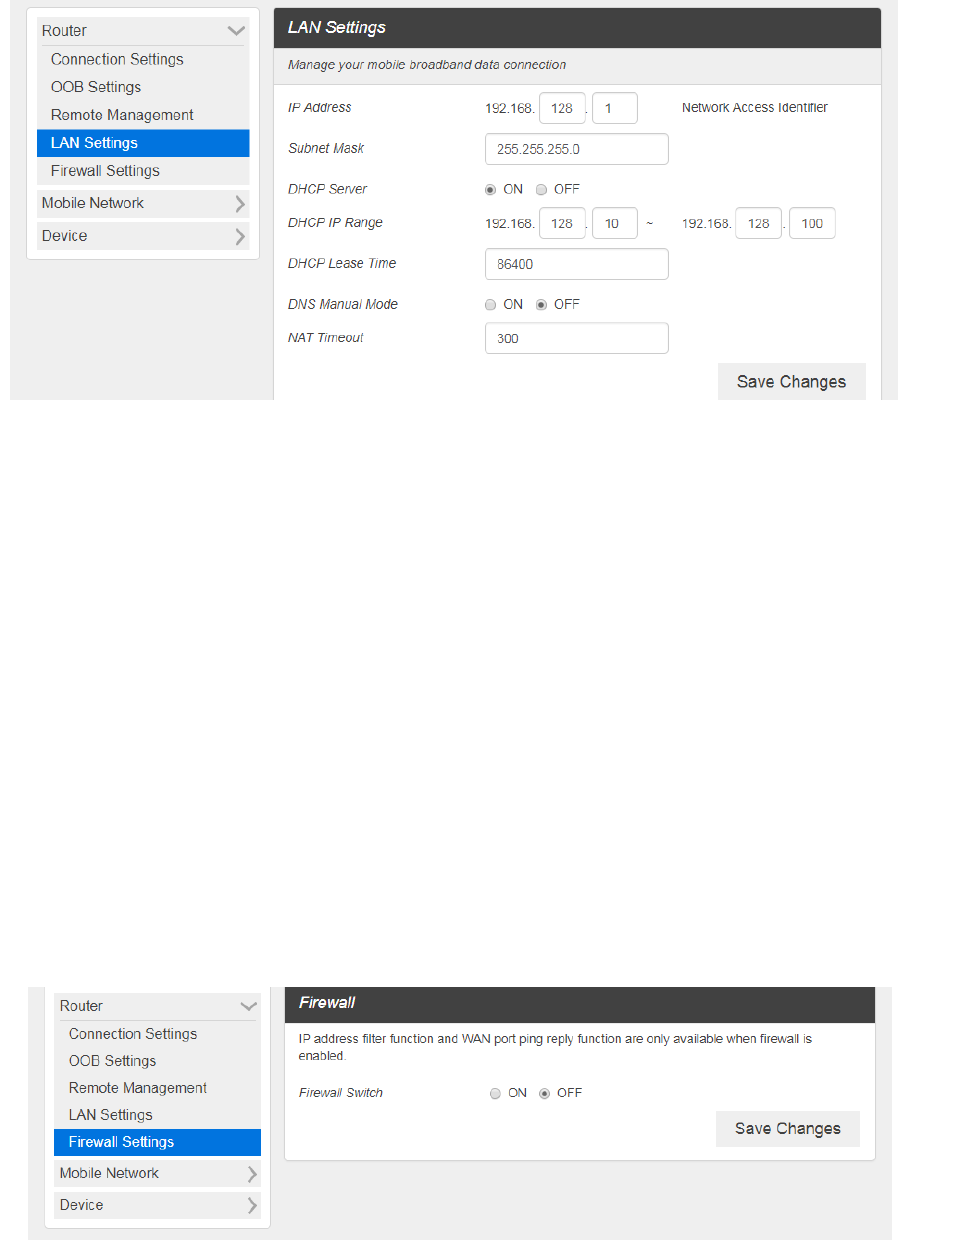
LAN Settings
1. From the Web UI, click Settings> Router>LAN Settings to display the information shown in the
following figure.
1) IP Address: IP address for Web User Interface.
2) Subnet Mask: Subnet mask for the IP address.
3) DHCP Server: Enable or disable DHCP Server function.
4) DHCP IP Range: Allocate begin and end IP address for IP Range.
5) DHCP Lease Time: Define how long the leased IP address will be in use before expiration. The new
IP address will be assigned.
6) DNS manual mode: Turn DNS manual mode on or off.
7) NAT Timer: Set TCP NAT time.
2. Click Save Changes to save your settings.
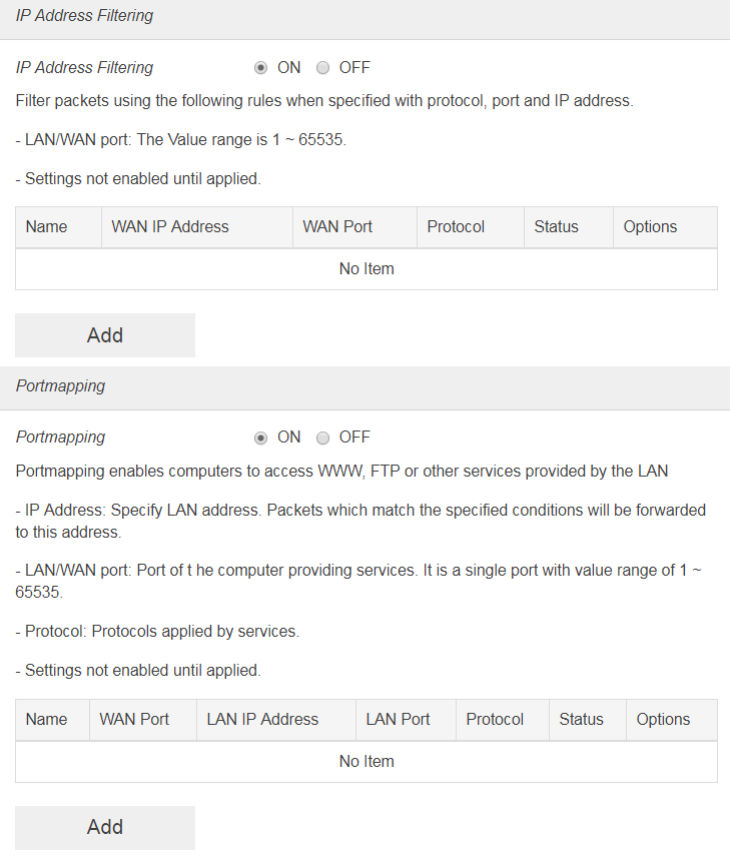
Firewall Settings
1. From the Web UI, click Settings>Router>Firewall Settings. The Settings page is shown in the
following figure.
17
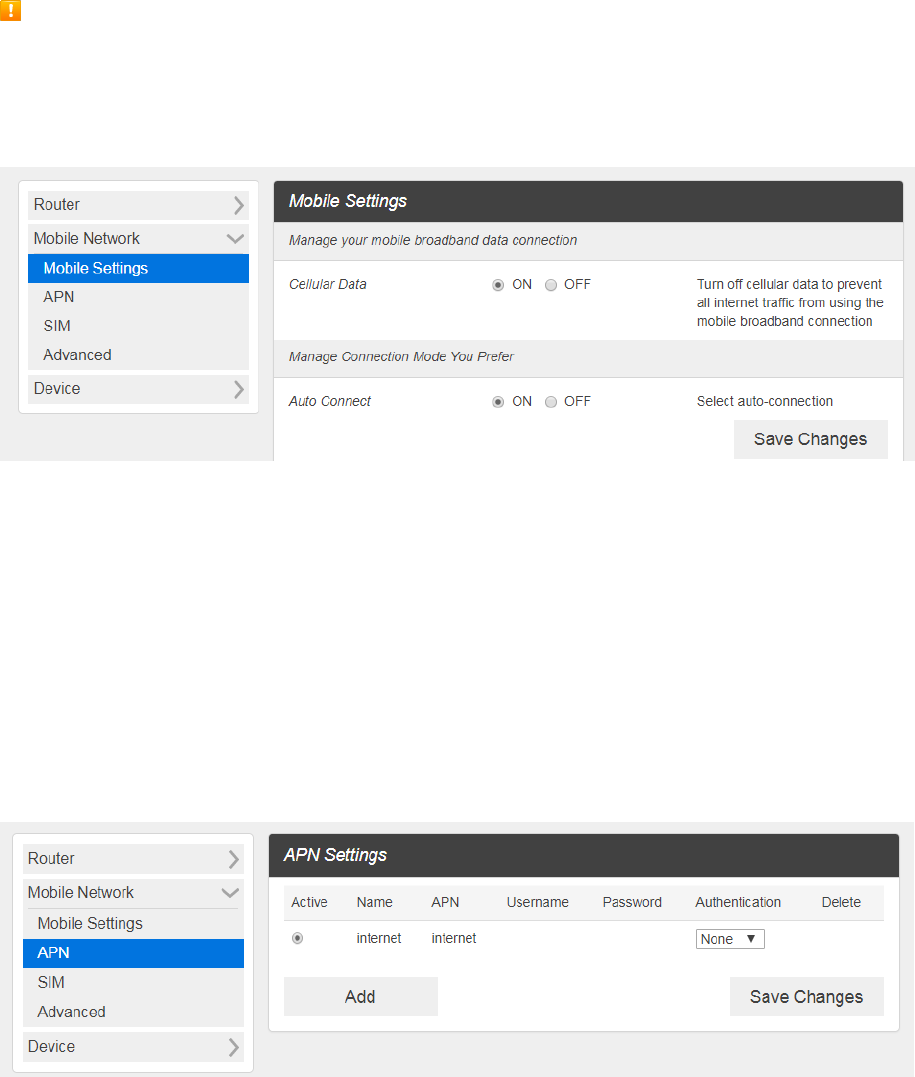
2. If ON is selected for Remote Management, an extra menu will appear like below.
18
Mobile Network
Mobile Network Settings should only be used as directed by Customer Service personnel.
Mobile Settings
1. From the Web UI, click Settings>Mobile Network>Mobile Settings. The Mobile Settings page is
shown in the following figure.
2. Cellular data: Turn Cellular data on or off. Turn it off to prevent all Internet traffic from using
the mobile broadband connection.
3. Auto Connect: Turn the device on or off to automatically connect to the network.
4. Click Save Changes to save your settings.
APN
1. From the Web UI, click Settings>Mobile Network>APN. The default APN parameters are shown
in the following figure. You can use the default APN to connect to the Internet. You can also add
new APNs.
■ To add a new APN, follow the steps below:
1) Click Add to access the following page.
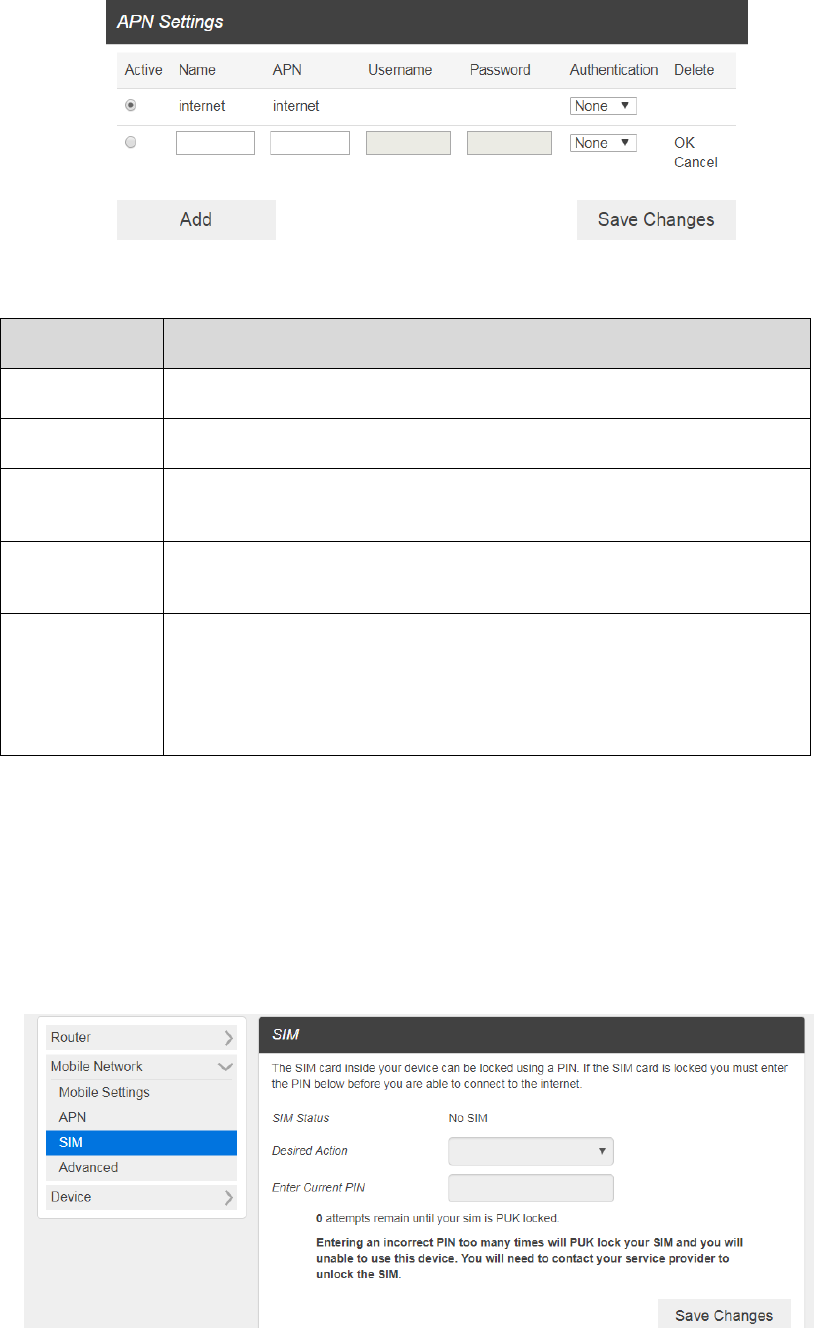
19
2) Enter the related parameters as described in the following table.
Parameters
Description
Name
Type the profile name.
APN
Type the APN string.
User name
User name is used to obtain authentication from the ISP when the
connection is established.
Password
Password is used to obtain authentication from the ISP when the
connection is established.
Authentication
Password Authentication Protocol (PAP) provides a simple method
without encryption for the peer to establish its identity using a 2-way
handshake. Challenge-Handshake Authentication Protocol (CHAP) is
used to periodically verify the identity of the peer using a 3-way
handshake.
3) Click Save to add the new APN.
Note: The default APN cannot be edited or deleted.
SIM
1. From the Web UI, click Settings>Mobile Network>SIM. The SIM PIN lock is disabled by default.
You can enable it by entering SIM PIN.
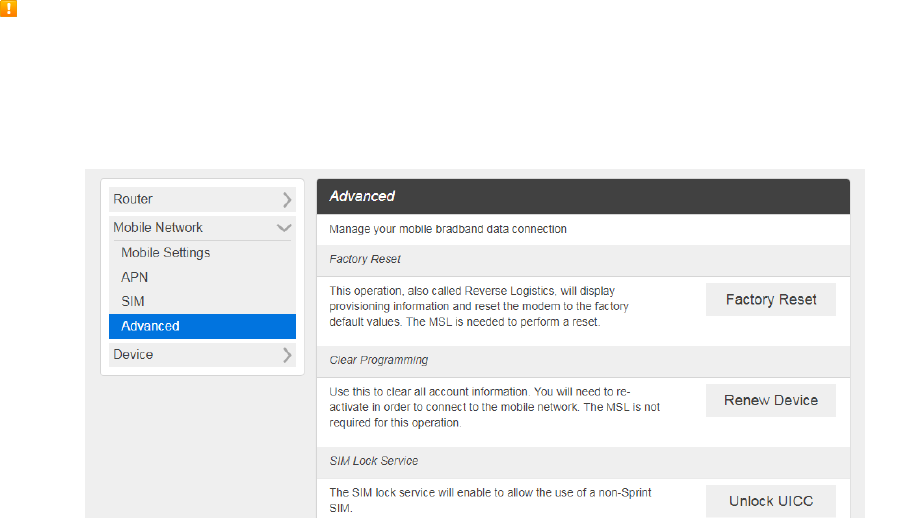
20
Enter the SIM PIN and press “Save Changes”. The SIM Status will be changed to Enabled. Once
the SIM PIN Lock is enabled, you need to enter the SIM PIN to connect to the mobile broadband
network each time you power on your C801.
Note: If you enter the wrong SIM PIN three times, your SIM will be disabled permanently until you enter
the PUK code from your service provider. Please contact your Service Provider.
Advanced
Caution Advanced Mobile Network Settings should only be used as directed by Customer Service
personnel. Certain advanced options will reset your device's connections and programming and
will require reactivation.
1. From the Web UI, click Settings>Mobile Network>Advanced to set the mobile network advanced
settings.
■ Factory Reset: Click Factory Reset to reset the C801 to factory default value.
■ Clear Programming: Click Renew Device to clear all account information.
■ SIM Lock Service: Click Unlock UICC to allow the use of SIM from various service providers.
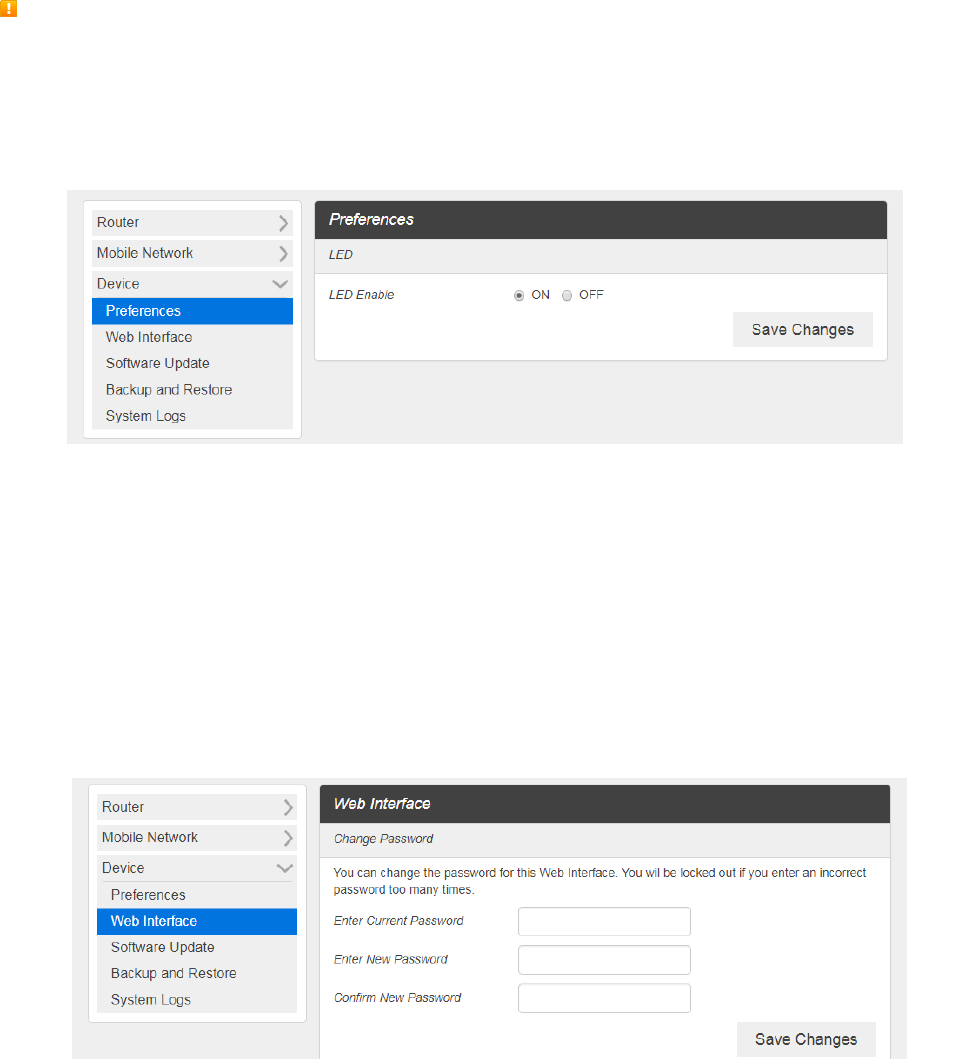
21
Device
The Device settings menu lets you set display brightness, manage account password, update
software, back up, restore and check system logs
Preferences
1. From the Web UI, click Settings>Device>Preferences. You can set the display timeout on this
page.
■ LED Enable: If ON is selected, the LED indicator next to Your C801 display will blink when the
device is on. This LED is a power indicator that shows the device is on when the device display
is off.
2. Click Save Changes to save your settings.
Web Interface
1. From the Web UI, click Settings>Device>Web Interface. You can manage your Web UI admin
password on this page.
■ Change Password: Allows changing password of Web UI Log in.
2. Click Save Changes to save your settings.
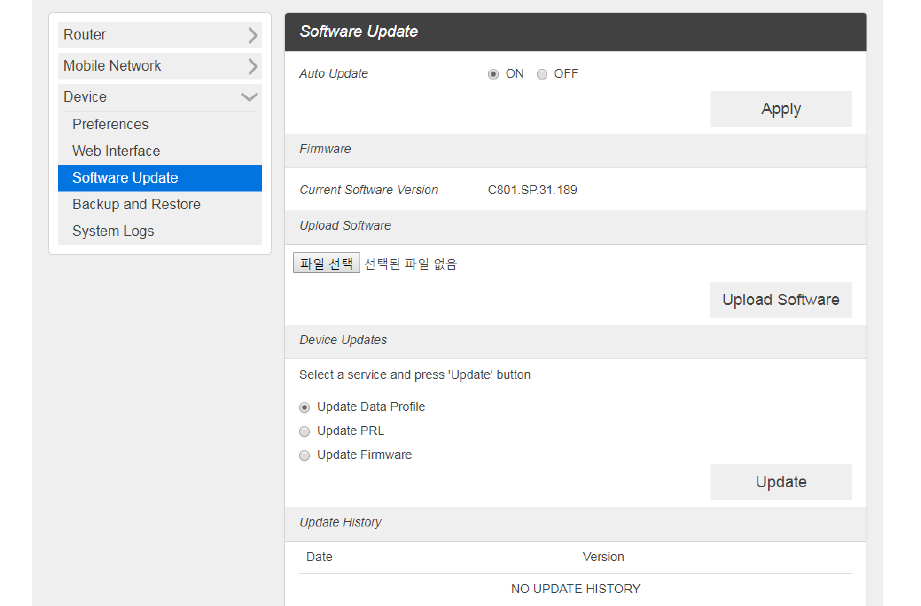
22
Software Update
1. From the Web UI, click Settings>Device>Software Update. You can update the software on this
page.
Read the onscreen options and click the update you would like to initiate.
■ Auto Update: If ON is selected, yourC801 will check the latest software periodically and update
if new software is available.
■ Update Software: If you have a new software file provided by your service provider, you can
select the file and update your C801manually by pressing Update Software button.
■ Device Updates: If you would like to check for new data profile, PRL, or Firmware, select
desired option and press the Update button. Your C801 will check for the latest version. If
available, the device will proceed to update.
■ Update History: Displays the update history list.
Backup and Restore
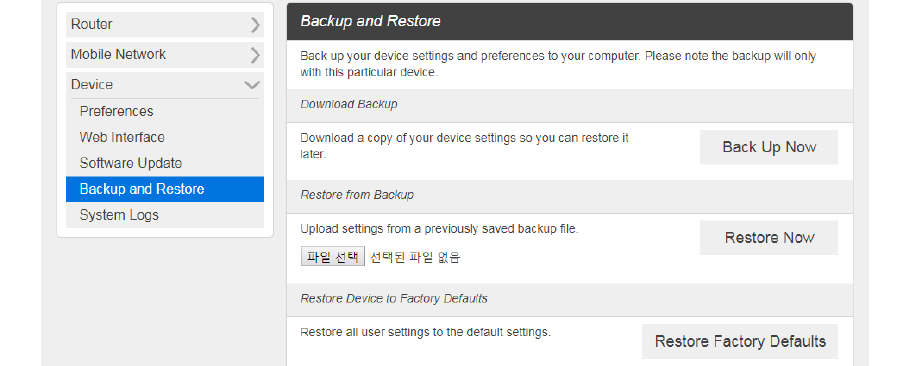
1. From the Web UI, click Settings>Device>Backup and Restore to back up your device settings to
your computer, restore settings from backup file, or restore your device to its factory default settings.
23
■ Backup Now
To back up your device settings to your computer, follow the steps below:
1) Click Back Up Now.
2) Click Save on the pop-up window.
3) Choose a location on your computer to save the backup file.
4) Click Save.
■ Restore Now
To restore from backup file, follow the steps below:
1) Click Select File to select the backup file in your computer.
2) Click Restore now.
■ Restore to Factory Defaults
To restore your device to its factory default settings, follow the steps below:
1) Click Restore factory defaults.
2) Click Yes to confirm the command.
24
System Logs
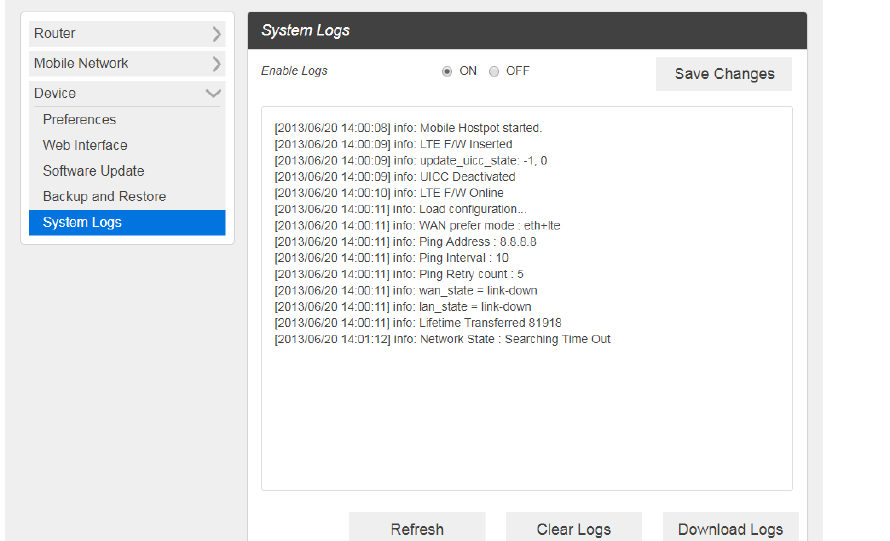
1. From the Web UI, click Settings>Device>System logs, and then click Download logs to
download the system logs displayed
Note: System logs are used for engineering purposes by your service provider. Keep it OFF during
regular usage of your device.
25
About
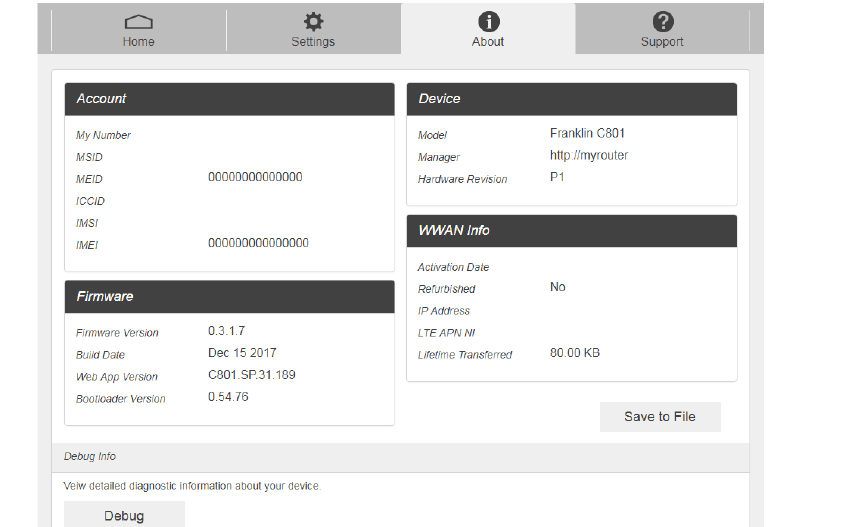
Displays your device's connection information, firmware information, WWAN information, Wi-Fi details
and device information.
1. From the Web UI main screen, Click the About tab to view the available information.
26
Support Tab
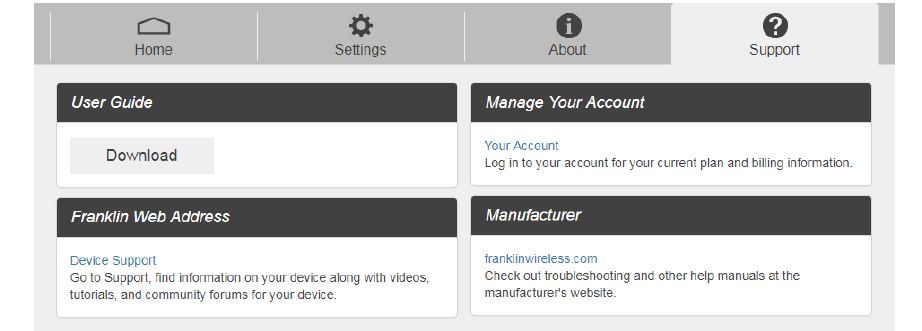
Obtain support information on this interface.
1. From the Web UI main screen, click the Support tab to view the available options.

27
Appendix
The following topics cover items such as troubleshooting, device specifications, applicable warranty and
service information, customer service contacts, and applicable trademark and copyright notices.
Troubleshooting
Check below for troubleshooting solutions for common device issues.
Issue: Internet connection fails.
Solution 1: Make sure that you are within the service area.
Solution 2: If signal reception is poor, move to where signal reception is good and then
reconnect. Solution 3: The access point might be busy depending on the time of day. Wait a
little and then reconnect.
Solution 4: Activate the Web UI and make sure that network settings are correct
Issue: Transmission fails quickly.
Solution 1: Make sure that the broadband device is properly connected to the PC or other
device.
Solution 2: Signal reception might be poor. Check transmission where signal reception is good.
Solution 3: Restart the broadband device.
Solution 4: Check the broadband device battery level. If battery level is low, charge with AC
charger. See Charge the Battery for how to charge.
Issue: Transmissions are slow.
Solution 1: Signal reception might be poor. Check transmission where signal reception is
good.
Solution 2: Connection might be poor. Try again after a while.
Issue: Forgot PIN / Unknown PIN Unblocking Key (PUK) / SIM card is locked.
Solution: Contact Service Provider.
Issue: SIM card is not recognized.
Solution 1: Check whether the SIM card is properly installed. For details, see Insert or
Remove a SIM Card.
Solution 2: Check the SIM card for damage.
Solution 3: Check the SIM card IC chip for scratches/corrosion.
Solution 4: Dirty SIM card (particularly IC chip) may prevent recognition. Clean gently with
a soft cloth.
Solution 5: Contact Customer Service.

28
Issue: How do I return the broadband device to the default settings (reset)?
Solution 1: Use the reset button located on the back of the device after battery cover
removal. (Device must be On when pressing reset button.)
Solution 2: Use the Web UI to reset the device. For details, see Web UI Window.
Issue: An old phone number appears on the Web UI.
Solution: The Web UI may display an old phone number depending on subscription terms
or cancellation method.
Issue: The broadband device operation is unstable.
Solution 1: Avoid extremely high/low temperatures, high humidity, direct sunlight, dusty
areas, etc. Read "Safety Precautions" for use in a proper environment.
Solution 2: Avoid invalid software. Operation is unguaranteed for Internet connection, etc.,
using other-party software.
Issue: The connection suddenly failed.
Solution 1: The connection method may have been changed. Check connection mode on
the broadband device display.
Solution 2: Restart the broadband device.
Specifications
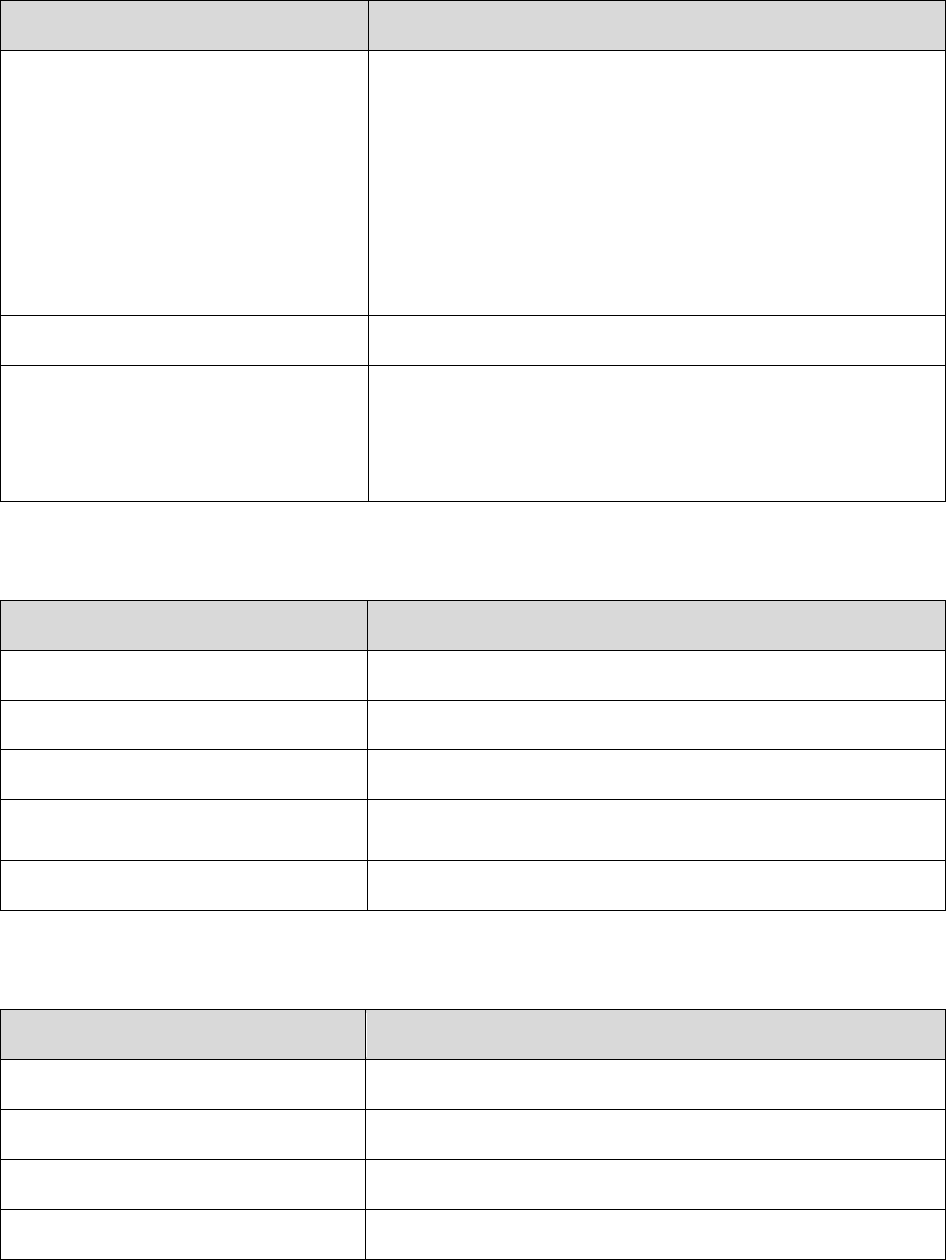
The following tables list the specifications for the broadband device, the AC charger, and the materials.
Broadband Device Specifications
Item
Description
Model name
C801 4G Router
Dimensions
104mm (L) x 104mm (W) x 49mm (H)
Weight
178g
Interface
Web UI
Power consumption
Normal state: 1.75 Watts
Max state : 3.5 Watts
Operating system
Linux OS
29
Item
Description
Frequency
LTE B25
DL: 1930 ~ 1995 MHz UL:1850 ~ 1915 MHz
LTE B26
DL: 859 ~ 894 MHz UL: 814 ~ 849 MHz
LTE B41
DL: 2496 ~ 2690 MHz UL: 2496 ~ 2690 MHz
Compatible networks
LTE category 4
Communication speed
LTE category 4
DL : 150Mbps
UP : 50Mbps
AC Charger Specifications
Item
Description
Rated input voltage
100-240Vac
Operating range
90-264Vac
Rated input frequency
50/60Hz +/- 3Hz
Nominal dc output voltage
+5.0V (±5%)
Rating load current
2.0A
Materials Specifications
Parts
Materials/Finishing
A cover
PC(White), Silk print
B cover
PC(Black), Silk print
A cover DECO
PC(Black)
Rubber feet
Silicon(Black)
30
Warranty and Service
The following topics outline your device's warranty and service information.
Warranty
Your device purchase includes Warranty.
● Confirm shop name and purchase date.
● Read contents of Warranty and keep it in a safe place.
● Check warranty period in the Warranty.
Services
Before submitting your device for repairs, contact Service Provider’s Customer Service or General
Information; be prepared to describe the problem in detail.
● During the warranty period, repairs will be made under the terms and conditions described in
the Warranty.
● After the warranty period, repairs will be upon request; if said repairs can be made, you will be
charged for them.
Customer Service
For broadband device or service information, call general information. For repairs, call your Service
Provider’s customer assistance.
Trademarks and Copyright Information
The names of companies, products, and services used in this guide are registered trademarks or
trademarks of the respective companies.
Franklin Wireless logo is trademarks or registered trademarks of Franklin Wireless Corporation
in US. Copyright © 2018 Franklin Wireless Corporation. All rights reserved.

31
Safety and Notices
The following topics address important safety precautions, general notes, and required RF exposure
information for your broadband device.
Safety Precautions
The following topics outline important safety precautions that must be observed when using your device.
Important Notice
Due to the nature of wireless communications, transmission and reception of data can never be
guaranteed. Data may be delayed, corrupted (i.e., have errors) or be totally lost. Although significant
delays or losses of data are rare when wireless devices are used in a normal manner with a well-
constructed network, your device should not be used in situations where failure to transmit or receive
data could result in damage of any kind to the user or any other party, including but not limited to
personal injury, death, or loss of property. Franklin Wireless accepts no responsibility for damages of
any kind resulting from delays or errors in data transmitted or received using your device, or for failure
of your device to transmit or receive such data.
Safety and Hazards
Do not operate your device under the following conditions.
● In areas where blasting is in progress
● Where explosive atmospheres may be present
● Near medical equipment
● Near life support equipment, or any equipment that may be susceptible to any form of radio
interference.
In such areas, your device MUST BE POWERED OFF. Your device can transmit signals that could
interfere with this equipment.
Do not operate your device in any aircraft, whether the aircraft is on the ground or in flight. In aircraft,
your device MUST BE POWERED OFF. When operating, your device can transmit signals that could
interfere with various onboard systems.
Note: Some airlines may permit the use of cellular phones while the aircraft is on the ground. Your
device may be used at this time if allowed by airlines.
The driver or operator of any vehicle should not operate the device while in control of a vehicle. Doing
so will detract from the driver or operator’s control and operation of that vehicle. In some jurisdictions,
operating such communications devices while in control of a vehicle is an offense.

32
FCC Compliance
This device complies with part 15 of the FCC Rules. Operation is subject to the following two conditions:
(1) This device may not cause harmful interference, and (2) this device must accept any interference
received, including interference that may cause undesired operation.
Note: Any changes or modifications not expressly approved by the party responsible for compliance
could void the user's authority to operate this equipment.
This equipment has been tested and found to comply with the limits for a Class B digital device,
pursuant to part 15 of the FCC Rules. These limits are designed to provide reasonable protection
against harmful interference in a residential installation. This equipment generates, uses and can
radiate radio frequency energy and, if not installed and used in accordance with the instructions, may
cause harmful interference to radio communications. However, there is no guarantee that interference
will not occur in a particular installation. If this equipment does cause harmful interference to radio or
television reception, which can be determined by turning the equipment off and on, the user is
encouraged to try to correct the interference by one or more of the following measures:
● Reorient or relocate the receiving antenna.
● Increase the separation between the equipment and receiver.
● Connect the equipment into an outlet on a circuit different from that to which the receiver is
connected.
● Consult the dealer or an experienced radio/TV technician for help
RF Exposure Statement
The antenna(s) must be installed such that a minimum separation distance of at least 20 cm is maintained
between the radiator (antenna) and all persons at all times. This device must not be co-located or operating in
conjunction with any other antenna or transmitter.
33