Franklin Technology R775 LTE/Wi-Fi Mobile Router User Manual
Franklin Technology Inc. LTE/Wi-Fi Mobile Router Users Manual
Users Manual
C Spire
4G LTE Mobile Hotspot
User Guide

i
Table of Contents
Table of Contents ........................................................................................................................... i
Get Started ................................................................................................................................. 1
Your 4G LTE Mobile Hotspot at a Glance................................................................................ 2
Insert Your 4G LTE SIM Card ................................................................................................ 3
Insert and Charge Your battery ............................................................................................... 4
Power Your 4G LTE Mobile Hotspot On and Off ..................................................................... 6
Activate Your 4G LTE Mobile Hotspot .................................................................................... 6
C Spire Account Information and Help .................................................................................... 6
C Spire Account Passwords .................................................................................................... 6
Manage Your Account ........................................................................................................... 7
Using Your 4G LTE Mobile Hotspot............................................................................................ 8
Connecting to Your 4G LTE Mobile Hotspot............................................................................ 8
Opening the 4G LTE Mobile Hotspot Web Browser Interface ................................................... 9
4G LTE Mobile Hotspot User Interface .................................................................................... 9
Graphic Color LCD & Icons ................................................................................................... 9
Buttons ................................................................................................................................ 9
4G LTE Mobile Hotspot UI Operation ....................................................................................10
Your 4G LTE Mobile Hotspot Web Browser Interface ................................................................14
Browser Interface ...................................................................................................................14
Opening the Browser Interface ...............................................................................................14
Landing Page .........................................................................................................................14
Connecting to the Network .....................................................................................................16
Navigating Web UI menu .......................................................................................................16
Device & Network Menu ........................................................................................................16
General Device and Network Information ...........................................................................17
4G LTE Device and Network Information ..........................................................................18
3G Device and Network Information ..................................................................................19
Check Usage Menu .................................................................................................................20
Wi-Fi Menu ...........................................................................................................................21
ii
Wi-Fi Profile.......................................................................................................................21
Connected Devices ..............................................................................................................22
Settings Menu ........................................................................................................................24
Connection Options ............................................................................................................24
Network Setting ..................................................................................................................25
Security Setting ..................................................................................................................27
VPN Passthrough ...............................................................................................................28
GPS Settings .......................................................................................................................28
Advanced Settings ..............................................................................................................30
General Settings .................................................................................................................30
Updates ..............................................................................................................................32
Help Menu .............................................................................................................................36
About .................................................................................................................................36
User Guide .........................................................................................................................37
Regulatory Information ................................................................................................................38
Appendix 1: Glossary ..................................................................................................................41

1
Get Started
Congratulations on your purchase of the C Spire 4G LTE Mobile Hotspot. This section gives you
all the information you need to set up your device and service the first time.
With the C Spire 4G LTE Mobile Hotspot, you can access the C Spire 4G LTE network, the
nation’s only personalized 4G LTE network. The built-in Wi-Fi tethering function allows you to share up
to 10 times faster than 3G connection with other Wi-Fi equipped devices such as laptops, tablets, smart
phones, and more.
C Spire 4G LTE Mobile Hotspot Features
Connect to the C Spire 4G LTE high-speed wireless data with fall-back to 3G CDMA
service when necessary
Easy-to-use Web User Interface
Graphic Color LCD User Interface
Data Usage display
Alert message (SMS)
This section contains information on getting started:
Your 4G LTE Mobile Hotspot at a Glance
Insert Your 4G LTE SIM Card
Insert and Charge Your Battery
Power Your 4G LTE Mobile Hotspot On/Off
Activate Your 4G LTE Mobile Hotspot
Account Information and Help
2
Your 4G LTE Mobile Hotspot at a Glance
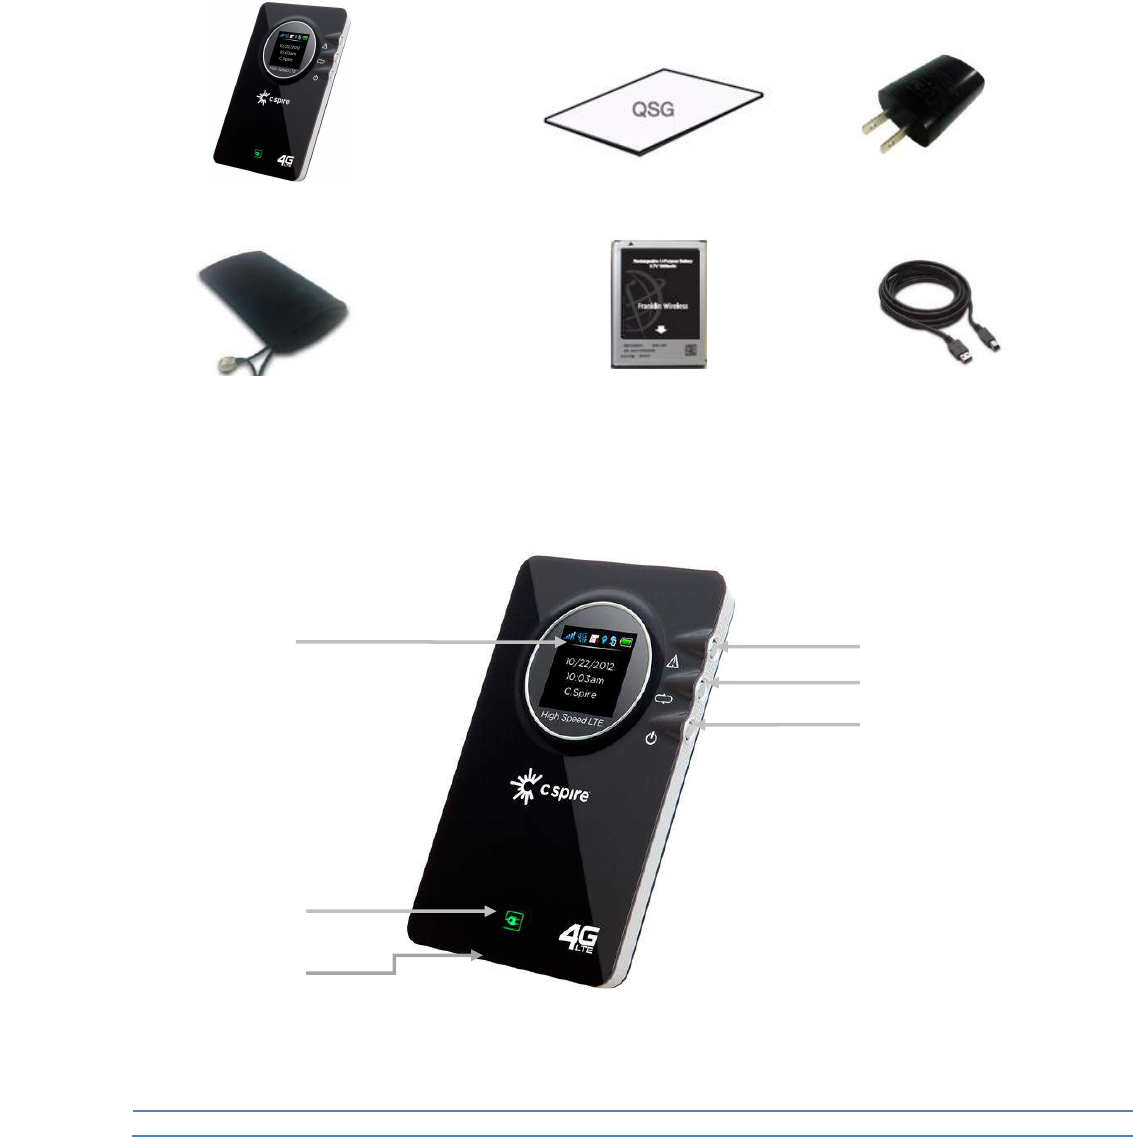
The C Spire 4G LTE Mobile Hotspot package includes:
The 4G LTE Mobile Hotspot Components:
Components
Functions
Description
4G LTE Mobile Hotspot
Quick Start Guide
Battery Pack
Travel Charger
USB Cable
6
5
1
2
3
4
Pouch
Pouch
3
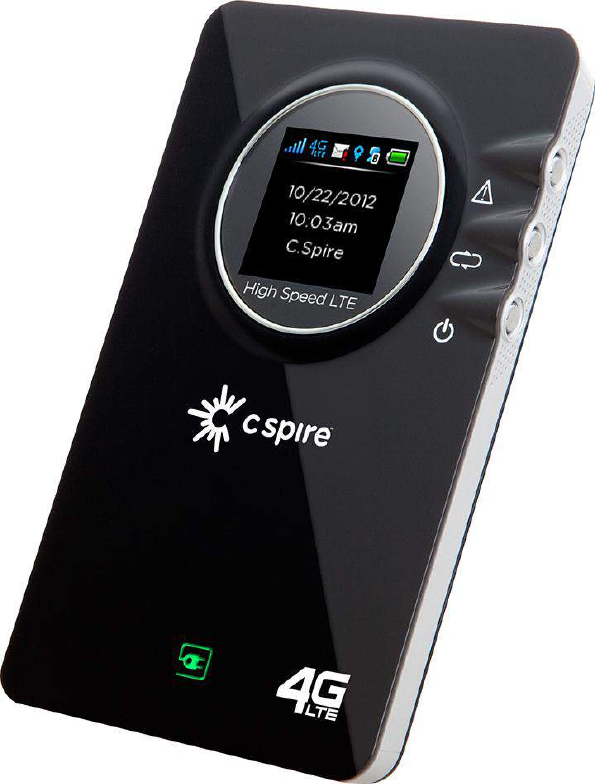
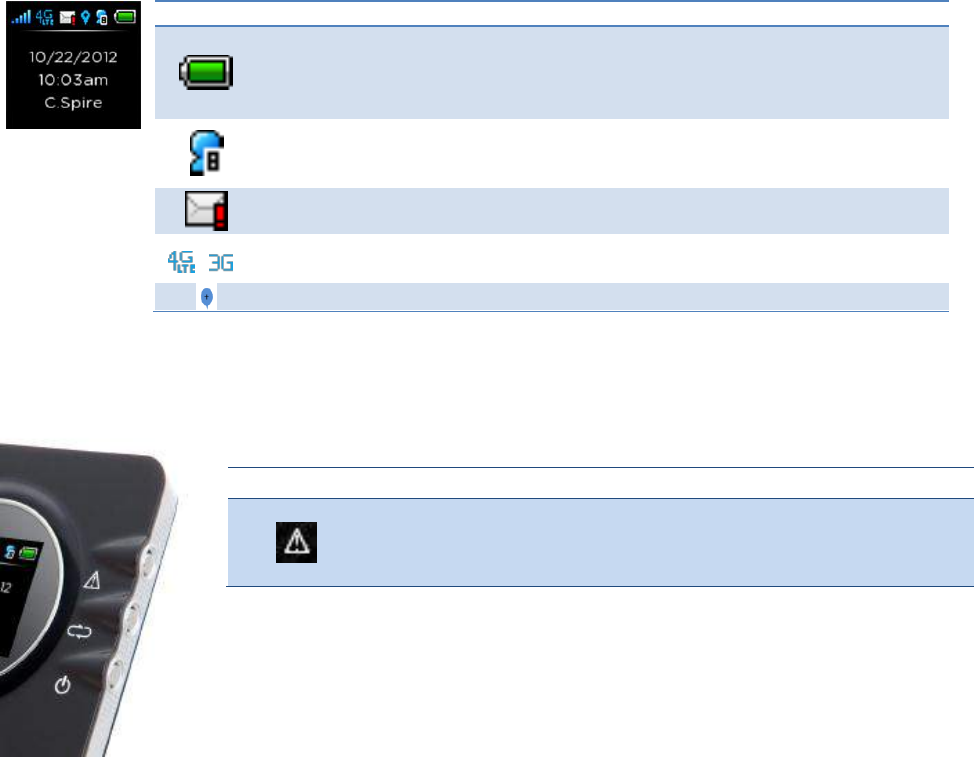
① Color LCD display
6 icons /
4 display lines for
alphanumeric character
display
The display has (6) icons on the top, including signal strength,
4G/3G service indicator, alert message, GPS, connected
devices, and battery status. Under the icon line, the display
has a display area for (4) lines of alphanumeric character
display. To save power, the display automatically turns off in
10 seconds unless any function key is pressed by users.
② Charging status
LED
Red/Green
When the battery is being charged, the LED illuminates a red
light. When the battery is fully charged, the LED color
changes to green.
③ Micro USB
Connector
Charging
Connect the charger cable to the micro USB port to charge the
battery.
④ Alert / Clear Button
Press once
Press & Hold
Press once to display alert messages. Press and hold the
button to delete the message displayed.
⑤ Information Button
Press once
Press & Hold
Press once to display data usage information. Press and hold
to reset the data usage information. Press short again to
display SSID. Press short again to display Wi-Fi security key.
⑥ Power Button
Press & Hold
Press and hold the button to turn on or to turn off your 4G
LTE Mobile Hotspot
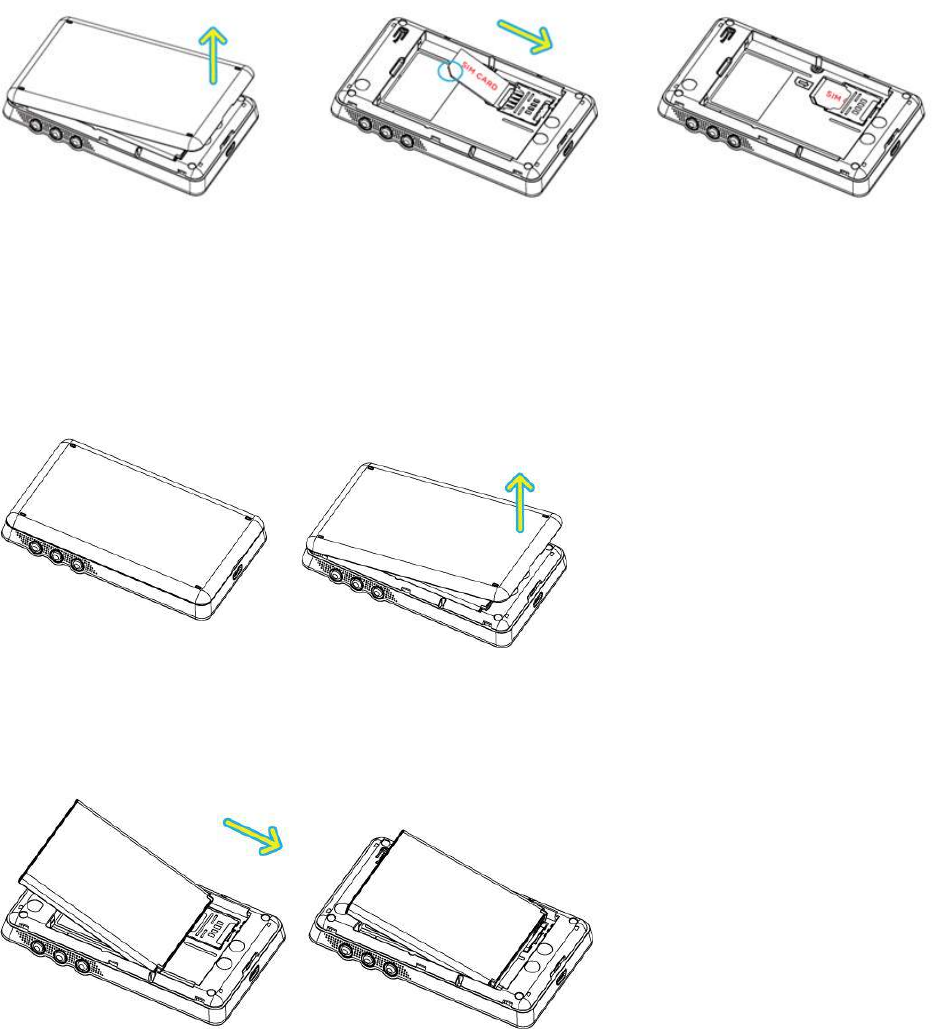
Insert Your 4G LTE SIM Card
Please ensure that the C Spire 4G LTE SIM card has been inserted prior to use.
1. Lift and open the battery cover.
2. Insert the SIM card as shown in the picture below.
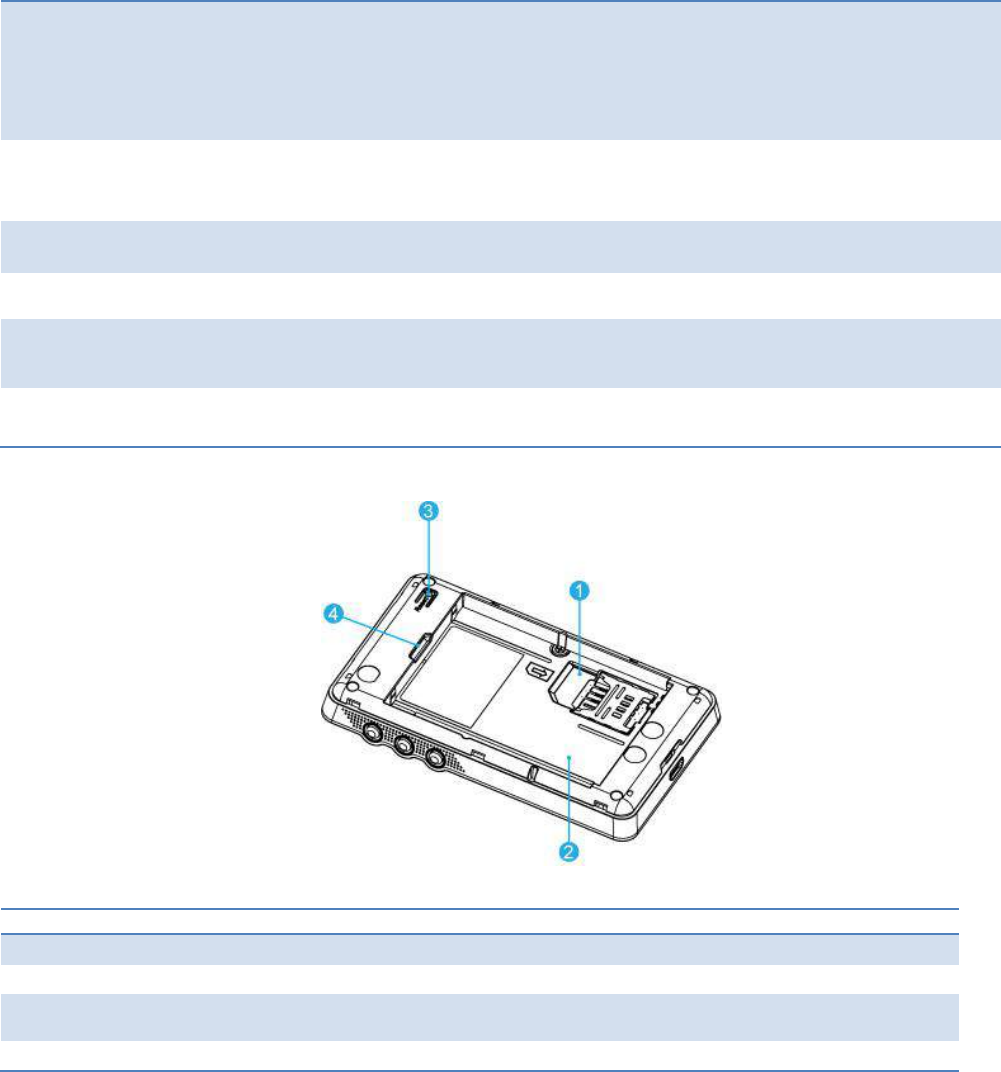
Button/Connector
Description
① SIM card slot
The 4G LTE SIM card is installed here.
② Battery compartment
The battery is installed in the compartment.
③ Master reset button
Insert a paper clip into the hole and press and hold to reset the device to factory
settings.
④ Battery removal divot
Lift the battery cover here
4
Insert and Charge Your battery
To insert and charge the battery, follow the below steps.
1. Lift and open the battery cover.
2. When inserting the battery, align the battery contacts with the contacts in the battery compartment
and slide the battery into the battery compartment.
3. Replace the cover, and press the four sides of the battery cover until it clicks into each notch.
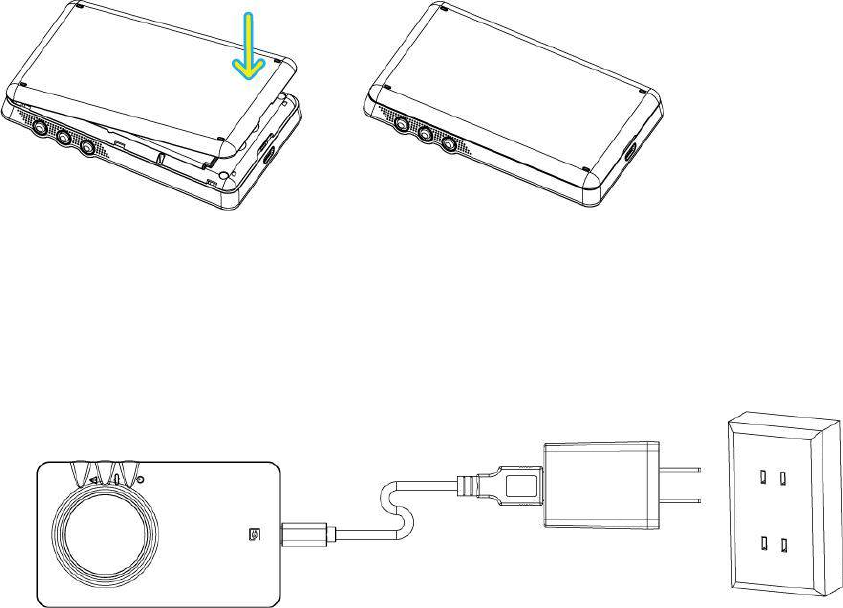
5
4. Connect the one end of the USB cable to the travel charger and also connect the other end of the USB
cable to the micro USB port on the bottom side of your 4G LTE Mobile Hotspot.
5. Plug the travel charger into the appropriate electrical outlet to charge the battery. The charging status
LED will be lit red while charging the battery. The LED color will change to green when the battery
is fully charged.
Note: Before you use the device, be sure to charge the battery fully until the charging status LED turns
green.
Important: Only use the batteries and the chargers that have been approved by C Spire. The warranty
is not valid with any damage caused by other batteries and chargers.

6
Power Your 4G LTE Mobile Hotspot On and Off
Press and hold the Power Button ( ) on the side of your 4G LTE Mobile Hotspot until the LCD turns
on and displays the C Spire power-on animation.
To turn off the device, press and hold the Power Button ( ) again until the LCD starts to display the C
Spire power-off animation.
Activate Your 4G LTE Mobile Hotspot
● When you receive 4G LTE Mobile Hotspot, it may or may not be activated and ready to use. If
you purchased your 4G LTE Mobile Hotspot at a C Spire store, it is probably activated and ready
to use.
● If you received your 4G LTE Mobile Hotspot in the mail and it is for a new service account or a
new line of service, it is designed to activate automatically. Just insert the C Spire 4G LTE SIM
card into the SIM slot beneath the battery.
● If you received your 4G LTE Mobile Hotspot in the mail and you are activating a new 4G LTE
Mobile Hotspot for an existing number on your account (you’re swapping devices), simply
remove the SIM card from the old device and insert it into the SIM slot on the new 4G LTE
Mobile Hotspot.
Note: If you are having any difficulty with activation, contact C Spire Customer Service by calling
1-855-CSPIRE5 (277-4735) from any phone.
C Spire Account Information and Help
C Spire Account Passwords
As a C Spire customer, you enjoy unlimited access to your personal account information and your data
services account. To ensure that no one else has access to your information, you will need to create
passwords to protect your privacy.
Account User Name and Password
If you are the account owner, you will create an account user name and password when you sign
on to cspire.com. (Click My Account to get started.)
7
Manage Your Account
Manage your C Spire account from your computer or any phone.
Online: cspire.com
● Access your account information.
● Check your data usage.
● View and pay your bill.
● Enroll in C Spire online billing and automatic payment.
● Purchase accessories.
● Shop for the latest C Spire phones and devices.
● View available C Spire service plans and options.
From Any Phone
● C Spire Customer Service: 1-855-CSPIRE5 (277-4735).

8
Using Your 4G LTE Mobile Hotspot
This section contains information on your device’s connection and LCD user interface.
Connecting to Your 4G LTE Mobile Hotspot
Opening the 4G LTE Mobile Hotspot Web Browser Interface
4G LTE Mobile Hotspot User Interface
4G LTE Mobile Hotspot UI Operation
Connecting to Your 4G LTE Mobile Hotspot
Now, you’re ready to connect your computer or other Wi-Fi capable devices to your 4G LTE Mobile
Hotspot using a Wi-Fi connection.
1. Power on your computer, tablet or Wi-Fi device and power on your 4G LTE Mobile Hotspot.
The C Spire power-on animation will appear on your 4G LTE Mobile Hotspot LCD window. After
displaying the C Spire power-on animation, your 4G LTE Mobile Hotspot will search for available
4G LTE or 3G services. The LCD window will display messages and service icons when connected
to 4G LTE or 3G networks. Your 4G LTE Mobile Hotspot will broadcast a Wi-Fi network signal.
2. Use the Wi-Fi manager (Windows) or the AirPort menu bar (Mac OS) to connect to the Wi-Fi signal
from your 4G LTE Mobile Hotspot.
Note: Methods connecting your device to a Wi-Fi network may vary depending on your computer and
its operation system. For Windows, select ―View Available Wireless Network‖ on the notification area.
For Mac OS, select the AirPort icon located on the menu bar. If you have any problems in setting up your
Wi-Fi connection to your computer, please refer to the computer help documentation.
3. Select the Wi-Fi signal named ―C Spire 4G LTE Hotspot XXXX‖ where XXXX is the last four digits
of Wi-Fi MAC ID of the device.
4. Once you are connected to the Wi-Fi network, your 4G LTE Mobile Hotspot is connected to the
internet.
Important: Your Wi-Fi Password is NOT pre-configured. Upon your first connection to the Wi-Fi
network from your 4G LTE Mobile Hotspot, immediately change the Wi-Fi security settings to secure
your connection security.
1. Type http://192.168.10.1 or http://cspire-admin into the address window and press Enter.
2. See ―the Wi-Fi menu‖ on the page 21 of this manual for more information.
9
Opening the 4G LTE Mobile Hotspot Web Browser
Interface
To use the Web browser interface, open the Web browser on your computer, tablet or Wi-Fi device and
type http://cspire-admin or http://192.168.10.1 into the web browser address window and press Enter or
Return.
Go to ―Your 4G LTE Mobile Hotspot Web Browser Interface‖ on the page 14 to see details of Web
Browser Interface features.
4G LTE Mobile Hotspot User Interface
Your 4G LTE Mobile Hotspot has a graphic color LCD window and three functional buttons for user
interaction. The LCD window displays various icons and text messages to show device status. The three
functional buttons allow you to control the device functions and messages displayed on the LCD window.
Graphic Color LCD & Icons
The LCD window can display 6 different icons and 4 lines of text messages.
Buttons
Your 4G LTE Mobile Hotspot has three buttons located on the right upper side of the device.
Icons
Name
Description
Battery
The longer green bar inside the battery outline indicates more
battery power remaining. When the remaining battery power
becomes very low, the battery outline will blink and a warning
message will display.
Connected
Device
When multiple Wi-Fi devices are connected to the device, the
number of connected devices is displayed next to the connected
device icon.
Alert /
Message
The alert message icon will display when there are messages from
the network or alert messages from the 4G LTE Mobile Hotspot.
/
4G LTE
/3G
A 4G or 3G icon displays according to the network your 4G LTE
Mobile Hotspot is connected to.
GPS
This icon appears when the GPS is enabled.
Buttons
Names
Description
Alert / Message
Displays or controls messages that are received
or self-generated.
10
4G LTE Mobile Hotspot UI Operation
The LCD window and buttons provide you with your 4G LTE Mobile Hotspot network service status and
other important information.
Device States
Buttons
Icons / Text
Description
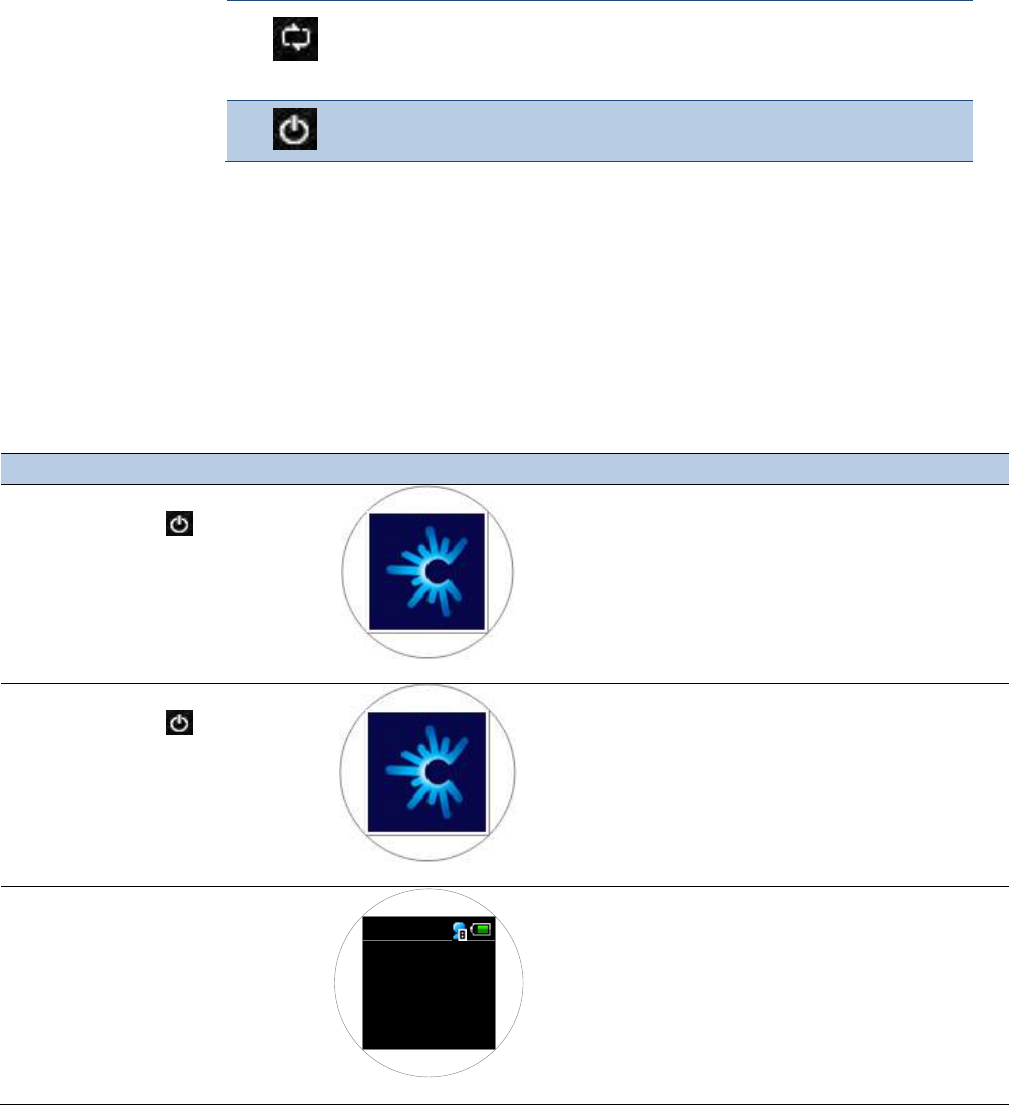
Power on
Press and hold
button for 2
seconds
The C Spire animation logo plays. Your 4G LTE
Mobile Hotspot starts searching for available
networks.
Power off
Press and hold
button for 2
seconds
The C Spire power off animation displays. Your 4G
LTE Mobile Hotspot powers off.
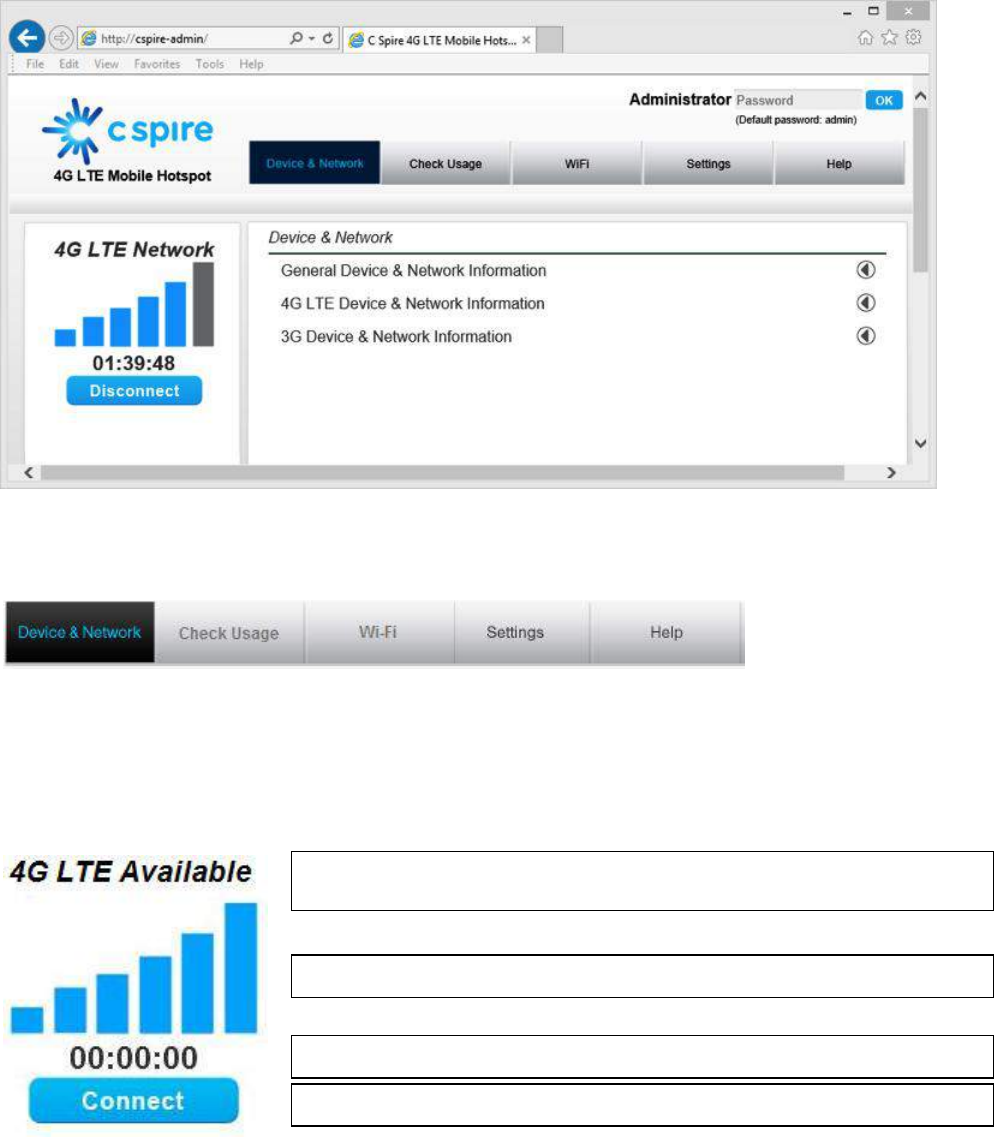
No 4G LTE
SIM card or
SIM card error
No 4G LTE SIM
card found
A 4G LTE SIM card is either missing or there was an
error reading the SIM card. Insert or replace the 4G
LTE SIM card
Information Display
Checks wireless data usage and to reset the data
usage information. Displays SSID and Wi-Fi
Security key.
Power
Powers the device on/off.
11
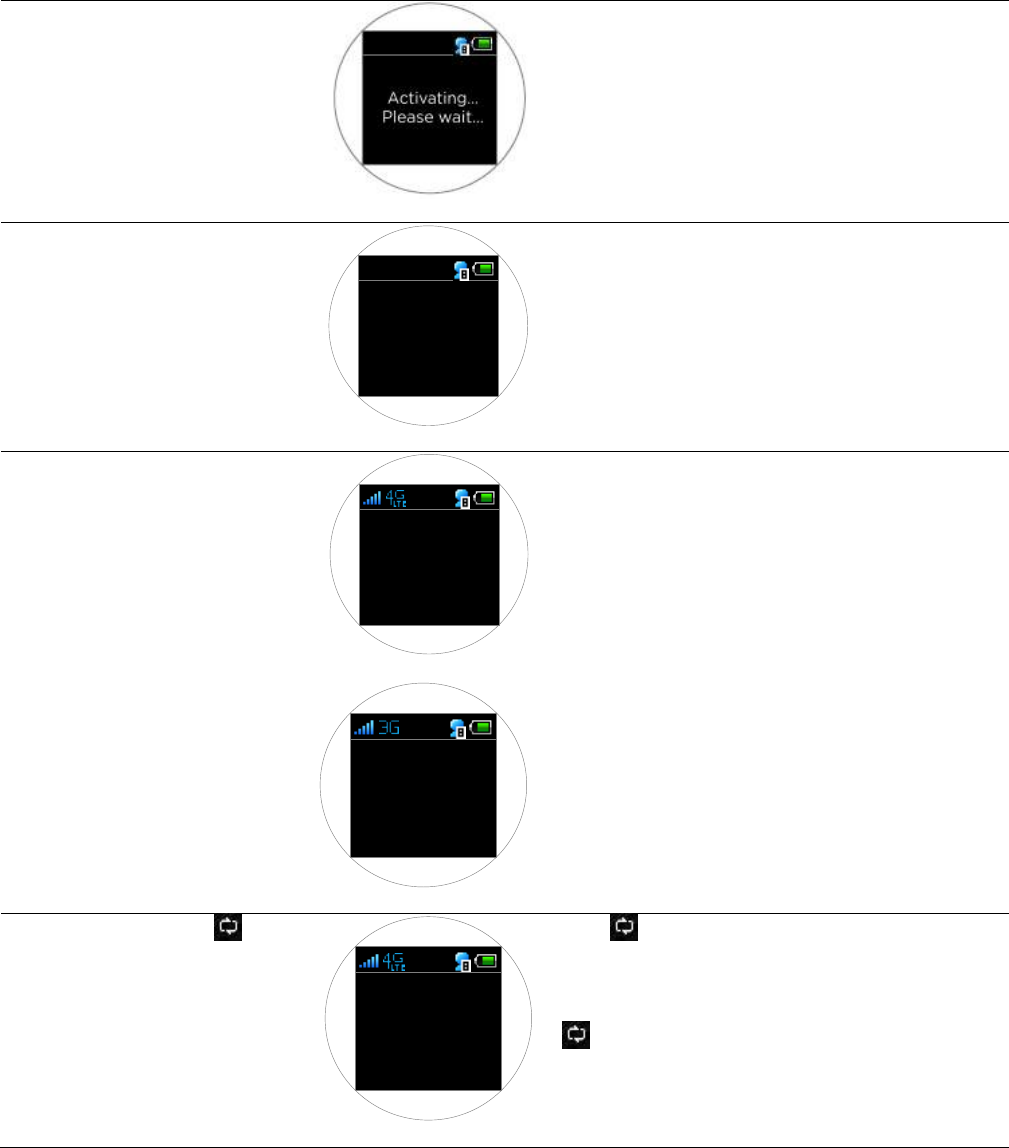
Account
Activation
Your 4G LTE Mobile Hotspot is activating. The first
time you insert the 4G LTE SIM card, your $G LTE
Mobile Hotspot automatically activate your account.
Note: If you are having difficulty with activation,
contact C Spire Customer Service by calling 1-855-
CSPIRE5 (277-4735)
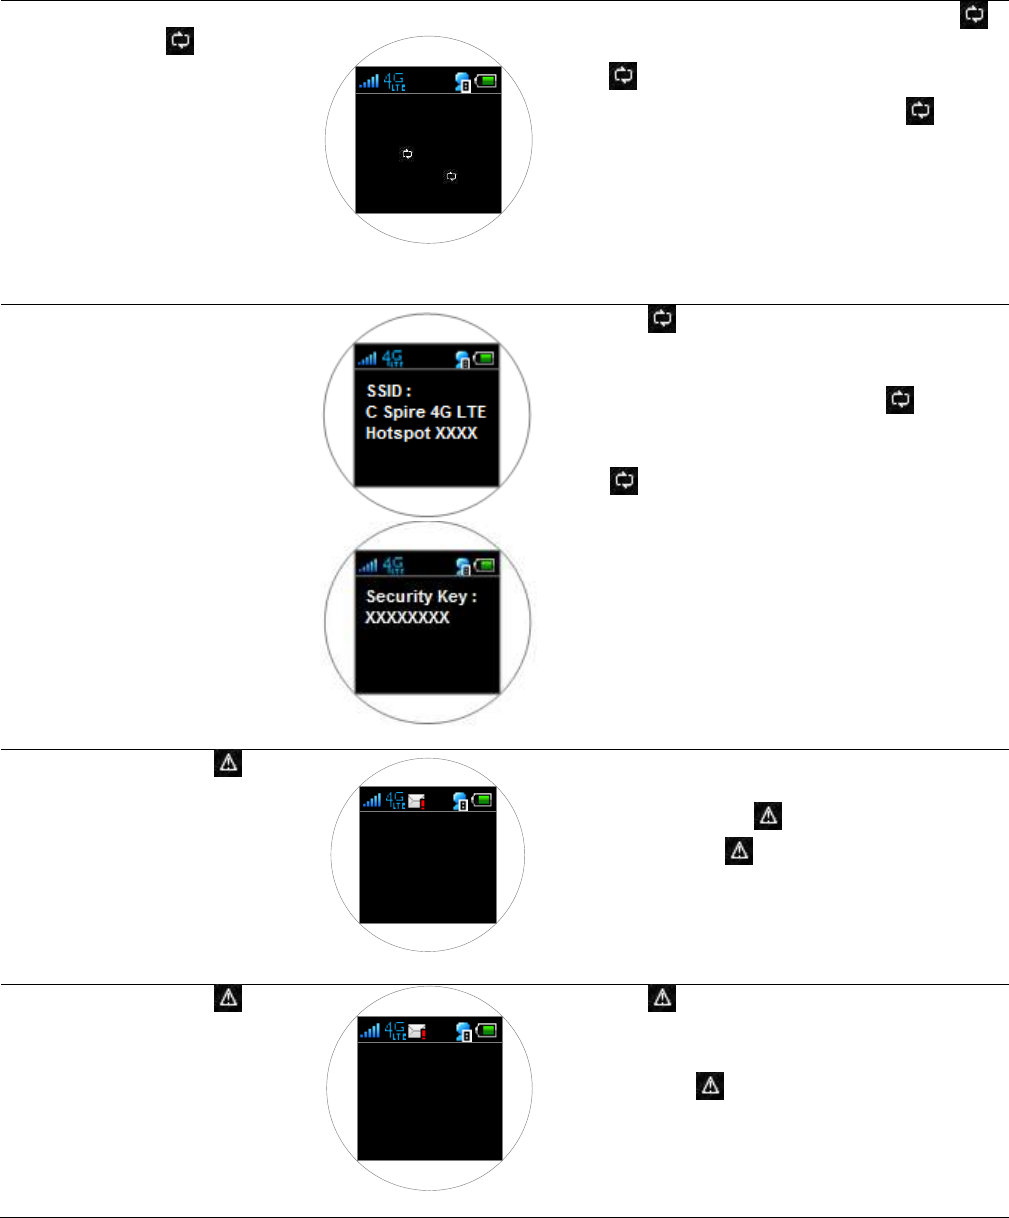
Searching for a
network signal
Searching for
network…
Your 4G LTE Mobile Hotspot is searching for
network service. Only the connected device and
battery icons appear.
Service status
10/ 22/ 20 12
13:25pm
C Spire
When a 4G LTE service is acquired, the signal
strength icon & 4G service icons will display. The
Date/Time/ Banner text also displays. The default
banner is C Spire. You can edit and personalize the
banner from the Web User Interface by going to:
Setting > Advanced Settings > General Settings >
Banner Setting.
10/ 22/ 20 12
13:25pm
C Spire
When 4G LTE is not available and 3G service is
acquired, the signal strength icon & 3G service
display. The Date/Time/Banner text also displays.
Data usage
display
Press
button once.
2.52 MB used
Since
0 9/ 07/ 20 12
Press button once to display the data usage.
The ―xxxx MB used since [date]‖ message appears for
10 seconds and returns to the main screen unless the
button is pressed again to return to the main
display.
12
Data usage reset
Press and hold
button for 2
seconds.
Reset usage?
Yes: hold dow n
for 2 sec
No: press
While the data usage is displayed, press and hold
button for 2 seconds. A warning message will display,
press button once to keep current usage data and
to return to main display or press and hold button
for 2 seconds again to reset the data usage to zero.
Note: The usage data is measured by your 4G LTE
Mobile Hotspot for your reference only. C
Spire’s data usage accounting may slightly
differ.
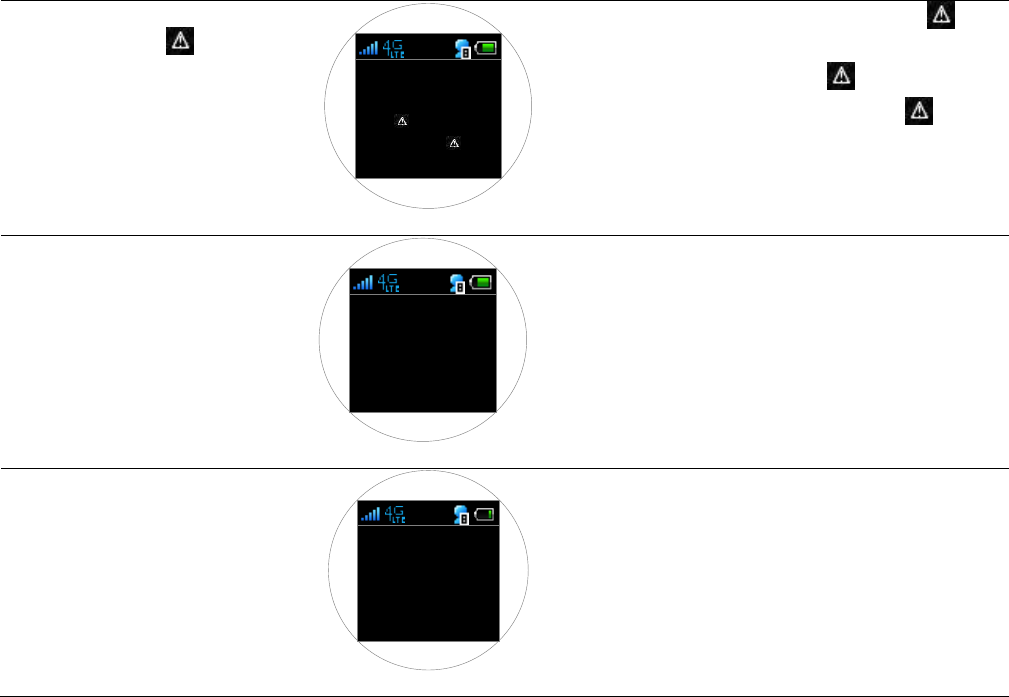
SSID(Wi-Fi
network name)
& Wi-Fi
security key
display
Each time is pressed shortly, data usage, SSID,
Security key will display one by one.
While the data usage is displayed, press shortly
again. SSID (Wi-Fi network name) will display.
Press shortly again. Wi-Fi security key will
display.
Note: Wi-Fi Security Key is not set by default.
It’s recommended to use security key for
your connection secured.
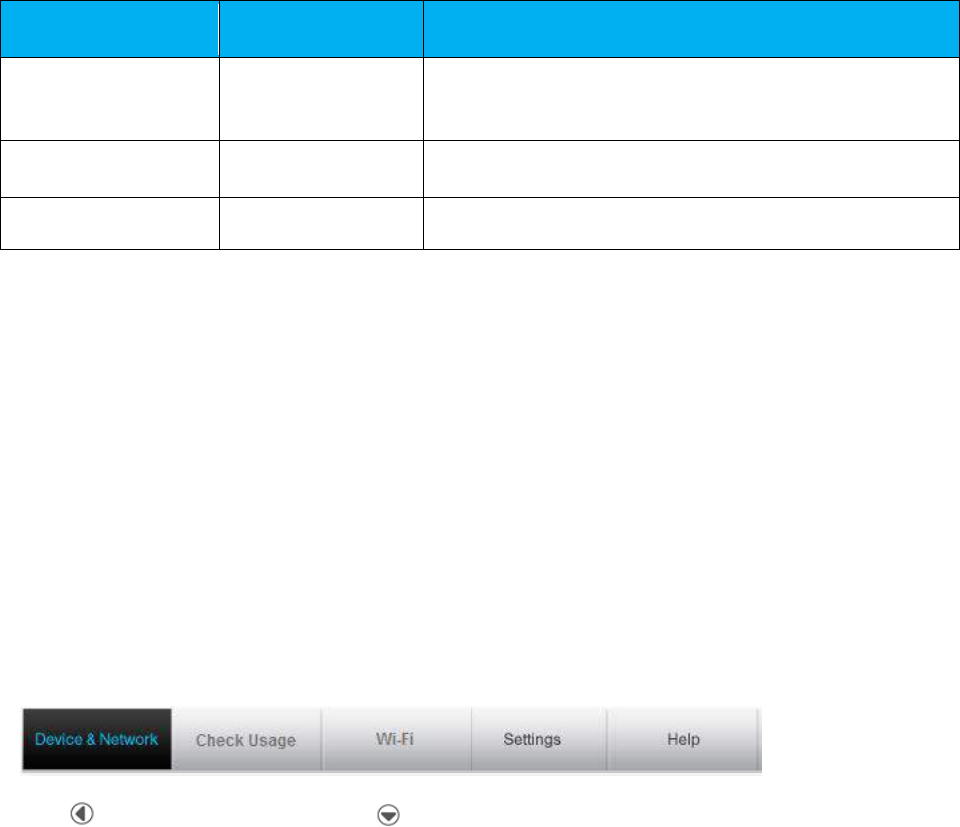
Alert message
display
Press
button once.
[ 1/ 2] 0 9/ 12/ 12 0 9:19pm
You have used
90 % of
wireless data
allowance until
June 30.
The message icon appears when your 4G LTE Mobile
Hotspot has an alert message or a network generated
messages (SMS). Press button once to display the
first message. Press button again to display the
next message. Each message has the header in the
form of [message no./ the total number of messages]
[received date & time]
Alert message
browsing
Press
button once
End of
Messages
Each time button is pressed, messages display one
by one in the order of occurrence or arrival. After
displaying the final message, ―End of Massage‖ is
displayed. Press button again to return to the main
screen
13
Alert message
delete
Press and hold
button for 2
seconds.
Delete msg?
Yes: hold down
for 2 sec
No: press
When a message is displayed, press and hold for 2
seconds to delete a message. Once the warning
message appears, press and hold button for 2
seconds again to confirm deletion or press button
once to revert deleting and move to the next message
or to the main screen.
Connected
device icon
display
10/ 22/ 20 12
13:25pm
C Spire
When there are multiple devices connected through
Wi-Fi to your 4G LTE Mobile Hotspot, the connected
device icon displays with the number of connected
devices.
Battery icon
display
10/ 22/ 20 12
13:25pm
C Spire
The green bar inside the battery outline indicates
battery power remaining on your 4G LTE Mobile
Hotspot. When the battery level is very low, the
battery outline blinks. Connect your 4G LTE Mobile
Hotspot to a charger immediately.

14
Your 4G LTE Mobile Hotspot Web Browser
Interface
This section contains information on your device’s browser interface.
Browser Interface
Opening the Browser Interface
Landing Page
Connecting to the Network
Navigating Web UI Menu
Device and Network Menu
Check Usage Menu
Wi-Fi Menu
Setting Menu
Help Menu
Browser Interface
The Web browser interface is a Web-based connection manager for your device. It allows you to manage
and monitor the Internet connection between your computer and the C Spire network. It is equipped with
many useful features that will enhance your internet navigation experience through a user-friendly
interface.
Opening the Browser Interface
To use the Web browser interface, open the Web browser on your desktop and type http://cspire-admin or
http://192.168.10.1 into the address window and press Enter or Return.
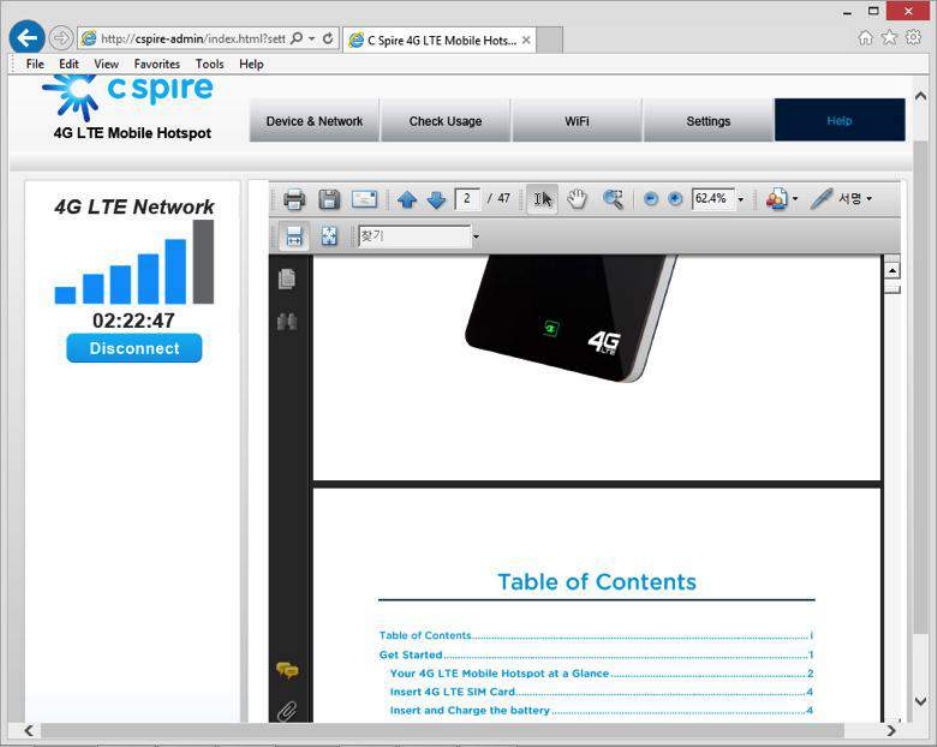
Landing Page
The Web browser will open the main page for the 4G LTE Mobile Hotspot as shown below. From this
page, you can see and manage available network connections, see your current connection state, and see
signal strength at a glance. Detailed menus for status and settings are displayed across the top of the menu.
15
The main menu appears down across the top of the browser interface and allows for ease of Web browser
interface navigation.
Information regarding your current network connection can be seen in the Network Connection Box
displayed down the left side of the main page. This box displays both 3G and 4G LTE service signals
which are available. The box has the following items:
Automatic connection mode and preferred service mode can be set from the ―Setting‖ menu in the main
menu bar.
Service Type: Not Activated / 4G LTE Available / 4G LTE Network / 3G Available /
3G Network / Connecting
Signal Strength Bars: The more bars, the stronger is the service signal
Connection Time: Count starts when connected.
Connection button: Activate / Connect / Disconnect
16
● Service Type: Displays the service type your 4G LTE Mobile Hotspot currently has acquired.
● Signal strength bar: Displays your current signal strength. Supports 0- 6 levels of signal strength.
● Connection time: Displays the time your 4G LTE Mobile Hotspot has been connected.
● Connection button: Connects/Disconnects you to/from an available network.
The following table provides your 4G LTE Mobile Hotspot status and connection button descriptions.
Status
Connection Button
says
Description
“Disconnected”
Connect
Radio power is on and your 4G LTE Mobile Hotspot is
disconnected.
Ready to connect.
“Connected”
Disconnect
Your 4G LTE Mobile Hotspot is connected and available
to disconnect the connection.
“Not Activated”
Activate
Activation is required.
Connecting to the Network
Once your 4G LTE Mobile Hotspot is properly configured, connecting to the Internet is as simple as
clicking Connect. Once connected, Connect will now display Disconnect. Simply click Disconnect to
end your current connection. To connect to any other network shown, select it, and then click Connect.
Note: You device is set to automatically connect upon power on. Use Connect / Disconnect button only when you
want to manually control network connection. You can change Auto Connection setting from ―Settings‖ menu.
Navigating Web UI menu
The main menu appears down across the top of the browser interface. Simply click the menu in the main
menu bar. The screen will display sub menus under each main menu item.
Click to open sub menu items. Click to close the sub menu items.
Device & Network Menu
The Device & Network menu allows you to view information about your device and network status.
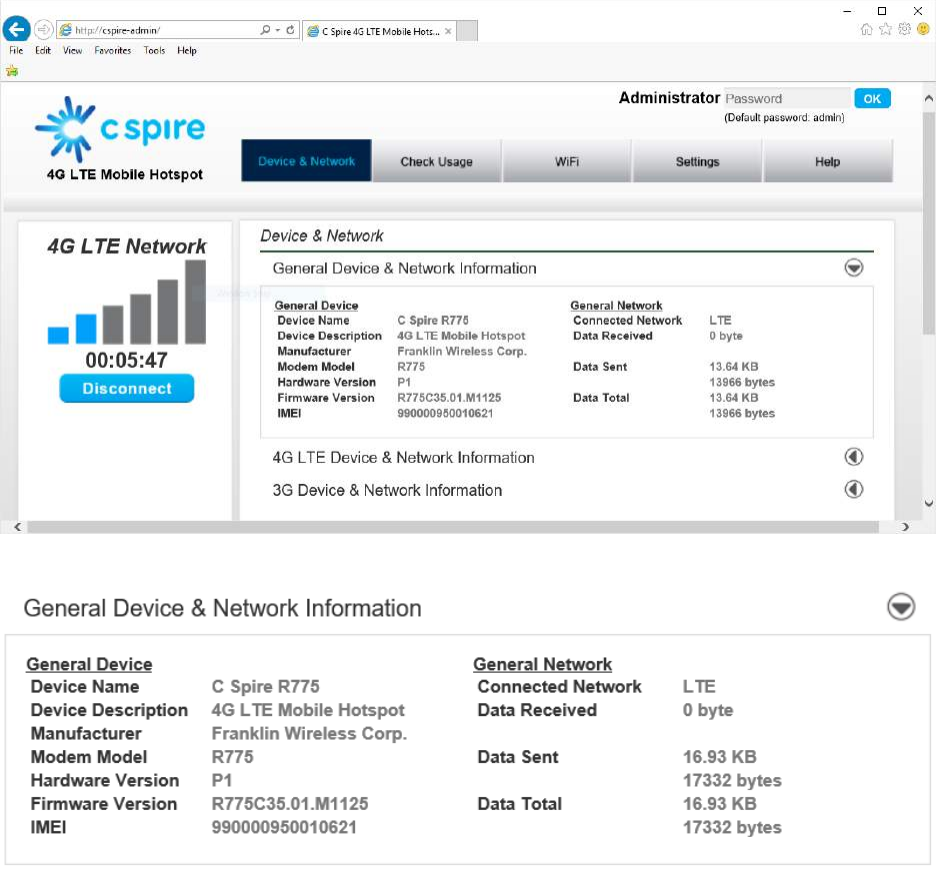
17
General Device and Network Information
General Device
● Device Name – name of the device
● Device Description – description of the device
● Manufacturer – manufacturer of the device
● Modem Model – model name of the device
● Hardware Version – hardware version
● Firmware Version – current firmware version
● IMEI – International Mobile Equipment Identity
18
General Network
● Connected Network – current network connected LTE/eHRPD/HRPD
● Data Received – number of bytes received
● Data Sent – number of bytes sent
● Data Total – total data received and sent
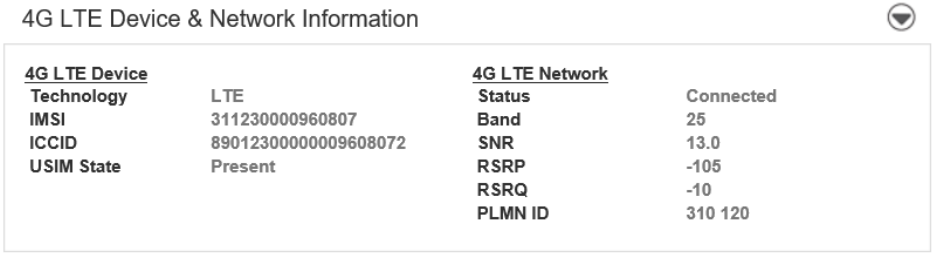
4G LTE Device and Network Information
4G LTE Device
● Technology – Long Term Evolution (LTE)
● IMSI – International Mobile Subscriber Identity (IMSI) number
● ICCID – Integrated Circuit Card ID (ICCID) number
● USIM State – current state of the Universal Subscriber Identity Module (USIM)
4G LTE Network
● Status – current network status
● Band – current 4G LTE band your device has acquired service on
● SNR – current Signal-to-Noise Ration (SNR)
● RSRP – current Reference Signal Received Power (RSRP)
● RSRQ – current Reference Signal Received Quality (RSRQ)
● PLMN ID – current state of Public Land Mobile Network ID
19
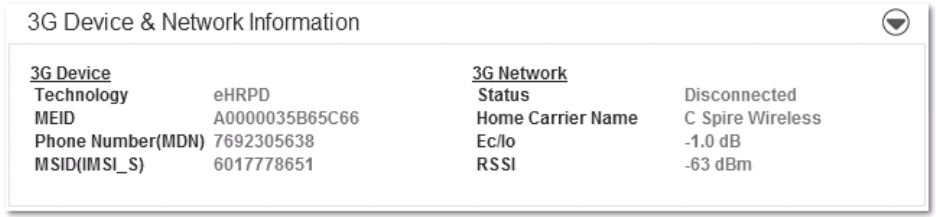
3G Device and Network Information
3G Device
● Technology – type of network you are connected to. HRPD/eHRPD
● MEID – unique number the network uses to identify your device
● Firmware – current internal software version
● Phone Number (Mobile Data Number (MDN)) – public ID for your specific wireless service
● MSID (IMSI_S) – internal ID C Spire uses to identify your account
3G Network
● Status – current network status
● Home Carrier Name – name of the network operator
● Ec/Io – measurement in dB of current Ec/Io
● RSSI – measurement in dBm of current signal strength
20
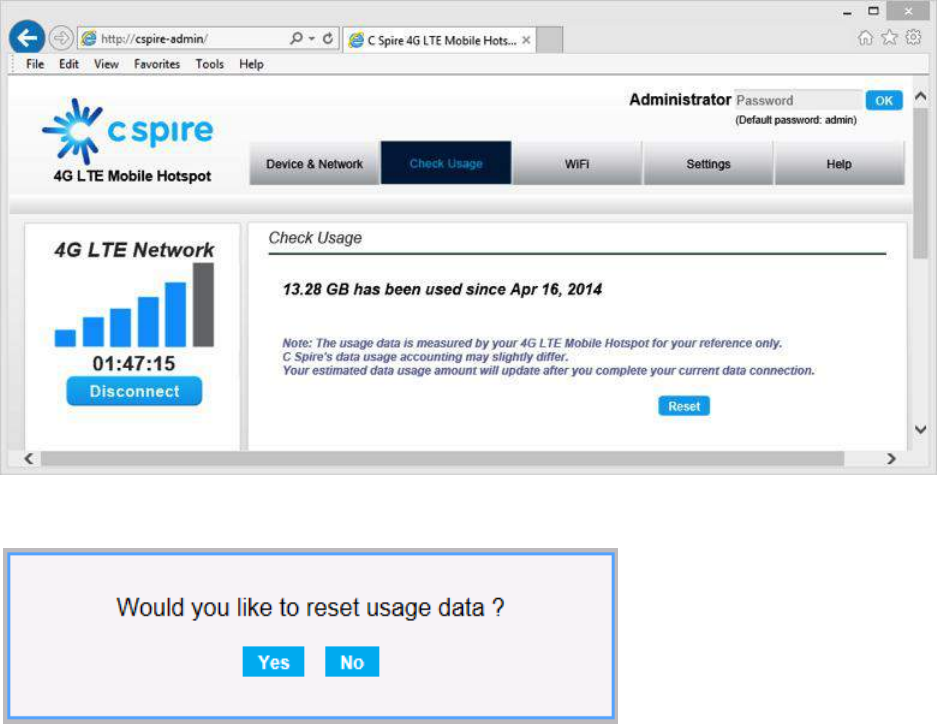
Check Usage Menu
The Check Usage menu allows you to review your usage history online. Please ensure that you have an
Internet connection. Selecting the Check Usage menu displays your wireless data usage to date.
To reset usage data, click the reset button.
Upon clicking Yes, the usage data will be reset to 0 and the date will be set to the current date.
21
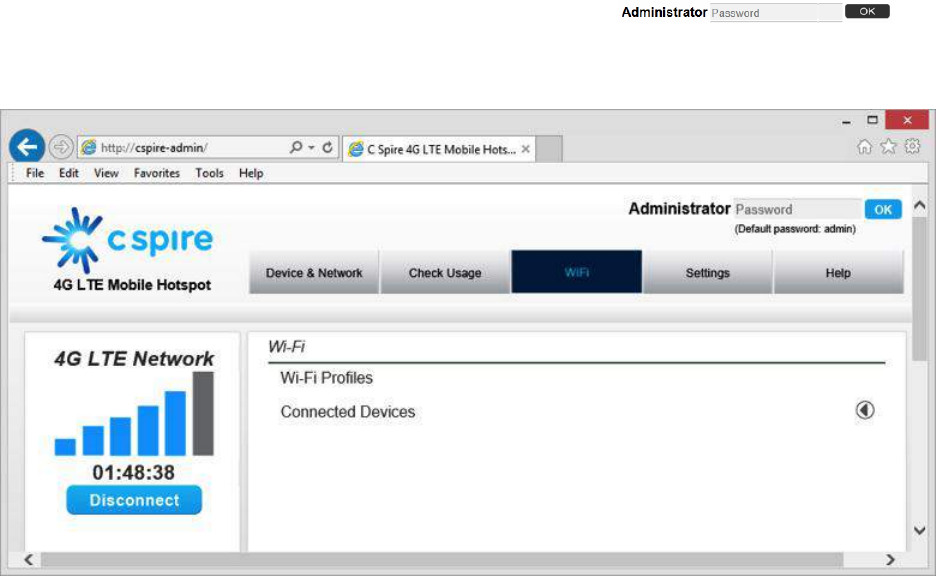
Wi-Fi Menu
The Wi-Fi menu allows you to review and change your 4G LTE Mobile Hotspot Wi-Fi tethering
configuration. In order to see the Wi-Fi menu, login as Administrator .
The default administrator password is ―admin‖. You can change the default Administrator password from
the Setting menu.
Wi-Fi Profile
When you open the Wi-Fi Profile menu, the following choices are available:
22
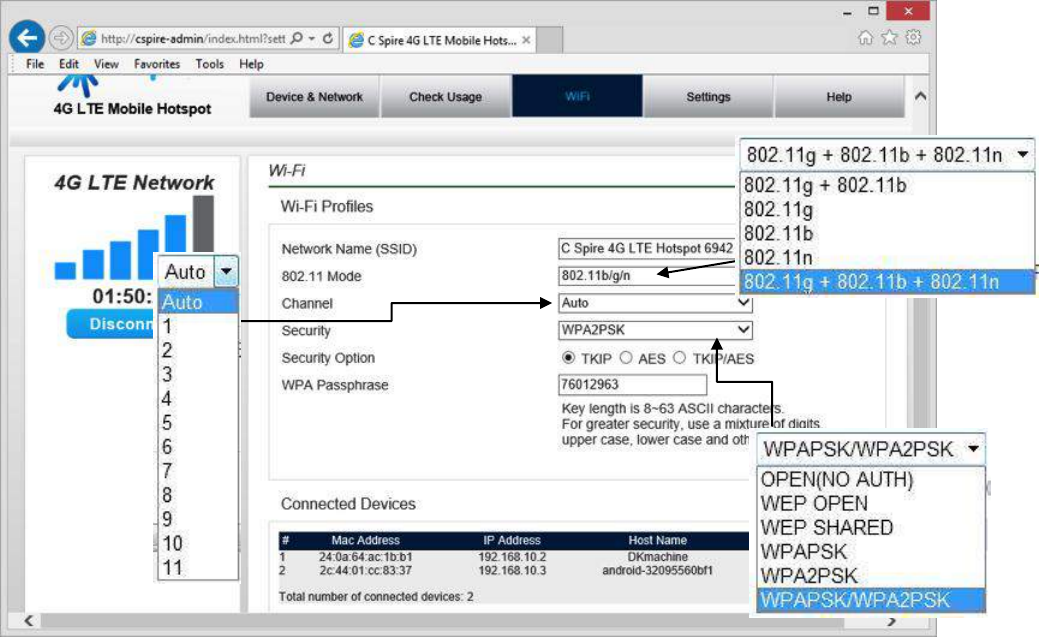
To modify the Wi-Fi Profile:
1. Enter new Network Name (SSID). The default SSID is C Spire 4G LTE Mobile Hotspot XXXX,
where XXXX are the last 4 digits of the Wi-Fi MAC ID of the device.
2. Select the proper 802.11 mode. The default mode is 802.11b/g/n.
3. Select the Wi-Fi channel number you want to use. The default setting is ―Auto‖.
4. Enter your Wi-Fi security level. The default setting is Open (NO AUTH)
5. Enter your Wi-Fi password. The Wi-Fi password requires at least 8 characters. For greater security,
use a mixture of digits, upper case, lower case and other symbols.
6. Click Save.
Connected Devices
When you open the ―Connected Devices‖ you can see the devices currently connected to your 4G LTE
Mobile Hotspot through the Wi-Fi connection. The Connected device section has the following;
23
MAC Address – Media Access Controller or physical address of your 4G LTE Mobile Hotspot
IP Address – IP address assigned to the device by your 4G LTE Mobile Hotspot
Hostname – Network name for the connected device. (if available)
Date/Time – Date/time your connected device was detected by your 4G LTE Mobile Hotspot..
Click Refresh button to renew the connected devices list.
24
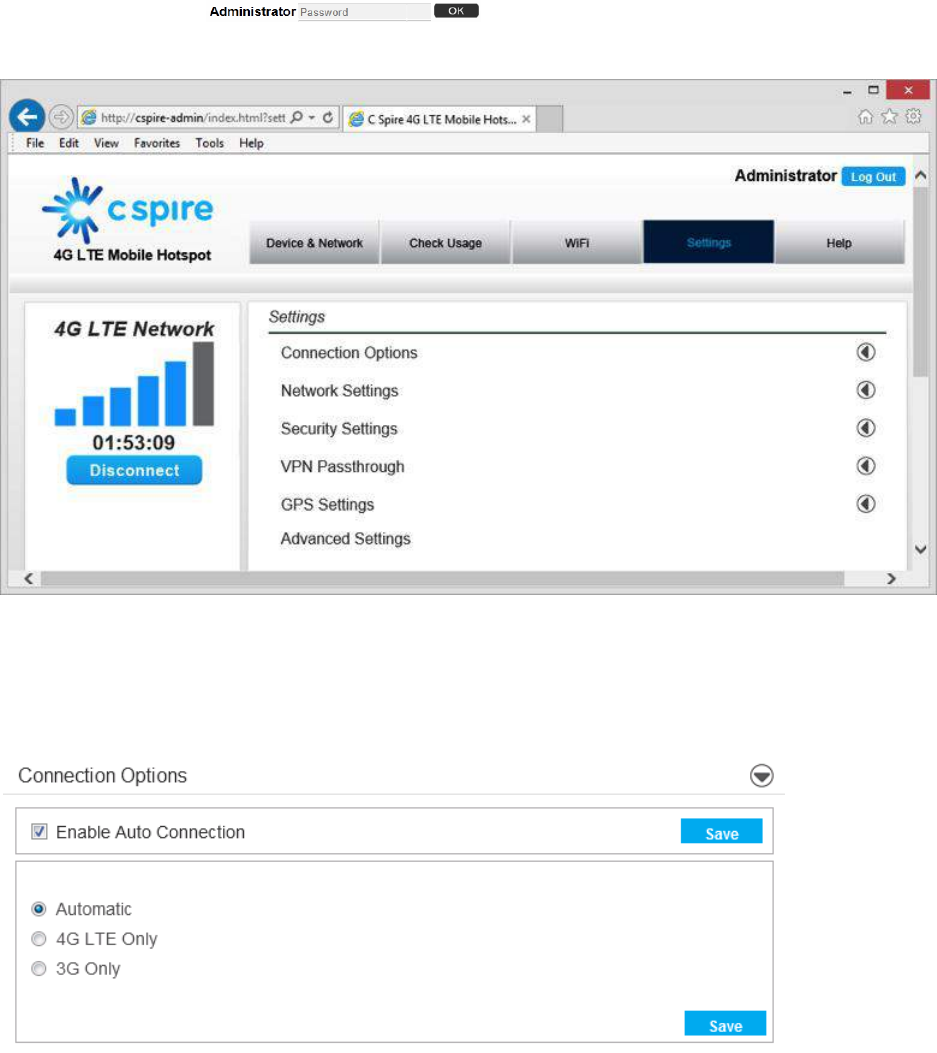
Settings Menu
The Settings menu allows you to set various setting options including Connection Options, Network
Setting, Security Settings, VPN Passthrough, and Advanced Settings. In order to see all settings, you must
login as Administrator . The default Administrator password is ―admin‖.
You can change the default Administrator password from the Advanced Setting menu.
Connection Options
When you open the Connection Options menu, the following choices are available:
Enable / Disable Auto Connection
1. Check or uncheck the Enable Auto Connection.
25
2. Click Save.
Note: If you click Connect button under the signal strength bars, Enable Auto Connection will be
cleared automatically regardless of whether Enable Auto Connection was checked before
rebooting the device.
Change Your Connection Options
1. Select a connection option.
2. Click Save.
Note: If the device is not activated, the options will be unavailable (grayed out).
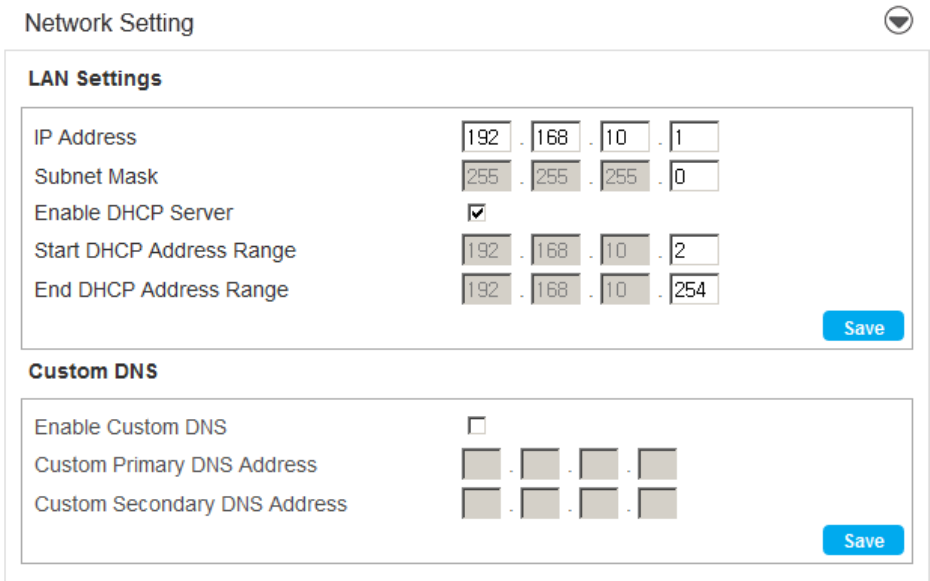
Network Setting
When you open the Network Setting menu, the following choices are available:
LAN Setting
● IP Address – IP Address that your PC is assigned by your device
● Subnet Mask – Subnet Mask that your PC is assigned by your device
● Enable DHCP Server – Enable this option to automatically assign IP address to other Wi-Fi
connected devices.
26
● Start DHCP Address – Your 4G LTE Mobile Hotspot will assign IP address beginning with this
IP address
● End DHCP Address Range – Your 4G LTE Mobile Hotspot will assign IP address ending with
this IP address.
Customer DNS
● Custom DNS - allows you to use a customized DNS rather than the one assigned by your
network.
To set the custom DNS:
1. Select Enable Custom DNS.
2. Enter your Custom DNS IP address.
3. Click Save.
Important: Changing LAN settings can result in connection malfunction. Please refer to C Spire’s
recommendation.

27
Security Setting
When you open the Security Setting menu, the following choices are available:
Port Forwarding
● IP Address – Enter IP address to forward
● Protocol– Both / UDP / TCP
● External Port – Enter external port range
● Internal Port – Enter internal port range
● Comment – Enter comments for the port forwarding setting
Firewall
● Protocol– Select protocol to use for Firewall. ICMP/ TCP / UDP / ICMPv6 / TCP UDP
● Start Port – Enter Start Port
● End Port – Enter End Port
● Comment – Enter comments for the firewall setting
● Custom DNS - Allows you to use a customized DNS rather than the one assigned by your
network.
28
DMZ
● Enable DMZ – check to enable DMZ feature
● DMZ Address – enter DMZ address
● Click Save.
Important: Changing security settings can result in connection malfunction. Please refer to C Spire’s
recommendation.
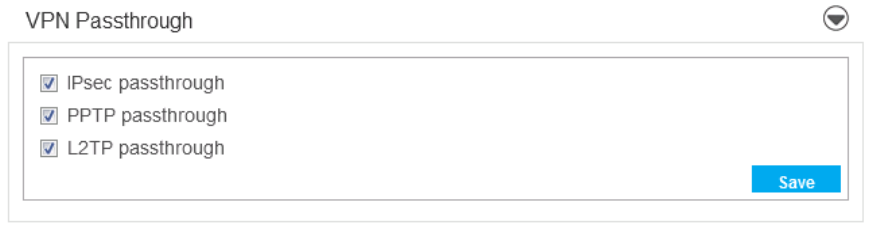
VPN Passthrough
When you open the VPN Passthrough, the following choices are available:
● IPSec Passthrough – Enable IPSec Passthrough
● PPTP Passthrough – Enable PPTP Passthrough
● L2TP Passthrough – Enable L2TP Passthrough
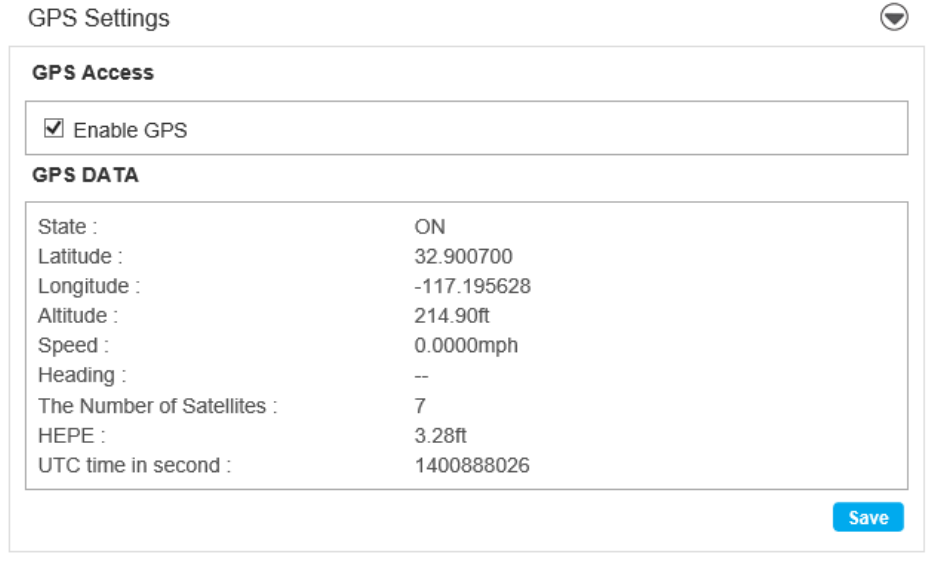
GPS Settings
When you open the GPS Settings, the following choices are available:
29
GPS Access
1. Check or uncheck the Enable GPS – check to enable DMZ feature
2. Click Save.
GPS Data
● State – GPS On/Off state
● Latitude – Latitude position information (Decimal degrees)
● Altitude – Altitude position information (Decimal degrees)
● Speed – Speed (meters/sec)
● Heading – Direction information (Decimal degrees)
● The number of Satellites – The Number of Satellites the GPS receiver having signal from
● HEPE – Horizontal Estimated Position Error
● UTC time in second – UTC time in second
30
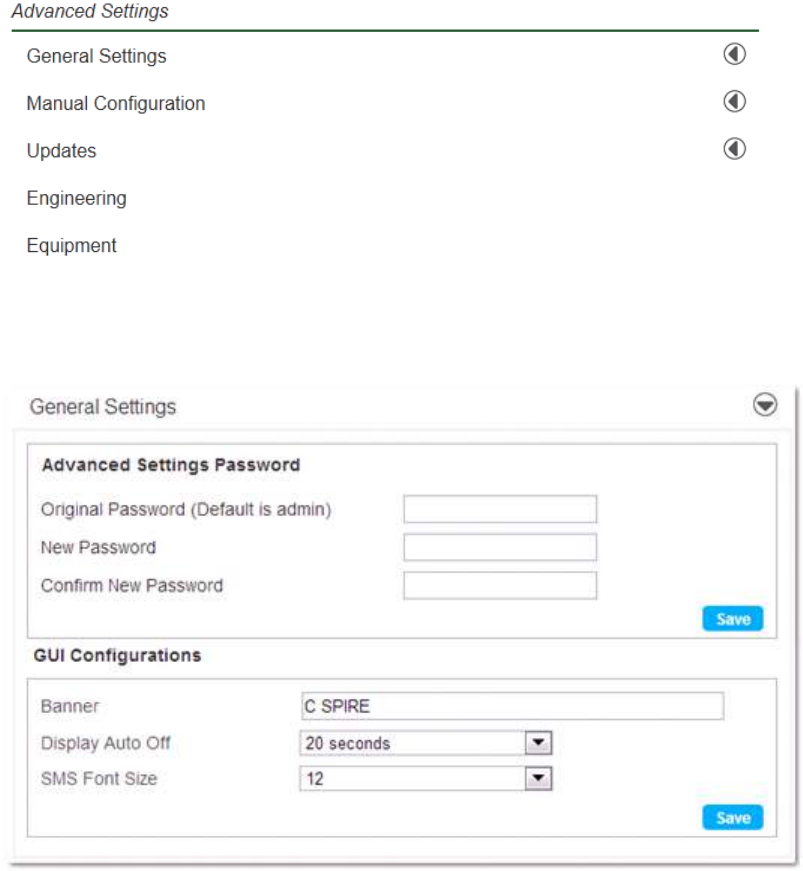
Advanced Settings
When you open the Advanced Settings, the following choices are available:
General Settings
Selecting the General Settings tab displays the following options:
Advanced Settings Password
The Advanced Settings Password section allows you to change the Administrator login password.
To change your password:
1. Enter the original password in the Original Password field. (factory default password is admin)
2. Enter your new password in the New Password field.
31
3. Re-enter your new password in the Confirm New Password field.
4. Click Save.
GUI configurations
The GUI configurations section allows you to change the GUI displayed in the LCD window of your 4G
LTE Mobile Hotspot.
● Banner - The Banner Settings allows you to change the banner displayed in the LCD window of
the device.
To change your banner:
1. Click the current banner window and type the new text to display on your 4G LTE Mobile Hotspot
LCD display.
2. Click the Save button.
Note: Four characters (<, >, |, &) cannot be used in the banner.
● Display auto off – The display auto off setting allows you to change the automatic turn-off time
of the LCD window of your 4G LTE Mobile Hotspot.
● SMS font size – The SMS font size allows you to change the font size of SMS message
notifications.
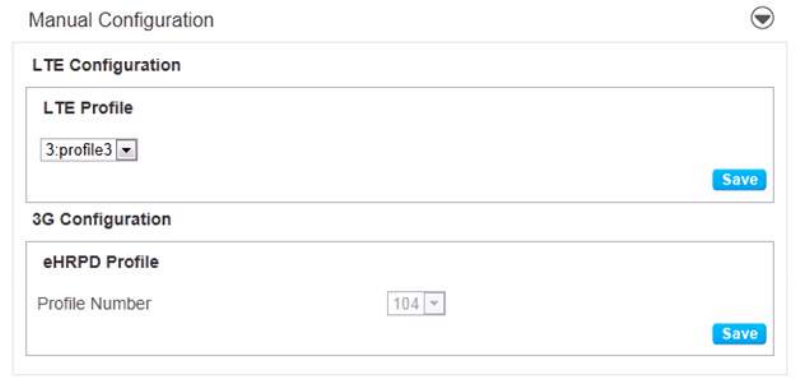
Manual Configuration
Selecting the Manual Configuration tab displays the following options:
Manual Configuration consists of two submenus (LTE Configuration / 3G Configuration).
32
LTE Configuration
The LTE Configuration box allows you to change the 4G LTE profile.
To modify the LTE profile:
1. Select proper profile in the list.
2. Click Save.
Important: Changing LTE profile can result in a 4G LTE connection malfunction. Please refer to C
Spire’s recommendation.
3G Configuration
The 3G Configuration box allows you to modify the 3G device configuration.
To modify the 3G configuration:
3. Select Profile Number
4. Click Save.
Important: Changing 3G profile can result in a 3G connection malfunction. Please refer to C Spire’s
recommendation.
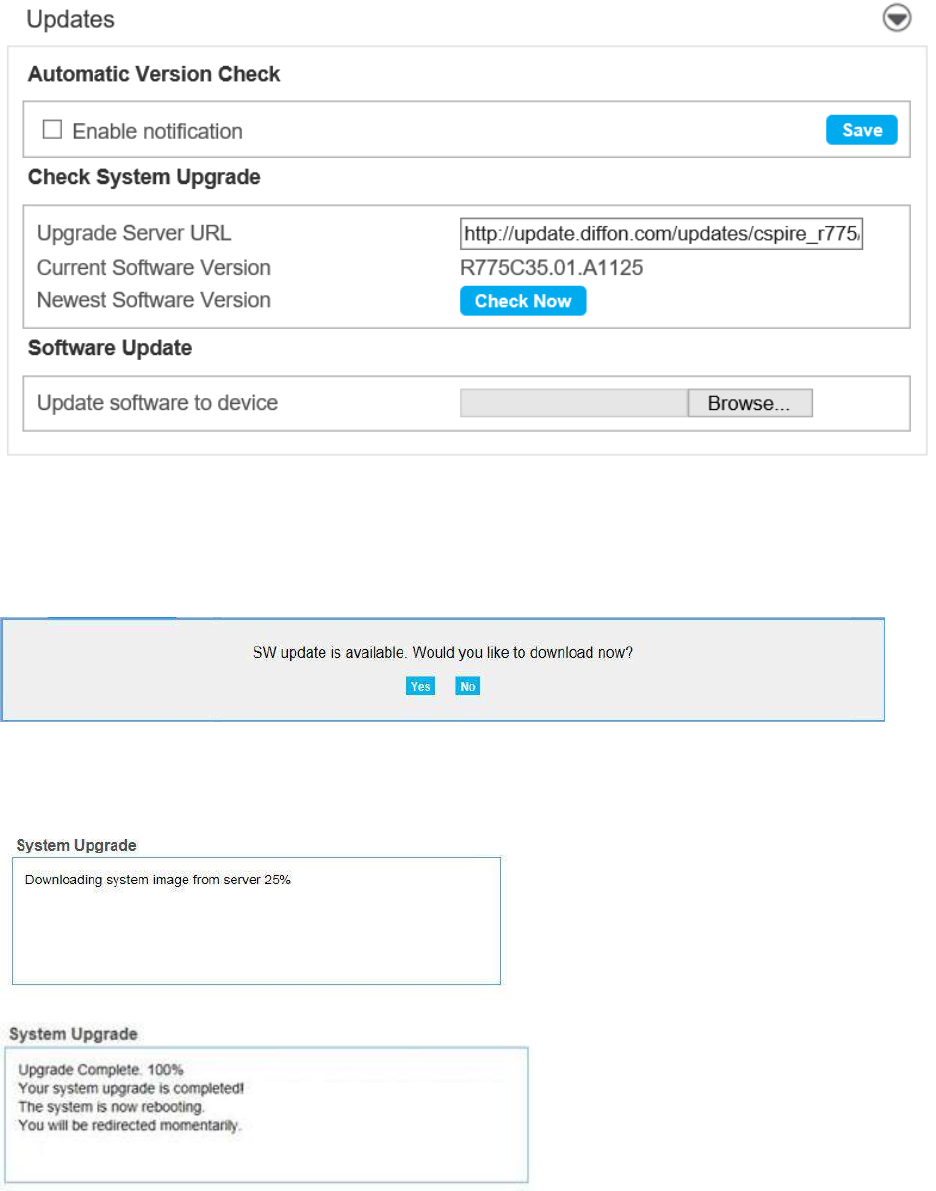
Updates
When you open the Updates menu, it displays the following options:
33
Automatic Version Check
If the box ―Enable notification‖ is checked, the Web User Interface will provide the pop up dialog
notifying that a new software (SW) update is available.
If you click Yes, downloading will start and automatically update the Web User Interface software (SW)
to the latest version.
34
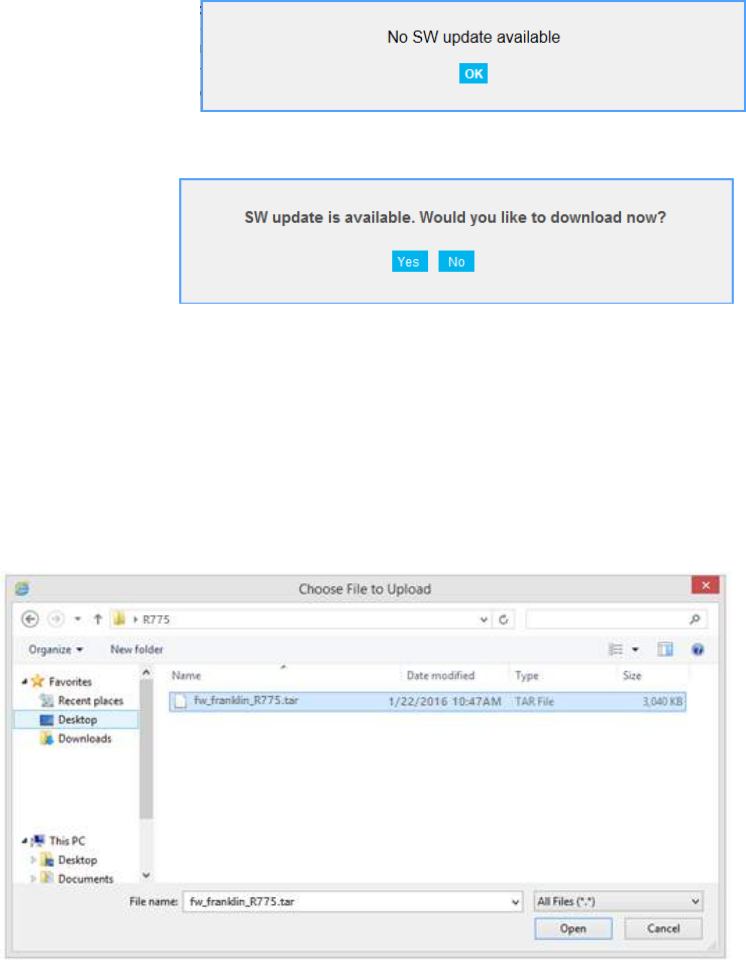
Check System Upgrade
The Check System Upgrade box reflects your current software version and allows you to upgrade the
Web browser interface as needed. To get the latest Web browser interface:
1. Click Check Now.
2. If the current version is the latest, you will see the following dialog: click OK.
If a newer version is available, you will see the following dialog:
3. Click Yes and select a folder your want to save the software (SW) update file in your computer.
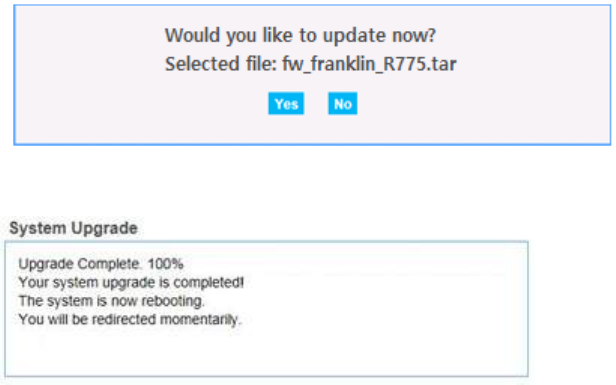
Software Update
To update:
1. Click Browse button and select the software (SW) update file you downloaded. Then, click Open.
2. You will see the following pop up dialog. Click Yes to update.
35
3. You will see the dialog showing the software update progress.
Important: The SW upgrade takes a few minutes. DO NOT unplug your 4G LTE Mobile Hotspot
before the browser refreshes the page automatically or if the refresh dialog is still open.
36
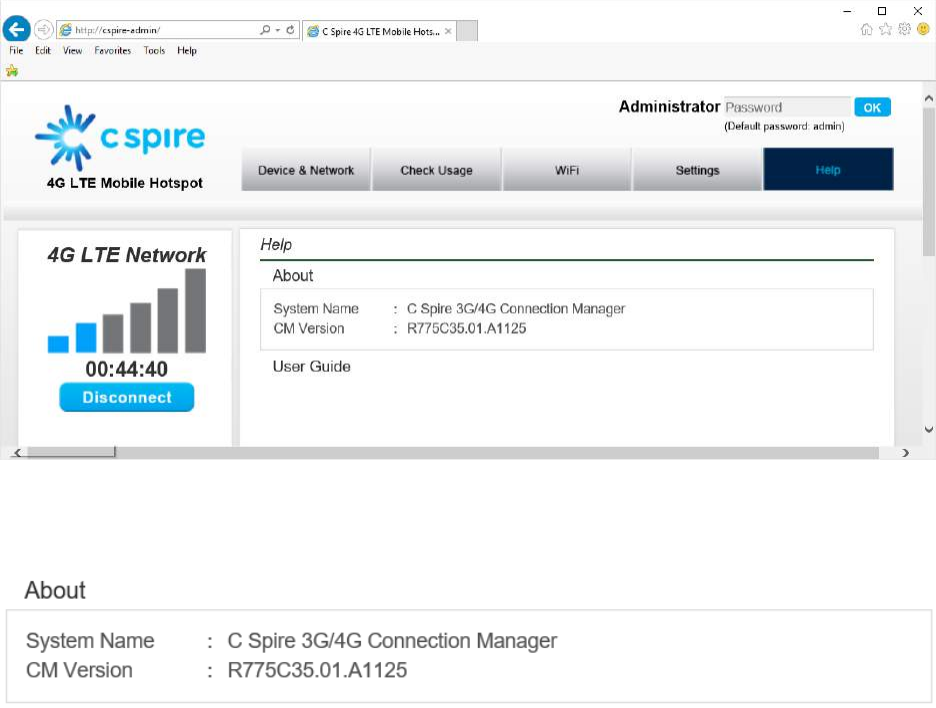
Help Menu
The Help menu allows you to view system information and the online user guide.
About
The About section displays the following information:
● System Name – current system name
● CM Version – current Web browser interface version
37
User Guide
Click on ―User Guide‖ to download the user guide.

38
Regulatory Information
WARRANTY
Manufacture’s Limited One-Year Warranty:
Franklin Wireless (the company) warrants to the original retail purchaser of this device, that should product or any part thereof,
during normal consumer usage conditions, be defective in material or workmanship that results in product failure within the first
twelve (12) month period from the date of purchase, such defects will be repaired or replaced (with new or refurbished) product
at the Company’s discretion, without charge for parts and labor directly related to the defect(s). This warranty extends to
consumers who purchase the product in the United States or Canada and it’s not transferable or assignable. This warranty does
not apply to:
(a) Product subject to abnormal use or conditions, accident, mishandling, neglect, unauthorized alteration, misuse, improper
installation or repair or improper storage;
(b) Products whose mechanical serial number or electronic serial number has been removed, altered, or defaced;
(c) Damage from exposure to moisture, humidity, excessive temperature or extreme environment conditions;
(d) Damage resulting from connection to, or use of any accessory or other product not approved or authorized by the company;
(e) Defects in appearance, cosmetic, decorative or structural items such as framing and non-operative parts;
(f) Product damaged from external causes such as fire, flooding, dirt, sand, weather conditions, battery leakage, blown fuse, theft
or improper usage of any electrical source.
The Company disclaims liability for removal or reinstallation of the product, for geographic coverage, for inadequate signal
reception by the antenna or for communications range or operation of the cellular system as a whole.
When sending your wireless device to Franklin Wireless’ authorized distributions for repair or service, please note that any
personal data or software stored on the device may be inadvertently erased or altered. Therefore, we strongly recommend you
make a back up copy of all data and software contained on your device before submitting it for repair or service. This includes all
contact lists, downloads (i.e. third-party software applications, games and graphics) and any other data added to your device.
Franklin Wireless is not responsible for and does not guarantee restoration of any third-party software, personal information or
memory data contained in, stored on, or integrated with any wireless device, whether under warranty or not, returned to Franklin
Wireless‟ authorized distributors for repair or service. To obtain repairs or replacement within the terms of this Warranty, the
product should be delivered with proof of Warranty coverage (e.g. dated bill of sale), the consumer’s return address, daytime
phone number and/or fax number and complete description of the problem, transportation prepaid, to the Company at the address
shown below or to the place of purchase for repair or replacement processing. In addition, for reference to an authorized
Warranty station in your area, please call (800)959-3558 in the United States.
The extent of the company’s liability under this warranty is limited to the repair or replacement provided above and, in no event,
shall the company’s liability exceed the purchase price paid by purchaser for the product.
Any implied warranties, including any implied warranty of merchant ability or fitness for a particular purpose, shall be limited to
the duration of this written warranty. Any action for breach of any warranty must be brought within a period of 18 months from
date of original purchase, but in no case shall the company be liable for a special consequential or incidental damages for breach
of this or any other warranty, express or implied, whatsoever. The company shall not be liable for the delay in pending service
under this warranty or loss of use during the time the produce is being repaired or replaced. No person or representative is
authorized to assume for the Company any liability other than expressed herein in connection with the sale of this product. Some
states or provinces do not allow limitations on how long an implied warranty lasts on the exclusion or limitation of incidental or
consequential damage so the above limitation or exclusions may not apply to you. This Warranty gives you specific legal rights,
and you may also have other rights, which vary from state to state or province to province.
Franklin’s Authorized Service Center Address:
9707 Waples Street, Suite, San Diego, CA 92121, U.S.A.
39
SAR INFORMATION
THIS MODEL MODEM MEETS THE GOVERNMENT’S REQUIREMENTS FOR EXPOSURE TO RADIO WAVES.
Your wireless modem is a radio transmitter and receiver. It is designed and manufactured not to exceed the emission limits for
exposure to radiofrequency (RF) energy set by the Federal Communications Commission of the U.S. Government. These limits
are part of comprehensive guidelines and establish permitted levels of RF energy for the general population. The guidelines are
based on standards that were developed by independent scientific organizations through periodic and thorough evaluation of
scientific studies. The standards include a substantial safety margin designed to assure the safety of all persons, regardless of age
and health. The exposure standard for wireless mobile modem employs a unit of measurement known as the Specific Absorption
Rate, or SAR. The SAR limit set by the FCC is 1.6 W/kg. * Tests for SAR are conducted with the modem transmitting at its
highest certified power level in all tested frequency bands. Although the SAR is determined at the highest certified power level,
the actual SAR level of the modem while operating can be well below the maximum value. This is because the modem is
designed to operate at multiple power levels so as to use only the power required to reach the network. In general, the closer you
are to a wireless base station antenna, the lower the power output. Before a modem model is available for sale to the public, it
must be tested and certified to the FCC that it does not exceed the limit established by the government adopted requirement for
safe exposure. The tests are performed in positions and locations (e.g., at the ear and worn on the body) as required by the FCC
for each model. The highest SAR value for this model modem when tested for use near the body, as described in this user guide,
is 1.446 W/Kg. While there may be differences between the SAR levels of various modems and at various positions, they all
meet the government requirement for safe exposure. The FCC has granted an Equipment Authorization for this model modem
with all reported SAR levels evaluated as in compliance with the FCC RF exposure guidelines. SAR information on this model
modem is on file with the FCC and can be found under the Display Grant section of http://www.fcc.gov/oet/fccid after searching
on FCC ID: XHG-R775. Additional information on Specific Absorption Rates (SAR) can be found on the Cellular
Telecommunications Industry Association (CTIA) web-site at http://www.wow-com.com. * In the United States and Canada, the
SAR limit for mobile modems used by the public is 1.6 watts/kg (W/kg) averaged over one gram of tissue. The standard
incorporates a substantial margin of safety to give additional protection for the public and to account for any variations in
measurements.
SAFETY INFORMATION
SAFETY INFORMATION FOR FIXED WIRELESS TERMINALS POTENTIALLY EXPLOSIVE ATMOSPHERES
Turn your modem OFF when in any area with a potentially explosive atmosphere and obey all signs and instructions. Sparks in
such areas could cause an explosion or fire resulting in bodily injury or even death.
INTERFERENCE TO MEDICAL DIVICES
Certain electronic equipment may be shielded against RF signal from your wireless modem (pacemakers, Hearing Aids, and so
on). Turn your modem OFF in health care facilities when any regulations posted in these areas instruct you to do so. RF signals
may affect improperly installed or inadequately shielded electronic system in motor vehicles.
EXPOSURE TO RF ENERGY
Use only the supplied or an approved replacement antenna. Do not touch the antenna unnecessarily when the modem is in use.
Do not move the antenna close to, or couching any exposed part of the body when making a call.
NEAR BODY OPERATION
This device was tested for typical near body operations with the back of the modem kept 0.5 cm from the body. To maintain
compliance with FCC RF exposure requirements, it must have a minimum distance including the antenna of 0.5 cm from the
body during normal operation
United States of America
U.S. FEDERAL COMMUNICATIONS COMMISSION RADIO FREQUENCY INTERFERENCE STATEMENT
INFORMATION TO THE USER
NOTE: This equipment has been tested and found to comply with the limits for a Class B digital device pursuant to Part 15 of the
FCC Rules. These limits are designed to provide reasonable protection against harmful Interference in a residential installation.
This equipment generates, uses, and can radiate radio frequency energy and, if Not installed and used in accordance with the
instructions, may cause harmful Interference to radio communications. However, there is no guarantee that interference will not
occur in a particular Installation. If this equipment does cause harmful interference to radio or television reception, which can be

40
determined by turning the equipment off and on, the user is encouraged to try to correct the interference by one or more of the
following measures: Reorient or relocate the receiving antenna. Increase the separation between the equipment and receiver.
Connect the equipment into an outlet of a circuit different from that to which the receiver is connected. Consult the dealer or an
experienced radio/TV technician for assistance. Changes or modification not expressly approved by the party responsible for
Compliance could void the user’s authority to operate the equipment. Connecting of peripherals requires the use of grounded
shielded signal cables.
FCC Compliance Information
This device complies with Part 15 of FCC Rules. Operation is subject to the following two conditions:
(1) This device may not cause harmful interference, and
(2) This device must accept any interference received, including interference that may cause undesired operation.
RF Exposure Statement
FCC ID: XHG-R775
Warning: Exposure to Radio Frequency Radiation The radiated output power of this device is
far below the FCC radio frequency exposure limits. Nevertheless, the device should be used
in such a manner that the potential for human contact during normal operation is minimized.
In order to avoid the possibility of exceeding the FCC radio frequency exposure limits, human
proximity to the antenna should not be less than 20 cm during normal operation as a plug-in-
wall-adaptor access point as 3G/4G and WiFi transmit simultaneously in this configuration.

41
Appendix 1: Glossary
1X: Internet at lower speed than EV-DO. Technical max speed is 153kbps.
3G: Third generation, referring to the 3rd generation wireless cellular technology.
4G: Fourth Generation, referring to the 4th generation of wireless cellular technology.
802.11 b/g/n: A set of WLAN communication standards.
bps: Bits per second. The rate of data speed.
Broadband: High-capacity transmission channel with a wider bandwidth than
conventional modem lines.
CDMA: Code Division Multiple Access.
DHCP: Dynamic Host Configuration Protocol. Software found in servers and routers that
automatically assigns temporary IP addresses to clients logging into an IP network.
DHCP Server: A server or service with a server that assigns IP addresses.
DNS: Domain Name System. A system for converting host names and domain names into IP
addresses on the Internet or on local networks that use the TCP/IP protocol.
EV-DO Rev 0: CDMA EV-DO Rev. 0 is a wireless technology with higher data rates and higher
system capacity. Rev 0 provides access to mobile devices with forward link speeds of up to 2.4 Mbps,
and reverse link speeds up to 152 kbps.
EV-DO Rev A: CDMA EV-DO Rev. A is a wireless technology with higher data rates and higher
system capacity. Rev A provides access to mobile devices with forward link speed of up to 3.1 Mbps,
and reverse link speeds up to 1.8 Mbps.
Firmware: A computer program embedded in an electronic device.
Hotspot: A Wi-Fi (802.11) access point or the area covered by an access point.
HTTP: Hypertext Transfer Protocol. An application-level protocol for accessing the World Wide
Web over the Internet.
IEEE: Institute of Electrical and Electronics Engineers. An international technical / professional
society that promotes standardization in technical disciplines.
IMEI: International Mobile Equipment Identity. Used in LTE networks to identify the device.
IP address: Internet Protocol address. The address of a device attached to an IP network (TCP/IP
network).
ISP: Internet Service Provider.
Kbps: Kilobits per second. The rate of data flow.
42
LAN: Local Area Network. A type of network that lets a group of computers, all in close proximity
(such as inside an office building), communicate with one another. It does not use common carrier
circuits though it can have gateways or bridges to other public or private networks.
MAC Address: Media Access Control. A number that uniquely identifies each network hardware
device. MAC addresses are 12-digit hexadecimal numbers. This is also known as the physical or
hardware address.
Mbps: Megabits per second. The rate of data flow.
MSID: Mobile Station Identifier. A number for a mobile phone that identifies that phone to the
network. These numbers are carrier specific.
Network Technology: The technology on which a particular network provider’s system is built; such
as CDMA or EVDO.
PRL: Preferred Roaming List. A list that your wireless phone or device uses to determine which
networks to connect with when you are roaming. (Network operator specific)
Protocol: A standard that enables connection, communication, and data transfer between computing
endpoints.
Router: A device that directs traffic from one network to another.
SSID: Service Set Identifier. The name assigned to a Wi-Fi network.
TCP/IP: Transmission Control Protocol/Internet Protocol. The set of communications protocols used
for the Internet and other similar networks.
USB: Universal Serial Bus. A connection type for computing device peripherals such as a printer,
mobile modem, etc. USB connectors may be used for data transfer or charging.
USIM: Universal Subscriber Identification Module. Found in LTE and GSM network technology,
the USIM is a card containing identification information for the subscriber and their account. The
USIM card can be moved to different devices
WWAN — Wireless Wide Area Network. A public network that extends beyond architectural,
geographical, or political boundaries (unlike a LAN, which is usually a private network located
within a room, building, or other limited area).
WEP: Wired Equivalent Privacy. An IEEE standard security protocol for 802.11 networks.
Superseded by WPA and WPA2.
Wi-Fi: Wireless Fidelity. Any system that uses the 802.11 standard developed and released in 1997
by the IEEE.
Wi-Fi Client: A wireless device that connects to the Internet via Wi-Fi.
WPA/WPA2: Wi-Fi Protected Access. A security protocol for wireless 802.11 networks from the
Wi-Fi Alliance.