Franklin Technology R910 Mobile Hotspot User Manual
Franklin Technology Inc. Mobile Hotspot
User Manual
R910 Mobile Hotspot
User Guide
[UG template version 15b_mbb
[Version 2.2]
[Sprint_Franklin_Wireless_R910_english_121715_v2.2]

TOC i
Table of Contents
Introduction.................................................................................................................................................... 1
Before You Begin .................................................................................................................................. 1
Compatible Operating Systems (OS).................................................................................................... 2
Package Contents ................................................................................................................................. 2
SSID and Security Key ......................................................................................................................... 3
Additional Information ........................................................................................................................... 3
Get Started .................................................................................................................................................... 4
Parts and Functions .............................................................................................................................. 4
Home Screen ........................................................................................................................................ 4
Data Transfer Volume and Transfer Speed .......................................................................................... 5
SIM Card ............................................................................................................................................... 6
Battery Use ........................................................................................................................................... 7
Turn Your Device On and Off ............................................................................................................. 10
Connect with Wi-Fi (WLAN) ........................................................................................................................ 11
Wi-Fi (WLAN) Overview ...................................................................................................................... 11
Activate Wi-Fi (WLAN) Function ......................................................................................................... 11
Connect Windows PCs with Wi-Fi ...................................................................................................... 11
Connect Mac Computers with Wi-Fi ................................................................................................... 13
Connect iOS devices (iPhone/iPod Touch/iPad) ................................................................................ 15
Connect an Android™ Device ............................................................................................................. 18
Hotspot Settings .......................................................................................................................................... 22
Launch the Web UI page .................................................................................................................... 22
Home ................................................................................................................................................... 23
Connected Devices ............................................................................................................................. 24
Settings ............................................................................................................................................... 27
About ................................................................................................................................................... 45
Support Tab ........................................................................................................................................ 46
Appendix ..................................................................................................................................................... 47
Troubleshooting .................................................................................................................................. 47
Specifications ...................................................................................................................................... 50
Warranty and Service ........................................................................................................................ 52
Warranty .................................................................................................................................................. 52
TOC ii
Services ................................................................................................................................................... 53
Customer Service .............................................................................................................................. 53
Trademarks and Copyrights ................................................................................................................ 53
Safety and Notices ...................................................................................................................................... 54
Safety Precautions .............................................................................................................................. 54
Important Notice ...................................................................................................................................... 54
Safety and Hazards ................................................................................................................................. 54
Proper Battery Use and Disposal ............................................................................................................ 55
FCC Compliance ..................................................................................................................................... 55
RF Exposure Information and Specific Absorption Rate (SAR) Information ...................................... 56
Index ............................................................................................................................................................ 57

錯誤! 使用 [常用] 索引標籤將 Heading 1 套用到您想要在此處顯示的文字。 1
Introduction
The following topics describe the basics of using this guide and your new mobile broadband device.
Before You Begin
Thank you for purchasing your new R910 Mobile Hotspot!
The following topics explain how best to use this guide to get the most out of your mobile broadband device.
Before Using Your Device
Read Safety and Notices thoroughly for proper usage.
Accessible services may be limited by subscription contract conditions.
Guide Usage Notes
Note that most descriptions in this guide are based on your device's default settings at the time of purchase.
Screenshots and Key Labels
Screenshots and Key labels are provided for reference only. Actual windows, menus, etc. may differ in
appearance.
Other Notations
In the user guide, the mobile broadband device may be referred to either as "mobile broadband device,"
"hotspot," "device," or "R910."

錯誤! 使用 [常用] 索引標籤將 Heading 1 套用到您想要在此處顯示的文字。 2
Compatible Operating Systems (OS)
The table below outlines the compatible operating systems (OS) for your device. Use outside these
environments may affect performance. Additional factors (hardware, connected peripherals, installed
applications, etc.) may also affect performance.
● For computer support, OS version upgrade information, etc., see the corresponding manufacturer's
product support documentation.
● The information for operating system (compatible OS) listed below is the current information for your
device sold as of Feb.2016. Check Compatible Operating Systems for the latest information in
regards to operating environment.
Item
Description
Compatible operating systems (OS)
Windows 7, 8, 10
MacOS 10.5 or later
Android 2.1 or later
Compatible browsers
Chrome 36.0 or later
Internet Explorer 8.0 or later
Firefox 3.1 or later
Safari 5.0 or later
Package Contents
See below for details on everything you will find in the box for your R910.
● R910 Mobile Hotspot (Battery and battery cover)
● AC Charger with micro USB
● Two Get Started Guide(English version, Spanish version)
錯誤! 使用 [常用] 索引標籤將 Heading 1 套用到您想要在此處顯示的文字。 3
SSID and Security Key
Before connecting Wi-Fi devices to your R910, you will need to confirm the WiFi Name and WiFi Password.
● Once your device is completely powered on, shortly press the menu button (power button) 1 time for
the WiFi Name and twice to obtain WiFi Password specific to your device (Note: when the device
display is off, the first press wakes up the display.)
You will see the WiFi Name (R910a-XXXXXX) and WiFi Password.
Additional Information
The following list describes additional information useful to know before you begin using your R910.
● Your mobile broadband device accommodates software updates. Always use the latest software.
● Note that connection speeds may drop or connections may be disabled depending on line traffic or
connection environments.
錯誤! 使用 [常用] 索引標籤將 Heading 1 套用到您想要在此處顯示的文字。 4
Get Started
The following topics give you all the information you need to set up your device and wireless service the first
time.
Parts and Functions
Learn your device's primary parts and functions.
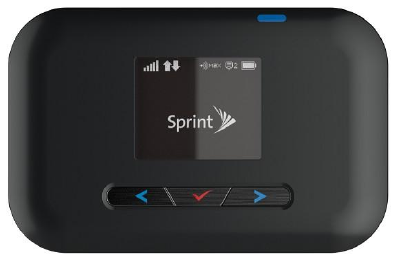
Device Layout
The following illustration outlines your device's primary external features and buttons.
To be updated.
Part
Description
Display
View device status and information
SIM card slot
Install the SIM card.
AC Charging micro USB port
Connect the micro USB cable for charging.
Battery cover
Remove the battery cover to remove or insert the battery or SIM card.
Settings Reset button
Long ress to reset your device to its default settings.
Power (Menu) button
Long press to toggle power on or off. Short press to navigate device
information
Home Screen
The following topics describe the details of your device's display layout, icons, data usage and information.
Home Screen Layout
Explore your device's home screen layout.
錯誤! 使用 [常用] 索引標籤將 Heading 1 套用到您想要在此處顯示的文字。 5
To be updated [Image]
Part
Description
Status bar
Displays status indicators including connection status, signal strength,
devices connected, battery level, and more.
Status Bar Icons
The home screen's status bar may feature the following icons, depending on current status.
Icon
Description
Mobile networks connected
Service signal strength. The more bars, the better service signal received
Out of service area
Appears when roaming
The number of connected WLAN devices
Battery full
Battery low
No battery. Battery icon blinking (charging required)
Invalid SIM
No SIM
SIM Lock
Data Transfer Volume and Transfer Speed
Wireless Mode
Maximum Downlink Speed
Typical Downlink Speed
4G LTE
150 Mbps
50 Mbps
錯誤! 使用 [常用] 索引標籤將 Heading 1 套用到您想要在此處顯示的文字。 6
Note: Actual speeds depend on several factors, including network conditions.
SIM Card
The SIM card is an IC card containing your device's phone number and other customer information.
Note: Your device's SIM card is pre-installed.
Handling a SIM Card
Keep the following in mind when handling a SIM card.
● Customer is responsible for any damage caused by inserting the SIM card in another-brand IC card
reader, etc. The company is not responsible in such case.
● Always keep the IC chip clean.
● Wipe clean with a dry, soft cloth.
● Avoid applying labels. May damage the SIM card.
● See instructions included with the SIM card for handling.
● The SIM card is the property of the company.
● The SIM card is replaceable (at cost) in case of loss/damage.
● Return the SIM card to the company when cancelling subscription.
● Returned SIM cards are recycled for environmental purposes.
● Note that SIM card specifications and performance may change without notice.
● It is recommended that you keep a separate copy of information that is stored on the SIM card. The
company is not responsible for damages from stored information that is lost.
● Always follow emergency procedures to suspend service if your SIM card or device (SIM card
inserted) is lost or stolen. For details, contact Customer Service.
● Always power off the mobile broadband device before inserting or removing the SIM card.

錯誤! 使用 [常用] 索引標籤將 Heading 1 套用到您想要在此處顯示的文字。 7
Installing / removing a SIM Card
Follow these instructions to insert or remove a SIM card. Remember to power off your device before inserting
or removing a SIM card.
Note: Your device's SIM card is preinstalled. These instructions are for reference only.
1. Press and hold the Power key to turn off the device before inserting or removing the SIM card.
To be updated [Image]
2. Remove the battery cover.
To be updated [Image]
3. Open the SIM card cover.
To be updated [Image]
4. Insert the SIM card gently with gold IC chip facing downward
To be updated [Image]
5. Remove the SIM card by gently pressing down and sliding outwards.
To be updated [Image]
6. Close the SIM card cover and insert the battery.
To be updated [Image]
Align the contacts of the battery with the contacts in the device.
7. Attach the battery cover.
To be updated [Image]
Battery Use
The following topics explain how to insert and remove your device's battery.
Battery Cautions
Storage: Avoid storing or leaving the battery with no charge remaining. Saved information and settings
may become lost or changed, or battery may become unusable. Charge once every six months before
storing or leaving unused for a long period.

錯誤! 使用 [常用] 索引標籤將 Heading 1 套用到您想要在此處顯示的文字。 8
Bulges: Depending on use, bulges may appear near end of battery life. This does not affect safety.
Replacing the Battery: The battery is a consumable item. It needs to be replaced if operating time
shortens noticeably. Purchase a new battery.
Cleaning: Clean soiled terminals between battery and device with a clean, dry cotton swab. Soiled
terminals can result in a poor connection and prevent charging, etc.
Inserting / Removing the Battery
Follow these instructions to insert your device's battery safely and properly.
1. Press and hold the Power key to turn off the device before inserting or removing the battery.
To be updated [Image]
2. Remove the battery cover.
To be updated [Image]
3. Remove the battery / Insert the battery.
To be updated [Image]
4. Replace the battery cover.
To be updated [Image]
Charge the Battery
Follow these instructions to charge your device's battery using the included AC
adapter. Battery Charging Cautions
Charging Conditions: Under low temperatures charging performance decreases. Charge in
temperatures between 5°C – 35°C. Do not charge in places where there is high humidity. USB charging
may be unavailable depending on Wi-Fi router temperature.
Use Supplied Accessories: Always use the supplied AC adapter.
Precaution for Extended Use: Your device may become hot when used for a long time or while
charging, especially in high temperatures. Prolonged contact with skin may cause low-temperature burn
injuries.
The R910 and AC Adapter Becoming Warm or Hot: Your device and the AC adapter may become
warm while charging. This is not a malfunction. However, stop using them immediately if they become
extremely hot; this could indicate a malfunction.
錯誤! 使用 [常用] 索引標籤將 Heading 1 套用到您想要在此處顯示的文字。 9
Charge Using the AC Adapter
Use the supplied AC adapter.
1. Plug the AC adapter into an electrical outlet.
The indicator light on the power button illuminates red when charging starts. The light turns
green when the battery is fully charged. Fully charging a battery may take up to three hours.
2. After charging, disconnect the device from the charger.
Unplug the AC adapter from the outlet, and remove the micro USB connector from the device.

錯誤! 使用 [常用] 索引標籤將 Heading 1 套用到您想要在此處顯示的文字。 10
Turn Your Device On and Off
The instructions below explain how to turn your device on and off, or to restart your device if it cannot be
powered on and off using the Power button .
Turn Your Device On
■ Press and hold the Power button until the device displays "Welcome".
Turn Your Device Off
Press and hold the Power button until the device displays "Goodbye".
Restart Your Device
If your device will not turn on or off using the Power button, remove and re-insert the battery (see the
section "Inserting / Removing the Battery"), then press and hold the power button again.
Note: Restarting your device does not reset the device settings.

錯誤! 使用 [常用] 索引標籤將 Heading 1 套用到您想要在此處顯示的文字。 11
Connect with Wi-Fi (WLAN)
The following topics outline basic features and operations of your device's Wi-Fi (WLAN) connections,
including connecting with various OS and device types.
Wi-Fi (WLAN) Overview
Your device supports IEEE 802.11 b/g/n standards. Connect Wi-Fi devices (PC, game console, etc.) via Wi-
Fi for wireless data transfers.
Below are some basics of your device's Wi-Fi (WLAN) function.
Wi-Fi (WLAN) Information
● Advanced Settings: Change your devices Wi-Fi (WLAN) settings as required. See Wi-Fi Basic
Settings
● Simultaneous Connection: Use your device to connect up to 10 Wi-Fi devices simultaneously.
● Automatic Updates for Optimizing Wi-Fi Connection: When connected by Wi-Fi, connection
optimizing settings may be automatically received and updated.
Wi-Fi (WLAN) Usage Cautions
For added security, it is recommended that you change the default Wi-Fi network name (SSID) and Wi-Fi
password after setting up your device.
Wi-Fi (WLAN) Overview
● Your device supports IEEE 802.11 b/g/n standards. Connect Wi-Fi devices (PC, game console, etc.)
via Wi-Fi for wireless data transfers.
Activate Wi-Fi (WLAN) Function
Follow the instructions below to activate your device's Wi-Fi function and connect to the Internet via an
available 4G LTE connection. Your device searches for and makes a connection automatically upon
powering up. Use the Web UI to select a network.
Press and hold the Power button until the device displays “Welcome”.
Your device's Wi-Fi function activates and automatically connects to the Internet.
Connect Windows PCs with Wi-Fi
The following topics describe how to connect your device with various versions of Windows PCs via Wi-Fi.
Connect Windows PCs to your device with Wi-Fi.
錯誤! 使用 [常用] 索引標籤將 Heading 1 套用到您想要在此處顯示的文字。 12
1. Press and hold the Power button to power on your R910.
Your device's Wi-Fi function activates and automatically connects to the Internet.
2. Activate your PC's Wi-Fi function.
The operations depicted are based on Window 10.
For other Window versions, consult your PC's operation manual for details on activating Wi-Fi.
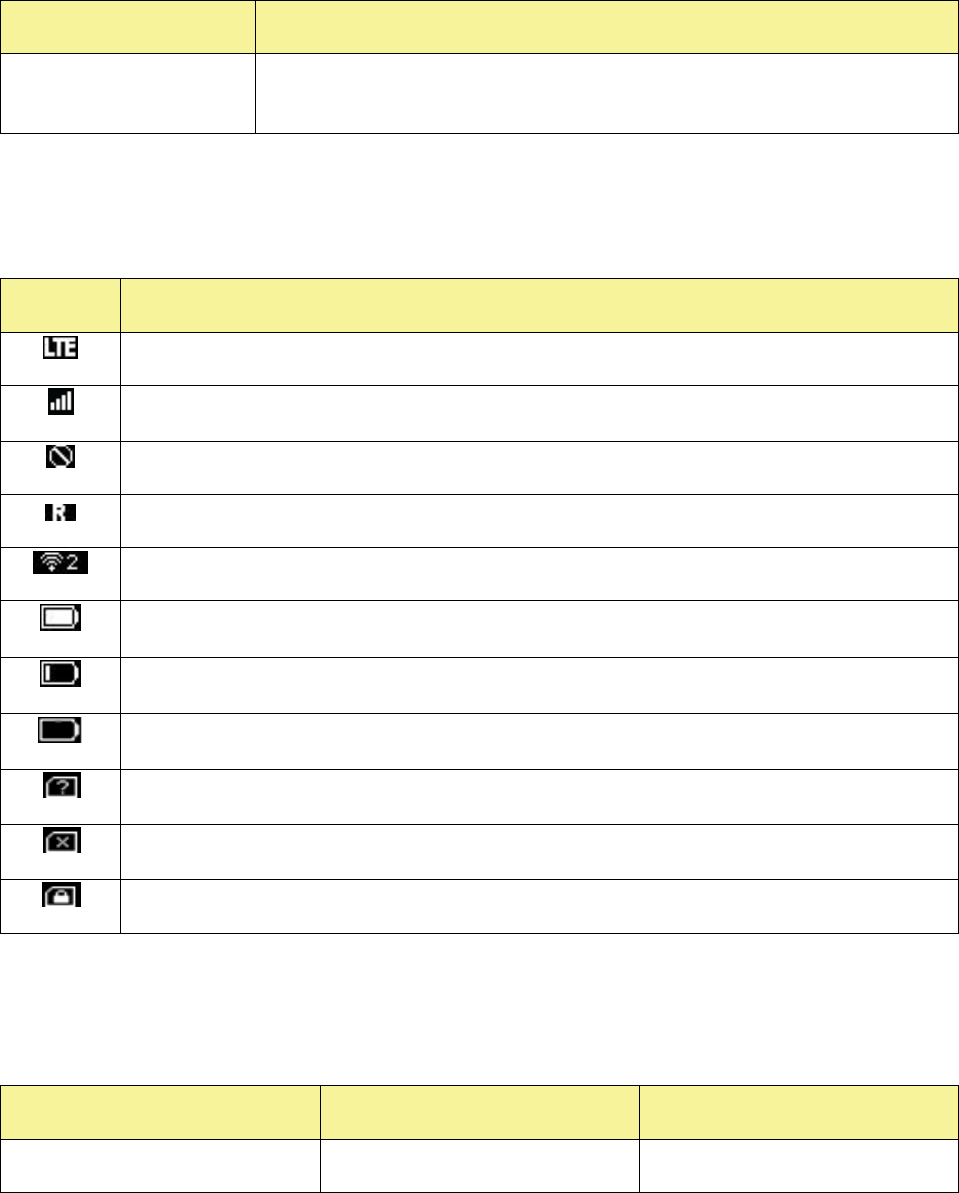
3. On your PC, move the cursor to the upper-right or lower-right corner and select WLAN icon
Select your device's Wi-Fi Name (SSID) from the list, and click Connect.
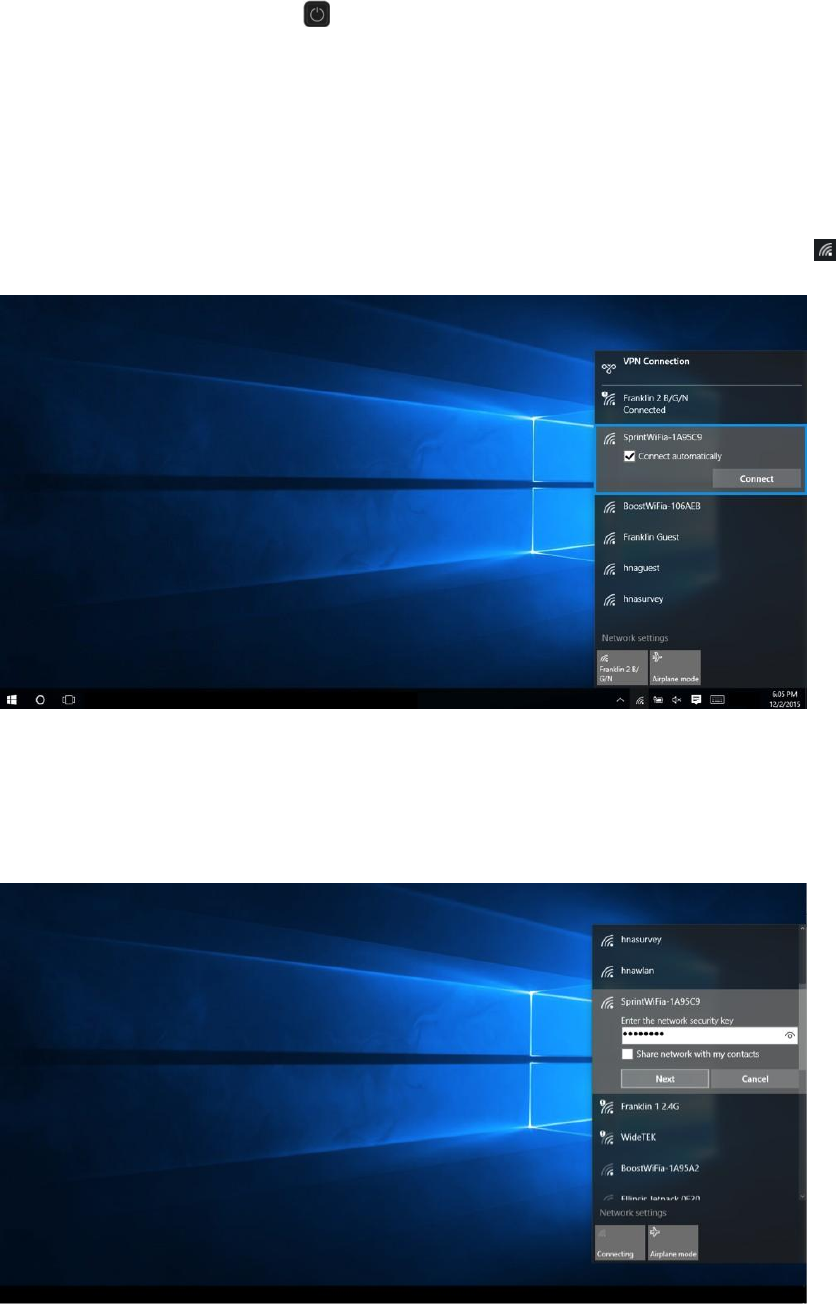
4. Enter the Wi-Fi password and then click Next.
錯誤! 使用 [常用] 索引標籤將 Heading 1 套用到您想要在此處顯示的文字。 13
The PC connects to your device. The connected status icon on your device will show an
additional device has been connected.
Connect Mac Computers with Wi-Fi
Follow the instructions below to connect a Mac computer to your device via Wi-Fi.
Note: The operations depicted are based on Mac OS X 10.10.5
1. Press and hold the Power button to power on your R910.
Your device's Wi-Fi function activates and automatically connects to the Internet.
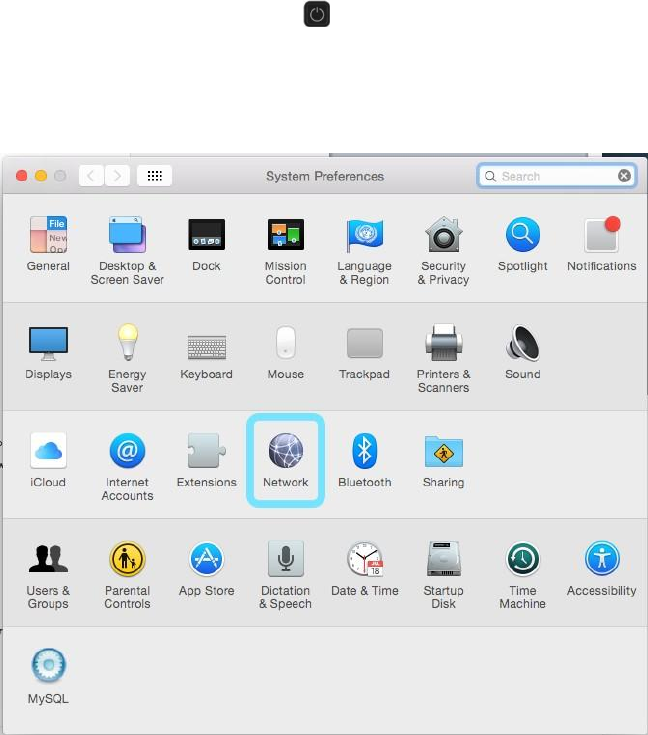
2. On your Mac, in the Apple menu, click System Preferences… > Network.

錯誤! 使用 [常用] 索引標籤將 Heading 1 套用到您想要在此處顯示的文字。 14
3. Click Wi-Fi > Turn Wi-Fi On.
Your computer's Wi-Fi function activates.
4. Select your R910's Wi-Fi Name (SSID) from the Network Name pulldown list.
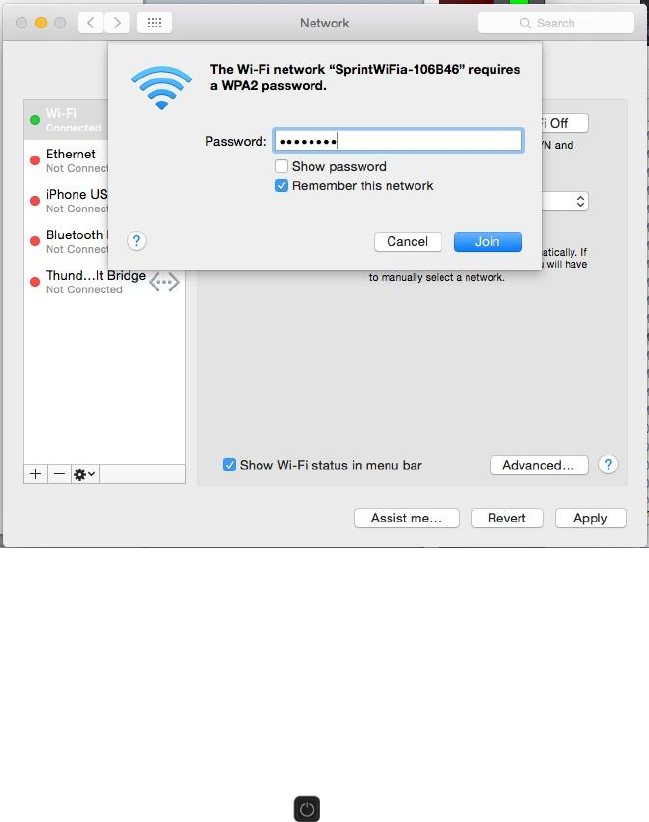
錯誤! 使用 [常用] 索引標籤將 Heading 1 套用到您想要在此處顯示的文字。 15
5. Enter the Wi-Fi password in the Password field, check Remember this network, and then click Join.
The computer connects to your device. The connected status icon on your device will show
an additional device has been connected.
Connect iOS devices (iPhone/iPod Touch/iPad)
The following topics outline how to connect your iPhone, iPod Touch, or iPad to your device via Wi-Fi.
Note: The operations below are based on your iPhone or iPod Touch Wi-Fi security set to [xxx].
1. Press and hold the Power button to power on your R910..
Your device's Wi-Fi function activates and automatically connects to the Internet.
錯誤! 使用 [常用] 索引標籤將 Heading 1 套用到您想要在此處顯示的文字。 16
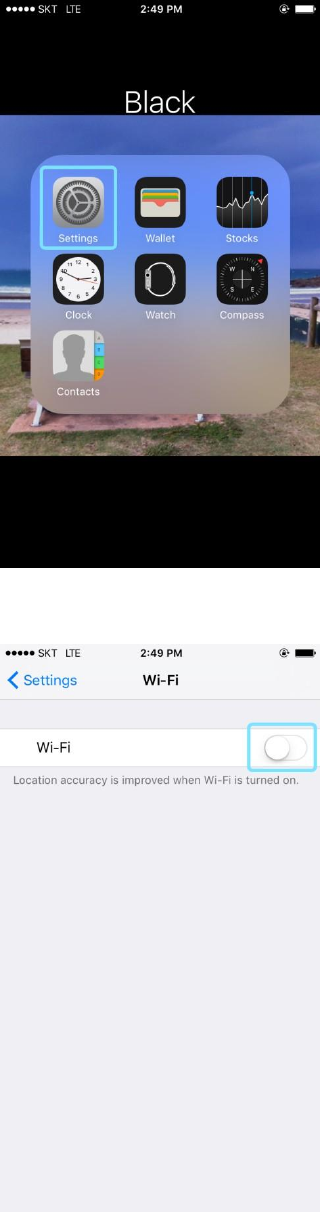
2. Select Settings > Wi-Fi.
3. Select Turn on Wi-Fi.
The iPhone or iPod Touch's Wi-Fi function activates.
錯誤! 使用 [常用] 索引標籤將 Heading 1 套用到您想要在此處顯示的文字。 17
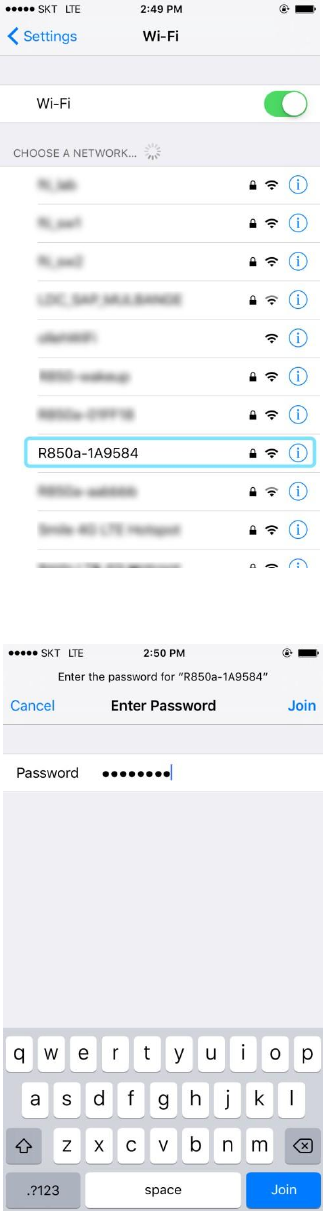
4. In the Choose a Network list, tap your R910's Wi-Fi Name (SSID).
5. Enter the Wi-Fi password and then tap Join.
錯誤! 使用 [常用] 索引標籤將 Heading 1 套用到您想要在此處顯示的文字。 18
The iPhone or iPod Touch connects to your device. The connected status icon on your
device will show an additional device has been connected.
Connect an Android™ Device
You can share your device's connection with compatible Android devices, such as wireless phones, tablets,
and Chromebook computers.
Note: The operations below are based on generic Android devices with Wi-Fi security set to [xxx]. Operation
may vary depending on Android device type. See your Android device user guide for details.
1. Press and hold the Power button to power on your R910.
Your device's Wi-Fi function activates and automatically connects to the Internet.
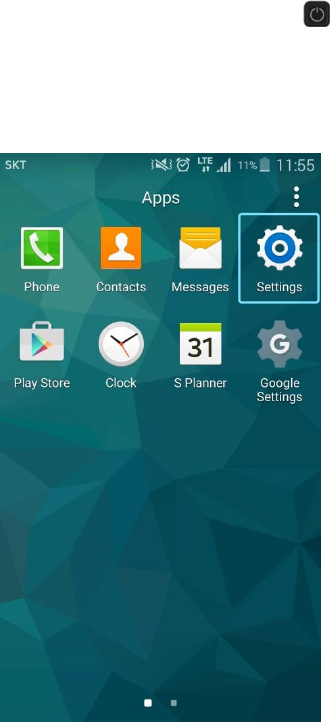
2. On your Android device, from home, select Menu > Settings.
錯誤! 使用 [常用] 索引標籤將 Heading 1 套用到您想要在此處顯示的文字。 19
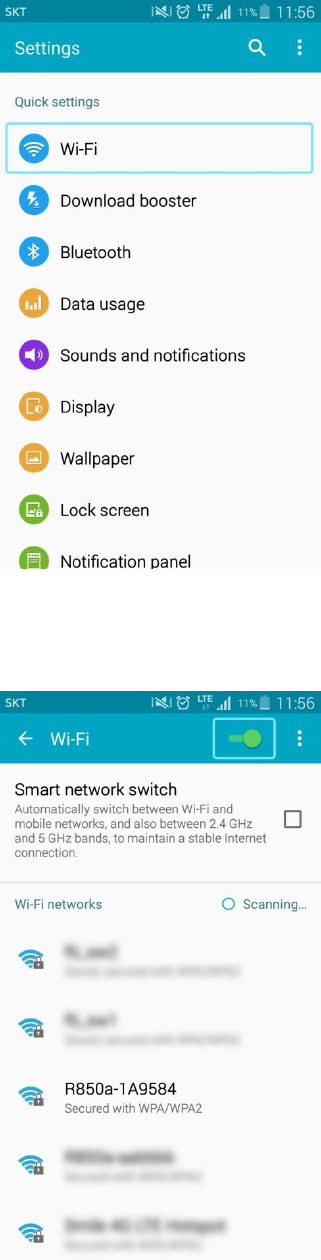
3. Tap or click Wi-Fi.
The Wi-Fi settings menu appears.
4. Tap or click the Wi-Fi slider to turn Wi-Fi on.
錯誤! 使用 [常用] 索引標籤將 Heading 1 套用到您想要在此處顯示的文字。 20
Wi-Fi is enabled on the Android device.
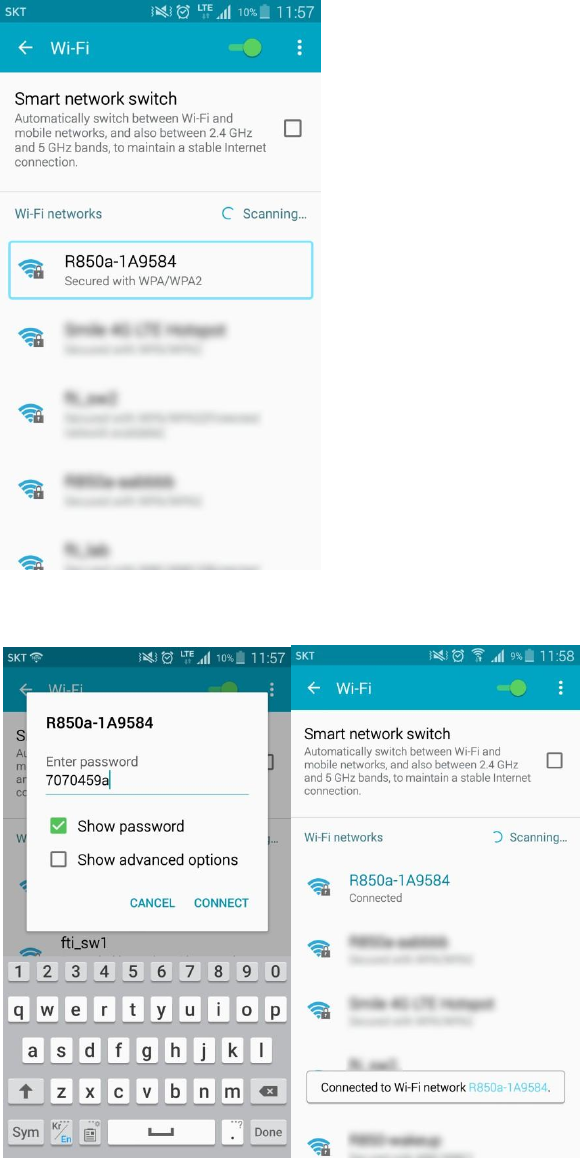
5. Tap or click your R910's Wi-Fi Name (SSID) from the list, and tap Connect.
6. Enter the Wi-Fi password and then tap or click Connect.
錯誤! 使用 [常用] 索引標籤將 Heading 1 套用到您想要在此處顯示的文字。 21
The Android device connects to your mobile broadband device. The connected status icon
on your device will show an additional device has been connected.

錯誤! 使用 [常用] 索引標籤將 Heading 1 套用到您想要在此處顯示的文字。 22
Hotspot Settings
The following topics provide an overview of items you can change using the device settings menu accessed
through the Web UI.
Launch the Web UI page
Use the device Web UI in a browser to check or change your R910 settings from a device connected via Wi-
Fi.
Explore the options available through the device's Web UI window.
1. Connect your R910 to an external device via a Wi-Fi connection.
2. Launch a browser and access the Web UI via http://myhotspot or http://192.168.128.1 .
3. The Web UI launches and displays the main window.
4. Log In with the Admin Password.
Admin Log in
Accessing other menus from the home screen requires admin log in.
Click “Log in” on the upper right corner of the main screen to log in. (Clicking other menus on the main
screen will prompt the log in page as well.)
Enter the password and click the “Login” button.
The default password is "password". It's recommended to change the password for your security.
Incorrect passwords are tried 5th times, access will be suspended while 3 minutes.
■ From the device LCD, You can view Admin Password
To be updated [Image]
錯誤! 使用 [常用] 索引標籤將 Heading 1 套用到您想要在此處顯示的文字。 23
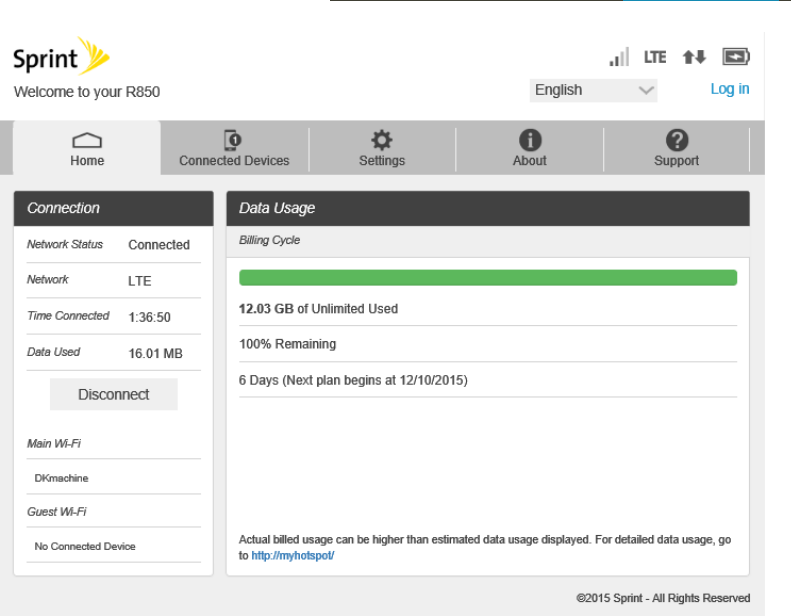
Home
Check current status of network connection and data usage on the Home page.
■ From the Web UI, click the Home tab. (For connection information, see Web UI Overview.)
Connection
The Connection Status display Network Status, LTE Status, Connection time, current Data Used and
Connect control button. Also Wi-Fi connected devices name.
Data Usage
The Data Usage page allows you to obtain data usage and billing cycle information for your mobile
broadband plan. Home display the Data Usage page and access information specific to your particular plan.
錯誤! 使用 [常用] 索引標籤將 Heading 1 套用到您想要在此處顯示的文字。 24
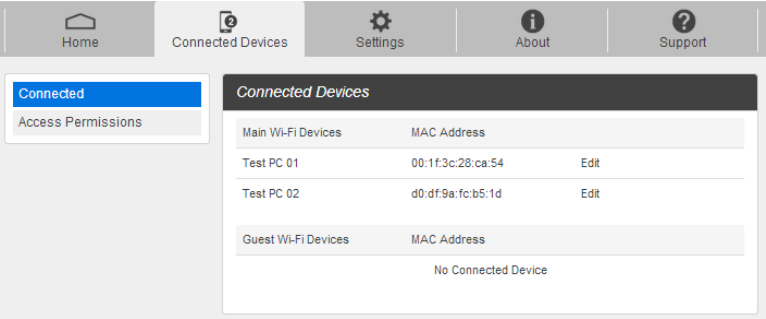
Connected Devices
The Connected Devices tab lets you confirm the names and MAC addresses of devices currently connected
to your device and set access permissions.
Check the Connected Devices
■ From the Web UI, click Connected Devices > Connected to display the list of connected devices.
■ From the device LCD, You can view Wi-Fi enabled devices currently connected to your Hotspot on
the display
To be updated [Image]
Edit the Connected Device
1. Click the Edit button. A page opens allowing you to edit a Main Wi-Fi Devices.
2. You can change a devices name on the Main Wi-Fi Devices filed.
3. To save, click the OK button
Set Access Permissions
Control user's ability to access main or guest Wi-Fi. Changing this status will immediately update the status
of devices listed ability to access Wi-Fi from this device, even if they have the password.
1. From the Web UI, click Connected Devices > Access Permissions.
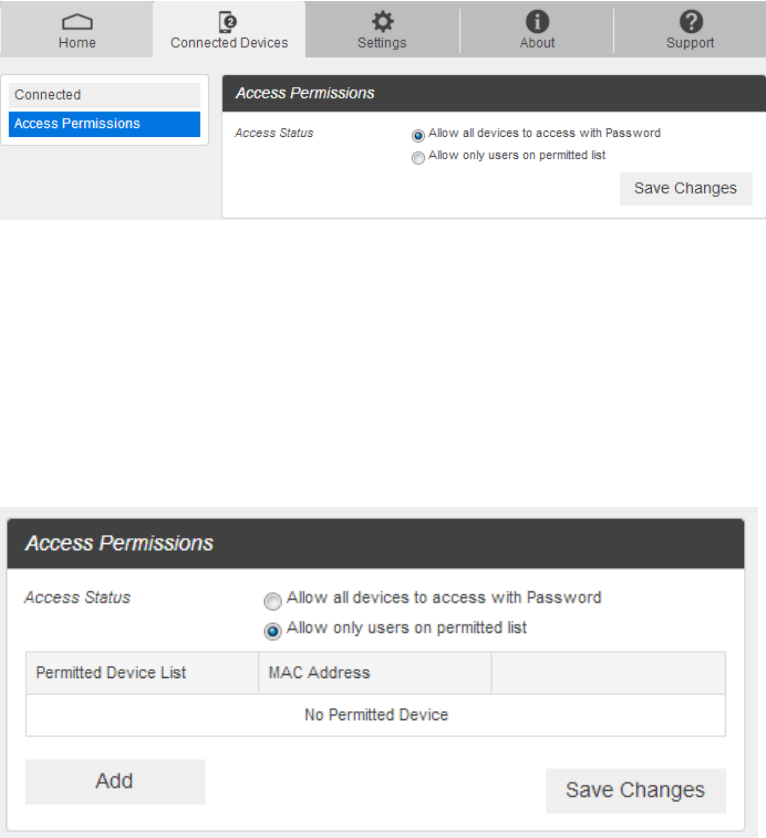
錯誤! 使用 [常用] 索引標籤將 Heading 1 套用到您想要在此處顯示的文字。 25
2. Select an access status and then click Save Changes.
Add Permitted Devices
The Access Permissions menu allows you to restrict access only to specific users, instead of anyone who
enters the password. To restrict access in this manner, you need to add permitted users from the menu.
3. From the Access Permissions menu, select Allow only users on Permitted list.
The Add Devices option will appear onscreen.
4. Click > next to Add Devices to open the Add Devices menu, and then click Add More.
5. Enter a Friendly Name (optional) and the MAC address of the permitted device.
A sample MAC address might be 00:1D:0F:10:2D:D9.
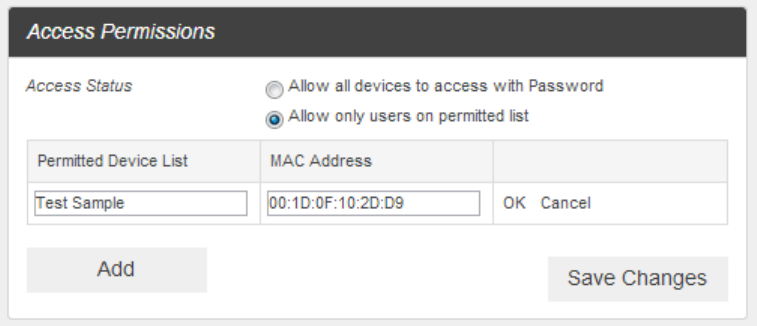
錯誤! 使用 [常用] 索引標籤將 Heading 1 套用到您想要在此處顯示的文字。 26
6. Click Add More to add more permitted devices.
7. When you are finished adding permitted devices, click Save Changes.
Access to your device will be restricted to the devices in your list.
錯誤! 使用 [常用] 索引標籤將 Heading 1 套用到您想要在此處顯示的文字。 27
Settings
Set your device options, including Wi-Fi, Mobile Network, Device and Advance Router.
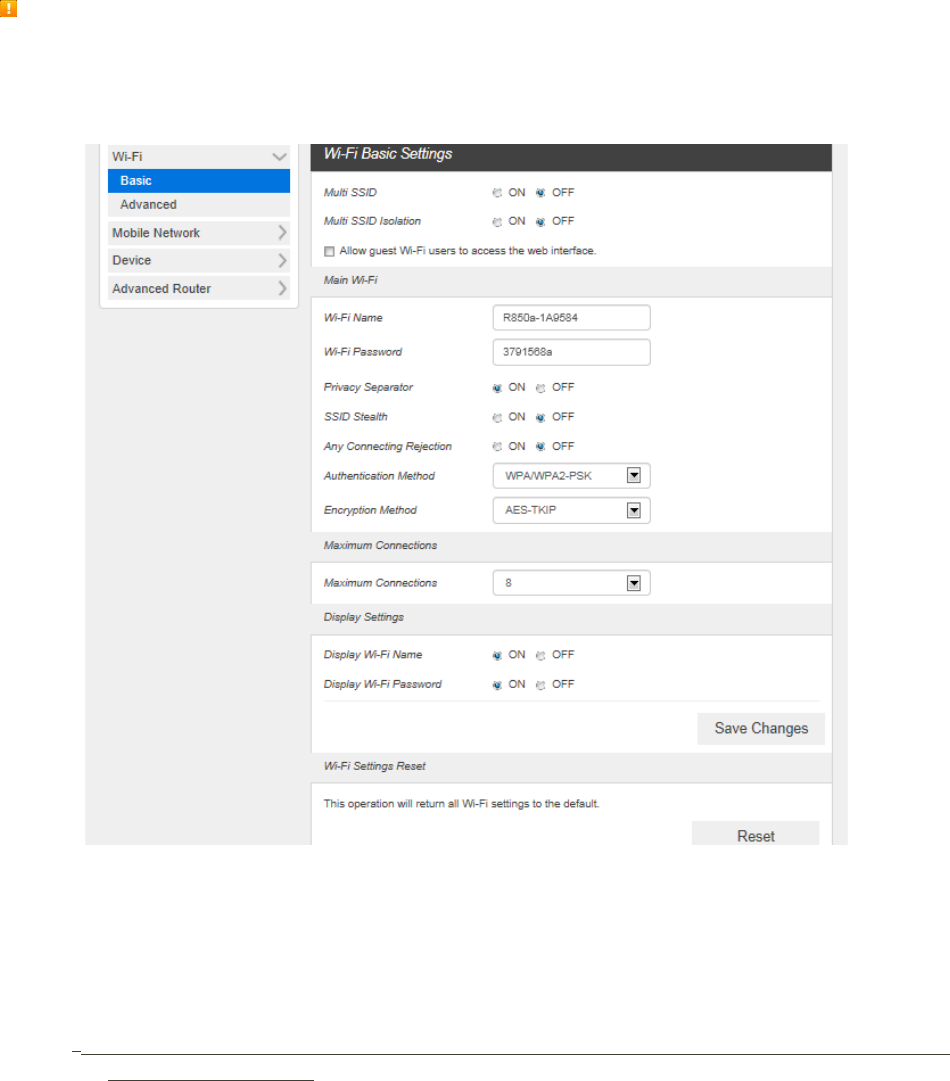
Wi-Fi Basic Settings
Set the basic Wi-Fi settings for your device.
These advanced settings should only be changed for specific circumstances. Changes to the advanced
settings could result in loss of Wi-Fi connection with your devices. Consult your devices’ manuals for Wi-
Fi specifications.
■ From the Web UI, click Settings > Wi-Fi > Basic to display the basic wireless network parameters.
Multi SSID: Select ON if you like to set up a separate guest Wi-Fi network. Your R910 will
broadcast two Wi-Fi Names.
If ON is selected for Multi SSID, Guest Wi-Fi menu will appears below Main Wi-Fi part. And
Main Wi-Fi shared Maximum Connections with Guest Wi-Fi. You can change Guest Wi-Fi
setting. And selected Off, Guest Wi-Fi menu will disappears.
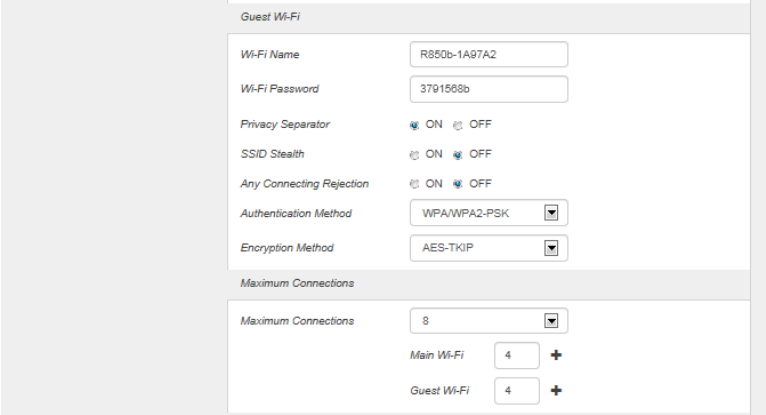
Guest Wi-Fi: If ON is selected for Multi SSIS, Guest Wi-Fi menu will appears. You can change
Guest Wi-Fi settings.
錯誤! 使用 [常用] 索引標籤將 Heading 1 套用到您想要在此處顯示的文字。 28
Multi SSID Isolation: If On is selected, it will prevents your devices from communicating across
the Main and Guest Wi-Fi's.
Allow Guest Wi-Fi users to access the web interface: If the box is checked, users on the
Guest Wi-Fi also can access the Web User Interface.
Wi-Fi Name: Service Set Identifier (SSID). To change it, enter a string less than 32 characters as
the name for your wireless local area network (WLAN).
Wi-Fi Password: To change, enter the new Wi-Fi password. The password needs to be at least
8 characters long.
Privacy Separator: If ON is selected, your devices on the same Wi-Fi Name can't make Local
Area Network communication. (Note: if you connect WLAN printer to your R910, Privacy
Separator should be OFF to send file from your PC to the printer.)
SSID Stealth: If OFF is selected, the Wi-Fi name won't be found by other device around it. s.
You need to manually ether Wi-Fi name and connect.
Any Connection Rejection: Any Connecting Rejection is a function of not returning Probe
Response in response to Probe Request in which SSID is not specified (null) or Probe Request
(SSID: any) which are transmitted from the client. (If SSID is set to "any" in the device, the device
must respond to Probe Request (SSID: any).)
Authentication Method: Use this setting to select the desired type of Wi-Fi security used to
encrypt the wireless network. WPA2 is the latest and most secure method and should be used
whenever possible..
Open : Authentication and encryption won't be performed. There are risks that private info
will be intercepted or network will be used by unauthorized individuals
SHARED : Authentication via Shared Key protocol.
WPA2-PSK : WPA-PSK is the securer version of WPA with implementation of the 802.11i
standard.
錯誤! 使用 [常用] 索引標籤將 Heading 1 套用到您想要在此處顯示的文字。 29
WPA-PSK/WPA2-PSK : Apply both the WPA-PSK and WPA2-PSK scheme.
Encryption Method: Use this setting to select the desired type of Encryption Method used to
encrypt the wireless network Advanced Encryption Standard (AES) is the latest and most secure
encrypt the wireless network. Advanced Encryption Standard (AES) is the latest and most secure
option and should be used whenever possible..
Maximum Connections: Choose the maximum number of the devices which connect to your
device simultaneously. You can also click the right or left arrow to distribute the maximum
number of the connected devices between the Main Wi-Fi and the Guest Wi-Fi.
Display Wi-Fi Name: If ON is selected, the Wi-Fi Name will be displayed on your R910 device
display menu.
To be updated [Image]
Display Wi-Fi Password: If ON is selected, the Wi-Fi password will be displayed on your R910
device display menu.
To be updated [Image]
Save Changes : Select your desired setting from the Authentication, Wi-Fi password and/or
available Wi-Fi connections drop down menu(s) and click Save Changes whenever you make a
change to save the new setting.
Wi-Fi Settings Reset: Click the Reset button to reset all Wi-Fi settings to the default.
錯誤! 使用 [常用] 索引標籤將 Heading 1 套用到您想要在此處顯示的文字。 30
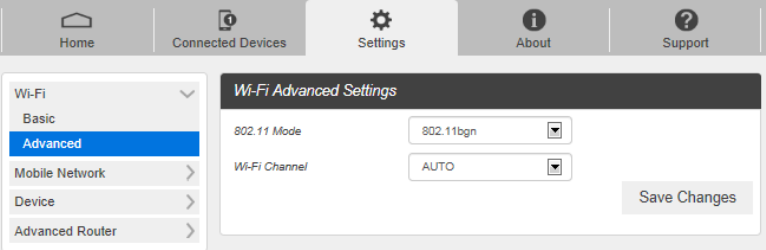
Wi-Fi Advanced Settings
1. From the Web UI, click Settings > Wi-Fi > Advanced.
802.11 Mode: Use this setting to change the Wi-Fi mode. The wireless network technology used.
802.11g+ 802.11b + 802.11n is most compatible, allowing both 802.11b,802.11g,and 802.11n
devices to connect to the wireless network..
2. Click Save Changes to save your settings.
錯誤! 使用 [常用] 索引標籤將 Heading 1 套用到您想要在此處顯示的文字。 31
Mobile Network
Mobile Network Settings should only be used as directed by Sprint Customer Service personnel.
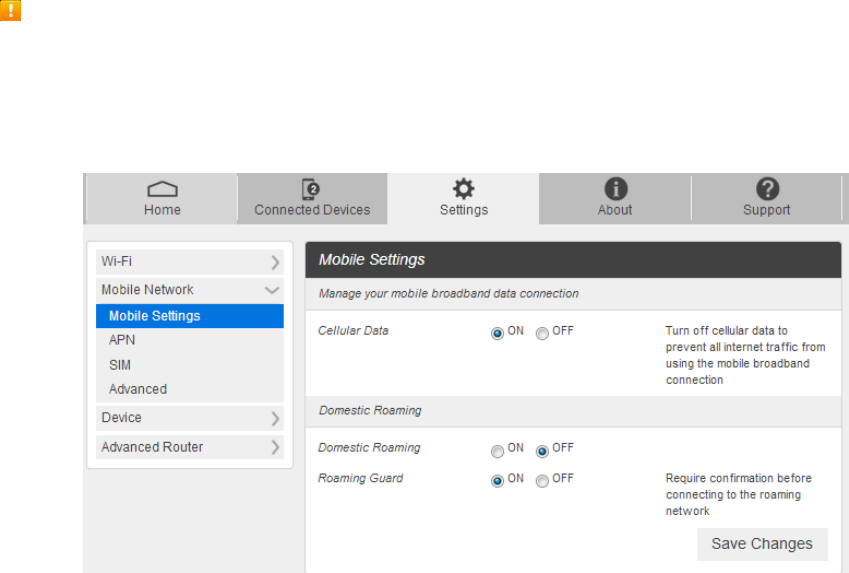
Mobile Settings
1. From the Web UI, click Settings > Mobile Network > Mobile Settings. The Mobile Settings page is
shown in the following figure.
Cellular data: Turn Cellular data on or off. Turn it OFF to prevent all Internet traffic from using
the mobile broadband connection.
Domestic Roaming: Turn Domestic Roaming on or off. Turn it OFF to prevent your device from
roaming to other service providers' networks. (Caution: allowing roaming could result in
additional service charges.)
Roaming Guard: Turn Roaming Guard on or off. Turn it ON to require confirmation before
connecting to the roaming network.
2. Click Save Changes to save your settings.
錯誤! 使用 [常用] 索引標籤將 Heading 1 套用到您想要在此處顯示的文字。 32
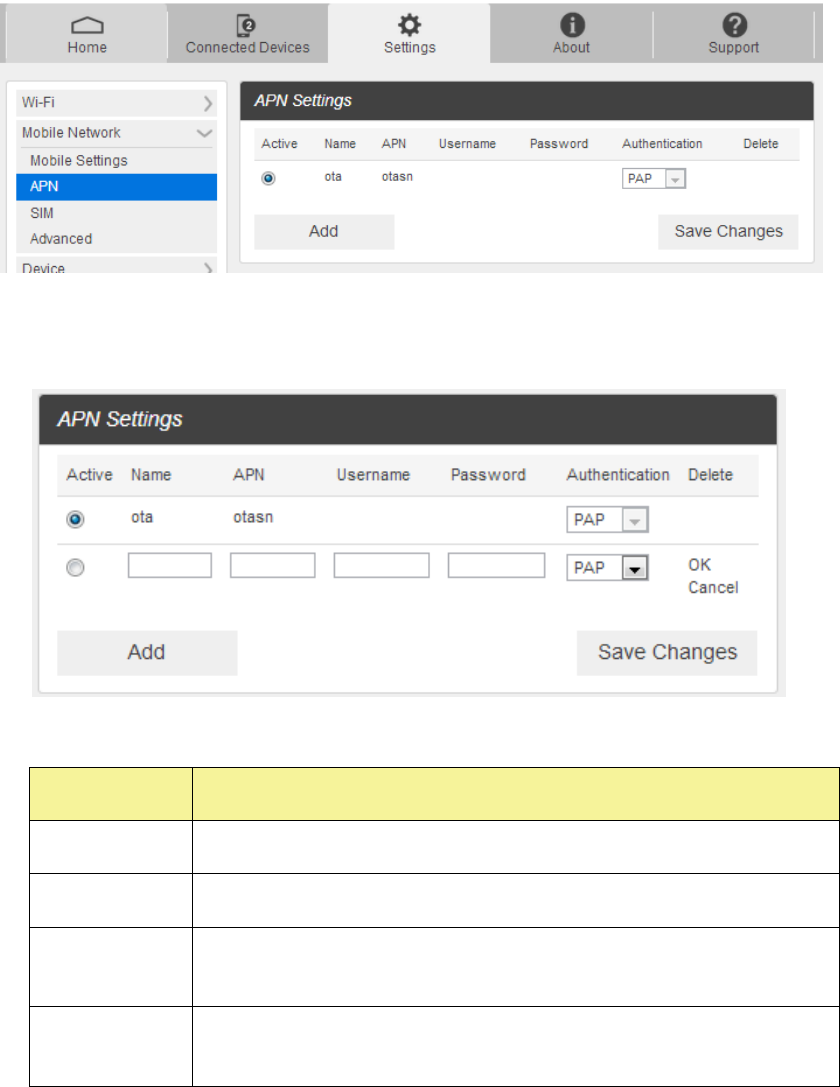
APN
■ From the Web UI, click Settings > Mobile Network > APN. The default APN parameters are shown
in the following figure. You can use the default APN to connect to the Internet. You can also add new
APNs.
■ To add a new APN, follow the steps below:
1. Click Add to access the following page.
2. Enter the related parameters as described in the following table.
Parameters
Description
Name
Type the profile name.
APN
Type the APN string.
User name
User name is used to obtain authentication from the ISP when the
connection is established.
Password
Password is used to obtain authentication from the ISP when the
connection is established.

錯誤! 使用 [常用] 索引標籤將 Heading 1 套用到您想要在此處顯示的文字。 33
Parameters
Description
Authentication
Password Authentication Protocol (PAP) provides a simple method
without encryption for the peer to establish its identity using a 2-way
handshake. Challenge-Handshake Authentication Protocol (CHAP) is
used to periodically verify the identity of the peer using a 3-way
handshake.
3. Click Save to add the new APN.
■ Additional APN Options
■ To activate the new APN, check the circle in front of it and then click Save Changes.
■ To edit the new APN, click Edit, change the settings, and then click Save.
■ To delete the new APN, click Delete.
Note: The default APN cannot be edited or deleted.
錯誤! 使用 [常用] 索引標籤將 Heading 1 套用到您想要在此處顯示的文字。 34
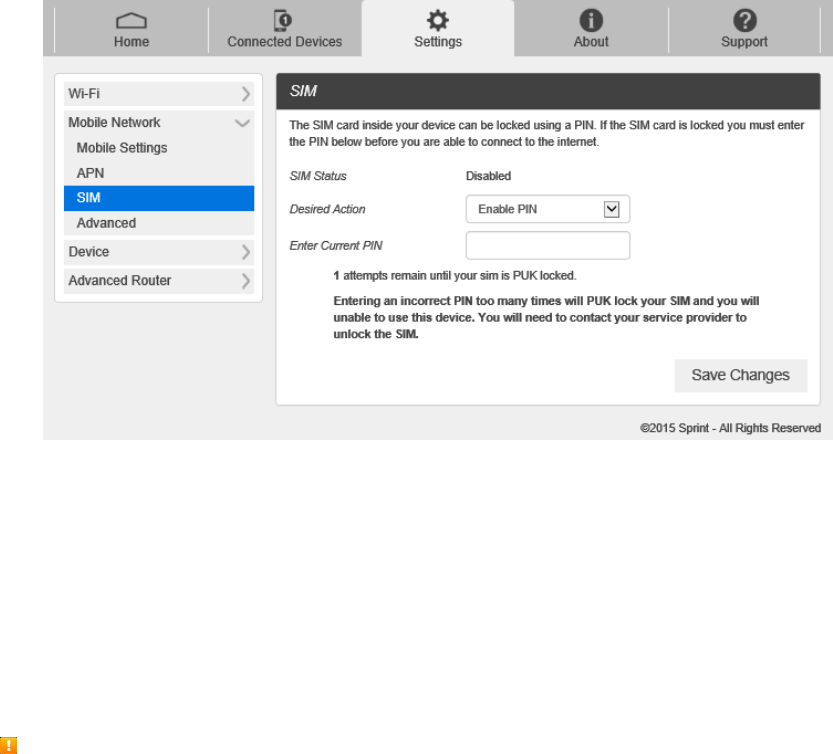
SIM
■ From the Web UI, click Settings > Mobile Network > SIM. The SIM PIN lock is disabled by default.
You can enable it by entering SIM PIN.
■ Enter the SIM PIN and press “Save Changes”. The SIM Status will be changed to Enabled. Once the
SIM PIN Lock is enabled, you need to enter SIM PIN to connect to the mobile broadband network
each time you power on your R910.
Note: If you enter the wrong SIM PIN three times, your SIM will be disabled permanently until you enter
the PUK code from your service provider. Please connect to Sprint Customer Service personnel.
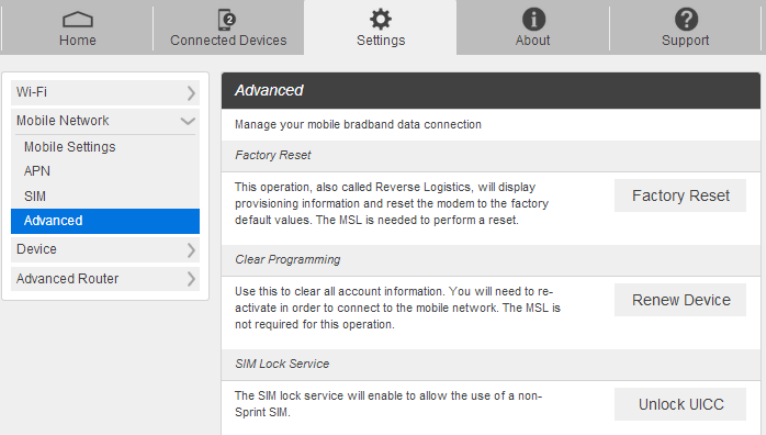
Advanced
Caution Advanced Mobile Network Settings should only be used as directed by Sprint Customer Service
personnel. Certain advanced options will reset your device's connections and programming and will
require reactivation.
■ From the Web UI, click Settings > Mobile Network > Advanced to set the mobile network
advanced settings on this interface.
錯誤! 使用 [常用] 索引標籤將 Heading 1 套用到您想要在此處顯示的文字。 35
Factory Reset: Click Factory Reset to reset the modem to the factory default value.
Clear Programming: Click Renew Device to clear all account information.
SIM Lock Service : Click Unlock UICC to allow the use of a non-Sprint SIM.
錯誤! 使用 [常用] 索引標籤將 Heading 1 套用到您想要在此處顯示的文字。 36
Device
The Device settings menu lets you set display brightness, manage account password, update software, back
up, restore and check system log.
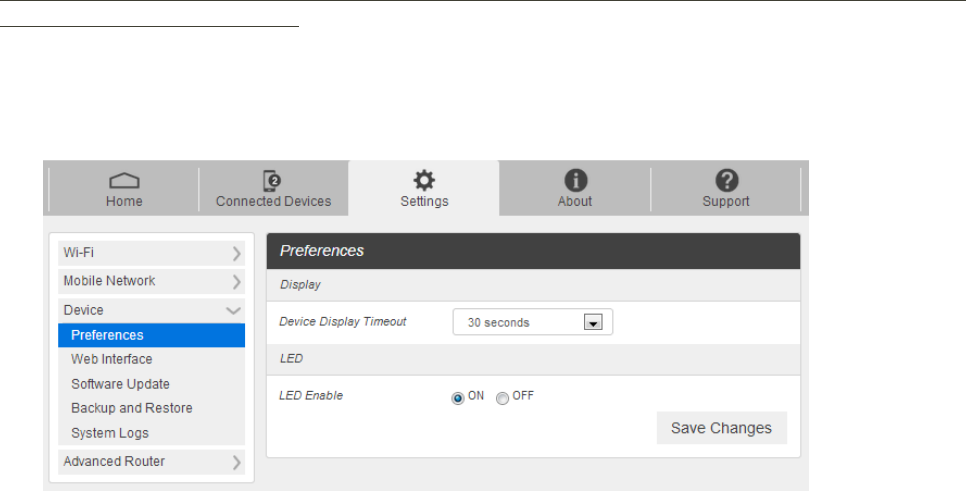
Preferences
1. From the Web UI, click Settings > Device > Preferences. You can set the display timeout on this page.
Display Timeout: Select a timeout time from the drop-down list. Your R910 display turns off
after this timeout period if there is no menu button action.
LED Enable: If ON is selected, the LED indicator next to Your R910 display will blink when the
device is on. This LED is a power indicator that shows the device is on when the device display
is off.
2. Click Save Changes to save your settings.
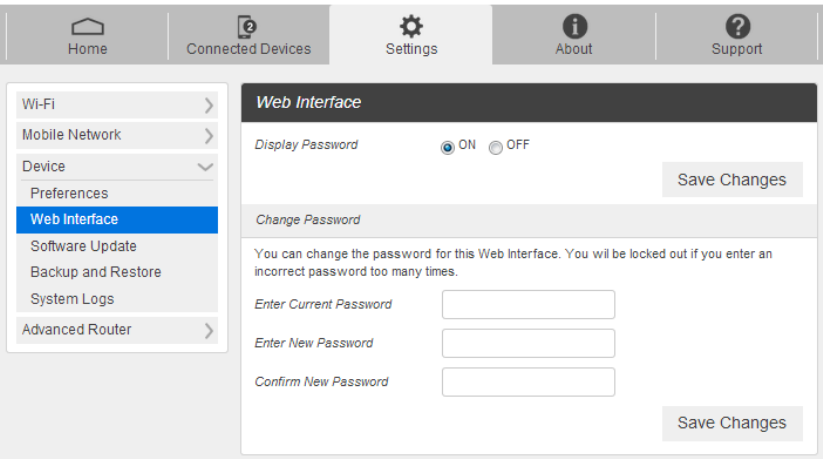
Web Interface
1. From the Web UI, click Settings > Device > Web Interface. You can manage your Web UI admin
password on this page.
錯誤! 使用 [常用] 索引標籤將 Heading 1 套用到您想要在此處顯示的文字。 37
Display Password: If ON is selected, the Web Interface admin password is displayed on your
R910 device display menu.
To be updated [Image]
Change Password
o Current Password: Enter the current password.
o New Password: Enter the new password.
o Confirm New Password: Enter the new password again.
2. Click Save Changes to save your settings.
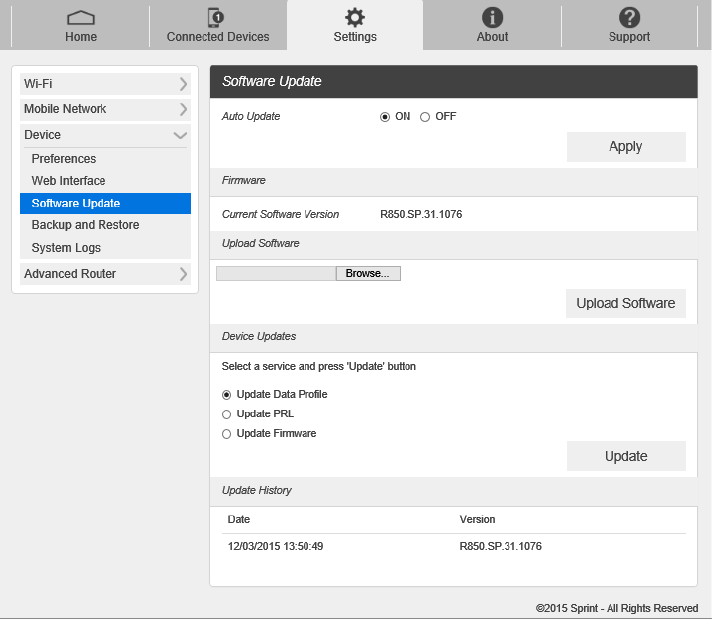
Software Update
1. From the Web UI, click Settings > Device > Software Update. You can update the software on this
page.
錯誤! 使用 [常用] 索引標籤將 Heading 1 套用到您想要在此處顯示的文字。 38
2. Read the onscreen options and click the update you would like to initiate.
Auto Update: If ON is selected, your R910 will check the latest software periodically and update
if new software is available.
Update Software: If you have a new software file provided by your service provider, you can
select the file and update your R910 manually by pressing Update Software button.
Device Updates: If you would like to check for new data profile, PRL, or Firmware, select the
menu and press Update button. Your R910 will check for the latest version, and then if available,
will update.
Update History: Displays the update history list.
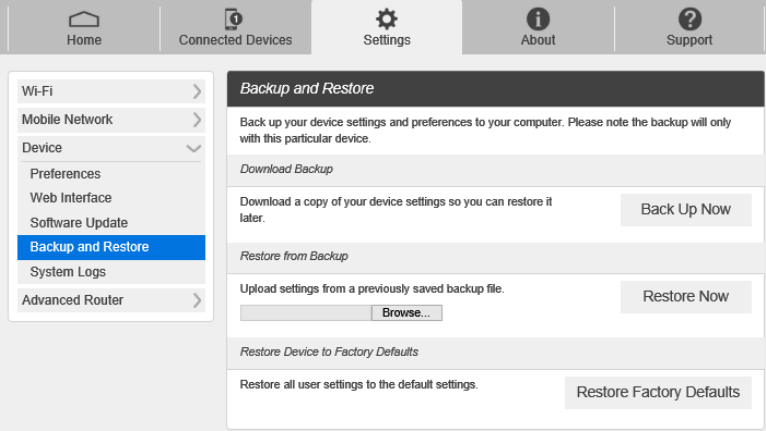
Backup and Restore
■ From the Web UI, click Settings > Device > Backup and Restore to access menus to back up your
device settings to your computer, restore from the backup and restore your device to its factory
default settings.
錯誤! 使用 [常用] 索引標籤將 Heading 1 套用到您想要在此處顯示的文字。 39
To back up your device settings to your computer, follow the steps below:
1. Click Back Up Now.
2. Click Save on the pop-up window.
3. Choose a location on your computer to save the backup file.
4. Click Save.
To restore from the backup, follow the steps below:
1. Click Select File to select the backup file in your computer.
2. Click Restore now.
To restore your device to its factory default settings, follow the steps below:
1. Click Restore factory default.
2. Click Yes to confirm the command.
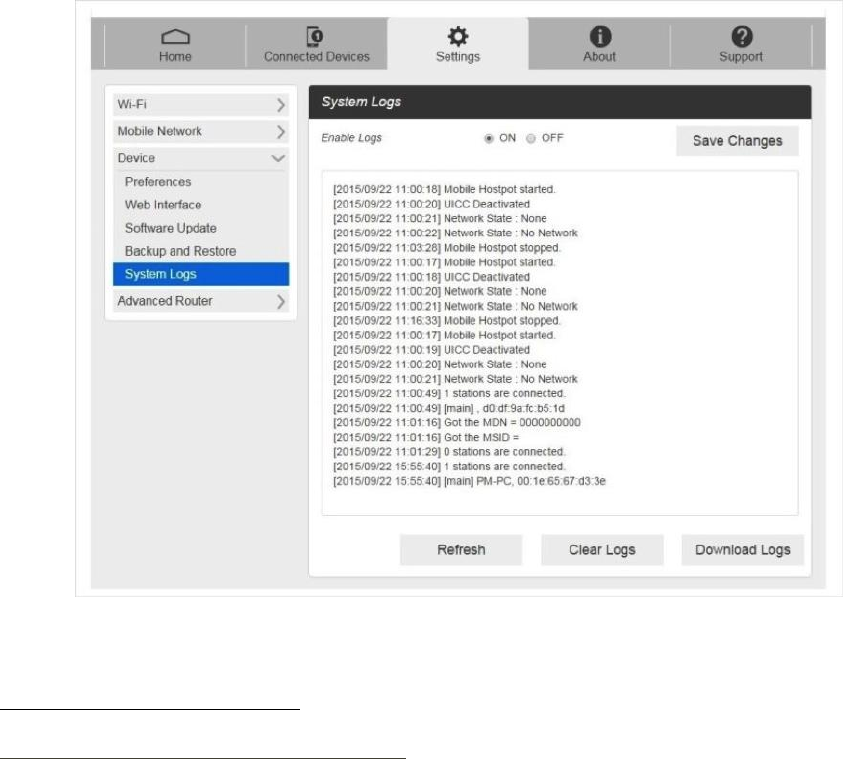
System Logs
■ From the Web UI, click Settings > Device > System logs, and then click Download logs to
download the system logs on this page.
錯誤! 使用 [常用] 索引標籤將 Heading 1 套用到您想要在此處顯示的文字。 40
Note: System logs are used for engineering purposes by your service provider. Keep it OFF during
regular usage of your device.
Advanced Router Settings
Set LAN settings, Firewall and Customization.
Advanced Router
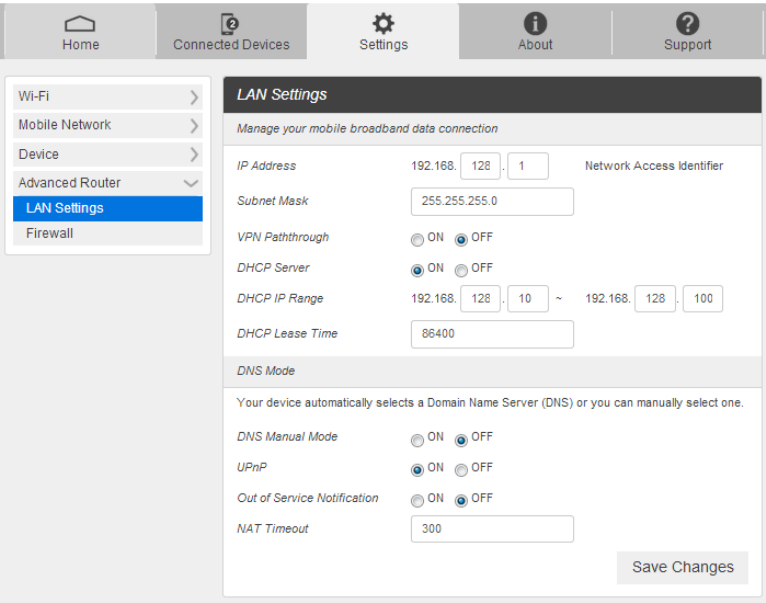
LAN Settings
1. From the Web UI, click Settings > Advanced Router > LAN Settings to display the router information
shown in the following figure.
錯誤! 使用 [常用] 索引標籤將 Heading 1 套用到您想要在此處顯示的文字。 41
IP Address: IP address for Web User Interface.
Subnet Mask: Subnet mask for the IP address.
VPN passthrough: VPN passthrough must be enabled if you want to allow VPN tunnels to pass
through your device’s firewall.
DHCP Server: Enable or disable DHCP Server function.
DHCP IP Range: Allocate begin and end IP address for IP Range.
DHCP Lease Time: Define how long the leased IP address will be expired. The new IP address
will be relocated after the IP address is expired.
DNS manual mode: Turn DNS manual mode on or off.
UPnP: Turn UPnP (Universal Plug n Play) mode on or off.
NAT Timer: Set TCP NAT time.
2. Click Save Changes to save your settings.
Firewall
1. From the Web UI, click Settings > Advanced Router > Firewall. You may set up firewall rules to protect
your network from virus and malicious activity on the Internet.
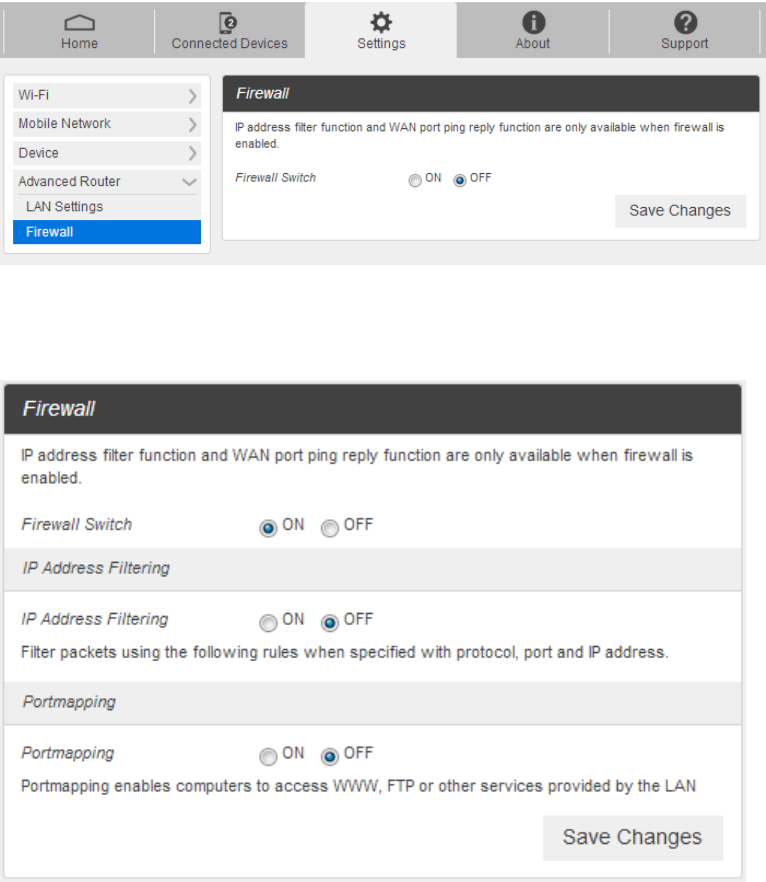
錯誤! 使用 [常用] 索引標籤將 Heading 1 套用到您想要在此處顯示的文字。 42
■ IP Address Filtering
To set IP Address Filtering rules, follow the steps below:
① Turn on the Firewall Switch.
② Turn on the IP Address Filtering.
③ Click Add.
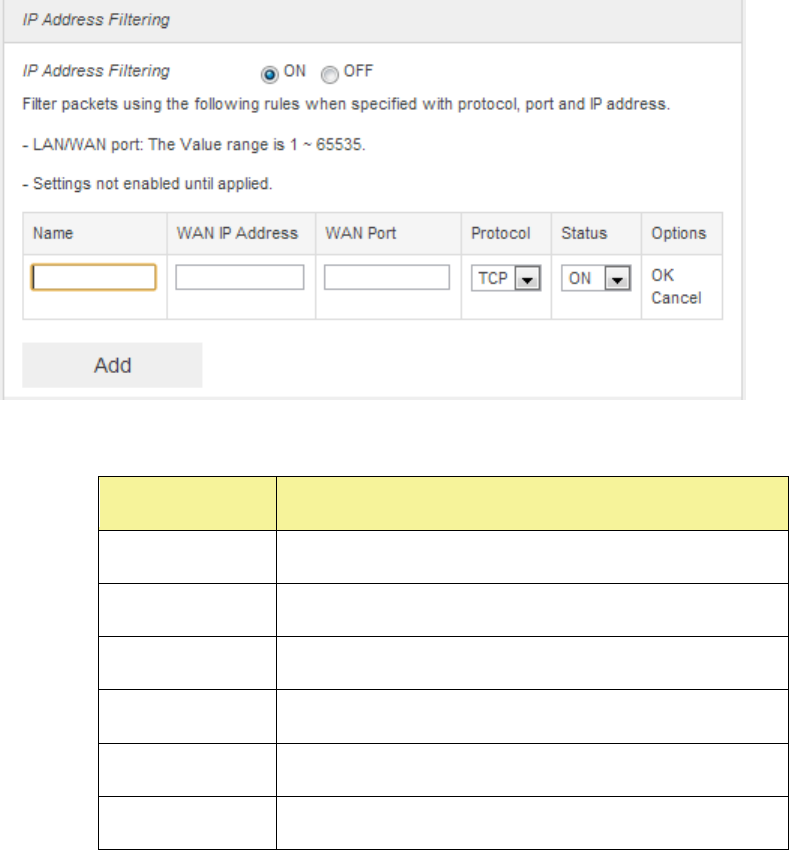
錯誤! 使用 [常用] 索引標籤將 Heading 1 套用到您想要在此處顯示的文字。 43
④ Enter the related parameters as described in the following table.
Parameters
Description
LAN IP address
Enter the LAN IP address.
LAN port
Set the LAN port.
WAN IP address
Enter the WAN IP address.
WAN port
Set the WAN port.
Protocol
Set which protocol will be used for filtering.
Status
Set how to handle the packet if it matches with the rule.
⑤ Click Save Changes to add the new filtering rule.
■ Portmapping
To set portmapping rules, follow the steps below:
① Turn on the Firewall Switch
② Turn on the Portmapping.
③ Click Add
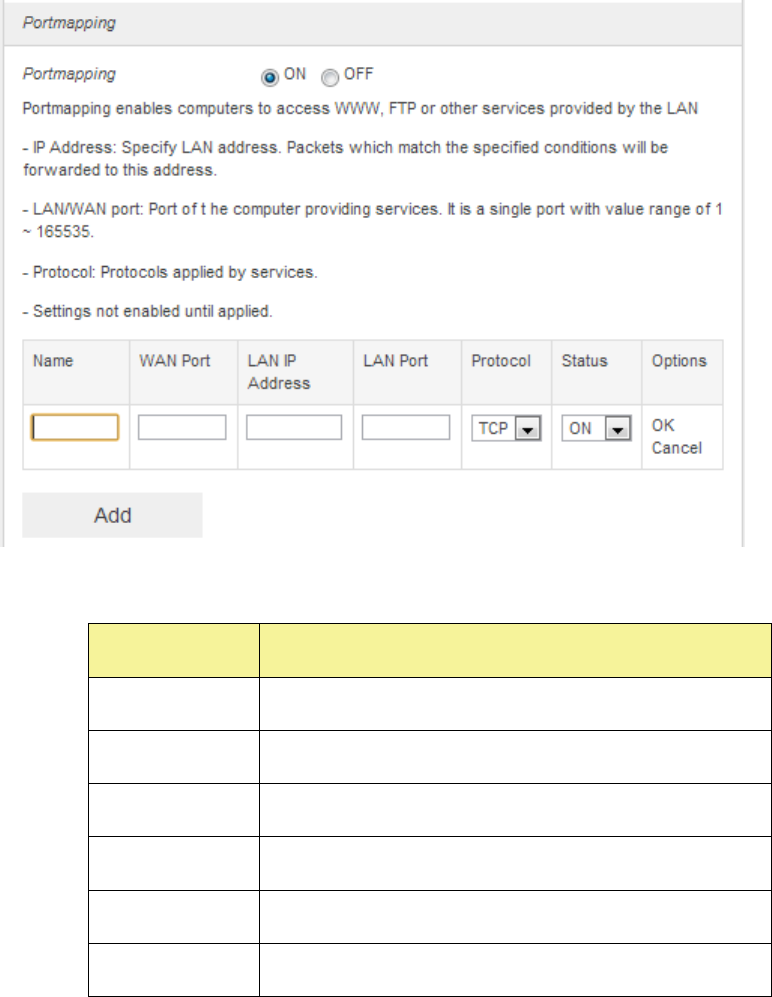
錯誤! 使用 [常用] 索引標籤將 Heading 1 套用到您想要在此處顯示的文字。 44
④ Enter the related parameters as described in the following table.
Parameters
Description
Name
Enter a name for the rule.
WAN port
Set the WAN port.
LAN IP address
Enter the LAN IP address.
LAN port
Set the LAN port.
Protocol
Set which protocol will be used for filtering.
Status
Set how to handle the packet if it matches with the rule.
2. Click Save Changes to save your settings.

錯誤! 使用 [常用] 索引標籤將 Heading 1 套用到您想要在此處顯示的文字。 45
About
Show your device's connection information, firmware information, WWAN information, Wi-Fi details and
device information.
■ From the Web UI main screen, Click the About tab to view the available information.
錯誤! 使用 [常用] 索引標籤將 Heading 1 套用到您想要在此處顯示的文字。 46
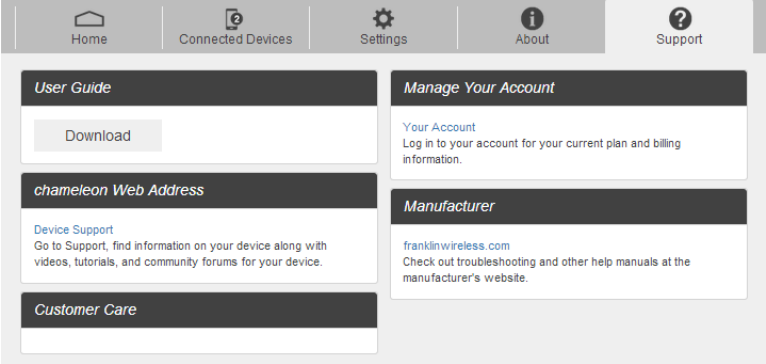
Support Tab
Obtain support information on this interface.
■ From the Web UI main screen, click the Support tab to view the available options.

錯誤! 使用 [常用] 索引標籤將 Heading 1 套用到您想要在此處顯示的文字。 47
Appendix
The following topics cover items such as troubleshooting, device specifications, applicable warranty and
service information, customer service contacts, and applicable trademark and copyright notices.
Troubleshooting
When properly installed, your device is highly reliable product. If you are having problems, consult this list of
common problems and their solutions.
Problems and Solutions
No service is available, or, I get a "No Services" message.
Reorient your device. Inside of a building or near a structure that maybe blocking the signal,
change the position or location of the device. For example, try moving your device close to a
window.
You are outside the Sprint coverage area, or there may be a problem with your account. Check
with Sprint Customer Service.
From device LCD
To be updated [Image]
The device has no power, or the LED indicator does not come on when the power button is pressed.
Make sure the battery is properly seated in the device.
Make sure the battery is fully charged. Plug in the AC charger for at least four hours.
I forgot my password.
Reset the device to factory defaults using the master reset button. Hold the button down for three
seconds to reset your router hardware and for three seconds to reset both your router hardware
and your device software. (Check the master reset button on Parts and Functions > Device
Layout)
You can also connect your device to an electrical outlet using the AC adapter and go to the
operating system (http://myhotspot or http://192.168.128.1) to view your security code.
I cannot connect to my device.
Make sure your Windows Wi-Fi adapter/Mac Wi-FI is turned on.
(Refer to your computer’s Help if you need assistance.)
Open your wireless network connection list:
1. Windows: Right-click icon and select View Available Networks.
錯誤! 使用 [常用] 索引標籤將 Heading 1 套用到您想要在此處顯示的文字。 48
– Or –
Mac: Pull down list from Wi-Fi icon.
2. Windows: Click Connect.
– Or –
Mac: Select the network name.
3. When your device is connected to the network, the Wi-Fi connected device icon displayed on
LCD Screen.
My network does not appear in the wireless network list.
Verify that your device’s LCD doesn't display Wi-Fi connected device icon.
Windows: Click Refresh Network List on the left side of the Wireless Network Connection
screen. If that does not work you can try the following:
1. Open Network Connections.
2. Right-click Wireless Network Connection and select Properties.
3. Click the Wireless Networks tab.
4. Delete any unused wireless connections from the Preferred Networks list and click OK.
5. Restart your computer.
Mac: Click the AirPort icon and select Turn Wi-Fi Off. Then click it again and select Turn Wi-Fi
On.
I see the network name but cannot connect to my device.
Check the Wi-Fi Name, Wi-Fi Password in your connection profile. If any of these are incorrect,
you will not be able to connect to the network
How do I disconnect from the network?
1. Open your device’s landing page.
2. Log in as the administrator if you have not already done so.
3. Click Disconnect.
How can I find out how many users are connected to my device?
See the device's LCD. The number of clients (users) currently connected to your device is in the
Wi-Fi connected device icon at the top of the LCD. You can also see the number of clients
currently connected on the Connected Devices page on Web UI.
Where can I find information about Internet connectivity and my Wi-Fi setup?
Open the Settings page on Web UI.
錯誤! 使用 [常用] 索引標籤將 Heading 1 套用到您想要在此處顯示的文字。 49
How do I check the model number and firmware versions of my device?.
Open the About page on Web UI.
How can I check the battery level of my device?
From the Web UI: Open the About. You can find Device sector, there are Battery Charge Level.
On the device: Battery icon displayed at the top of the LCD Screen,
How do I check the available space on the Nano-SIM card?
Open the Web UI. Open Settings > Mobile Network > SIM page and see the SIM Card status
information.
How do I turn off my device?
Press and hold the power button for three seconds until the LCD turns off. Your device is
connected to the AC adapter and being charged.
What is the default administrative/login password?
password
How do I access information on the Wi-Fi network and Wi-Fi clients?
Open the WebUI and choose Settings > Wi-Fi > Basic and see the current Wi-Fi Network and
Wi-Fi Clients information.
I am having trouble connecting to my office VPN.
Open the WebUI and choose Settings > Advanced Router > LAN Settings. Select the VPN
Passthrough ON checkbox and click Save Changes.
Using the master reset button
Your device comes with a master reset button that allows you to return it to its factory default
state.
The master reset button is accessed through an opening labeled “RESET” on the back cover of
the device. You need a paperclip or similar object to press the button.
Note: To reset both the router hardware and the device software to the original factory settings:
1. Make sure your device is powered on.
2. Remove the back cover and locate the opening on the back of the device labeled “RESET.”
3. Insert a paper clip in to the hole and hold the button down for three seconds until the displayed "Factory
Reset Restarting...".
Your list of wireless networks will now show the original default network when you first configured
your device.

錯誤! 使用 [常用] 索引標籤將 Heading 1 套用到您想要在此處顯示的文字。 50
Connect to your device again and reconfigure it. You will need to use the original password
(“password”) to complete the setup and assign a new unique password.
Specifications
The following tables list the specifications for the mobile broadband device, the AC charger, , and the
materials.
Mobile Broadband Device Specifications
Item
Description
Model name
R910 Mobile Hotspot
Dimensions1
12.5mm (H) x 90.1mm (W) x 67mm (D)
Weight
97g
Interface
Web UI
Power consumption
Normal state: 1.26 Watts
Max state : 2.52 Watts
Operating system
Linux OS

錯誤! 使用 [常用] 索引標籤將 Heading 1 套用到您想要在此處顯示的文字。 51
Item
Description
Frequency
LTE B2
DL: 1930 ~ 1990 MHz UL: 1850 ~ 1910 MHz
LTE B4
DL: 2110 ~ 2155 MHz UL: 1710 ~ 1755 MHz
LTE B5
DL: 869 ~ 894 MHz UL: 824 ~ 849 MHz
LTE B12
DL: 729 ~ 746 MHz UL: 699 ~ 716 MHz
LTE B25
DL: 1930 ~ 1995 MHz UL: 1850 ~ 1915 MHz
LTE B26
DL: 859 ~ 894 MHz UL: 814 ~ 849 MHz
LTE B41
DL: 2496 ~ 2690 MHz UL: 2496 ~ 2690 MHz
WIFI(B/G/N)
2412MHz ~ 2462MHz
Compatible networks
LTE category 4 / Wi-Fi IEEE802.11 b/g/n
Charging time2
3 hours 40 minutes
Continuous standby time3
41 hours
Continuous communication time3
8 hours
Communication speed
LTE category 4
DL : 150Mbps
UP : 50Mbps
1 Approximate values
2 Varies by ambient temperature, battery usage, etc.

錯誤! 使用 [常用] 索引標籤將 Heading 1 套用到您想要在此處顯示的文字。 52
3 Varies by environment, signal conditions, etc.
AC Charger Specifications
Item
Description
Rated input voltage
100-240Vac
Operating range
90-264Vac
Rated input frequency
50/60Hz +/- 3Hz
Nominal dc output voltage
+5.0V (±5%)
Rating load current
1.0A
Materials Specifications
Parts
Materials/Finishing
A cover
PC(Black),SF coating
B cover
PC(Black)
Battery cover
PC(Black),SF coating
A deco
PC(Black),UV(Gloss 80%)
Power key
PC(Milky White),Spray(Black),UV(Gloss 80%)
LCD Bracket
PC(Black)
Rubber feet
Silicon(Black)
Warranty and Service
The following topics outline your device's warranty and service information.
Warranty
Your device purchase includes Warranty.
● Confirm shop name and purchase date.
● Read contents of Warranty and keep it in a safe place.
● Check warranty period in the Warranty.
錯誤! 使用 [常用] 索引標籤將 Heading 1 套用到您想要在此處顯示的文字。 53
Services
Before submitting your device for repairs, contact Customer Service or General Information; be prepared to
describe problem in detail.
● During the warranty period, repairs will be made under the terms and conditions described in the
Warranty.
● After the warranty period, repairs will be upon request; if said repairs can be made, you will be
charged for them.
Customer Service
For mobile broadband device or service information, call general information. For repairs, call customer
assistance.
Sprint Customer Service
You can reach Sprint Customer Service online or by calling toll-free.
● Sign in to your account at sprint.com/mysprint.
● Call toll-free at 1-888-788-4727 (business use) or 1-888-211-4727 (personal use).
Virgin Mobile Customer Service
You can reach Virgin Mobile Customer Service online or by calling toll-free.
● Log in to your account at virginmobileusa.com.
● Call us toll-free at 1-877-877-8443.
Boost Mobile Customer Service
You can reach Boost Mobile Customer Service online or by calling toll-free.
● Log in to your account at boostmobile.com.
● Call us toll-free at 1-866-402-7366
Trademarks and Copyrights
The names of companies, products, and services used in this guide are registered trademarks or trademarks
of the respective companies.
● Franklin Wireless logo is trademarks or registered trademarks of Franklin Wireless Corporation in US.
Copyright © 2016 Franklin Wireless Corporation. All rights reserved.

錯誤! 使用 [常用] 索引標籤將 Heading 1 套用到您想要在此處顯示的文字。 54
Safety and Notices
The following topics address important safety precautions, general notes, and required RF exposure
information for your mobile broadband device.
Safety Precautions
The following topics outline important safety precautions that must be observed when using your device.
Important Notice
Due to the nature of wireless communications, transmission and reception of data can never be guaranteed.
Data may be delayed, corrupted (i.e., have errors) or be totally lost. Although significant delays or losses of
data are rare when wireless devices such as the Sprint Pocket Wi-Fi are used in a normal manner with a
well-constructed network, your device should not be used in situations where failure to transmit or receive
data could result in damage of any kind to the user or any other party, including but not limited to personal
injury, death, or loss of property. Sprint accepts no responsibility for damages of any kind resulting from
delays or errors in data transmitted or received using your device, or for failure of your device to transmit or
receive such data.
Safety and Hazards
Do not operate your device under the following conditions.
● In areas where blasting is in progress
● Where explosive atmospheres may be present
● Near medical equipment
● Near life support equipment, or any equipment that may be susceptible to any form of radio
interference.
In such areas, your device MUST BE POWERED OFF. Your device can transmit signals that could interfere
with this equipment.
Do not operate your device in any aircraft, whether the aircraft is on the ground or in flight. In aircraft, your
device MUST BE POWERED OFF. When operating, your device can transmit signals that could interfere
with various onboard systems.
Note: Some airlines may permit the use of cellular phones while the aircraft is on the ground and the door is
open. Your device may be used at this time.
The driver or operator of any vehicle should not operate the device while in control of a vehicle. Doing so will
detract from the driver or operator’s control and operation of that vehicle. In some jurisdictions, operating
such communications devices while in control of a vehicle is an offense.
錯誤! 使用 [常用] 索引標籤將 Heading 1 套用到您想要在此處顯示的文字。 55
Proper Battery Use and Disposal
Follow these guidelines to ensure safe and responsible battery use.
● Do not open, disassemble, puncture, crush, bend, or shred.
● Do not expose to water or other liquids, fire, explosion, or other hazards.
● Use the battery only in the Sprint Pocket Wi-Fi.
● If using with a charger, use only the AC charger supplied with your device.
● Do not short circuit the battery.
● When replacing a battery, use the same model of battery that was supplied with your device.
● Follow local regulations when disposing of a used battery.
● Avoid dropping your device or the battery. If dropped and you suspect damage, take it to a service
center for inspection.
● Battery usage by children should be supervised.
Note: Improper battery use may result in a fire, explosion, or other hazard.
FCC Compliance
This device complies with part 15 of the FCC Rules. Operation is subject to the following two conditions: (1)
This device may not cause harmful interference, and (2) this device must accept any interference received,
including interference that may cause undesired operation.
Note: Any changes or modifications not expressly approved by the party responsible for compliance could
void the user's authority to operate this equipment.
This equipment has been tested and found to comply with the limits for a Class B digital device, pursuant to
part 15 of the FCC Rules. These limits are designed to provide reasonable protection against harmful
interference in a residential installation. This equipment generates, uses and can radiate radio frequency
energy and, if not installed and used in accordance with the instructions, may cause harmful interference to
radio communications. However, there is no guarantee that interference will not occur in a particular
installation. If this equipment does cause harmful interference to radio or television reception, which can be
determined by turning the equipment off and on, the user is encouraged to try to correct the interference by
one or more of the following measures:
● Reorient or relocate the receiving antenna.
● Increase the separation between the equipment and receiver.
● Connect the equipment into an outlet on a circuit different from that to which the receiver is
connected.
● Consult the dealer or an experienced radio/TV technician for help.
錯誤! 使用 [常用] 索引標籤將 Heading 1 套用到您想要在此處顯示的文字。 56
RF Exposure Information and Specific
Absorption Rate (SAR) Information
The following topics detail the specific absorption rate (SAR) information, electromagnetic safety information,
and radiofrequency (RF) exposure information for this device.
This device is designed and manufactured not to exceed the emission limits for exposure to radio frequency
(RF) energy set by the Federal Communications Commission of the United States.
During SAR testing, this device is set to transmit at its highest certified power level in all tested frequency
bands, and placed in positions that simulate RF exposure in usage against, and near the body with the
separation of 10 mm. Although the SAR is determined at the highest certified power level, the actual SAR
level of the while operating can be well below the maximum value. This is because the device is designed to
operate at multiple power levels so as to use only the power required to reach the network. In general, the
closer you are to a wireless base station antenna, the lower the power output.Safety and Notices 90
The exposure standard for wireless employs a unit of measurement known as the Specific Absorption Rate,
or SAR. The SAR limit set by the FCC is 1.6W/kg.
Tests for SAR are conducted using standard operating positions accepted by the FCC with the
device transmitting at its highest certified power level in all tested frequency bands.
The FCC has granted an Equipment Authorization for this model device with all reported SAR levels
evaluated as in compliance with the FCC RF exposure guidelines. SAR information on this model device is
on file with the FCC and can be found under the Display Grant section of http://fcc.gov/oet/ea/fccid after
searching on FCC ID: XHG-R910
More information on the device's SAR can be found from the following FCC website:
http://fcc.gov/oet/ea/fccid.
While there may be differences between the SAR levels of various devices and at various positions, they all
meet the government requirement.
SAR compliance for body operation is based on a separation distance of 10 mm between the unit and the
human body. Carry this device, at least 10 mm away from your body to ensure RF exposure level compliant
or lower to the reported level. To support body operation, choose the belt clips or holsters, which do not
contain metallic components, to maintain a separation of 10 mm between this and your body.

Index 57
Index
Android Device
Connect Wi-Fi, 23
Battery
Charge, 15
Install, 14
Remove, 14
Customer Service, 48
Data Transfer Speed, 9
Device Driver Installation
Windows PC, 27
Device Layout (illustration), 4
Drag, 9
Electromagnetic Safety, 57
Enter Text, 9
Flick, 8
Home Screen, 5
iPad
Connect Wi-Fi, 22
iPhone
Connect Wi-Fi, 22
iPod Touch
Connect Wi-Fi, 22
Mac
Connect Wi-Fi, 21
Network setup, 31
Remove USB connection, 30
USB connection, 29
Memory Card, 12
Install, 12
Remove, 13
Network Name, 3
Operating System, 1
OS, 1
Package Contents, 2
Power Key, 4
Power Off, 17
Power On, 16
RF Exposure Information, 58
Safety Precautions, 49
Security Key, 3, 15
Services, 48
Settings, 32
SIM Card, 10
Insert, 11
Remove, 11
Sleep Mode, 7
Specific Absorption Rate (SAR), 57
Specifications
AC charger, 46
Materials, 47
Micro USB cable, 47
Mobile broadband device, 46
SSID, 3, 15
Status Bar Icons, 5
Swipe, 8
Tap, 8
Text Entry, 9
Touch Menu Icons, 6
Touchscreen, 7
Transfer Speed, 9
Troubleshooting, 43
Turn Device Off, 17
Turn Device On, 16
USB Connection
Mac, 29
Remove Mac, 30
Remove Windows PC, 26
Windows, 25
USIM Card, 10
Insert, 11
Remove, 11
Warranty, 48
Web UI
Overview, 32
Window, 32
Wi-Fi
Activate, 18
Connect Mac, 21
Connect Windows 7, 20
Connect Windows 8, 19
Connect Windows Vista, 20
Overview, 18
Wi-Fi Network Name, 3
Windows 7
Connect Wi-Fi, 20
Windows 8
Connect Wi-Fi, 19
Windows PC
Index 58
Remove USB connection, 26
Software Installation, 27
USB connection, 25
Windows Vista
Connect Wi-Fi, 20
WLAN
Activate, 18
Overview, 18
WPS
Connect Wi-Fi, 24