Fuji Film 02100003 IEEE802.11 b/g/n Wireless LAN module User Manual BM00 L340W 01 EN indb
Fuji Film Corporation IEEE802.11 b/g/n Wireless LAN module BM00 L340W 01 EN indb
Contents
- 1. User Manual (module)
- 2. User Manual (system)
User Manual (system)
First Steps
Taking Pictures
Viewing and Deleting Pictures
Movies
More on Photography
BL03601-200 EN
DIGITAL CAMERA
FINEPIX S8000W Series
Basic Manual
Thank you for your purchase of this prod-
uct. This manual takes you through the ba-
sic steps involved in using your camera for
the first time. Complete operating instruc-
tions may be found in the Owner’s Manual,
provided in pdf format on the supplied CD.
For information on related products, visit our website at
http://www.fujifilm.com/products/digital_cameras/index.html
Reference
ii
Be sure to read these notes before use
Safety Notes
• Make sure that you use your camera correctly. Read these
safety notes and your Owner’s Manual carefully before use.
• After reading these safety notes, store them in a safe place.
About the Icons
The icons shown below are used in this document to indi-
cate the severity of the injury or damage that can result if the
information indicated by the icon is ignored and the product
is used incorrectly as a result.
WARNING
This icon indicates that death or serious injury can
result if the information is ignored.
CAUTION
This icon indicates that personal injury or material
damage can result if the information is ignored.
WARNING
WARNING
If a problem arises, turn the camera o , remove the battery, and
disconnect and unplug the AC power adapter. Continued use of
the camera when it is emitting smoke, is emitting any unusual
odor, or is in any other abnormal state can cause a fi re or electric
shock. Contact your FUJIFILM dealer.
Do not allow water or foreign objects to enter the camera. If water
or foreign objects get inside the camera, turn the camera off ,
remove the battery, and disconnect and unplug the AC power
adapter. Continued use of the camera can cause a fi re or electric
shock. Contact your FUJIFILM dealer.
Do not use the camera in the bathroom or shower. This can cause a
fi re or electric shock.
Never attempt to change or take apart the camera (never open the
case). Failure to observe this precaution can cause fi re or electric
shock.
Should the case break open as the result of a fall or other accident,
do not touch the exposed parts. Failure to observe this precau-
tion could result in electric shock or in injury from touching the
damaged parts. Remove the battery immediately, taking care to
avoid injury or electric shock, and take the product to the point
of purchase for consultation.
WARNING
WARNING
Do not change, heat or unduly twist or pull the connection cord and do
not place heavy objects on the connection cord. These actions could
damage the cord and cause a fi re or electric shock. If the cord is
damaged, contact your FUJIFILM dealer.
Do not place the camera on an unstable surface. This can cause the
camera to fall or tip over and cause injury.
Never attempt to take pictures while in motion. Do not use the
camera while you are walking or driving a vehicle. This can
result in you falling down or being involved in a traffi c accident.
Do not touch any metal parts of the camera during a thunderstorm.
This can cause an electric shock due to induced current from
the lightning discharge.
Do not use the battery except as speci ed. Load the battery as
shown by the indicator.
Do not heat, change or take apart the battery. Do not drop or subject
the battery to impacts. Do not store the battery with metallic prod-
ucts. Any of these actions can cause the battery to burst or leak
and cause fi re or injury as a result.
Use only the battery or AC power adapters speci ed for use with this
camera. Do not use voltages other than the power supply voltage
shown. The use of other power sources can cause a fi re.
If the battery leaks and uid gets in contact with your eyes, skin or
clothing, ush the a ected area with clean water and seek medical
attention or call an emergency number right away.
Danger of explosion if battery is incorrectly replaced. Replace only
with the same or equivalent type.
Do not use in the presence of ammable objects, explosive gases, or
dust.
When carrying the battery, install it in a digital camera or keep it in
the hard case. When storing the battery, keep it in the hard case.
When discarding, cover the battery terminals with insulation tape.
Contact with other metallic objects or batteries could cause the
battery to ignite or burst.
Keep memory cards out of the reach of small children. Because
memory cards are small, they can be swallowed by children. Be
sure to store memory cards out of the reach of small children. If
a child swallows a memory card, seek medical attention or call
an emergency number.
CAUTION
CAUTION
Do not use this camera in locations a ected by oil fumes, steam, hu-
midity or dust. This can cause a fi re or electric shock.
Do not leave this camera in places subject to extremely high tem-
peratures. Do not leave the camera in locations such as a sealed
vehicle or in direct sunlight. This can cause a fi re.
Keep out of the reach of small children. This product could cause
injury in the hands of a child.
Do not place heavy objects on the camera. This can cause the heavy
object to tip over or fall and cause injury.
Do not move the camera while the AC power adapter is still connected.
Do not pull on the connection cord to disconnect the AC power adapter.
This can damage the power cord or cables and cause a fi re or
electric shock.
Do not use the AC power adapter if the plug is damaged or the plug
socket connection is loose. This could cause fi re or electric shock.
Do not cover or wrap the camera or the AC power adapter in a cloth or
blanket. This can cause heat to build up and distort the casing
or cause a fi re.
When you are cleaning the camera or you do not plan to use the cam-
era for an extended period, remove the battery and disconnect and
unplug the AC power adapter. Failure to do so can cause a fi re or
electric shock.
When charging ends, unplug the charger from the power socket.
Leaving the charger plugged into the power socket can cause
a fi re.
Using a ash too close to a person’s eyes may temporarily a ect the
eyesight. Take particular care when photographing infants and
young children.
When a memory card is removed, the card could come out of the slot
too quickly. Use your nger to hold it and gently release the card. In-
jury could result to those struck by the ejected card.
Request regular internal testing and cleaning for your camera. Build-
up of dust in your camera can cause a fi re or electric shock. Con-
tact your FUJIFILM dealer to request internal cleaning every two
years. Please note that this service is not free of charge.
Remove your ngers from the ash window before the ash res. Fail-
ure to observe this precaution could result in burns.
Keep the ash window clean and do not use the ash if the window
is obstructed. Failure to observe these precautions could cause
smoke or discoloration.
For Your Safety

iii
For Your Safety
IMPORTANT NOTICE:
Read Before Using the Software
Direct or indirect export, in whole or in part, of licensed soft-
ware without the permission of the applicable governing
bodies is prohibited.
Using the Camera
Do not aim the camera at extremely bright light sources,
such as the sun in a cloudless sky. Failure to observe this
precaution could damage the camera image sensor.
Li-ion Batteries
Li-ion Batteries
Read this section if your camera uses a rechargeable
Li-ion battery.
The battery is not charged at shipment. Charge the battery
before use. Keep the battery in its case when not in use.
■Notes on the Battery
The battery gradually loses its charge when not in use.
Charge the battery one or two days before use.
Battery life can be extended by turning the camera off when
not in use.
Battery capacity decreases at low temperatures; a depleted
battery may not function at when cold. Keep a fully charged
spare battery in a warm place and exchange as necessary,
or keep the battery in your pocket or other warm place and
insert it in the camera only when shooting. Do not place
the battery in direct contact with hand warmers or other
heating devices.
■ Charging the Battery
Charge the battery in the supplied battery charger. Charging
times will increase at ambient temperatures below +10 °C
(+50 °F) or above +35 °C (+95 °F). Do not attempt to charge
the battery at temperatures above 40 °C (+104 °F); at tem-
peratures below 0 °C (+32 °F), the battery will not charge.
Do not attempt to recharge a fully charged battery. The bat-
tery does not however need to be fully discharged before
charging.
The battery may be warm to the touch immediately after
charging or use. This is normal.
■Battery Life
At normal temperatures, the battery can be recharged about
300 times. A noticeable decrease in the length of time the
battery will hold a charge indicates that it has reached the
end of its service life and should be replaced.
■Storage
Performance may be impaired if the battery is left unused
for extended periods when fully charged. Run the battery
fl at before storing it.
If the camera will not be used for an extended period, re-
move the battery and store it in a dry place with an ambient
temperature of from +15 °C to +25 °C (+59 °F to +77 °F). Do
not store in locations exposed to extremes of temperature.
■Cautions: Handling the Battery
• Do not transport or store with metal objects such as neck-
laces or hairpins.
• Do not expose to fl ame or heat.
• Do not disassemble or modify.
• Use with designated chargers only.
• Do not drop or subject to strong physical shocks.
• Do not expose to water.
• Keep the terminals clean.
• The battery and camera body may become warm to the
touch after extended use. This is normal.
AA Alkaline/Rechargeable Ni-MH Batteries/ AA lithium batteries
AA Alkaline/Rechargeable Ni-MH Batteries/ AA lithium batteries
Read this section if your camera uses AA alkaline or re-
chargeable AA Ni-MH batteries. Information on compat-
ible battery types may be found elsewhere in the camera
manual.
■Cautions: Handling the Batteries
• Do not expose to water, fl ame, or heat, or store in warm or
humid conditions.
• Do not transport or store with metal objects such as neck-
laces or hairpins.
• Do not disassemble or modify the batteries or battery
casing.
• Do not subject to strong physical shocks.
• Do not use batteries that are leaking, deformed, or discol-
ored.
• Keep out of reach of infants and small children.
• Insert in the correct orientation.
• Do not mix old and new batteries, batteries with diff erent
charge levels, or batteries of diff erent types.
• If the camera will not be used for an extended period, re-
move the batteries. Note that the camera clock will be reset.
• The batteries may be warm to the touch immediately after
use. Turn the camera off and allow the batteries to cool
before handling.
• Battery capacity tends to decrease at low temperatures.
Keep spare batteries in a pocket or other warm place and
exchange as necessary. Cold batteries may recover some
of their charge when warmed.
• Fingerprints and other stains on the battery terminals
can impair battery performance. Thoroughly clean the
terminals with a soft, dry cloth before inserting them in
the camera.
If the batteries leak, clean the battery compartment
thoroughly before inserting new batteries.
If fl uid from the battery comes into contact with
skin or clothing, fl ush the aff ected area with water.
If uid enters your eyes, immediately ush the a ected
area with water and seek medical attention. Do not rub
your eyes. Failure to observe this precaution could result
in permanent visual impairment.

iv
For Your Safety
■Ni-MH Batteries
The capacity of Ni-MH batteries may be temporarily reduced
when new, after long periods of disuse, or if they are repeat-
edly recharged before being fully discharged. This is normal
and does not indicate a malfunction. Capacity can be in-
creased by repeatedly discharging the batteries using the
discharge option in the camera setup menu and recharging
them using a battery charger (sold separately).
QCAUTION: Do not use the discharge option with alkaline
batteries.
The camera draws a small amount of current even when
off . Ni-MH batteries that have been left in the camera for
an extended period may be drawn down to the point that
they no longer hold a charge. Battery performance may
also drop if the batteries are run down in a device such as
a fl ashlight. Use the discharge option in the camera setup
menu to discharge Ni-MH batteries. Batteries that no longer
hold a charge even after repeatedly being discharged and
recharged have reached the end of their service life and
must be replaced.
Ni-MH batteries can be recharged in a battery charger (sold
separately). Batteries may become warm to the touch after
charging. Refer to the instructions provided with the char-
ger for more information. Use the charger with compatible
batteries only.
Ni-MH batteries gradually lose their charge when not in use.
■Disposal
Dispose of used batteries in accord with local regulations.
Liquid Crystal
Liquid Crystal
In the event that the LCD monitor is damaged, care should
be taken to avoid contact with liquid crystal. Take the urgent
action indicated should any of the following situations arise:
• If liquid crystal comes in contact with your skin, clean the area
with a cloth and then wash thoroughly with soap and run-
ning water.
• If liquid crystal enters your eyes, fl ush the aff ected eye with
clean water for at least 15 minutes and then seek medical
assistance.
• If liquid crystal is swallowed, rinse your mouth thoroughly
with water. Drink large quantities of water and induce
vomiting, then seek medical assistance.
Although the display is manufactured using extremely high-
precision technology, it may contain pixels that are always
lit or that do not light. This is not a malfunction, and images
recorded with the product are unaff ected.
Notes on Copyright
Notes on Copyright
Unless intended solely for personal use, images recorded us-
ing your digital camera system cannot be used in ways that
infringe copyright laws without the consent of the owner.
Note that some restrictions apply to the photographing of
stage performances, entertainments, and exhibits, even
when intended purely for personal use. Users are also asked
to note that the transfer of memory cards containing images
or data protected under copyright laws is only permissible
within the restrictions imposed by those copyright laws.
NOTICES
To prevent re or shock hazard, do not expose the unit
to rain or moisture.
Please read the “Safety Notes” and make sure you understand
them before using the camera.
Perchlorate Material—special handling may apply. See
http://www.dtsc.ca.gov/hazardouswaste/perchlorate.
Trademark Information
Trademark Information
xD-Picture Card and E are trademarks of FUJIFILM
Corporation. The typefaces included herein are solely devel-
oped by DynaComware Taiwan Inc. Macintosh, QuickTime,
and Mac OS are trademarks of Apple Inc. in the U.S.A. and
other countries. Windows 8, Windows7, Windows Vista, and
the Windows logo are trademarks of the Microsoft group of
companies.
Wi-Fi® and Wi-Fi Protected Setup® are registered
trademarks of the Wi-Fi Alliance.
Adobe and Adobe Reader
are either trademarks or registered trademarks of Adobe
Systems Incorporated in the U.S.A. and/or other countries.
The SDHC and SDXC logos are trademarks of SD-3C, LLC. The
HDMI logo is a trademark. YouTube is a trademark of Google
Inc. Facebook is a trademark of Facebook, Inc. All other trade
names mentioned in this manual are the trademarks or reg-
istered trademarks of their respective owners.

v
For Your Safety
For Customers in the U. S. A.
For Customers in the U. S. A.
Tested To Comply With FCC Standards
FOR HOME OR OFFICE USE
Contains IC : 7736B-02100003
Contains FCC ID : W2Z-02100003
FCC Statement: This device complies with Part 15 of the FCC Rules.
Operation is subject to the following two conditions: (1) This de-
vice may not cause harmful interference, and (2) this device must
accept any interference received, including interference that may
cause undesired operation.
CAUTION: This equipment has been tested and found to com-
ply with the limits for a Class B digital device, pursuant to
Part 15 of the FCC Rules. These limits are designed to pro-
vide reasonable protection against harmful interference in a
residential installation. This equipment generates, uses, and
can radiate radio frequency energy and, if not installed and
used in accordance with the instructions, may cause harmful
interference to radio communications. However, there is no
guarantee that interference will not occur in a particular in-
stallation. If this equipment does cause harmful interference
to radio or television reception, which can be determined by
turning the equipment off and on, the user is encouraged
to try to correct the interference by one or more of the fol-
lowing measures:
• Reorient or relocate the receiving antenna.
• Increase the separation between the equipment and re-
ceiver.
• Connect the equipment into an outlet on a circuit diff erent
from that to which the receiver is connected.
• Consult the dealer or an experienced radio/TV technician
for help.
FCC Caution: Any changes or modifi cations not expressly ap-
proved by the party responsible for compliance could void
the user’s authority to operate this equipment.
This transmitter must not be co-located or operating in con-
junction with any other antenna or transmitter.
Radiation Exposure Statement: This device meets the gov-
ernment’s requirements for exposure to radio waves. This
device is designed and manufactured not to exceed the
emission limits for exposure to radio frequency (RF) energy
set by the Federal Communications Commission of the U.S.
Government.
The exposure standard for wireless device employs a unit
of measurement known as the Specifi c Absorption Rate, or
SAR. The SAR limit set by the FCC is 1.6W/kg. *Tests for SAR
are conducted using standard operating positions accepted
by the FCC with the device transmitting at its highest certi-
fi ed power level in all tested frequency bands.
Notes on the Grant: To comply with Part 15 of the FCC Rules,
this product must be used with a Fujifi lm-specifi ed ferrite-
core A/V cable, USB cable, and DC supply cord.
For Customers in Canada
For Customers in Canada
CAUTION: This Class B digital apparatus complies with Cana-
dian ICES-003.
Industry Canada statement: This device complies with RSS-
210 of the Industry Canada Rules. Operation is subject to
the following two conditions: (1) This device may not cause
harmful interference, and (2) this device must accept any
interference received, including interference that may cause
undesired operation.
This device and its antenna(s) must not be co-located or op-
erating in conjunction with any other antenna or transmit-
ter, except tested built-in radios. The County Code Selection
feature is disabled for products marketed in the US/ Canada.
Radiation Exposure Statement: The product comply with the
Canada portable RF exposure limit set forth for an uncon-
trolled environment and are safe for intended operation as
described in this manual. The further RF exposure reduction
can be achieved if the product can be kept as far as possible
from the user body or set the device to lower output power
if such function is available.
IMPORTANT SAFETY INSTRUCTIONS
• Read these instructions.
• Keep these instructions.
• Heed all warnings.
• Follow all instructions.
• Do not use this apparatus near water.
• Clean only with a dry cloth.
• Do not block any ventilation openings. Install in accor-
dance with the manufacturer’s instructions.
• Do not install near any heat sources such as radiators, heat
registers, stoves, or other apparatus (including amplifi ers)
that produce heat.
• Protect the power cord from being walked on or pinched
particularly at plugs, convenience receptacles, and the
point where they exit from the apparatus.
• Only use attachments/accessories specifi ed by the manu-
facturer.
• Unplug this apparatus during lightning storms or when un-
used for long periods of time.
• Refer all servicing to qualifi ed service personal. Servicing
is required when the apparatus has been damaged in any
way, such as power supply cord or plug is damaged, liquid
has been spilled or objects have fallen into the apparatus,
the apparatus has been exposed to rain or moisture, does
not operate normally, or has been dropped.

vi
For Your Safety
Caring for the Camera
To ensure continued enjoyment of the product, observe the
following precautions.
Storage and Use
Storage and Use
If the camera will not be used for an extended period, remove
the battery and memory card. Do not store or use the camera
in locations that are:
• exposed to rain, steam, or smoke
• very humid or extremely dusty
• exposed to direct sunlight or very high temperatures, such as in
a closed vehicle on a sunny day
• extremely cold
• subject to strong vibration
• exposed to strong magnetic fi elds, such as near a broad-
casting antenna, power line, radar emitter, motor, trans-
former, or magnet
• in contact with volatile chemicals such as pesticides
• next to rubber or vinyl products
■Water and Sand
Exposure to water and sand can also damage the camera and
its internal circuitry and mechanisms. When using the camera
at the beach or seaside, avoid exposing the camera to water or
sand. Do not place the camera on a wet surface.
■Condensation
Sudden increases in temperature, such as occur when enter-
ing a heated building on a cold day, can cause condensation
inside the camera. If this occurs, turn the camera off and wait
an hour before turning it on again. If condensation forms on
the memory card, remove the card and wait for the condensa-
tion to dissipate.
Cleaning
Cleaning
Use a blower to remove dust from the protective glass
covering the lens and LCD monitor, then gently wipe with
a soft, dry cloth. Any remaining stains can be removed by
wiping gently with a piece of FUJIFILM lens-cleaning paper
to which a small amount of lens-cleaning fl uid has been ap-
plied. Care should be taken to avoid scratching the protec-
tive glass or LCD monitor. The camera body can be cleaned
with a soft, dry cloth. Do not use alcohol, thinner, or other
volatile chemicals.
Traveling
Traveling
Keep the camera in your carry-on baggage. Checked bag-
gage may suff er violent shocks that could damage the
camera.
Disposal of Electrical and Electronic Equipment in Private
Disposal of Electrical and Electronic Equipment in Private
Households
Households
In the European Union, Norway, Iceland and Liechten-
stein: This symbol on the product, or in the man-
ual and in the warranty, and/or on its packaging
indicates that this product shall not be treated as
household waste. Instead it should be taken to
an applicable collection point for the recycling of
electrical and electronic equipment.
By ensuring this product is disposed of correctly, you will
help prevent potential negative consequences to the en-
vironment and human health, which could otherwise be
caused by inappropriate waste handling of this product.
This symbol on the batteries or accumulators
indicates that those batteries shall not be treated
as household waste.
If your equipment contains easy removable batteries or
accumulators please dispose these separately according to
your local requirements.
The recycling of materials will help to conserve natural re-
sources. For more detailed information about recycling this
product, please contact your local city offi ce, your household
waste disposal service or the shop where you purchased the
product.
In Countries Outside the European Union, Norway, Iceland and
Liechtenstein: If you wish to discard this product, including
the batteries or accumulators, please contact your local au-
thorities and ask for the correct way of disposal.
European Union regulatory notice
European Union regulatory notice
This product complies with the following EU Directives:
• Low Voltage Directive 2006/95/EC
• EMC Directive 2004/108/EC
• R & TTE Directive 1999/5/EC
Compliance with these directives implies conformity to ap-
plicable harmonized European standards (European Norms)
which are listed on the EU Declaration of Conformity issued
by FUJIFILM Corporation for this product or product family.
This compliance is indicated by the following conformity
marking placed on the product:
This marking is valid for non-Telecom products and EU har-
monized Telecom products (e.g. Bluetooth).

vii
For Your Safety
Regarding the Declaration of Conformity, visit http://www.fujifilm.com/products/
digital_cameras/f/finepix_S8400W/pdf/index/finepix_S8400W_cod.pdf.
IMPORTANT: Read the following notices before using the camera’s built-in wireless
transmitter.
c
This product, which contains encryption function developed in the United
States, is controlled by the United States Export Administration Regulations and
may not be exported or re-exported to any country to which the United States
embargoes goods.
• Use only as part of a wireless network. FUJIFILM does not accept liability for dam-
ages resulting from unauthorized use. Do not use in applications requiring
a high degree of reliability, for example in medical devices or other systems
that may directly or indirectly impact human life. When using the device in
computer and other systems that demand a greater degree of reliability than
wireless networks, be sure to take all necessary precautions to ensure safety
and prevent malfunction.
• Use only in the country in which the device was purchased. This device conforms to
regulations governing wireless network devices in the country in which it was
purchased. Observe all location regulations when using the device. FUJIFILM
does not accept liability for problems arising from use in other jurisdictions.
• Wireless data (images) may be intercepted by third parties. The security of data
transmitted over wireless networks is not guaranteed.
• Do not use the device in locations subject to magnetic fields, static electricity, or radio
interference. Do not use the transmitter in the vicinity of microwave ovens or
in other locations subject to magnetic fields, static electricity, or radio inter-
ference that may prevent reception of wireless signals. Mutual interference
may occur when the transmitter is used in the vicinity of other wireless devices
operating in the 2.4GHz band.
• The wireless transmitter operates in the 2.4GHz band using DSSS and OFDM modulation.
Wireless Network Devices: Cautions
• This device operates on the same frequency as commercial, educational, and medical
devices and wireless transmitters. It also operates on the same frequency as li-
censed transmitters and special unlicensed low-voltage transmitters used in
RFID tracking systems for assembly lines and in other similar applications.
• To prevent interference with the above devices, observe the following precautions.
Confirm that the RFID transmitter is not in operation before using this device.
Should you observe that the device causes interference in licensed transmit-
ters used for RFID tracking, immediately choose a new operating frequency
for this device to prevent additional interference. If you notice that this device
causes interference in low-voltage RFID tracing systems, contact a FUJIFILM
representative.
viii
Table of Contents
For Your Safety .................................................................................ii
First Steps
First Steps
.............................................................
.............................................................
1
1
Before You Begin ............................................................................ 1
Supplied Accessories ................................................................... 1
Inserting the Batteries and a Memory Card ....................... 2
Turning the Camera On and Basic Setup ............................. 3
Taking Pictures
Taking Pictures
....................................................
....................................................
4
4
Viewing and Deleting Pictures
Viewing and Deleting Pictures
...........................
...........................
6
6
Movies
Movies
...................................................................
...................................................................
7
7
Recording and Viewing Movies ............................................... 7
More on Photography
More on Photography
.........................................
.........................................
8
8
Shooting Mode ................................................................................ 8
M SCENE RECOGNITION................................................... 8
B AUTO ........................................................................................... 8
Adv. ADVANCED ............................................................................ 8
SP SCENE POSITION ................................................................... 13
r MOTION PANORAMA 360 ................................................ 15
P: PROGRAM AE ........................................................................... 17
S: SHUTTER PRIORITY AE ..........................................................18
A: APERTURE PRIORITY AE .......................................................18
M: MANUAL ................................................................................... 19
C: CUSTOM MODE .......................................................................20
Reference
Reference
...........................................................
...........................................................
21
21
Parts of the Camera ..................................................................... 21
Shooting, Playback, and Setup Options ............................22
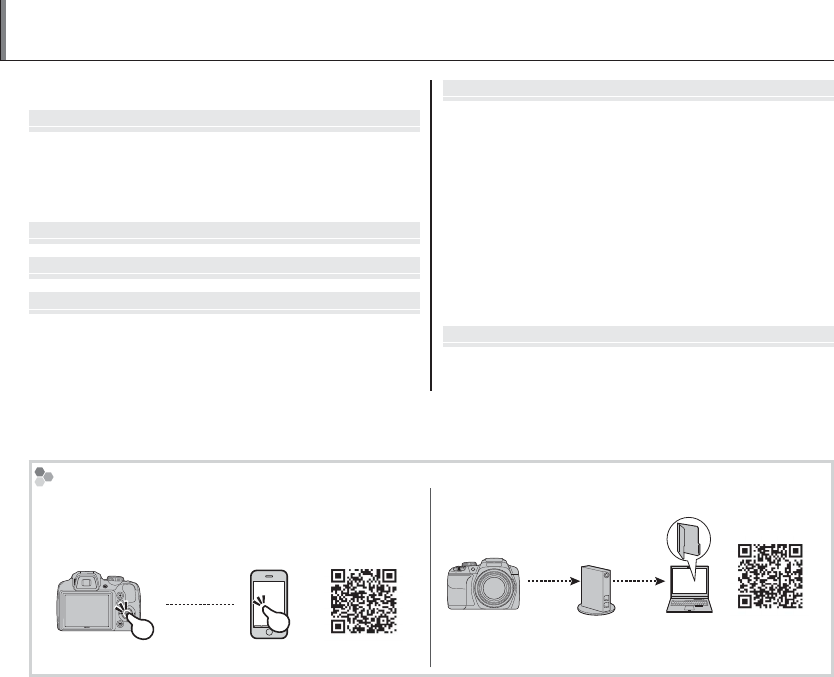
Wireless Networks
• Uploading Pictures to a Smartphone or a Tablet.
• Downloading Location Data from a Smartphone.
• Browsing the Camera from a Smartphone.
http://app.fujifilm-dsc.com/app/
• Saving Pictures to a Computer Automatically.
http://app.fujifilm-dsc.com/pc/
First Steps
1
Before You Begin
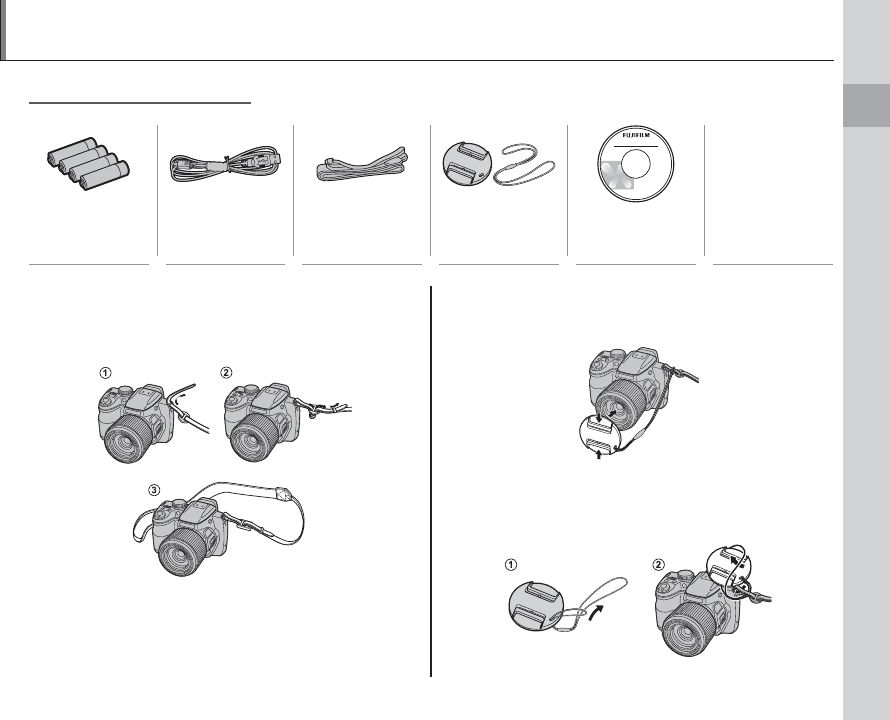
Supplied Accessories
Supplied Accessories
• Basic Manual
(this manual)
AA alkaline (LR6)
batteries (×4)
USB cable Strap Lens cap CD-ROM
Attaching the Strap
Attaching the Strap
Attach the strap to the two strap eyelets as shown
below.
The Lens Cap
The Lens Cap
Attach the lens cap as shown.
To avoid losing the lens cap, pass the supplied
string through the eyelet (q) and secure the lens
cap to the strap (w).
First Steps
2
Inserting the Batteries and a Memory Card
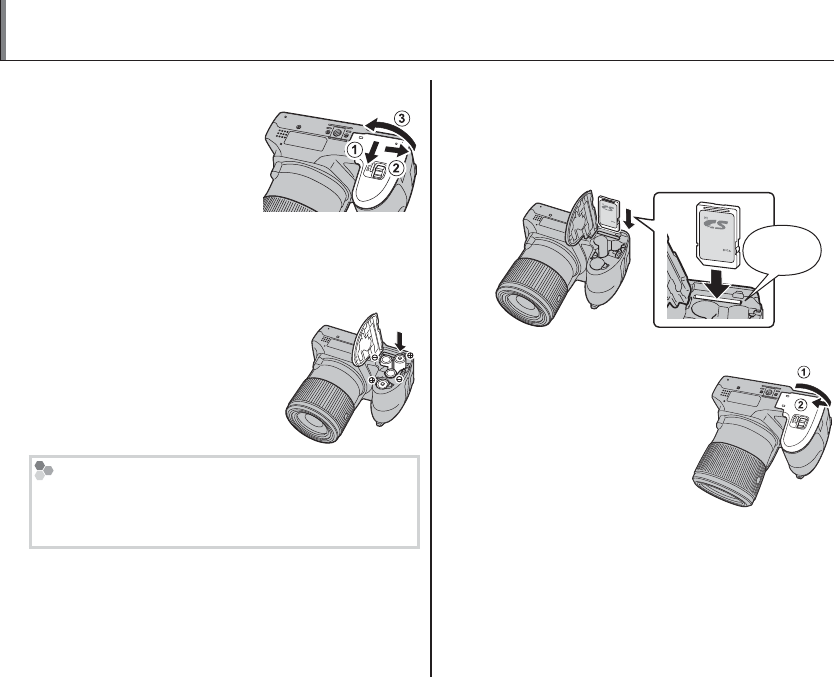
1
Open the battery-chamber cover.
Slide the battery-cham-
ber latch in the direction
shown and open the
battery-chamber cover.
1
Be sure the camera is off before opening the bat-
tery-chamber cover.
2
Insert the batteries.
Insert the batteries in the
orientation shown by the
“+“ and “–“ marks inside
the battery chamber.
Memory Cards
Pictures can be stored in an optional SD, SDHC, and
SDXC memory cards, referred to in this manual as
“memory cards”.
3
Insert the memory card.
Holding the memory card in the orientation
shown below, slide it in until it clicks into
place at the back of the slot.
Click
4
Close the battery-chamber cover.
Close the battery-cham-
ber cover and slide it in
until the latch clicks into
place.
3
Do not use force. If the battery-chamber cover
does not close, check that the batteries are in the
correct orientation and try again.
First Steps
3
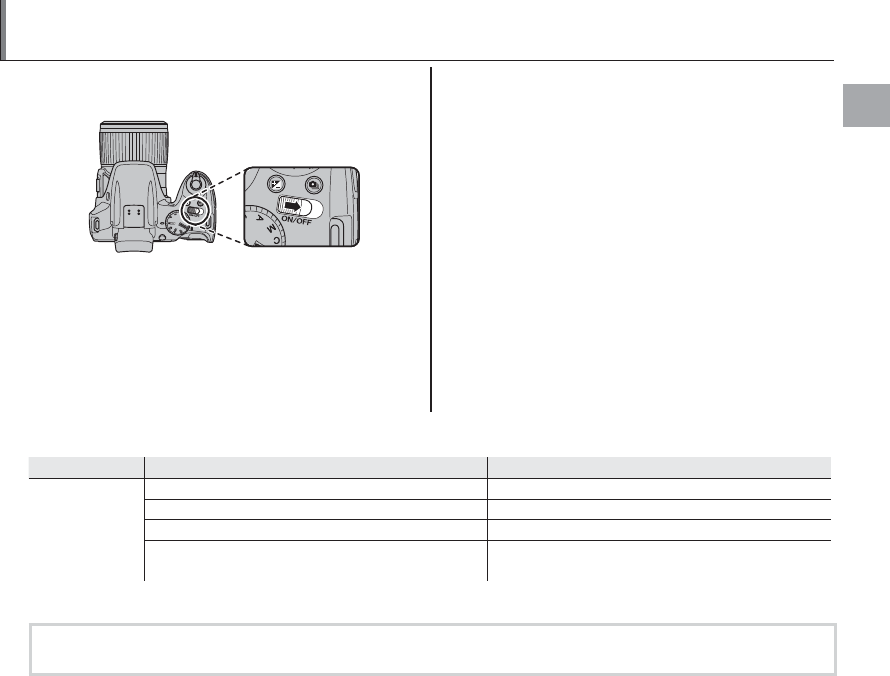
Turning the Camera On and Basic Setup
Slide the G switch in the direction shown
below. The lens will extend automatically.
A language-selection dialog is displayed the first
time the camera is turned on.
1
Choose a language.
1.1 Press the selector up or down to highlight
a language.
1.2 Press MENU/OK.
2
Set the date and time.
2.1 Press the selector left or right to highlight
the year, month, day, hour, or minute and
press up or down to change. To change
the order in which the year, month, and
day are displayed, highlight the date for-
mat and press the selector up or down.
2.2 Press MENU/OK. A battery type message
will be displayed; if the type differs from
the type inserted in the camera, use the
setup menu
T BATTERY TYPE option
to specify the correct type.
Troubleshooting
Troubleshooting
Problem
Problem
Possible cause
Possible cause
Solution
Solution
The camera does
not turn on.
The batteries are exhausted. Insert fresh or fully-charged spare batteries.
The batteries are not in the correct orientation. Re-insert the batteries in the correct orientation.
The battery-chamber cover is not latched. Latch the battery-chamber cover.
The AC power adapter and DC coupler are not con-
nected properly.
Make sure that the AC power adapter and DC cou-
pler are properly connected.
For additional troubleshooting information, visit http://www.fujifilm.com/.
For more information, see the supplied Owner’s Manual (CD) or visit
http://www.fujifilm.com/products/digital_cameras/index.html.
4
Taking Pictures
Taking Pictures
This section describes how to take pictures in M mode.
1
Turn the camera on.
Slide the G switch to turn the camera
on.
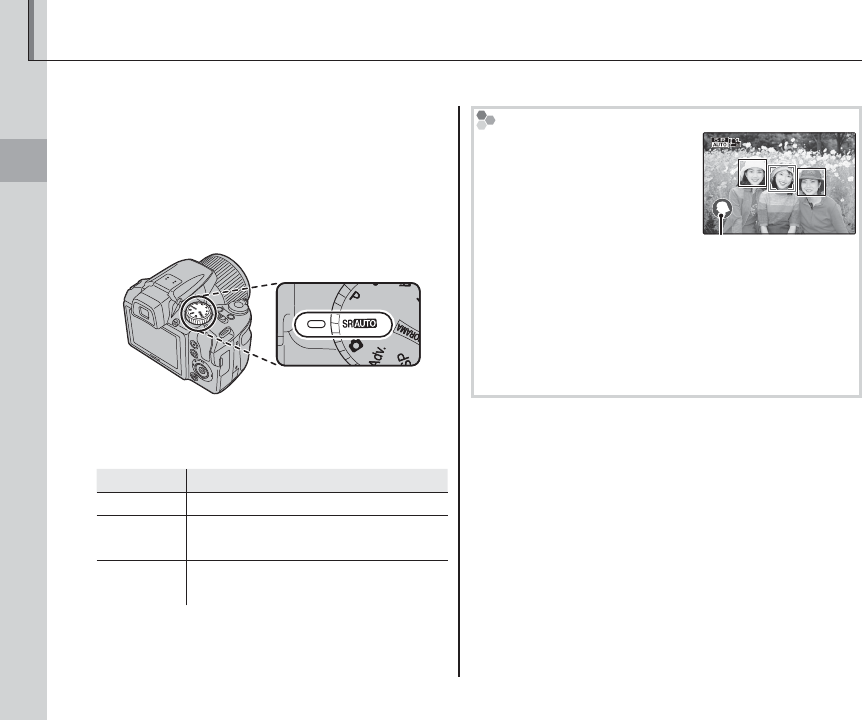
2
Select M mode.
Rotate the mode dial to M.
3
Check the battery level.
Check the battery level in the display.
Indicator
Indicator
Description
Description
NO ICON Batteries are partially discharged.
B
(red)
Batteries are low. Replace as soon
as possible.
A
(blinks red)
Batteries are exhausted. Turn cam-
era off and replace batteries.
M
In this mode, the camera au-
tomatically analyzes the com-
position and selects a scene
according to shooting condi-
tions and the type of subject:
• b (PORTRAIT): Human portrait
subject.
• c (LANDSCAPE): Man-made or natural landscape.
• d (NIGHT): Poorly-lit landscape.
• e (MACRO): Subject close to camera.
• f (NIGHT PORTRAIT): Poorly-lit portrait subject.
• g (BACKLIT PORTRAIT): Back-lit portrait subject.
a (AUTO) is selected if none of the above are detected.
Selected scene
Taking Pictures
5
Taking Pictures
Taking Pictures
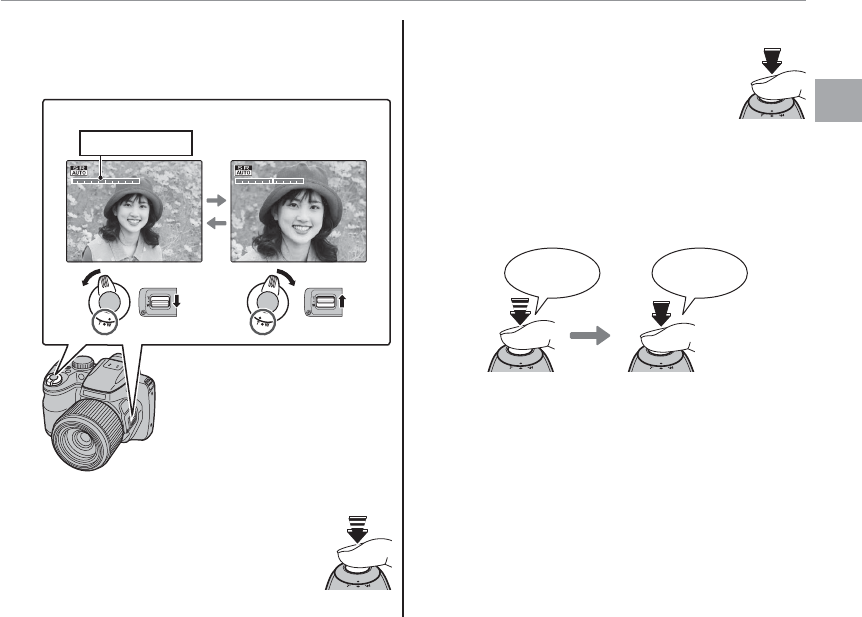
4
Frame the picture.
Use the zoom control or side lever to frame
the picture in the display.
Select W to zoom out Select T to zoom in
Zoom indicator
5
Focus.
Press the shutter button halfway
to focus.
6
Shoot.
Smoothly press the shutter button
the rest of the way down to take
the picture.
2 The Shutter Button
The shutter button has two positions. Pressing the
shutter button halfway (q) sets focus and exposure;
to shoot, press the shutter button the rest of the way
down (w).
q w
Press halfway Press the rest of
the way down
Double
beep Click
6
Viewing and Deleting Pictures
Viewing and Deleting Pictures
Pictures can be viewed in the monitor. When taking important photographs, take a test shot and
check the results.
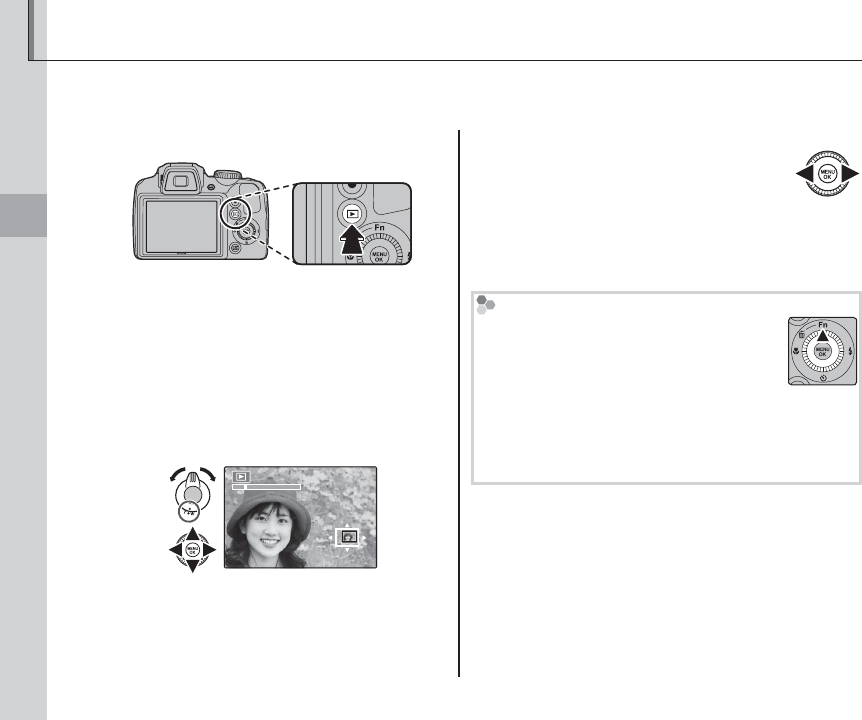
1
Press the a button.
The most recent picture will be displayed in
the monitor.
Select T to zoom in on pictures displayed in
single-frame playback; select W to zoom out.
When the picture is zoomed in, the selector
can be used to view areas of the image not
currently visible in the display.
Select W to increase the number of images
displayed or T to view fewer images.
2
View additional pictures.
Press the selector right to view pic-
tures in the order recorded, left to
view pictures in reverse order.
Press the shutter button to exit to shooting
mode.
Deleting Pictures
To delete the picture currently displayed
in the monitor, press the selector up (b).
• Select FRAME and press MENU/OK.
A confirmation dialog will be displayed.
• To delete the picture, press MENU/OK.
To exit without deleting the picture, press DISP/BACK.
Viewing and Deleting Pictures
7
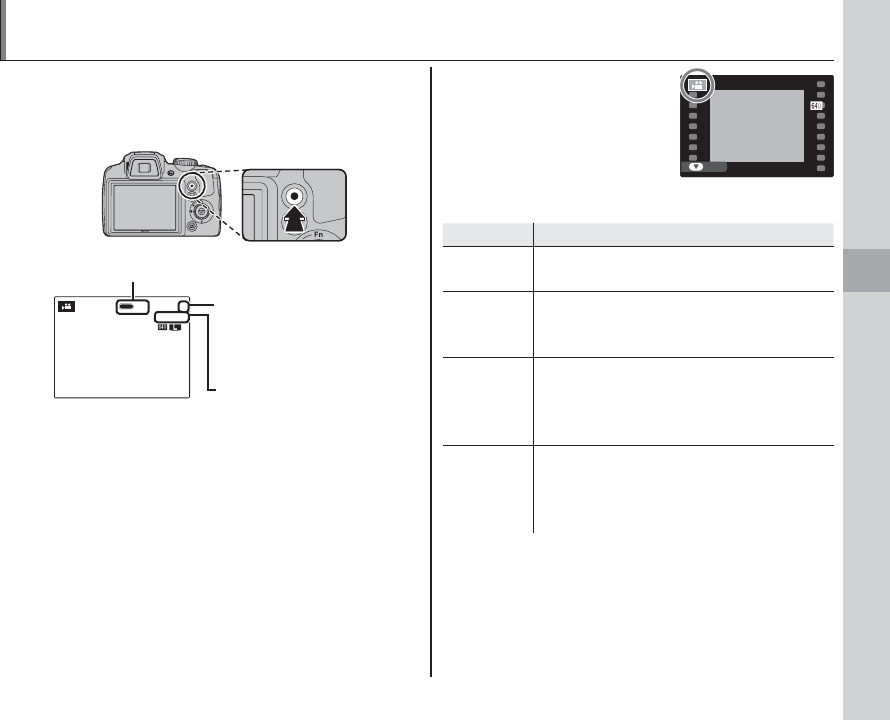
Movies
Press the z button to shoot a movie. Sound is re-
corded via the built-in microphone; do not cover
the microphone during recording.
1
1
REC
999m59s
999m59s
F
F
Number of photos that
can be taken during
recording
Time remaining
y REC icon
To end recording, press the z button again.
Recording ends automatically when the movie
reaches maximum length or memory is full.
During playback, movies
are displayed in the moni-
tor as shown at right. The
following operations can be
performed while a movie is
displayed:
100-006
100-006
10 : 00
AM
10 : 00
AM
12/31/2050
12/31/2050
PLAY
Operation
Operation
Description
Description
Start/pause
playback
Press the selector down to start playback.
Press again to pause.
End
playback/
delete
Press the selector up to end playback. If
playback is not in progress, pressing the
selector up will delete the current movie.
Advance/
rewind
Press the selector right to advance, left to
rewind. If playback is paused, the movie
will advance or rewind one frame each
time the selector is pressed.
Adjust
volume
Press MENU/OK to pause playback and dis-
play volume controls. Press the selector
up or down to adjust the volume; press
MENU/OK again to set the volume.
Recording and Viewing Movies
Movies
8
More on Photography
More on Photography
Shooting Mode
Choose a shooting mode according to the scene or type of subject. To choose a shooting mode, rotate
the mode dial to the desired setting. The following modes are available:
M
M
SCENE RECOGNITION
SCENE RECOGNITION
The camera automatically analyzes the composi-
tion and selects the appropriate scene mode ac-
cording to the subject and shooting conditions.
B
B
AUTO
AUTO
Choose for crisp, clear snapshots. This mode is
recommended in most situations.
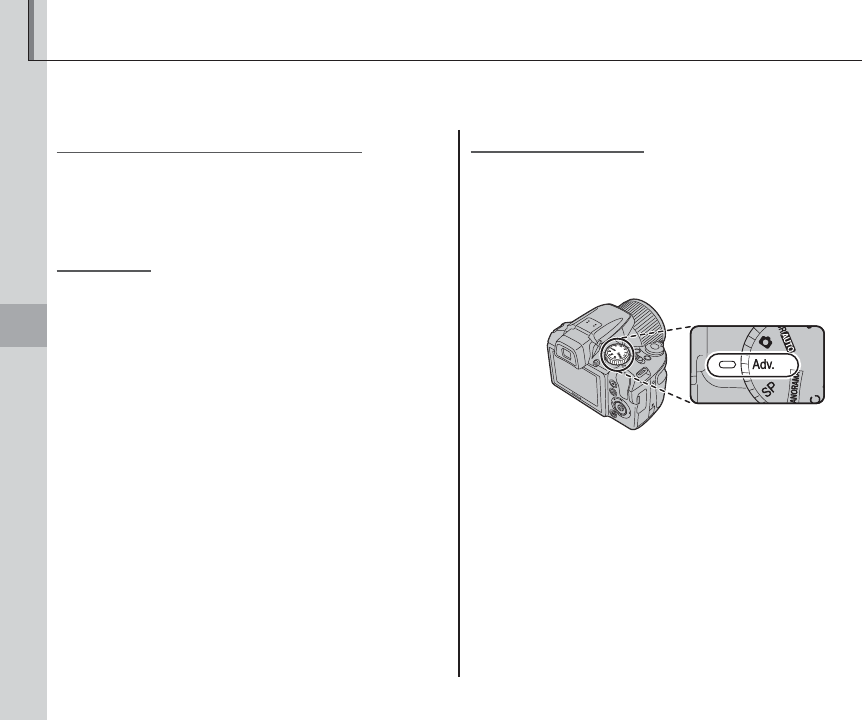
Adv.
Adv.
ADVANCED
ADVANCED
This mode combines “point-and-shoot” simplicity
with sophisticated photographic techniques. The
A Adv. MODE option in the shooting menu can
be used to choose from the following advanced
modes:

9
More on Photography
Shooting Mode
■
■
a
a
ADVANCED FILTER
ADVANCED FILTER
Take photos with filter effects. Select a filter effect and press MENU/OK.
1
Depending on the subject and camera settings, images may in some cases be grainy or vary in brightness and
hue.
Filter
Filter
Description
Description
G TOY CAMERA Choose for a retro toy camera effect.
H MINIATURE The tops and bottoms of pictures are blurred for a diorama effect.
I
I
POP COLOR
POP COLOR Create high-contrast images with saturated colors.
S SOFT FOCUS Create a look that is evenly soft throughout the whole image.
C CROSS SCREEN Create a star pattern where lines radiate out from bright objects.
u PARTIAL COLOR (RED)
Areas of the image that are the selected color are recorded in that color. All others areas of the
image are recorded in black-and-white.
v PARTIAL COLOR (ORANGE)
w PARTIAL COLOR (YELLOW)
x PARTIAL COLOR (GREEN)
y PARTIAL COLOR (BLUE)
z
z
PARTIAL COLOR (PURPLE)
PARTIAL COLOR (PURPLE)

10
Shooting Mode
■
■
j
j
PRO LOW-LIGHT
PRO LOW-LIGHT
Each time the shutter button
is pressed, the camera makes
four exposures and combines
them into a single photograph.
Use to reduce noise and blur
when photographing poorly lit subjects or static
subjects at high zoom ratios.
a
A single combined photograph may not be created
with some scenes or if the subject or camera moves
during shooting. Do not move the camera until shoot-
ing is complete.
Pro Low-Light
To save unprocessed copies of pictures taken in these
modes, select ON for the t SAVE ORG IMAGE op-
tion in the setup menu.
c
• Keep the camera steady during shooting.
• Frame coverage is reduced.
■
■
k
k
HDR
HDR
Each time the shutter button is pressed, the cam-
era takes a series of shots, each with different
exposure. These are combined into a single im-
age, preserving detail in highlights and shadows.
Choose for high-contrast scenes.
a
A single combined photograph may not be created
with some scenes or if the subject or camera moves
during shooting. Do not move the camera until shoot-
ing is complete.
HDR
To save unprocessed copies of pictures taken in this
mode, select ON for the t SAVE ORG IMAGE op-
tion in the setup menu.
3
• Keep the camera steady during shooting.
• Frame coverage is reduced.
11
More on Photography
Shooting Mode
■
■
C
C
Natural &
Natural &
N
N
This mode helps ensure good results with back-
lit subjects and in other situations with difficult
lighting. Before shooting, raise the flash; pictures
can only be taken when the flash is raised. Each
time the shutter button is pressed, the camera
takes two shots: one shot without the flash to
preserve natural lighting, followed immediately
by a second shot with the flash. Do not move the
camera until shooting is complete.
1
• Do not use where flash photography is prohibited.
• Only available if memory remains for two pictures.
• Burst mode is not available.
■
■
D
D
Natural Light
Natural Light
Capture natural light indoors, under low light, or
where the flash can not be used. The flash turns
off and sensitivity is raised to reduce blur.
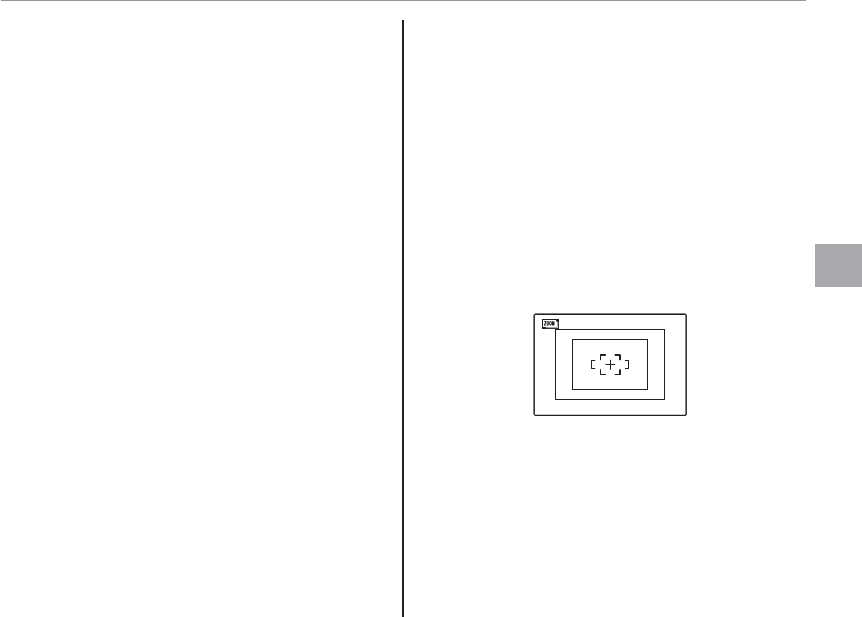
■
■
B
B
Zoom Bracketing
Zoom Bracketing
Each time the shutter button is pressed, the cam-
era takes three pictures: one at the current zoom
ratio with an image size of O, a second zoomed
in 1.4 × and cropped to P, and a third zoomed in
2 × and cropped to Q (pictures will only be taken
if there is enough memory for three images). Two
frames are displayed to show the areas that will
be included in the second and third pictures; the
outer frame shows the area that will be recorded
at 1.4 × zoom, the inner frame the area that will be
recorded at 2 × zoom.
1
• Digital zoom can not be used. If digital zoom is active
when
B
B mode is selected, zoom will be set to the
maximum optical zoom position.
• Burst shooting options can not be used.
12
Shooting Mode
■
■
i
i
I
I
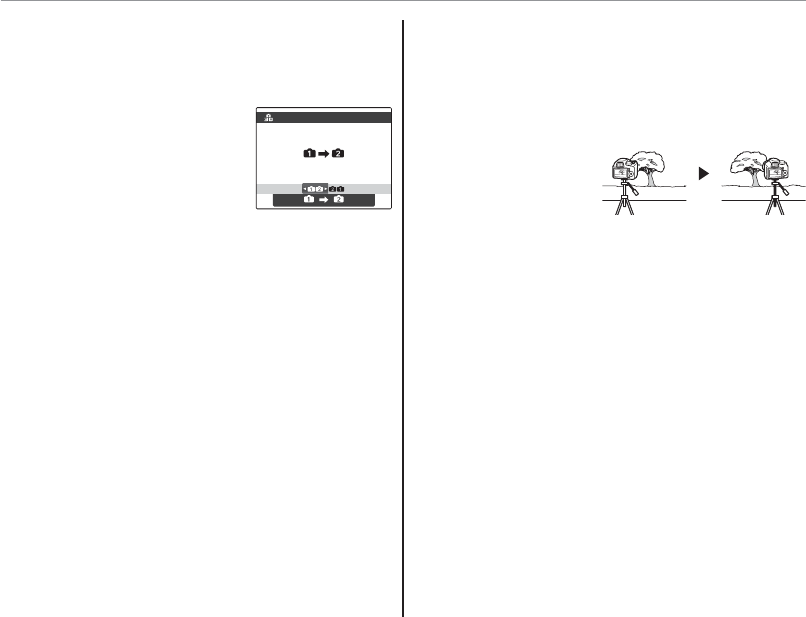
NDIVID. SHUTTER 3D
NDIVID. SHUTTER 3D
Take two shots from different angles to create a
3D image.
1 To choose the order in
which the pictures are tak-
en, press the selector right
to display the current order
and then press the selector
left or right to choose from the options below.
G: Take the left shot first.
H: Take the right shot first.
2 Press the shutter button to take the first shot.
c
To exit without recording a picture, press DISP/BACK.
3 The first shot will be shown superimposed on
the view through the lens. Using it as a guide,
frame the second shot and press the shutter
release button.
a
• The 3D effect may
not be visible with
some subjects or
under some shoot-
ing conditions. For best results, the distance the
camera is moved between shots should be about
1/30th to 1/50th of the distance to the subject.
• The camera will turn off automatically if no op-
erations performed for the time selected for
M AUTO POWER OFF. The first shot will not be
saved if the second shot is not taken before the
camera turns off.
TURN
13
More on Photography
Shooting Mode
Viewing and Printing 3D Images
• The camera displays images in 2D. Press the selector
down to toggle between the first and second shots.
• Devices equipped for 3D display, such as the FINEPIX
REAL 3D V3 digital photo frame or FINEPIX REAL 3D
W3 digital camera, will display the images in 3D.
• 3D prints can be ordered from http://www.fujifilm.
com/3d/print/
• The supplied software displays 3D anaglyph images.
3D photos can also be viewed using other applica-
tions that support the MP format.
• 3D TVs that support the MP format can display im-
ages in 3D. See the manual for your TV for details.
c
• Images are not output in 3D when printed directly
from the camera.
• 3D images are displayed in 2D in slide shows and
when output on a conventional TV.
• 3D images can not be edited or retouched.
1
The MP (Multi-Picture) format is a CIPA standard for files
containing multiple still images. Files in MP format are
referred to as “MP files” and have the extension “*.MPO”.
The camera uses this format for 3D images.
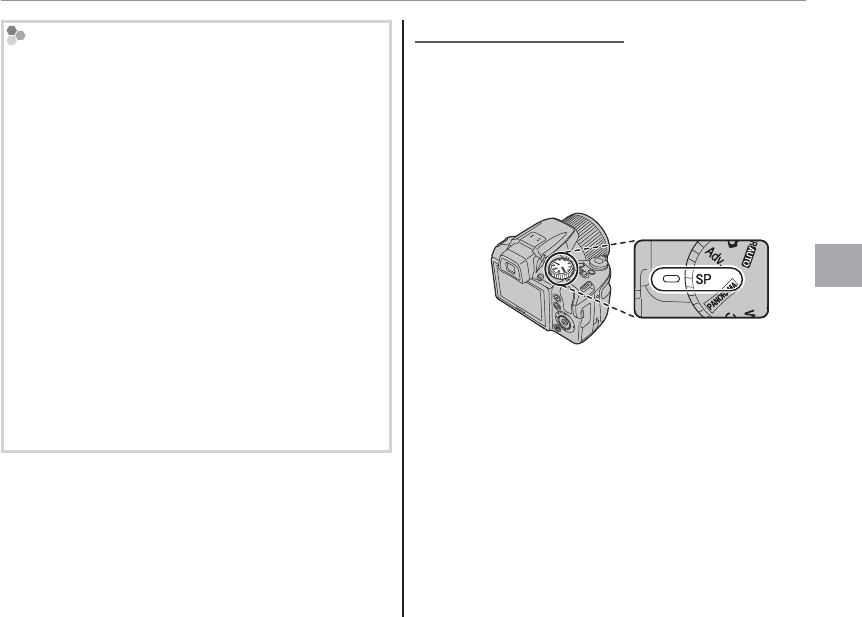
SP
SP
SCENE POSITION
SCENE POSITION
The camera offers a choice of “scenes,” each
adapted to particular shooting conditions or a
specific type of subject. Use the A SCENE POSI-
TION option in the shooting menu to choose the
scene assigned to the SP position on the mode
dial.

14
Shooting Mode
Scene
Scene
Description
Description
C PORTRAIT Choose this mode for soft-toned portraits with natural skin tones.
D BABY MODE Choose for natural skin tones when taking portraits of infants. The flash turns off automatically.
K SMILE&SHOOT The shutter is released automatically when Intelligent Face Detection detects a smiling face.
M LANDSCAPE Choose this mode for crisp, clear daylight shots of buildings and landscapes.
N SPORT Choose this mode when photographing moving subjects. Priority is given to faster shutter speeds.
O NIGHT Choose this mode for poorly lit twilight or night scenes. Sensitivity is automatically raised to reduce
blur caused by camera shake.
H NIGHT (TRIPOD) Choose this mode for slow shutter speeds when shooting at night. Use a tripod to prevent blur.
P FIREWORKS Slow shutter speeds are used to capture the expanding burst of light from a firework. Rotate the com-
mand dial to choose a shutter speed.
Q SUNSET Choose this mode to record the vivid colors in sunrises and sunsets.
R SNOW Choose for crisp, clear shots that capture the brightness of scenes dominated by shining white snow.
S BEACH Choose for crisp, clear shots that capture the brightness of sunlit beaches.
U PARTY Capture indoor background lighting under low-light conditions.
V FLOWER Choose for vivid close-ups of flowers. The camera focuses in the macro range.
W TEXT Take clear pictures of text or drawings in print. The camera focuses in the macro range.
15
More on Photography
Shooting Mode
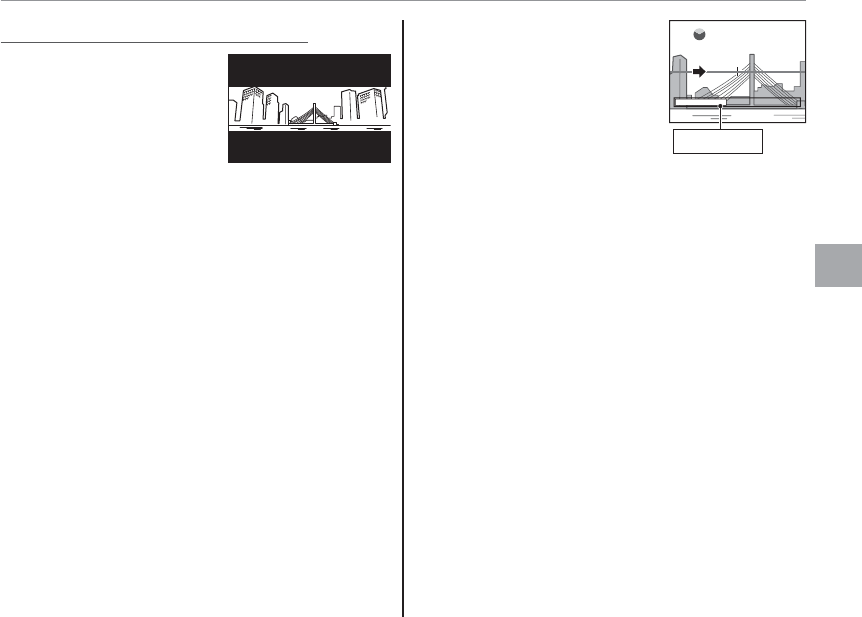
r
r
MOTION PANORAMA 360
MOTION PANORAMA 360
Follow an on-screen guide
to take photos that will
automatically be joined
to form a panorama. The
camera zooms all the way
out and remains fixed
at the widest angle until
shooting is complete.
1 To select the angle through which you will pan
the camera while shooting, press the selector
down. Press the selector left or right to high-
light an angle and press MENU/OK.
2 Press the selector right to view a choice of pan
directions. Press the selector left or right to
highlight a pan direction and press MENU/OK.
3 Press the shutter button all the way down to
start recording. There is no need to keep the
shutter button pressed during recording.
4 Pan the camera in the di-
rection shown by the arrow.
Shooting ends automati-
cally when the progress bar
is full and the panorama is
complete.
120
Progress bar
a
Shooting ends if the shutter button is pressed all the
way down during shooting. No panorama will be re-
corded if the shutter button is pressed before the cam-
era has been panned through 120 °.

16
Shooting Mode
c
• Panoramas are created from multiple frames. The
camera may in some cases record a greater or lesser
angle than selected or be unable to stitch the frames
together perfectly. The last part of the panorama
may not be recorded if shooting ends before the
panorama is complete.
• Shooting may be interrupted if the camera is panned
too quickly or too slowly. Panning the camera in a
direction other than that shown cancels shooting.
• The desired results may not be achieved with mov-
ing subjects, subjects close to the camera, unvarying
subjects such as the sky or a field of grass, subjects
that are in constant motion, such as waves and wa-
terfalls, or subjects that undergo marked changes in
brightness. Panoramas may be blurred if the subject
is poorly lit.
For Best Results
For best results, move the camera in a small circle at
a steady speed, keeping the camera horizontal and
being careful only to pan in the direction shown by
the guides. If the desired results are not achieved, try
panning at a different speed.
17
More on Photography
Shooting Mode
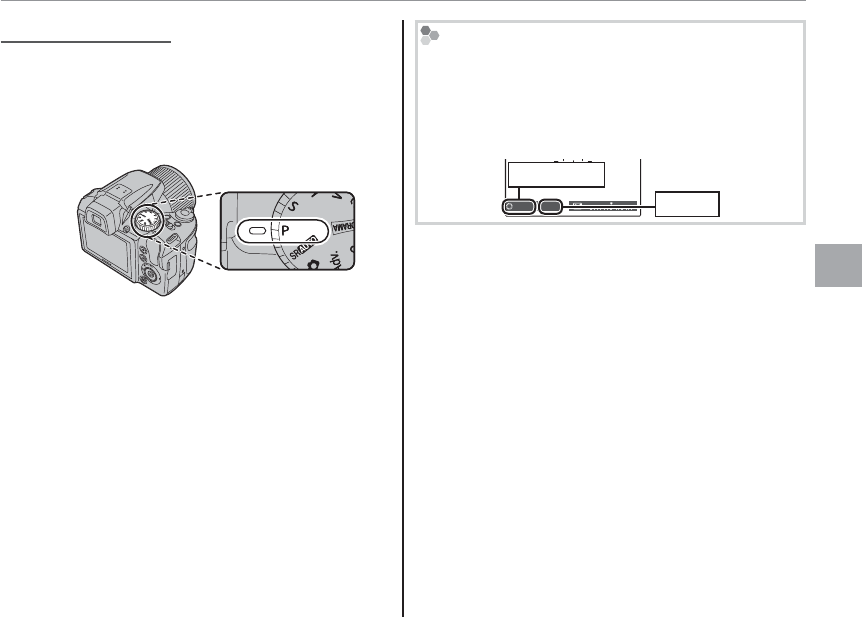
P
P
: PROGRAM AE
: PROGRAM AE
In this mode, the camera sets exposure automati-
cally. If desired, you can choose different com-
binations of shutter speed and aperture that will
produce the same exposure (program shift).
c
If the subject is outside the metering range of the cam-
era, the shutter speed and aperture displays will show
“---”. Press the shutter button halfway to measure ex-
posure again.
Program Shift
Rotate the command dial to choose the desired com-
bination of shutter speed and aperture. The default
values can be restored by raising the flash or turning
the camera off. Program shift is not available when
the flash is raised.
F
3.3
1200
Shutter speed
Aperture
18
Shooting Mode
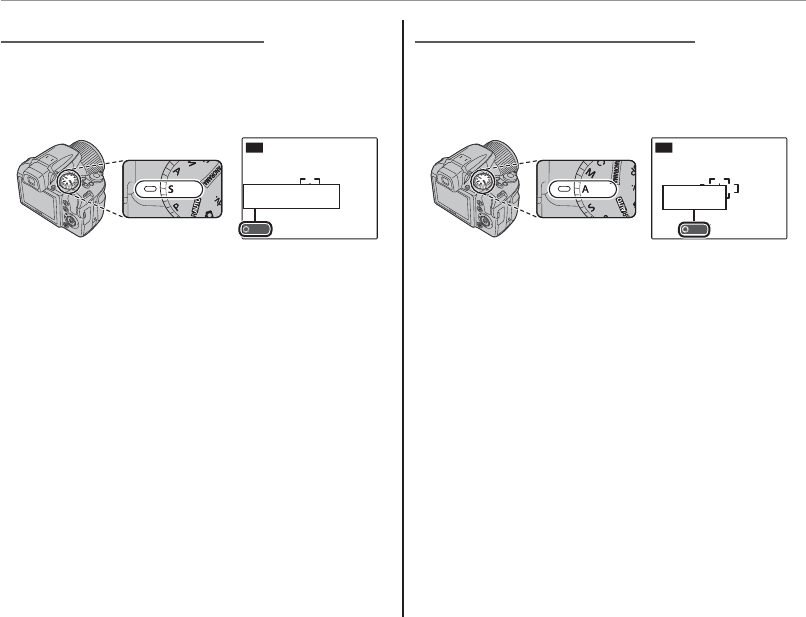
S
S
: SHUTTER PRIORITY AE
: SHUTTER PRIORITY AE
Choose the shutter speed using the command
dial, while the camera adjusts aperture for opti-
mal exposure.
1200
S
Shutter speed
c
• If the correct exposure can not be achieved at the
selected shutter speed, aperture will be displayed in
red. Adjust shutter speed until the correct exposure
is achieved. If the subject is outside the metering
range of the camera, the aperture display will show
“F---”. Press the shutter button halfway to measure
exposure again.
• The shutter speed is restricted depending on the ISO
setting.
A
A
: APERTURE PRIORITY AE
: APERTURE PRIORITY AE
Choose the aperture using the command dial,
while the camera adjusts shutter speed for opti-
mal exposure.
F
10
A
Aperture
c
If the correct exposure can not be achieved at the se-
lected aperture, shutter speed will be displayed in red.
Adjust aperture until the correct exposure is achieved.
If the subject is outside the metering range of the cam-
era, the shutter speed display will show “---”. Press the
shutter button halfway to measure exposure again.
19
More on Photography
Shooting Mode
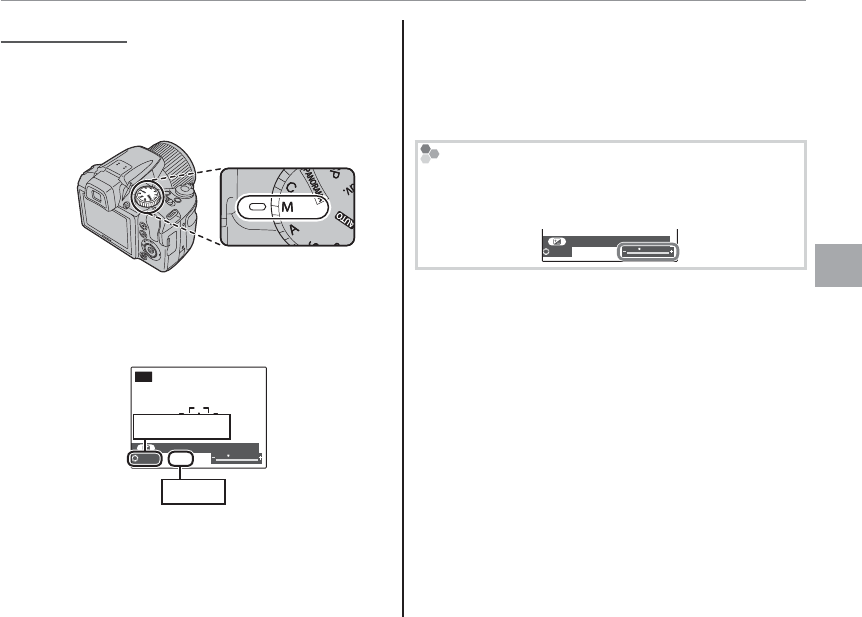
M
M
: MANUAL
: MANUAL
In this mode, you choose both shutter speed and
aperture. If desired, exposure can be altered from
the value suggested by the camera.
Press the d button to choose between shutter
speed and aperture and rotate the command dial
to adjust the selected setting.
SET SHUTTERSPEED, APERTURE.
F
7. 1
M
1200
Shutter speed
Aperture
c
• Noise in the form of randomly-spaced bright pixels
may occur in long exposures.
• The shutter speed is restricted depending on the ISO
setting.
The Exposure Indicator
The amount the picture will be under- or over-ex-
posed at current settings is shown by the exposure
indicator.
SET SHUTTERSPEED, APERTURE.
F
7. 1
1200

20
Shooting Mode
C
C
: CUSTOM MODE
: CUSTOM MODE
In P, S, A and M modes, the K CUSTOM SET option in the shooting
menu can be used to save current camera and menu settings. These set-
tings are recalled whenever the mode dial is rotated to C (custom mode).
Menu/setting
Menu/setting
Settings saved
Settings saved
Shooting menu
Shooting menu N ISO, O IMAGE SIZE, P FINEPIX COLOR, T IMAGE QUALITY, C PHOTOMETRY, D WHITE BALANCE,
F AF MODE, I FLASH, J AE BKT EV STEPS, b FACE DETECTION, Z INSTANT ZOOM
Setup menu
Setup menu A IMAGE DISP, L DUAL IS MODE, C AF ILLUMINATOR, E EVF/LCD MODE, mBLINK DETECTION,
RINTELLIGENT DIGITAL ZOOM
Other
Other Shooting mode (P, S, A, or M), continuous shooting mode, macro mode, exposure compensation, flash mode,
shutter speed, aperture, display type (EVF/LCD), indicators/best framing
21
Reference
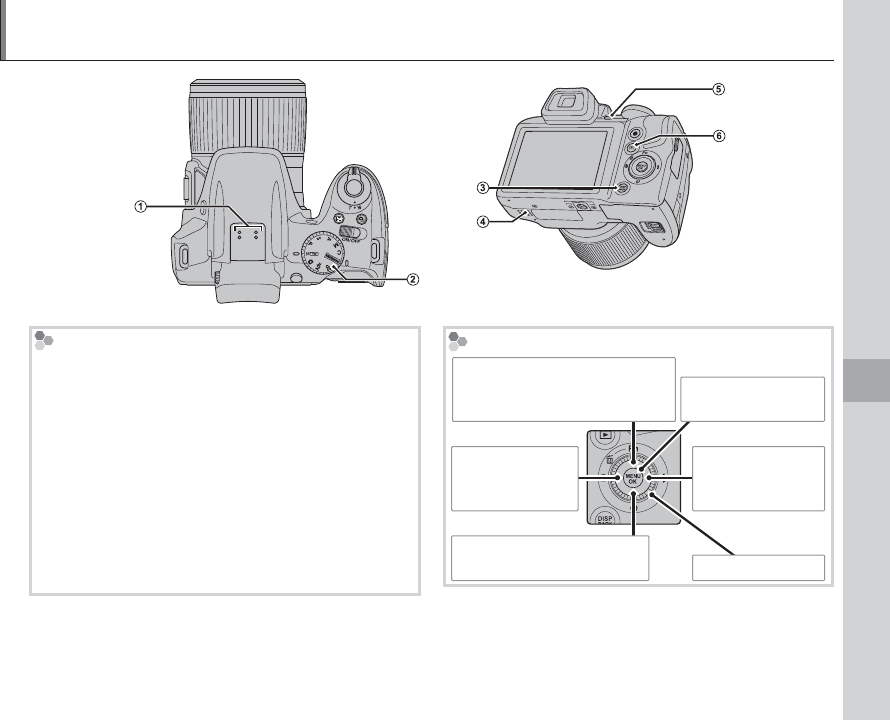
Parts of the Camera
Parts and descriptions
1 Microphone (P 7)
2 Mode dial: Select a shooting mode (P 8).
3 DISP/BACK button: View or hide indicators or cancel
the current operation. Press and hold to disable the
speaker, flash, and illuminator in situations in which
lights and sounds produced by the camera may be
unwelcome.
4 Speaker (P 7)
5 EVF/LCD button: Switch between the monitor and
electronic viewfinder.
6 a button: View pictures (P 6).
The Selector Button
MENU/OK button
(P 3)
Move cursor left
F (macro) button
(P 22)
Move cursor right
N (flash) button
(P 22)
Move cursor up
c (instant zoom) button (P 22)
b (delete) button (P 6)
Move cursor down
J (self-timer) button (P 22) Command dial
* Illustrations in this manual may be simplified for explanatory purposes.
Reference

22
Shooting, Playback, and Setup Options
■
■
Using the Selector (
Using the Selector (
F
F
, Fn,
, Fn,
N
N
, or
, or
J
J
) During Shooting
) During Shooting
Option
Option
Description
Description
Control
Control
F Macro
F G OFF Take close-ups of small objects. Press the selector
left (F)
Fn Fn The role played by the Fn button can be selected us-
ing the F Fn BUTTON option in the setup menu. Press the selector up (Fn)
N Flash
Q/K N/L P O/MUse the flash for additional lighting. Press the selector right
(N)
J SELF-TIMER
S R OFF Reduce blur or shoot self-portraits. Press the selector down
(J)
■
■
Using the Mode Dial to select a Shooting Mode
Using the Mode Dial to select a Shooting Mode
Option
Option
Description
Description
Control
Control
Shooting Mode
M B Adv. SP N
P S A M C
Choose a shooting mode according to the scene or
type of subject.
Rotate the mode dial to
the desired setting
■
■
Using the Selector in A
Using the Selector in A
dv./SP
dv./SP
Mode
Mode
Option
Option
Description
Description
Control
Control
A Adv. MODE Choose the advanced mode used when the mode
dial is rotated to Adv.
Rotate the mode
dial to Adv./SP, press
MENU/OK, and
navigate with the
selector
A SCENE POSITION Choose the scene mode used when the mode dial is
rotated to SP.

23
Reference
Shooting, Playback, and Setup Options
■
■
Using the
Using the
d
d
Button During Shooting
Button During Shooting
Option
Option
Description
Description
Control
Control
d Exposure
compensation
Photograph very bright, very dark, or high contrast
subjects. Press the d button
■
■
Using the
Using the
I
I
Button During Shooting
Button During Shooting
Option
Option
Description
Description
Control
Control
I CONTINUOUS
OFF r t P O K J OCapture motion in a series of pictures. Press the I button
■
■
Using the
Using the
z
z
Button During Shooting
Button During Shooting
Option
Option
Description
Description
Control
Control
F Recording Movies Press the z button to shoot a movie. Press the z button

24
Shooting, Playback, and Setup Options
■
■
Using the Selector During Shooting (All Modes)
Using the Selector During Shooting (All Modes)
Option
Option
Description
Description
Control
Control
A SCENE POSITION Choose a scene for SP mode.
Press MENU/OK and navi-
gate with the selector
A Adv. MODE Choose an advanced shooting mode.
N ISO Control the camera’s sensitivity to light.
O IMAGE SIZE Choose the size and aspect ratio at which pictures
are recorded.
T IMAGE QUALITY Choose how much image files are compressed.
P FINEPIX COLOR Enhance contrast and color saturation or take pictures
in black and white.
D WHITE BALANCE Adjust colors to compensate for different colored
light sources.
Z INSTANT ZOOM Use to frame erratically moving subjects.
b FACE DETECTION
Choose whether the camera automatically detects
and sets focus and exposure for human portrait
subjects.
C PHOTOMETRY Choose how the camera meters exposure when Intel-
ligent Face Detection is off.
F AF MODE Choose how the camera selects the focus area.
F MOVIE AF MODE This option controls how the camera selects the
focus area for movies.
W MOVIE MODE Choose a frame size for movies.
J AE BKT EV STEPS Choose the size of the bracketing increment when
O is selected in continuous shooting mode.
I FLASH Adjust flash brightness.
K CUSTOM SET Save settings for P, S, A, and M modes.

25
Reference
Shooting, Playback, and Setup Options
■
■
Using the Selector During Playback (the Playback Menu)
Using the Selector During Playback (the Playback Menu)
Option
Option
Description
Description
Control
Control
r WIRELESS TRANSFER
Connect via a wireless network to upload pictures
to smartphones or tablets or to remotely browse
the pictures on the camera and select images for
download.
Press a to start play-
back, press MENU/OK,
and navigate with the
selector
s PC AUTO SAVE Upload pictures to a computer over a wireless
network.
U LOCATION INFO COPY Copy location data from one picture to another.
k PHOTOBOOK ASSIST Create books from your favorite photos.
b IMAGE SEARCH View pictures in an automated slide show.
A ERASE Delete all or selected pictures.
i MOVIE EDIT Edit movies.
j MARK FOR UPLOAD Select pictures for upload to YouTube or FACEBOOK.
I SLIDE SHOW View pictures in an automated slide show.
B RED EYE REMOVAL Remove red-eye from pictures taken with Intelligent
Face Detection.
D PROTECT Protect pictures from accidental deletion.
G CROP Create a cropped copy of the current picture.
O RESIZE Create a resized copy of the current picture.
C IMAGE ROTATE Rotate pictures.
F VOICE MEMO Add a voice memo to the current photograph.
K PRINT ORDER (DPOF) Select pictures for printing on DPOF- and PictBridge
compatible devices.
J DISP. ASPECT Choose how High Definition (HD) devices display pic-
tures.

26
Shooting, Playback, and Setup Options
■
■
The Setup Menu
The Setup Menu
Option
Option
Description
Description
Control
Control
F DATE/TIME Set the camera clock.
See following page
N TIME DIFFERENCE Set the clock to local time.
L aChoose a language.
r WIRELESS SETTINGS Adjust settings for connection to a wireless network.
s PC AUTO SAVE SETTING Choose a destination for images uploaded using
s PC AUTO SAVE.
U GEOTAGGING SET-UP Access location data options.
o SILENT MODE Disables the AF-assist illuminator, operation sounds,
shutter sound, and movie playback sound.
R RESET Reset settings to default values.
K FORMAT Format the memory card.
A IMAGE DISP.
Choose how long pictures are displayed after shooting.
B FRAME NO. Choose how files are named.
G OPERATION VOL. Adjust the volume of the sounds made by camera
controls.
H SHUTTER VOLUME Adjust the volume of the sound made by the shutter.
e SHUTTER SOUND Choose a shutter sound.
I PLAYBACK VOLUME Adjust the volume of movie and voice memo play-
back.
J LCD BRIGHTNESS Adjust display brightness.
T MONITOR SUNLIGHT
MODE
Select ON to make the display in the monitor easier to
read in bright light.

27
Reference
Shooting, Playback, and Setup Options
Option
Option
Description
Description
Control
Control
E EVF/LCD MODE Choose 30 fps to increase battery life, 60 fps for im-
proved display quality.
Display the shooting or playback
menu and press the selector left to
highlight the menu tab, then press
the selector down to highlight X and
press the selector right to place the
cursor in the setup menu
SET-UP
EXIT
Tab
E LCD MODE Choose whether to save power to increase battery life.
M AUTO POWER OFF Choose the auto power off delay.
F Fn BUTTON Choose the role played by the Fn button.
L DUAL IS MODE Image stabilization options.
B RED-EYE REMOVAL Reduce “red-eye”.
m BLINK DETECTION Turn blink detection on or off.
R INTELLIGENT DIGITAL
ZOOM Enable or disable intelligent digital zoom.
l MOVIE ZOOM TYPE Choose the zoom type when recording movies.
W SIDE ZOOM LEVER Choose the setting of the side lever.
C AF ILLUMINATOR Enable or disable the AF-assist illuminator.
t SAVE ORG IMAGE
Choose ON to save unprocessed copies of pictures tak-
en using B RED EYE REMOVAL, j PRO LOW-LIGHT MODE,
or k HDR.
m AUTOROTATE PB Display pictures in the correct orientation.
O BACKGROUND COLOR Choose a color scheme.
c GUIDANCE DISPLAY Display tool tips.
S CUSTOM RESET Reset all settings for mode C.
T BATTERY TYPE Specify the type of battery used in the camera.
P DISCHARGE Discharge rechargeable Ni-MH batteries.
S DATE STAMP Choose whether to add shooting date and time to the
pictures.

7-3, AKASAKA 9-CHOME, MINATO-KU, TOKYO 107-0052, JAPAN
http://www.fujifilm.com/products/digital_cameras/index.html
Printed in
Please contact your local distributor for repairs and technical support. (see Worldwide
Network list)