Fuji Xerox H815DW Multifunction Laser Printer User Manual Short Term Confidential 2
Fuji Xerox Co., Ltd. Multifunction Laser Printer Short Term Confidential 2
Contents
(Short-Term Confidential) User Manual-2

271
Printing, Copying, Scanning,
Faxing, and Dell Document Hub
18 Printing........................................................................................ 273
19 Copying ....................................................................................... 295
20 Scanning..................................................................................... 307
21 Faxing.......................................................................................... 335
22 Dell™ Document Hub ............................................................... 363

272

Printing
273
18
Printing
This chapter covers tips for printing, how to print certain information from your printer, and how to cancel a job.
NOTE:
The images used in this manual are those of the Dell™ Cloud Multifunction Printer | H815dw unless otherwise mentioned.
Tips for Successful Printing
Tips on Storing Print Media
Store your print media properly. For more information, see
"
Storing Print Media.
"
Avoiding Paper Jams
CAUTION:
Before buying large quantities of any print media, it is recommended that you try a sample first.
By selecting appropriate print media and loading it properly, you can avoid paper jams. See the following instructions
on loading print media:
•"Loading Paper"
• "Loading Print Media in the MPF"
•"Avoiding Jams"
If you encounter a paper jam, see
"
Clearing Jams.
"
Sending a Job to Print
Install the printer driver to use all the features of the printer. When you choose Print from an application, a window
representing the printer driver opens. Select the appropriate settings for the specific job that you are sending to
print. Print settings selected from the driver override the default menu settings selected from the operator panel or
Tool Box.
You may need to click Preferences from the initial Print box to see all of the available system settings. If you are not
familiar with a feature in the printer driver window, open the online Help for more information.
To print a file from a typical
Microsoft
®
Windows
®
application:
1
Open the file you want to print.
2
From the
File
menu, select
Print
.
3
Verify that the correct printer is selected in the dialog box. Change the print settings if needed.
4
Click
Preferences
to adjust system settings that are not available from the first screen, and then click
OK
.
5
Click
OK
or
Print
to send the job to the selected printer.
NOTE:
When you print on small-sized print media such as envelopes, lift the operator panel so that you can easily remove the
printed media from the output tray.

274
Printing
Canceling a Print Job
There are several methods for canceling a job.
• "Canceling a Job From the Operator Panel"
• "Canceling a Job From a Computer Running Windows
®
Operating System"
Canceling a Job From the Operator Panel
To cancel a job after it has started printing:
1
Ta p
Stop
.
Printing is canceled only for the current job. All the following jobs will continue to print.
To cancel a job before it has started printing:
1
Press the button.
A list of print jobs appears.
2
Tap the desired job to cancel.
3
Ta p
Stop
.
4
Ta p
Stop
Job
.
Canceling a Job From a Computer Running Windows® Operating System
Canceling a Job From the Taskbar
When you send a job to print, a small printer icon appears in the bottom right corner of the taskbar.
1
Double-click the printer icon.
A list of print jobs appears in the printer window.
2
Select the job you want to cancel.
3
Press the <Delete> key.
Canceling a Job From the Desktop
1
Click
Start
Devices and Printers
.
For Windows Vista
®
: Click
Start
Control Panel
Hardware and Sound
Printers
.
For Windows Server
®
2008: Click
Start
Control Panel
Printers
.
For Windows Server
®
2008 R2: Click
Start
Devices and Printers
.
For Windows
®
8/Windows
®
8.1: On the Desktop screen, right-click the bottom left corner of the screen, and then
click
Control Panel
Hardware and Sound
Devices and Printers
.
For Windows Server
®
2012/Windows Server
®
2012 R2: On the Desktop screen, right-click the bottom left corner
of the screen, and then click
Control Panel
Hardware
Devices and Printers
.
A list of available printers appears.
2
Right-click the printer that you selected when you sent the job for printing, and then select
See what's printing
.
3
Select the printer driver.
A list of print jobs appears in the printer window.
4
Select the job you want to cancel.
5
Press the <Delete> key.

Printing
275
Duplex Printing
Duplex printing (or two-sided printing) allows you to print on both sides of a sheet of paper. For sizes that are
acceptable for duplex printing, see
"
Supported Paper Sizes.
"
Duplex Printing With Duplex Unit
1
Click
Start
Devices and Printers
.
For Windows Vista
®
: Click
Start
Control Panel
Hardware and Sound
Printers
.
For Windows Server
®
2008: Click
Start
Control Panel
Printers
.
For Windows Server
®
2008 R2: Click
Start
Devices and Printers
.
For Windows
®
8/Windows
®
8.1: On the Desktop screen, right-click the bottom left corner of the screen, and then
click
Control Panel
Hardware and Sound
Devices and Printers
.
For Windows Server
®
2012/Windows Server
®
2012 R2: On the Desktop screen, right-click the bottom left corner
of the screen, and then click
Control Panel
Hardware
Devices and Printers
.
2
Right-click the printer and select
Printing Preferences
.
The
General
tab appears.
3
From
Paper Source
, select the paper tray.
For PCL driver:
Select from
Auto
,
Tray1
,
Tray2
, or
MPF
.
For PS driver:
Select from
Automatically Select
,
Tray1
,
Tray2
, or
MPF
.
4
From
Duplex
, select
Flip on Short Edge
or
Flip on Long Edge
.
NOTE:
For details on the Flip on Short Edge and Flip on Long Edge options, see
"Flip on Short Edge" and "Flip on Long Edge."
5
Click
OK
.
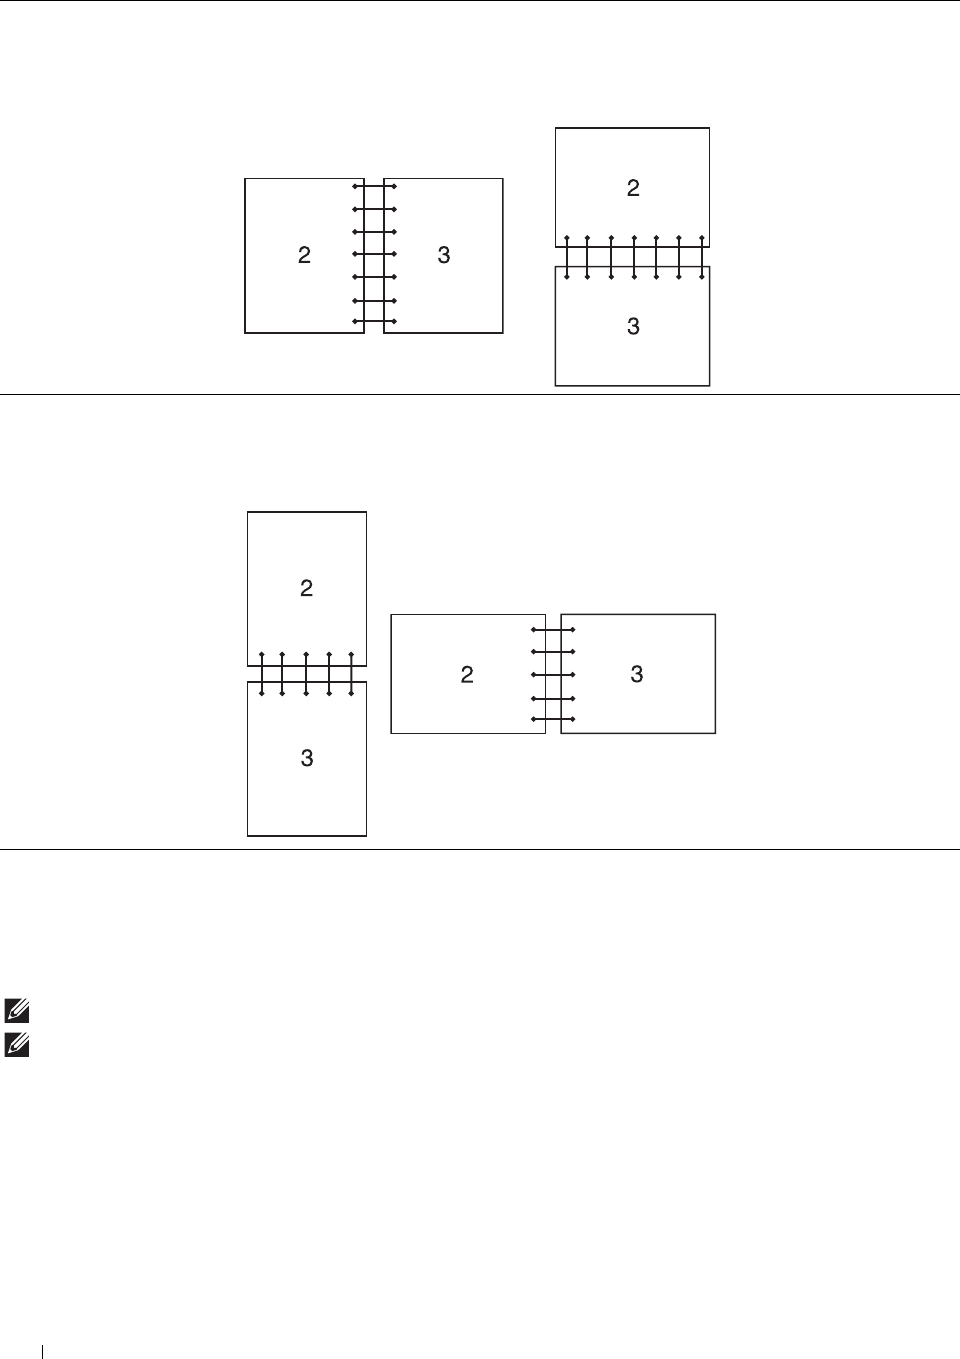
Using Booklet Print
To use the booklet print feature, select the Enable check box of the Booklet Printing in the Layout tab.
NOTE:
When the XML Paper Specification (XPS) or PS driver is used, booklet print is not available.
NOTE:
You must select Flip on Long Edge in the Duplex when using the Booklet Print feature.
276
Printing
Using the Stored Print Feature
When you send a job to the printer, you can specify the information such as user ID, password, and job name in the
printer driver to store the job in the memory. When you are ready to print the job, select the desired job name in the
memory using the operator panel.
NOTE:
The data in the memory is cleared when the printer is turned off.
NOTE:
Stored Print feature is available when:
•The RAM disk is enabled in the printer menu.
•RAM Disk is set to Available in the printer driver.
Overview
The stored printing feature includes the following job types.
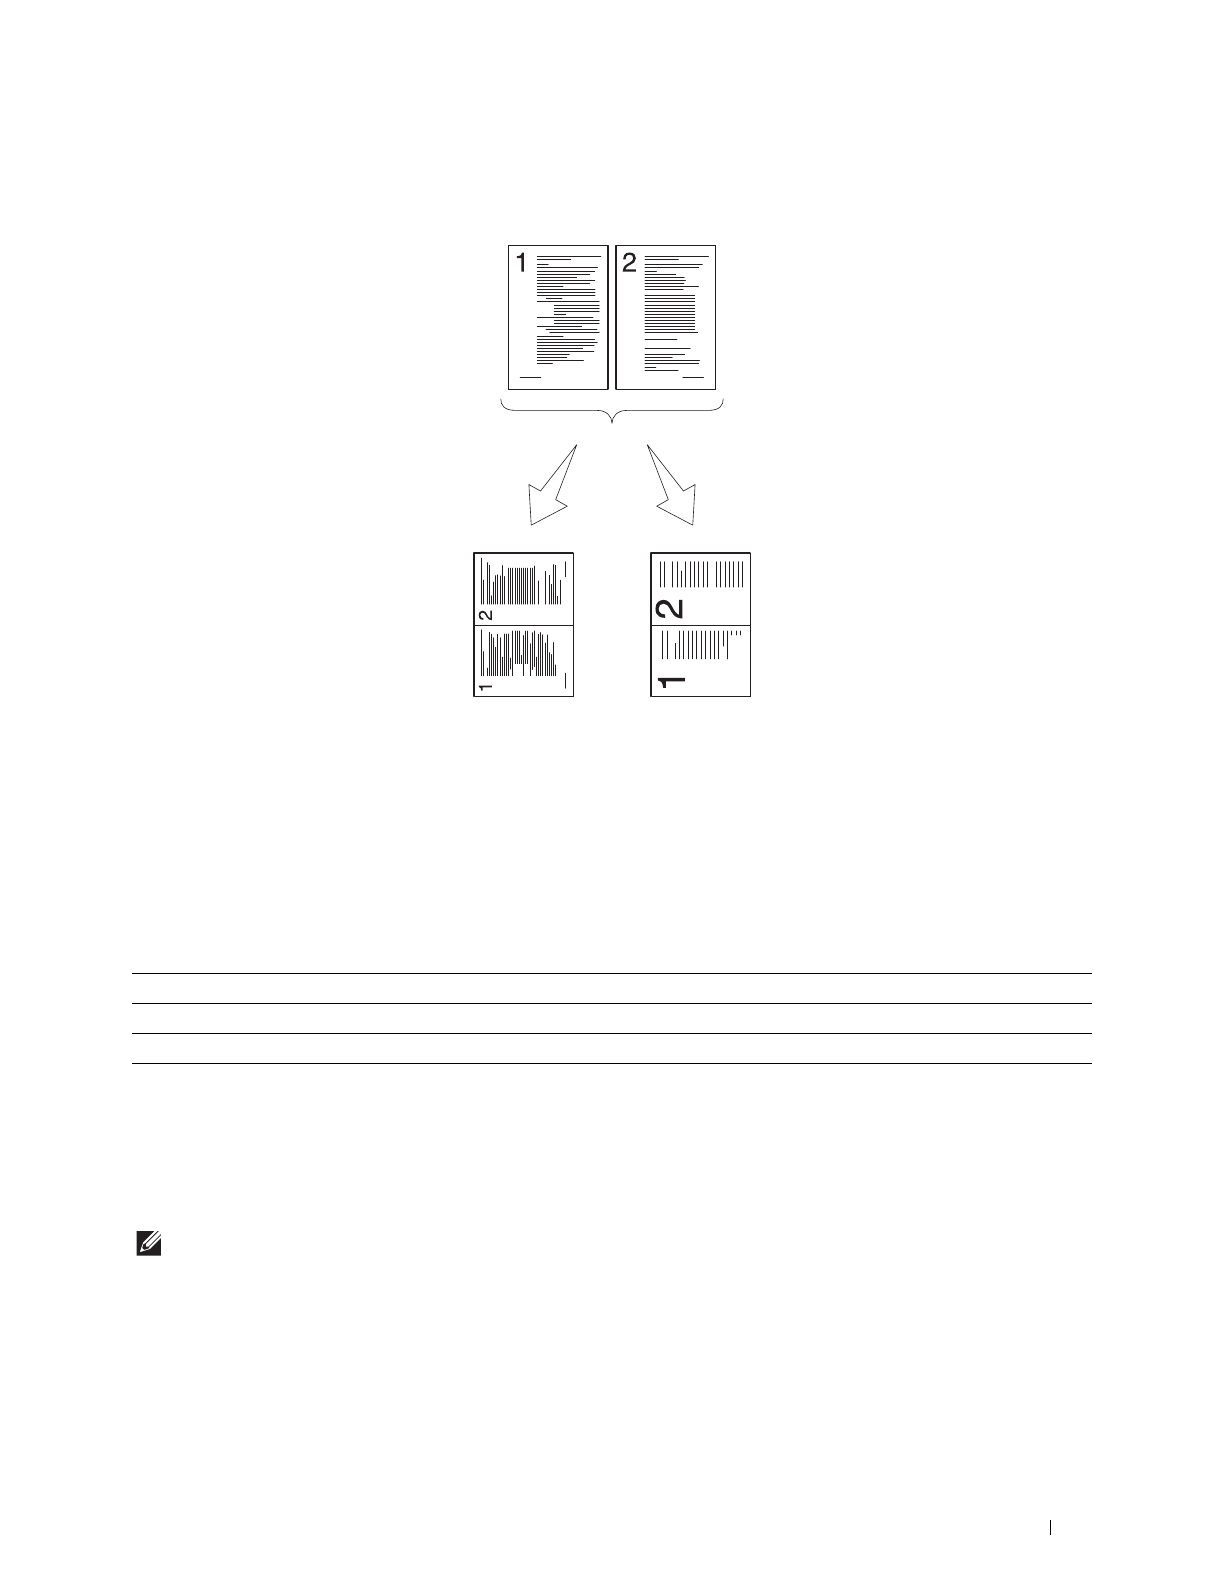
Flip on Long Edge Assumes binding along the long edge of the page (left edge for portrait orientation and top edge
for landscape orientation). The following illustration shows long-edge binding for portrait and
landscape pages:
Flip on Short Edge Assumes binding along the short edge of the page (top edge for portrait orientation and left
edge for landscape orientation). The following illustration shows short-edge binding for portrait
and landscape pages:
Portrait Landscape
Portrait Landscape
Printing
277
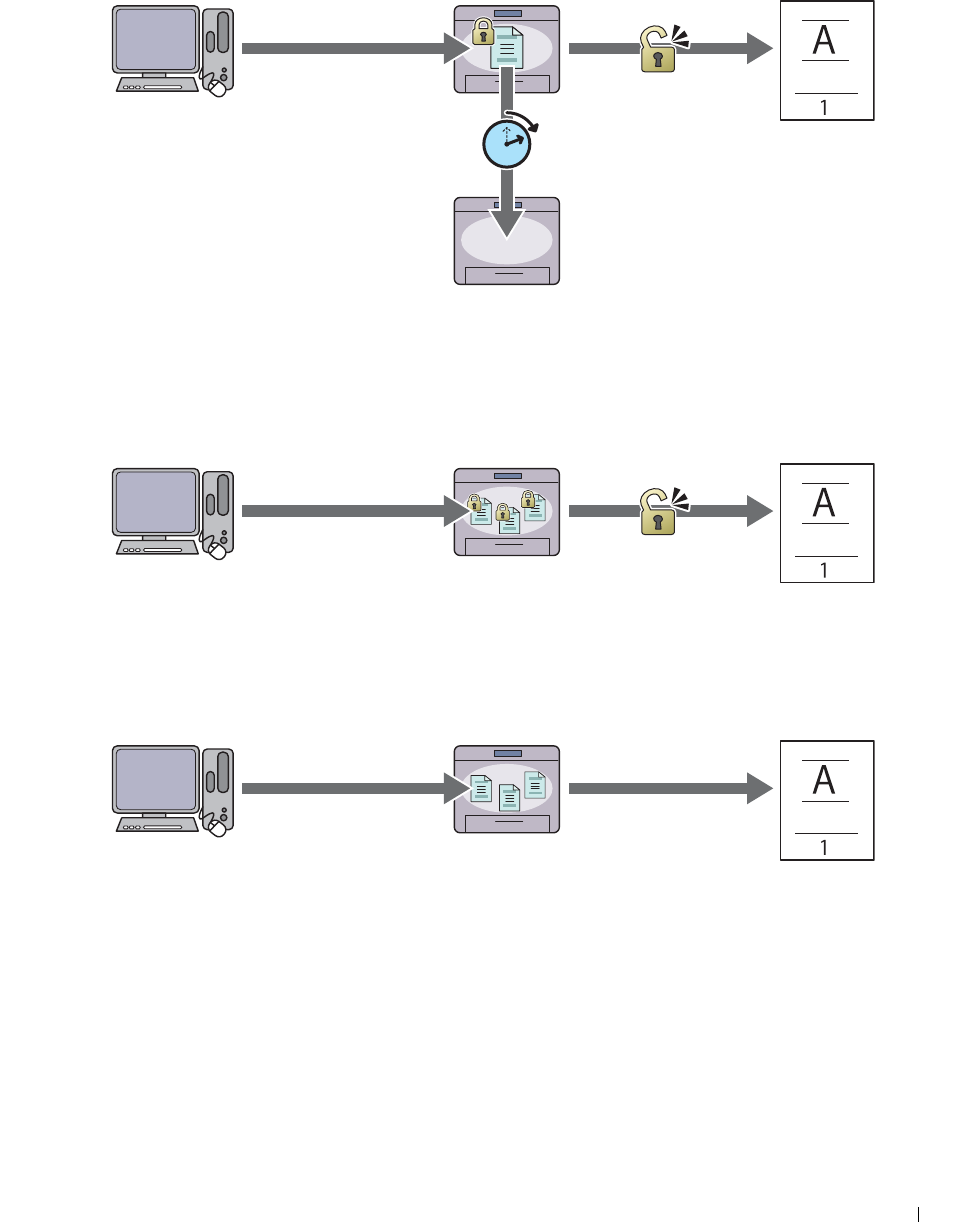
Secure Print
You can temporarily store print jobs secured with a password in the memory. Users with the password can print them
from the operator panel. This feature can be used to print confidential documents. A stored print job will be deleted
after you print it or at a designated time.
Private Mail Box Print
You can store print jobs secured with a password in the memory. Users with the password can print them at a more
convenient time from the operator panel. This feature can be used to print confidential documents. The stored jobs
remain in the memory until you delete them from the operator panel.
Public Mail Box Print
You can store print jobs without a password in the memory. Any user can print them at a more convenient time from
the operator panel. The stored jobs remain in the memory until you delete them from the operator panel.
Send confidential data.
Enter the password from
the operator panel.
Print data.
Confidential
Data is deleted at a
designated time.
Send data.
Enter the password from
the operator panel.
Print data.
Send data.
Print data.
278
Printing
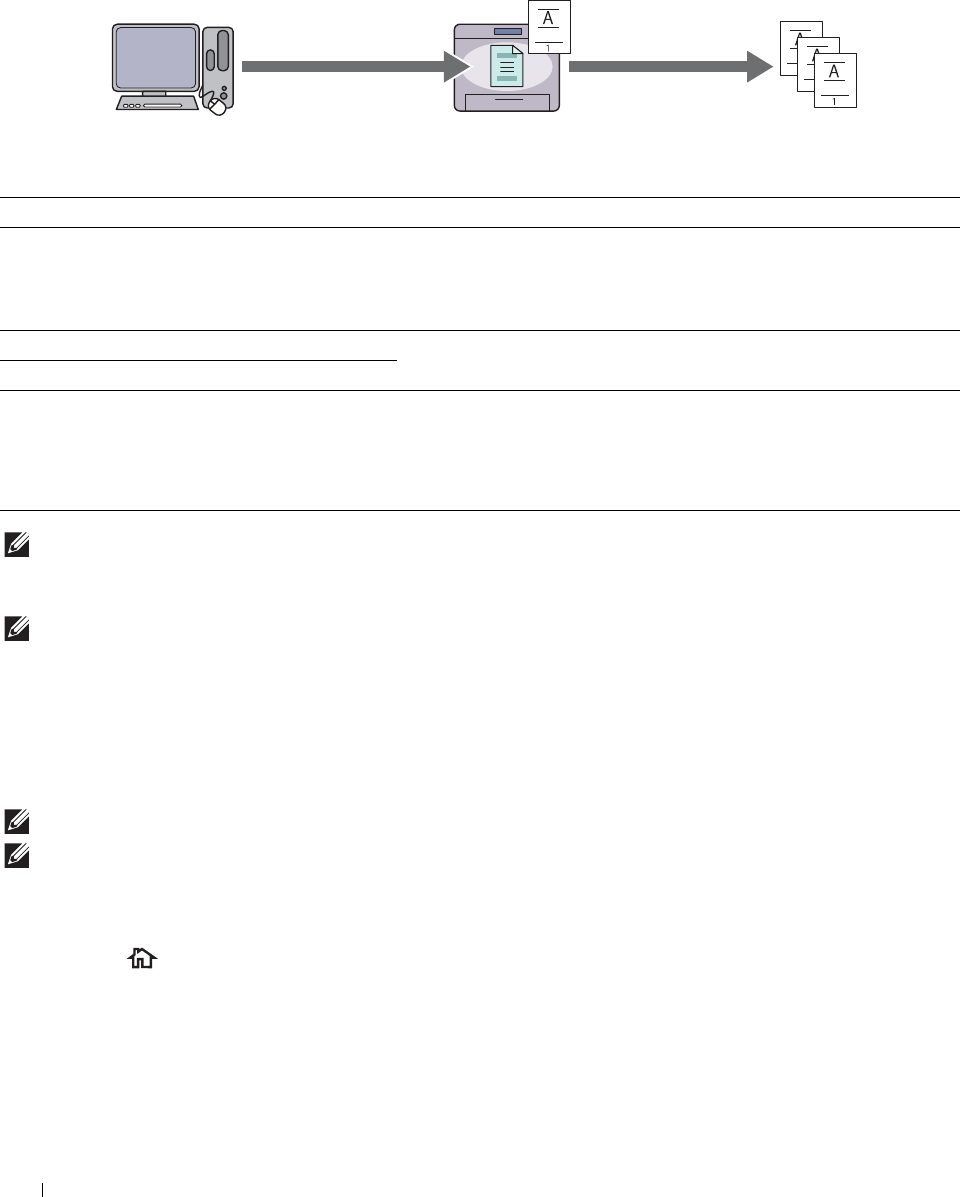
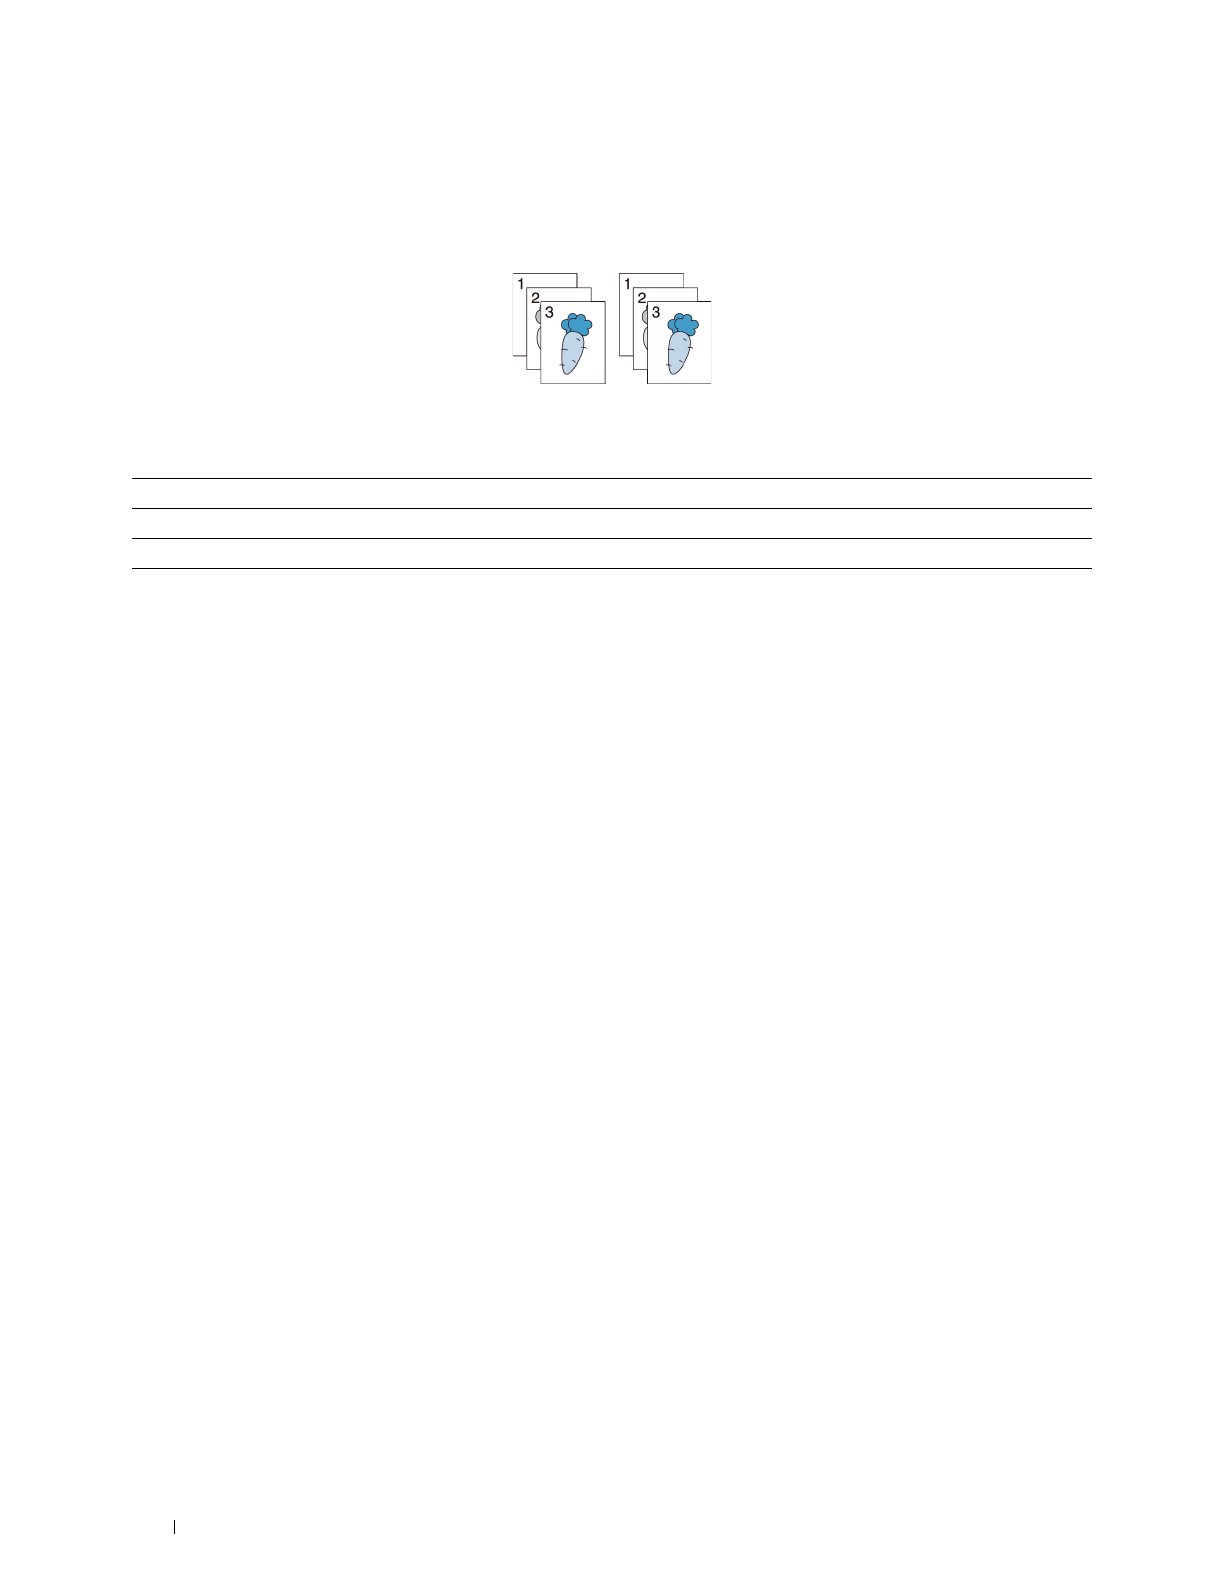
Proof Print
The collated print job is stored in the memory, but a single copy is printed automatically so you can check the print
result. If you do not have problems with the print result, you can choose to print more copies. This prevents large
number of misprinted copies from being printed at one time.
The difference between each of the job types are listed below. If you want to set the password for confidentiality,
store the jobs in the Secure Print or Private Mail Box Print.
NOTE:
If a print job is too large for the memory available, the printer may display an error message.
Procedures for Printing Stored Print
NOTE:
The stored print feature is available when using the PCL or PS driver.
When you select a job type in the printer driver, the job will be stored in the memory until you request to print it
from the operator panel. The following are procedures for storing and printing jobs.
Storing Print Jobs
To use the stored print feature, you need to select a job type other than Normal Print in the General tab of the
printer driver. The job will be stored in the memory until you request to print it from the operator panel.
NOTE:
Secure Print and Private Mail Box Print require specifying a password for confidentiality.
NOTE:
If a document name is not assigned to your print job in the printer driver, the job's name will be identified using the
printer's time and date of submission to distinguish it from other jobs you have stored under your name.
Printing the Stored Jobs
1
Press the
(Home)
button.
2
Ta p
Print
.
3
Select a job type such as
Secure Print
,
Private Mailbox
,
Public Mailbox
, or
Proof Print
.
A list of user ID appears.
Job types Password Differences
Secure Print Y
• The stored jobs will be deleted at a designated time.
• You cannot specify the quantity of copies from the operator panel. The
quantity of copies depends on the number you specified on the printer
driver.
Private Mail Box Print Y
• The stored jobs remain until you delete them from the operator panel.
• You can specify the quantity of copies from the operator panel.
Public Mail Box Print N
Proof Print N
• The print job is set to collate.
• A single copy is printed automatically.
• The stored jobs remain until you delete them from the operator panel.
• You can specify the quantity of copies from the operator panel.
Send data.
Print the rest of sets
from the operator panel.
One set is
printed.
Check if the print result
is OK.
Printing
279
4
Tap until the desired user ID appears, and then tap that user ID.
NOTE:
Secure Print and Private Mail Box Print require specifying a password for confidentiality. If you select Public Mail
Box Print or Proof Print, proceed to step 6.
5
Enter the password using the number pad, and then tap
OK
.
For details about specifying the password, see "Specifying your password on the operator panel (Secure
Print/Private Mail Box Print)."
6
Tap until the desired document appears, and then tap that document.
NOTE:
You can tap
Quantity
to specify the number of copies. For Secured Print, Quantity is not available.
7
Ta p
Print
.
NOTE:
If you want to keep the data in the memory for the time being, clear the Print and Delete check box.
8
Ta p
OK
.
The stored job will be printed.
Specifying your password on the operator panel (Secure Print/Private Mail Box Print)
When you tap Secure Print or Private Mailbox from Print Menu, a screen to enter the password
appears after selecting your user ID.
Use the number pad to enter the numeric password you specified in the printer driver. The password you entered will
appear as asterisks (*******) to ensure confidentiality.
If you enter an invalid password, the message Incorrect password Try again appears. Wait 3 seconds, or
tap Close to return to the screen for entering the password.
When you enter a valid password, you have access to all print jobs matching the user ID and password you entered.
The print jobs matching the password you entered appear on the screen. You can then choose to print or delete jobs
matching the password you entered. (See "Printing the Stored Jobs" for more information.)
Deleting Stored Jobs
With Secure Print, a job that has been stored will be deleted after printing or deleted at a designated time entered on
the operator panel.
For other jobs, these jobs remain stored until you delete them from the operator panel.
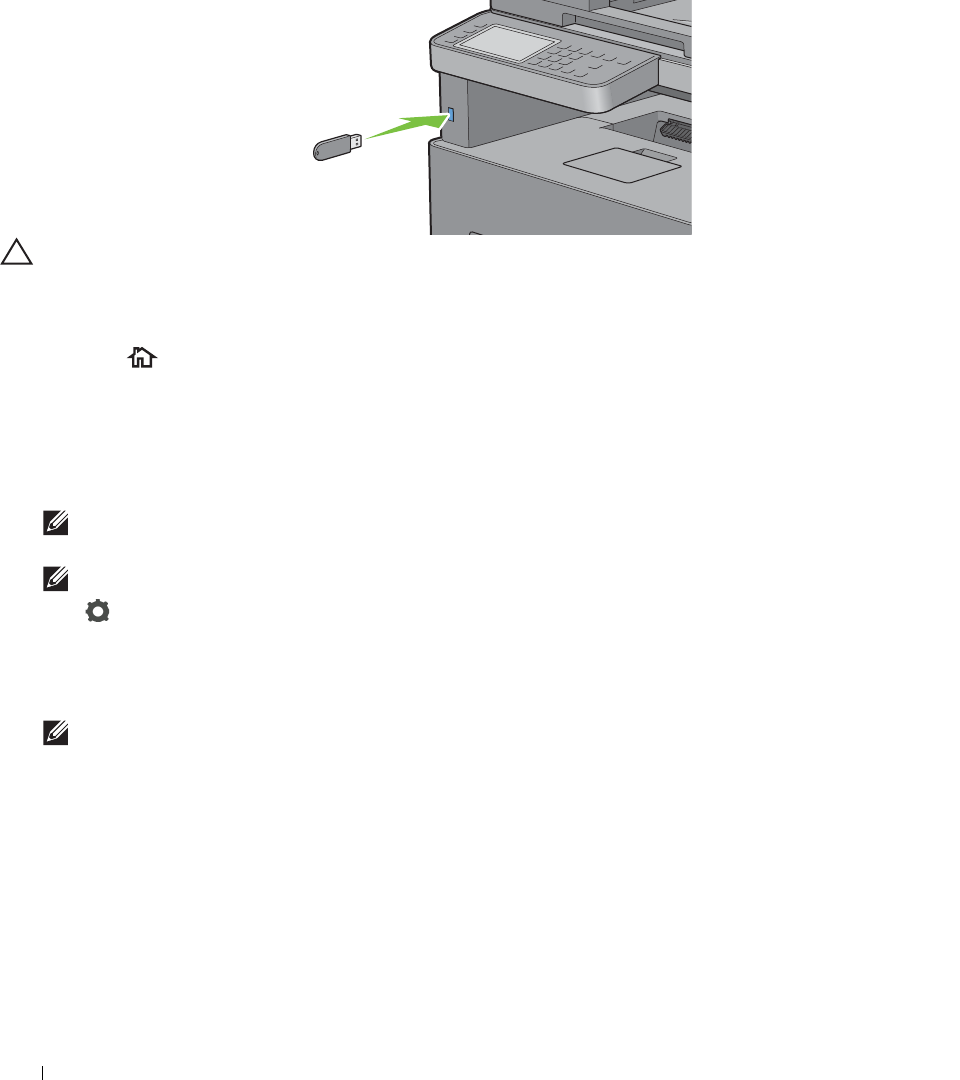
Printing from USB Memory (USB Direct Print)
The USB Direct Print feature allows you to print files stored in a USB memory using the operator panel.
CAUTION:
To prevent damage to your printer, do not connect any device other than USB memory to the front USB port of the
printer.
CAUTION:
Do not remove the USB memory from the front USB port until the printer has finished printing.
NOTE:
If the Functions Control setting for
USB Direct Print
is set to
On(Password)
, you need to enter the four-
digit password to use the print function. If the Functions Control setting for
USB Direct Print
is set to
Off
, the print
function is disabled and the menu is also disabled on the screen. For details, see "Functions Control."
The front USB port of the printer is designed for USB 2.0 devices. You must use only an authorized USB memory
with an A plug type connector. Use only a metal shielded USB memory.
A plug type
280
Printing
Supported File Formats
Files in the following file formats can be printed directly from a USB memory.
•PDF
• TIFF
•JPEG
Inserting and Removing a USB Memory
You can insert the USB memory before printing or scanning images.
Before removing the USB memory, ensure that the printer is not accessing the USB memory.
CAUTION:
If you remove the USB memory while the printer is accessing, the data in the USB memory or the USB memory
device itself may be destroyed.
Printing a PDF/TIFF File in a USB Memory
1
Press the
(Home)
button.
2
Insert a USB memory to the front USB port of the printer.
For details about inserting a USB memory, see "Inserting and Removing a USB Memory."
3
Ta p
Print PDF/TIFF
.
4
Scroll through the page or tap a folder until the desired files appear, and then tap those files.
NOTE:
Only the following characters are displayed on the touch panel:
A B C D E F G H I J K L M N O P Q R S T U V W X Y Z 0 1 2 3 4 5 6 7 8 9 $ % ’ ‘ - @ {} ~ ! # ( ) & _ ^
NOTE:
Up to 10 files can be selected and printed in display order.
5
Ta p .
6
Specify print options such as
Select Tray
,
2 Sided Printing
,
Layout
,
Image Types
,
Collation
,
and
PDF Password
on the
Print Settings
screen. For details, see "Print PDF/TIFF."
7
Ta p
Print
to begin printing.
NOTE:
Only PDF/TIFF files created using the scan features of your printer can be printed through
Print PDF/TIFF
.

Printing
281
Printing a JPEG File in a USB Memory
1
Press (
Home
) button.
2
Insert a USB memory to the front USB port of the printer.
For details about inserting a USB memory, see "Inserting and Removing a USB Memory."
3
Ta p
Print JPEG
.
4
Scroll through the page or select a folder until the desired files appear, and then tap those files.
To select all the files, tap .
NOTE:
Only the following characters are displayed on the touch panel:
A B C D E F G H I J K L M N O P Q R S T U V W X Y Z 0 1 2 3 4 5 6 7 8 9 $ % ’ ‘ - @ {} ~ ! # ( ) & _ ^
NOTE:
Up to 100 files can be selected and printed in display order.
5
Ta p .
6
Specify print options such as
Select Tray
,
2 Sided Printing
,
Layout
,
Image Types
, and
Collation
on the
Print Settings
screen. For details, see "Print JPEG."
7
Ta p
Print
to begin printing.
NOTE:
Only JPEG files created using the scan features of your printer can be printed through
Print JPEG
.
Printing With Web Services on Devices (WSD)
This section provides information for network printing with Web Services on Devices (WSD), the protocol of
Microsoft
®
for Windows Vista
®
, Windows
®
7, Windows
®
8, Windows
®
8.1, Windows Server
®
2008, Windows
Server
®
2008 R2, Windows Server
®
2012, and Windows Server
®
2012 R2.
Adding Roles of Printer Services
When you use Windows Server
®
2008, Windows Server
®
2008 R2, Windows Server
®
2012, or Windows Server
®
2012 R2, you need to add the roles of print services to the Windows Server
®
2008, Windows Server
®
2008 R2,
Windows Server
®
2012, or Windows Server
®
2012 R2 client.
For Windows Server® 2008:
1
Click
Start
Administrative Tools
Server Manager
.
2
Select
Add Roles
from the
Action
menu.
3
Check the
Print Services
check box on the
Server Roles
window in the
Add Roles Wizard
, and then click
Next
.
4
Check the
Print Server
check box, and then click
Next
.
5
Click
Install
.
For Windows Server® 2008 R2:
1
Click
Start
Administrative Tools
Server Manager
.
2
Select
Add Roles
from the
Action
menu.
3
Check the
Print and Document Services
check box on the
Server Roles
window in the
Add Roles Wizard
, and
then click
Next
.
4
Click
Next
.
5
Check the
Print Server
check box, and then click
Next
.
6
Click
Install
.

282
Printing
For Windows Server® 2012/Windows Server® 2012 R2:
1
Click
Server Manager
of the
Start
screen.
2
Select
Add Roles and Features
from the
Manage
menu.
3
Click
Next
on the
Before You Begin
window
Select installation type on the
Installation Type
window
Select
destination server on the
Server Selection
window in the
Add Roles and Features Wizard
.
4
Check the
Print and Document Services
check box on the
Server Roles
window, and then click
Next
.
5
Select features on the
Features
window
Confirm installation selections on the
Confirmation
window.
6
Click
Install
.
Printer Setup
You can install your new printer on the network using the
Software and Documentation
disc that shipped with your
printer, or using the Add Printer wizard on Microsoft
®
Windows
®
.
Installing a Printer Driver Using the Add Printer Wizard
1
Click
Start
Devices and Printers
(
Start
Control Panel
Hardware and Sound
Printers
for Windows Vista
®
and Windows Server
®
2008).
For Windows
®
8, Windows
®
8.1, Windows Server
®
2012, and Windows Server
®
2012 R2:
On the Desktop screen, right-click the bottom left corner of the screen, and then click
Control Panel
Hardware
and Sound
(
Hardware
for Windows Server
®
2012/Windows Server
®
2012 R2)
Devices and Printers
.
2
Click
Add a printer
to launch the
Add Printer
wizard.
3
Select
Add a network, wireless or Bluetooth printer
.
4
In the list of available printers, select the one you want to use, and then click
Next
.
NOTE:
In the list of available printers, the Web Services on Devices (WSD) printer is displayed in the form of
http://IP
address/ws
/.
NOTE:
If no Web Services on Devices (WSD) printer is displayed in the list, enter the printer's IP address manually to
create a Web Services on Devices (WSD) printer. To enter the printer's IP address manually, follow the instructions below.
For Windows Server
®
2008 R2, to create a Web Services on Devices (WSD) printer, you must be a member of
Administrators group.
1. Click The printer that I want isn't listed.
2. Select Add a printer using a TCP/IP address or hostname and click Next.
3. Select Web Services Device from Device type.
4. Enter the printer's IP address in the Hostname or IP address text box and click Next.
NOTE:
Before installing the driver using the Add Printer wizard on Windows Server
®
2008 R2 or Windows
®
7, perform one
of the following:
•Establish the Internet connection so that Windows Update can scan your computer.
•Add the printer driver to your computer.
5
If prompted, install the printer driver on your computer. If you are prompted for an administrator password or
confirmation, type the password or provide confirmation.
6
Complete the additional steps in the wizard, and then click
Finish
.
7
Print a test page to verify installation.
a
Click
Start
Devices and Printers
(
Start
Control Panel
Hardware and Sound
Printers
for Windows
Vista
®
and Windows Server
®
2008).
For Windows
®
8, Windows
®
8.1, Windows Server
®
2012, and Windows Server
®
2012 R2:

Printing
283
On the Desktop screen, right-click the bottom left corner of the screen, and then click
Control Panel
Hardware and Sound
(
Hardware
for Windows Server
®
2012/Windows Server
®
2012 R2)
Devices and
Printers
.
b
Right-click the printer you just created, and then click
Printer properties
(
Properties
for Windows Vista
®
and
Windows Server
®
2008).
c
On the
General
tab, click
Print Test Page
. When a test page prints successfully, installation is complete.
Printing With Wi-Fi Direct
NOTE:
The Wi-Fi Direct feature is available on the Dell Cloud Multifunction Printer | H815dw only.
This section provides information for Wi-Fi Direct printing. Wi-Fi Direct allows your Wi-Fi mobile devices such as
computers, smart phone, and tablets, to connect to the printer directly via a Wi-Fi network. With Wi-Fi Direct, you
can print documents, photos, or e-mail on your Wi-Fi mobile devices directly without a wireless access point.
NOTE:
Wi-Fi Direct is available even if the printer is connected to your wireless network connection.
NOTE:
Only printing function is available via the Wi-Fi Direct network.
NOTE:
The maximum number of devices that can be connected via the Wi-Fi Direct network is 3.
NOTE:
You cannot connect your mobile device to the Internet via the printer’s Wi-Fi Direct network.
NOTE:
Depending on the device, the channel used to connect the device to the printer via Wi-Fi Direct may differ from the
channel used by the printer to connect to a network via Wi-Fi infrastructure mode. In such a case, simultaneous connection with
Wi-Fi Direct and Wi-Fi infrastructure mode may not work properly.
NOTE:
The printer connected with Wi-Fi Direct supports the following protocols; LPD, Port9100, Web Services on Devices
(WSD) (print), Bonjour (mDNS), SNMPv1/v2c, Dell Printer Configuration Web Tool.
Setting Up Wi-Fi Direct
To use Wi-Fi Direct, you need to first set up the Wi-Fi Direct settings from the operator panel of the printer. To
connect the mobile device to the printer via Wi-Fi Direct, select the SSID of the printer from the list of wireless
networks on the mobile device and enter the passphrase necessary for connection.
Setting Up the Printer
1
Press the (
Information
) button.
2
Ta p t h e
Tools
tab, and then tap
Admin Settings
.
3
Ta p
Network
.
4
Ta p
Wi-Fi Direct
.
5
In the
Wi-Fi Direct
menu, tap
Wi-Fi Direct
.
6
Ta p
Enable
, and then tap
OK
.
When a popup message about the devices is displayed, tap
Close
.
7
Ta p
Group Role
.
8
Ta p
Group Owner
, and then tap
OK
.
9
The printer must be rebooted after you set
Wi-Fi Direct
. After the reboot, repeat steps from 1 to 4.
10
Ta p u n t il
SSID
and
Passphrase
appears, and tap each menu to check what the SSID and passphrase is.
NOTE:
To confirm the printer's SSID and passphrase, you can also print the list by tapping
Print Passphrase
under the
Passphrase
menu.

284
Printing
Connecting the Mobile Device
1
Connect the mobile device to the Wi-Fi Direct network.
For Windows
®
8, Windows
®
8.1, Windows
®
RT, and Windows
®
RT 8.1
a
Ta p
Settings
in the
PC settings
menu.
b
Tap the Wi-Fi icon.
c
Tap the printer's SSID, and then tap
Connect
.
d
Enter the passphrase, and then tap
Next
.
The mobile device will connect to the printer.
For Windows
®
7
a
Click the network icon on the taskbar.
b
Click the printer's SSID, and then click
Connect
.
c
Enter the passphrase, and then click
OK
.
d
Click
Cancel
to exit the
Set Network Location
window.
The mobile device will connect to the printer.
For Windows Vista
®
a
Click
Start
Connect To
.
b
Click the printer's SSID.
c
Enter the passphrase, and then click
Connect
.
The mobile device will connect to the printer.
For iOS
a
Ta p
Settings
Wi-Fi
.
b
Tap the printer's SSID.
c
Enter the passphrase, and then tap
Join
.
The mobile device will connect to the printer.
For Android
The procedure varies depending on your mobile device you are using. Refer to the manual provided with your
mobile device.
2
Install the printer on the mobile device.
For Windows
®
8, Windows
®
8.1, Windows
®
RT, and Windows
®
RT 8.1
a
Click
Devices
in the
PC settings
menu.
b
Click
Add a device
in the
Devices
sub-menu.
c
Click
Dell_xxxxxx
.
The printer is ready for use.

Printing
285
For Windows Vista
®
and Windows
®
7
You need to install the printer driver on the mobile device. See "Installing Printer Drivers on Windows
®
Computers."
For iOS
You need to install the printing application such as Dell Document Hub App for Dell, and then the printer is ready
for use.
For Android
You need to install the printing application such as Dell Document Hub app, and then the printer is ready for use.
Printing via Wi-Fi Direct
The printing procedure varies depending on your mobile device you are using. Refer to the manual provided with
your mobile device to print as you normally do from the device.
Disconnecting Wi-Fi Direct Network
1
Press the
(Information)
button.
2
Ta p
Paired Device
.
NOTE:
The
Paired Device
menu is displayed only when the printer is connected via Wi-Fi Direct.
3
Tap the device name to disconnect.
4
Ta p
Disconnect Now
or
Disconnect and Reset Passphrase
.
5
Ta p
Yes
.
The selected device is successfully disconnected.
You can also disconnect the device from the following steps.
1
Press the
(Information)
button.
2
Ta p t h e
Tools
tab, and then tap
Admin Settings
.
3
Ta p
Network
.
4
Ta p
Wi-Fi Direct
.
5
Ta p
Paired Device
.
6
Tap the device name to disconnect.
7
Ta p
Disconnect now
.
8
Ta p
Yes
.
Resetting the Passphrase
1
Press the
(Information)
button.
2
Ta p t h e
Tools
tab, and then tap
Admin Settings
.
3
Ta p
Network
.
4
Ta p
Wi-Fi Direct
.
5
Ta p u n t il
Passphrase
appears, and then tap
Passphrase
.
6
Ta p
Reset Passphrase
.
7
Ta p
Yes
.
The Wi-Fi Direct is disconnected and the passphrase is reset.
286
Printing
Resetting the PIN
1
Press the
(Information)
button.
2
Ta p t h e
Tools
tab, and then tap
Admin Settings
.
3
Ta p
Network
.
4
Ta p
Wi-Fi Direct
.
5
Ta p u n t il
WPS Setup
appears, and then tap
WPS Setup
.
6
Ta p
PIN Code
.
7
Ta p
Reset Code
.
8
Ta p
Yes
.
The Wi-Fi Direct is disconnected and the PIN is reset.
Mobile Printing
The printer supports printing from a variety of mobile devices.
Android OS
Download the Dell Document Hub app for free from Google Play. Easy to use and navigate, the Dell Document
Hub app enables direct printing of photos, documents web content and more, to supported Dell printers on a Wi-Fi,
Wi-Fi Direct, or Ethernet network.
Scan the QR Code for quick access to the relevant application store.
Apple iOS
This printer is compatible with AirPrint. For details about AirPrint, see "Printing With AirPrint." This printer is also
compatible with Dell Document Hub App, available for free download from App Store.
Scan the QR Code for quick access to the relevant application store.
For Android OS
For Apple iOS

Printing
287
Printing With AirPrint
AirPrint allows you to print through a network with the device running iOS or OS X.
Be sure to install the latest version of iOS for iOS device. For OS X, be sure to update OS X and the apps
you have purchased from the App Store using the Software Update.
Setting Up AirPrint on Your Printer
1
Ensure that the printer is connected to the network.
2
Launch the
Dell Printer Configuration Web Tool
by entering the IP address of the printer in your web browser.
For more information, see "Setting Up the Dell Printer Configuration Web Tool" and "Starting the Dell Printer
Configuration Web Tool."
3
When the
Dell Printer Configuration Web Tool
opens, click
Print Server Settings
in the left frame, and click the
Print Server Settings
tab.
4
Click
AirPrint
.
5
In
Enable AirPrint
, select the check box to enable the printer for AirPrint.
6
Click
Apply New Settings
.
7
Click
Restart Printer
.
Printing via AirPrint
The following procedure uses the iPhone running iOS8.1 as an example.
1
Open your email, photo, web page, or document you want to print.
2
Tap the action icon
.
3
Ta p
Print
.
4
Select your printer and set printer options.
5
Ta p
Print
.
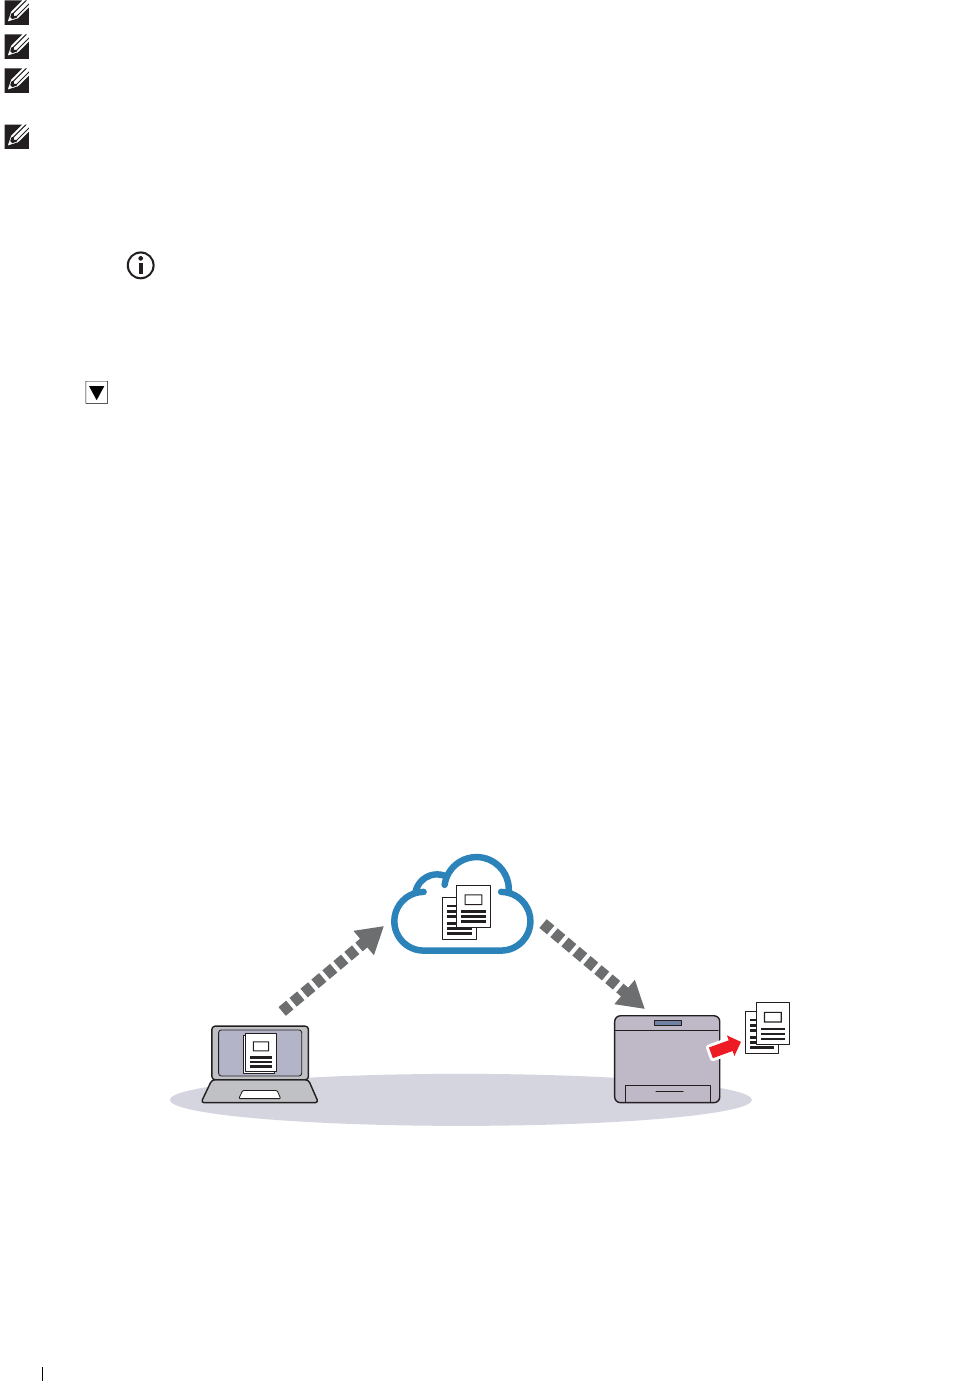
Printing With Google Cloud Print
By registering the printer to your Google account, you can use the Google Cloud Print service to print from the
Google Chrome browser without installing the printer drivers to your device. You can also share the printer with the
specified users over the Internet.
The printer supports the following version of the Google Cloud Print service:
• Google Cloud Print version 1.1
• Google Cloud Print version 2.0
NOTE:
Information about Google Cloud Print is based on the information as of December 2014. For the latest information, visit
the Google Cloud Print web site.
NOTE:
Use the latest version of the Google Chrome browser for Google Cloud Print.
Preparing to Use the Printer with Google Cloud Print
To use Google Cloud Print, you need the following preparations in advance:
• "Enabling Google Cloud Print on the Printer"
• "Selecting the Version of the Google Cloud Print Service"
• "Registering the Printer to the Google Cloud Print Service"
• "Sharing the Printer Using the Google Cloud Print Service"
288
Printing
NOTE:
To register the printer to the Google Cloud Print service, the printer needs to be connected to the Internet.
NOTE:
Google Cloud Print supports only IPv4 connection.
NOTE:
If the printer is connected to a network that uses a proxy server, you need to specify the settings in Proxy Server from the
Dell Printer Configuration Web Tool. For more information, see "Proxy Server."
NOTE:
Acquire a Google account and a Gmail address in advance.
Enabling Google Cloud Print on the Printer
When using the operator panel
1
Press the
(Information)
button.
2
Ta p t h e
Tools
tab, and then tap
Admin Settings
.
3
Ta p
Network
.
4
Ta p
Protocols
.
5
Ta p u n t il
Google Cloud Print
appears, and then tap
Google Cloud Print
.
6
Ta p
Enable
.
7
Ta p
OK
.
8
Turn off the printer, and turn it on again to apply the settings.
When using the Dell Printer Configuration Web Tool
1
Launch the
Dell Printer Configuration Web Tool
by entering IP address of the printer in your web browser. For
more information, see "Setting Up the Dell Printer Configuration Web Tool" and "Starting the Dell Printer
Configuration Web Tool."
2
When the
Dell Printer Configuration Web Tool
opens, go to the pages in the
Print Server Settings
tab. Click
Port
Settings
. In
Port Status
, select the
On
check box for
Google Cloud Print
.
Selecting the Version of the Google Cloud Print Service
Select the version of the Google Cloud Print service from either version 1.1 or version 2.0.
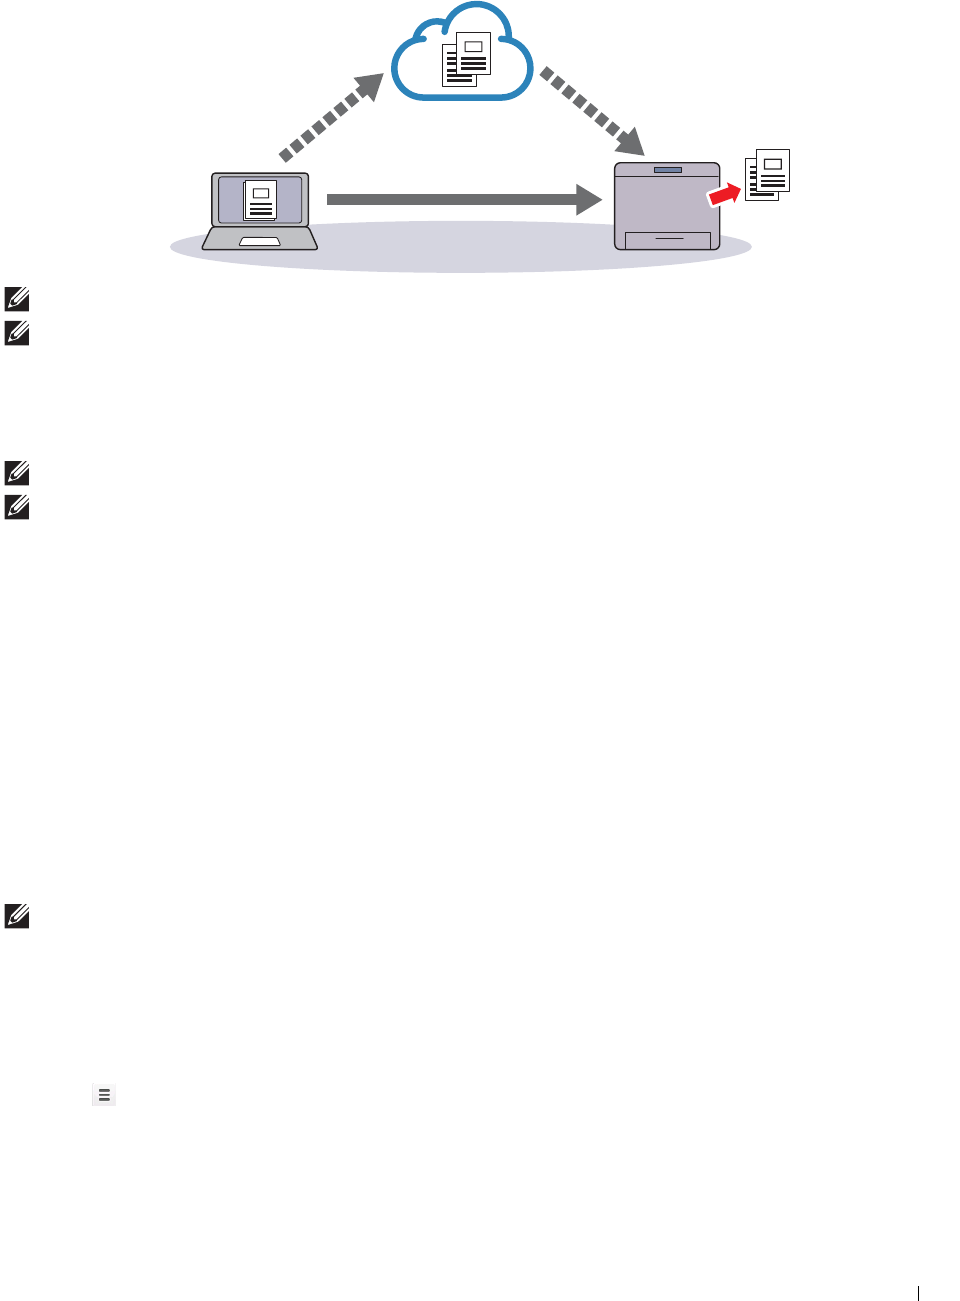
Google Cloud Print version 1.1 sends the print data to the printer via Internet. For this version, the printer needs to
be connected to the Internet.
Printing
289
Google Cloud Print version 2.0 sends the print data to the printer either via Internet or via local network. This
version is recommended for the environment where the Internet connection cannot be used.
NOTE:
Available options for printing may vary according to your device or the version of the Google Cloud Print service.
NOTE:
You cannot use both version 1.1 and version 2.0 of the Google Cloud Print service on a printer.
Registering the Printer to the Google Cloud Print Service
Before registering the printer to the Google Cloud Print service, prepare the Google account to which the printer is
registered.
NOTE:
To register the printer to the Google Cloud Print service, the printer needs to be connected to the Internet.
NOTE:
The Google account which is used in the registration procedure will be registered as the owner.
For Google Cloud Print Version 1.1
1
Launch the
Dell Printer Configuration Web Tool
by entering IP address of the printer in your web browser. For
more information, see "Setting Up the Dell Printer Configuration Web Tool" and "Starting the Dell Printer
Configuration Web Tool."
2
When the
Dell Printer Configuration Web Tool
opens, go to the pages in the
Print Server Settings
tab. Click
Register This Device to Google Cloud Print
in
Google Cloud Print
. A sheet with a URL for the Google Cloud
Print printer registration web site is printed.
3
From the web browser of your computer, visit the Google web site and sign in with your Google account. Visit the
Google Cloud Print registration web site by entering the URL on the printout into your web browser. You can also
visit the site by scanning the QR code with your mobile device.
4
On the Google Cloud Print registration web site, click
Finish printer registration
.
5
Click
Manage your printers
. Your printer will be listed in the
Printers
list and will be ready for use with the Google
Cloud Print service.
NOTE:
When the printer does not print a sheet with a URL and shows a message of the status code 016-757, launch the Dell
Printer Configuration Web Tool, open the Dell AccessControl page in the Print Volume tab, and either turn AccessControl Mode
to Off or turn Non Registered User to On.
For Google Cloud Print Version 2.0
1
Launch the Google Chrome browser. When you are using the Google Chromebook, start and log in to the
Chromebook.
2
Click in the top right corner, and select
Settings
.
3
Click
Show advanced settings
in the bottom of the page.

290
Printing
4
Click
Manage
under the
Google Cloud Print
menu.
NOTE:
If a message is displayed under New Devices to request you to sign in to Chrome, click sign in and sign in to
Chrome.
5
Click
Register
for the printer you want to register.
NOTE:
If Bonjour (mDNS) is set to off, the new printer will not show in New devices. In this case, launch the Dell Printer
Configuration Web Tool, open the Port Settings page in the Print Server Settings tab, and turn Bonjour (mDNS) to On.
6
When the window to confirm the registration appears, click
Register
.
The window appears to show that the printer is being added.
7
Go to the printer, and follow the instructions displayed on the operator panel.
8
When the printer name appears in the
My devices
list, the registration is completed.
NOTE:
It may take about 5 minutes or more until the printer name appears in the My devices list.
Sharing the Printer Using the Google Cloud Print Service
You can share the printer registered for the Google Cloud Print service with other users.
1
Launch the Google Chrome browser. When you are using the Google Chromebook, start and log in to the
Chromebook.
2
Click in the top right corner, and select
Settings
.
3
Click
Show advanced settings
in the bottom of the page.
4
Click
Manage
under the
Google Cloud Print
menu.
NOTE:
If a message is displayed to request you to sign in to Chrome, click sign in and sign in to Chrome.
5
Click
Manage
for the printer you want to share.
6
In the
Google Cloud Print
window, click
Share
.
7
In the window to specify the printer sharing, enter the Google accounts of the users you want to invite to share the
printer, and click
Share
.
NOTE:
When the invited users log in to the Google Cloud Print web page, a message appears to show that the printer owner
made the sharing settings. Accept the sharing invitation.
Canceling Registration to Google Cloud Print
1
Launch the
Dell Printer Configuration Web Tool
, open the
Google Cloud Print
page in the
Print Server Settings
tab.
2
Click
Cancel Registration
.
3
Confirm that the button changes to
Register This Device to Google Cloud Print
.
Printing via Google Cloud Print
The printing procedure varies depending on the application or the device you are using. You can see the application
list that supports Google Cloud Print service on the Google web site.
Printing From an Application on a Mobile Device
The following procedure uses the Google Drive application on an Android mobile device as an example.
1
Install the Google Drive application on your mobile device.
NOTE:
You can download the application from Google Play.
2
Access the Google Drive application from your mobile device and select the document.
3
Select
Print
from the application menu.

Printing
291
4
Select your printer from the list.
5
Select printer options and then tap
Print
.
Printing From Google Chrome
The following procedure uses the Google Chrome browser on the computer running a Microsoft
®
Windows
®
operating system as an example.
1
Open the Google Chrome browser.
2
Open the web page or e-mail that you want to print.
3
Click
or
(varies depending on the version of the Google Chrome browser) in the top right corner and then
click
Print
.
4
Click
Change
in the
Destination
area.
5
Choose your printer from the Google Cloud Print area.
NOTE:
When your printer is registered to Google Cloud Print version 2.0, you can print the document by way of the local
print with the printer in your local network. In this case, select your printer in Local Destinations.
6
Click
Print
.
Printing From Google Chromebook
1
Open the web page or e-mail that you want to print.
2
Click in the top right corner and then click
Print
.
3
Confirm that your printer is specified in the
Destination area
. If not, click
Change
and select your printer.
NOTE:
When your printer is registered to Google Cloud Print version 2.0, you can print the document by way of the local
print with the printer in your local network. In this case, select your printer in Local Destinations.
4
Click
Print
.
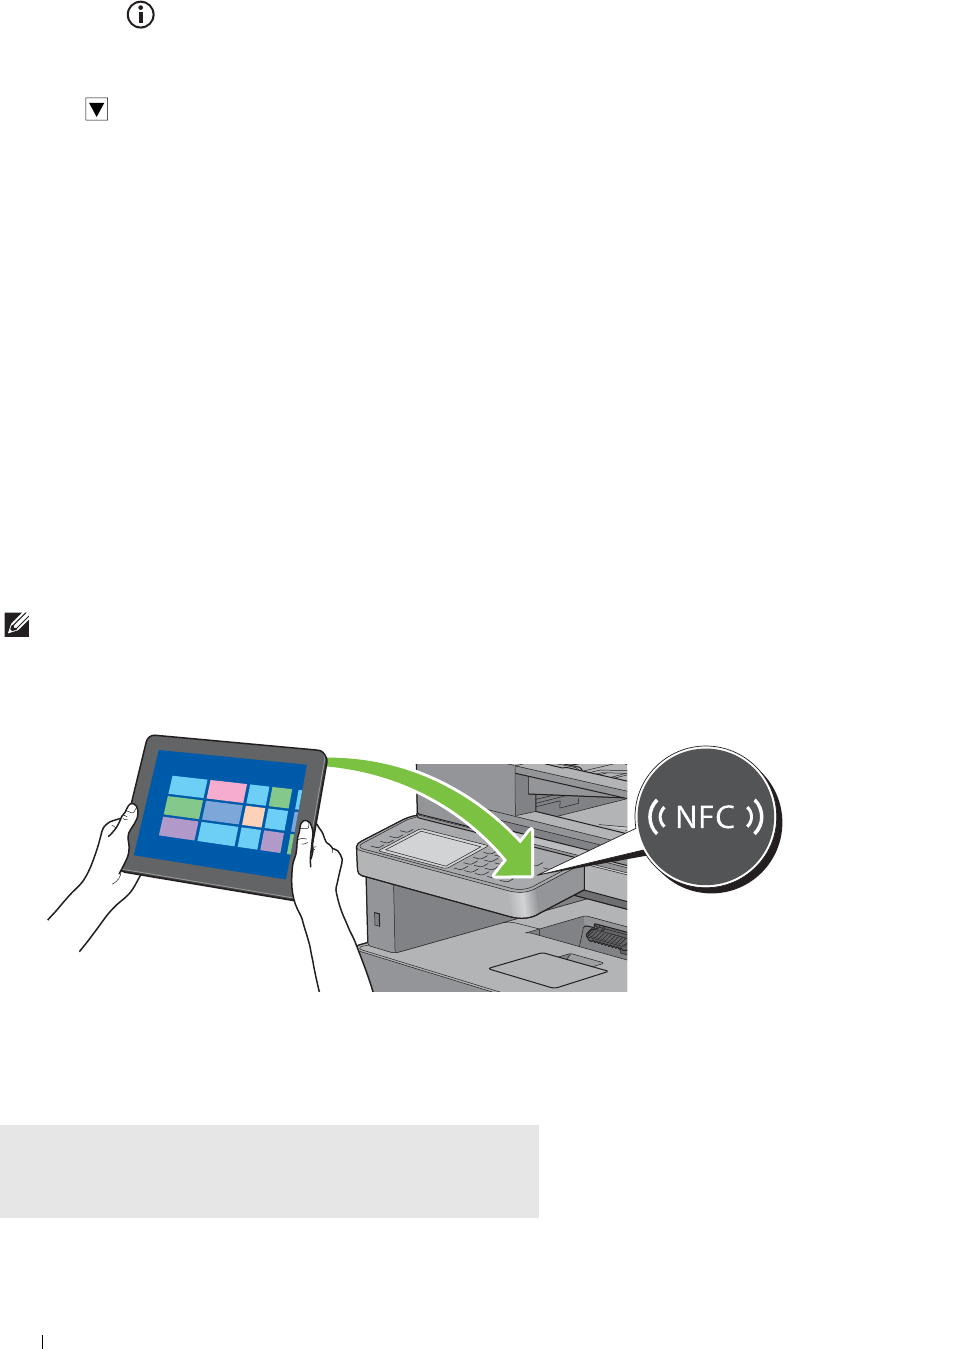
Tap to Print
NOTE:
The Tap to Print feature is available on the Dell Cloud Multifunction Printer | H815dw only.
You can add the printer to a mobile device such as a tablet or a notebook computer, simply by tapping the mobile
device onto the printer. Once the printer is added to the mobile device, you can start printing or scanning from the
mobile device.
NOTE:
To utilize the Tap to Print feature, make sure the following:
•The mobile device should be NFC-enabled and running the Microsoft
®
Windows
®
8.1 operating system.
•The printer should be connected to a network. If the printer is connected with the computer only with the USB cable, the
Tap to Print feature is not available.
Preparations
1
Check that the Tap to Print feature is enabled.
The
Tap to Pr int
feature is enabled as default on the printer.
To check whether the
Tap to Print
feature is enabled on the printer, use the printer menu or the
Dell Printer
Configuration Web Tool
. For more information on enabling the Tap to Print feature, see "Enabling Tap to Print on
the Printer Menu" or "Enabling Tap to Print on the Dell Printer Configuration Web Tool."
2
Ensure that both the printer and the computer are on the same network.
3
It is recommended that the computer is connected to the Internet so that the latest driver could be installed on
the computer.
292
Printing
Enabling Tap to Print on the Printer Menu
1
Press the
(Information)
button.
2
Ta p t h e
Tools
tab, and then tap
Admin Settings
.
3
Ta p
System Settings
.
4
Ta p u n t il
NFC - Tap to Print
appears, and then tap
NFC - Tap to Print
.
5
Ta p
Enable
.
6
Ta p
OK
.
7
Turn off the printer, and turn it on again to apply the settings.
Enabling Tap to Print on the Dell Printer Configuration Web Tool
1
Launch the
Dell Printer Configuration Web Tool
by entering IP address of the printer in your web browser. For
more information, see "Setting Up the Dell Printer Configuration Web Tool" and "Starting the Dell Printer
Configuration Web Tool."
2
When the
Dell Printer Configuration Web Tool
opens, select
Printer Settings
.
3
Click the
System Settings
tab.
4
Check the
Enable
check box for
Tap To Pr int
.
5
Click
Apply New Settings
.
Adding the Printer to the Mobile Device
While the printer is connected to the same subnet of the network with the mobile device, it is possible to add the
printer to the mobile device by tapping the mobile device onto the printer. The printer is added as a WSD (Web
Services on Devices) printer.
NOTE:
Make sure that the NFC function is activated on the mobile device.
1
Locate the NFC reader of the mobile device.
2
Tap the mobile device onto the printer to start adding the printer to the mobile device.
The printer beeps when it detects a tapping mobile device.
3
When the following message appears in the top right corner of the mobile device screen, tap the message window
to start setting up the printer on the mobile device.
Add a device?
Tap to set up your Dell-H815dw-xxxxxx.

Printing
293
The printer icon named Dell MFP H815dw will be created on the mobile device.
NOTE:
The time required until the driver is installed varies depending on the network traffic.
NOTE:
To check the printer icon, right-click the bottom left corner of the Desktop screen, and then click Control Panel
Hardware and Sound Devices and Printers.
When the Printer Icon Already Exists on the Mobile Device
If the mobile device is tapped onto of the printer, the message appears in the top right corner of the mobile
device screen confirming whether to connect to the printer.
In this case, tap the message window to connect the mobile device to the printer.
Starting Printing or Scanning
Once the printer is added and connected to the mobile device, you can start printing or scanning as described in
"Sending a Job to Print" or "Scanning From the Operator Panel - Scan to WSD."
Printing a Report Page
You can print a variety of settings for your printer including system settings, panel setting, and font list. For details about
how to print reports or lists, see "Report / List."
Printer Settings
You can change most of the print settings from the application you are printing from. If your printer is attached to
the network, you can also change settings from the Dell Printer Configuration Web Tool. To launch the Dell
Printer Configuration Web Tool, type the printer's IP address in your web browser. To find your printer's IP address,
see
"
Verifying the IP Settings.
"
Settings from the application update the default system settings for the printer. Settings from the printer driver only
apply to the job that you are currently sending to the printer.
If you cannot change a setting from the application, use the operator panel, Tool Box or the Dell Printer
Configuration Web Tool. Changing a system setting from the operator panel, Tool Box or from the Dell Printer
Configuration Web Tool makes that setting the user default.
You can verify the detailed system settings by printing a system settings report. For details about how to print a
system settings report, see "
Report / List
."
You can reset settings to their default values from the Tool Box or the operator panel.
Using the Operator Panel to Change the Printer Settings
You can select menu items and corresponding values from the operator panel.
When you first browse through the menus from the operator panel, you see some menu items are highlighted.
These highlighted items are the factory default and original system settings.
NOTE:
Factory defaults may vary for different countries.
When you select a new setting from the operator panel, the item selected is highlighted to identify it as the current
user default menu setting.
These settings are active until new ones are selected or the factory defaults are restored.
Driver settings may override changes previously made and may require you to change the operator panel defaults.

294
Printing
Using the Dell Printer Configuration Web Tool to Change the Printer Settings
If your printer is connected to the network, you can change the printer settings from your web browser. If you are a
network administrator, you can clone the system settings of one printer to one or all the printers on the network.
Type the IP address of your printer in your web browser. Choose Printer Settings from the topics list. From the
Printer Settings tab, select the System Settings to change the printer settings.
To change the paper type and size, choose Tray Management from the topics list. To change the AccessControl
settings, choose Print Volume from the topics list, and then select the Dell AccessControl tab.
To copy your system settings to another printer on the network, choose Copy Printer Settings from the topics list,
and then type the other printer's IP address.
If you do not know your printer's IP address, see the
system settings report or display the TCP/IP settings
. For details
about how to find your printer's IP address, see "Verifying the IP Settings."
Copying
295
19
Copying
NOTE:
If the Functions Control setting for
Copy
is set to
On(Password)
, you need to enter the four-digit password to use
the copy function. If the Functions Control setting for
Copy
is set to
Off
, the copy function is disabled and the menu is also
disabled on the screen. For details, see "Functions Control."
NOTE:
The images used in this manual are those of the Dell™ Cloud Multifunction Printer | H815dw unless otherwise mentioned.
Loading Paper for Copying
The instructions for loading paper in the paper tray are the same whether you are printing, faxing, or copying. For
details about loading paper, see "Loading Print Media." For details about setting the paper type and size in the tray,
see "Print Media Guidelines."
Selecting Paper Tray
After loading the print media for copy output, select the desired paper tray to be used for the copy job.
To select the tray:
1
Press the
(Home)
button.
2
Ta p
Copy
.
3
Ta p
Select Tray
.
4
Tap the desired tray, and then tap
OK
.
You can select
MPF
,
Tray1
, or
Tray2
*.
* Tray2 is only available when
the optional 550-sheet feeder (tray2) is installed.
Preparing a Document
You can use the document glass or the duplex automatic document feeder (DADF) to load an original document for
copying, scanning, and sending a fax. You can load up to 50 sheets of 75 g/m
2
(20 lb) documents for one job using
the DADF or one sheet at a time using the document glass.
WARNING:
Avoid loading documents that are smaller than 5.5 inches by 5.5 inches (139.7 mm by 139.7 mm) or larger than 8.5
inches by 14 inches (215.9 mm by 355.6 mm), different sizes or weights together, or booklets, pamphlets, transparencies, or
documents having other unusual characteristics in the DADF.
WARNING:
Carbon-paper or carbon-backed paper, coated paper, onion skin or thin paper, wrinkled or creased paper, curled
or rolled paper, torn paper, photographs, or transparencies cannot be used in the DADF.
WARNING:
Do not use the documents with staples, paper clips or exposed to adhesives or solvent based materials such as
glue, ink and correcting fluid in the DADF.
NOTE:
To get the best scan quality, especially for color or grayscale images, use the document glass instead of the DADF.
296
Copying
Making Copies From the Document Glass
NOTE:
A computer connection is not required for copying.
NOTE:
Remove any documents from the DADF before copying from the document glass.
NOTE:
Contaminants on the document glass may cause black spots on the copy output. For best results, clean the document
glass before use. For more information, see "Cleaning the Scanner."
To make a copy from the document glass:
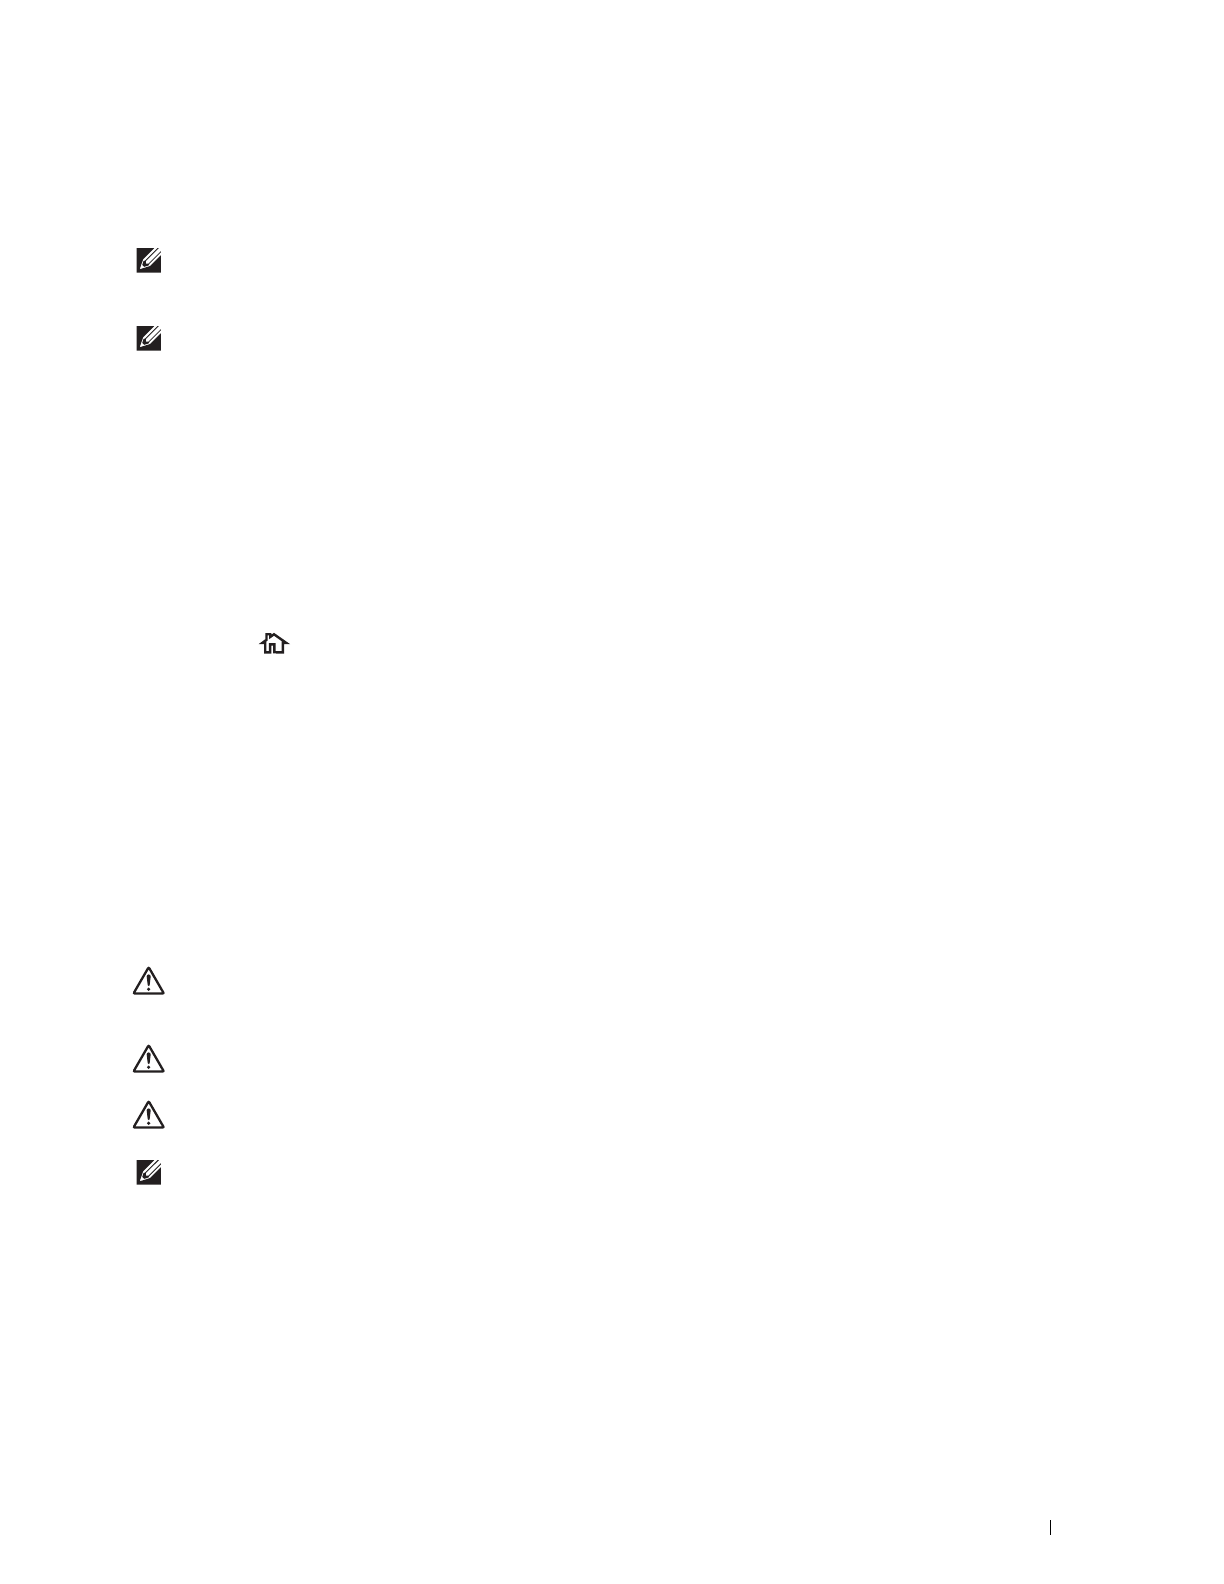
1
Lift and open the document cover.
2
Place the document facing down on the document glass and align it with the registration guide on the top left
corner of the glass.
3
Close the document cover.
NOTE:
Leaving the document cover open while copying may affect the copy quality and increase the toner consumption.
NOTE:
If you are copying a page from a book or magazine, lift the cover until its hinges are caught by the stopper and then
close the cover. If the book or magazine is thicker than 30 mm, start copying with the document cover open.
4
Press the
(Home)
button.
To simply make a copy without changing the default copy settings, proceed to step 7.
Copying
297
5
Ta p
Copy
.
To customize the copy settings such as
Select Tray
and
Darken/Lighten
, see "Setting Copy Options."
NOTE:
The copy options automatically return to their default status after the auto clear timer is expired.
6
Tap – or + to specify the number of copies from 1 to 99 in the
Quantity
tile.
7
Ta p
Copy
to begin copying.
NOTE:
You can cancel a copy job while scanning a document by tapping
Stop
.
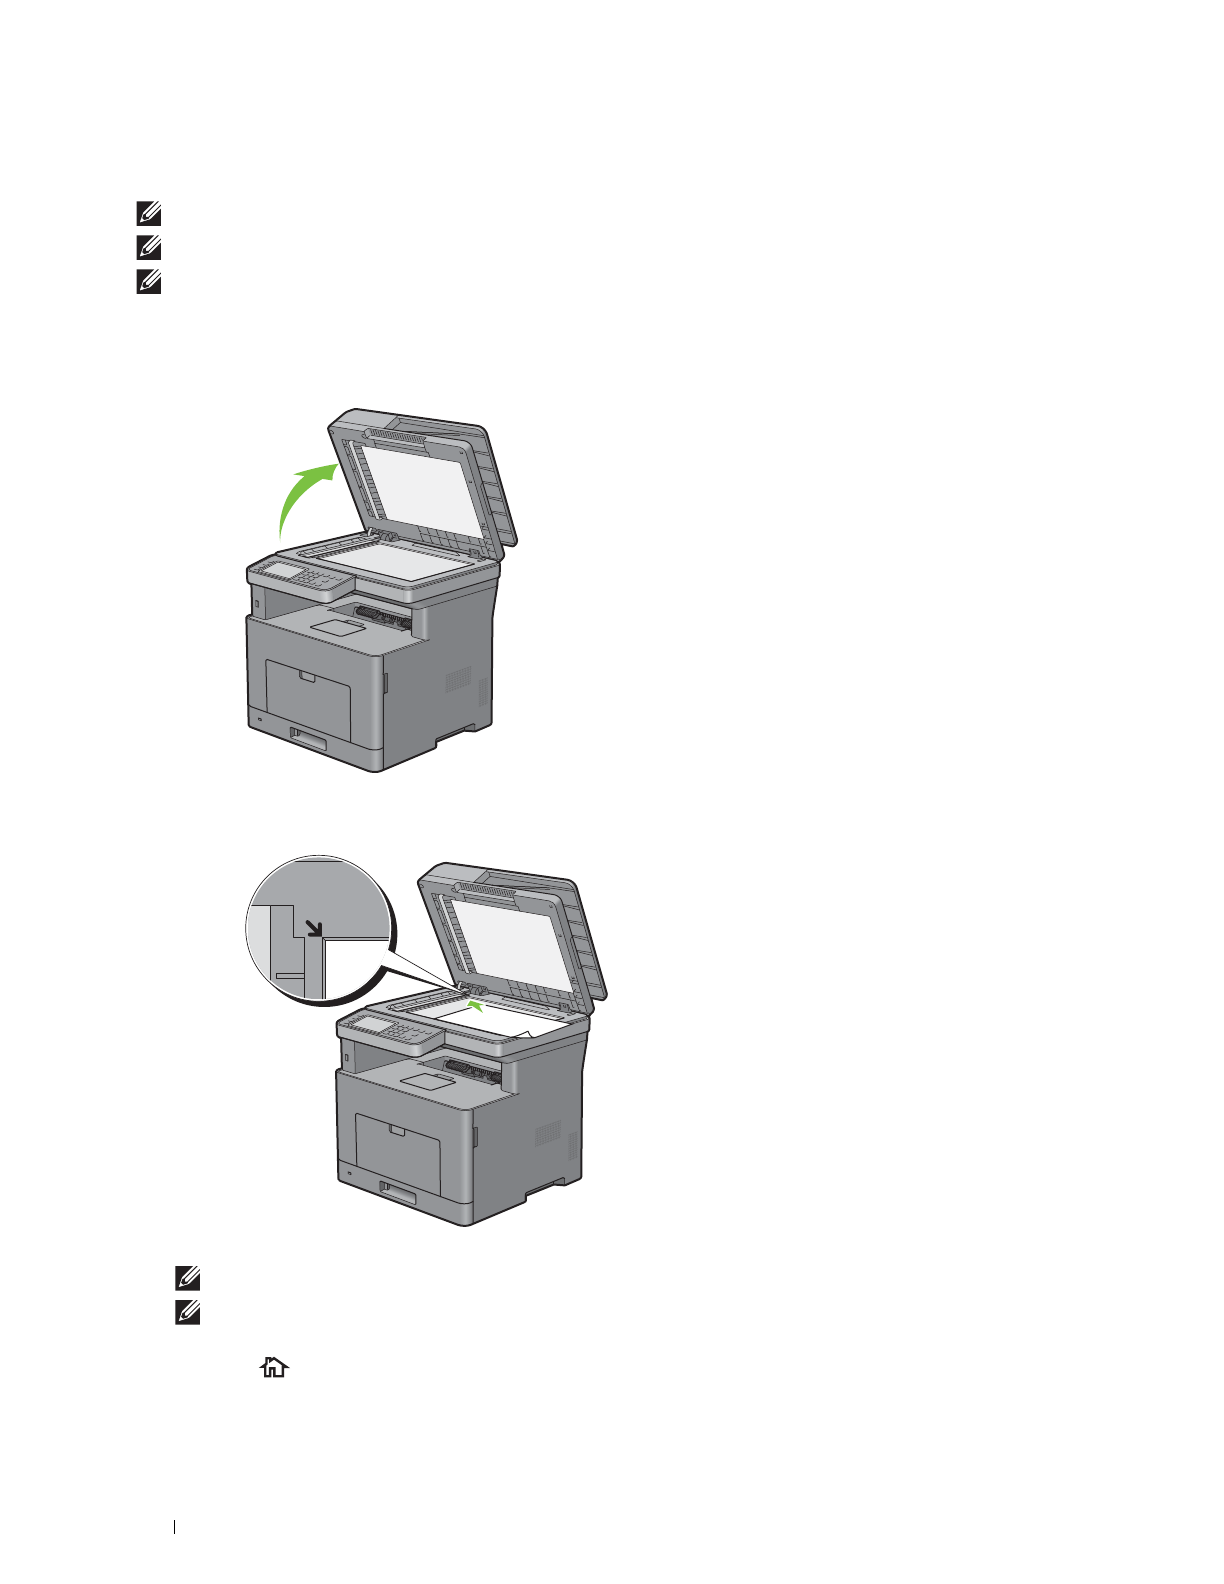
Making Copies From the DADF
CAUTION:
Do not load more than 50 sheets into the DADF or allow more than 50 sheets to be fed to the document output tray.
The document output tray should be emptied before it exceeds 50 sheets or your original documents may be damaged.
NOTE:
A computer connection is not required for copying.
1
Load the document(s) facing up on the DADF with top edge of the documents in first. Then adjust the document
guides to the document size.
NOTE:
Ensure that you use the document stopper before copying a legal-size document.
2
Press the
(Home)
button.
To simply make a copy without changing the default copy settings, proceed to step 5.
3
Ta p
Copy
.
To customize the copy settings such as
Select Tray
and
Darken/Lighten
, see "Setting Copy Options."
NOTE:
The copy options automatically return to their default status after the auto clear timer is expired.
4
Tap – or + to specify the number of copies from 1 to 99 in the
Quantity
tile.
5
Ta p
Copy
to begin copying.
NOTE:
You can cancel a copy job while scanning a document by tapping
Stop
.

298
Copying
Setting Copy Options
Set the following options for the current copy job before tapping Copy
to begin copying.
For details about making copies, see "Making Copies From the Document Glass" and "Making Copies From the
DADF."
NOTE:
The copy options automatically return to their default status after the auto clear timer is expired.
Options on each tile are below:
•Copy tile
–Quantity
–Darken / Lighten
– Select Tray
– 2 Sided Copying
–Sharpness
– Reduce / Enlarge
–Original Size
–Original Type
– Collation
–2-Up
–Margin
–Auto Exposure
Quantity
To specify the number of copies from 1 to 99.
1
Tap – or + to specify the number of copies.
Darken / Lighten
To adjust the contrast to make the copy darker or lighter than the original:
1
Ta p
Darken/Lighten
.
2
Drag the desired level on the
Darken/Lighten
bar, and then tap
OK
.
You can select a contrast level from seven levels between
Darken
and
Lighten
.
Drag the indicator on the left side of the bar makes the document contrast lighter, and selecting a cell on the right
side of the bar makes the document contrast darker.
* Denotes the factory default setting.
Darken 3 Works well with light documents or faint pencil markings.
Darken 2
Darken 1
Normal* Works well with normal typed or printed documents.
Lighten 1 Works well with dark documents.
Lighten 2
Lighten 3
Copying
299
Select Tray
To select the tray:
1
Ta p
Select Tray
.
2
Tap the desired setting, and then tap
OK
.
* Denotes the factory default setting.
NOTE: Tray2
is only available when the optional 550-sheet feeder is installed.
NOTE:
When
Any
is displayed as the paper size and type in the MPF, you can select the paper size and type from this
menu. For details, see "Select Tray."
2 Sided Copying
To make duplex copies with the specified binding position:
1
Swipe the screen until
2 Sided Copying
appears, and then tap
2 Sided Copying
.
2
Tap the desired setting, and then tap
OK
.
* Denotes the factory default setting.
When you are using the document glass and it is set to
1
2 Sided
or
2
2 Sided
, the display prompts you
for another page after tapping
Copy
.
a
If you want to place a new document, replace the document with a new document, and then tap
Continue
.
b
If you finish copying, tap
Print Now
.
NOTE:
When you use the DADF to copy both sides of a document, the printed position of the front and back of the document
may differ if the size in the document size setting and the size of the document do not match. In this case, set
Original
Size
to the same size as the document.
MPF The paper is fed from the multipurpose feeder.
Tray1* The paper is fed from tray1.
Tray2 The paper is fed from the optional 550-sheet feeder.
1 1 Sided* Select 1 sided or 2 sided and specify binding position for the 2 sided copy.
1 2 Sided
2 1 Sided
2 2 Sided
Long Edge Binding
Short Edge Binding
300
Copying
Sharpness
To adjust the sharpness to make the copy image sharper or softer than the original:
1
Swipe the screen until
Sharpness
appears, and then tap
Sharpness
.
2
Ta p t h e d esi re d se t t ing .
* Denotes the factory default setting.
Reduce / Enlarge
To reduce or enlarge the size of a copied image from 25 to 400 percent when you copy original documents from the
document glass or DADF:
NOTE:
When you make a reduced copy, black lines may appear at the bottom of your copy.
1
Swipe the screen until
Reduce/Enlarge
appears, and then tap
Reduce/Enlarge
.
2
Tap the desired setting, and then tap
OK
.
(Inch series)
(mm series)
* Denotes the factory default setting.
NOTE:
You can also specify the value in increments of 1 percent from 25 to 400 by tapping – or +.
Sharpen Makes the copy image sharper than the original.
Normal* The clarity of the image is the same as the original.
Soften Makes the copy image softer than the original.
100%*
50%
64% (LedgerLetter)
78% (LegalLetter)
129% (StatementLetter)
154% (StatementLegal)
200%
100%*
50%
70% (A4A5)
81% (B5A5)
122% (A5B5)
141% (A5A4)
200%

Copying
301
Original Size
To select the default document size:
1
Swipe the screen until
Original Size
appears, and then tap
Original Size
.
2
Ta p t h e d esi re d se t t ing .
(Inch series)
(mm series)
* Denotes the factory default setting.
Original Type
To select the copy image quality:
1
Swipe the screen until
Original Type
appears, and then tap
Original Type
.
2
Ta p t h e d esi re d se t t ing .
* Denotes the factory default setting.
Auto*
Letter (8.5x11")
Folio (8.5x13")
Legal (8.5x14")
Statement (5.5x8.5")
A4 (210x297mm)
A5 (148x210mm)
B5 (182x257mm)
Executive (7.3x10.5")
Auto*
A4 (210x297mm)
A5 (148x210mm)
B5 (182x257mm)
Letter (8.5x11")
Folio (8.5x13")
Legal (8.5x14")
Statement (5.5x8.5")
Executive (7.3x10.5")
Photo & Text* Used for documents with both photos and text.
Text Used for documents with text.
Photo Used for documents with photos.
302
Copying
Collation
To sort the copy output: For example, if you make two copies of three page documents, one complete three page
document will be printed followed by the second complete document:
1
Swipe the screen until
Collation
appears, and then tap
Collation
.
2
Ta p t h e d esi re d se t t ing .
* Denotes the factory default setting.
When you are using the document glass and it is set to
Collated
, the display prompts you for another page after
tapping
Copy
.
a
If you want to place a new document, replace the document with a new document, and then tap
Continue
.
b
If you finish copying, tap
Print Now
.
Auto* Only the documents loaded from DADF are copied in collated order.
Collated Copies in collated order.
Uncollated Does not copy in collated order.
Copying
303
2-Up
To print two original images to fit onto one sheet of paper:
1
Swipe the screen until
2-Up
appears, and then tap
2-Up
.
2
Tap the desired setting, and then tap
OK
.
* Denotes the factory default setting.
When you are using the document glass and it is set to
Auto
or
Manual
, the display prompts you for another
page after tapping
Copy
.
a
If you want to place a new document, replace the document with a new document, and then tap
Continue
.
b
If you finish copying, tap
Print Now
.
NOTE:
When you use the DADF to copy both sides of a document, the printed position of the front and back of the document
may differ if the size in the document size setting and the size of the document do not match. In this case, set
Original
Size
to the same size as the document.
Off* Does not perform multiple-up printing.
Auto Automatically reduces the original pages to fit onto one sheet of paper.
Manual Prints the original pages onto the one sheet of paper in the size specified in Reduce / Enlarge.
Auto:
Automatically
reduces the
pages to fit in
one page.
Manual:
Reduces the
pages in the
custom size
depending on the
setting of the
Reduce / Enlarge
menu.
304
Copying
Margin
To specify the margins of the copy:
1
Swipe the screen until
Margin
appears, and then tap
Margin
.
2
Tap – or + to enter the desired value, and then tap
OK
.
* Denotes the factory default settings.
Auto Exposure
To suppress the background of the original to enhance text on the copy:
1
Swipe the screen until
Auto Exposure
appears, and then tap
Auto Exposure
.
2
Ta p
On
.
Using the ID Copy
NOTE:
If the Functions Control setting for
ID Copy
is set to
Disable
, the ID copy function is disabled and the menu is also
disabled on the screen. For details, see "Functions Control."
You can copy both sides of an ID card on one side of a single sheet of paper in its original size by tapping ID Copy
on the touch panel.
To make a cop y:
1
Place an ID card facing down on the document glass, and close the document cover.
For details about loading a document, see "Making Copies From the Document Glass."
2
Press the
(Home)
button.
3
Ta p
ID Copy
.
4
Specify the copy settings below as required.
•Quantity
•Darken / Lighten
• Select Tray
•Sharpness
•Auto Exposure
For details, see "Setting Copy Options."
5
Ta p
Copy
to begin copying.
After the front side of the ID card is scanned, the display prompts you to turn over the card.
a
To scan the back side of the ID card, turn the ID card over and tap
Continue
.
b
To finish copying, tap
Print Now
.
Top / Bottom 0.2 inch* (4 mm*) Specify the value in increments of 0.1 inch (1 mm).
Available Range: 0.0–2.0 inches (0–50 mm)
Left / Right 0.2 inch* (4 mm*) Specify the value in increments of 0.1 inch (1 mm).
Available Range: 0.0–2.0 inches (0–50 mm)
Middle 0 inches* (0 mm*) Specify the value in increments of 0.1 inch (1 mm).
Available Range: 0.0–2.0 inches (0–50 mm)

Copying
305
Changing the Default Settings
The default settings of the copy menu options such as Select Tray and Darken/Lighten can be set to the
most frequently used modes. When you copy a document, the specified default settings are used unless they are
changed by using the operator panel.
The settings on Default Settings will be reflected when you create a new tile. If you change the settings on
Default Settings after creating the new tile, it does not affect the settings of the tile you created earlier. For
details about creating a new tile, see "Adding a New Tile."
To create your own default settings:
1
Press the
(Information)
button.
2
Ta p t h e
Tools
tab, and then tap
Default Settings
.
3
Ta p
Copy Defaults
.
4
Tap until the desired menu item appears, and then tap that menu item.
5
Tap the desired setting or enter the value, and then tap
OK
.
6
Repeat steps 4 and 5 as needed.

306
Copying

Scanning
307
20
Scanning
NOTE:
If the Functions Control setting for a scan function (
Scan to Email
,
Scan to Network Folder
,
Scan
to PC
,
Scan to WSD
, or
Scan to USB
) is set to
On
(Password)
, you need to enter the four-digit password to use
that scan function. If the Functions Control setting for a scan function is set to
Off
, that scan function is disabled and the menu
is also disabled on the screen. For details, see "Functions Control."
NOTE:
The images used in this manual are those of the Dell™ Cloud Multifunction Printer | H815dw unless otherwise mentioned.
Scanning Overview
Use the Dell™ Cloud Multifunction Printer | H815dw and Dell Smart Multifunction Printer | S2815dn to turn
pictures and text into editable images on your computer.
Your printer provides several ways to scan your document. There are two main scanning types. One is operated on
the printer side without using the scanner driver, and the other is operated on the computer side using a software
and the scanner driver. See the available features below to help you find the information you need.
• Scanning - With scanner driver
• Scanning - Without scanner driver
Tips for Easy Network Scanning
•Use the
Scan to Web Services on Devices (WSD)
feature if you are not familiar with the network scanning setup.
The
Scan to Web Services on Devices (WSD)
feature does not require the complicated setup of the network
shared folder.
• Before using the
Scan to Network Folder
feature, configure the network connection details using the
Address Book
Editor
if you are not familiar with the setup on the
Dell Printer Configuration Web Tool
.
The
Address Book Editor
helps to register the scanning destination details to the printer.
Scanning - With scanner driver
• Scan into a graphic software such as Adobe
®
Photoshop
®
using a TWAIN driver
(Supporting USB and Network connections for both Microsoft
®
Windows
®
and Apple Macintosh using a graphic
software)
See "Scanning Using the TWAIN Driver."
• Scan into a Microsoft’s default program such as Windows
®
Photo Gallery and Microsoft
®
Paint, using a Windows
Image Acquisition (WIA) driver
(Supporting USB and Network (including WSD
*
) connections on Windows
®
only)
*
Web Services on Devices
See "Scanning Using the Windows Image Acquisition (WIA) Driver."
• Scan and send the scanned document to computer connected via USB cable
(Supporting USB connection for both Microsoft
®
Windows
®
and Apple Macintosh using bundled software tool of
ScanButton Manager
)
Using the feature of Scan to PC on the operator panel of your printer, the scanned image is saved in the location of
your computer specified with the
ScanButton Manager
.
See "Scanning From the Operator Panel - Scan to PC."

308
Scanning
Scanning - Without scanner driver
• Scan and save the scanned document in a USB memory
See "Scanning to a USB Memory."
• Scan and send the scanned document by e-mail
See "Sending an E-Mail With the Scanned Image."
• Scan and send the scanned document to computer or server connected to network
See "Scanning to a PC or Server via SMB/FTP."
• Scan and send the scanned document to a computer connected to a network using Web Services on Devices
(WSD)
See "Scanning From the Operator Panel - Scan to WSD."
The resolution setting to use when you scan an item depends on the item type and how you plan to use the image or
document after you scan it to your computer. For the best results, use these recommended settings.
Scanning above these recommended resolutions may exceed the capabilities of the application. If you require a
resolution above those recommended in the above table, you should reduce the size of the image by previewing (or
pre-scan) and cropping before scanning the image.
Scanning From the Operator Panel - Scan to PC
NOTE:
You must connect your computer via USB for selecting the Scan to PC feature from the operator panel. Network
connection is not supported.
NOTE:
This feature is supported on both Microsoft
®
Windows
®
and Apple Macintosh.
1
Load the document(s) facing up with top edge in first into the DADF.
OR
Place a single document facing down on the document glass, and close the document cover.
For details about loading a document, see "Loading an Original Document."
2
Press the
(Home)
button.
3
Ta p
Scan to PC
.
4
Specify scan settings such as
Output Color
,
Resolution
,
File Format
,
2 Sided Scanning
,
Darken/Lighten
,
Contrast
,
Sharpness
,
Auto Exposure
,
Original Size
,
Margin
, and
File
Naming Mode
. For details, see "Scan Settings."
5
Ta p
Scan
to begin scanning the document.
NOTE:
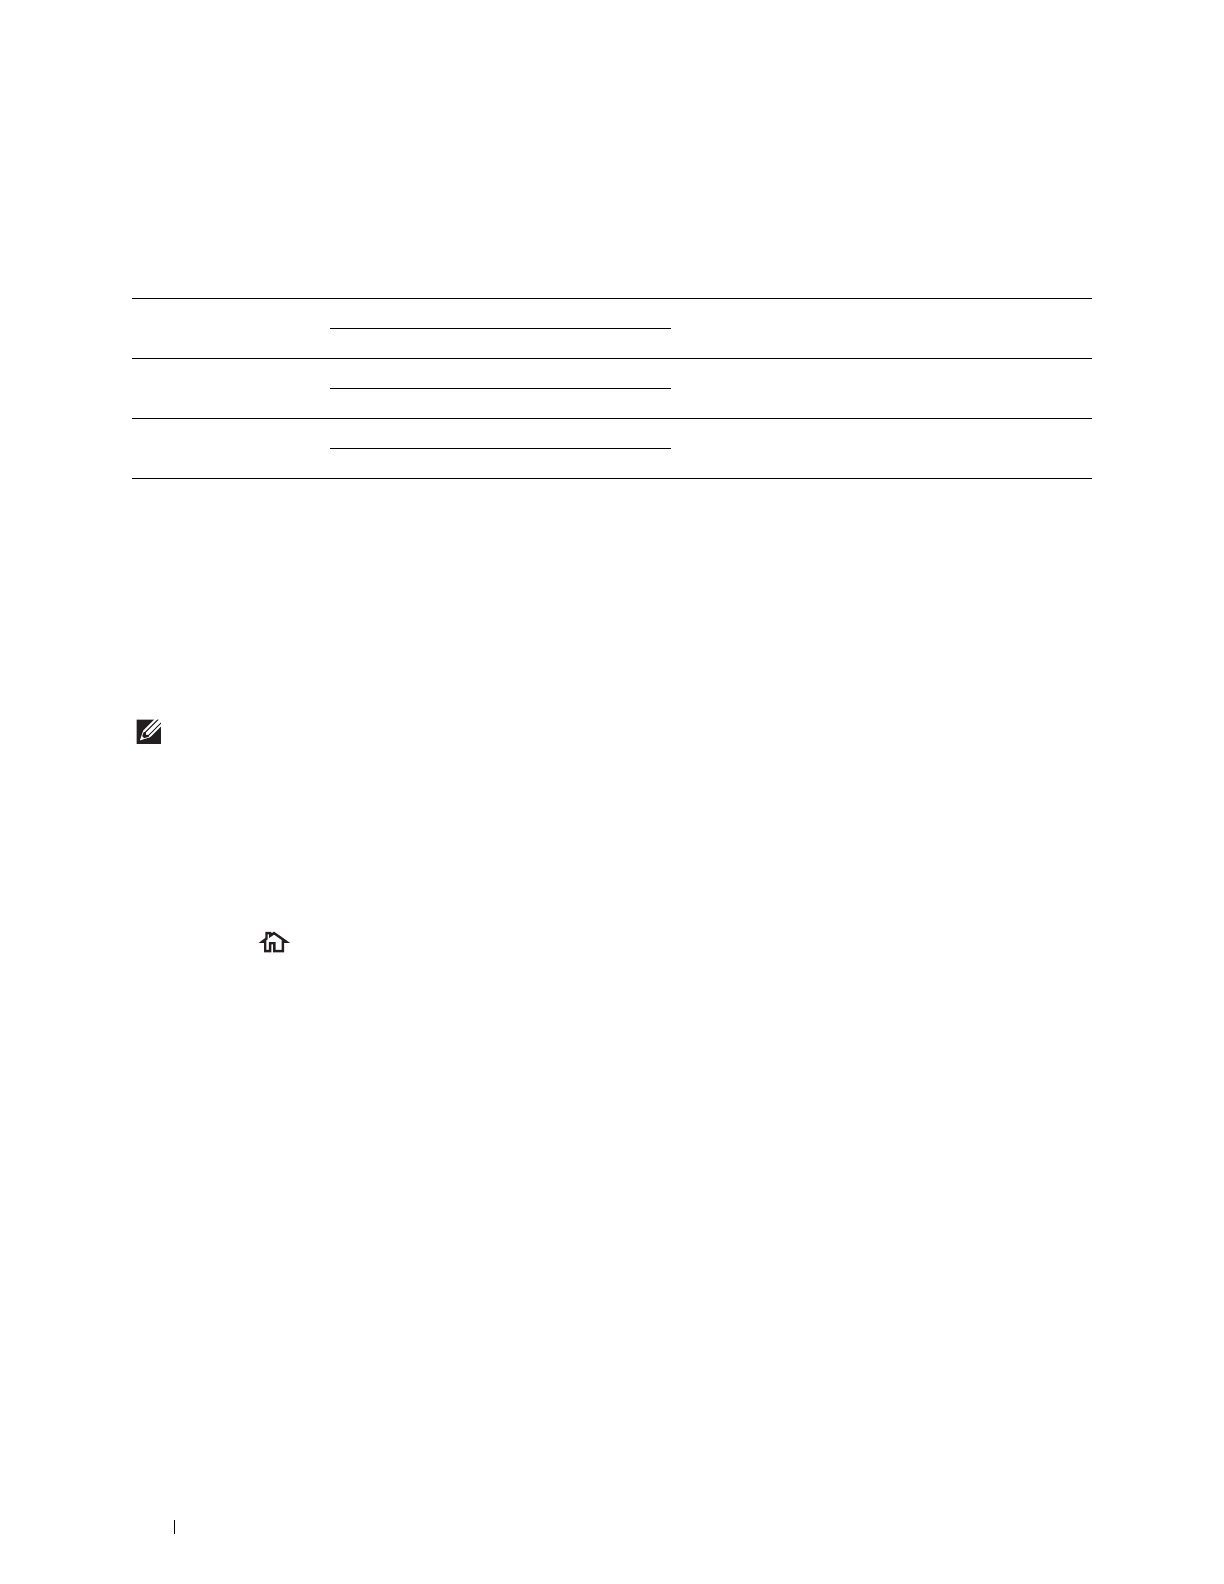
If the following dialog box appears on your computer, select Dell MFP S2815dn/H815dw ScanButton Manager and
then click OK.
Type Resolution
Documents 300 dpi black-and-white or 200 dpi grayscale or color
Documents of poor quality or that contain small text 400 dpi black-and-white or 300 dpi grayscale
Photographs and pictures 100–200 dpi color or 200 dpi grayscale
Images for an inkjet printer 150–300 dpi
Images for a high-resolution printer 300–600 dpi
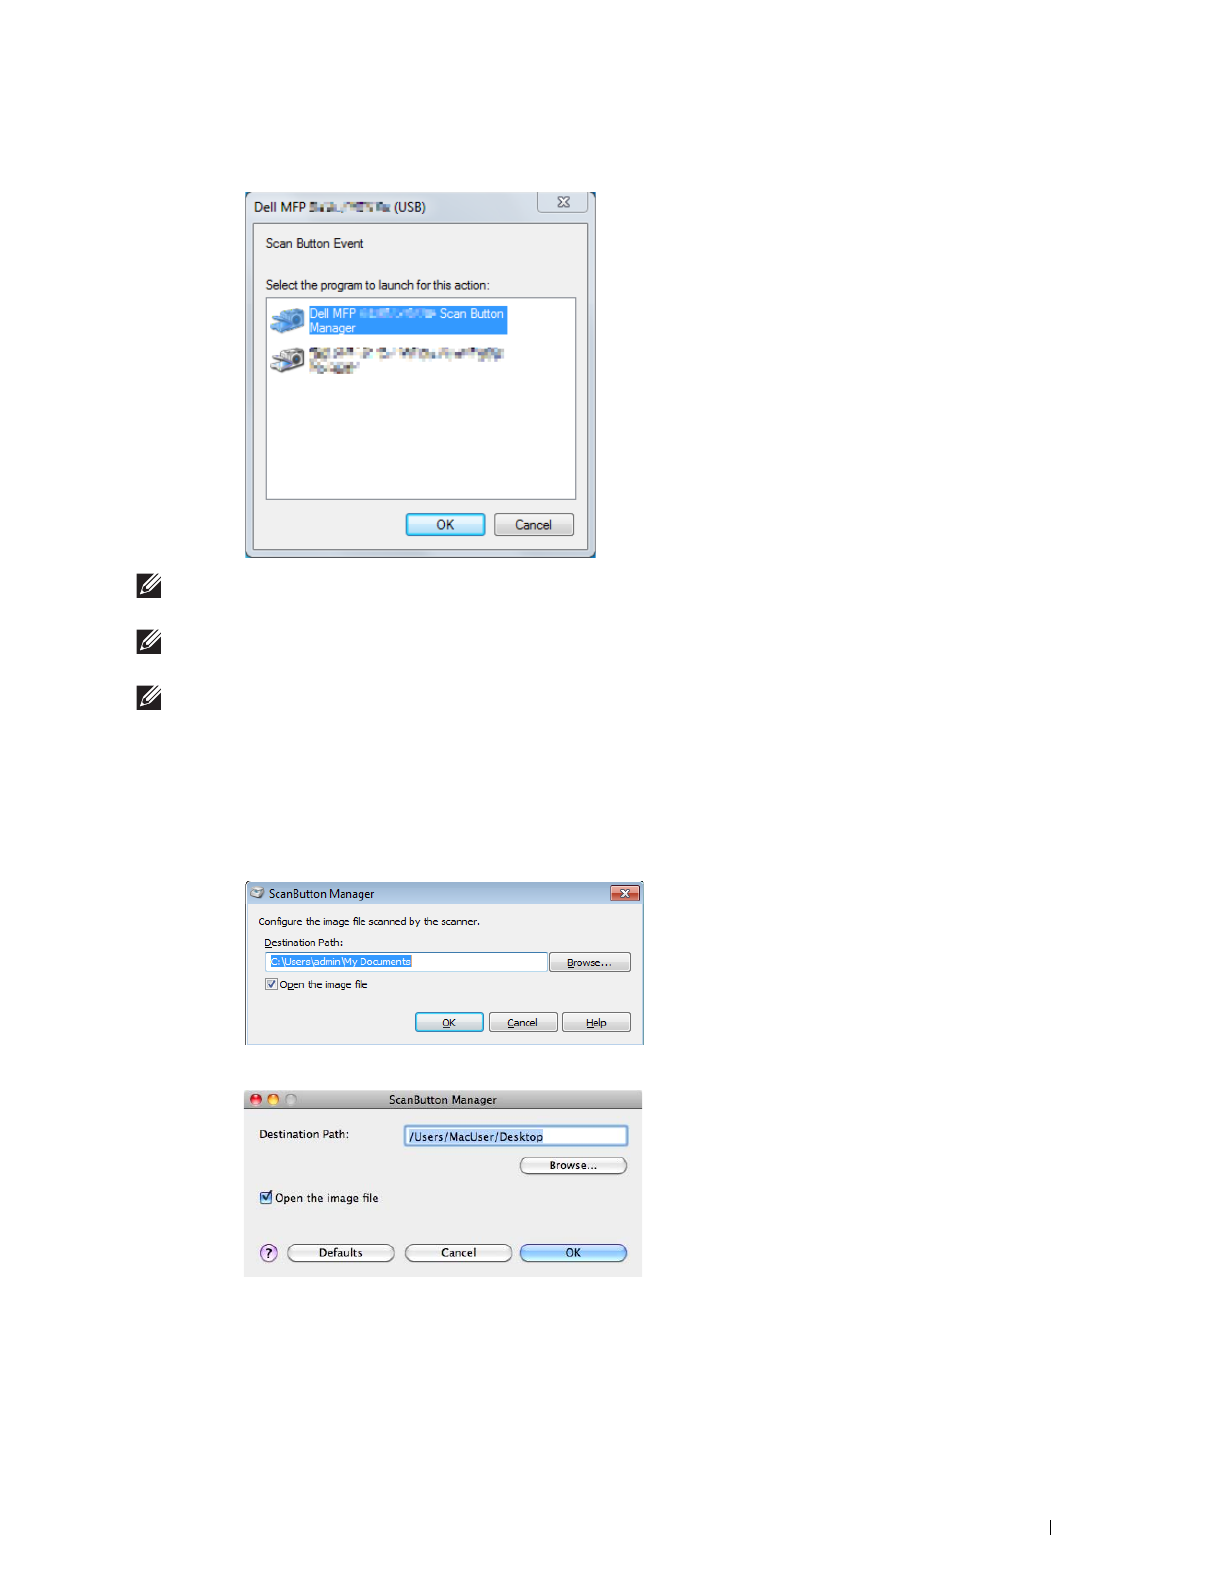
Scanning
309
For Microsoft
®
Windows
®
:
NOTE:
Once you select Dell MFP S2815dn/H815dw ScanButton Manager with the Always use this program for this action check
box selected, Dell MFP S2815dn/H815dw ScanButton Manager will automatically open without selecting an application.
NOTE:
You must use ScanButton Manager on your computer to change the settings for scanning. For details, see "ScanButton
Manager."
NOTE:
For Macintosh, the dialog box for selecting a program is not displayed.
ScanButton Manager
The Scan to PC stores the image files in the My Documents folder by default, and then you can open them using
the related application. Use ScanButton Manager to change the output destination of the obtained image files and
to select whether to open the image files using the related application.
For Microsoft
®
Windows
®
:
For Apple Macintosh:

310
Scanning
Scanning From the Operator Panel - Scan to WSD
If the printer is connected to a computer via network using Web Services on Devices (WSD), you can use the Scan
to Web Services on Devices (WSD) function to send scanned images to a computer.
NOTE:
To use Scan to Web Services on Devices (WSD), you need to setup connection using Web Services on Devices (WSD).
NOTE:
Web Services on Devices (WSD) are supported only on Windows Vista
®
, Windows
®
7, Windows
®
8, and Windows
®
8.1.
Ensure that the scanner driver is installed on your computer. See "Setting Up the Printer Using Dell Printer Easy Install
(Windows
®
Only)" for details.
Printer Setup for Scan to Web Services on Devices (WSD)
Setup the printer and computer for connection using Web Services on Devices (WSD).
Checking the Printer Setting
To use the Scan to Web Services on Devices (WSD) function, the Scan to WSD function needs to be enabled from
the operator panel of the printer or on the Dell Printer Configuration Web Tool. See "Port Settings" or "Protocols"
for details.
Setting Up the Computer
NOTE:
For Windows
®
8 and Windows
®
8.1, the computer automatically connects the printer using Web Services on Devices
(WSD). There is no need to install the printer manually.
For Windows
®
7:
1
Click
Start
Computer
Network
2
Find the printer you want to use, right-click the icon for the printer, and then click
Install
. The printer is
connected using Web Services on Devices (WSD).
3
Right-click the icon for the printer, and then click
Scan profiles
. Specify the various settings of the profile,
including the
Source
where the documents are loaded.
For Windows Vista
®
:
1
Click
Start
Network
2
Right-click the icon for the printer, and then click
Install
.
3
Click
Continue
. The printer is connected using Web Services on Devices (WSD).
Scanning and Sending Images to the Computer Using Web Services on Devices (WSD)
1
Load the document(s) facing up with top edge in first into the DADF.
OR
Place a single document facing down on the document glass, and close the document cover.
For details about loading a document, see "Loading an Original Document."
2
Press the (
Home
) button.
3
Ta p
Scan to WSD
.
NOTE:
Whether to scan from the DADF or from the document glass can be specified in the scan profile. Make sure to specify
the scan profile accordingly if you want to scan the document from the DADF.
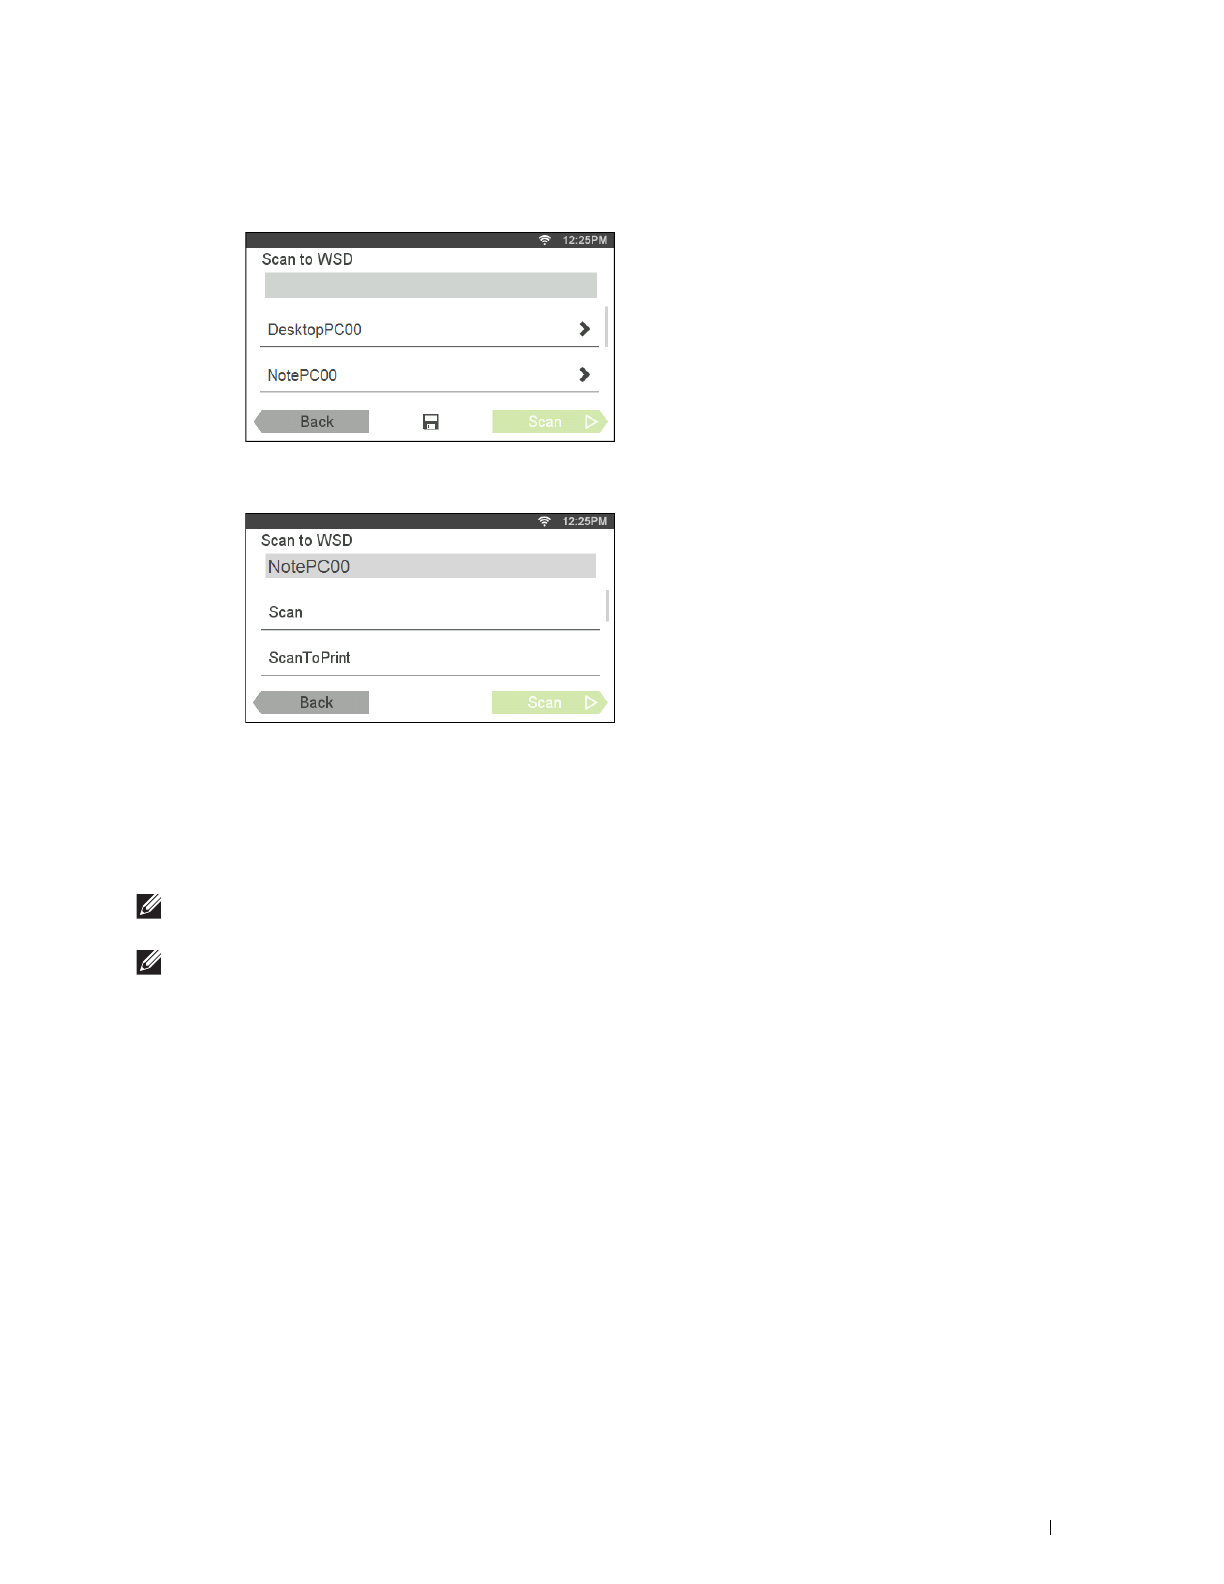
Scanning
311
4
Swipe the screen until the desired computer you want to send the scan job to appears, and then select that
computer.
5
Specify the type of scan. For details, see "Scan to WSD."
6
Ta p
Scan
to begin sending the scanned file.
Scanning From a Computer Using Web Services on Devices (WSD)
If the printer is connected to a computer via network using Web Services on Devices (WSD), you can scan
documents from the computer.
NOTE:
To scan from the computer using Web Services on Devices (WSD), you need to setup connection using Web Services on
Devices (WSD).
NOTE:
Web Services on Devices (WSD) are supported only on Windows Vista
®
, Windows
®
7, Windows
®
8, and Windows
®
8.1.
Preparations for scanning from the computer
The same preparations are necessary as in using the Scan to WSD feature. See "Printer Setup for Scan to Web
Services on Devices (WSD)."
Scanning from the computer
The following procedure uses Windows
®
7 as an example.
1
Load the document(s) facing up with top edge in first into the DADF.
OR
Place a single document facing down on the document glass, and close the document cover.
For details about loading a document, see "Loading an Original Document."
2
Click
Start
Devices and Printers
on the computer.
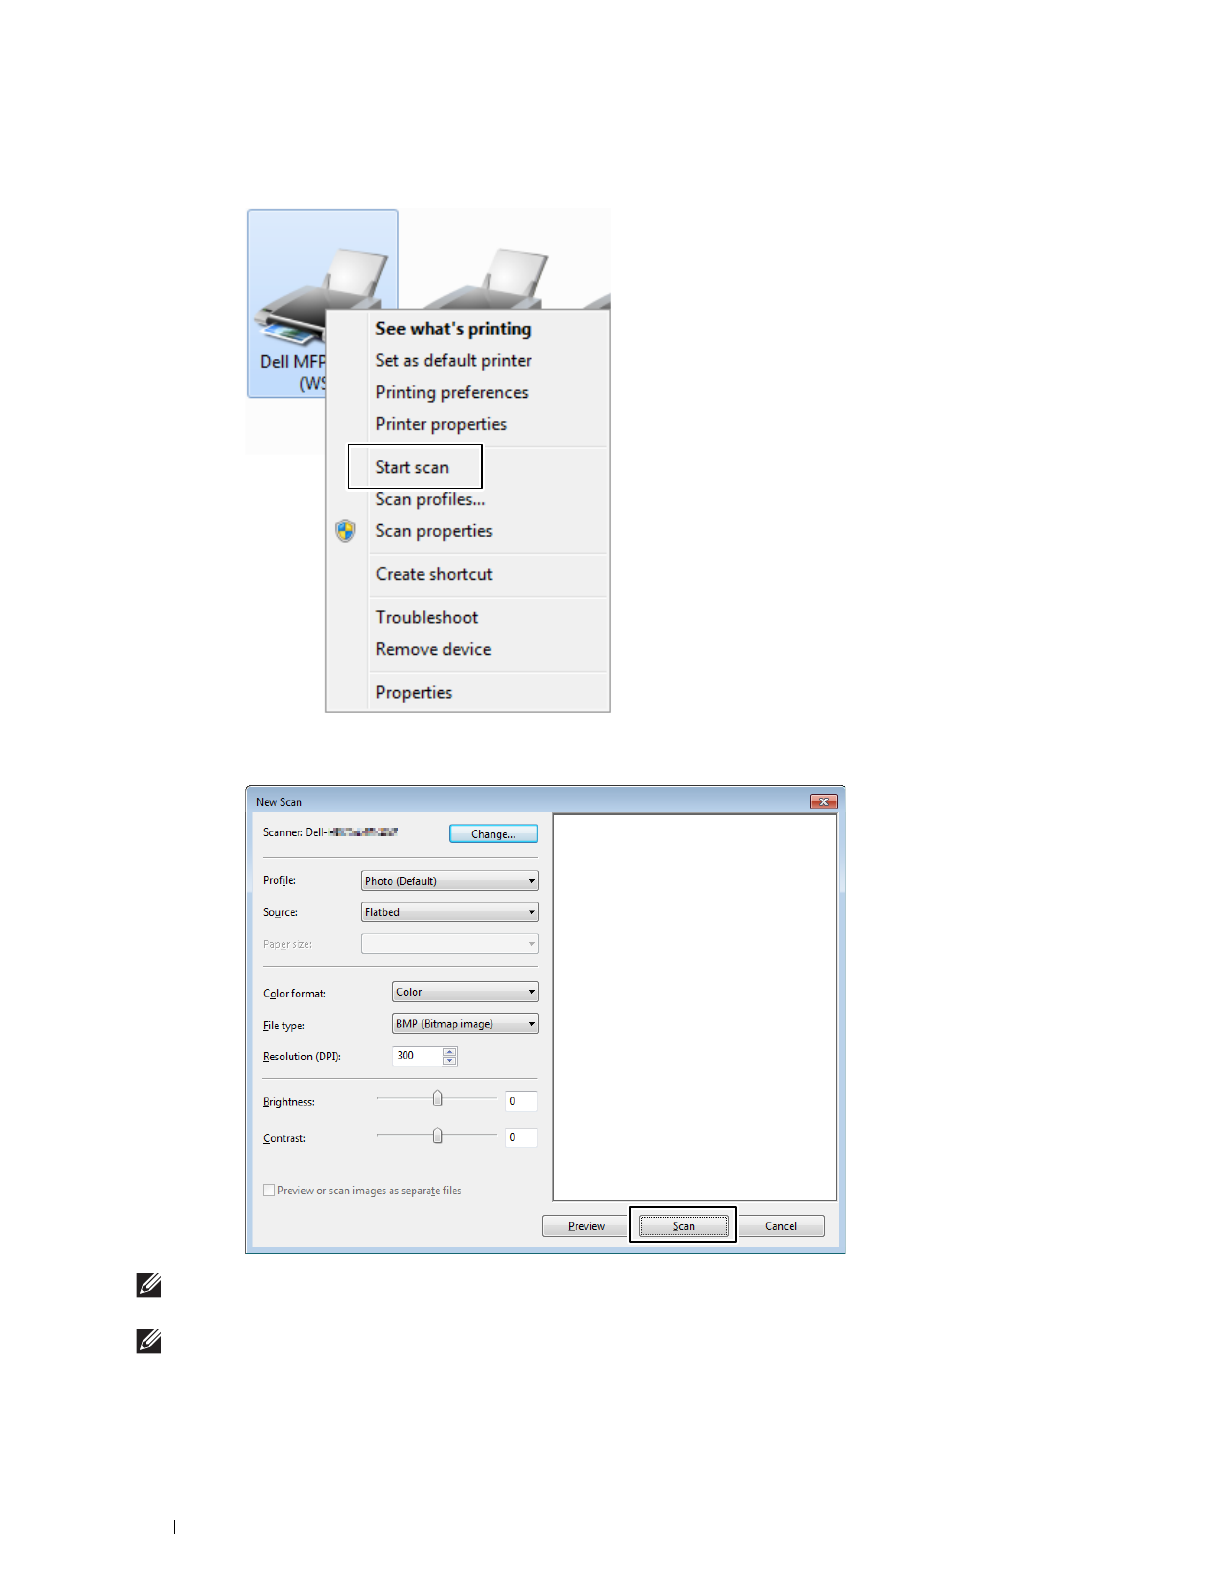
312
Scanning
3
Right-click the printer icon of the Dell MFP H815dw or Dell MFP S2815dn, and then select
Start scan
.
4
Specify the necessary settings for scanning, and then click
Scan
.
NOTE:
When you use Windows Vista
®
, use the drawing software such as Microsoft
®
Photo Gallery, select the printer
connected using the Web Services on Devices (WSD), and start scanning.
NOTE:
To open Devices and Printers on Windows
®
8, Windows
®
8.1, Windows Server
®
2012, or Windows Server
®
2012 R2,
right-click the bottom left corner of the screen on the Desktop screen, and then click Control Panel Hardware and Sound
(Hardware for Windows Server
®
2012/Windows Server
®
2012 R2) Devices and Printers.
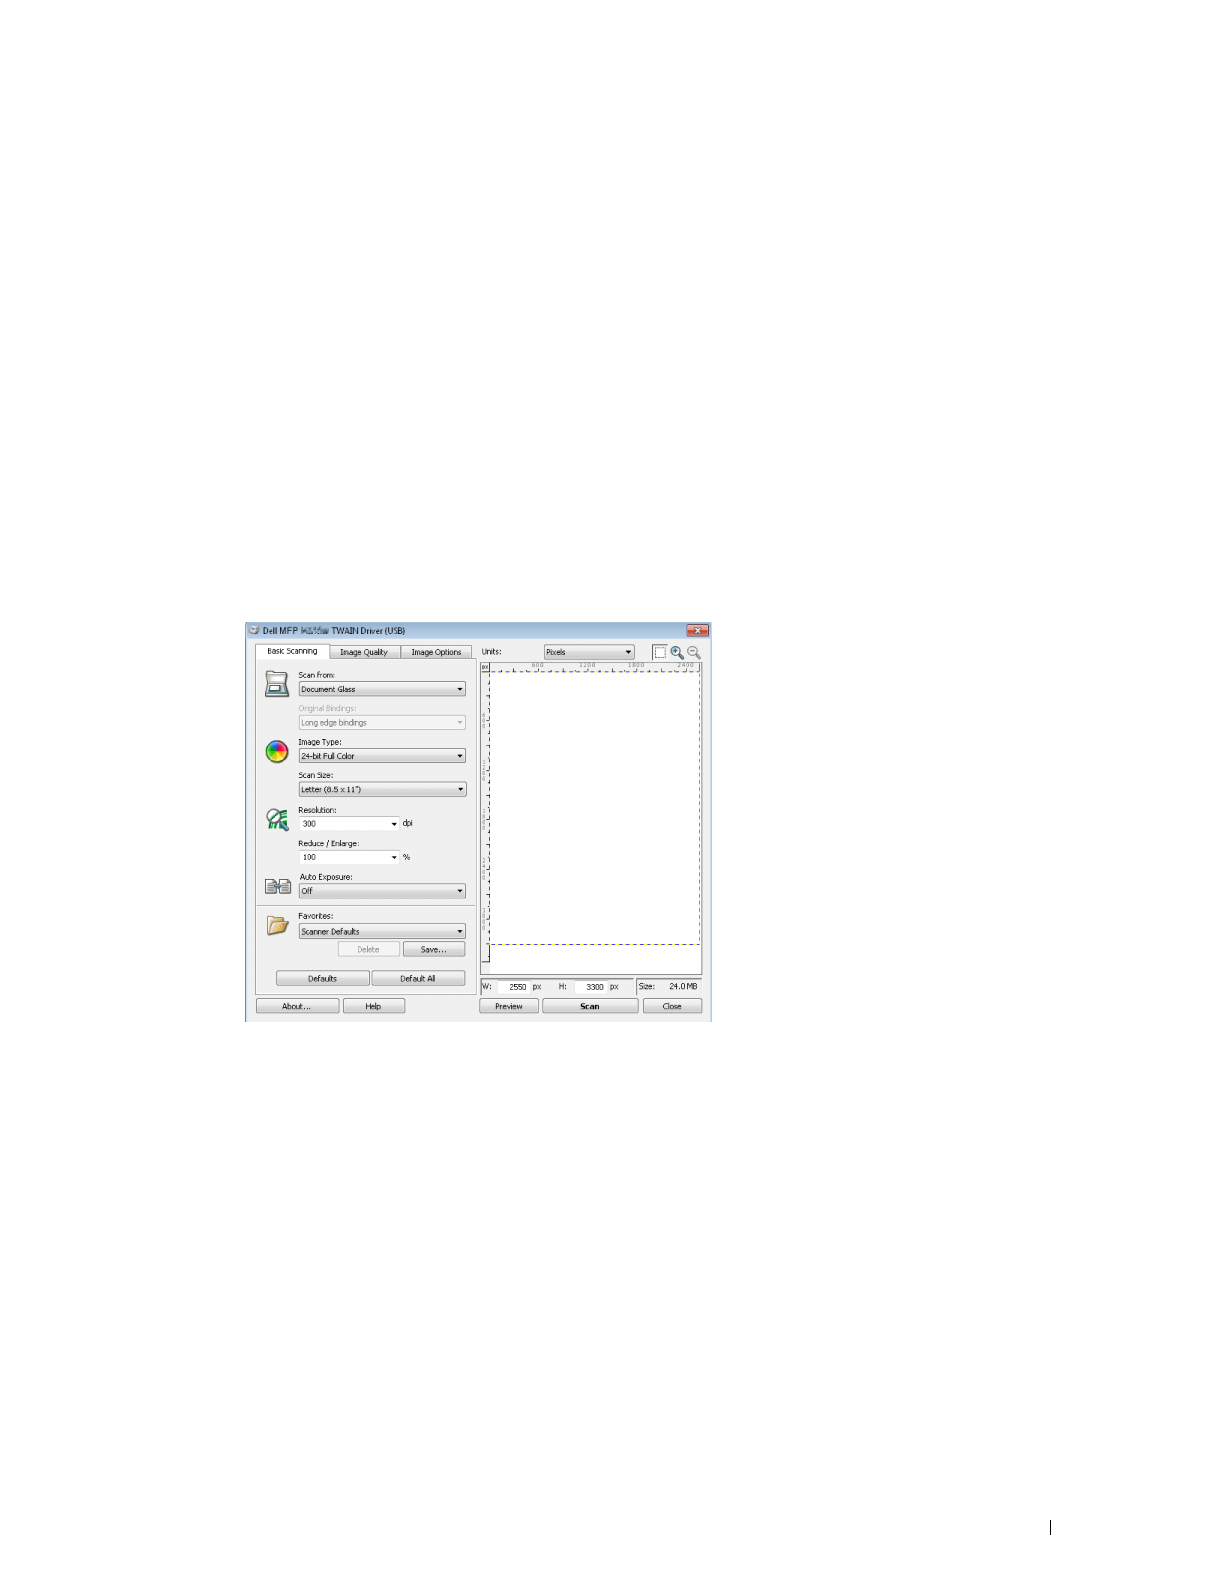
Scanning
313
Scanning Using the TWAIN Driver
Your printer supports the TWAIN driver for scanning images that supports Microsoft
®
Windows Server
®
2003,
Windows Vista
®
, Windows Server
®
2008, Windows Server
®
2008 R2, Windows
®
7, Windows
®
8, Windows
®
8.1,
Windows Server
®
2012, Windows Server
®
2012 R2, Apple Mac OS X 10.5, Mac OS X 10.6, OS X 10.7, OS X 10.8,
OS X 10.9, OS X 10.10, and works with various scanners.
1
Load the document(s) facing up with top edge in first into the DADF.
OR
Place a single document facing down on the document glass, and close the document cover.
For details about loading a document, see "Loading an Original Document."
2
Start the graphic software that supports TWAIN, such as Adobe
®
Photoshop
®
.
3
Select the scanner from the TWAIN menu on the graphic software, specify the necessary settings, and then start
scanning on the window such as shown below.
For details on operating the graphic software, see the manuals of your software.
For Microsoft
®
Windows
®
:
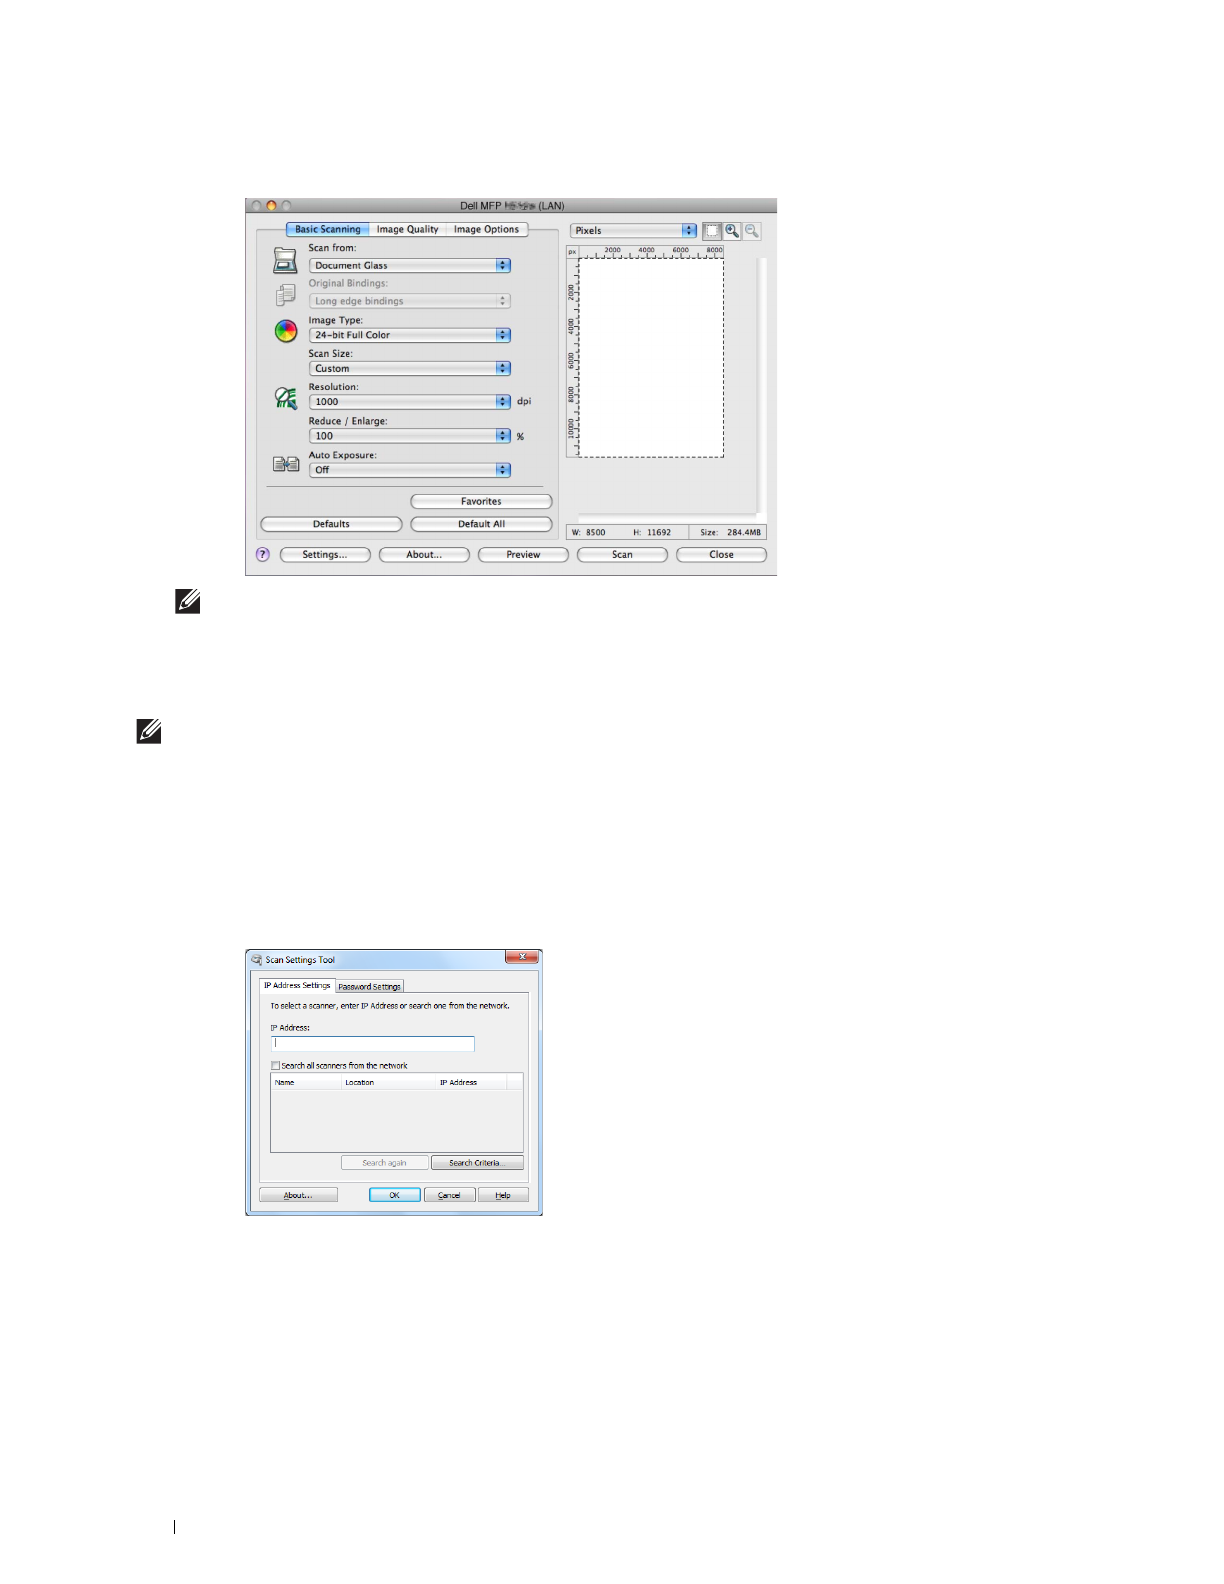
314
Scanning
For Apple Macintosh:
NOTE:
The screen image may vary depending on the software or the operating system.
Scan Settings Tool
Use the Scan Settings Tool to find the scanner on the network or set the password to access the scanner.
NOTE:
When you are using DHCP for TCP/IP setting for the printer and the printer is turned on again after a certain period of
time, the image capturing software cannot find the printer because the IP address of the printer has been changed. In this case,
use the Scan Settings Tool to check the new IP address of the printer.
To open the Scan Settings Tool:
For Microsoft
®
Windows
®
:
Click Start
All Programs
Dell Printers
Dell Cloud Multifunction Printer - H815dw
or
Dell Smart
Multifunction Printer - S2815dn
Scan Settings Tool.
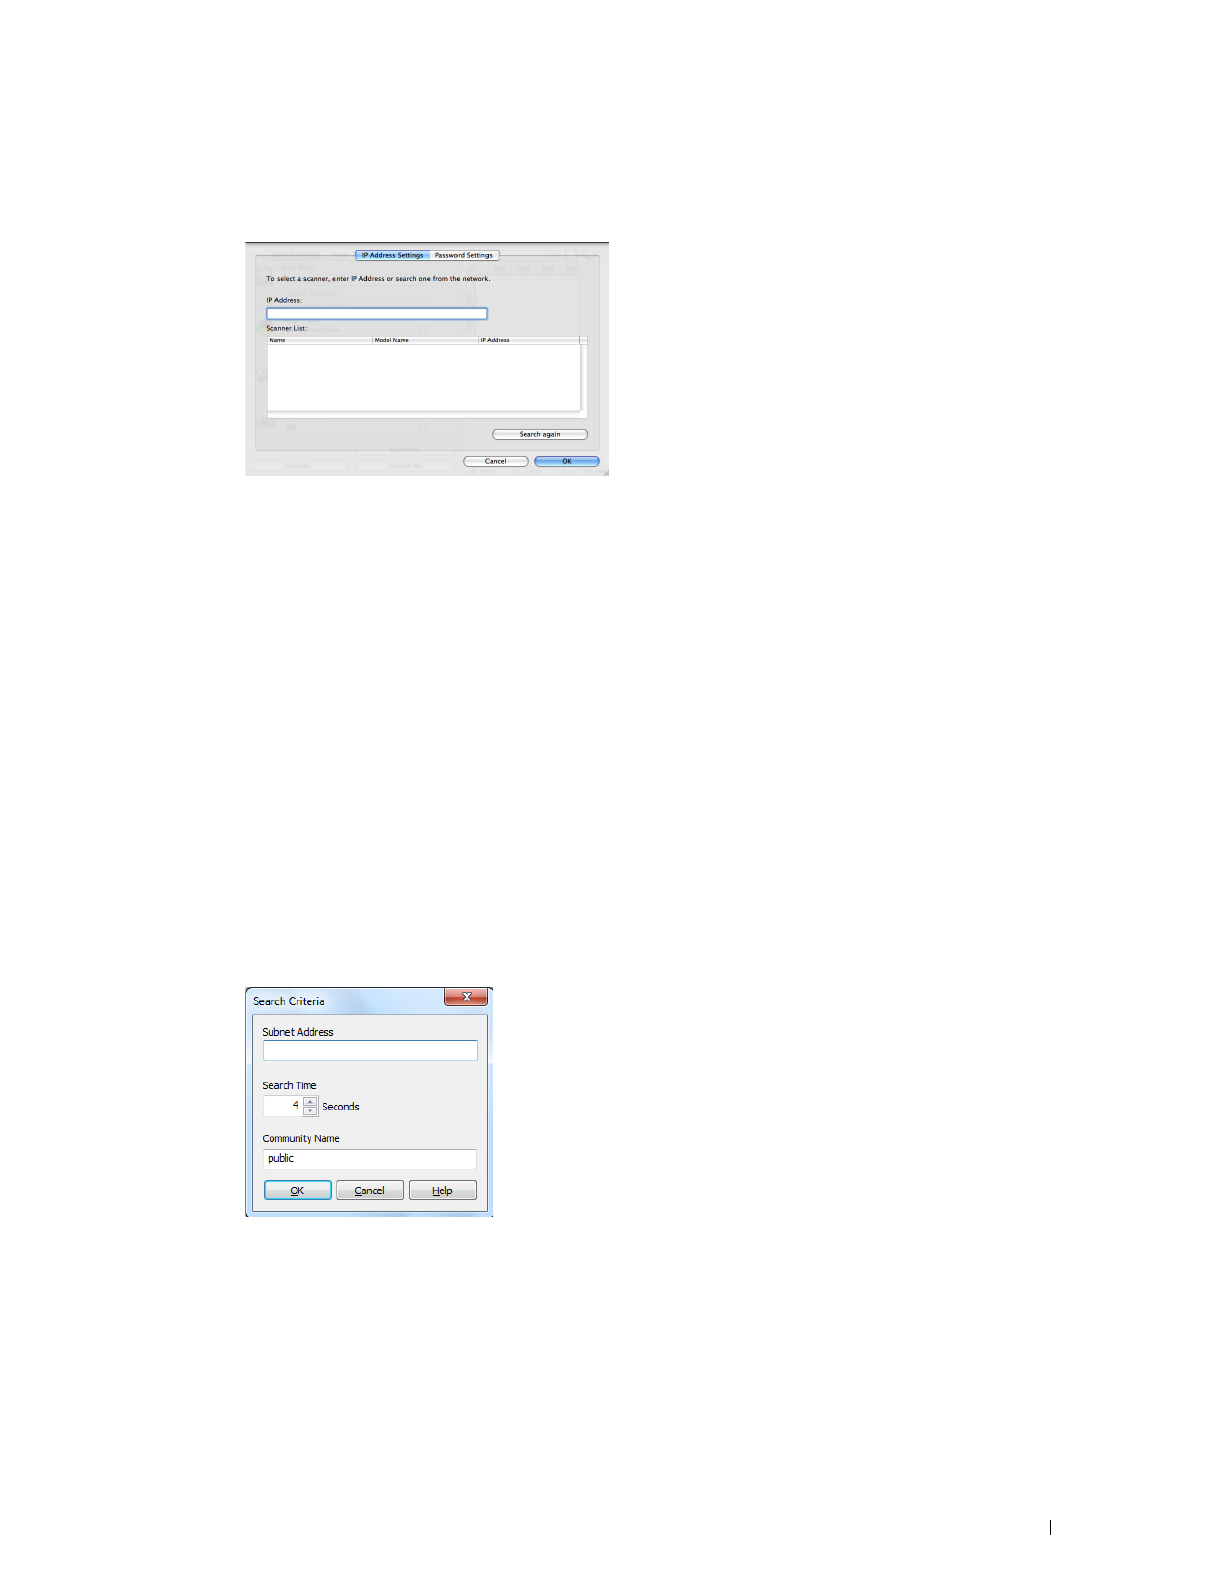
Scanning
315
For Apple Macintosh:
Click Settings on the main scanning window of the
Dell MFP H815dw
window or
Dell MFP S2815dn
window.
IP Address Settings
In the IP Address Settings tab, you can check the IP address that is set for your scanner or change the scanner
selection.
• IP Address
Enter the IP address.
• Search all scanners from the network
(Windows
®
only)
Searches scanners in your network.
• Scanner List
Displays a list of scanners that are detected.
• Search again
Searches the scanners in your network.
• Search Criteria
(Windows
®
only)
Displays the
Search Criteria
dialog box for setting the search condition.
Search Criteria Dialog Box (Windows® only)
• Subnet Address
Enter the subnet address.
• IPv4: Broadcast Address such as "192.168.1.255"
• IPv6: Multicast Address such as "ff02::1"
• Search Time
Specify a time period for searching a scanner.

316
Scanning
• Community Name
Enter the SNMPv1/v2 community name. The default community name is "public."
Password Setting
In the Password Setting tab, you can input the password that is set for your scanner to access from your computer to
the printer.
For Microsoft
®
Windows
®
:
For Apple Macintosh:
• Password for Scanner
Enter the password.
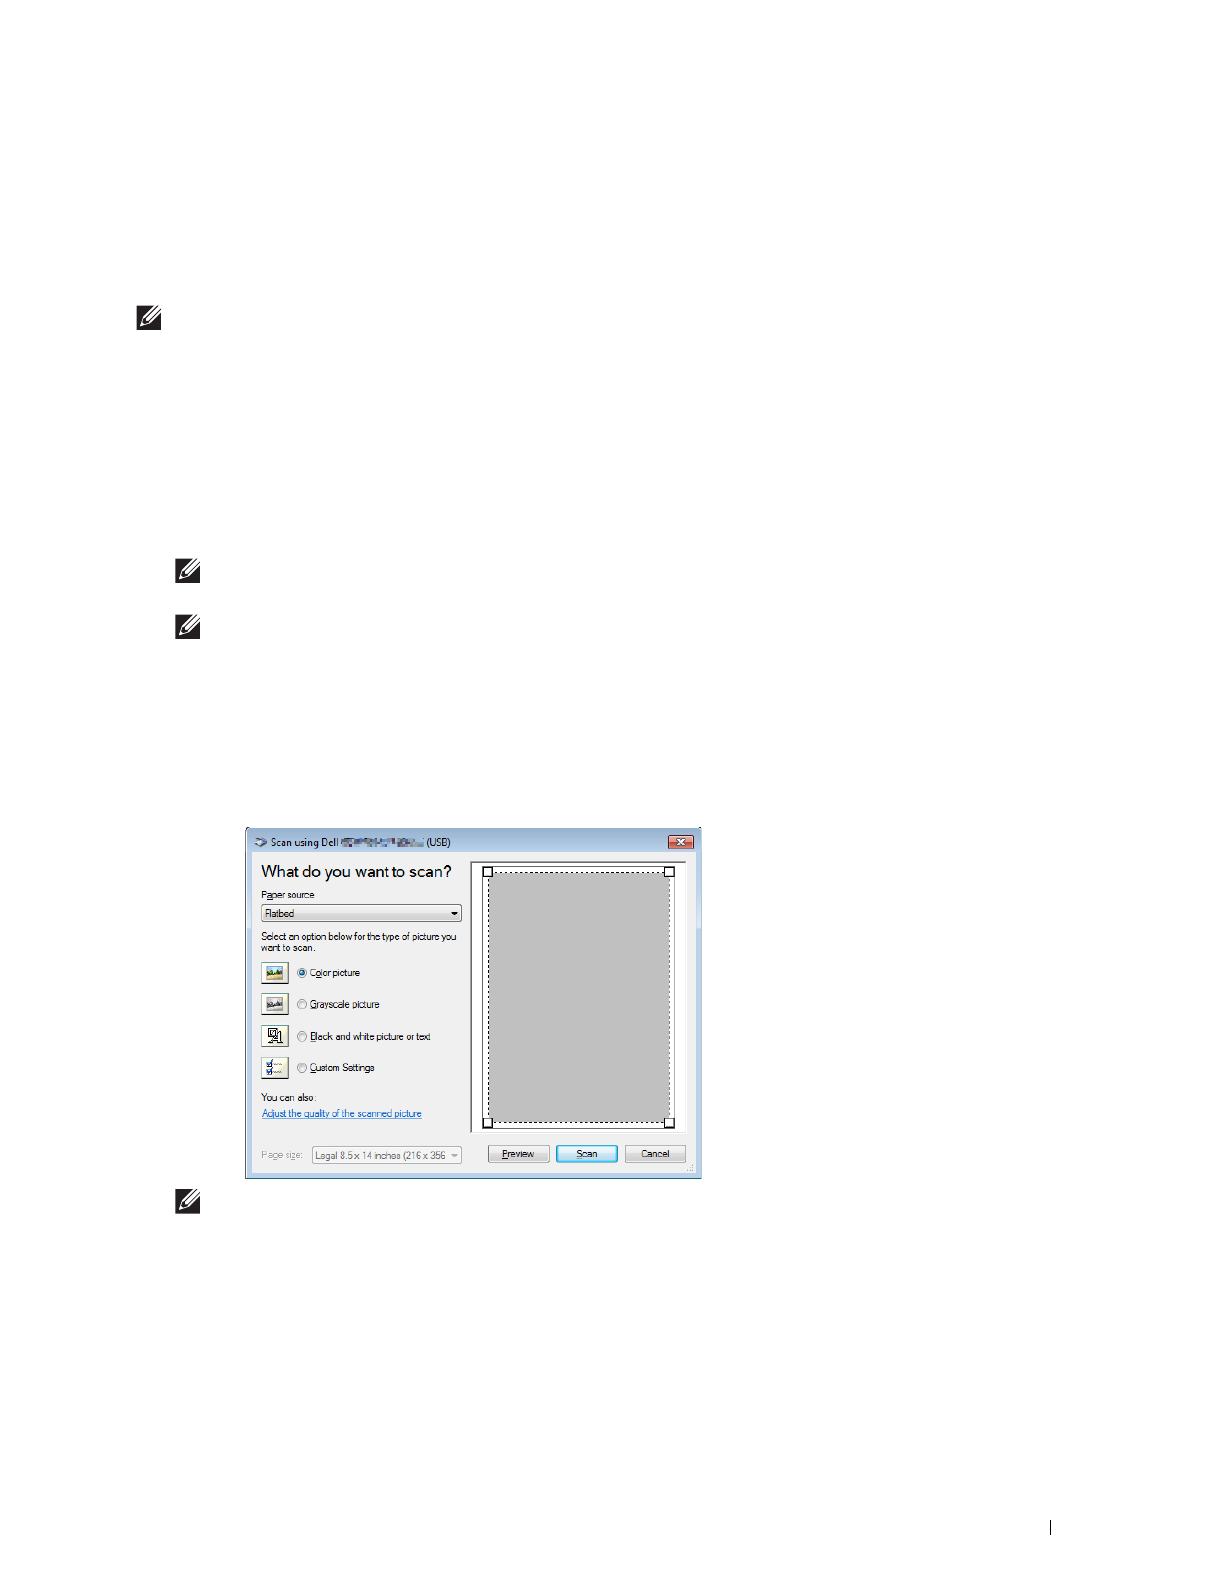
Scanning
317
Scanning Using the Windows Image Acquisition (WIA) Driver
Your printer also supports the Windows Image Acquisition (WIA) driver for scanning images. Windows Image
Acquisition (WIA) is one of the standard components incorporated in the recent Microsoft
®
Windows
®
operating
systems and works with digital cameras and scanners. Unlike the TWAIN driver, the Windows Image Acquisition
(WIA) driver allows you to scan an image and easily manipulate those images without using additional software.
NOTE:
The Windows Image Acquisition (WIA) driver is supported only on Windows
®
.
To scan an image from the drawing software:
1
Load the document(s) facing up with top edge in first into the DADF.
OR
Place a single document facing down on the document glass, and close the document cover.
For details about loading a document, see "Loading an Original Document."
2
Start the drawing software, such as Microsoft
®
Paint for Windows
®
.
NOTE:
When you use Windows Vista
®
or Windows Server
®
2008, use Windows
®
Photo Gallery instead of Microsoft
®
Paint.
NOTE:
When using applications that utilize Windows Image Acquisition (WIA) 2.0, such as Windows
®
Fax and Scan on
Windows Vista
®
, Windows
®
7, Windows
®
8, and Windows
®
8.1, the Feeder (Scan both sides) option can be selected for
duplex (two-sided) scanning.
3
Click
File
From Scanner or Camera
(
Paint
button
From scanner or camera
for Windows
®
7, Windows
®
8,
Windows
®
8.1, Windows Server
®
2008 R2, Windows Server
®
2012, and Windows Server
®
2012 R2).
The
Scan using Dell MFP S2815dn/H815dw (USB)
window or
Scan using Dell MFP S2815dn/H815dw
(NETWORK)
window
appears.
NOTE:
The screen image may vary depending on the operating system.
4
Select your desired type of picture that you want to scan, and click
Adjust the quality of the scanned picture
to
display the
Advanced Properties
dialog box.
5
Select the desired properties including brightness and contrast, and then click
OK
.
6
Click
Scan
to start scanning.
7
Click
File
Save
to save your scanned document in your desired location on your computer.

318
Scanning
To scan an image from Control Panel:
NOTE:
This feature is supported on Microsoft
®
Window Server
®
2003 only.
1
Load the document(s) facing up with top edge in first into the DADF.
OR
Place a single document facing down on the document glass, and close the document cover.
For details about loading a document, see "Loading an Original Document."
2
Click
Start
Control Panel
Printers and Other Hardware
Scanners and Cameras
.
3
Double-click the scanner icon. The
Scanner and Camera Wizard
launches.
4
Click
Next
to display the
Choose Scanning Preferences
page.
NOTE:
The screen image may vary depending on the operating system.
5
Select your desired type of picture, paper source, and paper size, and click
Next
.
6
Enter a picture name, select a file format, and specify the desired location to save the scanned document.
7
Click
Next
to start scanning.
8
Follow the on-screen instructions to edit the picture after it is copied to your computer.
Scanning to a PC or Server via SMB/FTP
NOTE:
This feature does not require a network scan driver.
Overview
The Scan to Network Folder feature allows you to send the scanned documents to a computer or FTP server.
Scan
Using FTP
Using SMB
FTP Server
Computer
Computer

Scanning
319
Required operating systems:
For FTP:
NOTE:
For information on how to configure the FTP service, refer to the manual provided with the software.
NOTE:
Microsoft
®
Windows Server
®
2003, Windows Vista
®
, and Mac OS X
10.5 support IPv4 only.
• Microsoft
®
Windows Server
®
2003 Service Pack 1
FTP service of Microsoft
®
Internet Information Services 6.0
• Microsoft
®
Windows Vista
®
Microsoft
®
Windows Server
®
2008
FTP service of Microsoft
®
Internet Information Services 7.0
• Microsoft
®
Windows
®
7
Microsoft
®
Windows Server
®
2008 R2
FTP service of Microsoft
®
Internet Information Services 7.5
• Microsoft
®
Windows
®
8
Microsoft
®
Windows Server
®
2012
FTP service of Microsoft
®
Internet Information Services 8.0
• Mac OS X 10.5/Mac OS X 10.6/OS X 10.7/OS X 10.8/OS X 10.9/OS X 10.10
FTP service of Mac OS X
For SMB:
NOTE:
Microsoft
®
Windows Server
®
2003, Mac OS X 10.5, and Mac OS X 10.6 support IPv4 only.
• Microsoft
®
Windows Server
®
2003
• Microsoft
®
Windows Vista
®
• Microsoft
®
Windows Server
®
2008
• Microsoft
®
Windows Server
®
2008 R2
• Microsoft
®
Windows
®
7
• Microsoft
®
Windows
®
8
• Microsoft
®
Windows
®
8.1
• Microsoft
®
Windows Server
®
2012
• Microsoft
®
Windows Server
®
2012 R2
• Mac OS X 10.5/Mac OS X 10.6/OS X 10.9/OS X 10.10
Procedures
Follow the procedures below to complete the setup for the Scan to Network Folder feature.
For FTP:
1
"Adding a Scanning Destination to the Printer's Address Book"
2
"Sending the Scanned File on the Network Folder"
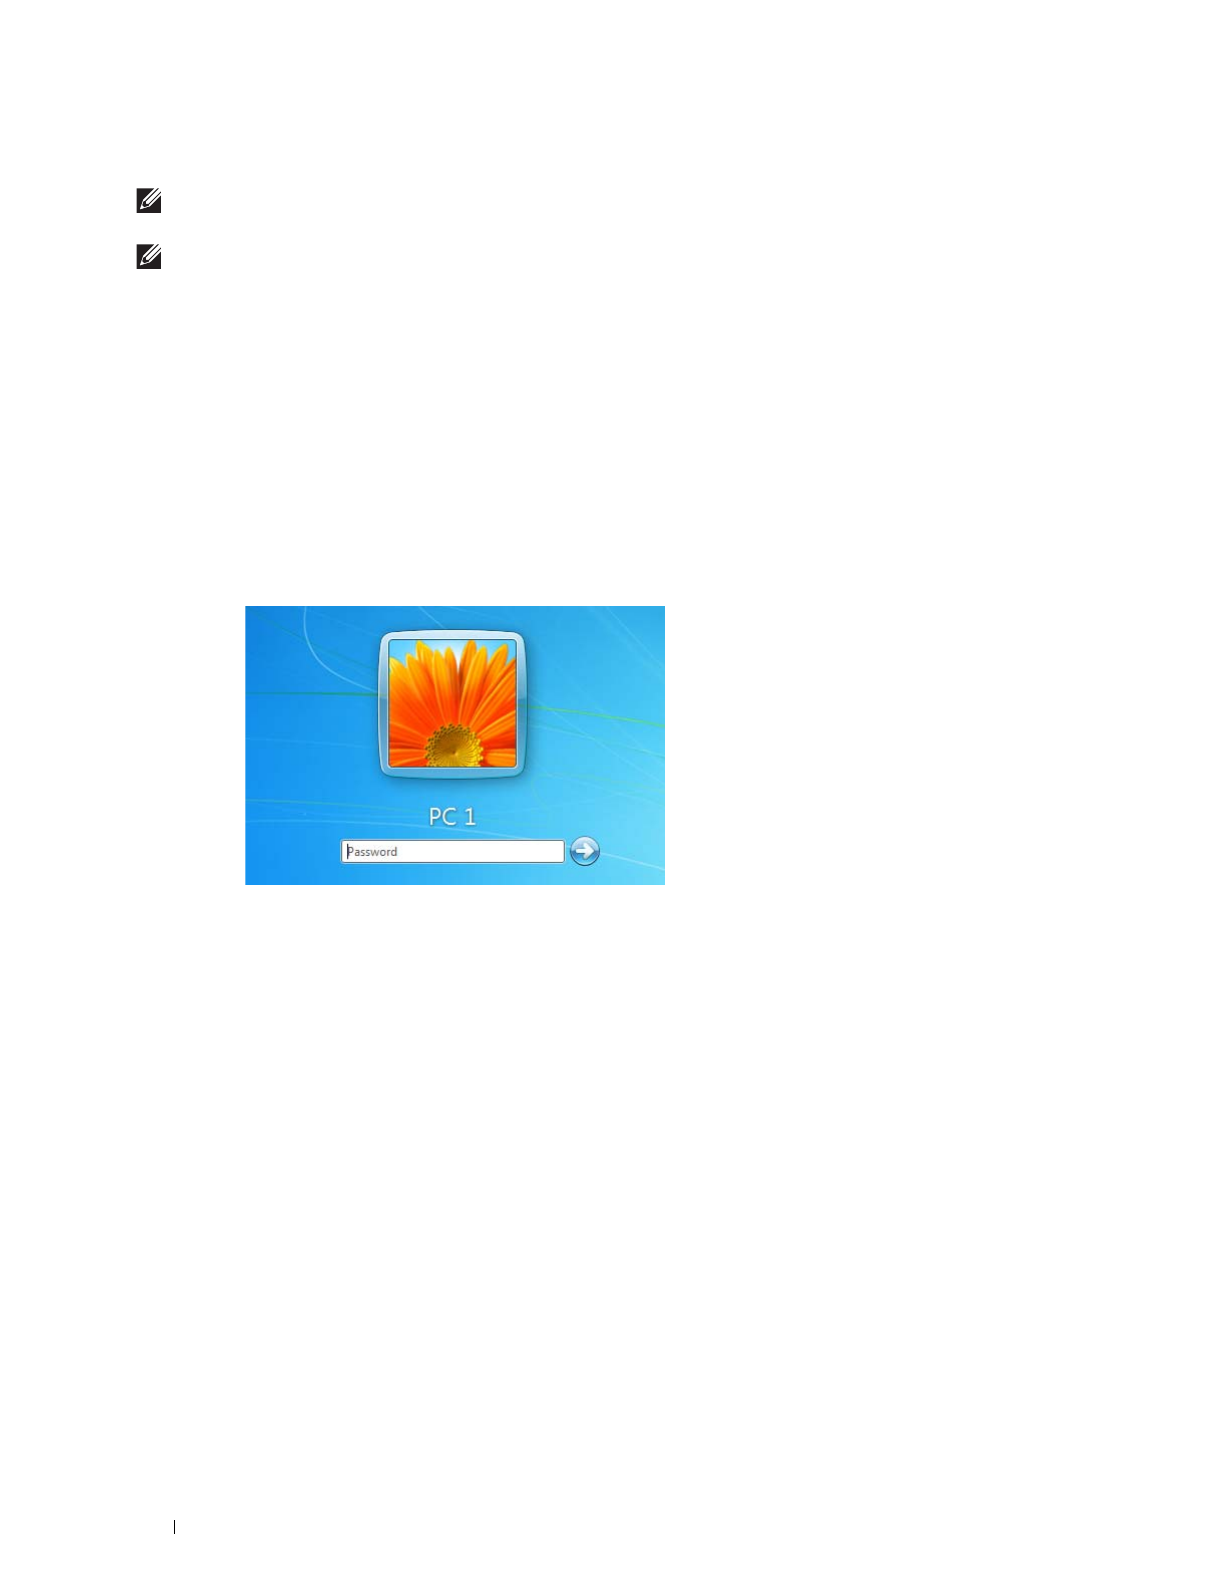
320
Scanning
For SMB:
NOTE:
The setup for Scan to Network Folder via SMB can be configured easily with the bundled "Address Book Editor" utility.
For details about Address Book Editor, see "Adding a Scanning Destination to the Printer's Address Book."
NOTE:
Scan to Network Folder can be also accomplished with the Web Services on Devices (WSD) function. For details about
scanning using the Web Services on Devices (WSD) function, see "Scanning From the Operator Panel - Scan to WSD" and
"Scanning From a Computer Using Web Services on Devices (WSD)."
1
"Setting a Login Name and a Password (SMB Only)"
2
"Creating a Shared Folder (SMB Only)"
3
"Adding a Scanning Destination to the Printer's Address Book"
4
"Sending the Scanned File on the Network Folder"
Setting a Login Name and a Password (SMB Only)
The Scan to Network Folder feature requires a user login account with a valid and non-empty password for
authentication. Confirm a login user name and password.
For Microsoft
®
Windows
®
:
If you do not use a password for your user login, you need to create a password on your User Login Account with the
following procedure.
For Windows Vista
®
and Windows
®
7:
1
Click
Start
Control Panel
.
2
Click
User Accounts and Family Safety
.
3
Click
User Accounts
.
4
Click
Create a password for your account
and add in a password for your user login account.
For Windows Server
®
2008:
1
Click
Start
Control Panel
.
2
Double-click
User Accounts
.
3
Click
Create a password for your account
and add in a password for your user login account.
For Windows Server
®
2008 R2:
1
Click
Start
Control Panel
.
2
Select
User Accounts
.
3
Click
User Accounts
.

Scanning
321
4
Click
Create a password for your account
and add in a password for your user login account.
For Windows
®
8 and Windows Server
®
2012:
1
Point to the top or bottom right corner of the screen, and then click
Settings
.
2
Click
Change PC settings
.
3
Click
Users
.
4
Click
Create a Password
and add in a password for your user login account.
For Windows
®
8.1 and Windows Server
®
2012 R2:
1
Point to the top or bottom right corner of the screen, and then click
Settings
.
2
Click
Change PC settings
.
3
Click
Accounts
.
4
Click
Sign-in options
.
5
Click
Add
under
Password
, and add in a password for your user login account.
For Mac OS X 10.5 and Mac OS X 10.6:
1
Click
System Preferences
Accounts
.
2
Select
Change Password
.
3
Enter a password for your user login account in
New password
.
4
Re-enter the password in
Verify
.
For OS X 10.9 and OS X 10.10:
1
Click
System Preferences
Users & Groups
.
2
Select
Change Password
.
3
Enter a password for your user login account in
New password
.
4
Re-enter the password in
Verify
.
Creating a Shared Folder (SMB Only)
Create a shared folder to store the scanned document from your printer.
For Windows Vista
®
, Windows Server
®
2008, Windows Server
®
2008 R2, Windows
®
7, Windows
®
8, Windows
®
8.1,
Windows Server
®
2012, and Windows Server
®
2012 R2:
1
Create a folder in the desired directory on your computer (Example of folder name,
MyShare
).
2
Right-click the folder, and then select
Properties
.
The
Properties
dialog box appears.
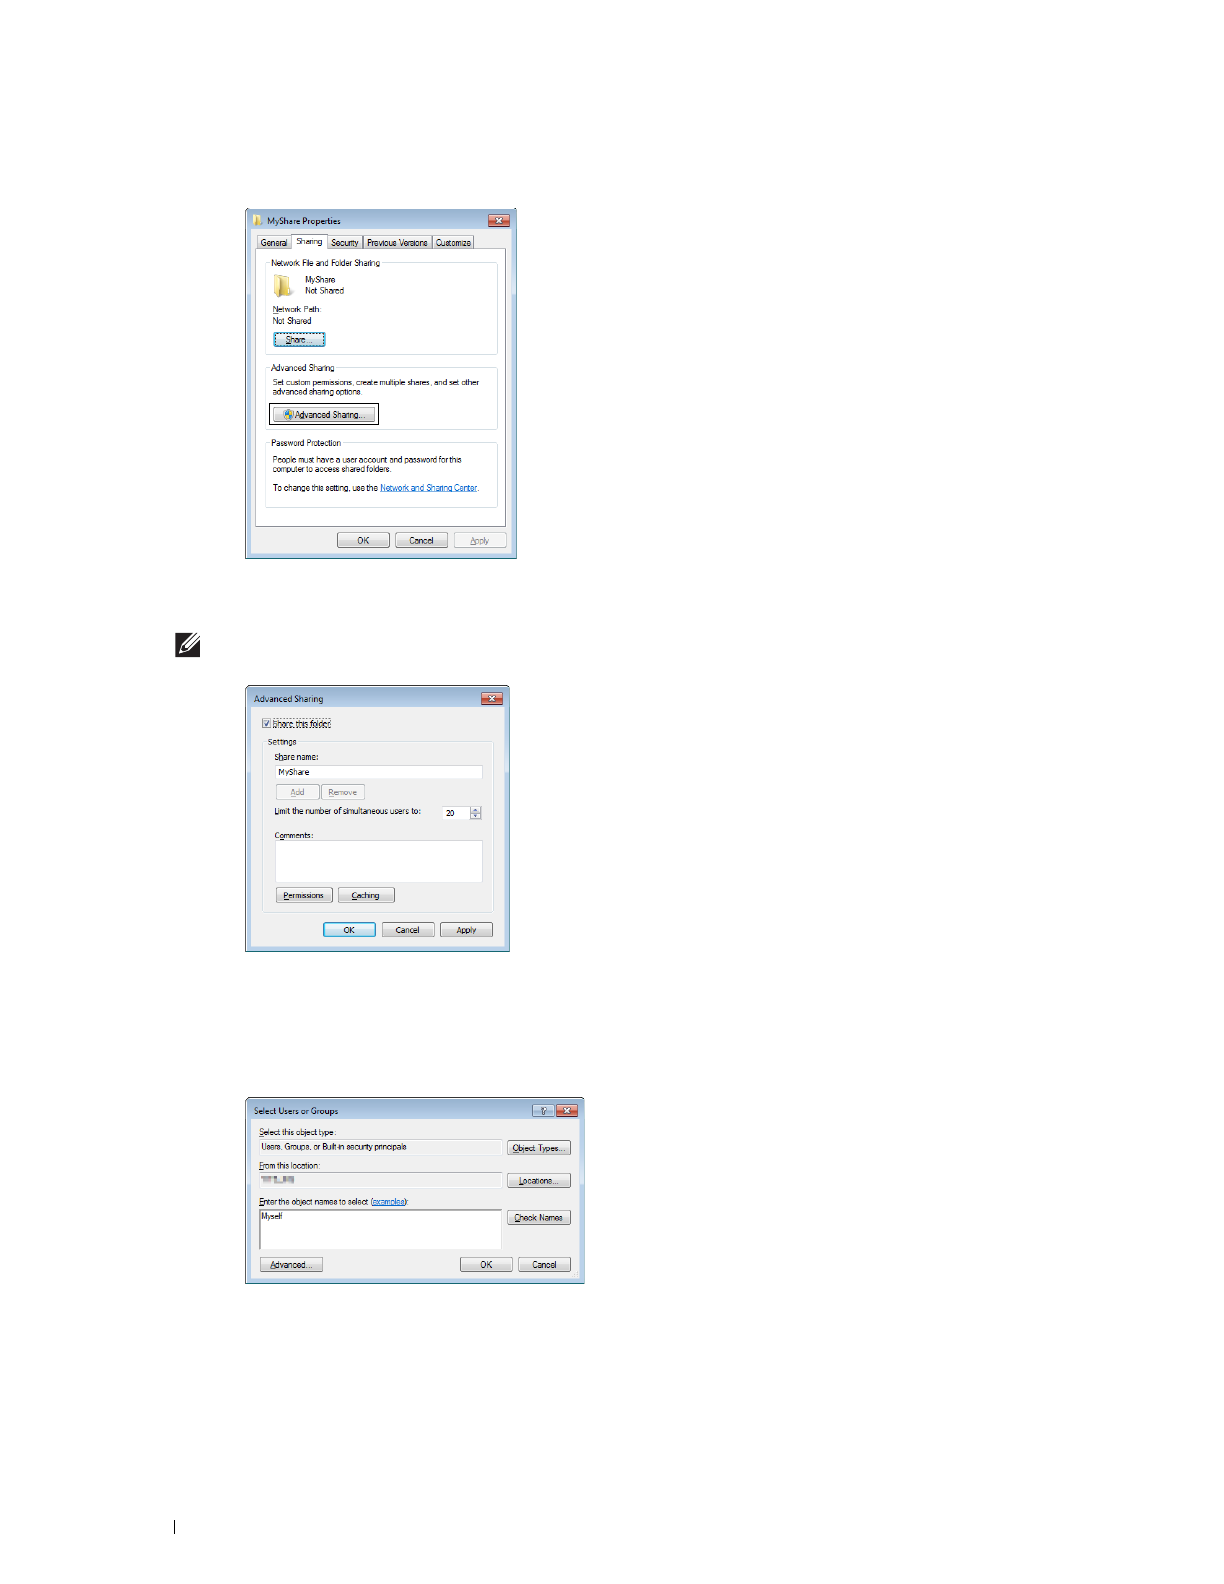
322
Scanning
3
Click the
Sharing
tab, and then select
Advanced Sharing
.
4
Select the
Share this folder
check box.
5
Enter a shared name in the
Share name
box.
NOTE:
Write down the shared name as you need to use this name in the next setting procedure.
6
Click
Permissions
to create a write permission for this folder.
7
Click
Add
.
8
Search user login name by clicking
Advanced
, or enter the user login name in
Enter the object names to select
box
and click
Check Names
to confirm (Example of user login name,
Myself
).
9
Click
OK
.
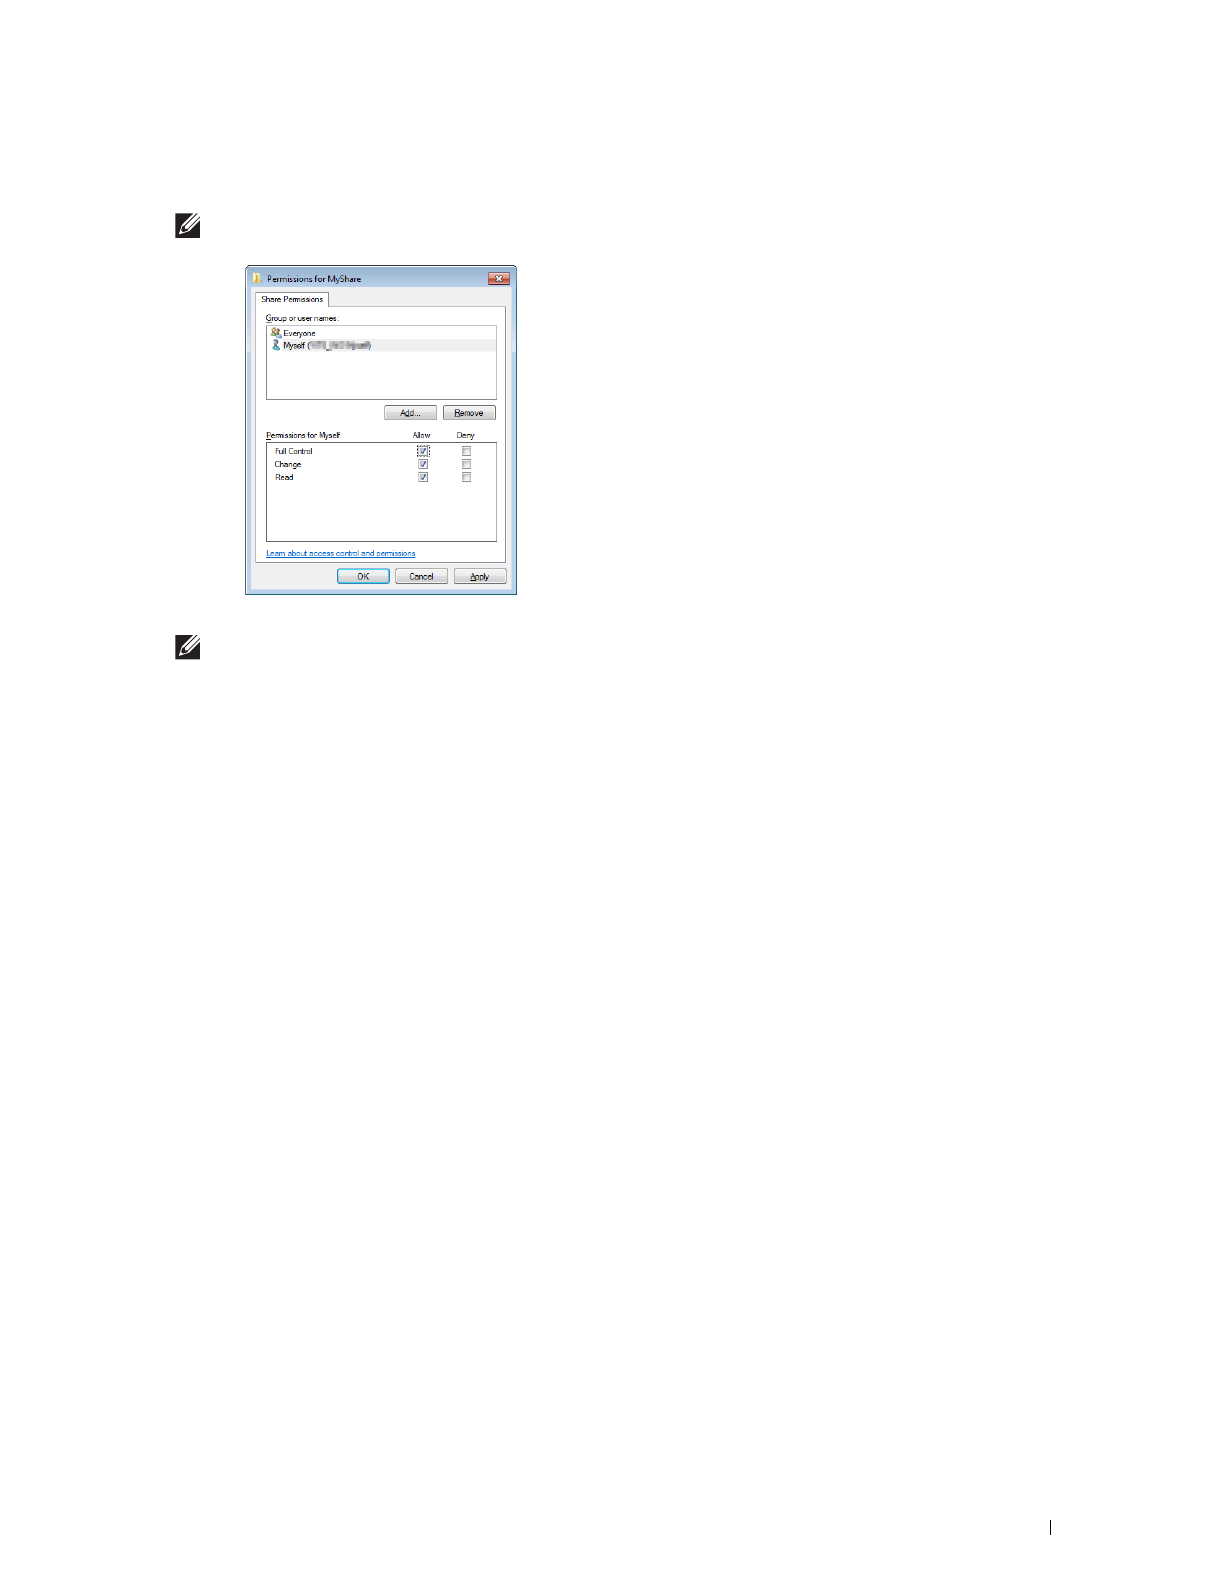
Scanning
323
10
Click the user login name that you have just entered. Select
Full Control
check box. This will grant you permission
to send the document into this folder.
NOTE:
Do not use Everyone as the user login name.
11
Click
OK
.
NOTE:
To add sub-folders, create new folders in the shared folder you have created.
For example:
Folder name:
MyShare
,
Second-level folder name:
MyPic
, Third-level folder name:
John
You should now see
MyShare\MyPic\John
in your directory.
For Mac OS X 10.5, Mac OS X 10.6, OS X 10.9, and OS X 10.10:
1
Create a folder in the desired directory on your computer (Example of folder name,
MyShare
).
2
Select the created folder, and then select
Get Info
from the
File
menu.
3
Select the
Shared Folder
check box.
4
Open
System Preferences
, and then click
Sharing
.
5
Select the
File Sharing
check box, and then click
Options
.
6
Select the
Share Files and folders using SMB
and account name check boxes.
7
Click
Done
.
Adding a Scanning Destination to the Printer's Address Book
You can register the connection details for SMB and FTP server in the address book using Dell Printer
Configuration Web Tool or Address Book Editor.
Before beginning to setup a destination, make sure you have the IP addresses you need such as printer and computer.
Verifying the IP Address Setting of the Printer
To setup the server address book through the network, you will first need to locate the IP address of the printer. To
find your printer's IP address, see "Verifying the IP Settings."

324
Scanning
Locating the IP Address Setting of Your Computer
You can locate the IP address of your computer by the following operations.
1
For Windows Vista
®
/Windows
®
7:
Click
Start
All Programs
Accessories
Run
.
For Windows Server
®
2003/Windows Server
®
2008/Windows Server
®
2008 R2:
Click
Start
Run
.
For Windows
®
8/Windows
®
8.1/Windows Server
®
2012/Windows Server
®
2012 R2:
Point to the top or bottom right corner of the screen, and then click
Search
Type
Run
in the search box, click
Apps
(for Windows
®
8 and Windows Server
®
2012 only), and then click
Run
.
2
Ty p e
cmd
in the text field and click
OK
. A command prompt window will open.
3
Ty p e
ipconfig
and press
Enter
.
4
Write down the IP Address xxx.xxx.xxx.xxx.
Using Dell Printer Configuration Web Tool
1
Open a web browser.
2
Type in the IP address of the printer in the address bar, and press the <Enter> key.
The web page of the printer appears.
NOTE:
For details on how to check the IP address of the printer, see "Verifying the IP Settings."
3
Click
Address Book
. If a security login dialog box appears, type in the correct
User Name
and
Password
.
NOTE:
The default user name is "admin", and the default password is left blank (NULL).
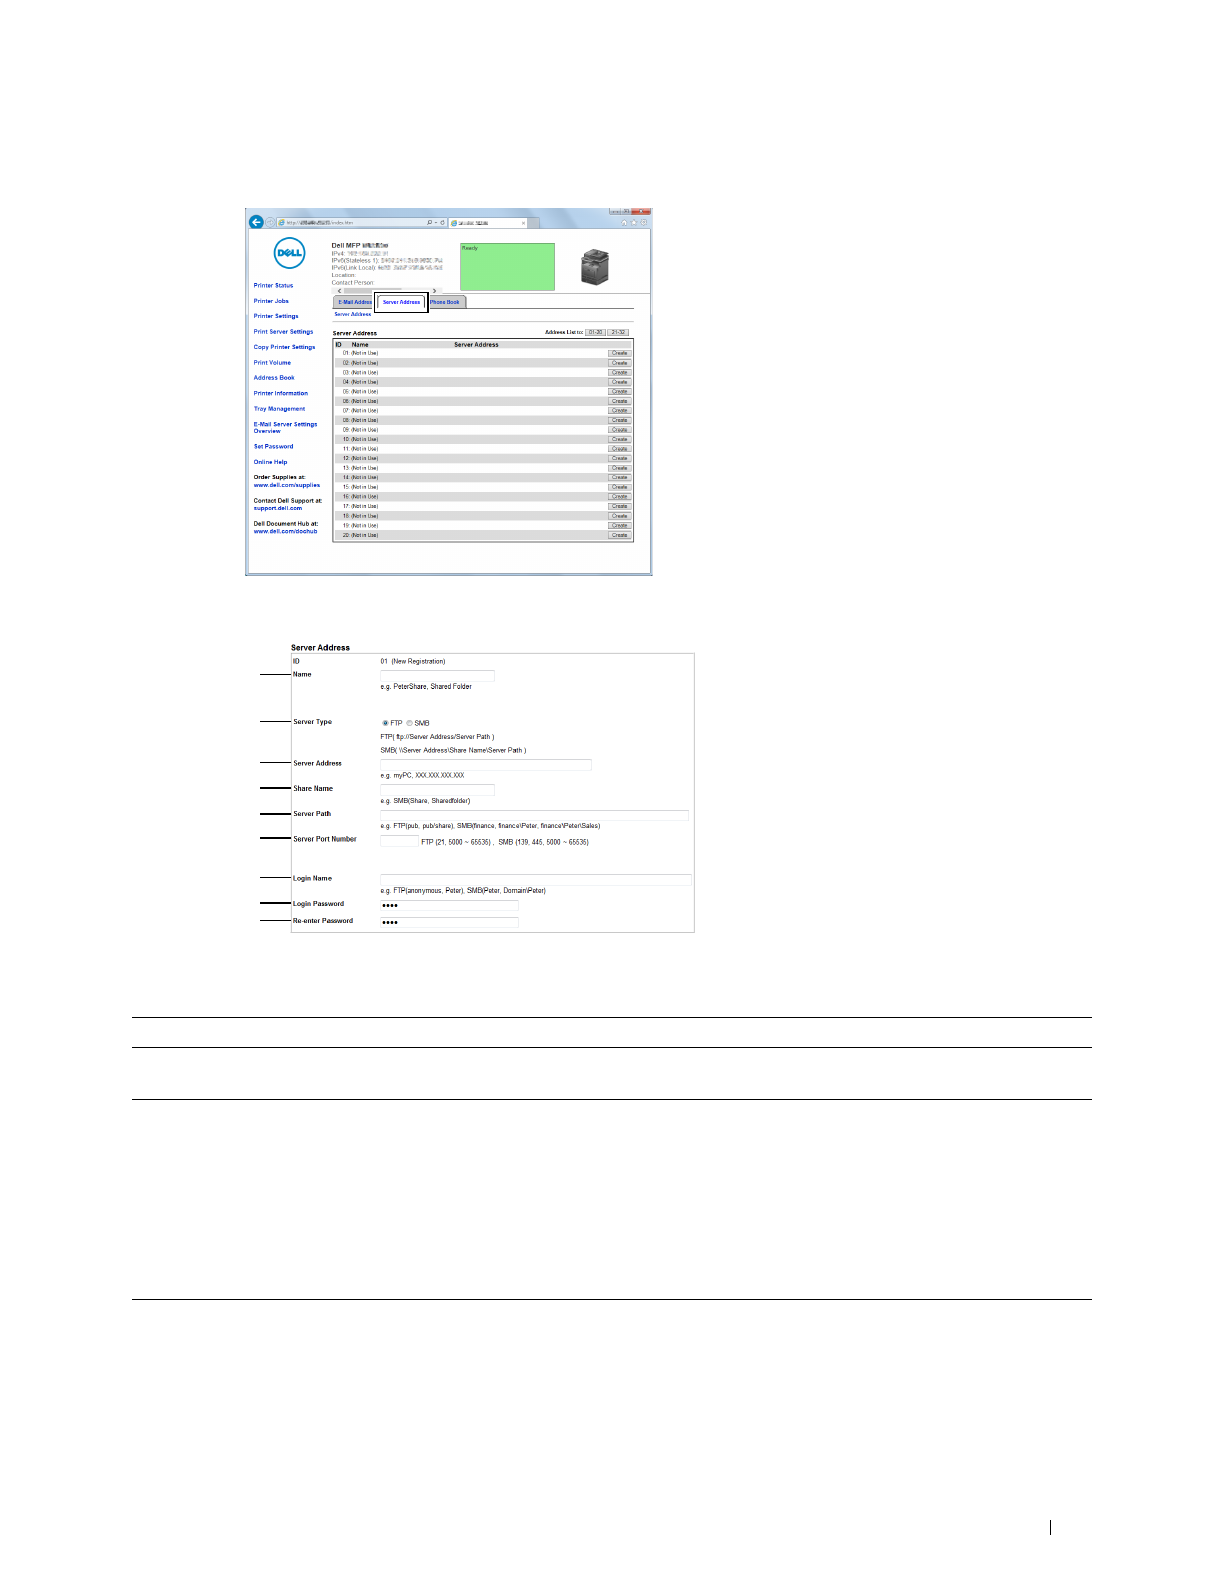
Scanning
325
4
Click the
Server Address
tab, and then click
Create
of an ID.
Server Address
page appears.
To fill in the fields, enter the information as follows:
(1) Name Enter a friendly name that you want to display on the Server address book.
(2) Server Type Select FTP if you store document on a FTP server.
Select SMB if you store documents in a shared folder on your computer.
(3) Server Address Enter a FTP server name that you have shared out or a server name or IP address of your computer.
•For FTP:
Server name: myhost.example.com
(myhost: host name, example.com: domain name)
IP address: 192.168.1.100
•For SMB:
Server name: myhost
IP address: 192.168.1.100
(4) Share Name
Enter the name of the shared folder on the recipient computer. For SMB only.
• For SMB: e.g. Share, Sharefolder
1
2
3
4
5
6
7
8
9
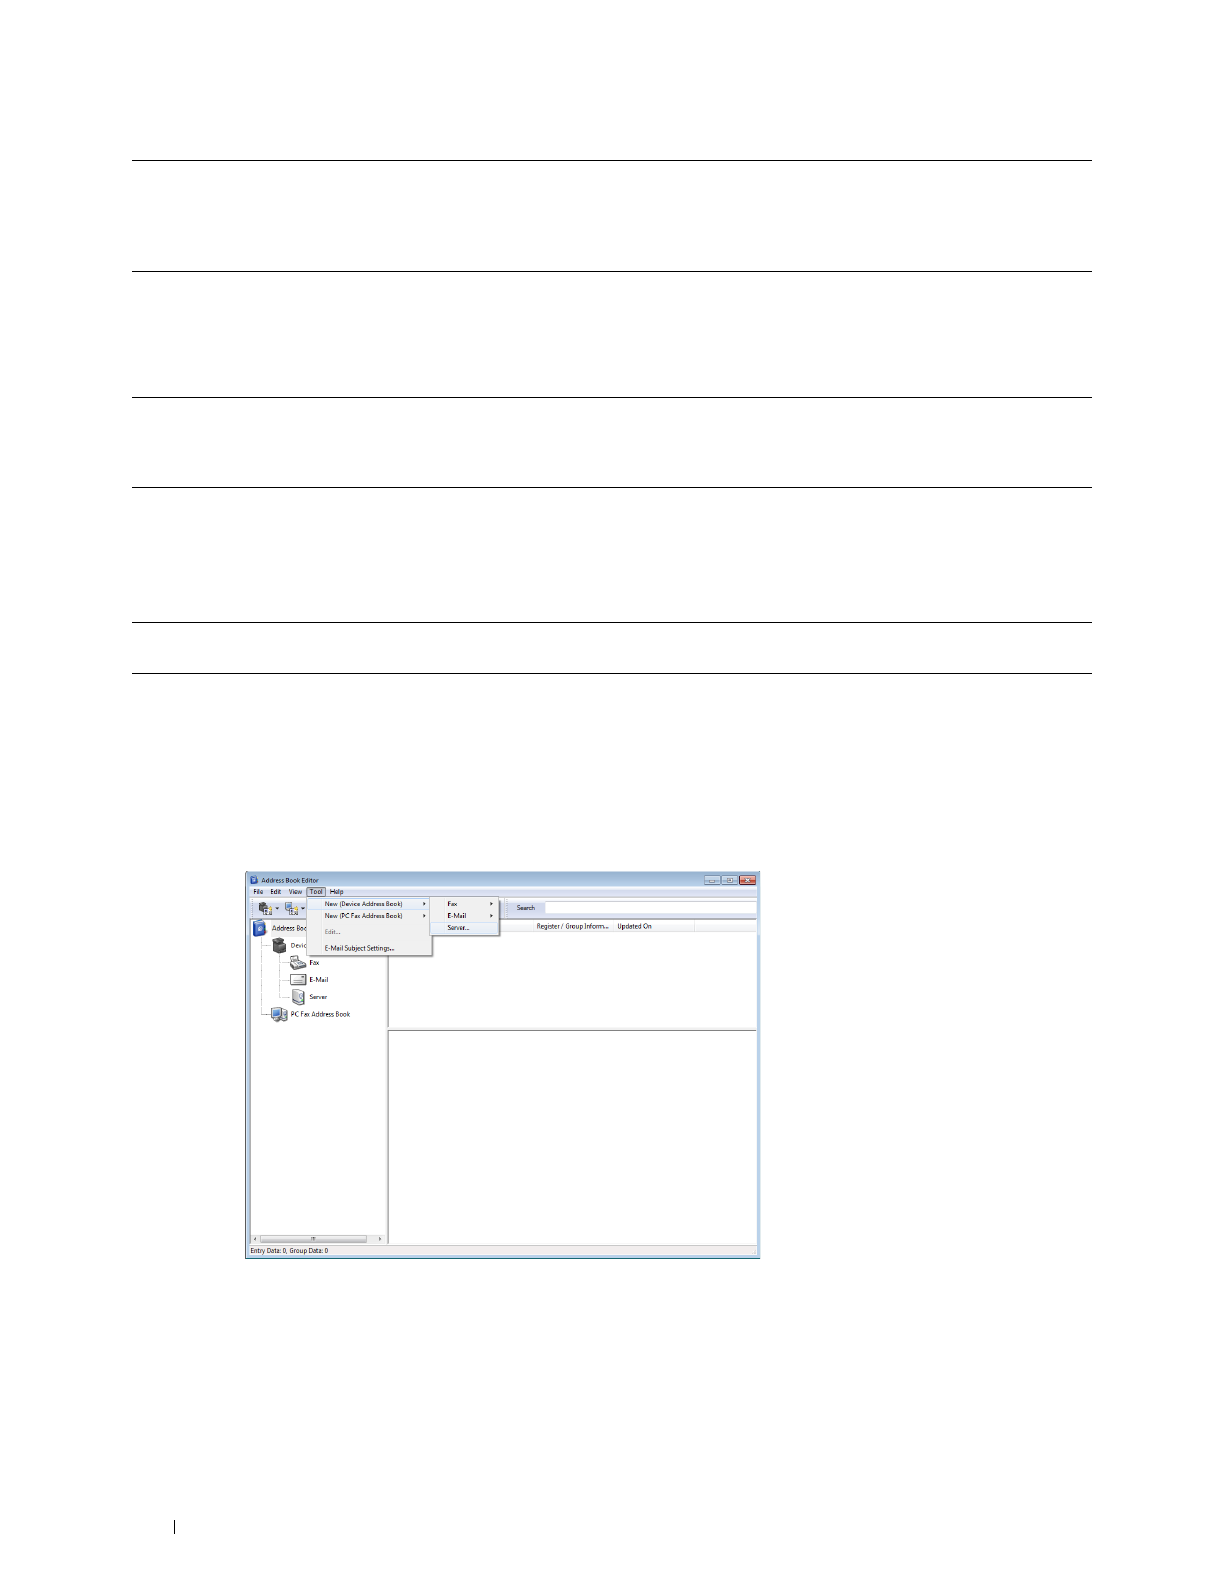
326
Scanning
Using Address Book Editor
1
Click
Start
All Programs
Dell Printers
Dell Cloud Multifunction Printer - H815dw
or
Dell Smart
Multifunction Printer - S2815dn
Address Book Editor
.
2
Click
Tool
New (Device Address Book)
Server
.
For Microsoft
®
Windows
®
:
(5) Server Path Enter the subdirectory path where you want the scanned document to be stored. Ensure that the
subdirectory path is already created in the shared folder or FTP server.
• For FTP: e.g. pub, pub/share
• For SMB: e.g. finance, finance\Peter, finance\Peter\Sales
(6) Server Port
Number
Enter the Server Port Number. If you are unsure, you can enter the default value of 21 for FTP or 139 for
SMB.
Available ports are:
FTP: 21, 5000 - 65535
SMB: 139, 445, 5000 - 65535
(7) Login Name
Enter the user account name to allow access to a shared folder on your computer or to a FTP server.
• For FTP: Contact the system administrator.
• For SMB: Windows
®
login name that you have specified in the procedure 1.
(8) Login Password
Enter the password corresponding to the above login name.
• For FTP: Contact the system administrator
• For SMB: Empty password is not valid in the Network (Computer) feature. Ensure that you have a valid
password for the user login account. (See "Setting a Login Name and a Password (SMB Only)" for details
on how to add a password in your user login account.)
(9) Re-enter
Password
Re-enter your password.
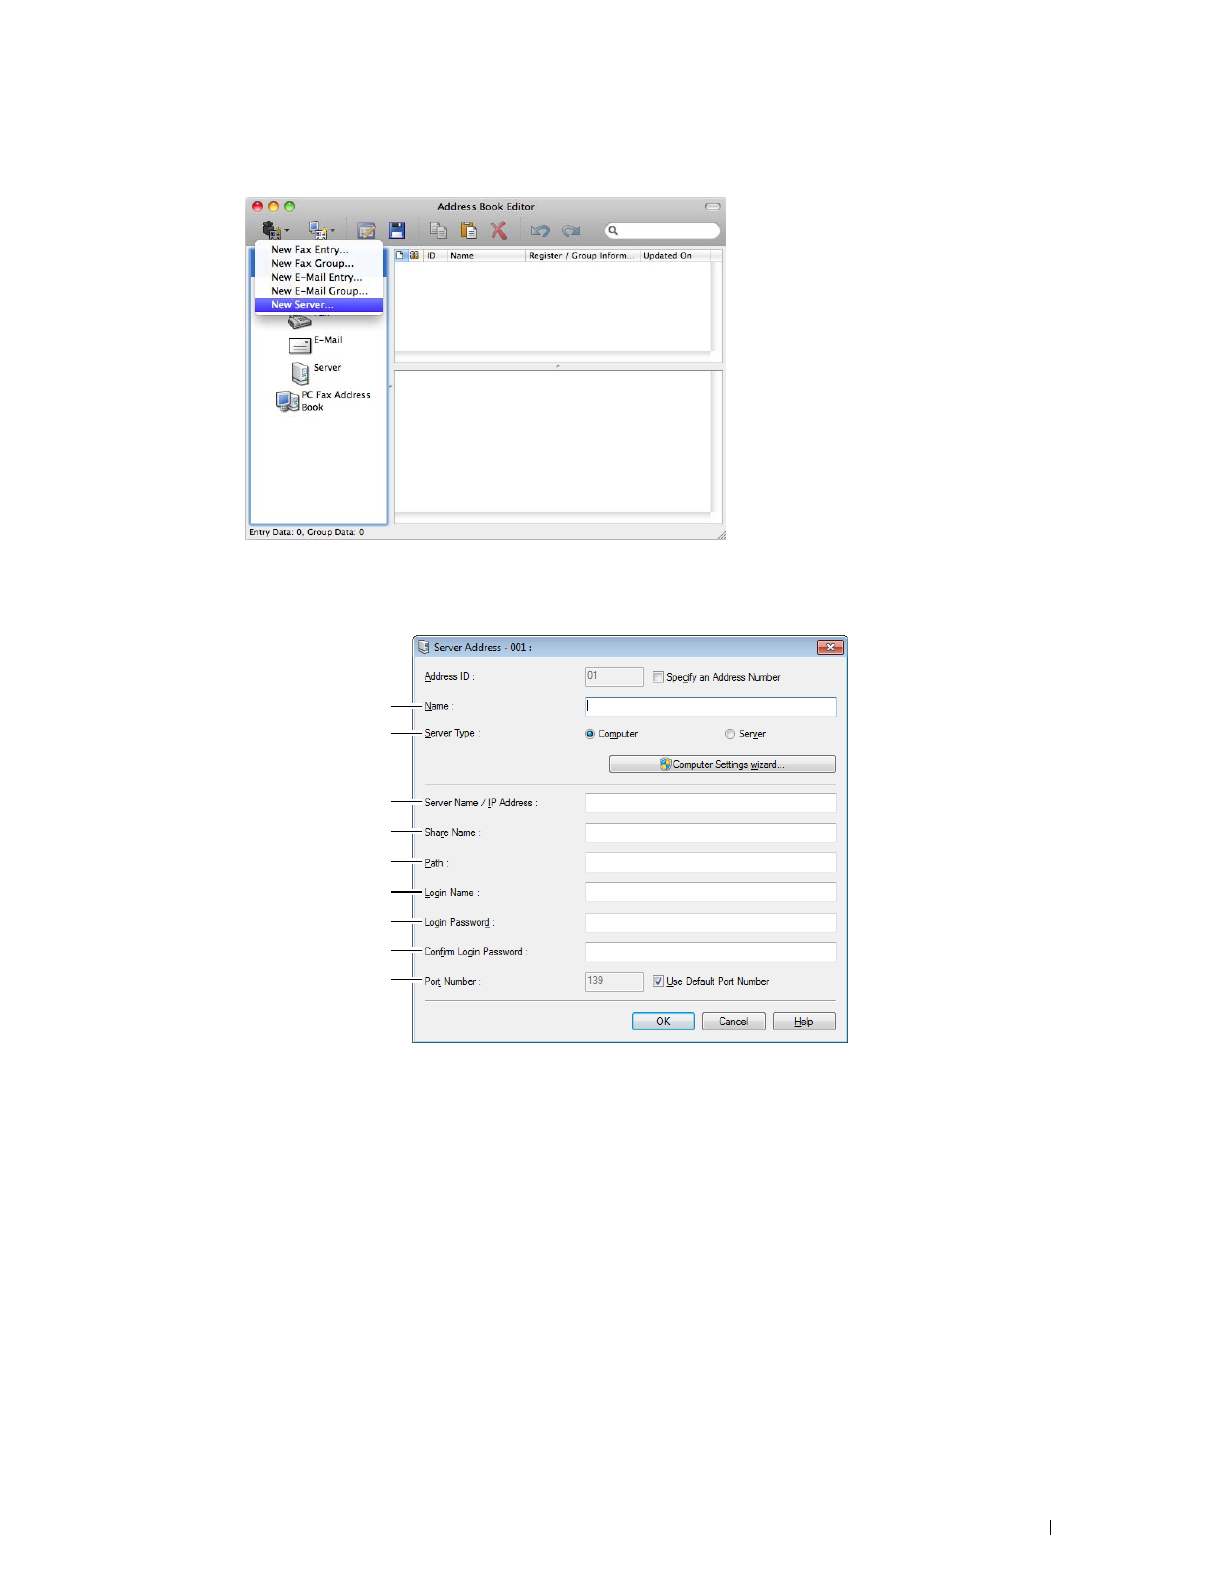
Scanning
327
For Apple Macintosh:
Server Address
dialog box appears.
For Microsoft
®
Windows
®
:
1
2
3
4
5
6
7
8
9
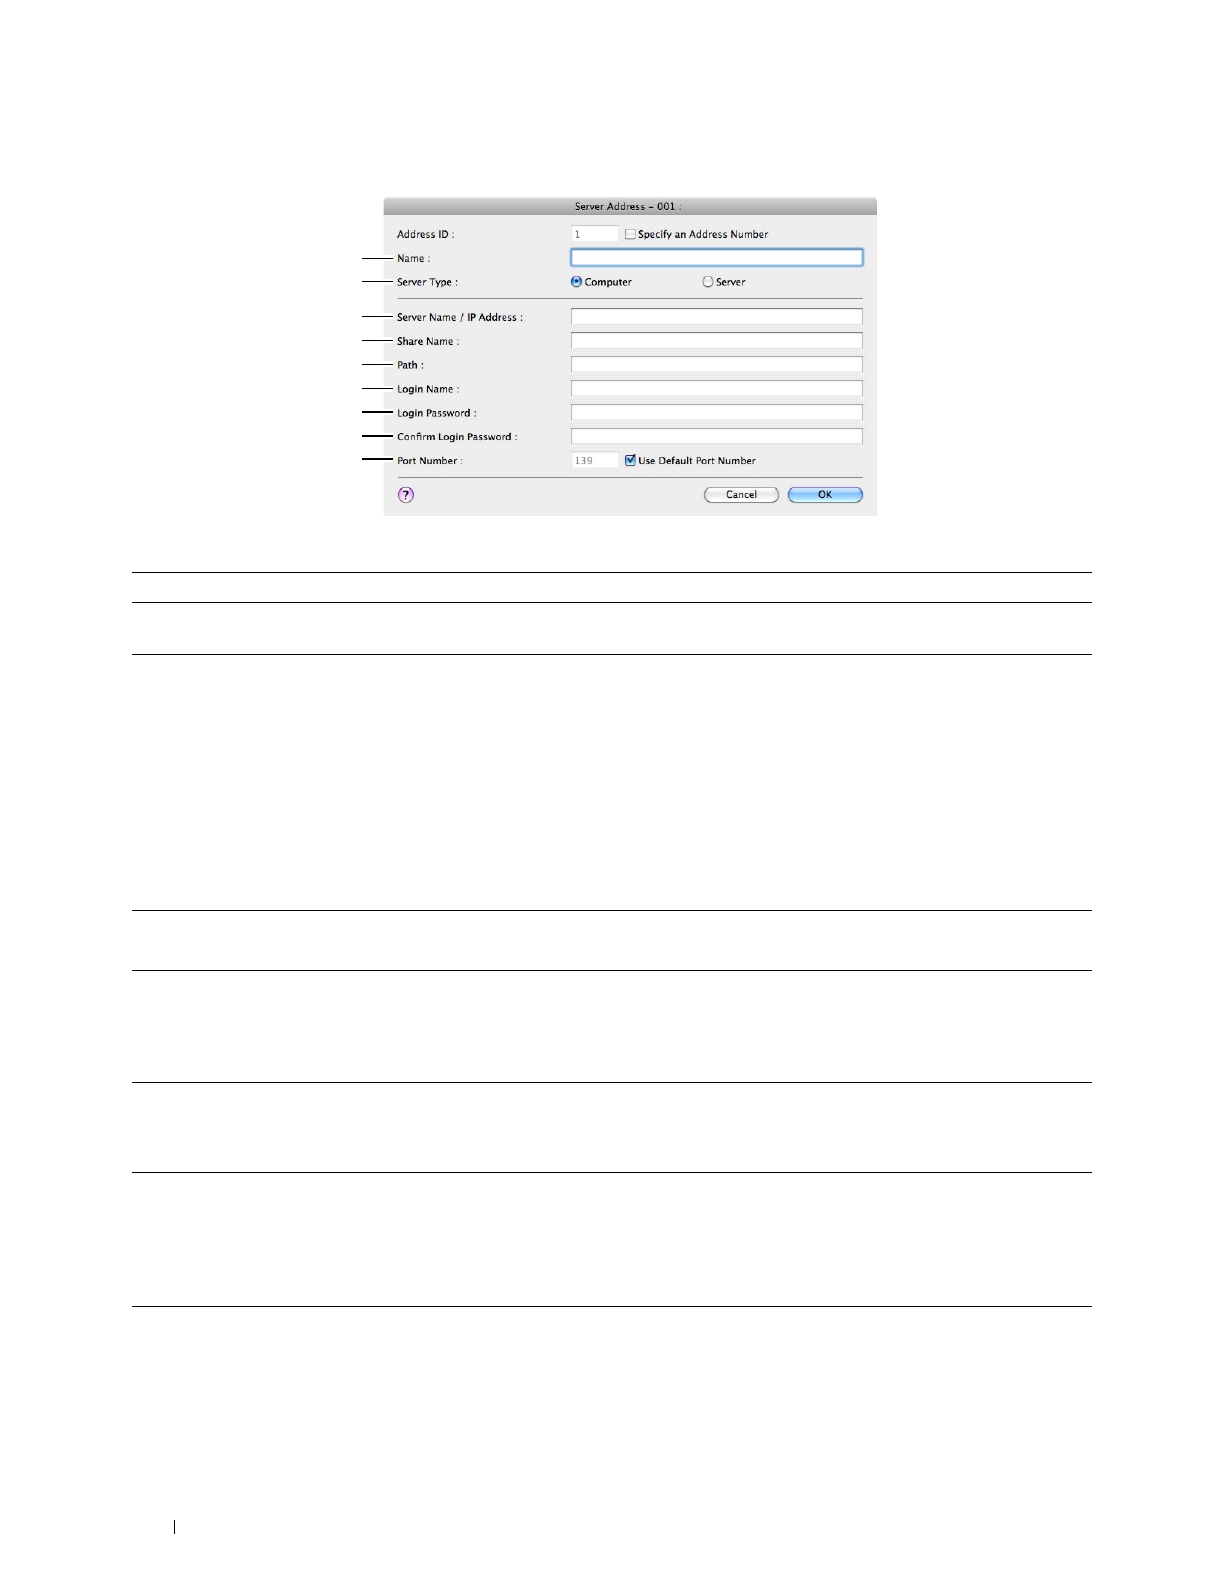
328
Scanning
For Apple Macintosh:
To fill in the fields, enter the information as follows:
(1) Name Enter a friendly name that you want to display on the Server address book.
(2) Server Type Select Computer if you store documents in a shared folder on your computer.
Select Server if you store documents on a FTP server.
(3) Server Name/IP
Address
Enter a server name or IP address of your computer or the FTP server name that you have shared out.
The following are examples:
•For Computer:
Server name: myhost
IP address: 192.168.1.100
•For Server:
Server name: myhost.example.com
(myhost: host name, example.com: domain name)
IP address: 192.168.1.100
(4) Share Name Enter the name of the shared folder on the recipient computer. For SMB only.
• For SMB: e.g. Share, Sharefolder
(5) Path
Enter the subdirectory path where you want the scanned document to be stored. Ensure that the
subdirectory path is already created in the shared folder or FTP server.
• For FTP: e.g. pub, pub/share
• For SMB: e.g. finance, finance\Peter, finance\Peter\Sales
(6) Login Name
Enter the user account name to allow access to a shared folder on your computer or to a FTP server.
• For Computer: Windows
®
login name that you have specified in the procedure 1.
• For Server: Contact the system administrator.
(7) Login Password
Enter the password corresponding to the above login name.
• For Computer: Empty password is not valid in the
Network(Computer)
feature. Ensure that you
have a valid password for the user login account. (See "Setting a Login Name and a Password (SMB Only)"
for details on how to add a password in your user login account.)
• For Server: Contact the system administrator.
(8) Confirm Login
Password
Re-enter your password.
1
2
3
4
5
6
7
8
9

Scanning
329
Sending the Scanned File on the Network Folder
1
Load the document(s) facing up with top edge in first into the DADF.
OR
Place a single document facing down on the document glass, and close the document cover.
For details about loading a document, see "Loading an Original Document."
2
Press the
(Home)
button.
3
Ta p
Scan to Network Folder
.
4
Tap and select the desired address. When you cannot find the address, tap
Address Book
and select the desired
address.
5
Tap and specify scan settings such as
Output Color
,
Resolution
,
File Format
,
2 Sided
Scanning
,
Darken/Lighten
,
Contrast
,
Sharpness
,
Auto Exposure
,
Original Size
,
Margin
,
and
File Naming Mode
. For details, see "Scan Settings."
6
Ta p
Scan
to begin scanning and sending the file.
Scanning to a USB Memory
The Scan to USB feature allows you to store scanned image directly to a USB memory attached to the printer
without using software.
Types of a USB Memory
You can use a USB memory with the following interfaces:
•USB 1.1
•USB 2.0
The USB memory must be formatted in FAT file systems (FAT16, FAT32, or VFAT) before inserting the memory
device into the front USB port of the printer.
NOTE:
If the USB memory is formatted in a file system other than above, the printer may not recognize that the USB memory is
attached.
NOTE:
A USB memory with authentication feature and some brands of USB memories cannot be used with this printer.
Procedures
To store the scanned images to a USB memory:
NOTE:
If you insert a USB memory to the front USB port first, the USB Drive Detected screen may appear. In this case, select
Scan to USB
, and proceed to step 6.
1
Load the document(s) facing up with top edge in first into the DADF.
OR
Place a single document facing down on the document glass, and close the document cover.
For details about loading a document, see "Loading an Original Document."
(9) Port Number Enter the Server Port Number. If you are unsure, you can enter the default value of 139 for Computer and
21 for FTP server.
Available ports are:
For Computer: 139, 445, 5000 - 65535
For Server: 21, 5000 - 65535

330
Scanning
2
Press the
(Home)
button.
3
Insert a USB memory into the front USB port of the printer. See "Inserting and Removing a USB Memory" for
more details.
4
Ta p
Scan to USB
.
5
Tap and specify scan settings such as
Output Color
,
Resolution
,
File Format
,
2 Sided
Scanning
,
Darken/Lighten
,
Contrast
,
Sharpness
,
Auto Exposure
,
Original Size
,
Margin
,
and
File Naming Mode
. For details, see "Scan Settings."
You can also specify the folder to save the scanned image. For details, see "Specifying a Folder to Save the Scanned
Image."
6
Ta p
Scan
to begin scanning the document.
7
Remove the USB memory from the printer. See "Inserting and Removing a USB Memory" for more details.
Specifying a Folder to Save the Scanned Image
To save the scanned image to a folder in the USB memory, specify the folder before executing the scan job.
1
If a folder has already existed in the USB memory, the folder name appears on the display.
2
Select a folder to save the scanned image.
NOTE:
The default saving location is the root directory of the USB memory.
NOTE:
You cannot directly enter a folder path using the numeric keypad.
NOTE:
You can select any folder in the USB memory but cannot create a new folder in this step. You should always create
a new folder before connecting the memory to the printer.
If the name of the scanned image has already existed in the folder, the printer automatically generate a new file
name to save the data.
Sending an E-Mail With the Scanned Image
You can send the scanned image as an e-mail attachment using the Scan to Email function. To send an e-mail, an
e-mail account is necessary such as the corporate mail account or the Internet service provider's mail account. Gmail
account can be used as well.
The following are the procedures necessary to setup Scan to E-mail function.
• "Preparing the Printer to Send the E-Mail"
• "Setting the DNS Server Address"
• "Setting the Information Necessary to Access the Mail Server"
• "Setting the Administrator's E-mail Address"
Preparing the Printer to Send the E-Mail
To send an e-mail from your printer, the following information is necessary:
• E-mail account (user account) information
• E-mail sever information
NOTE:
For information of your e-mail account or the mail server, consult your network administrator or your Internet service
provider.
NOTE:
When the printer is connected to the network which is using a proxy server, the printer may not be able to send the
e-mail. In this case, consult your network administrator.
NOTE:
The preparations described below are effective while the e-mail account information is valid. You do not have to repeat
the settings whenever you send the e-mail.
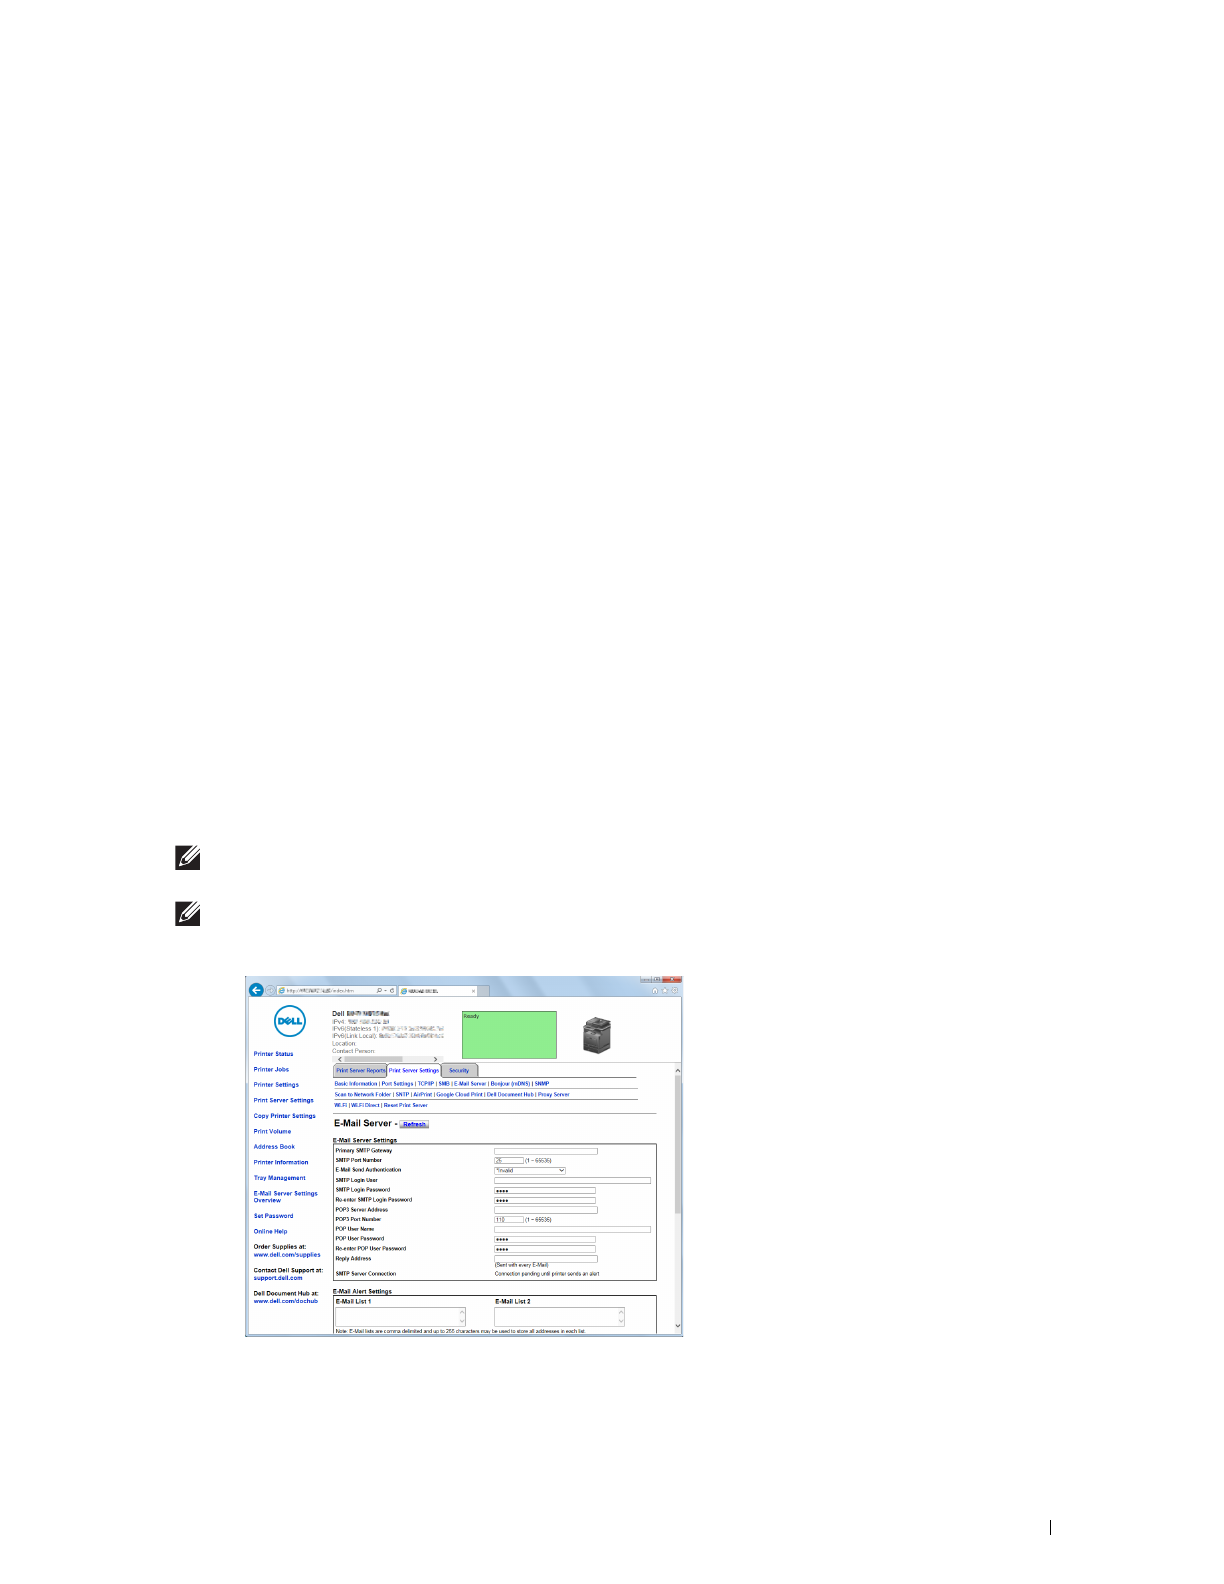
Scanning
331
Setting the DNS Server Address
To set the DNS server address to your printer, follow the steps below:
1
Launch the
Dell Printer Configuration Web Tool
.
a
Open the web browser.
b
Enter the IP address of your printer in the web browser.
See "Dell™ Printer Configuration Web Tool."
2
Click
Print Server Settings
.
3
Click
TCP/IP
.
4
If you are using DHCP for TCP/IP setting for the printer:
Set
Get DNS Server Address from DHCP
to
Enable
.
If you are setting TCP/IP manually:
Set
Manual DNS Server Address
.
5
Click
Apply New Settings
.
Setting the Information Necessary to Access the Mail Server
To make the printer to send an e-mail, follow the steps below:
1
Launch the
Dell Printer Configuration Web Tool
.
a
Open the web browser.
b
Enter the IP address of your printer in the web browser.
See "Dell™ Printer Configuration Web Tool."
2
Click
E-Mail Server Settings Overview
.
3
Set the mail server information under
E-Mail Server
.
NOTE:
In this procedure, the server settings for a Gmail account are used as an example. The server settings will differ for
each e-mail service.
NOTE:
Information about the Gmail account is based on the information as of October 2013. For the latest information, visit
the homepage of Gmail.
a
In the
Primary SMTP Gateway
text box, set the primary SMTP gateway.
For example:
smtp.gmail.com

332
Scanning
b
In the
SMTP Port Number
text box, enter the SMTP port number. This must be between 1 and 65535.
c
In the
E-Mail Send Authentication
drop-down menu, specify the authentication method for outgoing e-mail.
For example:
SMTP_Auth
(
Auto
)
d
In the
SMTP Login User
text box, set the SMTP login user. Up to 63 alphanumeric characters, periods,
hyphens, underscores, and at symbols (@) can be used. If specifying more than one address, separate them
using commas.
For example:
aaaa@gmail.com
NOTE:
It is not advisable to share a personal e-mail account with others for Scan to Email function. Instead, use the
e-mail account dedicated for Scan to Email function.
e
In the
SMTP Login Password
text box, set the SMTP account password using up to 31 alphanumeric
characters.
f
In the
Re-enter SMTP Login Password
text box, enter the login password again to confirm it.
g
In the
POP3 Server Address
text box, enter the POP3 server address in IP address format of "aaa.bbb.ccc.ddd"
or as a DNS host name using up to 63 characters.
*1
h
In the
POP3 Port Number
text box, enter the POP3 server port number. This must be between 1 and 65535.
*1
i
In the
POP User Name
text box, set the POP3 account user name. Up to 63 alphanumeric characters, periods,
hyphens, underscores, and at symbols (@) can be used. If specifying more than one address, separate them
using commas.
*1
j
In the
POP User Password
text box, enter the POP3 account password using up to 31 alphanumeric
characters.
*1
k
In the
Re-enter POP User Password
text box, enter the POP user password again to confirm it.
*1
l
In the
Reply Address
text box, enter the reply e-mail address sent with each
E-Mail Alert
.
*1
Required to enter if you select POP before SMTP (Plain) or POP before SMTP (APOP) for E-Mail
Send Authentication.
4
Click
Apply New Settings
.
If SMTP authentication is selected for
E-Mail Send Authentication
and if SSL/TLS encryption is used to
communicate with the SMTP sever, the SSL/TLS type must be set in
SMTP-SSL/TLS Communication
of
SSL/TLS
under the
Security
tab. Proceed to step 5.
If SSL/TLS is not used or if "
Invalid"
, "
POP before SMTP (Plain)"
, or "
POP before SMTP (APOP)"
is selected for
E-Mail Send Authentication
, the mail server settings are complete.
NOTE:
To send an e-mail through Gmail, set the SSL/TLS type should be set to STARTTLS in SMTP-SSL/TLS
Communication of SSL/TLS under the Security tab.
5
Click
Security
tab.
6
Select
SSL/TLS
.
7
Select a SSL/TLS type from the
SMTP-SSL/TLS Communication
list.
NOTE:
To use a Gmail account, select STARTTLS.
8
Click
Apply New Settings
.
Setting the Administrator's E-mail Address
To make the printer to set an administrator's e-mail address, follow the steps below:
1
Launch the
Dell Printer Configuration Web Tool
.
a
Open the web browser.
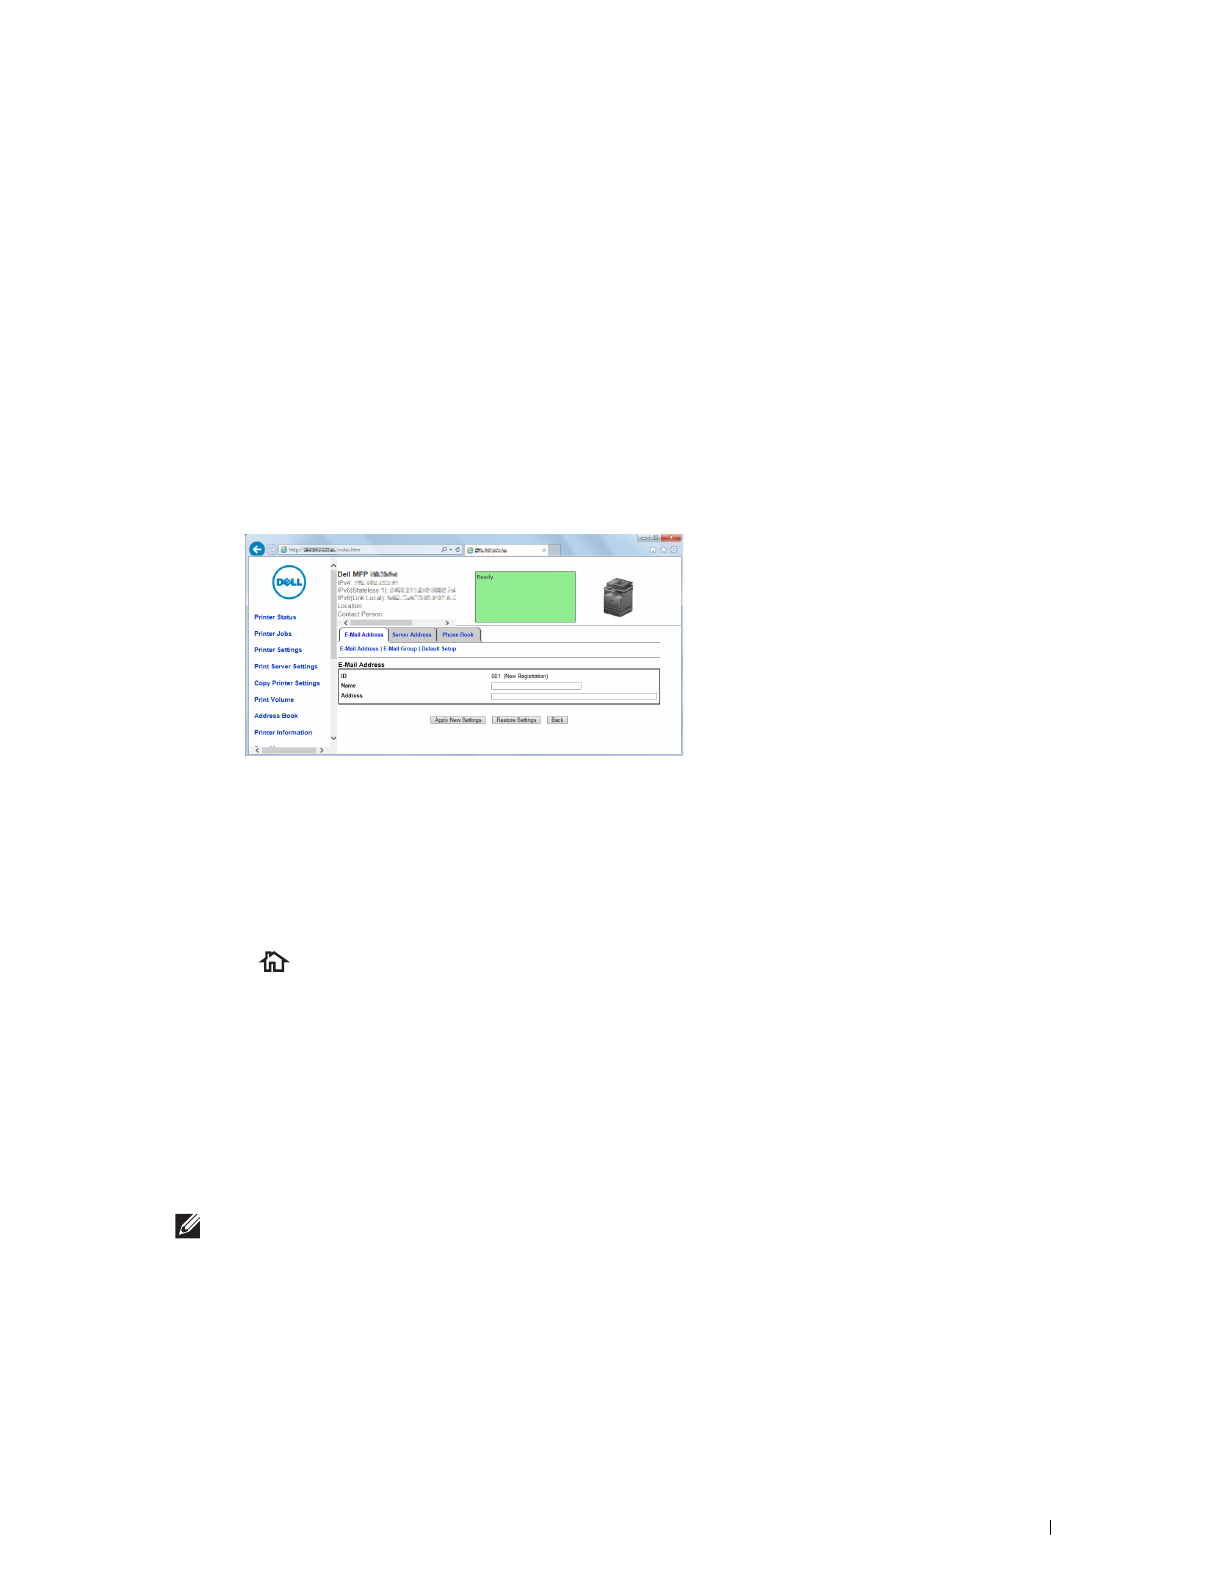
Scanning
333
b
Enter the IP address of your printer in the web browser.
See "Dell™ Printer Configuration Web Tool."
2
Click
Print Server Settings
.
3
Click
Basic Information
.
4
Set administrator's e-mail address in the
Administrator E-Mail Address
text box. Up to 63 alphanumeric
characters, periods, hyphens, underscores, and at symbols (@) can be used.
5
Click
Apply New Settings
.
Adding a New E-Mail Address to the Printer's Address Book
1
From the
Dell Printer Configuration Web Tool
, click
Address Book
, and then click the
E-Mail Address
tab.
2
Click
Create
.
The
E-Mail Address
page for registering a new e-mail address appears.
3
Enter the following:
•Name
•Address
4
Click
Apply New Settings
.
Sending an E-mail With the Scanned File
1
Press the
(Home)
button.
2
Ta p
Scan to Email
.
3
Specify a recipient from the following:
Enter Recipient's Address
: Enter an e-mail address directly.
Sender
: Select from the following types of selecting sender's e-mail address:
•
Keyboard
: Select an e-mail address from using keyboard.
•
Address Book
: Select a group of e-mails registered in the address book.
•
Network Address Book
: Search an e-mail address from the LDAP server address book.
NOTE:
The sender's e-mail address cannot be edited when the remote authentication is used as the user authentication
method on the Dell Smart Multifunction Printer | S2815dn.
Address Book
: Select from the following types of address books:
•
Individuals
: Select an e-mail address registered in the address book.
•
Groups
: Select a group of e-mails registered in the address book.
•
Network Address Book
: Search an e-mail address from the LDAP server address book.

334
Scanning
Tap + and the recipient you specified from
Enter Recipient's Address
to remove or edit the recipient.
Tap + and the recipient you specified from
Address Book
to remove or see details of the recipient. You can also
change the e-mail to Bcc.
NOTE:
For more information on address book and server address book, see "Address Books."
NOTE:
For details about
Network Address Book
, see "Using the Server Address Book and Server Phone Book."
NOTE:
The e-mail addresses needs to be registered before you can select
Address Book
.
4
Tap and specify scan settings such as
Output Color
,
Resolution
,
File Format
,
2 Sided
Scanning
,
Darken/Lighten
,
Contrast
,
Sharpness
,
Auto Exposure
,
Original Size
,
Margin
,
and
File Naming Mode
. For details, see "Scan Settings."
5
Ta p
Send
to begin scanning the document and sending an e-mail with the scanned file.
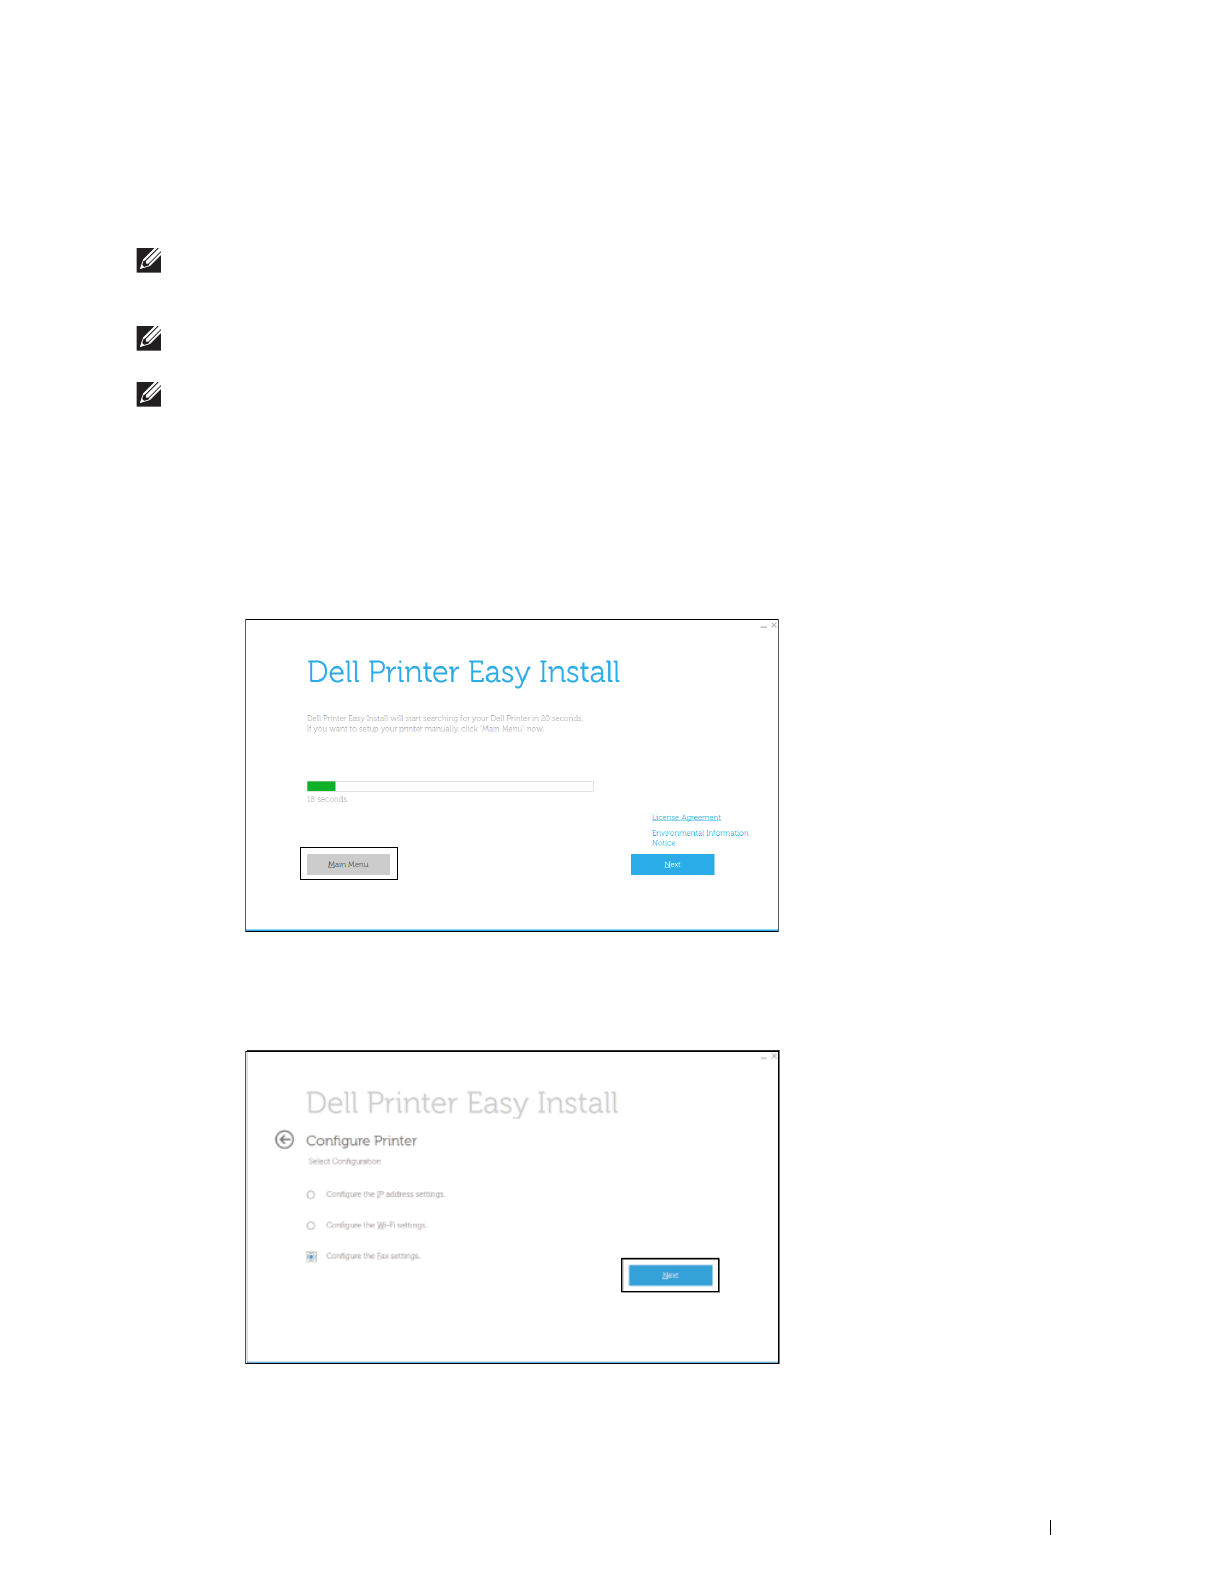
Faxing
335
21
Faxing
NOTE:
If the Functions Control setting for
Fax
is set to
On(Password)
, you need to enter the four-digit password to use
the fax function. If the Functions Control setting for
Fax
is set to
Off
, the fax function is disabled and the menu is also disabled
on the touch panel. For details, see "Functions Control."
NOTE:
If the
Panel Lock Control
is set to
Enable
, you need to enter the four-digit password to enter the
Admin
Settings
menu.
NOTE:
The images used in this manual are those of the Dell™ Cloud Multifunction Printer | H815dw unless otherwise mentioned.
Specifying the Fax Initial Settings Using the Dell Printer Easy Install
You can specify the country, line type, tone/pulse, receive mode, DRPD pattern, fax header name, and fax number.
1
Insert the
Software and Documentation
disc provided with the printer into your computer. The
Dell Printer Easy
Install
program launches automatically.
2
Click
Main Menu
.
3
Click
Change
.
The
Configure Printer
window appears.
4
Select
Configure the Fax settings
, and then click
Next
.

336
Faxing
5
Follow the instructions displayed on the screen.
Available settings are:
•Country
•Line Type
•Tone/Pulse
• Receive Mode
•DRPD Pattern
(This setting is available only when a distinctive ring service is installed on your telephone line by your
telephone company.)
• Fax Header Name
•Fax Number
NOTE:
To make initial settings from the printer operator panel, see "Setting Your Country."

Faxing
337
Setting Your Country
1
Press the
(Information)
button.
2
Ta p t h e
Tools
tab, and then tap
Admin Settings
.
3
Ta p
Fax Settings
.
4
Ta p
Fax Line Settings
.
5
Ta p
Country
.
6
Select the country where the printer is used, and then tap
OK
.
The printer must be rebooted after you set the country settings. When a screen prompting you to reboot the
printer, tap
Yes
. After the reboot, the
Home
screen is displayed on the touch panel.
NOTE:
When you configure the country setting, the information, which is registered to the printer, is initialized.
Setting the Printer ID
In most countries, you are required by law to indicate your fax number on any fax you send. The printer ID,
containing your telephone number and name or company name, will be printed at the top of each page sent from
your printer.
1
Press the
(Information)
button.
2
Ta p t h e
Tools
tab, and then tap
Admin Settings
.
3
Ta p
Fax Settings
.
4
Ta p
Fax Line Settings
.
5
Ta p
Fax Number
.
6
Enter your fax number using the number pad, and then tap
OK
.
NOTE:
If you make a mistake while entering numbers, press the button to delete the last digit.
7
Ta p
Fax Header Name
.
8
Enter your name or company name using the keyboard, and then tap
OK
.
For details on how to use the keyboard to enter alphanumeric characters, see "Using the Keyboard Displayed on the
Touch Panel."
Setting the Time and Date
NOTE:
It may be necessary to reset the correct time and date if loss of power to the printer occurs.
To set the time and date:
1
Press the
(Information)
button.
2
Ta p t h e
Tools
tab, and then tap
Admin Settings
.
3
Ta p
System Settings
.
4
Ta p
General
.
5
Ta p
Date & Time
.
6
Ta p
Time Zone
.
7
Tap until the desired geographic region appears, and then select that region.
8
Tap until the desired time zone appears, and then select that time zone.
9
Ta p
OK
.
10
Ta p
Date
.

338
Faxing
11
Tap – or + or enter the date using the number pad, and then tap
OK
.
12
Ta p
Time
.
13
Enter the time using the number pad.
14
Ta p
OK
.
NOTE:
The printer beeps and does not allow you to proceed to the next step if a wrong number is entered.
Changing the Clock Mode
You can set the current time using either the 12-hour or the 24-hour format.
1
Press the
(Information)
button.
2
Ta p t h e
Tools
tab, and then tap
Admin Settings
.
3
Ta p
System Settings
.
4
Ta p
General
.
5
Ta p
Date & Time
.
6
Ta p
Time
.
7
Ta p
12 Hour
or
24 Hour
, and then tap
OK
.
Setting Sounds
Speaker Volume
1
Press the
(Information)
button.
2
Ta p t h e
Tools
tab, and then tap
Admin Settings
.
3
Ta p
Fax Settings
.
4
Ta p
Fax Line Settings
.
5
Ta p u n t il
Line Monitor
appears, and then tap
Line Monitor
.
6
Select the desired volume, and then tap
OK
.
7
Turn off the printer, and turn it on again to apply the settings.
Ringer Volume
1
Press the
(Information)
button.
2
Ta p t h e
Tools
tab, and then tap
Admin Settings
.
3
Ta p
Fax Settings
.
4
Ta p
Incoming Defaults
.
5
Ta p
Ring Tone Volume
.
6
Select the desired volume, and then tap
OK
.
7
Turn off the printer, and turn it on again to apply the settings.

Faxing
339
Specifying the Fax Settings Options
Changing the Fax Settings Options
1
Press the
(Information)
button.
2
Ta p t h e
Tools
tab, and then tap
Admin Settings
.
3
Ta p
Fax Settings
.
4
Select the desired menu.
5
Select the desired setting or enter a value.
To enter a value, tap – or +, or use the number pad or the keyboard.
6
Ta p
OK
.
If necessary , repeat steps 4 through 6.
Available Fax Settings Options
You can use the following settings options for configuring the fax system:
Option Description
Fax Line Settings Fax Number Specifies the fax number of the printer, which will be printed on
the header of faxes. This feature is available when you set
Fax
Header
to
On
. The number specified in Fax Number is used in
the printer ID.
Country You can select the country where the printer is used.
You can change this setting when:
• No jobs in operation
• No fax jobs waiting in the memory
Fax Header Name
Specifies the sender’s name to be printed on the header of faxes.
Line Type
You can select the default line type.
•PSTN
•PBX
Line Monitor
Sets the volume of the line monitor, which audibly monitors a
transmission through the internal speaker until a connection is
made.
DRPD Pattern
Before using the Distinctive Ring Pattern Detection (DRPD)
option, distinctive ring service must be installed on your telephone
line by the telephone company. After the telephone company has
provided a separate number for faxing with a distinctive ring
pattern, configure the fax setup to monitor for that specific ring
pattern.

340
Faxing
Incoming
Defaults
Receive Mode You can select the default fax receiving mode.
•
Tel ep ho ne
(manual receive mode): Automatic fax reception is
turned off. You can receive a fax by picking up the handset of the
external telephone and then pressing the remote receive code, or
by tapping
Manual Receive
in
On Hook
and then
tapping
Receive
. For details about
Manual Receive
,
see "Receiving a Fax Manually in the Telephone Mode."
•
Fax
: (automatic receive mode)
•
Tel ep ho ne / Fax
: When the printer receives an incoming fax, the
external telephone rings for the time specified in
Auto Rec
Fax/Tel
, and then the printer automatically receives a fax. If
an incoming call is not a fax, the printer beeps from the internal
speaker indicating that the call is a telephone call.
•
Ans Machine/Fax
: The printer can share a telephone line with an
answering machine. In this mode, the printer will monitor the fax
signal and pick up the line if there are fax tones. If the phone
communication is using serial transmission in your country (such
as Germany, Sweden, Denmark, Austria, Belgium, Italy, France
and Switzerland), this mode is not supported.
•
DRPD
: Before using the Distinctive Ring Pattern Detection
(DRPD) option, distinctive ring service must be installed on your
telephone line by the telephone company. After the telephone
company has provided a separate number for faxing with a
distinctive ring pattern, configure the fax setup to monitor for
that specific ring pattern.
Ring Tone Volume
Sets the volume of the ring tone, which indicates that an incoming
call is a telephone call through the internal speaker when
Receive Mode
is set to
Telephone / Fax
.
Auto Receive
Setup
Auto Receive Fax
Sets the interval at which the printer goes into the fax receive
mode after receiving an incoming call. The interval can be
specified within the range of 0 to 255 seconds. The default is 0
second.
Auto Receive
Tel/Fax
Sets the interval at which the printer goes into the fax receive
mode after the external telephone receives an incoming call. The
interval can be specified within the range of 0 to 255 seconds. The
default is 6 seconds.
Auto Receive
Ans/Fax
Sets the interval at which the printer goes into the fax receive
mode after the external answering machine receives an incoming
call. The interval can be specified within the range of 0 to 255
seconds. The default is 21 seconds.
Junk Fax Setup
You can reject faxes sent from unwanted stations. The system only
accepts faxes from the remote stations registered in the speed dial.
This feature is useful for blocking any unwanted faxes.
Ta p
Off
to turn the feature off. Anybody can send you a fax.
Ta p
On
to turn the feature on.
Secure Receive
You can specify whether to require a four-digit password to receive
faxes, and to set or change the password.
Option Description
Faxing
341
Received Fax
Forward
You can set your printer to forward incoming faxes to another fax
number, to e-mail addresses, or to a server. When a fax arrives at
your printer, it is stored in the memory. Then, the printer dials the
fax number you have specified in
Forwarding Number
or
forwards the fax to e-mail addresses or a server address you have
specified in the Dell Printer Configuration Web Tool.
To forward to a fax number, you need to register a fax number on
Forwarding Number. To forward to e-mail addresses, you need
to register information on the e-mail server and the forwarding e-
mail addresses. To forward to a server address, you need to register
information on the destination server. For details on setting the e-
mail server, see "E-Mail Server" and on forwarding number, e-mail
address, and server address, see "Fax Settings."
Ta p
Off
not to forward incoming faxes.
Ta p
Forward
to forward incoming faxes without printing. If an
error occurs during forwarding a received fax, the printer prints the
fax.
Ta p
Print and Forward
to print and forward incoming
faxes.
Ta p
Forward to Email
to forward incoming faxes to e-mail.
NOTE:
Depending on the e-mail server settings, the printer
may not get an error which occurs during the transfer.
Ta p
Print and Forward to E-mail
to print and
forward incoming faxes to e-mail.
Ta p
Forward to Server
to forward incoming faxes to
server.
Ta p
Print and Forward to Server
to print and
forward incoming faxes to server.
2 Sided Print You can set whether to make duplex print when you print faxes.
Ta p
Off
to print faxes on one side of a sheet of paper.
Ta p
On
to print faxes on both sides of a sheet of paper.
NOTE:
Duplex print may not be done depending on the size of
the received faxes or settings of the trays, etc.
Remote Receive You can receive a fax by pressing the remote receive code on the
external telephone after picking up the handset of the telephone.
When you set
Remote receive
to
On
, specify a two digit
remote receive code in
Remote Receive Tone
.
Discard Size When receiving a document as long as or longer than the paper
installed in your printer, you can set the printer to discard any
excess at the bottom of the page. If the received page is outside
the margin you set, it will print on two sheets of paper at the
actual size. When the document is within the margin and
Discard Size
is set to
Auto Reduction
, the printer
reduces the document to fit it onto the appropriate sized paper
and discard does not occur. If
Discard Size
is set to other
than
Auto Reduction
, the data within the margin will be
discarded.
Option Description
342
Faxing
NOTE:
Prefix Dial supports only the environment where you send a fax to the external line number. To use Prefix Dial, you must
do the following from the operator panel.
1
Press the
(Information)
button.
2
Ta p t h e
Tools
tab, and then tap
Admin Settings
.
3
Ta p
Fax Settings
.
4
Ta p
Fax Line Settings
.
Transmission
Defaults
Auto Redial Setup Redial Attempts You can specify the number of redial attempts to make when the
destination fax number is busy, within the range of 0 to 13. If you
enter 0, the printer will not redial.
Interval of Redial Your printer can automatically redial a remote fax machine if it
was busy. Intervals from 1–15 minutes can be entered.
Resend Delay You can specify the interval between transmission attempts within
the range of 3 to 255 seconds. The default is 8 seconds.
Tone/Pulse You can select the dialing type.
•Tone
•
Pulse(10PPS)
•
Pulse(20PPS)
Prefix Dial
You can specify whether or not to set a prefix dial number. When
you set
Prefix Dial
to
On
, the number set in
Prefix
Dial Number
dials before any auto dial number is started. It is
useful for accessing the Private Automatic Branch Exchange
(PBX). You can set a prefix dial number of up to five digits.
Fax Cover Page
You can set whether to attach a cover page to faxes when sending
faxes.
Fax Header
Prints the sender’s information on the header of faxes.
Ta p
Off
to turn this feature off.
Ta p
On
to turn this feature on.
Note that if United States is selected for the setting of Country,
this option does not appear on the menu. The setting is fixed to
On and cannot be changed.
For information on the country setting, see "Setting Your
Country."
ECM
You can set whether to enable or disable the ECM (Error
Correction Mode).
Modem Speed
You can set the modem speed.
Display Manual
Fax Recipients
You can set whether to display the fax number of the recipient on
the
Sending Fax
screen when manually sending a fax.
Fax Reports Fax Activity
You can set whether to automatically print a fax activity report
after every 50 incoming and outgoing fax communications.
Fax Transmit
You can set whether to print a transmission result after a fax
transmission.
Fax Broadcast
You can set whether to print a transmission result after a fax
transmission to multiple locations.
Fax Protocol
You can set whether to print the protocol monitor report after a fax
transmission to monitor fax protocol problems.
Option Description

Faxing
343
5
Ta p
Line Type
.
6
Ta p
PBX
, and then
OK
.
7
Ta p
Transmission Defaults
.
8
Ta p
Prefix Dial
.
9
Ta p
On
.
10
Enter a prefix number using the number pad, and then tap
OK
. The characters you can use for a prefix number are
0–9, *, and #. The maximum number of characters for a prefix number is five.
11
Turn off the printer, and turn it on again to apply the settings.
Advanced Fax Settings
NOTE:
The advanced fax settings are only meant for advanced users. Incorrect settings may damage the printer.
If you are experiencing fax send or receive errors, there is an advanced fax settings menu which you can access and
change the settings accordingly.
To enter the Diagnostic Menu (Customer Mode), follow the instructions.
1
Turn off the printer.
2
Disconnect all network, phone line, and USB cables from the printer.
3
Turn on the printer while holding down the
8
and
2
buttons on the number pad to start in
Customer Mode
.
After all the advanced fax settings have been made, you will need to turn off and on the printer
for the new settings
to be effective.
Fax Data Encoding Method
Some of the legacy fax devices do not support the Joint Bi-level Image Experts Group (JBIG) data encoding method.
You may experience fax send or receive errors due to this data encoding method. You can disable the JBIG and select
the Modified Huffman (MH), Modified Read (MR), or Modified Modified Read (MMR) encoding with the
following instructions.
You can change the modem transmission encoding with the following instructions.
1
Turn on the printer while holding down the
8
and
2
buttons on the number pad to start in Customer Mode.
2
Tap button to tap
Fax/Scanner Diag
, and then tap
OK
.
3
Tap button until
Parameter
appears, and then tap
OK
.
4
Ensure that
FAX Parameter
appears, and then tap
OK
.
5
Tap button until
G3M TX Coding
appears, and then tap
OK
.
6
Tap button until the desired encoding appears, and then tap
OK
.
You can select
MH
,
MR
, or
MMR
.
You can change the modem receive encoding with the following instructions.
1
Turn on the printer while holding down the
8
and
2
buttons on the number pad to start in Customer Mode.
2
Tap button to tap
Fax/Scanner Diag
, and then tap
OK
.
3
Tap button until
Parameter
appears, and then tap
OK
.
4
Ensure that
FAX Parameter
appears, and then tap
OK
.
5
Tap button until
G3M RX Coding
appears, and then tap
OK
.
6
Tap button until the desired encoding appears, and then tap
OK
.
You can select
MH
,
MR
, or
MMR
.

344
Faxing
Diagnosing the Fax Connection
You can diagnose the Fax connection using the FAX Line Diagnosis feature that can detect the abnormalities of
telephone line connection.
1
Turn on the printer while holding down the
8
and
2
buttons on the number pad to start in Customer Mode.
2
Tap button to tap
Fax/Scanner Diag
, and then tap
OK
.
3
Tap button until
FAX Test
appears, and then tap
OK
.
4
When the message
Check FAX Connection
appears, tap
OK
.
5
When the message
Ready to Start
appears, tap
OK
to start diagnosing the FAX connection.
One of the following diagnosing result is displayed.
Diagnosing result Description
Connection not Detected
Please Reconnect Telephone Line
The telephone line cord is not connected. Make sure that the
telephone line cord is securely connected.
Cable Connected Wrongly
Reconnect Telephone Line from Wall
Jack to Line Connection
The telephone line cord is connected to the wrong connector. Make
sure that the telephone line cord is connected at one end to the wall
jack connector
()
of your printer and at the other end to an active
wall jack. If you use a telephone or answering machine, connect to the
phone connector
()
.
Fax Connection OK
Please Check Setting of Tone/Pulse
in Admin Menu after Restart Printer
The telephone line cord is properly connected. Check the Tone/Pulse
setting. For information on Tone/Pulse setting, see "Available Fax
Settings Options."
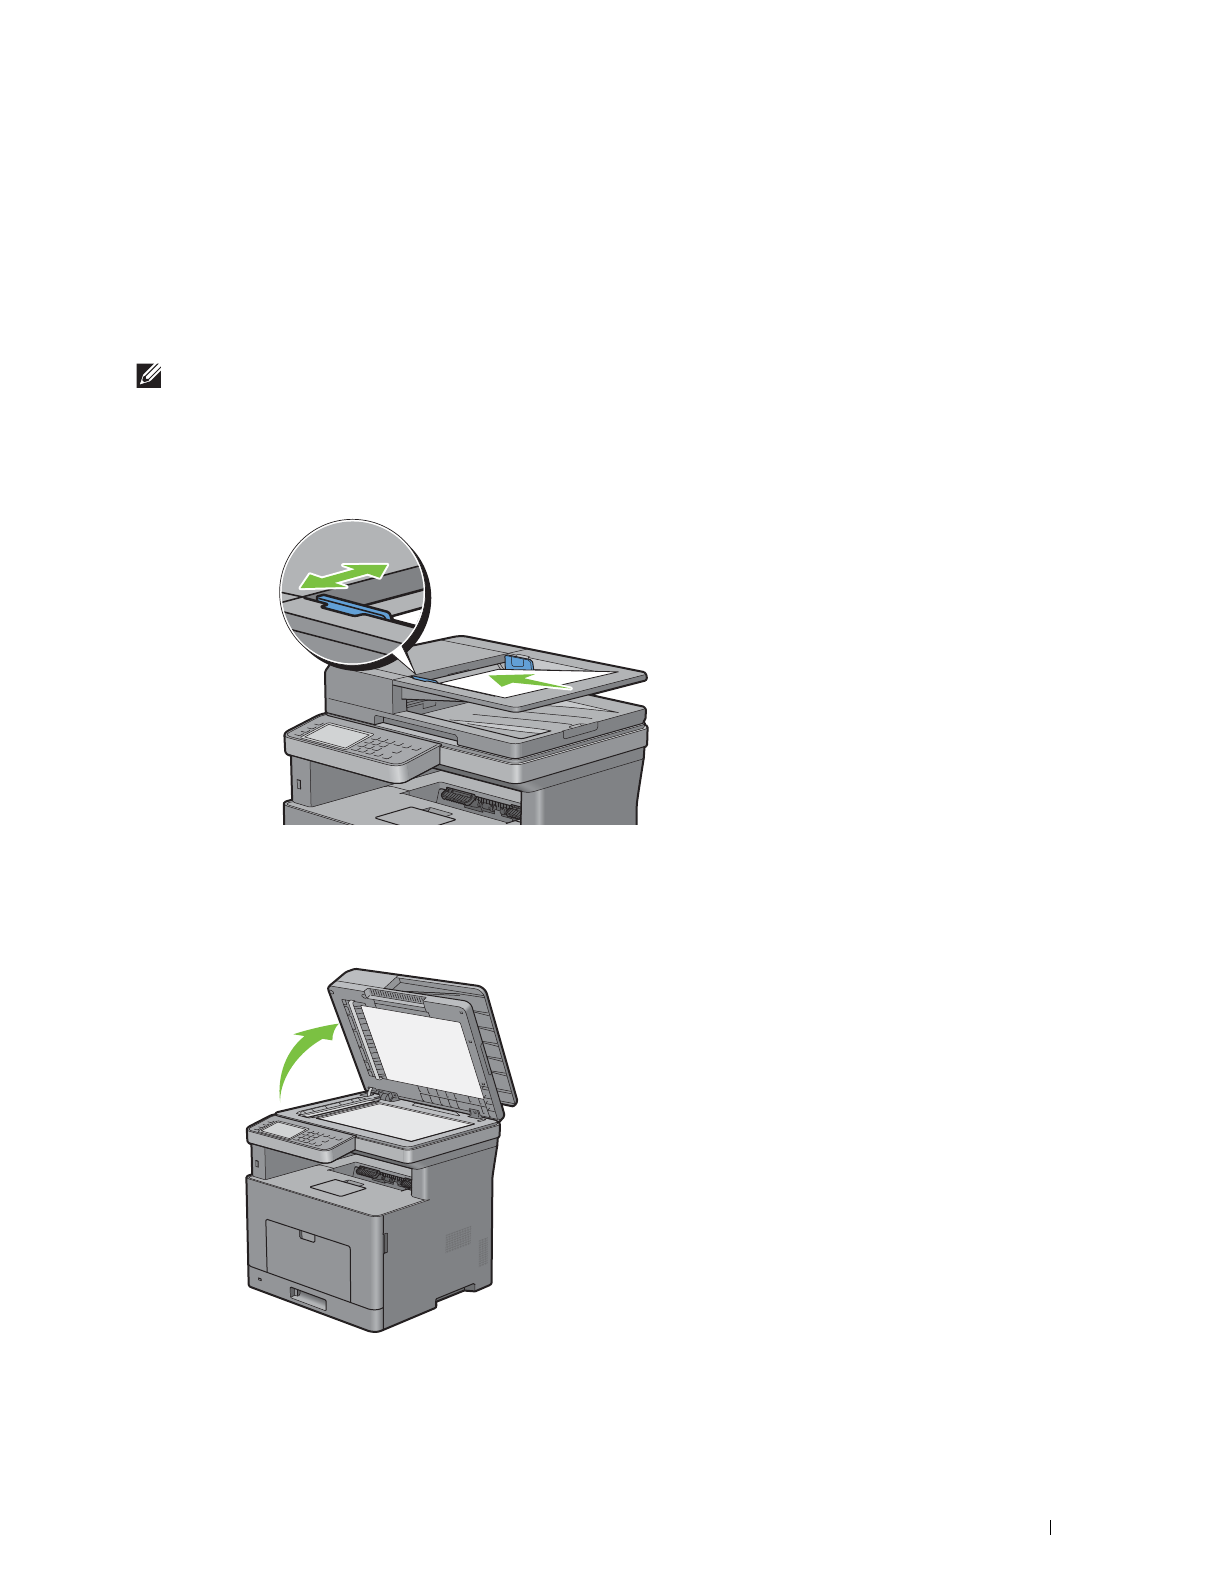
Faxing
345
Sending a Fax
You can fax data from your printer. You can also directly fax data transferred from the computer running a
Microsoft
®
Windows
®
operating system.
Loading an Original Document
You can use the DADF or the document glass to load an original document for faxing. Using the DADF, you can load
up to 50 sheets of 75 g/m
2
(20 lb) paper at a time. Using the document glass, you can load one sheet at a time.
NOTE:
To get the best scan quality, especially for grayscale images, use the document glass instead of the DADF.
To fax a document using the Duplex Automatic Document Feeder (DADF):
1
Place the document(s) facing up on the DADF with the top edge of the documents in first. Then adjust the
document guides to the correct document size.
2
Adjust the document resolution. (For details, see "Adjusting the Document Resolution.")
To fax a document from the document glass:
1
Open the document cover.
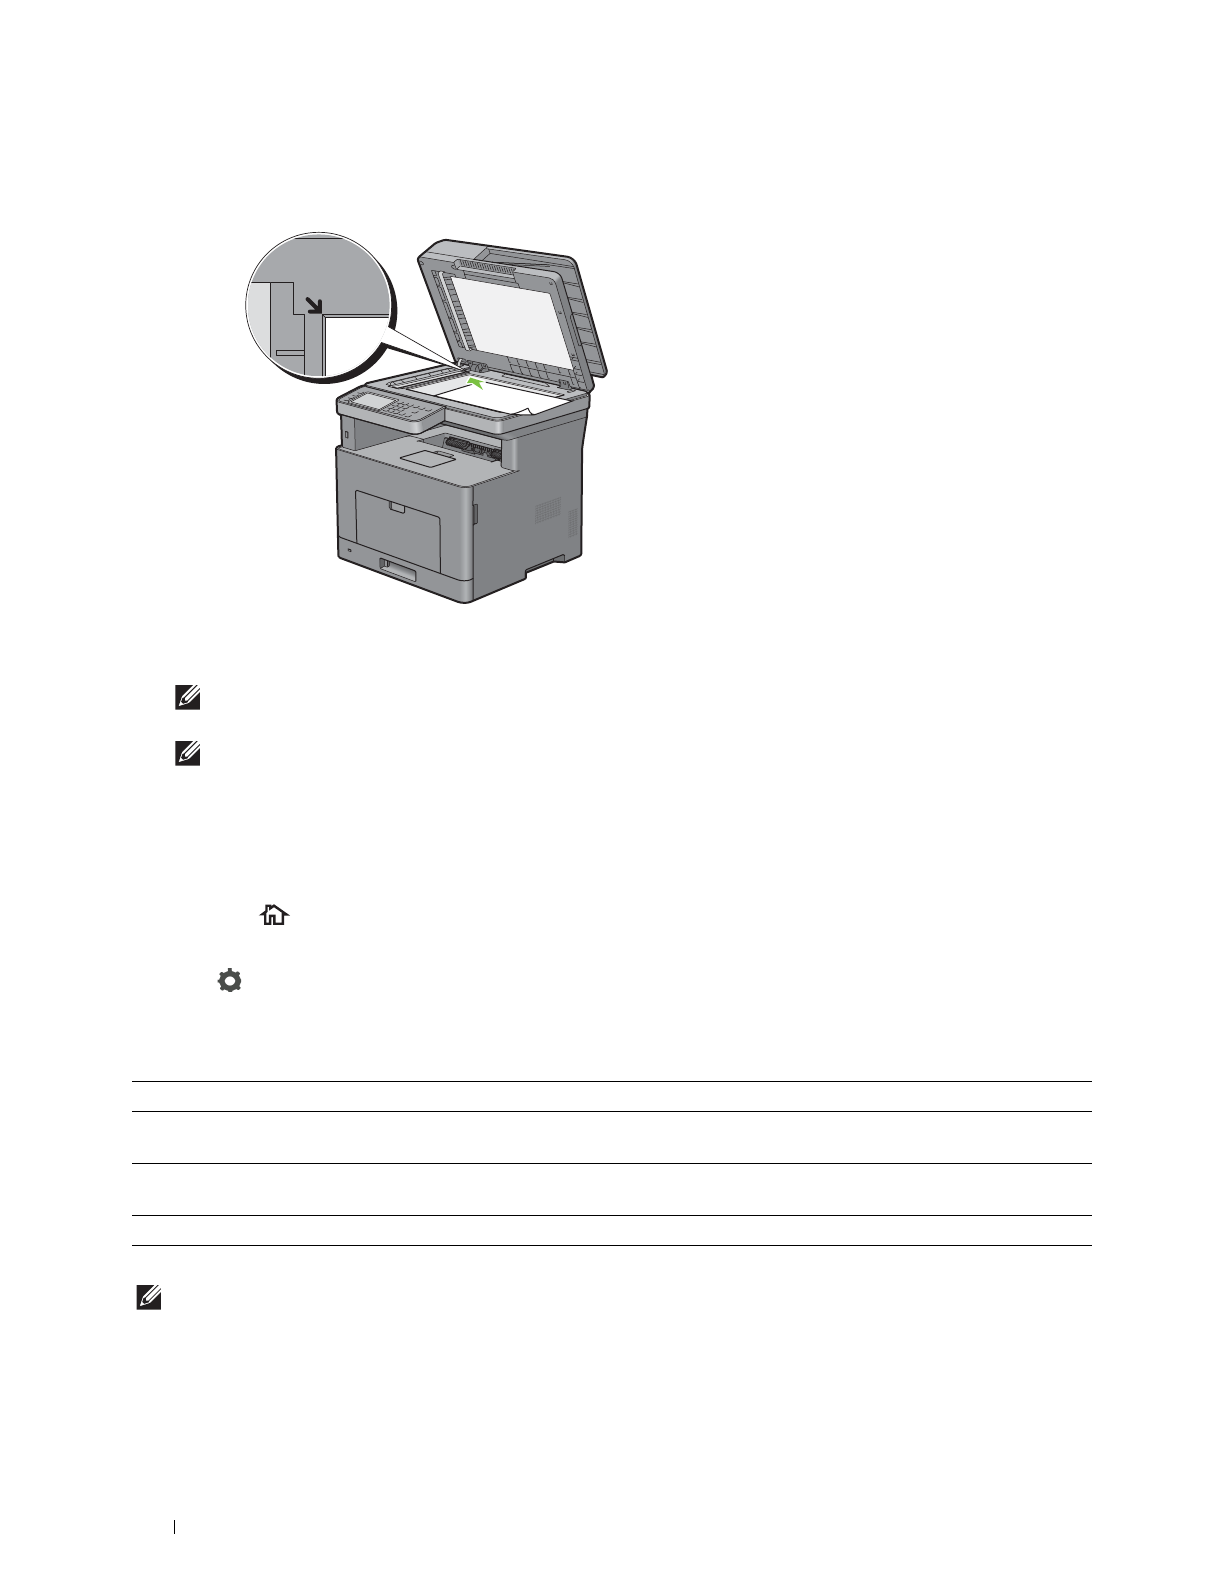
346
Faxing
2
Place the document facing down on the document glass and align it with the registration guide on the top left
corner of the glass.
3
Adjust the document resolution. (For details, see "Adjusting the Document Resolution.")
4
Close the document cover.
NOTE:
Ensure that no document is in the DADF. If any document is detected in the DADF, it takes priority over the
document on the document glass.
NOTE:
If you are faxing a page from a book or magazine, lift the cover until its hinges are caught by the stopper and then
close the cover. If the book or magazine is thicker than 30 mm, start faxing with the cover open.
Adjusting the Document Resolution
You can improve the quality of the fax document by adjusting the resolution, especially for documents with low
image quality or documents containing photographic images.
1
Press the
(Home)
button.
2
Ta p
Fax
.
3
Ta p
.
4
Ta p
Resolution
.
5
Tap the desired setting.
* Denotes the factory default setting.
NOTE:
Faxes scanned in the Super Fine resolution transmit at the highest resolution supported by the receiving device.
Standard* Used for documents with normal sized characters.
Fine Used for documents containing small characters or thin lines or documents printed using a
dot-matrix printer.
Super Fine Used for documents containing extremely fine detail. The super fine mode is enabled only if
the remote machine also supports the Super Fine resolution. See the note below.
Photo Used for documents containing photographic images.
Faxing
347
Adjusting the Document Contrast
You can adjust the contrast of the fax document to be lighter or darker than the original.
1
Load the document(s) facing up with top edge in first into the DADF.
OR
Place a single document facing down on the document glass, and close the document cover.
For details about loading a document, see "Loading an Original Document."
2
Press the
(Home)
button.
3
Ta p
Fax
.
4
Ta p
.
5
Ta p
Darken/Lighten
.
6
Drag the desired level on the
Darken/Lighten
bar, and then tap
OK
.
You can select a contrast level from seven levels between
Darken
and
Lighten
.
Drag the indicator on the left side of the bar makes the document contrast lighter, and selecting a cell on the right
side of the bar makes the document contrast darker.
* Denotes the factory default setting.
Sending a Fax From Memory
1
Load the document(s) facing up with top edge in first into the DADF.
OR
Place a single document facing down on the document glass, and close the document cover.
For details about loading a document, see "Loading an Original Document."
2
Press the
(Home)
button.
3
Ta p
Fax
.
4
Adjust the document resolution to suit your fax needs. (For details, see "Adjusting the Document Resolution." For
adjusting the contrast, see "Adjusting the Document Contrast.")
5
To select a fax number, do one of the following:
•Tap
Phone Book
, and then select one of the following:
Individuals:
Select an individual fax number and then tap
Done
.
Groups:
Select a group dial number and then tap
Done
.
Network Phone Book:
Search and select a fax number from the LDAP server and then tap
Search
.
NOTE:
For more information on address book and server address book, see "Address Books."
NOTE:
For details about
Network Phone Book
, see "Using the Server Address Book and Server Phone Book."
Darken 3 Works well with light documents or faint pencil markings.
Darken 2
Darken 1
Normal* Works well with standard typed or printed documents.
Lighten 1 Works well with dark documents.
Lighten 2
Lighten 3

348
Faxing
NOTE:
The fax number needs to be registered before you can select
Address Book
.
•Tap
Speed Dial
.
Enter the speed dial number using the number pad, and then tap
Done
.
6
Ta p
Send
to scan data.
When the document is loaded on the document glass, the display prompts you for another page.
If you want to place a new document, replace the document with a new document, and then tap
Continue
.
When you have finished loading documents, tap
Done
.
The printer starts dialing the number, and then sends the fax when the remote fax machine is ready.
NOTE:
You can cancel the fax job while sending the fax by tapping
Stop
.
NOTE:
Tapping
Send
does not start sending a fax when the available time is set or the Fax function is locked. (For details,
see "Set Available Time" for the Available time and "Functions Control" for the Fax function.)
Sending a Fax Manually
1
Load the document(s) facing up with top edge in first into the DADF.
OR
Place a single document facing down on the document glass, and close the document cover.
For details about loading a document, see "Loading an Original Document."
2
Press the
(Home)
button.
3
Ta p
Fax
.
4
Adjust the document resolution to suit your fax needs. (For details, see "Adjusting the Document Resolution." For
adjusting the contrast, see "Adjusting the Document Contrast.")
5
Ta p
On Hook
.
6
Enter the fax number of the recipient using the number pad.
You can also select the recipient by using speed dial number or address book. (For details, see "Automatic
Redialing.")
7
Ta p
Send
to send the fax.
NOTE:
You can cancel the fax job while sending the fax by tapping
Stop
.
NOTE:
Tapping
Send
does not start sending a fax when the available time is set or the Fax function is locked. (For details,
see "Set Available Time" for the Available time and "Functions Control" for the Fax function.)
Confirming Transmissions
When the last page of your document has been sent successfully, the printer beeps and returns to the standby mode.
If something goes wrong while sending your fax, an error message appears on the display.
If you receive an error message, press Close to clear the message and try to send the document again.
You can set your printer to print a confirmation report automatically after each fax transmission. For further details,
see "Printing a Report."

Faxing
349
Automatic Redialing
If the number you have dialed is busy or there is no answer when you send a fax, the printer will automatically redial
the number every minute based on the number set in the redial settings.
To change the time interval between redials and the number of redial attempts, see "Available Fax Settings Options."
NOTE:
The printer will not automatically redial a number that was busy when the number was manually entered.
Sending a Delayed Fax
The Delayed Start mode can be used to save scanned documents for transmission at a specified time to take
advantage of lower long distance rates.
1
Load the document(s) facing up with top edge in first into the DADF.
OR
Place a single document facing down on the document glass, and close the document cover.
For details about loading a document, see "Loading an Original Document."
2
Press the
(Home)
button.
3
Ta p
Fax
.
4
Adjust the document resolution to suit your fax needs. (For details, see "Adjusting the Document Resolution." For
adjusting the contrast, see "Adjusting the Document Contrast.")
5
Tap , and then tap
Delayed Send
.
6
Ta p
On
.
7
Enter the start time using – or +, and then tap
OK
.
8
Ta p
Back
, and then enter the fax number of the recipient using the number pad.
You can also select the recipient by using speed dial number or address book. (For details, see "Automatic
Redialing.")
9
Ta p
Send
to scan data.
Once Delayed Start mode is activated, your printer stores all of the documents to be faxed into its memory and
sends them at the specified time. After faxing in the Delayed Start mode is complete, the data in the memory is
cleared.
NOTE:
If you turn off and on the printer, the stored documents are sent as soon as the printer is activated.
NOTE:
If the specified start time overlaps with the time periods for the available time or the Fax function, the printer cannot
send the delayed fax at the specified time. (For details, see "Set Available Time" for the Available time and "Functions
Control" for the Fax function.)

350
Faxing
Sending a Fax from the Driver (Direct Fax)
You can send a fax directly from your computer by using the driver.
NOTE:
Only black and white faxes can be sent using Direct Fax.
NOTE:
If the specified start time overlaps with the time periods for the available time or the Fax function, the printer cannot send
the delayed fax at the specified time. (For details, see "Set Available Time" for the Available time and "Functions Control" for the
Fax function.)
Example
Procedure
NOTE:
The names of the dialog boxes and the buttons may be different from those given in the following procedure depending
on the application you are using.
NOTE:
To use this feature, you must install the fax driver. (For details, see "Starting Dell Printer Easy Install" for Windows
®
or
"Installing the Drivers and Software" for Macintosh.)
1
Open the file you want to send by fax.
2
Open the print dialog box from the application, and then select
Dell MFP H815dw Fax or Dell MFP S2815dn
Fax
.
3
Click
Preferences
in Windows
®
, or select
FAX Setting
in Macintosh.
For Microsoft
®
Windows
®
:
Send data via the
Dell MFP H815dw Fax or
Dell MFP S2815dn Fax driver
Send fax
Receiving machine (fax
machine/multifunction
printer)
Sending machine
(your printer)
Faxing
351
For Apple Macintosh:
4
When the setting dialog box appears, specify the following settings.
NOTE:
The settings done here are only applied to a single fax job.
For Microsoft
®
Windows
®
:
For Apple Macintosh:
352
Faxing
a. Transmission image quality
Purpose:
To set the output quality.
Values:
* Denotes the factory default setting.
NOTE:
Faxes printed in the Super-high image quality by Direct Fax driver transmits at the highest resolution supported by the
receiving device.
b. Transmission report
Purpose:
To specify whether to print a fax transmission result.
Values:
* Denotes the factory default setting.
c. Fax Cover Page
Purpose:
To specify whether to attach a cover page to your fax.
Values:
* Denotes the factory default setting.
Sender
Purpose:
To specify whether to print the sender’s name on the fax cover page.
Values:
* Denotes the factory default setting.
Standard For documents with normal sized characters.
High Quality* For documents containing small characters or thin lines or documents printed using a dot-
matrix printer.
Super-high image quality For documents containing extremely fine detail. The super fine mode is enabled only if the
remote machine also supports Super Fine resolution. See the notes below.
Output regularly Prints a transmission result after every fax transmission.
Output for non-transmission* Prints a transmission result only when an error occurs.
Do not output Does not print fax transmission results.
According to Printer Settings Determines whether to attach a cover page to your fax depending on the setting you specify in
Fax Cover Page
on the operator panel.
Attach Attaches a cover page to your fax.
None* Does not attach a cover page to your fax.
According to Printer Settings* Determines whether or not to print the sender’s name on the fax cover page based on the
printer settings.
Enter a sender name Allows you to enter a sender’s name that will be printed on the fax cover page in Sender
Name.
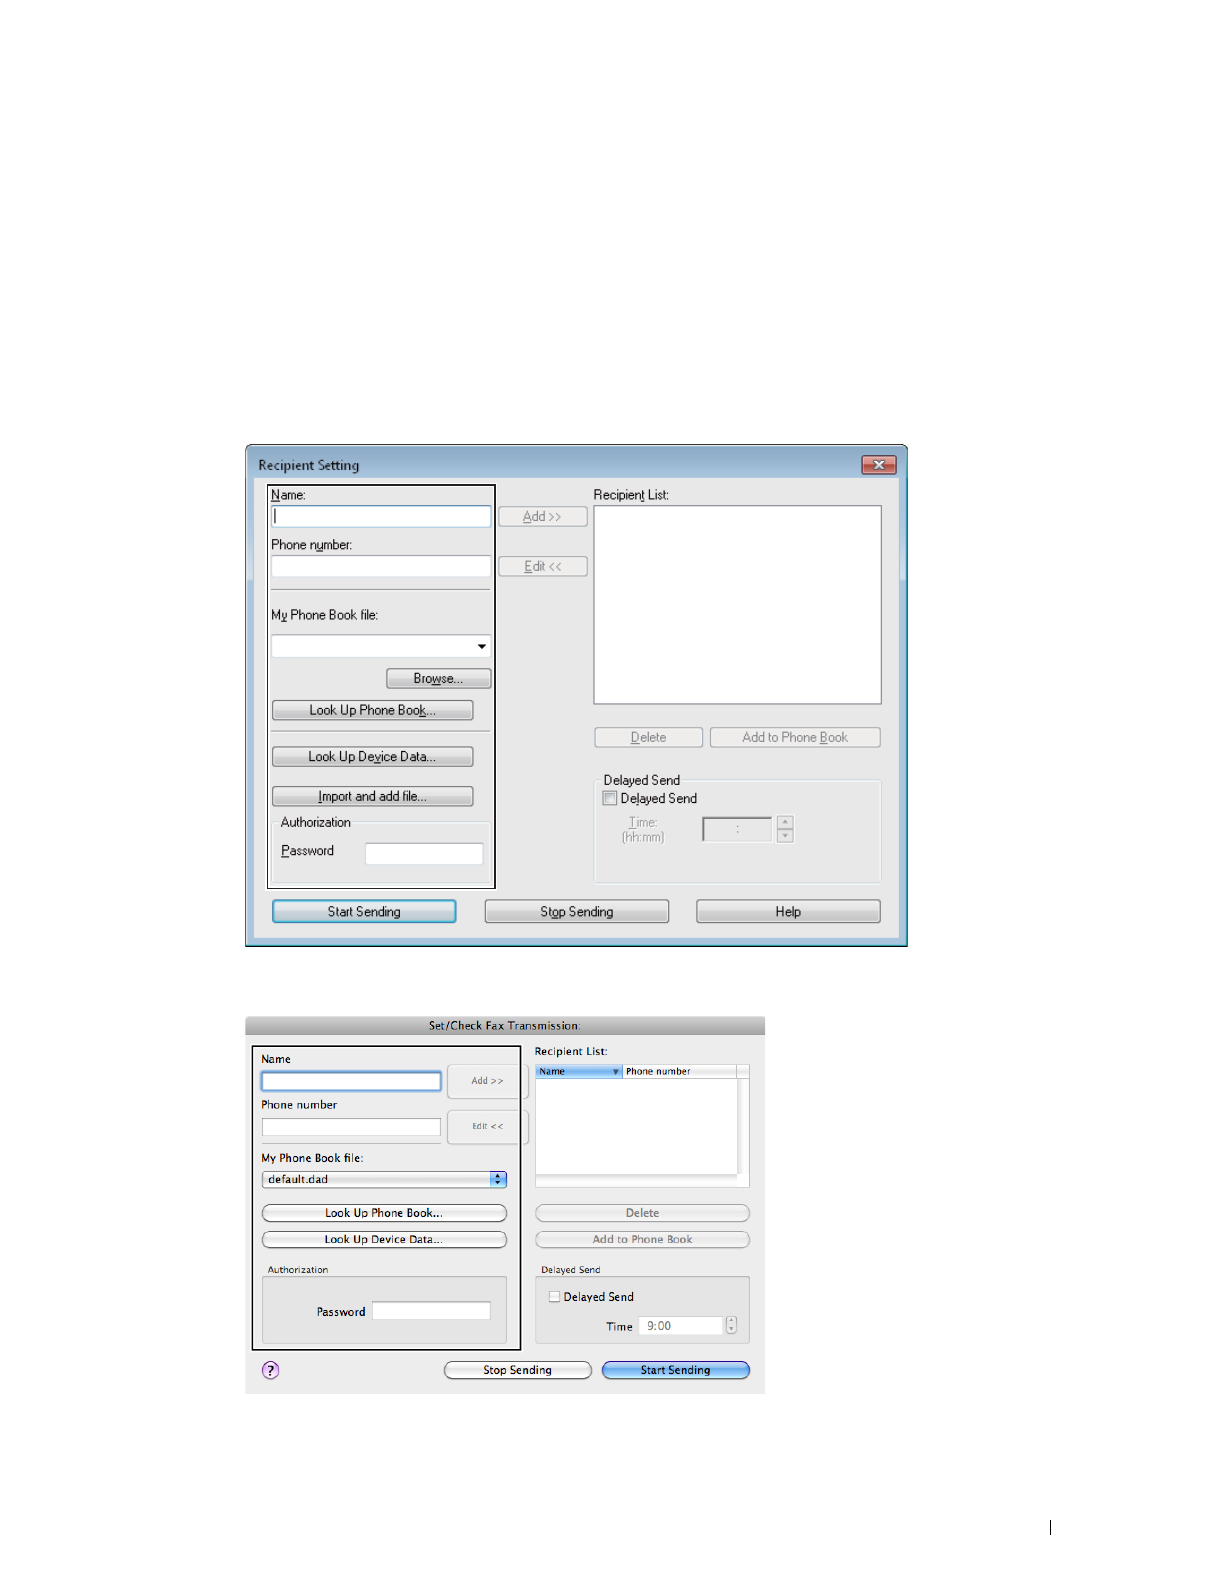
Faxing
353
Sender Name
Purpose:
To enter a sender’s name that will be printed on the fax cover page.
The sender’s name can be up to 30 characters. If it exceeds 30 characters, only the first 30 characters will be printed.
5
For Windows
®
, click
OK
to close the
Printing Preferences
dialog box, and then click
Print
.
For Macintosh, click
Print
.
The
Set/Check Fax Transmission
dialog box appears.
For Microsoft
®
Windows
®
:
For Apple Macintosh:

354
Faxing
6
Enter the destination for the recipient. The following procedure is for entering the destination. For details on how
to enter the destination, please refer to the Help file for the driver.
a
Enter the name and fax number directly.
b
Select a fax number from a phone book.
•
Look Up Phone Book
:
Displays a list of fax numbers that are saved in the file specified for
My Phone
Book file
.
•
Look Up Device Data
: Displays a list of fax numbers that are saved in the Phone Book on your printer.
•
Import and add file
(Windows
®
only): Allows you to select a source file such as a CSV file, WAB file,
MAPI, or a LDAP server. (For details on LDAP server, see "LDAP Server" and "Fax Server Phone Book.")
NOTE:
Depending on the application (when you are using OS X 10.7 or later), you cannot use Look Up Device Data
function.
NOTE:
Enter the password in the Password field in the Authorization area before sending a fax if the fax function is locked
with a password.
NOTE:
If the Functions Control setting for
Fax
is set to
On(Password)
, you need to enter the four-digit password to
use the fax function.
To lock the fax function with a password:
NOTE:
To lock the fax function from
Functions Control
, you must first set
Panel Lock
to
On
. For details, see
"Panel Lock."
1
Press the
(Information)
button.
2
Ta p t h e
Tools
tab, and then tap
Admin Settings
.
3
Ta p u n t il
Secure Settings
appears, and then tap
Secure Settings
.
4
Ta p
Functions Control
.
5
Ta p
Fax
.
6
Ta p
On (Password)
.
7
Enter a four-digit password, and then tap
OK
.
8
Turn off the printer, and turn it on again to apply the settings.
To check whether the fax has been sent:
Print a job history report. For details about how to print a job history report, see "Report / List."
Receiving a Fax
About Receiving Modes
NOTE:
To use the
Telephone / Fax
or
Ans Machine/Fax
, connect an answering machine to the phone connector
( ) on the rear of your printer.
When the memory is full, the fax is received in the Telephone mode.
Loading Paper for Receiving Faxes
The instructions for loading paper in the paper tray are the same whether you are printing, faxing, or copying, except
that faxes can only be printed on Letter-sized, A4-sized, or Legal-sized paper. For details about loading paper, see
"Loading Print Media." For details about setting the paper type and size in the tray, see "Print Media Guidelines."

Faxing
355
Receiving a Fax Automatically in the Fax Mode
Your printer is preset to the Fax mode at the factory.
If you receive a fax, the printer automatically goes into the fax mode after a specified period of time and receives the
fax.
To change the interval at which the printer goes into the fax mode after receiving an incoming call, see "Available
Fax Settings Options."
Receiving a Fax Manually in the Telephone Mode
You can receive a fax by picking up the handset of the external telephone and then pressing the remote receive code
(see "Available Fax Settings Options"). You can also receive a fax by tapping Manual Receive in On Hook.
To receive a fax by tapping Manual Receive:
1
When the external telephone rings, pick up the handset and check for the fax tone.
2
After you hear the fax tone, press the
(Home)
button.
3
Ta p
Fax
.
4
Ta p
On Hook
.
5
Ta p
Receive
.
6
Hang up the hand set of the external telephone.
The printer begins receiving a fax and returns to the standby mode when the reception is completed.
Receiving a Fax Automatically in the Telephone / Fax or Ans Machine/Fax
To use the Telephone / Fax or Ans Machine/Fax mode, you must connect an external telephone to the
phone connector ( ) on the rear of your printer.
If the caller leaves a message, the answering machine stores the message as it would normally. If your printer hears a
fax tone on the line, it automatically starts to receive a fax.
For details on Telephone / Fax or Ans Machine/Fax mode, see "Available Fax Settings Options."
NOTE:
If you have set your printer to
Ans Machine/Fax
and your answering machine is switched off, or no answering
machine is connected to your printer, your printer will automatically go into the
Fax
mode after a predefined time.
Receiving a Fax Manually Using an External Telephone (Remote Receive)
You can manually receive a fax from the external telephone without having to go to the printer.
To manually receive a fax using the external telephone, you must connect an external telephone to the phone
connector ( ) on the rear of your printer and also set Remote Receive to On.
When you receive a call on the external telephone and hear a fax tone, enter the two-digit code from the external
telephone.
The printer receives the document.
When entering the remote receive code from the external telephone, press the number keys slowly in sequence. If
you still hear the fax tone from the remote machine, try entering the two-digit code once again.
The default remote receive code is 00. You can change the two-digit code to whatever you choose. For details on
changing the code, see "Available Fax Settings Options."
NOTE:
Set the dialing system of your external telephone to DTMF.

356
Faxing
Receiving Faxes Using the DRPD
The DRPD is a telephone company service which enables a user to use a single telephone line to answer several
different telephone numbers. The particular number someone uses to call you on is identified by different ringing
patterns, which consist of various combinations of long and short ringing sounds.
Before using the Distinctive Ring Pattern Detection option, Distinctive Ring service must be installed on your
telephone line by the telephone company. To set up Distinctive Ring Pattern Detection, you will need another
telephone line at your location, or someone available to dial your fax number from outside.
To set up the DRP D:
1
Press the
(Information)
button.
2
Ta p t h e
Tools
tab, and then tap
Admin Settings
.
3
Ta p
Fax Settings
.
4
Ta p
Fax Line Settings
.
5
Ta p u n t il
DRPD Pattern
appears, and then tap
DRPD Pattern
.
6
Tap the desired pattern, and then tap
OK
.
7
Turn off the printer, and turn it on again to apply the settings.
To receive faxes in the DRPD, you need to set the menu to DRPD. For details, see "Available Fax Settings
Options."
Your printer provides seven DRPD patterns. If this service is available from your telephone company, ask your
telephone company which pattern you need to select to use this service.
Receiving Faxes in the Memory
Since your printer is a multi-tasking device, it can receive faxes while you are making copies or printing. If you
receive a fax while you are copying, printing, or run out of paper or toner, your printer stores incoming faxes in the
memory. Then, as soon as you finish copying, printing, or re-supply the consumables, the printer automatically prints
the fax.
Polling Receive
You can receive faxes from the remote fax machine when you want to receive it.
1
Press the
(Home)
button.
2
Ta p
Fax
.
3
Ta p
On Hook
.
4
Ta p
Polling
.
5
Enter the fax number of the remote machine using the number pad.
6
Ta p
Receive
to begin receiving the fax.
Automatic Dialing
Speed Dialing
You can store up to 200 frequently dialed numbers in speed dial locations (001–200).
When the speed dial job specified in the delayed fax or redial exists, you cannot change the speed dial number from
the operator panel or Dell Printer Configuration Web Tool.

Faxing
357
Setting Speed Dial
1
Press the
(Information)
button.
2
Ta p t h e
Tools
tab, and then tap
Admin Settings
.
3
Ta p
Phone Book
.
4
Ta p
Individuals
.
5
Tap until the desired speed dial number between 1 and 200 appears and then select that number.
To jump to a specific speed dial number, enter the desired number and then # using the number pad.
6
Ta p t h e
Enter Name
text box.
7
Enter the name, and then tap
OK
.
8
Ta p t h e
Enter Number
text box.
9
Enter the fax number using the number pad, and then tap
OK
.
To insert a pause between numbers, press the
(Redial/Pause)
button.
"-" appears on the display.
10
Ta p
OK
.
To store more fax numbers, repeat steps 5 to 10.
Sending a Fax Using Speed Dial
1
Load the document(s) facing up with top edge in first into the DADF.
OR
Place a single document facing down on the document glass, and close the document cover.
For details about loading a document, see "Loading an Original Document."
2
Press the
(Home)
button.
3
Ta p
Fax
.
4
Ta p
Speed Dial
.
5
Enter the speed dial number between 1 and 200 using the number pad, and then tap
Done
.
6
Adjust the document resolution to suit your fax needs. (For details, see "Adjusting the Document Resolution." For
adjusting the contrast, see "Adjusting the Document Contrast.")
7
Ta p
Send
to scan data.
When the document is loaded on the document glass, the display prompts you for another page.
If you want to place a new document, replace the document with a new document, and then tap
Continue
.
When you have finished loading documents, tap
Send Now
.
The fax number stored in the speed dial location is automatically dialed. The document is sent when the remote
fax machine answers.
NOTE:
Using the asterisk (*) in the first digit, you can send a document to multiple locations. For example, if you enter 00*,
you can send a document to the locations registered between 001 and 009.

358
Faxing
Group Dialing
If you frequently send the same document to several destinations, you can create a group of these destinations and
set them under a one-digit group dial location. This enables you to use a group dial number setting to send the same
document to all the destinations in the group.
NOTE:
You cannot include one group dial number within another group dial number.
Setting Group Dial
1
Press the
(Information)
button.
2
Ta p t h e
Tools
tab, and then tap
Admin Settings
.
3
Ta p
Phone Book
.
4
Ta p
Groups
.
5
Tap until the desired group dial number between 1 and 6 appears and then select that group dial number.
If a speed dial number is already stored in the location you chose, the display shows the name and the number of
entries stored in that group dial number.
6
Ta p t h e
Enter Group Name
text box.
7
Enter the name, and then tap
OK
.
8
Ta p
Add from Phone Book
.
NOTE:
The fax number needs to be registered before you can select
Add from Phone Book
.
9
Tap until the desired speed dial number appears and then select that speed dial number.
10
Ta p
OK
.
To store more group dial numbers, repeat steps 5 to 10.
Editing Group Dial
You can delete a specific speed dial number from a selected group or add a new number to the selected group.
1
Press the
(Information)
button.
2
Ta p t h e
Tools
tab, and then tap
Admin Settings
.
3
Ta p
Phone Book
.
4
Ta p
Groups
.
5
Tap until the group dial number that you want to edit appears, and then select that group dial number.
6
Ta p
Edit
.
7
Tap the group name text box.
8
Enter a new name, and then tap
OK
.
9
To delete a speed dial number from the group dial number:
a
Tap until the speed dial number that you want to edit appears, and then select that speed dial number.
b
Ta p
Remove
.
10
To add a new speed dial number to the group dial number:
a
Ta p
Add from Phone Book
.
b
Tap until the desired speed dial number appears and then select that speed dial number.
c
Ta p
OK
.

Faxing
359
11
Ta p
OK
.
To delete an existing group dial number, select the group dial number, and then tap
Remove
.
If you want to edit another group dial number, repeat steps 5 to 11.
Sending a Fax Using Group Dial (Multi-address Transmission)
You can use group dialing for Broadcasting or Delayed transmissions.
Follow the procedure of the desired operation. (For Delayed transmission, see "Specifying the Fax Settings
Options.")
You can use one or more group numbers in one operation. Then continue the procedure to complete the desired
operation.
Your printer automatically scans the document loaded in the DADF or on the document glass into the memory. The
printer dials each of the numbers included in the group.
Printing a Speed Dial List
You can check your automatic dial setting by printing a Speed Dial list.
For details about how to print a Speed Dial list, see "Report / List."
Phone Book
You can select or search the registered phone numbers from the phone books.
1
Load the document(s) facing up with top edge in first into the DADF.
OR
Place a single document facing down on the document glass, and close the document cover.
For details about loading a document, see "Loading an Original Document."
2
Press the
(Home)
button.
3
Ta p
Fax
.
4
Ta p
Phone Book
, and then select one of the following:
To select from the local phone book:
a
Ta p
Individuals
or
Groups
.
b
Swipe the screen until the desired speed dial number or the group dial number appears, and then select that
speed dial number or group dial number.
c
Ta p
Done
.
To search from the server phone book:
a
Ta p
Network Phone Book
.
b
Enter a keyword using the keyboard, and then tap
Search
.
c
Tap a recipient from the search result, and then tap
Done
.
NOTE:
For more information on address book and server address book, see "Address Books."
NOTE:
For details about
Network Phone Book
, see "Using the Server Address Book and Server Phone Book."
NOTE:
A fax number needs to be registered before you can select an address book.
5
Ta p
Send
to send the fax.

360
Faxing
Other Ways to Fax
Using the Secure Receiving Mode
You may need to prevent your received faxes from being accessed by unauthorized people. You can turn on the secure
fax mode using the Secure Receive option to restrict printing out all of the received faxes when the printer is
unattended. In the secure fax mode, all incoming faxes will go in memory. When the mode is turned off, all stored
faxes will be printed.
NOTE:
Before operation, ensure Panel Lock is enabled.
To turn the secure receiving mode on:
1
Press the
(Information)
button.
2
Ta p t h e
Tools
tab, and then tap
Admin Settings
.
3
Ta p
Fax Settings
.
4
Ta p
Incoming Defaults
.
5
Ta p u n t il
Secure Receive
appears, and then tap
Secure Receive
.
6
Ta p
Secure Receive Set
.
7
Ta p
Enable
.
8
Enter a four-digit password, and then tap
OK
.
When a fax is received in the secure receiving mode, your printer stores it into memory and
Secure Fax
Receive
is enabled on the
Job Status
screen to let you know that there is a fax stored.
To prin t re ceived documents:
1
Press the
(Home)
button.
2
Ta p
Print
.
3
Swipe the screen until
Secure Fax Receive
appears, and then tap
Secure Fax Receive
.
4
Enter a four-digit password, and then tap
OK
.
The faxes stored in memory are printed.
To turn the secure receiving mode off:
1
Follow the same steps from 1 to 6 in "To turn the secure receiving mode on:" and tap
Secure Receive Set
.
2
Ta p
Disable
.
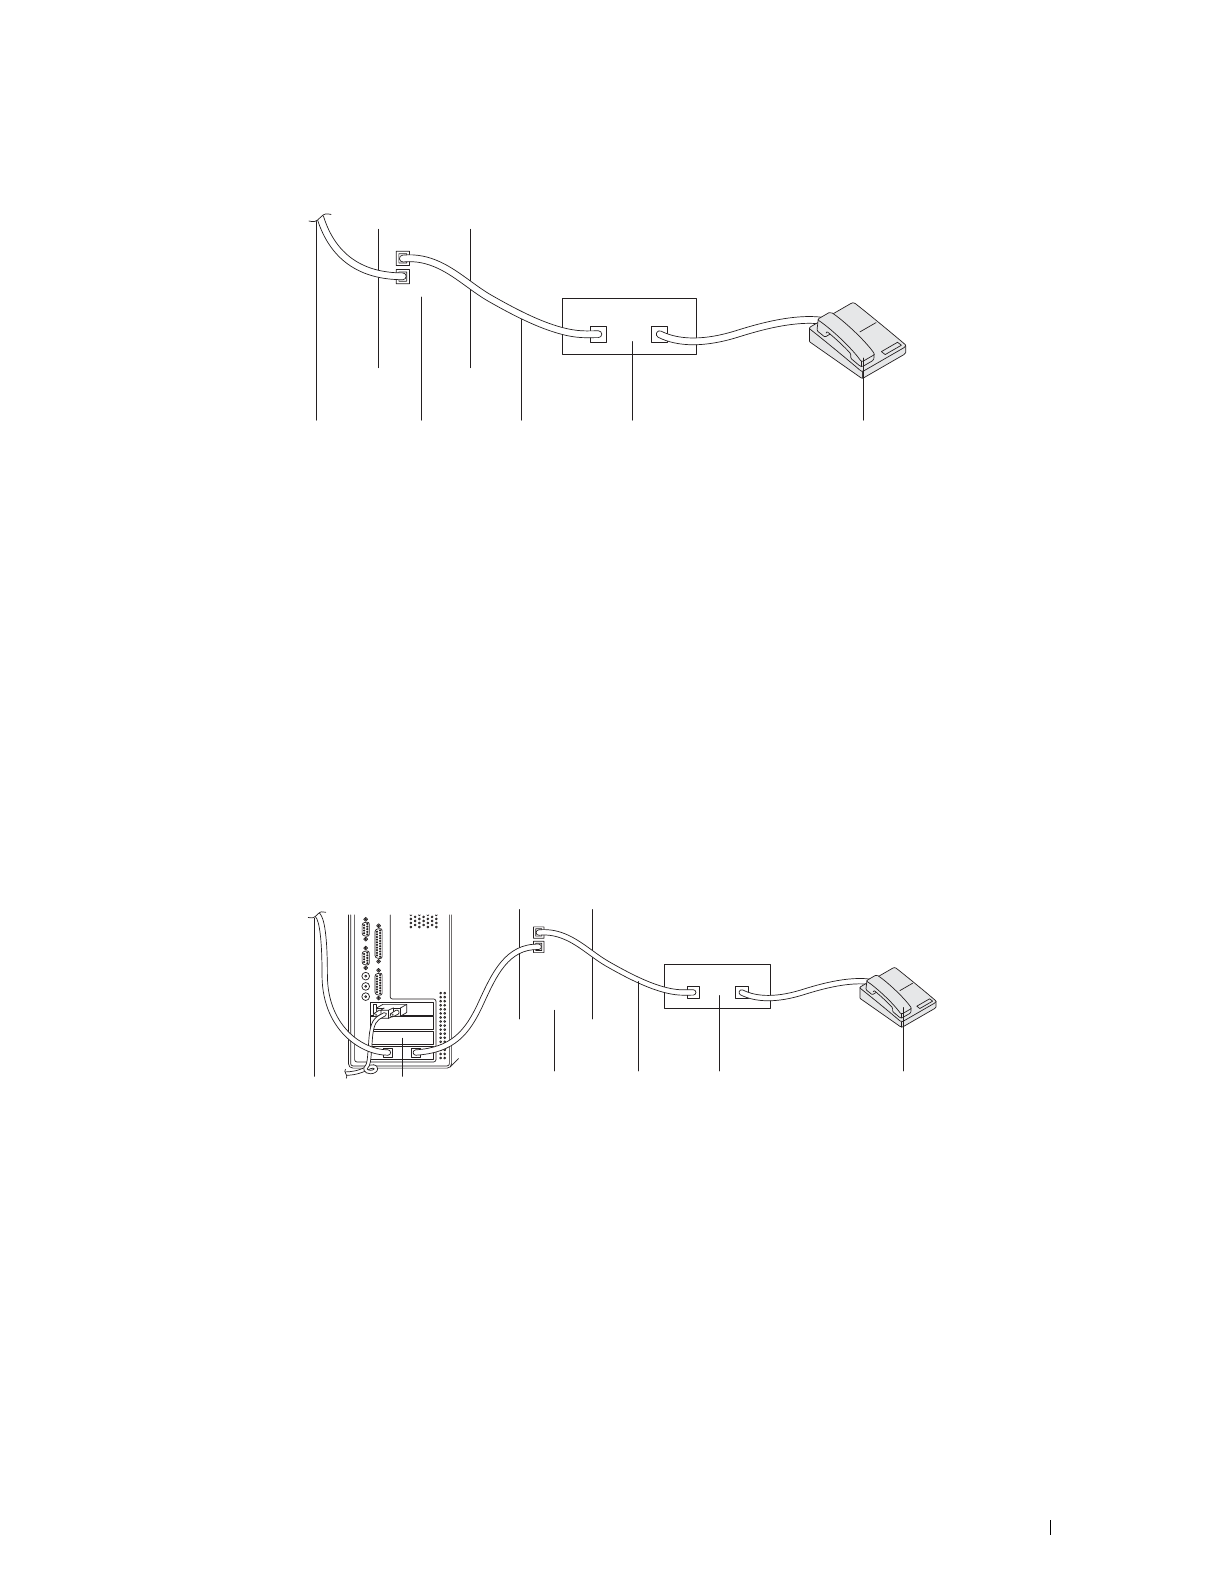
Faxing
361
Using an Answering Machine
You can connect a telephone answering device (TAD) directly to the rear of your printer as shown above.
• Set your printer to the
Ans Machine/Fax
and set
Auto Receive Ans/Fax
to specify the time for the
TAD.
• When the TAD picks up the call, the printer monitors and takes the line if fax tones are received and then starts
receiving the fax.
• If the answering device is off, the printer automatically goes into the
Fax
after the ring tone sounds for a
predefined time.
• If you answer the call and hear fax tones, the printer will answer the fax call if you
Set
On Hook
to
On
(you can hear voice or fax tones from the remote machine), and then tap
Receive
and hang
up the receiver.
OR
Press the two-digit remote receive code and hang up the receiver.
Using a Computer Modem
If you want to use your computer modem for faxing or for a dial-up Internet connection, connect the computer
modem directly to the rear of your printer with the TAD as shown above.
• Set your printer to the
Ans Machine/Fax
and set
Auto Receive Ans/Fax
to specify the time for the
TAD.
• Turn off the computer modem's fax-receive feature.
• Do not use the computer modem if your printer is sending or receiving a fax.
• Follow the instructions provided with your computer modem and fax application to fax via the computer modem.
To the
wall jack
Printer Line Telephone
Answering Device
Phone
To the
Internet
Computer Line Telephone
Answering Device
PhonePrinter
362
Faxing
Printing a Report
The following reports may be useful when using fax:
NOTE:
For more information about other reports and how to print a report, see "Report / List."
Changing Setting Options
1
Press the
(Information)
button.
2
Ta p t h e
Tools
tab, and then tap
Default Settings
.
3
Ta p
Fax Defaults
.
4
Select the desired menu.
5
Select the desired setting or enter the value using the number pad, and then tap
OK
.
Speed Dial
This list shows all the numbers currently stored in the memory of your printer as speed dial
numbers.
Address Book
This list shows all the addresses currently stored in the printer's memory as Address Book
information.
Server Address
This list shows all of the numbers currently stored in the printer's memory as Server Address
information.
Fax Activity
This report shows information about the faxes you recently received or sent.
Fax Pending
This list shows the status of pending faxes.
Print Meter
This report shows the total number of pages printed. The report will be titled Print Volume
Report or AccessControl Report, depending on the
AccessControl Mode
setting.
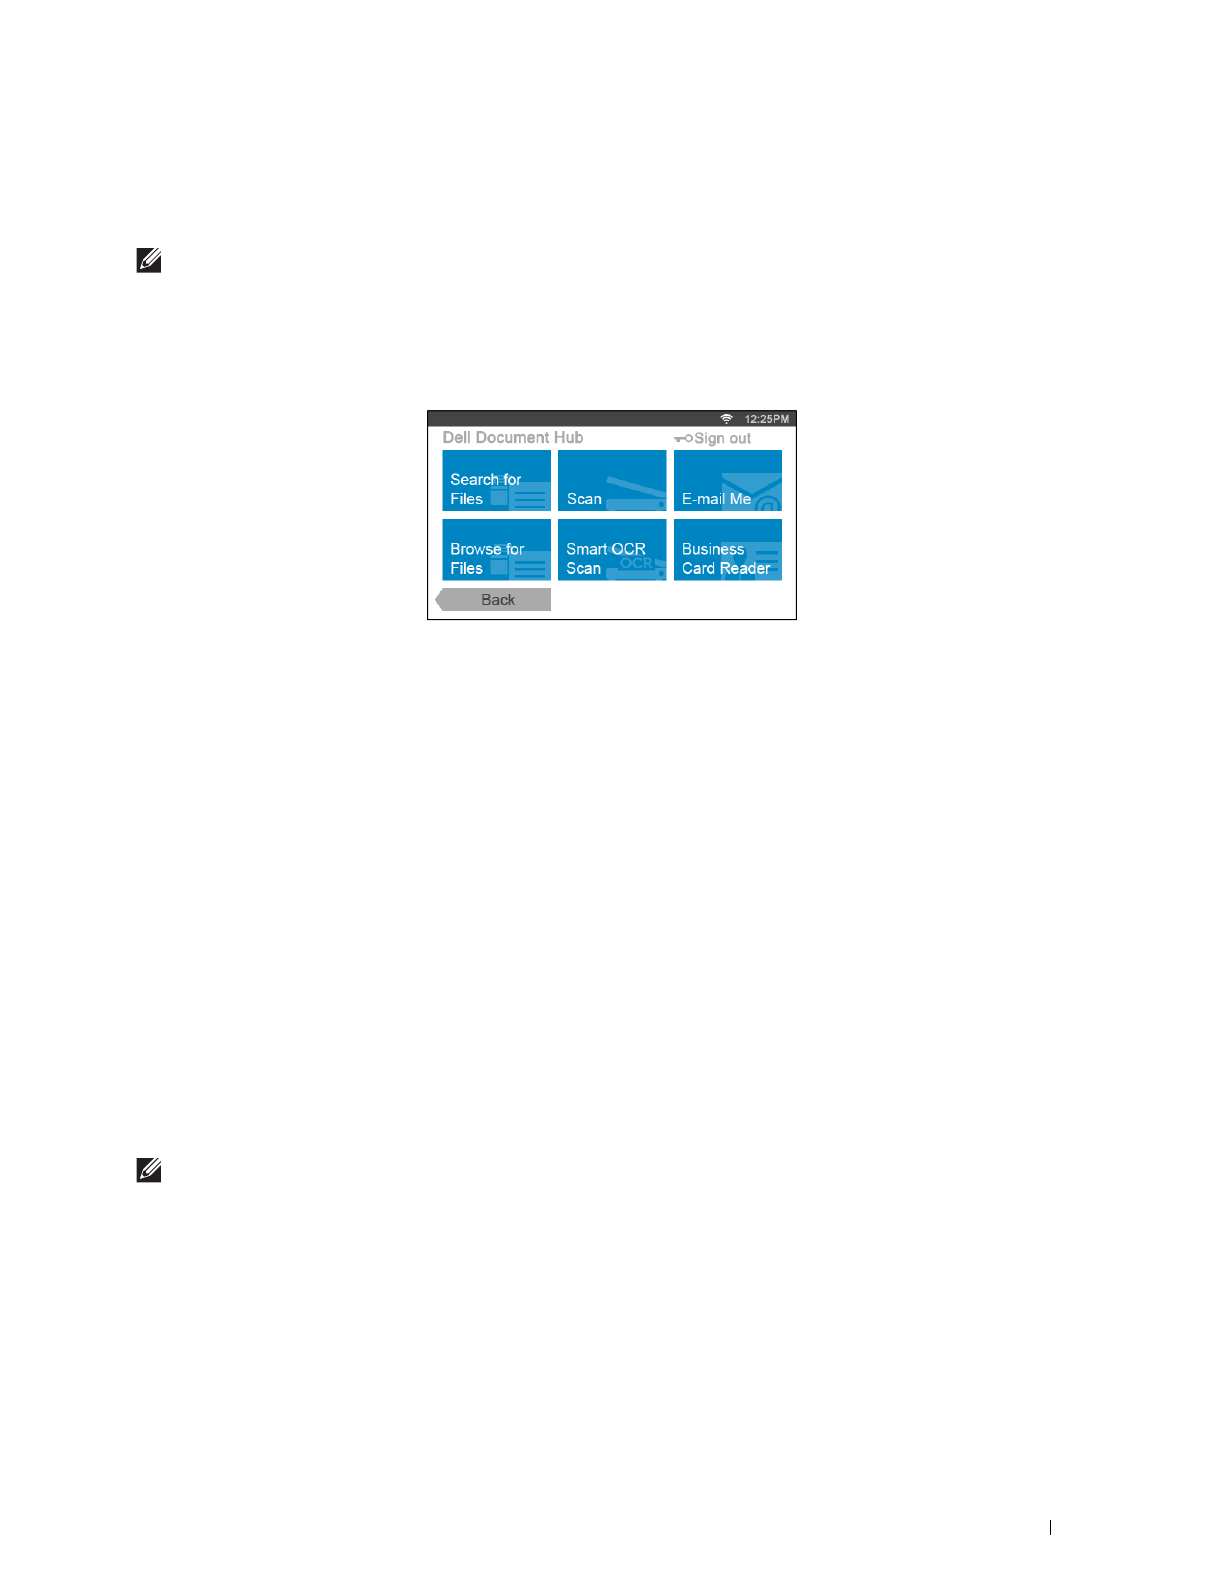
Dell™ Document Hub
363
22
Dell™ Document Hub
NOTE:
The Dell Document Hub feature is available on the Dell Cloud Multifunction Printer | H815dw only.
The Dell Document Hub is a convenient one-stop gateway to a variety of cloud services to help you manage your
documents. With the Dell Document Hub, you can convert hard copy documents into editable digital content and
store them directly in your preferred cloud storage service. You can search for files across multiple clouds
simultaneously and then share and print content easily.
Registering the User and Signing In to the Dell Document Hub
To use the Dell Document Hub, you need a user account registered to the printer, and sign in to the Dell Document
Hub.
Registering a New User to the Dell Document Hub
Prepare the access information required for each of the cloud services you want to use, and make sure that you have
a user account registered to the printer. For more information on registering an account, see "Creating a New User
Account."
1
Access the Dell Document Hub website from your computer.
Enter the following URL in the web browser:
www.dell.com/dochub
2
Follow the instructions displayed on the screen.
3
An e-mail will be soon sent to the registered e-mail address. Check the e-mail and follow the instructions on the e-
mail to activate.
To Register a New User From the Printer
You can start the user registration alternatively using the printer.
NOTE:
To complete the registration process, you will need to use your computer or mobile device to receive an e-mail and
access the Dell Document Hub website.
1
Log in to the printer as a registered user.
2
Ta p t h e
Dell Document Hub
tile in the
Home
screen.
3
Ta p
New User
.
The
Welcome to Dell Document Hub
screen is displayed. Tap
Next
.
4
Follow the instructions displayed in the touch panel.
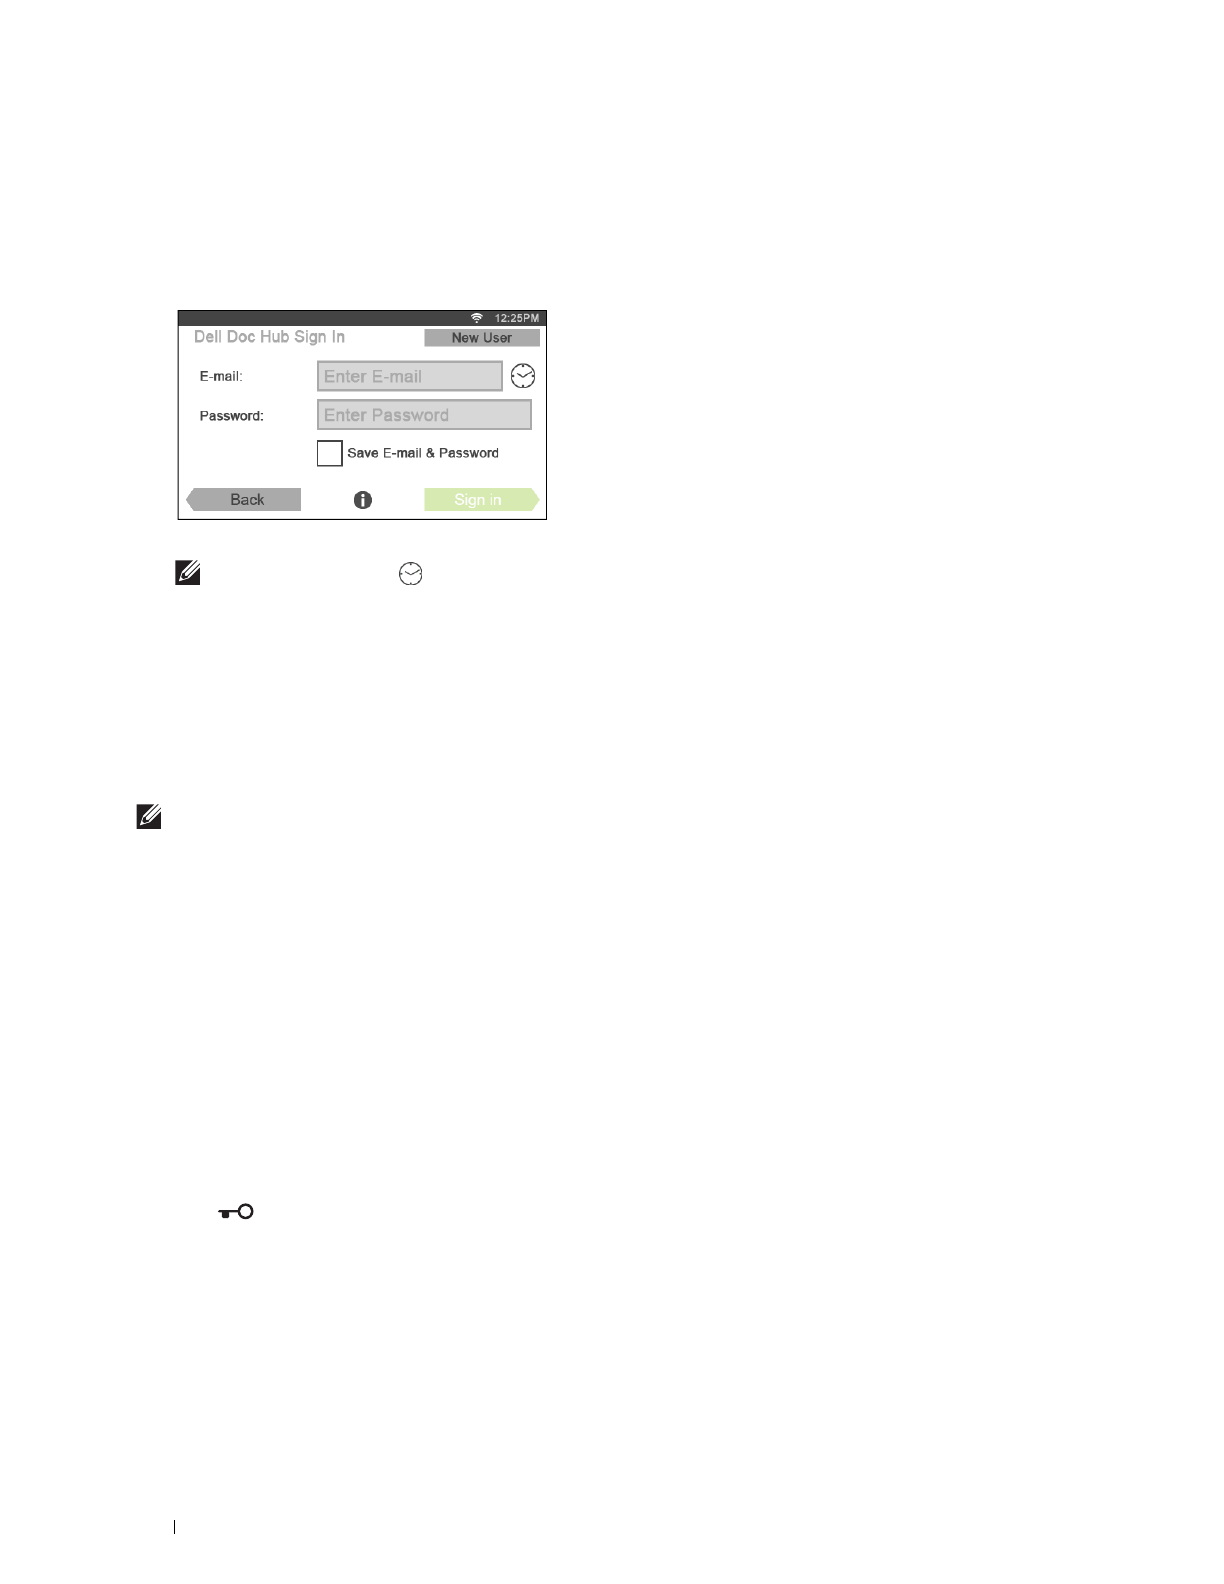
364
Dell™ Document Hub
Signing In to the Dell Document Hub
1
Log in to the printer as a registered user.
2
Ta p t h e
Dell Document Hub
tile in the
Home
screen.
The
Dell Doc Hub Sign In
screen is displayed.
3
Ta p t h e
E-mail
text box to enter the e-mail address.
NOTE:
You can also tap to select a recently entered e-mail address from a list. The list can contain up to eight
recently entered e-mail addresses.
4
Ta p t h e
Password
text box to enter the password, and tap
Done
.
5
If you want to save your e-mail address and password, tap to check the
Save E-mail & Password
check box.
The e-mail and password are stored under the registered user's account and unauthorized user will not be able to
access them. For security purpose, it is recommended that you set a password for registered user.
6
Ta p
Sign in
.
When the
Dell Document Hub
screen is displayed, signing in is successful.
NOTE:
If all the tiles on the Dell Document Hub screen are pale and disabled when you sign in, you have not completed the
necessary procedures to activate your account of the Dell Document Hub. Check the e-mail you received from the Dell
Document Hub, and activate your account.
When the Favorite List Screen is Displayed When You Tap the Tile on the Dell Document Hub Screen
This means that your favorite settings for the function have been saved on the printer. Select settings from the list as
desired.
Returning to the Home Screen
Ta p Back. The sign-in status is maintained. Next time you tap the Dell Document Hub tile on the Home
screen, you do not have to sign in while you are logged in to the Home screen.
You can tap Sign out as well to return to the Home screen, but the sign-in status is not maintained. Next time you
sign in to the Dell Document Hub, you need to reenter your e-mail address and password.
Logging Out From the Printer
Press the (Login/Logout) button. You will log out from the Home screen and the portal screen will be
displayed. In this case, the sign-in status to the Dell Document Hub is maintained as far as the Save E-mail &
Password check box option is selected in the step 5 above. Next time you tap the Dell Document Hub tile on
the Home screen, you can skip the sign in process.
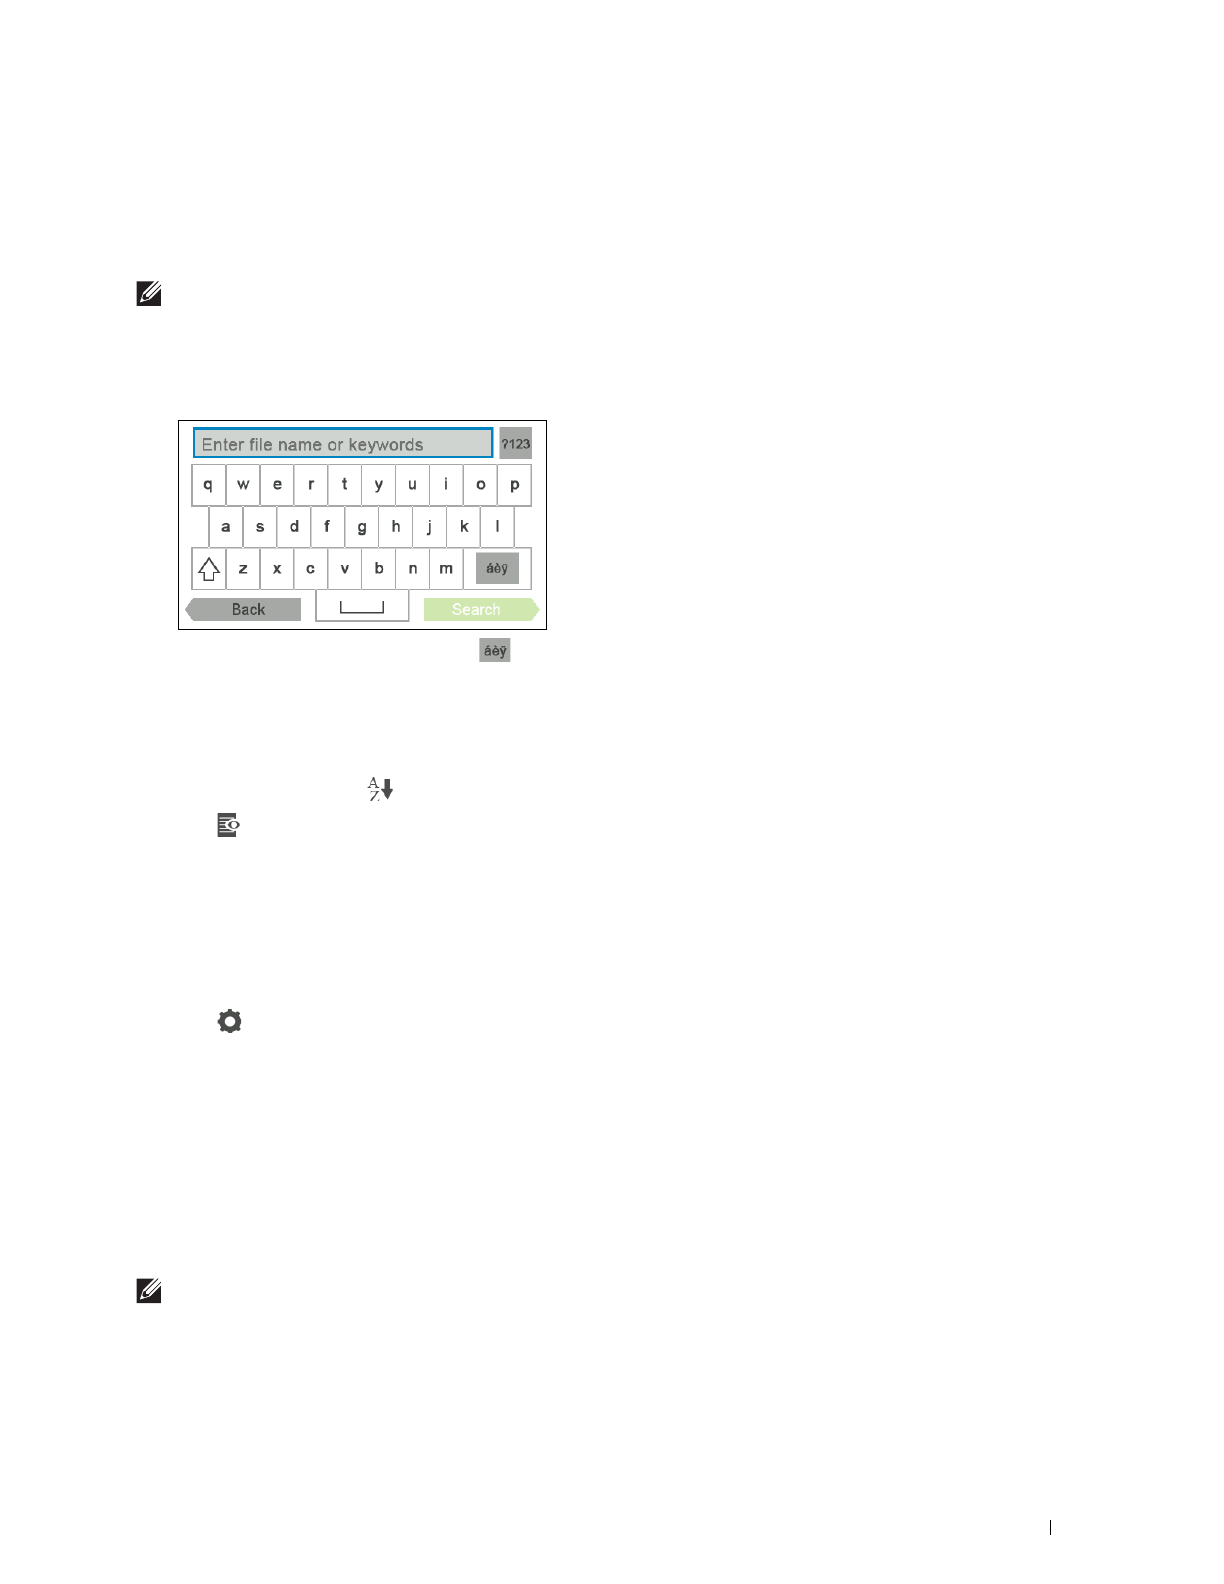
Dell™ Document Hub
365
Searching for and Printing Files
You can search for the files saved in the cloud services, and print them from the printer. You can search across
multiple cloud services at once. This method is suitable when you want to search by the keywords, including the file
name.
NOTE:
To search for files across multiple cloud services, you need to go to www.dell.com/dochub and connect the cloud
services with the Dell Document Hub.
1
Ta p t h e
Search for Files
tile in the
Dell Document Hub
screen.
2
Enter the keywords, and tap
Search
.
To enter the accented characters, tap to display the keyboard for those characters.
Files are searched across the cloud services you registered.
The
Search Results
screen is displayed.
3
Tap the files you want to print. You can select up to 10 files.
To sort the results, tap and select the sorting order.
4
Tap to preview the selected files.
The
File Preview
screen is displayed. The first three pages of each file are displayed in the small previews.
a
To show the page in the large preview, tap the page in the small previews.
b
To preview other files, flick the screen side to side.
c
To specify the file as the one to be printed, tap the rectangle beside the small previews to enter a check mark.
d
To return to the previous screen, tap
Back
.
5
Tap to check or change the print settings.
The
Print Settings
screen is displayed.
a
To show the other tiles, flick the screen side to side.
b
To return to the previous screen, tap
Back
.
For more information on the Print Settings, see "Print Settings."
6
Ta p
Print
to start printing.
To cancel printing, tap
Stop
.
When all the selected files are printed, the screen returns to the Search Results screen.
NOTE:
You can start printing by tapping
Print
in any screens of Search Results, File Preview or Print Settings.

366
Dell™ Document Hub
Browsing and Printing Files
You can browse and print the files saved in the selected cloud services. This method is suitable when you know which
cloud service the file you want to print is located in.
1
Ta p t h e
Browse for Files
tile in the
Dell Document Hub
screen.
The
Cloud Services
screen is displayed.
To scroll the list, flick the screen up or down.
The status of the cloud services can be confirmed by an icon on the right side of the names of each cloud service.
indicates that the cloud service is correctly associated with the Dell Document Hub.
indicates that the cloud service is not associated, or not linked correctly.
indicates that the cloud service link with the Dell Document Hub has expired.
To link the cloud service with the Dell Document Hub, go to
www.dell.com/dochub
.
For more information, tap the status icon.
2
Tap the cloud service you want to browse in.
The list of the contents stored in the selected cloud service is displayed.
3
Tap the location you want to browse in.
The contents in the selected location are listed.
4
Tap the files you want to print. You can select up to 10 files.
5
Tap to search the files in the current location.
a
Enter the file name or keywords, and tap
Search
.
The
Search Results
screen is displayed.
You can sort the results by tapping and selecting the sorting order.
b
To return to the previous screen, tap
Back
.
6
Tap to preview the selected files.
The
File Preview
screen is displayed. The first three pages of each file are displayed in the small previews.
a
To show the page in the large preview, tap the page in the small previews.
b
To preview other files, flick the screen side to side.
c
To specify the file as the one to be printed, tap the rectangle beside the small previews to enter a check mark.
d
To return to the previous screen, tap
Back
.
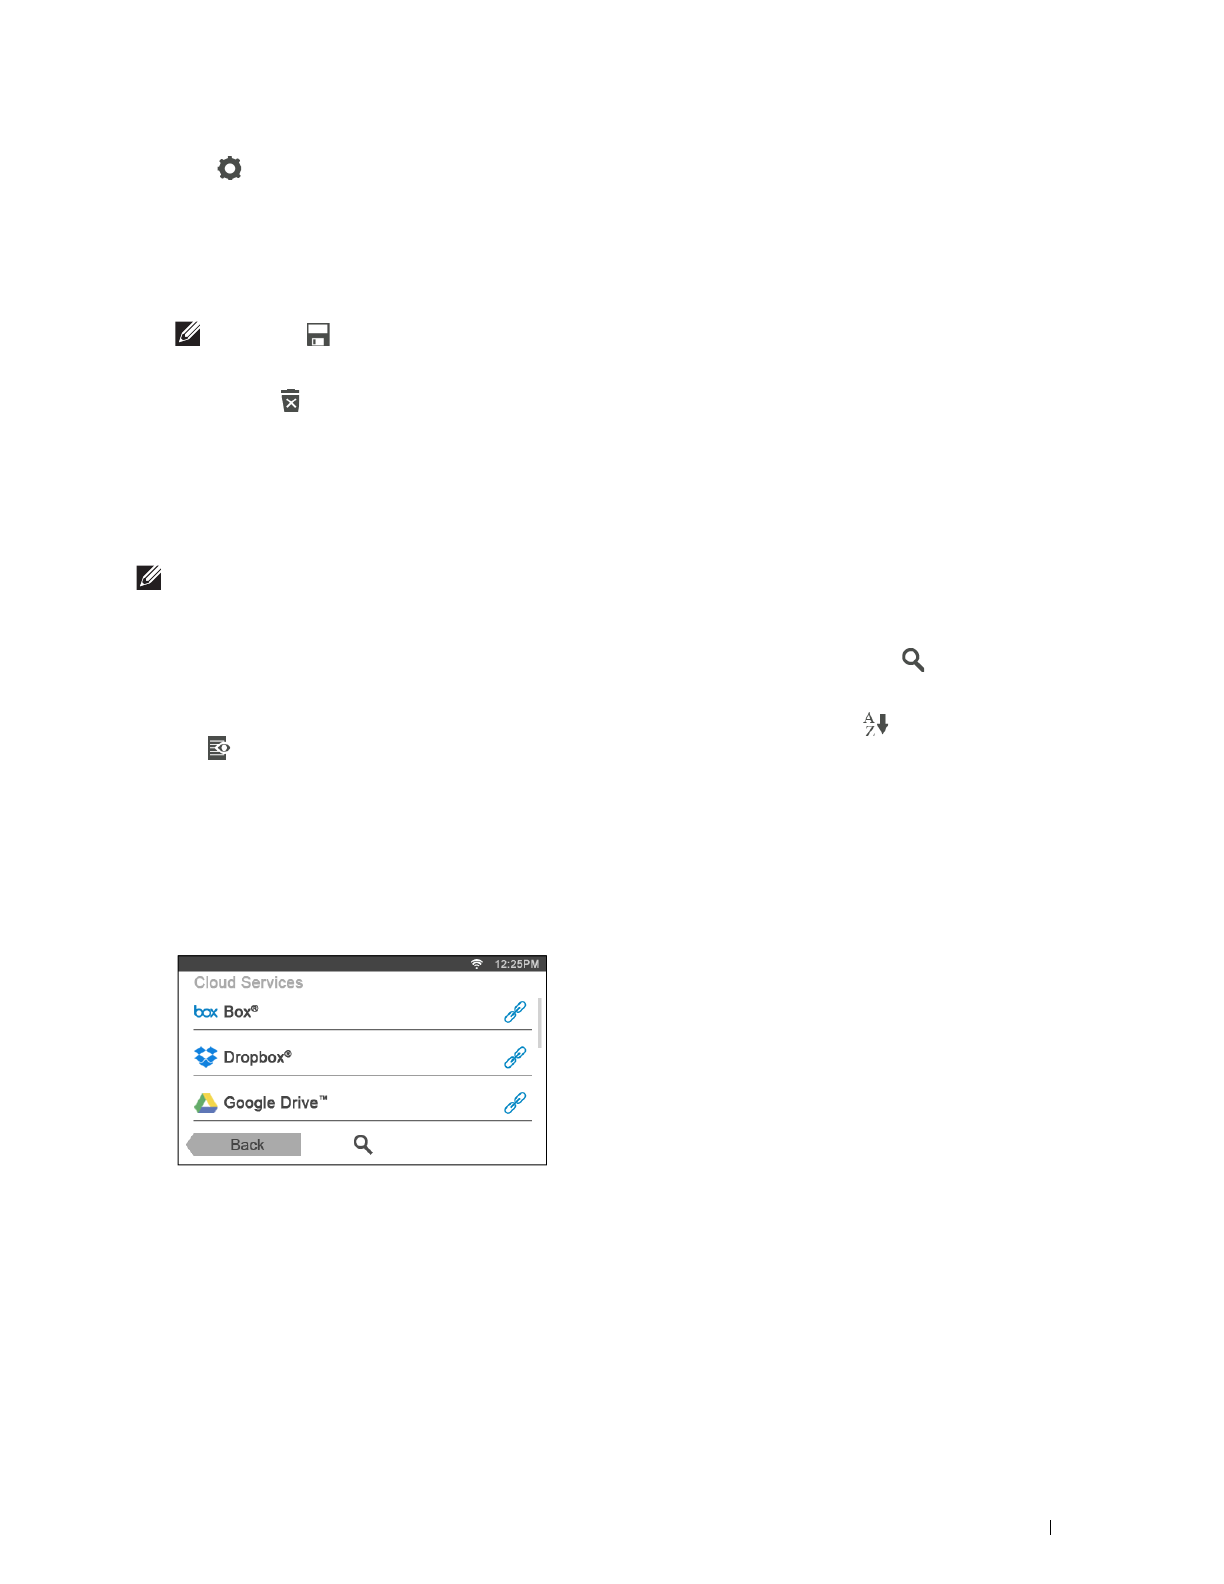
Dell™ Document Hub
367
7
Tap to check or change the print settings.
The
Print Settings
screen is displayed.
a
To show the other tiles, flick the screen side to side
b
To return to the previous screen, tap
Back
.
For more information on the Print Settings, see "Print Settings."
NOTE:
Tap in the Print Settings screen, and you can save your print settings and file path to the cloud service as a
favorite. Name your favorite in the Save Favorite screen, and tap
Save
. If you are saving the favorite in the same name
with the existing favorite, the settings and the file path will be overwritten. You can delete the unnecessary favorite by
tapping .
Once you save your settings as a favorite, you can recall those settings the next time you sign in to the Dell Document Hub
from any printers of the same model.
8
Ta p
Print
to start printing.
To cancel printing, tap
Stop
.
When all the selected files are printed, the screen to show the selected location returns.
NOTE:
You can start printing by tapping
Print
in any screens of contents list, Search Results, File Preview or Print Settings.
Searching for the Files in the Selected Cloud Service
After you select the cloud service in the step 2 above, you can search for the files by tapping .
Enter the file name or keywords, and tap Search.
You can select the files to print in the Search Results screen, sort the results by tapping , or preview the files by
tapping .
Scanning
You can scan the document and save the scanned file in the cloud service.
1
Ta p t h e
Scan
tile in the
Dell Document Hub
screen.
The
Cloud Services
screen is displayed.
To scroll the list, flick the screen up or down.
The status of the cloud services can be confirmed by an icon on the right side of the names of each cloud service.
For more information, tap the status icon.
2
Tap the destination cloud service you want to save the scanned file to.
The list of the contents stored in the selected cloud service is displayed.
3
Tap the location you want to save the scanned file to.
The screen to show the selected location is displayed.

368
Dell™ Document Hub
4
Ta p
Next
.
The screen to specify the file name and the file format is displayed.
5
Ta p t h e
File Name
text box, and enter the file name.
6
Ta p t h e
File Format
box, and specify the file format to save the scanned file.
7
Tap to check or change the scan settings.
The
Scan Settings
screen is displayed.
a
To show the other tiles, flick the screen side to side.
b
To return to the previous screen, tap
Back
.
For more information on the Scan Settings, see "Scan" and "Scan Settings."
NOTE:
Tap in the Scan Settings screen, and you can save your scan settings and file path to the cloud service as a
favorite. Name your favorite in the Save Favorite screen, and tap
Save
. If you are saving the favorite in the same name
with the existing favorite, the settings and the file path will be overwritten. You can delete the unnecessary favorite by
tapping .
Once you save your settings as a favorite, you can recall those settings the next time you sign in to the Dell Document Hub
from any printers of the same model.
8
Ta p
Scan
to start scanning.
To cancel scanning, tap
Stop
.
When the scanning is completed, the screen to show the selected location returns.
Searching for the Location Across the Cloud Services
Before you select the cloud service in the step 2 above, you can search for the location you want to save the scanned
file across the cloud services by tapping .
Enter the keywords, and tap Search.
You can select the location to save the scanned file in the Search Results screen.
You can sort the results by tapping .
Searching for the Location in the Selected Cloud Service
Before you select the location in the step 3 above, you can search for the location in the selected cloud service by
tapping .
Enter the keywords, and tap Search.
You can select the location to save the scanned file in the Search Results screen.
You can sort the results by tapping .
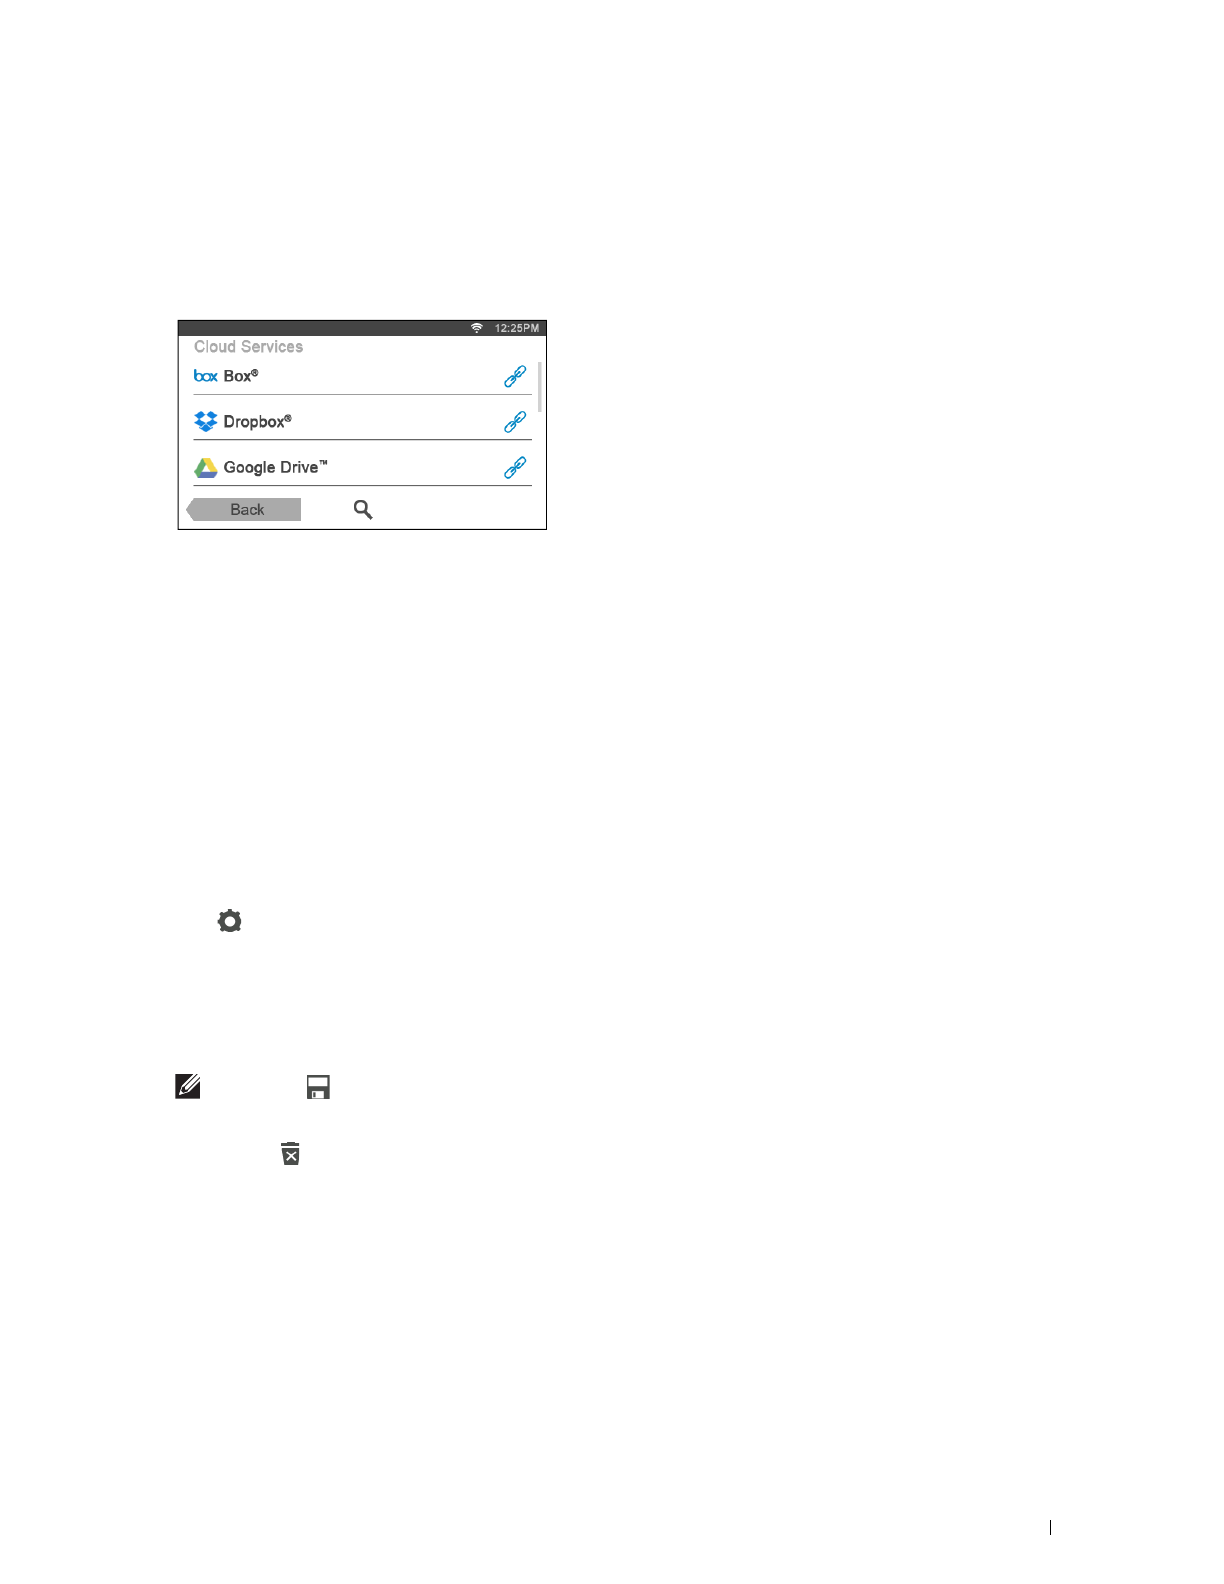
Dell™ Document Hub
369
Scanning the Document Using Optical Character Recognition (OCR)
You can scan the document using OCR, and save it in the cloud service.
1
Ta p t h e
Smart OCR Scan
tile in the
Dell Document Hub
screen.
The
Cloud Services
screen is displayed.
To scroll the list, flick the screen up or down.
The status of the cloud services can be confirmed by an icon on the right side of the names of each cloud service.
For more information, tap the status icon.
2
Tap the destination cloud service you want to save the converted file to.
The list of the contents stored in the selected cloud service is displayed.
3
Tap the location you want to save the converted file to.
The screen to show the selected location is displayed.
4
Ta p
Next
.
The screen to specify the file name and the file format is displayed.
5
Ta p t h e
File Name
text box, and enter the file name.
6
Ta p t h e
File Format
box, and specify the file format to save the converted file.
7
Tap to check or change the OCR scan settings.
The
Scan Settings
screen is displayed.
a
To show the other tiles, flick the screen side to side.
b
To return to the previous screen, tap
Back
.
For more information on the Scan Settings, see "Smart OCR Scan" and "Scan Settings."
NOTE:
Tap in the Scan Settings screen, and you can save your scan settings and file path to the cloud service as a
favorite. Name your favorite in the Save Favorite screen, and tap
Save
. If you are saving the favorite in the same name
with the existing favorite, the settings and the file path will be overwritten. You can delete the unnecessary favorite by
tapping .
Once you save your settings as a favorite, you can recall those settings the next time you sign in to the Dell Document Hub
from any printers of the same model.
8
Ta p
Scan
to start scanning using the OCR.
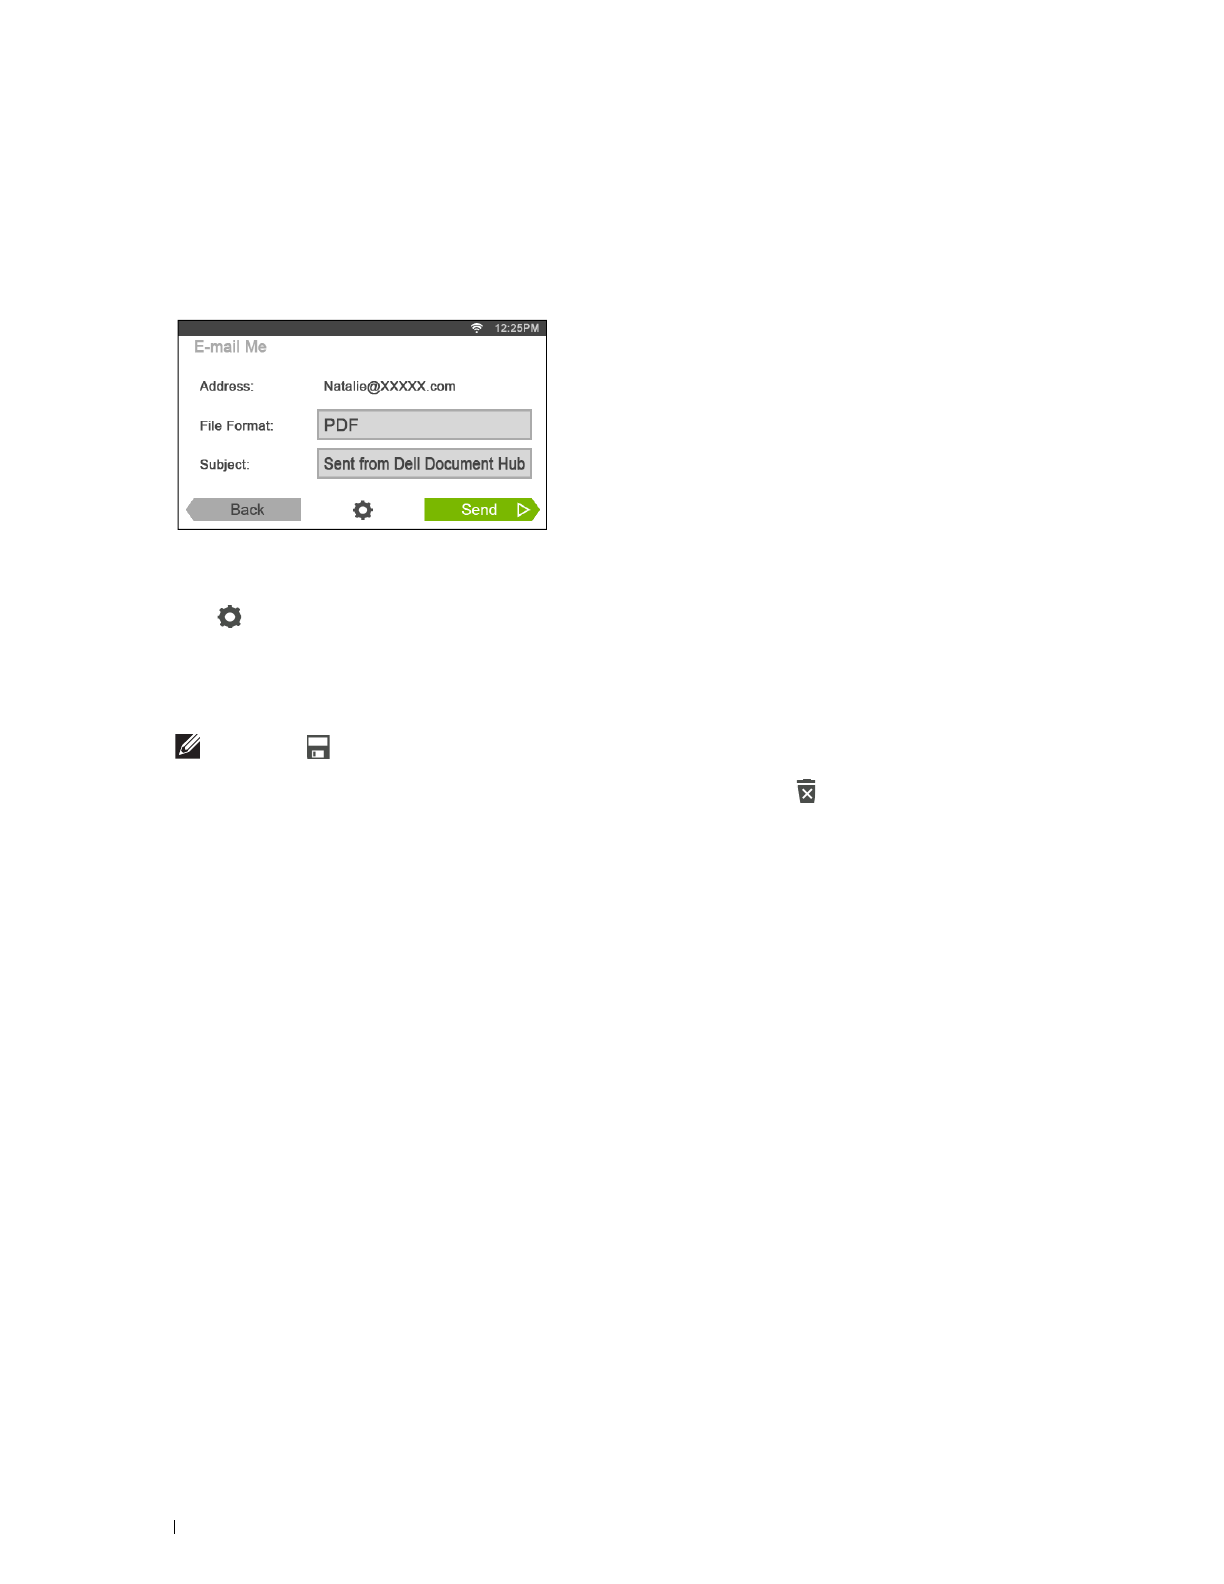
370
Dell™ Document Hub
Receiving the Scanned File as an E-Mail
The document can be scanned and sent to you as an attached file of an e-mail.
1
Ta p t h e
E-mail Me
tile in the
Dell Document Hub
screen.
The
E-mail Me
screen is displayed.
2
Ta p t h e
File Format
box, and specify the file format to save the scanned file in.
3
Ta p t h e
Subject
text box, and enter the subject of the mail sent with the scanned file.
4
Tap to check or change the e-mail settings.
a
To show the other tiles, flick the screen side to side.
b
To return to the previous screen, tap
Back
.
For more information on the E-mail Settings, see "E-mail Me" and "Scan Settings."
NOTE:
Tap in the E-mail Settings screen, and you can save your e-mail settings as a favorite. Name your favorite in
the Save Favorite screen, and tap Save. If you are saving the favorite in the same name with the existing favorite, the
settings will be overwritten. You can delete the unnecessary favorite by tapping .
Once you save your settings as a favorite, you can recall those settings the next time you sign in to the Dell Document Hub
from any printers of the same model.
5
Ta p
Send
to start scanning and sending the scanned file as an attached file of an e-mail.
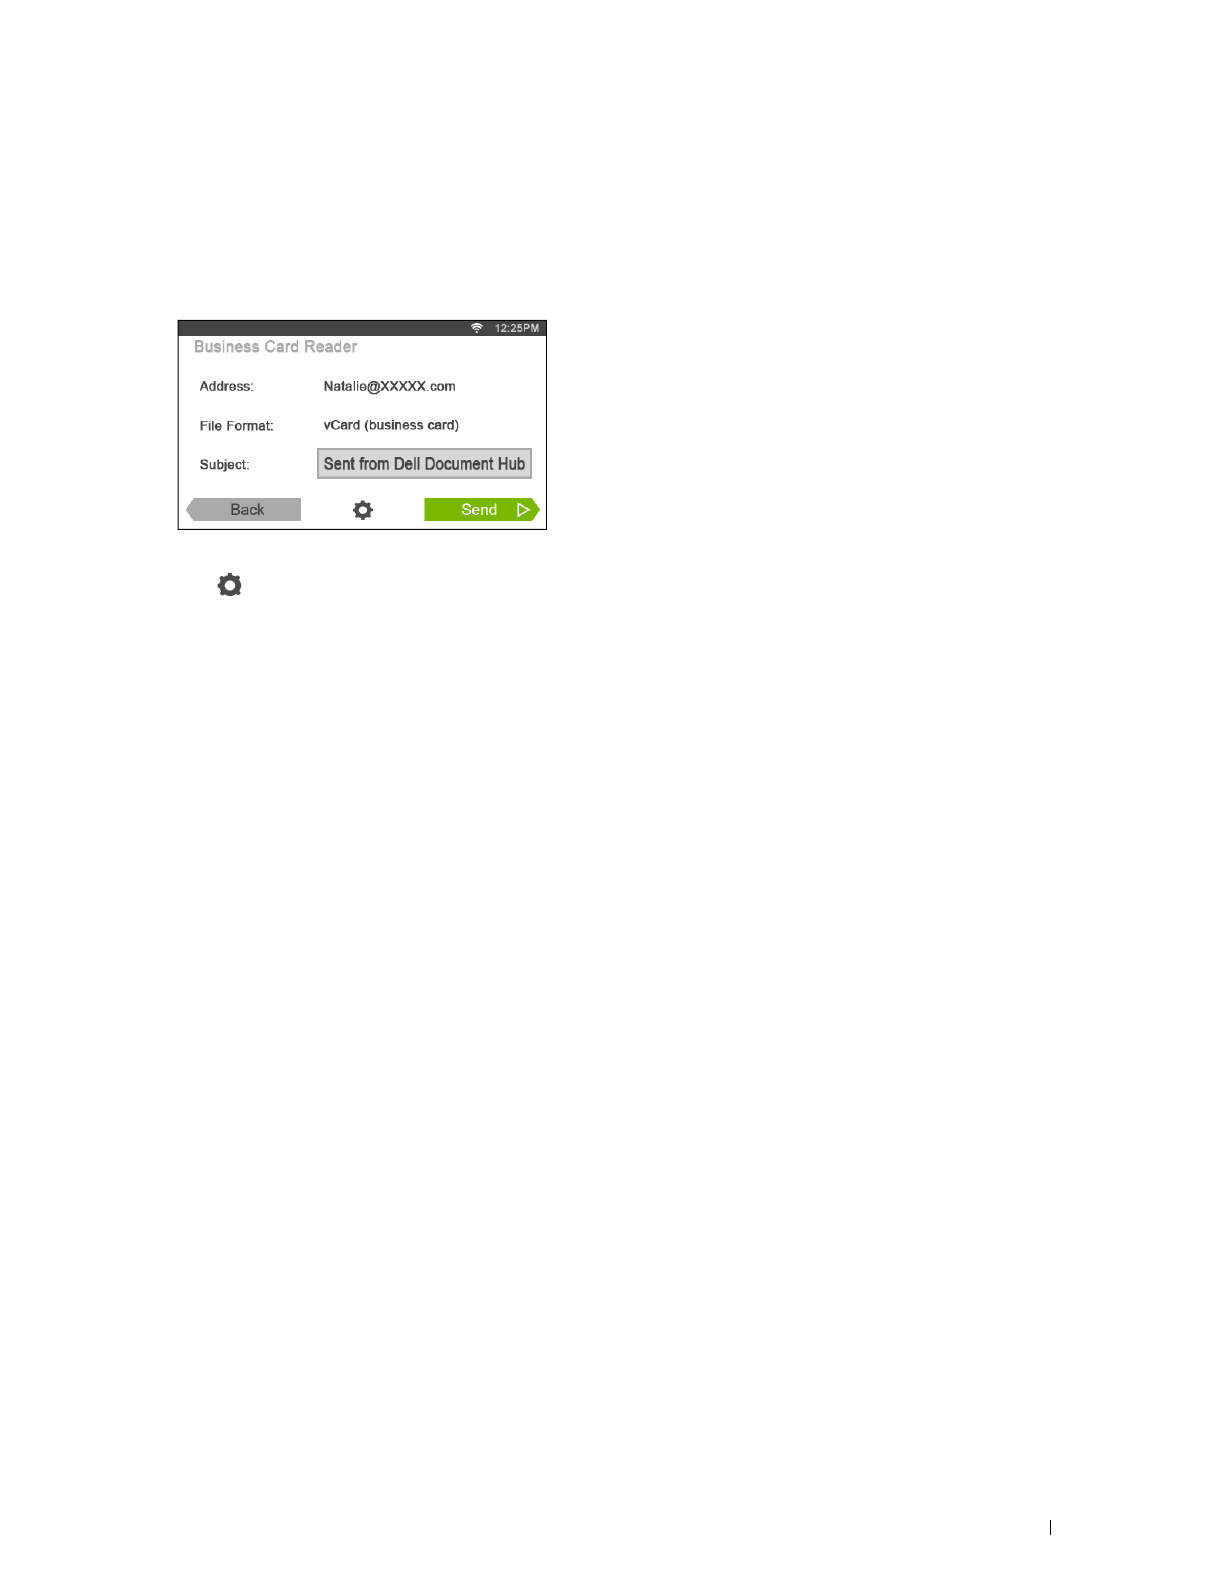
Dell™ Document Hub
371
Receiving the Scanned Image of the Business Card as an E-Mail
The business card can be scanned and converted to the vCard file, and sent to you as an attached file of an e-mail.
1
Ta p t h e
Business Card Reader
tile in the
Dell Document Hub
screen.
The
Business Card Reader
screen is displayed.
2
Ta p t h e
Subject
text box, and enter the subject of the e-mail sent with the vCard file.
3
Tap to check or change the scan settings.
a
Ta p t h e
OCR Language
tile to specify the language.
b
To return to the previous screen, tap
Back
.
4
Ta p
Send
to start scanning and sending the vCard file as an attached file of an e-mail.

372
Dell™ Document Hub

373
Know Your Printer
23 Understanding Your Printer Software ................................... 375
24 User Authentication.................................................................. 393
25 Tile Customization ..................................................................... 397
26 Using the Server Address Book and Server Phone Book ... 399
27 Using Digital Certificates ......................................................... 403
28 Understanding Printer Messages .......................................... 413
29 Specifications............................................................................ 423

374

Understanding Your Printer Software
375
23
Understanding Your Printer Software
Use the
Software and Documentation
disc that shipped with your printer to install a combination of software
programs, depending on your operating system.
NOTE:
The images used in this manual are those of the Dell™ Cloud Multifunction Printer | H815dw unless otherwise mentioned.
Printer Status Window
The Printer Status window alerts you when there is a warning or when an error occurs, for example, when a paper
jam occurs or toner is running low.
By default, the Printer Status window launches only when an error occurs. When an error occurs, the error message
appears on the Printer Status window. You can set the Printer Status window to always launch when printing in
Printing Status Window Properties.
You can also check toner level, quantity of paper remaining or the configuration of options for the printer.
Status Monitor Console
Use the Status Monitor Console to manage multiple instances of the Status Window for a particular printer.
Select a printer from the list view (or Printer Selection) by clicking its name to open a Status Window for a
particular printer.
Dell Supplies Management System
You can launch the Dell Supplies Management System dialog box from the All Programs menu or the desktop icon.
You can order consumables by phone or from the web.
1
Click
Start
All Programs
Dell Printers
Dell Cloud Multifunction Printer - H815dw
or
Dell Smart
Multifunction Printer - S2815dn
Dell Supplies Management System
.
The
Dell Supplies Management System
window appears.
2
Select your printer from the
Select Printer Model
list.
3
If you are ordering from the web:
a
Select a URL from the
Select Reorder URL
list.
b
Click
Visit Dell printer supplies ordering web site
.
NOTE:
When you cannot get information from the printer automatically by two-way communication, a window prompting
you to type the Service Tag appears. Type the Service Tag of your Dell printer in the field provided.
Your Service Tag is located inside the front cover of your printer.
4
If you order by phone, call the number that appears in the
Order by Phone
section.
User Setup Disk Creating Tool
The User Setup Disk Creating Tool program located in the MakeDisk folder of the Utilities folder on the
Software
and Documentation
disc and the printer drivers located on the
Software and Documentation
disc are used to create
driver installation packages that contain custom driver settings. A driver installation package can contain a group of
saved printer driver settings and other data for things such as:
• Print orientation and Multiple Up (document settings)
• Watermarks
•Font references
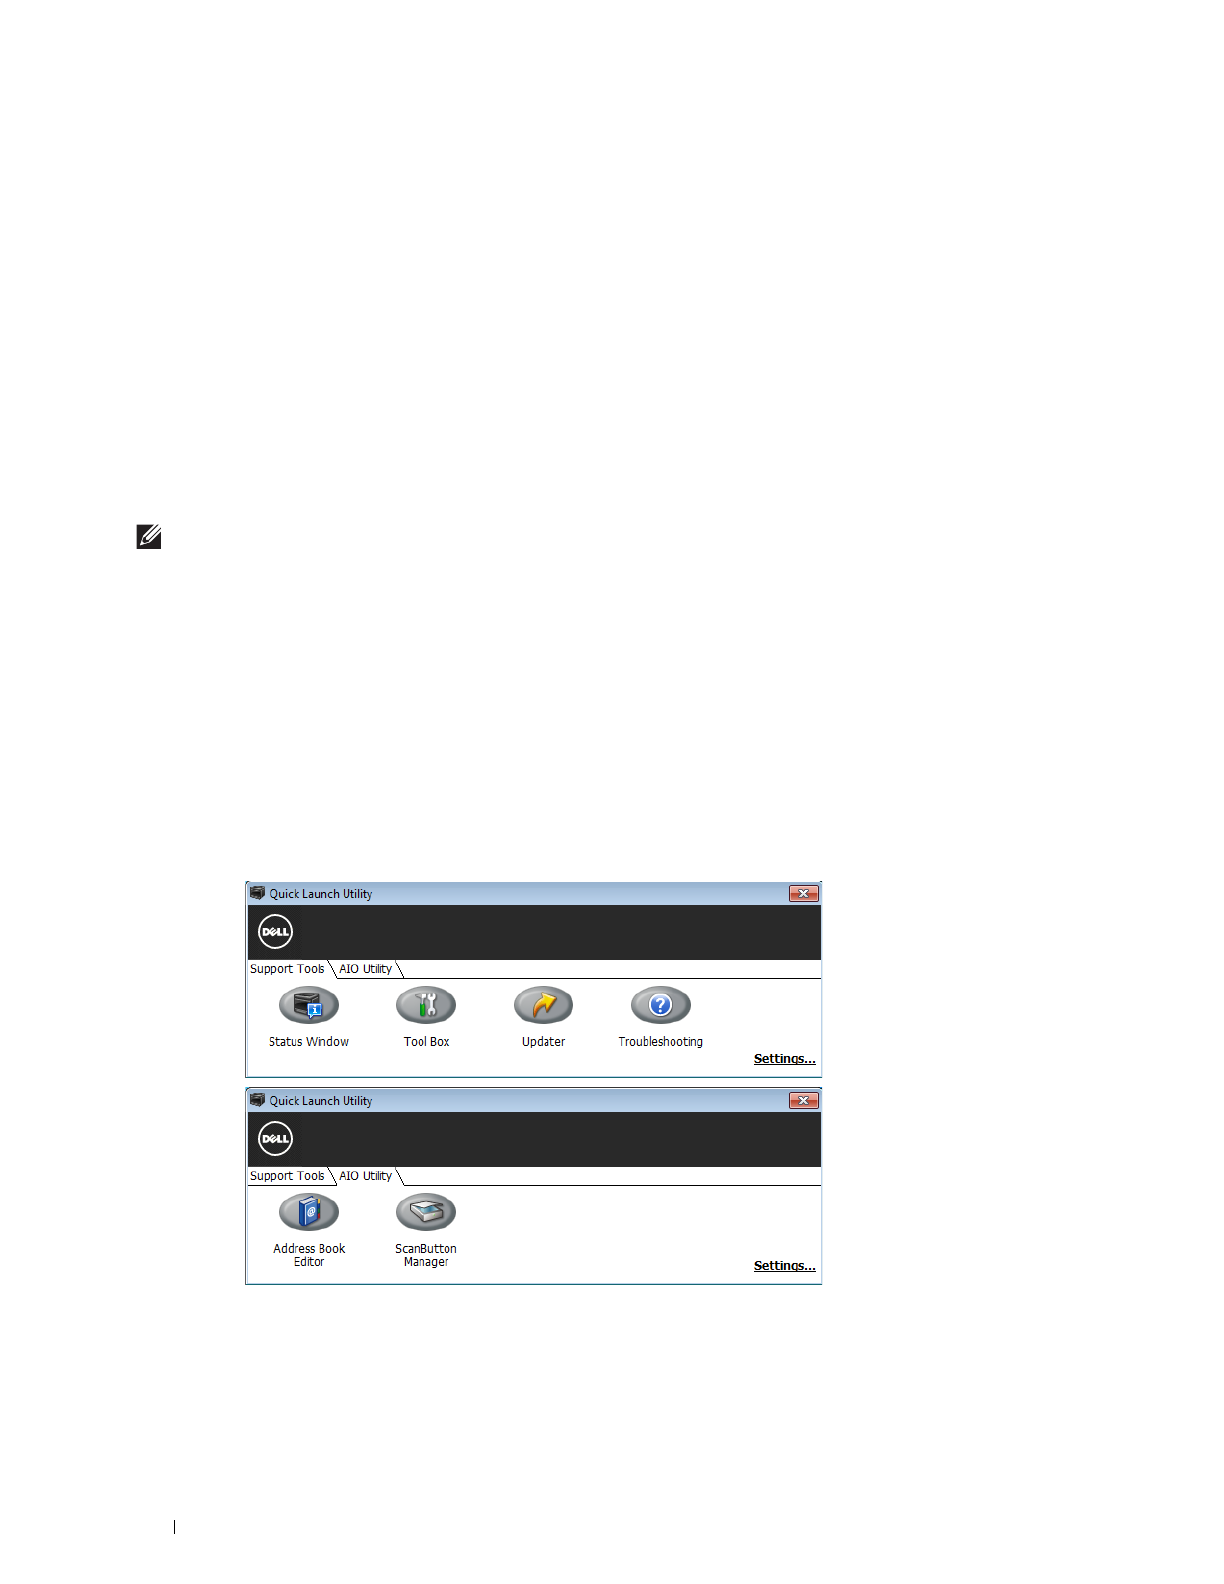
376
Understanding Your Printer Software
If you want to install the printer driver with the same settings on multiple computers running the same operating
system, create a setup disk in a floppy disk or in a server on the network. Using the setup disk that you have created
will reduce the amount of work required when installing the printer driver.
• Install the printer driver in the computer on which the setup disk is to be created.
• The setup disk can only be used on the operating system on which the disk was created or computers running the
same operating system. Create a separate setup disk for each of the operating systems.
Software Update
The firmware and/or driver updates can be downloaded from the Dell Support web site located at dell.com/support.
Printer Utility Software
You can open the Status Window, Tool Box, Updater, Troubleshooting, Address Book Editor, and ScanButton
Manager using the Quick Launch Utility window.
NOTE:
Quick Launch Utility is only supported on Microsoft
®
Windows
®
.
To use the Quick Launch Utility, select to install the Quick Launch Utility when you install the Dell software.
To install the Dell software, follow the instructions below.
1
Insert the
Software and Documentation
disc provided with the printer into your computer. The
Dell Printer Easy
Install
program launches automatically.
2
Click
Main Menu
.
3
Click
Connect
. Select
Software and Documentation
, and then click
Next
.
4
Follow the on-screen instructions.
To open the Quick Launch Utility window:
1
Click
Start
All Programs
Dell Printers
Dell Cloud Multifunction Printer - H815dw
or
Dell Smart
Multifunction Printer - S2815dn
Quick Launch Utility
.
The Quick Launch Utility window provides five buttons: Status Window, Tool Box, Updater, Troubleshooting,
Address Book Editor, and ScanButton Manager.

Understanding Your Printer Software
377
To exi t the Quick Launch Utility window:
1
Click the Close (x) button at the top-right of the window.
For details, click
Help
of each application.
Status Window
The Status Window button opens the Printer Status window. For more information about using Status Window,
refer to "Printer Status Window."
Tool Box
The Tool Box button opens the To ol Box.
Updater
The Updater button updates the printer firmware.
Troubleshooting
The Troubleshooting button opens the Troubleshooting Guide, which allows you to solve problems by yourself.
Address Book Editor
The Address Book Editor button opens the Address Book Editor, which allows you to register the contact
information such as phone number and e-mail address. For more information about using Address Book Editor, refer
to "Using Address Book Editor."
ScanButton Manager
The ScanButton Manager button opens the ScanButton Manager, which allows you to specify how the ScanButton
Manager behaves for scan events that the device generates (USB connection only). For more information about
using ScanButton Manager, refer to "Scanning From the Operator Panel - Scan to PC."
Address Books
There are several address books available for Scan and Fax functions. Address books help you organize contact
information, such as e-mail addresses, fax numbers and server information, and quickly choose the recipient or
locate the address. The address book data can be obtained from the printer or a remote LDAP server.
NOTE:
Phone Book is described as one of Address Books in this section.
NOTE:
For information on how to setup the LDAP server, see "LDAP Server" and "LDAP User Mapping." For information on how to
obtain e-mail addresses and fax numbers from LDAP servers, see "Using the Server Address Book and Server Phone Book."
Types of Address Books
• E-mail Address Book (for Scan to Email)
E-mail addresses registered for sending the scanned document via e-mail
• Email Group (for Scan to Email)
Groups of e-mail addresses registered for sending the scanned document via e-mail
• LDAP Server Address Book (for Scan to Email)
E-mail addresses registered in the LDAP server for sending the scanned document via e-mail
• Network Address Book
(for Scan to Network Folder)
Computer and FTP server information registered for sending the scanned document to a computer or ftp server

378
Understanding Your Printer Software
• Phone Book (for Fax)
Fax numbers registered for sending documents from your printer
• Group Dial (for Fax)
Groups of fax numbers registered for sending documents from your printer
• LDAP Server Phone Book (for Fax)
Fax numbers registered in the LDAP server for sending documents from your printer
• PC Fax Address Book (for Direct Fax)
Fax numbers registered for sending documents from your computer
• PC Fax Address Book for group (for Direct Fax)
Groups of fax numbers registered for sending documents from your computer
Adding and Editing Entries to the Address Books
There are following three ways to add or edit entries to the address books:
• Operator panel of the printer
• Address Book Editor
• Dell Printer Configuration Web Tool
Using Operator Panel of the Printer
You can directly enter the fax numbers on the operator panel.
NOTE:
For information on how to add a new entry, see "Setting Speed Dial."
Functions Features Types of Address Books Entry Registration
Operator Panel on
the Printer
Address Book Editor Dell Printer
Configuration Web
Tool
Scan E-mail Address Book -
Email Group -
Server Address Book
(LDAP server)
---
Network Address Book -
Fax Fax Phone Book
Group Dial
Server Phone Book
(LDAP server)
---
Direct Fax PC Fax Address Book - -
PC Fax Address Book - group - -
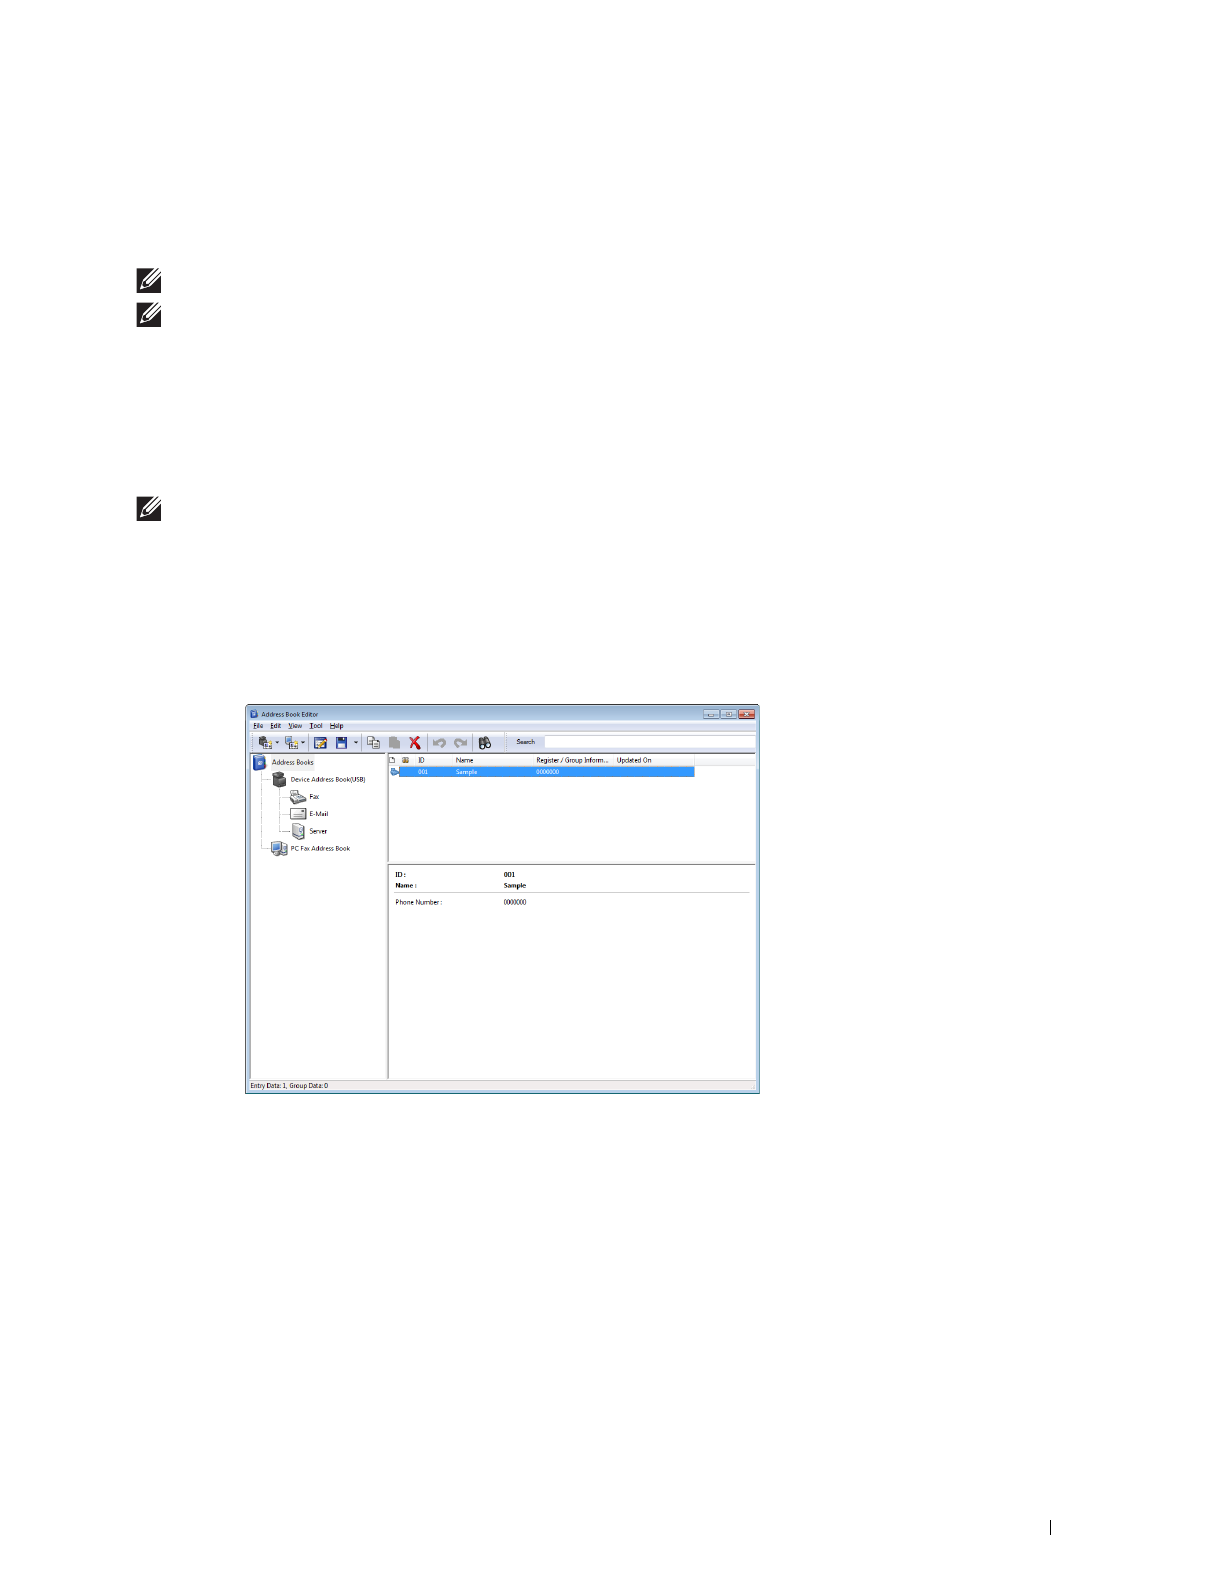
Understanding Your Printer Software
379
Using Address Book Editor
You can use Address Book Editor installed on your computer to add or edit entries. Address Book Editor is
synchronized with the address books of your printer and updated simultaneously as you save changes to the entries
in Address Book Editor.
NOTE:
This tool is supported on both Microsoft
®
Windows
®
and Apple Macintosh.
NOTE:
When the printer and your computer is connected via USB, you must install the scanner driver.
With Address Book Editor, you can:
• Automatically retrieves data from the address books of your printer at startup
• Synchronizes with the printer
• Allows you to import the Address Book data from CSV file, WAB file, MAPI, and LDAP server
• Allows you to export the Address Book data into a CSV file
NOTE:
Do not edit the exported CSV file with applications other than the Address Book Editor. Editing the CSV file with other
applications may corrupt the address data.
Address Book Panel
There are two address books you can manage in the Address Book Editor: Device Address Book for Fax, E-mail, and
Server and PC Fax Address Book for Direct Fax.
For Microsoft
®
Windows
®
:
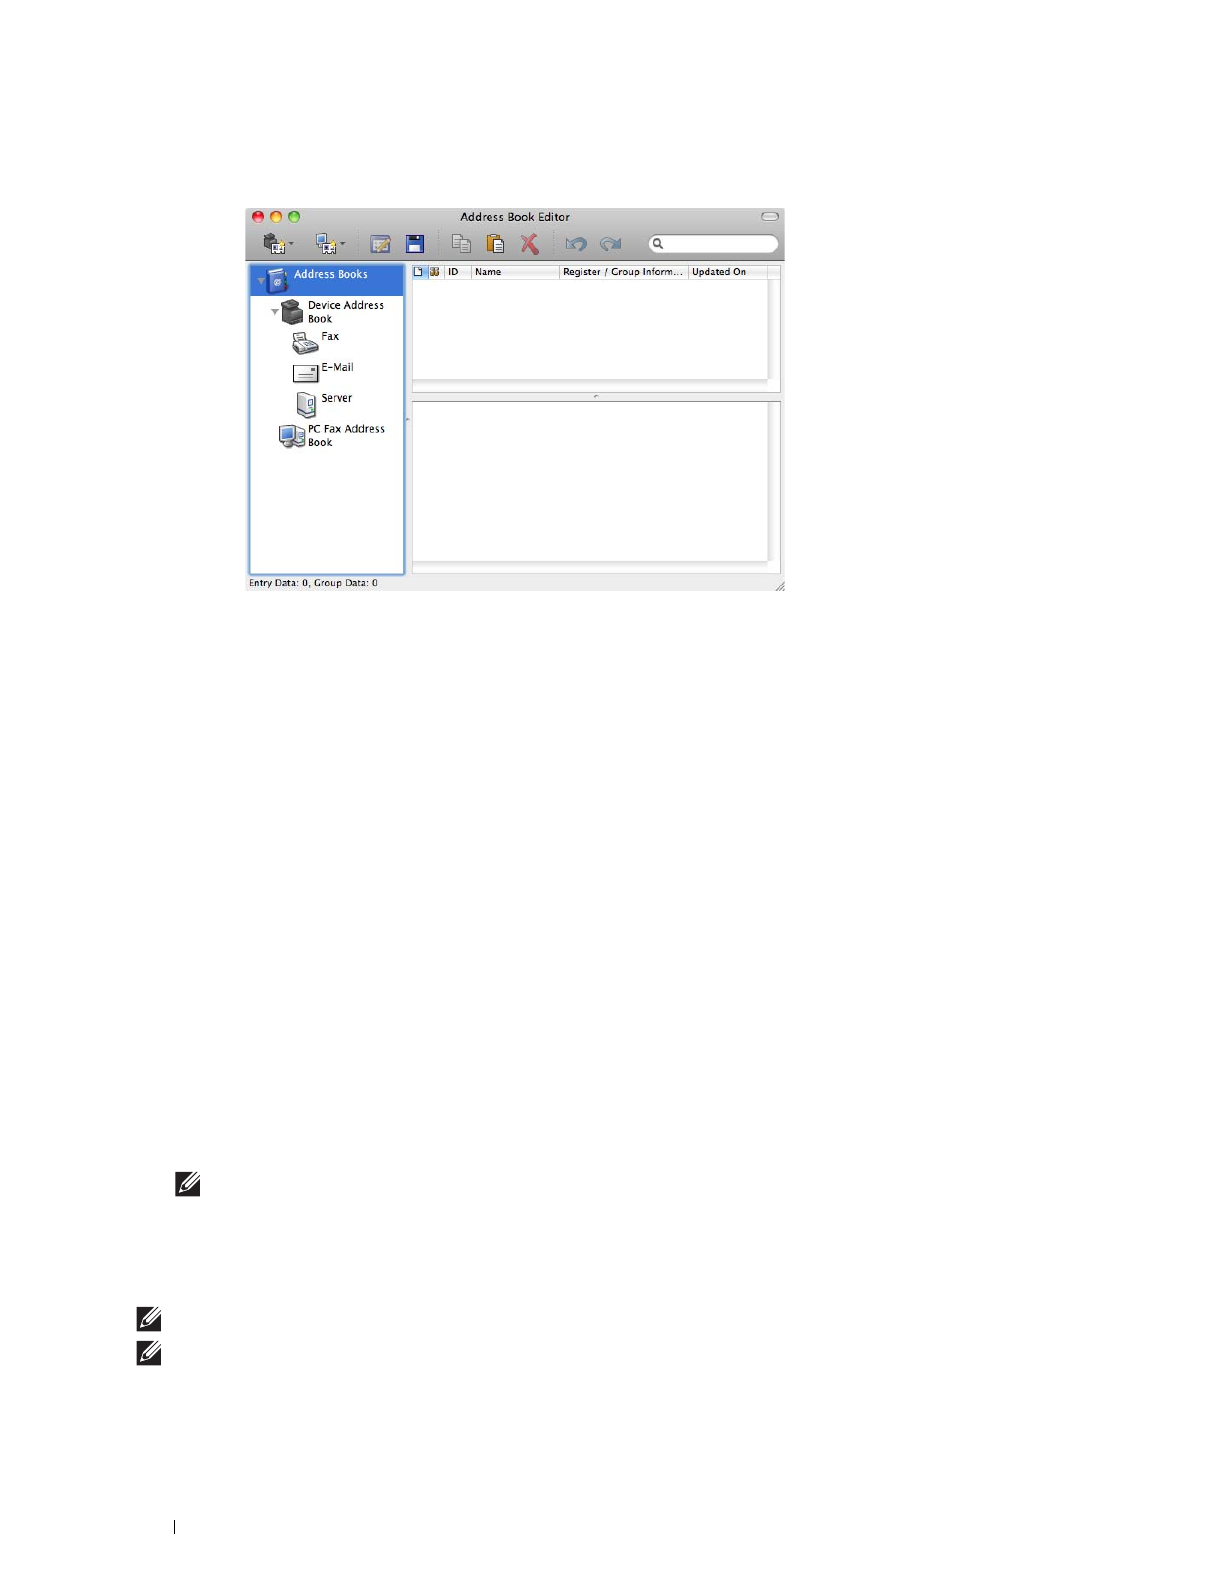
380
Understanding Your Printer Software
For Apple Macintosh:
•
Device Address Book
•Fax
Links to the printer's Address Book for Fax feature. You can register up to 200 fax numbers and 6 groups with
200 fax numbers.
•E-Mail
Links to the printer’s Address Book for Scan to Email feature. You can register up to 100 e-mail addresses and
10 groups with 10 e-mail addresses.
•Server
Links to the printer’s Address Book for Scan to Network Folder feature. You can register up to 32 server
information.
•
PC Fax Address Book
You can manage the PC Fax Address Book for using Direct Fax feature on your computer. You can register up to
500 fax numbers and 500 groups with 30 fax numbers.
Editing an entry:
1
Select an Address Book that the entry you want to edit is stored.
2
Select an entry that you want to edit.
3
Click
Edit
, and enter new information.
4
Click
Save
to save changes.
NOTE:
When the address book entries are updated, it synchronizes with the printer and updates the address books of your
printer simultaneously.
Using Dell Printer Configuration Web Tool
You can use Dell Printer Configuration Web Tool using a general web browser.
NOTE:
For information on how to add a new entry, see "Address Book."
NOTE:
When the address book entries are updated, it synchronizes with the printer and updates the address books of your
printer simultaneously.

Understanding Your Printer Software
381
App Manager
NOTE:
The App Manager feature is available on the Dell Cloud Multifunction Printer | H815dw only.
The App Manager - Dell H815dw is a utility that lets you manage the apps on your printer.
The following tasks can be performed from the App Manager - Dell H815dw:
• Install, update, and uninstall apps
• Back up and restore printer settings, address books, and apps
CAUTION:
Do not turn off the printer or the computer while backing up or restoring data.
NOTE:
The App Manager - Dell H815dw can back up the data of 10 printers. For each printer, up to five backup history can be
cached.
NOTE:
The following will not be included in the backup data:
– Settings data of Default Settings, Network Settings, Fax Settings, Maintenance, Secure Settings, and USB Settings
– Data that is integral with other setting data such as digital certificates
– Data that is specific to the printer such as an IP address
– Data that is not permitted to be backed up due to security reasons
– Settings about date and time, and also settings that are associated with date and time
– Data that are considered invalid for settings of the printer
NOTE:
The time it takes to send and create backup files may take longer depending on the data size.
NOTE:
The features of the App Manager - Dell H815dw may not be used when the printer has an error. If the App Manager - Dell
H815dw does not respond, check and clear the status of the printer.
Preparing to use the App Manager - Dell H815dw
To use the App Manager - Dell H815dw, it is recommended that your computer should have more than 25GB of
storage space.
NOTE:
Your computer needs to be connected to a network. USB connection is not supported.
NOTE:
For Windows Vista
®
, .Net Framework 3.5 or later is required.
Using the App Manager - Dell H815dw
1
Click
Start
All Programs
Dell Printers
Dell Cloud Multifunction Printer - H815dw
App Manager
.
2
Click
Printers
.
3
Click
Add Printer.
4
Find the printer you want to register and click
Add
.
NOTE:
If the printer you are looking for does not appear in the list, enter the IP address of the printer in the search text box.
5
Enter the same ID and password that is used for the
Dell Printer Configuration Web Tool
, and click
OK
.
6
Click
to return to the printer list.
Click the printer you want to manage from the list.
NOTE:
If the printer you are looking for does not appear in the list or cannot be accessed from the App Manager - Dell H815dw,
check that the On check box for Port9100 and SNMP is selected in the Port Settings of Print Server Settings tab in the Dell
Printer Configuration Web Tool.

382
Understanding Your Printer Software
Status Monitor Widget for Macintosh
Status Monitor Widget is a printer utility that promotes efficient use of the printer through the exchange of
information between the Macintosh and the printer.
Status Monitor Widget Feature
• Monitoring Dell Printers
Allows you to check the status of Dell printers currently connected to your Macintosh
• Receiving Alerts
Alerts you to problems, such as paper jams or low toner
• Ordering Supplies
Allows you to access the web site to order supplies
Before Installing the Status Monitor Widget
Operating systems
• Mac OS X 10.5
• Mac OS X 10.6
• OS X 10.7
• OS X 10.8
• OS X 10.9
• OS X 10.10
Network protocols and interfaces
•LPR
• Socket 9100
•Bonjour
• USB 2.0 and 1.1 (When connecting with multiple printers of the same model via USB cables, only the printer
recognized first can be monitored in the
Status Monitor Widget
.)
Installing the Status Monitor Widget
1
Double-click the
Dell H815dw Installer
icon or
Dell S2815dn Installer
icon
in the
Finder
window.
2
Follow the on-screen instructions.
When the
Install Succeeded
screen appears, the installation is complete.
NOTE:
Entering the administrative login name and password are required during the installation process.
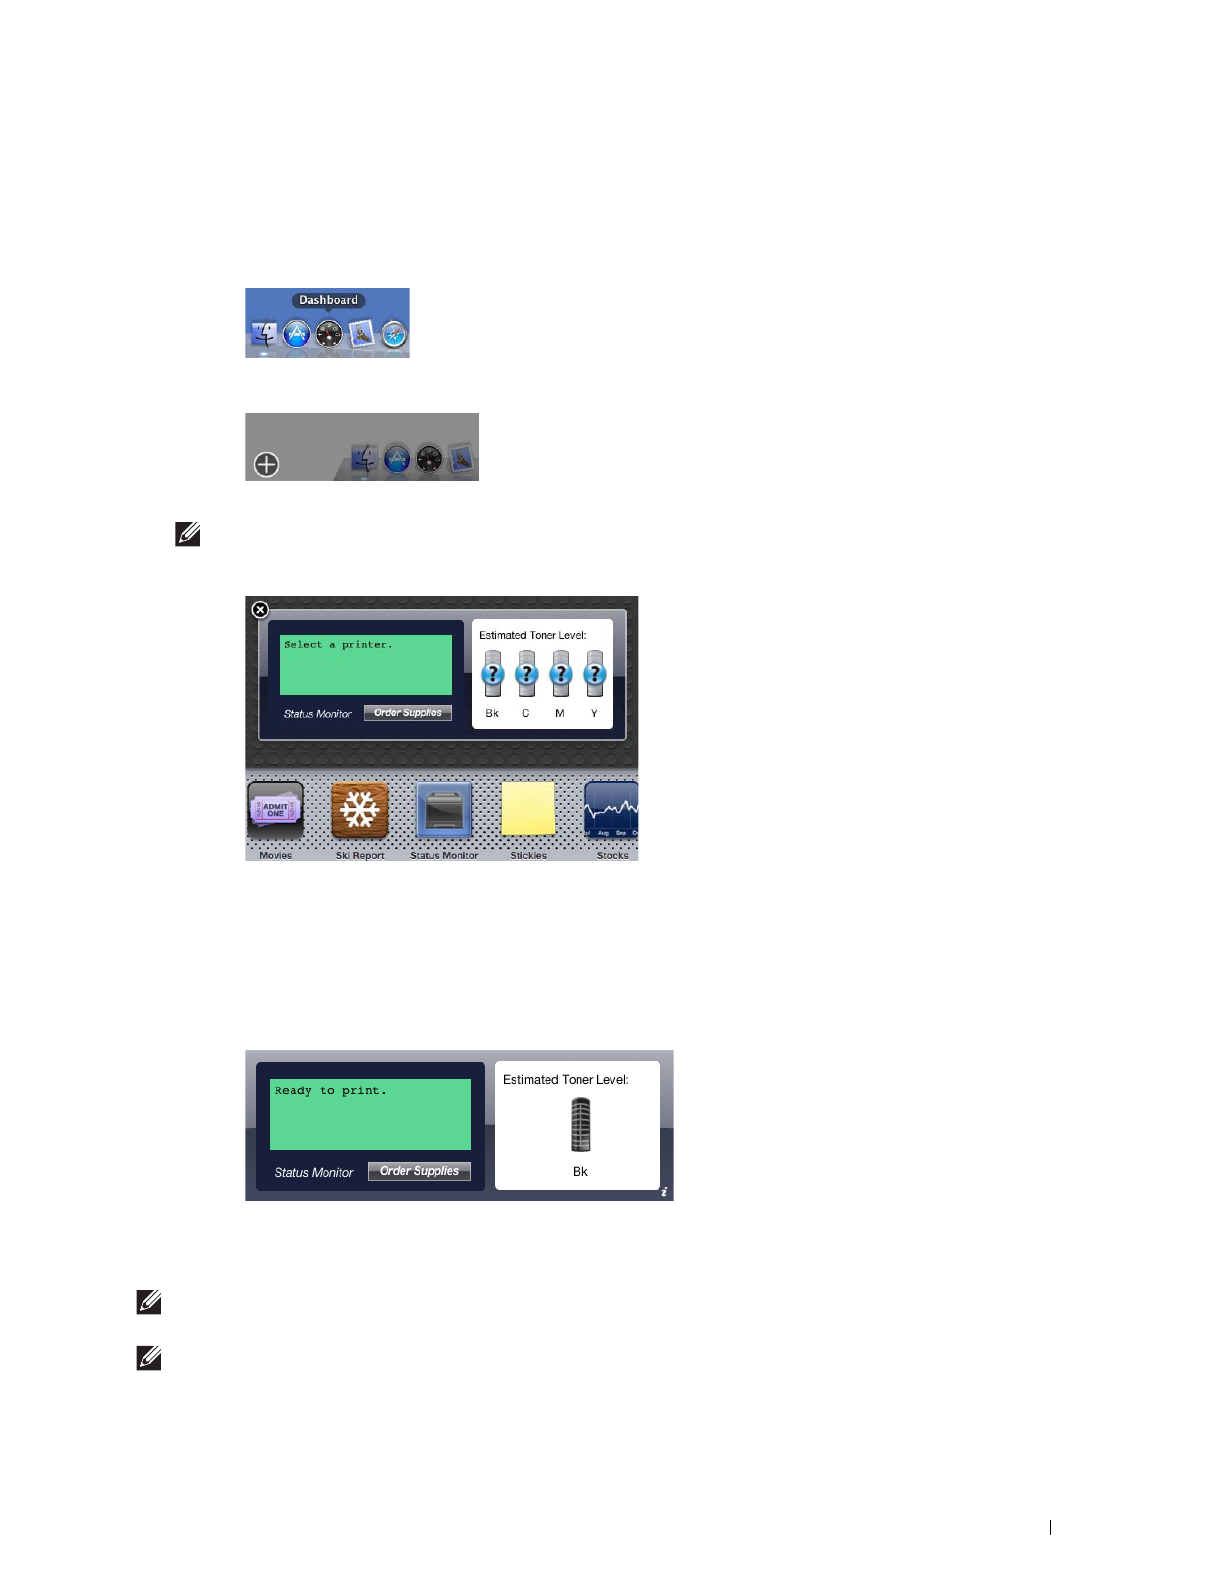
Understanding Your Printer Software
383
Opening and Closing the Status Monitor Widget
Opening the Status Monitor Widget
1
Click the Dashboard icon in the Dock to launch Dashboard.
2
Click the Plus (+) sign to display the Widget Bar.
3
Click the icon of
Status Monitor
in the Widget Bar. The
Printer Status
window appears.
NOTE:
If the message Select a printer is displayed, select your printer in Preferences. (For more information on
Preferences, see "Preferences.")
Closing the Status Monitor Widget
1
Click the Close (x) button in the upper-left corner of the
Printer Status
window.
Printer Status Window
When the Status Monitor Widget is activated, the Printer Status window appears on Dashboard.
Printer Status Message Area
Displays a message of the current printer status.
NOTE:
The Status Monitor Widget automatically obtains the printer information at the updated interval that can be specified in
Preferences. Also, the printer status is refreshed when Dashboard is launched or Preferences is closed.
NOTE:
If the Status Monitor Widget receives no response from the printer, the message Cannot get printer information is
displayed.
384
Understanding Your Printer Software
NOTE:
When the printer is connected via USB cable, you cannot check the status of the printer during a print or scan job.
Printer Status Image Area
Displays the image of printer condition.
• Estimated Toner Level image
Displays the estimated toner level if the printer is functioning properly.
NOTE:
If the utility does not receive a response from the printer, the Unknown toner image is displayed.
• Printer error image
Displays an indication image when an error occurs.
An error has occurred and the printer cannot be used.
Order Supplies button
Click this button to display the Order window.
To hide the Order window, click Order Supplies again.
Info (i)
button
Click this button to open Preferences.
NOTE:
The info (i) button appears on the lower-right corner of the window when the cursor is over the Printer Status window.
The info (i) button is a standard used across all widgets.
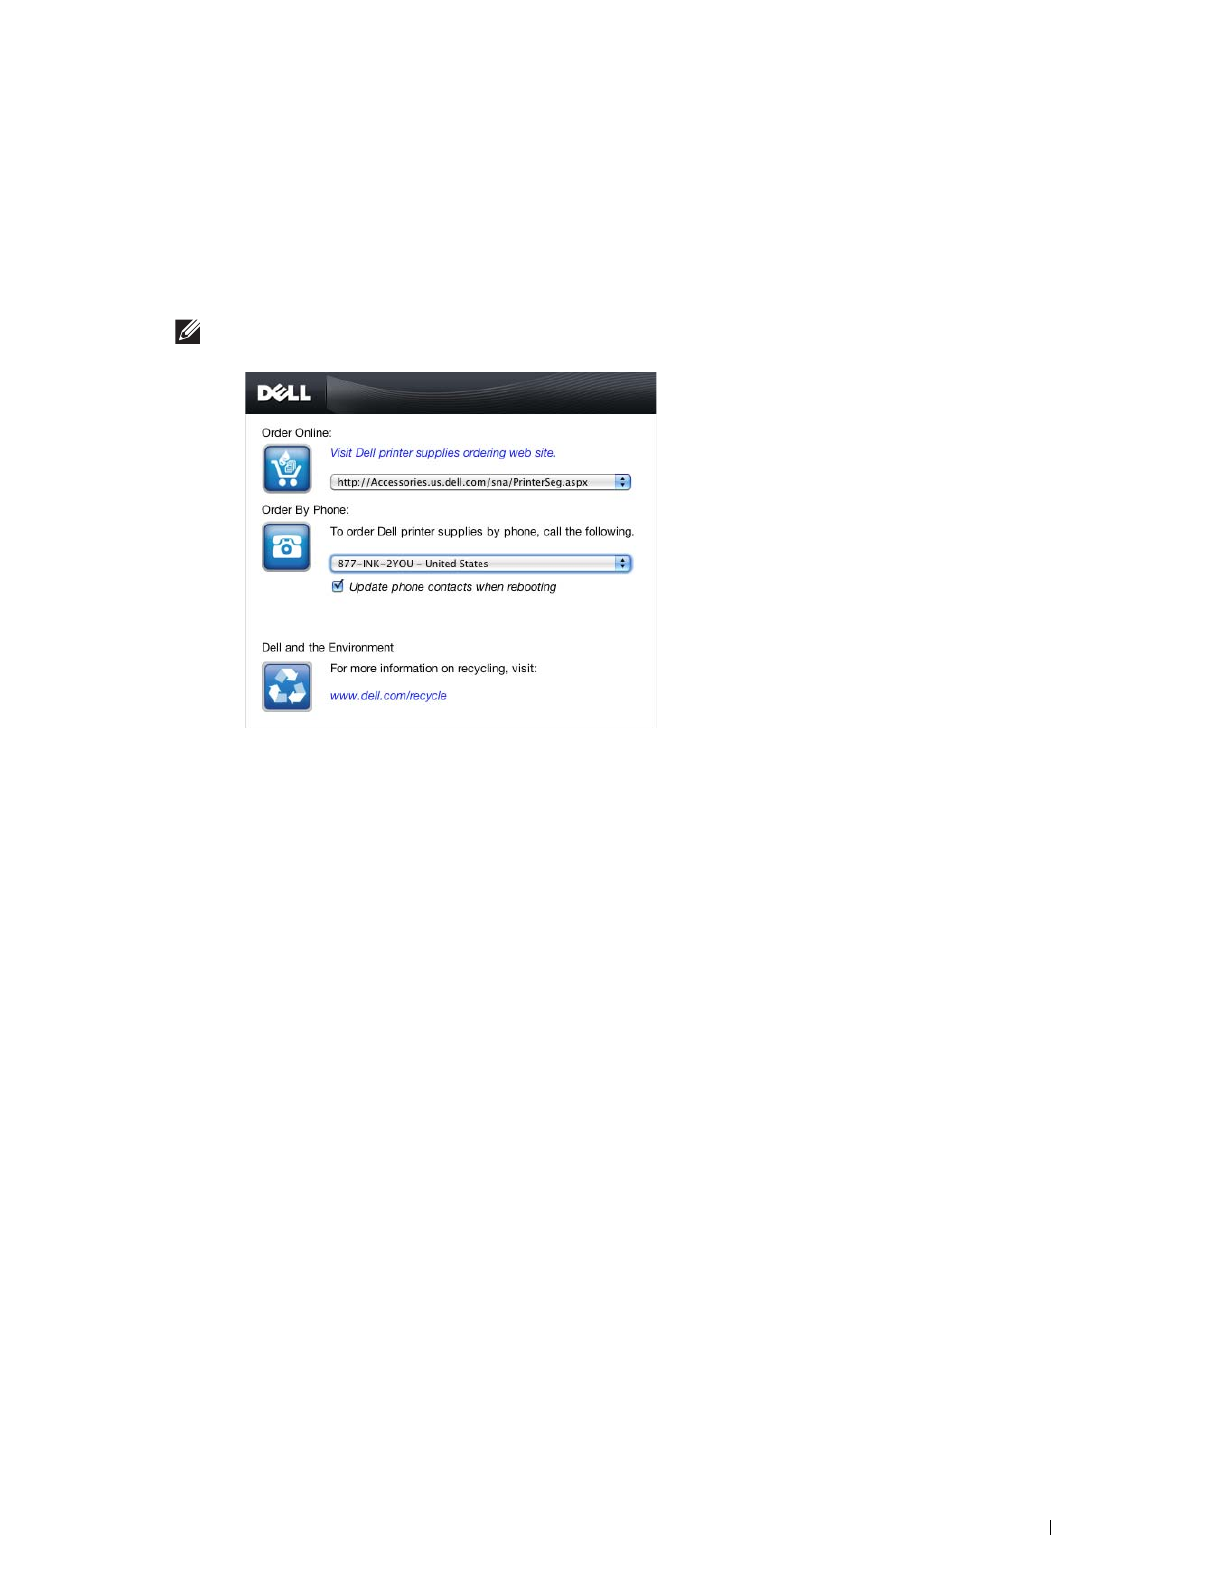
Understanding Your Printer Software
385
Order Window
This window provides you with the information for ordering printer supplies by telephone or from the web site.
To open the Order window:
1
Click
Order Supplies
in the
Printer Status
window.
The
Order
window appears.
NOTE:
The Order window appears when low toner is detected.
Order Online
•
Visit Dell printer supplies ordering web site
hyperlink
Click the
Visit Dell printer supplies ordering web site
hyperlink to access the web site for ordering Dell printer
supplies.
•URL list
Displays a list of available URLs where you can order Dell printer supplies.
Select a URL address to use when the
Visit Dell printer supplies ordering web site
hyperlink is clicked.
Order By Phone
• Phone number list
Displays a list of available phone numbers that you can call to order Dell printer supplies.
•
Update phone contacts when rebooting
check box
Select this check box to regularly update the phone number list.
Dell and the Environment
Click the hyperlink to access the web site about recycling.
386
Understanding Your Printer Software
Preferences
To open Preferences:
1
Click the
info (i)
button
in the
Printer Status
window.
Preferences
appears.
NOTE:
The info (i) button appears on the lower-right corner of the window when the cursor is over the Printer Status
window. The info (i) button is a standard used across all widgets.
Printer
Displays a list of available printer names in the pull down menu. The first printer displayed in this list is set as
default.
Status Update Interval
You can specify the update interval of the printer status. By default, it is set to obtain the printer information every
10 seconds. It can be set from 0 to 600 seconds.
SNMP Community Name
You can change the SNMP (Simple Network Management Protocol) community name if using default community
name (public). Up to 31 characters can be entered.
Get Tag button
Click this button to obtain the service tag.
NOTE:
You cannot retrieve the service tag when the printer is connected via USB cable.
done button
Click this button to return to the Printer Status window.
Status Monitor Console for Linux
Status Monitor Console is a printer utility that promotes efficient use of the printer through the exchange of
information between the Linux and the printer.
Status Monitor Console Feature
• Monitoring Dell Printers
Allows you to check the status of Dell printers currently connected to your Linux.
• Receiving Alerts
Alerts you to problems, such as paper jams or low toner.
• Ordering Supplies
Allows you to access the web site to order supplies.

Understanding Your Printer Software
387
Before Installing the Status Monitor Console
NOTE:
The Status Monitor Console requires the following modules installed.
- Python, PyGTK, Net-SNMP, cups-libs, and xdg-open
Please confirm that these modules are installed before you install the
Status Monitor Console
.
NOTE:
The Status Monitor Console is available when the printer is connected to a network (LPR or Socket 9100). USB
connection is not supported.
Distributions
• Red Hat Enterprise Linux 6 Desktop
• SUSE Linux Enterprise Desktop 11
• Ubuntu 12.04 LTS
Printing system
• CUPS (Common Unix Printing System)
Installing the Status Monitor Console
1
Activate the terminal, and log in as a super user.
2
Type the following rpm command in the terminal window.
On Red Hat Enterprise Linux 6 Desktop or SUSE Linux Enterprise Desktop 11
On Ubuntu 12.04 LTS
Starting the Status Monitor Console
1
Click
Dell Printers
Status Monitor Console
The
Printer Selection
window appears.
For more information on Printer Selection window, see "Printer Selection Window."
2
Select your printer.
The
Printer Status
window appears.
For more information on
Printer Status
window, see "Printer Status Window."
• You can order supplies from the
Dell Supplies Management System
window. See "Dell Supplies Management
System Window."
# rpm -ivh (Type the package file name)
# dpkg -i
(Type the package file name)
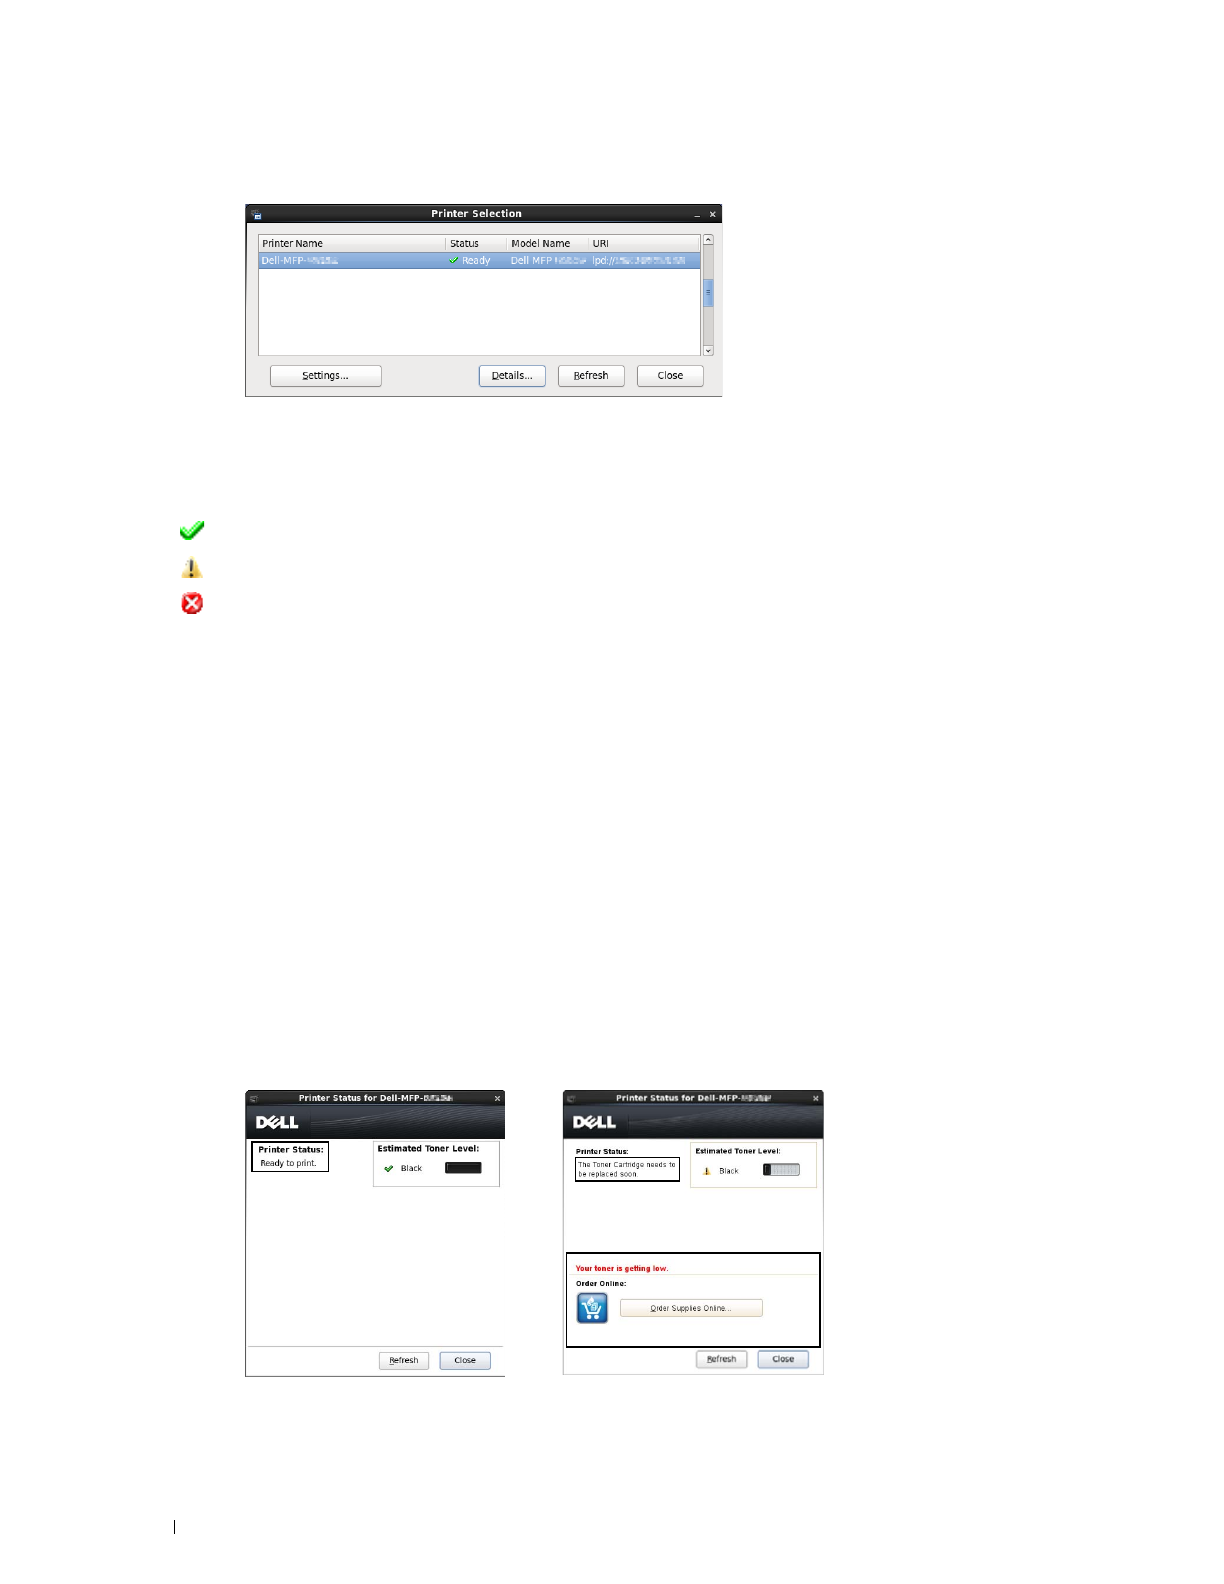
388
Understanding Your Printer Software
Printer Selection Window
Printers list
All the printers registered in the CUPS (Common UNIX Printing System) are displayed in a list.
• Status icons:
Ready
Unknown/Offline/Toner Low/Paper Low
Door Open/Paper Jam/No Toner/Out Of Paper
Settings button
Click this button to open the Settings window.
Details button
Click this button to open the Printer Status window. If a non-supported printer is selected, it opens the Dell Printer
Configuration Web Tool. For details on the Dell Printer Configuration Web Tool, see "Dell™ Printer Configuration
Web Tool."
Refresh button
Click this button to update the information of printers.
Close button
Click this button to close the
Printer Selection
window
.
Printer Status Window
When the printer is specified in the
Printer Selection
window,
the Printer Status window appears.

Understanding Your Printer Software
389
Printer Status Message Area
Displays a message of the current printer status.
NOTE:
The Status Monitor Console automatically obtains the printer information at the updated interval that can be specified in
the Settings window. Also, the printer status is refreshed when the Refresh is clicked.
NOTE:
If the Status Monitor Console receives no response from the printer, the message Cannot get printer information is
displayed.
Printer Status Image Area
• Current Toner Status icons
Displays icons of the current status of the toner.
The toner level is more than 30%.
The toner level is less than 29%.
The toner level is less than 9%.
The toner level is unknown.
• Estimated Toner Level images
Keeps you informed about the amount of toner that remains.
Toner Alert
Displays an alert message when the remaining toner is low, empty, or unknown.
Order Online
•
Order Supplies Online
button
Click this button to access the web site for ordering Dell printer supplies.
This button appears when the amount
of toner becomes less than 30%.
Refresh button
Click this button to update the status of the printer.
Close button
Click this button to close the Printer Status window.
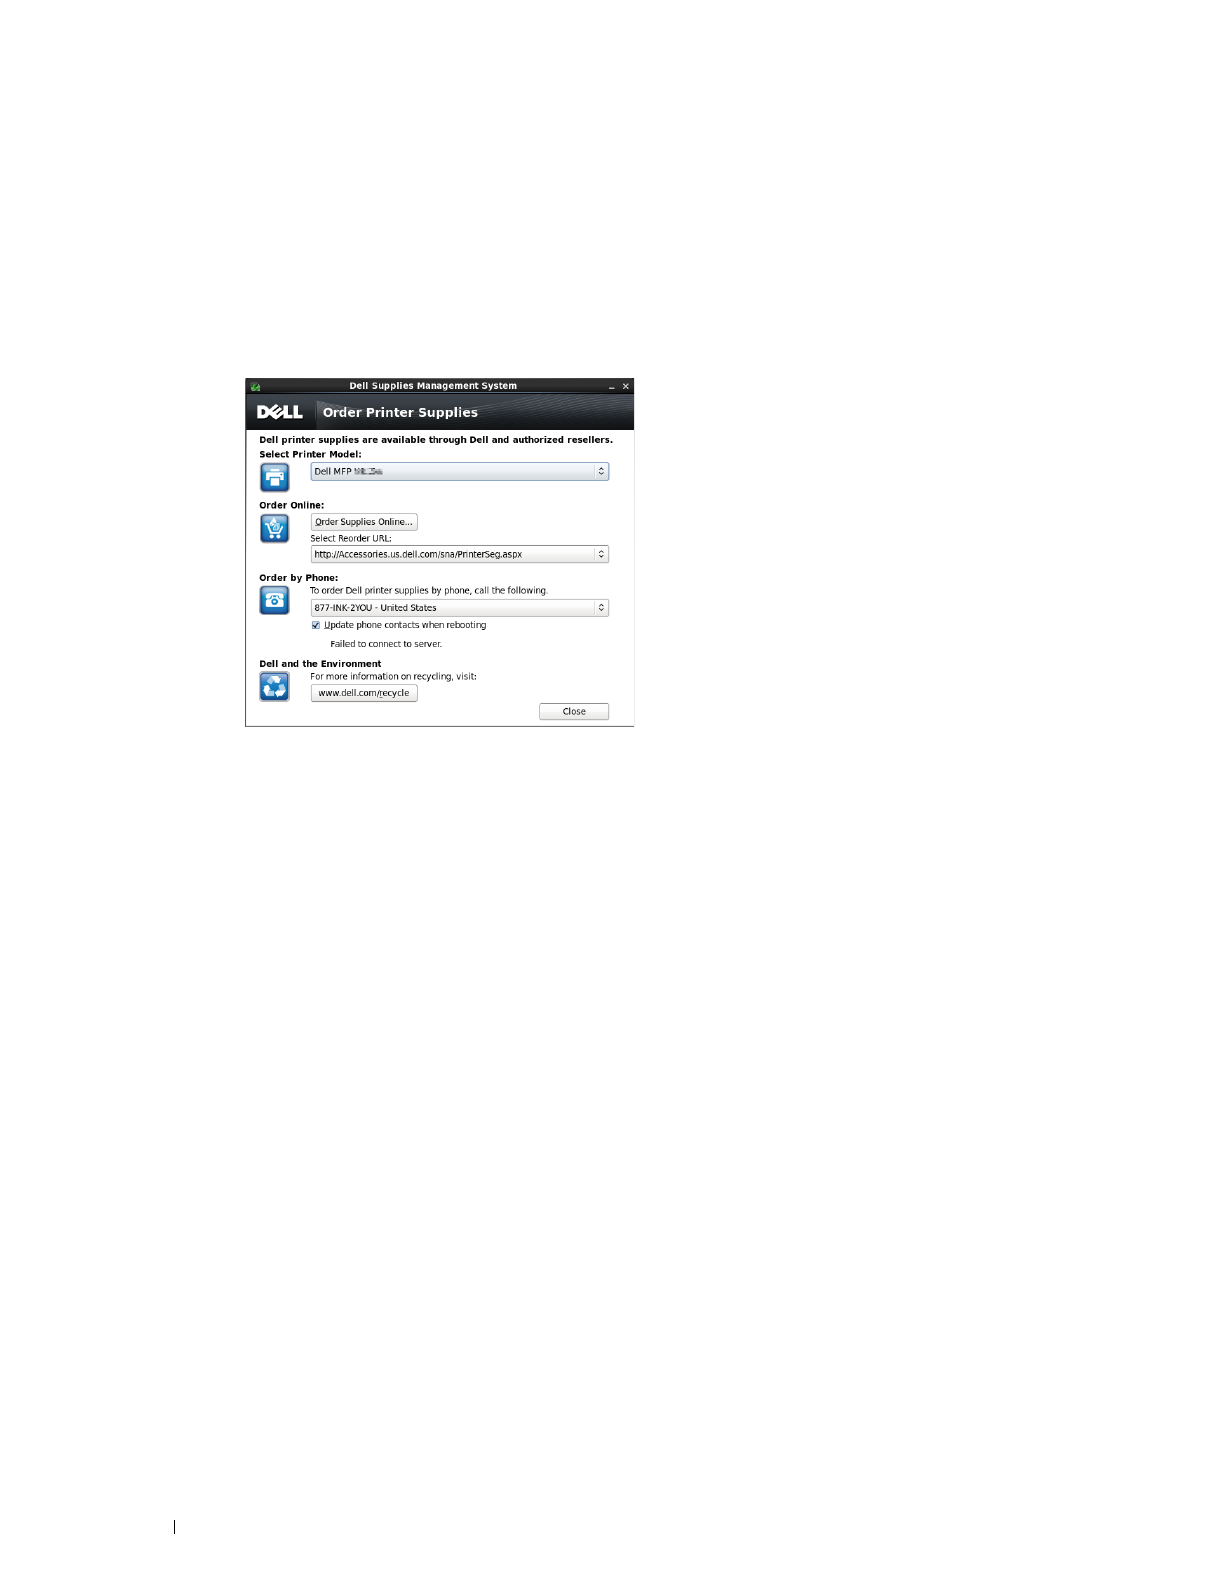
390
Understanding Your Printer Software
Dell Supplies Management System Window
This window provides you with the information for ordering printer supplies by telephone or from the web site.
To open the Dell Supplies Management System window:
1
Click
Order Supplies Online
in the
Printer Status
window.
OR
Click
Dell Printers
Dell Supplies Management System
.
Select Printer Model
Select your printer model name.
Order Online
•
Order Supplies Online
button
• When the Regular URL is selected in the
Select Reorder URL
:
Click this button to open the
Service Tag
window.
• When the Premier URL is selected in the
Select Reorder URL
:
Click this button to open the procurement and support web site.
• Select Reorder URL
Displays a list of available URLs where you can order Dell printer supplies. Select a URL address to use when the
Order Supplies Online
button is clicked.
•Regular URL:
http://Accessories.us.dell.com/sna/PrinterSeg.aspx
•Premier URL:
http://premier.dell.com
Order by Phone
• To order Dell printer supplies by phone, call the following
Select your country with phone number from the list, and call the displayed telephone number to order supplies.
•
Update phone contacts when rebooting
check box
Select this check box to regularly update the phone number list.
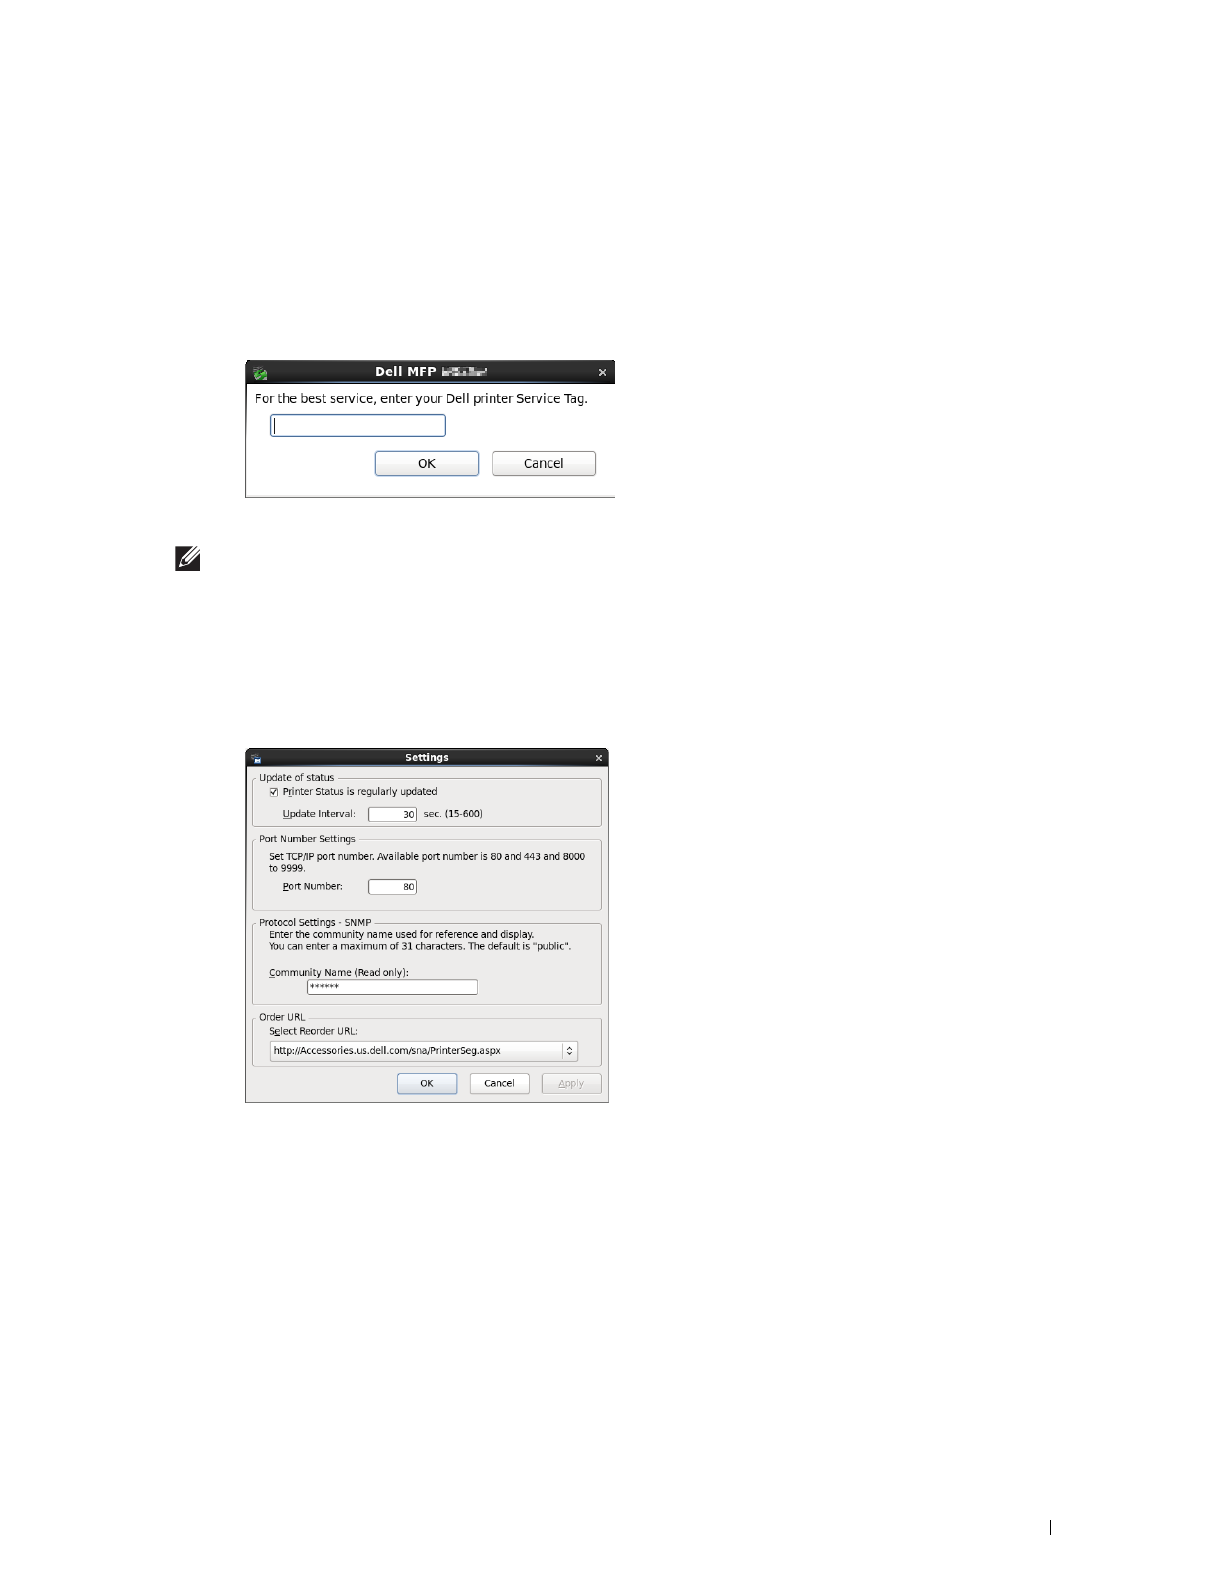
Understanding Your Printer Software
391
Dell and the Environment
Click the hyperlink to access the web site about recycling.
Close button
Click this button to close the Dell Supplies Management System window.
Service Tag Window
1
Enter the Dell printer service tag.
NOTE:
For information on the service tag, see "Express Service Code and Service Tag."
Settings Window
To open the Settings window:
1
Click
Settings
in the
Printer Selection
window.
The
Settings
window appears.
Update of status
•
Printer Status is regularly updated
check box
Select the check box to enable/disable the printer status to be updated by the specified interval.
•
Update interval
text box
Specify the update interval of the printer status.
Port Number Settings
•Port Number
Specify the port number in the
Port Number
text box to open the setting page of your printer in a web browser.

392
Understanding Your Printer Software
Protocol Settings - SNMP
• Community Name
Enter the Community name of SNMP in the
Community Name
text box.
Order URL
• Select Reorder URL
The selected URL address is set as default web site for the
Select Reorder URL
in the
Dell Supplies Management
System
window.
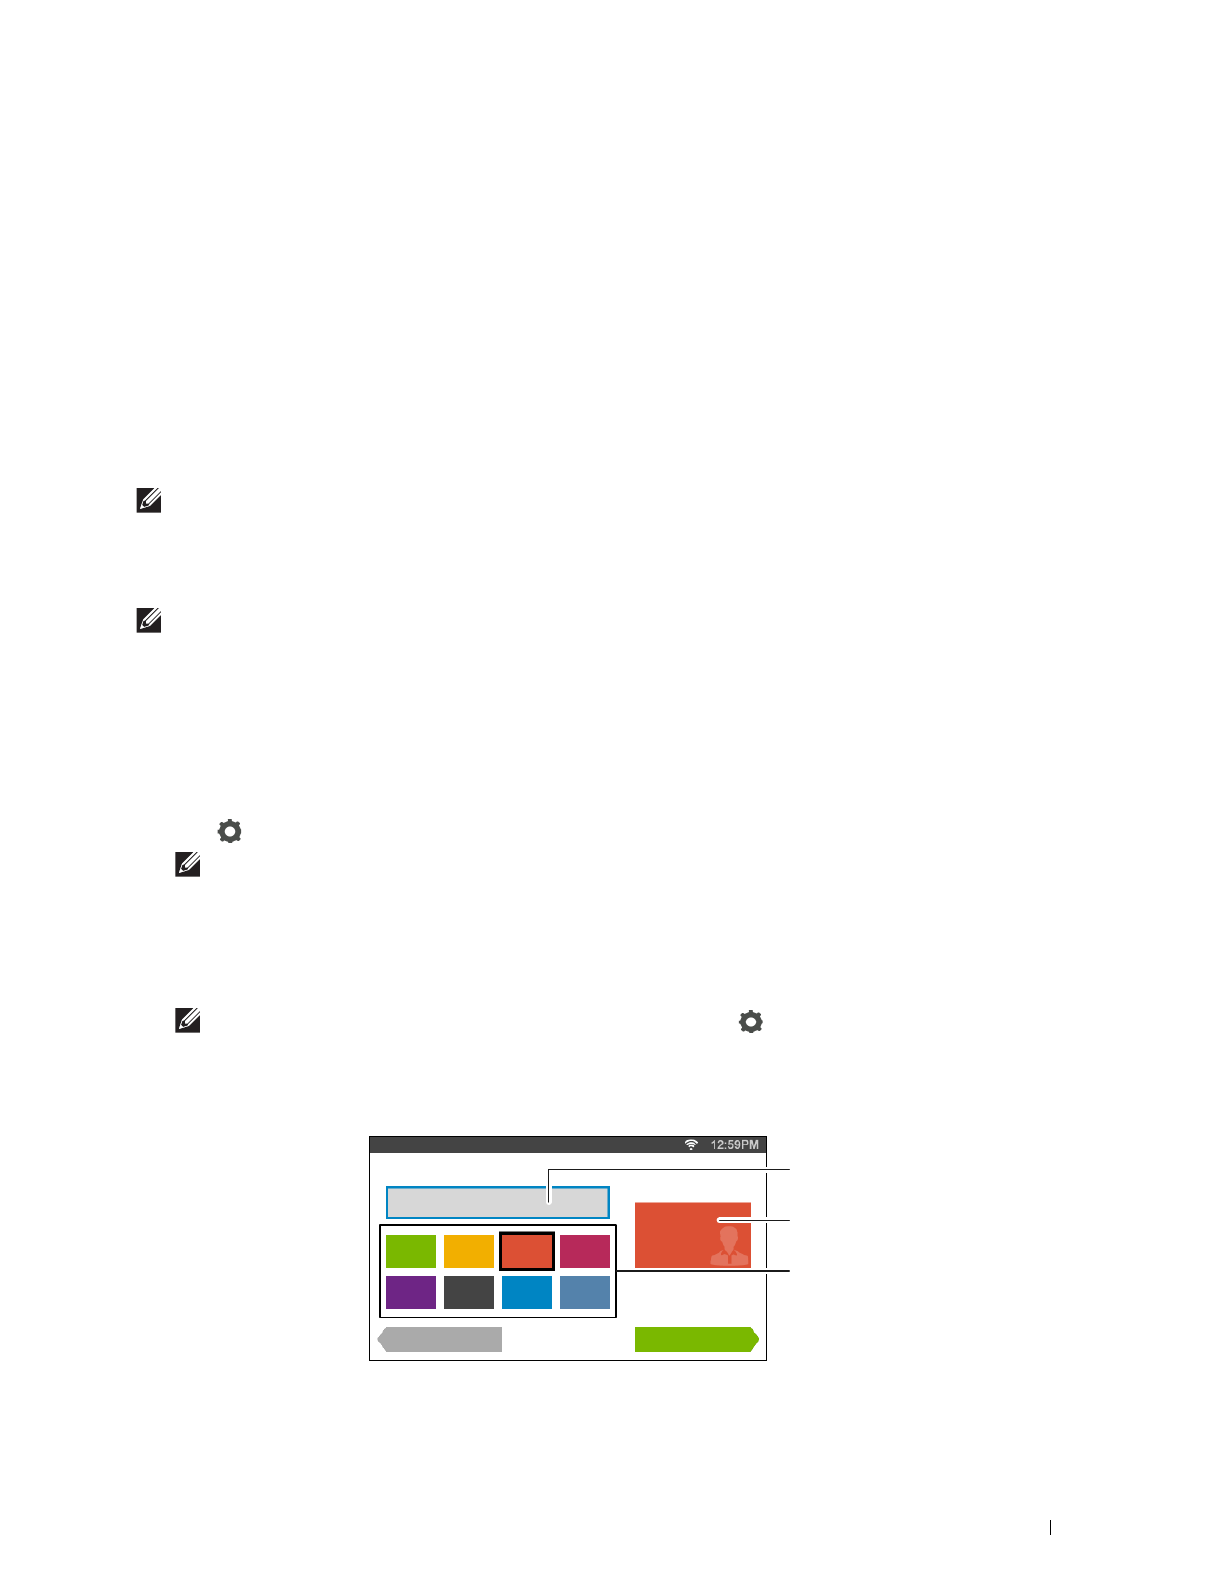
User Authentication
393
24
User Authentication
Using the user authentication function of the printer, it is possible to create and manage up to 18 user accounts
secured with a password. Each user of the accounts can customize the home screen and save the changes.
For the Dell™ Cloud Multifunction Printer | H815dw only, it is also possible to associate NFC (Near Field
Communication) capable ID Cards to an user account. When the ID card is associated with a user account, you can
login to that user account by waving the ID card over the NFC reader.
For the Dell Smart Multifunction Printer | S2815dn only, it is also possible to select the user authentication method
from either local authentication or remote authentication. To use the remote authentication method, the LDAP or
Kerberos server is required to authenticate the user. To select the user authentication method, see "Desktop Login"
or "Desktop Authentication."
NOTE:
The Dell Cloud Multifunction Printer | H815dw supports the following card types:
•MIFARE Ultralight
•MIFARE Standard (Classic) 1K
•MIFARE Standard (Classic) 4K
NOTE:
The images used in this manual are those of the Dell Cloud Multifunction Printer | H815dw unless otherwise mentioned.
Creating and Editing the User Accounts
To use user authentication, you must first create a user account.
Creating a New User Account
1
Turn on the printer and wait until the portal screen is displayed.
2
Ta p .
NOTE:
If the
Panel Lock Control
is set to
Enable
, you need to enter the four-digit password to proceed
further.
The dialog box is displayed to confirm to enter the edit mode.
3
Ta p
OK
.
The printer enters the edit mode, and the
Add Account
tile is displayed in the portal screen.
NOTE:
In the edit mode, each tile except the
Add Account
tile has .
4
Enter the account name and select the tile color.
You can preview the image of your custom tile in
Preview
.
Guest
Print
Account Settings 1/2
Guest
Preview
Back Next
Account Name
Preview
Tile Color

394
User Authentication
5
Ta p
Next
.
The
Account Settings 2/2
screen is displayed.
6
Enter the account password and NFC ID.
NOTES:
•When there is a check mark in the
Initial Login
check box, the printer always displays the Home screen of the
account when you turn on the printer. If no account is specified as
Initial Login
, the portal screen is displayed
when you turn on the printer.
•You can create a new account without setting the account password.
•NFC ID is available only on the Dell Cloud Multifunction Printer | H815dw.
•When the NFC Authentication is disabled, NFC ID is not displayed.
•When you use UID as the NFC ID, enter the hexadecimal characters. The characters A to F should be entered in the capital
letters.
7
Tap Done. The screen returns to the portal screen.
Editing the User Account
1
Tap in the portal screen to enter the edit mode.
2
Tap the account tile you want to edit.
3
Edit the account name, tile color, password, NFC ID, or
Initial Login
.
NOTE:
When the NFC authentication is disabled, NFC ID is not displayed.
4
Ta p
Done
.
The screen returns to the portal screen.
Deleting the User Account
1
Tap in the portal screen to enter the edit mode.
2
Tap and hold the account tile you want to edit.
is displayed.
3
Drag the tile to .
4
Ta p
OK
to delete the tile.
Logging In to the User Account on the Dell Cloud Multifunction Printer |
H815dw
There are two ways to log in to the account. One is to log in using the touch panel, and the other is to log in using
the NFC authentication card.
Logging In Using the Touch Panel
1
Start the printer and wait until the portal screen is displayed.
2
Tap the account tile you want to log in to.
NOTE:
When the account you want to log in to does not require a password, skip step 3. The Home screen is displayed.
3
Enter the account password, and tap
Login
.
When the password is correct, the
Home
screen is displayed.

User Authentication
395
Logging In Using the NFC Authentication Card
To use the NFC authentication card, the following settings are needed:
• Enable the NFC authentication function in Secure Settings of the operator panel.
(See "NFC Authentication")
• Register your user account to the printer so that you can log in with your NFC Authentication card.
(See "Creating a New User Account")
1
Turn on the printer and wait until the portal screen is displayed.
NOTE:
The NFC authentication is available only when the portal screen is displayed.
2
Wave the card over the NFC reader on the printer.
Yo u r
Home
screen is displayed.
Logging Out
When there is an account which is specified as Initial Login, turning on the printer will always display the
Home screen of that account. To log in to another account, you need to log out first.
1
Press the (
Login/Logout)
button on the operator panel.
The screen returns to the portal screen.
Logging In to the User Account on the Dell Smart Multifunction Printer |
S2815dn
You can select the user authentication method from either local authentication or remote authentication. To use the
remote authentication method, the LDAP or Kerberos server is required to authenticate the user.
NOTE:
The Dell Smart Multifunction Printer | S2815dn requires Kerberos Version 5 and Windows Active Directory on the
following Microsoft
®
Windows Server
®
operating systems:
•Windows Server
®
2003
•Windows Server
®
2008
•Windows Server
®
2008 R2
•Windows Server
®
2012
•Windows Server
®
2012 R2
Specifying the User Authentication Method
Use the operator panel menu or the Dell Printer Configuration Web Tool. For details about how to specify the user
authentication method, see "Desktop Login" or "Desktop Authentication."
Preparations for Remote Authentication
To use the remote authentication method, the printer needs to be specified so that the printer can access to the
LDAP or Kerberos server, and that the users need to be registered to the Server Address Book. For details, see "Using
the Server Address Book and Server Phone Book" and "Address Books."
Logging In for Remote Authentication
The Sign In screen is displayed when the printer is turned on while the printer is specified to use the remote
authentication method.
Enter the login name and password registered in the LDAP or Kerberos server to log in to the printer.

396
User Authentication
To use the LDAP authentication, you can select one of the following methods to enter the Login Name text box.
Method 1 [user name]
Method 2 [domain name]\[user name]
Method 3 [user name]@[domain1].[domain2]
The [domain2] in the method 3 can be specified in the Dell Printer Configuration Web Tool, using the “Use Added
Text String” feature. In the Login Name text box on the Sign In screen, enter only the [user name]@[domain1].
For details, see "LDAP Authentication."
To use the Kerberos authentication, specify the domain name in the Dell Printer Configuration Web Tool. For
details, see "Kerberos Server."
NOTE:
To enter the accented characters, tap
to display the keyboard for those characters.
NOTE:
When you enter the login name, you can also tap to select a recently entered login name from a list. The list can
contain up to eight recently entered login names.
NOTE:
When the remote authentication method is used, the same Home screen is displayed for each user.
Logging In for Local Authentication
When the printer is specified to use the local authentication method, you can log in to the account using the touch
panel.
1
Start the printer and wait until the portal screen is displayed.
2
Tap the account tile you want to log in to.
NOTE:
When the account you want to log in to does not require a password, skip step 3. The Home screen is displayed.
3
Enter the account password, and tap
Login
.
When the password is correct, the
Home
screen is displayed.
Logging Out
When there is an account which is specified as Initial Login, turning on the printer will always display the
Home screen of that account. To log in to another account, you need to log out first.
1
Press the (
Login/Logout)
button on the operator panel.
The screen returns to the portal screen.
Tile Customization
397
25
Tile Customization
The Home screen is like a desktop of your computer and customizable to suit your preference or work style.
For example, you can gather only the tiles you often use, or rearrange the tiles so that you can easily access the tiles
you often use.
The tiles on the Home screen can be the shortcuts to the jobs to be done on the printer, like "taking seven copies of
the handouts for the weekly meeting in 2-Sided copy" or "scanning the document and sending the scanned file to my
boss by e-mail." If you create a tile for a job with such job settings, the printer will automatically change the settings
of the printer as you specified just by tapping the tile.
NOTE:
The images used in this manual are those of the Dell™ Cloud Multifunction Printer | H815dw unless otherwise mentioned.
Adding a New Tile
You can select and add the tile from the pre-defined tiles, or you can create a new customized tile which includes
specific settings for copy, fax, scan or print. Up to 41 tiles can be placed in your Home screen.
Selecting From the Pre-defined Tiles
The printer offers the pre-defined tiles which include the default job settings.
1
On the
Home
screen, tap the
Add App
tile.
The
Apps List
screen is displayed.
2
Tap the tile you want to add to your
Home
screen.
indicates that the tile already exists in your
Home
screen.
Creating a New Tile Including the Job Settings
You may often use the same settings to copy a certain document, for example. You can create the tile including those
job settings and save it in your Home screen.
Creating Your Custom Tile for Job With Its Job Settings
The following explanation is an example to create your custom tile for copying.
To create custom tiles for other jobs such as faxing, scanning, or printing, follow the same procedures on the job
settings screen of each job.
1
Ta p t h e
Copy
tile in your
Home
screen.
The
Copy Settings
screen is displayed.
Dell
Document
Hub
Print
PDF/TIFF
Copy
Fax
Scan to
Email
Scan to PC
Home Guest

398
Tile Customization
2
Tap the setting tiles to change the copy options as needed. For more information, see "Setting Copy Options."
3
After setting all the necessary copy options, tap .
The
Save Settings
screen is displayed.
4
Tap the text box to name your settings.
5
Tap the color tile to select the color of your custom tile.
You can preview the image of your custom tile in
Preview
.
6
Ta p
Save As
.
Your settings are saved as a new tile in your
Home
screen.
NOTE:
When a tile has the Lock icon, that function is controlled by the Functions Control setting. To enable the function,
you need to enter the password.
For more information, see "Functions Control."
NOTE:
When you save the job settings for
Fax
or
Scan to Email
as a custom tile, recipient information is saved together
with the settings. To prevent from sending faxes or e-mails to wrong recipients, check that the fax number or the e-mail address
of the recipient shown in the operator panel is correct.
To prevent others from using customized tiles with personal information, logout from your user account after you finish using the
printer.
Editing Your Custom Tile for Job
You can edit the job settings saved in your custom tile.
1
Tap the tile you want to edit in your
Home
screen.
2
Change the job settings as needed.
3
Ta p .
The
Save Settings
screen is displayed.
4
Tap the text box to name your settings if you want to rename your settings.
5
Tap the color tile if you want to change the color of the tile.
6
Ta p
Save
.
Your settings are overwritten.
If you have renamed the tile name, the new settings overwrites the old settings, and the tile is renamed with a new
name.
NOTE:
If you tap
Save As
instead, the new tile will be added in your Home screen.
Moving or Deleting Your Tiles
You can move your tiles in your Home screen or delete your tiles from your Home screen.
For more information, see "
Moving, Adding or Deleting the Tiles
."
Using the Server Address Book and Server Phone Book
399
26
Using the Server Address Book and Server Phone
Book
With the E-mail Server Address Book and the Fax Server Phone Book, you can specify an e-mail address or fax
number of a recipient registered in the external LDAP server when sending a scanned image with e-mail or fax.
To use the E-mail Server Address Book and the Fax Server Phone Book, the printer needs to be configured in order
to access the external LDAP server.
NOTE:
To configure the settings of the external LDAP server, consult your system administrator.
NOTE:
The images used in this manual are those of the Dell™ Cloud Multifunction Printer | H815dw unless otherwise mentioned.
Preparing the Printer to Access the External LDAP Server
Set the following items using the Dell Printer Configuration Web Tool.
• Authentication type
•LDAP Server
• LDAP User Mapping
Starting the Dell Printer Configuration Web Tool
To launch the Dell Printer Configuration Web Tool, enter the IP address of your printer in your web browser.
If you do not know the IP address of your printer, print the system settings report or display the TCP/IP Settings
page, which lists the IP address. For details about how to find your printer's IP address, see "Verifying the IP Settings."
Setting Authentication Type
1
Select
Print Server Settings
, click the
Security
tab, and then select
Authentication System
.
2
From the
Authentication System Settings
drop-down menu under
Authentication Type
, select
LDAP
as the
authentication method, and then click
Apply New Settings
.
NOTE:
When the server you are accessing uses the Kerberos authentication, select Kerberos as the authentication
method. To set the information necessary to access the Kerberos server, enter the information in Kerberos Server under
the Security tab. For more information, see "Kerberos Server."
3
Click
Restart Printer
.

400
Using the Server Address Book and Server Phone Book
Setting LDAP Server
NOTE:
When SSL/TLS communication is required to access the LDAP server, enter a check in the Enable check box for LDAP-
SSL/TLS Communication in SSL/TLS under the Security tab. For more information, see "SSL/TLS."
1
Select
Print Server Settings
, click the
Security
tab, and then select
LDAP Server
.
2
In the
IP Address/Host Name & Port
text box under
Server Information
, enter IP address or the host name, and
the port number. The port number must be 389, 636, 3268, 3269, or between 5000 and 65535.
NOTE:
When LDAPS communication is required, set the port number to 636, and when you use the global catalog, set the
port number to 3269.
3
Under
Optional information
, set the following items.
For details on configuring each item, consult your network administrator.
a
In the
Search Directory
Root text box, enter the search directory root.
b
In
Login Credentials to Access LDAP Server
, select credential used to access the LDAP server.
c
In the L
ogin Name
text box, enter the login name.
d
In the
Password
text box, enter the login password using 1 to 127 alphanumeric characters. If the password is
left blank (NULL), you cannot log in to a server.
e
In the
Re-enter Password
text box, enter the login password again to confirm it.
b
f
a
c
d
g
h
i
e
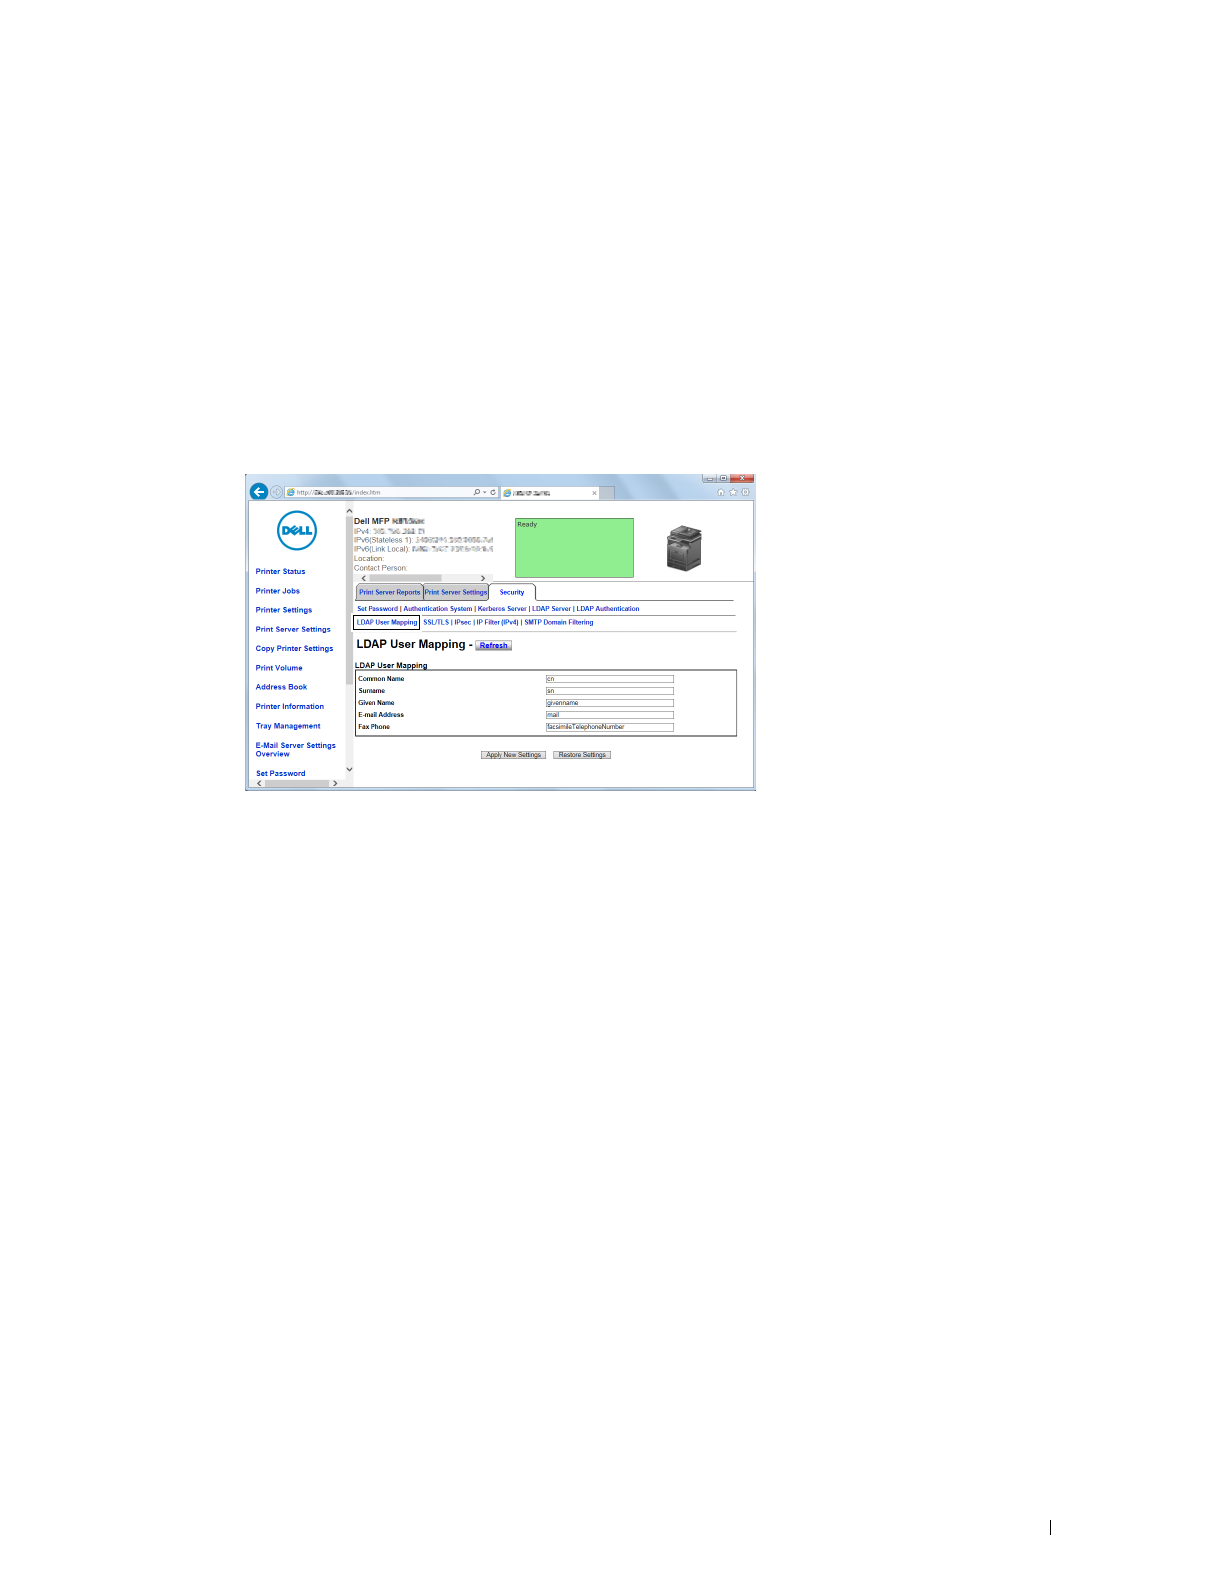
Using the Server Address Book and Server Phone Book
401
f
In
Search Time-Out
, select
Wait LDAP Server Limit
to follow the time specified by the LDAP server. Select
Wait
to specify the time between 5 and 120 seconds.
g
From the
Search Name Order
drop-down menu, specify the search order.
h
In
Server Address Book
, select the check box to enable the server address book.
i
In
Server Phone Book
, select the check box to enable the server phone book.
4
Click
Apply New Settings
.
5
Click
Restart Printer
.
Setting LDAP User Mapping
1
Select
Print Server Settings
, click the
Security
tab, and then select
LDAP User Mapping
.
2
Specify the attribute names used in the LDAP server. If the attribute names are not customized in the LDAP
server, leave the settings in this step as they are by default.
3
Click
Apply New Settings
if you make any changes.
4
Click
Restart Printer
.
402
Using the Server Address Book and Server Phone Book
Sending an E-mail With the Scanned File Using the E-mail Server Address
Book
1
Press the (
Home
) button.
2
Ta p
Scan to Email
.
3
Ta p
Address Book
.
4
Ta p
Network Address Book
.
5
Enter a keyword using the keyboard, and then tap
Search
.
6
Tap a recipient from the search result, and then tap
Done
.
NOTE:
The sender's e-mail address cannot be edited when the remote authentication is used as the user authentication
method on the Dell Smart Multifunction Printer | S2815dn.
7
Ta p
Send
to begin scanning the document and sending an e-mail with the scanned file.
Sending a Fax Using the Fax Server Phone Book
1
Press the (
Home
) button.
2
Ta p
Fax
.
3
Ta p
Phone Book
.
4
Ta p
Network Address Book
.
5
Enter a keyword using the keyboard, and then tap
Search
.
6
Tap a recipient from the search result, and then tap
Done
.
7
Ta p
Send
to send the fax.
Using Digital Certificates
403
27
Using Digital Certificates
The authentication feature using digital certificates upgrades security when sending print data or setting data.
This chapter describes how to manage digital certificates.
The printer supports the following formats as the digital certificates.
•PKCS#12
HTTPS, IPsec (PKI), Wi-Fi (WPA-Enterprise)
•PKCS#7 (for CSR)
HTTPS, IPsec (PKI)
NOTE:
For information about digital certificate error, see "Understanding Printer Messages" and "Digital Certificate Problems."
The following is a typical setup flow for using digital certificates.
Managing Certificates
This section describes how to manage digital certificates as follows.
• "Preparing to Manage Certificates"
• "Creating and Downloading a Certificate Signing Request (CSR)"
• "Importing a Digital Certificate"
• "Setting a Digital Certificate"
• "Confirming the Settings of a Digital Certificate"
• "Deleting a Digital Certificate"
• "Exporting a Digital Certificate"
Preparing to Manage Certificates
Before managing digital certificates, the following settings must be applied.
• "Setting HTTPS Communication"
• "Creating and Downloading a Certificate Signing Request (CSR)"
Prepare to manage digital certificates.
• Set HTTPS Communication
Import and set digital certificates.
• Import a Digital Certificate
• Set a Digital Certificate
• Confirm the Settings of a Digital Certificate
Set various security features using digital certificates.

404
Using Digital Certificates
Setting HTTPS Communication
Before managing certificates, set HTTPS communication with a self-signed certificate.
When Using the Dell™ Printer Configuration Web Tool
1
Launch
Dell Printer Configuration Web Tool
.
a
Open the web browser.
b
Enter the IP address of your printer in the web browser.
See "Dell™ Printer Configuration Web Tool.
"
2
Select
Print Server Settings
.
3
Click the
Security
tab.
4
Select
SSL/TLS
.
5
Click
Generate Self-Signed Certificate
of
Machine Digital Certificate
. The
Generate Self-Signed Certificate
page is displayed.
6
Select the public key method from the list of
Public Key Method
.
7
Select the size of public key from the list of
Size of Public Key
.
8
Specify the issuer of SSL self-signed certificate.
9
Click
Generate Signed Certificate
.
10
The
Restart Printer
button is displayed after generating the self-signed certificate, and then click
Restart Printer
.
11
Repeat steps 2 to 4 to display the
SSL/TLS
page after restarting the printer.
12
Confirm that the
HTTP- SSL/TLS Communication
column is set to
Enable
.
Creating and Downloading a Certificate Signing Request (CSR)
NOTE:
To download a CSR from the printer, you must set up HTTPS communication. For details, see "Setting HTTPS
Communication."
1
Launch
Dell Printer Configuration Web Tool
.
a
Open the web browser.
b
Enter the IP address of your printer in the web browser.
See "Dell™ Printer Configuration Web Tool.
"
2
Select
Print Server Settings
.
3
Click the
Security
tab.
4
Select
SSL/TLS
.
5
Click
Certificate Signing Request (CSR)
.
The
Certificate Signing Request (CSR)
page is displayed.
6
Specify each item of certificate signing request.
7
Click
Apply New Settings
.
8
Confirm the settings of certificate signing request, and then click
Download
.
9
Save a CSR file to your computer.
Use this CSR to receive a signed certificate from a trusted certificate authority.
Importing a Digital Certificate
CAUTION:
Before importing a certificate file, back up the certificate file.

Using Digital Certificates
405
NOTE:
To manage digital certificates, you must set up HTTPS communication. For details, see "Preparing to Manage
Certificates."
NOTE:
Be sure to import the certificate with Internet Explorer
®
.
NOTE:
After importing a PKCS#12 format certificate, the secret key is not exported even if you execute exporting.
1
Launch
Dell Printer Configuration Web Tool
.
a
Open the web browser.
b
Enter the IP address of your printer in the web browser.
See "Dell™ Printer Configuration Web Tool.
"
2
Select
Print Server Settings
.
3
Click the
Security
tab.
4
Select
SSL/TLS
.
5
Click
Upload Signed Certificate
of
Machine Digital Certificate
.
The
Upload Signed Certificate
page is displayed.
6
Enter a password.
NOTE:
The password is not necessary when importing a PKCS#7 format certificate, which is having the filename extension
of.p7b.
7
Re-enter the password again to confirm it.
8
Click
Browse
of
File Name,
and select the file to be imported.
9
Click
Import
to import the certificate.
Setting a Digital Certificate
NOTE:
To manage digital certificates, you must set up HTTPS communication. For details, see "Preparing to Manage
Certificates."
1
Launch
Dell Printer Configuration Web Tool
.
a
Open the web browser.
b
Enter the IP address of your printer in the web browser.
See "Dell™ Printer Configuration Web Tool.
"
2
Select
Print Server Settings
.
3
Click the
Security
tab.
4
Select
SSL/TLS
.
5
Click
Certificate Management
to display the
Certificate Management
page.
6
When setting a Wireless LAN (Server)* certificate, select
Trusted Certificate Authorities
within
Category
.
When setting a certificate of SSL Server, SSL Client, IPsec, or Wireless LAN (Client)*, select
Local Device.
7
Select the purpose of use from the
Certificate Purpose
list.
8
Click
Display the List
to display the
Certificate List
page.
NOTE:
If the list includes more than 20 certificates, click Next to display the next page.
9
Select the certificate to associate. At this time, confirm that
Vali d i t y
of the certificate selected is set to
Val i d
.
10
Click
Certificate Details
to display the
Certificate Details
page.
11
Confirm the content, and click
Use This Certificate
at the upper-right corner.
* Dell Cloud Multifunction Printer | H815dw only

406
Using Digital Certificates
Confirming the Settings of a Digital Certificate
NOTE:
To manage digital certificates, you must set up HTTPS communication. For details, see "Preparing to Manage
Certificates."
1
Launch
Dell Printer Configuration Web Tool
.
a
Open the web browser.
b
Enter the IP address of your printer in the web browser.
See "Dell™ Printer Configuration Web Tool.
"
2
Select
Print Server Settings
.
3
Click the
Security
tab.
4
Select
SSL/TLS
.
5
Click
Certificate Management
to display the
Certificate Management
page.
6
Select the category from the
Category
list.
7
Select the purpose of use from the
Certificate Purpose
list.
8
Click
Display the List
to display the
Certificate List
page.
NOTE:
If the list includes more than 20 certificates, click Next to display the next page.
9
The certificate displayed with an asterisk as "
*Valid
" in the
Val i d i t y
column is the certificate associated with the
use purpose and actually used.
Deleting a Digital Certificate
NOTE:
To manage digital certificates, you must set up HTTPS communication. For details, see "Preparing to Manage
Certificates."
1
Launch
Dell Printer Configuration Web Tool
.
a
Open the web browser.
b
Enter the IP address of your printer in the web browser.
See "Dell™ Printer Configuration Web Tool.
"
2
Select
Print Server Settings
.
3
Click the
Security
tab.
4
Select
SSL/TLS
.
5
Click
Certificate Management
to display the
Certificate Management
page.
6
Select the category from the
Category
list.
7
Select the purpose of use from the
Certificate Purpose
list.
8
Click
Display the List
to display the
Certificate List
page.
NOTE:
If the list includes more than 20 certificates, click Next to display the next page.
9
Select the certificate to be deleted.
10
Click
Certificate Details
to display the
Certificate Details
page.
11
To delete the selected certificate, click
Delete
at the upper-right corner.
NOTE:
When a certificate is deleted, the features associated with the deleted certificate are disabled. To delete a
certificate being used, either set the feature to OFF in advance or switch the association to another certificate, and then
switch to another operation mode if possible before deleting the certificate.
• For an SSL Server, switch to another certificate such as a self-signed certificate.

Using Digital Certificates
407
• For Wireless LAN*, change the Wireless Security setting to other than WPA-Enterprise before deleting the
certificate.
* Dell Cloud Multifunction Printer | H815dw only
Exporting a Digital Certificate
NOTE:
To manage digital certificates, you must set up HTTPS communication. For details, see "Preparing to Manage
Certificates."
NOTE:
Since the secret key is not exported, an imported PKCS#12 format certificate can be exported only as a PKCS#7
certificate.
1
Launch
Dell Printer Configuration Web Tool
.
a
Open the web browser.
b
Enter the IP address of your printer in the web browser.
See "Dell™ Printer Configuration Web Tool.
"
2
Select
Print Server Settings
.
3
Click the
Security
tab.
4
Select
SSL/TLS
.
5
Click
Certificate Management
to display the
Certificate Management
page.
6
Select the category from the
Category
list.
7
Select the purpose of use from the
Certificate Purpose
list.
8
Click
Display the List
to display the
Certificate List
page.
NOTE:
If the list includes more than 20 certificates, click Next to display the next page.
9
Select the certificate to be exported.
10
Click
Certificate Details
to display the
Certificate Details
page.
11
To export the selected certificate, click
Export this certificate
.
Setting the Features
You can set various security features using digital certificates.
See the following for details:
• "Setting the SSL-use Server Certificate (HTTP/IPP)"
• "Setting SMTP-SSL/TLS Communication"
• "Setting LDAP-SSL/TLS Communication"
• "Setting for Wireless LAN WPA-Enterprise (EAP-TLS)"
NOTE:
This feature is available on the Dell Cloud Multifunction Printer | H815dw only.
• "Setting for Wireless LAN WPA-Enterprise (PEAPV0-MS-CHAPV2, EAP-TTLS PAP, EAP-TTLS CHAP)"
NOTE:
This feature is available on the Dell Cloud Multifunction Printer | H815dw only.

408
Using Digital Certificates
Setting the SSL-use Server Certificate (HTTP/IPP)
NOTE:
To manage digital certificates, you must set up HTTPS communication. For details, see "Preparing to Manage
Certificates."
1
Import the certificate to be used with the SSL-use server. For more information, see "Importing a Digital
Certificate."
2
Set the certificate to be used with the SSL-use server. For more information, see "Setting a Digital Certificate."
3
Confirm whether the certificate is set correctly. For more information, see "Confirming the Settings of a Digital
Certificate."
NOTE:
Confirm whether the newly set certificate, not the self-signed certificate, is associated.
4
After restarting the printer, the certificate set as described above is used as the server certificate when executing
communication with HTTP/IPP-SSL/TLS.
Setting SMTP-SSL/TLS Communication
1
Select
Print Server Settings
from the left side of the page.
2
Click the
Security
tab.
3
Select
SSL/TLS
.
4
Select
Enable
from the
SMTP-SSL/TLS Communication
list.
5
Click
Apply New Settings
.
6
After restarting the printer, SMTP-SSL/TLS Communication is enabled.
Setting LDAP-SSL/TLS Communication
1
Select
Print Server Settings
from the left side of the page.
2
Click the
Security
tab.
3
Select
SSL/TLS
.
4
Select the
Enable
check box for
LDAP-SSL/TLS Communication
.
5
Click
Apply New Settings
.
6
After restarting the printer, LDAP-SSL/TLS Communication is enabled.
Setting for Wireless LAN WPA-Enterprise (EAP-TLS)
NOTE:
This feature is available on the Dell Cloud Multifunction Printer | H815dw only.
NOTE:
To manage digital certificates, you must set up HTTPS communication. For details, see "Preparing to Manage
Certificates."
NOTE:
WPA-Enterprise is available only when infrastructure is selected as the network type.
NOTE:
Be sure to import the certificate with Internet Explorer
®
.
NOTE:
After importing a PKCS#12 format certificate, the secret key is not exported even if you execute exporting.
1
Import the certificate to be used with Wireless LAN (server or root certificate). For details, see "Importing a Digital
Certificate."
2
Set the digital certificate for wireless LAN (server or root certificate).
a
Launch
Dell Printer Configuration Web Tool
.
b
Select
Print Server Settings
.
c
Click the
Security
tab.
d
Select
SSL/TLS
.

Using Digital Certificates
409
e
Click
Certificate Management
to display the
Certificate Management
page.
f
Select
Trusted Certificate Authorities
within
Category
.
g
Select
Wireless LAN (Server)
from the
Certificate Purpose
list.
h
From
Certificate Order
, select how the certificates are sorted in
Certificate List
. This setting is not necessary
if you do not need to specify the order for the certificates.
i
Click
Display the List
to display the
Certificate List
page.
j
Select the certificate to associate. At this time, confirm that
Vali d i t y
of the certificate selected is set to
Val i d
.
k
Click
Certificate Details
to display the
Certificate Details
page.
l
Confirm the content, and click
Use This Certificate
at the upper-right corner.
3
Confirm whether the certificate is set correctly. For details, see "Confirming the Settings of a Digital Certificate."
4
Import the certificate to be used with Wireless LAN (client or client certificate). For details, see "Importing a
Digital Certificate."
5
Set the digital certificate for wireless LAN (client or client certificate).
a
Launch
Dell Printer Configuration Web Tool
.
b
Select
Print Server Settings
.
c
Click the
Security
tab.
d
Select
SSL/TLS
.
e
Click
Certificate Management
to display the
Certificate Management
page.
f
Select
Local Device
within
Category
.
g
Select
Wireless LAN (Client)
from the
Certificate Purpose
list.
h
From
Certificate Order
, select how the certificates are sorted in
Certificate List
. This setting is not necessary
if you do not need to specify the order for the certificates.
i
Click
Display the List
to display the
Certificate List
page.
j
Select the certificate to associate. At this time, confirm that
Vali d i t y
of the certificate selected is set to
Val i d
.
k
Click
Certificate Details
to display the
Certificate Details
page.
l
Confirm the content, and click
Use This Certificate
at the upper-right corner.
6
Confirm whether the certificate is set correctly. For details, see "Confirming the Settings of a Digital Certificate."
7
Set WPA-Enterprise for EAP-TLS.
a
Launch
Dell Printer Configuration Web Tool
.
b
Click the
Print Server Settings
tab.
c
Select
Wi-Fi
.
d
Select
WPA-Enterprise-AES/WPA2-Enterprise-AES
or
Mixed Mode Enterprise
from the
Encryption
list of
Security Settings
.
NOTE:
WPA-Enterprise-AES/WPA2-Enterprise-AES or Mixed Mode Enterprise becomes available only when the
following steps are set correctly.
•Importing a Digital Certificate
•Setting a Digital Certificate
•Confirming the Settings of a Digital Certificate
e
Set
EAP-Identity
of
WPA-Enterprise
.
f
Select
EAP-TLS
from the
Authentication Method
list of
WPA-Enterprise
.
g
Click
Apply New Settings
.

410
Using Digital Certificates
Setting for Wireless LAN WPA-Enterprise (PEAPV0-MS-CHAPV2, EAP-TTLS PAP, EAP-TTLS CHAP)
NOTE:
This feature is available on the Dell Cloud Multifunction Printer | H815dw only.
NOTE:
To manage digital certificates, you must set up HTTPS communication. For details, see "Preparing to Manage
Certificates."
NOTE:
WPA-Enterprise is available only when infrastructure is selected as the network type.
NOTE:
Be sure to import the certificate with Internet Explorer
®
.
NOTE:
After importing a PKCS#12 format certificate, the secret key is not exported even if you execute exporting.
1
Import the certificate to be used with Wireless LAN (server or root certificate). For details, see "Importing a Digital
Certificate."
2
Set the digital certificate for wireless LAN (server or root certificate).
a
Launch
Dell Printer Configuration Web Tool
.
b
Select
Print Server Settings
.
c
Click the
Security
tab.
d
Select
SSL/TLS
.
e
Click
Certificate Management
to display the
Certificate Management
page.
f
Select
Trusted Certificate Authorities
within
Category
.
g
Select the purpose of use from the
Certificate Purpose
list.
h
Click
Display the List
to display the
Certificate List
page.
i
Select the certificate to associate. At this time, confirm that
Vali d i t y
of the certificate selected is set to
Val i d
.
j
Click
Certificate Details
to display the
Certificate Details
page.
k
Confirm the content, and click
Use This Certificate
at the upper-right corner.
3
Confirm whether the certificate is set correctly.
a
Launch
Dell Printer Configuration Web Tool
.
b
Select
Print Server Settings
.
c
Click the
Security
tab.
d
Select
SSL/TLS
.
e
Click
Certificate Management
to display the
Certificate Management
page.
f
Select the category from the
Category
list.
g
Select
Wireless LAN (Server)
from the
Certificate Purpose
list.
h
From
Certificate Order
, select how the certificates are sorted in
Certificate List
. This setting is not necessary
if you do not need to specify the order for the certificates.
i
Click
Display the List
to display the
Certificate List
page.
j
The certificate displayed with an asterisk as "
*Valid
" in the
Val i d i t y
column is the certificate associated with
the use purpose and actually used.
4
Set WPA-Enterprise for PEAPV0-MS-CHAPV2, EAP-TTLS PAP, or EAP-TTLS CHAP.
a
Launch
Dell Printer Configuration Web Tool
.
b
Click the
Print Server Settings
tab.
c
Select
Wi-Fi
.
d
Select
WPA-Enterprise-AES/WPA2-Enterprise-AES
or
Mixed Mode Enterprise
from the
Encryption
list of
Security Settings
.

Using Digital Certificates
411
NOTE:
WPA-Enterprise-AES/WPA2-Enterprise-AES or Mixed Mode Enterprise becomes available only when the
following steps are set correctly.
•Importing a Digital Certificate
•Setting a Digital Certificate
•Confirming the Settings of a Digital Certificate
e
Set
EAP-Identity
,
Login Name
, and
Password
of
WPA-Enterprise
.
f
Select either of the following from the
Authentication Method
list of
WPA-Enterprise
:
•
PEAPV0 MS-CHAPV2
•
EAP-TTLS PAP
•
EAP-TTLS CHAP
g
Click
Apply New Settings
.

412
Using Digital Certificates
Understanding Printer Messages
413
28
Understanding Printer Messages
The touch panel displays error messages describing the current state of the printer and indicates possible printer
problems you must resolve. This chapter provides a list of status codes or error messages, and informs you what you
can do to clear error messages. When you contact customer support about an error, have the status codes and error
messages ready.
CAUTION:
When an error occurs, the print data remaining on the printer and the information accumulated in the memory of
the printer may be corrupted.
NOTE:
An status code is listed in an error message.
NOTE:
For status codes that are not listed in this chapter, refer to instructions in each error messages.
Status Codes
Status-Code What you can do
004-310 Turn off the printer. Make sure that the tray is correctly installed, and turn on the printer. Contact customer
support if this failure is repeated.
005-110 Open the DADF cover and remove the jammed documents.
005-121
005-124 Open the DADF cover and remove all documents.
005-301 Close the DADF cover.
009-363 Turn off the printer. Make sure that the toner cartridge is correctly installed, and turn on the printer.
Contact customer support if this failure is repeated. For more information about installing the toner
cartridge, see "Replacing the Toner Cartridge."
009-370 Turn off the printer. Make sure that the black toner cartridge is correctly installed, and turn on the printer.
Contact customer support if this failure is repeated. For more information about installing the toner
cartridge, see "Replacing the Toner Cartridge."
010-317 Turn off the printer, wait for 40 minutes to let the fusing unit cool, and then make sure that the fusing unit
is fully installed. For more information about installing the fusing unit, see "Replacing the Fusing Unit, the
Transfer Unit, and the Retard Roller."
010-351 Turn off the printer. Remove the used fusing unit, and install a new fusing unit. For more information about
replacing the fusing unit, see "Replacing the Fusing Unit, the Transfer Unit, and the Retard Roller."
010-377 Turn off the printer. Confirm that the fusing unit is correctly installed, and turn on the printer. Contact
customer support if this failure is repeated. For more information about installing the fusing unit, see
"Replacing the Fusing Unit, the Transfer Unit, and the Retard Roller."
010-421 It is time to replace the fusing unit soon. Replace the fusing unit, following the procedures in "Replacing the
Fusing Unit, the Transfer Unit, and the Retard Roller."
010-910 Either one of the two envelope switches is not set to the correct position. Open the rear cover, and slide both
the envelope switches on the fusing unit to the correct position. For more information about setting the
envelope mode, see "To Set the Printer to the Envelope Mode."
010-911 The printer is not set to the envelope mode. To print on envelopes, it is recommended to set the printer to
the envelope mode. Open the rear cover, and slide both the envelope switches on the fusing unit to the
position.
010-912 The printer is set to the envelope mode. To cancel the envelope mode, open the rear cover, and slide both
the envelope switches on the fusing unit to the position. For more information about canceling the
envelope mode, see "To Cancel the Envelope Mode."
414
Understanding Printer Messages
010-913 The printer is set to the envelope mode. To cancel the envelope mode, open the rear cover, and slide both
the envelope switches to the position. For more information, see "To Cancel the Envelope Mode."
016-338 Turn off the printer, and turn it on again. Contact customer support if this failure is repeated.
016-404 Contact your system administrator. For more information about digital certificate problems, see "Digital
Certificate Problems."
016-405 Security setting mismatch. Initialize the security setting, and then restart the printer. Contact your system
administrator for the security resetting.
016-503 Unable to resolve the e-mail SMTP server hostname. Tap
Close
, or wait for 60 seconds for the printer to
recover. Check if SMTP server and DNS server are set correctly.
016-504 Unable to resolve the e-mail POP3 server hostname. Tap
Close
, or wait for 60 seconds for the printer to
recover. Check if user name and password for POP3 server and DNS server are set correctly.
016-505 E-mail POP3 server login error. Tap
Close
, or wait for 60 seconds for the printer to recover. Check if user
name and password used for POP3 server are set correctly.
016-506 SMTP server is not configured. Tap
Close
, or wait for 60 seconds for the printer to recover. Check if
SMTP server or POP server is set.
016-507 E-mail SMTP server login error. Tap
Close
, or wait for 60 seconds for the printer to recover. Check if user
name and password used for SMTP server are set correctly.
016-520 IPsec certificate error. (Certificate error of the printer.) The certificate of the printer is invalid. Contact your
system administrator. Reset the certificate from other connectable clients with Dell™ Printer
Configuration Web Tool. If no device can be connected, disconnect Ethernet cable, turn off the IPsec, and
then reset the certificate with Dell Printer Configuration Web Tool.
016-521 IPsec certificate error. (Remote device certification verification error.) The certificate of the destination
client is invalid. Contact your system administrator. Confirm the certificate of the destination client and
reset.
016-530 Authentication server access error. Turn off the printer, and turn it on again. Check the access settings for
the authentication server and try again. Contact customer support if this failure is repeated.
016-541 A wireless certificate (server or client) cannot be correctly referenced while using Wireless LAN
WPA-Enterprise or WPA2-Enterprise. Ask your system administrator to connect the printer with a wired
network, initialize the wireless settings, import the wireless certificate, and set WPA-Enterprise or
WPA2-Enterprise again.
016-542 A server certificate error has occurred when acquiring the certificate with the operation of WPA-Enterprise
or WPA2-Enterprise. This is a problem in the server certificate, such as the validity period has expired for
the server certificate being used with the Radius server. Ask your system administrator to confirm the server
certificate being used with the Radius server.
016-543 A wireless certificate (server or client) corruption error has occurred while using the Wireless LAN
WPA-Enterprise or WPA2-Enterprise. Ask your system administrator to connect the printer with a wired
network, initialize the wireless settings, import the wireless certificate, and set WPA-Enterprise or
WPA2-Enterprise again.
016-718 Error relating to USB Direct Print problems has occurred. While the USB memory is still inserted, set
Image Types
to
Photos(Standard Quality)
in Print Settings under the
Print
PDF/TIFF
menu and try printing again. For more information about this setting, see "Image Types."
016-720 Error relating to PDL emulation problems has occurred. Change the Print Mode setting in the Graphics tab
of the printer driver. Contact customer support if this failure is repeated.
016-756 Printing in the prohibited time. Contact your system administrator.
016-757 The account is not registered. Contact your system administrator.
016-758 The function cannot be used. Contact your system administrator.
016-759 Printable page limit is exceeded. Contact your system administrator.
Status-Code What you can do

Understanding Printer Messages
415
016-764 An error occurs when the printer connected to the SMTP server. Tap
Close
, or wait for 60 seconds for the
printer to recover. Check the SMTP server settings or contact the SMTP server administrator.
016-765 The capacity of the SMTP server is not enough. Tap
Close
, or wait for 60 seconds for the printer to
recover. Contact the SMTP server administrator.
016-766 The e-mail exceeds the SMTP server size restriction. Tap
Close
, or wait for 60 seconds for the printer to
recover. Contact the SMTP server administrator.
016-767 The e-mail address of the recipient is incorrect. Tap
Close
, or wait for 60 seconds for the printer to recover.
Check e-mail address, and try scanning again.
016-768 The e-mail address of the sender is incorrect. Tap
Close
, or wait for 60 seconds for the printer to recover.
Check e-mail address, and try scanning again.
016-786 A timeout error occurs when sending or receiving scanned data. Tap
Close
, or wait for 60 seconds for the
printer to recover. Check if the Ethernet cable is connected properly. If there is no problem with the
Ethernet cable, contact server administrator.
016-790 Network connection error. (IP address is not determined.) Tap
Close
, or wait for 60 seconds for the printer
to recover. Check if the Ethernet cable is connected properly. If there is no problem with the Ethernet cable,
contact server administrator.
016-799 Tap
Close
to clear the message and cancel the current print job. Confirm the configuration of the printer
on the printer driver.
016-930 The device is not supported. Remove it from the front USB port.
016-931 The USB hub is not supported. Remove it from the front USB port.
016-985 Tap
Close
, or wait for 60 seconds for the printer to recover. Retry scanning by lowering the resolution
setting or changing the file format of the scanned image.
016-986
024-910 The paper size set is different from the specified size. Load the specified paper in tray1. To load paper in
tray1, see "Loading Print Media."
024-911 The paper size set is different from the specified size. Load the specified paper in the optional 550-sheet
feeder (tray2). To load paper in tray2, see "Loading Print Media."
024-914 The paper size set is different from the specified size. Load the specified paper in the multipurpose feeder
(MPF). To load paper in the MPF, see "Loading Print Media."
024-965 Confirm that the size and type specified in the tray settings matches the size and type of paper loaded in the
tray.
024-966
024-969
026-721 Check your USB memory:
• If the file size or the number of files exceeds the limit of your USB memory.
• If your USB memory is write-protected.
027-446 Change the IPv6 address to avoid duplication. Turn off the printer, and turn it on again.
027-452 Change the IPv4 address to avoid duplication. Turn off the printer, and turn it on again.
031-521 SMB server login error. Tap
Close
, or wait for 60 seconds for the printer to recover. Confirm login-able
computer with your system administrator.
031-522 SMB server login error. Tap
Close
, or wait for 60 seconds for the printer to recover. Check if login name
(domain name and user name) and password are correct.
031-523 Invalid SMB share name. Tap
Close
, or wait for 60 seconds for the printer to recover. Check the share
name you specified.
031-524 Exceeded the SMB server user account limit. Tap
Close
, or wait for 60 seconds for the printer to recover.
Check the number of users who use the server at the same time is not exceeding the upper limit.
Status-Code What you can do

416
Understanding Printer Messages
031-525 SMB destination client permission error. Tap
Close
, or wait for 60 seconds for the printer to recover.
Check if the specified user can read and write file at the storage location.
031-526 Unable to resolve the SMB server hostname. Tap
Close
, or wait for 60 seconds for the printer to recover.
Check DNS connection, or check if forwarding destination server is registered with DNS.
031-527 Unable to resolve the SMB server hostname. Tap
Close
, or wait for 60 seconds for the printer to recover.
Set DNS address, or set forwarding destination server address as IP address.
031-528 Unable to connect to the SMB server. Tap
Close
, or wait for 60 seconds for the printer to recover. Check if
the printer can communicate via network with the forwarding destination SMB server. For example, check
the following:
• Connection of an Ethernet cable
•TCP/IP setting
• Communication with Port 137 (UDP), 138 (UDP), and 139 (TCP).
For communication beyond the subnet, contact your system administrator.
031-529 SMB server login error. (Invalid password.) Tap
Close
, or wait for 60 seconds for the printer to recover.
Check if password is correct.
031-530 The SMB share folder was not found on the specified SMB server. Tap
Close
, or wait for 60 seconds for
the printer to recover. Check the following:
• Check if the storage location is correct.
• Check if the file name you specified can be used when creating a file on the SMB server.
• Have your system administrator check the DFS setting, and directly specify the SMB server, share name, and
storage location according to the checked settings.
031-531 Unable to get a file or folder name on the SMB server. Tap
Close
, or wait for 60 seconds for the printer to
recover. Check access right of the folder you specified.
031-532 SMB scan file or folder name limit exceeded. Tap
Close
, or wait for 60 seconds for the printer to recover.
Change file name and forwarding destination folder, or move or delete file in forwarding destination folder.
031-533 Unable to write a file in the SMB server. Tap
Close
, or wait for 60 seconds for the printer to recover. Check
the following:
• If the file name you specified is not used by other users.
• If file or folder that has the same name as the one you specified already exists.
031-534 Unable to create a folder on the SMB server. Tap
Close
, or wait for 60 seconds for the printer to recover.
Check the following:
• If the file name you specified is not used by other users.
• If file or folder that has the same name as the one you specified already exists.
031-535 Unable to delete a file on the SMB server. Tap
Close
, or wait for 60 seconds for the printer to recover.
Check if other user is not operating file in storage location you specified.
031-536 Unable to delete a folder on the SMB server. Tap
Close
, or wait for 60 seconds for the printer to recover.
Check if other user is not operating file in storage location you specified.
031-537 SMB server capacity exceeded. Tap
Close
, or wait for 60 seconds for the printer to recover. Check if
storage location has free space.
031-539 The specified SMB server is invalid. Tap
Close
, or wait for 60 seconds for the printer to recover. Check if
server name is correct.
031-540 The specified domain name is invalid. Tap
Close
, or wait for 60 seconds for the printer to recover. Check
if domain name is correct.
031-541 Invalid user name specified for SMB server. Tap
Close
, or wait for 60 seconds for the printer to recover.
Check if login name (user name) is correct.
Status-Code What you can do

Understanding Printer Messages
417
031-542 TCP/IP not initialized. Tap
Close
, or wait for 60 seconds for the printer to recover. Wait for a while and try
the same operation again. Contact customer support if this failure is repeated.
031-543 SMB server login error. Tap
Close
, or wait for 60 seconds for the printer to recover. Check login permitted
time with your system administrator.
031-544 SMB server login error. (Expired password.) Tap
Close
, or wait for 60 seconds for the printer to recover.
Check the password valid period with your system administrator.
031-545 SMB server login error. (Password change required.) Tap
Close
, or wait for 60 seconds for the printer to
recover. Check necessity of password change with your system administrator.
031-546 SMB server login error. (Invalid user is specified.) Tap
Close
, or wait for 60 seconds for the printer to
recover. Contact your system administrator for the destination server settings.
031-547 SMB server login error. (The specified user is restricted from accessing the SMB server.) Tap
Close
, or wait
for 60 seconds for the printer to recover. Contact your system administrator for the destination server
settings.
031-548 SMB server login error. (Logon time of SMB destination expired.) Tap
Close
, or wait for 60 seconds for
the printer to recover. Contact your system administrator for the destination server settings.
031-549 SMB server login error. Specified user is restricted, and a null password is prohibited. Tap
Close
, or wait
for 60 seconds for the printer to recover. On server security settings, check access permission of null
password user.
031-550 Append command not supported by SMB server. Tap
Close
, or wait for 60 seconds for the printer to
recover. Check if the printer has access rights to append data to the SMB server. Check if server supports
SMB append command.
031-551 Rename command not supported by SMB server. Tap
Close
, or wait for 60 seconds for the printer to
recover. Check if the printer has access rights to rename data on the SMB server. Check if server supports
SMB append command.
031-552 Job canceled. Tap
Close
, or wait for 60 seconds for the printer to recover. Change the file name that
already exists on FTP server.
031-574 Unable to resolve the FTP server hostname. Tap
Close
, or wait for 60 seconds for the printer to recover.
Check DNS connection, or check if name of forwarding destination server is registered with DNS.
031-575 Unable to resolve the FTP server hostname. Tap
Close
, or wait for 60 seconds for the printer to recover.
Set DNS address, or set forwarding destination server address as IP address.
031-576 Unable to connect to the FTP server. Tap
Close
, or wait for 60 seconds for the printer to recover. Check if
the printer communicates with forwarding destination FTP server. For example, check connection of
Ethernet cable and if the IP address of the server is correct.
031-578 FTP server login error. Tap
Close
, or wait for 60 seconds for the printer to recover. Check if login name
(user name) and password are correct.
031-579 Invalid FTP subdirectory path. Tap
Close
, or wait for 60 seconds for the printer to recover. Check if
storage location is correct.
031-580 Failed to obtain a file or folder name of the FTP server. Tap
Close
, or wait for 60 seconds for the printer to
recover. Check server access right.
031-581 FTP scan file or folder name limit exceeded. Tap
Close
, or wait for 60 seconds for the printer to recover.
Change file name and forwarding destination folder, or move or delete file in forwarding destination folder.
031-582 Unable to write a scan file to the FTP server location. Tap
Close
, or wait for 60 seconds for the printer to
recover. Check if the file name you specified can be created in storage location. Check if storage location has
free space.
031-584 Unable to create a scan folder on the FTP server. Tap
Close
, or wait for 60 seconds for the printer to
recover. Check if the folder name you specified can be created in storage location. Check if the folder that
has the same name as the one you specified already exists.
Status-Code What you can do

418
Understanding Printer Messages
031-585 Unable to delete a file on the FTP server. (DEL command failure.) Tap
Close
, or wait for 60 seconds for
the printer to recover. Check server access rights.
031-587 Unable to delete a folder on the FTP server. (RMD command failure.) Tap
Close
, or wait for 60 seconds
for the printer to recover. Check server access rights.
031-588 Unable to write a file to the FTP server location. Tap
Close
, or wait for 60 seconds for the printer to
recover. Check if storage location has free space.
031-590 Job canceled. Tap
Close
, or wait for 60 seconds for the printer to recover. Change the file name that
already exists on FTP server.
031-594 FTP transfer type error. (TYPE command failure.) Tap
Close
, or wait for 60 seconds for the printer to
recover. Try the same operation again. Contact customer support if this failure is repeated.
031-595 FTP data port error. (PORT command failure.) Tap
Close
, or wait for 60 seconds for the printer to recover.
Try the same operation again. Contact customer support if this failure is repeated.
031-598 FTP append data error. (APPE command failure.) Tap
Close
, or wait for 60 seconds for the printer to
recover. Check if the printer has access rights to append data to the FTP server. Check if server supports
FTP append command.
031-599 FTP rename file error. (RNFR command failure.) Tap
Close
, or wait for 60 seconds for the printer to
recover. Check if the printer has access rights to rename data on the FTP server. Check if server supports
FTP rename command.
033-513 Tap
Close
, or wait for 60 seconds for the printer to recover. Try the following:
• Print the received fax, or wait for a while until sending a fax is completed.
• Print the fax job stored using the Secure Receive feature.
For more information about the Secure Receive feature, see "Using the Secure Receiving Mode."
033-527 Tap
Close
, or wait for 60 seconds for the printer to recover. Wait for a while until the printer is not busy,
and try again.
033-528 Tap
Close
, or wait for 60 seconds for the printer to recover. Check the available time period for the FAX,
and try again.
033-762 Tap
Close
, or wait for 60 seconds for the printer to recover. The printer rejects faxes sent from unwanted
numbers. For more information, see "Junk Fax Setup."
033-776 The size of the fax document data is too large and may have exceeded the space available in memory. Lower
the scan resolution rate and then try scanning again. For details, see "Adjusting the Document Resolution."
033-788 Tap
Close
, or wait for 60 seconds for the printer to recover. Try the following:
• Remove the received fax, or wait for a while until sending a fax is completed.
• Print the fax job stored using the Secure Receive feature.
For more information about the Secure Receive feature, see "Using the Secure Receiving Mode."
034-515 Tap
Close
, or wait for 60 seconds for the printer to recover. Try the following:
•Try the same operation.
• Check the printer or remote machine if the memory is full.
034-791 Tap
Close
, or wait for 60 seconds for the printer to recover. Check if the telephone line cord is connected
properly. If the line connection is correct, check the following:
• If Tone/Pulse setting is correct.
For more information about Tone/Pulse setting, see "Tone / Pulse."
If Tone/Pulse setting is correct, check the following:
• If the remote machine can receive a fax.
Status-Code What you can do

Understanding Printer Messages
419
035-701 Tap
Close
, or wait for 60 seconds for the printer to recover. Check the following:
• Status of the remote machine
• Tone/Pulse setting
For more information about Tone/Pulse setting, see "Tone / Pulse."
035-708 Tap
Close
, or wait for 60 seconds for the printer to recover. Try the following:
•Try the same operation.
• Reduce the modem speed.
For more information about modem speed, see "Modem Speed."
035-717 Tap
Close
, or wait for 60 seconds for the printer to recover. Reduce the modem speed. For more
information about modem speed, see "Modem Speed."
035-718 Tap
Close
, or wait for 60 seconds for the printer to recover. Check the status of the remote machine.
035-720 Tap
Close
, or wait for 60 seconds for the printer to recover. Check the features of the remote machine.
035-781 Tap
Close
, or wait for 60 seconds for the printer to recover. Check if the remote machine is busy.
042-700 Wait for a while until the printer cools down. Contact customer support if this failure is repeated.
077-300 Close the front cover.
077-302 Close the rear cover.
091-411 The time to replace the drum cartridge is coming soon. Prepare the new drum cartridge.
091-479 Open the front cover. Remove the used drum cartridge, and install a new drum cartridge. For more
information about replacing the drum cartridge, see "Replacing the Drum Cartridge."
091-914 Reinstall the drum cartridge. If the message remains, replace the cartridge. For more information about
replacing the drum cartridge, see "Replacing the Drum Cartridge."
091-921 Make sure that the drum cartridge is fully installed. For more information about installing the drum
cartridge, see "Replacing the Drum Cartridge."
091-931 Remove the used drum cartridge, and install a new cartridge. For more information about replacing the
drum cartridge, see "Replacing the Drum Cartridge."
091-942 Reinstall the drum cartridge. If the message remains, replace the cartridge. For more information about
replacing the drum cartridge, see "Replacing the Drum Cartridge."
091-963 Remove the unsupported drum cartridge, and install a supported drum cartridge. For more information
about installing the drum cartridge, see "Replacing the Drum Cartridge."
093-426 The time to replace the toner cartridge is coming soon. Prepare the new toner cartridge.
093-922 Open the front cover, and pull out the toner cartridge. Shake it five or six times, and reinstall it. For more
information about replacing the toner cartridge, see "Replacing the Toner Cartridge."
093-933 Remove the used toner cartridge, and install a new cartridge. For more information about replacing the
toner cartridge, see "Replacing the Toner Cartridge."
093-963 Remove the unsupported toner cartridge, and install a supported toner cartridge. For more information
about installing the toner cartridge, see "Replacing the Toner Cartridge."
093-973 Make sure that the toner cartridge is fully installed. For more information about installing the toner
cartridge, see "Replacing the Toner Cartridge."
116-722 Tap
Close
for the printer to recover. Check the Web Services on Devices (WSD) scan address and the
destination computer, and then try scanning again. Contact your system administrator.
142-700 Do not start another print job until the warning message disappears.
193-700 When the genuine toner cartridge is installed, change the Non-Dell Toner setting to disable using the
Dell
Printer Configuration Web Tool
or the
Tool Box
.
Status-Code What you can do

420
Understanding Printer Messages
Error Messages
Message Cause Action
Cannot access the LDAP address
book. Consult your network
administrator if this error persists.
The printer fails to authenticate against an
authentication server.
Check the server settings. If the error
persists, consult your network administrator.
An SSL authentication error on connection
to the LDAP server; an SSL authentication
internal error occurs.
If the error persists, consult your network
administrator.
Cannot access the LDAP address
book. The LDAPS server certificate
is not correct.
An SSL authentication error on connection
to the LDAP server; the server certificate
data is incorrect.
Check the root certificate of the LDAP
server SSL certificate on the printer.
Cannot access the LDAP address
book. The LDAPS SSL client
certificate is not set.
An SSL authentication error on connection
to the LDAP server; the LDAP server cannot
acquire an SSL client certificate.
Check that an SSL client certificate is
correctly imported into the printer.
Cannot access the LDAP address
book. The server names of LDAPS
and the SSL certificate do not
match.
An SSL authentication error on connection
to the LDAP server; the server certificate for
the LDAP server is not yet valid or has
expired.
Change to a valid LDAP server SSL
certificate.
An SSL authentication error on connection
to the LDAP server; the LDAP server name
does not match the certificate.
Set the LDAP server address on the printer
to match the address on the LDAP server
SSL certificate.
Cannot access the LDAP address
book. The time settings of the
printer and the Kerberos server do
not match.
The printer and the Kerberos server clocks
have a time difference that exceeds the
Kerberos server clock skew value.
Check that the printer and the Kerberos
server clocks have the correct time.
Cannot connect to server. Check the
server settings.
The specified server settings such as IP
address and realm/domain name are
incorrect.
Make sure that the correct IP address/host
name, port number, realm/domain name,
and search directory root are specified in IP
Address / Host Name & Port, Domain
Name, and Search Directory Root on the
Dell Printer Configuration Web Tool. (See
"Kerberos Server" and "LDAP Server.")
The LDAP or Kerberos version on the server
is not compatible with the printer.
Consult your network administrator.
The server is down. Check that the server is functioning
normally.
Change the server settings and
confirm the server connection.
The printer cannot search for destinations
within the specified time.
Increase the time setting for Search Time-
Out on the Dell Printer Configuration Web
Tool. (See "Authentication System" and
"LDAP Server.")
Check that the printer and the server are
properly connected with an Ethernet cable.
If there are not any problems with the
connection and the error persists, the server
settings may have been changed. Consult
your network administrator.
Check the authentication settings. The login name and password for access to
an authentication server are incorrect.
Make sure that the correct login name and
password are specified in Login Name and
Password on the Dell Printer Configuration
Web Tool. (See "Kerberos Server" and
"LDAP Server.")

Understanding Printer Messages
421
Invalid search characters or LDAP
User Mapping incorrectly configured
for Configuration Web Tool.
The LDAP search filter fails to work properly
as special characters are used in your search
condition or on the LDAP User Mapping
page on the Dell Printer Configuration
Web Tool.
Remove special characters, and then search
again. (See "LDAP User Mapping.")
Network connection is not ready. Try
again later.
You have started searching for destinations
before the IP address is set for the printer.
Wait for a while, and then search again.
No attribute or invalid name.
Confirm address info. on server.
The address information on the server
contain incorrect data or are insufficient to
get your search request.
Check the address information registered on
the server or consult your network
administrator.
No Entries. The printer cannot find any destinations
that meet your search condition.
Ta p
OK
to return to the Search Network
Address Book screen, and then specify a
new condition to search again.
Search Directory Root incorrectly
configured for Configuration Web
Tool.
The directories that do not exist in the
LDAP server are specified or an invalid DN
syntax is specified.
Make sure that valid values are specified in
Search Directory Root on the Dell Printer
Configuration Web Tool. (See "LDAP
Server.") Specify the origin of the search
with the correct DN syntax, as shown in the
following example:
dc=w2008ad,dc=addressbook,dc=net
Too many search results. Only a
maximum of 50 search scan be
displayed. Please refine your search if
needed.
The number of search results has exceeded
the limits (50 search results) the printer can
display.
Ta p
Close
to display the search results. If
you cannot find your desired destination on
the result list, specify a new condition to
search again.
Authentication server access Error
016-530
Restart the printer.
Some other error occurs regarding the LDAP
server address book.
Turn off the printer, and turn it on again. If
the error persists, consult your network
administrator.
Message Cause Action

422
Understanding Printer Messages

Specifications
423
29
Specifications
NOTE:
The images used in this manual are those of the Dell™ Cloud Multifunction Printer | H815dw unless otherwise mentioned.
Operating System Compatibility
Your Dell Cloud Multifunction Printer | H815dw and Dell Smart Multifunction Printer | S2815dn are compatible
with Microsoft
®
Windows Server
®
2003, Windows Server
®
2003 x64 Edition, Windows Server
®
2008, Windows
Server
®
2008 64-bit Edition, Windows Server
®
2008 R2, Windows Vista
®
, Windows Vista
®
64-bit Edition,
Windows
®
7, Windows
®
7 64-bit Edition, Windows
®
8, Windows
®
8 64-bit Edition, Windows Server
®
2012,
Windows
®
8.1, Windows
®
8.1 64-bit Edition, Windows Server
®
2012 R2, Windows
®
RT, Windows
®
RT 8.1, Mac
OS X 10.5, Mac OS X 10.6, OS X 10.7, OS X 10.8, OS X 10.9, OS X 10.10, Red Hat Enterprise Linux 6 Desktop
(32/64bit), SUSE Linux Enterprise Desktop 11 (32/64bit), and Ubuntu 12.04 LTS (32/64bit).
Power Supply
*
This condition is equivalent to Network standby mode, the power consumption in this condition is that all wired
network ports are connected and all wireless network ports are activated.
Dimensions
Height: 492 mm (19.37 inches) Width: 439 mm (17.28 inches) Depth: 438 mm (17.24 inches)
Weight (including toner cartridge and drum cartridge): 19.0 kg (41.90 lb)
Memory
Rated voltage 220 VAC - 240 VAC 110 VAC - 127 VAC
Frequency 50/60 Hz 50/60 Hz
Current 6 A or less 11 A or less
Power consumption Ready
Sleep
Deep Sleep
Offline
52.0 W
14.0 W
1.7 W*
0 W
52.0 W
14.0 W
1.7 W
0 W
TEC value 2.7 kWh 2.8 kWh
Memory 1 GB
Speed DDR3-1066MHz

424
Specifications
Page Description Language (PDL)/Emulation, Operating System, and
Interface
MIB Compatibility
Management Information Base (MIB) is a database containing information about network devices (such as adapters,
bridges, routers, or computers). This information helps network administrators manage the network (analyze
performance, traffic, errors, and so on). Dell Cloud Multifunction Printer | H815dw and Dell Smart Multifunction
Printer | S2815dn comply with standard industry MIB specifications, allowing the printer to be recognized and
managed by various printer and network management software systems.
Environment
Operation
Print Quality Guarantee
Storage
Altitude
PDL/Emulations PCL 6, PCL5e, PostScript 3 Compatible, HBPL, XML Paper Specification (Host Based/PCL 6)
Operating systems Microsoft
®
Windows Server
®
2003, Windows Server
®
2003 x64 Edition, Windows Server
®
2008,
Windows Server
®
2008 64-bit Edition, Windows Server
®
2008 R2, Windows Vista
®
, Windows
Vista
®
64-bit Edition, Windows
®
7, Windows
®
7 64-bit Edition, Windows
®
8, Windows
®
8 64-bit
Edition, Windows Server
®
2012, Windows
®
8.1, Windows
®
8.1 64-bit Edition, Windows Server
®
2012 R2, Mac OS X 10.5, Mac OS X 10.6, OS X 10.7, OS X 10.8, OS X 10.9, OS X 10.10, Red Hat
Enterprise Linux 6 Desktop (32/64bit), SUSE Linux Enterprise Desktop 11 (32/64bit), and Ubuntu
12.04 LTS (32/64bit).
Interfaces Standard local: USB 2.0
Standard wireless network (Dell Cloud
Multifunction Printer | H815dw only):
IEEE 802.11b/802.11g/802.11n
Standard wired network: 10Base-T/100Base-TX/
1000Base-T Ethernet
Temperature 10
°C - 32 °C
Relative humidity
10 % - 85 % RH (no condensation)
Temperature
15 °C - 28 °C
Relative humidity
20 % - 70 % RH (no condensation)
Temperature range
-20 °C to 40 °C (0 °F to 104 °F)
Storage humidity range
5 % - 85 % RH (no condensation)
Operating
Up to 3,100 m (10,170 feet)
Storage
Up to 3,100 m (10,170 feet)
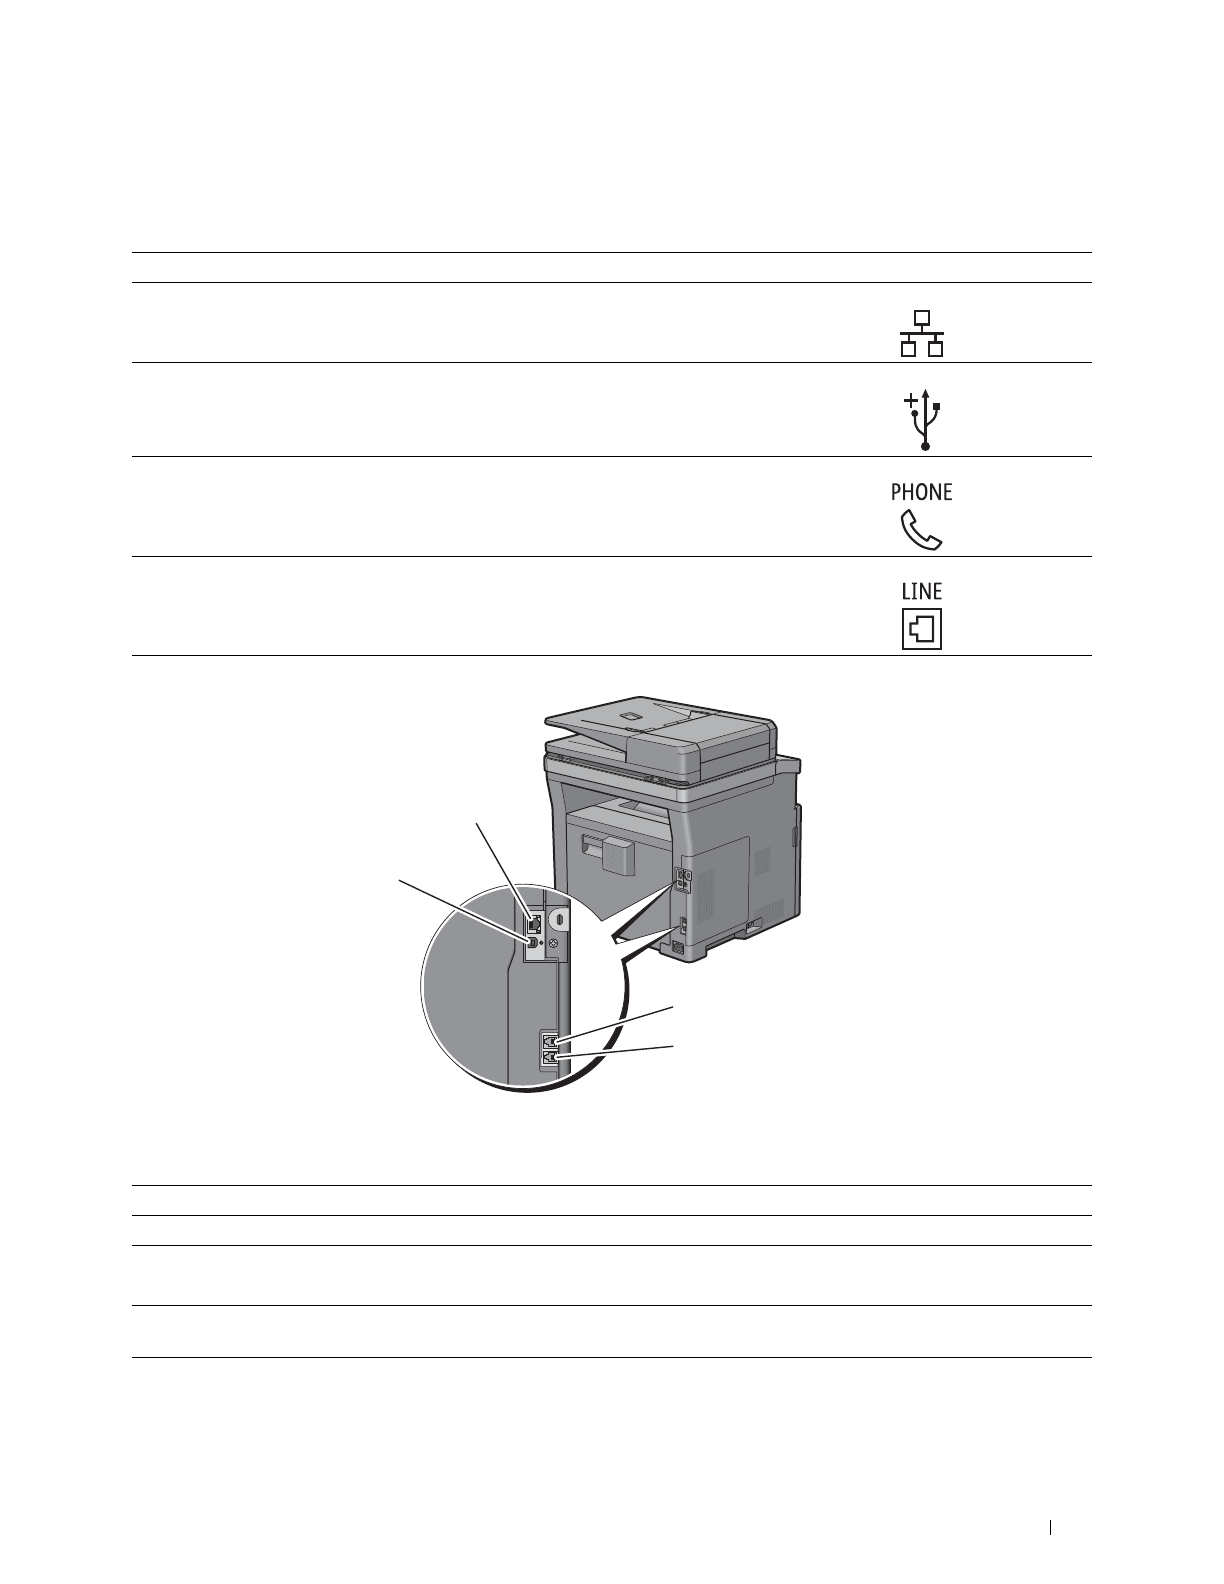
Specifications
425
Cables
Your interconnection cable must meet the following requirements:
Print Specifications
Connection type Connection specifications and symbols
1Ethernet 10Base-T/100Base-TX/
1000Base-T
2USB USB 2.0
3Phone connector
4Wall jack connector
Item Description
Print resolution 600 dpi x 600 dpi
Print speed Simplex: 38 ppm (A4), 40 ppm (Letter)
Duplex: 22 ppm (A4), 24 ppm (Letter)
Paper size A4, B5, A5, B6, A6, Letter, Executive, Folio (8.5" x 13"), Legal, Statement,
Envelope #10, Monarch, DL, C5, Japanese Postcard
1
2
3
4

426
Specifications
Copy Specifications
Scanner Specifications
*1
: Windows
®
OS only
*2
: Only on Windows Vista
®
/Windows
®
7/Windows
®
8/Windows
®
8.1
Item Description
Copy resolution Optical: 600 dpi x 600 dpi
Copy speed 38 cpm (A4)/40 cpm (Letter) or more (When using the document glass to make
sequential copies of a document with pages scanned one by one.)
Simplex: 22 cpm (A4)/24 cpm (Letter) or more
Duplex: 7 cpm (A4/Letter) or more
(When using the Duplex Automatic Document Feeder (DADF) to make
sequential copies of multiple documents.)
Paper size A4, B5, A5, B6, A6, Letter, Executive, Folio (8.5" x 13"), Legal, Statement,
Envelope #10, Monarch, DL, C5, Japanese Postcard
Zoom rate Document glass: 25 % - 400 %, DADF: 25 % - 400 %
Multiple copies 1 - 99
Copy mode (=Original type) Text, Text & Photo, Photo
Scanning method Document glass: Document-fixed flatbed scanning
DADF: Carriage-fixed, document-feeding scanning (2- side scanning)
Item Description
Compatibility TWAIN, TWAIN-Net, Windows Image Acquisition (WIA)
*1
,
Scan Service for Web Services on Devices (WSD)
*2
Scan resolution Optical: 600 dpi x 300 dpi (Color only), 600 dpi x 400 dpi, 600 dpi x 600 dpi, 1,200
dpi x 1,200 dpi
Enhanced (Pull Scan):
• TWAIN – 50 x 50 to 9,600 x 9,600 dots/25.4 mm
• Windows Image Acquisition (WIA) – 75/100/150/200/300/400/600 dots/25.4 mm
Enhanced (Push Scan):
200(Default)/300/400/600 dots/25.4 mm
Color bit depth
24 bit
Mono bit depth
1 bit for Line art. 8 bit for Gray scale
Effective scanning length
Document glass: 297 mm. DADF: 355.6 mm
Effective scanning width
215.9 mm
Scan speed (Text mode)
Monochrome: 665 μs/line (600 dpi), 1330 μs/line (1200 dpi)
Color: 1330 μs/line (600 dpi), 2660 μs/line (1200 dpi)
Specifications
427
Facsimile Specifications
Wireless Connection Specifications
NOTE:
The wireless network connection feature is available on the Dell Cloud Multifunction Printer | H815dw only.
*1
EAP method supports PEAPv0, EAP-TLS, EAP-TTLS PAP, and EAP-TTLS CHAP.
*2
WPS 2.0 compliant.
Item Description
Compatibility ITU-T Super G3, ITU-T G3 ECM, ITU-T G3
Applicable line Public Switched Telephone Network (PSTN), Private Branch Exchange (PBX), or
Leased line (3.4 KHz/2-wire)
Data coding 1bit/JBIG/MMR/MR/MH
Max modem speed 33.6 Kbps
Transmission speed Approx. 3 seconds/page *Transmission time applies to memory transmission of
text data scanned in Standard resolution with ECM using only ITU-T No.1 Chart.
Scanning speed Document glass: approx. 3 seconds/A4 (at standard fax resolution mode) DADF:
approx. 5 seconds/Letter (at standard fax resolution mode), 7.5 seconds/Letter (at
fine fax resolution mode)
Maximum document length Document glass: 297 mm DADF: 355.6 mm
Paper size Letter, A4 (depending on a country)
Resolution Standard: R8 x 3.85 l/mm, Fine: R8 x 7.7 l/mm, Super Fine: 400 dpi x 400 dpi,
Photo: R8 x 7.7 1/mm
User memory 4 MB (320 pages)
Halftone 256 levels
Item Description
Connectivity technology Wireless
Compliant standards IEEE 802.11b, 802.11g, and 802.11n
Bandwidth 2.4 GHz
Data transfer rate IEEE 802.11n: 65 Mbps
IEEE 802.11g: 54, 48, 36, 24, 18, 12, 9, and 6 Mbps
IEEE 802.11b: 11, 5.5, 2, and 1 Mbps
Security 64 (40-bit key)/128 (104-bit key) WEP,
WPA- PSK (TKIP, AES), WPA2-PSK (AES), WPA-Enterprise (TKIP, AES)
*1
,
WPA2-Enterprise (AES)
*1
Wi-Fi Protected Setup (WPS)
*2
Push-Button Configuration (PBC),
Personal Identification Number (PIN)
Wireless mode Infrastructure, Ad-hoc, Wi-Fi Direct

428
Specifications