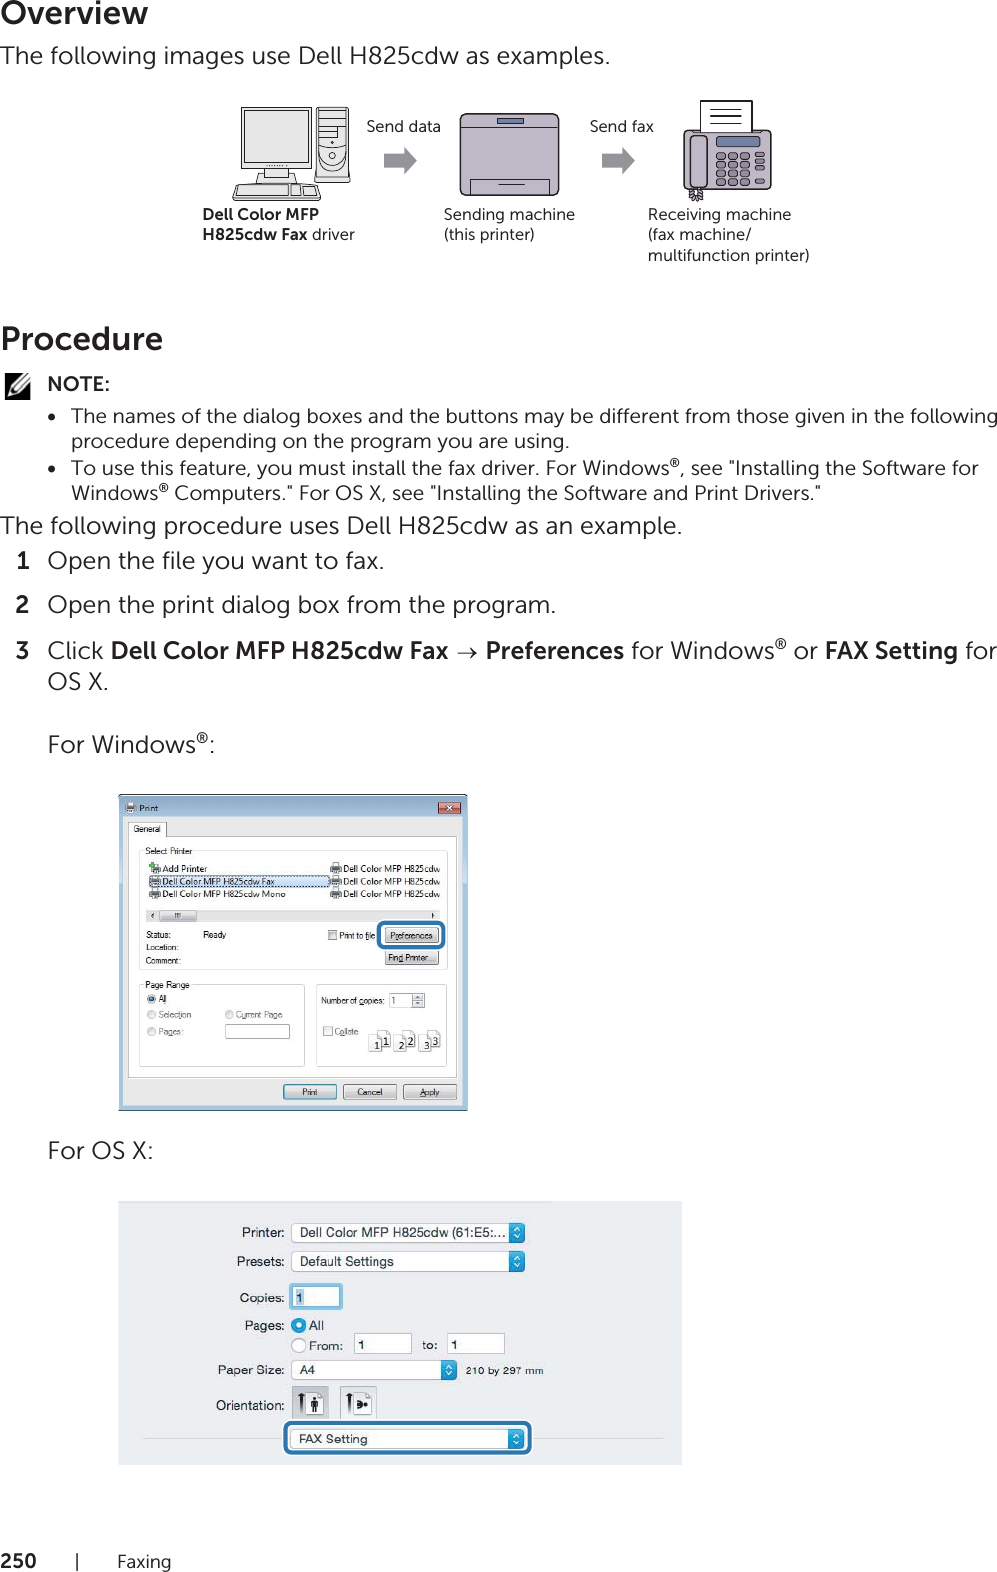
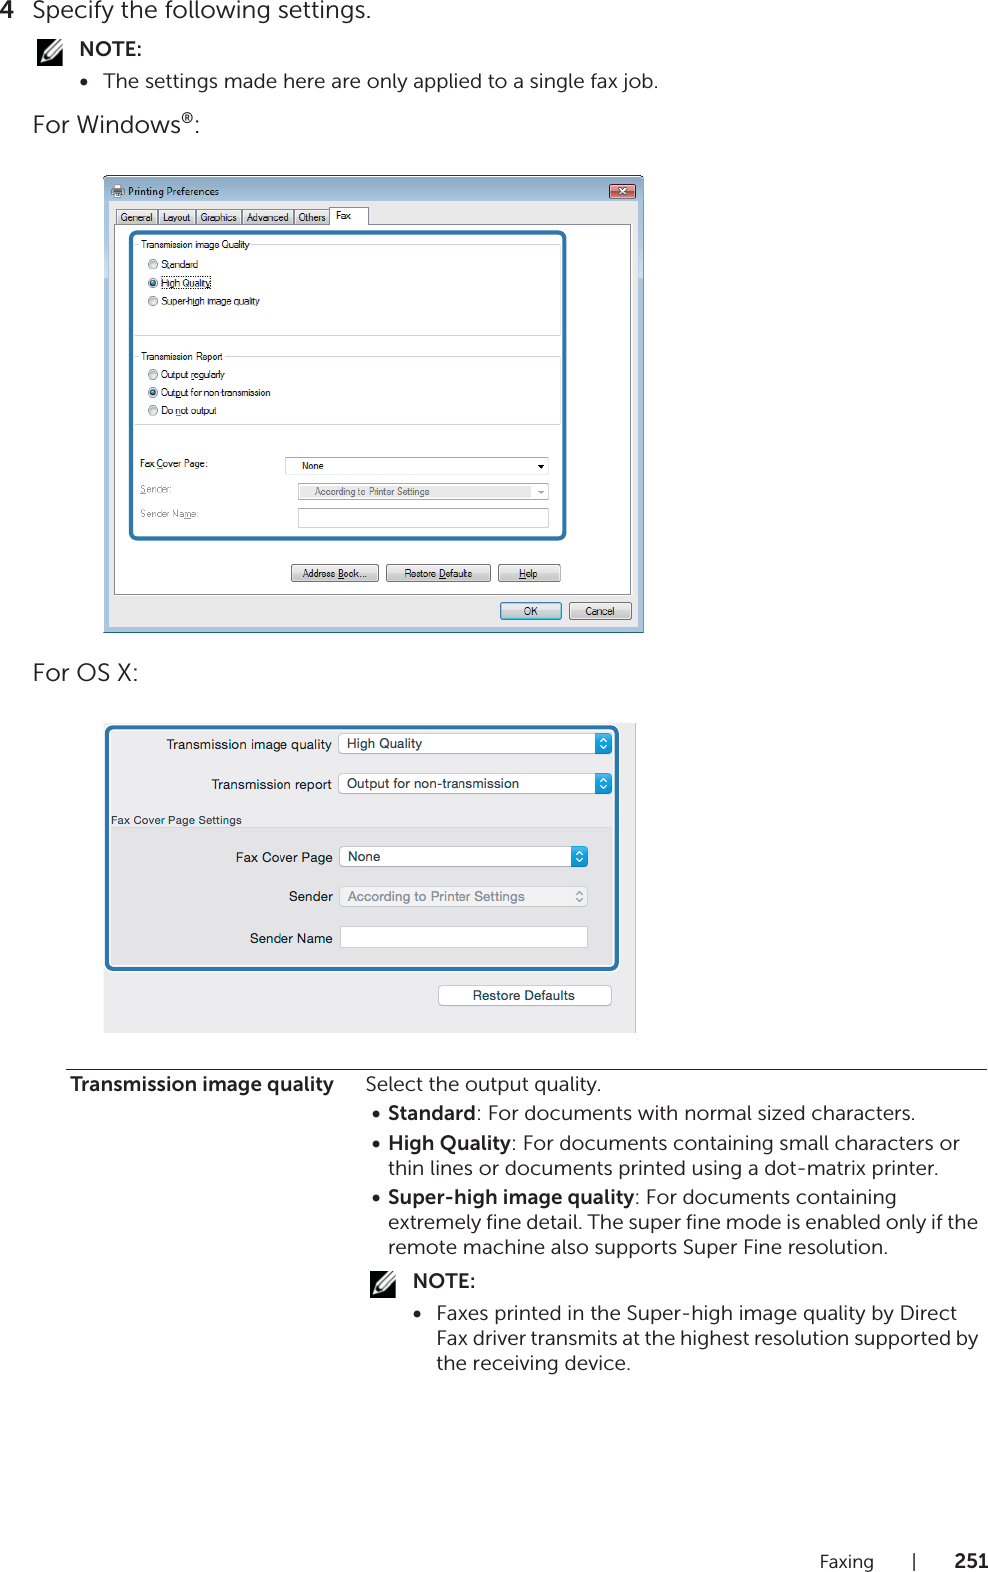
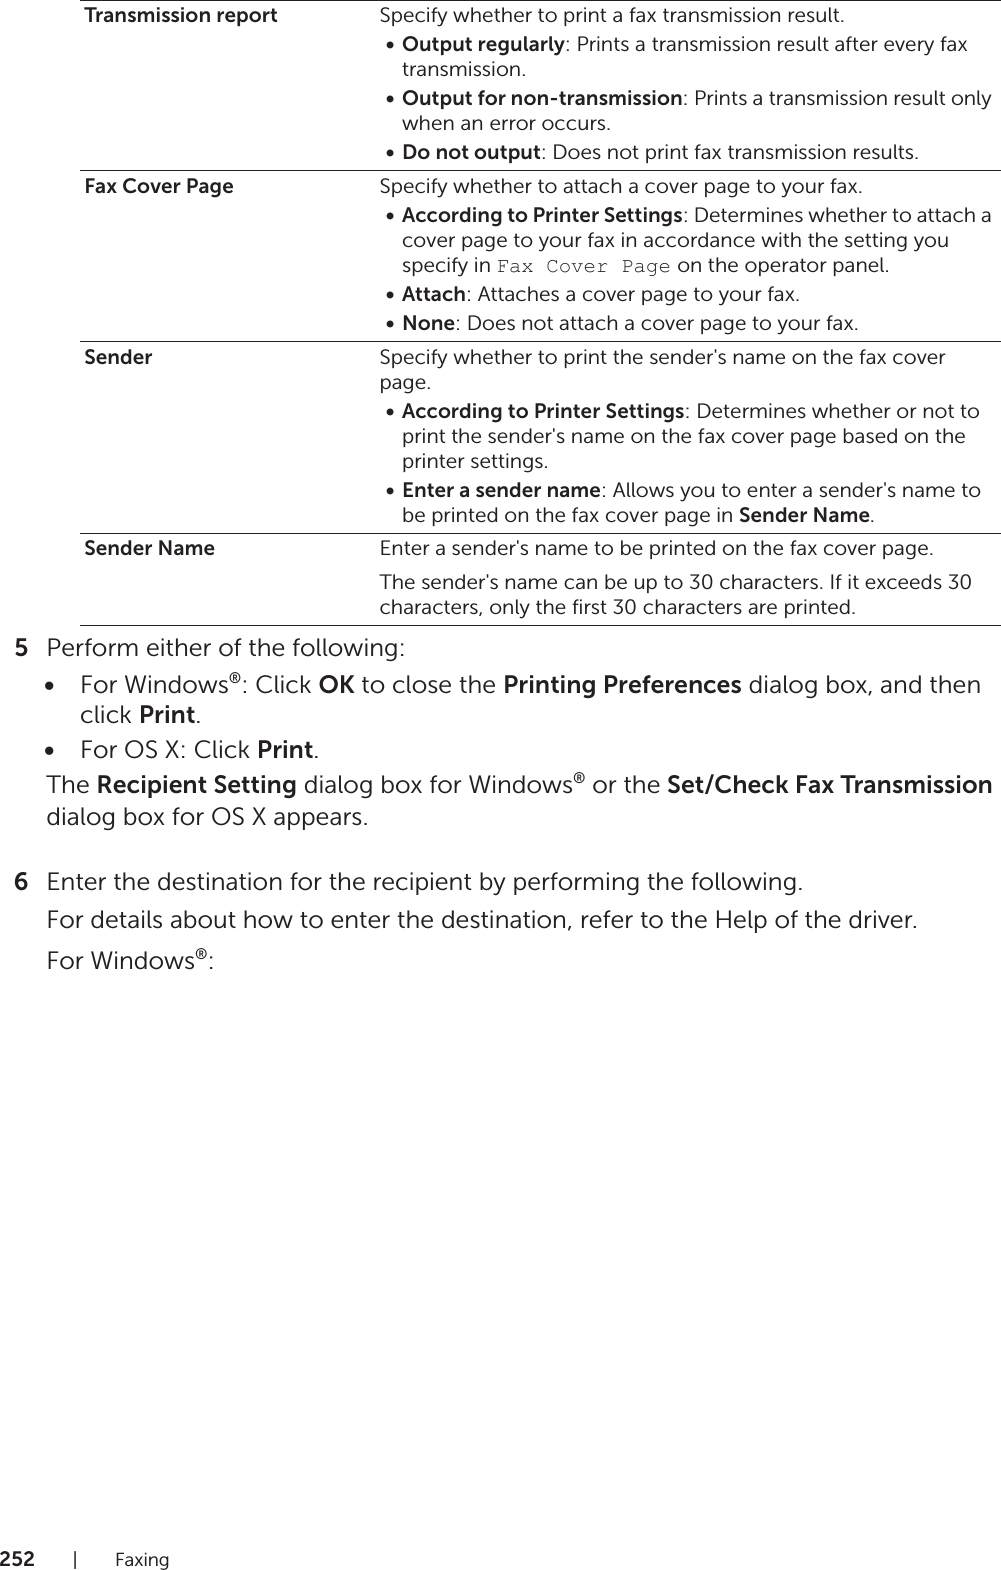
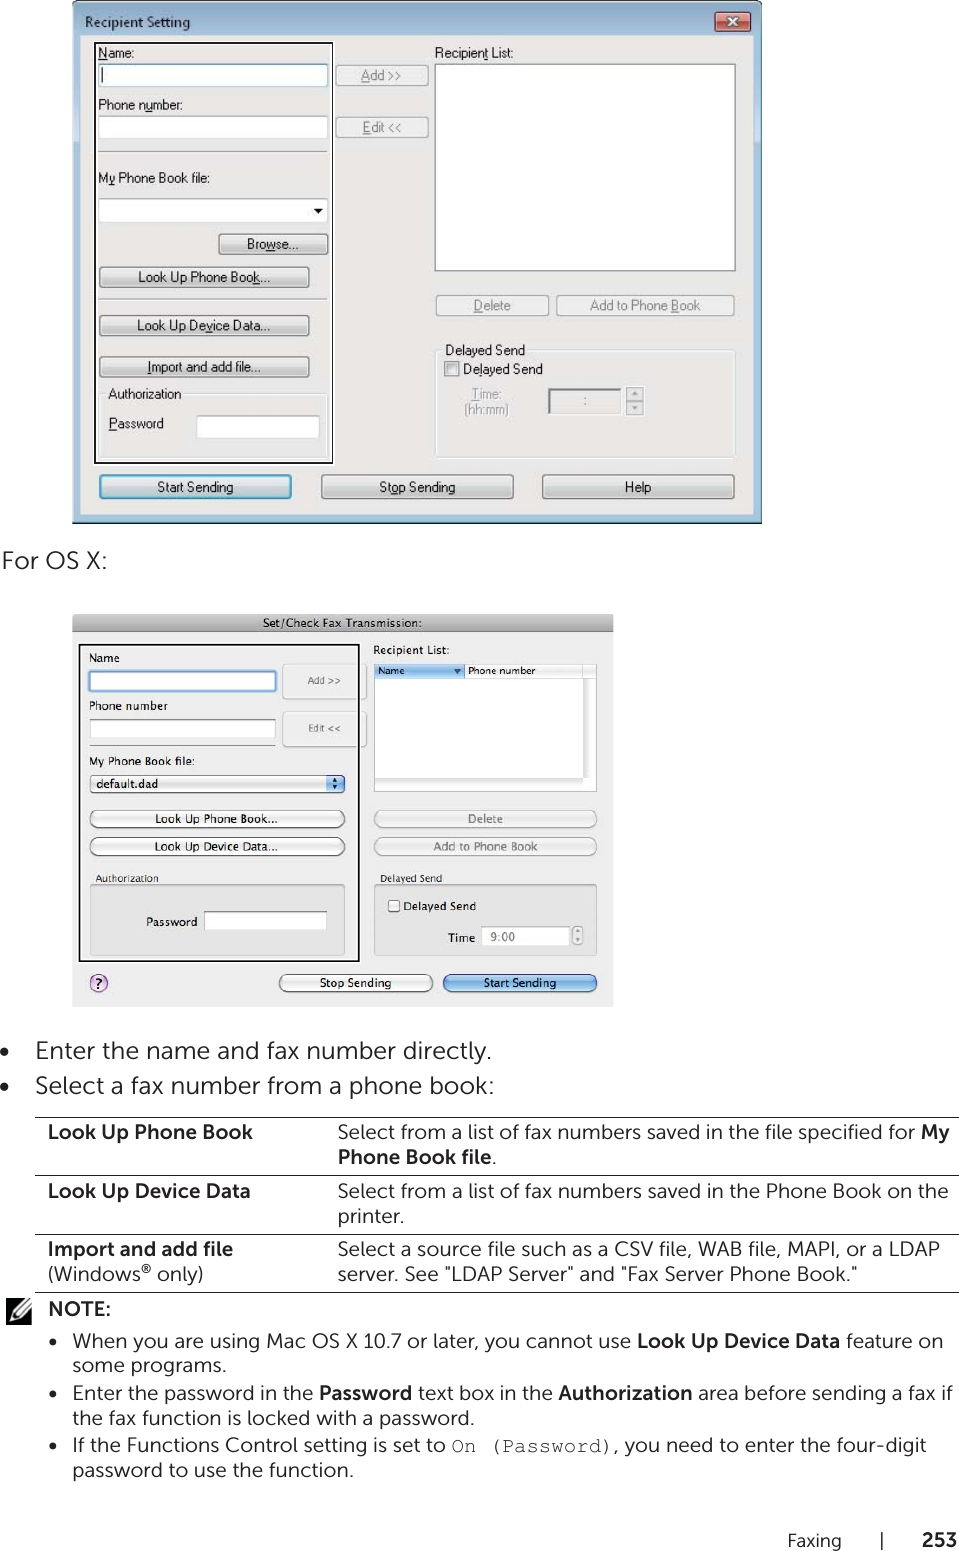
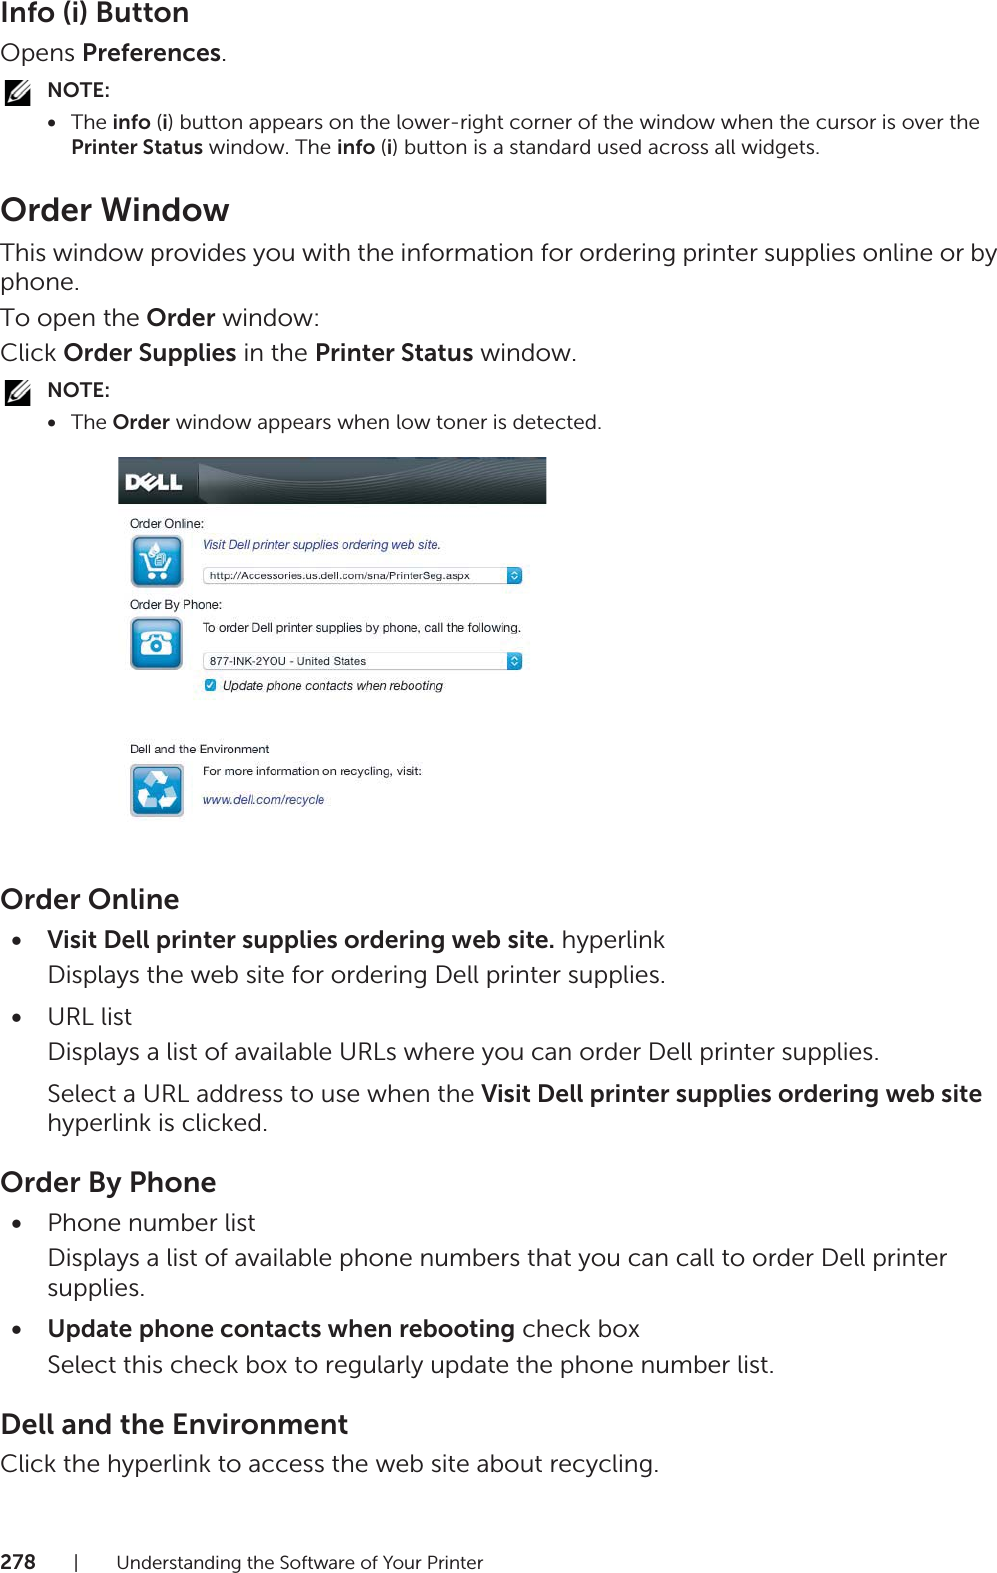
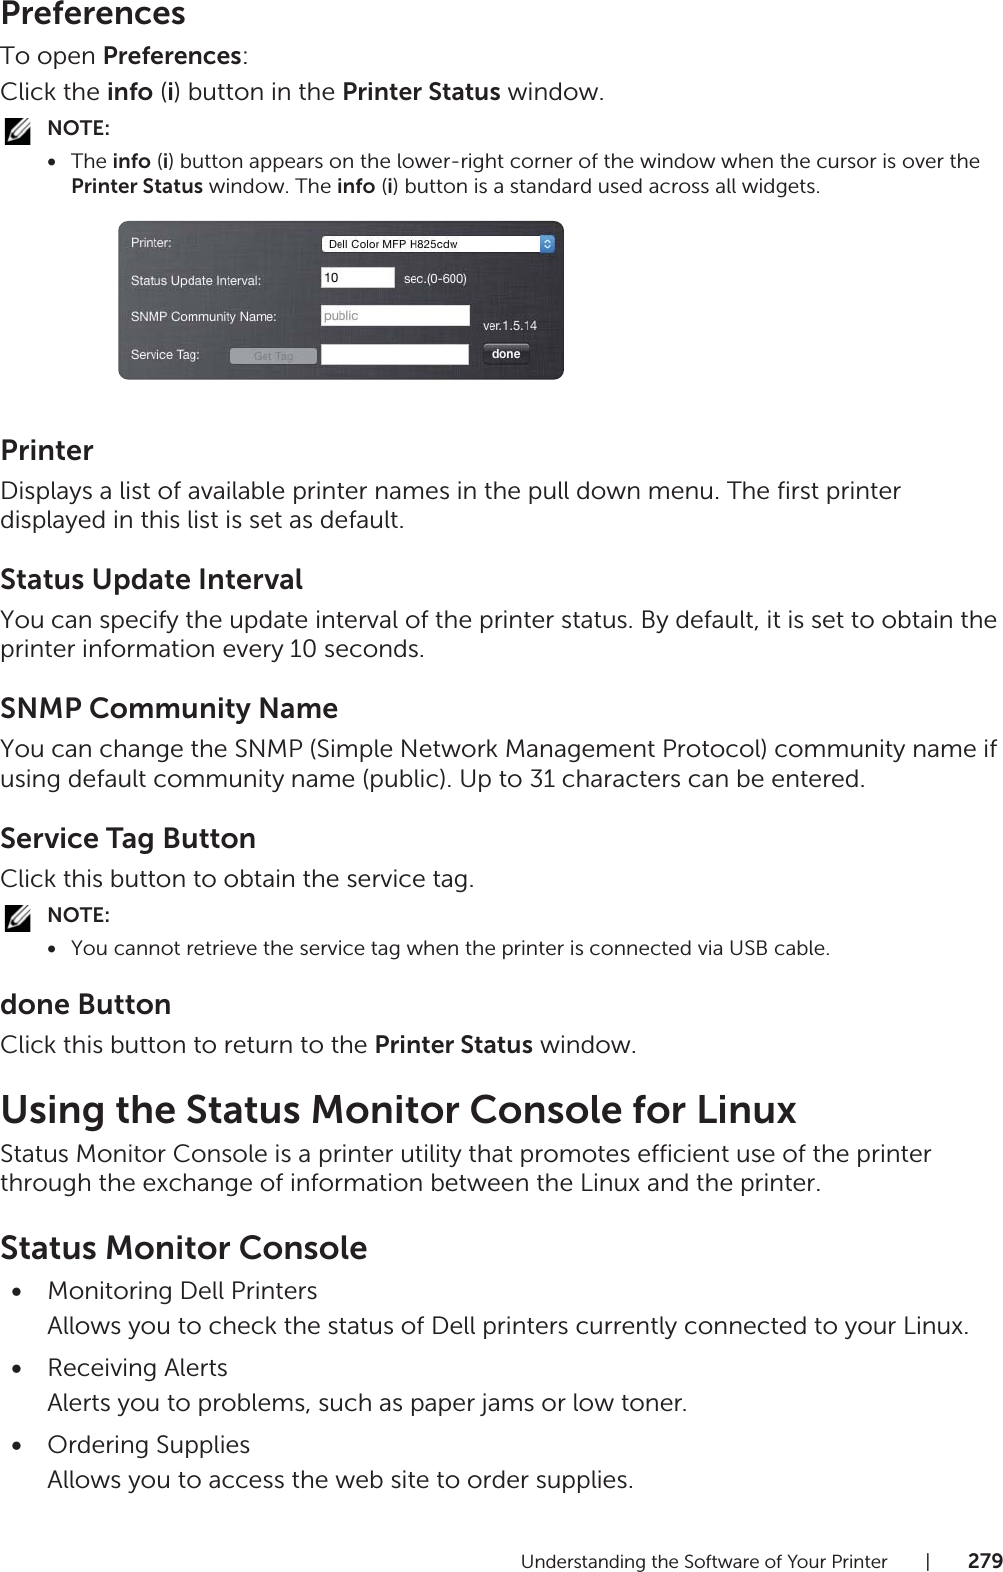
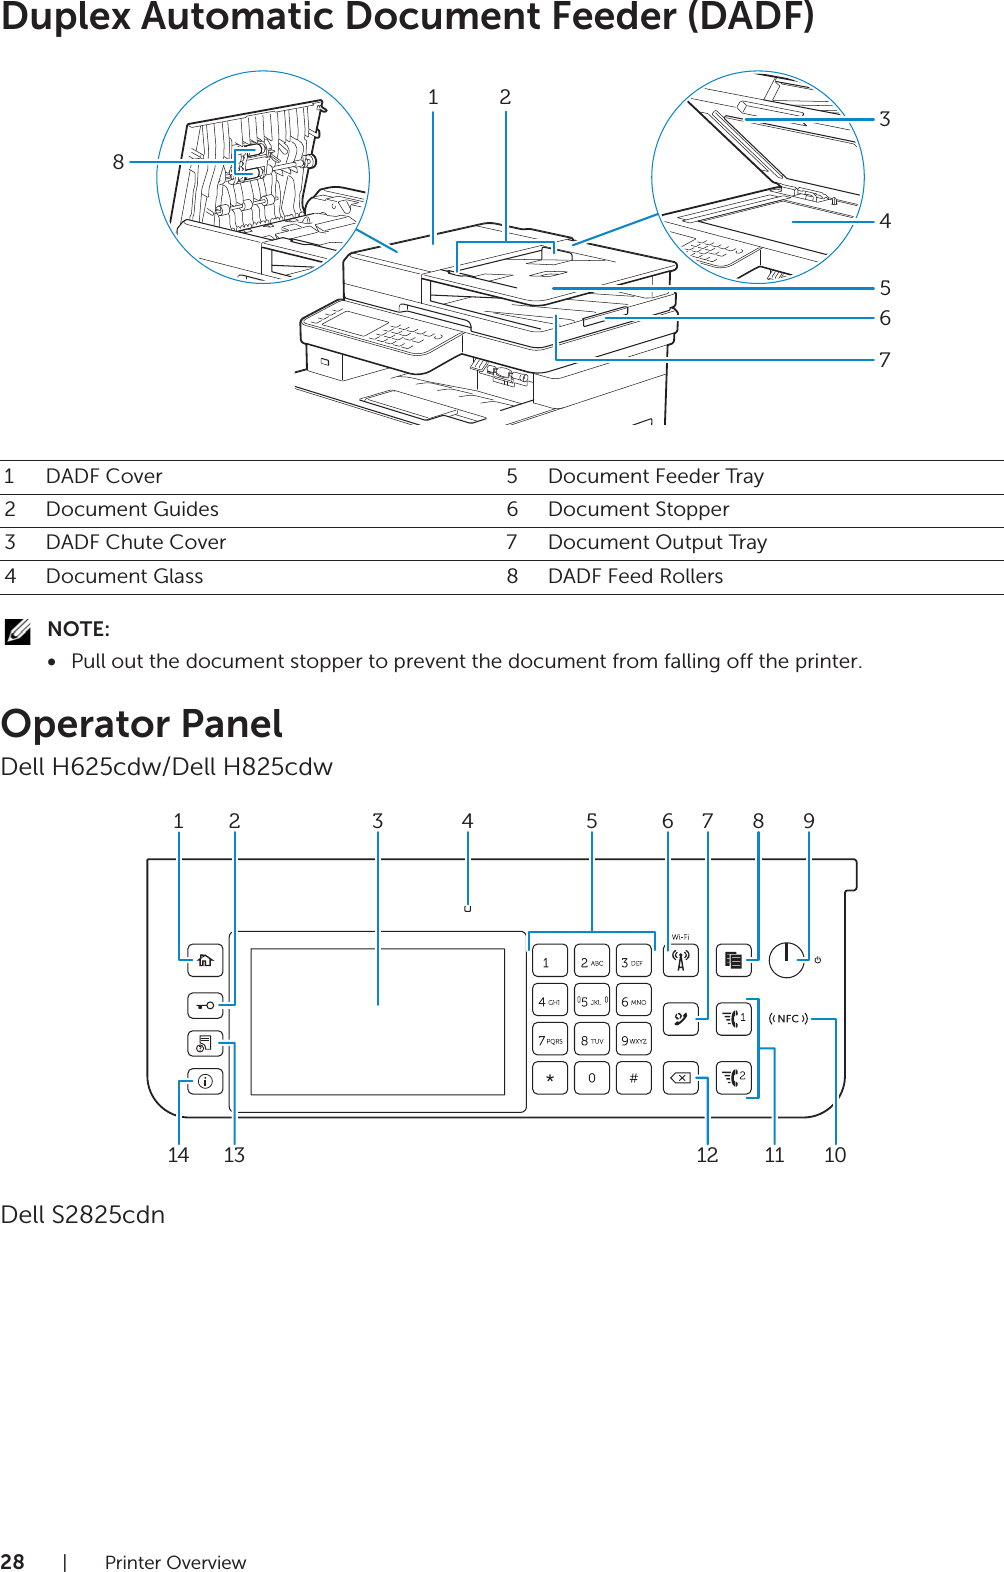
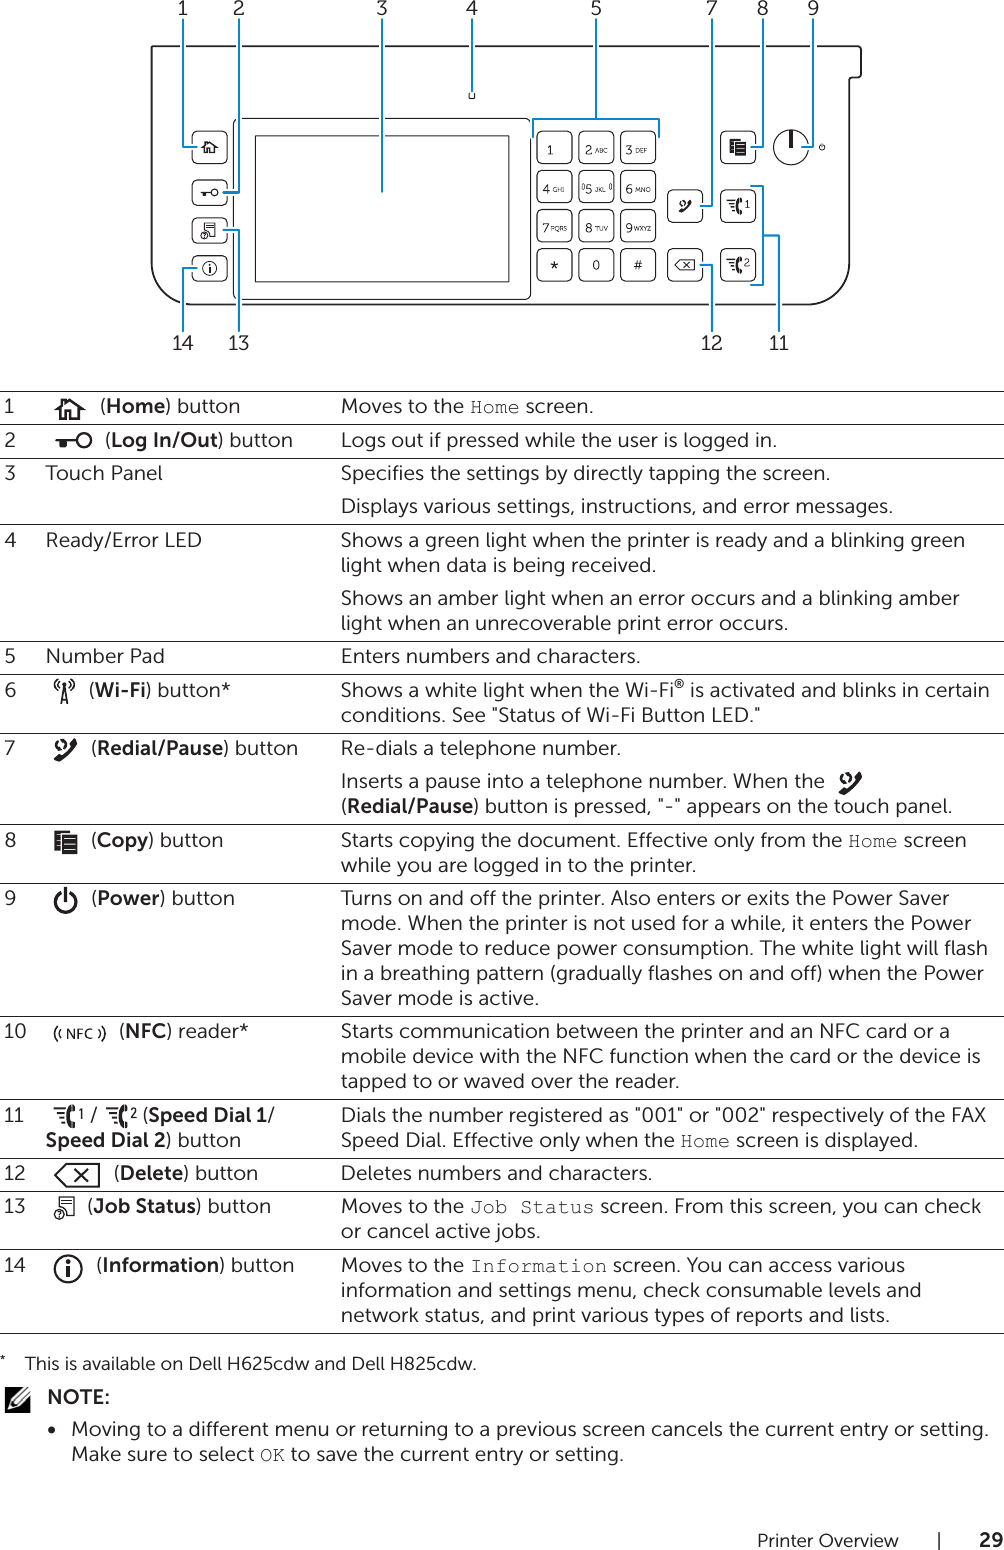
Fuji Xerox H825CDW Color Multifunction Printer User Manual
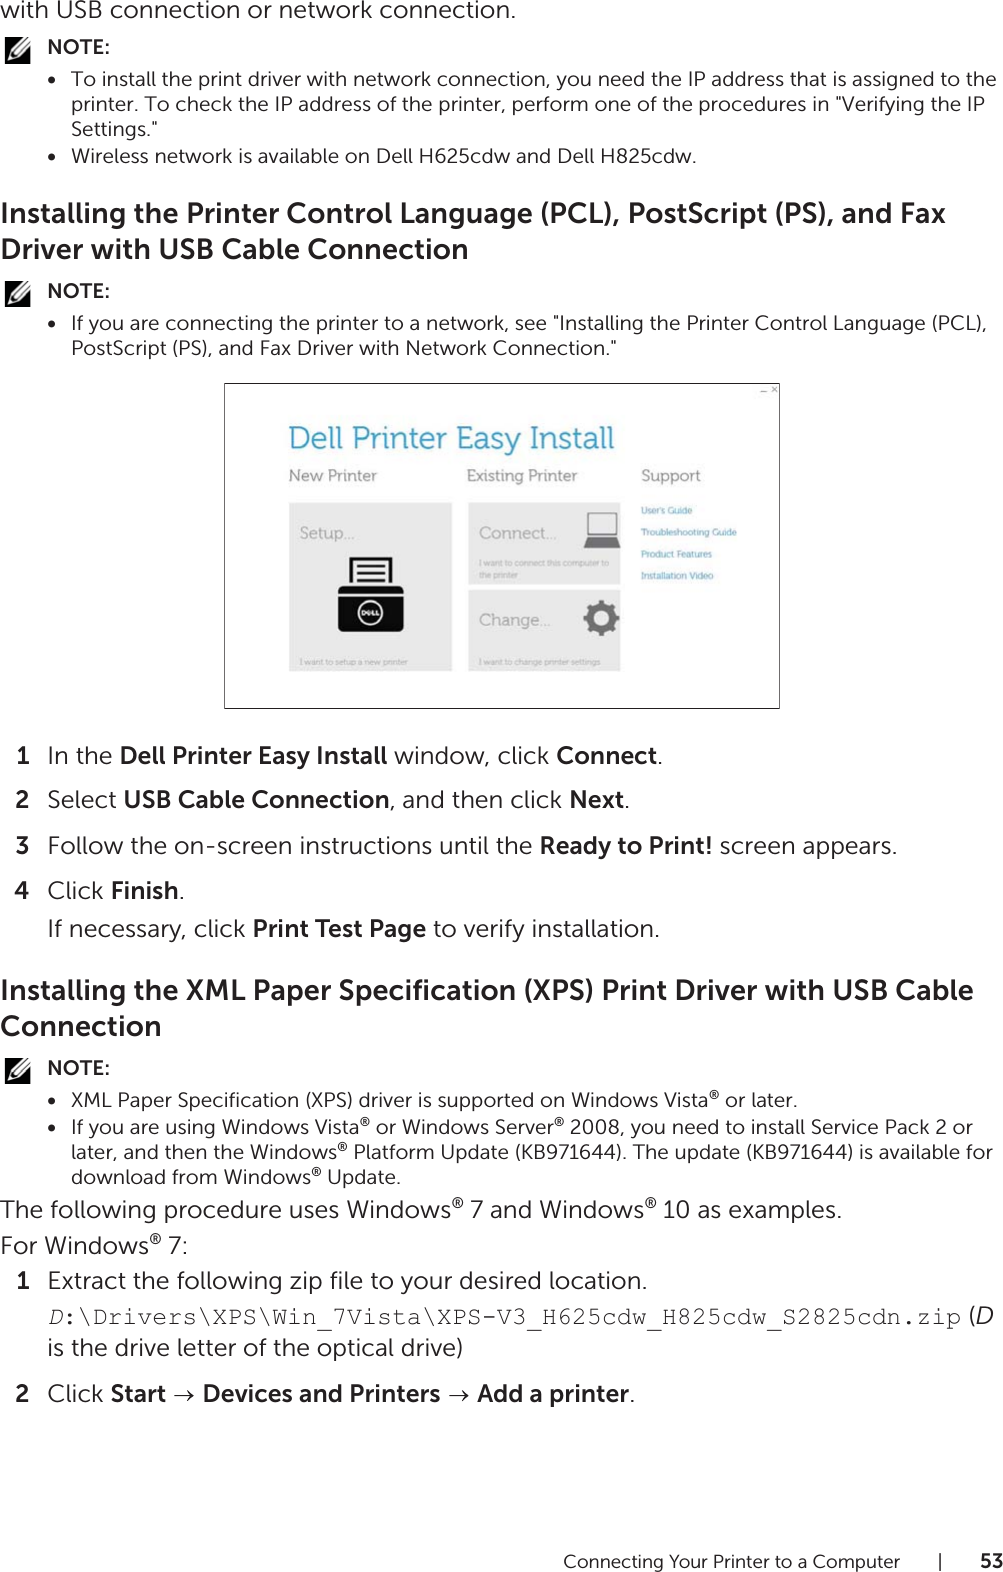
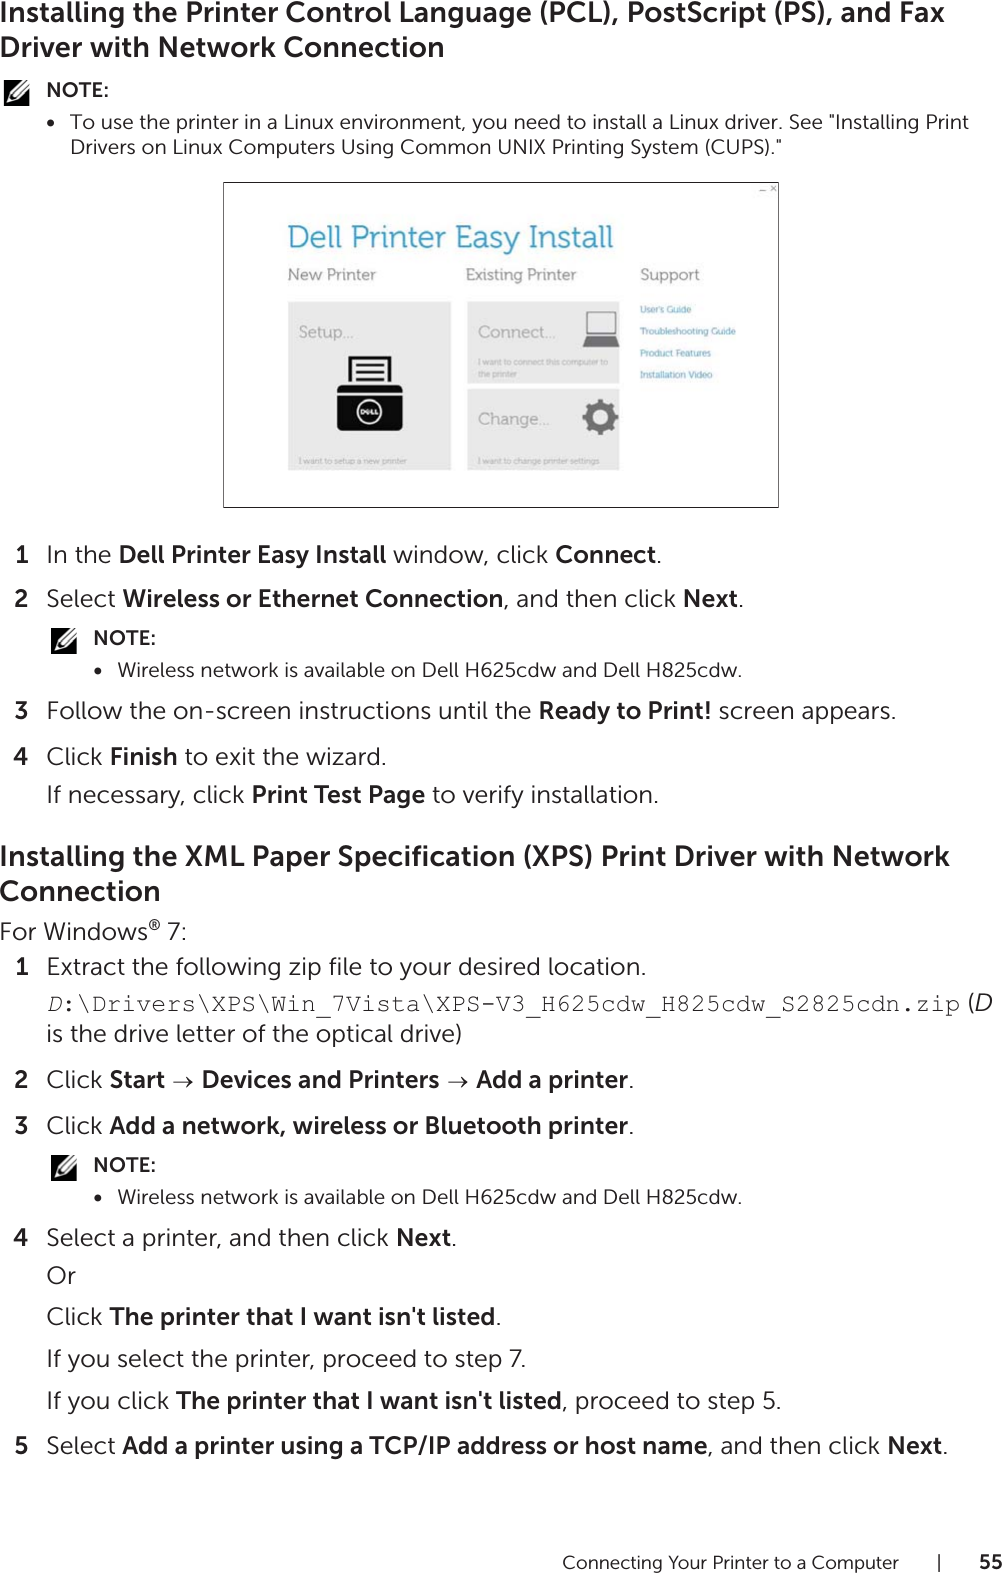
Fuji Xerox Co., Ltd. Color Multifunction Printer
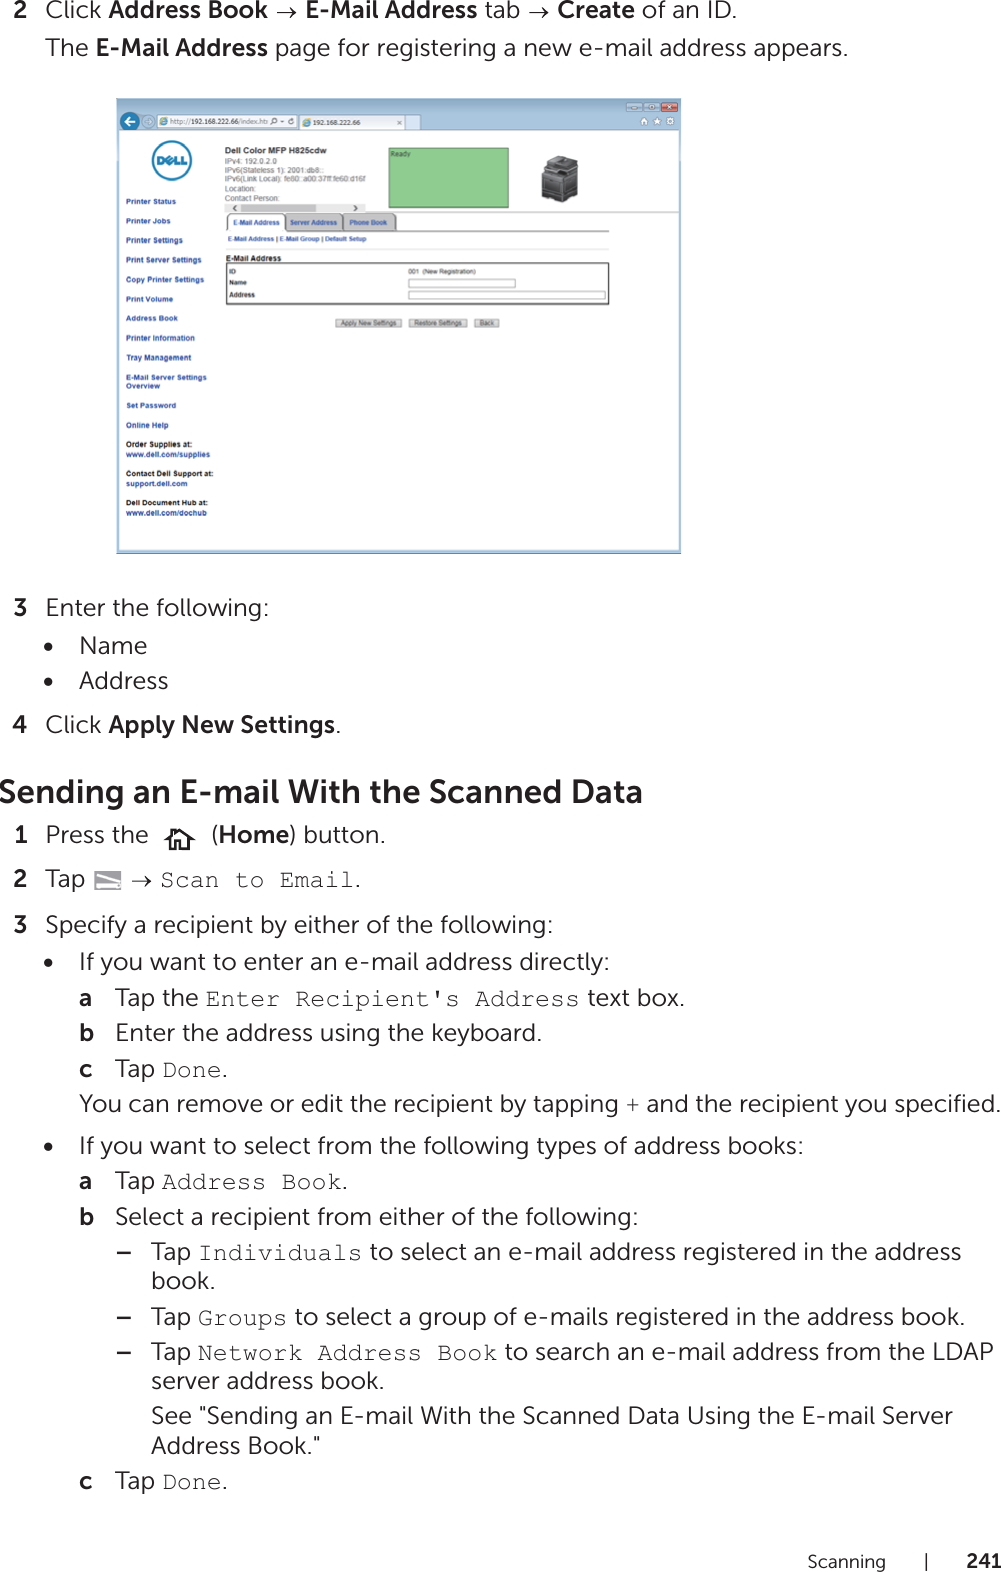
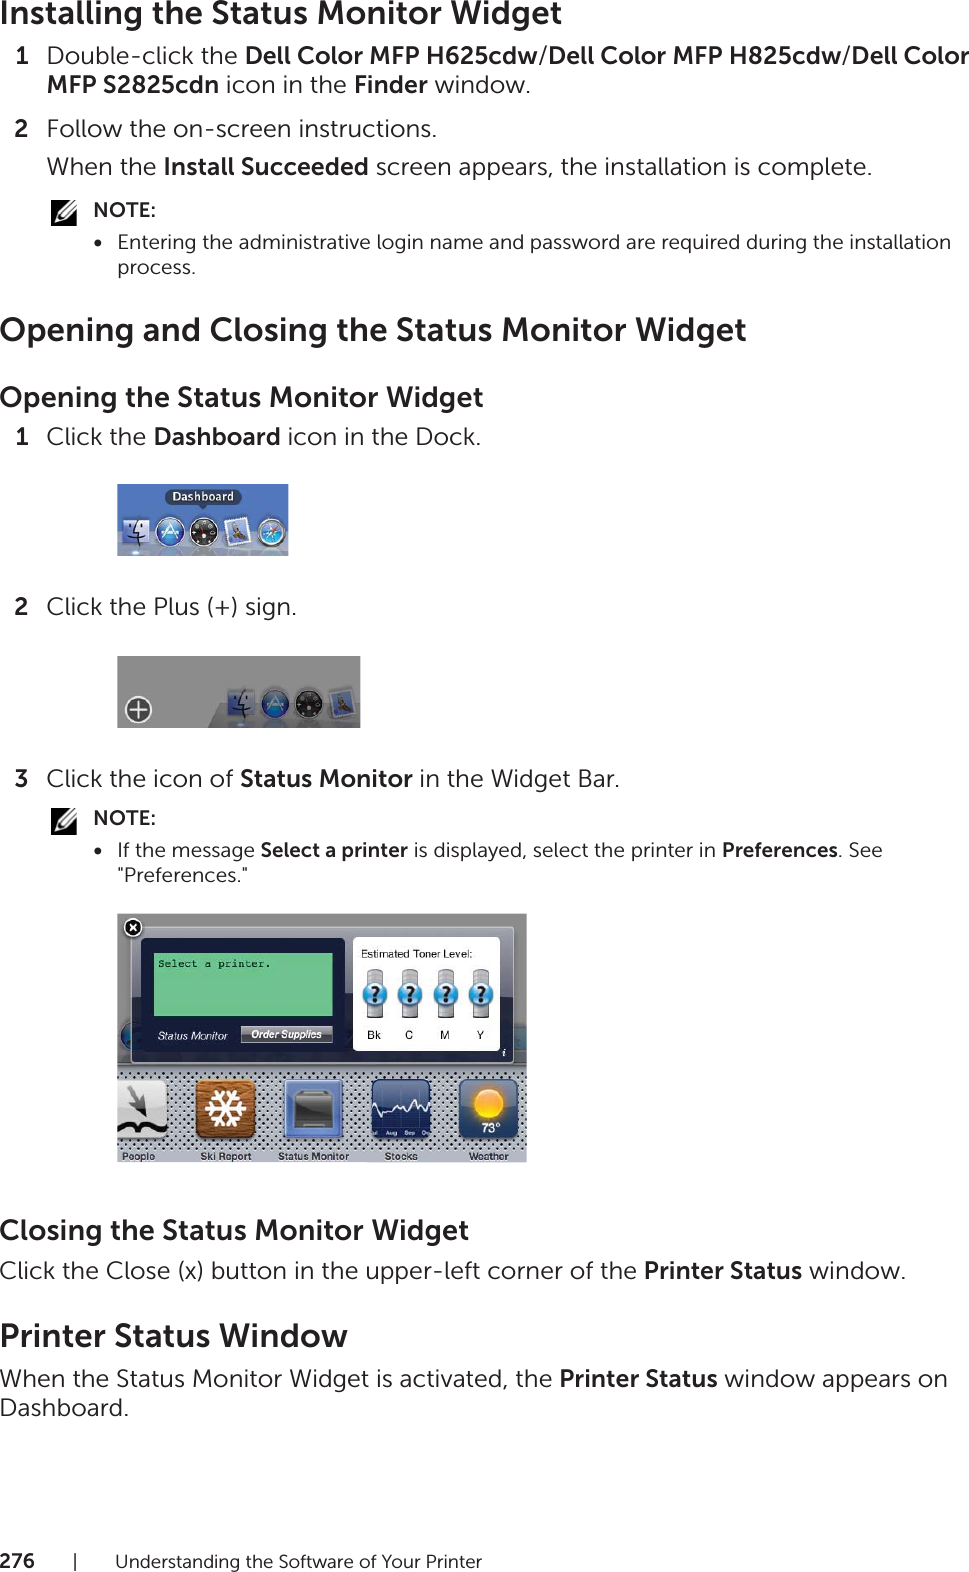
Contents
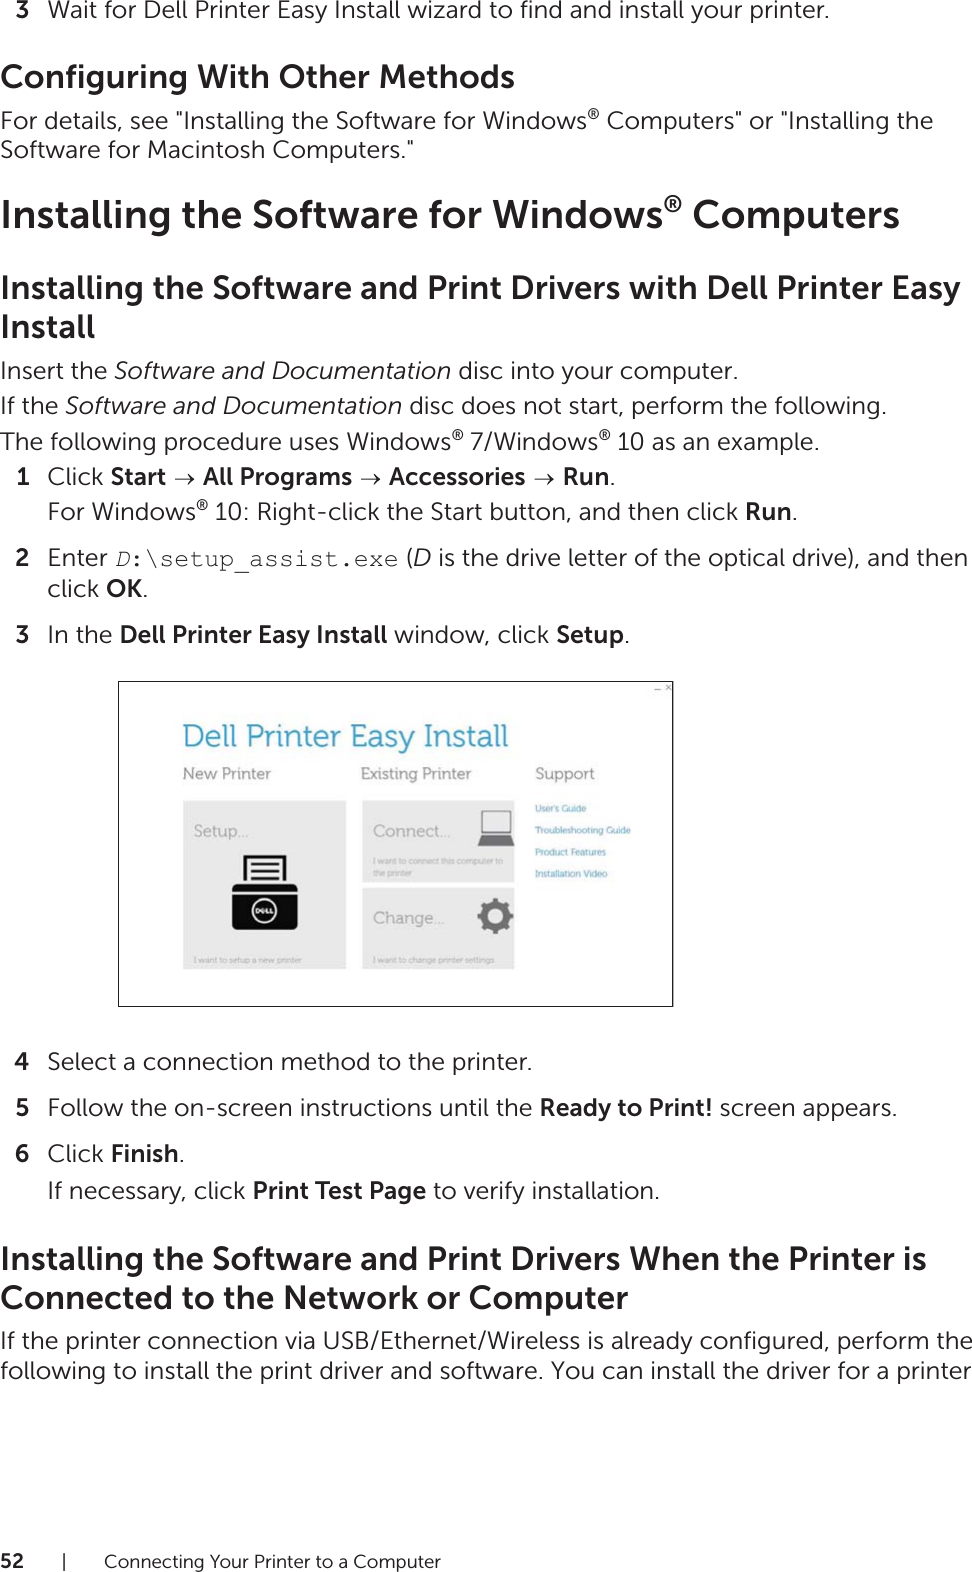
- 1. (Short-Term Confidential) User manual_1
- 2. (Short-Term Confidential) User manual_2
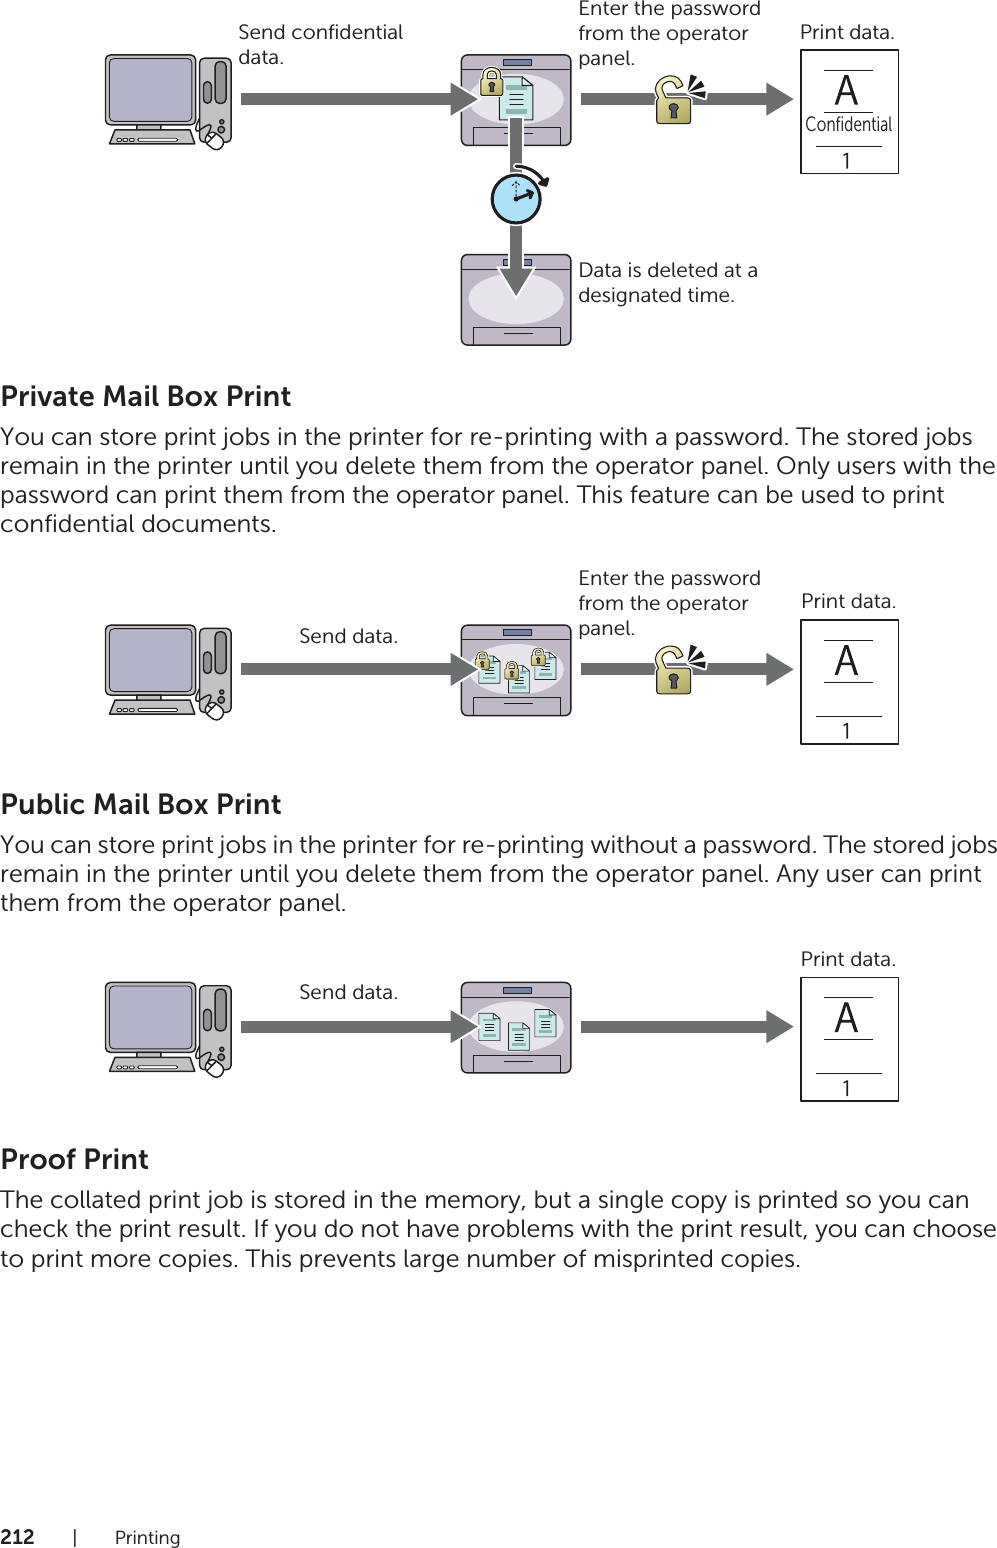
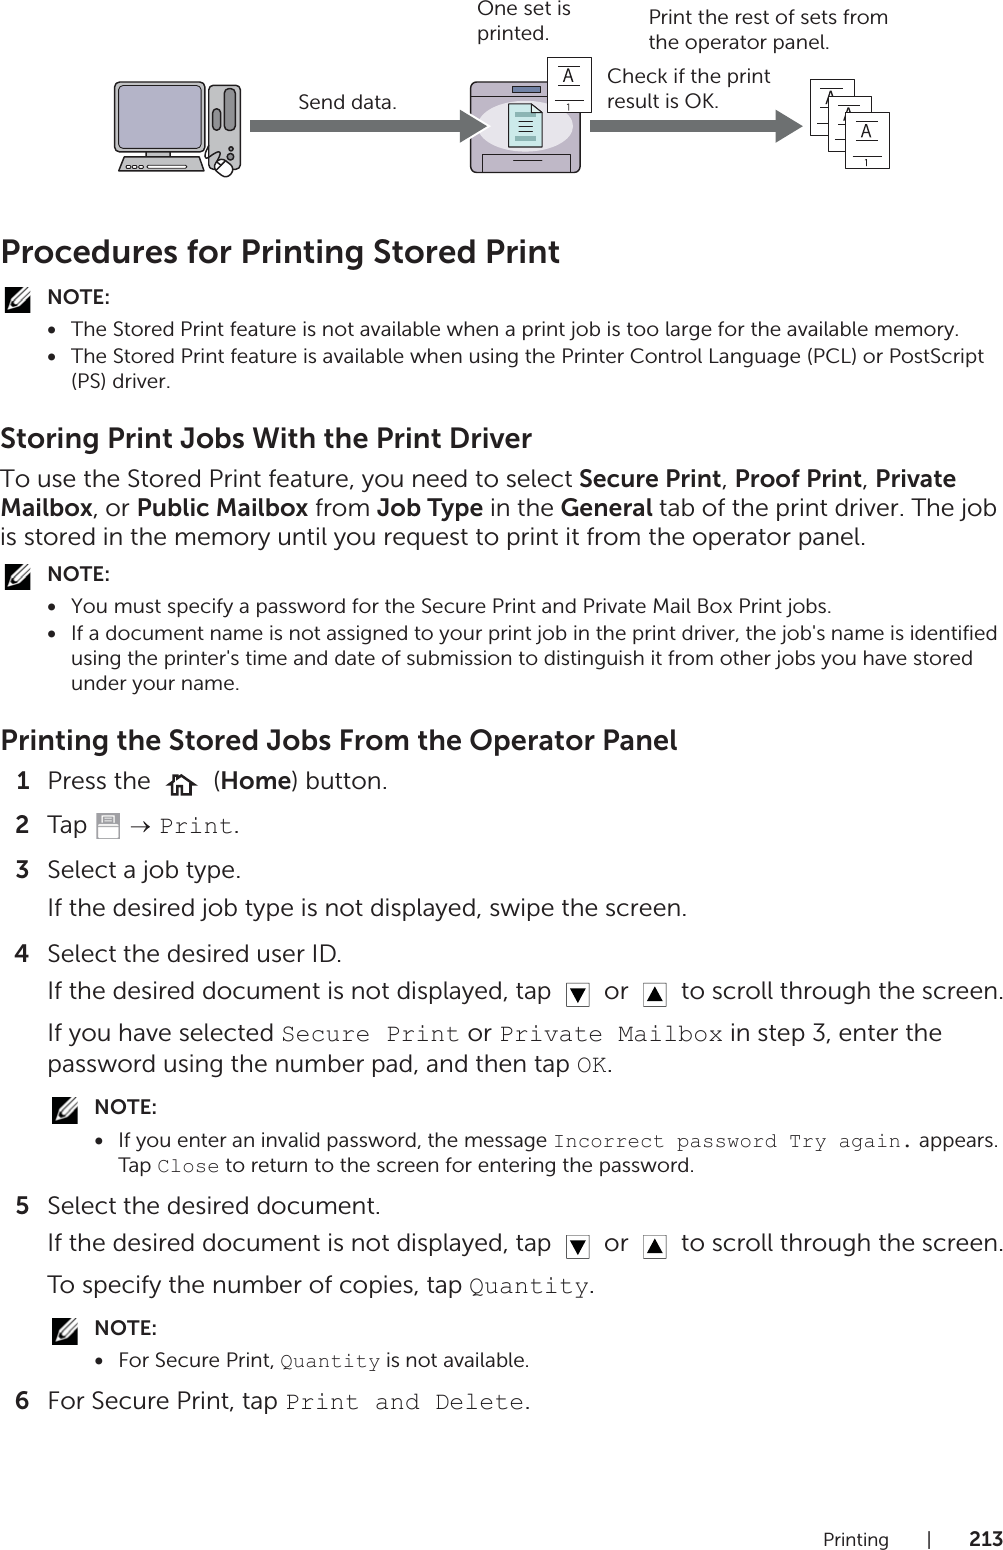
- 3. (Short-Term Confidential) User Manual-Important Info
- 4. (Short-Term Confidential) User Manual-Regulatory Info for USA
(Short-Term Confidential) User manual_1


![72| Installing Print Drivers on Linux Computers Using Common UNIX Printing System (CUPS)Installing Print Drivers on Linux Computers Using Common UNIX Printing System (CUPS)This section provides information for installing or setting up the print driver with CUPS on Red Hat® Enterprise Linux® 6 Desktop, SUSE® Linux Enterprise Desktop 11, or Ubuntu 12.04 LTS.The following procedure uses Dell H825cdw as an example.Operation on Red Hat Enterprise Linux 6 DesktopSetup OverviewRed Hat Enterprise Linux 6 Desktop:1Install the print driver.2Set up the print queue.3Set up the default queue.4Specify the printing options.Installing the Print Driver1Select Applications System Tools Terminal.2Enter the following command in the terminal window.Setting Up the Print QueueTo perform printing, you must set up the print queue on your workstation.1Open the URL http://localhost:631 using a web browser.2Click Administration Add Printer.3Enter root as the user name, enter the administrator password, and then click OK.For network connections:aSelect LPD/LPR Host or Printer from the Other Network Printers menu, and then click Continue.bEnter the IP address of the printer in Connection, and then click Continue.Format: lpd:// xxx.xxx.xxx.xxx (the IP address of the printer)For USB connections:aSelect Dell Color MFP H825cdw from the Local Printers menu, and then click Continue.su[administrator password]rpm -ivh [file path] /Dell-Color-MFP-S2825cdn-H825cdw-x.x-x.rpm](https://usermanual.wiki/Fuji-Xerox/H825CDW.Short-Term-Confidential-User-manual-1/User-Guide-2746304-Page-72.png)
![Installing Print Drivers on Linux Computers Using Common UNIX Printing System (CUPS) |734Enter the name of the printer in the Name box in the Add Printer window, and then click Continue.You can optionally specify the location and description of the printer for further information.5Select Dell Color MFP H825cdw vxxxx.PS (en) from the Model menu, and then click Add Printer.Printing From the ProgramWhen you have finished setting up the queue, you can print from the programs. To print from the program, specify the queue in the print dialog box.However, on programs such as Mozilla, it may only be possible to print from the default queue. In these cases, set the queue that you want to print to as the default queue before you start printing. See "Setting Up the Default Queue."Setting Up the Default Queue1Select Applications System Tools Terminal.2Enter the following command in the terminal window.Specifying the Printing OptionsYou can specify the printing options such as color mode.1Open the URL http://localhost:631 using a web browser.2Click Administration Manage Printers.3Click the queue name for which you want to specify the printing options.4Select Set Default Options from the Administration menu.5Click the desired setting item to specify the required settings, and then click Set Default Options.su[administrator password]lpadmin -d [queue name]](https://usermanual.wiki/Fuji-Xerox/H825CDW.Short-Term-Confidential-User-manual-1/User-Guide-2746304-Page-73.png)
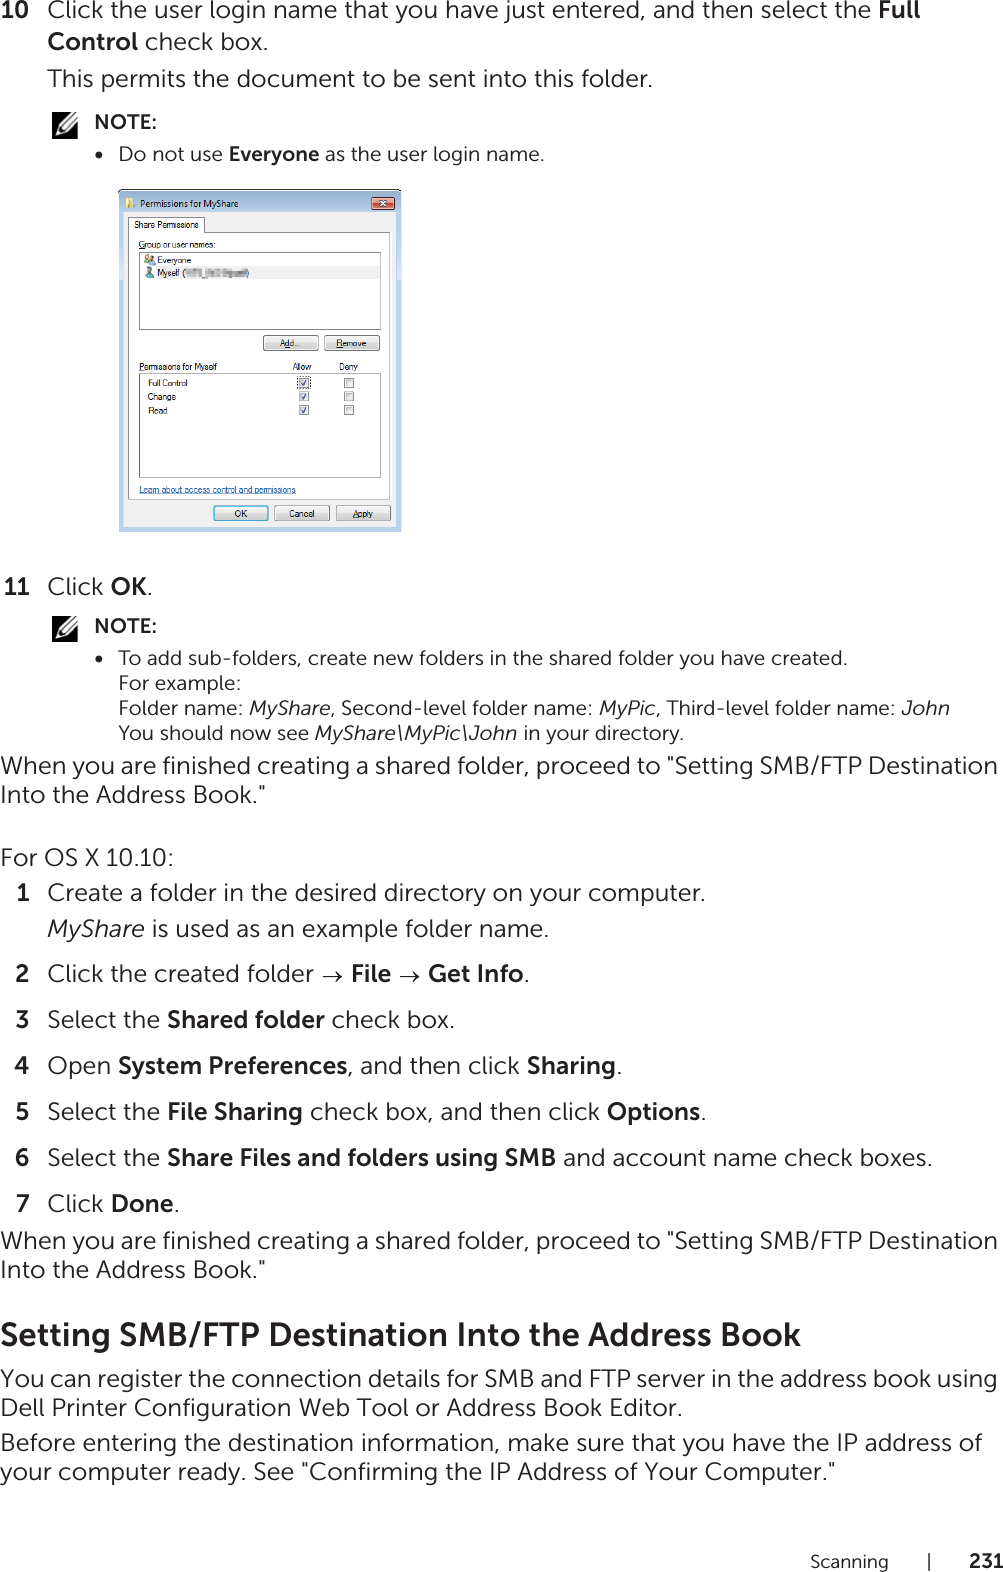
![74| Installing Print Drivers on Linux Computers Using Common UNIX Printing System (CUPS)Uninstalling the Print Driver1Select Applications System Tools Terminal.2Enter the following command in the terminal window to delete the print queue.3Repeat the command above for all queues for the same model.4Enter the following command in the terminal window.Operation on SUSE Linux Enterprise Desktop 11Setup OverviewSUSE Linux Enterprise Desktop 11:1Install the print driver.2Set up the print queue.3Set up the default queue.4Specify the printing options.Installing the Print Driver1Select Computer More Applications..., and then select GNOME Terminal on the Application Browser.2Enter the following command in the terminal window.su[administrator password]/usr/sbin/lpadmin -x [queue name]su[administrator password]rpm -e Dell-Color-MFP-S2825cdn-H825cdwsu[administrator password]rpm -ivh [file path] / Dell-Color-MFP-S2825cdn-H825cdw-x.x-x.rpm](https://usermanual.wiki/Fuji-Xerox/H825CDW.Short-Term-Confidential-User-manual-1/User-Guide-2746304-Page-74.png)
![76| Installing Print Drivers on Linux Computers Using Common UNIX Printing System (CUPS)7Check the settings, and then click OK.Specifying the Printing OptionsYou can specify the printing options such as color mode.1Open a web browser.2Enter http://localhost:631/admin in Location, and then press <Enter> on the keyboard.3Click Manage Printers.4Click Set Printer Options of the printer for which you want to specify the printing options.5Specify the required settings, and then click Set Printer Options.6Enter root as the user name, enter the administrator password, and then click OK.NOTE:•Set the password for authority as the printer administrator before setting the printer queue. If you have not set it, proceed to "Setting the Password for Authority as the Printer Administrator."7Execute printing from the program.Setting the Password for Authority as the Printer AdministratorYou must set the password for authority as the printer administrator to do operations as the printer administrator.1Select Computer More Applications... and select GNOME Terminal on the Application Browser.2Enter the following command in the terminal window.3Enter the password for authority as the printer administrator.4Re-enter the password.Uninstalling the Print Driver1Select Computer More Applications... and select GNOME Terminal on the Application Browser.2Enter the following command in the terminal window to delete the print queue.su[administrator password]lppasswd -g sys -a rootsu[administrator password]/usr/sbin/lpadmin -x [queue name]](https://usermanual.wiki/Fuji-Xerox/H825CDW.Short-Term-Confidential-User-manual-1/User-Guide-2746304-Page-76.png)
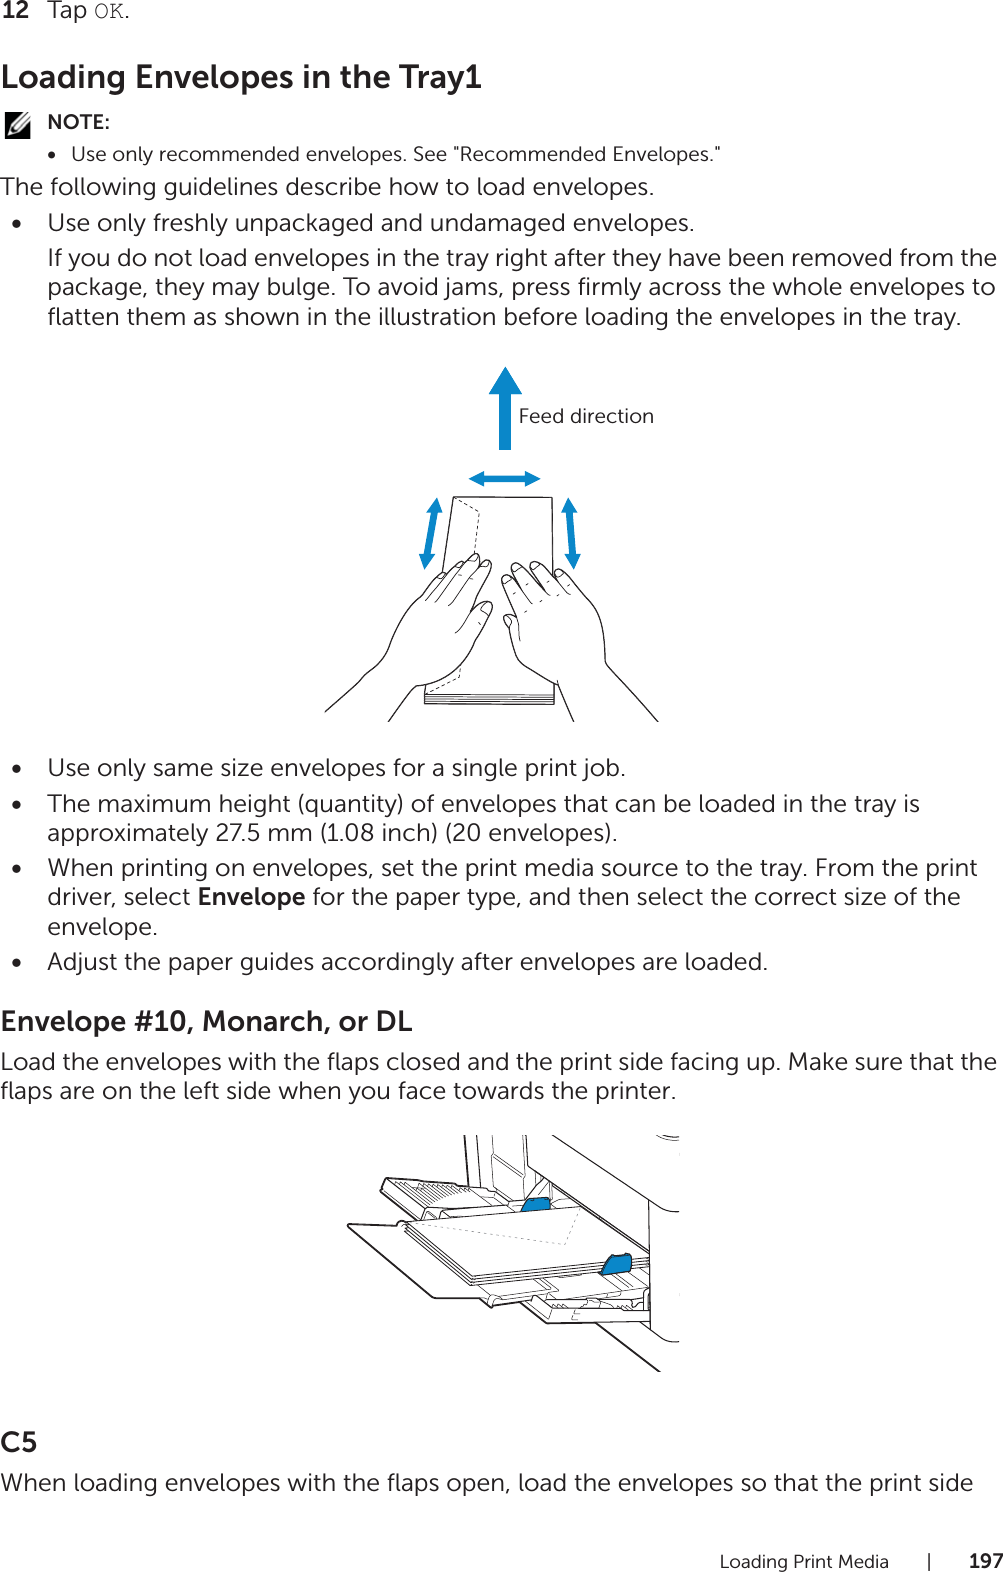
![Installing Print Drivers on Linux Computers Using Common UNIX Printing System (CUPS) |773Repeat the command above for all queues for the printer.4Enter the following command in the terminal window.Operation on Ubuntu 12.04 LTSSetup Overview1Install the print driver.2Set up the print queue.3Set up the default queue.4Specify the printing options.Installing the Print Driver1Click Dash Home, and then enter the terminal in the Search text box.2Click Applications Terminal.3Enter the following command in the terminal window.For the 32-bit architecture:For the 64-bit architecture:Setting Up the Print QueueTo execute printing, you must set up the print queue on your workstation.1Open the URL http://localhost:631 using a web browser.2Click Administration Add Printer.3Enter the user name and the administrator password, and then click OK.4Select either of the following according to the type of your printer connection.For network connections:su[administrator password]rpm -e Dell-Color-MFP-S2825cdn-H825cdwsudo lpadmin -d (Enter the queue name)(Type the administrator password)sudo dpkg –i (Type the file path)/ dell-color-mfp-s2825cdn-h825cdw-*.*-*_amd64.deb(Type the administrator password)](https://usermanual.wiki/Fuji-Xerox/H825CDW.Short-Term-Confidential-User-manual-1/User-Guide-2746304-Page-77.png)