Fujifilm Finepix S1000 Fd Owners Manual S1000fd Owner's
Fujifilm-Finepix-S1000Fd-Users-Manual-770812 fujifilm-finepix-s1000fd-users-manual-770812
Fujifilm-Finepix-S1000Fd-Owner-S-Manual fujifilm-finepix-s1000fd-owner-s-manual
SX 2 finepix_s1000fd_manual_01
Finepix S1000 FD - Owner’s Manual fx_s1000fd_UM_EN Free User Guide for Fujifilm Camera, Manual - page2
2015-07-27
: Fujifilm Fujifilm-Finepix-S1000-Fd-Owners-Manual-774771 fujifilm-finepix-s1000-fd-owners-manual-774771 fujifilm pdf
Open the PDF directly: View PDF  .
.
Page Count: 164 [warning: Documents this large are best viewed by clicking the View PDF Link!]
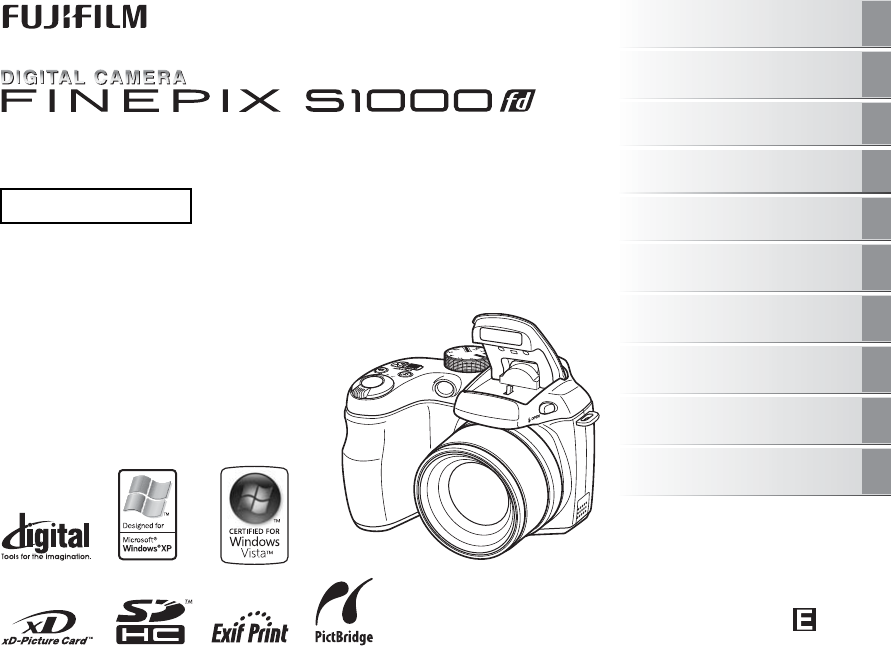
OWNER’S MANUAL
This manual will show you how to use
your FUJIFILM DIGITAL CAMERA
FinePix S1000fd correctly.
Please follow the instructions carefully.
BL00731-200(1)
Getting Ready
Using the Camera
Advanced Features • Photography
Settings
Camera Connection
Software
Installation
• Playback
•Movie
Appendices
Troubleshooting
2
Warning
To prevent fire or shock hazard, do not expose the unit to rain
or moisture.
For customers in the U.S.A.
Tested To Comply
With FCC Standards
FOR HOME OR OFFICE USE
FCC Statement
This device complies with Part 15 of the FCC Rules. Operation is
subject to the following two conditions: (1) This device may not
cause harmful interference, and (2) this device must accept any
interference received, including interference that may cause
undesired operation.
CAUTION
This equipment has been tested and found to comply with the limits
for a Class B digital device, pursuant to Part 15 of the FCC Rules.
These limits are designed to provide reasonable protection against
harmful interference in a residential installation. This equipment
generates, uses, and can radiate radio frequency energy and, if not
installed and used in accordance with the instructions, may cause
harmful interference to radio communications. However, there is no
guarantee that interference will not occur in a particular installation.
If this equipment does cause harmful interference to radio or
television reception, which can be determined by turning the
equipment off and on, the user is encouraged to try to correct the
interference by one or more of the following measures:
— Reorient or relocate the receiving antenna.
— Increase the separation between the equipment and receiver.
— Connect the equipment into an outlet on a circuit different from
that to which the receiver is connected.
— Consult the dealer or an experienced radio/TV technician for
help.
You are cautioned that any changes or modifications not expressly
approved in this manual could void the user’s authority to operate
the equipment.
Notes on the Grant:
To comply with Part 15 of the FCC Rules, this product must be used
with a Fujifilm-specified ferrite-core A/V cable, USB cable, and DC
supply cord.
For customers in Canada
CAUTION
This Class B digital apparatus complies with Canadian ICES-003.
Please read the Safety Notes (separate note “Notes
and Cautions”) and make sure you understand them
before using the camera.

3
IMPORTANT Be sure to read this page before using the software.
NOTICE
BEFORE OPENING THE CD-ROM PROVIDED BY FUJIFILM
Corporation, PLEASE READ THIS END USER LICENSE AGREEMENT
CAREFULLY. ONLY IF YOU AGREE WITH THIS AGREEMENT,
SHOULD YOU USE THE SOFTWARE RECORDED ON THE CD-ROM.
BY OPENING THE PACKAGE, YOU ACCEPT AND AGREE TO BE
BOUND BY THIS AGREEMENT.
End User License Agreement
This End User License Agreement (“Agreement”) is an agreement between
FUJIFILM Corporation (“FUJIFILM”) and you, which sets forth the terms
and conditions of the license granted for you to use the software provided
by FUJIFILM.
The CD-ROM contains third party software. In case a separate agreement
is provided by a third party supplier for its software, the provisions of such
separate agreement shall apply to the use of such third party software,
prevailing over those of this Agreement.
1. Definitions.
(a) “Media” means the CD-ROM titled “Software for FinePix”- which is
provided to you together with this Agreement.
(b) “Software” means the software which is recorded on Media.
(c) “Documentation” means the operation manuals of Software and
other related written materials which are provided to you together
with Media.
(d) “Product” means Media (including Software) and Documentation
collectively.
2. Use of Software.
FUJIFILM grants to you a nontransferable, nonexclusive license:
(a) to install one copy of Software onto one computer in binary machine
executable form;
(b) to use Software on the computer onto which Software is installed; and
(c) to make one backup copy of Software.
3. Restrictions.
3.1 You shall not distribute, rent, lease or otherwise transfer all or any
part of Software, Media or Documentation to any third party without
FUJIFILM’s prior written consent. You also shall not sublicense,
assign or otherwise transfer all or any part of the rights granted to
you by FUJIFILM under this Agreement without FUJIFILM’s prior
written consent.
3.2 Except as expressly granted by FUJIFILM hereunder, you shall not
copy or reproduce all or any part of Software or Documentation.
3.3 You shall not modify, adapt or translate Software or Documentation.
You also shall not alter or remove copyright and other proprietary
notices that appear on or in Software or Documentation.
3.4 You shall not, or shall not have any third party, reverse-engineer,
decompile, or disassemble Software.
4. Ownership.
All copyrights and other proprietary rights to Software and Documentation are
owned and retained by FUJIFILM or the third party suppliers as indicated on
or in Software or Documentation. Nothing contained herein shall be
construed, expressly or implicitly, as transferring or granting any right, license,
or title to you other than those explicitly granted under this Agreement.
5. Limited Warranty.
FUJIFILM warrants to you that Media is free from any defect in material
and workmanship under normal use for ninety (90) days from the date
of your receipt of Media. Should Media not meet the foregoing warranty,
FUJIFILM shall replace such defective Media with other Media bearing
no defect. FUJIFILM’s entire liability and your sole and exclusive
remedy with regard to any defect in Media shall be expressly limited to
such FUJIFILM’s replacement of Media as provided herein
6. DISCLAIMER OF WARRANTY.
EXCEPT AS PROVIDED IN SECTION 5 HEREIN, FUJIFILM PROVIDES
PRODUCT “AS IS” AND WITHOUT WARRANTIES OF ANY KIND,
EXPRESS OR IMPLIED. FUJIFILM SHALL MAKE NO WARRANTY,
EXPRESS, IMPLIED OR STATUTORY, AS TO ANY OTHER MATTERS,
INCLUDING, BUT NOT LIMITED TO NON-INFRINGEMENT OF ANY
COPYRIGHT, PATENT, TRADE SECRET, OR ANY OTHER
PROPRIETARY RIGHTS OF ANY THIRD PARTY, MERCHANTABILITY,
OR FITNESS FOR ANY PARTICULAR PURPOSE.
7. LIMITATION OF LIABILITY.
IN NO EVENT SHALL FUJIFILM HAVE ANY LIABILITY FOR ANY
GENERAL, SPECIAL, DIRECT, INDIRECT, CONSEQUENTIAL,
INCIDENTAL, OR OTHER DAMAGES (INCLUDING DAMAGES FOR
LOSS OF PROFITS OR LOST SAVINGS) INCURRED FROM THE
USE OF OR INABILITY TO USE PRODUCT EVEN IF FUJIFILM HAS
BEEN ADVISED OF THE POSSIBILITY OF SUCH DAMAGES.
8. No export.
You acknowledge that neither Software nor any part thereof, will be
transferred, or exported to any country or used in any manner in violation
of any export control laws and regulations to which Software is subject.
9. Termination.
In case you breach any of the terms and conditions hereof, FUJIFILM
may immediately terminate this Agreement without any notice.
10. Term.
This Agreement is effective until the date when you cease to use
Software, unless earlier terminated in accordance with Section 9 hereof.
11. Obligation upon termination.
Upon termination or expiration of this Agreement, you shall, at your own
responsibility and expense, delete or destroy immediately all Software
(including its copies), Media and Documentation.
12. Governing Law.
This Agreement shall be governed by and construed in accordance with
laws of Japan.
4
EC Declaration of Conformity
We
Name: FUJIFILM Electronic Imaging Europe GmbH
Address: Benzstrasse 2
47533 Kleve, Germany
declare that the product
Product Name: FUJIFILM DIGITAL CAMERA FinePix S1000fd
Manufacturer’s Name: FUJIFILM Corporation
Manufacturer’s Address: 7-3, AKASAKA 9-CHOME, MINATO-KU,
TOKYO 107-0052, JAPAN
conforms to the following Standards:
Safety: EN60065: 2002 + A1
EMC: EN55022: 1998 + A1: 2000 + A2: 2003 Class B
EN55024: 1998 + A1: 2001 + A2: 2003
EN61000-3-2: 2000 + A2: 2005
EN61000-3-3: 1995 + A1: 2001 + A2: 2003
following the provision of the EMC Directive (2004/108/EC) and Low Voltage Directive (2006/95/EC).
Kleve, Germany
Place
February 1, 2008
This product comes with batteries. When these are empty, you shouldn’t throw them
away but deliver them as domestic chemical refuse.
Signature/Managing DirectorDate

5
Disposal of Electric and Electronic Equipment in Private Households
Disposal of used Electrical & Electronic Equipment (Applicable in the European Union and other European countries with
separate collection systems)
This symbol on the product, or in the manual and in the warranty, and/or on its packaging indicates that this
product shall not be treated as household waste.
Instead it should be taken to an applicable collection point for the recycling of electrical and electronic
equipment.
By ensuring this product is disposed of correctly, you will help prevent potential negative consequences to
the environment and human health, which could otherwise be caused by inappropriate waste handling of this
product.
If your equipment contains easy removable batteries or accumulators please dispose these separately according to your local
requirements.
The recycling of materials will help to conserve natural resources. For more detailed information about recycling of this product,
please contact your local city office, your household waste disposal service or the shop where you have purchased the product.
In Countries outside the EU:
If you wish to discard this product, please contact your local authorities and ask for the correct way of disposal.
6
Contents
Warning................................................................. 2
IMPORTANT ......................................................... 3
EC Declaration of Conformity................................ 4
Disposal of Electric and Electronic Equipment in
Private Households ......................................... 5
Contents................................................................ 6
About this Manual ................................................. 9
Accessories Included .......................................... 10
Camera Parts and Features................................ 11
Example of screen Text Display.......................... 13
Getting Ready
Attaching the Strap and Lens Cap ...................... 14
Loading the Batteries .......................................... 15
Checking the battery charge ....................... 17
Loading the Memory Card................................... 18
Turning On and Off ............................................. 21
Setting the language, date, and time .......... 22
Correcting the Date and Time ............................. 24
Selecting the Language ...................................... 25
Using the Camera
Taking Pictures (B AUTO Mode) ................. 26
Using Intelligent Face Detection when
taking pictures .......................................... 29
Taking pictures with the focus and
exposure locked ....................................... 31
AF-assist illuminator.................................... 33
Using zoom function ................................... 34
Adjusting the shot composition ................... 34
Viewing the Images............................................. 36
Erasing the Images/Movies .......................... 41
Using the erase button ( /n)................... 41
Erasing the images using
[PLAYBACK MENU] ................................ 41
Advanced Features — Photography
Using the Shooting Functions —
Procedure of Setting ..................................... 44
Setting the Shooting Mode ................................. 48
[B AUTO] ............................................ 48
[ NATURAL LIGHT] .............................. 48
[ , SCENE POSITION]................... 49
[ PANORAMA] ................................. 53
[N PROGRAM AE]..................................... 54
[M SHUTTER PRIORITY AE] .................... 55
[< APERTURE PRIORITY AE] ................. 57
[> MANUAL].............................................. 59
Adjusting the Image Brightness
(D Exposure Compensation) ....................... 61
e Macro/> Super Macro (Close-up) ................ 63
d Setting the Flash............................................. 64
* Self-Timer ...................................................... 67
Setting self-timer ........................................ 67
Taking pictures using self-timer ................. 67
f Taking pictures continuously......................... 69
j Increasing LCD Monitor Brightness .............. 73
Using [p-MODE MENU] (Photography)/
[SHOOTING MENU] ..................................... 74
Setting the [p-MODE MENU]
(Photography).......................................... 74
Setting the [SHOOTING MENU] ................ 74

7
[p-MODE MENU] (Photography) ....................... 77
Changing the sensitivity setting
([S ISO]) ................................................. 77
Changing the quality setting
([ QUALITY]) ........................................ 78
Changing the FinePix COLOR setting
([ FinePix COLOR]) .............................. 79
[SHOOTING MENU] ........................................... 80
Selecting light metering method
([ PHOTOMETRY]) .............................. 80
Adjusting color balance
([T WHITE BALANCE]) ......................... 81
Focusing the shot quickly
([ HIGH-SPEED SHOOTING]) ............. 82
Specifying the focusing mode
([H FOCUSING]) .................................... 83
Specifying the focusing area
([ AF MODE]) ....................................... 84
Adjust the image outline (hard/soft)
([G SHARPNESS]) ................................ 86
Adjust the amount of light emitted by the flash
([ FLASH] (Brightness Adjustment)) .... 87
Photograph the same image with different
exposure ([ BRACKETING])................ 87
Advanced Features — Playback
Playback Information.......................................... 89
Using [p-MODE MENU] (Playback)/
[PLAYBACK MENU] ..................................... 90
Setting the [p-MODE MENU]
(Playback) ............................................... 90
Setting the [PLAYBACK MENU] ................ 90
[p-MODE MENU] (Playback) ............................ 91
Setting automatic playback
([ SLIDE SHOW]) ................................ 91
DPOF set frame
([ PRINT ORDER (DPOF)]) ................. 91
[PLAYBACK MENU] ........................................... 96
Correcting red-eye effect in images
([ RED EYE REMOVAL])..................... 96
Rotating the images
([ IMAGE ROTATE])............................ 97
Protecting the images
([ PROTECT]) ...................................... 98
Copying the images
([V COPY]) ............................................ 99
Adding voice memos to the images
([ VOICE MEMO]).............................. 101
Trimming the images
([ TRIMMING])................................... 104
Continued Q

8
Contents
Advanced Features — Movie
r Recording Movies ........................................ 106
Changing movie size................................ 108
w Playing Back Movies ................................... 109
Settings
[U SET-UP]..................................................... 111
Using the [SET-UP] menu......................... 111
[SET-UP] menu option .............................. 112
Camera Connection
Connecting to a TV ........................................... 120
Connecting Camera Directly to Printer —
PictBridge Function ..................................... 121
Software Installation
Installation on a Windows PC ........................... 125
Installation on a Mac OS X ............................... 127
Connecting to a PC ........................................... 130
Using FinePixViewer................................. 133
Appendices
System Expansion Option................................. 134
Accessories Guide ............................................ 135
Using Your Camera Correctly ........................... 136
Discharging rechargeable batteries .................. 137
Notes on the xD-Picture Card™, the SD Memory
Card and the Internal Memory ..................... 138
Warning Displays .............................................. 139
Troubleshooting
Troubleshooting................................................ 144
Specifications ................................................. 150
Explanation of Terms ..................................... 156
FUJIFILM Digital Camera Worldwide
Network..................................................... 158
Usable Memory Cards
You can use the xD-Picture Card, the SD Memory Card and
the SDHC Memory Card with the FinePix S1000fd. In this
Owner’s Manual, these cards are expressed as “Memory
Card” and “SD Memory Card”.

9
About this Manual
ZAbout marks
CAUTION
This mark denotes issues that may affect the camera’s operation.
CHECK
This mark denotes points to notice in the camera’s operation.
MEMO
This mark denotes additional topics that complement the basic operating procedures.
ZUsable Memory Cards
You can use the xD-Picture Card, the SD Memory Card and the SDHC Memory Card with the FinePix S1000fd. In this Owner’s
Manual, these cards are expressed as “Memory Card” and “SD Memory Card”.
Z4-direction (nopq) button
Up, down, left, and right are indicated by black triangles in the Owner’s Manual. Up or down is shown as n or o, and left or
right is shown as p or q.
ZAbout the illustration for the LCD monitor display
In this manual, the illustration for the LCD monitor display is simplified.
ZNote
In this manual, the menu names or messages displayed in the LCD monitor appear in square brackets([ ]).
When pressing q:
When pressing DISP/BACK:
10
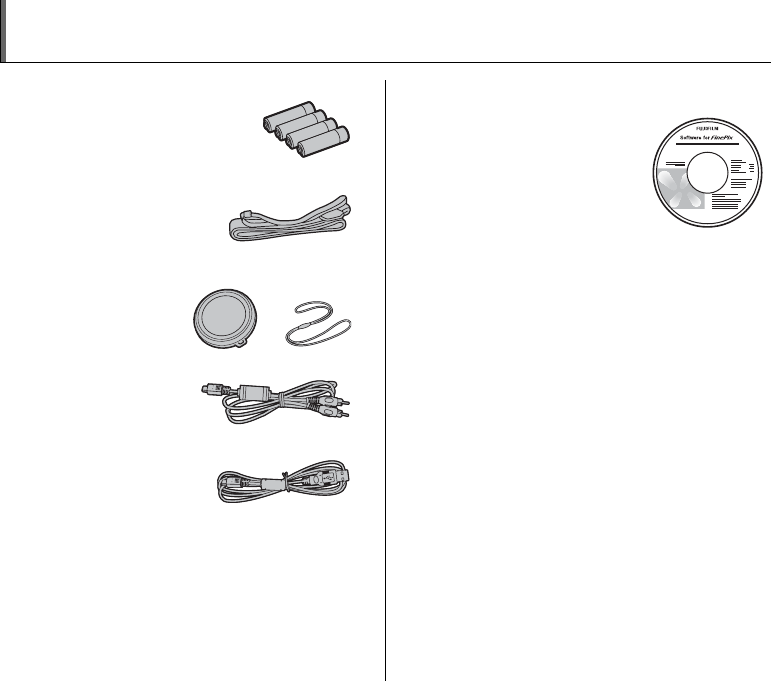
Accessories Included
• AA-size Alkaline Batteries (LR6) (4)
• Shoulder strap (1)
• Lens cap (1 set)
•A/V cable (1)
•USB cable (1)
•CD-ROM (1)
Software for FinePix
• Owner’s Manual (this manual) (1)
• Notes and Cautions (1)

11
Camera Parts and Features
• Refer to the pages in parentheses for information on using the camera parts or features.

12
Camera Parts and Features
AStrap mount (p.14)
BZoom lever (p.34) (Multi-frame playback (p.39))
CShutter button
DIntelligent Face Detection (p.29)/
bRed-eye removal button (p.29)
Ef Continuous button (p.69)
FON/OFF switch (p.21)
GIndicator lamp (p.29)
HMode dial
IAF-assist illuminator (p.33)/Self-timer lamp (p.68)
JFlash (p.64)
KdFlash pop-up button (p.64)
LMicrophone
MSpeaker
NViewfinder (EVF)
OMENU/OK button
PLCD monitor
QDISP (Display)/BACK button (p.34, 36)
RD Exposure compensation button (p.61, 89)
STripod mount
TBattery cover (p.15)
UCover lock release catch (p.15)
VEVF/LCD (monitor selector) button (p.26)
Ww (Playback) button (p.36)
Xp (Photo mode) button (p.74, 77)
Ynopq (4-direction) button
ZTerminal cover
!Memory Card slot (p.18)
_; USB socket/A/V OUT (Audio/Visual output)
socket (p.120, 121)

13
Example of screen Text Display
ZShooting mode
ZPlayback mode
FinePix S1000fd has internal memory that can store images without Memory Card. Y appears on the screen when the internal
memory is active.
N
N
16
1 6
12/31/2050 12:00 AM
12/31/2050 12:00 AM
1000
1000
F3.5
F3.5
SET
SET
A( Self-timer (p.67)
Be Macro (close-up) (p.63)
Cd Flash (p.64)
DIntelligent Face Detection
(p.29)
E Photography mode (p.48)
F Battery level indicator
(p.17)
G9 White balance (p.81)
H High-speed shooting
(p.82)
IAF frame (p.27)
JDate/Time (p.22)
KShutter speed (p.55)
LAperture (p.57)
M) Photometry (p.80)
NSensitivity (p.77)
ON Quality mode (p.78)
PNumber of available frames
(p.154)
Q FinePix COLOR (p.79)
R{AF warning (p.27)
S Camera shake warning
(p.139)
T Increasing monitor
brightness (p.73)
UY Internal memory (p.20)
Vf Continuous shooting
(p.69)
WExposure compensation
indicator (p.61)
XS Exposure compensation
(p.61)
100-0001
100-0001
12/31/2050 12:00 AM
12/31/2050 12:00 AM
Aw Playback mode (p.36)
BIntelligent Face Detection (p.40)
C Red-eye removal
Du DPOF (p.91)
EFrame number (p.115)
F Present (p.36)
G# Voice memo (p.101)
HF Protection (p.98)
14
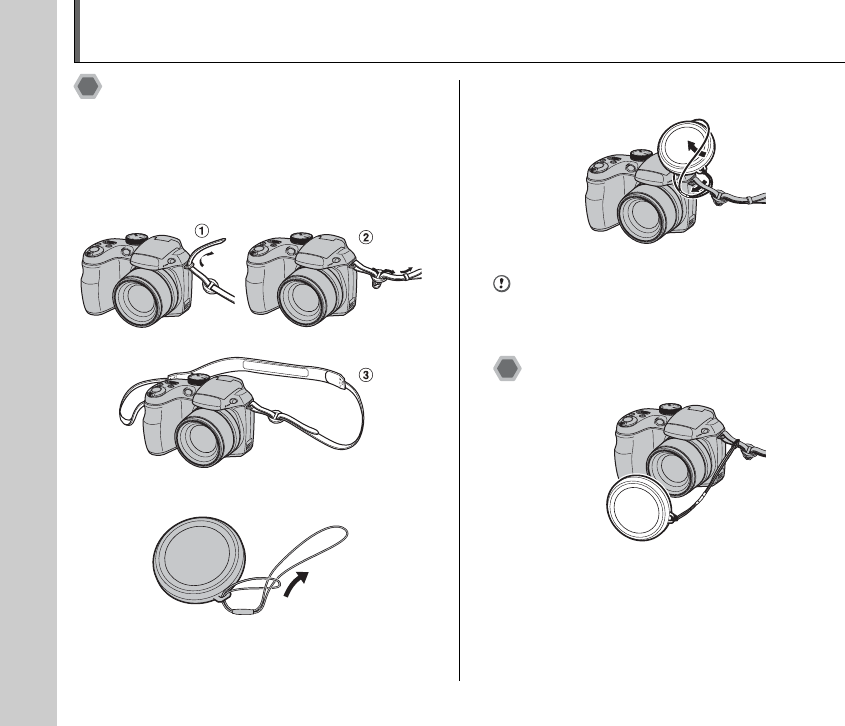
Attaching the Strap and Lens Cap
Attaching the strap
1Attach the strap to the strap mounts on the
camera. Once you have attached both ends
of the strap, check carefully to make sure
that the strap is firmly secured.
2Attach the lens cap cord to the lens cap.
3Pull the lens cap cord through the strap.
CAUTION
• Attach the strap correctly to prevent dropping the
camera.
• Attach the lens cap cord to prevent losing the lens cap.
Attaching the lens cap
14
15
Getting Ready
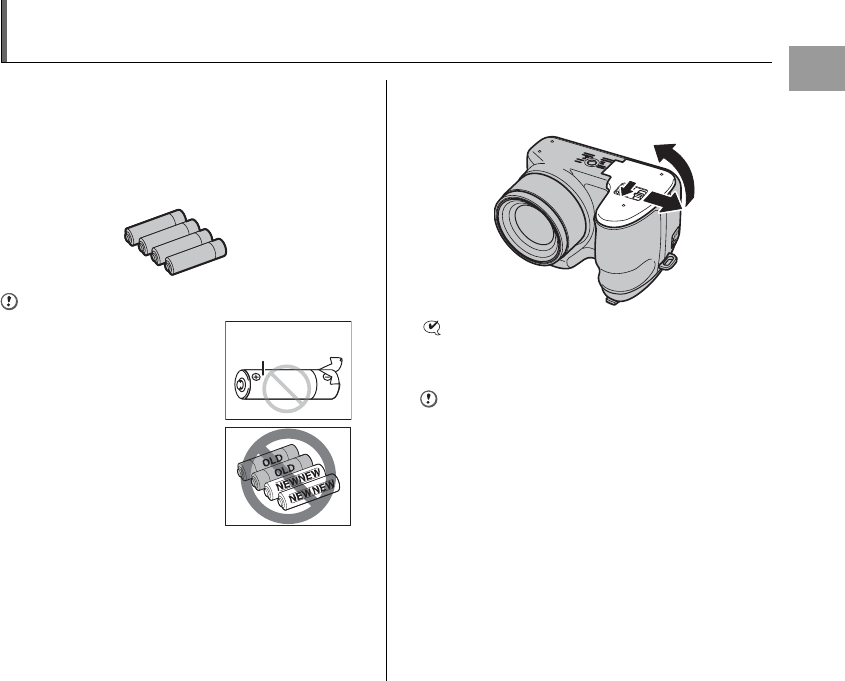
Loading the Batteries
Batteries are required to operate the digital camera. At
first, load the batteries in the camera.
Compatible batteries
AA-size alkaline batteries (4) AA-size Ni-MH
rechargeable batteries (4) (sold separately) or AA-size
lithium batteries (4) (sold separately)
CAUTION
• Never use the following types of
batteries, as they could cause
serious problems such as battery
fluid leakage or overheating:
1. Batteries with split or peeling
outer casings
2. Combinations of different
types of batteries or new and
used batteries together
• Do not use manganese or Ni-Cd
batteries.
• Use the same brand and grade
AA-size alkaline batteries as
those supplied with the camera.
• The batteries shall not be exposed to excessive heat
such as sunshine, fire or the like.
1Slide the lock release catch to open the
battery cover.
CHECK
Check that the camera is turned off before opening the
battery cover.
CAUTION
• Do not open the battery cover while the camera is on.
This could damage the Memory Card or ruin the image
files on the Memory Card.
• Do not apply force to the battery cover.
Continued Q
Outer casing

16
Loading the Batteries
2Load the batteries correctly as indicated by
the polarity icons.
CAUTION
Match the polarity icons (+ and ,) of the batteries to
those on the inside of the battery cover.
3Press on the battery cover to push the
batteries down. Slide the cover closed.
CHECK
Make sure to close the battery cover securely until you
hear a click.
MEMO
If you want to use the camera powered by AC, the AC
power adapter, AC-5VX (sold separately), and DC
coupler, CP-04 (sold separately), are necessary. Refer to
the manual provided with the AC-5VX and CP-04 for
instructions.
17
Getting Ready
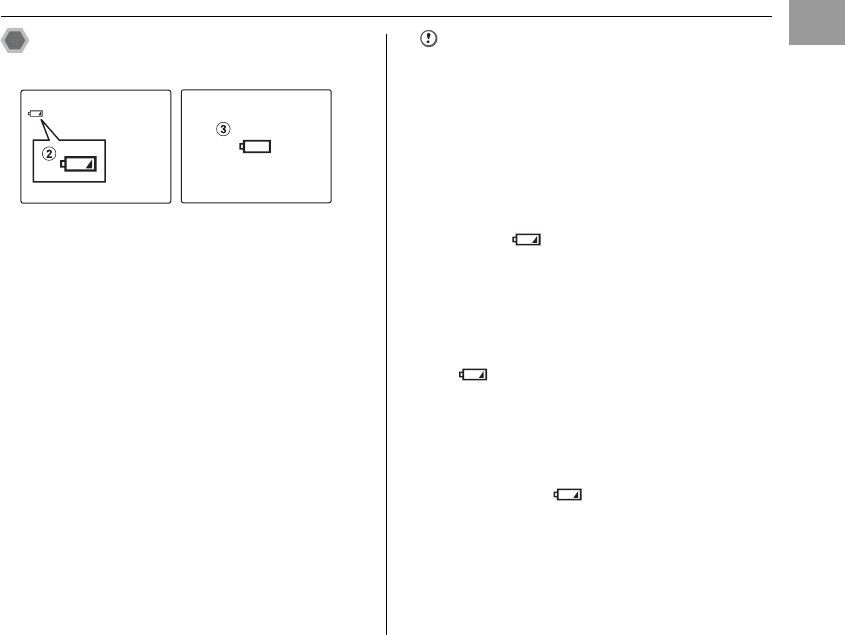
Checking the battery charge
Turn the camera on and check the battery charge.
AThere is ample battery charge. (Not displayed)
BThere is insufficient charge left in the batteries. The
batteries will soon run out. Have a new set of batteries
ready. (Lit red)
CThe batteries are depleted. The display will shortly go
blank and the camera will stop working. Replace or
recharge the batteries. (Blinking red)
Notes on batteries
• Soil, such as fingermarks on the poles of the batteries,
can shorten time for which the batteries can be used.
• The time for which AA-size alkaline batteries (referred
to hereafter simply as alkaline batteries) can be used
varies depending on the brand. Some brands of alkaline
batteries may stop providing power more quickly than
those supplied with the camera. Note also that due to
their nature, the time for which alkaline batteries can be
used decreases in cold conditions (0°C to +10°C/+32°F
to +50°F). For this reason, it is better to use AA-size Ni-
MH batteries.
• Due to the nature of the battery, the battery level
warning ( , V) may appear early when the
camera is used in cold locations. Try warming the
batteries in your pocket or a similar location before use.
• Depending on the battery type and the level of charge
in the batteries, the camera may run out of power
without first displaying a battery level warning. This is
particularly likely to happen when batteries that have
run out of charge once are re-used.
• Depending on the camera mode, the transition from
to V may occur more quickly.
• Use Fujifilm Battery charger (sold separately) to charge
AA-size Ni-MH batteries.
• When first purchased or if left unused for a long period,
the amount of time which AA-size Ni-MH batteries can
be used may be short.
• Battery power consumption varies greatly depending
on use. When you change to Playback mode from
Shooting mode, may not occur, however, V
may suddenly blink red and the camera may stop
operation.
• See “Notes and Cautions” (included) for more
information.

18
Loading the Memory Card
Although you can store pictures in the camera’s internal
memory, you can store many more images on the
Memory Card (sold separately). You can use the xD-
Picture Card and the SD Memory Card with the FinePix
S1000fd. In this Owner’s Manual, these cards are
expressed as “Memory Card”.
SD Memory Cards/SDHC Memory Cards
They are operation-checked at FUJIFILM Corporation.
Manufacturer: SanDisk
MEMO
• Compatible models will be updated in our website:
http://www.fujifilm.com/products/digital_cameras/index.html
• Depending on the SD Memory Card, recording of
movies may be interrupted.
Use of above mentioned SD Memory Cards are
recommended.
• The camera is not compatible with multimedia cards.
1Open the battery cover.
CAUTION
Do not open the battery cover while the camera is on. This
could damage the Memory Card or ruin the image files on
the Memory Card.
2Insert a Memory Card.
(xD-Picture Card)
(SD Memory Card)
Align the gold marking with the
gold contact area, then insert an
xD-Picture Card completely.
Align the gold marking with the
gold contact area, then insert a
SD Memory Card completely.
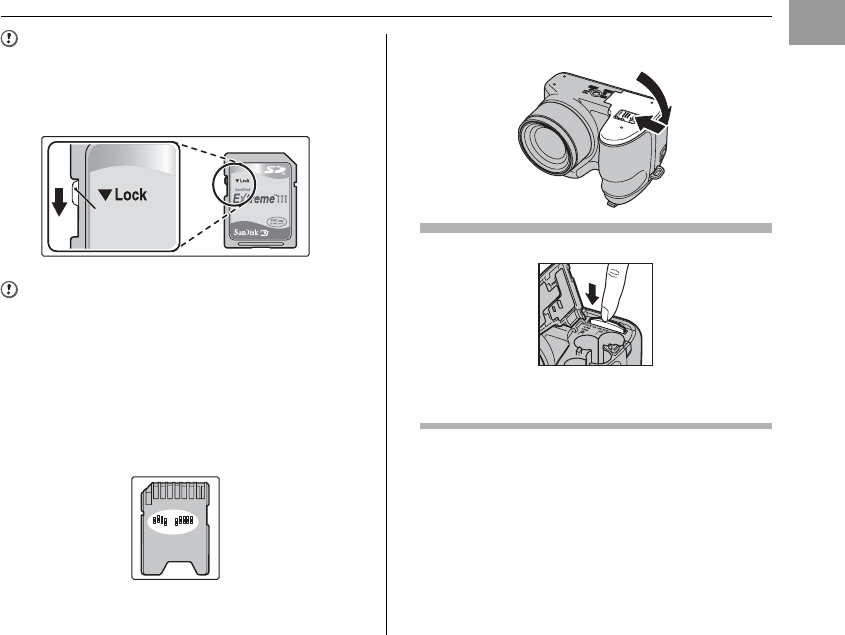
19
Getting Ready
CAUTION
Be sure to unlock the protection of the SD Memory Card
before inserting it. If it is locked, recording/deleting
images, as well as formatting are not available. To unlock
the protection, slide the switch back, and the SD Memory
Card will work normally.
CAUTION
• A new SD Memory Card or a card previously used on a
PC or any device other than the camera should be
formatted (➝p.117) on the camera before use.
• Do not use a miniSD adaptor or a microSD adaptor
which have exposed contact areas on the back. Use of
these adaptors may cause a malfunction or damage
due to the improper contacts.
• A miniSD adaptor or microSD adaptor bigger than SD
Memory Card standard size may become stuck. Pulling
out forcefully may cause a malfunction. In that case,
contact your FUJIFILM dealer.
3Close the battery cover.
How to replace the Memory Card
Push the Memory Card into the slot and then slowly remove
your finger. The lock is released and the Memory Card is
pushed out.
Continued Q
Protection
switch

20
Loading the Memory Card
CAUTION
• When storing Memory Cards, make sure that they are
kept out of the reach of children. A Memory Card could
be swallowed and cause suffocation. If a child swallows
a Memory Card, seek medical attention or call
emergency number right away.
• If the Memory Cards is oriented incorrectly, it will not go
all the way into the slot. Do not apply force when
inserting a Memory Card.
• Note that the Memory Cards may spring out if you
release your finger quickly from the card immediately
after the lock is released.
• Operation of this camera is only guaranteed when it is
used with FUJIFILM xD-Picture Card and operation-
checked SD Memory Card (➝p.18).
• See p.138 for information on the xD-Picture Card, SD
Memory Card and the Internal Memory.
MEMO
• The size of an image file varies depending on the
subject. For this reason, the number recorded may not
represent the actual number of frames.
• See p.154 for information on the standard number of
available frames.
ZAbout internal memory
When a Memory Card (sold separately) is inserted
Record images: Record images to a Memory Card.
Playback images: Playback images in a Memory Card.
When a Memory Card (sold separately) is not inserted
Record images: Record images to internal memory.
Playback images: Playback images in internal memory.
ZAbout images in the internal memory
Images held in the camera’s internal memory may be
corrupted or erased due to problems such as camera
faults. Save your important data to another media (i.e.,
DVD-R, CD-R, CD-RW, hard disk, etc.).
It is possible to transfer saved images on the internal
memory to a Memory Card (➝p.99).
AUTO
AUTO
12
12
/
31
31
/
2050
2050
10
10
:
00
00
AM
AM
FinePix S1000fd has
internal memory that can
store images without
Memory Card. Y appears
on the screen when internal
memory is active.

21
Getting Ready
Turning On and Off
Turning the camera on in
Shooting mode
Slide the ON/OFF switch to turn the camera on in
Shooting mode.
Slide the ON/OFF switch again to turn the camera off.
MEMO Switching between the Shooting and
Playback mode
Pressing w when the camera is in Shooting mode
switches the camera to the Playback mode. Pressing the
shutter button switches the camera to the Shooting mode.
CAUTION
The ON/OFF switch does not completely disconnect the
camera from its power supply.
Turning the camera on in
Playback mode
Press w for about 1 second to turn the camera on in
Playback mode. Slide the ON/OFF switch to turn the
camera off.
MEMO
Press the shutter button to switch to the Shooting mode.
22
Turning On and Off
Setting the language, date, and
time
When using the camera for the first time after purchasing,
the language, date, and time are cleared. Set the
language, date, and time.
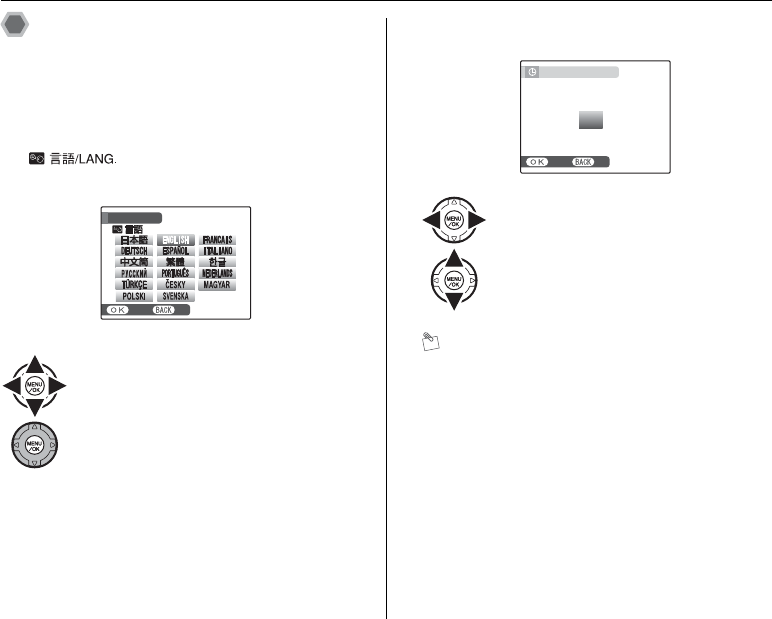
1[ ] screen appears when turning
the camera on.
2Set the date and time.
MEMO
• Holding down n or o changes the numbers
continuously.
• When the time displayed passes “12”, the AM/PM
setting changes.
APress n, o, p, or q to select the
language.
BPress MENU/OK to confirm the setting.
SET
SET
NO
NO
START MENU
START MENU
/ LANG.
/ LANG.
APress p or q to select Year, Month,
Day, Hour, or Minute.
BPress n or o to correct the setting.
SET
SET
NO
NO
DATE / TIME NOT SET
DATE / TIME NOT SET
YY.MM.DD
YY.MM.DD
1. 1 12
1. 1 12
:
00
00
AM
AM
2010
2010
2009
2009
2007
2007
2006
2006
2008
2008

23
Getting Ready
3Change the date format.
Date format
ex. December 1, 2008
[YY.MM.DD]: [2008.12.1]
[MM/DD/YY]: [12/1/2008]
[DD.MM.YY]: [1.12.2008]
MEMO
[START MENU] screen also appears when the batteries
have been removed and the camera has been left for a
long period. Once the AC power adapter and DC coupler
has been connected or the batteries have been installed
for 10 hours or more, the camera settings will be retained
for roughly 24 hours even if both sources of power are
removed.
When the Auto power off function is active, if the camera
is left unused for 2 or 5 minutes, this function turns the
camera off (➝p.118). To turn the camera back on, slide
the ON/OFF switch. To playback images, press w for
about 1 second.
SET
SET
NO
NO
AM
AM
12 /
12 /
1 / 2008 10:00
1 / 2008 10:00
DD . MM . YY
DD . MM . YY
YY . MM . DD
YY . MM . DD
MM /
MM /
DD /
DD /
YY
YY
DATE / TIME NOT SET
DATE / TIME NOT SET
APress p or q to select the date format.
BPress n or o to set the format.
CAlways press MENU/OK after the settings
are completed.
Auto power off function
24
Correcting the Date and Time
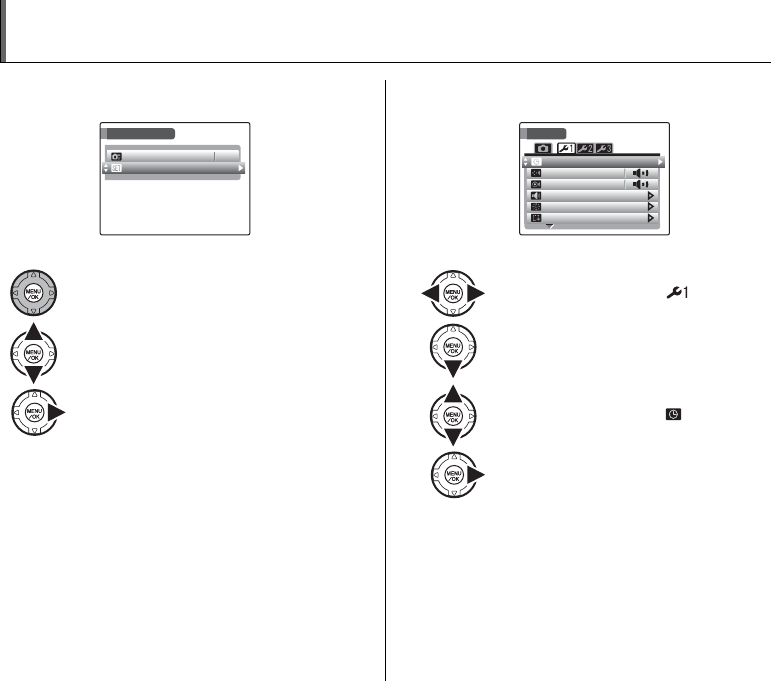
1Open the [SET-UP] menu. 2Display the [DATE/TIME] screen.
APress MENU/OK to open the menu.
BPress n or o to select [U SET-UP].
CPress q.
SHOOTING MENU
SHOOTING MENU
HIGH-SPEED SHOOTING
HIGH-SPEED SHOOTING
OFF
OFF
SET-UP
SET-UP
APress p or q to select .
BPress o to move to menu item.
CPress n or o to select [ DATE/TIME].
DPress q.
See “2 Set the date and time.” (➝p.22).
SET
SET
-
UP
UP
FORMAT
FORMAT
PLAYBACK VOLUME
PLAYBACK VOLUME
LCD BRIGHTNESS
LCD BRIGHTNESS
BEEP VOLUME
BEEP VOLUME
SHUTTER VOLUME
SHUTTER VOLUME
DATE / TIME
DATE / TIME

25
Getting Ready
Selecting the Language
1Open the [SET-UP] menu. 2Display the [ ] screen.
APress MENU/OK to open the menu.
BPress n or o to select [U SET-UP].
CPress q.
SHOOTING MENU
SHOOTING MENU
HIGH-SPEED SHOOTING
HIGH-SPEED SHOOTING
OFF
OFF
SET-UP
SET-UP
APress p or q to select .
BPress o to move to menu item.
CPress n or o to select [ ].
DPress q.
See “1 [ ] screen appears
when turning the camera on.” (➝p.22).
SET
SET
-
UP
UP
DISCHARGE
DISCHARGE
VIDEO SYSTEM
VIDEO SYSTEM
2 MIN
2 MIN
ENGLISH
ENGLISH
AUTO POWER OFF
AUTO POWER OFF
TIME DIFFERENCE
TIME DIFFERENCE
BACKGROUND COLOR
BACKGROUND COLOR
NTSC
NTSC

26
Taking Pictures (B AUTO Mode)
This section describes the basic operations.
1Turn the camera on.
ASlide the ON/OFF switch.
CHECK
Select e Macro mode to take close-up shots (➝p.63).
2Press the Flash pop-up button to pop-up
the flash.
3Switch the display.
Press the EVF/LCD to alternate the display between the
viewfinder (EVF) and the LCD monitor.
MEMO
The EVF/LCD selection is retained even when the
camera is off or the mode setting is changed.
BSet the Mode
dial to B.
LCD
EVF
26

27
Using the Camera
Holding the camera correctly
Brace your elbows against your sides and hold the
camera with both hands.
Using the viewfinder (EVF) allows for a steady arm
position, preventing picture blur.
CAUTION
• Moving the camera while shooting gives a blurred
picture (camera shake). Hold the camera steadily with
both hands.
• If the lens or flash is obscured by your fingers or the
strap, or if the autofocus ring is touched when shooting,
subjects may be out of focus or the brightness
(exposure) of your shot may be incorrect.
• When the autofocus ring is held during operation, a
warning message [ZOOM ERROR] is displayed. Then
the lens will automatically refocus.
4Focus on the main subject in the AF frame
and press the shutter button down halfway.
CHECK
• Focus on the subject
Double beep is heard
Indicator lamp lit green
• Not focus on the subject
No sound
AF frame lit red
{ indicated
Indicator lamp blinking green
MEMO
• The shutter button has a halfway point at which focus
and exposure are automatically optimized before taking
the picture by pressing fully down.
• When pressing the shutter button halfway, a lens
operation sound may be heard.
Continued Q
Do not cover the lens or
flash with your fingers.
AUTO
AUTO
60
60
60
60
F 3
F 3
.
5
F 3
F 3
.
5
12
12
/
31
31
/
2050
2050
10
10
:
00
00
AM
AM
12
12
/
31
31
/
2050
2050
10
10
:
00
00
AM
AM
AF frame AF frame
becomes smaller
and camera
focuses on the
subject.
Halfway
pressed

28
Taking Pictures (B AUTO Mode)
5Press the shutter button fully.
CAUTION
When taking a picture using the flash, the image may
disappear and go dark briefly due to flash charging. The
indicator lamp blinks orange during charging.
MEMO
• When the subject is not in the AF frame, use AF/AE lock
to take the picture (➝p.32).
• When pressing the shutter button down fully in one
motion, the camera takes the picture without the AF
frame changing.
Flash
If you want to change the setting, see p.64 for information on
flash.
CAUTION
• The image shown on the screen before the picture is
taken may differ in brightness, color, etc. from the
image actually recorded. Play back the recorded image
to check it (➝p.36).
• When selecting a slow shutter speed that will cause
camera shake, appears on the screen. Use flash or
a tripod.
• See p.139-143 for information on warning displays. See
“Troubleshooting” (➝p.144-149) for more information.
Click
Double
beep
Halfway pressed Fully pressed
60
60
60
60
F 3
F 3
.
5
F 3
F 3
.
5
When pressing the shutter
button down halfway, b
appears on the screen before
the flash fires.
29
Using the Camera
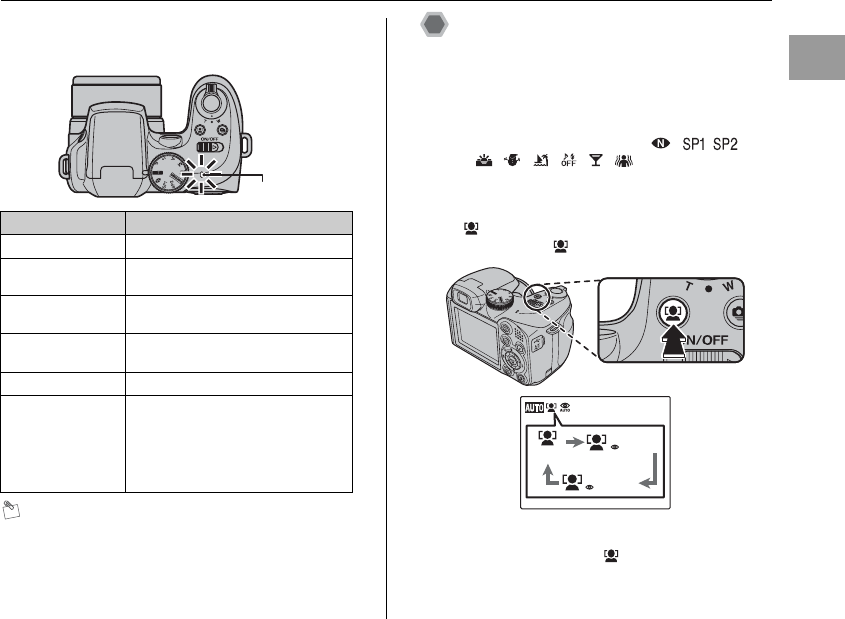
ZIndicator lamp display
The indicator lamp lights or blinks when pressing the shutter
button, etc. The indicator lamp shows the camera status.
MEMO
Detailed warning messages appear on the screen
(➝p.139-143).
Using Intelligent Face Detection
when taking pictures
Intelligent Face Detection allows you to focus on and
adjust the brightness of people’s faces. Intelligent Face
Detection is effective with the camera held horizontally or
vertically.
Available Shooting modes: B, , /
(H, /, , , , , , ), N, M, <, >
1Set Intelligent Face Detection.
Press . Intelligent Face Detection setting changes
each time you press .
Red-eye effect, caused by the light of the flash reflecting
off the inside of the eye, will be corrected automatically
when a picture is taken with [ FACE
DETECTIONbREMOVAL ON] set.
Continued Q
Display Status
Lit green Locking the focus
Blinking green Camera shake warning, AF warning,
or AE warning (ready to shoot)
Blinking green and
orange alternately
Recording to Memory Card or internal
memory (ready to shoot)
Lit orange Recording to Memory Card or internal
memory (not ready)
Blinking orange Charging flash (flash will not fire)
Blinking red • Warnings for Memory Card and
internal memory
Card not formatted, incorrect format,
memory full, Memory Card or
internal memory error
• Lens operation error
Indicator lamp
OFF
FACE DETECTION
REMOVAL ON
FACE DETECTION
REMOVAL OFF

30
Taking Pictures (B AUTO Mode)
CAUTION
• Correction results may differ depending on the scene.
• The processing may take more time if there are many
faces in an image.
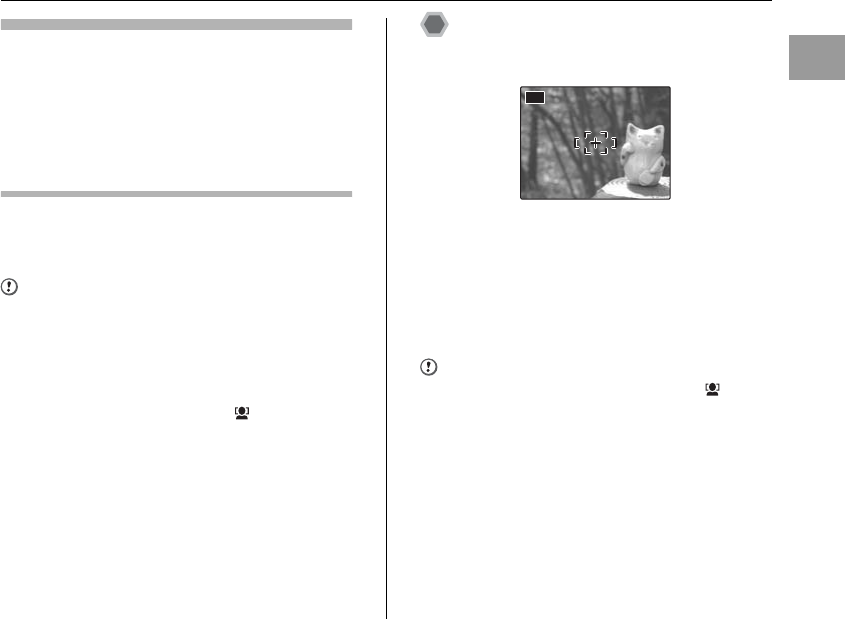
2Check the composition on the LCD monitor.
3Press the shutter button down fully to take
pictures.
CHECK [ FACE DETECTIONbREMOVAL ON]
When a picture is taken with [ FACE
DETECTIONbREMOVAL ON] set, the red-eye effect
will be detected and corrected before the image is
recorded.
When there are multiple people
in the frame, Intelligent Face
Detection will set a green frame
around the face nearest to the
center of the picture. This face
has focusing priority.
Green frame
CANCELCANCEL
DETECTINGDETECTING
ARed-eye effect in an
image will be detected after
the shooting.
REMOVINGREMOVING
BProcessing will end when
the red-eye effect is not
detected.
31
Using the Camera
Subjects not suitable for Intelligent Face Detection
Intelligent Face Detection automatically focuses on a face(s).
However, difficulties will occur with the Intelligent Face
Detection mode in the following situations:
• The face is obscured by glasses, sunglasses, a hat or hair.
• A person turned sideways, or who has their head tilted
• The subject is too far away to recognize a face
Intelligent Face Detection will not work in cases where the
subject is standing on his/her head, is not a person (pet or
other animal), or if the camera is not held correctly.
Use AF/AE lock (➝p.31) to guarantee best result
when shooting a subject that is not suited for
Intelligent Face Detection.
CAUTION
• If the camera or subject move as the picture is taken,
the subject’s face may move out of the Intelligent Face
Detection frame.
• When the camera is detecting multiple faces, the green
frame is set around the face near the center. If you want
to focus on another subject, move the camera so that
the new subject is in the center of the screen.
If focus is still not achieved, press (Intelligent Face
Detection) to turn off the function, and take the picture
using AF/AE lock (➝p.32).
Intelligent Face Detection can focus on a face in a white
frame providing the subjects in the green and white
frame are of the same focal length.
• Pressing the shutter button halfway with Intelligent Face
Detection off, the focus will be on the center of the
frame.
Taking pictures with the focus
and exposure locked
In the above composition, the subjects are not in the AF
frame. Pressing the shutter button halfway at this point
will result in the subjects being out of focus.
AF/AE lock is useful:
Use AF/AE lock to guarantee best result when shooting a
subject that is not suited to autofocusing (➝p.33).
CAUTION
When taking a picture in AF/AE lock, cancel
Intelligent Face Detection.
Continued Q
AUTO
AUTO
12
12
/
31
31
/
2050
2050
10
10
:
00
00
AM
AM
12
12
/
31
31
/
2050
2050
10
10
:
00
00
AM
AM

32
Taking Pictures (B AUTO Mode)
1Move the camera slightly so that one of the
subjects is in the AF frame.
2Press the shutter button down halfway to
focus on the subject.
3Continue to hold the shutter button down
halfway. Move the camera back to the
original image and press the shutter button
fully.
MEMO
• AF/AE lock can be applied repeatedly before the shutter
is released.
• On FinePix S1000fd, pressing the shutter button down
halfway locks the focus and exposure settings (AF and
AE lock).
Using AF/AE lock
AUTO
AUTO
12
12
/
31
31
/
2050
2050
10
10
:
00
00
AM
AM
12
12
/
31
31
/
2050
2050
10
10
:
00
00
AM
AM
60
60
60
60
F 3
F 3
.
5
F 3
F 3
.
5
Double
beep
Halfway
pressed
60
60
60
60
F 3
F 3
.
5
F 3
F 3
.
5
Click
Fully pressed

33
Using the Camera
Subjects not suitable for autofocus
FinePix S1000fd uses a high-precision autofocusing
mechanism. However, it may have difficulty focusing on the
following:
• Subjects photographed through glass
• Subjects that do not reflect well, such as hair or fur
• Subjects with no substance, such as smoke or flames
• Dark subjects
• Subjects with little or no contrast between the subject and
the background (such as subjects dressed in the same color
as the background)
• Shots where another high-contrast object (not the subject) is
close to the AF frame and is either closer or further away
than your subject (such as a shot of someone against a
background with strongly contrasting elements)
For such subjects use AF/AE lock (➝p.32).
AF-assist illuminator
Use this illuminator to focus on the subject in dimly lit
conditions.
When pressing the shutter button down halfway, the
camera fires the AF-assist illuminator (orange) while
focusing on your subject.
MEMO
• Even when the AF-assist illuminator fires, the camera
may have difficulty focusing in some conditions.
• Even though there is no danger to safety, do not expose
it directly in someone’s eyes.
• When using the AF-assist illuminator in Macro mode,
the camera may have difficulty focusing to take close-
up shots.
• See p.111, 112 for information on turning the AF-assist
illuminator off.
• AF-assist illuminator does not fire in ,, ., , ,
, , , or mode.
Very shiny subjects such
as a mirror or car body
Fast moving subjects
AF-assist
illuminator

34
Taking Pictures (B AUTO Mode)
Using zoom function
Use the zoom lever to take pictures with zoom function.
The zoom bar appears on the screen while the zoom lever
is being used. Use digital zoom when you want to shoot
the subject closer (➝p.116).
Adjusting the shot composition
Select the screen display.
Press DISP/BACK to change the screen display.
AUTO
AUTO
AUTO
AUTO
T: tele zoom lever
(zoom in)
W: wide zoom lever
(zoom out)
zoom bar
N
16
16N
16
16
AUTO
AUTO
AUTO
AUTO
N
16
16N
16
16
12
12
/
31
31
/
2050
2050
10
10
:
00
00
AM
AM
12
12
/
31
31
/
2050
2050
10
10
:
00
00
AM
AM
12
12
/
31
31
/
2050
2050
10
10
:
00
00
AM
AM
12
12
/
31
31
/
2050
2050
10
10
:
00
00
AM
AM
Text displayed No text displayed
Framing guideline
displayed
Post shot assist window
displayed

35
Using the Camera
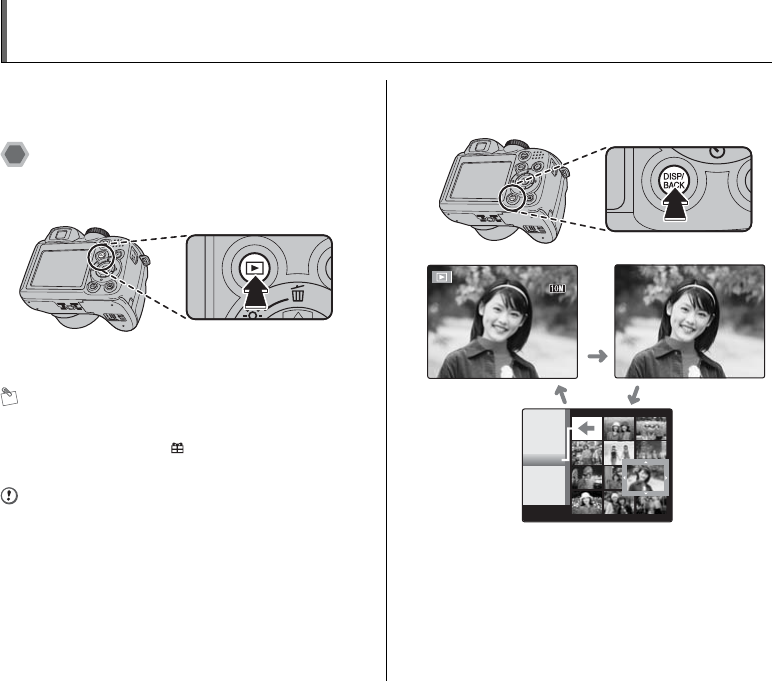
Position the main subject at
the intersection of two lines
in this frame or align one of
the horizontal lines with the
horizon. Use this frame as a
guide to the subject’s size
and the balance of the shot
while composing a shot.
MEMO
Always use AF/AE lock when composing a shot. The
image may be out of focus if AF/AE lock is not used.
Up to the last 3
photographed images
appear on the post shot
assist window. This serves
as a guide for taking other
shots with similar
compositions.
ZFormat of post shot assist window
Best framing
Post shot assist window
12
12
/
31
31
/
2050
2050
10
10
:
00
00
AM
AM
12
12
/
31
31
/
2050
2050
10
10
:
00
00
AM
AM
AUTO
AUTO
36
Viewing the Images
Playback your images to check them. For important
photographs, always take a test shot and view the image
to make sure that the camera is working normally.
Setting the camera to Playback
mode
Press w during shooting to change to Playback mode.
When the camera is off, press w for about 1 second to
turn the camera on in Playback mode.
MEMO
•Press w to play back the last shot.
• When playing back images shot with a camera other
than FinePix S1000fd, a present icon appears on
the screen.
CAUTION Still images viewable on
FinePix S1000fd
This camera will display still images recorded on FinePix
S1000fd or still images (excluding some uncompressed
images) recorded on any FUJIFILM digital camera that
supports xD-Picture Cards or SD Memory Cards. Clear
playback or playback zooming may not be possible for still
images shot on cameras other than FinePix S1000fd.
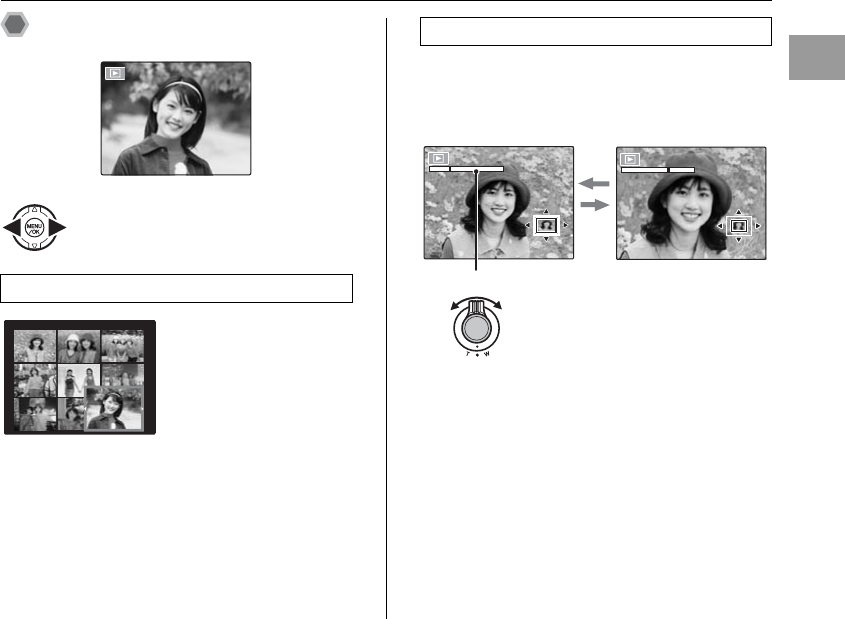
Select the screen display.
Press DISP/BACK during Playback mode to change the
screen display.
100
100
-
0001
0001
100
100
-
0001
0001
NN
12
12
/
31
31
/
2050
2050
10
10
:
00
00
AM
AM
12
12
/
31
31
/
2050
2050
10
10
:
00
00
AM
AM
2050
2050
1/11
1/11
12
12
/
30
30
12
12
/
29
29
12
12
/
31
31
Text displayed No text displayed
Sorting by date
37
Using the Camera
Single-frame playback
1Zoom in / Zoom out.
To zoom in an image during single-frame playback:
Continued Q
To select the required image:
Press p: last image
Press q: next image
Selecting images
100
100
-
0001
0001
100
100
-
0001
0001
12
12
/
31
31
/
2050
2050
10
10
:
00
00
AM
AM
12
12
/
31
31
/
2050
2050
10
10
:
00
00
AM
AM
To select images on the
thumbnail lists screen, hold
down p or q for 1 second
during playback.
When releasing p or q,
camera returns to single-
frame playback.
Playback zoom
W: wide zoom lever
(zoom out)
T: tele zoom lever
(zoom in)
Turn to T or W to zoom in or out of an
image.
Zoom bar

38
Viewing the Images
2Display another part of the image.
MEMO
• Zoom cannot be performed when the images recorded
by ` are played back.
• Press DISP/BACK to cancel playback zoom.
Sorting by date
In sorting by date mode, you can view all images taken on
the same day.
Press n, o, p, or q to display another
part of the image.
Navigation screen
(Current displayed
image)
APress n, o, p, or q to move the cursor
(colored frame) to the selecting frame.
BPress MENU/OK to enlarge the image.
1
1
/
11
11
2050
2050
12
12
/
30
30
12
12
/
29
29
12
12
/
31
31

39
Using the Camera
Multi-frame playback
Use this function to display a single frame, 2 frames, 9
frames or 100 frames (Micro Thumbnail). You can
compare and select images using the Multi-frame display.
Use the zoom lever to change the display.
Selecting the date
APress n, o, p, or q to move the cursor
(colored frame) to on the upper left
frame.
BPress p to display the selecting date.
CPress n or o to move the cursor (colored
frame) to select the date.
Press n or o repeatedly to jump to the
next page.
DPress q.
2050
2050
11
11
12
12
/
30
30
12
12
/
29
29
12
12
/
31
31
NN
12
12
/
31
31
/
2050
2050
10
10
:
00
00
AM
AM
12
12
/
31
31
/
2050
2050
10
10
:
00
00
AM
AM
100-0001
100-0001
100-0001
100-0001
Continued Q

40
Viewing the Images
Using Intelligent Face Detection
when playing back pictures
You can display and enlarge the faces in images when
playing back the images shot using the Intelligent Face
Detection function ( is displayed) (➝p.29).
CAUTION
The images recorded by ` cannot be enlarged.
MEMO
Press DISP/BACK to return to normal playback.
2 frames playback
APress n, o, p or q to select the
images you want to compare.
BPress MENU/OK to enlarge the image.
9 frames playback/100 frames playback
(Micro thumbnails playback)
APress n, o, p or q to change the
colored frame and select an image.
Press n or o repeatedly to jump to the
next page.
BPress MENU/OK to enlarge the image.
APress , then the frame(s) appears on
the detected face(s) in pictures.
BThe detected face(s) is enlarged each time
you press .
CPress n, o, p, or q to display another
part of the image (➝p.37).
DETECTED FACESDETECTED FACES

41
Using the Camera
Erasing the Images/Movies Setting the camera to w
Playback mode (➝p.36)
Use this mode to erase unnecessary images or movies to
have ample free space on the Memory Card or internal
memory. Your camera calls images “frames”.
Using the erase button ( /n)
Pressing (n) erases images easily.
Erasing the images using
[PLAYBACK MENU]
Continued Q
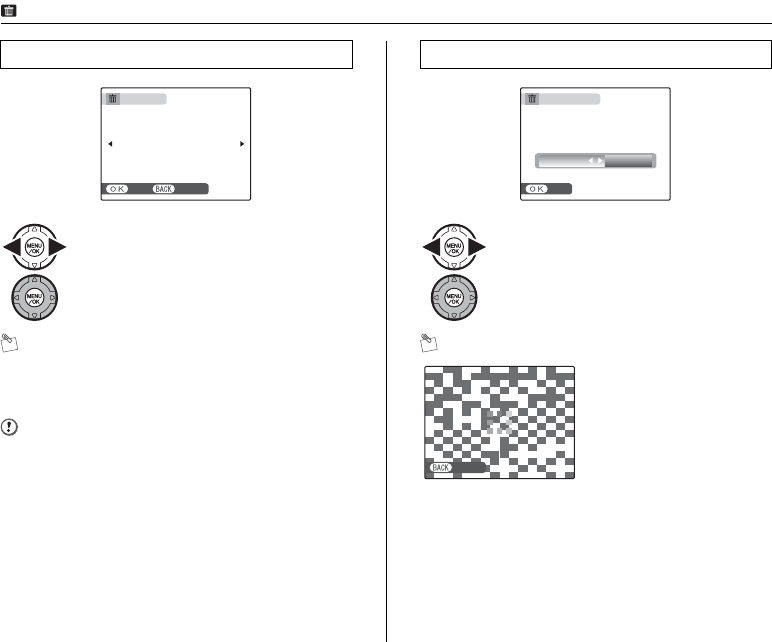
APress p or q to select the erasing
image.
BPress (n).
CPress p or q to select [OK].
DPress MENU/OK to erase the displayed
image.
ERASE OK?
ERASE OK?
SET
SET
OK
OK
CANCEL
CANCEL
APress MENU/OK to open the [PLAYBACK
MENU].
BPress n or o to select [ ERASE].
CPress q.
DPress n or o to select [FRAME] or [ALL
FRAMES].
EPress MENU/OK to confirm the setting.
ERASE
ERASE
PROTECT
PROTECT
IMAGE ROTATE
IMAGE ROTATE
VOICE MEMO
VOICE MEMO
COPY
COPY
RED EYE REMOVAL
RED EYE REMOVAL
PLAYBACK MENU
PLAYBACK MENU
FRAME
FRAME
ALL FRAMES
ALL FRAMES
BACK
BACK
42
Erasing the Images/Movies
MEMO
To erase another frame (file), repeat above steps.
When erasing frames (files) is completed, press DISP/
BACK.
CAUTION
Pressing MENU/OK repeatedly erases consecutive
frames (files). Take care not to erase a frame (file) by
mistake.
MEMO
Erasing one frame at a time ([FRAME])
APress p or q to select the erasing frame
(file).
BPress MENU/OK to erase the currently
displayed frame (file).
ERASE OK?
ERASE OK?
YES
YES
CANCEL
CANCEL
Erasing all frames ([ALL FRAMES])
APress p or q to select [OK].
BPress MENU/OK to erase all the frames
(files).
Press DISP/BACK to cancel
erasing of all the frames
(files). Some unprotected
frames (files) will be left
unerased.
ERASE ALL OK?
ERASE ALL OK?
IT MAY TAKE A WHILE
IT MAY TAKE A WHILE
OK
OK
CANCEL
CANCEL
SET
SET
CANCEL
CANCEL
Setting the camera to w playback mode (➝p.36) Erasing the Images/Movies

43
Using the Camera
MEMO
• When using a Memory Card, the images in the Memory
Card are erased. When not using a Memory Card, the
images in the internal memory are erased.
• Protected frames (files) cannot be erased. Unprotect
the frames (files) before erasing them (➝p.98).
• [DPOF SPECIFIED. ERASE OK?] or [DPOF
SPECIFIED. ERASE ALL OK?] appears, when erasing
DPOF specified files is attempted.
CAUTION
Erased frames (files) cannot be recovered. Back up
important frames (files) onto your PC or another media.
Setting the camera to w playback mode (➝p.36)

44
Using the Shooting Functions — Procedure of Setting
Specify the camera settings for taking pictures to get the
best result. A general guide is given below.
1Select the Shooting mode.
Turn the Mode dial to select the Shooting mode.
The camera settings are tailored to the scene being
shot.
CAUTION
When you have been used for long periods in places
subject to extreme temperature rises, it will lower your
image quality and streaking may also be visible in your
images. If this occurs, turn the camera off several times to
prevent heating the camera.
B Auto This is the easiest mode for taking
pictures (➝p.48).
Natural light
This mode produces beautiful images
that retain the natural ambience when
shots are taken in low-light conditions
(➝p.48).
,
Scene position
Use to select the ideal setting from Scene
position menu for the shot. (➝p.49).
PANORAMA
Used for shooting panoramic pictures
(➝p.53).
NProgram AE
MShutter-
priority AE
<Aperture-
priority AE
Used for changing the aperture or shutter
speed setting so that the action is frozen,
the flow of the motion is conveyed, or the
background is out of focus (➝p.54-58).
> Manual All manual settings for taking pictures
(➝p.59).
r Movie Used for shooting movies (➝p.106).
44

45
Advanced Features — Photography
2Specify the photography settings.
Pressing buttons or selecting menu allows you to
specify photography functions. You can obtain the
best result for shooting.
ZSpecifying functions using buttons
Continued Q
D Exposure
compensation
button
e (p)Macro button
d (q)Flash button
* (o)Self-timer
button
Intelligent Face
Detection/
bRed-eye removal
button
f Continuous
button
f Continuous
Used to take a series of continuous shots
or to use auto bracketing (with exposure
compensation) (➝p.69).
Intelligent
Face
Detection/
bRed-eye
removal
Pressing this button allows you to focus
on people’s faces. Also, red-eye effect,
caused by the light of the flash reflecting
off the inside of the eye, can be corrected
before an image is recorded. (➝p.29).
e Macro Used for close-up shots (➝p.63).
dFlash Used for shots in dark locations or for
backlit subjects, etc. (➝p.64).
*Self-timer
Used in situations such as group shots
where the photographer is included in the
shot (➝p.67).
DExposure
compensation
Used for changing the image brightness
(➝p.61).
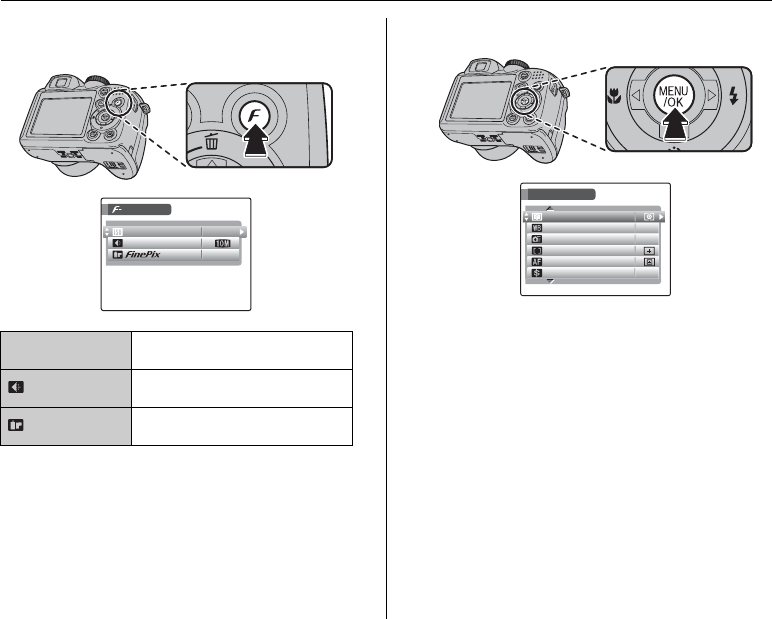
46
Using the Shooting Functions — Procedure of Setting
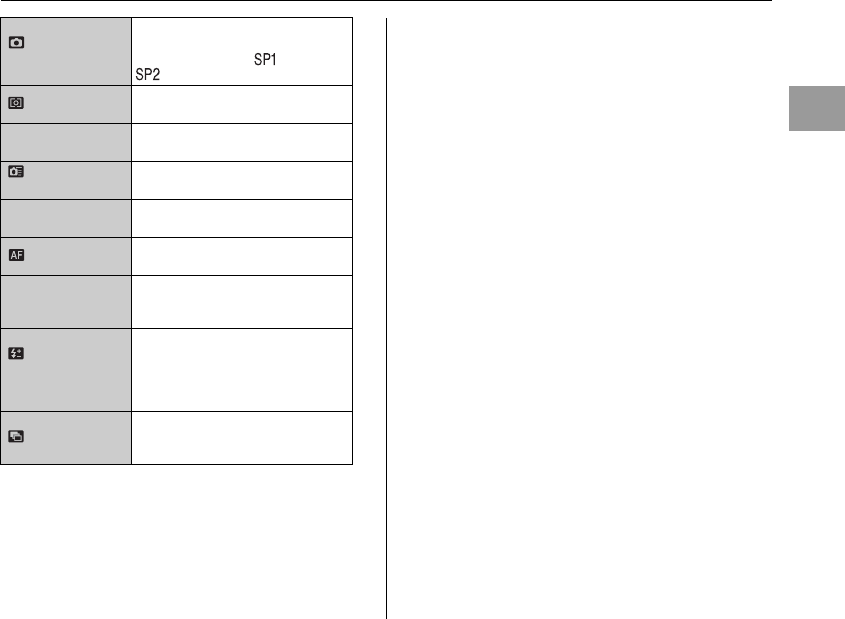
ZSpecifying functions using [p-MODE MENU] (p
button)
Press p button to open the [p-MODE MENU].
ZSpecifying functions using [SHOOTING MENU]
(MENU/OK button)
[S ISO] Use to specify required sensitivity
setting (➝p.77).
[ QUALITY] Use to specify required image size
(➝p.78).
[ FinePix COLOR]
Use to specify required color tone
(➝p.79).
ISO
ISO
MODE MENU
MODE MENU
AUTO
AUTO
STD
STD
N
QUALITY
QUALITY
COLOR
COLOR
SHOOTING MENU
SHOOTING MENU
PHOTOMETRY
PHOTOMETRY
HIGH
HIGH
-
-
SPEED SHOOTING
SPEED SHOOTING
SHARPNESS
SHARPNESS
OFF
OFF
STD
STD
WHITE BALANCE
WHITE BALANCE
AUTO
AUTO
AF MODE
AF MODE
FOCUSING
FOCUSING
47
Advanced Features — Photography
[ SCENE
POSITION]
Use to select the best setting for the
scene being shot. Choose from 13
types of scene (only or
)(➝p.49).
[ PHOTOMETRY] Use to select light metering method
(only N, M, <, >) (➝p.80).
[TWHITE
BALANCE]
Use to adjust the color tone (only N,
M, <, >) (➝p.81).
[ HIGH-SPEED
SHOOTING]
Use to focus the shot quickly (➝p.82).
[H FOCUSING] Use to specify focusing mode (only
N, M, <, >) (➝p.83).
[ AF MODE] Use to specify focusing area (only N,
M, <, >) (➝p.84).
[G SHARPNESS]
Use this setting to soften or
emphasize the outline and quality of
an image (only N, M, <, >) (➝p.86).
[ FLASH]
(Brightness
Adjustment)
Use this setting to adjust the amount
of light emitted by the flash to suit the
photography conditions or to achieve
a desired effect (only N, M, <, >)
(➝p.87).
[ BRACKETING]
Use this setting to photograph the
same image with different exposure
settings (only N, M, <, >) (➝p.87).

48
Setting the Shooting Mode
You can select the most suitable setting according to the
subject by selecting one of the Shooting modes.
[B AUTO]
This is the easiest mode for providing crisp and clear
shots.
Use this mode for ordinary photography.
Camera specifies all settings other than p-MODE
([QUALITY] and [FinePix COLOR]) automatically.
Set the Mode dial to B.
CHECK
• See p.65 for information on the available flash modes.
• Only [AUTO] can be selected for the [ ISO]
(sensitivity) setting.
[ NATURAL LIGHT]
This mode produces beautiful images that retain the
natural ambience when shots are taken in low-light
conditions.
This mode is also ideal for shooting indoor or situations
where the flash cannot be used.
Camera sets the high-sensitivity setting when selecting
the Natural light mode. This mode is effective for reducing
camera shake and moving-subject blurring when taking
pictures in low-light conditions.
CHECK
• Flash cannot be used in the Natural light mode.
• Only [AUTO] can be selected for the [ ISO]
(sensitivity) setting.
Set the Mode dial to .

49
Advanced Features — Photography
[ , SCENE POSITION]
This mode provides the best Scene position setting for the
scene being shot. Choose from 13 types of scene.
Select the Scene position setting in the [SCENE
POSITION] menu.
About and of the Mode Dial
The camera enables to set the scene position for and
separately.
For example, select H for and , for separately at
traveling. The setting combination can be used for variety of
shooting scene. The menu options of and are the
same. However the options cannot be set for both and
.
MEMO
• and are set to H and , as factory default
settings.
• See p.65 for information on the available flash modes.
•[ p-CHROME] (➝p.79) cannot be set.
• AF-assist illuminator does not fire in ,, ., , ,
, , and mode.
• Only [AUTO] can be selected for the [ ISO]
(sensitivity) setting.
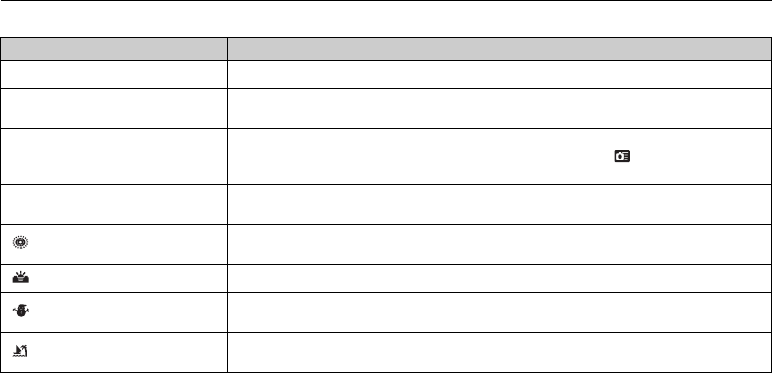
ZSelecting Scene position setting
Continued Q
Set the Mode dial to or
.
APress MENU/OK to open the menu.
BPress n or o to select [ SCENE
POSITION].
CPress q.
DPress n or o to select the setting.
EPress MENU/OK to confirm the setting.
Portrait with soft
Portrait with soft
overall tone and
overall tone and
beautiful skin tones
beautiful skin tones
PORTRAIT
PORTRAIT
SPORT
SPORT
NIGHT
NIGHT
SET
SET
CANCEL
CANCEL
LANDSCAPE
LANDSCAPE
50
Setting the Shooting Mode
ZScene position list
Scene position Functions
[H PORTRAIT] Use this mode for photography to get beautiful skin tones and soft overall tone.
[, LANDSCAPE] Use this mode for shooting scenery in daylight and provides crisp, clear shots of scenery
such as buildings and mountains.
[. SPORT]
Use this mode to take pictures of a moving subject. It gives priority to faster shutter
speeds. When setting [.SPORT] mode, the camera sets to [ HIGH-SPEED
SHOOTING] mode (➝p.82) automatically.
[/ NIGHT] Use this mode for shooting evening and night scenes. A picture is taken with a slow
shutter of up to 8 seconds.
[ FIREWORKS] Use this mode to shoot fireworks. It is effective for taking more vivid shots of fireworks
with a slow shutter. Refer to “Selecting the exposure time setting” (➝p.52).
[ SUNSET] Use this mode to shoot sunset, making the colors more vivid.
[ SNOW] Use this mode to prevent darkening images and provide crisp, clear shots, when
shooting at snowy scene where the whole screen appears white.
[ BEACH] Use this mode to prevent darkening images and provide crisp, clear shots, when
shooting at beach under strong sunlight.

51
Advanced Features — Photography
CHECK
• When setting [. SPORT] mode, the camera sets to [ HIGH-SPEED SHOOTING] (➝p.82) automatically.
• Use a tripod to prevent camera shake for [/ NIGHT], [ FIREWORKS] and [ PANORAMA], as a slow shutter speed is
used.
• When setting [ FLOWER] or [ TEXT] mode, the camera sets to e Macro mode automatically.
• Check whether photography is permitted before using [ MUSEUM] mode.
[ MUSEUM]
Use this mode for taking pictures in places such as museum where the use of flash and
making an operation sound and a shutter sound are restricted. Flash mode is forcibly set
to Suppressed flash, and operation sound, shutter sound, and self-timer lamp are off.
[ PARTY] Use this mode for shooting at indoor wedding and party. This mode produces beautiful
images that retain the natural ambience when shots are taken in low-light conditions.
[ FLOWER] Use this mode to take clear close-up shots when zooming up a flower. It is effective for
taking more vivid shots of flower petal.
[ TEXT] Use this mode to shoot documents and white board. It is effective for taking clearer
shots.
[ PICTURE
STABILIZATION]
Used for selecting a fast shutter speed that reduces camera shake and moving-subject
blurring.
Scene position Functions

52
Setting the Shooting Mode
ZSelecting the exposure time setting for [ FIRE
WORKS]
APress D to open the setting screen.
BPress n or o to select the exposure time.
2"
2"
SETTING EXPOSURE TIME
SETTING EXPOSURE TIME

53
Advanced Features — Photography
[ PANORAMA]
You can take panoramic pictures by stitching 3 pictures
into a panoramic scene.
BYou can select the direction of taking panoramic
pictures from left to right or right to left by pressing p
or q.
CTake the first picture. Press MENU/OK if you want to
save the first picture.
If the pan direction is left to right, a section from the
right side of the first picture will appear on the left side
of the second picture you will take, so that you can
align the next shot in panoramic fashion.
DCompose the second picture by overlapping the saved
section of the first image onto the matching area in the
viewfinder on the far left side. Then take your second
shot. Press MENU/OK to save the second picture.
Repeat one more time for a panoramic view of the
combined pictures.
EIf you are only taking two pictures, press n to stitch
them together.
After you take the third picture, press MENU/OK to
stitch the pictures together.
Press MENU/OK again to save the panoramic picture.
MEMO
• Use a tripod to prevent camera shake.
• Only the panoramic picture is saved.
• The picture size is set to 3 automatically.
• Exposure compensation and white balance are set with
the first picture.
• The flash cannot be used.
ASet the Mode dial to
.
21 3 23 1

54
Setting the Shooting Mode
[N PROGRAM AE]
This is an automatic mode to specify the settings except
for the shutter speed and aperture setting.
This is a simple way to take pictures the same as the <
Aperture-priority Auto and M Shutter-priority Auto modes
(Program shift).
Shooting functions:
• [ PHOTOMETRY] (➝p.80)
•[T WHITE BALANCE] (➝p.81)
•[H FOCUSING] (➝p.83)
• [ AF MODE] (➝p.84)
•[G SHARPNESS] (➝p.86)
• [ FLASH] (➝p.87)
• [ BRACKETING] (➝p.87)
CHECK
See p.65 for information on the available flash modes.
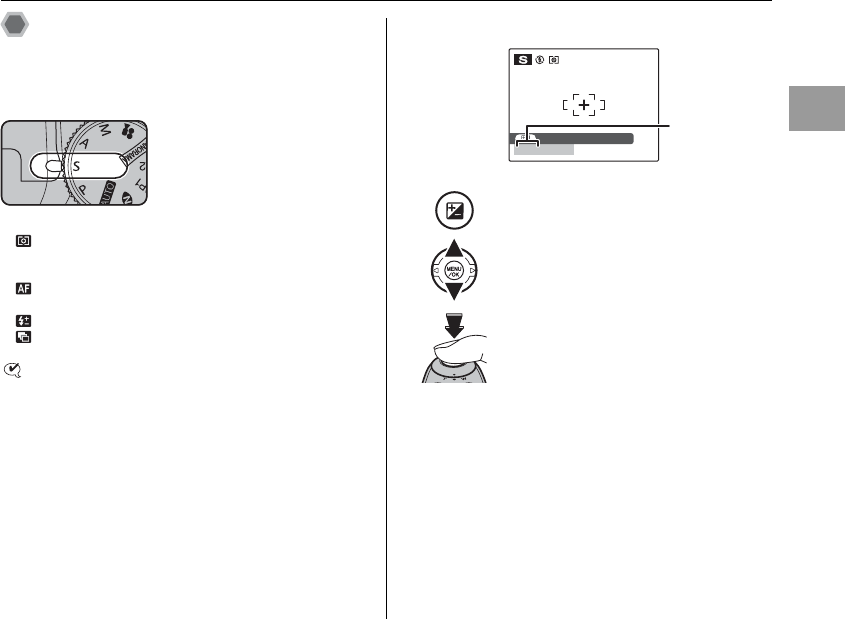
ZProgram shift
MEMO
• Program shift can be used when Suppressed flash
(➝p.65) is set in flash mode.
• The shutter speed and aperture setting appear in yellow
when the camera is in Program shift mode.
• Any of following cancels Program shift:
- Changing the Mode dial setting
- Setting the camera to Playback mode
- Turning the camera off
- Popping the flash up
CAUTION
Set the Mode dial to N.
PROGRAM SHIFT
PROGRAM SHIFT
ISO 100
ISO 100
F3
F3
.
5
60
60
APress D to open the setting screen.
BSelect different shutter speed and aperture
setting combinations without changing the
exposure setting.
CPress the shutter button to take pictures.
SET
SET
ISO 100
ISO 100
When the brightness of the
subject is outside the camera’s
brightness metering range, [---]
appears as the shutter speed and
aperture setting on the screen.
55
Advanced Features — Photography
[M SHUTTER PRIORITY AE]
This is an automatic mode to set the shutter speed.
Use this mode to freeze a moving subject (fast shutter
speed) or convey the impression of movement (slow
shutter speed).
Shooting functions:
• [ PHOTOMETRY] (➝p.80)
•[T WHITE BALANCE] (➝p.81)
•[H FOCUSING] (➝p.83)
• [ AF MODE] (➝p.84)
•[G SHARPNESS] (➝p.86)
• [ FLASH] (➝p.87)
• [ BRACKETING] (➝p.87)
CHECK
See p.65 for information on the available flash modes.
ZSetting the shutter speed
Continued Q
Set the Mode dial to M.
APress D to open the setting screen.
BPress n or o to select the shutter speed.
CPress the shutter button to take pictures.
1000
1000
F3
F3
.
5
ISO 100
ISO 100
SETTING SHUTTER SPEED
SETTING SHUTTER SPEED
Shutter speed
56
Setting the Shooting Mode
CAUTION
Shutter speed
When shooting a moving subject, you can either “freeze the
motion” or “capture the sense of movement” by adjusting the
shutter speed.
SET
SET
SET
SET
ISO 100
ISO 100
200
200
F2
F2
.
8
SET
SET
F2
F2
.
8
When the correct
exposure cannot be
obtained with selected
shutter speed, the
aperture setting appears
in red. When this occurs,
adjust the shutter speed
again.
Lit red
ISO 100
ISO 100
50
50 F
---
---
SET
SET
When the brightness of
the subject is outside the
camera’s brightness
metering range, [F---]
appears as the aperture
setting. When this
occurs, press the shutter
button down halfway to
measure the light level
again.
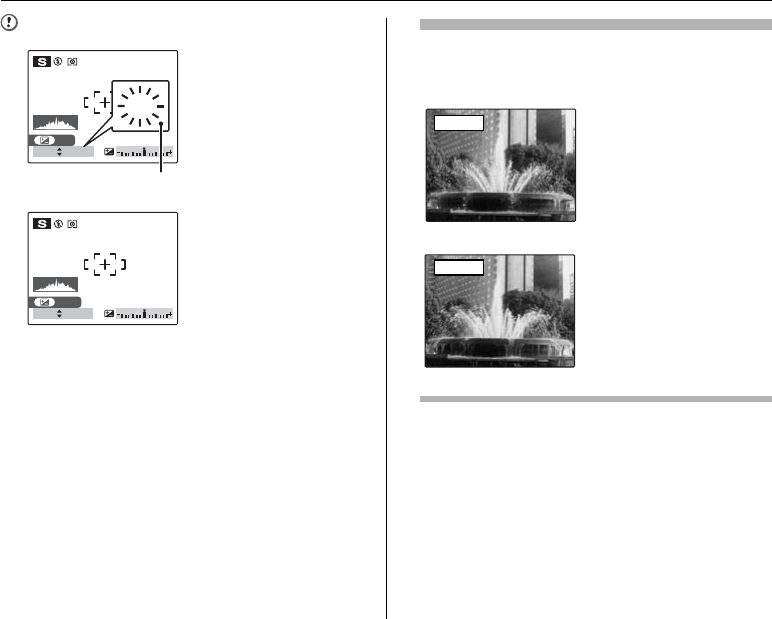
Freezes the motion of the
subject.
Fast
Photographs the traces left
by the subject’s movement.
Slow
57
Advanced Features — Photography
[< APERTURE PRIORITY AE]
This is an automatic mode to set the aperture.
Use this mode to have the area in front of and behind the
subject out of focus (large aperture) or have both near
and far subjects in focus (small aperture).
Shooting functions:
• [ PHOTOMETRY] (➝p.80)
•[T WHITE BALANCE] (➝p.81)
•[H FOCUSING] (➝p.83)
• [ AF MODE] (➝p.84)
•[G SHARPNESS] (➝p.86)
• [ FLASH] (➝p.87)
• [ BRACKETING] (➝p.87)
CHECK
See p.65 for information on the available flash modes.
ZSetting the aperture
Continued Q
Set the Mode dial to <.
APress D to open the setting screen.
BPress n or o to select the aperture.
CPress the shutter button to take pictures.
1000
1000
F3
F3
.
5
ISO 100
ISO 100
SETTING APERTURE
SETTING APERTURE
Aperture

58
Setting the Shooting Mode
CAUTION
Aperture
By adjusting the aperture, you can change the depth of focus
(depth of field). Selecting a larger number of aperture (closed)
obtains a larger depth of focus. Selecting a smaller number of
aperture (open) has the area in front of and behind the subject
out of focus.
SET
SET
F8
F8
ISO 100
ISO 100
4
4
When the correct exposure
cannot be obtained with
selected aperture setting, the
shutter speed appears in red.
When this occurs, adjust the
aperture setting again.
When [d FORCED FLASH] is
set, you can take a picture with
a shutter speed of up to 1/45
sec.
Lit red
ISO 100
ISO 100
F8
F8
----
----
SET
SET
When the brightness of the
subject is outside the camera’s
brightness metering range,
[----] appears as the shutter
speed.
The area in front of and
behind the subject is also in
focus in the shot.
Closed
Main subject
The area in front of and
behind the subject is out of
focus.
Open

59
Advanced Features — Photography
[> MANUAL]
This is a shooting mode that allows for settings including
the shutter speed and aperture.
Set the Shooting functions to manual to easily control
yourself.
Shooting functions:
• [ PHOTOMETRY] (➝p.80)
•[T WHITE BALANCE] (➝p.81)
•[H FOCUSING] (➝p.83)
• [ AF MODE] (➝p.84)
•[G SHARPNESS] (➝p.86)
• [ FLASH] (➝p.87)
• [ BRACKETING] (➝p.87)
CHECK
See p.65 for information on the available flash modes.
ZSetting the shutter speed
MEMO
• Use a tripod to prevent camera shake.
• In shots with long exposures, noise (dots) may appear
on the image.
Continued Q
Set the Mode dial to >.
APress D to open the setting screen.
BPress n or o to select the shutter speed.
CPress the shutter button to take pictures.
SET SHUTTERSPEED,APERTURE
SET SHUTTERSPEED,APERTURE
ISO 100
ISO 100
1000
1000
F3
F3
.
5
Shutter speed
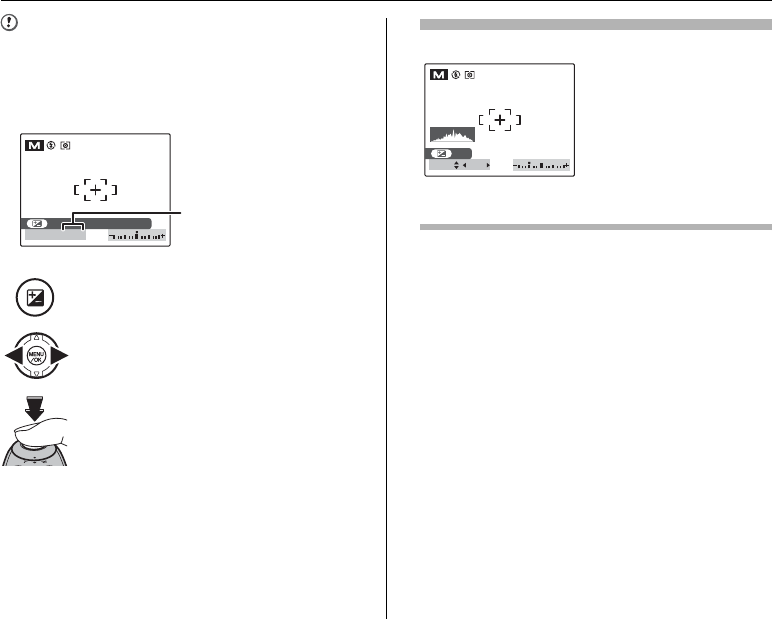
60
Setting the Shooting Mode
CAUTION
If the shutter speed is set to a speed 1/1000 sec.,
smearing (white stripes) may appear in the image
(➝p.156).
ZSetting the aperture
The exposure indicator
APress D to open the setting screen.
BPress p or q to select the aperture.
CPress the shutter button to take pictures.
SET SHUTTERSPEED,APERTURE
SET SHUTTERSPEED,APERTURE
ISO 100
ISO 100
1000
1000
F3
F3
.
5
Aperture
SET
SET
ISO 100
ISO 100
1000
1000
F3
F3
.
5
Use the exposure indicator
on the screen as a guide
when setting the
exposure.When the
brightness of the subject is
outside the camera’s
brightness metering range,
the exposure indicator
disappears on the screen.
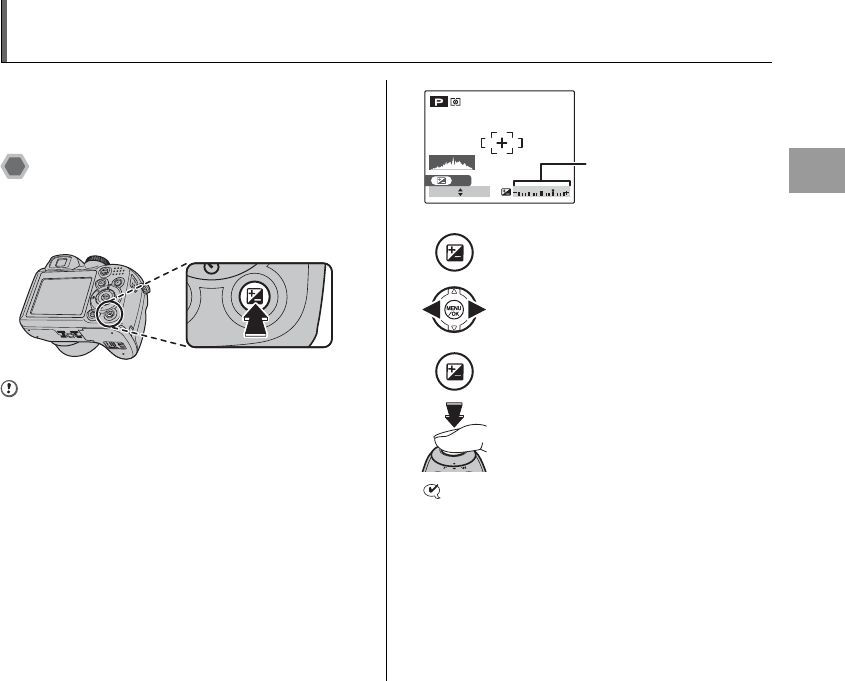
61
Advanced Features — Photography
Adjusting the Image Brightness (
D
Exposure Compensation)
Use this menu for shots to get the correct brightness
(exposure), such as shots with extremely high contrast
between the subject and the background.
Available Shooting modes: N, M, <
Adjusting exposure
compensation
Press D to display the exposure compensation setting
screen.
CAUTION
This function can only be used for N, M, < in Shooting
mode.
CHECK
• The symbol indicating the compensation direction (– or
+) turns yellow.
• The S icon also turns yellow while exposure
compensation is being set and then turns blue after
setting is completed.
• The screen brightness will increase or decrease
depending on the exposure compensation setting.
Continued Q
APress D to open the setting screen.
BPress p or q to set the compensation
value.
CPress D to confirm the setting.
DPress the shutter button to take pictures.
60
60
F3
F3
.
5
SET
SET
ISO 100
ISO 100
Exposure Compensation
indicator
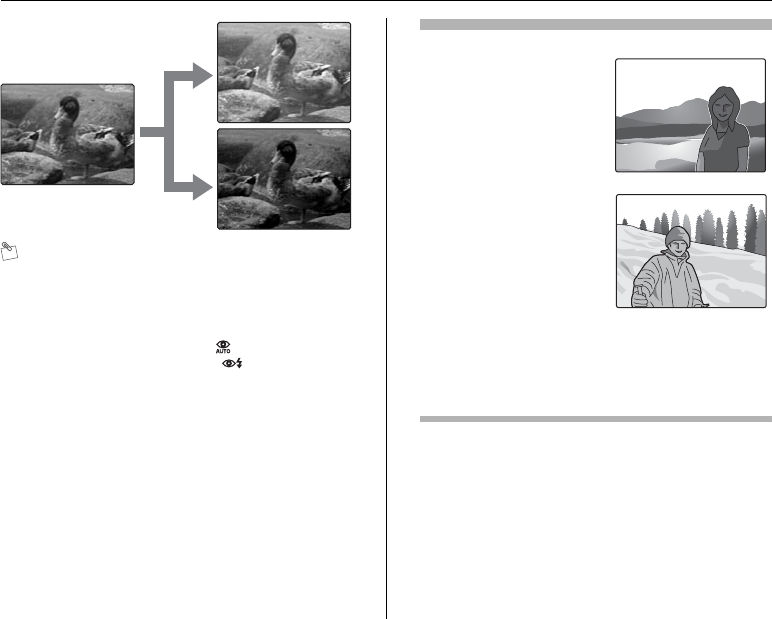
62
Adjusting the Image Brightness (D Exposure Compensation)
MEMO
• This setting is retained when the mode is changed or
the camera is turned off (S icon appears). Set the
exposure compensation to “0” unless compensation is
required.
• Any of the following disables exposure compensation:
- Using the flash in [AUTO] or mode
- Shooting dark scenes in d or mode
Guide to compensation
• Backlit portraits: +2 steps to
+4 steps (+2/3 EV to +1 1/3
EV)
• Very bright scenes (such as
snowfields) and highly
reflective subjects: +3 steps
(+1 EV)
• Shots made up predominantly of sky: +3 steps (+1 EV)
• Spotlit subjects, particularly against dark backgrounds: –2
steps (–2/3 EV)
• Scenes with low reflectivity, such as shots of pine trees or
dark foliage: –2 steps (–2/3 EV)
positive (+) compensation
negative (–) compensation
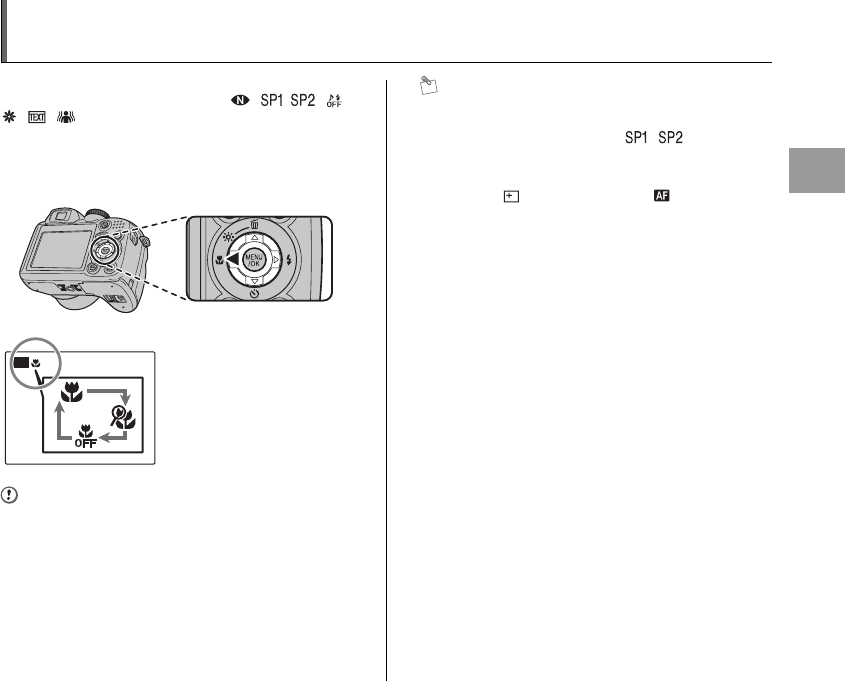
63
Advanced Features — Photography
e Macro/> Super Macro (Close-up)
Use this mode to take close-up shots.
Available Shooting modes: B, , / ( ,
, , ), N, M, <, >
Press e (p) to select Macro mode.
The Macro mode setting changes each time you press the
e (p).
CAUTION
• When Super Macro is set, focal length is fixed to 60 mm
(35 mm camera equivalent). Zoom function is not
available.
• When Super Macro is set, flash cannot be used.
MEMO
• Use a tripod to prevent camera shake in Macro mode.
• Any of the following cancels Macro mode:
- Changing the Mode dial to , or r mode
- Turning the camera off
• If the flash is too bright, use flash brightness adjustment
(➝p.87).
• Even if [ MULTI] (➝p.85) in the [ AF MODE] is set,
the camera focuses near the center of the screen.
• AF-assist may not function correctly if the camera is up
close to the subject, such as in macro-mode.
AUTO
AUTO
e or > appears on the
screen indicating that you
can take close-up shots.
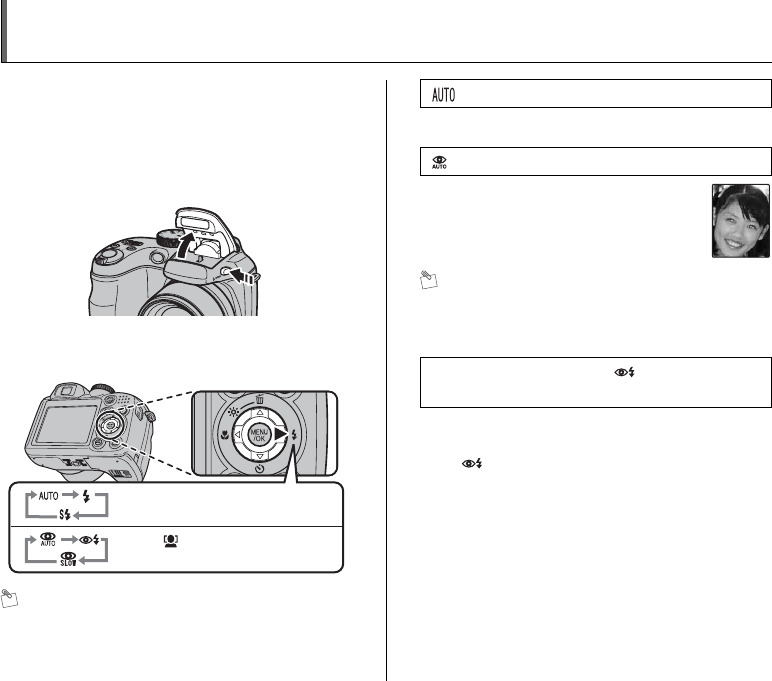
64
d Setting the Flash
Flash photography is useful for taking pictures at night or
indoor dark locations. Choose from 6 flash modes
according to the type of shot. See p.65 for information on
the available Shooting modes.
1Press the Flash pop-up button to pop up the
flash.
2Turn the Command dial to select the flash
mode setting.
MEMO
When pressing the shutter button down halfway, b
appears on the screen before the flash fires.
Use this mode for ordinary photography.
The flash fires as required by the shooting conditions.
MEMO Red-eye effect
When using the flash to take a picture of people in low-
light conditions, their eyes sometimes appear red in the
picture. This is caused by the light of the flash reflecting
off the inside of the eye.
Use this mode in backlit scenes, or to get the correct
colors when taking a picture under bright lighting. In this
mode, the flash fires in bright as well as dark conditions.
Using synchronizes Red-eye reduction mode.
The flash setting changes each
time you press d (q).
When [ FACE
DETECTIONbREMOVAL ON] is set.
[ AUTO FLASH]
[ RED EYE REDUCTION]
This mode is suitable for shooting portraits in
low-light conditions.
Use this mode to minimize red-eye (eyes
appear in red in the finished photo).
[d FORCED FLASH], [ FORCED
FLASH]

65
Advanced Features — Photography
This mode allows you to take pictures of people at night
that clearly show both your subjects and the night time
backdrop. To prevent camera shake, always use a tripod.
Using n synchronizes Red-eye reduction mode.
Using / selects slow shutter speeds of up to 8 seconds.
CAUTION
In bright scenes, overexposure may occur.
Suppressed flash
ZAvailable flash modes in Shooting modes
Available flash modes in each Shooting mode are listed
below.
: FACE DETECTION
b: RED EYE REMOVAL
Continued Q
[c SLOW SYNCHRO],
[n RED EYE & SLOW]
Pressing the flash down
changes the camera to
Suppressed flash mode.
This mode is suitable for
situations where the flash
cannot be used. Use a tripod
to prevent camera shake
when shooting in
Suppressed flash mode in
the dark condition.
ON
b
OFF
ON
b ON
OFF
AUTO d c n
B✓ ✓ ✓ ✓
H✓ ✓ ✓ ✓ ✓ ✓
,
.✓ ✓
/✓ ✓
✓ ✓
✓ ✓ ✓ ✓
✓ ✓ ✓ ✓
✓ ✓
✓
✓ ✓ ✓ ✓
N✓ ✓ ✓ ✓ ✓ ✓
M✓ ✓
<✓ ✓ ✓ ✓
>✓ ✓

66
d Setting the Flash
CAUTION Notes on using flash
• If the shutter speed is set to a speed faster than 1/1000
sec., the image may appear dark even if the flash is
used.
• If pressing the shutter button while the flash is charging
(indicator lamp blinking orange), the picture will be
taken without the flash (when using [AUTO] and ).
• The flash charging time may increase when the
batteries are low on charge.
• When taking a picture using the flash, the image may
disappear and go dark briefly due to flash charging. The
indicator lamp blinks orange during charging.
• The flash fires several times (pre-flashes and the main
flash). Do not move the camera until the picture is
taken.

67
Advanced Features — Photography
* Self-Timer
The self-timer is used in situations where the
photographer is included in the shot.
Available Shooting modes: All
Setting self-timer
The self-timer setting changes each time you press *
(o).
Taking pictures using self-timer
1Press the shutter button down halfway to
focus on the subject and press the shutter
button fully.
Pressing the shutter button down halfway that focuses
on the subject.
Without releasing the shutter button, press the button
all the way down (fully pressed) to start the self-timer.
Continued Q
AUTO
AUTO
OFF
The last displayed setting
is the selected mode.
:The picture is taken
after 10 seconds.
(: The picture is taken
after 2 seconds.
Double
beep Beep
Halfway pressed Fully pressed

68
* Self-Timer
2Take pictures in selected time. Using the 2-second self-timer
This is useful when you worry about camera shake even if
attaching the camera on a tripod.
MEMO
• To stop the self-timer, once it has started running, press
DISP/BACK.
• Any of the following cancels the self-timer setting:
- Completing the shooting
- Changing the Shooting mode setting
- Setting the camera to Playback mode
- Turning the camera off
• Take care not to stand in front of the lens when pressing
the shutter button as this can prevent the correct focus
or brightness (exposure) from being achieved.
Taking pictures with the self-
timer and Intelligent Face
Detection function
Available Shooting modes: B, , /
(H, /, , , , , , ), N, M, <, >
Intelligent Face Detection
The Intelligent Face Detection function is especially
useful when using the self timer since it ensures that
faces will appear in focus automatically.
A picture is taken after the self-timer lamp changes from
lit to blinking (only blinks with the 2-second self-timer).
9
9
A countdown appears on
the LCD monitor indicating
the time remaining until the
picture is taken.

69
Advanced Features — Photography
f Taking pictures continuously
Use this mode to take pictures of a moving subject.
APress f to display the continuous shooting setting
screen.
[ TOP 152] : Continuous shooting
[ TOP 6[] : Continuous shooting
[h LONG PERIOD] : Long period continuous shooting
[k LAST 3]: Continuous shooting
[j BRACKETING] : Auto bracketing
[f TOP 3] : Continuous shooting
CAUTION
• Shooting continues as long as holding the shutter
button down. In auto bracketing mode however, just
press the shutter button once to shoot 3 frames.
• Number of available frames is limited depending on the
available space on the Memory Card or internal
memory. When auto bracketing, if there is insufficient
space on the Memory Card or internal memory to
record 3 frames, no pictures are taken.
• The focus is determined in the first frame and cannot be
changed in mid-sequence (except for [LONG
PERIOD]).
• The exposure is determined in the first frame, but in
[LONG PERIOD] continuous shooting the exposure is
adjusted for the scene being shot.
• The speed of continuous shooting varies depending on
the shutter speed.
• The flash cannot be used as the flash mode is set to
Suppressed flash. However, when the mode is changed
back to normal photography, the flash setting specified
before continuous shooting was selected is restored.
• For [TOP 3] continuous shooting and Auto bracketing,
the results are always displayed after you shoot. Note
that pictures taken using [LONG PERIOD] continuous
shooting are recorded without displaying the results.
• In [LONG PERIOD] continuous shooting mode, only 1
frame can be shot when using the [LONG PERIOD]
continuous shooting mode and Self-timer mode
together.
• File recording time using [TOP 3] or [BRACKETING]
may increase when record to a Memory Card or internal
memory.
Continued Q
BPress n or o to select a Continuous
shooting mode.
CPress MENU/OK to confirm the setting.
OFF
OFF
CONTINUOUS
CONTINUOUS
TOP15
TOP15
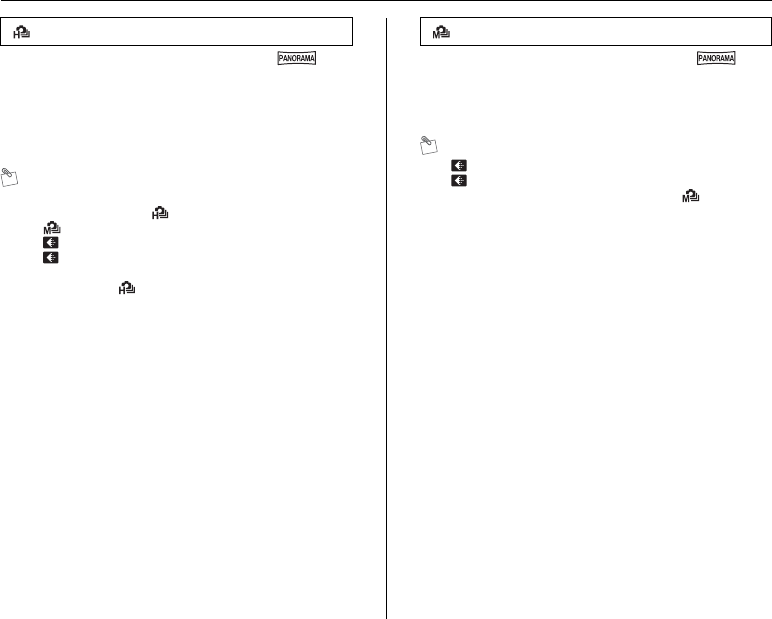
70
f Taking pictures continuously
Available Shooting modes: All (except for )
Shooting continues up to 15 frames as long as the shutter
button is held down. Use this setting when your priority is
continuous shooting speed over image quality, during
continuous shooting.
MEMO
• Whitish lines may appear around a bright spot in an
image when using [ TOP 152]. In this case, use
[ TOP 6[].
• [ QUALITY] (➝p.78) is limited to 2. The
[ QUALITY] setting changes and is displayed in
yellow in the LCD monitor. When Shooting mode is set
to other than [ TOP 152], the restriction is cleared.
Available Shooting modes: All (except for )
Shooting continues up to 6 frames as long as the shutter
button is held down.
MEMO
[QUALITY] (➝p.78) is limited to [. The
[ QUALITY] setting changes and is displayed in yellow.
When Shooting mode is set to other than [ TOP 6[],
the restriction is cleared.
[TOP 152][TOP 6[]

71
Advanced Features — Photography
Available Shooting modes: All (except for )
Shooting continues as long as the shutter button is held
down. This mode shoots up to Memory Card or internal
memory end.
MEMO
Continuous shooting mode and assist window (➝p.35)
can be used together.
Available Shooting modes: All (except for )
Shooting continues as long as holding the shutter button
down.
This mode shoots up to 40 times. The camera records the
final 3 frames shot when you release the shutter button.
Continued Q
[h LONG PERIOD] continuous
shooting
Press shutter
button.
Release
shutter button.
All frames
[k LAST 3] continuous shooting
Max.40 shots
Press shutter
button.
Release
shutter button.
3 frames

72
f Taking pictures continuously
Available Shooting modes: N, M, <, >
CHECK
Auto bracketing settings (3) ±1/3 EV, ±2/3 EV, ±1 EV
CAUTION
• If the underexposed or overexposed frame is outside
the camera’s control range, the picture is not taken with
the specified setting increments.
• This function can only be used for
N
,
M
,
<
or
>
in Shooting
mode.
MEMO Changing the setting (exposure range)
Available Shooting modes: All (except for )
[j BRACKETING]
This mode shoots the same
image with different exposure
settings.
Bracketing shoots 3
continuous frames, each with
a different exposure setting.
is correctly exposed,
is overexposed and is
underexposed.
The exposure range settings
can be changed in [
BRACKETING] in the
[SHOOTING MENU].
STORING
STORING
SHOOTING MENU
SHOOTING MENU
SET
SET
-
-
UP
UP
FLASH
FLASH 0
BRACKETING
BRACKETING
EV
EV
EV
EV
+
1/
3
-
+
2/
3
-
EV
EV
+
1
-
Press the MENU/OK to
display the menu and change
the setting in the [
BRACKETING] menu option
(➝p.87).
[f TOP 3] continuous shooting
Shooting continues as long as
holding the shutter button
down. This mode shoots up to
3 frames.
STORING
STORING

73
Advanced Features — Photography
j Increasing LCD Monitor Brightness
This is useful when checking the shot composition for
outdoor scenes.
Increasing the LCD monitor
brightness
Press j (n) to increase the LCD monitor brightness.
Press j (n) again to return to normal LCD monitor
brightness.
MEMO
• This function is automatically canceled after each shot.
• When this function is active, it will increase the amount
of speckling in images on the screen. This is normal and
does not affect the photographed image.
• This function is purely for checking the composition of
your shot. It does not increase the brightness of the
image.
• Even if you increase the brightness in low-light
conditions, you cannot check the subject.
• The color tones may vary depending on the subjects.
blinks on the LCD monitor
when the function is active.
UP
AUTO
AUTO
12
12
/
31
31
/
2050
2050
10
10
:
00
00
AM
AM
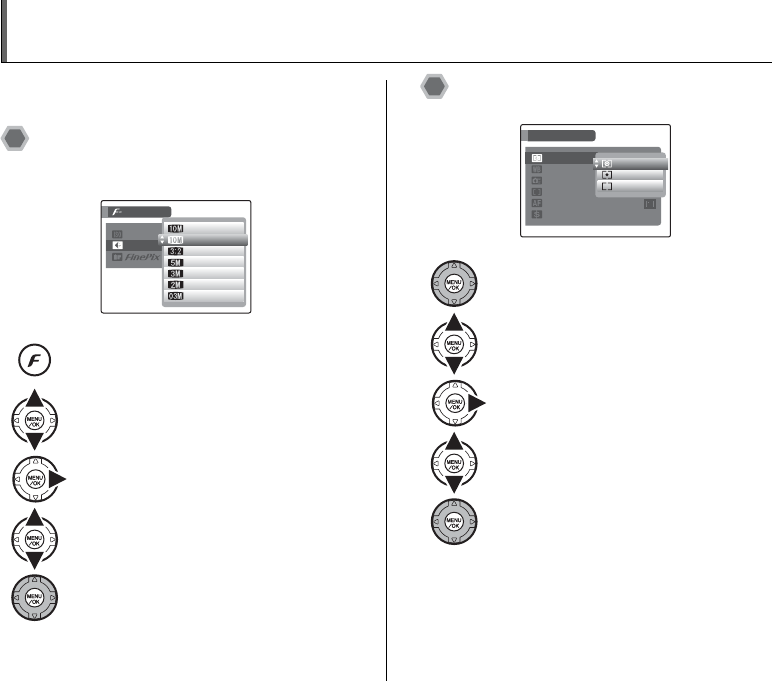
74
Using [p-MODE MENU] (Photography)/[SHOOTING MENU]
Use these menus to adjust image quality or focus. You
can take pictures in a wide range of conditions.
Setting the [p-MODE MENU]
(Photography)
Setting the [SHOOTING MENU]
APress p button to open the [p-MODE
MENU].
BPress n or o to select the menu.
CPress q.
DPress n or o to change the setting.
EPress MENU/OK to confirm the setting.
QUALITY
QUALITY 9
19
19
11
11
30
30
38
38
169
169
FRAMES
FRAMES
N
4
F
MODE MENU
MODE MENU
ISO
ISO
APress MENU/OK to open the [SHOOTING
MENU].
BPress n or o to select the menu.
CPress q.
DPress n or o to change the setting.
EPress MENU/OK to confirm the setting.
OFF
OFF
SHOOTING MENU
SHOOTING MENU
PHOTOMETRY
PHOTOMETRY
WHITE BALANCE
WHITE BALANCE
HIGH
HIGH
-
SPEED SHOOTING
SPEED SHOOTING
FOCUSING
FOCUSING
MULTI
MULTI
SPOT
SPOT
AVERAGE
AVERAGE
AF MODE
AF MODE
SHARPNESS
SHARPNESS
STD
STD
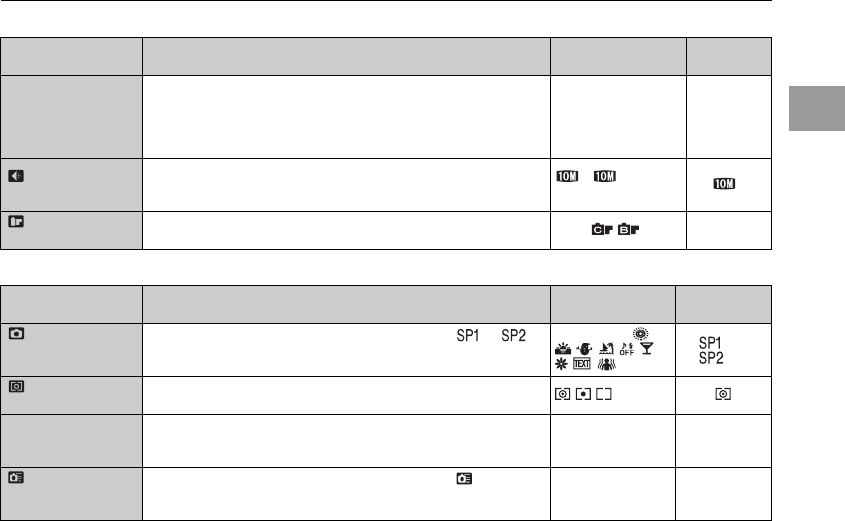
75
Advanced Features — Photography
ZList of [p-MODE MENU] options
ZList of [SHOOTING MENU] options
Menu Functions Settings Factory
default
[SISO]
(➝p.77)
Specifies required sensitivity setting of the ambient light around the
subject.
The larger value of the sensitivity, the higher sensitivity is obtained.
The higher sensitivity settings will allow you to take pictures in darker
locations.
[AUTO]/[AUTO (800)]/
[AUTO (400)]/
[32003]/[1600]/
[800]/[400]/[200]/
[100]/[64]
[AUTO]
[QUALITY]
(➝p.78)
Specifies the image size.The larger image size, the better image
quality is obtained. The smaller image size, the larger number of
images are recorded.
F/ N/%/[/
3/2/`N
[ FinePix COLOR]
(➝p.79)
Specifies required color tone.This mode is effective for taking more vivid
shots or black and white shots. [STD]/ / [STD]
Menu Functions Settings Factory
default
[ SCENE
POSITION]
(➝p.49)
This setting can be used when the Mode dial is set to or .
Use this setting to provide the best photography menu setting for the
scene being shot.
H/,/.////
/////
//
: H
: ,
[ PHOTOMETRY]
(➝p.80)
This setting can be used when the Mode dial is set to N, M, < or >.
Use this setting to specify the light metering method. //
[TWHITE
BALANCE]
(➝p.81)
This setting can be used when the Mode dial is set to N, M, < or >.
Use this setting to adjust the color balance to suit the color of the
ambient light around the subject.
[AUTO]/]/6/7/
9/0/-/8[AUTO]
[ HIGH-SPEED
SHOOTING]
(➝p.82)
When setting [. SPORT] mode, the camera sets to [ HIGH-
SPEED SHOOTING] mode automatically.
Use this setting to reduce the time required for focusing.
[ON]/[OFF] [OFF]
Continued Q
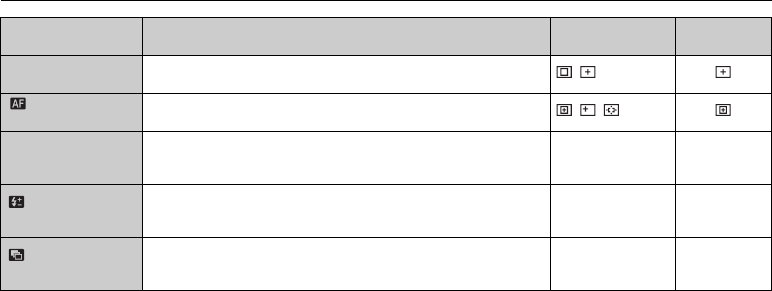
76
Using [p-MODE MENU] (Photography)/[SHOOTING MENU]
[HFOCUSING]
(➝p.83)
This setting can be used when the Mode dial is set to N, M, <, or >.
Use this setting to specify the focusing mode. /
[AF MODE]
(➝p.84)
This setting can be used when the Mode dial is set to N, M, <, or >.
Use this setting to specify the focusing area. //
[GSHARPNESS]
(➝p.86)
This setting can be used when the Mode dial is set to N, M, < or >.
Use this setting to soften or emphasize the outline of an image.
[SOFT]/
[STANDARD]/
[HARD]
[STANDARD]
[ FLASH]
(➝p.87)
This setting can be used when the Mode dial is set to N, M, < or >.
Use this setting to adjust the amount of light emitted by the flash to suit
the photography conditions or to achieve a desired effect.
–2/3 EV to +2/3 EV
in approx. 1/3 EV
increments
0
[ BRACKETING]
(➝p.87)
This setting can be used when the Mode dial is set to N, M, < or >.
Use this setting to photograph the same image with different exposure
settings.
±1/3 EV, ±2/3 EV,
±1 EV ±1/3 EV
Menu Functions Settings Factory
default

77
Advanced Features — Photography
[p-MODE MENU] (Photography) Setting the menu (➝p.74)
Changing the sensitivity setting
([S ISO])
Use this menu to specify required sensitivity setting of the
ambient light around the subject.
The larger value of the sensitivity, the higher sensitivity is
obtained. The higher sensitivity settings will allow you to
take pictures in darker locations.
CHECK
• Settings
[AUTO]/[AUTO(800)]/[AUTO(400)]/[32003]/[1600]/
[800]/[400]/[200]/[100]/[64]
Selecting [AUTO]/[AUTO(800)]/[AUTO(400)] as the
sensitivity setting, the camera selects the best
sensitivity setting for the subject’s brightness.
• About [AUTO(800)]/[AUTO(400)]
[AUTO(800)]/[AUTO(400)] can be selected when the
Mode dial is set to N. For [AUTO(800)]/[AUTO(400)],
sensitivity is automatically set in the same way as for
[AUTO], but the highest sensitivity is limited. Select
[AUTO(800)]/[AUTO(400)] depending on the scene.
MEMO
• When anything other than N, M, < and > in the
Shooting mode is selected, only AUTO can be selected
for the ISO (sensitivity) setting.
• When N, M, < and > in the Shooting mode is selected,
AUTO cannot be selected for the ISO (sensitivity)
setting.
• [ QUALITY] is limited to 3, when [ ISO] is set to
3200. [ QUALITY] automatically changes and is
displayed in yellow in the LCD screen. When [ ISO]
is set to other than 3200, the restriction is cleared.
CAUTION
• Although higher sensitivity settings will allow you to take
pictures in darker locations, they will also increase the
amount of speckling in your images. Choose the
sensitivity setting that best suits the conditions.
• When 3200 is set for [SISO], image resolution will be
lower than if shot at a sensitivity setting lower than
1600.
The selected sensitivity
setting appears on the
screen when the
sensitivity setting is set
to the setting other than
[AUTO].
ISO 100
ISO 100
60
60
F3
F3
.
5
PROGRAM SHIFT
PROGRAM SHIFT

78
[p-MODE MENU] (Photography)
Changing the quality setting
([ QUALITY])
Use this menu to specify the image size (number of
recorded pixels).
Select the quality setting for the scene being shot.
ZQuality settings in Shooting mode
Area shot and quality setting
Normal shooting provides an aspect ratio of 4:3 and %
shooting provides an aspect ratio of 3:2 (same aspect ratio as
35 mm film and post card).
MEMO
• The bigger the number of recorded pixels, the better the
image quality becomes. As the number of recorded
pixels becomes smaller, you will be able to record more
frames to a Memory Card.
• The quality setting is retained even when the camera is
turned off or the mode setting is changed.
• When changing the quality setting, the number of
available frames also changes (➝p.154). The numbers
to the right of setting show the number of available
frames.
• [ ISO] is limited to 1600 when [ QUALITY] is set to
or %. The [ ISO] setting automatically changes
and is displayed in yellow in the LCD screen. When
[ QUALITY] is set to other than or %, the
restriction is cleared.
Quality mode Sample uses
F (3648 × 2736)
N (3648 × 2736)
Printing at up to 10R (25.4 × 30.5 cm/
10 × 12 in.) / A4 size / A3 size
For better quality, select F
% (3648 × 2432)
[ (2592 × 1944) Printing at up to 6R (15.2 × 20.3 cm/
6 × 8 in.) / A5 size
3 (2048 × 1536)
2 (1600 × 1200) Printing at up to 4R (10.2 × 15.2 cm/
4 × 6 in.) / A6 size
` (640 × 480) To use for e-mail or web site
12
12
/
31
31
/
2050
2050
10
10
:
00
00
AM
AM
12
12
/
31
31
/
2050
2050
10
10
:
00
00
AM
AM
12
12
/
31
31
/
2050
2050
10
10
:
00
00
AM
AM
12
12
/
31
31
/
2050
2050
10
10
:
00
00
AM
AM
AUTO
AUTO
Area shot excluding %Area shot with %
Setting the menu (➝p.74)

79
Advanced Features — Photography
Changing the FinePix COLOR
setting ([ FinePix COLOR])
Use this menu to specify required color tone.
It is effective for taking vivid shots or black and white
shots.
CHECK
FinePix COLOR settings
CAUTION
When the Mode dial is set to or , does not
appear on the screen.
MEMO
• The FinePix COLOR setting is retained even when the
camera is off or the mode setting is changed.
•[ p-CHROME] may have little visible effect with
some subjects or the scene being shot. You may not be
able to see any difference on the screen.
[STD]
[p-STANDARD]
The contrast and color saturation
are set to standard.
Use this mode for normal
photography.
[p-CHROME]
The contrast and color saturation
are set to high.
This mode is effective for taking
more vivid shots of subjects such
as flowers.
[p-B&W]
This mode converts the colors in
the photographed image to black
and white.
When setting [ p-CHROME] or [ p-B&W],
the icon appears on the screen.
Setting the menu (➝p.74)

80
[SHOOTING MENU] Setting the menu (➝p.74)
Selecting light metering method
([ PHOTOMETRY])
Available Shooting modes: N, M, <, >
(When Intelligent Face Detection is turned
OFF)
Use this setting when the correct exposure cannot be
obtained by the shooting conditions.
[) MULTI] (Pattern):Light metering where the camera
assesses the scene and selects the
correct exposure.
[_ SPOT] : Light metering where the exposure
is optimized for the center of the
image.
[+ AVERAGE] : Light metering where an average
value for the entire image is used.
To use the photometry modes effectively
•[MULTI]
In this mode, the camera uses automatic scene recognition
to analyze the subject and provide optimum exposure in a
wide range of shooting conditions.
•[SPOT]
This mode is useful for subjects with strongly contrasting
light and dark areas where you want to achieve the correct
exposure for a particular feature.
•[AVERAGE]
The advantage of this mode is that the exposure tends not
to change for different compositions or subjects. This mode
is particularly effective for shots of people wearing black or
white clothing and shots of scenery.
OFF
OFF
SHOOTING MENU
SHOOTING MENU
PHOTOMETRY
PHOTOMETRY
WHITE BALANCE
WHITE BALANCE
HIGH
HIGH
-
SPEED SHOOTING
SPEED SHOOTING
FOCUSING
FOCUSING
MULTI
MULTI
SPOT
SPOT
AVERAGE
AVERAGE
AF MODE
AF MODE
SHARPNESS
SHARPNESS
STD
STD

81
Advanced Features — Photography
Adjusting color balance
([T WHITE BALANCE])
Available Shooting modes: N, M, <, >,
Adjust the color balance based on white to suit the color
of the ambient light around the subject.
[AUTO]: Automatic adjustment
]: Select the white balance be using white paper to
suit the shooting conditions
6: Shooting outdoors in good weather
7: Shooting in shade
9: Shooting under Daylight fluorescent lamps
0: Shooting under Warm White fluorescent lamps
-: Shooting under Cool White fluorescent lamps
8: Shooting in incandescent light
ASelect ] custom white balance (➝p.74).
BHold a piece of white paper under the light source for
setting the white balance, so that it fills entire the
screen. Then press the shutter button to set the white
balance.
MEMO
To use the white balance set previously, press the MENU/
OK without pressing the shutter button.
CWhen the correct exposure is measured,
[COMPLETED!] appears. Press MENU/OK to confirm
the setting.
Continued Q
WHITE BALANCE
WHITE BALANCE
AUTO
AUTO
] Custom white balance
CUSTOM WB
CUSTOM WB
NOT CHANGE
NOT CHANGE
CANCEL
CANCEL
NEW WB
NEW WB
COMPLETED!
COMPLETED!
SET
SET
CANCEL
CANCEL
Setting the menu (➝p.74)

82
[SHOOTING MENU]
Example
You can change the white balance for a photographed image
by using colored paper instead of white paper.
MEMO
• In AUTO mode, the correct white balance may not be
achieved for subjects such as close-ups of people’s
faces and pictures taken under a special light source.
Select the correct white balance for the light source.
• When the flash fires, the white balance (except for
custom white balance) setting for the flash is used.
Consequently, to achieve a particular effect, the flash
mode should be set to Suppressed flash (➝p.65).
• The specified custom white balance is retained until it is
reset. This setting is retained even if the batteries are
removed.
• The color tones may vary depending on the shooting
conditions (light source, etc.).
• After taking the picture, check the image color (white
balance).
• Explanation of Terms “White Balance” (➝p.157).
Focusing the shot quickly
([ HIGH-SPEED SHOOTING])
Available Shooting modes: All (except for
)
Use this mode to reduce the time required for focusing
when pressing the shutter button down halfway.
It is useful to avoid missing snapshot opportunities.
CAUTION
[ EVF/LCD MODE] in the [U SET-UP] menu is
automatically set to 60fps (➝p.156).
MEMO
• When taking pictures while the [HIGH-SPEED
SHOOTING] mode is set to [ON], the batteries will run
down more quickly.
• When setting . Sport mode, the camera sets to
[HIGH-SPEED SHOOTING] mode automatically.
Set the exposure
compensation again, using
a negative value (–) when
[OVER] appears and a
positive value (+) when
[UNDER] appears (➝p.61).
OVER
OVER
----
----
F
---
---
ISO 100
ISO 100
PROGRAM SHIFT
PROGRAM SHIFT
OVER or UNDER
SHOOTING MENU
SHOOTING MENU
HIGH-SPEED SHOOTING
HIGH-SPEED SHOOTING
SET-UP
SET-UP
ON
ON
OFF
OFF
Setting the menu (➝p.74)

83
Advanced Features — Photography
Specifying the focusing mode
([H FOCUSING])
Available Shooting modes: N, M, <, >
(When Intelligent Face Detection is turned
OFF)
Use this mode to specify focusing mode that best suits the
subject.
Use this setting to take pictures of a moving subject. The
camera continues to focus on the main subject in the AF
frame.
CAUTION
• When using [ CONTINUOUS AF], attention must be
given to the battery level.
The battery level (power consumption) increases when
using [ CONTINUOUS AF]. Because the camera
focuses continuously without pressing the shutter
button.
• When using [ CONTINUOUS AF], [ AF MODE] is
set to [ CENTER] automatically.
Continued Q
: [CONTINUOUS AF]
: [SINGLE AF]
SHOOTING MENU
SHOOTING MENU
AUTO
AUTO
OFF
OFF
PHOTOMETRY
PHOTOMETRY
WHITE BALANCE
WHITE BALANCE
HIGH - SPEED SHOOTING
HIGH - SPEED SHOOTING
FOCUSING
FOCUSING
SHARPNESS
SHARPNESS
AF MODE
AF MODE
CONTINUOUS AF
CONTINUOUS AF
SINGLE AF
SINGLE AF
[ CONTINUOUS AF]
60
60
F3.5
F3.5
PROGRAM SHIFT
PROGRAM SHIFT
ISO 100
ISO 100
AF frame
Setting the menu (➝p.74)

84
[SHOOTING MENU]
Use this setting to take picture of a static subject such as
a landscape.
Specifying the focusing area
([ AF MODE])
Available Shooting mode: N, M, <, >
(When Intelligent Face Detection is turned
OFF)
Use this mode to specify the focusing area that best suits
the subject.
The camera focuses on the center of the screen.
Use this setting when taking pictures with AF/AE lock
(➝p.31).
[ SINGLE AF]
60
60
F3
F3
.
5
ISO 100
ISO 100
ISO 100
PROGRAM SHIFT
PROGRAM SHIFT
: [CENTER]
: [MULTI]
: [AREA]
[ CENTER]
AF MODE
AF MODE
PHOTOMETRY
PHOTOMETRY
WHITE BALANCE
WHITE BALANCE
AUTO
AUTO
HIGH - SPEED SHOOTING
HIGH - SPEED SHOOTING
OFF
OFF
SHOOTING MENU
SHOOTING MENU
FOCUSING
FOCUSING
SHARPNESS
SHARPNESS
AREA
AREA
MULTI
MULTI
CENTER
CENTER
ISO 100
ISO 100
60
60
F3
F3
.
5
PROGRAM SHIFT
PROGRAM SHIFT
Setting the menu (➝p.74)

85
Advanced Features — Photography
When pressing the shutter button down halfway, the
camera recognizes any strongly contrasting subject near
the center of the screen and displays the AF frame over
subject in focus.
CAUTION
When taking pictures in Macro mode, the camera focuses
on the center of the screen.
MEMO
When the AF frame does not appear in the focusing
position, select [ CENTER] in the AF mode and use
AF/AE lock (➝p.31).
The camera changes the focusing position on the screen.
Use this setting when composing the shot using a tripod
and changing the focusing position.
[ MULTI]
60
60
F3.5
F3.5
60
60
60
60
F3
F3
.
5
F3
F3
.
5
ISO 100
ISO 100
ISO 100
PROGRAM SHIFT
PROGRAM SHIFT
Halfway pressed
AF frame
[ AREA]
APress n, o, p or q to move the
(target point) to the focusing position.
BThe AF frame appears in the location to
which the target point was moved when
you press MENU/OK.
SELECT AF AREA
SELECT AF AREA
SET
SET
CANCEL
CANCEL
Before moving
After moving
Target point
60
60
F3
F3
.
5
ISO 100
ISO 100
PROGRAM SHIFT
PROGRAM SHIFT
Setting the menu (➝p.74)
Continued Q

86
[SHOOTING MENU]
MEMO
• To reposition the AF frame, repeat step A.
• Regardless of the AF frame location, the exposure is
always set using the area in the center of the screen. To
expose the shot for your main subject, use AF/AE lock
(➝p.32).
Adjust the image outline (hard/
soft) ([G SHARPNESS])
Available Shooting modes: N, M, <, >
Use this setting to soften or emphasize the outline and
quality of an image.
CPress the shutter button to take pictures.
[HARD]:
Emphasizes the outlines.
Best for shots of subjects
such as buildings or text
where sharp images are
desirable.
[STANDARD]:
Best for ordinary
photography. Provides edge
sharpness that is ideal for
most picture taking situations.
[SOFT]:
Softens the outlines. Best for
shots of subjects such as
people, where a softer image
is desirable.
AF MODE
AF MODE
PHOTOMETRY
PHOTOMETRY
WHITE BALANCE
WHITE BALANCE
AUTO
AUTO
HIGH - SPEED SHOOTING
HIGH - SPEED SHOOTING
OFF
OFF
SHOOTING MENU
SHOOTING MENU
FOCUSING
FOCUSING
SHARPNESS
SHARPNESS
HARD
HARD
STANDARD
STANDARD
SOFT
SOFT
Setting the menu (➝p.74)

87
Advanced Features — Photography
Adjust the amount of light
emitted by the flash
([ FLASH] (Brightness
Adjustment))
Available Shooting modes: N, M, <, >
Use this setting to change the amount of light emitted by
the flash to suit the photography conditions or to achieve
a desired effect.
CAUTION
• Depending on the type of subject and the shooting
distance, brightness adjustment may have no effect.
• The image may appear dark when setting the shutter
speed to higher than 1/1000 sec.
Photograph the same image with
different exposure
([ BRACKETING])
Available Shooting modes: N, M, <, >
Use this setting to photograph the same image with
different exposure settings. Bracketing shoots 3
continuous frames, one of which is correctly exposed
while the remaining two are underexposed and
overexposed respectively by a set amount.
SHOOTING MENU
SHOOTING MENU
FLASH
FLASH
0
AUTO
AUTO
-
1/
3
-
2/
3
+
1/
3
+
2/
3
+
0
-
SET
SET
-
-
UP
UP
BRACKETING
BRACKETING
SHOOTING MENU
SHOOTING MENU
SET
SET
-
-
UP
UP
FLASH
FLASH 0
BRACKETING
BRACKETING
EV
EV
EV
EV
+
1/
3
-
+
2/
3
-
EV
EV
+
1
-
Setting the menu (➝p.74)

88
[SHOOTING MENU]
CAUTION
• If the underexposed or overexposed frame is outside
the camera’s control range, the picture is not taken with
the specified setting increments.
• Flash photography cannot be used.
• This feature always takes 3 shots. However, if there is
insufficient space on the Memory Card or internal
memory for 3 shots, no picture will be taken.
MEMO Auto bracketing
OFF
OFF
CONTINUOUS
CONTINUOUS
BRACKETING
BRACKETING
After setting the exposure for
bracketing, select [j
BRACKETING] by pressing
f.
Setting the menu (➝p.74)

89
Advanced Features — Playback
Playback Information
Shooting information can be checked when the camera is
set to single-frame playback mode. Press D to check the
information. Press D again to return to playback mode.
CAUTION
• Highlight warning
Histograms
A histogram is a chart showing the distribution of brightness in
an image (horizontal axis: brightness; vertical axis: pixels).
CAUTION
The shape of the graph will vary depending on the
subject.
100
100
-
0002
0002
F
ISO
ISO
400
400
1/60
1/60
12
12
/
31
31
/
2050
2050
10
10
:
00
00
AM
AM
F3.5
F3.5
:
STD
STD
:
OFF
OFF
:
AUTO
AUTO
:
+1
AQuality mode
BSensitivity
CShutter speed/Aperture
DFinePix COLOR
EFlash
FWhite balance
GExposure compensation setting
HFrame number
IHistogram
100
100
-
0002
0002
F
ISO
ISO
400
400
12
12
/
31
31
/
2050
2050
10
10
:
00
00
AM
AM
:
STD
STD
:
OFF
OFF
:
AUTO
AUTO
:
+1
1/60
1/60
F3.5
F3.5
Overexposed area blinks in
black.
Highlight warning
Pixels
Shadows Highlights
Brightness
AOptimal exposure:
There is an ample distribution of
pixels overall with a peak in the
middle range.
BOverexposed:
The number of highlight pixels
is high with the distribution
sloping upwards to the right.
CUnderexposed:
The number of shadow pixels is
high with the distribution sloping
upwards to the left.
89
Advanced Features — Playback

90
Using [
p
-MODE MENU] (Playback)/[PLAYBACK MENU]
Use these menus to playback photographed images.
Setting the [p-MODE MENU]
(Playback)
ASet the camera to Playback mode (➝p.36).
Setting the [PLAYBACK MENU]
ASet the camera to Playback mode (➝p.36).
BPress p button to open the [p-MODE
MENU].
CPress n or o to select the menu.
DPress q.
EPress n or o to change the setting.
FPress MENU/OK to confirm the setting.
MODE MENU
MODE MENU
PRINT ORDER
PRINT ORDER (
DPOF
DPOF)
SLIDE SHOW
SLIDE SHOW
BPress MENU/OK to open the [PLAYBACK
MENU].
CPress n or o to select the menu.
DPress q.
EPress n or o to change the setting.
FPress MENU/OK to confirm the setting.
PLAYBACK MENU
PLAYBACK MENU
ERASE
ERASE
COPY
COPY
PROTECT
PROTECT
IMAGE ROTATE
IMAGE ROTATE
VOICE MEMO
VOICE MEMO
RED EYE REMOVAL
RED EYE REMOVAL

91
Advanced Features — Playback
[p-MODE MENU] (Playback) Setting the menu (➝p.90)
Setting automatic playback
([ SLIDE SHOW])
Use this mode to playback photographed images
continuously. You can select type of image transition.
MEMO
• To interrupt automatic playback, press MENU/OK.
•Press p or q to advance or go back through the
images when selecting [NORMAL] and [FADE-IN].
• The Auto power off function (➝p.118) does not operate
during playback.
• Movie starts automatically. When the movie ends, the
playback function moves it on.
• Press DISP/BACK once during playback to display on-
screen help.
• The date is displayed on the Slide Show (except
[MULTIPLE]) if the date is displayed on the Single-
Frame Playback.
• The camera plays back the image taken with Intelligent
Face Detection (➝p.29) zoomed in on the detected face
when [NORMAL ] or [FADE-IN ] is selected.
DPOF set frame
([ PRINT ORDER (DPOF)])
You can specify the image, number of prints, with or
without date of printing with a DPOF-compatible printer.
Continued Q
PRINT ORDER (DPOF)
PRINT ORDER (DPOF)
MODE MENU
MODE MENU
SLIDE SHOW
SLIDE SHOW
FADE-IN
FADE-IN
MULTIPLE
MULTIPLE
CLOCK
CLOCK
FADE-IN
FADE-IN
NORMAL
NORMAL
NORMAL
NORMAL
[WITH DATEE] : The date will be imprinted on your
prints.
[WITHOUT DATE]: The date will not be imprinted on your
prints.
[RESET ALL] : All DPOF settings will be canceled.
PRINT ORDER (DPOF)
PRINT ORDER (DPOF)
MODE MENU
MODE MENU
SLIDE SHOW
SLIDE SHOW
WITHOUT DATE
WITHOUT DATE
RESET ALL
RESET ALL
WITH DATE
WITH DATE

92
[p-MODE MENU] (Playback)
Selecting [WITH DATEE], E appears on the screen
and the date will be imprinted on your prints.
MEMO Canceling DPOF setting
APress p to open the [p-MODE MENU] and press n
or o to select [ PRINT ORDER (DPOF)].
BPress q.
CPress n or o to select [WITH DATE E] or
[WITHOUT DATE] and press MENU/OK to display the
print order screen.
DPress p or q to select the frame (file) with the DPOF
setting you want to cancel.
EPress o to set the number of prints to 0 (zero).
To cancel the DPOF setting for another frame (file),
repeat steps D and E.
Always press MENU/OK to complete the settings.
• [RESET ALL] (➝p.94)
[WITH DATE] / [WITHOUT DATE]
APress p or q to display the frame (file)
for specifying DPOF setting.
BPress n or o to set a value.
Up to 99 sheets are printed.
For frames (files) that you do not want
printed, set the number of prints to 0
(zero).
To specify more DPOF settings, repeat steps A and B.
CAlways press MENU/OK after the settings
are completed.
Pressing DISP/BACK cancels those
settings.
DPress MENU/OK again. The total number
of prints appears on the screen.
FRAME
FRAME
SET
SET
DPOF
DPOF
:
00009
00009
01
01
SHEETS
SHEETS
PRINT ORDER
PRINT ORDER (
DPOF
DPOF)
Total number of prints
Setting for that frame
Setting the menu (➝p.90)
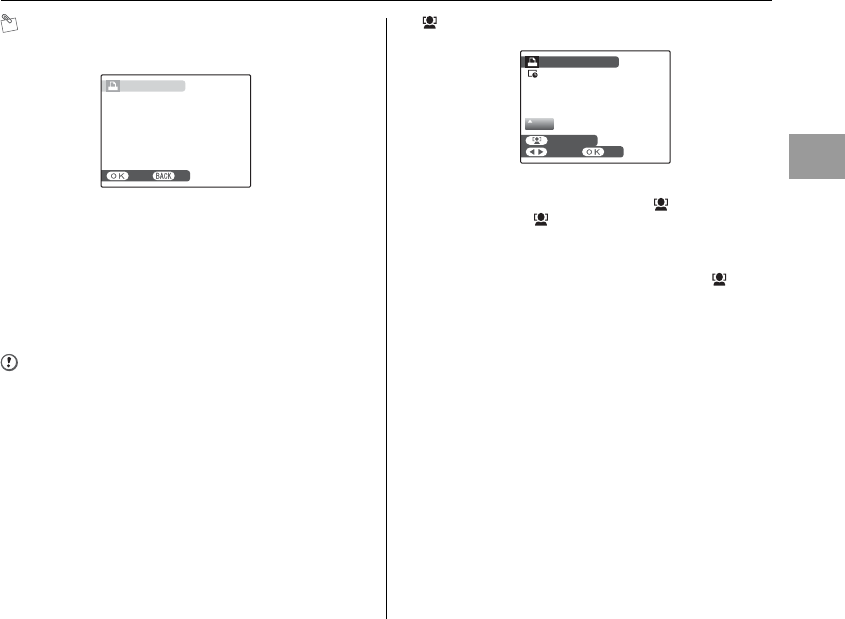
93
Advanced Features — Playback
MEMO
• When DPOF settings were specified on another
camera.
When the data includes a frame (file) with DPOF
settings that were specified on another camera,
[RESET DPOF OK?] appears.
Pressing MENU/OK erases all of the DPOF settings
already specified for each frame (file). Specify the
DPOF setting for each frame (file) again.
• Prints of up to 999 frames (files) can be ordered on the
same Memory Card.
• DPOF settings cannot be specified for movies.
CAUTION
• Pressing DISP/BACK while choosing settings will
cancel all current settings. If there were previous DPOF
settings, only the modifications are canceled.
• When selecting the [WITH DATE E] setting, the date
is imprinted on your shots using the Print Service or a
DPOF-compatible printer (depending on the printer
specifications, the date may not be printed in some
cases).
• Images photographed with a camera other than FinePix
S1000fd may not be specified DPOF settings.
Intelligent Face Detection
When DPOF settings are set to the images taking with the
Intelligent Face Detection (➝p.29) ( appears on the
screen), press (Intelligent Face Detection), the frame
appears around the detected face, and then the number
of the detected faces is set to print number. It is easy to
set the number of prints for each person in the picture.
Press n or o to set the print number. Press
(Intelligent Face Detection) again, the number of the
detected faces is set to the print number. After setting,
press MENU/OK.
Continued Q
RESET DPOF OK?
RESET DPOF OK?
YES
YES
NO
NO
FRAME
FRAME
FACE COUNT
FACE COUNT
SET
SET
DPOF
DPOF
:
00000
00000
00
00
SHEETS
SHEETS
PRINT ORDER
PRINT ORDER (
DPOF
DPOF)
Setting the menu (➝p.90)

94
[p-MODE MENU] (Playback)
To cancel all DPOF settings:
Select [RESET ALL] in the [p-MODE MENU] (➝p.91).
MEMO
u appears on the screen during playback when the
image has specified DPOF settings.
[RESET ALL]
Press MENU/OK.
RESET DPOF OK?
RESET DPOF OK?
YES
YES
CANCEL
CANCEL
100-0001
100-0001
100
100
-
0001
0001
12
12
/
31
31
/
2050
2050
10
10
:
00
00
AM
AM
Setting the menu (➝p.90)
95
Advanced Features — Playback
Z[u PRINT ORDER (DPOF)]
DPOF stands for Digital Print Order Format and refers to a format that is used for recording printing specifications
for images shot using a digital camera on media such as a Memory Card. The recorded specifications include
information on which frames are to be printed.
*Some printers do not support date and time imprinting or specification of the number of prints.
*The warnings shown below may appear while specifying the prints.
[DPOF SPECIFIED. ERASE OK ?]
[DPOF SPECIFIED. ERASE ALL OK ?] (➝p.43)
When erasing the image, the DPOF setting for that image is deleted at the same time.
[RESET DPOF OK ?] (➝p.93)
When inserting a Memory Card that contains images specified for printing by another camera, those print specifications are all reset
and replaced by the new print specifications.
[DPOF FILE ERROR] (➝p.142)
Up to 999 images can be specified on the same Memory Card.
Setting the menu (➝p.90)

96
[PLAYBACK MENU] Setting the menu (➝p.90)
Correcting red-eye effect in
images
([ RED EYE REMOVAL])
You can correct the red-eye effect in images taken with
the Intelligent Face Detection (➝p.29) ( appears on
the screen).
CAUTION
• Correction results may differ depending on scene.
• The processing may take more time if there are many
faces in the image.
• Images photographed with a camera other than
FinePix S1000fd cannot be red-eye corrected.
• The corrected image is added as a separate file in the
final frame and is indicated in the image.
• A red-eye corrected image is shown with a . The
image cannot be corrected again.
CHECK
APress p or q to select the frame taken
with the Intelligent Face Detection.
BPress MENU/OK to open [PLAYBACK
MENU].
CPress n or o to select [ RED EYE
REMOVAL].
DPress q.
EPress MENU/OK to perform removal.
YES
YES
CANCEL
CANCEL
REMOVAL OK?
REMOVAL OK?
CANCELCANCEL
DETECTINGDETECTING
ARed-eye effect in an image
will be detected.
REMOVINGREMOVING
BProcessing will end when the
red-eye effect is not detected.

97
Advanced Features — Playback
Rotating the images
([ IMAGE ROTATE])
When shooting in the vertical position, the image appears
horizontal on the screen.
Use this mode to rotate an image and to display correct
direction. Your camera calls images “frames”.
CAUTION
Protected frames (files) cannot be rotated. Unprotect the
frames (files) before rotating them (➝p.98).
MEMO
An image can be rotated only when playing back using
FinePix S1000fd.
You may not be able to rotate images that were shot with
a camera other than the FinePix S1000fd.
The panoramic picture cannot be rotated.
APress p or q to select the rotating frame
(file).
BPress MENU/OK to open the [PLAYBACK
MENU].
CPress n or o to select [ IMAGE
ROTATE].
DPress q.
EPress n or o to rotate the image.
o: Rotates the image clockwise at a 90
degree angle.
n: Rotates the image counterclockwise at
a 90 degree angle.
FPress MENU/OK to confirm the setting.
Next time the image is played back, it will
be automatically rotated.
Press DISP/BACK to cancel rotating the
image.
IMAGE ROTATE
IMAGE ROTATE
SET
SET
CANCEL
CANCEL
Setting the menu (➝p.90)

98
[PLAYBACK MENU]
Protecting the images
([ PROTECT])
Use this mode to prevent frames (files) from being
accidentally erased. Your camera calls images “frames”.
To protect or unprotect only the selected frame (file):
[FRAME] (set or reset a frame)
APress p or q to select the protecting/
unprotecting frame (file).
BPress MENU/OK to protect/unprotect the
currently displayed frame (file).
Unprotected: protecting frame (file)
Protected: reset frame (file)
To protect another frame (file), repeat steps A and B.
When protecting frames (files) is completed, press DISP/
BACK.
PROTECT OK?
PROTECT OK?
YES
YES
CANCEL
CANCEL
Unprotected
UNPROTECT OK?
UNPROTECT OK?
YES
YES
CANCEL
CANCEL
Protected (F appears)
[SET ALL]
Press MENU/OK to protect all the frames
(files).
[RESET ALL]
Press MENU/OK to unprotect all the frames
(files).
SET ALL OK?
SET ALL OK?
IT MAY TAKE A WHILE
IT MAY TAKE A WHILE
YES
YES
CANCEL
CANCEL
RESET ALL OK?
RESET ALL OK?
IT MAY TAKE A WHILE
IT MAY TAKE A WHILE
YES
YES
CANCEL
CANCEL
Setting the menu (➝p.90)

99
Advanced Features — Playback
MEMO To stop the procedure midway
If the images are very large, protecting or unprotecting all
the frames (files) may take some time.
If you want to take a picture or record a movie during the
procedure, press DISP/BACK.
CAUTION
The Format function erases all the frames (files),
including protected frames (files) (➝p.117).
Copying the images
([V COPY])
It is possible to transfer saved images between the
internal memory and a Memory Card. Your camera calls
images “frames”.
ZSelecting COPY
Copying the images to another Memory Card
Copy images from the Memory Card inserted in your camera
to the internal memory using the Copy Image function, then
remove that Memory Card and insert another Memory Card
into the camera. Then, copy the images to the Memory Card
from the internal memory.
Continued Q
CANCEL
CANCEL
APress n or o to select [Y INTERNAL
MEMORY Q \ CARD] or [\ CARD Q
Y INTERNAL MEMORY].
BPress q.
COPY
COPY
NEXT
NEXT
CANCEL
CANCEL
CARD
CARD
INTERNAL MEMORY
INTERNAL MEMORY
INTERNAL MEMORY
INTERNAL MEMORY
CARD
CARD
Setting the menu (➝p.90)

100
[PLAYBACK MENU]
MEMO
To copy another frame (file), repeat steps C and D.
When copying frames (files) is completed, press DISP/
BACK.
CAUTION
• When [\ MEMORY FULL] or [Y MEMORY FULL]
appears on the screen, copying the data stops on the
way.
• When copying the image that has specified DPOF
setting, the DPOF setting is not copied.
Copying one frame at a time ([FRAME])
APress n or o to select [FRAME].
BPress MENU/OK.
CPress p or q to select the copying frame
(file).
DPress MENU/OK to copy the currently
displayed frame (file).
COPY
COPY
YES
YES
CANCEL
CANCEL
CARD
CARD
INTERNAL MEMORY
INTERNAL MEMORY
INTERNAL MEMORY
INTERNAL MEMORY
CARD
CARD
FRAME
FRAME
ALL FRAMES
ALL FRAMES
Copying all frames ([ALL FRAMES])
APress n or o to select [ALL FRAMES].
BPress MENU/OK.
CPress MENU/OK to copy all the frames
(files).
COPY
COPY
YES
YES
CANCEL
CANCEL
CARD
CARD
INTERNAL MEMORY
INTERNAL MEMORY
INTERNAL MEMORY
INTERNAL MEMORY
CARD
CARD
FRAME
FRAME
ALL FRAMES
ALL FRAMES
Setting the menu (➝p.90)

101
Advanced Features — Playback
Adding voice memos to the
images ([ VOICE MEMO])
Voice memos of up to 30 seconds can be added to still
images.
The remaining recording time appears during recording.
MEMO
Face the microphone to record your comment.
Hold the camera about 20 cm (7.9 in.) away for the best
results.
Continued Q
Recording voice memos
APress p or q to select the image to add
a voice memo.
BPress MENU/OK to open the [PLAYBACK
MENU].
CPress n or o to select [ VOICE
MEMO].
DPress q.
EPress MENU/OK to start recording.
REC STANDBY
REC STANDBY
START
START
CANCEL
CANCEL
30s
30s
RECORDING
RECORDING
REC RE
REC RE
-
REC
REC
28s
28s
Remaining
time
Blinking red
Microphone
Setting the menu (➝p.90)

102
[PLAYBACK MENU]
To record your comment: press MENU/OK.
To rerecord the comment: press DISP/BACK.
MEMO
• When the image already has a voice memo
• When [PROTECTED FRAME] appears, unprotect the
frame (➝p.98).
• Voice memos cannot be added to movies.
CAUTION
FThe voice memo ends when pressing
MENU/OK midway or 30 seconds pass.
FINISH
FINISH
REC RE
REC RE
-
REC
REC
PLAYBACK MENU
PLAYBACK MENU
ERASE
ERASE
PROTECT
PROTECT
IMAGE ROTATE
IMAGE ROTATE
VOICE MEMO
VOICE MEMO
COPY
COPY
RE
RE
-
REC
REC
BACK
BACK
RED EYE REMOVAL
RED EYE REMOVAL
If you select an image that
already has a voice memo, a
screen appears in which you
can select whether to rerecord
the memo.
Playing back voice memo
APress p or q to select an image file with
a voice memo. # appears on the screen.
BPress o to start playing back the voice
memo.
15s
15s
STOP PAUSE
STOP PAUSE
The playback time appears on
the screen along with a
progress bar.
Progress bar
Speaker
Uncover the speaker.
The sound may be difficult to hear.
Setting the menu (➝p.90)

103
Advanced Features — Playback
ZPlaying back voice memos
CHECK
• Audio recording format:
WAVE (➝p.156), PCM recording format
• Audio file size:
Approx. 480 KB (for a 30-second voice memo)
MEMO Playing voice memo files
You may not be able to play back some voice memo files
recorded on other cameras.
Volume can be adjusted while playing back voice memos.
Control Description
Playback Playback begins.
The voice memo stops when
playback ends.
Pause /
Resume
Pauses the voice memo during
playback.
Press o again to resume
playback.
Stop Stops playback.
Press p or q while voice
memo playback is stopped to go
back to the previous file or
advance to the next file
respectively.
Fast forward /
Rewind
Press p or q during playback
to skip forwards or backwards
through the voice memo.
These buttons do not function
while playback is paused.
Adjusting volume of voice memos
APress MENU/OK while playing back voice
memo.
The voice memo is paused during
playback.
BPress n or o to adjust the volume.
CPress MENU/OK to confirm your selection.
Camera starts to play back the voice
memo.
VOLUME
VOLUME
SET
SET
CANCEL
CANCEL
7
Setting the menu (➝p.90)
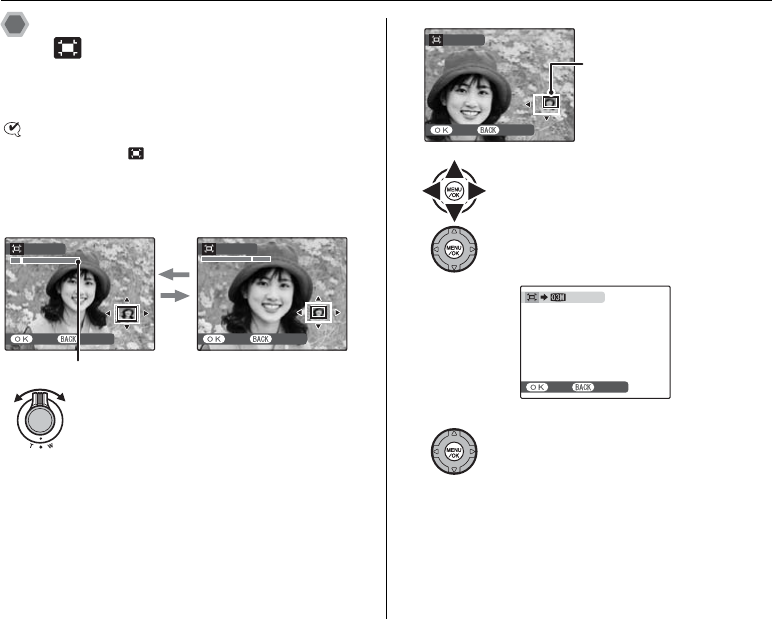
104
[PLAYBACK MENU]
Trimming the images
([ TRIMMING])
Use this mode to trim the required part of the
photographed image.
CHECK
Before selecting [ TRIMMING], select the trimming
frame (file).
YES CANCEL
YES CANCEL
TRIMMING
TRIMMING
TRIMMING
TRIMMING
YES CANCEL
YES CANCEL
W:wide zoom lever
(Zoom out)
T:tele zoom lever
(Zoom in)
ATurn to T or W to zoom in or out on an
image.
Zoom bar
BPress n, o, p or q to move to another
part of the image.
CPress MENU/OK.
DCheck the saved image size and press
MENU/OK.
The trimmed image is added as a separate
file in the final frame.
YES CANCEL
YES CANCEL
TRIMMING
TRIMMING
Navigation screen
(Current displayed image)
REC
REC
CANCEL
CANCEL
REC OK?
REC OK?
Setting the menu (➝p.90)
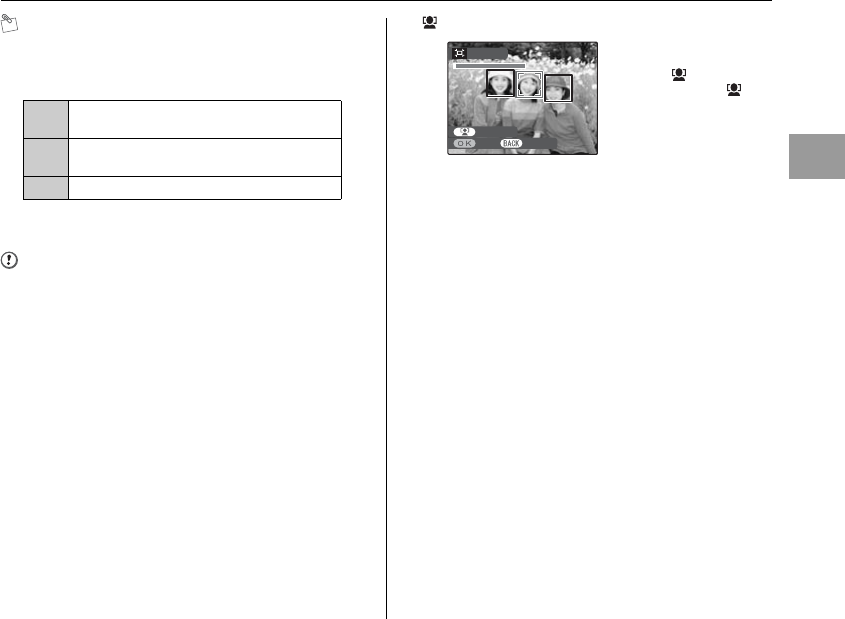
105
Advanced Features — Playback
MEMO
• A saved image size varies depending on the zoom
scale of step A. For 0.3 M, k YES option appears
in yellow.
• Image sizes
• When % quality setting is selected, the image is
trimmed to normal size (4:3 aspect ratio).
CAUTION
You may not be able to trim images that were shot with a
camera other than FinePix S1000fd.
Intelligent Face Detection
Images taken with the
Intelligent Face Detection
(➝p.29) ( appears on
the screen). Press
(Intelligent Face Detection),
the face that is focused on
is zoomed in to help crop
the main subject. To specify
a cropped part of the image
according to preference,
specify and adjust
according to the procedure
in [TRIMMING].
[
3
Printing at up to 6R (15.2 × 20.3 cm/6 × 8 in.) /
A5 size
2Printing at up to 4R (10.2 × 15.2 cm/4 × 6 in.) /
A6 size
`To use for e-mail or web site
YES
YES
CANCEL
CANCEL
TRIMMING
TRIMMING
TRIMMING
TRIMMING
Setting the menu (➝p.90)

106
r Recording Movies
Use this mode to record movies with sound.
1Set the camera to r Movie mode.
Set the Mode dial to r.
ZZooming the image
You must zoom beforehand as you cannot zoom during
recording.
The available recording time
appears on the screen.
STANDBY
STANDBY
999m13s
999m13s
30s
30s
12
12
/
31
31
/
2050
2050
10
10
:
00
00
AM
AM
27s
27s
STANDBY
STANDBY
12
12
/
31
31
/
2050
2050
10
10
:
00
00
AM
AM
Zoom bar
Turn the zoom lever to zoom in or out on an
image.
106

107
Advanced Features — Movie
2Record movies.
Press the shutter button down fully to start recording.
During recording, [lREC] and a counter that shows the
remaining time appear on the screen.
MEMO
There is no need to hold down the shutter button during
recording.
CHECK Recording movies
• Specifications: Motion JPEG (➝p.156), Monaural
sound
• Quality selection method: % (640 × 480 pixels)
$ (320 × 240 pixels)
• Frame rate (➝p.156): 30 frames per second (fixed)
MEMO
• The brightness and color of the screen shown during
movie recording may differ from those shown before
recording begins.
• The exposure and white balance will be automatically
adjusted to the scene being shot even after recording
has started.
• If recording is stopped immediately after it begins,
1 second of the movie is recorded onto the Memory
Card or internal memory.
CAUTION
• Because a movie is recorded onto the Memory Card or
internal memory as it is saved, it cannot be recorded
correctly if the camera suddenly loses power (if the
batteries run out or the AC power adapter and DC
coupler are disconnected).
• A movie file taken by FinePix S1000fd may not be
playable on other cameras.
• [ EVF/LCD MODE] in the [U SET-UP] menu is
automatically set to [30 fps] (➝p.156).
• Because sound is recorded concurrently with the
images, make sure that you do not cover the
microphone with a finger, etc. (➝p.12).
• Camera operation noises may be recorded during
movie shooting.
• The size of a movie file can be up to 2 GB.
999m12s
999m12s
30s
30s
REC
REC
Fully pressed
Recording ends when pressing the
shutter button down halfway during
recording or the remaining time
runs out.
Halfway pressed

108
r Recording Movies
Changing movie size
Press p to open the [p-MODE MENU].
ZQuality settings in Movie mode
% (640 × 480 pixels): For better quality
$ (320 × 240 pixels): To record longer movies
MEMO
• The quality setting is retained even when the camera is
turned off or the mode setting is changed.
•In r Movie mode, you cannot set the [S ISO]
(sensitivity) setting and [ FinePix COLOR] setting.
• See p.154 for information on recording times per
Memory Card or internal memory.
CAUTION
If you shoot using the xD-Picture Cards with model
numbers containing “M” such as DPC-M1GB, movie
recording time may be reduced if you repeatedly record
and erase (frame erase) image files.
In such a case, erase all frames or format the xD-Picture
Card before use. Back up important frames (files) onto
your PC or another media.
APress q.
BPress n or o to change the setting.
CPress MENU/OK to confirm the setting.
MODE MENU
MODE MENU
QUALITY
QUALITY
29s
29s
53s
53s

109
Advanced Features — Movie
w Playing Back Movies Setting the camera to w
Playback mode (➝p.36)
ZPlaying back movies
Continued Q
APress p or q to select the movie file. r
appears on the screen.
BPress o to begin playing back movie.
100
100
-
0006
0006
100
100
-
0006
0006
PLAY
PLAY
12
12
/
31
31
/
2050
2050
10
10
:
00
00
AM
AM
12
12
/
31
31
/
2050
2050
10
10
:
00
00
AM
AM
34s
34s
STOP PAUSE
STOP PAUSE
The playback time appears on
the screen along with a
progress bar.
Progress bar
Control Description
Playback
Playback begins.
Playback stops when the end of
the movie is reached.
Pause /
Resume
Pauses the movie during
playback.
Press o again to resume
playback.
Stop
Stops playback.
Press p or q while playback is
stopped to go back to the previous
file or advance to the next file
respectively.
Fast
forward /
Rewind
Press p or q during playback to
skip forwards or backwards
through the movie.
Skip
playback
Press p or q when the movie is
paused, the movie advances or
goes back one frame.
Hold down p or q to move
through the frames quickly.
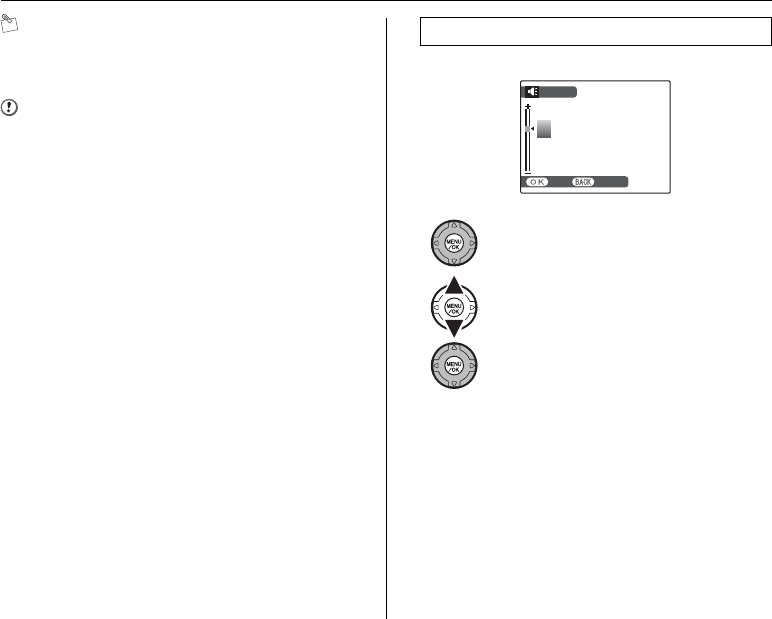
110
w Playing Back Movies
MEMO
If the subject of the shot is very bright, white vertical
streaks or black horizontal streaks may appear in the
image during playback. This is normal.
CAUTION
• You may not be able to playback some movie files
recorded on other cameras.
• To playback movie files on a PC, save the movie file on
the Memory Card or internal memory to the PC’s hard
disk and then playback the saved file.
• Uncover the speaker. The sound is difficult to hear.
Volume can be adjusted while playing back movies.
Adjusting volume of movies
APress MENU/OK while playing back
movie.
The movie is paused during playback.
BPress n or o to adjust the volume.
CPress MENU/OK to confirm the setting.
Camera starts to playback the movie.
VOLUME
VOLUME
SET
SET
CANCEL
CANCEL
7
Setting the camera to w Playback mode (➝p.36)
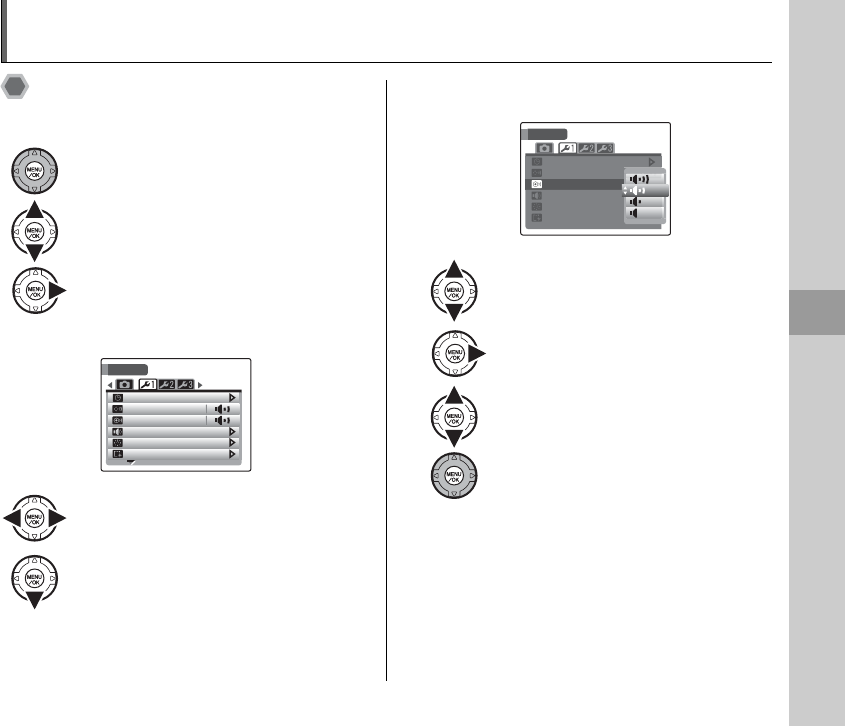
111
Settings
[U SET-UP]
Using the [SET-UP] menu
1Open the [SET-UP] menu.
2Change the page.
3Change the setting.
APress MENU/OK to open the menu.
BPress n or o to select [U SET-UP].
CPress q.
APress p or q to select the page.
BPress o to move to menu item.
SET
SET
-
UP
UP
FORMAT
FORMAT
PLAYBACK VOLUME
PLAYBACK VOLUME
LCD BRIGHTNESS
LCD BRIGHTNESS
BEEP VOLUME
BEEP VOLUME
SHUTTER VOLUME
SHUTTER VOLUME
DATE / TIME
DATE / TIME
APress n or o to select the menu.
BPress q.
Different type of screen appears
depending on selected item.
CPress n or o to change the setting.
DPress MENU/OK to confirm the setting.
OFF
OFF
SET
SET
-
UP
UP
BEEP VOLUME
BEEP VOLUME
SHUTTER VOLUME
SHUTTER VOLUME
PLAYBACK VOLUME
PLAYBACK VOLUME
LCD BRIGHTNESS
LCD BRIGHTNESS
FORMAT
FORMAT
DATE / TIME
DATE / TIME
111
Settings
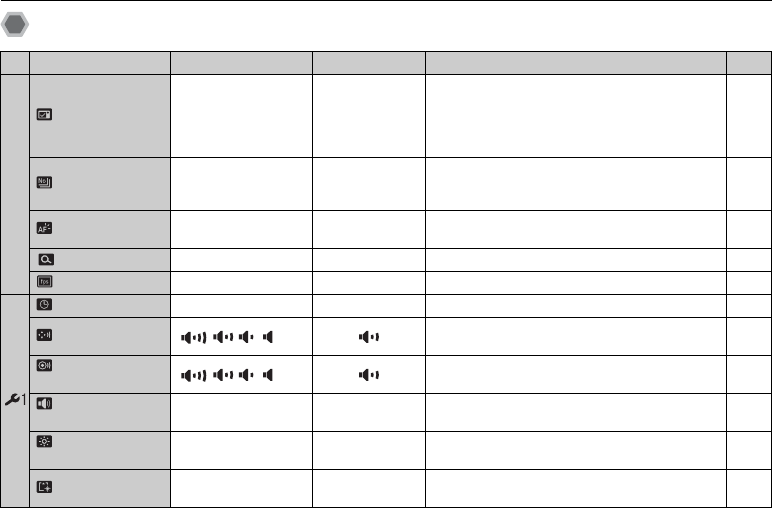
112
[U SET-UP]
[SET-UP] menu option
Setting Display Factory default Explanation Page
q
[ IMAGE DISP.]
[CONTINUOUS]/[3
SEC]/[1.5 SEC]/
[ZOOM
(CONTINUOUS)]/
[OFF]
[1.5 SEC]
Sets the way for displaying the check image screen
(photograph result) after taking a picture. The color
tones in images recorded may differ from actual
color. Playback the recorded images to check them.
114
[ FRAME NO.] [CONTINUOUS]/
[RENEW] [CONTINUOUS]
Specifies whether frame numbers are assigned
consecutively from previous numbers or begin
again.
115
[ AF ILLUMINATOR] [ON]/[OFF] [ON] Specifies whether the AF-assist illuminator is [ON]
or [OFF]. 33
[ DIGITAL ZOOM] [ON]/[OFF] [OFF] Specifies whether digital zoom is used. 116
[ EVF/LCD MODE] [30fps]/[60fps] [30fps] Sets the screen display to the fine mode. –
[ DATE/TIME] – – Corrects the date or time. 24
[ BEEP VOLUME] / / /[ OFF] Sets the volume of the tone emitted when the
camera controls are used. –
[ SHUTTER
VOLUME] / / /[ OFF] Sets the volume of the sound emitted when the
shutter operates. –
[ PLAYBACK
VOLUME] –7
Sets the volume of playing back movie and voice
memo. 116
[ LCD
BRIGHTNESS] –0
Sets the LCD monitor brightness. 117
[ FORMAT] – – Initializes a Memory Card or internal memory.
Select this menu to erase all the frames (files). 117
How to use the [SET-UP] menu (➝p.111)
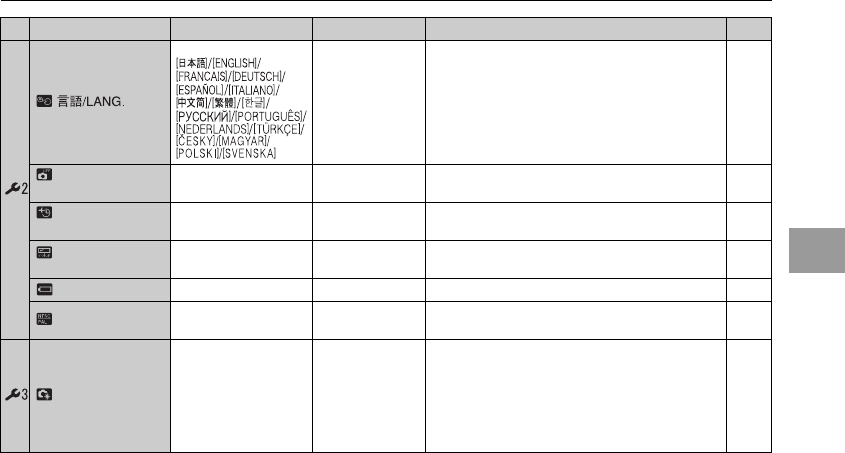
113
Settings
[ ] [ENGLISH] Specifies the language used for screen display. 25
[ AUTO POWER
OFF] [5 MIN]/[2 MIN]/[OFF] [2 MIN] Sets the time of turning camera off when camera is
not used. 118
[TIME
DIFFERENCE] N/INSpecifies the time difference settings. 118
[ BACKGROUND
COLOR] – – Specifies the colors of menu and background. –
[ DISCHARGE] – – Discharges Ni-MH batteries. 137
[ VIDEO SYSTEM] [NTSC]/[PAL] – Specifies whether video output is set to [NTSC] or
[PAL]. –
[ RESET] – –
Resets all the camera settings (other than the
[DATE/TIME], [TIME DIFFERENCE],
[BACKGROUND COLOR], and [VIDEO SYSTEM])
to the factory default values set at shipment. A
confirmation message appears when you press q.
To reset the camera settings, press p or q to
select [OK] and press MENU/OK.
–
Setting Display Factory default Explanation Page
How to use the [SET-UP] menu (➝p.111)

114
[U SET-UP]
Use this setting to specify the way for displaying the check
image screen (photograph result) after taking a picture.
CAUTION
• The color tones in images displayed when [3 SEC] or
[1.5 SEC] is selected may differ slightly from those in
the images actually recorded.
• [IMAGE DISP.] cannot be used when [h LONG
PERIOD] (➝p.71) is set.
MEMO
When a result is displayed with [CONTINUOUS] set,
overexposed areas in an image can be checked by
pressing D.
ZEnlarging images
MEMO
• When ` quality setting is selected, the image cannot
be enlarged.
• Pressing DISP/BACK cancels the zoom setting.
• This function is disabled when setting the continuous
shooting.
Intelligent Face Detection
Images taken with the Intelligent Face Detection (➝p.29).
Press (Intelligent Face Detection) to alternate
between the displayed faces. Turn the zoom lever to T or
W to zoom in or out the selected face. Press n, o, p
or q to display another part of the image.
[IMAGE DISP.]
[CONTINUOUS]:
The results are always displayed after you shoot.
Press the MENU/OK to take another picture.
[3 SEC]/[1.5 SEC]:
The image appears for about 3 or 1.5 seconds and is
then recorded.
[ZOOM (CONTINUOUS)]:
The image appears enlarged. Use this mode to check
details of image.
[OFF]:
The results are not displayed.
ATurn to T or W to zoom in or out of an
image.
BPress n, o, p, or q to display another
part of the image.
CPress MENU/OK to take another picture.
The image is recorded automatically.
ZOOM
ZOOM (
CONTINUOUS
CONTINUOUS
)
)
NEXT SHOOTING
NEXT SHOOTING
Navigation screen
(Current displayed image)
How to use the [SET-UP] menu (➝p.111)
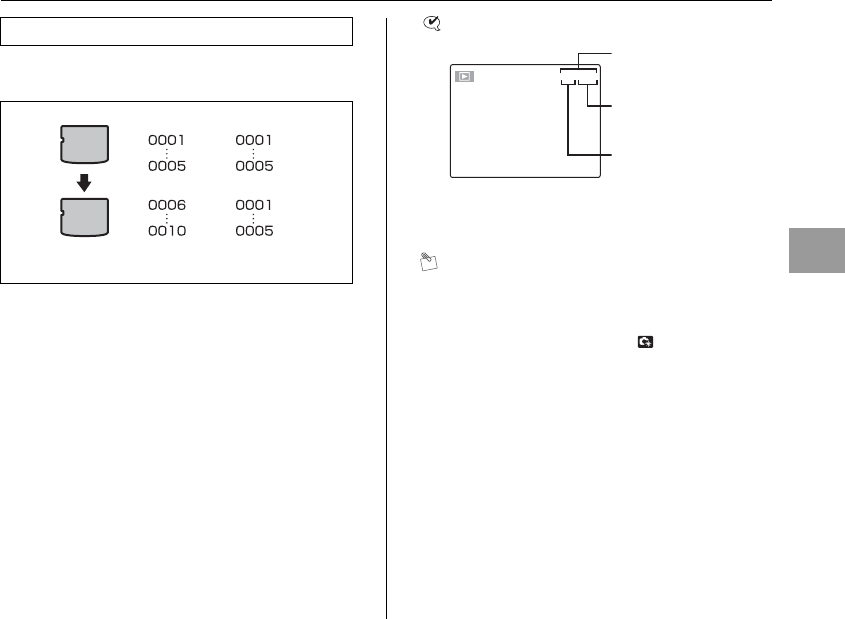
115
Settings
Use this function to specify whether frame numbers are
assigned consecutively from previous numbers or begin
again.
CHECK
MEMO
• Setting this function to [CONTINUOUS] makes file
management easier as it makes sure that file names
are not duplicated when images are downloaded to a
PC.
• When the camera settings are [ RESET] (➝p.113),
the frame number setting ([CONTINUOUS] or
[RENEW]) is changed to [CONTINUOUS] and the
frame number itself does not return to 0001.
• In [CONTINUOUS] setting, images are stored
beginning from the highest file number on the current
Memory Card when the Memory Card already contains
image files with file numbers higher than the highest file
number on the last Memory Card.
• The displayed frame number may differ for images
photographed on other cameras.
[FRAME NO.]
*Formatted Memory Card or internal memory used for
both A and B.
[CONTINUOUS]:
Pictures are stored beginning from the highest file
number stored on the last Memory Card or internal
memory used.
[RENEW]:
Pictures are stored on each Memory Card beginning
with a file number 0001.
Each image will be numbered consecutively from the
last number used. So when recorded images in the
Memory Card are erased, the number of the erased
frame will not be used again.
A
A
B
B
[CONTINUOUS] [RENEW]
100 - 0001
100 - 0001
File number
Frame number
Directory number
The last 4 digits of the 7-digit number in the top right
corner of the screen are the file numbers, while the
first 3 digits show the directory number.
How to use the [SET-UP] menu (➝p.111)
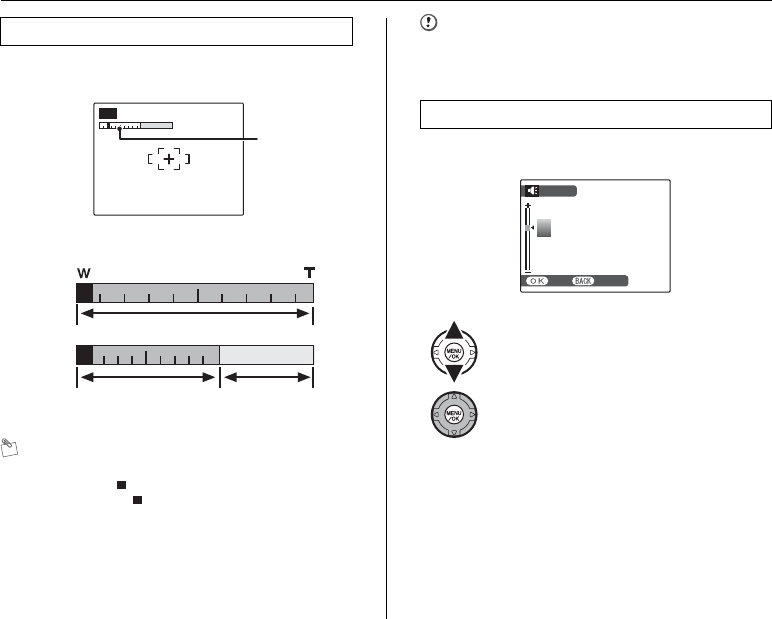
116
[U SET-UP]
Use this function to shoot enlarged images than
maximum optical zoom scale.
ZZoom bar display
MEMO
When zooming changes between optical and digital, the
position of the “ ” indicator stops. Turn the Zoom lever
again to start the “ ” indicator moving again.
CAUTION
Using the digital zoom allows you to enlarge your subject
and shoot it. However, it will lower your image quality. Set
the digital zoom when requiring it.
Use this function to adjust volume while playing back
movie and voice memo.
[DIGITAL ZOOM]
AUTO
AUTO
Zoom bar
OFF
ON
Optical zoom:12x
Optical zoom:12x Digital zoom:
approx. 5.7x
[PLAYBACK VOLUME]
APress n or o to adjust the volume.
The larger the number, the larger the
volume is emitted. 0 (zero) indicates a
sound deadening.
BPress MENU/OK to confirm the setting.
VOLUME
VOLUME
SET
SET
CANCEL
CANCEL
7
How to use the [SET-UP] menu (➝p.111)

117
Settings
Use this function to adjust the screen brightness. Initialize (format) the Memory Card or internal memory for
use with the camera.
CAUTION
• The Format function erases all the frames (files),
including protected frames (files).
Back up important frames (files) onto your PC or
another media.
• Do not open the battery cover during formatting. The
Memory Card or internal memory could be damaged.
[LCD BRIGHTNESS]
APress n or o to adjust the screen
brightness.
The indicator moves to the + to display the
screen brightly or to the – to darken the
screen.
BPress MENU/OK to confirm the setting.
LCD
LCD
BRIGHTNESS
BRIGHTNESS
SET
SET
CANCEL
CANCEL
0
[FORMAT]
APress p or q to select [OK].
BPressing MENU/OK initializes the Memory
Card or internal memory.
ERASE ALL DATA
ERASE ALL DATA
FORMAT
FORMAT
SET
SET
OK
OK
CANCEL
CANCEL
FORMAT OK?
FORMAT OK?
Place of initialize
[Y FORMAT OK?]:
Internal memory
[\ FORMAT OK?]:
Memory Card
How to use the [SET-UP] menu (➝p.111)

118
[U SET-UP]
When this function is active and the camera remains
unused for 2 or 5 minutes, it turns camera off.
Use this function when you want to get the maximum
possible running time from your batteries.
CAUTION
The Auto power off function is disabled during slide show
(➝p.91), discharging rechargeable batteries (➝p.137),
and when a printer or a PC connection (➝p.121, 130) is
being used.
MEMO To restore power to the camera
Refer to “Turning On and Off” (➝p.21).
Use this function when traveling to destinations in
different time zones. This function sets a time difference
relative to the date and time currently set. When this
setting is enabled, the specified time difference is applied
when pictures are taken.
1Use Time difference function.
[AUTO POWER OFF] [TIME DIFFERENCE]
Press n or o to change between [N
HOME] and [I LOCAL].
To set the time difference, select [I LOCAL].
[N HOME]:Your home time zone
[I LOCAL]:Your destination time zone
AUTO POWER OFF
AUTO POWER OFF
TIME DIFFERENCE
TIME DIFFERENCE
BACKGROUND COLOR
BACKGROUND COLOR
DISCHARGE
DISCHARGE
VIDEO SYSTEM
VIDEO SYSTEM
SET
SET
-
UP
UP
2 MIN
2 MIN
ENGLISH
ENGLISH
NTSC
NTSC
HOME
HOME
LOCAL
LOCAL
How to use the [SET-UP] menu (➝p.111)
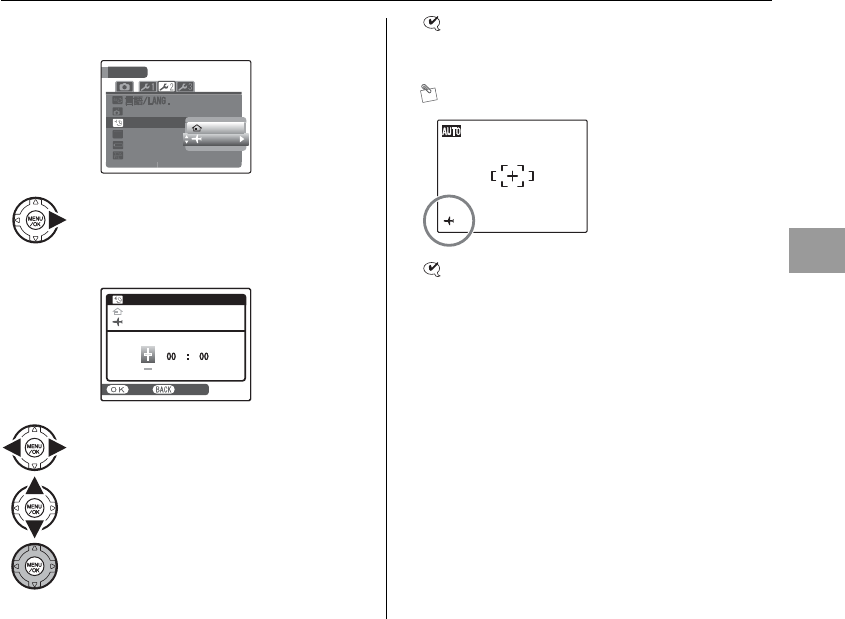
119
Settings
2Move to [TIME DIFFERENCE] screen.
3Set time difference.
CHECK
Available time setting
–23:45 to +23:45 (in 15-minute increments)
MEMO
CHECK
Upon returning from a trip, always change the time
difference setting back to [N HOME] and then check the
date and time again.
Press q.
APress p or q to select +/–, hour, and
minute.
BPress n or o to change the setting.
CAlways press MENU/OK after the settings
are completed.
AUTO POWER OFF
AUTO POWER OFF
TIME DIFFERENCE
TIME DIFFERENCE
BACKGROUND COLOR
BACKGROUND COLOR
SET
SET
-
UP
UP
VIDEO SYSTEM
VIDEO SYSTEM
DISCHARGE
DISCHARGE
NTSC
NTSC
2 MIN
2 MIN
ENGLISH
ENGLISH
HOME
HOME
LOCAL
LOCAL
SET
SET
CANCEL
CANCEL
TIME DIFFERENCE
TIME DIFFERENCE
12 / 31 / 2050 10:00 AM
12 / 31 / 2050 10:00 AM
12 / 31 / 2050 10:00 AM
12 / 31 / 2050 10:00 AM
12
12
/
31
31
/
2050
2050
11
11
:
00
00
AM
AM
In the time difference
setting, when you change to
the Shooting mode, I and
the date is displayed for 3
seconds, the date display
turns yellow.
How to use the [SET-UP] menu (➝p.111)

120
Connecting to a TV
When connecting to a TV, images can be displayed on wider screen. Using slide show function (➝p.91) together, you can have
fun with folks.
Plug the A/V cable (included) into
the A/V OUT (Audio/Visual
output) socket of the camera.
Plug the other end of the cable into the
audio/video input socket on the TV.
CAUTION
Plug the A/V cable (included) and the AC power adapter
correctly and push them in each terminal.
MEMO
• When connecting the A/V cable (included) to TV, the
camera’s screen is turned off.
• The image quality for movie playback is lower than for
still images.
• When connecting to a TV, even if you adjust the volume
from the [ PLAYBACK VOLUME], the TV volume
cannot be changed. Refer to the instructions provided
with your TV for more information on audio/video input
for your TV.
• Use the AC-5VX (sold separately) and CP-04 (sold
separately) when FinePix S1000fd is connected to a TV
for long periods. See “Notes and Cautions” (included)
for notes on the AC power adapter.
To terminals
Video (yellow)
Audio (white)
A/V OUT socket
AC-5VX (sold separately) and CP-04
(sold separately)
120
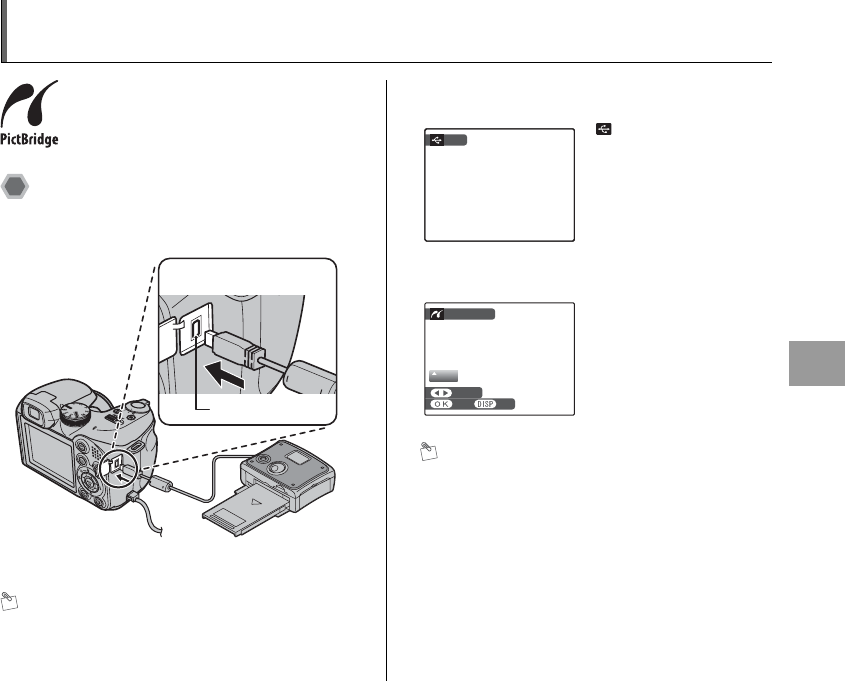
121
Camera Connection
Connecting Camera Directly to Printer — PictBridge Function
When a printer that supports PictBridge is
available, images can be printed by
connecting the camera directly to the
PictBridge-compatible printer without a PC.
Connecting to a printer
AConnect the camera to your printer using the USB
cable.
MEMO
Use the AC-5VX (sold separately) and CP-04 (sold
separately) when FinePix S1000fd is connected to a
printer.
BConnect the camera to a printer and turn the printer on.
Press w for about 1 second to turn the camera on.
CThe following screen appears on the screen after a
moment.
MEMO
Depending on the printer, some functions are disabled.
;USB socket
AC-5VX (sold separately)
and CP-04 (sold separately)
USB
USB
[ USB] appears on
the screen.
OK SET
OK SET
PICTBRIDGE
PICTBRIDGE
TOTAL : 00000
TOTAL : 00000
00
00
FRAME
FRAME
SHEETS
SHEETS
“Specifying images for
printing”
➝p.122
“Printing with DPOF setting”
➝p.123

122
Connecting Camera Directly to Printer — PictBridge Function
Specifying images for printing
([PRINT WITH DATE] / [PRINT
WITHOUT DATE])
MEMO
Even if MENU/OK is pressed with total number of images set
at 0 (zero), the screen printing once appears on the screen.
Press MENU/OK again and printing starts.
MEMO Printing with date
CAUTION
[PRINT WITH DATEE] is not available when the camera
is connected to a printer that does not support date
printing.
APress p or q to display the frame (file)
for specifying PRINT setting.
B
Press
n
or
o
to set a value.
Up to 99 sheets are printed.
To specify more PRINT settings, repeat steps A and B.
CPress MENU/OK to display the confirm
setting.
PICTBRIDGE
PICTBRIDGE
TOTAL : 00002
TOTAL : 00002
02
02
OK SET
OK SET
FRAME
FRAME
SHEETS
SHEETS
DPress MENU/OK again to download the
data to the printer and start printing the
specified number of prints.
PRINT THESE FRAMES
PRINT THESE FRAMES
YES
YES
CANCEL
CANCEL
TOTAL
TOTAL :
9 SHEETS
9 SHEETS
APress DISP/BACK to
display the setting
display.
BPress n or o to select
[PRINT WITH
DATEE].
CPress MENU/OK.
PRINT DPOF
PRINT DPOF
PRINT WITHOUT DATE
PRINT WITHOUT DATE
PICTBRIDGE
PICTBRIDGE
PRINT WITH DATE
PRINT WITH DATE

123
Camera Connection
Printing with DPOF setting
[uPRINT DPOF]
CHECK
To select [uPRINT DPOF], the DPOF settings must be
specified on FinePix S1000fd beforehand (➝p.91).
CAUTION
Even when [WITH DATEE] is specified in the DPOF
settings (➝p.91), the date is not inserted on printers that
do not support date printing.
Continued Q
APress DISP/BACK to open the menu.
BPress n or o to select [u PRINT DPOF].
CPress MENU/OK to display the confirm
setting.
PRINT DPOF
PRINT DPOF
PRINT WITHOUT DATE
PRINT WITHOUT DATE
PICTBRIDGE
PICTBRIDGE
PRINT WITH DATE
PRINT WITH DATE
DPress MENU/OK again to download the
data to the printer and start printing the
specified frames (files) continuously.
YES
YES
CANCEL
CANCEL
TOTAL
TOTAL :
9 SHEETS
9 SHEETS
PRINT DPOF OK?
PRINT DPOF OK?

124
Connecting Camera Directly to Printer — PictBridge Function
MEMO
Press DISP/BACK to cancel the printing.
Depending on the printer, the printing may not be
canceled immediately or printing may stop midway
through.
When printing stops midway, briefly turn the camera off
and then on again.
Disconnecting the printer
ACheck that [PRINTING] is not displayed on the
camera’s screen.
BTurn the camera off. Unplug the USB cable.
MEMO
DPOF setting can be specified for images on internal
memory.
CAUTION
• In PictBridge function, images photographed on other
than a camera may not be printed.
• The camera cannot be used to specify printer settings
such as the paper size and print quality.
• Please connect the AC Power Adapter AC-5VX (sold
separately) and DC Coupler CP-04 (sold separately) to
your camera.
• Use internal memory or a Memory Card that was
formatted on FinePix S1000fd.
• Movies cannot be printed.
• Images photographed with a camera other than FinePix
S1000fd may not be printed.
PRINTING
PRINTING
CANCEL
CANCEL
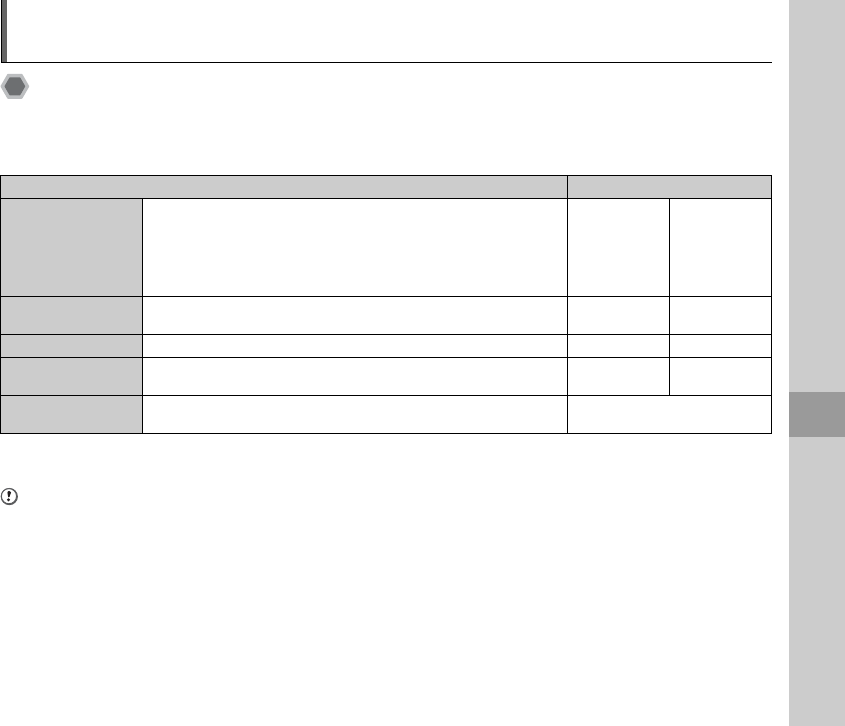
125
Software Installation
Installation on a Windows PC
Pre-installation checklist
ZHard ware (software) requirements and recommended system
To run this software, you must have the hardware and software described below. Check your system before you begin the
installation.
*1Models with one of the above operating systems pre-installed.
*2When you install the software, login using a system administrator account (e.g. “Administrator”).
CAUTION
• Additional USB interface board is not guaranteed.
• Windows 95, Windows 98 and Windows NT cannot be used.
• Operation is not guaranteed on home-built PCs or on PCs running updated operating system software.
• When you reinstall or remove FinePixViewer, the Internet menu and your user ID and password for the FinePix Internet Service
are deleted from your PC. Click the [Register now] button, enter your registered user ID and password and download the menu
again.
requirement Recommendation
Operating System*1
Windows 98 SE
Windows Millennium Edition (Windows Me)
Windows 2000 Professional*2
Windows XP Home Edition*2
Windows XP Professional*2
Windows Vista*2
Windows XP Windows Vista
CPU 200 MHz Pentium minimum
(Windows XP/Vista users: 800MHz Pentium 4 or better recommended)
2 GHz Pentium
4 or better
3 GHz Pentium
4 or better
RAM 128 MB minimum (512 MB minimum for Windows Vista) 512 MB or better 1 GB or better
Hard disk space Amount required for installation: 450 MB minimum
Amount required for operation: 600 MB minimum
2 GB or better 15 GB or better
Display 800 × 600 pixels or better, 16-bit color or better 1024 × 768 pixels or better,
Highest (32 bit)
125
Software Installation

126
Installation on a Windows PC
Do not connect the camera to your PC
until the software installation is
completed.
1Install FinePixViewer as instructed by the
on-screen instructions.
Launching the installer manually
ADouble-click the [My Computer] icon.
*Windows XP users should click [My Computer] in the [Start]
menu.
Windows Vista users should click [Computer] in the [Start]
menu.
BRight-click [FINEPIX] (CD-ROM drive) in the [My
Computer] window (Windows Vista users: in the
[Computer] window) and select [Open].
CDouble-click [SETUP] or [SETUP.exe] in the CD-ROM
window.
*The way file names are displayed differs as described below
depending on your PC settings.
-File extensions (3-letter suffixes indicating the file type)
may be shown or hidden. (e.g. Setup.exe or Setup)
-Text may be shown normally or all in uppercase (e.g. Setup
or SETUP).
2Install DirectX as directed by the on-screen
instructions and then restart your PC. If the
latest version of DirectX is already installed
on your PC, this installation is not
performed.
CAUTION
• If the latest version of DirectX or Windows Media Player
has not been installed, each software will be installed,
and then the PC will restart.
• Do not remove the CD-ROM during this procedure.
3After restarting the PC, a message appears
stating [Installation of the FinePixViewer
has been completed]. Remove the CD-ROM
from your PC.
For Windows Vista users:
When loading the bundled CD-ROM on your PC, the
[AutoPlay] window may appear. In this case, click
[SETUP.exe].
When [User Account Control] window appears, click [Allow].

127
Software Installation
Installation on a Mac OS X
Pre-installation checklist
ZHardware and software requirements
To run this software, you must have the hardware and software described below. Check your system before you begin the
installation.
*1PowerPC, Intel processor loaded
*2Models with a USB port as a standard feature
CAUTION
• Connect the camera directly to the Macintosh using the USB cable (included). The software may not operate correctly if you use
an extension cable or connect the camera via a USB hub.
• Push the USB connector fully into the socket to ensure that it is securely connected. The software may not operate correctly if the
connection is faulty.
• Additional USB interface board is not guaranteed.
Continued Q
Compatible Mac*1
Power Macintosh G3*2, PowerBook G3*2,
Power Macintosh G4, iMac, iBook,
Power Macintosh G4 Cube, PowerBook G4, Power Macintosh G5,
MacBook, MacBook Pro, or Mac mini
Operating System Mac OS X (compatible with version 10.3.9 to 10.4.10)
RAM 256 MB minimum
Hard disk space Amount required for installation: 200 MB minimum
Amount required for operation: 400 MB minimum
Display 800 × 600 pixels or better, at least 32,000 colors

128
Installation on a Mac OS X
1Turn your Macintosh on and start up Mac
OS X. Do not launch any other applications.
2When the bundled CD-ROM is loaded into
the CD-ROM drive, the [FinePix] icon
appears. Double-click the [FinePix] icon to
open the [FinePix] volume window.
3Double-click on [Installer for MacOSX].
4The Installer setup dialog appears. Click the
[Installing FinePixViewer] button.
CAUTION
For more information on what is installed, click the [Read
Me First] button and [Using FinePixViewer] button.
5The [Authenticate] dialog appears.
Enter the name and password for the
administrator account and then click the
[OK] button.*
*The administrator account is the user account used for
Mac OS X installation and you can confirm the user
account in the Accounts dialog in the System
Preferences.
6Install FinePixViewer as directed by the on-
screen instructions.

129
Software Installation
7The [FinePixViewer installation completed]
message dialog appears. Then click exit
button and close it.
CAUTION
When Safari is used as the Web browser, a message may
be displayed and the CD-ROM may not be removed. If
this happens, click the Safari icon in the Dock to make
Safari the active application and then select [Quit Safari]
in the [Safari] menu to shut down Safari.
8Launch [Image Capture] from the
[Applications] folder.
9Change the Image Capture settings.
Select [Preferences...] from the [Image
Capture] menu.
10
Select [Other...] from [When a camera is
connected, open].
11
Select [FPVBridge] from [FinePixViewer]
folder in the [Applications] folder and click
the [Open] button.
12
Select [Quit Image Capture] menu in the
[Image Capture] menu.

130
Connecting to a PC
By connecting the camera to a PC, your system can be
expanded to fill a wide range of uses. Using
“FinePixViewer” performs images saving, browsing and
file management etc.
FinePixViewer Overview
Enables importing images, managing files and folders,
and ordering prints using the internet (only Windows
users).
CAUTION
The Windows CD-ROM may also be required during
installation. In this event, change CD-ROMs as directed
by the on-screen instructions.
CAUTION
• Do not format the Memory Card in the camera on the PC.
• Use the Memory Card with images taken by a
FUJIFILM Digital camera.
MEMO
In Windows, if FinePixViewer is already installed, the
driver will be set automatically. No action is required.
AInsert the Memory Card with images into the camera
(➝p.18).
You can use the xD-Picture Card and the SD
Memory Card with the FinePix S1000fd.
In this Owner’s Manual, these cards are expressed as
“Memory Card”.
CD-ROM
(Software for FinePix)
Refer to Software
Installation (➝p.125, 127)
the first time you connect
the camera to your PC.
Install the software first. Do
not connect the camera to
the PC before installing all
the software.
BConnect the camera to your PC using the USB cable
(included).
CPress w for about 1 second to turn the
camera on in Playback mode.
DSet your PC
AC-5VX (sold separately)
and CP-04 (sold separately)
;USB socket
131
Software Installation
CAUTION
• FinePix S1000fd is compatible with PTP (Picture
Transfer Protocol)/MTP (Media Transfer Protocol). A
PTP/MTP-compatible camera is a camera that can
recognize the PC and printer automatically when
connected.
• Do not disconnect the USB cable (included) when the
camera is communicating with a PC. If the USB cable
(included) is disconnected during communication, the
files on the Memory Card or internal memory may be
damaged.
• In Mac OS X, you must set automatic setup the first time
you connect the camera to your PC.
• When the camera and PC are exchanging data, the
indicator lamp blinks alternately green and orange.
• Auto power off is disabled during USB connection.
• Before replacing the Memory Card, always disconnect
the camera from the PC.
• The camera and PC may be exchanging data even
when [Copying] disappears from your PC screen.
Before disconnecting the USB cable (included), always
check that the indicator lamp is off.
• Always use FinePixViewer to transfer images with voice
memos to a PC.
• The cost of an Internet provider for connecting to the
internet is the user’s responsibility.
• When using FinePixViewer to save images on a data
server (network), FinePixViewer may not run as it would
in a standalone PC environment.
CAUTION
• Always use the FUJIFILM AC Power Adapter AC-5VX
(sold separately) and DC Coupler CP-04 (sold
separately). If the camera suddenly loses power during
data exchange, data exchange will not be performed
correctly, and the Memory Card or internal memory
could be damaged.
• Make sure that the USB cable (included) is connected
correctly and securely.
• Connect the camera directly to the PC using the USB
cable (included). The software may not operate
correctly when you use an extension cable, or if you
connect the camera via a USB hub.
• When your PC has more than one USB port, the
camera can be connected to either port.
• When Windows 98 SE is used, the supplied software
must be installed first before connecting the camera to
a PC using the USB cable. The PC will not recognize
the camera if it is connected before installation.
• A memory Card, the internal memory, data in a Memory
Card or data in the internal memory could be damaged
if any of the following are performed;
- the USB cable is disconnected
- ON/OFF switch or buttons are pressed
Continued Q

132
Connecting to a PC
The following steps differ depending on the
PC’s operating system (Windows XP/Vista and
Mac OS X case)
When your PC recognizes the camera automatically,
FinePixViewer automatically starts up and the Save
Image Wizard window (Save Image dialog box) appears.
Follow the instructions provided on screen to save the
images. To proceed without saving the images, click the
[Cancel] button.
CAUTION
When there are many images stored on a Memory Card,
it takes a while to display on the screen of your PC. Also,
it may take a while to import images or you may be unable
to save images. In this case, use an Image Memory Card
Reader.
MEMO
• You can only see images saved on a PC. Save images
on a PC.
• If you cancel saving by clicking the [Cancel] button,
slide the power swich to turn off the camera and then
disconnect it from the PC.
• When the camera is connected to your PC,
FinePixViewer automatically starts up by the function of
Exif Launcher, which is installed in FinePixViewer.
CAUTION (MAC OS X)
If FinePixViewer does not start up automatically, the
software may not be installed correctly. Set your PC again
after disconnecting the camera and restart.
CAUTION (MAC OS X)
Note on disconnecting the camera
• Close all files in the camera, and make sure the camera
is not exchanging data.
• The camera and PC may be exchanging data even
when [Copying] disappears from your PC screen,
especially in the case of copying large data amounts.
Do not disconnect the USB cable (included),
immediately after this message has disappeared.
Always check that the indicator lamp is off first before
disconnecting.
Proceed to “Using FinePixViewer” (➝p.133).

133
Software Installation
Using FinePixViewer
For all information on FinePixViewer functions, refer to
[How to Use FinePixViewer] in the Help menu for details.
• What is explained in [How to Use FinePixViewer]...
[How to Use FinePixViewer] covers a range of topics,
including batch processing and ordering prints.
Example: Looking up slide shows
AClick [How to Use FinePixViewer] in the FinePixViewer
Help menu.
BClick [Basic Operation] and then click [Slide Show] in
the menu that appears.
CThe [Slide Show] information appears. Press the [<<<]
key to view the previous page or the [>>>] key to view
the next page.
Only perform this operation when you no longer require
the installed software or when the software was not
installed correctly.
Windows
ACheck that the camera is not connected to the PC.
BQuit all currently running applications.
CThe steps for uninstalling software differ depending on
the operating system. Follow the steps for each
operating system to uninstall the software listed below.
The following software is to be uninstalled:
• FinePixViewer
• FinePix Resource
• FinePix Studio*
• RAW FILE CONVERTER LE*
*May not have been installed depending on the
operating system.
DWhen the message appears, click the [OK] button.
Check your selection carefully since the process
cannot be canceled once you click the [OK] button.
Macintosh
Quit FinePixViewer. Then drag the installed
FinePixViewer folder to the Trash and select [Empty
Trash] in the [Finder] menu.
Mastering FinePixViewer
Uninstalling the software
5
5
To remove FinePixViewer
To remove the driver
software
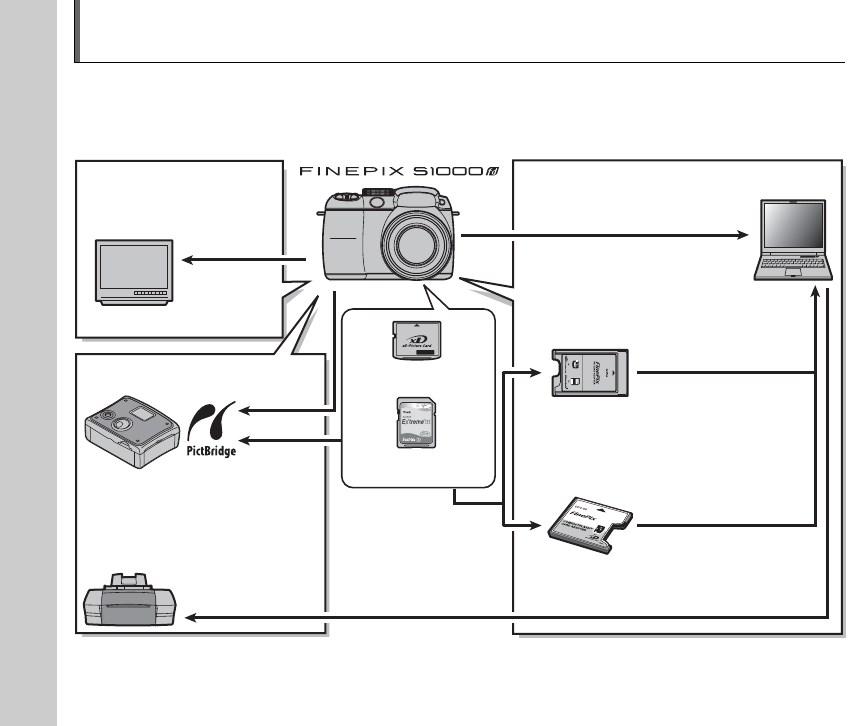
134
System Expansion Option
By using FinePix S1000fd together with other optional FUJIFILM products, your system can be expanded to fill a wide range
of uses.
Accessory availability may vary by country. Please check with your local Fujifilm representative to confirm product availability.
ZAudio/Visual
output
TV monitor
(commercially available)
Audio/Visual
output
ZPrinting
USB
PictBridge-compatible printer
(commercially available)
Printer
(commercially available)
xD-Picture Card
ZImage input/output to the PC
Personal Computer
(commercially available)
PC Card Adapter DPC-AD
CompactFlash™
Card Adapter DPC-CF
(PC card slot)
*This will not work with an
SD Memory Card.
(CF card slot)
*This will not work with an SD
Memory Card.
USB
SD/SDHC Memory Card
134
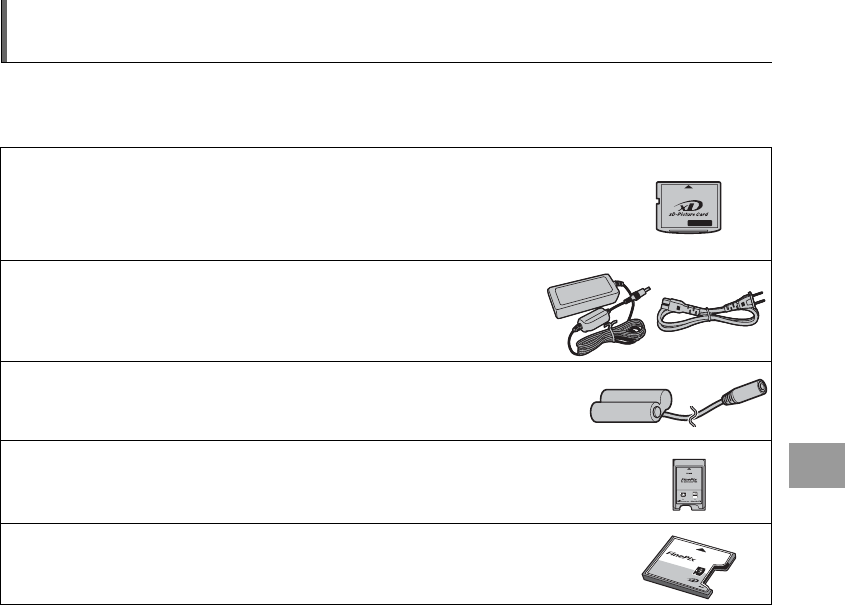
135
Appendices
Accessories Guide
Visit the FUJIFILM web site for the latest information on camera accessories.
http://www.fujifilm.com/products/digital_cameras/index.html
Accessory availability may vary by country. Please check with your local Fujifilm representative to confirm product availability.
• xD-Picture Card
Use the following xD-Picture Cards:
256MB/512MB/1GB/2GB
There are two types of xD-Picture Card: standard type and Type M (containing “M” in the model
number, such as DPC-M1GB).
FinePix S1000fd is compatible with Type M, however they may not be compatible depending on the
device used (Image Memory Card Reader, etc.).
•AC Power Adapter AC-5VX
Use the AC-5VX when taking pictures or play back images for long periods or when FinePix
S1000fd is connected to a PC.
*The shape of the AC power adapter, the plug, and power outlet depend on the country.
• DC Coupler CP-04
Use the CP-04 with AC-5VX when taking pictures or playback images for long periods or
when FinePix S1000fd is connected to a PC.
• PC Card Adapter DPC-AD
The PC Card Adapter allows the xD-Picture Card and SmartMedia to be used as a PC Card Standard
ATA-compliant (PCMCIA 2.1) PC card (Type u).
-Compatible with xD-Picture Card of 16 MB to 512 MB, and SmartMedia of 3.3 V, 2 MB to 128 MB.
*This is not compatible with the SD Memory Card.
• CompactFlash™ Card Adapter DPC-CF
Loading an
xD-Picture Card
into this adapter allows you to use the card as a CompactFlash card (Type
s
).
*This is not compatible with the SD Memory Card.
COMPACTFLASH
DPC-CF
TM
for
xD-Picture Card
CARD ADAPTER

136
Using Your Camera Correctly
Read this information and the “Safety Notes” (➝ “Notes
and Cautions” (included)), to make sure you use your
camera correctly.
ZPlaces to Avoid
Do not store or use the camera in the following types of
locations:
• In the rain or in very humid, dirty, or dusty places
• In direct sunlight or in places subject to extreme
temperature rises, such as in a closed car in summer
• Extremely cold places
• Places with strong vibration
• Places with smoke or steam
• Places subject to strong electric magnetic fields (such
as near broadcasting tower, power lines, radar, motors,
transformers, magnets, etc.)
• In contact with chemicals such as pesticides
• Next to rubber or vinyl products
ZDamaged by Water or Sand
FinePix S1000fd can be damaged on the inside and
outside by water and sand. When you are at the beach or
close to water, make sure that the camera is not damaged
by water or sand. Take care not to place the camera on a
wet surface.
ZDamaged by Condensation
If the camera is carried from a cold location into a warm
place, water droplets (condensation) may form on the
inside of the camera or on the lens. When this occurs, turn
the camera off and wait an hour before using the camera.
Condensation may also form on the Memory Card. In this
event, remove the Memory Card and wait a short time.
ZWhen the Camera is Not Used or is stored Periods
of Time
If you do not intend to use the camera for a long period of
time, remove the batteries and the Memory Card.
ZCleaning Your Camera
• Use a blower brush to remove any dust on the lens,
LCD monitor or viewfinder, and then gently wipe the
camera with a soft, dry cloth. If any soil remains, apply
a small amount of lens cleaning liquid to a piece of
FUJIFILM lens cleaning paper and wipe gently.
• Do not scratch hard objects against the lens, LCD
monitor or viewfinder.
• Clean the body of the camera with a soft, dry cloth. Do
not use volatile substances or cleaning products these
items can cause damage.
ZUsing the Camera When Traveling
When traveling overseas, do not place your camera in the
check-in baggage. Baggage can be subjected to violent
shocks, and the camera may be damaged inside or
outside.

137
Appendices
Discharging rechargeable batteries
The Discharging rechargeable batteries function can only
be used with Ni-MH batteries.
The Discharging rechargeable batteries function should
not be used with alkaline batteries or lithium batteries as
it will completely drain the battery charge.
Use the Discharging rechargeable batteries function in
the following situations:
• When the batteries only last for a short time after being
charged normally
• When the batteries have not been used for a long period
• When you purchase new Ni-MH batteries
Do not use the Discharging rechargeable batteries
function while using the AC power adapter and DC
coupler. In these situations, the Ni-MH batteries will not
be discharged due to the external power supply.
To discharge rechargeable batteries:
CAUTION
To cancel discharging, press DISP/BACK.
APress w to turn the camera on.
BPress MENU/OK to display the menu on
the screen.
CPress n or o to select [U SET-UP].
SET
SET
-
UP
UP
AUTO POWER OFF
AUTO POWER OFF
TIME DIFFERENCE
TIME DIFFERENCE
BACKGROUND COLOR
BACKGROUND COLOR
DISCHARGE
DISCHARGE
VIDEO SYSTEM
VIDEO SYSTEM
2 MIN
2 MIN
ENGLISH
ENGLISH
NTSC
NTSC
DPress q to display the [SET-UP] menu.
EPress p or q to select .
FPress n or o to select [
DISCHARGE].
GPress q.
HPress MENU/OK.
IPress p or q to select [OK].
JThe screen changes and discharging
begins. When the battery level indicator
blinks red and discharging ends, the
camera turns off.
IT MAY TAKE A WHILE
IT MAY TAKE A WHILE
DISCHARGE OK?
DISCHARGE OK?
FOR DISCHARGING
FOR DISCHARGING
CANCEL
CANCEL
OK
OK
SET
SET
DISCHARGE
DISCHARGE

138
Notes on the
xD-Picture Card
™, the SD Memory Card and the Internal Memory
ZHandling Memory Card
• When inserting the Memory Card into the camera, hold
the Memory Card straight as you push it in.
• Never remove the Memory Card or turn the camera off
during data recording or erasing (Memory Card
formatting) as this could be damaged to the Memory
Card.
• The use of xD-Picture Cards is recommended with
FinePix S1000fd.
The recording quality cannot be guaranteed when xD-
Picture Cards other than those manufactured by
FUJIFILM are used.
• The Memory Card may feel warm when it is removed
from the camera after taking pictures. This is normal.
• Do not put labels on the Memory Card. Peeling labels
can cause the camera not to work properly.
MEMO Type M and H of xD-Picture Card
• Type M
There are two types of Memory Card: standard type and
Type M (containing “M” in the model number, such as
DPC-M2GB).
FinePix S1000fd is compatible with Type M.
• Type H
Type H and M share the same compatibility.
• Usable USB drive
Type H cannot be used with xD-Picture Card USB
drive DPC-UD1, while Type M can.
ZInternal Memory
• Images held in the camera’s internal memory may be
corrupted or erased due to problems such as camera
faults. Save your important data to another media (i.e.,
DVD-R, CD-R, CD-RW, hard disk, etc.).
• Data stored in the camera’s internal memory cannot be
guaranteed in the event that the camera is submitted for
repairs.
• When the camera is repaired, any data stored in the
camera’s internal memory is subject to checking by the
repairer.
ZUsing Memory Card or Internal Memory with a PC
• When taking pictures using a Memory Card or internal
memory that has been used on a PC, reformat the
Memory Card using your camera.
• When formatting, a directory (folder) is created. Image
data is then recorded in this directory.
• Do not change or delete the directory (folder) or file
names on the Memory Card or internal memory
because this will make it impossible to use the Memory
Card or internal memory in your camera.
• Always use the camera to erase image data.
• To edit image data, copy or transfer the image data to
the PC and edit the copied or transferred data.

139
Appendices
Warning Displays
The table below lists the warnings that are displayed on the screen.
Warning Displayed Explanation Remedy
(Lit red)
V (Blinking red)
The batteries are low or completely out of charge. Load new or fully charged batteries.
There is a strong likelihood of camera shake
because the shutter speed is slow.
Use flash photography. A tripod may be
recommended, depending on the scene and mode.
{
*The shape of the AF
frame differs depending
on the setting in the
[SHOOTING MENU].
The AF (autofocus) cannot work effectively. • If the image is too dark, take the picture at a
distance of around 2 m (6.6 ft.) from the subject.
• Use AF lock to take the picture (➝p.32).
• Select Macro mode when taking close-up shots.
Aperture/
Shutter speed display
(Lit red)
The camera cannot shoot the picture at the correct
brightness due to too bright or dark shooting
condition.
The picture can be taken, but the correct brightness
(exposure) will not be obtained.
[FOCUS ERROR] • Camera malfunction or fault. • Turn the camera on again, taking care not to touch
the lens.
[ZOOM ERROR] • You are touching the autofocus ring. • Do not hold the autofocus ring. The lens will
automatically refocus when you release the
autofocus ring.
[NO CARD] Memory Card is not inserted when transferring
images.
Insert a Memory Card.
Continued Q

140
Warning Displays
[CARD NOT
INITIALIZED]
• The Memory Card or internal memory is not
formatted.
• The Memory Card was formatted on a PC.
• The Memory Card contact area is soiled.
• Format the Memory Card or internal memory on
the camera (➝p.117).
• Format the Memory Card on the camera.
• Wipe the contact area on the Memory Card with a
soft, dry cloth. It may be necessary to format the
Memory Card (➝p.117). If the message still
appears, replace the Memory Card.
• Camera fault. • Contact your FUJIFILM dealer.
[CARD ERROR]
• The Memory Card contact area is soiled.
• The Memory Card format is incorrect.
• Wipe the contact area on the Memory Card with a
soft, dry cloth. It may be necessary to format the
Memory Card (➝p.117). If the message still
appears, replace the Memory Card.
• Camera fault.
• The Memory Card is damaged.
• Inserted Memory Card is not compatible with your
camera.
• Contact your FUJIFILM dealer.
• Insert a compatible Memory Card that is operation-
checked at FUJIFILM Corporation.
[\ MEMORY FULL]
[Y MEMORY FULL]
The internal memory or Memory Card is full. Erase some images in internal memory or Memory
Card (➝p.41), or use a Memory Card that has ample
free space.
[WRITE ERROR]
• The data could not be recorded due to an Memory
Card error or a connection error between the
Memory Card and camera.
• The image cannot be recorded as it is too large to
fit in the available space on the Memory Card.
• The Memory Card or internal memory is not
formatted.
• Re-insert the Memory Card or turn the camera off
and then on again. If the message still appears,
contact your FUJIFILM dealer.
• Use a new Memory Card.
• Format the Memory Card or internal memory on
the camera (➝p.117).
[PROTECTED CARD] The SD Memory Card switch is slide to the “Lock”
side.
Unlock the protection by sliding it back (➝p.19)
[INTERNAL MEMORY
IS FULL
INSERT A NEW CARD.]
The data could not be recorded or copied since the
internal memory is full.
Erase some images from the internal memory
(➝p.41), or use a Memory Card that has ample free
space.
[BUSY] The timing for recording was incorrect because the
Memory Card was formatted on a PC.
Use a Memory Card that was formatted on the
camera.
Warning Displayed Explanation Remedy

141
Appendices
[FRAME NO. FULL]
The frame number has reached 999-9999.
No more pictures can be taken.
AInsert a formatted Memory Card into the camera.
BSet [RENEW] as the [FRAME NO.] setting in the
[U SET-UP] menu (➝p.115).
CStart taking pictures (The frame number starts
from “100-0001”).
DSet [CONTINUOUS] as the [FRAME NO.]
setting in the [U SET-UP] menu.
[READ ERROR]
• The played back file was not recorded correctly.
• The Memory Card contact area is soiled.
• Camera fault.
• An attempt was made to play back the image or the
movie that was not recorded on this camera.
• This file cannot be played back.
• Wipe the contact area on the Memory Card with a
soft, dry cloth. It may be necessary to format the
Memory Card (➝p.117). If the message still
appears, replace the Memory Card.
• Contact your FUJIFILM dealer.
• The movie and image cannot be played back.
[TOO MANY FRAMES] An attempt was made to show 5,000 or more image
by date sorting.
No more than 4,999 images can be shown by date
sorting.
[PROTECTED FRAME]
• An attempt was made to erase a protected file.
• An attempt was made to add a voice memo to
protected file.
• An attempt was made to rotate a protected file.
• Protected files cannot be erased. Remove the
protection (➝p.98).
• Protected files cannot be added to voice memos.
Remove the protection (➝p.98).
• Protected files cannot be rotated. Remove the
protection (➝p.98).
[# ERROR] • The voice memo file is faulty.
• Camera fault.
• The voice memo cannot be played back.
• Contact your FUJIFILM dealer.
[\ NO IMAGE]
[Y NO IMAGE]
An attempt was made to transfer images from the
Memory Card or internal memory that memory was
empty.
It is impossible to copy.
[` CAN NOT TRIM] An attempt was made to trim a 0.3M image. The image cannot be trimmed.
Continued Q
Warning Displayed Explanation Remedy

142
Warning Displays
[CAN NOT TRIM]
• An attempt was made to trim an image shot using
a camera other than FinePix S1000fd.
• The image is damaged.
The image cannot be trimmed.
[DPOF FILE ERROR]
Prints were specified for 1000 or more frames in the
DPOF frame settings.
The maximum number of frames for which prints can
be specified on the same Memory Card is 999.
Copy the images for which you want to order prints
onto another Memory Card and then specify the
DPOF settings.
[CAN NOT SET DPOF]
[r CAN NOT SET
DPOF]
An attempt was made to specify DPOF settings for a
movie or an image that is not supported by DPOF.
DPOF printing cannot be used with this image
format.
[CAN NOT ROTATE]
[r CAN NOT ROTATE]
An attempt was made to rotate a movie or an image
shot using a camera other than FinePix S1000fd.
These images cannot be rotated by image formats.
[CANNOT DETECT]
[ CANNOT DETECT]
[r CANNOT DETECT]
[ CANNOT DETECT]
An attempt was made to correct the red-eye effect in
images taken with [FACE DETECTION] set to [OFF],
movies, images taken by another camera, or images
not allowing red-eye removal.
Red-eye removal cannot be used with these image
formats.
[COMMUNICATION
ERROR]
The camera is not connected to a PC or printer. • Check that the USB cable is connected correctly.
• Check that your printer is turned on.
[PRINTER ERROR]
Displayed for PictBridge. • Check that the printer is not out of paper or out of
ink.
• Turn the printer off briefly and then turn it back on.
• Refer to the user manual supplied with your
printer.
[PRINTER ERROR
RESUME?]
Displayed for PictBridge. Check that the printer is not out of paper or out of ink.
Printing automatically restarts when the error is
cleared. If the message still appears after checking,
press MENU/OK to restart printing.
Warning Displayed Explanation Remedy

143
Appendices
[CANNOT BE PRINTED]
Displayed for PictBridge. • Refer to the user manual for the printer being used
and check whether the printer supports the JFIF-
JPEG or Exif-JPEG image format. If not, the printer
cannot print the images.
• Movies cannot be printed.
• Was the image data photographed using FinePix
S1000fd?
You may not be able to print some images
photographed on other cameras.
Warning Displayed Explanation Remedy

144
Troubleshooting
ZGetting ready
Matters Problems Possible causes Solutions Page
Batteries and
power supply
Nothing happens
when sliding the
ON/OFF switch or
pressing w.
The batteries have run out. Load new or fully charged batteries. 15, 17
The batteries are loaded backward. Load the batteries in the corrected
direction. 16
The AC power adapter and DC coupler are
not connected correctly.
Connect the AC power adapter and DC
coupler correctly. –
The camera has been left for a long period
with batteries, AC power adapter and DC
coupler removed.
Load the batteries or connect the AC
power adapter and DC coupler, and wait a
short time before turning the camera on.
15, 21
Batteries run out
quickly.
Camera is used in extremely cold
conditions.
Put the batteries in your pocket or another
warm place to heat it and then load it into
the camera just before you take a picture.
15, 17
The battery terminals are soiled. Wipe the battery terminals with a clean,
dry cloth. 17
Same batteries have been used for a long
period.
The batteries can no longer be recharged.
Load a new batteries. 15, 17
The rechargeable batteries (if used) have
become deactivated, or the battery
capacity has diminished due to the
memory effect.
Use the rechargeable battery discharging
function to restore the rechargeable
batteries to full capacity. 137
Power cuts out
during operation.
The batteries have run out. Load new or fully charged batteries. 15, 17
The AC power adapter and DC coupler are
not connected correctly.
Connect the AC power adapter and DC
coupler correctly. –
144

145
Troubleshooting
ZSetting menu etc.
ZShooting
Matters Problems Possible causes Solutions Page
LCD monitor
display
Screens are not
displayed in
English.
A language other than English is selected
in the [ ] setting in the [SET-UP]
menu.
Select [ENGLISH].
25
Matters Problems Possible causes Solutions Page
Basic operations
No photograph is
taken when
pressing the
shutter button.
The Memory Card or internal memory is
full.
Insert a new Memory Card or erase some
unnecessary frames. 18, 41
The Memory Card or internal memory is
not formatted.
Format the Memory Card or internal
memory on the camera.
111,
117
The Memory Card contact area is soiled. Wipe the Memory Card contact area with a
soft, dry cloth.
18,
138
The Memory Card is damaged. Insert a new Memory Card. 18
The batteries have run out. Load new or fully charged batteries. 15, 17
The Auto power off function has turned the
camera off.
Turn the camera on. 21
The screen
darkens after
taking a picture.
You took pictures with flash. The screen may darken for charging flash.
Wait a short time. 66
Focusing
Camera has
difficulty in
focusing on the
subject.
You took a close-up shot without selecting
Macro mode.
Select Macro mode. 63
You photographed scenery with Macro
mode selected.
Cancel Macro mode. 63
You are shooting a subject that is not
suited to autofocusing (➝p.33).
Use AF/AE lock to take the picture. 32
Continued Q

146
Troubleshooting
Intelligent Face
Detection
Cannot set
Intelligent Face
Detection.
The Shooting mode is set to ,, ., ,
, or .
Change the Shooting mode.
48
Macro
Cannot set the
camera to Macro
(close-up) mode.
The Shooting mode is set to H, ,, .,
/, , , , , or .
Change the Shooting mode.
48
Flash
Cannot use the
flash.
The shutter button was pressed while the
flash was charging.
Wait until the charging is completed before
pressing the shutter button. 66
The flash is not popped up. Pop up the flash. 64
The Shooting mode is set to , ,, ,
, or .
Change the Shooting mode. 48
The batteries have run out. Load new or fully charged batteries. 15, 17
Continuous shooting is selected. Set continuous shooting to OFF. 69
> Super macro mode is selected. Cancel > Super macro mode. 63
The flash settings
are restricted and
cannot be
selected.
The Shooting mode is set to anything other
than H and N.
The flash settings are restricted because
the camera settings are tailored to the
scene being shot. Change the Shooting
mode for a wider range of flash settings.
48, 65
The playback
image is dark
even though the
flash was used.
The subject is too far away. Move to within the effective flash range
before taking the picture. 152
Your finger was covering the flash. Hold the camera correctly. 27
Photographed images
The image is
blurred.
The lens is dirty. Clean the lens. 136
AF frame (lit red) and { appeared when
taking pictures.
Check the focus on the subject and take
pictures.
27,
31,
139
appeared when taking pictures. It may cause camera shake. Hold the
camera steadily.
28,
139
There is speckling
on the image.
The picture was taken with a slow shutter
speed (long exposure) in a high-
temperature environment.
This is a characteristic of CCDs and does
not indicate a camera fault. –
Matters Problems Possible causes Solutions Page

147
Troubleshooting
Recording images
Photographed
images or movies
are not recorded.
AC power adapter and DC coupler were
connected or disconnected during turning
the camera on.
Connect or disconnect the AC power
adapter and DC coupler only when the
camera is off. Failing to turn the camera off
first can result in damage to the Memory
Card or malfunctions during PC
connection.
–
Continuous
shooting
Only 1 frame can
be shot even
though continuous
shooting mode
was set.
A picture is taken using self-timer when
setting [LONG PERIOD] continuous
shooting mode.
Only 1 frame can be shot when using
[LONG PERIOD] continuous shooting
mode and Self-timer mode together. 69, 71
Matters Problems Possible causes Solutions Page

148
Troubleshooting
ZPlaying back
Matters Problems Possible causes Solutions Page
Playing back
movie / voice
memo
The camera does
not emit any
sound.
The camera volume is set too low. Adjust the volume. 103,
110,
111,
116
The microphone was blocked during
shooting/recording.
Take care not to block the microphone
during shooting/recording.
12,
101,
107
There is something covering the speaker
during playback.
Make sure that the speaker is uncovered. 12,
102,
110
Erasing
Erasing [FRAME]
does not erase the
frame.
Some frames may be protected. Unprotect frames using the camera on
which the protection was first applied.
98
Erasing [ALL
FRAMES] does
not erase all the
frames.
Frame No.
[CONTINUOUS]
in the frame
number setting
does not function.
You opened the battery cover without
turning the camera off when replacing the
batteries or Memory Card.
Always turn the camera off when replacing
the batteries or Memory Card. Opening the
battery cover without turning the camera
off may cause the frame number memory
to not function.
21

149
Troubleshooting
ZConnecting
ZOthers
Matters Problems Possible causes Solutions Page
Connecting to TV
There is no image
or sound on the
TV.
The camera is not connected to the TV
correctly.
Connect the camera and TV correctly. 120
The included A/V cable was connected
during movie playback.
After the movie playback mode is stopped,
connect the camera and TV correctly.
109,
120
“TV” is selected as the TV input. Set the TV input to “VIDEO”. –
The video output setting is incorrect. Change the setting to [NTSC] or [PAL]. 111,
113
The TV volume is turned down. Adjust the volume. –
The TV image is
black and white.
The video output setting is incorrect. Change the setting to [NTSC] or [PAL]. 111,
113
Connecting to PC
PC does not
recognize the
camera.
The USB cable is not correctly connected
to the PC or camera.
Set up the camera, and connect the USB
cable correctly. 130
Connecting to
printer
Cannot print with
PictBridge.
• The USB cable is not correctly
connected to the printer or camera.
• The printer is not turned on.
• Set up the camera, and connect the USB
cable correctly.
• Turn the printer on.
121
Matters Problems Possible causes Solutions Page
Camera operation
etc.
Nothing happens
when pressing the
buttons on the
camera.
Camera malfunction may be caused
temporarily.
Briefly remove the batteries or disconnect
the AC power adapter and DC coupler.
Then reload the batteries or reconnect the
AC power adapter and try again.
15, 16
The batteries have run out. Load new or fully charged batteries. 15, 17
The camera no
longer works
correctly.
Camera malfunction may be caused
temporarily.
Briefly remove the batteries or disconnect
the AC power adapter and DC coupler.
Then reload the batteries or reconnect the
AC power adapter and DC coupler and try
again. If you think the camera is faulty,
contact your FUJIFILM dealer.
15, 16

150
Specifications
System
Model Digital camera FinePix S1000fd
Effective pixels 10.0 million pixels
CCD 1/2.3-inch CCD
Storage media Internal memory (approx. 24 MB)/xD-Picture Card (16/32/64/128/256/512 MB/1 GB/2 GB)/SD/SDHC
Memory Card (FUJIFILM recommendation (➝p.18))
File format Still image: DCF-compliant
Compressed: Exif ver.2.2 JPEG, DPOF-compatible
*Design rule for Camera File System compliant/DPOF compatible
Movie: AVI format, Motion JPEG
Audio: WAVE format, Monaural sound
Number of recorded pixels Still image: 3648 × 2736 pixels/3648 × 2432 pixels/2592 × 1944 pixels/2048 × 1536 pixels
1600 × 1200 pixels/640 × 480 pixels ( /%/[/3/2/`)
File size See the table on the p.154
Lens Fujinon 12× optical zoom lens
F2.8 (Wide-angle)-F5.0 (Telephoto)
Focal length f=5.9 mm-70.8 mm
(Equivalent to approx. 33 mm-396 mm on a 35 mm camera)
Digital zoom Approx. 5.7× (12× optical zoom lens is used together: Max. zoom scale: approx. 68.4×)
Aperture F2.8-F6.4 (Wide-angle) to F5.0-F8.0 (Telephoto) in 1/3 EV increments Manual/Auto selectable
Focal range
(from lens surface)
Normal: Wide-angle: approx. 40 cm (1.3 ft.) to infinity (In High-speed shooting mode: approx. 1.5 m
(4.9 ft.) to infinity)
Telephoto: approx. 1.5 m (4.9 ft.) to infinity (In High-speed shooting mode: approx. 2.0 m
(6.6 ft.) to infinity)
Macro: Wide-angle: 5 cm to 3.0 m (2.0 in. to 9.8 ft.)
Telephoto: 80 cm to 9.9 m (2.6 ft. to 32.5 ft.)
Super macro: Approx. 2 cm to 10 cm (0.8 in. to 3.9 in.)
Focal length: fixed to approx. 60 mm (35 mm camera equivalent)
Sensitivity [AUTO]/[AUTO(400)]/[AUTO(800)]/Equivalent to ISO [64]/[100]/[200]/[400]/[800]/[1600]/[3200]
(max.number of recorded pixels:3) (Standard output sensitivity)

151
Photometry TTL 256-zones metering Multi, Spot, Average
Exposure control Program AE (When using P mode : Program Shift is enabled)/Shutter priority AE/Aperture priority AE/
Manual exposure
Scene position ([NATURAL LIGHT]), H ([PORTRAIT]), , ([LANDSCAPE]), . ([SPORT]), / ([NIGHT]),
([FIREWORKS]), ([SUNSET]), ([SNOW]), ([BEACH]), ([MUSEUM]), ([PARTY]),
([FLOWER]), ([TEXT]), ([PICTURE STABILIZATION])
Intelligent Face Detection Available
Exposure compensation –2 EV to +2 EV in 1/3 EV-step increments (N, <, M)
Shutter speed B, , H, ,, ., , , , , , , : 1/4 sec. to 1/2000 sec*.
/: 8 sec. to 1/1000 sec.*
: 8 sec. to 1/2 sec.*
: 1/45 sec. to 1/2000 sec.* (flash only).
N, <: 1/45 sec. to 1/2000 sec.* (8 sec. to 1/2000 sec.* when suppressed flash is set)
M, >: 8 sec. to 1/2000 sec.* *depend on Exposure mode
Continuous shooting Continuous shooting (TOP 152):
Number of recorded frames: up to 15 frames (Max. 7.5 frames/sec.)
Continuous shooting (TOP 6[):
Number of recorded frames: up to 6 frames (Max. 3.3 frames/sec.)
Long period continuous shooting (LONG PERIOD):
Number of recorded frames: Depend on memory size. 0.7 sec. interval at N depending on
quality level. (Max. 1.4 frames/sec.)
Continuous shooting (LAST 3):
Number of recorded frames: 3 frames just before releasing shutter button (Max. 1.4 frames/sec)
Bracketing: (BRACKETING)
Number of recorded frames: up to 3 frames (appropriate, over or under setting value)
Continuous shooting (TOP 3):
Number of recorded frames: up to 3 frames (Max. 1.4 frames/sec.)
Auto bracketing ± 1/3 EV, ± 2/3 EV, ± 1 EV
Focus Mode: Single AF, Continuous AF
AF system: TTL contrast-type, AF-assist illuminator (effective distance: 1.8m)
AF frame selection: AF (CENTER), AF (MULTI), AF(AREA)
System
Continued Q
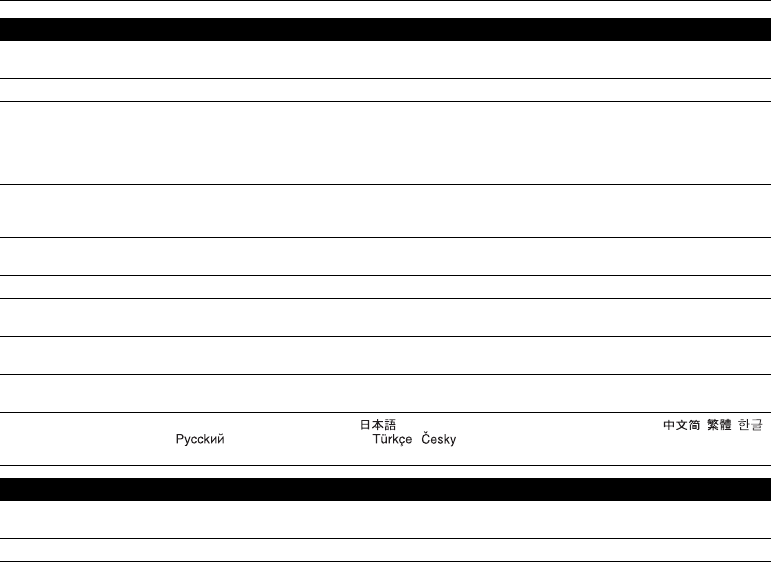
152
Specifications
White balance Automatic scene recognition/Preset (Fine, Shade, Fluorescent (Daylight), Fluorescent (Warm White),
Fluorescent (Cool White), Incandescent) /Custom
Self-timer Approx. 2 sec./10 sec.
Flash type Auto flash
Effective range: (S: [AUTO]): approx. 40 cm-8.7 m (1.3 ft.-28.5 ft.) (Wide-angle) approx. 1.5m-4.8m
(4.9 ft.-15.7 ft.) (Telephoto)
(Macro): approx. 30 cm-3.0 m (1.0 ft.-9.8 ft.) (Wide-angle) approx. 0.8m-3.0m
(2.6 ft.-9.8 ft.) (Telephoto)
Flash mode
Red-eye removal set to OFF: Auto, Forced Flash, Suppressed Flash, Slow Synchro
Red-eye removal set to ON: Red-eye Reduction Auto, Red-eye Reduction & Forced Flash, Suppressed Flash,
Red-eye Reduction & Slow Synchro
Viewfinder
0.20 inches, approx. 200,000 dots FLCD monitor, (Each dot displays all R, G, and B colors consecutively),
Approx. 97% coverage
LCD monitor 2.7 inches, Aspect ratio: 4:3; approx. 230,000 dots TFT color LCD monitor, Approx. 97% coverage
Movie 640 × 480 pixels/320 × 240 pixels (%/$)
(30 frames per second with monaural sound)
Photography functions Intelligent face detection, Red eye removal, High-speed shooting, Best framing, Post shot assist window,
Frame No. memory, Histograms, Panorama
Playback functions Intelligent face detection, Micro thumbnails playback, Trimming, Slide Show, Multi-frame playback,
Sorting by date, Image rotate, Histograms (Highlight warning), Voice memo
Other functions PictBridge, Exif print, Language ( , English, Français, Deutsch, Español, Italiano, , , ,
, Português, Nederlands, , , Magyar, Polski, Svenska), Time difference, FinePix
photo mode(p-mode), Discharging rechargeable batteries
Input/Output Terminal
A/V OUT (Audio/Visual
output) NTSC/PAL-type (with monaural sound)
Digital input/output USB 2.0 High-Speed, PTP (Picture Transfer Protocol)/MTP (Media Transfer Protocol)
System

153
Power Supply and Others
Power supply Use one of the following:
• 4× AA-size alkaline batteries
• 4x AA-size Lithium batteries (sold separately)
• 4× AA-size Ni-MH (Nickel-Metal Hydride) batteries (sold separately)
• AC Power Adapter AC-5VX (sold separately) DC Coupler CP-04 (sold separately)
Guide to the number of
available frames for battery
operation
According to the CIPA (Camera & Imaging Products Association) standard procedure for measuring
digital still camera battery consumption (extract):
When using alkaline batteries, use the batteries supplied with the camera. You can use Ni-MH batteries
also. The storage media should be xD-Picture Card.
Pictures should be taken at a temperature of +23°C (+73°F), with the LCD monitor turned on, the optical
zoom moved from full wide-angle to full telephoto (or vice-versa) and back again to its original position
every 30 seconds, the flash used at full power every second shot and the camera turned off and then on
again once every 10 shots.
• Note: Because the number of available shots varies depending on the capacity of alkaline batteries,
lithium batteries or the level of charge in Ni-MH batteries, the figures shown here for the number
of available shots using batteries are not guaranteed.
The number of available shots will also decline at low temperatures.
Camera dimensions (W/H/D) 102.5 mm × 73 mm × 67.8 mm/4.0 in. × 2.9 in. × 2.7 in. (not including accessories and attachments)
Camera mass (weight) Approx. 325 g/11.5 oz. (not including accessories, batteries and Memory Card)
Weight for photography Approx. 420 g/14.8 oz. (including batteries and Memory Card)
Operating Conditions Temperature: 0°C to +40°C (+32°F to +104°F)
85% humidity or less (no condensation)
Continued Q
Battery Type With LCD monitor ON With viewfinder (EVF) ON
Alkaline batteries Approx. 300 frames Approx. 300 frames
Ni-MH batteries 2500 mAh Approx. 500 frames Approx. 500 frames
Lithium batteries Approx. 700 frames Approx. 700 frames

154
Specifications
ZStandard number of available frames/recording time per xD-Picture Card, SD Memory Card and internal memory
The number of available frames and recording time is approximate. Actual number of frames and recording time varies
depending on the types of Memory Card or shooting condition. Also, the number of frames and recording time displayed in the
LCD monitor may not decrease regularly.
*A movie recording will stop automatically when a movie file becomes approx. 2GB. If you want to continue recording another
movie, press the shutter button again. The available recording time is displayed based on approx. 2GB.
Quality setting FN%[32`
%
(30 fps)
$
(30 fps)
Number of recorded
pixels 3648 × 2736
3648 × 2432 2592 × 1944 2048 × 1536 1600 × 1200
640 × 480 640 × 480 320 × 240
Image data size 4.9 MB 2.5 MB 2.2 MB 1.3 MB 789 KB 631 KB 134 KB – –
Internal memory
(approx. 24 MB) 5 9 11 19 30 38 170 29 sec. 53 sec.
xD-Picture Card
16 MB 3 6 7 12 19 24 110 19 sec. 34 sec.
32 MB 6121425394922138 sec.1.1 min.
64 MB 13 25 29 50 79 99 444 1.2 min. 2.3 min.
128 MB 26 51 58 101 159 199 888 2.5 min. 4.6 min.
256 MB 52 103 116 202 319 399 1777 5.1 min. 9.2 min.
512 MB 104 207 233 404 639 799 3551 10.2 min. 18.4 min.
1 GB 209 415 466 809 1279 1599 7108 20.5 min. 37.0 min.
2 GB 418 830 927 1599 2559 3199 12796 41.1 min. 74.0 min.
SD
Memory
Card
512 MB 101 200 225 391 618 773 3438 9.9 min. 17.9 min.
1 GB 202 402 452 784 1239 1549 6885 19.9 min. 35.8 min.
2 GB 405 804 898 1549 2479 3098 12395 39.8 min. 71.7 min.
SDHC
Memory
Card
4 GB 811 1611 1798 3102 4964 6205 24518 79.8 min.*143.6
min.*
8 GB 1627 3233 3608 6225 9960 12450 47132 160.1
min.*
288.1
min.*

155
If you shoot using the xD-Picture Cards with model numbers containing “M” such as DPC-M1GB, movie recording time may be
reduced if you repeatedly record and erase (frame erase) image files. In such a case, erase all frames or format the xD-Picture Card
before use. Back up important frames (files) onto your PC or another media.
*These specifications are subject to change without notice. FUJIFILM shall not be held liable for damages resulting from
errors in this Owner’s Manual.
*The LCD monitor on your digital camera is manufactured using advanced high-precision technology. Even so, small bright
points and anomalous colors (particularly around text) may appear on the monitor. These are normal display characteristics
and do not indicate a fault with the monitor. This phenomenon will not appear on the recorded image.
*The operation error may be caused in a digital camera by the strong radio interference (i. e. electric fields, static electricity,
line noise, etc.).
*Due to the nature of the lens, the edges of images may appear distorted. This is normal.

156
Explanation of Terms
Deactivated batteries
Leaving an Ni-MH battery unused in storage for a long period may cause a rise in the level of substances that inhibit current
flow inside the battery and result in a dormant battery. A battery in this state is referred to as deactivated.
Because current flow is inhibited in a deactivated Ni-MH battery, the battery’s original level of performance cannot be achieved.
EV
A number denotes Exposure Value. The EV is determined by the brightness of the subject and sensitivity (speed) of the film
or CCD. The number is larger for bright subjects and smaller for dark subjects. As the brightness of the subject changes, a
digital camera maintains the amount of light hitting the CCD at a constant level by adjusting the aperture and shutter speed.
When the amount of light striking the CCD doubles, the EV increases by 1. Likewise, when the light is halved, the EV decreases
by 1.
Frame rate (fps)
The frame rate refers to the number of images (frames) that are photographed or played back per second. For example, when
10 frames are continuously photographed in a 1-second interval, the frame rate is expressed as 10 fps.
For reference, TV images are displayed at 30 fps (NTSC).
JPEG
Joint Photographic Experts Group
A file format used for compressing and saving color images. The higher the compression rate, the greater the loss of quality in
the decompressed (restored) image.
Memory effect
If an Ni-MH battery is repeatedly charged without first being fully discharged, its performance may drop below its original level.
This is referred to as the “memory effect”.
Motion JPEG
A type of AVI (Audio Video Interleave) file format that handles images and sound as a single file. Images in the file are recorded
in JPEG format. Motion JPEG can be played back by QuickTime 3.0 or later.
Smear
A phenomenon specific to CCDs whereby white streaks appear on the image when there is a very strong light source, such as
the sun or reflected sunlight, in the photography screen.
WAVE
A standard format used on Windows systems for saving audio data. WAVE files have the “.WAV” file extension and the data
can be saved in either compressed or uncompressed format. Uncompressed recording is used on this camera.
WAVE files can be played back on a personal computer using the following software:
Windows: MediaPlayer
Macintosh: QuickTime Player
* QuickTime 3.0 or later

157
White Balance
Whatever the kind of the light, the human eye adapts to it so that a white object still looks white. On the other hand, devices
such as digital cameras see a white subject as white by first adjusting the color balance to suit the color of the ambient light
around the subject. This adjustment is called matching the white balance.
Exif Print Format is a newly revised digital camera file format that contains a variety of shooting information for optimal printing.
158
FUJIFILM Digital Camera Worldwide Network
If you have technical questions or if you need repair service, ask the following local distributor.
Please present the warranty card and your purchase receipt when you ask for repairs. Refer to the warranty card for conditions of the warranty.
There is a case that repair and Technical support cannot be accepted for some models which your local distributor does not deal with.
These lists are subject to change without notice.
NORTH AMERICA
Canada FUJIFILM Canada Inc.
Technical support
600 Suffolk Court Mississauga Ontario, L5R 4G4
TEL 1-866-818-FUJI (3854) http://www.fujihelp.ca
Repair service 600 Suffolk Court Mississauga Ontario, L5R 4G4
TEL 1-800-263-5018 FAX 1-905-755-2993 http://www.fujihelp.ca
U.S.A. FUJIFILM U.S.A., Inc.
Technical support
1100 King George Post Rd., Edison, NJ 08837
TEL 800-800-3854 FAX 732-857-3487 digitalinfo@fujifilm.com
Repair service 1100 King George Post Rd., Edison, NJ 08837
TEL 732-857-3000 FAX 732-857-3471 njcamerarepair@fujifilm.com
CENTRAL & SOUTH AMERICA
Argentina Imagen e informacion S.A.
Technical support & Repair service
Fondo de la Legua 936 San Isidro Pcia. de Buenos Aires
TEL +54-11-4836-1000 FAX +54-11-4836-1144
servtec@imageneinformacion.com.ar
Bolivia Reifschneider Bolivia Ltda.
Technical support & Repair service
Calle H N.° 5 - Equipetrol Norte - Santa Cruz
TEL +591 33 44 1129 FAX +591 33 45 2919 gciagral@bibosi.scz.entelnet.bo
Brazil FUJIFILM do Brasil Ltda.
Technical support & Repair service
Av. Vereador José Diniz, 3400 - Campo Belo, Sào Paulo/SP
TEL 0800-12-8600 FAX +55 11 5091-4150 camarasdigitais@fujifilm.com.br
Chile Reifschneider SA
Technical support & Repair service
Av. El Conquistador del Monte 5024, Huechuraba, Santiago, Chile
TEL 02-4431500 FAX 02-4431596 ceciliacalvo@reifschneider.cl
Colombia Animex de Colombia Ltda.
Technical support & Repair service
Calle 44 N.° 13-43 Piso 2 Apartado 18001 - Bogotá
TEL +57 1 338-0299 FAX +57 1 288-2208 animex@etb.net.co
Ecuador Espacri Cia Ltda
Technical support & Repair service
Bolivar 5-69 y Hermano Miguel
TEL 593-72-835526 FAX 593-72-833157
Ecuador Importaciones Espacri Cia. Ltda.
Technical support & Repair service
Simón Bolivar 5-69 y Hno. Miguel - Cuenca
TEL +593 783 5526 FAX +593 783 3157 portiz@fujifilm.com.ec
Mexico Fujifilm de Mexico, S.A. de C.V.
Technical support
Av. Ejercito Nacional 351, Col. Granada 11520 Mexico, D.F.
TEL (52-55) 5263-5566 / 68 FAX (52-55) 5254-1508 jlgiraud1@fujifilm.com.mx
Repair service Av. Presidente Juarez 2007, Col. Tepetlacalco, 54090 Tlalnepantla, Edo. de
Mexico
TEL (52-55) 5263-5500 FAX (52-55) 5254-1508 jlgiraud1@fujifilm.com.mx

159
Paraguay Errece S.R.L.
Technical support & Repair service
Edificio Unitas 15 de Agosto 1035, Asunción
TEL +595 21 444256 FAX +595 21 444651 jmarbulo@fujifilm.com.py
Peru Procesos de Color S.A.
Technical support & Repair service
Pablo Bermudez 111 Apartado 3794 - Esq. Arequipa - Lima 11
TEL +51 14 33 5563 FAX +51 14 33 7177 jalvarado@fujifilm.com.pe
Uruguay Fotocamara S.R.L.
Technical support & Repair service
Cuareim 1439, montevideo, Uruguay
TEL +598-2-9002004 FAX +598-2-9008430 fotocam@adinet.com.uy
Uruguay Kiel S.A.
Technical support & Repair service
Maldonado 1787 Montevideo- Uruguay
TEL (05982) 419 4542 FAX (05982) 412 0046 kiel@fujifilm.com.uy
Venezuela C. Hellmund & Cia Sa
Technical support & Repair service
Av. Ppal Diego Cisneros Caracas Venezuela Edf Oficentro
TEL 0212-2022300 FAX 0212-2399796 hellmund@hellmund.com
EUROPE
Austria Fuji Film Oesterreich
Technical support & Repair service
Traviatagasse/Pfarrgasse, 1230 Vienna, Austria
TEL 0043 1 6162606/51 or 52 FAX 0043 1 6162606/58
kamera.service@fujifilm.at
Belgium Belgian Fuji Agency
Technical support & Repair service
20, Avenue Lavoisier, Wavre, 1300, Belgium
TEL 3210242090 FAX 3210238562 info@fuji.be
Croatia I&I d.o.o.
Technical support
Hondlova 2, Zagreb, Croatia
TEL 38512319060 FAX 2310240 dsaravanja@fujifilm.hr
Repair service Hondlova 2, Zagreb, Croatia
TEL 38512316228 FAX 2310240 info@fujifilm.hr
Cyprus PMS IMAGING LTD
Technical support & Repair service
11, Dighenis Akritas Avenue, P.O.BOX 22315, 1586 Nicosia
TEL 35722746746 FAX 35722438209 mariosashiotis@fujifilm.com.cy
Cyprus Doros Neophytou
CAMERA REPAIRS
Technical support & Repair service
28B, Agiou Demetriou, Acropoli, Nicosia
TEL 35722314719 FAX 35722515562 dorosn@logosnet.cy.net
Czech Republic Fujifilm Cz., s.r.o.
Technical support
U nakladoveho nadrazi 2/1949, 130 00 Praha 3
TEL 00420 234 703 411 FAX 00420 234 703 489 fricman@fujifilm.cz
Czech Republic AWH servis
Repair service
Milesovska 1, 130 00 Praha 3, Czech republic
TEL 00420 222 721 525 FAX 00420 222 720 122 awh@awh.cz
Denmark Fujifilm Danmark A/S
Technical support & Repair service
Stubbeled 2, 2950 Vedbæk Denmark
TEL 0045 45662244 FAX 0045 45662214 fujifilm@fujifilm.dk
Finland Fuji Finland Oy
Technical support & Repair service
Martinkyläntie 41, 01720 Vantaa, Finland
TEL +358 9 825951 FAX +358 9 870 3818 fuji@fuji.fi
France FUJIFILM France 9 rue d’Alembert BAT A1 ZA Pissaloup 78190 Trappes, France
Technical support & Repair service FAX 33 1 01 30 58 58 65direction.technique@pm2s.fr

160
FUJIFILM Digital Camera Worldwide Network
Germany FUJIFILM Electronic Imaging Europe
GmbH
Technical support & Repair service
Benzstrasse 2, 47533 Kleve, Germany
International call TEL +49 211 50890 FAX +49 211 5089668 service@fujifilm.de
National call* TEL 0180 5898980 FAX 0180 5898982
*12 Cent/Min aus dem deutschen Festnetz
Greece FUJIFILM HELLAS S.A.
Technical support & Repair service
1, Ihous & Ag. Anargiron str., 175 64 P.Phaliro, Athens, Greece
TEL 0030 210 9404100 FAX 0030 210 9404397 fujifilm@fujifilm.gr
Hungary Foto-Paradicsom Kft.
Technical support & Repair service
Nagy Lajos király útja 20. Budapest, 1148, Hungary
TEL 361363377 FAX 3612234250
Technical support Vaci ut 19. Budapest, 1134, Hungary
TEL 3612389410 FAX 3612389401 fujifilm@fujifilm.hu
Iceland Icephoto (Ljosmyndavorur)
Technical support & Repair service
Skipholt 31, 105 Reykjavik, Iceland
TEL 354 568 0450 FAX 354 568 0455 framkollun@fujifilm.is
Italy FujiFilm Italia S.p.A.
Technical support
Via Dell’Unione Europea, 4 - 20097 San Donato Milanese (MI), Italy
TEL 039-02895821 FAX 039-0289582912 info@fujifilm.it
Repair service Fujifilm On Line - Call center
TEL 039-026695272 info@fujifilm.it
Lithuania Fujifilm Lithuania
Technical support & Repair service
Gerosios Vilties str. 38, LT-03143 Vilnius, Lithuania
TEL 370-5-2130121 FAX 3705-5-2134066 info@fujifilm.lt
Malta Ciancio (1913) Co.Ltd.
Technical support & Repair service
Fuji Tech Centre, Ciancio House, Cannon Road, Qormi, QRM05
TEL 0356-21-480500 FAX 0356-21-488328 info@fujifilm.com.mt
Norway Fujifilm Norge AS
Technical support
Lilleakerveien 10, 0283 Oslo, Norway
TEL 0047-02273 FAX 0047-22736020 http://www.fujifilm.no/
mailto:post@fujifilm.no
Repair service Liaveien 1, 5132 Nyborg, Norway
TEL 0047-55393880 FAX 0047-55195201 http://www.camera.no/
mailto:service@camera.no
Poland Fujifilm Polska Distribution Sp. z o.o.
Technical support
Poland Al..Jerozolimskie 178; 02-486 Warszawa
TEL +48-22-517-66-00 FAX +48-22-517-66-02 fujifilm@fujifilm.pl
Repair service Poland, Muszkieterow 15, 02-273 Warszawa
TEL +48-22-886-94-40 FAX +48-22-886-94-42 serwis@fujifilm.pl
Portugal Fujifilm Portugal, Lda
Technical support
Av. Fontes Pereira de Melo, 342, 4100-259 Porto, Portugal
TEL (351) 226194200 FAX (351) 226194213 finepix@fujifilm.pt
Repair service Av. Fontes Pereira de Melo, 342, 4100-259 Porto, Portugal
TEL (351) 226194200 FAX (351) 225194662 cameras@fujifilm.pt
Romania CTS-Cardinal Top Systems Ltd
Technical support & Repair service
112, Calea Dorobanti street, 4 flat, 1sector, Bucharest, Romania
TEL 4021-230-09-82 FAX 4021-230-09-82 cts_tirla@hotmail.com

161
Russia ZAO “Fujifilm RU”
Technical support
Bld. 1, 10, Rozanova str., Moscow, 123007, Russia
TEL +7-495-956-98-58 FAX +7-495-230-62-17 info@fujifilm.ru
Repair service www.fujifilm.ru
TEL +7-495-956-98-58
Slovakia Fujifilm Slovakia
Technical support
Pribylinska 2, 831 04 Bratislava, Slovakia
TEL 00421 2 44 888 077 FAX 00421 2 44 889 300 fujifilm@fujifilm.sk
Repair service FIS Tatracentrum, Hodzovo nam. 4 - Tatracentrum, 811 06 Bratislava, Slovakia
TEL 00421 2 54 647 347 fis.tatracentrum@stonline.sk
Spain Fujifilm España S.A.
Technical support
Aragón 180, 08011 Barcelona (España)
TEL 902012535 FAX 934515900 / 933230330 info@fujifilm.es
Repair service Aragón 180, 08011 Barcelona (España)
TEL 934511515 FAX 934515900 / 933230330 tallersat@fujifilm.es
Sweden Fujifilm Sverige AB
Technical support
Sveavägen 167 104 35 Stockholm
TEL 46 8 506 141 70 FAX 46 8 506 142 09 kamera@fujifilm.se
Repair service Sveavägen 167 104 35 Stockholm
TEL 46 8 506 513 54 FAX 46 8 506 513 99 kameraverkstaden@fujifilm.se
Switzerland /
Lichtenstein
Fujifilm (Switzerland) AG
Technical support & Repair service
Niederhaslistrasse 12, 8157 Dietlikon, Switzerland
TEL +41 44 855 5154 FAX +41 44 855 5329 RepairCenter@fujifilm.ch
The Netherlands FUJIFILM Electronic Imaging
Nederland
Technical support
Hoogstraat 35, 3011 PE Rotterdam, Nederlands
TEL +31(0)102812500 FAX +31(0)102812560 helpdesk@fujifilm-digital.nl
Repair service Hoogstraat 35, 3011 PE Rotterdam, Nederlands
TEL +31(0)102812520 FAX +31(0)102812550 camerareparaties@fujifilm-digital.nl
Turkey Fujifilm Turkiye Sinfo A.S.
Technical support
Fujifilm Plaza, Dereboyu Cad. 39 34660 Halkali, Istanbul, Turkey
TEL +90 212 696 5090 FAX +90 212 696 5009 csarp@fujifilm.com.tr
Repair service Fujifilm Plaza, Dereboyu Cad. 39 34660 Halkali, Istanbul, Turkey
TEL +90 212 696 5090 FAX +90 212 696 5010 servis@fujifilm.com.tr
U.K. FUJIFILM UK Ltd.
Technical support
St Martins Way St Martins Business Centre Bedford MK42 0LF
TEL +44 (0)123 424 5383 FAX +44 (0)123 424 5285 fujitec@fuji.co.uk
Repair service St Martins Way St Martins Business Centre Bedford MK42 0LF
TEL +44 (0)123 421 8388 FAX +44 (0)123 424 5285 fujitec@fuji.co.uk
Ukraine Image Ukraine CJSC
Technical support & Repair service
12, Kontraktova ploshcha, Kyiv 04070, Ukraine
TEL +380-44-4909075 FAX +380-44-4909076 d@fujifilm.ua
MIDDLE EAST
Iran Tehran Fuka Co.
Technical support & Repair service
229,“Fuji” Bldg., Mirdamad Blvd., Tehran 19189, Iran
TEL (+98-21)2254810-19 FAX (+98-21)2221002 fuka@neda.net

162
FUJIFILM Digital Camera Worldwide Network
Israel Shimone Group Ltd.
Technical support
Efal 33 keyriat Arie Petah Tikva 49130, Israel
TEL (+ ) 972 3 9250666 digital@fujifilm.co.il
Repair service Efal 33 keyriat Arie Petah Tikva 49130, Israel
TEL (+ ) 972 3 9250666 FAX 972 3 9250699 khaim@shimone.com
Jordan Grand Stores
Technical support & Repair service
Al- Abdali, Amman / Jordan
TEL 009626-4646387 FAX 009626-4647542 gstores@go.com.jo
Qatar Techno Blue
Technical support
Blue Salon Bldg, 3rd Floor, Suhaim bin Hamad st, Al- Saad, Doha
TEL 00974 44 66 175 FAX 00974 44 79 053 prabu@techno-blue.com
Saudi Arabia Emam Distribution Co. Ltd.
Technical support
P.O. Box 1716, Jeddah 21441, Saudi Arabia
TEL 96626978756 FAX 96626917036 service@fujifilm.com.sa
Syria Film Trading Company
Technical support
Al-Shahbandar P.O. Box:31180 Damascus SYRIA
TEL + 963 11 2218049 FAX + 963 11 44673456 f.t.c@Net.SY
Repair service Al-cheikh Taha P.O. Box: 6171 Aleppo SYRIA
TEL + 963 21 4641903 FAX + 963 21 4641907 filmtradin@Net.SY
U.A.E. Grand Stores
Technical support & Repair service
P. O. Box 2144, Saleh Bin Lahej Building, Al Garhoud, Deira, Dubai
TEL + 971-4-2823700 FAX + 971-4-2828382 photography@grandstores.ae
Yemen Al-Haidary Trading
Technical support
P.O.Box-2942 Haddah St. HTC, Sana’a, Yemen
TEL 00967-1-503980 FAX 00967-1-503983
Repair service P.O.Box-2942 Haddah St. HTC, Sana’a, Yemen
TEL 00967-1-503977 FAX 00967-1-503983
AFRICA
Egypt Foto Express Egypt
Technical support & Repair service
426 Pyramids St., Giza, Egypt
TEL (202) 7762062 FAX (202) 7760169 fotoegypt@access.com.eg
Kenya Fuji Kenya Ltd
Repair service
P.O.Box 41669-00100, Fuji Plaza, Chiromo Road, Nairobi, Kenya.
TEL (254-20)4446265-8 FAX (254-20)4448515 / 7 info@fujifilm.co.ke
OCEANIA
Australia FUJIFILM Australia Pty Ltd
Technical support & Repair service
Locked Bag 5100, Brookvale, NSW, 2100
TEL 1800 226 355 FAX +61 (2) 9466 2854 digital@fujifilm.com.au
Fiji Brijlal & Co. Ltd
Technical support & Repair service
70-72 Cumming Street,Suva,Fiji
TEL (679)3304133 FAX (679)3302777 kapadia@connect.com.fj
New Caledonia Phocidis SARL
Technical support & Repair service
58, rue Higginson - B.P.661 - 98845
TEL (00 687) 25-46-35 FAX (00 687) 28-66-70 phocidis@phocidis.nc
New Zealand Fujifilm NZ Ltd
Technical support & Repair service
Cnr William Pickering & Bush Road Albany, Auckland
TEL +64-9-4140400 FAX +64-9-4140410 glenn.beaumont@fujifilm.co.nz
Papua New Guinea Oceania PNG Limited
Technical support
Section 15, Allotment 1, Reke St, Boroko NCD. PNG. Mail: PO Box 2167, Boroko
NCD. PNG. TEL +675 3256411 FAX +675 3250311 oceania@daltron.com.pg
163
ASIA
Hong Kong Fuji Photo Products Co., Ltd.
Technical support & Repair service
8/F.,TSUEN WAN IND. CENTRE, 220 TEXACO RD., TSUEN WAN, HONG KONG
TEL (852)2406 3287 FAX (852)2408 3130 rsd@chinahkphoto.com.hk
Indonesia PT Modern Photo Tbk
Technical support & Repair service
Jl.Matraman Raya 12, Jakarta Timur 13150
TEL +62 021 2801000 FAX +62 021 8581620+62 021 2801012
assd_kmr@modernphoto.co.id
Malaysia FUJIFILM (Malaysia)
Sdn. Bhd.
Technical support
Letter Box 1, Level 10, 11 & 12, Menara Axis, No 2, Jalan 51A/223, 46100 Petaling
Jaya, Selangor Darul Ehsan, Malaysia
TEL 603-79584700 FAX 603-79584110 digital@fujifilm.com.my
Repair service Letter Box 1, Level 10, 11 & 12, Menara Axis, No 2, Jalan 51A/223, 46100 Petaling
Jaya, Selangor Darul Ehsan, Malaysia
TEL 603-79584700 FAX 603-79584110 technical@fujifilm.com.my
Philippines YKL Development & Trdg. Corp.
Technical support
24 Sto. Domingo St., Quezon City 1100, Philippines
TEL 632-7436601~06 FAX 632-7324661 digital@yklcolor.com
Repair service 24 Sto. Domingo St., Quezon City 1100, Philippines
TEL 632-7436601~06 FAX 632-7324661 tech_services@yklcolor.com
Singapore FUJIFILM (Singapore) Pte Ltd
Technical support & Repair service
10 New Industrial Road Fujifilm Building Singapore 536201
TEL 65-6380 5557 FAX 65-6281 3594 service@fujifilm.com.sg
South Korea Korea Fujifilm Co., Ltd.
Technical support
30-1, Mukjeung-dong, Jung-gu, Seoul, Korea
TEL +82-2-3282-7363 FAX +82-2-2269-7435 photo@fujifilm.co.kr
South Korea Yonsan AS Center (Fujidigital)
Repair service
#301, 3F, Jeonjaland, 16-9, Hangangro3-ga, Yongsan-gu, Seoul, Korea
TEL +82-2-701-1472 FAX +82-2-718-1331 1bowl@hanmail.net
South Korea Kangnam AS Center (Digitalgallery)
Repair service
2F, Hyeongin Tower, 23-2, Bangyi-dong, Songpa-gu, Seoul, Korea
TEL +82-2-2203-1472 FAX +82-2-418-5572 nurijili@hanmail.net
South Korea Busan AS Center (Digital-Sewon)
Repair service
241-4, Bujeon-dong, Busanjin-gu, Busan, Korea
TEL +82-51-806-1472 FAX +82-51-817-0083 merahan@yahoo.co.kr
Taiwan Hung Chong Corp.
Technical support & Repair service
No. 38, Min-Chuan E. Rd. Sec. 6, Taipei (114), Taiwan, R.O.C.
TEL 886-2-6602-8988 FAX 886-2-2791-8647 dah@mail.hungchong.com.tw
Thailand FUJIFILM (Thailand) Ltd.
Technical support
388 SP Building, 8th Floor, Phayathai, Bangkok 10400
TEL +662-2730029 ext. 755 FAX +662-2730239 supaleark@fujifilm.co.th
Repair service 388 SP Building, 8th Floor, Phayathai, Bangkok 10400
TEL +662-2730029 ext.761,762 FAX +662-2730239 warin@fujifilm.co.th
Vietnam International Minh Viet Co., Ltd.
Technical support & Repair service
99-107 Bach Van street, Ward 5, District 5, Ho chi minh city
TEL +84-8-8366807 ext.122 FAX +84-8-8380621 diep.phanthithanh@imv.com.vn

7-3, AKASAKA 9-CHOME, MINATO-KU, TOKYO 107-0052, JAPAN
http://www.fujifilm.com/products/digital_cameras/index.html
Printed in China
